
ZE-NA150 - Gps ZENEC - Free user manual and instructions
Find the device manual for free ZE-NA150 ZENEC in PDF.


| Product Type | GPS Navigation Device |
| Brand | ZENEC |
| Model | ZE-NA150 |
| Display Size | 5.0 inches (estimated) |
| Dimensions (approx.) | 12.5 x 8.2 x 1.5 cm |
| Weight (approx.) | 200 g |
| Power Supply | DC 5V / 1A (car charger included) |
| Battery Type | Rechargeable Li-ion 3.7V / 1000 mAh |
| Battery Life | Approximately 1-2 hours |
| Navigation Functions | GPS navigation, points of interest, voice guidance, route planning, lane guidance, speed limit alerts |
| Map Coverage | Preloaded maps (Europe or regional variant) |
| Map Updates | Free lifetime updates (via internet connection) |
| Touchscreen | Yes, resistive or capacitive |
| Connectivity | USB (for data and charging), microSD card slot |
| Audio Output | Built-in speaker, 3.5 mm headphone jack |
| Supported Languages | Multiple (including English, German, French, etc.) |
| Mounting | Windshield suction mount (included) |
| Maintenance & Cleaning | Clean with a soft dry cloth; avoid moisture and abrasive cleaners. |
| Safety Instructions | Do not disassemble; keep away from heat and moisture; use only specified charger and mounts. |
| Spare Parts & Reparability | Contact ZENEC support; no user-serviceable parts inside. |
| General Information | User manual available in PDF; device designed for automotive GPS navigation. |
Frequently Asked Questions - ZE-NA150 ZENEC
User questions about ZE-NA150 ZENEC
0 question about this device. Answer the ones you know or ask your own.
Ask a new question about this device
Download the instructions for your Gps in PDF format for free! Find your manual ZE-NA150 - ZENEC and take your electronic device back in hand. On this page are published all the documents necessary for the use of your device. ZE-NA150 by ZENEC.
USER MANUAL ZE-NA150 ZENEC
natural_image
Abstract red and white light streaks on black background, no text or symbols presentINSTRUCTION MANUAL

NAVTEQ
ON BOARD
ZENEC
ZE-NA150
NAVIGATIONSMODUS....16
natural_image
Diagram of Earth with multiple satellites orbiting each other, showing orbital paths (no text or labels)natural_image
Illustration of a car driving on a curved road with three satellites deploying signals from the sky (no text or symbols)⚠ BITTE BEACHTEN:
BELEUCHTUNG
1. Datum
SPRACHE
Schritt 1: Startmenü
FUNKTIONSTASTEN
TASTATURMODUS
![AIRPORT 1 2 3 4 5 6 7 8 9 0 Q W E R T Y U I O P A S D F G H J K L [ ] Z X C V B N M - . ,](/content/2026/05/782357/images/b6f4577b5bef8dd99bed43a20d02dabe44243befa2a8f68329298e9f52cfa1c0.jpg)
FUNKTIONSTASTEN IM TASTATURMODUS

■ Nach Kategorie (Category)
EINGABE DES POI
![1 2 3 4 5 6 7 8 9 0 Q W E R T Y U I O P A S D F G H J K L [ ] Z X C V B N M - . , ✓ GU GU ✗](/content/2026/05/782357/images/da5ad128a96525bb31aeaa41c5e4feb9539059c7c6b33c525a517c1427c04c5c.jpg)
BÜROADRESSE (OFFICE ADDRESS)

■ Adressbuch (Address Book)
■ Fahrtenbuch (Trail Book)
VORHERIGE ZIELE
KARTENANZEIGE
ZIELANKUNFT


ZURÜCKSETZEN DER FAHRZEUGPOSITION
SYSTEMDIAGNOSE

ROUTE BEARBEITEN
![(1 - 9 mi): 1 2 3 4 5 6 7 8 9 0 Q W E R T Y U I O P A S D F G H J K L [ ] Z X C V B N M - . ,](/content/2026/05/782357/images/547d99e1a371b231e28288a9e5e6f037fbc8f00e4b1fe5db6db651994bb41a15.jpg)
VERMEIDEN VON BESTIMMTEN STRASSEN
STRASSE AUSWÄHLEN

ROUTE ABBRECHEN
TRACKLOG (TRAIL BOOK)

![Trail_1 1 2 3 4 5 6 7 8 9 0 Q W E R T Y U I O P A S D F G H J K L [ ] Z X C V B N M - . ,](/content/2026/05/782357/images/6b89317f8dc31caebb52e8f7d67f49889c8e2d571e0a03cfb3b99b851360b495.jpg)
![Point-1 1 2 3 4 5 6 7 8 9 0 Q W E R T Y U I O P A S D F G H J K L [ ] Z X C V B N M - . ,](/content/2026/05/782357/images/16d0fbc4217046e46d11a955cbf1cdeed1c818861b7f5676d0c7629d236c74e7.jpg)

![Trail_1 1 2 3 4 5 6 7 8 9 0 Q W E R T Y U I O P A S D F G H J K L [ ] Z X C V B N M - . ,](/content/2026/05/782357/images/5f9e92740e7d2a88b09e8f8a936d1ad0512eed95bc1ba8b2d96470eff26fd33a.jpg)
LÖSCHEN EINES TRACKLOGS


REISEPLANER
HINZUFÜGEN EINES REISEPLANS


DER AKKU
FEATURES/BOX CONTENTS....82
SUPPLIED MAP DATA 83
PREFACE....84
END-USER LICENSE AGREEMENT 85
SAFETY INFORMATION AND PRECAUTIONS 86
INTRODUCTION TO YOUR NAVMATE SOFTWARE 87
VEHICLE POSITION 87
MAP AND INFORMATION DATABASE 87
USING THE ZE-NA150 NAVIGATION SYSTEM 88-99
ABOUT PND AND PNR 88
MAIN MENU 89
INSERT SD CARD 90
INTRODUCTION OF NAVI APPLICATION 91
AUDIO PLAYER....92-93
VIDEO PLAYER....94-95
PHOTO VIEWER....96-97
EBOOK VIEWER....98-99
SYSTEM SETTING....100-106
VOLUME SETTING....101
POWER SETTING 101
BACKLIGHT SETTING 102
TIME AND DATE SETTING.... 103-104
LANGUAGE SETTING 104
SYSTEM INFORMATION....105
NAVMATE SOFTWARE OPERATION ....106-107
QUICK START....106-107
USING YOUR NAVMATE SOFTWARE ....108-112
FUNCTION BUTTONS....108
NAVIGATION MENUS....109
LIST MODE, SPELL MODE, AND MOST RECENTLY USED ......109-110
MAP SCREEN 111
REMOTE CONTROL.... 112
DESTINATION SELECTION....113-123
ADDRESS/INTERSECTION 114-116
POINT OF INTEREST (POI) 116-119
ADDRESS BOOK....120-121
SELECT DESTINATION BY LATITUDE AND LONGITUDE 122
PREVIOUS DESTINATION....122
BY USING MAP 123
ROUTE CALCULATION AND GUIDANCE ....124-128
ROUTE CALCULATION 124
PLEASE PROCEED 124
ROUTE GUIDANCE 125
MAP DISPLAY 126
CURRENT LOCATION SCREEN....126-127
ARRIVAL SCREEN....128
OFF-ROUTE AND ROUTE INTERRUPTIONS 128
EDIT FAVROITES MENU 129-130
EDIT ADDRESS BOOK....129
EDIT HOME ADDRESS 130
EDIT OFFICE ADDRESS 130
EDIT TRAIL BOOK 130
EDIT TRIP BOOK....130
SET-UP MENU....131-151
NAVIGATION PREFERENCES....131-132
DISPLAY OPTIONS 132-134
SET DISTANCE UNITS....135-136
SYSTEM DIAGNOSTICS 136-140
CANCEL ROUTE 141
TRAIL BOOK....141-142
NAME TRAIL....143
DELETE TRAIL....144
FOLLOW TRAIL 145-146
TRIP COMPUTER....147-148
TRIP BOOK....148-150
ADD DESTINATIONS....150-151
BATTERY 152
SPECIFICATION....153
WARRANTY 154-155
FEATURES
■ Mobile navigation system with 3.5" touchscreen
■ Connection via docking station with ZE-MC190/192 and ZE-MC290/292
■ CPU 400MHz - 64MB SDRAM
■ Highly sensitive and integrated GPS-receiver (SIRF3)
■ Built-in SD card reader (addressing up to 2GB memory)
■ Pre-installed map data covering 42 Western Europe countries
■ Voice guidance in 17 languages
■ OSD in 12 languages
■ Multi destination search (by address, POI, street and city names, recent finds etc.)
■ Route preference function
■ 2-D/3-D map display with auto-zoom function
■ Auto switching day/night colour mode
■ Picture viewer, media player compatible with MP3, WMA, WAV, WMV, ASF and AVI, e-book viewer
■ Lithium-polymer battery (3 hours operating time)
■ Including 2GB SD card with pre-installed map data
■ Compact size (W x H x D): 97 x 92 x 24 mm
BOX CONTENTS
ZE-NA150 unit
■ Windshield adapter
■ Docking station and connection cable to moniceiver
■ DC connection box
■ 12V cigarette lighter adapter cable
USB cable
■ DVD with map data and software
SUPPLIED MAP DATA
The map data of the following 42 European countries is pre-loaded on the supplied SD card and you will find the data also on the supplied DVD.
| Albania (major roads only) | Luxembourg |
| Andorra | Macedonian (major roads only) |
| Austria | Moldavian (major roads only) |
| Belarus (major roads only) | Monaco |
| Belgium | Montenegro (major roads only) |
| Bosnia Herzegovina (major roads only) | Norway |
| Bulgaria (major roads only) | Poland |
| Croatia (major roads only) | Portugal |
| Czech Republic | Romania |
| Denmark | Russia |
| Estonia | San Marino |
| Finland | Serbia (major roads only) |
| France | Slovakia |
| Germany | Slovenia |
| Greece | Spain |
| Hungary | Sweden |
| Ireland | Switzerland |
| Italy | The Netherlands |
| Latvia | Turkey |
| Liechtenstein | Ukraine (major roads only) |
| Lithuania | United Kingdom |
The following languages are available for the voice output and the OSD menu. Most of them are pre-loaded on the SD card and you will find the data together with the remaining languages also on the supplied DVD. You can use the supplied software to copy languages from the DVD to the SD card.
| Czech | Italian 1 |
| Danish | Italian 2 (only DVD) |
| Dutch 1 | Norwegian |
| Dutch 2 (only DVD) | Russian |
| Finnish | Spanish |
| French 1 | Swedish |
| French 2 (only DVD) | UK English 1 |
| German 1 | UK English 2 (only DVD) |
| German 2 (only DVD) |
PREFACE
NavMate navigation software provides turn-by-turn route guidance while traveling to your destination. Before operating, take a few minutes to review the safety and operating instructions in this manual so you can quickly and safely become familiar with your NavMate software's many features.
This user manual explains the NavMate software's functions and provides the following details:
■ Using the control buttons
■ Entering destinations
■ Understanding the different screens which are available on your NavMate software
■ Adjusting user preferences
NOTE:
All users should read this manual prior to operating the NavMate software.
Copyright© 2007
All rights reserved.
NavMate Software User Manual Ver. 3.2.60
This document and the software described in it are furnished under license and may be used or copied only in accordance with such license. Except as permitted by such license, the contents of this document may not be disclosed to third parties, copied, or duplicated in any form, in whole or in part, without the prior written permission of Horizon Navigation, Inc.
The NavMate software, including its operation and use, is covered by one or more of the following patents:
US Patents No. 5,262,775; 5,283,575; 5,291,412; 5,291,413; 5,291,414; 5,297,028; 5,303,159; 5,311,434; 5,339,246; 5,343,400; 5,345,382; 5,359,529; 5,374,933; 5,377,113; 5,390,123; 5,394,333; 5,402,120; 5,414,630; 5,430,655; 5,440,484; 5,477,220; 5,508,931; 5,515,283; 5,515,284; 5,550,538; 5,608,635; 5,712,788; 5,731,978; 5,862,509; 5,898,390; 5,902,350; 5,904,728; 5,910,177; 5,912,635; 5,922,042; 5,928,307; 5,938,720; 5,987,381; 6,058,390; 6,144,919; 6,147,626; 6,253,154; 6,259,987; 6,282,496; 6,298,305; 6,360,165; 6,456,931; 6,456,935; 6,470,268; 6,542,814; 6,552,656; 6,600,994; 6,622,086; 6,735,516; D364,840; D397,046; D457,823; EP0987665A3. The sale and/or licensing of the NavMate software and associated materials does not include any licenses (implied or otherwise) to patents or technology, unless specifically stated in writing.
NavMate® is a trademark of Horizon Navigation, Inc. The NavMate software and associated materials are protected by copyright in the US and internationally.
END-USER LICENSE AGREEMENT
This End-User License Agreement (EULA) is a legal agreement between you (either an individual or a single entity) and HORIZON NAVIGATION, INC. for the operating software and updates thereof that run the digital map database and associated hardware (collectively the „Software“). By installing or using the Software, you agree to be bound by the terms of this Agreement. If you do not agree to the terms of this Agreement, return the Software, along with all other accompanying items in the form they were purchased, within thirty (30) days after such purchase to the authorized dealer from where the Software was purchased, for a full refund of any fees paid. Use of the Software without acceptance of this Agreement is unauthorized and not permitted.
- License Grant. HORIZON NAVIGATION, INC. grants you a non-exclusive license to use your purchased copy of the Software for your own internal purposes of accessing the digital map database and running the associated hardware and not for service bureau time-sharing, or other similar purposes.
- Limitations On Use. You are not permitted to copy, modify, decompile, disassemble, or reverse engineer any portion of the Software without the expressed written permission from HORIZON NAVIGATION, INC.
- U.S. Government End Users. The Software is provided with Restricted Rights. Use, duplication, or disclosure by the Government is subject to restrictions as set forth in subparagraph (c) (1) (II) of the Rights in Technical Data and Computer Software clause at DFARS 252.227-7013 or subparagraphs (c) (1) and (2) of the Commercial Computer Software-Restricted Rights at 48 CFR 52.227-19, as applicable. HORIZON NAVIGATION, INC., 4701 Patrick Henry Dr. Suite 1301 Santa Clara, CA 95054 USA.
- Indemnity. You agree to indemnify, defend and hold free and harmless HORIZON NAVIGATION, INC., including its licensors, assignees, subsidiaries, affiliated companies, and the respective officers, directors, employees, shareholders, agents, authorized dealers or sales agents, and representatives of each of them from and against any liability, loss, injury, demand, cost, expense, or claim of any kind of character, including but not limited to attorney's fees, arising out of (a) any use or possession of the Software, or (b) any breach of any warranties or representations made by you in this Agreement or of your obligations under this Agreement.
- Disclaimer of Warranty. HORIZON NAVIGATION, INC. does not make any warranties or representations, either express or implied, with respect to the software, without limiting the foregoing, HORIZON NAVIGATION, INC. expressly disclaims any implied warranties of quality, performance, merchantability, fitness for a particular purpose or non-infringement. Some states do not allow the exclusion of implied warranties, so some portion of the above exclusion may not apply to you.
- Limitation of Liability. HORIZON NAVIGATION, INC. shall not be held responsible for any actual, anticipated or speculative loss of profit or direct, indirect, incidental, special, or consequential damages, including, without limitation, loss of revenue, data, or use incurred by you or any third party arising out of your use or possession of the software, whether in an action in contract or tort or based on a warranty, even if HORIZON NAVIGATION, INC. has been advised of the possibility of such damages.
- Warnings.
A. Copies of the digital map database reflect conditions as they existed at various points in time before your receipt of such copies. Accordingly, copies of the digital database map may contain inaccurate or incomplete data or information due to inaccurate or incomplete source materials, the passage of time, road construction, changing conditions, and otherwise.
B. Neither the Software nor the digital map database include, analyze, process, consider o reflect any of the following categories of information, i.e., neighborhood quality or safety; population density; availability or proximity of law enforcement, emergency, rescue, medical or other assistance; construction work, zones, or hazards; road and lane closures; various legal restrictions (such as vehicular type, weight, load, height and speed restrictions); road slope or grade; bridge height, width, weight or other limits; road, traffic or traffic facilities safety or conditions; weather conditions; pavement characteristics or conditions; special events; traffic congestion; or travel time. - Transfer. This Agreement, including all rights, obligations and representations may be transferred to another individual or single entity, provided the same transfer includes the simultaneous transfer of the associated hardware in which the Software is installed, and further provided that such other individual or single entity accepts all the terms of this Agreement. In the event such individual or single entity to which the Software is transferred does not accept the terms of this agreement, then the License herein automatically terminates. Further use of the Software is unauthorized and not permitted.
- Governing Law. This Agreement shall be governed by the laws of the State of California, without giving effect to its conflict of laws provisions.
SAFETY INFORMATION AND PRECAUTIONS
⚠ WARNING!
Please read and follow the following safety precautions.
Failure to follow the instructions below may increase your risk of collision and personal injury.
The "Please Drive Safely" screen is displayed each time when the NavMate software is turned ON as a reminder to make use of the system's navigational aids in a safe manner.
Before using the NavMate software, read this entire manual. Make sure that you are familiar with the system's features and know how to operate the system. Proper use of the NavMate software includes the following guidelines:
The NavMate software is not a substitute for your personal judgment. The route suggestions should never supersede any local traffic regulation or your personal judgment and/or knowledge of safe driving practices. Prior to completing any maneuvers suggested by your NavMate software (for example, a U-turn or a left turn), verify that you can legally and safely complete the maneuver. Do not follow route suggestions if they direct you to perform an unsafe or illegal maneuver, would place you in an unsafe situation, or would route you into an area that you consider unsafe.
Glance at the screen only when necessary and safe to do so. Let the computer voice guide you. If prolonged viewing is necessary, pull off the road to a safe location.
■ Do not use the NavMate software to locate emergency services (such as police, fire stations, hospitals, and clinics). The database may not include all emergency service providers. Use your own best judgment and ask for directions in these situations.
If the vehicle is in motion, only a passenger should program the NavMate software. The driver should not program the system unless the vehicle is parked in a safe location.
The NavMate software's map database provides information on suggested routes without regard to factors that may affect your driving experience or the time required to arrive at your destination. For example, the system does not reflect road detours, closures or construction, some road characteristics (e.g., road surface, slope or grade, weight or height restrictions, etc.), temporary traffic congestion, weather conditions, and similar factors.
INTRODUCTION TO YOUR NAVMATE SOFTWARE
The NavMate software provides turn-by-turn visual and voice assistance to direct you to your selected destination. The software quickly calculates step-by-step directions to any destination available on the included navigation map.
The NavMate software uses Global Positioning System (GPS) satellites, and a digital roadway map database to calculate and display travel directions. The system's GPS antenna receives signals from a constellation of 24 satellites orbiting the earth and uses the strongest of signals, to determine your position to within meters.

natural_image
Diagram of Earth with multiple satellites orbiting each other, showing orbital paths (no text or labels)VEHICLE POSITION
The NavMate software's computer considers vehicle speed and heading changes, together with longitude and latitude information, to accurately determine vehicle heading and position on a digital map.
Signals from GPS satellites are used to determine the vehicle location. Three (good) or four (best) satellites must be received to accurately determine location. The GPS reception status is indicated by the GPS symbol on the map.
MAP AND INFORMATION DATABASE
The map database used by your NavMate software was created using high-resolution aerial and land based data collection.

natural_image
Illustration of a car driving on a curved road with three satellites deploying signals (no text or symbols)Car navigation maps are frequently updated. While the database was judged to be as accurate as possible at the time of its release, a map database can never be 100% accurate. Road information that is maintained in the map databases, such as turn restrictions or road names may change over time.

Tunnels and indoor parking lots Surrounded by tall buildings Surrounded by tall trees

natural_image
Illustration of a car inside a curved parking garage (no text or symbols)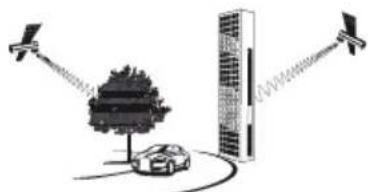
natural_image
Illustration of a smart city with a car, sensor array, and tower (no text or symbols)Bottom level of double-decker motorways When a GPS satellite is low (angle below 15°)
USING THE ZE-NA150 NAVIGATION SYSTEM
There are two ways to use the ZE-NA150 navigation system.
ABOUT PND AND PNR
PND Mode
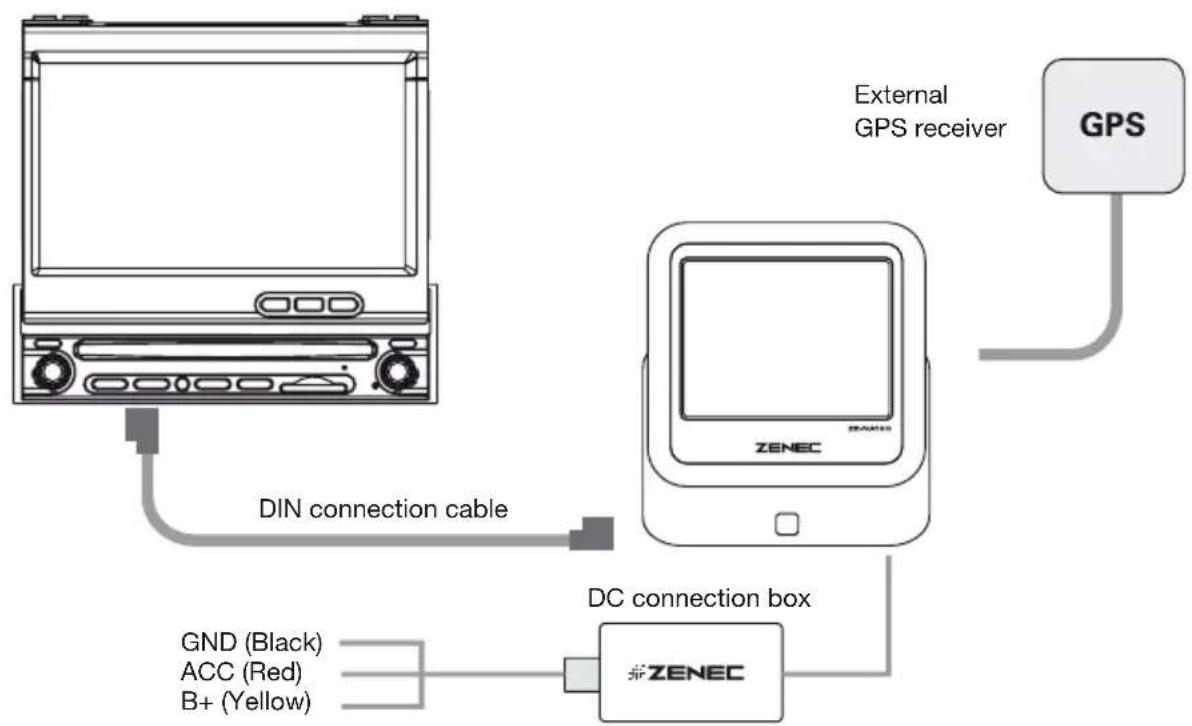
■ Start the portable when it is not connected to the moniceiver through the DIN connection cable, enter the system main menu, and now the ZE-NA150 is working in Portable Navigation Display Mode (PND Mode for short).
In PND mode, you can use all the functions on the portable, such as navigation, music player and video player. For details, please refer to the chapter “Introduction of main function”.
PNR Mode
- Start the portable when it is connected to the moniceiver through the DIN connection cable, then the moniceiver can identify the navigation function on the portable, and the "navi" button/icon of the moniceiver is ready for use. Now, the ZE-NA150 is working in Portable Navigation Ready Mode (PNR Mode for short).
flowchart
graph TD
    A["External GPS receiver"] --> B["ZENEC"]
    B --> C["GPS"]
    D["DIN connection cable"] --> B
    E["GND (Black) ACC (Red) B+ (Yellow)"] --> F["ZENEC"]
    G["DC connection box"] --> F
GND (Black): Connect the black wire to GND of your car.
ACC (Red): Connect the red wire to a switchable +12V source.
B+ (Yellow): Connect the yellow wire to a permanent +12V source.
DIN connection cable: Connection cable to connect the docking station to the moniceiver.
External GPS receiver: Connectivity to connect an external GPS receiver.
MAIN MENU

Introduction of main function
1. NAVIGATION
■ Enter the navigation mode.
2. MUSIC
■ Support WMA9, MP3 and WAV formats.
3. PHOTO
■ Support JPG, GIF, BMP and PNG formats.
4. EBOOK
■ Support TXT format.
5. VIDEO
■ Support .WMV, .ASF and .AVI formats.
6. SYSTEM
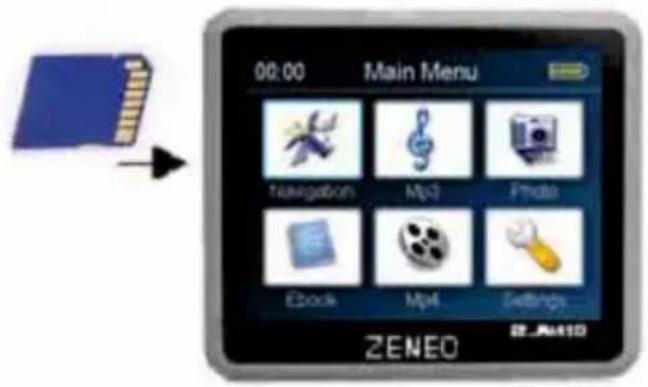
■ Include volume settings, power, backlight, date and time, language and system informations.
INSERT SD CARD
■ Before using the ZE-NA150, you must insert the SD card into the slot of the unit as follows:

NOTE:
■ Before using any application, please make sure that your SD card contains data the application may used.
■ Please do not use or store the SD card in high temperature or high humidity place.
Keep it away from chemicals or solvents like benzene or thinner etc.
■ Please notice the direction when inserting the SD card.
- Don't remove the SD card when the application is accessing it.
■ Please protect the SD card from mechanical stress, bending, dropping and striking.
Because the difference of the SD card standards, it is possible some of the SD cards can't be used with this unit. But we assure that most of the SD cards can work well with this unit.
INTRODUCTION OF NAVI APPLICATION
Start-up of navi application
■ Press on the main menu to enter the map warning window:
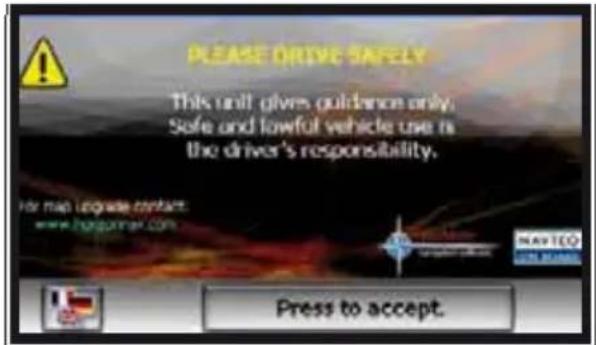
■ Press the button "accept" and the main map window will appears on the screen:
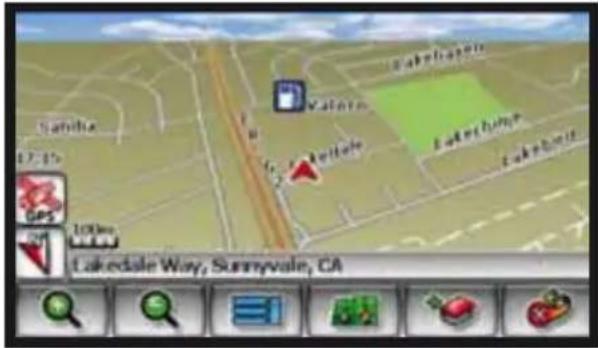
The use of navi application
- Please refer to "Navigation map user's manual" for the details.
Exit of navi application
- Press the “exit” button on the right bottom of the main map window, then the exit window will be on the screen.
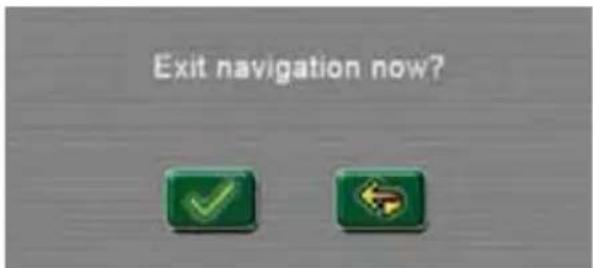
■ Press to exit the navi application, while for return
NOTE:
Before using the navi function, please make sure that your SD card contains the right map data or there is no reaction when you click .
AUDIO PLAYER
Features
- Supports WMA, MP3 and WAV formats.
- Supports normal, repeat and random play mode.
Interface and Operation
- Press ☐ on the main menu to enter the folder which contains music files. Press the folder icon, then enter the following music selecting interface by pressing the folder icon:

| Items Function | ||
 | Close | 1. Return to the system main menu (when the music player is turn off or music player (when the music player is turn on). |
 | Previous 2. Press to enter the previous page. | |
 | Next 3. Press to enter the next page. | |
 | Back 4. Press to enter the main folder. | |
 | File icon 5. File information. | |
- Press the music file icon, then the selected file will be played on the following audio player:

| Icon Function | |
| 1. Press to play/pause. | |
| 2. Press to stop the file playback. | |
| 3. Press to choose the previous file. | |
| 4. Press to choose the next file. | |
| 5. Press to music file selecting interface. | |
| 6. Press to set file playing progress. | |
| 7. Press to change the volume. | |
| 8. Press to play all files repeatedly. | |
| 9. Press to play files randomly. | |
| 10. Press to close the music player. | |
NOTE:
- It is possible that some corrupted files cannot be played back with this unit. We recommend to use only high quality music files.
- Please make sure that the SD card contains music files or there is no reaction when you press 📄.
VIDEOPLAYER
Features
-
Supports .WMV, .ASF and .AVI formats.
-
Supports movie file selecting, folder selecting and full screen playback.

NOTE:
It is possible that some corrupted files cannot be played back with this unit. We recommend to use only high quality video files.
Interface and Operation
- Press 📄 on main menu to enter the folder which contains video files, then enter the following video file interface by pressing folder icon:

| Icon Function | ||
 | Close | 1. Return to the system main menu (when the video player is turn off) or to the video player (when the video player is turn on). |
 | Previous | 2. Press to enter the previous page. |
 | Next 3. Press to enter the next page. | |
 | Back 4. Press to enter the main folder. | |
 | File icon 5. File information. | |
- Click the video file icon, then the selected file will be played on the following video player:
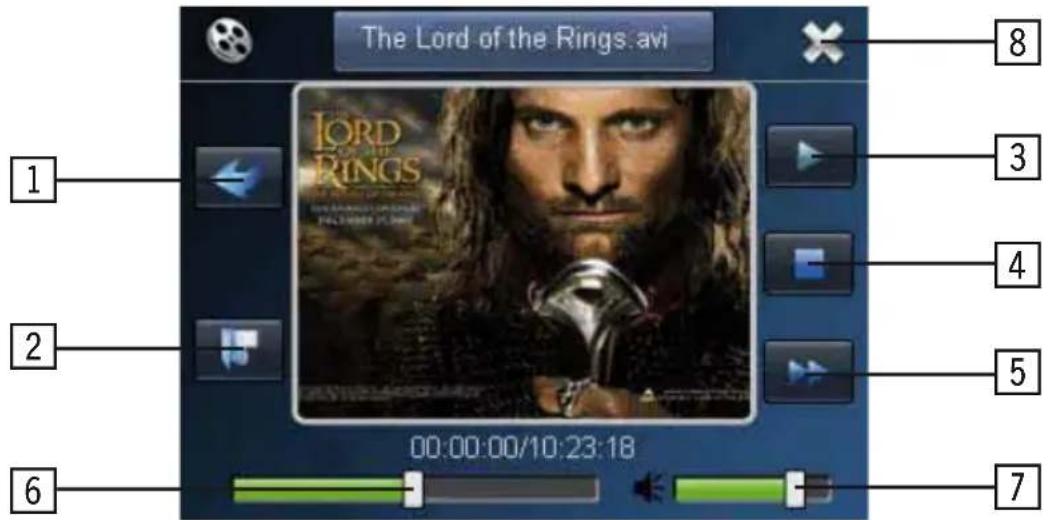
| Icon Function | |
 | 1. Press to enter the full screen mode. |
 | 2. Press to enter the music file selecting interface. |
 | 3. Press to play/pause the video playback. |
 | 4. Press to stop the video playback. |
 | 5. Fast forward. |
 | 6. Press to set the file playing progress. |
 | less to change the volume. |
 | 8. Press to close the video player. |
PHOTO VIEWER
Features
- Supports JPG, GIF, BMP and PNG formats.
- Supports spin, zoom in/out, slide etc.

NOTE:
■ Make sure that some folders of the SD card contain pictures.
Interface and Operation
- Press of main menu to enter the following photo viewer folder interface:
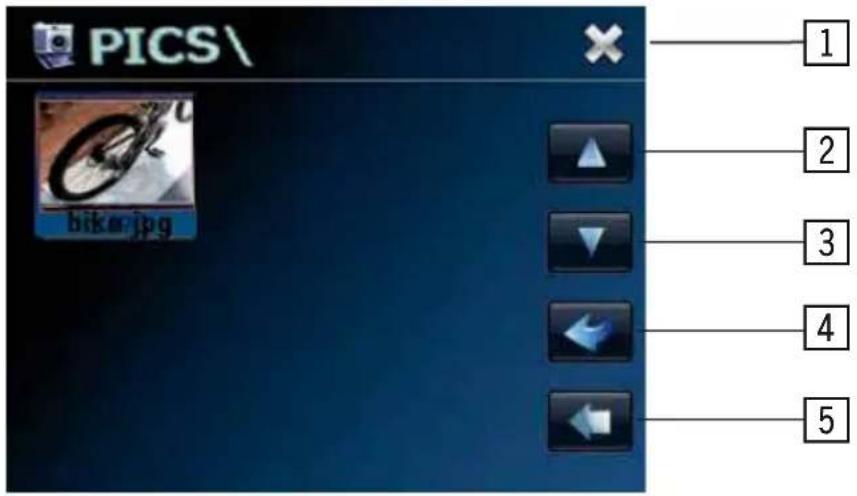
| Icon Function | ||
 | Close 1. Press to close the folder. | |
 | Previous 2. Press to enter the previous page. | |
 | Next 3. Press to enter the next page. | |
 | Back 4. Press to enter the main folder. | |
 | Select current picture | 5. Press to enter the full screen mode. |
- Press the picture file icon to view it with the following viewer:

| Icon Function | |
 | 1. Previous. |
 | 2. Next. |
 | 3. Exit. |
 | 4. Zoom in. |
 | 5. Zoom out. |
 | 6. Spin. |
 | II screen. |
 | 8. Close photo viewer. |
EBOOK VIEWER
Features
- Supports .TXT format.
- Supports page flipping, page skipping and folder selecting.

NOTE:
- Make sure that some folders of the SD card contains .TXT files.
- The txt files should be less than 8MB.
Interface and Operation
- Press of main menu to enter the txt viewer folder. You can read the chosen file by pressing it directly.


| Icon Function | ||
 | Close 1. Close the viewer. | |
 | Previous page 2. Turn to the previous page. | |
 | Next page 3. Turn to the next page. | |
 | Folder | 4. Enter the page selecting interface to select any page you want to read. |
 | Skip page 5. Full screen. | |
 | Page number 6. | Current page's number/total page number. |
2. Page selecting interface:

| Icon Function | ||
 | Close 1. Press to exit the page selecting. | |
 | Number keyboard | 2. Enter 0-9, you can choose any number of 0-99999999. |
 | Digital displayer | 3. Display the number input. |
 | Backspace | 4. Press to backspace the last number. |
 | Clear 5. Clear digits. | |
 | Turn to jump | 6. Turn to the page that's displayed in number displayer to read its content. |
SYSTEM SETTING
Press 📄 on the main menu to enter the "System Setting" window, then you can set items as the following table lists:

| Icon Function | ||
 | Volume 1. | Sound settings. |
 | Power 2. | Power settings. |
 | Back-light | 3. Adjust the backlight of the touchscreen. |
 | Date and time | 4. Set system time and date. |
 | Language | 5. Language and GUI settings. |
 | Sys Info | 6. System settings. |
VOLUME SETTING
It includes:
- Adjust the volume.
- Set the taps sounds (enable/disable).
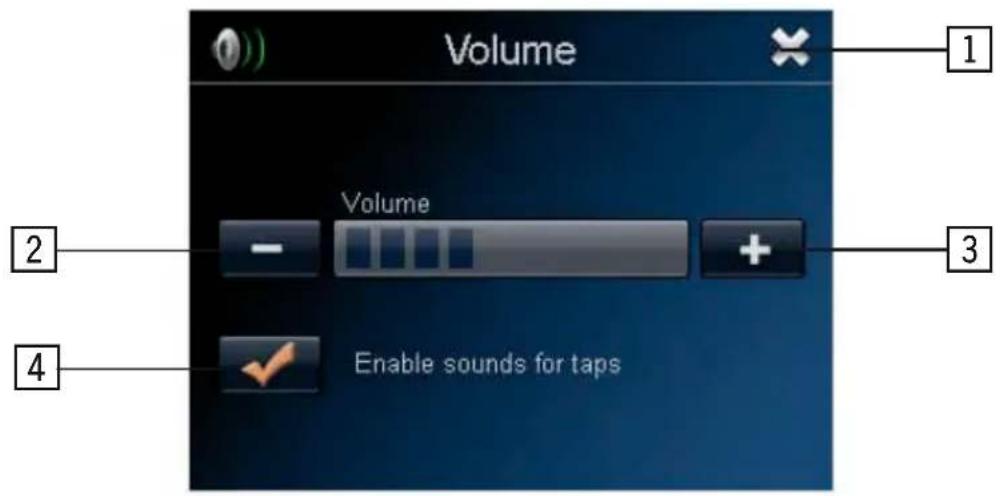
| Icon Function | ||
 | Close 1. Press to exit the volume adjusting application. | |
 | VOL - 2. Decrease the volume. | |
 | VOL + 3. Increase the volume. | |
 | Press taps sound | 4. Dis- or enables the tap sound. |
POWER SETTING

BACKLIGHT SETTING
It includes:
- Adjust backlight of the touchscreen.
- Set the period of time when backlight stays on without any operation in battery supply mode.
- Set the period of time when backlight stays on without any operation if the unit isn't in battery supply mode.

| Icon Function | ||
 | Brightness -/+ 1. + 2. Press to adjust the brightness. | |
 | ||
 | Leftward/rightward | 3. + 4.Press to select the intervals of brightness on in battery supply mode or AC power supply mode. |
 | ||
 | Brightness indicator | 5. Indicate the adjusted brightness. |
 | Time interval | 6. Set the period of time when backlight stays on without any operation. "Never", "3 min", "2 min", "1 min", "30 sec", "10 sec", 6 choice, display repeating. |
TIME AND DATE SETTING
Features
- System time setting.
- System date setting.
- Time zone selecting.
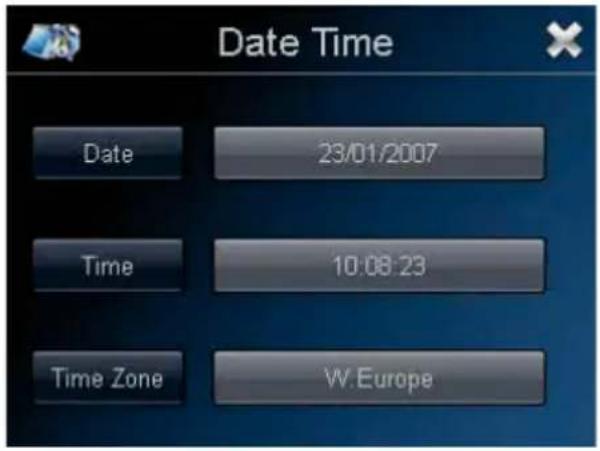
- Press Date enter the "Date" interface. Set the year, month and day by pressing

or


- Press Time enter the "Time" interface. Set the hour and minute by pressing

or


- Press Time Zone the "Time Zone" interface. Set the time zone by pressing



LANGUAGE SETTING
Features
- Set different languages displayed.
- Set different appearance's colour.
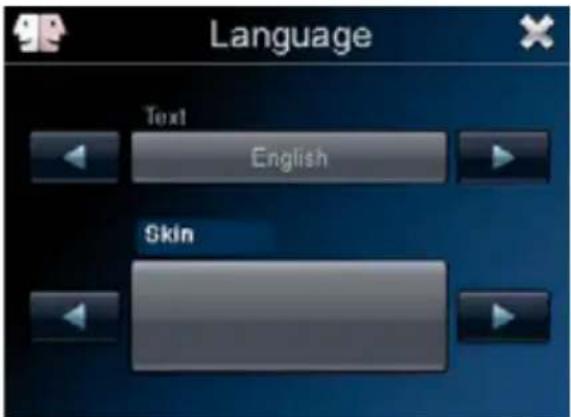
■ Set the system language by pressing . There are different kinds of languages to select.
■ Select the desired GUI colour by pressing or is possible to choose between blue and yellow background colour.
SYSTEM INFORMATION
Features
- Factory reset.
- GPS reset.
- Touchscreen calibration.

NAVMATE SOFTWARE OPERATION
QUICK START
Follow these four easy steps and you are on your way.
Before operating your NavMate software, please carefully read and follow the instructions provided in the „Safety Information and Precautions“ section of this manual.
Step 1 – Start up/Main Menu
■ After the NavMate software starts, you will see the reminder warning to use your NavMate software safely and lawfully.
WARNING SCREEN

MAIN MAP SCREEN

Step 2 – Select Destination
You have many ways to select a destination. For this example, let's find a nearby airport.
Select by touching screen:
■ Press MENU button (F3) to activate main menu
■ Start route guidance
■ Point of interest
■ State/province
NOTE: The software remembers the last state/province, so this step is not necessary every time.
By category
Airport
■ Sort by distance
■ Select one of these and the system will calculate a route to that destination using the criteria set in the setup menu
Step 3 - Map/Guide along route
■ Proceed to the highlighted route and drive while the NavMate software provides audible and visual guidance to your destination.

Step 4 – Arrive at destination
That's it! You've arrived at the selected destination.
■ Refer to the rest of this manual to become more familiar with the many options available on your NavMate software.

USING YOUR NAVMATE SOFTWARE
The best way to learn about this product is to explore it, while observing the safety precautions discussed earlier.
FUNCTION BUTTONS
The buttons on the bottom of the display are called function buttons. These buttons change labels and function depending on the screen displayed. The list below provides a brief description of the function buttons.

Exit from navigation.
Zoom in the map to show a smaller area.
Zoom out the map to show a larger area.
Center map on current vehicle location.
Display menu, jump to main menu.
Display map in 3D view.
Display map in 2D view.
After panning map, select current panned position.
Select currently highlighted item.
Display spell mode.
Page up in displayed list.
Page down in displayed list.
Go back one step.
Repeat voice instruction.
NAVIGATION MENUS
The table below briefly describes the main menu options.
MAIN MENU OPTIONS AT-A-GLANCE

| Main menu option Select this | option to... |
| Go to... Pick a destination for routing. | |
| Edit favorites Add or modify destinations in address book, home address, office address and tail book. | |
| Setup Set preferences for routing and navigation display. | |
| Trip computer Display speed, trip, odometer and clock readings. | |
| Home address Route to home address. | |
| Office address Route to office address. | |
LIST MODE, SPELL MODE, AND MOST RECENTLY USED
There are five ways to select a destination. Several of the methods allow you to move through a list by scrolling using the arrow keys (List Mode) or by searching using an on screen keyboard (Spell Mode):
■ Many of the lists keep track of the last five most recently used (MRU) selections. These are placed at the top of the list in a different color and allow you to quickly select items that are used frequently. The pictures below illustrate the list mode and spell mode screens.
LIST MODE AND SPELL MODE
![AIRPORT 1 2 3 4 5 6 7 8 9 0 Q W E R T Y U I O P A S D F G H J K L [ ] Z X C V B N M - . ,](/content/2026/05/782357/images/46254833330ba412fb2700954b5c4b2e1ec26f43eb517ac8c10eeb574593abe0.jpg)
MOST RECENTLY USED PORTION OF LIST

SPELL MODE BUTTONS
| Button Mode Press this button to... | |
 | Spell Select current input characters and show list of matches. |
 | Spell Delete last entered character. |
 | Spell Switch keyboard from QWERTY layout to special character layout. |
 | Spell Switch keyboard from special character layout to QWERTY layout. |
 | Spell Quit spell mode and return to list mode. |
MAP SCREEN
The table below explains the button functions available on the map screen.
MAP BUTTONS
| Button Press this button to... | ||
| F1 |  | Show smaller map area. |
| F2 |  | Show larger map area. |
| F3 Show |  | Menu. |
| F4 |  | Change type of map view. |
| F5 If no a |  | ute, select current location. |
| F6 |  | Exit. |
REMOTE CONTROL

| 1 | INFO Select current place. | |
| 2 | ESC Switch remote control mode from map move to menu item selection or from menu item selection to map move. | |
| 3 | OK | Selection confirm. |
| 4 | ▲▼◄► | Up/down/left/right to select items or move map. |
| 5 | ROOT | Return to main menu. |
| 6 | F1 | Show smaller map area. |
| 7 | F2 | Show larger map area. |
| 8 | F3 | Show main menu. |
| 9 | F4 | Change type of map view. |
| 10 | F6 | Exit navigation. |
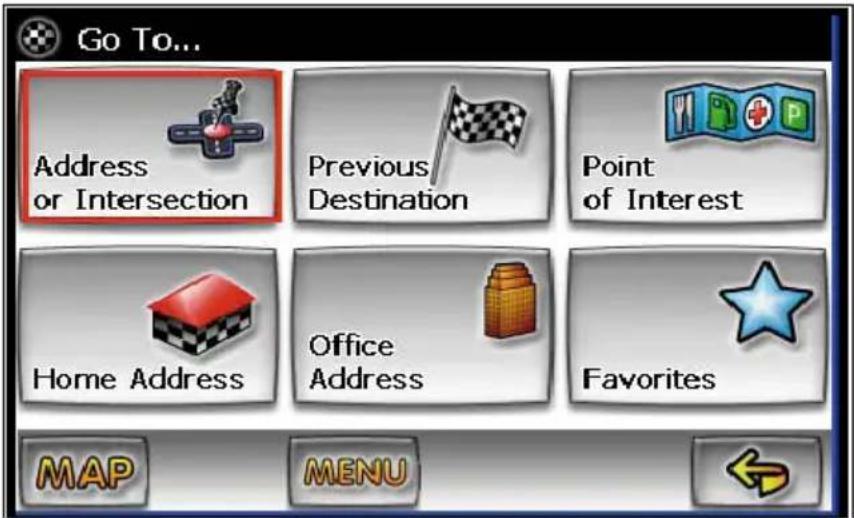
DESTINATION SELECTION (GO TO...)
To select a destination, you must select from the main menu.
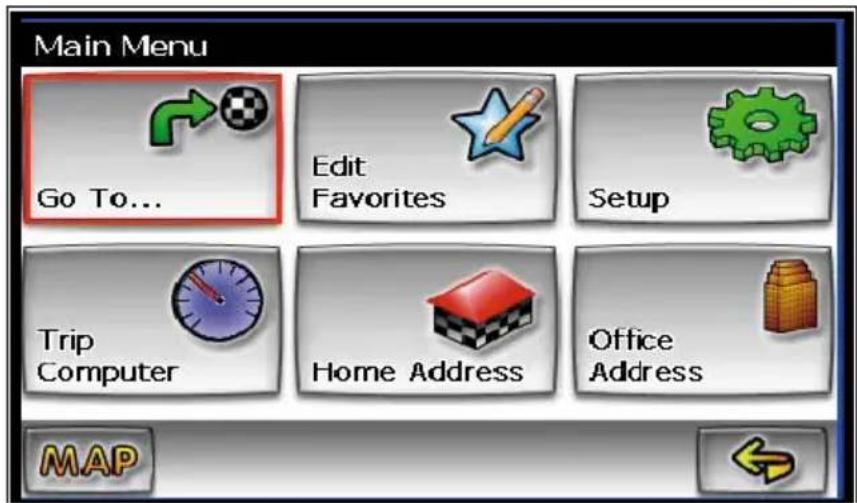

The table below explains the button functions available on the destination selection menu.
DESTINATION SELECTION BUTTONS
| Button Press this button to... | ||
| F1 |  | Return to map mode. |
| F3 |  | Return to main menu. |
| F6 |  | Go back one step. |
ADDRESS/INTERSECTION
If you know the street address or cross streets of your destination, use the „Address/Intersection“ selection. You must select the state/province where the destination is located.
NOTE:
The system remembers the last state/province selected, so this step is not necessary every time.

You may select either the postal (zip) code or city name or the street name first.
■ Postalcode – If you know the postal code, select this option to quickly find the city.
NOTE:
The postal code search is limited to the currently selected state/province. Postal code searching may not be available in all areas.
■ City Name – If you know the city and street, select this option. You could use the „Street Name“ option instead, but it is quicker and easier to use the „City Name“ option when you know both parts of the address.
■ Street Name – If you know the street name but you are not sure of the city, select this option. You might use this option, for example, if you were in a large metropolitan area and a street continues through multiple cities and you are not sure of which city is appropriate for the street.
SELECT CITY

SELECT STREET
![1 2 3 4 5 6 7 8 9 0 Q W E R T Y U I O P A S D F G H J K L [ ] Z X C V B N M - . ,](/content/2026/05/782357/images/5e97e449e21c2d9a71ce2fbb9aedf509b01014f9566956df126f0173813ea6a7.jpg)
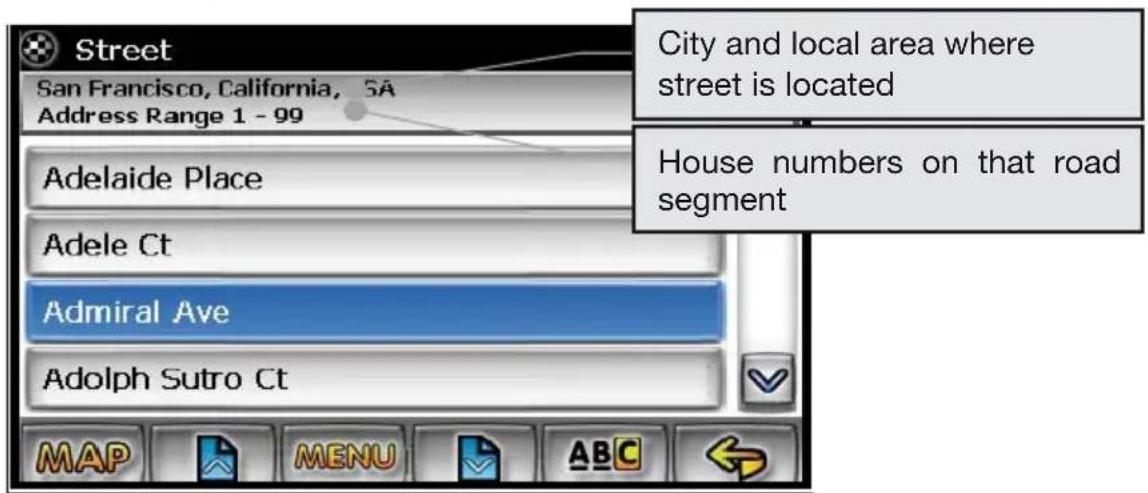
If you selected the „City Name“ option, continue by following the prompts on the display screen to select a city first, then street, then address number or intersection. If you selected the „Street Name“ option, follow the prompts to select a street name, then a city, then a street address or intersection.
Select State/Province/City/Street List Mode buttons

Return to map mode.
Page up in displayed list.

Return to main menu.

down in displayed list.

h to spell mode.

ack one step.
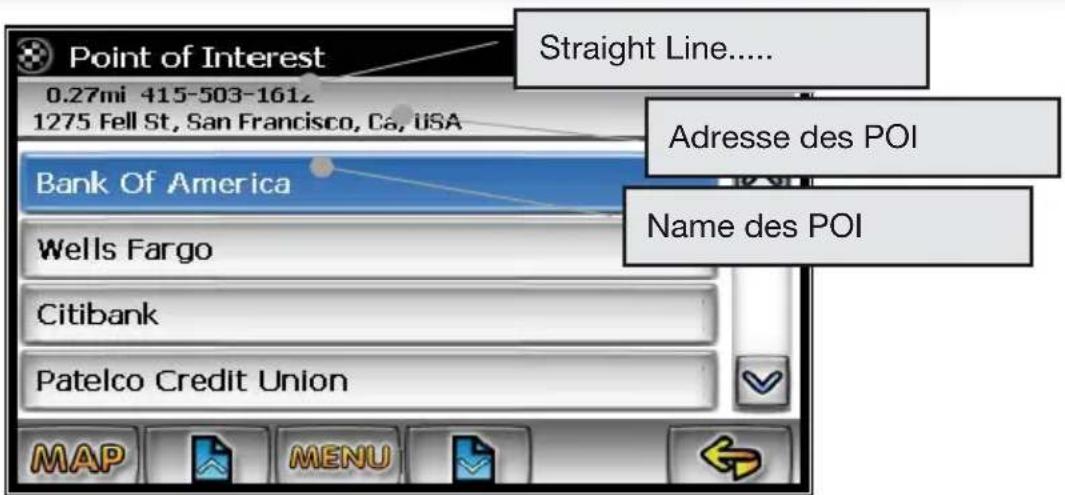
POINT OF INTEREST (POI)
The point of interest option is useful when you are going to a public place or are looking for some type of facility such as a gasoline station. After selecting the point of interest option, you must select the state/province where the destination is located.
NOTE:
The system remembers the last state/province selected, so this step is not necessary every time.
Points of interest may be searched by Category, Postcode, Phone Number, or Name.
POI SEARCH METHODS
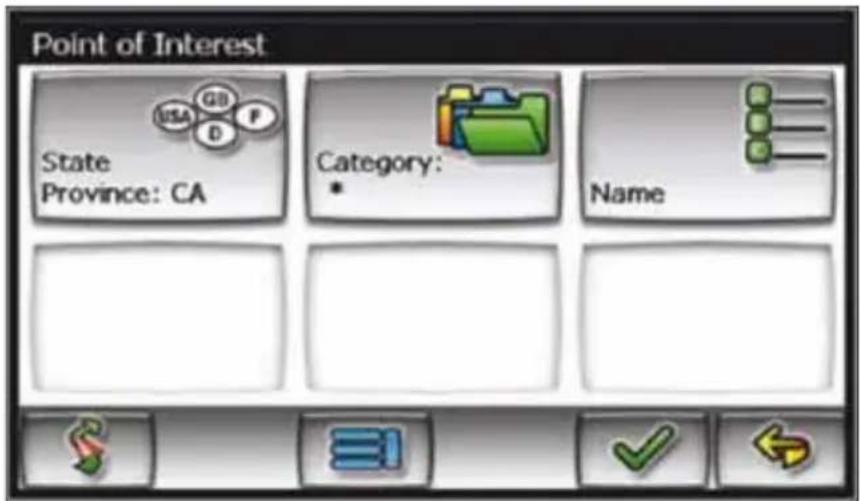
- By Category – If you are interested in the closest POI of a certain type for example nearest gas station, select this option.
By Name – If you know the name of the point of interest for example “COLUSSEUM”, select this option.
Or if might see the following screen depending on the map data you use:

■ By Postcode - If you know the postcode, select this option to quickly find the city.
NOTE:
■ Postcode search is limited to the currently selected state/province. Postcode searching may not be available in all areas.
■ By City – You can select the city also.
■ By Phone Number – If you know the phone number of the desired POI, select this option to quickly find the POI.
NOTE:
The phone number search is limited to the currently selected country. Phone number searching may not be available for all POIs.
POI CATEGORY

POI NAME SPELLER
![1 2 3 4 5 6 7 8 9 0 Q W E R T Y U I O P A S D F G H J K L [ ] Z X C V B N M - . ,](/content/2026/05/782357/images/fb460a708634c0fb1f5bbacc7908dd12d83b66fa1e0d062476a3505d99fe6980.jpg)
Some POI categories may not be available in some areas and not all possible POIs may be listed for all categories. For example, although the „Restaurant“ category is very extensive, it is only as current as the map database information. Several categories restrict the search radius as well to minimize the search time.
Since businesses change over time, so will the accuracy of the points of interest in your navigation map. To have the most accurate map database, annual map database updating is recommended.
After selecting POI search criteria, you may select to list the results sorted by distance or by name.
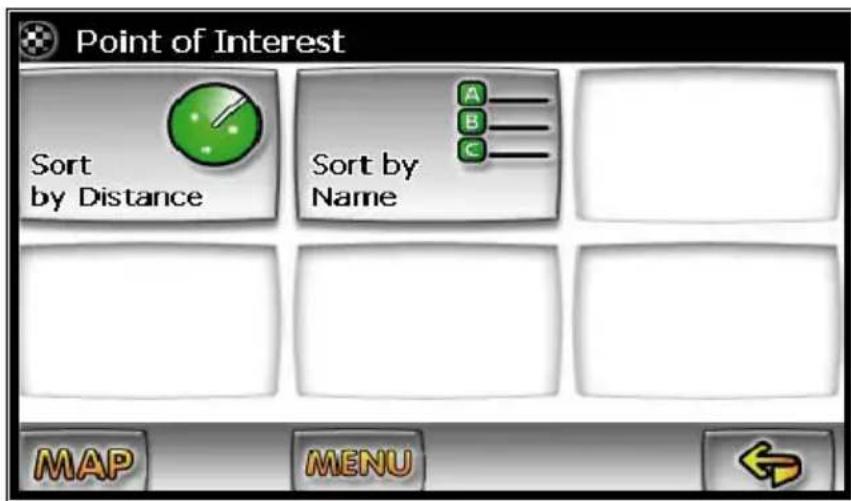
POI SEARCH RESULTS

HOME ADDRESS
The Home Address is a convenient way to route to your saved home address directly.

OFFICE ADDRESS
The office address is a convenient way to route to your saved office address directly.

FAVORITES
There are four additional ways to set your destination under favorites.


ADDRESS BOOK
The address book is a convenient place to store frequently visited destinations. To add, delete, or edit address book entries see “Address Book Editing” section of this manual.
ADDRESS BOOK ENTRIES
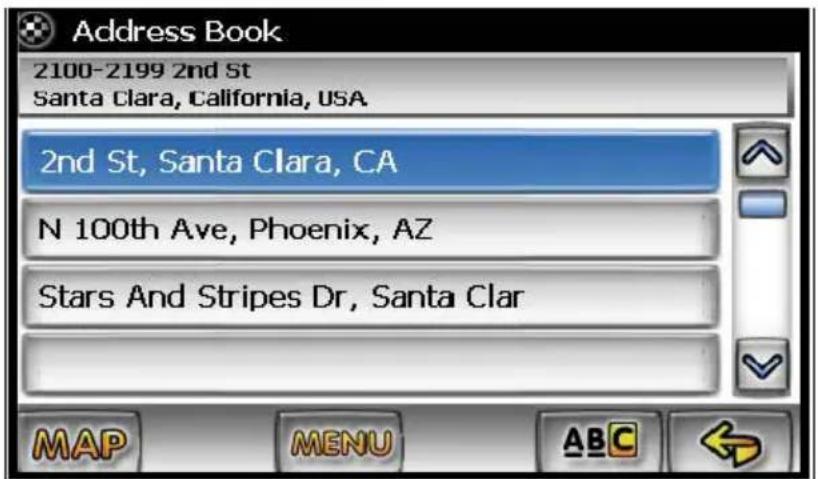
Address Book Selection Buttons
Button Press this button to...

Exit menu mode and return to map mode.
Page up in displayed list.
Return back one menu level.
Page down in displayed list.
Display spell mode.
Go back one step.
TRAIL BOOK
You can route to trails you have created.
TRIP BOOK
Trip book allows you to navigation a trip that has multiple destinations.
LATITUDE LONGITUDE
You can route to a destination by directly inputting latitude and longitude values.
![01. " ; 02. " 1 2 3 4 5 6 7 8 9 0 Q W E R T Y U I O P A S D F G H J K L [ ] Z X C V B N M - . ,](/content/2026/05/782357/images/6712913f7b5de001dbe8426b785a847558b944b0b79d9f84ff0aae276a9072b7.jpg)
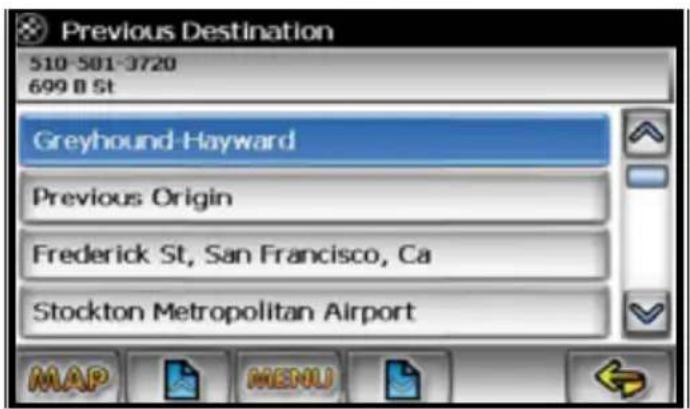
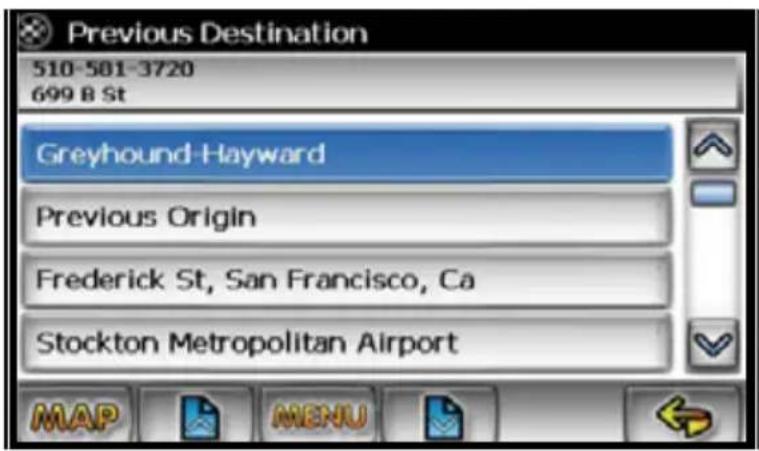
PREVIOUS DESTINATION
Previous destinations entered into your NavMate software are automatically saved into the memory of the NavMate software. This is helpful when you want to return to a recent destination, such as a hotel where you may be staying. The previous origin of the last calculated route is also stored for easy return to your start point.
PREVIOUS DESTINATION SELECTION
Previous Destination Selection Buttons
Button Press this button to...
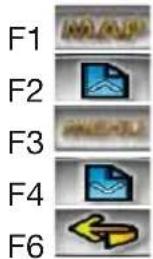
Exit menu mode and return to map mode.
Page up in displayed list.
Return back one menu level.
Page down in displayed list.
Go back one step.
BY USING MAP
You may select the destination by touching the screen. The system will display the cross-hairs according to the location you touch.
SELECT DESTINATION FROM MAP

Press to display location information about the current panned location. Select the highlighted entry to select the panned location for the following options.

Select Destination from Map Buttons
Button Press this button to...
F1

F3

F6

Return to map mode.
Return to main menu.
Go back one step.
ROUTE CALCULATION AND GUIDANCE
After selecting a destination, the system calculates a route based on the route criteria set in the setup menu.
ROUTE CALCULATION
The status bar indicates route calculation progress.
ROUTE CALCULATION PROGRESS

PLEASE PROCEED
When route calculation is complete, the NavMate software will instruct you to “Please proceed to the highlighted route” unless you are already on the route. The highlighted route is indicated in orange.
ROUTE GUIDANCE
Once on the highlighted route, guidance information is provided on the screen. Glance at the screen only when necessary and safe to do so.
As you continue on the route, the guidance information is continually updated to correspond with your progress to the destination.

True View (Intersection Zoom)
Just before a turn point, the guidance display will show a close-up or "true view" of the roads around the turn point.
TRUE VIEW (INTERSECTION ZOOM)

MAP DISPLAY
The map display shows roads, road names, and cartographic features like lakes and rivers. You can adjust the map scale, the map orientation, map view, status information display, and the distance units to your own preferences (See setup section of this manual).
MAP DISPLAY

The GPS symbol may change colors indicating the strength of the signal. The GPS symbol colors mean:
■ Green – GPS signal is free from obstruction and is being received regularly. At least four satellites are being received.
■ Yellow – GPS signal is partially obstructed. Three satellites are being received.
■ Red – GPS signal is unavailable. Two or fewer satellites are being received.
■ Press to display function buttons.
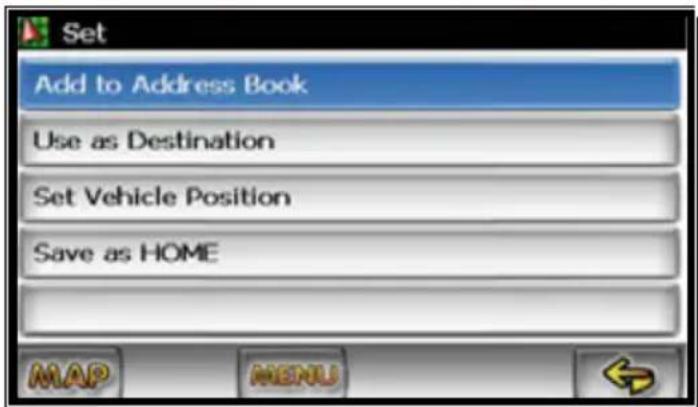
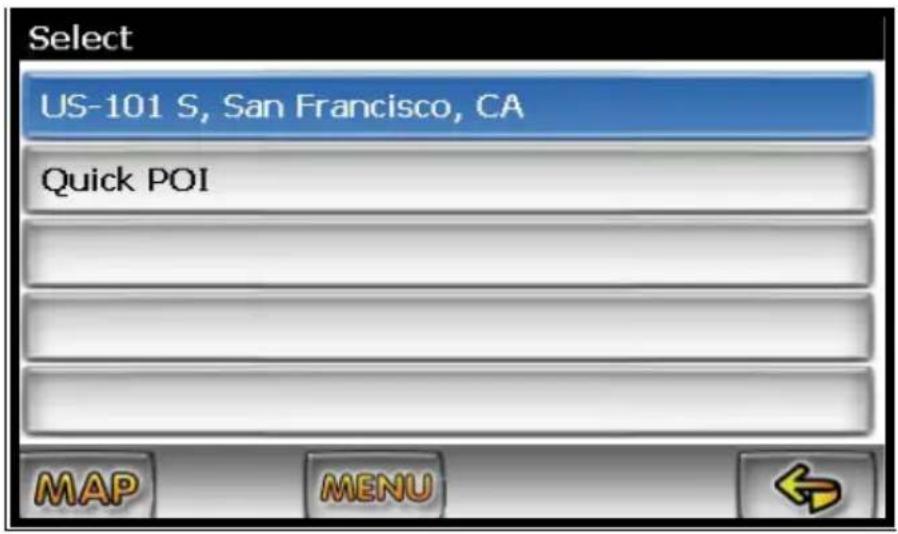
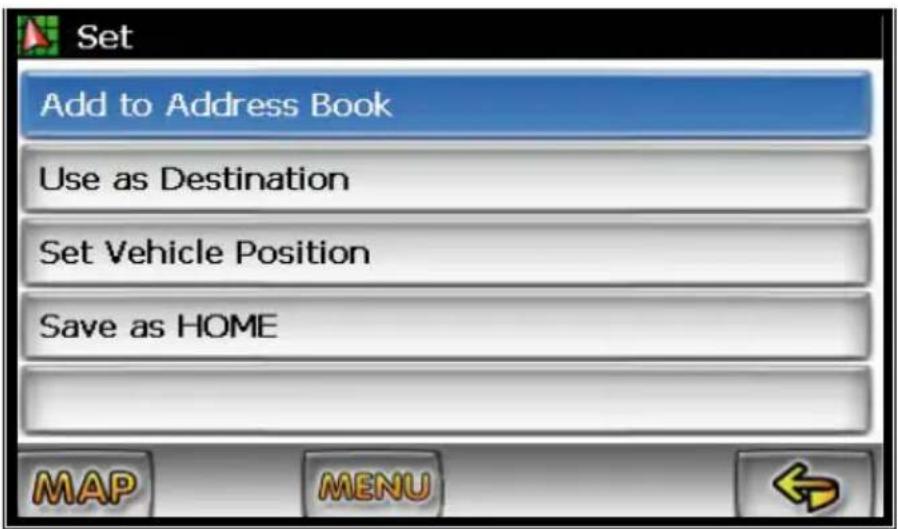
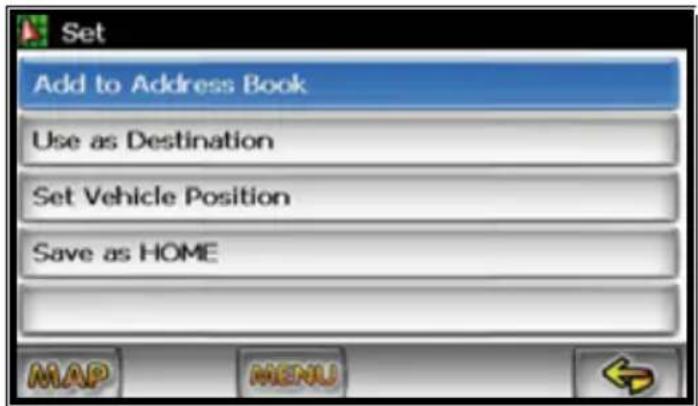
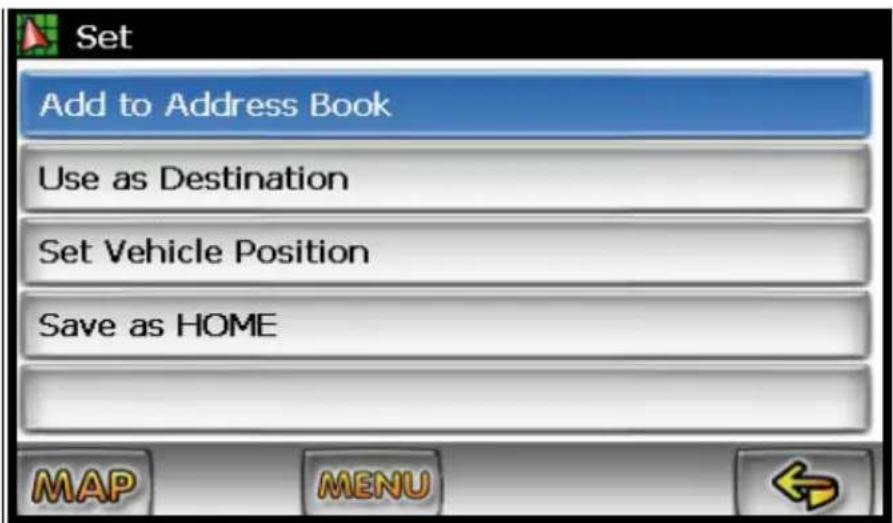
Press 18 to display information about the current map location. Then select the location information box to add it to address book, use it as a destination, reset position, or save location as HOME location.

ARRIVAL SCREEN
The destination is shown on the map display screen with a circle. A voice message announces that you are approaching your destination.
ARRIVAL SCREEN

OFF-ROUTE AND ROUTE INTERRUPTIONS
If you leave the current route, the NavMate software will automatically recalculate the route. This feature may be disabled if you prefer by turning "Auto Recalc Off" in the setup menu.
If you leave the route to make a stop, the NavMate software remembers your destination. After you re-start, the NavMate software will ask if you want to continue your route.
EDIT FAVORITES MENU
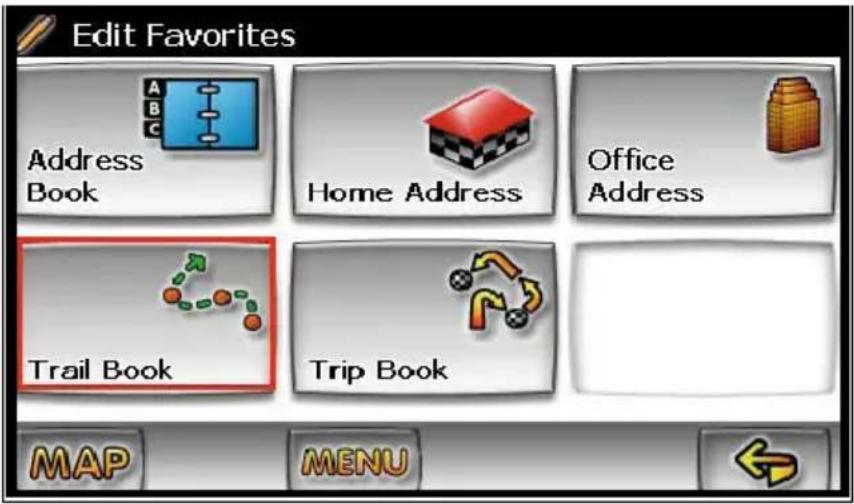
Add or modify destinations in Address Book, Home Address, Office Address and Trail Book.

EDIT ADDRESS BOOK
The “Address Book” option allows adding and editing address book entries.
Select "Edit Favorites" from the main menu then select "Address Book":


Use edit function to rename address book entries.

EDIT HOME ADDRESS
The "Home Address" option allows adding or replacing home address.

Select home address from the following places.

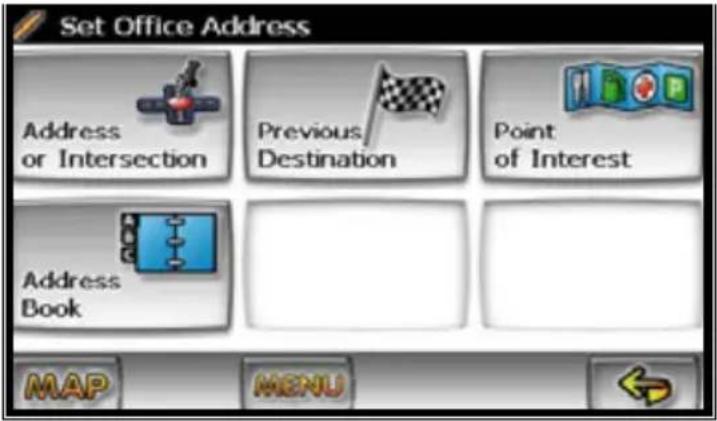
EDIT OFFICE ADDRESS
The "Office Address" option allows adding or replacing office address book.
Select office address from the following places.
EDIT TRAIL BOOK
The “Trail Book” option allows adding, deleting an editing trail book entries. Please see “Trail Book” section for detailed descriptions.
EDIT TRIP BOOK
The “Trip Book” option allows adding, deleting an editing trip book entries. Please see “Trip Book” section for detailed descriptions.
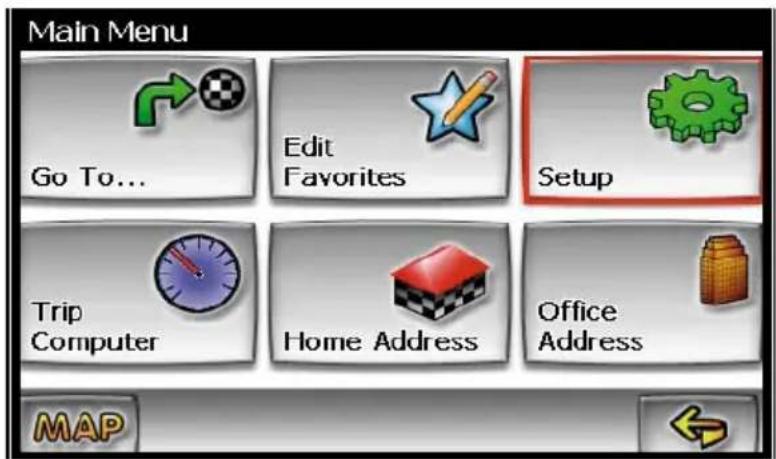
SETUP MENU
You may customize the NavMate software to your own preferences. Select setup option to adjust navigation preferences, display options, and units (km or mi) settings. You may also reset the vehicle position and do some basic system diagnostics through the setup menu.

NAVIGATION PREFERENCES
Navigation preferences allows you to set the simulation mode on, and set the route calculation and guidance options.


■ Simulation On/Off – When on, the NavMate software will “drive” the selected route even though the vehicle is not moving. This can be used to preview a route, or show off the system to friends.
- Shortest time/distance – Determines if the NavMate software emphasizes finding the fastest or the shortest route.
- Avoid Freeway yes/no – Determines if the NavMate software avoids or uses freeways in the route calculation.
- Toll Yes/No – Determines if the NavMate software uses toll roads in the calculated route.
■ Auto recalc On/Off – When on, the NavMate software will automatically recalculate the route if the current route is left.
■ Voice Guidance On/Off – When on, the system will give audible guidance.
DISPLAY OPTIONS
Display options allow you to set the map orientation and some of the information items displayed.

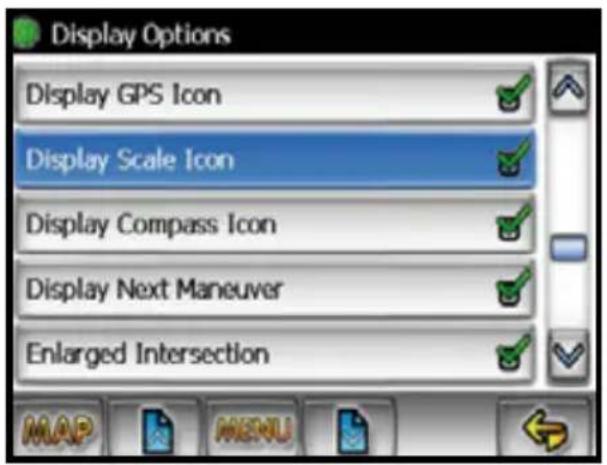
■ North Up/Heading Up – Determines if the map is always displayed with north direction at the top of the screen or if map is always adjusted so that vehicle symbol points toward the top of the screen.
■ Status Bar Display On/Off – Turn the display of the status bar on or off.
■ GPS Icon Display On/Off – Turn the display of the GPS reception symbol on or off.
■ Scale Icon Display On/Off – Determines if the map scale symbol is shown.
■ Compass Icon Display On/Off – Turn the compass symbol on or off.
■ Next Maneuver On/Off – Set the display of the turn symbol.
■ Soft Keys Auto-hide On/Off – Turn the function key display on or off.
- Intersection On/Off – Turn the true view on or off.
UIF SETTINGS


Day/Night Settings
You can select Auto, Day or Night color scheme.

Point of Interest
This feature will allow you to select POI that will be displayed in different scales.


SET DISTANCE UNITS
The units used when displaying and announcing the distance to turns may be set to miles (decimal miles, e.g. zero point three miles), kilometers/meters, or miles/yards based on personal preference.
DISTANCE UNITS SELECTION

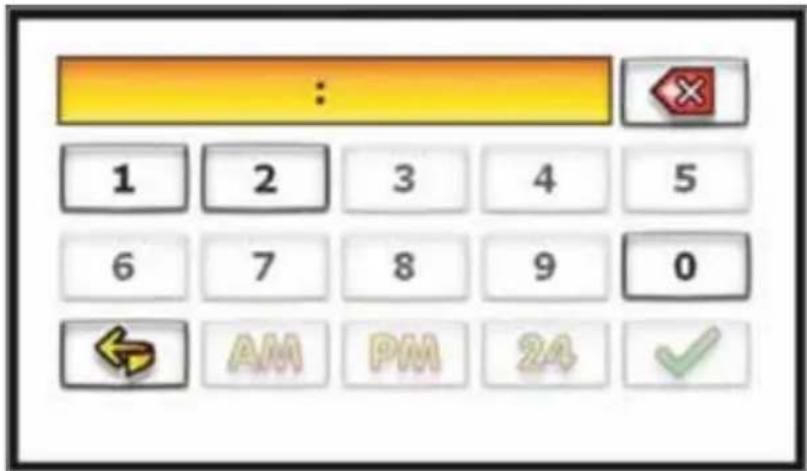
SET TIME
Language Settings
You can choose a language/voice of your choice:

Location Reset
You may reset the location of the vehicle symbol using the location reset option.
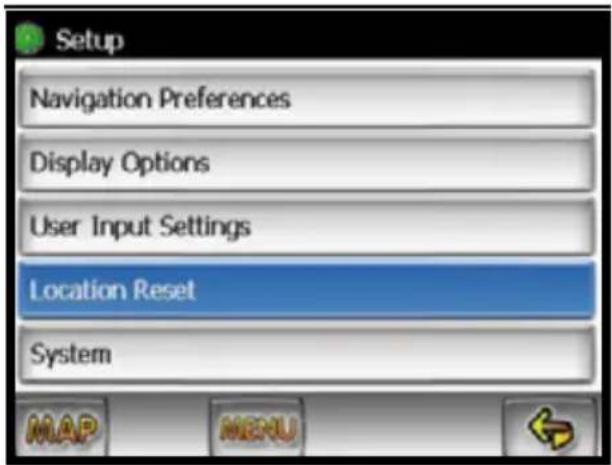

SYSTEM DIAGNOSTICS
The system diagnostics menu allows you to diagnose the GPS reception status, adjust the current vehicle symbol position, and it also provides information on the current software and map version numbers.
SYSTEM MENU

The GPS diagnostic displays the number of GPS satellites currently in view and how many are currently being used. The GPS satellite time is displayed (UTC) and so is the latitude and longitude determined from GPS.
GPS DIAGNOSTIC TEST RESULT
![GPS Diagnostics [2109] Satellites Visible 0 Satellites Used 0 GPS Time 0:0:0, sr:7:21, ss17:0 Latitude: 3741048, Longitude: -12197957 Sat. ID SNR. Elevat. Azim. SNR: 0, P = 0.00, H = 0.00, V = 0.00](/content/2026/05/782357/images/930db4f4d8a0942a4766b8807d3151000454fdf82494b084191bf368f5df39cc.jpg)
To reset the vehicle symbol based on the GPS determined longitude and latitude, select GPS VP reset.
GPS VP RESET

The version numbers for the system software and mapping can be found under system information.
SYSTEM INFORMATION


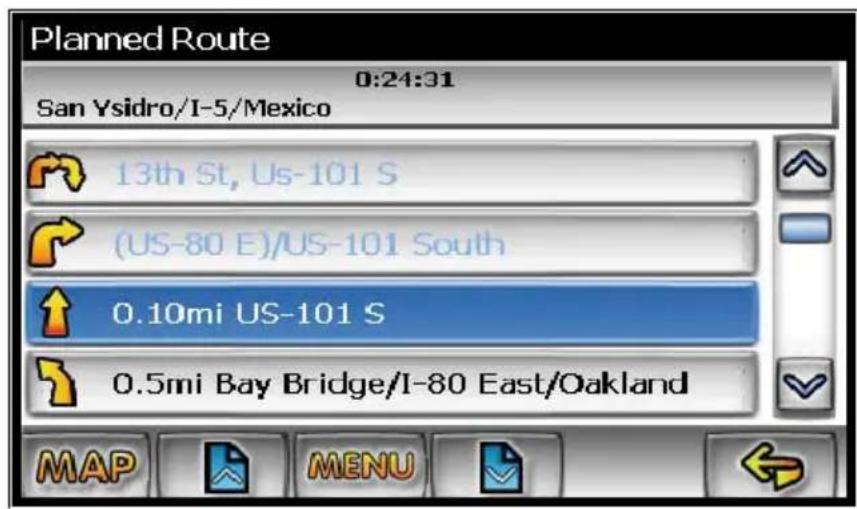
PLANNED ROUTE
To view planned route on a highlighted route click the yellow maneuver icon and the system will display the entire route list.

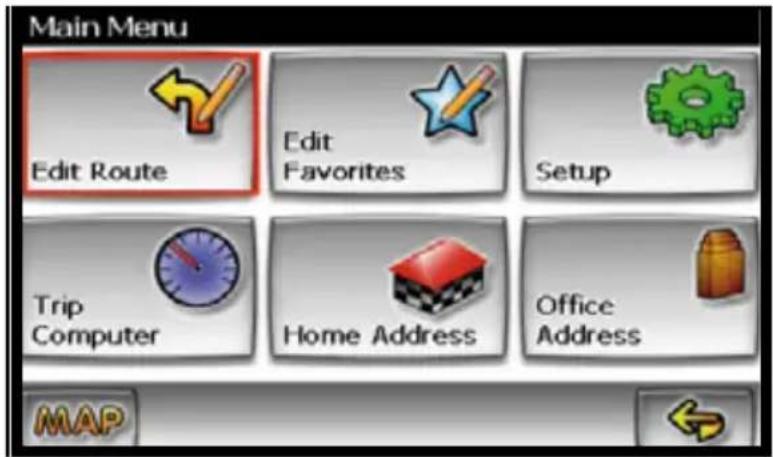
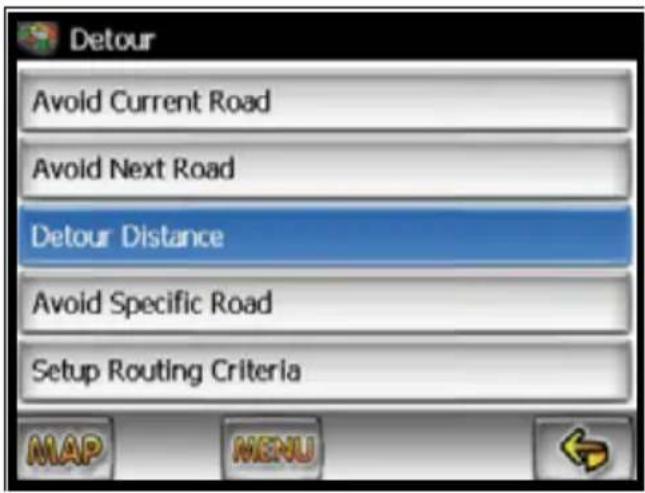
DETOUR
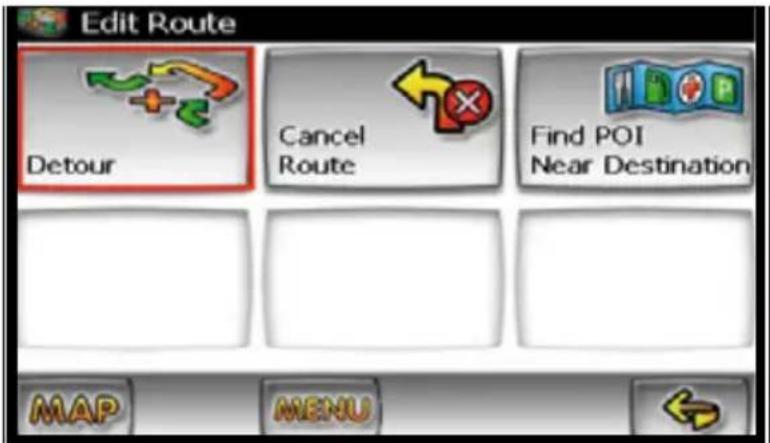

DETOUR DISTANCE
![(1 - 9 mi): 1 2 3 4 5 6 7 8 9 0 Q W E R T Y U I O P A S D F G H J K L [ ] Z X C V B N M - , ,](/content/2026/05/782357/images/cf074a79d233cf1d3119133ee0d00b54ee8b63e83197b36e5a3d7838aab67374.jpg)
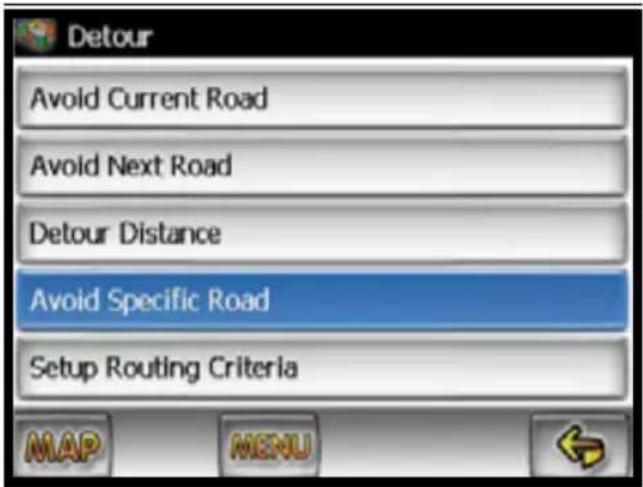
AVOID SPECIFIC ROAD


CANCEL ROUTE
Select this function to cancel the current route.

TRAIL BOOK
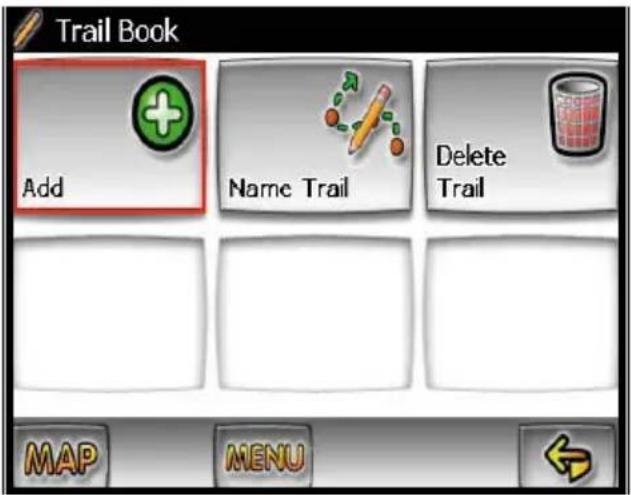
Select add function and choose a name for this trail. After confirming the name then start driving. During trailblazing, you can press push-pin icon to create waypoint. Press menu icon when you complete the trail.
ADD TRAIL
![Trail_1 1 2 3 4 5 6 7 8 9 0 Q W E R T Y U I O P A S D F G H J K L [ ] Z X C V B N M - . ,](/content/2026/05/782357/images/887ee40cb5c8bc66e0c0b30c03706bacbf9a9cd8beb0ac0ad378009cfd2ac097.jpg)
Press to add a waypoint:
![Point-0 1 2 3 4 5 6 7 8 9 0 Q W E R T Y U I O P A S D F G H J K L [ ] Z X C V B N M - . ,](/content/2026/05/782357/images/f22d9ab1794ca9291f9c692f84b616f7e4b940b2f9d36a0cef87ef23adbffe04.jpg)
![Point-1 1 2 3 4 5 6 7 8 9 0 Q W E R T Y U I O P A S D F G H J K L [ ] Z X C V B N M - . ,](/content/2026/05/782357/images/edda1a14e32b3919a10639cb602c75c45b53c7d131cdab90752244a896dbe7cc.jpg)
Press and select stop trail when you complete the trail.
NAME TRAIL
After select the saved trail use the keyboard to rename the trail.


![Trail_1 1 2 3 4 5 6 7 8 9 0 Q W E R T Y U I O P A S D F G H J K L [ ] Z X C V B N M - . ,](/content/2026/05/782357/images/a1c7acbad4ca31923ec89486a63ec5a3fa2a8e7aa92844e0df6a17d68152131d.jpg)
DELETE TRAIL
Select Delete Trail function system.

then choose the trail name to remove it from the


FOLLOW TRAIL
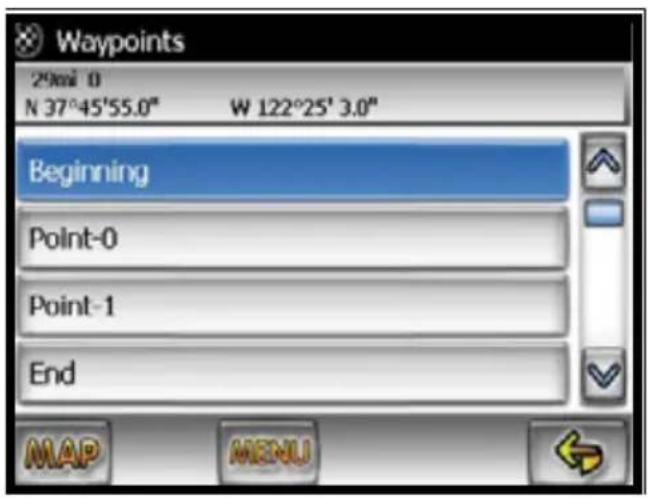
The next time you go off-road, you can follow the same trail you just created by selecting "Start Route Guidance" then select "Trail Book" and finally select an existing trail.


You will see the following screen upon selecting a trail:


You can select to go to any points in this trail as a starting point. Upon your selection, the system will point you with a red line to that starting location. You will follow the red line to the starting point and start your trail blazing by following the dotted line.

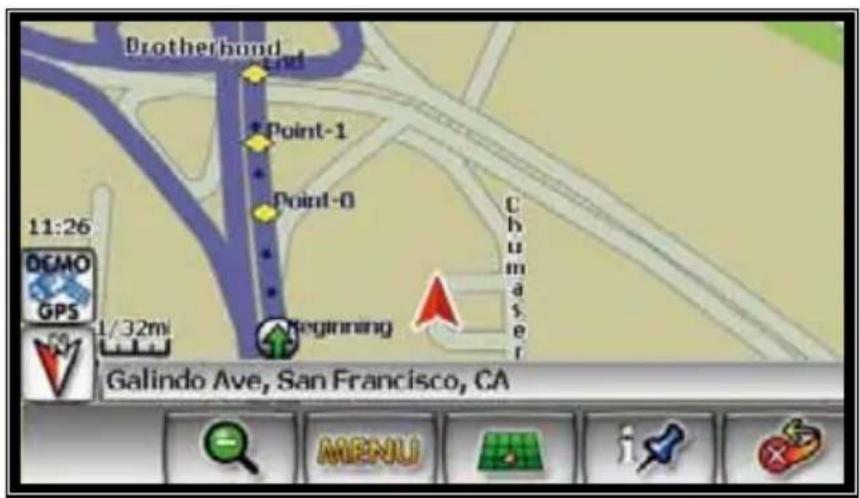

Press then select "Stop Trail" to cancel route.
TRIP COMPUTER
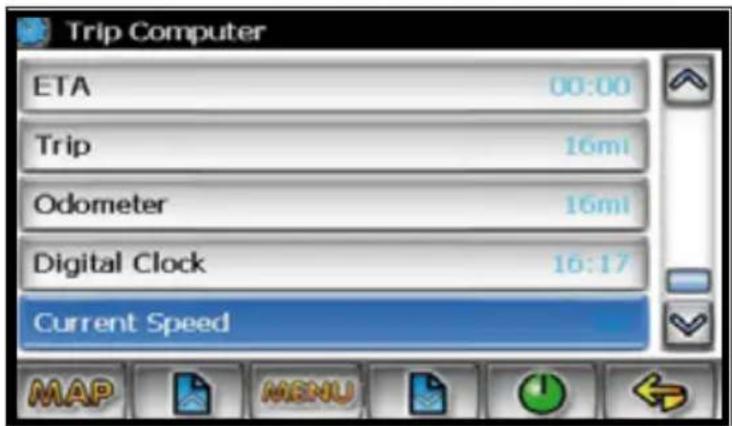
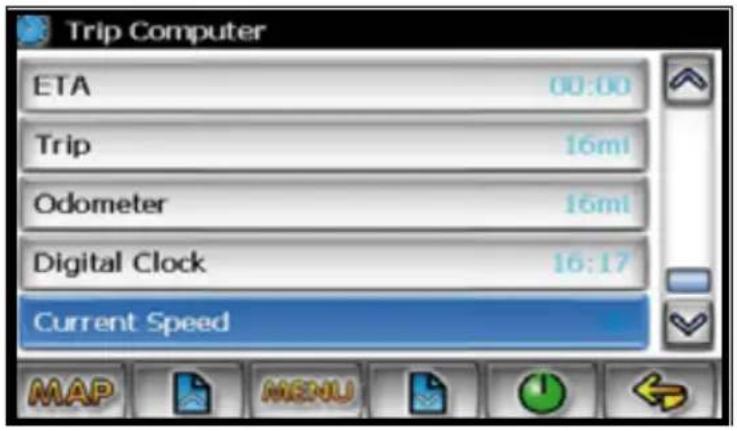
Trip Computer gives the readings of speed, trip related timing, elevation, odometer and clock.

Press to display detailed reading of each field.
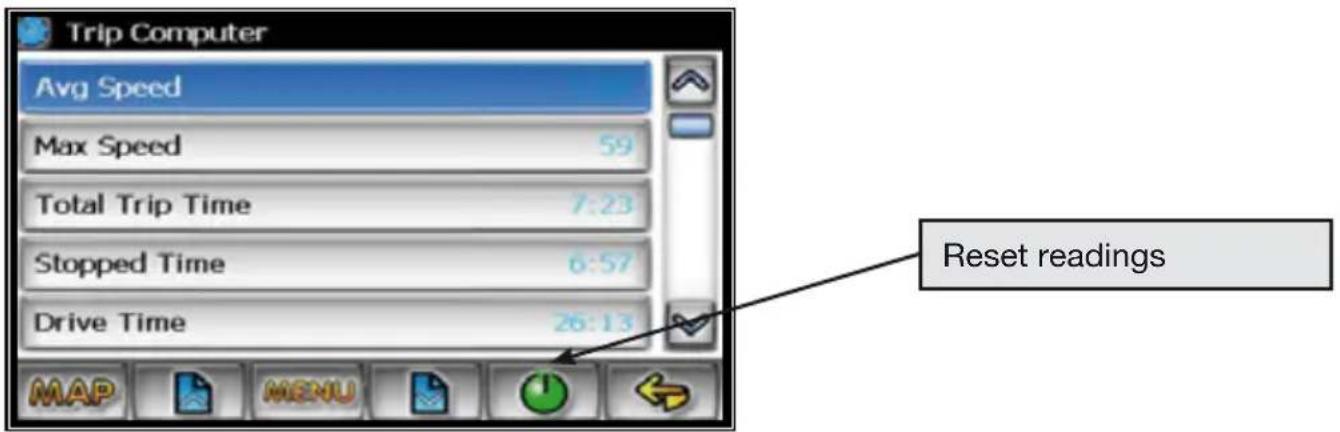
Scroll the Up or Down arrow button to choose the field then press to reset current reading.

TRIP BOOK
Favorites
There are four additional ways to set your destination under Favorites:


Trip Book
Trip Book allows you to navigation a trip that has multiple destinations.


To add, delete, or edit Trip Book entries see “Trip Book” section of this manual.
Edit Favorites Menu
Add or modify destinations in Address Book, Home Address, Office Address, Trail Book and Trip Book.

Edit Trip Book
Edit Trip Book allows adding and editing trips and destinations within a trip.

ADD
Add allows adding trips and destinations within a trip.
![Trip_1 1 2 3 4 5 6 7 8 9 0 Q W E R T Y U I O P A S D F G H J K L [ ] Z X C V B N M - . . ✓ OK](/content/2026/05/782357/images/62729f842c256468684fb03e73e8b6686777e633bd3465d1181334c14dd12848.jpg)
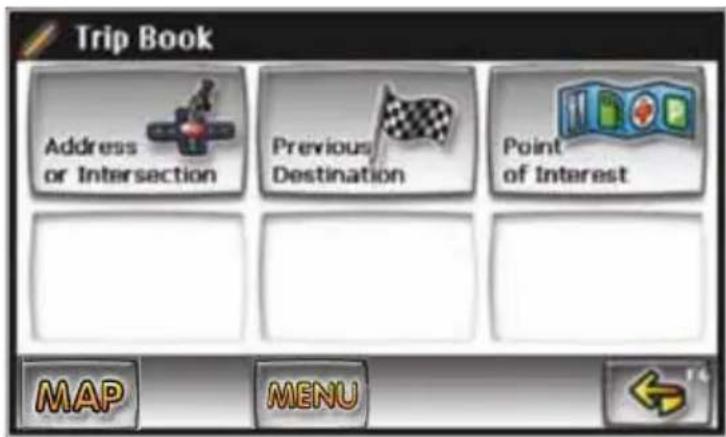

Press to add additional destination or press to delete an existing destination in a selected trip.
Edit
Edit allows modifying destinations within a trip and or deleting an existing trip.


BATTERY
CHARGING THE BATTERY
Method 1:
Connect the appropriate end of the AC adapter to the power connector of the ZE-NA150 and the end to a receptacle.
Method 2:
- Connect the output end of the 12V cigarette lighter to the appropriate slot of the ZE-NA150.
- Insert the other end of 12V cigarette lighter into receptacle of car's 12V cigarette lighter.

NOTE:
■ Please charge the battery over 4 hours before starting to use the unit for first time.

WARNING:
- Please don't put the battery set in heated vessel, washing machine or high-pressure container.
- Please don't use the battery set with other batteries together. Don't use it with the battery set different package, different type or different brand together, either.
- Stop using it if the battery set becomes hot, smelly or changes the colour when using, charging or storing.
- Please keep away if the battery leaks or starts smelling.
- Please wash your skin or cloth with water if electrolyte leaks to your skin or cloth.
- Please wash your eyes with water and go to see the doctor if electrolyte leaks into your eyes. DON'T KNEAD YOUR EYES.
SPECIFICATION
| Dimensions (W x H x D): 97 mm x 92 mm x 24 mm | |
| Display: | 3.5" touchscreen |
| Display resolution: 320 x 240 pixels | |
| Battery: Lithium-polymer battery (3 hours operating time) | |
| Weight incl. battery: 204 g | |
| Waterproof: No | |
| CPU: Samsung GPD14B01-007 (400 MHz) | |
| Memory: Internal working memory and optional removableSD card (addressing up to 2GB memory) | |
| Computer interface: USB 1.1 and 2.0 | |
| Integrated GPS receiver: SIRF | Star 3 (20 channels) |
| Working and storing temperature: | ZE-NA150 (with battery)Working temperature: 0°C to +45°CStoring temperature: -20°C to +45°C |
| ZE-NA150 (without battery)Working temperature: -20°C to +70°CStoring temperature: -20°C to +70°C | |
| AC adapterWorking temperature: 0°C to +45°CStoring temperature: -20°C to +65°C | |
| 12V cigarette lighter adapterWorking temperature: 0°C to +45°CStoring temperature: -20°C to +65°C | |

NOTE:
Design and specifications are subject to change without notice.
Weight and dimensions shown are approximate.


If at any time in the future you should need to dispose this product please note that waste electrical products should not be disposed of with household waste. Please recycle where facilities exist. Check with your Local Authority or retailer for recycling advice (Waste Electrical and Electronic Equipment Directive).
2 YEARS LIMITED WARRANTY
Dear customer
Thank you for purchasing this ZENEC product. It is advisable to keep the original packing material for any future transporting of the product.
Should your ZENEC product require warranty service, please return it to the retailer from whom it was purchased or the distributor in your country.
This ZENEC product is warranted against defective materials or workmanship for a period of TWO years from date of purchase at retail.
WARRANTY LIMITATIONS
This warranty does not cover any damage due to:
- Improper installation, incorrect audio or mains connection(s).
- Exposure to excessive humidity, fluids, heat sun rays or excessive dirt or dust.
- Accidents or abuse, unauthorized repair attempts and modifications not explicitly authorized by the manufacturer.
This warranty is limited to the repair or the replacement of the defective product at the manufacturer's option and does not include any other form of damage, whether incidental, consequential or otherwise. The warranty does not cover any transport costs or damages caused by transport or shipment of the product. Warranty work will not be carried out unless this warranty certificate is presented fully completed with model, serial number, purchaser's address, purchasing date and dealer stamp together with the original sales slip!
2 JAHRE GARANTIE
Date of purchase: ....
Your name: ....
Your address: ....
City:
State: ZIP or postal code
Country: ....
Dealer's address & stamp

ZENEC · 2F, 343, SEC. 2 · Fu Hsing S. Road · Taipei, Taiwan R.O.C.

- ZE-NA150
- ⚠ BITTE BEACHTEN:
- BELEUCHTUNG
- Datum
- SPRACHE
- Schritt 1: Startmenü
- FUNKTIONSTASTEN
- ■ Nach Kategorie (Category)
- EINGABE DES POI
- BÜROADRESSE (OFFICE ADDRESS)
- ■ Adressbuch (Address Book)
- ■ Fahrtenbuch (Trail Book)
- VORHERIGE ZIELE
- KARTENANZEIGE
- ZIELANKUNFT
- ZURÜCKSETZEN DER FAHRZEUGPOSITION
- SYSTEMDIAGNOSE
- ROUTE BEARBEITEN
- ROUTE ABBRECHEN
- TRACKLOG (TRAIL BOOK)
- LÖSCHEN EINES TRACKLOGS
- REISEPLANER
- HINZUFÜGEN EINES REISEPLANS
- DER AKKU
- ROUTE CALCULATION AND GUIDANCE ....124-128
- EDIT FAVROITES MENU 129-130
- SET-UP MENU....131-151
- BATTERY 152
- SPECIFICATION....153
- WARRANTY 154-155
- FEATURES
- BOX CONTENTS
- SUPPLIED MAP DATA
- PREFACE
- NOTE:
- END-USER LICENSE AGREEMENT
- SAFETY INFORMATION AND PRECAUTIONS
- ⚠ WARNING!
- INTRODUCTION TO YOUR NAVMATE SOFTWARE
- VEHICLE POSITION
- MAP AND INFORMATION DATABASE
- USING THE ZE-NA150 NAVIGATION SYSTEM
- ABOUT PND AND PNR
- PND Mode
- PNR Mode
- MAIN MENU
- Introduction of main function
- NAVIGATION
- MUSIC
- PHOTO
- EBOOK
- VIDEO
- SYSTEM
- INSERT SD CARD
- INTRODUCTION OF NAVI APPLICATION
- Start-up of navi application
- The use of navi application
- Exit of navi application
- AUDIO PLAYER
- Interface and Operation
- VIDEOPLAYER
- PHOTO VIEWER
- EBOOK VIEWER
- Page selecting interface:
- SYSTEM SETTING
- VOLUME SETTING
- It includes:
- POWER SETTING
- BACKLIGHT SETTING
- TIME AND DATE SETTING
- LANGUAGE SETTING
- SYSTEM INFORMATION
- NAVMATE SOFTWARE OPERATION
- QUICK START
- Step 1 – Start up/Main Menu
- Step 2 – Select Destination
- Select by touching screen:
- Step 3 - Map/Guide along route
- Step 4 – Arrive at destination
- USING YOUR NAVMATE SOFTWARE
- FUNCTION BUTTONS
- NAVIGATION MENUS
- LIST MODE, SPELL MODE, AND MOST RECENTLY USED
- MAP SCREEN
- DESTINATION SELECTION (GO TO...)
- ADDRESS/INTERSECTION
- SELECT CITY
- SELECT STREET
- Select State/Province/City/Street List Mode buttons
- POINT OF INTEREST (POI)
- POI SEARCH METHODS
- POI CATEGORY
- POI NAME SPELLER
- HOME ADDRESS
- OFFICE ADDRESS
- FAVORITES
- ADDRESS BOOK
- Address Book Selection Buttons
- TRAIL BOOK
- TRIP BOOK
- LATITUDE LONGITUDE
- PREVIOUS DESTINATION
- Previous Destination Selection Buttons
- BY USING MAP
- Select Destination from Map Buttons
- ROUTE CALCULATION AND GUIDANCE
- ROUTE CALCULATION
- PLEASE PROCEED
- ROUTE GUIDANCE
- True View (Intersection Zoom)
- MAP DISPLAY
- ARRIVAL SCREEN
- OFF-ROUTE AND ROUTE INTERRUPTIONS
- EDIT FAVORITES MENU
- EDIT ADDRESS BOOK
- EDIT HOME ADDRESS
- EDIT OFFICE ADDRESS
- EDIT TRAIL BOOK
- EDIT TRIP BOOK
- SETUP MENU
- NAVIGATION PREFERENCES
- DISPLAY OPTIONS
- UIF SETTINGS
- Day/Night Settings
- Point of Interest
- SET DISTANCE UNITS
- Language Settings
- Location Reset
- SYSTEM DIAGNOSTICS
- SYSTEM MENU
- GPS DIAGNOSTIC TEST RESULT
- GPS VP RESET
- PLANNED ROUTE
- DETOUR
- DETOUR DISTANCE
- AVOID SPECIFIC ROAD
- CANCEL ROUTE
- NAME TRAIL
- DELETE TRAIL
- FOLLOW TRAIL
- TRIP COMPUTER
- ADD
- Edit
- BATTERY
- CHARGING THE BATTERY
- Method 1:
- Method 2:
- WARNING:
- YEARS LIMITED WARRANTY
- WARRANTY LIMITATIONS
- JAHRE GARANTIE
Brand : ZENEC
Model : ZE-NA150
Category : Gps