
ZE-NC526 - Gps ZENEC - Free user manual and instructions
Find the device manual for free ZE-NC526 ZENEC in PDF.


| Product Type | 2-DIN Naviceiver (GPS Navigation, Multimedia, Bluetooth) |
| Display | 6.2" (15.7 cm) 16:9 HD TFT-LCD, 800x480 pixels, touchscreen |
| Power Supply | 12V DC, negative ground, 4 x 50W class-D amplifier |
| Dimensions (Approx.) | 178 x 100 x 160 mm (standard 2-DIN) |
| Audio Formats (USB/SD) | MP3, WMA |
| Video Formats (USB/SD) | AVI, Xvid |
| Image Formats (USB/SD) | JPEG |
| Navigation System | 3D High-Definition, TMC/TMC Pro receiver, 8 GB microSD map data (43 countries) |
| Bluetooth | Parrot hands-free module, up to 5 phones, 1000 contacts, internal/external mic |
| Radio Tuner | RDS, 30 presets (18 FM / 12 AM) |
| Connectivity | Front and rear USB 2.0, SD/SDHC card reader, A/V input, rear view camera input, DVB-T/DAB+ ready |
| Outputs | 4.1-CH preamp line outputs, 2-CH line outputs (non-volume), 2 x composite video outputs |
| Multi-Zone | M-Zone for rear seat entertainment |
| Remote Control | IR remote control included |
| Key Illumination | Bicolor (red/white) |
| Safety Features | Parking brake interlock for video, fuse protection, anti-theft code option |
| Warranty | 2 years (defective materials/workmanship) |
Frequently Asked Questions - ZE-NC526 ZENEC
User questions about ZE-NC526 ZENEC
0 question about this device. Answer the ones you know or ask your own.
Ask a new question about this device
Download the instructions for your Gps in PDF format for free! Find your manual ZE-NC526 - ZENEC and take your electronic device back in hand. On this page are published all the documents necessary for the use of your device. ZE-NC526 by ZENEC.
USER MANUAL ZE-NC526 ZENEC
ABOUT THIS INSTRUCTION MANUAL
The instruction manual contains important information and warnings about the operation of this unit. Please store it inside your vehicle to have access to it any time. ZENEC reserves the right to revise this document at any time without prior notice.
CONTENTS
SAFETY INSTRUCTIONS .... 3
FRONT PANEL BUTTONS 4-5
BASIC OPERATION 6-7
RADIO MODE 8-11
PLAYBACK/PLAYLIST AUDIO/VIDEO 12-17
BLUETOOTH MODE 18-25
NAVIGATION MODE 26-27
SETUP....28-35
REMOTE CONTROL 36-37
EXTERNAL PLAYBACK SOURCES....38-39
GLOSSARY....40
TROUBLESHOOTING 41-42
SPECIFICATIONS......43
WARRANTY 86-87
⚠ Navigation manual is separate.
SAFETY INSTRUCTIONS
- Read these instructions entirely.
- Keep these instructions. Whoever uses the unit should have access to this manual.
- Heed all warnings. Follow all instructions.
- This unit is designed to be used in a vehicle with 12V DC battery and negative ground.
- Do not operate the unit in any other way than described in this manual. Failure to follow the instructions within this manual may void your warranty.
- Do not disassemble or alter the unit in any way, because it will void your warranty. Do not attempt to repair or to service the unit yourself, but contact an authorized ZENEC dealer instead.
- Use only original accessories which are designed and manufactured for the unit, otherwise you will risk damage. Install the unit according to the mounting manual by using the supplied mounting accessories. The forces of acceleration for accidents are sometimes huge. Incorrectly mounted units are a big risk for the driver and the car passengers, during an accident.
- Protect the unit from water and other liquids, which can enter the casing. A short circuit or even fire could be the result.
- To prevent a short circuit, never insert or stick any metallic objects (such as coins or metal tools) into the unit.
- Before you replace a defective fuse, try to find the cause for the short circuit. Please pay attention to the cables of the power supply! If the short circuit doesn't result from a failure of the power supply or wiring, you can replace the defective fuse with a new one (same value). If the short-circuit is still existing, please contact an authorized ZENEC dealer.
- When connecting to any other device, read its user's guide for detailed safety instructions. Do not connect incompatible products.
- Be careful not to drain the car battery while using the unit when the car engine is turned off. Because the unit uses a considerable amount of energy and the battery will be charged only while the engine is running, it might happen that the battery will discharge to a point where it's not longer possible to start the engine.
- According to the traffic laws in different European countries, driving with monitors which are showing movies in the viewing range of the driver is not allowed, because the driver might be distracted from the traffic. Please respect the traffic regulations of your country, or you might face penalties in case of an accident or even loose your insurance coverage. Please pay attention to the volume inside your vehicle, because you are obliged to notice exterior sounds like police sirens etc.
- Don't expose the unit to hard impacts. A mechanical or electrical malfunction of the unit could be the result.
- Should any problems or questions occur during installation, please consult your ZENEC dealer/importer.
FRONT PANEL BUTTONS
Front Panel


FRONT PANEL BUTTONS
1. INTERNAL MICROPHONE
2. POWER/MUTE
Press to switch device ON. Press and hold to switch device OFF. Short press to mute/unmute.
3. IR RECEIVER
4. NAVI-MAP & UPDATE SLOT
Separate Micro-SD slot (for software updates & navi files).
5. USB AND SD-CARD SLOT, RESET
Open the hatch to access the two slots and the RESET button. Press to initiate a hardware reset.
6. NAV
Short press to start navigation. Press and hold to adjust the TFT-screen brightness.
7. VOLUME/EQUALIZER
Rotate to increase/decrease volume. Press to open Equalizer page.
8. HOME
Press to open main menu.
BASIC OPERATION
POWER ON/OFF
Correctly installed, your device will power on together with the ignition. Ignition off: Device does not receive power. When the ignition is activated, you may also switch the device On and Off using the front panel power button.
SELECT A SOURCE
Enter main menu:
- Via Touchscreen:
Touch the icon in the upper left corner of the screen.
- Via "HOME" button:
Push "HOME" button to enter main menu.
Operation at main menu:
The main menu consists of three pages: Two main pages and one M-Zone page.
There are two basic ways to get there:
- Slide You can slide the three pages back and forth.
Just slide your fingertip onscreen in the respective direction.
- Bar Tap on any of the three markers on top of the screen to navigate through the main menu pages. M-Zone included.
Entering the main menu you have access to all playback sources and settings.
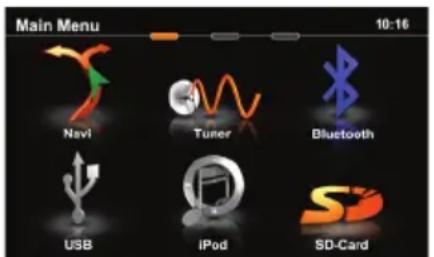
Main menu 1

Main menu 2
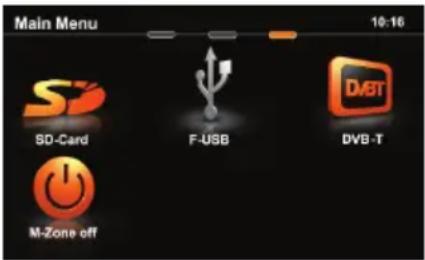
M-Zone page
Tap center header button or slide to second main menu page. Choose SETUP > LANGUAGE and adjust to your likings. You might want to adjust some other basic settings. See chapter "Setup".

BASIC OPERATION
Basic elements (all playback sources)

Display & control elements:
① Indicates current source
- Tap to enter main menu
② Connected cellphone battery status.
③ Cellphone reception fi eld strength
RADIO MODE


Display elements:
① Red line marks current frequency
② Frequency or station name
③ Traffic c announcement status
④ Traffi c announcements on carrier
⑤ LOC/DX status
⑥ Stereo reception status
Control elements:
① Scroll left
② Previous station
3 Tap to select center display content
④ Next station
⑤ Scroll right
6 100 kHz down
⑦ Drag to adjust frequency
8 100 kHz up
RADIO MODE

RDS text allows a radio station to transmit free-form textual information that can be either static e.g. station slogans or in sync with the programming such as the title and artist of the currently playing song or even short ads. Availability depends on region, reception quality and carrier.
RADIO MODE

Select preset or save a preset. Press and hold a center button to set a new frequency as preset.

To select a radioband tap on a center button.

DIO MODE
Lower bar options:
The selected item is highlighted in orange onscreen:
AF ON/OFF: When activated, AF function automatically switches to an alternative frequency (AF) of your chosen station, in order to always offer the best possible reception quality.
TA ON/OFF: When activated, the radio temporarily switches, for the duration of the traffic announcement, to tuner mode.
AS Searches for the six strongest stations and saves them as preset.
SCAN Intro-scan of all stations in reception range. You can hear each station for a short moment. Lock to the one you like by pressing scan again.
REG ON/OFF: At certain daytimes some stations divide their program into regional subprograms. The REG function prevents your receiver from switching to an alternative frequency with different content.
LOC Touch LOC/DX to omit or allow reception of stations with weak signals. /DX If LOC is activated it will exclusively find strong stations.
NOTE:
This unit features an RDS tuner. RDS is a system which transmits data on top of the FM radio signal. Availability and content of the RDS data depend on the respective broadcast station and its signal strength. RDS does, for example, transmit alternative frequencies, which allow for frequency changes without user interaction. AM band doesn't support RDS functions.
■ You need to have the AF function activated in order to use the RDS feature. However, the AF function is deactivated ex factory. We recommend to activate it directly after mounting/installation of your device.
Playback page:
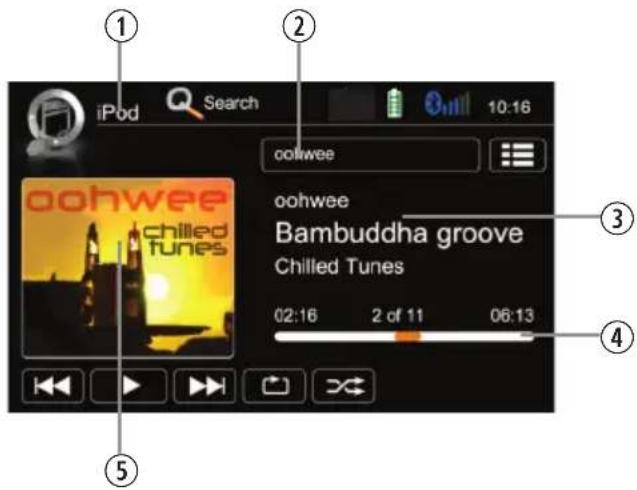
Display elements:
① Source
② Current folder/playlist
③ ID3 tag info
④ Progress bar
⑤ Album Art
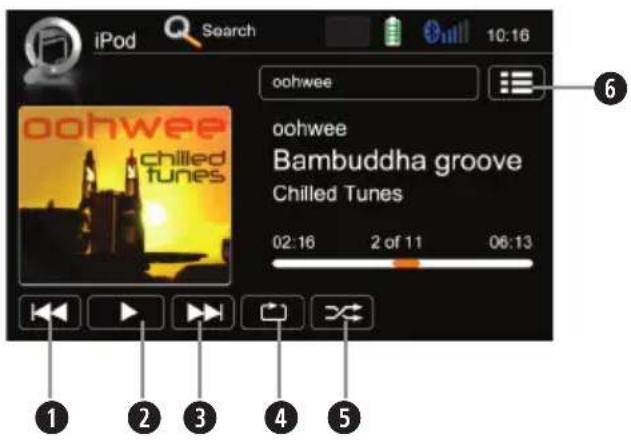
Control elements:
① Previous track
② Play/Pause
③ Next track
4 Repeat
⑤ Shuffle
6 Switch to playlist page
PLAYBACK
IPOD/USB/SD
Playlist page iPod:
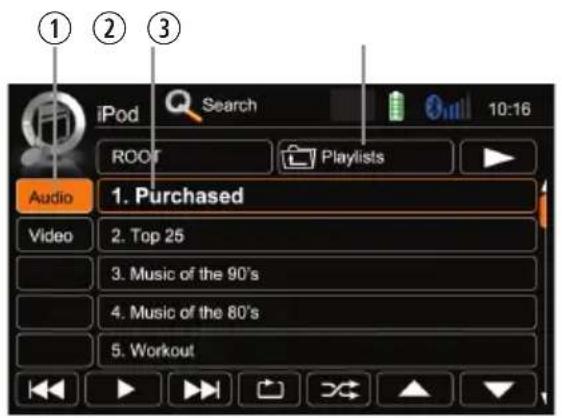
Display elements:
① i-Pod mode
② Track/folder/playlist
③ Current folder

Control elements:
① Previous track
② Play/Pause
③ Next track
4 Repeat
⑤ Shuffle
⑥ Cursor up
⑦ Cursor down
8 Switch to playback page
9 Switch to iPod audio mode
10 Switch to iPod video mode
11 Go to root directory
⑫ Search
13 Folder/playlist up
NOTE:
All fi les on the inserted media get sorted according to their fi le extension.
■ Types can be separately played/handled.
■ Directories containing a single file type only, are also displayed.
Playlist page USB/SD:

Display elements:
① Track/folder
② Current folder
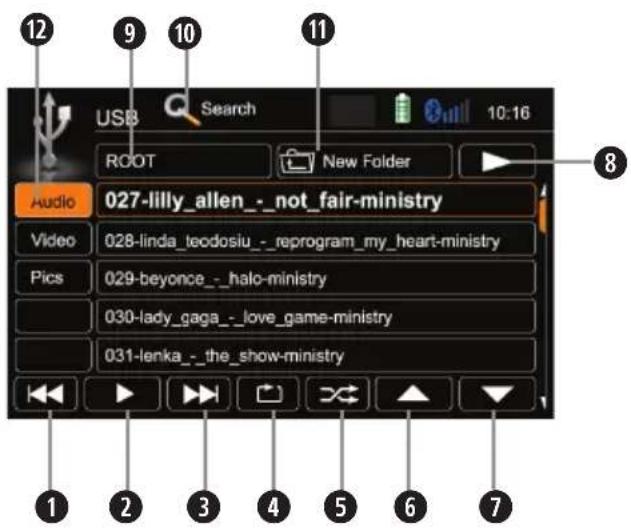
Control elements:
① Previous track
② Play/Pause
③ Next track
④ Repeat track
⑤ Shuffle
⑥ Cursor up
⑦ Cursor down
8 Switch to playback page
⑨ Go to root directory
10 Search
11 Folder up
12 Select media fi le type
Search function:

iPod search:
Tapping on 📄 Search pops up an alphabetic keyboard, allowing you to enter an initial letter. Alphabetical search is unique for iPod mode.

USB/SD modi search:
Tapping on 🔒 Search pops up an numeric keyboard, allowing you to enter track numbers. Numeric search is unique for USB/SD modi.
Elements to control playback of video files:

Display elements:
① Current temporal position in track
② Total duration of track
Elements to control playback of video and picture fi les:

Control elements:
① Previous title/track/file
② Play/Pause
③ Next title/track/file
4 To playlist/menu
5 Full screen mode

PLAYBACK
IPOD/USB/SD
USB/SD mode:
■ Make sure your mass storage device is FAT32 formatted.
■ Depending on directory structure and contents the total number of available folders is limited.
■ Sorting and handling speed depends on speed and capacity of the mass storage used, as well as on the amount of stored data.
■ Connected USB hard disks have to be formatted with FAT32 and are only allowed to consume a maximum of 400mA (peak) current. Otherwise they must be considered incompatible and can't be used with the device.
■ The display of album covers depends on the used file format and may be served delayed, depending on the file size.
iPod mode:
The device sports two USB ports. One port is located at the front panel and the other at the rearside. They are generic USB ports which both allow connection to USB data carriers as well as to iPod/iPhone. However, you cannot connect two iPod/iPhone devices simultaneously.
■ Depending on the size of the search list, results may be delayed during first search. That is due to the iPod, which takes a moment to setup and provide the search index.
■ iPods/iPhones display, depending on content and sorting, an extended set of information on the playlist page.
NOTE:
See www.zenec.com for:
■ Compatible fi le formats and their possible restrictions.
■ iPod/iPhone compatibility list.
BLUETOOTH MODE
Bluetooth main menu:
Tap icon to enter
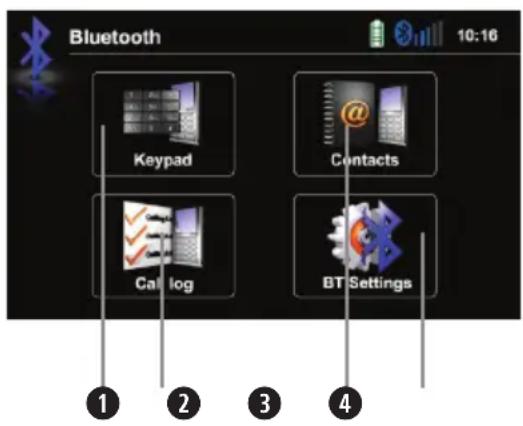
Control elements:
① Onscreen keypad
② Call Log
3 Contacts
4 Bluetooth settings
NOTE:
If you are trying to pair a cell phone:
■ Switch off the "auto connect" function while pairing additional mobile phones with the device.
■ You may try to initiate pairing from your phone if the following procedure fails.
BLUETOOTH MODE
Accept call, dial, hang up, switch between calls:

Display elements:
① First incoming call
② Second incoming call
③ Dialled number

Control elements:
① Keypad
② Deletes last digit
③ Pick up call/Switch to second call
④ Toggle to shift call between handsfree and mobile phone (privacy mode)
⑤ Hang up active call/Back to first call
6 Back to BT main menu
BLUETOOTH MODE
Pairing a mobile phone:
1 Enter BT settings > Device
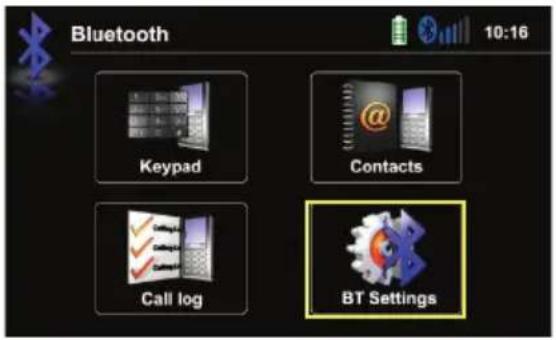
2 Tap on "Add" to trigger a search for BT devices.
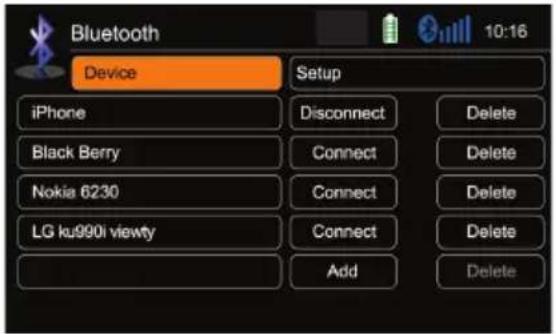
3 Choose your mobile phone from the list or retry searching. Press "Pair".
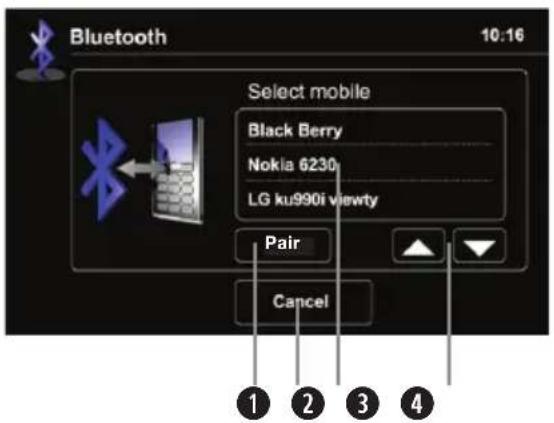
Control elements:
① Pair a mobile phone and input PIN for pairing
② Back to BT settings
③ Tap to select mobile phone
4 Browse list (up/down)
BLUETOOTH MODE
4 Enter pin code and tap OK or retry.

① Pin code
② Deletes the last digit
③ Acknowledge pincode and continue
5 Upon request enter identical pin code on your mobile and acknowledge. You should now get a screen saying "Device paired successfully".
NOTE:
If you are trying to pair more than one cell phone:
■ Switch off the "auto connect" function while pairing additional mobile phones with the device.
■ Use different pin code twins for each paired cell phone.
BLUETOOTH MODE
Contacts - Manage phonebook:

Control elements:
① Back to BT main menu
② Tap a contact number to start a call
③ Search
4 Choose contact name from list
⑤ Browse contact list up/down
Search for an entry:

① No function, when keypad is active
② Quit keypad
③ Display input
4 Tap to delete last character
⑤ Switch to next page of keypad
NOTE:
■ You may search for up to 15 leading characters.
BLUETOOTH MODE
Manage phonebook:

Control elements:
① Go back to BT main menu
② Go to contacts page
③ Tap to display outgoing call list
④ Tap to display incoming call list
⑤ Tap to display missed call list
⑥ Tap on entry to call
⑦ Page up/down
NOTE:
■ The synchronisation, the transferring, the sorting as well as the display of the phone book entries depend on the mobile phone brand and model. If the synchronisation doesn't work properly, disconnect the cell phone and repeat the pairing process.
If automatic phone book synchronisation does not work, consult the manual of your mobile phone. Some mobile phones require explicit activation of that function.
■ After entering the BT main menu press & hold either the Contacts or Call-Log icon in order to force a resync of the entire phone book (if you have experienced syncing problems).
BLUETOOTH MODE
Setup settings:

① Back to BT main menu
② Options
③ BT device settings
4 Microphone selection
⑤ Tap +/- to adjust microphone gain
NOTE:
If your mobile phone is compatible and still does not appear in the device list, make sure Bluetooth is turned on and set to "visible for all devices".
■ Bluetooth connections usually work within a range of approx. 8 m. Obstacles in the way may shorten the distance.
■ You can pair up to five cell phones, and synchronise up to a thousand phonebook contacts each.
In order to use the built-in handsfree device you need to pair your mobile phone first.
It cannot be guaranteed, that all mobile phones can be paired and that all functions will work.
For the "BT compatibility list" of tested and compatible mobile phones as well as the latest software updates look out on www.zenec.com.
NAVIGATION MODE
How to input a destination and start a route guidance:

Tap on "Find".

Choose your preferred destination search method. Here, in our example, choose "Find address".

Type in a city, street name, house number and confirm each step by tapping OK.
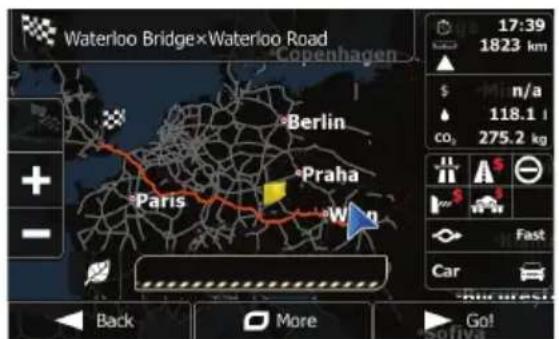
The program is now calculating the desired route. Once route calculation has completed just tap "GO!" to start route guidance.
NOTE:
■ For operation and detailed description of navigation features, please refer to the included, separate navigation manual.
■ You may listen to any playback source during navigating.
The navigation software automatically manages volume levels during voice guidance.
If you change the volume level during voice guidance, the chosen volume level gets stored for later route guidance.
■ Audio playback is, during voice guidance, capped to volume 10. If the preset audio volume is below 10, it will be muted.
SETUP: MAIN / FIRST SETTINGS
Main setup screen:
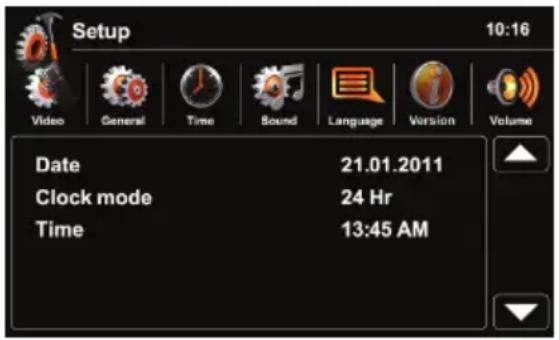
Choose submenu:
Select and tap one of the icons in the upper row.
Settings to be made directly after mounting and initial startup:
Set OSD language: Go to Setup>Language
to choose the desired OSD language.
Set button background illumination: Go to Setup>General>Illumination and select the desired color.
Set date and time:
Go to Setup>Time.
Tap ▲ to adjust date and time.
SETUP: VIDEO
| Name Descriptor Function Choice/Range | |||
| Aspect ratio | Video display setting | TV-Shape | Normal |
| Full | |||
| A/V-In | PAL/NTSC adjustment | TV system setting for A/V-In | Auto |
| NTSC | |||
| PAL | |||
| Rear view camera | Signal will be internally mirrored | Picture mirroring | Normal |
| Mirror | |||
SETUP: GENERAL
| Name Descriptor Function | Choice/Range | ||
| Radio region S | Select area | Presets search frequency | Europe |
| Asia | |||
| USA | |||
| Dimmer-Mode | TFT brightness | Stepwise | Night |
| Dark | |||
| Normal | |||
| Bright | |||
| Illumination | Key illumination | Choose between different colors | Red |
| White | |||
| Beep | Beep to acknowledge | Beep on touch | On |
| Off | |||
| Wallpaper Preset only Select presets Various | |||
| Anti-theft | Anti-theft function | De- or activate code input | On |
| Off | |||
| Password Code input Password | Standard-code"000000" Use an arbitrary 6-digit code. To reset the code enter the "standard-code" instead. | ||
| Calibration | Screen calibration | Set points Start | |
| Load factory Ex-factory Defaults set Reset | |||
SETUP: TIME
| Name Descriptor Function Choice/Range | |||
| Date YYYY/MM/DD Sets date As usual | |||
| Clock mode Time format Set time display | 12 H | ||
| 24 H | |||
| Time Time display Set time As usual | |||
SETUP: SOUND
| Name Descriptor Function | Choice/Range | ||
| Subwoofer | Subwoofer output | De- or activate subwoofer output | On |
| Off | |||
| Subwoofer fi Iter | Subwoofer output | Sets low-pass fi Iter frequency | 80 Hz |
| 120 Hz | |||
| 160 Hz | |||
| Loudness | Spectral adaption | Spectral adaption the acoustic range of the ear | On |
| Off | |||
SETUP: LANGUAGE
| Name Descriptor Function Choice/Range | |||
| OSD | OSD language | Selection of the OSD language | English |
| German | |||
| French | |||
| Italian | |||
| Turkish | |||
| Dutch | |||
| Spanish | |||
| Czech | |||
| Serbian | |||
| Polish | |||
SETUP: VERSION
| Name Descriptor Function Choice/Range | |||
| Version | Installed soft-ware versions | Display the in-stalled software versions | OS |
| MPU | |||
| MCU | |||
| MPEG | |||
SETUP: VOLUME
| Name Descriptor Function Choice/Range | |||
| Volume | Level adjustment of sources | USB 0...12 | |
| SD-Card 0...12 | |||
| Radio 0...12 | |||
| Bluetooth 0...12 | |||
| AV-In 0...12 | |||
| DVB-T 0...12 | |||
| Navigation 0...12 | |||
| iPod 0...12 | |||
REMOTE CONTROL
Remote Control Buttons


REMOTE CONTROL
1 POWER
Device ON/OFF
2 SRC
Toggle main menu, selected source
3 VOL +
Increase volume
4 VOL -
Decrease volume
5 SETUP
Toggle setup menu,selected source
6 MENU
Toggle playlist, playback
7 DISP
Press and hold to switch TFT into standby
8 STOP
Stop/Pause playback
9 WIDE
N/A
10 MUSIC
List music files only
11 PIC
TFT screen brightness
12 BAND
Tuner mode, next radio band
13 GOTO
Input and go to time index
14 PICK UP HANDSET
Accept incoming call
15 NAV
Switch between navigation and playback mode
16 NUMERIC KEYPAD
Input track/title/time index
17 BT
Bluetooth main menu
18 FM/AM
Tuner mode, next radio band
19 RPT
Repeat track/title/folder
20 EQ
Open Equalizer
21 MUTE
Mute/Un-mute audio output
22 DIRECTIONAL PAD
Press to pause the playback Cursor keys
23 FRONT REMOTE
Front operation mode
24 REAR REMOTE
M-Zone operation mode
25 PHOTO
List photo files only
26 VIDEO
List video files only
27 SKIP PREVIOUS
Jump to previous track/preset/title
28 SKIP NEXT
Jump to next track/preset/title
29 CLEAR
Clear input
30 HANG UP HANDSET
Hang up or deny an incoming call
NOTE:
■ Some functions may not be available; depending on your chosen mode and type of media.
EXTERNAL PLAYBACK & SOURCES
M-Zone


flowchart
graph TD
    A["Main Menu"] --> B["1"]
    B --> C["SD-Card"]
    B --> D["F-USB"]
    B --> E["DVB-T"]
    C --> F["M-Zone off"]
    D --> G["4"]
    E --> H["3"]
    F --> I["5"]
    G --> J["2"]
    H --> K["10:16"]
Control elements:
① Direct access to M-Zone
M-Zone setup allows you to issue different content to the front and head rest monitors (optional).
Control elements:
① Direct access to main menu
② Choose DVB-T
③ Choose Front-USB
4 Choose SD-Card
⑤ Deactivate M-Zone signal
NOTE:
■ With deactivated M-Zone you will not see any signal on connected M-Zone monitors (Blackscreen).
■ The M-Zone volume cannot be adjusted by the headunit. Use the control elements of the connected peripherals (i.e. roof monitor) instead to adjust the volume.
EXTERNAL PLAYBACK & SOURCES
DVB-T
1
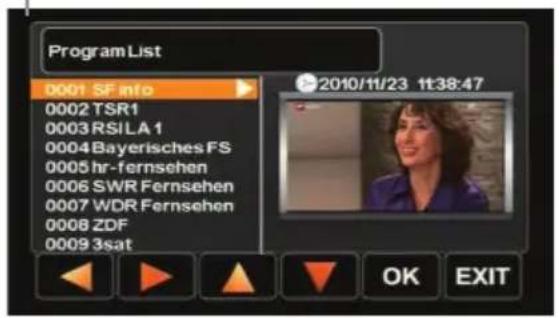
① Tap into the upper right corner to return to the main menu.
NOTE:
■ For DVB-T reception you need to connect an external ZENEC DVB-T receiver. For a perfect compatibility match check out the manual and the compatibility list in advance.
■ Compatible DVB-T devices provide easy operation by using the touchscreen of the headunit.
GLOSSARY
AUX In Auxiliary Input, Audio only Input
A/V In Audio-Video Input
CAN-Bus Controller Area Network-Bus; Automotive industrial standard bus system
CAN/Stalk IF Interface to communicate with CAN-Bus
DVB-T Digital Video Broadcasting – Terrestrial; TV transmission standard
EQ Equalizer
FAT32 File allocation table 32-bit
GUI Graphical User Interface
HMI Human Machine Interface (graphical part = GUI)
ID3-Tag Format to display additional info together with MP3 audio files
M-Zone Rear seat entertainment area
OSD On Screen Display
TROUBLESHOOTING
| Problem Cause Solution | ||
| GENERAL | ||
| Unit will not power on. | Radio fuse blown. Install new fuse with correct rating. | |
| Car battery fuse blown. Install new fuse with correct rating. | ||
| Illegal operation. Press the RESET button. | ||
| No/low audio output. | Improper audio output connection. Check wiring and correct. | |
| Volume set too low. Increase volume level. | ||
| Speakers damaged. Replace speakers. | ||
| Only one channel is playing. | Check the balance and fader adjustments. | |
| Speaker wiring is in contact with metal part of car. | Insulate all speaker wiring connections or replace the speaker cable. | |
| Mute is activated. Turn off the Mute function. | ||
| Speaker impedance rating not compatible with unit. | Connect proper speakers. | |
| Speaker is shorted. Check speaker connections. | ||
| TFT MONITOR | ||
| No image. | The parking brake is not engaged. | Stop vehicle in a safe place and apply parking brake. |
| The parking wire was wrong or not connected. | Please connect the parking wire correctly. | |
| The "Monitor off"-function is activated. | Touch the monitor to activate the display. | |
| Prolonged image or improper height/width ratio. | Improper aspect ratio setup. Use correct aspect ratio setting. | |
| TUNER | ||
| Weak station searching. | Auto antenna not properly connected. | Connect the auto antenna cable properly. |
| REG function is activated. Turn REG function off. | ||
| The adapter with antenna power supply is not connected. | Connect the antenna power supply adapter properly. | |
| The AF function is not activated. Activate the AF function. | ||
| MP3 | ||
| The ID3 tags are shown incorrectly. | Message is longer than LCD can display or ID3 tag is not compatible. | Use proper ID3 tag information. |
SPECIFICATIONS ZE-NC526
2-DIN NAVICEIVER:
• 3D High-Definition navigation system
• TMC and TMC Pro receiver
- External GPS antenna
- 8 GB microSD card with map data for 43 Eastern and Western European countries and Premium POI database
• Graphical user interface and voice guidance in 28 different languages
- 2D or 3D map view with auto-zoom and display of 3D terrains and 3D landmarks
- Eco and Smart Route Planning, Outlook address import, Real Junction View and Real Signpost rendering etc.
• Text to Speech function
PARROT BLUETOOTH HANDS-FREE MODULE
- Synchronization of up to 1'000 contacts with max. 5 telephone numbers per contact
- Alphabetical search function for contacts
- Internal and external microphone
• Future-proof upgradable Bluetooth firmware
MULTIMEDIA PLAYER
- Front and rear USB 2.0 port
• SD/SDHC card reader (up to 32 GB)
• Made for iPod/Made for iPhone - Playback SD/USB: MP3, WMA, AVI, Xvid and JPEG
GENERAL FEATURES
- Intuitive, user friendly HMI in 10 different languages
- 6.2"/15.7 cm 16:9 HD TFT-LCD display with 800x480 pixel resolution and touchscreen control
- RDS tuner with 30 preset stations (18 FM/12 AM)
- Multi zone function
- 4 x 50 watts class-D amplifier
• Bicolor key illumination (red/white) - 1 x IR-remote control
A/V-CONNECTIONS
• 4.1-CH preamp line outputs
• 2-CH preamp line outputs without volume adjustment
• 2 x composite video outputs (NTSC)
- 1 x A/V-input
- 1 x video input for rear view camera with switching function
- Connectivity for compatible external DVB-T or DAB+ receivers

NOTE: SPECIFICATIONS AND DESIGNS OF THIS MODEL ARE NECESSARILY SUBJECT TO CHANGE WITHOUT NOTICE.
ÜBER DIESES HANDBUCH

ASTEN DES BEDIENTEILS
1. INTERNES MIKROFON
2. POWER/STUMMSCHALTEN
Anzeigeelemente:
Bedienelemente:
iPod Suche:
Anzeigeelemente:
Bedienelemente:
Bedienelemente:
Thank you for purchasing this ZENEC product. It is advisable to keep the original packaging material for any future transporting of the product. Should your ZENEC product require warranty service, please return it to the retailer from whom it was purchased or the distributor in your country. This ZENEC product is warranted against defective materials or workmanship for a period of TWO years from date of purchase at retail to the original purchaser.
WARRANTY LIMITATIONS
This warranty does not cover any damage due to:
- Improper installation, incorrect audio or mains connection(s).
- Exposure to excessive humidity, fluids, heat sun rays or excessive dirt or dust.
- Accidents or abuse, unauthorized repair attempts and modifications not explicitly authorized by the manufacturer.
This warranty is limited to the repair or the replacement of the defective product at the manufacturer's option and does not include any other form of damage, whether incidental, consequential or otherwise. The warranty does not cover any transport costs or damages caused by transport or shipment of the product. Warranty work will not be carried out unless this warranty certificate is presented fully completed with model, serial number, purchaser's address, purchasing date and dealer stamp together with the original sales slip!
2 JAHRE GARANTIE
Date of purchase: ....
Your name: ....
Your address: ....
City:
State: ZIP or postal code:
Country:
Dealer's address & stamp



03 2201
The packing material of this item and the finished product contained inside are fully compliant with RoHS directive. Halogenated flame retardants are not used in any of the plastic injection parts of the product, nor for the printed circuit boards.
This item incorporates copy protection technology that is protected by U.S. patents and other intellectual party rights of Rovi corporation. Reverse engineering and disassembly are prohibited.
The Bluetooth word mark and logos are owned by the Bluetooth SIG, Inc. and any use of such marks by Parrot S.A. is under license. Other trademarks and trade names are those of their respective owners.
All Rights reserved. The Parrot trademarks appearing on this giftbox artwork are the sole and exclusive property of Parrot S.A. All the others trademarks are the property of their respective owners and are used under license by Parrot S.A.
"Made for iPod" and "Made for iPhone" mean that an electronic product has been designed to connect specifically to iPod or iPhone, respectively, and has been certified by the developer to meet Apple performance standards. Apple is not responsible for the operation of this device or its compliance with safety and regulatory standards. Please note that the use of this product with iPod or iPhone may affect wireless performance.

- ABOUT THIS INSTRUCTION MANUAL
- CONTENTS
- SAFETY INSTRUCTIONS
- FRONT PANEL BUTTONS
- INTERNAL MICROPHONE
- POWER/MUTE
- IR RECEIVER
- NAVI-MAP & UPDATE SLOT
- USB AND SD-CARD SLOT, RESET
- NAV
- VOLUME/EQUALIZER
- HOME
- BASIC OPERATION
- POWER ON/OFF
- SELECT A SOURCE
- RADIO MODE
- Display elements:
- Control elements:
- DIO MODE
- Lower bar options:
- NOTE:
- PLAYBACK
- IPOD/USB/SD
- USB/SD mode:
- iPod mode:
- BLUETOOTH MODE
- Enter BT settings > Device
- Tap on "Add" to trigger a search for BT devices.
- Choose your mobile phone from the list or retry searching. Press "Pair".
- Enter pin code and tap OK or retry.
- Upon request enter identical pin code on your mobile and acknowledge. You should now get a screen saying "Device paired successfully".
- NAVIGATION MODE
- SETUP: MAIN / FIRST SETTINGS
- SETUP: VIDEO
- SETUP: GENERAL
- SETUP: TIME
- SETUP: SOUND
- SETUP: VERSION
- SETUP: VOLUME
- REMOTE CONTROL
- POWER
- SRC
- VOL +
- VOL -
- SETUP
- MENU
- DISP
- STOP
- WIDE
- MUSIC
- PIC
- BAND
- GOTO
- PICK UP HANDSET
- NAV
- NUMERIC KEYPAD
- BT
- FM/AM
- RPT
- EQ
- MUTE
- DIRECTIONAL PAD
- FRONT REMOTE
- REAR REMOTE
- PHOTO
- VIDEO
- SKIP PREVIOUS
- SKIP NEXT
- CLEAR
- HANG UP HANDSET
- EXTERNAL PLAYBACK & SOURCES
- DVB-T
- GLOSSARY
- SPECIFICATIONS ZE-NC526
- 2-DIN NAVICEIVER:
- PARROT BLUETOOTH HANDS-FREE MODULE
- MULTIMEDIA PLAYER
- GENERAL FEATURES
- A/V-CONNECTIONS
- ÜBER DIESES HANDBUCH
- ASTEN DES BEDIENTEILS
- INTERNES MIKROFON
- POWER/STUMMSCHALTEN
- Anzeigeelemente:
- Bedienelemente:
- WARRANTY LIMITATIONS
- JAHRE GARANTIE
Brand : ZENEC
Model : ZE-NC526
Category : Gps