
CORE Z-E1010-NAV - Gps ZENEC - Free user manual and instructions
Find the device manual for free CORE Z-E1010-NAV ZENEC in PDF.


| Product Type | Car infotainment system with GPS navigation |
| Model | ZENEC CORE Z-E1010-NAV |
| Display | 10.1-inch touchscreen TFT LCD |
| Operating System | Android 7.1.2 |
| Power Supply | 12V DC (on-board voltage) |
| Dimensions | Approx. 178 x 100 x 160 mm (2 DIN chassis) |
| Weight | Approx. 1.5 kg |
| Navigation | GPS navigation with microSD card, 36-month free map updates |
| Radio Tuner | FM RDS and DAB+ digital radio |
| Bluetooth | Hands-free calling and audio streaming (A2DP) |
| Media Playback | USB, HDMI, AV/IN, BT-Audio, SmartLink, WebLink |
| Rear View Camera | Supports ZENEC and OE cameras, with adjustable grid lines |
| Optical Parking System | OPS display compatible with vehicle sensors |
| SmartLink Direct | Smartphone integration with Drive Mode |
| RealDash | Virtual dashboard with OBD II support |
| Steering Wheel Controls | Compatible with multifunction steering wheel (SWC) |
| Audio Settings | 3-band equalizer, subwoofer control, fader/balance |
| Security | Anti-theft password protection |
| Software Updates | Free via USB from zenec.com (except navigation) |
| Installation | Professional installation recommended; ISO connectors |
| Cleaning | Soft dry cloth; no solvents |
| Spare Parts & Repairability | Contact authorized ZENEC dealer; no user-serviceable parts |
Frequently Asked Questions - CORE Z-E1010-NAV ZENEC
User questions about CORE Z-E1010-NAV ZENEC
0 question about this device. Answer the ones you know or ask your own.
Ask a new question about this device
Download the instructions for your Gps in PDF format for free! Find your manual CORE Z-E1010-NAV - ZENEC and take your electronic device back in hand. On this page are published all the documents necessary for the use of your device. CORE Z-E1010-NAV by ZENEC.
USER MANUAL CORE Z-E1010-NAV ZENEC
natural_image
Abstract geometric design with red and pink overlapping parallelograms and a blurred central image (no text or symbols)E>GO
CORE
INFOTAINER
USER MANUAL
EN
Device user manual for ZENEC media system
We are delighted that you have chosen a product from ZENEC.
Please read this operating manual before you start your new ZENEC system. In this device user manual you will find important instructions and information for the safe operation of the ZENEC system, and to help you make the most of its technical advantages.
All the information in this manual corresponds to the state at the time of going to press, and applies only to ZENEC systems in original condition. On account of possible updates to device software, the illustrations and features shown in this operating manual may be different from your ZENEC system. Differences in the information, illustrations or features cannot form a basis for any claims.
If you sell your vehicle with the ZENEC system still fitted, please ensure that this operating manual stays with the vehicle, and that any personal data like a phonebook stored in the device is deleted.
CONTENTS
| SAFETY INSTRUCTIONS | 04 |
| TURN DEVICE ON AND OFF | 05 |
| ANTI-THEFT PROTECTION | 05 |
| MULTIFUNCTION STEERING WHEEL CONTROLS | 06 |
| E>GO CORE (FRONT PANEL) | 07 |
| MAIN MENU STRUCTURE | 08 |
| MAIN MENU ICONS | 09 |
| MEDIA AUDIO SOURCES | 10 |
| INPUT SOURCES | 11 |
| STATUS BAR | 12 |
| SEARCH AND INPUT FUNCTION | 13 |
| FM RADIO | 14 |
| FM BAR GRAPH MODE | 15 |
| MANUAL FM STATION SEARCH | 16 |
| FM SETUP | 17 |
| FM STATIONS-PRESETS | 18 |
| DAB+ RADIO | 19 |
| DAB+ ENSEMBLE AND STATION LIST | 20 |
| DAB+ SETUP | 21 |
| DAB+ STATIONS-PRESETS | 22 |
| USB / BT A2DP / MEDIA | 23 |
| USB / BT A2DP / MEDIA CONTROL AND OPERATION BAR | 24 |
| BT-MUSIC (A2DP) | 25 |
| PLAYLIST (AUDIO) | 26 |
| SMART PLAYLIST (AUDIO) | 27 |
| FAV PLAYLIST (AUDIO) | 28 |
| VIDEO MEDIA: HARDDISK | 29 |
| PLAYLIST (VIDEO) | 30 |
| HDMI / AV/IN | 31 |
| CAMERA: ZENEC TYPE (NON OE REAR VIEW CAM SYSTEM) | 32 |
| CAMERA GRID-LINES: ZENEC TYPE | 33 |
| CAMERA: OE REAR VIEW CAM | 34 |
| OPTICAL PARKING SYSTEM (OPS) | 35 |
| WEBLINK | 36 |
| SMARTLINK DIRECT | 37 |
| SMARTLINK DIRECT CONTROL INTERFACE | 38 |
| SMARTLINK DIRECT APP LINKING | 39 |
| REAL DASH | 40 |
| BLUETOOTH (HANDS-FREE SYSTEM) | 41 |
| CONTROL AND OPERATION BAR (RIGHT) | 42 |
| DEVICE MANAGER | 43 |
| PAIRING | 44 |
| BLUETOOTH SETUP | 45 |
| BLUETOOTH STATUS BAR | 45 |
| ACCEPTING/ENDING INCOMING CALLS (VIA DEVICE) | 46 |
| OUTGOING CALL VIA NUMERIC PAD | 46 |
| OUTGOING CALL VIA PHONEBOOK | 46 |
| BLUETOOTH MENU | 47 |
| PHONEBOOK | 48 |
| CALL LISTS | 49 |
| FAVORITES | 50 |
| NAVIGATION | 51 |
| NAVIGATION UPDATE | 51 |
| MAPS (EXAMPLES) | 52 |
| NAVIGATION START UP INSTRUCTIONS | 53-54 |
| SETUP OPERATIONS | 55 |
| DISPLAY ICON (BRIGHTNESS) | 56 |
| VAG CAR MENU | 57 |
| SETUP OF SOURCES | 58 |
| MISC SETUP | 59 |
| EASY DRIVE MODE | 60 |
| AUDIO SETUP (EQ / BAL / FAD / SUBWOOFER / LOUDNESS / PRESETS) | 61 |
| VOLUME SETUP | 62 |
| AUDIO SETUP: ADVANCED SETTINGS (NAVI-MIXER / SUBWOOFER / EQ SETTINGS) | 63 |
| TFT DISPLAY CONFIGURATIONS | 64 |
| ASSISTS (VEHICLE) SETUP | 65 |
| INPUT SETUP | 66 |
| SYSTEM SETUP | 67 |
| CLOCK & DATE SETUP | 68 |
| SOFTWARE VERSION | 69 |
| PASSWORD | 70 |
| AIR CONDITIONING (AC INFO) | 71-72 |
| INSTALLATION NOTES | 73 |
| REMOVAL WORK AND PREPARATION | 73 |
| OVERVIEW INCLUDED ACCESSORIES | 74 |
| CONNECTION DIAGRAM E>GO CORE | 75-76 |
| ABBREVIATIONS | 77 |
| STATUTORY RIGHTS AND WARRANTY | 78 |
SAFETY INSTRUCTIONS
CAUTION
If the driver of the vehicle is distracted, this may lead to an accident or injury. Operating the ZENEC system can distract attention from the general traffic situation! Equally, connecting, changing or inserting data media can distract the driver from the general traffic situation.
CAUTION
Always choose loudspeaker settings such that acoustic signals coming from outside can always be heard in the vehicle (e.g. signal horns or sirens).
CAUTION
Incorrect installation or commissioning of the ZENEC system may cause damage to the ZENEC system or to the vehicle electronics. Only let qualified specialists authorized by ZENEC install the device.
CAUTION
This ZENEC system is intended solely for operation at an on-board voltage of 12 V DC. Operating the ZENEC system at any other voltage can cause damage to the ZENEC system or to the vehicles electrical system.
CAUTION
Taking apart or modifying the ZENEC system can result in damage to the device or the vehicle. Opening the device or modification by a person not authorized by ZENEC will render warranty claims null and void.
In the event of a malfunction or defect please contact an authorized ZENEC dealer. Unauthorized repairs will void any warranty claim.
CAUTION
The connection and charging leads of external mobile devices can get in the way of the driver. Please run these so that the driver's freedom of movement is not hindered.
CAUTION
Route recommendations and displayed traffic signs on the ZENEC system may differ from the real situation. Real traffic signs and traffic regulations have precedence over route recommendations and indications of the ZENEC system.
Speed data displayed in the navigation system corresponds to the permitted speed limit. Please adjust your speed and driving behavior to the prevailing visibility, weather, road, and traffic conditions.
TURN ON / OFF
Manual ON / OFF
Press and hold the sensor button (fig. S/7 ③), to turn the ZENEC system ON or OFF.
Automatic ON / OFF
E>GO CORE devices mounted in vehicles without factory installed SWC: Device will switch on with ignition (ACC) position of key*.
The device automatically switches on/off by CAN bus interface ignition signal.
Switching on the ignition will activate the ZENEC system. The boot process can take up to 30sec. This may result in some delay until the system is ready. The ZENEC system is shut down by switching off the ignition, or removing the ignition key.
ANTI-THEFT PROTECTION
The ZENEC system is equipped with an anti-theft protection function. If this is active, on restarting the ZENEC system after interruption of the power supply you will be asked to enter your password.
To change the password:
Device User Manual → Setup → Password
NOTE
Keep your password safe. If the password is lost the ZENEC system must be uninstalled, and sent back in to ZENEC Service to unblock the anti-theft protection. The unblocking service is not free of charge!

See detailed information at page 70
MULTIFUNCTION STEERING WHEEL
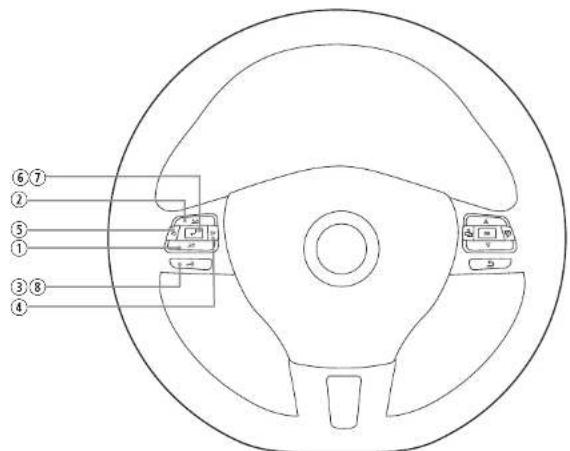
| Item Icon Function | ||
| 1 | Reduce volume | |
| 2 | Increase volume | |
| 3 | Mute | |
| 4 | Radio source Press to choose the next radio station. | |
| Media source Press to choose the next track/title.Press and hold to fast forward. | ||
| 5 | Radio source Press to choose the previous radio station. | |
| Media source Press to choose the previous next track/title.Press and hold to fast rewind. | ||
| 6 | Accept call | |
| 7 | Reject / End call | |
| 8 | Voice (not supported) | |
FRONT PANEL
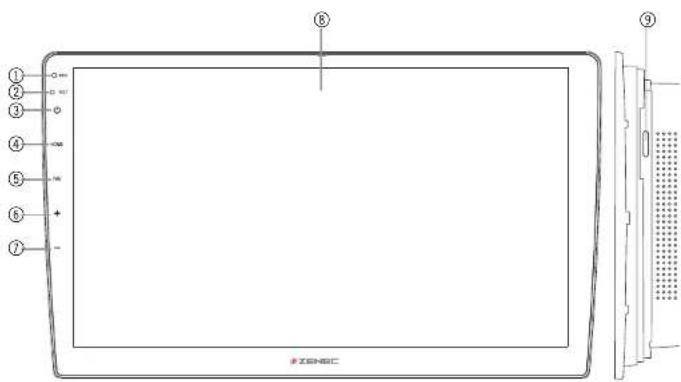
Device Front Panel Control Options
| Item | Icon Function | |
| 1 | ○ MIC | Internal microphone |
| 2 | ○ RST | Hole in the panel for reset pin |
| 3 | Press and hold to turn device ON or OFFTap to mute/- unmute device | |
| 4 | HOME | Tap to jump back to main menuPress and hold jump to audio settings |
| 5 | FAV | Tap to select preferred content or execute a functionInside navigation source: Long press open Quick-Media-ControlBarPress and hold to jump to audio settings |
| 6 | + | Tap and / or hold to increase the volume |
| 7 | - | Tap and / or hold to decrease the volume |
| 8 | Touchscreen display | |
| 9 | microSD card slot on the underside of the device for GPS navigation software behind „MAP“ cover | |
MAIN MENU STRUCTURE

Main menu with 8 Icons
Display - touch sensitive operation Bedienung
| Function Icon Operation | ||
| Slide | Swipe to navigate in the main menu by sliding page to the left or right | |
| Move |  | Press and hold to move an icon into the desired position |
MAIN MENU ICONS

You can navigate through main menu pages by swiping or tapping on the orange page markers in the bottom area of each page.
| Function Icon Operation | ||
| Navi |  | Tap to open navigation App |
| Bluetooth |  | Tap to open the Bluetooth suite |
| Tuner (FM) |  | Tap to open FM radio source |
| USB |  | Tap to enter USB source |
| BT-Music |  | Tap to open BT-Music source |
| DAB+ |  | Tap to open DAB+ radio source |
MEDIA AUDIO SOURCES

You can access / enter connected internal or external sources by tapping on the main icon according to the following list.
| Function Icon Operation | ||
| USB |  | Tap to enter USB source |
| BT-Music |  | Tap to open BT-Music source |
| WebLink |  | Tap to start ZENEC WebLink |
| Tuner FM |  | Tap to open FM radio source |
| DAB+ |  | Tap to open DAB+ radio source |
| Smart Link |  | Tap to start ZENEC SmartLink |
INPUT SOURCES

To select and open external sources like HDMI, Camera, AV/IN, WebLink or SmartLink, they need to be paired or physically connected to the device.
Input Sources
| Function Icon Operation | ||
| HDMI |  | Tap to open HDMI source |
| Camera |  | Tap to enter camera source |
| WebLink |  | Tap to start ZENEC WebLink |
| Smart Link |  | Tap to start ZENEC SmartLink |
| AV/IN |  | Tap to open AV/IN source |
NOTE
Icons in the main menu remain greyed out for sources not connected to device.
STATUS BAR ("INFO BAR")
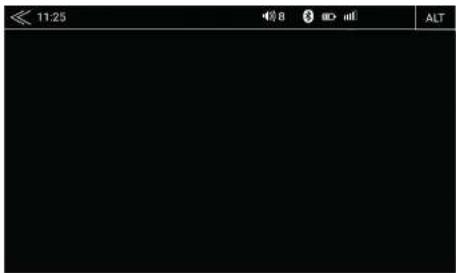
The „info bar" in the upper hand screen area shows TA, volume and time but also contains two important controls for device operation: BACK (left side) and ALT (right side).
| Function Icon Operation | ||
| Back |  | Tap to jump one level up or back |
| Clock Time |  | Display of time (no interaction possible) |
| Traffic Announcement |  | Traffic announcement of FM radio (if function is set to active) |
| Volume |  | Shows the current playback volume |
| ALT |  | Tap to select / start a previously assigned function Setup → Misc → ALT Software button |
| No DAB Signal |  | This icon indicates that no DAB signal, or no DAB antenna is connected to device. |
SEARCH AND INPUT FUNCTION

The keyboard for search and input is based on the Android OS system layout. The system language selection will automatically assign QUERTY or QWERTZ layout.
| Function Icon Operation | ||
| Search |  | Cursor and text input field |
| Delete |  | Tap to delete a number, letter or sign |
| Press and hold to delete the full string | ||
| Back |  | Tap to end the search or the input |
| Large / Small |  | Tap to select small / capital letters for entries |
| Tap twice to write all letters or numbers in capital style | ||
| List view |  | Tap to show all search results/- full list |
| Open keyboard |  | Tap to open the keyboard |
FM RADIO
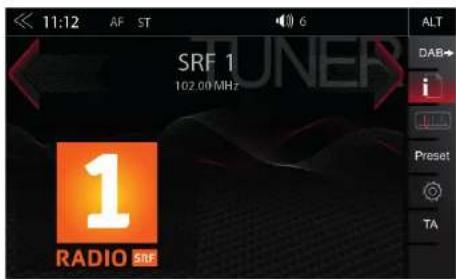
The FM RDS source menu offers a control-/operating section on the right hand side, for fast and convenient adjustments during the FM radio playback.
Center Section of Display
| Function Icon Operation | ||
| Station freq search up |  | Tap to start the auto FM station search, running up in the frequency band |
 | ||
| Station | Station name / Station frequency | |
 | ||
 | ||
| Station freq search down |  | Tap to start auto FM station search, running down in the frequency band |
 | ||
| Cover |  | Shows radio station graphics or cover picture of artist |
 | ||
| Info display area |  | Finger swiping left and right to access stored FM stations previous / next |
 | ||
Control- and Operating Section
| Function Icon Operation | ||
| Info |  | Tap to show station information |
 | ||
| Frequency Scale |  | Tap to open FM station frequency bar |
 | ||
| Preset | KKKW | Tap to show the stored FM station list |
 | ||
| Tuner Setup |  | Tuner settings |
 | ||
| TA |  | Tap to activate or de-activate the auto switching of RDS traffic announcements |
 | ||
| FM / DAB Switch |  | Tap to switch to DAB |
 | ||
FM BAR GRAPH MODE

The FM setup mode (press gear icon) allows to assign two different operation modes to both station frequency arrows: manual steps in 100kHz, or auto scan (stopping at next station). See page 18.
| Function Icon Operation | ||
| Station Frequency UP | Tap to start manual 100kHz jump, or FM station auto search up | |
| Station Frequency Input | Tap to open the frequency direct input mode keyboard | |
| Station Frequency DOWN | Tap to start manual 100kHz jump, or FM station auto search down | |
| Bar Graph Scale | Press and hold to slide the frequency pointer of the bar graph into any position. Tap to set a desired frequency value on the scale | |
14 Rev.B 15 Rev.B
MANUAL FM STATION SEARCH

When you tap to the frequency display area, the numeric input keyboard opens for a direct station frequency input.
| Function Icon Operation | ||
| Station Frequency UP |  | Tap to auto seek / manual seek up, depending on setting |
| Station Frequency | Tap to open and close station direct frequency input via keypad | |
| Station Frequency DOWN |  | Tap to auto seek / manual seek down, depending on setting |
| Scale | Radio frequency scale display | |
| Delete |  | Tap to delete a numberPress and hold to delete the full text string |
| Keypad | Direct frequency input option | |
| OK |  | Tap to confirm frequency |
FM SETUP

Here you can set important FM RDS based settings such are AF and REG.
| Function Icon Operation | ||
| AF | AF | Alternative Frequency ON / OFF |
| REG | REG | Setting to keep AF in the regional (local) station tuning mode. |
| SCAN | SCAN | Setting to choose the automatic or manual station frequency search. |
| FM antenna socket phantom power | Antenna Supply | Tap to turn ON the 8.5V or 12V phantom power supply out of the FM antenna socket on the device backside. |
| TA | TA | Tap to activate or de-activate the auto switching of RDS traffic announcements |
FM STATIONS-PRESETS

bar
| Value | |---| | 87.50 | | 90.10 | | 98.10 | | 106.10 | | 108.00 | | 87.50 |Select a previously stored FM radio station by tapping on the station preset button.
| Function Icon Operation | ||
| Previous page |  | Tap to switch to previous preset page |
| Next page |  | Tap to switch to next preset page |
| Select station / Store a station |  | Tap to select a previously stored radio station. Press and hold the station to save an actual radio station on any of the station preset buttons |
DAB+ RADIO

The DAB+ source menu offers a control-operating section on the right side of the display, allowing for simple and convenient direct adjustments of DAB+ functions in the playback menu.
| Function Icon Operation | ||
| Station up |  | Tap to jump to next stationPress and hold to jump to next Ensemble |
| Station info |  | Station Name / Ensemble name |
| Station down |  | Tap to jump to previous stationPress and hold to jump to previous Ensemble |
| Slideshow |  | Radio station artwork / artist display ("MOT Slideshow") |
| Info Display Area |  | Finger swiping left and right to switch between Preset stationsPre-Slideshow (Station list pre-show) area: Finger swipingleft and right to scroll the Station list |
| Station list back(List scrolling) |  | Press / hold to move the station list back |
| Pre-Slideshow(Station list pre-show) |  | DAB+ Station list artwork / artist pre-display, if available |
| Station list forward(List scrolling) |  | Press / hold to move the station list forward |
Control- and Operating Section
| Function Icon Operation | ||
| FM / DAB+Switch | Tap to switch to FM tuner source | |
| Info | Tap to show station information - main display | |
| List | Tap to open the station list (showing all currently receivable radio stations in the area) | |
| Preset | Preset | Tap to show the stored DAB station list |
| Setup | Tap to change settings for DAB+ functions | |
DAB+ ENSEMBLE AND STATION LIST
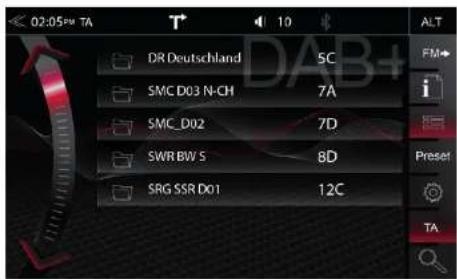
Once the first DAB+ band scan has completed, device will show all DAB+ Ensembles and radio stations of sufficient signal strength. The Ensemble list and its content is auto updated periodically.
| Function Icon | Operation | |
| Ensemble list selection | Tap to open an Ensemble, showing the assigned DAB+ radio station list | |
| List scrolling | Press and hold to move the slider of the Ensemble list up and down | |
| Back | Tap to jump one level back or up |
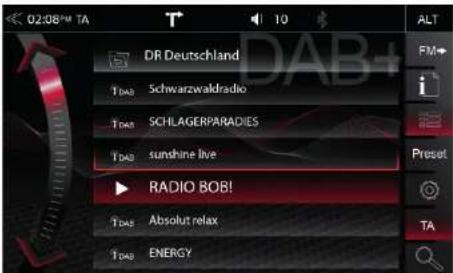
A tap on each Ensemble opens the related DAB+ station list of the respective Ensemble. The station list content follows exactly the original Ensemble display format and list sequence.
| Function Icon Operation | ||
| Radio station selection | Tap to select one particular radio station out of the list | |
| List scrolling | Press and hold to move the slider of the station list up and down | |
20 Rev.B 21 Rev.B
DAB+ SETUP

The setup page for the DAB+ tuner allows to define important functions such as DAB<>DAB and FM<>DAB station following. And also to activate the phantom power supply voltage of the DAB antenna socket.
| Function Icon Operation | ||
| DAB-DAB Following |  | Tap to turn DAB-DAB station following ON or OFF |
| FM-DAB Following |  | Tap to turn FM-DAB station following ON or OFF |
| DAB antenna socket phantom power |  | Tap to turn the 12V phantom power supply of the DAB antenna socket on the device backside ON or OFF |
| DAB Firmware |  | Displays the current DAB+ Firmware version |
DAB+ STATION-PRESETS
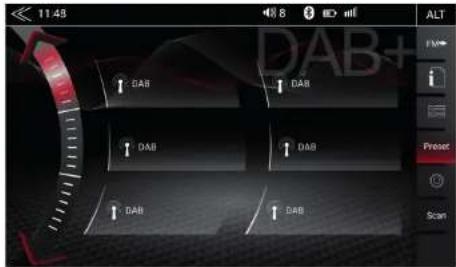
Select a previously stored DAB+ radio station by tapping on the station preset button.
| Function Icon Operation | ||
| Previous page |  | Tap to switch to previous preset page |
| Next page |  | Tap to switch to next preset page |
| Select station / Store a station |  | Tap to select a stored DAB+ station. Press and hold the station to save the actual radio station on any of the station preset buttons |
USB / BT A2DP / MEDIA

Various types of information shown in the source menu of the audio playback by (USB, BT A2DP, etc.).
| Function Icon Operation | ||
| Album Cover Art | If a cover is stored on the music media, it will be displayed. This function is not supported for BT Audio playback. | |
| Artist | Information about the artist | |
| Track | Information about the track | |
| Album | Information about the album | |
| Genre | Information about the genre or any other special infos | |
| Back | Tap to skip to the previous trackPress and hold to start fast reverse | |
| Swipe to the left to skip to the previous track | ||
| Play | Tap to play a track | |
| Pause | Tap to pause at a track | |
| Forward | Tap to skip to the next trackPress and hold to start fast forward | |
| Swipe to the right to skip to the next track | ||
| Playback Time Line | 750.38 | Tap or slide to skip within a track |
USB / BT A2DP / MEDIA CONTROL AND OPERATION BAR

The control and operation bar on the right side of the audio playback media menu continues to play lists, favorites, and external USB memory.
| Function Icon Operation | ||
| Playlist |  | Tap to display the folder and track listThis function is not supported for BT Audio playback. |
| Smart Playlist |  | Tap to add a track to own playlistThis function is not supported for BT Audio |
| Favorites |  | Tap to add a track to FAV playlistThis function is not supported for BT Audio |
| Video <-> Audio Source |  | Tap to switch between audio or video playback. This function is not supported for BT Audio |
| Shuffle |  | Tap to turn on the random play feature within the folder that is playing |
| Repeat |  | Tap to automatically repeat a track, folder or a complete music collection |
| Source |  | Tap to jump to next available source(Available sources are USB, BT-Music, WebLink, SmartLink and the Audio Setup) |
BT MUSIC (A2DP)
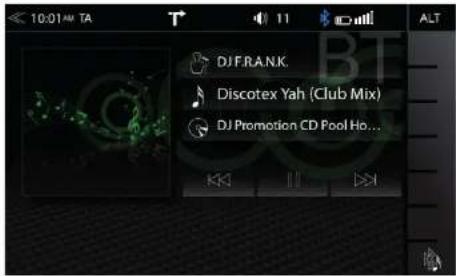
The A2DP RVC interface offers play, pause and skip control of previously paired smartphones in audio playback mode. The iD3-Tag meta data display is possible only when tag data is contained in the streamed music track.
NOTE
The listed functions depend on the paired mobile phone, installed software versions and the degree of compatibility.
PLAYLIST (AUDIO) SMART PLAYLIST (AUDIO)

There are different playlists. We generally differentiate between the standard and special playlists (Smart Playlist and Favorites Playlist).
| Function Icon Operation | ||
| Folder (uppermost) |  | Tap to go to the next higher level |
| Folder |  | Tap to go to the highest folder levelHold to go to the hard disk overview (root) |
| Song |  | Listing by song |
| Artist |  | Listing by artist |
| Album |  | Listing by album |
| Smart Playlist |  | Tap to access the Smart Playlist (Shows created Playlists) |
| FAV List |  | Tap to access the FAV playlist |
| Search |  | Tap to open search keypad |
| Scroll |  | Scroll in the list:Tap and hold to move the slider up or downTap and hold your finger on the list to move the list up or down |
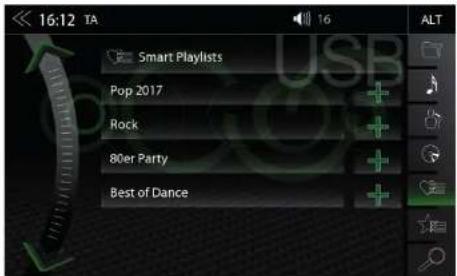
This function allows you to manage the playlists which created by the Smart Playlist function. The playlists can be renamed.
| Function Icon Operation | ||
| Playlist name field | Tap to go to the next higher level | |
| Playlist editing mode | Tap to edit a playlist (editing mode) | |
| Tap to delete a playlist | ||
| Tap to rename a playlist | ||
| Tap to cancel playlist edit mode | ||
| Song editing mode | Tap to edit a song within a playlist (editing mode) | |
| Tap to delete a playlist song | ||
| Tap to move a song of the playlist(Add a song to another playlist) | ||
| Tap to cancel edit mode | ||
| Scroll | Scroll in the list: Tap and hold to move the slider up or down Tap and hold your finger on the list to move the list up or down. | |
FAV PLAYLIST (AUDIO)
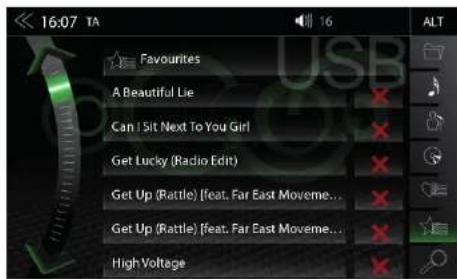
This playlist feature allows you to add a song easily and quickly to a fixed favorite playlist.
| Function Icon Operation | ||
| Playlist name field | No function, text field only.Note: The name of the FAV playlist can not be changed. | |
| Delete | Tap to delete a FAV playlist song | |
| Scroll |  | Scroll in the list;Tap and hold to move the slider up or downTap and hold your finger on the list to move the list up or down. |
VIDEO MEDIA: HARDDISK
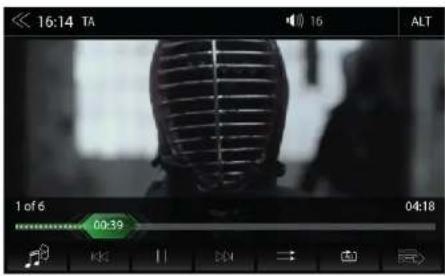
For video playback via USB, the parking cable must be connected during the device installation. Without this connection, the screen remains black.
| Function Icon Operation | ||
| Jump inside Title | Tap to skip directly to the desired positionSlide to reach the desired position | |
| Video<->Audio Source | Tap to switch between audio or video playback. This function is not supported for BT Audio | |
| Back | Tap to skip back to the previous section | |
| Play | Tap to play a film | |
| Pause | Tap to pause a film | |
| Forward | Tap to skip forward to the next section | |
| Playlist | Tap to display the folder and track listThis function is not supported for BT Audio | |
| Shuffle | Tap to turn on the random play feature within the folder that is playing | |
| Repeat | Tap to automatically repeat a film or complete video collection | |
PLAYLIST (VIDEO)

Playlist (Video) displays the video files on the USB data carrier with their file name. In this list sliding up or down is easily possible.
| Function Icon Operation | ||
| Folder |  | Tap to go to the highest folder levelHold to go to the hard disk overview (root) |
| Back |  | Tap to skip back to the previous section |
| Play / Pause |  | Tap to play a film or a videoTap to pause a film or a video |
| Forward |  | Tap to skip forward to the next section |
| Shuffle |  | Tap to turn on the random play feature within the folder that is playing |
| Repeat |  | Tap to automatically repeat a film or complete video collection |
| Video <-> Audio Source |  | Tap to switch between audio or video playback. This function is not supported for BT Audio |
| Scroll |  | Scroll in the list:Tap and hold to move the slider up or downTap and hold your finger on the list to move the list up or down |
CAUTION
Playing video files while driving is not permitted by the law. For this reason, the screen will switched off when the vehicle is in motion, only the sound is played.
HDMI / AV/IN

Tap on the HDMI icon to open the HDMI source, if a compatible HDMI source is connected, for example a videogame, smartphone, tablet, notebook.
| Function Icon Operation | ||
| HDMI |  | Tap to open HDMI source mode |
Tap to the AV/IN icon to open the AV/IN source, if a compatible AV/IN source is connected, for example a videogame, smartphone, tablet, notebook.
| Function Icon Operation | ||
| AV/IN |  | Tap to open AV/IN source mode |
CAMERA: ZENEC TYPE (NON OE REAR VIEW CAM SYSTEM)

Tapping the camera icon starts the manual camera mode, when a CVBS type camera is connected to the camera input of the unit. The cam is controlled by touchscreen, ALT key, FAV sensor key or automatically, by engaging reverse gear.
| Function Icon Operation | ||
| Camera |  | Tap to open camera source |
| Camera switching |  | Tap to switch sequentially between camera 1 and camera 2 (CAM-1 <-> CAM-2) |
| Settings |  | Tap to adjust the lines |
CAMERA GRID-LINES: ZENEC TYPE

Comfortable parking assistant with variably adjustable camera grid lines for their own individual attitude.
| Function Icon Operation | ||
| Presentation | Marker | Tap to show or hide the lines |
| Grid-Line area |  | Display the grid lines with the arrowsand circles the lines can be positioned. |
| Back | [000m] | Tap to exit the settings menu |
| Together | [BK45] | Tap to narrow the field |
| Apart | [HK43] | Tap to widen the field |
| Up | [02W8] | Tap to bring the field nearer |
| Down | [A703] | Tap to push the field away |
| Default setting | [BHKK] | Tap to set the lines to the default setting and positions |
| Corner points |  | Press and hold to move an corner point to the desired position |
| Corner point –move left |  | Tap to move left the corner point |
| Corner point –move right | [A2A5] | Tap to move right the corner point |
| X/Ycoordinates | [0H45] | Display the current X/Y coordinates |
NOTE
To calibrate the assist lines, reverse parallel to the parking space stripes and centrally to the start of the parking space.
CAMERA: OE REAR VIEW CAM
natural_image
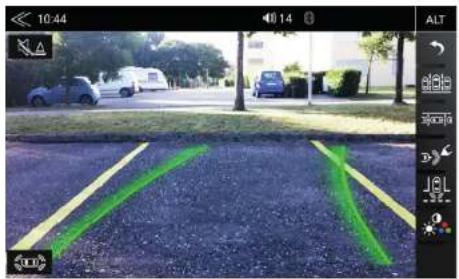
Parking lot with green painted lines on asphalt, parked cars in background (no readable text or symbols)The E>GO Core system offers simple connection of the OE rear view cam from 2015 and up, including all standard operations.
| Function Icon Operation | ||
| Camera |  | Tap to open camera source |
| Back |  | Tap to exit the settings menu |
| OE Rear Camera Assist |  | Tap to access OE camera image settings (brightness, contrast, hue) |
| Park Assist sound (mute-/unmute) |  | Tap to mute/- unmute the beeps sounds of the Park Assist (Turn off sound) |
| Optical Parking System (OPS) Full Screen |  | Tap to show OPS full screen (without camera image) |
OPTICAL PARKING SYSTEM (OPS)

natural_image
Top-down view of a car inside a circular tunnel or radar array, captured in a digital camera interface (no text or symbols on the car or environment)If your vehicle is equipped with an original factory installed optical parking system, then you can use it with your ZENEC system.
OVERVIEW
| Function Icon Operation | ||
| Park Assist |  | OFF / CAM / OPS / OPS & CAM |
| OFF The function is permanently turned off | ||
| CAM | If a rearview camera is connected, the camera picture will be displayed automatically | |
| OPS | Indicates the optical parking system depending on the vehicle configuration | |
| OPS & CAM | Indicates a combined picture of the rear view camera and the optical parking system | |
| Camera |  | Tap to show the camera picture |
| Driver Position |  | Tap to leave this view |
i NOTE
The effective range of functions is depending on the vehicle manufacturer, vehicle type and vehicle configuration. The ZENEC system supports all listed functions above. Differences from this information, features or functions cannot be used for claims.
WEBLINK
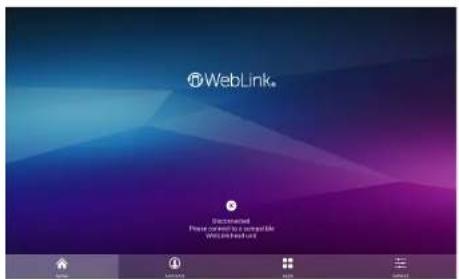
The WebLink® 2.0 app built into the E>GO Core models will make other Android smartphone apps available on the CORE platform. Apps integrated directly into WebLink®, such as youtube, Shout-Cast and also the audio and video players are perfectly integrated into the CORE device.
| Function Icon Operation | ||
| Home | Tap to Jump back to WebLink main menu | |
| Accounts | Tap to change the user account details | |
| Apps | Tap to show the available WebLink Apps | |
| Settings | Tap to access WebLink standard settings | |
NOTE
This function may become available via a future software update if not present on device at market launch.
SMARTLINK DIRECT

Tapping on the Smartlink Direct main icons open the pairing options of the smartphone, or the display mode if the phone has been successfully paired before.
| Function Icon Operation | ||
| Smartlink Direct |  | Tap to enter the Smartlink Direct mode |
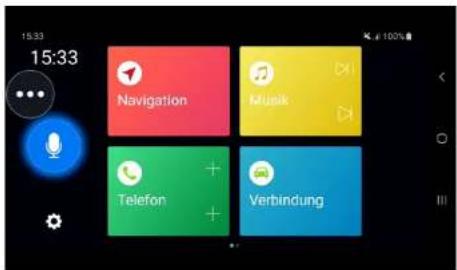
The Drive Mode control interface offers several options to configure and operate this App on the device, including the control of smartphone functions. See the three icons in the right-hand side vertical area, which target operation and control of the (paired + connected) smartphone.
| Function Icon Operation | ||
| Smartlink DirectDrive ModeControl PanelButton | Tapping on this circular button opens five control icons. Pressand hold this Smartlink Direct button allows to move it into anyposition on the display screen. | |
SMARTLINK DIRECT CONTROL INTERFACE

| Function Icon Operation | ||
| Smartlink Setup Icon Tap to open to |  | Direct setup page |
| Smartphone disconnect Icon |  | Tap to disconnect the smartphone and to jump back to the smartphone pairing options |
| Battery Level and Charge Status icon |  | Shows battery level and charge status (no operation) |
| Drive Mode Icon to activate or lock screen rotation |  | Tap to activate screen (auto) rotation, or lock of screen rotation in dependency to smartphone |
| Display of Time |  | Display of Time (no operating function) |
| Smartphone Control Bar Icons to operate the connected smart-phone (Icons and control logic may vary in accordance with connected smartphone model) |  | Tap to access/ open further functions of the connected smartphone |
SMARTPHONE APP LINKING

In the Drive Mode panel, you can link Apps on your smartphone to become a Smartlink Direct embedded function on the ZENEC device. Tap on the respective function in the Drive Mode panel, where you want to assign a specific function. With the linked smartphone app, you can operate the app control functions directly via Zenec device (Android OS).
NOTE
When a main system software update is installed on the device, the Smartlink Direct license will get overwritten (erased). The Smartlink Direct App will attempt to reload the UUID based license after a software update automatically. Make sure to connect a Smartphone right after the update has completed. Contact the ZENEC Support in case of Smartlink Direct function mishaps, after such an update.
REALDASH


RealDash is a customized virtual dashboard app for the E>GO Core platform with performance meter display. Data is transmitted to the E>GO Core device via the OBD II dongle. Vehicle and engine data can be shown in near real time, e.g. vehicle speed, turbo boost level, oil temperature, gas tank level, engine RPM etc. You can chose among several different display template options.
| Function Icon Operation | ||
| RealDash |  | Tap to open RealDash app |
PRE-CONDITIONS FOR REAL DASH USE:
- The RealDash app can only be used in combination with a compatible standard OBD II dongle.
BLUETOOTH (HANDS-FREE SYSTEM)
ABOUT THIS CHAPTER
This chapter describes how to operate and use the hands-free system. In addition, the BT setup and functions of the ZENEC BT system are described.
SAFETY INSTRUCTIONS
CAUTION
Operating the mobile phone by hand while driving is not permitted. Only enter data or make changes via the ZENEC system when the vehicle is parked, or traffic situation allows such actions.
CAUTION
Network coverage depends on a number of factors – such as the network provider, or the geographical position of the vehicle. Tunnels, underpasses, parking garages, or street canyons in cities may lead to interruption of the connection. Thermal glazing or metallic stickers on the windows of the vehicle may also disrupt the connection of the smartphone to the GSM network.
The vertical control and operation bar on the right area of the Bluetooth page serves to invoke device manager, or access phone book, favorites, call logs, numeric keypad, Bluetooth settings and Scan (BT device search).
| Function Icon Operation | ||
| Device manager |  | Tap to access the device manager page |
| Phonebook |  | Tap to access the phonebook of the currently paired mobile phone |
| Favorites |  | Tap to access the stored favorites |
| Call logs |  | Tap to access the call logs |
| Numeric pad |  | Tap to open the numeric keypad |
| Bluetooth setup |  | Tap to change the most important settings for BT operation |
| Scan (Search) |  | Tap to search for a new Bluetooth device |
DEVICE MANAGER

The BT function on the device must be activated to invoke connection process. Please pay attention to the smartphone manufacturer's instructions regarding device pairing.
| Function Icon | Operation | |
| Device manager |  | Tap to pair, disconnect, or manage mobile devices |
| Function Icon Operation | ||
| Pair Tap to reconr |  | Bluetooth device |
| Disconnect |  | Tap to disconnect a paired Bluetooth device |
| Delete |  | Tap to delete a Bluetooth device from the list (requires the device to be disconnected) |
| Icon Meaning | |
| This icon indicates that the paired Bluetooth device supports HSP/HFP, and can be used via the hands-free system. | |
PAIRING

To connect a smartphone to the Zenec device via Bluetooth, first step is to successfully complete the pairing process.
Via ZENEC system
| Function Icon | Operation | |
| Scan (Search) | Tap to the SCAN icon to Initiate a search for BT devices. Select the desired mobile device from the list that you want to synchronize with the ZENEC system. Once the device is selected, follow the instructions. |
Via the mobile device
| Function Icon | Operation | |
| Search | Make sure that the ZENEC system is in Device Manager view otherwise the ZENEC system will not be visible to other devices. Follow the instructions of the device manufacturer on pairing. |
Auto Connect
Once a mobile device has been connected with the ZENEC system, it will be automatically paired when the ZENEC system is started. On being briefly disconnected the ZENEC system will attempt to establish a new connection.
| NOTEOn pairing for the first time, be sure to permanently enable the connection confirmation on your mobile device, otherwise malfunctions may occur during the auto-connect process. |
BLUETOOTH SETUP

On the Bluetooth setup page you can adjust settings for Bluetooth operation. Press the appropriate button / field to change any of the listed settings.
| Function Icon Operation | ||
| Bluetooth Settings | Tap to change settings for BT operation | |
| Auto Connection | ON | ON / OFF |
| Contacts Order | First Name | 1. by first name of contact2. by surname of contact |
| Microphone | Int. | Internal = inside deviceExternal = only if installed |
| Microphone Gain | Tap to set the Mic. gain from 0 to 15 | |
| Bluetooth | ON | ON / OFFON = Bluetooth module activatedOFF = Bluetooth module deactivated |
| BT-Voice Channel | 1: Driver: Sound output of call is exclusively on the driver side.2: Front: Sound output of call is on both sides (in the entire front area). | |
BLUETOOTH STATUS BAR
| Icon Function | |
| Mobile phone currently connected | |
| Battery capacity of the mobile phone currently connected | |
| Signal strength of the current mobile network | |
ACCEPTING/ENDING INCOMING CALLS (VIA DEVICE)
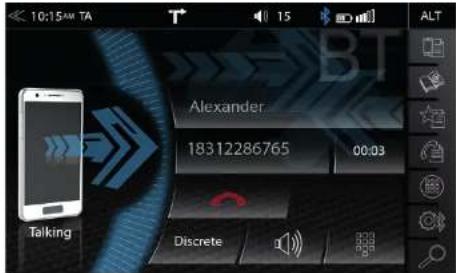
| Function Icon Operation | ||
| Accept | Tap the green handset to accept the call | |
| Reject | Tap the red handset to reject the incoming call | |
| End | Tap the red handset to end the call | |
DIAL A CALL USING NUMERIC PAD
In the control-/operation panel touch the 📄 to open the numeric pad.
Key in the desired phone number in full using the numeric pad. To establish the connection, touch. The display now changes to the call connection view.
DIAL A CALL USING PHONEBOOK
In the control-/operation panel touch the 📄 to open the phonebook.
From the phonebook list select a call partner and set up a connection by touching . After touching a contact you will be directed to the contact details view.
NOTE
Depending on the existing numbers of mobile phone and phonebook entries, the first synchronization can take several minutes.
BLUETOOTH MENU
| Function Icon Operation | ||
| Discrete |  | Tap to pass the call from the hands-free system to the mobile phone or vice versa |
| Mute conversation |  | Mute / un-mute the microphone input |
| Numeric key pad |  | Tap to show the numeric key pad.Necessary in case asked to enter a further number during the call (telephone call center etc.) |
| Back |  | Tap to jump back to the previous level |
NOTE
To be able to use the phonebook or call lists without any problems, make sure that during the pairing process you you confirm "data access enable" on the smartphone.
PHONEBOOK
Contacts

After successful pairing of the smartphone with subsequent phone book synchronization, the device will show you the full contact list. You can directly add contact Favorites.
| Function Icon Operation | ||
| Search |  | Tap to open the contact search keypad |
| Scroll |  | Scroll in the list: Tap and hold to move the slider up or down, showing letters by the alphabet. |
| Phonebook Contacts |  | Tap to Jump to the contact list. Up to 1000 contacts per paired mobile phone can be synchronized; it makes no difference whether the contacts are stored in the phonebook or on the SIM card. |
| Conctact List |  | Tap to show phone numbers of the respective contact entry |
| Call / Accept |  | Tap the green handset to set up/- start the call |
| Add Favorite |  | Tap to add a new Favorite Tap once more to remove a Favorite |
CALL LISTS
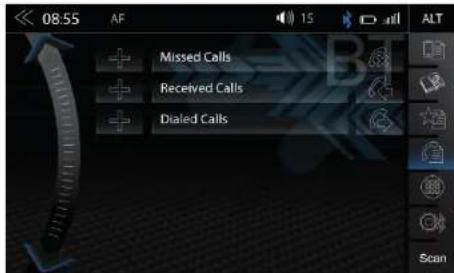
If a compatible mobile phone is connected, call lists from the mobile phone will be synchronized with the BT hands-free system (process can take some minutes, depending on the number of contacts). Once sync process has completed you will be able to access the following logs:
| Function Icon Operation | ||
| Call logs |  | Tap to see all call logs |
| Missed Calls |  | Tap to see the missed calls only |
| Received Calls |  | Tap to see the received calls only |
| Dialled Calls |  | Tap to see the dialled (outgoing) calls only |
| Function Icon Operation | ||
| Missed | Entries with this icon refer to calls that you missed | |
| Incoming | Entries with this icon refer to accepted incoming calls | |
| Contacted | Entries with this icon refer to outgoing calls | |
FAVORITES

On this page you can link eight or more phone numbers to become favorites. You can select any of the phone numbers in the phonebook and save them as favorites; the only exceptions are e-mails and addresses.
NOTE
All favorites are visible to every user of the device as they are saved in the device memory.
| Function Icon | Operation | |
| Stored Favorite |  | Tap to set up/- start a connection with a stored favorite |
| Assign New Favorite |  | 1 Tap to add a new favorite contact |
| 2 Select desired number from phonebook and confirm with this ☆ icon | ||
| Delete |  | Tap to remove a stored favorite |
NOTE
A change of data on the mobile phone will not sync automatically with the stored favorites. Should you want to change phone numbers this change must be manually transferred to favorites by deleting the existing favorite and re-assigning the new number.
NAVIGATION

For the ZENEC devices E>GO CORE a navigation package is available separately. This bundle comes with multilanguage Quickstart manual and navigation software on microSDHC card. The images shown on this and the following page, as well as instructions, are taken from this solution.
| Function Icon Operation | ||
| Navigation | Tap to start navigation and show map view(only if navi microSD card of the E>GO CORE set is insert in the device) | |
NAVIGATION UPDATE
Activation of the free 36-month map software update period begins once the ZENEC system has been switched on and vehicle was driving over a distance of >10 km.
Requirements
- PC or notebook with a Windows 7 operating system or higher, an SD card reader, together with broadband Internet access. Apple OS not supported.
- An activated navigation map microSD card (set content)
- Latest Naviextras Toolbox software, installed on your computer. Download-Link: https://zenec.naviextras.com/shop/portal/downloads
To update your ZENEC device with new maps, proceed as follows:
- Go to https://zenec.naviextras.com/shop/portal and set up a user account with a password and the personal data for your navigation device.
- Download the Toolbox Software: Naviextras Toolbox Download. Read through the application instructions before taking any further steps. The Toolbox is periodically updated. Therefore, should you want to make a map update at a later time, always download the latest Toolbox version. This will guarantee optimal compatibility of all data transfer functions.
NOTE
Map updates can be carried out by visiting https://zenec.naviextras.com/shop/portal. Safety instructions: see page 4.
MAPS

Fast and simple route calculation
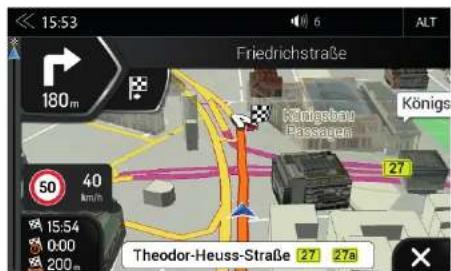
High resolution 3D maps

Advanced route guidance
NAVIGATION START UP INSTRUCTIONS
NAVIGATION SOFTWARE INSTALLATION
Before you can use the E>GO CORE navigation software supplied on microSD card, the Android device (E>GO CORE) must be prepared by installing a software.
a. Insert the provided mircoSD card with navigation software into the respective slot of the device. Turn on the device.
b. Tap on the "navigation source icon" in the main menu to start the standard installation process (illustration 1).
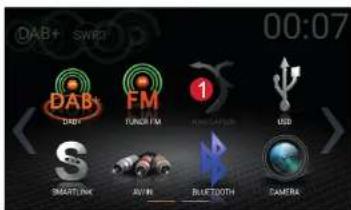
Illustration 1
c. The software installation will run in a step-by-step mode. A visual animated software installation status bar allows you to track progress (illustration 2). The complete update process takes approx. 30 - 60 seconds.

Illustration 2
d. Finally, the navigation will be start automatically if the installation was successful. Device should show navigation loading mode (illustration 3). Now close the navigation software, turn off the device and read the info given under "Sat-Fix" below.

Illustration 3
NAVIGATION START UP INSTRUCTIONS
FIRST NAVI START-UP (SAT FIX PROCESS)
After the device install is completed make sure, the vehicle is located outdoors under free sky. There should be no objects above vehicle affecting GPS reception (trees, tall buildings etc.).
Tap on the navigation icon in the main menu to start the navigation mode. Tap on "Show Map" to initiate the "search GPS" process.
Allow 3 to 5 minutes of time to for the creation of the so called Sat-Fix. During this period, the vehicle must not move nor drive!
Online Updates (Map Content + Bugfixes)
Naviextras Toolbox is a Windows utility, able to establish the server access to the Naviextras portal.
■ Before you update the navigation content of your microSD card, always download, install and use the latest Toolbox software.
■ Before you can download content and updates you are asked for setting up a user account on the Naviextras portal. Once the Toolbox software has installed a login window pops open to indicate readiness for user account setup.
- With the user account ready make sure the first step is backing up the microSD card content prior to any content update. Data backup is offered automatically with Toolbox recognizing a valid nav license on the microSD card.
- Do not start update before you have not created a backup. The backup allows you to restore original map data of the package, which is a welcome help to cope with update or installation problems, which would otherwise become costly software restore processes.
■ Important: When a free or pay type content update was installed on the microSD card, the following two steps must be completed to reactivate the license:
1) Insert the microSD card into your navicever and start the navigation. Shut down device, remove the microSD card.
2) Start Toolbox and connect the microSD card to your PC or notebook and follow the instructions of the software (activation of license).
SETUP OPERATIONS

This chapter describes all the parameter and setting functions of the ZENEC system. Please note that settings or changed parameters can have a direct influence on the everyday use of the ZENEC system.
| Function | Icon | Operation |
| Setup |  | Tap to access the setup mode |
NOTE
Software updates applicable to this device, except navigation engine and map updates are free of charge. Download here: www.zenec.com/support/software-updates/
DISPLAY ICON

Use the display icon, to dimm the the LCD TFT screen picture brightness or switch off completely (standby) in two steps. This is done by tapping the icon.
| Function Icon Operation | ||
| Disp | Tap to dim or brighten up TFT screen (G 100% → 50% → 0% *standby* *) | |
VAG CAR MENU

Tap to the CAR icon in the main menu to enter the menu for the trip computer and configuration settings.
| Function Icon Operation | ||
| CAR Menu | Tap to access the VAG CAR menu (Trip computer and configuration settings) | |
| Next page | Next page of trip computer menu | |
| Previous page | Previous page of trip computer menu | |
| Trip computer | Tap to open the trip computer page (default page) | |
| Vehicle status | Tap to open the vehicle status overview | |
| Vehicle settings | Tap to access the vehicle settings | |
| Service information | Tap to show the inspection and oil change information | |
| Additional fuel consumption | Tap to indicate the additional fuel consumption through various comfort functions of the vehicle, such as at active air conditioning |
NOTE
For further information about the trip computer and configuration settings, please pay attention to the owner's manual of your car.
SETUP OF SOURCES

When you tap the setup icon, you will enter this setup source page, which offers six different sources you can adjust for personal preferences.
| Function Icon Operation | ||
| Misc Tap to access device settings | ||
| Audio | Audio | Tap to access sound settings |
| TFT | TFT | Tap to access display settings |
| Assists | Assists | Tap to access vehicle assist settings (Park Assist etc.) |
| Inputs | Inputs | Tap to access Video inputs settings (camera inputs) |
| System | System | Tap to access system settings |
MISC SETUP
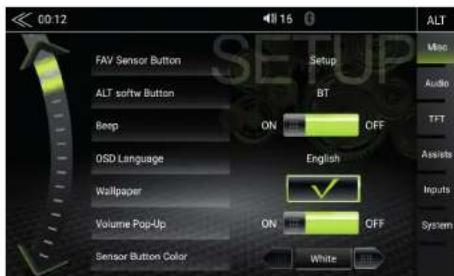
In the Misc menu page, you can configure various settings: The FAV / ALT button definition, ON/OFF of the beep sound, LED color (amber / white / etc.) of the button illumination on the device front.
| Function Icon Operation | ||
| Misc | Misc | Tap to access basic settings view |
| FAV Button | FAV | Tap to link source or function to FAV button (CAM; HDMI; DISP; EQ; AV/IN; DAB; NAVI; BT; USB; Setup; FM; BT-Music; WebLink, SmartLink, RealDash, CAR, Mute) |
| ALT Software Button = Tap to link source or function to ALT (HMI) button (CAM; HDMI; DISP; EQ; AV/IN; DAB; NAVI; BT; USB; Setup; FM; BT-Music; WebLink, SmartLink, RealDash, CAR, Mute) | ||
| Button sounds | Beep | ON / OFFOff = acoustic acknowledgment disabledOn = acoustic acknowledgment enabled |
| OSD Language | OSD Lang | Tap to change the menu language |
| Button Color | Button Co | Tap to alter hard key illumination color to White / Red / Green / Blue or Amber |
| Wallpapers | Wallpaper | Tap to change the background wallpaper |
| Volume Pop-Up | ON / OFFOff = visual volume pop-up disabledOn = visual volume pop-up enabled | |
| Navi Media-ControlBar | ON / OFFOff = MediaControlBar not shown inside NAVI SourceOn = MediaControlBar shown inside NAVI Source | |
| Easy Drive Mode | ON / OFFOff = EasyDrive Mode disabledOn = EasyDrive Mode enabled | |
| WiFi | Tap to enter the WiFi / Wlan or Hotspot passwordON / OFFOff = WiFi activatedOn = WiFi deactivated | |
EASY DRIVE MODE
TUNER (FM AND DAB)
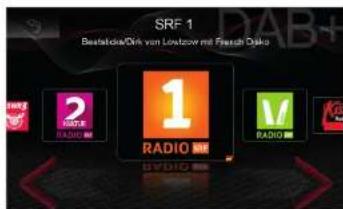
The radio sources FM and DAB+ as well as the Media Player switch after approx. 5 seconds into Easy Drive mode. Easy Drive then displays enlarged radio station icons, program information and other content with the required controls and allows for simplified operation, which increases driving safety.
| Function Icon Operation | ||
| Info Display Area & Slideshow | Radio station artwork / artist display ("MOT Slideshow") | |
| Finger swiping left and right to switch between Preset stations Pre-Slideshow (Station list pre-show) area: Finger swiping left and right to scroll the Station list | ||
| Station Info | Station Name / Ensemble name | |
| Station up | Tap to jump to next stationPress and hold to jump to next Ensemble | |
| Station down | Tap to jump to previous stationPress and hold to jump to previous Ensemble | |
| Back | Tap to jump to the normal screen | |
| Album Cover Art Slideshow | If a cover is stored on the music media, it will be displayed.Cover Art Pre-Slideshow of the music collection | |
| Cover Art Pre-Slideshow area: Finger swiping left and right to scroll the cover list and skip to the previous or next track. | ||
| Back (previous) | Tap to skip to the previous track | |
| Forward | Tap to skip to the next track | |
| ID3 Tag Info's (Artist, Track, Album) | t - My Head Inkelmut & Emma Lo | Information about the artist, track and album |
60 Rev.B 61 Rev.B
AUDIO SETUP (EQ / BAL / FAD / SUBWOOFER / LOUDNESS / PRESETS)
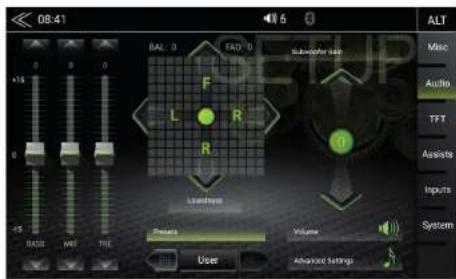
In the Audio menu page, you can adjust the sound, e.g. volume of the sources, loudness, bass and treble, fader and balance etc.. You can also adjust the 3-Band parametric equalizer. Press and hold the individual band level sliders to move it up or down for a level change. The "Advanced Audio Settings" provide more sound adjustment options.
| Function Icon Operation | ||
| Audio |  | Tap to access and configure audio settings |
| Presets |  | Use the arrow keys < -> to select another EQ Preset (Pop / Classic / Rock etc.)All changes at the EQ will be stored automatically under the Presets "User". |
| Advanced Settings |  | Tap to open the Advanced Settings, accessing the advanced sound and navi mixer configuration options. |
| Volume |  | Tap to set initial and source volume levels |
| Balance Left/Right |  | 7L > 0 < 7R |
| Fader Front/ Rear |  | 7F > 0 < 7R |
| Loudness |  | ON / OFF |
| Subwoofer Gain |  | -6 < 0 > +6 dB |
| Bass configuration |  | -15 < 0 > +15 DB Tap and hold to adjust the volume of the selected frequency |
| Middle configuration |  | -15 < 0 > +15 DB Tap and hold to adjust the volume of the selected frequency |
| Treble configuration | TRE | -15 < 0 > +15 DB Tap and hold to adjust the volume of the selected frequency |

VOLUME SETUP
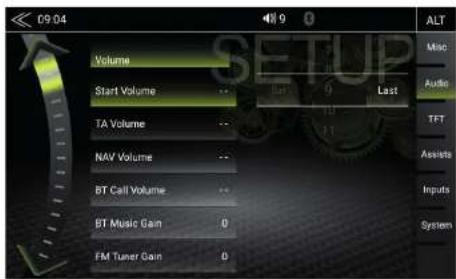
In the Audio menu -> Media Volume, you can customize the basic settings of each source individually.
| Function Icon Operation | ||
| Media Volume | Media Volume | Media volume configurationSet = Start always with manually adjusted volumeLast = Start with last volume set before switching off |
| TA Volume | TA Volume | TA volume configurationSet = Start always with manually adjusted volumeLast = Start with last volume set before switching off |
| Navi Volume | NAV Volume | NAV volume configurationSet = Start always with manually adjusted volumeLast = Start with last volume set before switching off |
| BT Call Volume | BT Call Volume | BT Call volume configurationSet = Start always with manually adjusted volumeLast = Start with last volume set before switching off |
Fine adjustment of the volume of all "Gain" sources
| Function Icon Operation | ||
| BT Music Gain | BT Music Gain | Fine adjustment of BT Music volume-9 < 0 > +3 dB |
| A/V-IN Gain | FM Tuner Gain | Fine adjustment of A/V-IN volume-9 < 0 > +3 dB |
| FM Tuner Gain | FM Tuner Gain | Fine adjustment of FM tuner volume-9 < 0 > +3 dB |
| DAB Tuner Gain | DAB Tuner Gain | Fine adjustment of DAB tuner volume-9 < 0 > +3 dB |
| USB/WebLink Gain Gain | USB Gain | Fine adjustment of USB volume-9 < 0 > +3 dB |
| HDMI Gain | HDMI Gain | Fine adjustment of HDMI volume-9 < 0 > +3 dB |
AUDIO SETUP: ADVANCED SETTINGS (NAVI-MIXER / SUBWOOFER / EQ SETTINGS)

In the advanced setting menu at navi mixer, you can adjust audio ducking or mute of audio and video source playback by navi route guidance voice. Works only for ZENEC navigation software. And in the subwoofer settings, you can adjust Phase, Gain, and Low-pass transition frequencies of the subwoofer. The default settings are Phase 0", Power ON, LPF 120Hz. Also you can set the 3-Band graphical equalizer at the EQ settings.
| Function Icon Operation | ||
| Muto MediaSources forNavl VoiceAnnouncement | ON / OFFOFF = Ducking of media playback during route guidance voice announcementsON = Media playback is fully muted during route guidance announcements | |
 | ||
| Power |  | Subwoofer -RCA line-outs (affects the subwoofer line-out only)ON = Volume according to setting.OFF = Mute |
| LPF |  | Tap to set the low pass filterPASS / 55 Hz / 85 Hz / 120 Hz / 160 Hz |
| Phase | GZZ7 | Subwo offer ONLY0/180° phase adjustment |
| Gain | Tap to set the GAIN level-6 < > +6 | |
| Bass center frequency |  | Tap to set the filter60 Hz/80 Hz/100 Hz/120 Hz |
| Middle center frequency |  | Tap to set the filter0.5 KHz/1 KHz/1.5 KHz/2.5 KHz/ |
| Treble center frequency | TRE | Tap to set the filter7.5 KHz/10 KHz/12.5 KHz/15 KHz/ |

TFT DISPLAY CONFIGURATION

In the TFT Setup menu you can make screen settings that control the day/night brightness of the TFT LCD display screen. This will only work with microSD card from the ZENEC navigation software bundle (E>GO CORE-SDFEU).
| Function Icon | Operation | |
| TFT configuration | Tap to adjust TFT display configuration | |
| TFT Control | Tap to select the brightness control mode:Navi = Day/Night brightness is controlled by the navigation system.Car = Day/Night brightness is controlled by vehicle illu voltage | |
| TS-Brightness Day | Day adjust range0 ~ 30 | |
| TS-Brightness Night | Night adjust range0 ~ 30 | |
| TS-Auto Standby | Tap to enable or disable TFT Auto Standby function and Auto Screen shutdown. TFT goes into standby after selected time. |
NOTE
Using the DISP button you can set the display brightness to three levels ( ≤ 100% 50% 0% ).
ASSIST (VEHICLE) SETUP

In the Car Setup menu, you can set how the ZENEC device interacts with optional components such as cameras and parking assist inside the vehicle.
| Function Icon | Operation | ||
| Assist (vehicle) |  | Tap to access vehicle configurations | |
| Camera Type |  | Tap to set the camera type to ZENEC (aftermarket) or to OE Camera system | |
| Park Assist |  | Tap to set the parking aid display source.OFF / CAM / OPS / CAM+OPS | |
| OFF The function is turned off permanently. | |||
| CAM | If a rear view camera is connected, the camera picture will be displayed automatically. | ||
| OPS | Indicates the optical parking system depending on the vehicle configuration. | ||
| OPS+CAM | Indicates a combined picture of the rear view camera and the optical parking system. | ||
| Reverse Audio Assist |  | Tap to set the muting function when parking aid is active.OFF / reduced Volume / CAM Audio / MUTE Audio | |
INPUT SETUP

In the Input Setup menu, you can adjust the image settings of each connected camera channel, such as reverse cameras. Contrast, brightness, color saturation and hue can be adjusted.
| Function Icon | Operation | |
| Inputs | Inputs | Tap to adjust image setup configuration of connected external video sources (e.g. rear view camera., etc.) |
| Brightness |  | -10 to +10 |
| Contrast |  | -10 to +10 |
| Saturation |  | -10 to +10 |
| Hue |  | -10 to +10 |
SYSTEM SETUP

In the System Setup menu page, you can make various system settings, such as: Adjust the Clock Time, Load Factory settings, initiate Software Updates or set a Password.
| Function Icon | Operation | |
| System | System | Tap to access various system settings |
| SW Versions Info | SW Version | Tap to access detailed software version information |
| Load Factory | Tap and confirm to reset the ZENEC system to factory default | |
| Clock & Date Settings | Clock Time | Tap to adjust clock time, date and time sync. mode |
| Software Update | Tap and confirm to initiate a software update. www.zenec.com → Support → Softwareupdates | |
| Navi Synctool | Tap and confirm to initiate a navi update. (Open the navi update module for new or re-installation of the navigation software and MAP updates via USB Naviextras SYNCTOOL) | |
| Password Function | OFF = password protection disabledON = password protection enabled | |
| Password | Tap and confirm to store a password | |
| Export to USB | Tap and confirm to save your full profile settings to external data media (USB). (FAT32 formatting) | |
| Load from USB | Tap and confirm to load your saved device profile settings from external media carrier (USB) back into the ZENEC system |
CLOCK & DATE SETUP

In the System Setup menu page under Clock & Date, you can set the format, change the displayed time and select the time sync source (system time or DAB) for the time display.
| Function Icon Operation | |||
| Clock Time Sync. Mode | Tap to change the clock time sync. mode | ||
| DAB Sync | automatic synchronisation by DAB(Manual adjustments such as clock time and time zone not possible) | ||
| RTC Sync | automatic synchronisation by system RTC(Manual adjustments possible) | ||
| Clock Format | Tap to change the clock format | ||
| Date & Clock Time | Tap to change time and date (Year:Month:Day) if sync is "RTC Sync." | ||
NOTE
"RTC" means "Real Time Clock", a internal Quartz generated time signal.
SOFTWARE VERSION
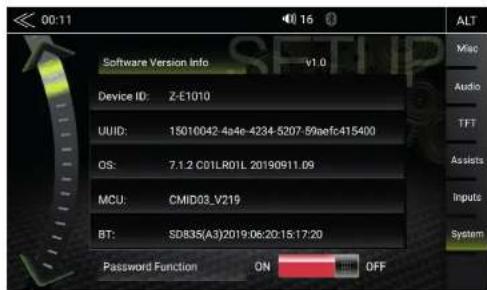
In the System Setup menu page under SW version, you will see the currently installed software versions with detailed version info for MCU, OS and BT etc., including a simple Short Software Version.
| Function Icon | Operation | |
| System | Tap to access this view | |
| SW Version | Displays the current software version information |
PASSWORD


In the System Setup menu page under Password function, you can activate and deactivate the password protection for the device.
| Function Icon Operation | ||
| Password Function | OFF = password protection disabledON = password protection enabled | |
| Password | Tap and confirm to store a password*Standard password "12345" | |
| Input Keypad | Enter the desired password | |
CAUTION
* If you protect you ZENEC system with a Passwort make sure, you have access to this password anytime.
Lost or forgotten Passwords require the device to be uninstalled and sent in to ZENEC Service Centre. Device unlocking is not a service which is free of charge.
AIR CONDITIONING (AC INFO)
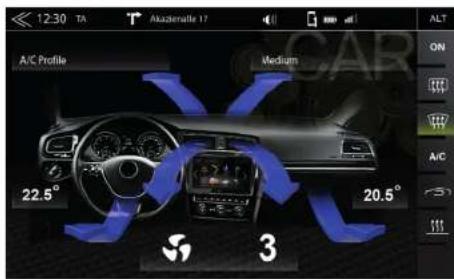
If AC Info is enabled, pressing the Climate Setup button displays the current A/C value in the ZENEC system. Different profiles can be selected
| Function Icon Display Information | ||
| Ventilation | ON | On = Switch for ventilation is minimum adjusted to level 1Off = Switch for ventilation is adjusted to level 0 |
| Rear window heating | Rear window heating switched on or off | |
| Windshield heating | Defrost function switched on or off | |
| Air conditioning | A/C | Air conditioning switched on or off |
| Recirculating air operation | Recirculating air operation switched on or off | |
| Dual | DUAL | Synchronous the temperature settings for driver and passenger side |
| Auto | AUTO | Automatic adjustment of temperature |
| Temperature arrows | [8036] | Indication of actual air flow:Frontwindow – Center – Leg room |
| Temperature | Blue ca. LOW – 20.0 CYellow ca. 20.0 – 24.0 CRed ca. 24.0 – HIGH | |
| Ventilator setting | ### | The digit shows the fan level. |
DYNAMIC INDICATION OF SEAT HEAT
| Seat heater |  | Indication of current seat heating level.In addition to the digit, the seat heating level will be indicated in three different colour gradations. |
| Setting | [0779] | The seat heating level will be displayed in combination with a digit. |
| Function Icon Operation | ||
| A/C profile | N/A | Open up the shortlist of the various climate profiles |
NOTE
All functions related to the air conditioning are only status indications.
The effective range of functions is depending on the vehicle manufacturer, vehicle type and vehicle configuration. The ZENEC system supports all listed functions above. Differences from this information, features or functions cannot be used for claims.
INSTALLATION NOTES
CAUTION
- The installation of the ZENEC system should be carried out by an authorized installer. Specific knowledge and tools are required to do the installation. Incorrect installation can cause damage to the vehicle and the ZENEC system.
- Correct functioning can only be guaranteed when you use the ZENEC original accessories included in the kit or those optionally available. The ZENEC system and the original accessories must under no circumstances be modified or altered in any way. Inappropriate actions can cause damage to the vehicle and the ZENEC system.
NOTE
- The ZENEC E>GO CORE is equipped with an integrated DAB+ receiver. To make use of this you will need a suitable DAB antenna mounted to the vehicle (not included in kit) that must be connected to the ZENEC system.
- If the target vehicle is already equipped with an original DAB antenna, it is still possible to use it in combination with the ZENEC system.
- Software updates to the ZENEC system are installed with an USB memory device. Therefore when fl tting the system make sure that the USB connection of the ZENEC system will still be accessible later (installation of USB extension cable or USB hub).
- If you have questions or problems relating to the ZENEC system, please contact the dealer from whom it was purchased.
REMOVAL WORK AND PREPARATION
NOTE
- Remove the ignition key and keep it outside the car until the installation is finished.
- Please wait for approx. 10 minutes until the CAN bus system is completely shut down,
before you start with the uninstallation of the original device. - Start with the uninstallation of the original device.
- Please switch on the ignition only, when all installation steps are done and the ZENEC system is completely mounted.
NOTE
- Make sure that all connectors at the rear of the ZENEC system have sufficient room and are not bent.
- Connectors without a retaining mechanism must be additionally secured with insulating tape.
OVERVIEW INCLUDED ACCESSORIES

| No. | Article Qty | |
| 1 | GPS antenna with metal mounting plate and double sided adhesive pad 1 | |
| 2 B | Bluetooth antenna 1 | |
| 3 | USB extension cable 2 | |
| 4 | 18-pin connection cable (Line Out) 1 | |
| 5 | 20-pin connection cable (Mic, Cam, AV-IN, USB) 1 | |
| 6 | Parking brake cable 1 | |
| 7 M | Main device user manual 2 |
CONNECTION DIAGRAM E>GO CORE

A

| A1 | N.A. |
| A2 | Reverse |
| A3 | KL 15 / Switched +12V PWR |
| A4 | Illumination |
| A5 | Analog Wheel KEY 2 |
| A6 | Analog Wheel KEY 1 |
| A7 | Speaker Rear Left (-) |
| A8 | Speaker Rear Left (+) |
| A9 | Speaker Front Left (-) |
| A10 | Speaker Front Left (+) |
| A11 N.A. | |
| A12 P. ANT +12V** (Antenna) | |
| A13 P. CNTR +12V** (Amplifier) | |
| A14 Parking | |
| A15 KL 31 / Power GND | |
| A16 KL 30 / Permanent +12V PWR | |
| A17 Speaker Rear Right (-) | |
| A18 Speaker Rear Right (+) | |
| A19 Speaker Front Right (-) | |
| A20 Speaker Front Right (+) |
300mA max current
C
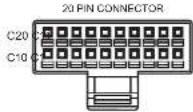
| C1 | External MIC |
| C2 | |
| C3 | Camera 1 +12V MAX 300mA |
| C4 | Camera 2 +12V MAX 300mA |
| C5 | CVBS Camera 1 IN |
| C6 | |
| C7 | USB 2 |
| C8 | |
| C9 | |
| C10 |
| C11 | N.A. |
| C12 | 2 x Camera GND |
| C13 | AUX IN R |
| C14 | AUX IN L |
| C15 | N.A. |
| C16 | A/V IN / Camera 2 IN |
| C17 | USB 1 |
| C18 | |
| C19 | |
| C20 |
D
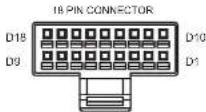
| D1 | N.A. |
| D2 | IR IN |
| D3 | N.A. |
| D4 | LINEOUT Rear L |
| D5 | N.A. |
| D6 | LINEOUT Front R |
| D7 | N.A. |
| D8 | N.A. |
| D9 | N.A. |
| D10 | N.A. |
| D11 | N.A. |
| D12 | 2 x LINEOUT Subwoofer |
| D13 | LINEOUT Rear R |
| D14 | N.A. |
| D15 | LINEOUT Front L |
| D16 | N.A. |
| D17 | N.A. |
| D18 | N.A. |
CONNECTION DIAGRAM E>GO CORE
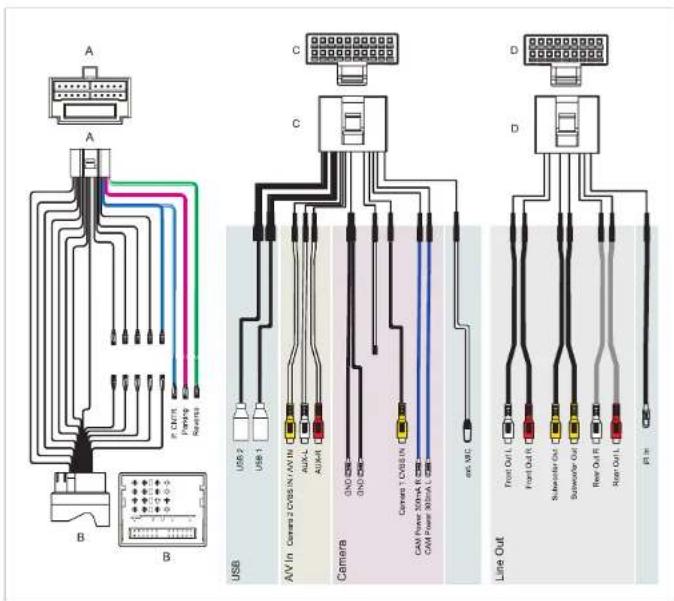
GENERAL
ABBREVIATIONS
| Abbreviation Description | |
| A2DP | Manufacturer-independent Bluetooth® technology allowing audio signals to be transmitted (Advanced Audio Distribution Profile) |
| AF Alternative frequency | |
| CAN-Bus | The CAN bus (Controller Area Network) is a serial bus system for the communication of control units in a vehicle |
| DAB / DAB+ | Transmission standard for terrestrial reception of digital radio (Digital Audio Broadcasting) |
| DSP | The digital signal processor is used for the processing of digital signals (e.g. audio or video signals) |
| EQ Equalizer | |
| FAT32 | Formatting format for digital media(File allocation table 32-bit) |
| UKW/FM | Transmission standard for terrestrial reception of very high frequency analog radio (UKW) |
| OE / OEM Original Equipment / Original Equipment Manufacturer | |
| GPS | Global navigation satellite system for position fixing(Global Positioning System) |
| GSM | Global mobile radio network standard for fully digital mobile radio networks(Global System for Mobile Communications) |
| ID3 -Tag | ID3 is a metadata container most often used in conjunction with the MP3 audio file format. It allows information such as the title, artist, album, track number, and other information about the file to be stored in the file itself. |
| microSD Compact flash memory | |
| REG Regional station | |
| SSP Secure Simple Pairing (for Bluetooth devices) | |
| TA Traffic Announcement (RDS service) | |
| USB | A USB connection is a serial bus system for connecting a device to other devices (Universal Serial Bus). |
STATUTORY RIGHTS AND WARRANTY
Dear customer,
Please read the warranty terms below carefully.
Should your ZENEC product require warranty service, please return it to the retailer from whom it was purchased or the distributor of your country. Do not send-in any product to ZENEC directly.
This ZENEC product is protected against defective materials and/or improper workmanship by a manufacturer warranty for the period of 3 years from date of purchase at retail, to the original buyer. The statutory consumer protection regulation ("EU statutory warranty") remains unaffected by the provided manufacturer product warranty.
For the treatment of warranty related claims, the dealer / importer needs to provide a valid product serial number and the original slip of purchase or the invoice, showing the purchase date.
Not covered by the manufacturer warranty are damages due to:
- Unauthorized or unapproved installation, incorrect audio or mains connection(s).
2 Defects caused by exposure of product to moisture, water and organic fluids ("solvents"), excessive heat and prolonged exposure to sun rays as well as excessive dirt or dust. - Mechanical defects caused by accidents, fall or impact.
- Damage due to unauthorized repair attempts and modifications of product not explicitly authorized by the manufacturer.
- Damage caused by normal "wear and tear" over time.
This warranty is limited to the repair or the replacement of the defective product at the manufacturer's option and does not include any other form of damage, whether incidental, consequential or otherwise.
Damages caused by improper packaging during transport of product to dealer or importer are not covered under warranty. Any compensation claims of sequential damages to auxiliary components or components in the dashboard caused by the device directly or indirectly, are excluded.
Not covered by the manufacturer are consequential costs for the handling of product to conduct warranty service labor. For example the un-installation and re-installation of devices to cure a hardware failure or defect.
EU Legal Representative: ACR S & V GmbH · Industriestraße 35 · D-79787 Lauchringen · Germany ZENEC by ACR AG · Bohrturmweg 1 · CH-5330 Bad Zurzach · Switzerland
www.zenec.com
Hereby, ACR Brändli + Vögeli AG declares that the type of radio equipment ZENEC Z-E1010 complies with the 2014/53/EU Directive. The full text of the EU Declaration of Conformity is available at the following Internet address: http://www.zenec.com (see link "Product Conformity Documents" in the footer area of the page).
E2410R-05 2983
UKCA
CE
78 Rev.B
© Copyright 2019
RevB / copy deadline: Q4-2019
English
Manufacturer: ACR AG · Bohrturmweg 1 · CH-5330 Bad Zurzach · Switzerland
EU Legal Representative: ACR S & V GmbH · Industriestraße 35 · D-79787 Lauchringen · Germany

- Device user manual for ZENEC media system
- SAFETY INSTRUCTIONS
- CAUTION
- TURN ON / OFF
- Manual ON / OFF
- Automatic ON / OFF
- ANTI-THEFT PROTECTION
- NOTE
- i NOTE
- PRE-CONDITIONS FOR REAL DASH USE:
- BLUETOOTH (HANDS-FREE SYSTEM)
- ABOUT THIS CHAPTER
- Auto Connect
- DIAL A CALL USING NUMERIC PAD
- DIAL A CALL USING PHONEBOOK
- PHONEBOOK
- NAVIGATION UPDATE
- Requirements
- NAVIGATION START UP INSTRUCTIONS
- NAVIGATION SOFTWARE INSTALLATION
- FIRST NAVI START-UP (SAT FIX PROCESS)
- Online Updates (Map Content + Bugfixes)
- EASY DRIVE MODE
- AUDIO SETUP (EQ / BAL / FAD / SUBWOOFER / LOUDNESS / PRESETS)
- INSTALLATION NOTES
- REMOVAL WORK AND PREPARATION
- GENERAL
- STATUTORY RIGHTS AND WARRANTY
- Not covered by the manufacturer warranty are damages due to:
Brand : ZENEC
Model : CORE Z-E1010-NAV
Category : Gps