JD2902LK - Saw Cotech - Free user manual and instructions
Find the device manual for free JD2902LK Cotech in PDF.


| Product Type | Jigsaw (Pendulum action) |
| Model | JD2902LK |
| Power Input | 800 W |
| Variable Speed | 800–3000 strokes/min |
| Pendulum Action Settings | 4 settings (0–3) |
| Blade Clamp | Keyless, compatible with T-shank and U-shank blades |
| Soleplate Bevel | 0–45° left or right |
| Sawing Capacity (Wood) | 80 mm |
| Sawing Capacity (Steel) | 8 mm |
| Weight | 2.1 kg |
| Sound Power Level (LwA) | 100 dB(A), K=3 dB(A) |
| Sound Pressure Level (LpA) | 89 dB(A), K=3 dB(A) |
| Vibration (Cutting boards) | 8.641 m/s², K=1.5 m/s² |
| Vibration (Cutting sheet metal) | 7.856 m/s², K=1.5 m/s² |
| Laser Guide | Yes, projects a line for guidance |
| LED Worklight | Yes, combined with laser switch |
| Dust Extraction | Vacuum adaptor port with deflector switch |
| Trigger Lock | Yes, for continuous operation |
| Accessories Included | Parallel edge guide, wood and metal cutting blades, Allen key |
| Safety Features | Blade guard, trigger lock, laser warning |
| Care and Maintenance | Clean with soft moist cloth, mild detergent; keep vents dust-free |
| Disposal | Dispose according to local regulations |
Frequently Asked Questions - JD2902LK Cotech
User questions about JD2902LK Cotech
0 question about this device. Answer the ones you know or ask your own.
Ask a new question about this device
Download the instructions for your Saw in PDF format for free! Find your manual JD2902LK - Cotech and take your electronic device back in hand. On this page are published all the documents necessary for the use of your device. JD2902LK by Cotech.
USER MANUAL JD2902LK Cotech
natural_image
Technical line drawing of a mechanical device with mounting bracket and lever mechanism (no text or symbols)ART.NO
18-3557
40-8774
MODEL
JD2902LK-UK
JD2902LK

Important!
Read the entire instruction manual carefully and make sure that you fully understand it before you use the equipment. Keep the manual for future reference.
Viktig information:
Original instructions
Bruksanvisning i original
Please read the entire instruction manual before using the product and then save it for future reference. We reserve the right for any errors in text or images and any necessary changes made to technical data. In the event of technical problems or other queries, please contact our customer services (see address details on the back).
Contents
- Safety 4
1.1 General Safety Requirements – EN 60745-1....4
1.2 Safety Instructions – Jigsaw EN 60745-2-11....6
1.3 Product safety symbols 6
-
Product description....7
-
Assembly and setup......8
3.1 Changing the blade 8
3.2 Fitting the edge guide 8
3.3 Adjusting the soleplate bevel angle....9
3.4 Setting the pendulum action....9
3.5 Laser/LED light 10
3.6 Setting the blade speed....10
3.7 Switch operation 10
3.8 Vacuum cleaner dust extraction.... 11
- Operating tips....11
4.1 Preparations.... 11
4.2 Sawing....11
4.3 Internal cuts.... 11
4.4 Sawing metal 12
-
Troubleshooting.... 12
-
Care and maintenance 13
-
Disposal 13
-
Specifications 13
1. Safety
1.1 General Safety Requirements – EN 60745-1
Warning: Read all the instructions. Failure to comply with the following instructions can lead to electric shocks, fires and/or serious injury. The term “power tool” in the warning text below refers to your handheld mains operated or battery operated tool.
SAVE THESE INSTRUCTIONS.
1) Work area
a) Keep the work area clean and well illuminated. Cluttered and poorly lit areas invite accidents.
b) Do not use power tools in explosive environments, e.g. near to flammable liquids, gases or dust. Power tools generate sparks that can easily ignite dust or fumes.
c) Keep children and bystanders away from the area where you are using the power tool. Distractions can cause you to lose your concentration and control.
2) Electrical safety
a) The plug of the power tool must fit correctly into the wall socket. Never modify the plug in any way. Never use an adaptor together with earthed power tools. Unmodified plugs and suitable wall sockets minimize the risk of electric shocks.
b) Avoid physical contact with earthed objects, such as pipes, radiators, ovens or refrigerators. There is an increased risk of receiving an electrical shock if your body is earthed.
c) Do not expose the power tool to rain or other wet conditions. Water entering a power tool will increase the risk of electric shock.
d) Do not abuse the mains lead. Never use the lead to carry the tool or pull the plug from a wall socket. Keep the lead away from heat, oil, sharp edges and moving parts. Damaged or tangled leads increase the risk of electric shock.
e) When using power tools outdoors, use an extension lead that is suitable for this purpose. The use of an extension lead designed for outdoor use decreases the risk of electric shocks.
3) Personal safety
a) Pay attention to what you are doing and use common sense when using power tools. Never use power tools if you are tired or under the influence of drugs, alcohol or medication. One moment of inattention while using a power tool may result in serious injury.
b) Wear protective clothing. Always wear safety glasses. Using protective clothing such as dust masks, non-slip safety shoes, helmets and ear defenders when needed decreases the risk of injury.
c) Avoid accidental starts. Make sure that the power switch is set to OFF before plugging the tool into a wall socket. Never carry a power tool with your finger on the trigger and never connect the power tool to a wall socket when the switch is set to ON, since it may result in injury.
d) Remove all service tools/keys before switching on the power tool. A service tool left on a rotating part of the power tool may result in personal injury.
e) Do not overreach. Make sure you stand steady and well balanced at all times. This will allow you to have more control in unexpected situations.
f) Wear suitable clothing. Do not wear loose-fitting clothing or jewellery. Keep hair, clothes and gloves away from moving parts. Loose-fitting clothes, jewellery or long hair could potentially become caught in any moving parts.
g) If equipment for dust extraction or collecting is available make sure it is connected and used properly. Use of dust collection equipment can reduce dust related hazards.
4) Use and maintenance of the power tool
a) Do not force the power tool. Use the correct power tool for your application. The correct power tool will perform the task better and safer if used at the correct feed rate.
b) Never use the power tool if the power switch does not switch the tool on and off. Any power tool that cannot be controlled by the power switch is dangerous and must be repaired.
c) Unplug the lead from the wall socket before making any adjustments, changing accessories or storing the power tool. These precautions reduce the risk of the power tool starting unexpectedly.
d) Store power tools that are not being used out of children's reach. Do not allow people who are unfamiliar with the tool or its functions to operate it. Power tools can be dangerous if they fall into the hands of inexperienced users.
e) Maintain power tools. Check for any incorrect settings, parts that catch, broken parts or anything else which may cause the power tool to malfunction. If something is damaged it must be repaired before use. Accidents are frequently caused by poorly maintained power tools.
f) Keep tools sharp and clean. Properly maintained cutting tools with sharp cutting edges are less likely to bind and are easier to control.
g) Use the power tool, accessories and similar according to the instructions and in an appropriate way suitable for the type of power tool used. Also take into consideration your work environment and the type of work to be done. Using the power tool for a purpose other than that for which it is intended could result in a dangerous situation.
5) Service
a) Repairs and service should only be performed by qualified tradesmen, and only with original spare parts. This guarantees that the safety of the power tool is maintained.
1.2 Safety Instructions – Jigsaw EN 60745-2-11
Warning: Always disconnect the plug from the mains before adjusting, servicing or performing maintenance on the machine.
- Hold the power tool by its insulated gripping surfaces whenever there is a risk of the saw blade coming into contact with hidden live wires or its own power flex. If the saw blade comes into contact with live wires it may electrify the metal parts of the jigsaw which can give the user an electric shock.
- If the mains lead is damaged it should only be replaced by the retailer.
- Keep your hands away from the blade and other moving parts.
- Do not reach under the workpiece being sawed. Be extra careful if the blade or your hand is out of sight. Make sure that the underside of the workpiece is free of obstacles.
- Do not use blunt or damaged saw blades. Bent saw blades can easily break or cause kickback.
- Start the saw and let it run up to speed before starting to cut.
- Make sure that the soleplate is in constant contact with the workpiece during sawing. Be extra careful when cutting with a tilted soleplate as it is easy to exert too much lateral force on the saw blade.
- Secure the workpiece with a clamp, vice, etc.
- Make sure that the settings are correct and that the blade is securely fastened in the blade holder before beginning to saw.
- Make sure that the saw blade has come to a complete stop before removing the saw from the cut. The saw blade should not be stopped by applying lateral force to the side of the blade.
1.3 Product safety symbols

natural_image
Four circular icons showing different human and professional roles: person holding a book, sunglasses, head with hands, face mask, and computer (no text or symbols)Read the instruction manual before use.
Always wear eye protection.
Always wear ear protection.
Always wear a dust mask.
2. Product description
- Jigsaw
- Laser guide
- LED worklight
- Blower and dust extraction port
• Keyless blade holder for quick and easy blade changes -
Comes with parallel guide and saw blade
-
Saw blade
- Edge guide slots with set screws (2B)
- Chip guard
- Keyless blade holder with lock (4B)
- Laser
- Pendulum action control
- Laser/LED power switch
- Speed selector control
- Power switch
- Trigger lock button
- Allen key
- Motor cooling vents
- Dust extraction vacuum adaptor
- Sawdust deflector switch The switch should be forward to blow dust away from sawing line and backward when a dust collector is attached.
- Bevel angle scale
- Soleplate
- Blade guide roller
- Parallel edge guide
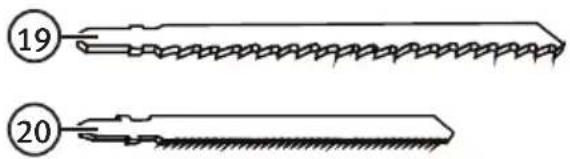
- Wood cutting blade
- Metal cutting blade


3. Assembly and setup
Warning: Unplug the jigsaw from the electrical socket before carrying out any adjustment, servicing or maintenance.
3.1 Changing the blade
- Undo the blade holder lock (4B) by lifting it up towards the handle. Remove the used blade.
- Insert the new blade (1) as far up into the blade holder (4) as it will go. Check that the back of the blade runs along the guide roller (17).
- Release the blade holder lock.
- Check that the blade is held securely by trying to pull it.
Note: The saw blade will be locked as soon as the blade holder lock is released.

3.2 Fitting the edge guide
- Undo the two set screws (2B) but do not remove them. Use the Allen key (11) which is kept in a holder on the power lead.
- Slide the edge guide (18) into the slots (2) on the soleplate.
- Set the desired length.
- Tighten the set screws.
- Check that the saw is set correctly by test-cutting a piece of scrap wood/metal before sawing the workpiece. Adjust the edge guide if necessary.

3.3 Adjusting the soleplate bevel angle
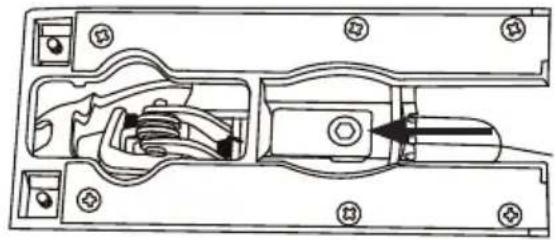
The soleplate (6) can be tilted up to 45^ to the right or left.
- Loosen the socket head screw on the bottom of the soleplate.
natural_image
Technical line drawing of a mechanical assembly with internal components and mounting holes (no text or symbols)
natural_image
Technical diagram of a mechanical assembly with internal components and directional arrows (no text or labels)
natural_image
Technical line drawing of a sewing machine with no visible text or symbols-
Slide the soleplate (6) forwards and tilt it to the required angle. There are fixed settings for -45^ , 0^ and 45^ .
-
Tighten the socket head screw.
-
Check that the saw is set correctly by test-cutting a piece of scrap wood/metal before sawing the workpiece. Adjust the angle if necessary.
Do NOT pull the soleplate (6) backwards if you want to set an angle other than the fixed settings. Set the desired bevel angle and then tighten the set screw.
3.4 Setting the pendulum action
The pendulum action can improve cutting efficiency and the setting can be adjusted until the optimum setting for the material being cut has been found. However, the swing of the pendulum action does create a rougher finish, so if a really fine finish is required the pendulum action should be set to 0.
The pendulum action control (6) sets the degree of pendulum swing. There are 4 fixed settings, turn the control carefully until it clicks into a setting.
- 0 – sheet metal, steel or rubber
• 1 – non-ferrous metals, hard woods, plastics - 2 - wood
• 3 – wood (highest removal rate)

natural_image
Technical line drawing of a mechanical assembly with no visible text or symbols
natural_image
Technical line drawing of a mechanical device with no visible text or symbols
natural_image
Technical line drawing of a mechanical device with no visible text or symbols
natural_image
Technical line drawing of a mechanical device with no visible text or symbols3.5 Laser/LED light
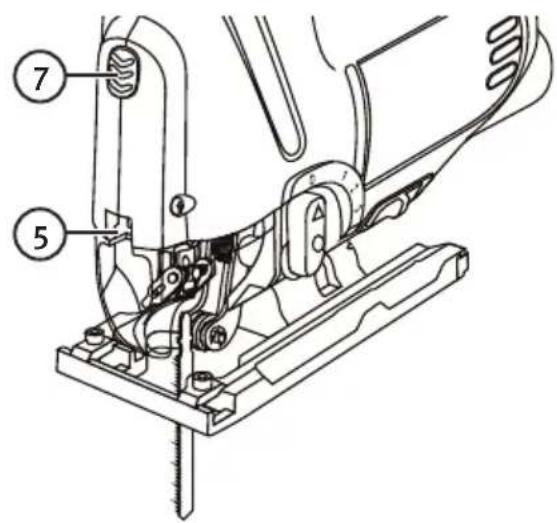
The laser/LED light is controlled by a switch (7) on the front of the housing. The laser projects a line in front of the jigsaw to help guide the sawing line.
Press the switch the required number of times to select one of the following settings:
| LED worklight Laser | |
| ON OFF | |
| OFF ON | |
| ON ON | |
| OFF OFF |
Warning:
Never point the laser beam at a person or animal. Never look directly into the laser beam. The laser beam can cause permanent eye damage.
3.6 Setting the blade speed
The blade speed can be adjusted to suit the material by rotating the speed selector control (8), even during operation. 1 = lowest speed, 6 = highest speed.
After cutting for an extended time at low speed the motor should be run at maximum speed for about 3 minutes to cool down the motor.

3.7 Switch operation
Starting the jigsaw: To start the jigsaw, pull and hold in the trigger (9).
Stopping the jigsaw: Release the trigger to stop the jigsaw.
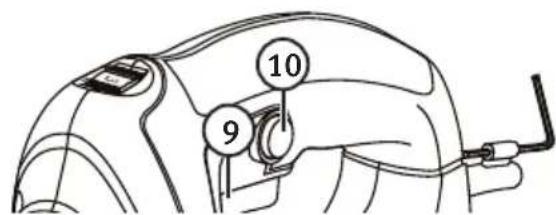
The jigsaw is equipped with a lock button (10) to lock the trigger on for longer cuts.
To lock the trigger (9) in the on position:
Press the lock button (10) and trigger (9) simultaneously and then release the trigger before the lock button.
Stopping when the trigger is locked:
To disengage the trigger lock and stop the jigsaw, pull and release the trigger (9) once.
3.8 Vacuum cleaner dust extraction
- Fit the vacuum cleaner onto the dust extractor port (13).
- Set the sawdust deflector switch (14) to the forward position.
Note: The switch should be in the rear position when the vacuum cleaner is not used, the cooling air from the motor will then be directed to blow the sawing line clean.

4. Operating tips
4.1 Preparations
• Measure and mark out the sawing line carefully before starting to cut.
- Small workpieces should be securely clamped. Make sure that the power supply cable does not impede working operations or come into contact with the blade during use.
- Check that the soleplate is locked at the required angle before you begin sawing.
- If you are unsure about the choice of blade speed or type of blade, test-cut a piece of scrap of the same material as the workpiece.
4.2 Sawing
- Hold the jigsaw in a firm grip. Make sure that the saw blade is not in contact with the workpiece and then pull the trigger to start the saw. Let the motor come up to speed before starting to cut.
- Never apply excessive forward pressure to the tool – always let the blade do the work.
- Keep hands in sight, do not hold hands under the workpiece where the blade cannot be seen.
4.3 Internal cuts
This operation should be undertaken with great care and should only be performed by experienced operators. Internal cutting is only possible in soft materials such as wood.
- Rest the front of the soleplate on the workpiece and tilt the saw forwards. Make sure that the saw blade is not in contact with the workpiece.
- Run the blade up to full speed and slowly pivot the saw so the blade starts to cut into the material, then slowly lower the entire soleplate onto the workpiece.
(Alternatively, a hole can be drilled in the material to provide a starting point for the blade.)

natural_image
Line drawing of a sewing machine on a base, showing mechanical components and a downward arrow indicating motion (no text or symbols)4.4 Sawing metal
- Be careful, the saw blade can easily bend.
- Use a finer toothed blade if the jigsaw vibrates a lot during operation.
- Lower the speed if the saw blade becomes very hot.
- The use of some kind of lubrication/coolant is recommended, e.g. alcohol for aluminium and cutting oil for steel.
- When cutting thin sheet metal, it is advisable to clamp the sheet to a sheet of thin plywood or similar on either side of the metal. Then saw through all the layers.
5. Troubleshooting
| Problem Possible cause Action | ||
| The machine does not start. | No voltage in the wall socket. | Check to see if there is power at the wall socket. |
| Worn brushes. Contact us in case of motor or electrical faults. | ||
| Short circuit. | ||
| Faulty power trigger. | ||
| The machine runs slowly. | Dull or damaged saw blade. Replace saw blade. | |
| Speed too low. Alter the variable setting. | ||
| The motor is overheated. Do not press down too hard. | ||
| Strange noise. | Mechanical fault. Contact us. | |
| Faulty windings. | ||
| Heavy vibration. | Loose blade. Check the saw blade and make sure it is fitted correctly. | |
| Sparks in the motor. | Brushes jammed. Contact us. | |
| Winding short circuited. | ||
| Dirty commutator. | ||
6. Care and maintenance
- Unplug the mains lead before cleaning the product.
- Clean the product using a soft, moist cloth. Only use mild detergents; never use solvents or strong, abrasive cleaning agents for cleaning as these can damage the product.
• Always keep the ventilation openings of the motor free of dust and debris.
7. Disposal
This product should be disposed of in accordance with local regulations. If you are unsure how to proceed, contact your local council.
8. Specifications
Power output 800 W
Variable speed 800–3000 strokes/min
Pendulum action 4 settings
Blade clamp T-shank and U-shank compatible
Soleplate bevel 0–45°
Sawing capacity Wood: 80 mm, steel: 8 mm
Sound LwA = 100 dB(A), K = 3 dB(A)
$$ \mathrm{LpA} = 8 9 \mathrm{dB(A)}, K = 3 \mathrm{dB(A)} $$
Vibration Cutting boards a
Cutting sheet metal a
$$ \mathrm{h}, \mathrm{B} = 8. 6 4 1 \mathrm{m} / \mathrm{s} ^ {2}, \mathrm{K} = 1. 5 \mathrm{m} / \mathrm{s} ^ {2} $$
$$ h, M = 7. 8 5 6 \mathrm{m} / \mathrm{s} ^ {2}, K = 1. 5 \mathrm{m} / \mathrm{s} ^ {2} $$
Weight 2.1 kg
Pendelsticksåg
ART.NR 18-3557 MODELL JD2902LK-UK
40-8774
JD2902LK
natural_image
Four circular icons showing a person reading, wearing sunglasses, using a phone, and using a smartphone (no text or symbols)
natural_image
Technical line drawing of a mechanical assembly with internal components and mounting holes (no text or symbols)
natural_image
Technical line drawing of a mechanical assembly with internal components and directional arrows (no text or symbols)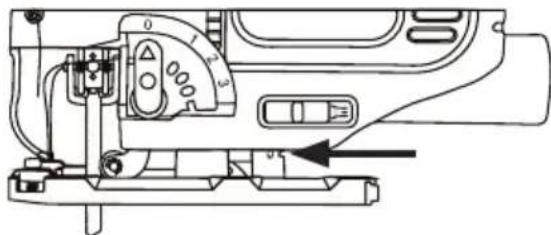
natural_image
Technical line drawing of a sewing machine with no visible text or symbolsnatural_image
Technical line drawing of a mechanical assembly with no visible text or symbols
natural_image
Technical line drawing of a mechanical device with no visible text or symbols
natural_image
Technical line drawing of a mechanical device with no visible text or symbols
natural_image
Technical line drawing of a mechanical assembly with no visible text or symbols3.5 Laser/LED-belysning
Varning!
4. Användningstips
4.1 Förberedelser
natural_image
Line drawing of a sewing machine on a base, showing mechanical components and a downward arrow indicating motion (no text or symbols)
natural_image
Technical line drawing of a mechanical assembly with internal components and mounting holes (no text or symbols)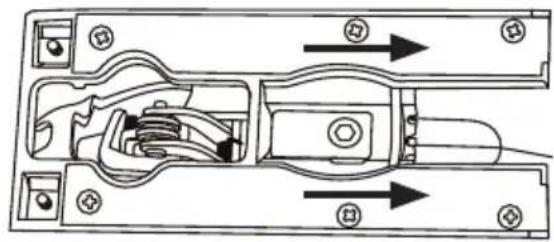
natural_image
Technical diagram of a mechanical assembly with internal components and directional arrows (no text or labels)
natural_image
Technical line drawing of a sewing machine with no visible text or symbols-
Trekk fotplaten (6) framover og still inn ønsket vinkel. Det er faste innstillinger for -45°, 0° og 45°.
-
Trekk til skruen.
-
Foreta en prøvesaging på et testeemne og kontroller målene. Juster vinkelen ved behov.
natural_image
Technical line drawing of a mechanical assembly with no visible text or symbols
natural_image
Technical line drawing of a mechanical device with no visible text or symbols
natural_image
Technical line drawing of a mechanical device with no visible text or symbols
natural_image
Technical line drawing of a mechanical device with no visible text or symbols3.5 Laser-/LED-belysning
Advarsel!
Vend aldri laserstrålen mot mennesker eller dyr. Se aldri inn i laserstrålen. Laserstrålen kan forårsake synsskader.
natural_image
Line drawing of a sewing machine on a base, showing mechanical components and a downward arrow indicating motion (no text or symbols)4.4 Saging i metall
3.5 Laser-/LED-valot 43
natural_image
Technical line drawing of a mechanical assembly with internal components and mounting holes (no text or symbols)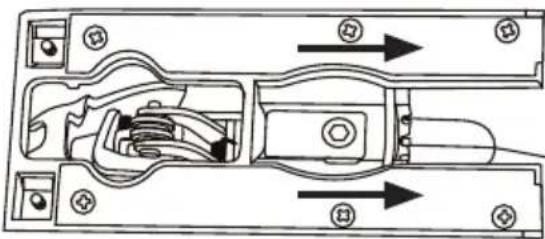
natural_image
Technical line drawing of a mechanical assembly with internal components and directional arrows (no text or symbols)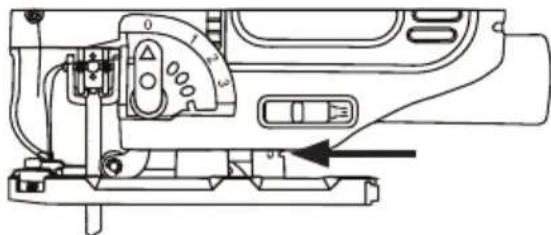
natural_image
Technical line drawing of a sewing machine with no visible text or symbolsnatural_image
Technical line drawing of a mechanical assembly with no visible text or symbols
natural_image
Technical line drawing of a mechanical assembly with no visible text or symbols
natural_image
Technical line drawing of a mechanical device with no visible text or symbols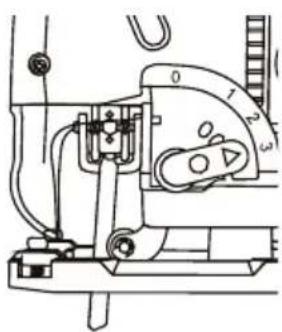
natural_image
Technical line drawing of a mechanical device with no visible text or symbols3.5 Laser-/LED-valot
Varoitus!

natural_image
Technical line drawing of a mechanical assembly with internal components and mounting holes (no text or symbols)
natural_image
Technical diagram of a mechanical assembly with internal components and directional arrows (no text or labels)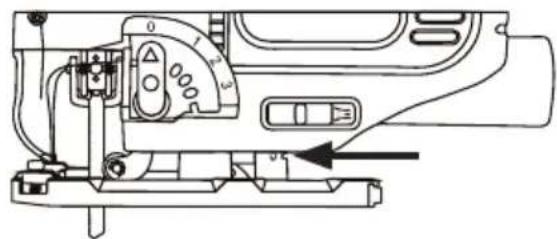
natural_image
Technical line drawing of a sewing machine with no visible text or symbolsnatural_image
Technical line drawing of a mechanical assembly with no visible text or symbols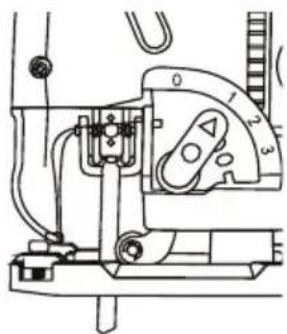
natural_image
Technical line drawing of a mechanical device with no visible text or symbols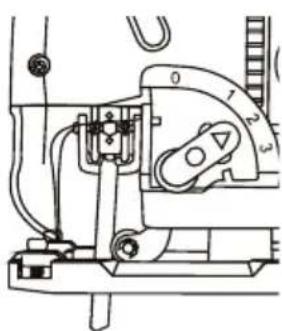
natural_image
Technical line drawing of a mechanical device with no visible text or symbols
natural_image
Technical line drawing of a mechanical device with no visible text or symbolsAchtung:
4. Benutzungstipps
4.1 Vorbereitungen
natural_image
Line drawing of a sewing machine on a base, showing mechanical components and a downward arrow indicating motion (no text or symbols)Declaration of Conformity
Declares that this product complies with the requirements of the following directives and standards
Machinery directive 2006/42/EC
EN 60745-1:2009+A11
EN 60745-2-11:2010
EMC directive 2004/108/EC
EN 55014-1:2006+A1+A2
EN 55014-2:1997+A1+A2
EN 61000-3-2:2006+A1+A2
EN 61000-3-3:2008
Low voltage directive 2006/95/EC

Klas Balkow
President
Insjön, Sweden, 2014-02-19
SVERIGE
KUNDTJÄNST Tel: 0247/4 45 00
Fax: 0247/4 45 09
E-post: kundservice@clasohlson.se
INTERNET www.clasohlson.se
BREV Clas Ohlson AB, 793 85 INSJÖN
NORGE
KUNDESENTER Tlf.: 23 21 40 00
Faks: 23 21 40 80
E-post: kundesenter@clasohlson.no
INTERNETT www.clasohlson.no
POST Clas Ohlson AS, Postboks 485 Sentrum, 0105 OSLO
SUOMI
ASIAKASPALVELU Puh.: 020 111 2222
POSTAL 10 – 13 Market Place
Kingston Upon Thames
Surrey
KT1 1JZ
DEUTSCHLAND

- Important!
- Viktig information:
- Contents
- Safety
- General Safety Requirements – EN 60745-1
- 1) Work area
- 2) Electrical safety
- 3) Personal safety
- 5) Service
- Safety Instructions – Jigsaw EN 60745-2-11
- Product safety symbols
- Product description
- Assembly and setup
- Changing the blade
- Fitting the edge guide
- Adjusting the soleplate bevel angle
- Setting the pendulum action
- Laser/LED light
- Warning:
- Setting the blade speed
- Switch operation
- Vacuum cleaner dust extraction
- Operating tips
- Preparations
- Sawing
- Internal cuts
- Sawing metal
- Troubleshooting
- Care and maintenance
- Disposal
- Specifications
- Pendelsticksåg
- Laser/LED-belysning
- Varning!
- Användningstips
- Förberedelser
- Laser-/LED-belysning
- Advarsel!
- Saging i metall
- Laser-/LED-valot
- Varoitus!
- Achtung:
- Benutzungstipps
- Vorbereitungen
- Declaration of Conformity
- SVERIGE
- NORGE
- SUOMI
- DEUTSCHLAND
Brand : Cotech
Model : JD2902LK
Category : Saw