SPK5006 - Loudspeaker Manta - Free user manual and instructions
Find the device manual for free SPK5006 Manta in PDF.


| Product Type | Karaoke Bluetooth Speaker Box |
| Model | SPK5006 |
| Brand | Manta |
| Power Supply | AC 230V~50Hz / DC 12V |
| Audio Sources | Bluetooth, FM Radio, USB A, USB B, AUX, LINE, Microphone, Guitar |
| Bluetooth Version | Standard (pairing code 0000) |
| FM Radio | With auto scan and memory |
| Playback Control | Next/Previous, Play/Pause, Volume for each USB |
| DJ Effects | Scratch, Reverb, Beat Box, Yeah, DJ Off |
| Light Modes | R, G, B, RG, RB, GB, RGB, Auto, Demo |
| X-Bass (X Drive) | Yes, toggle on/off via remote |
| Equalizer Controls | Bass, Treble, Main volume |
| Display Type | LED Display |
| Remote Control | Included with full function |
| Dimensions (approx.) | 400 x 300 x 500 mm |
| Weight (approx.) | 5 kg |
| Ventilation Clearance | 10 cm on top, rear, sides |
| Cleaning | Use a clean, dry cloth; do not use chemical solvents |
| Safety Warnings | Do not open; risk of electric shock; no user-serviceable parts |
| Repairs | Only by qualified service personnel |
| Included Accessories | Remote control, FM antenna, user manual |
Frequently Asked Questions - SPK5006 Manta
User questions about SPK5006 Manta
0 question about this device. Answer the ones you know or ask your own.
Ask a new question about this device
Download the instructions for your Loudspeaker in PDF format for free! Find your manual SPK5006 - Manta and take your electronic device back in hand. On this page are published all the documents necessary for the use of your device. SPK5006 by Manta.
USER MANUAL SPK5006 Manta
Karaoke Bluetooth Speaker Box PHANTOM
Model:
SPK5006
Instrukcja obsługi
User's Manual
Bedienungsanleitung
Istruzioni d'uso
Manual de usuario
Návod k obsluze
- WYŚWIETLACZ LED
- GŁOŚNOŚĆ
- EFEKTY DJ
natural_image
Symbol of a trash bin with crossed lines indicating no waste or discharge (no text or labels)Caution: Read this before operating your unit.
1 To assume the finest performance, please read this manual carefully. Keep it in a safe place for future reference.
2 Install this sound system in a well ventilated, cool, dry, clean place - away from direct sunlight, heat sources, vibration, dust, moisture, and/or cold. For proper ventilation, allow the following minimum clearances around this unit.
Top: 10 cm (4 in)
Rear: 10 cm (4 in)
Sides: 10 cm (4 in)
3 Locate this unit away from other electrical appliances, motors, or transformers to avoid humming sounds.
4 Do not expose this unit to sudden temperature changes from cold to hot, and do not locate this unit in an environment with high humidity (i.e. a room with a humidifier) to prevent condensation inside this unit, which may cause an electrical shock, fire, damage to this unit, and/or personal injury.
5 Avoid installing this unit where foreign object may fall onto this unit and/or this unit may be exposed to liquid dripping or splashing. On the top of this unit, do not place:
Other components, as they may cause damage and/or discoloration on the surface of this unit.
Burning objects (i.e. candles), as they may cause fire, damage to this unit, and/or personal injury.
Containers with liquid in them, as they may fall and liquid may cause electrical shock to the user and/or damage to this unit.
6 Do not cover this unit with a newspaper, tablecloth, curtain, etc. in order not to obstruct heat radiation. If the temperature inside this unit rises, it may cause fire, damage to this unit, and/or personal injury.
7 Do not plug in this unit to a wall outlet until all connections are complete.
8 Do not operate this unit upside-down. It may overheat, possibly causing damage.
9 Do not use force on switches, knobs and/or cords.
10 When disconnecting the power cable from the wall outlet, grasp the plug; do not pull the cable.
11 Do not clean this unit with chemical solvents; this might damage the finish. Use a clean, dry cloth.
12 Only voltage specified on this unit must be used. Using this unit with a higher voltage than specified is dangerous and may cause fire, damage to this unit, and/or personal injury. We will not be held responsible for any damage resulting from use of this unit with a voltage other than specified.
13 To prevent damage by lightning, keep the power cable and outdoor antennas disconnected from a wall outlet or this unit during a lightning storm.
14 Do not attempt to modify or fix this unit. Contact Qualified service personnel when any service is needed. The cabinet should never be opened for any reasons.
15 When not planning to use this unit for long periods of time (i.e. vacation), disconnect the AC power plug from the wall outlet.
16 Be sure to read the TROUBLESHOOTING section on common operating errors before concluding that this unit is faulty.
17 Before moving this unit, disconnect the AC power plug from the wall outlet.
18 Condensation will form when the surrounding temperature changes suddenly. Disconnect the power cable from the outlet, then leave this unit alone.
19 When using this unit for a long time, this unit may become warm. Turn the power off, then leave this unit alone for cooling.
20 Install this unit near the AC outlet and where the AC power plug can be reached easily.
21 The batteries shall not be exposed to excessive heat such as sunshine, fire or the like. When you dispose of batteries, follow your regional regulations.
22 Excessive sound pressure from earphones and headphones can cause hearing loss.
REAR PANEL
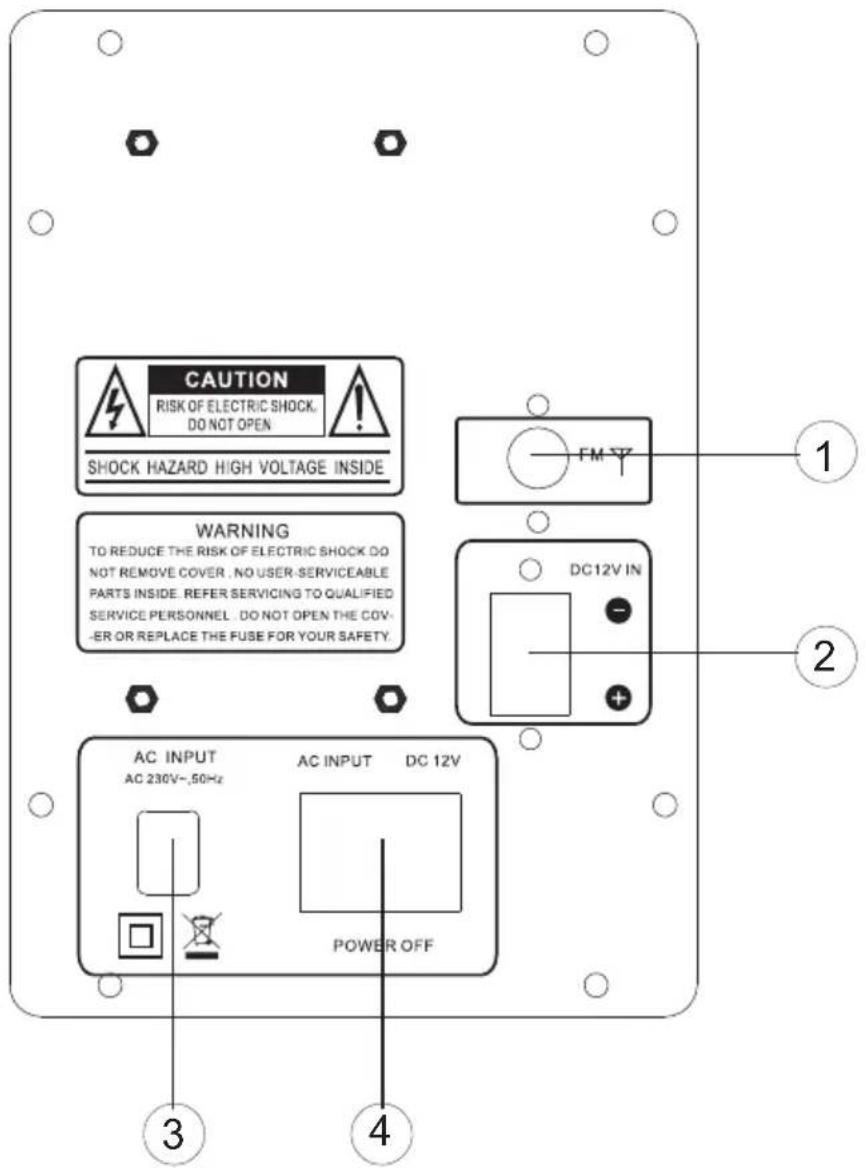
1.FM ANTENNA
FM antenna input jacks.
2.DC 12V INPUT
To connect to external power DC 12V
4.POWER
Switch power DC 12V INPUT, AC INPUT, AC or DC off.
5.AC INPUT
AC 230V\~,50Hz
FRONT PANEL

1.LED DISPLAY
2.VOLUME/MULTI
Rotate the knob to adjust the volume and this knob to choose different DJ Effect
3.DJ MODE
Press this key to choose different dj mode.
4.USB B NEXT
Press this key to choose next music with USB B
5.USB B PREV
Press this key to choose previous music with USB B
6.USB B VOLUME
This is used to adjust the volume with USB B
7.USB B PAUSE
Press this key to choose play/pause music with USB B
- INPUT USB B
Press this key to choose USB B input mode.
9.USB B input jack
10.GUITAR VOLUME
11.MIC VOLUME
12.ECHO
13. GUITAR jack
- Wall spotlight
15.MIC jack - LINE IN AUDIO INPUT JACK
Connect to LINE IN signal output jack.
17.DC POWER light
18.AUX AUDIO INPUT JACK
Connect to AUX signal output jack.
19.USB A input jack
20.STANDBY
- INPUT USB A
Press this key to choose USB A input mode.
22.USB A PAUSB
Press this key to choose play/pause music with USB A
23.USB A VOLUME
This is used to adjust the volume with USB A
24.USB A PREV
Press this key to choose previous music with USB A
25.USB A NEXT
Press this key to choose next music with USB A
- MENU
This switch selects the menu.
REMOTE CONTROL

- LIGHT
- STANDBY
- NUMBER BUTTON
- TUNING-
- CHANNEL-
- VOLUME+
- X DRIVE
- TREBLE+
- VOLUME-
- TREBLE-
- AUX-A
- USB-A
- USB-A F.WARD
- USB-A B.WARD
- LINE
- USB-B
- USB-B F.WARD
- USB-B B.WARD
- MUTE
- FM
- AUTO
- TUNING+
- CHANNEL+
- BT
- DISCONNECT
- BASS+
- BASS-
- USB-A REPEAT
- 日A B S E
- BREAOUS
- NEBTA
- USB-B REPEAT
- 日A B S E
- BREEBOUS
- N687B
Normal function
- Be sure to switch off the power and to connect to corresponding input jacks.
- Turn on the power and wait 3-4 seconds until the speaker functions are connected.
- Select an audio source by pressing the INPUT A key on the front panel to display AUX A, BT-A, FM, USB A. Press the INPUT B key on the front panel to display LINE, USB B.
- Adjust the VOLUME/MULTI knob on the front panel or the VOL+/- key on the remote control to adjust the setting of the main volume. Then turn the left push shot to adjust the volume of USB A, turn the right push shot to change the volume of the USB B.
- Press the MENU key on the front panel to play BASS, TREBLE, XDRIVE,AUTO, MAIN then adjust the VOLUME knob to change music treble,bass,light mode and sound effect.
- Press the DJ button on the front panel to display SCRATCH, REVERB, BEAT BOX, YEAH, DJ OFF mode, then adjust the DJ knob to design and change the music effect as you like.
- Press the LIGHT button on the remote control or press the MENU button on the front panel to display light mode, then press the VOLUME/MULTI knob to change the OFF,R,G,B,RG,RB,GB,RGB, AUTO,DEMO light mode.
- Press the MUTE key to mute, press it again to reset. Press X Drive on the remote t turn on/off X-Bass effect.
Light color control function
To control the light modes coming from the speaker panels by "Speaker" menu or "light model" button on remote control
● R = red lights flash
● G = green lights flash
● B = blue lights flash
● RG = red and green lights flash
● RB = red and blue lights flash
● GB = green and blue lights flash
- RGB = red, green, and blue lights flash
● Auto = the various color combinations cycle through and flash.
● Demo = lights flash and change color as if they were responding to the beat of the music.
Tuner applications
-
Before using the radio functions, you must attach the supplied antenna. Adjust the antenna to obtain optimum reception.
Press the INPUT A key on the front panel(amplifier)or the FM key on the remote control, to select FM function. " " -
Press the CH+/CH- key on the remote control to find radio bands that you have previously saved.
-
Press or hold the TU+/TU- key on the remote control to adjust the radio frequency manually.
-
Press the AUTO key on the remote control, the machine will scan radio channels from low-frequency to high-frequency by itself and memorize the channels one by one.
KARAOKE & GUITAR function
- The machine can auto detect whether MIC or GUITAR is inserted.
Please turn off the microphone volume and adjust the volume gradually after inserting the microphone. - Press VOL+/- on the remote or adjust the VOL knob on the front panel microphone VOLUME.
- Adjust the EChlOnkocoportheEcoH0.panel
- Adjostheg@ulteAgRiteOL knob on the front panel VOLUME
Note: Do not touch the top of the microphone when singing in order to avoid howling effect.
Adjust the microphone volume gradually to avoid howling effect.
Bluetooth pair and connect
● Turn off any Bluetooth devices previously paired (linked) with this unit.
● Turn on the Bluetooth features on your phone or music player.
- Turn on and set this unit to Bluetooth mode. The flashing blue light BT on LED display indicates it is in pairing mode.
- Set your phone or music player to search for Bluetooth devices.
- Select SPK5007 from search results on your phone or music player.
- Select OK or YES to pair this unit with your phone or music player.
- If protected, enter 0000 for passkey steady blue light indicates successful connection.
- Press the DISCONNECT key on the remote to disconnect the bluetooth.
Function of USB reader
USB A interface
This unit has two USB jacks. Press the INPUT A key to select USB A, then you can insert a USB to play music. Press the INPUT B key to select USB B, then you can insert the another USB to play music.
Important: The USB port is intended only for data transfer only, other devices cannot be used with this USB connection. The use of USB extension cords is not recommended.
HEADPHONE JACK
For private listening, insert a 6.3mm headphone into the PHONE JACK. The SPEAKER output is automatically cut off.
CAUTION: LISTENING AT HIGH POWER FOR A LONG MOMENT COULD DAMAGE USER'S EARS.

natural_image
Symbol of a trash bin with crossed lines indicating no waste or restriction, accompanied by a solid black rectangle below (no text or symbols)Correct Disposal of this product.
This marking indicates that this product should not be disposed with other household wastes throughout the EU. To prevent possible harm to the environment or human health from uncontrolled waste disposal, recycle it responsibly to promote the sustainable reuse of material resources. To return your used device, please use the return and collecon systems or contact the retailer where the product was purchased. They can take this product for environmental safe recycling.
Note!
Product design and Technical parameters may be change without noce. This mainly concerns parameters technical, software and user manual present. User's Manual is a general orientation on service product. Manufacturer and distributor do not assume any responsibility as compensation for any inaccuracies errors in the descripons appearing in this user manual.
HINTERES PANEEL
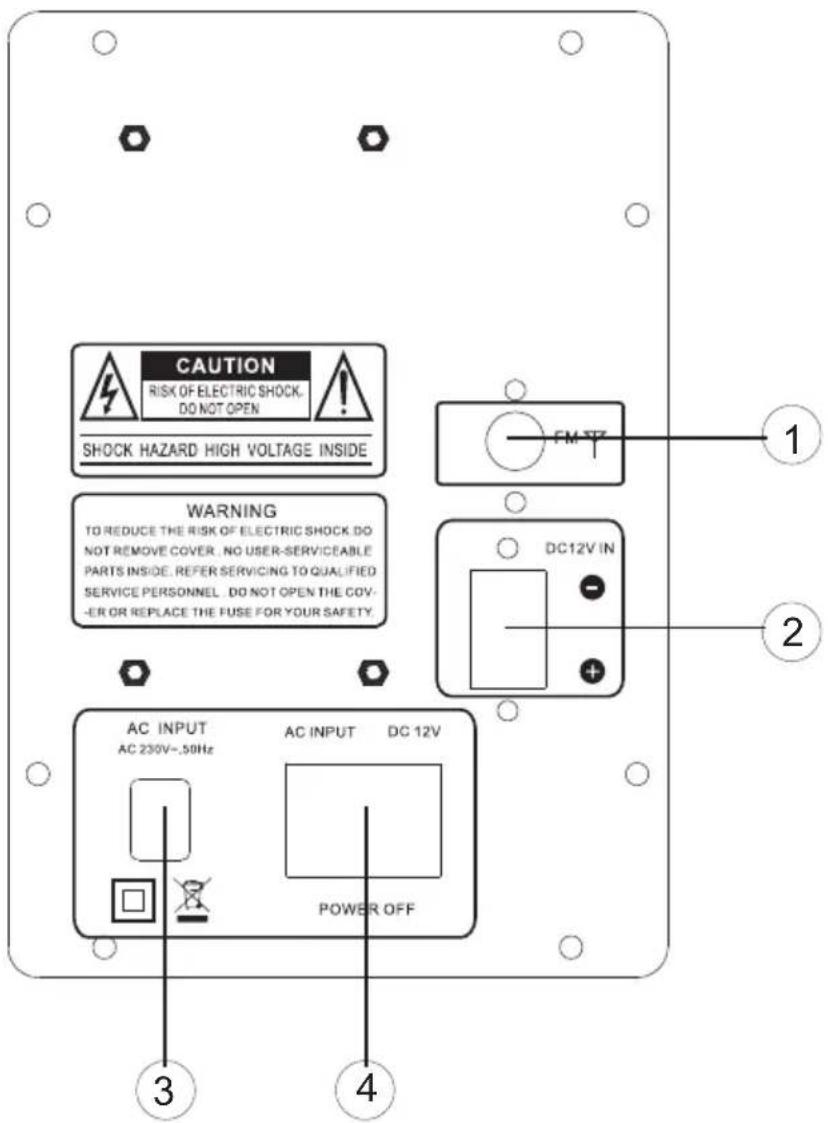
- FM-ANTENNE
-
LED-DISPLAY
-
VOLUME
-
DJ Effekte
1 PANTALLA LED
2 VOLUMEN / MULTI
3 EFFECTOS DJ
1 SCHERMO LED
2 VOLUME / MULTI
3 EFFETTI DJ
1 LED DISPLEJ
2 HLASITOST
3 DJ EFEKTY
natural_image
Abstract black-and-white circular logo with interlocking curved shapes (no text or symbols)MANTA
INFOLINIA SERWISOWA
The manufacturer reserves the right to make changes to product specificaons without noce.
Home: www.manta.com.pl Home support: www.manta.info.pl



Made in P.R.C. FOR MANTA EUROPE
- Karaoke Bluetooth Speaker Box PHANTOM
- Caution: Read this before operating your unit.
- REAR PANEL
- Normal function
- Light color control function
- Tuner applications
- KARAOKE & GUITAR function
- Bluetooth pair and connect
- Function of USB reader
- USB A interface
- HEADPHONE JACK
- Correct Disposal of this product.
- Note!
- HINTERES PANEEL
- MANTA
- INFOLINIA SERWISOWA
Brand : Manta
Model : SPK5006
Category : Loudspeaker