
GDT 2050 X - Range hood GRUNDIG - Free user manual and instructions
Find the device manual for free GDT 2050 X GRUNDIG in PDF.


| Product Type | Range Hood |
| Brand | Grundig |
| Model | GDT 2050 X |
| Width | 598 mm |
| Depth (closed) | 300 mm |
| Depth (open) | 452 mm |
| Height | 175 mm |
| Supply Voltage | 220-240 V ~ 50 Hz |
| Total Power | 220 W |
| Motor Power | 140 W |
| Suction Capacity | 375 m³/h |
| Air Outlet Diameter | 120 mm |
| Speed Settings | 3 positions (Light, Medium, Fast) |
| Lighting Type | Halogen |
| Lighting Power | 2 x 40 W |
| Filter Type | Aluminum oil trap filter (washable), optional carbon filter |
| Control Type | Sliding buttons |
| Installation Height | Minimum 65 cm above hob |
| Safety Features | Bipolar switch required; automatic shut-off when sliding panel pushed back |
| Environmental Note | Recyclable per WEEE directive |
Frequently Asked Questions - GDT 2050 X GRUNDIG
User questions about GDT 2050 X GRUNDIG
0 question about this device. Answer the ones you know or ask your own.
Ask a new question about this device
Download the instructions for your Range hood in PDF format for free! Find your manual GDT 2050 X - GRUNDIG and take your electronic device back in hand. On this page are published all the documents necessary for the use of your device. GDT 2050 X by GRUNDIG.
USER MANUAL GDT 2050 X GRUNDIG
natural_image
Exterior view of a modern kitchen air conditioner unit (no signage or text visible)
natural_image
Close-up of a curled paper corner with a gray highlight (no text or symbols)
DEUTSCH 05-14
ENGLISH 15-24
natural_image
3D diagram of a cabinet or shelf with a dimension label (150 mm) and label (Abbildung 1), no readable text or symbols beyond the label.natural_image
3D rendering of a simple cabinet or enclosure with a central circular opening and two open doors (no text or symbols visible)natural_image
3D diagram of a mechanical setup inside a transparent enclosure, showing a cylindrical component and a base block (no text or symbols)natural_image
Illustration of a hand inserting a device into a device with an arrow indicating direction (no text or symbols present)(Abbildung 10)
Aluminium-Fettfilter
natural_image
Illustration of a hand using a tool to adjust or install electronic components, showing three views (no text or symbols present)(Abbildung 11a)
GERÄT BEDIENEN
natural_image
Technical line drawing of a mechanical assembly with a hand operating a tool, showing a close-up of a component inside a housing (no text or symbols present)Technische Daten

- Do not plug in the hood before it is installed.
■ Operating voltage is 220 to 240 volts.
■ Power cord of your hood is supplied with an ungrounded plug. Have the electrical installation made by a qualified electrician.
■ Install a bipolar switch with a contact distance of at least 3 mm to the electrical circuit. - Do not make connections to the flues connected with stoves, exhaust shafts or flues with rising flames.
■ The height between the lower surface of the hood and upper surface of the oven/hub should not be less than 65 cm. - Do not operate the hood without its filters installed. Do not remove the filters while the hood is in use.
- Do not touch the lamps of the hood after operating it for a long time. Hot lamps may burn your hand.
- Check the hood from time to time when you are frying any food. Excessively heated oil may splash up to your hood and lead to danger.
■ There is a risk of fire if the hood is not cleaned in the specified periods. -
Do not allow high flames under the hood. Otherwise, oil in the aluminum filter may ignite and lead to a fire.
If you use a gas hob, do not leave open any of the burners when the hood is in use. When you take away your vessel from the hob, make sure you shut the relevant burner. Before you take away the cookware from the burner, we recommend that you shut the burner first.
■ After you place the pot or pan onto the burners, operate your hood. -
Operate your appliance for a while more after the end of cooking or frying in order to remove unpleasant smell and vapors from the air in the kitchen.
■ Ensure that fresh air enters the kitchen, especially when the hood is operated together with the gas hobs. - Keep the packaging materials away from the children since they may pose a danger to the children.
■ Flue connection pipe may be 4 to 5 meters long if no spill and bending is made during installation. If the pipe has to be longer than 5 meters, it is recommended that your hood is operated with a carbon filter when it is used indoors.
■ Make sure that your children do not play with this appliance. Do not allow children use this appliance. - Our company will not be responsible for any problems that arise from not observing the above warnings.
■ This appliance is intended for domestic use.
TECHNICAL SPECIFICATIONS
- Light
- Aluminum filter
- Aluminum filter handle
- Lamp button
- Sliding panel
- Perforated panel and synthetic filter
- Perforated panel pawl
| GDK 2050 X | |
| Width 598 mm | |
| Depth 300 (closed position) | 452 (open position) |
| Height 175 mm | |
| Supply voltage 220-240 V | ~ 50 Hz |
| Control 3 Positions | |
| Lamp power 2 x 40 W | |
| Air outlet pipe diameter | 120 mm |
| Capacity 375 m | 3/h |
| Motor power 140 W | |
| Total power 220 W |
Markings on the appliance or the values stated in other documents supplied with the appliance are values obtained under laboratory conditions as per relevant standards. These values may vary depending on the use of the appliance and the environmental conditions. Service life: 10 years (The period required for availability of spare parts for functioning of the appliance).
Product dimensions required for the installation of your hood is given in mm in the figure below.

Installation of your hood
You may install your hood on your kitchen furniture from the top or the sides.
The height between the lower surface of the hood and upper surface of the oven/hob should not be less than 65 cm.

Installation from top
The base of the cupboard that the hood shall be installed must be 135 mm over the cook tops as shown in (Figure 1).

natural_image
3D diagram of a cabinet or shelf with a dimension label (128) and figure number (Figure 1), no readable text or symbols beyond the label.Place your hood as shown in Figure 2. Secure it to the base of the cupboard with a 4.2 x 44.5 mm screw.

natural_image
3D rendering of a cabinet with open door and internal shelf (no text or symbols)If the installation holes are not drilled on the base of the cupboard, hood is placed on its housing and secured on the base of the cupboard with 3.5 x 16mm screws inside the body.
Note:
■ Front face of your hood shall be aligned with the front face of the cupboard.
Installation from sides
(Optional):
In this connection method, the base of the cupboard is level with the bases of other cupboards.
Installation:
Mark and cut the area on the cupboard base that shall be removed as per the dimensions given in Figure 3.
Remove the protrusions on both sides of the hood body. Install the wing screws from the inside of the body. Place the upper side of the hood inside the furniture from the base of the cupboard. Ensure that the wing screws are loosened; otherwise the hood shall not fit into its seating.
(Figure 4)
Pull the sliding part forwards, remove the filters and tighten the wing screws to secure the hood on the base of the cupboard (Figure 5). Screws shall be fully tightened clockwise.
Note:
■ You may procure the wing screws from the authorized dealers when it is required to install the hood with wing screws from the sides.

INSTALLATION
After the installation of your hood (both from the top or the sides) is done:
Connect an air outlet pipe suitable for the air outlet of the hood on the part remains inside the cupboard. Pipe shall protrude about 20 cm over the cupboard to allow the installation of the connection pipe that will take the aspirated air to outdoors (Figure 6).
After the installation is performed, you may use the 'L' profile delivered with the packing of your hood to remove the gap that nay be left on the rear part of your hood (Figure 6).

You must install an vent here if the hood shall be used in internal circulation mode by installing a carbon filter (Figure 7).

natural_image
3D diagram of a mechanical setup with a cylindrical component inside a transparent enclosure, labeled (Figure 7) and an arrow indicating motion direction (no text or symbols on the diagram itself)The surroundings of the pipe inside the cupboard may be covered as you desire.
Note:
The air outlet pipe shall be procured by the customer.
Usage Method
You can use your hood in two ways:
1- Usage with Flue Connection:
In usage with flue connection, hood must be connected to a flue that will discharge the air to outside. Ensure that the pipework connected to flue follows the shortest possible route to obtain best efficiency from your hood.
As the bends and elbows will cause decreases in the air suction power, using these must be avoided as much as possible.

Connection to flue (for a pipe with a diameter of 120 mm):
Procure a pipe with a diameter of 120, and connect one end of the pipe to the ventilation hole on the upper side of the hood and the other end to the flue.
It is not advisable to make connections to the flues connected with stoves or exhaust shafts. Do not make connections to these types of flues. Pipe connection must be as short as possible and have minimum number of elbows.
2- Internal Circulation (connection without a flue):
If your kitchen does not have a flue, you must use an anti-odor filter to operate your hood. Carbon anti-odor filter cleans the air inside kitchens and returns this air back to the kitchen where a flue is not available.
Connection without flue

Anti-odor filter contains charcoal (active carbon). This filter looks like an oil trap filter, and it must be replaced every 4 months approximately depending on your usage frequency. Pull the front panel to install carbon filters. To install the carbon filters, install them to both sides of the motor holder (Figure 10). To remove the carbon filters, repeat the above operations in reverse order.

natural_image
Illustration of a hand inserting a device into a device with an arrow indicating direction (no text or symbols present)(Figure 10)
Aluminum oil trap filter
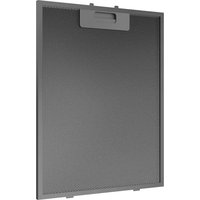
This filter is delivered with your hood. It must be used for any type of connection, whether it is with flue or not.
Your oven-top hood provides oil trapping feature thanks to its special filter.
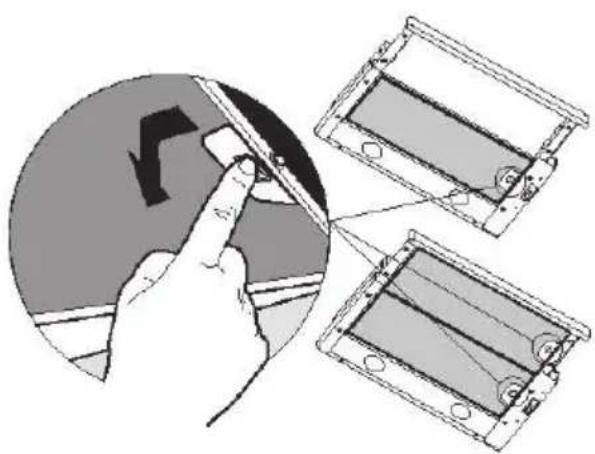
This filter is made of aluminum and thus, it is cleanable. Check your filter with a period of 1 month and if you see that it is dirty, wash the filter with detergent and after rinsing and drying the filter, install it to its place. A discoloration may be observed on aluminum filters as they are washed. This will not deteriorate the function of your filter.
To open the filter, hold it from the latches on both sides and pull it towards you. Perform this procedure in the reverse order to install it (Figure 11a).
Attention!
■ You can also wash your filters in dishwasher.
natural_image
Illustration of a hand holding a device with directional arrows, alongside three views of a smartphone (no text or symbols present)(Figure 11a)
OPERATING THE APPLIANCE
Control buttons are under the body right side bracket and in the front, and they can be seen when the sliding part is pulled out. You can operate your hood with two types of sliding control buttons (A, B) (Figure 12).

Fan motor button (B) has 3 positions.
1st position Light ventilation
2nd position Medium ventilation
3rd position Fast ventilation
You can switch the lamp of your hood on or off with Button A.
- Button A: Lighting control
- Button B: Fan motor control button
When the sliding part is moved, two micro-switches control the lamp and motor. When the sliding part is pushed back, lamp is turned off and motor is stopped (if the lamp and motor buttons are turned on before). When the sliding part is pulled out, hood operates with the preselected speed.
MAINTENANCE AND CLEANING
Cleaning and Care
1 Always unplug the appliance before cleaning. Ensure that the cleaning materials that you will use for cleaning your appliance do not contain particles that may scratch the painted surfaces. Use creamy or liquid cleaning agents.
2 Particularly do not neglect to clean your hood immediately after you have made frying.
3 Clean the hood with a cloth dampened with warm water or mild detergent water. You may use the cleaning agents commercially available for persistent grease etc. by following the warnings on the product. However, do not use abrasive or scratching agents.
4 Wash your aluminum oil trap filters with detergent and after rinsing and drying the filter, install it to its place in monthly periods. Replace your synthetic filters every 1 month approximately depending on the frequency of use.
If you need to transport the appliance:
1 Transport the appliance with its original package if possible, and follow the transport markings on the package.
2 If the original packaging is not available, fix the sliding panel to the body with tape to prevent it from moving.
3 Take measures to prevent any impact on your appliance.
4 Carry the appliance in its normal position.
Replacing the lamp
■ 40 W halogen lamps are used in your hood.
■ Pull the front panel to replace the lamps. Remove the filters.
■ Replace the lamp with a new one.
■ Place the filter again into its seat.

natural_image
Technical line drawing of a hand operating a tool with an inset showing a mechanical component (no text or symbols present)Technical data

This product conforms to European
Directives 2004/108/EC,
2006/95/EC, 2009/125/EC and
2011/65/EU.
Power supply
Operating voltage: 220-240V\~, 50Hz
Technical and design modifications reserved!
Environmental note

The symbol on the product or on its packaging indicates that this product may not be treated as household waste. Instead it shall be handed over to the applicable collection point for the recycling of electrical and electronic equipment. By ensuring this product is disposed of correctly, you will help prevent potential negative consequences for the environment and human health, which could otherwise be caused by inappropriate waste handling of this product. For more detailed information about recycling of this product, please contact your local city office, your household waste disposal service or the shop where you purchased the product.
- Aluminium-Fettfilter
- GERÄT BEDIENEN
- Technische Daten
- TECHNICAL SPECIFICATIONS
- Installation of your hood
- Installation from top
- Note:
- Installation from sides
- (Optional):
- INSTALLATION
- After the installation of your hood (both from the top or the sides) is done:
- Usage Method
- 1- Usage with Flue Connection:
- Connection to flue (for a pipe with a diameter of 120 mm):
- 2- Internal Circulation (connection without a flue):
- Aluminum oil trap filter
- Attention!
- OPERATING THE APPLIANCE
- MAINTENANCE AND CLEANING
- Cleaning and Care
- If you need to transport the appliance:
- Replacing the lamp
- Technical data
- Power supply
- Environmental note
Brand : GRUNDIG
Model : GDT 2050 X
Category : Range hood