
GDK5782 - Range hood GRUNDIG - Free user manual and instructions
Find the device manual for free GDK5782 GRUNDIG in PDF.


| Product Type | Range Hood |
| Brand | Grundig |
| Model | GDK5782 |
| Width | 60 cm (23.6 inches) |
| Height | 15 cm (5.9 inches) (adjustable for ducting) |
| Depth | 50 cm (19.7 inches) |
| Weight | 12 kg (26.5 lbs) |
| Power Supply | 220-240 V, 50 Hz |
| Max Motor Power | 238 W |
| Lighting | 2 x 2 W LED |
| Air Capacity (Max) | 650 m³/h |
| Noise Level (Max) | 65 dB(A) |
| Number of Speeds | 3 speeds + intensive |
| Controls | Push buttons |
| Extraction / Recirculation | Both options (ducting or carbon filter) |
| Grease Filters | Aluminum mesh, washable |
| Carbon Filter | Optional (not included) |
| Energy Efficiency Class | A |
| Annual Energy Consumption | 35 kWh/year (approx) |
| Cleaning Reminder | Filter saturation indicator |
| Safety Features | Automatic shut-off? Not specified; manual operation |
| Spare Parts Availability | Grundig service centers and online shops |
| Warranty | 2 years (based on standard Grundig policy) |
Frequently Asked Questions - GDK5782 GRUNDIG
User questions about GDK5782 GRUNDIG
0 question about this device. Answer the ones you know or ask your own.
Ask a new question about this device
Download the instructions for your Range hood in PDF format for free! Find your manual GDK5782 - GRUNDIG and take your electronic device back in hand. On this page are published all the documents necessary for the use of your device. GDK5782 by GRUNDIG.
USER MANUAL GDK5782 GRUNDIG
natural_image
Exterior view of a modern stainless steel kitchen with a curved top and three black panels, no visible text or symbols.EN
FOR A GOOD REASON
GRUNDIG

natural_image
Close-up of a white paper corner with a curled corner, no text or symbols visiblePlease read this user manual first!
Dear Customer,
Thank you for purchasing this Grundig product. We hope that you get the best results form your product which has been manufactured with high quality and starte-of-the-art technology.
Therefore, please read this entire user manual and all other accompanying documents carefully before using the product and keep it as a reference for future use. If you handover the product to someone else, give the user manual as well. Follow all warnings and information in the user manual.
Remember that this user manual is also applicable for several other models. Differences between models will be identified in the manual.
Please visit the "Support" section on the Grundig website www.grundig.co.uk.to register your 5 year warranty.
Grundig Helpline
0845 603 1234
0345 603 1234
TABLE OF CONTENTS
1 Warnings 6-7
2 Technical specification 8
General appearance 8
3 Installation 9-13
Electrical connection 9
Assembly 10
Mounting the hood body. 11
Connections 11
Flue assembly.... 13
Transportation 13
Disposal of packaging....13
4 Operating your appliance 14
Touch control 14
5 Maintenance and cleaning 15-16
Cleaning the comfort panels ..... 15
Metal grease filter 15
Carbon filter 15
Cleaning the hood 16
Replacing the lamp 16
6 Troubleshooting suggestions 17
7 Information 17
Technical data 17
Environmental note....17
8 Guarantee 18
9 Service 19
Please review the following information. Failure to comply with these instructions may cause risk of personal injury or material damage. Any warranty or commitment of reliability shall be void.
■ This appliance is intended for domestic use. The product shall never be used for any purpose other than its intended use.
■ You may use a pipe with a diameter of 120 mm on the flue connection of your hood. Pipe connection shall be as short as possible and have minimum number of elbows.
■ Do not make connections to the flues connected with stoves, exhaust shafts or flues with rising flames.
■ The height between the lower surface of the hood and upper surface of the oven/hob should not be less than 45 cm.
■ Turn on your hood after you have placed the pot or pan onto the burners in order to prevent heat damage to your hood. Turn off the burners before taking a pot, pan etc. from the burners when you are done.
- Do not operate the hood without aluminum filters and do not remove the filters while it is operated.
■ This appliance shall be connected to a grounded mains outlet that is protected by a fuse with proper capacity. - Do not plug in the hood before it is installed.
- Do not touch the plug with wet hands. Do not hold the cable to remove the plug, always pull out the plug by holding the plug itself. Never use the appliance if the plug or the power cord is faulty.
■ Do not put power cord near cooktops. This may cause a fire as the cord may be melted.
■ Do not touch the lamps of the hood after operating the hood for a long time. Hot lamps may burn your hand. -
Do not operate the hood without oil filter, otherwise internal parts of the hood may get dirty.
■ Overheated oil may splash over the hood and may cause a fire; therefore, do not leave the hob unattended while frying. Be careful that the covers and curtains do not catch a fire. -
Do not allow high flames under the hood. Otherwise, oil in the aluminum filter may ignite and lead to a fire.
■ Do not keep easily flammable materials under your hood.
■ There is a risk of fire if your hood is not cleaned in the specified periods.
■ Operate your hood for 15 minutes more after the end of cooking or frying in order to remove unpleasant smell from the air in the kitchen.
■ Ensure that fresh air enters the kitchen, especially when the hood is operated together with the gas hobs.
If an appliance operated with fuel oil or gaseous fuels (such as room heaters) is available in the environment where your hood shall be operated, the exhaust of that appliance must be fully isolated from the volume of the room or the appliance must be of hermetic type.
If there is non-electric appliance in the same room with the hood, the negative pressure inside the room should be maximum 0.4 mbar to prevent the suction of the waste gas from the other appliance by the hood into the room again.
■ Do not make connections to the flues connected with stoves, exhaust shafts or flues with rising flames. Observe the rules set by authorities on the discharge of exhaust air.
■ Electrical appliances may be risky for children. Keep the children away from the unit when it is operated, do not let them play with the appliance.
■ Package materials may be risky for children. Keep all packaging materials away from the children and dispose them off by classifying them as per the waste instructions.
■ The fan of the hood shall be operated in the proper level as required.
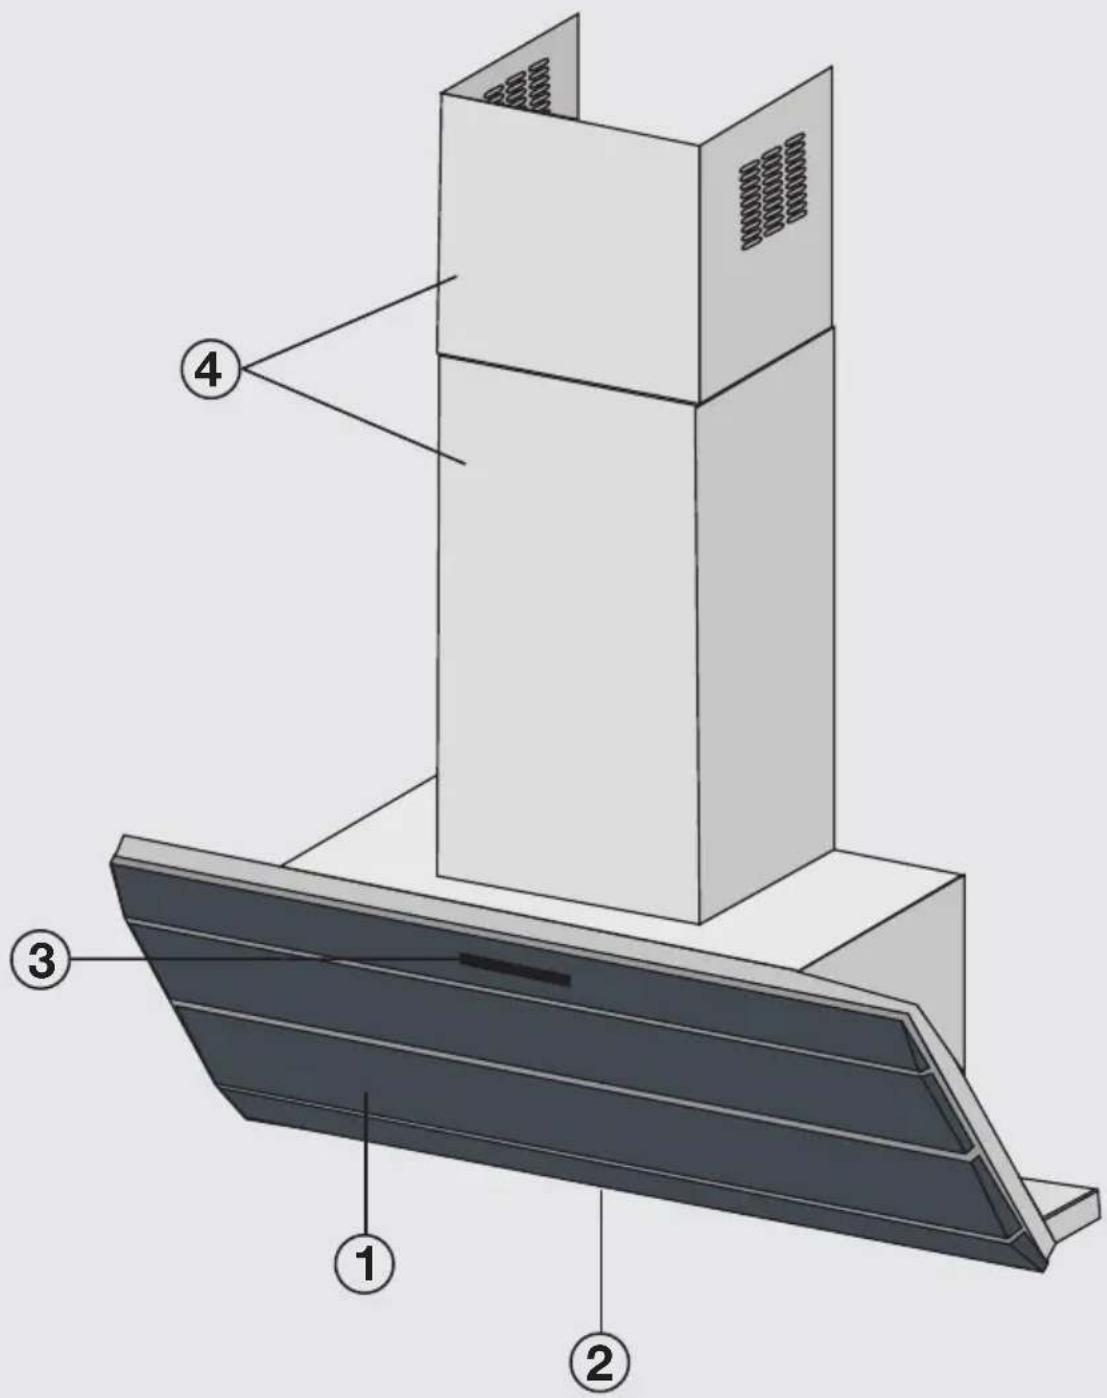
General appearance
1 Hood body
2 Lighting
3 Control panel
4 Flue connection element
| GDK 5782 B | |
| Width 898 mm | |
| Depth 380 mm | |
| Height Min. 1055 - Max. 1330 mm | |
| Supply voltage 220-240 V | ~ 50 Hz |
| Control 4 positions | |
| Suction power 740 m | 3/h |
| Control type Touch control | |
| Motor power 250 W | |
| Lamp power 3x20 W | |
| Total power 310 W | |
| Fuse 13 A | |
| Air outlet pipe diameter 120/150 mm | |
| Net weight 26.2 kg | |
| Gross weight 33.8 kg | |
| Color | black glass |
Specifications of the product may be modified without prior notification in order to increase the product quality. Figures given in this manual are for schematic purposes only, and they may not fully conform with the actual appliance.
Markings on the product or the values stated in other documents supplied with the product are values obtained under laboratory conditions as per relevant standards. These values may vary depending on the use of the product and ambient conditions.
Note:
■ Preparation of the installation place and electric wiring is the responsibility of the customer.
Attention:
■ Assembly and electrical connections must be carried out by specialized personnel.
■ Remove the protective film (if any) on the hood and flue surface after the installation.
Electrical connection
The hood shall be connected to a grounded mains outlet that is protected by a fuse with proper capacity.
Attention:
■ Have a qualified electrician perform the electric connection.
Important:
■ Connection shall comply with national regulations.
■ The power outlet shall be reached easily after installation.
■ Voltage and fuse protection allowed is specified in "Technical Specifications."
■ Specified voltage shall be equivalent with your mains voltage.
- Do not connect the appliance with extension cords or multiple outlets.
In case of direct connection to mains, connect a 3-pole switch with a minimum contact distance of 3mm between the appliance and the mains.

natural_image
Diagram showing a mechanical component with an inset view of a bracket and a directional arrow (no text or symbols)■ Remove the grease filters making sure that the connector of the supply cable is correctly inserted in the socket placed on the side of the fan (Refer to Maintenance section).
Attention:
■ Any damaged power cord shall be replaced by a qualified electrician.
■ Do not operate the appliance before it is repaired! Risk of electric shock!
Assembly
Accessories and installation material
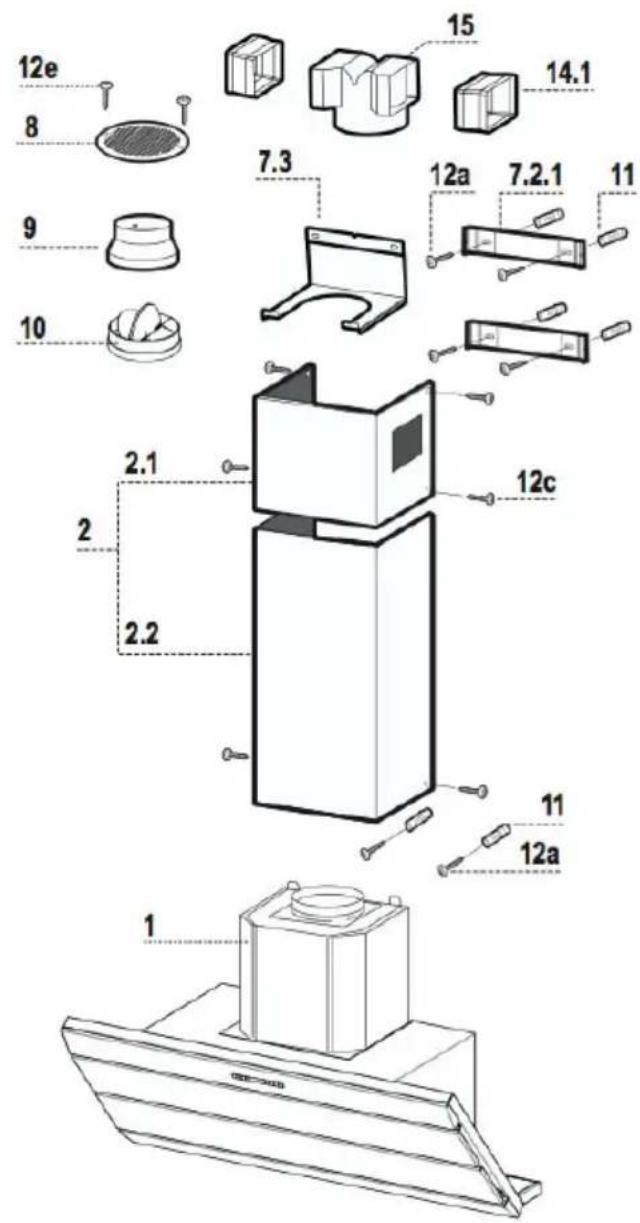
| Ref Quantity Product materials | ||
| 1 | 1 | Hood Body and parts: Controls, light, blower, filters |
| 2 | 1 | Telescopic chimney comprising of: |
| 2.1 1 | Upper section | |
| 2.2 1 | Lower section | |
| 8 1 | Air outlet grill | |
| 9 | 1 | Reducer flangeø150-120 mm |
| 10 1 | Damperø150 | |
| 14.1 2 | Air outlet connection extension | |
| 15 1 | Air outlet connection | |
| Ref Quantity Installation materials | ||
| 7.2.1 | 2 | Upper chimney section fixing brackets |
| 7.3 1 | Air outlet connection support | |
| 11 | 6 Plugs | |
| 12a 6 | Screws 4.2 x 44.4 | |
| 12c | 6 Screws 2.9 x 6.5 | |
| 12e 2 | Screws 2.9 x 9.5 | |
| Quantity Documentation | ||
| 1 Instruction manual | ||
Wall drilling and bracket fixing

■ Draw a vertical line on the supporting wall up to the ceiling, or as high as practical, at the center of the area in which the hood will be installed.
■ Draw a horizontal line at 1040 mm above the hob.
■ Place bracket (7.2.1) on the wall as shown about 1-2 mm from the ceiling or upper limit aligning the center (notch) with the vertical reference line.
■ Mark the wall at the centers of the holes in the bracket.
■ Place bracket (7.2.1) on the wall as shown at X mm below the first bracket (X = height of the upper chimney section supplied), aligning the center (notch) with the vertical line.
■ Mark the wall at the centers of the holes in the bracket.
■ Mark a reference point at 116 mm from the vertical reference as indicated.
■ Repeat this operation on the other side.
- Drill 8 mm holes at all the center points marked.
■ Insert plugs (11) into the holes.
■ Fix the lower bracket (7.2.1) using 12a screws (4.2 x 44.4) supplied.
■ Fix the upper bracket (7.2.1) and the air outlet connection support (7.3), together using the 2 12a (4.2 x 44.4) screws supplied.
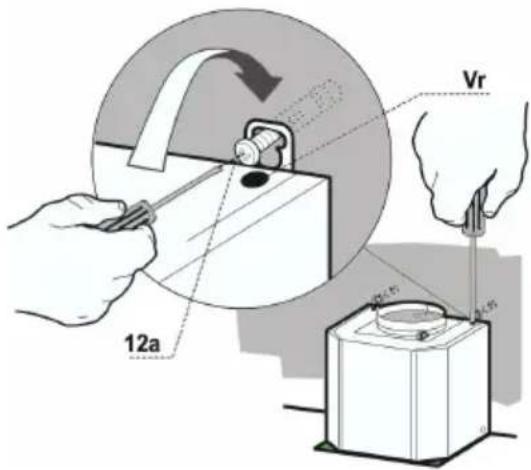
■ Insert the two 12a (4.2 x 44.4) screws supplied in the hood body fixing holes, leaving a gap of 5-6 mm between the wall and the head of the screw.
Mounting the hood body
■ Before mounting the hood body, tighten the two screws (Vr) located on the hood body mounting points
■ Hook the hood body onto the screws (12a)
■ Fully tighten the support screws (12a).
■ Adjust the screws (Vr) to level the hood body.
Connections

Air outlet in ducted version
When installing the ducted version, connect the hood to the chimney using either a flexible or rigid pipe with a diameter 150 or 120mm (the choice of which is left to the installer).
To install a pipe with a diameter of 150 mm:
■ To install the damper (10)
■ Fix the pipe in position using suitable pipe clamps (not supplied).
To install a pipe with a diameter of 120 mm:
■ To install an air exhaust connection with a diameter of 120 mm, insert the reducer flange (9) onto the damper (10).
■ Fix the pipe in position using suitable pipe clamps (not supplied).
■ Remove carbon filters if any.
Usage with carbon filter

- Cut a hole with a diameter of 125 mm in any shelf that may be positioned over the hood.
■ Insert the reducer flange (9) on the hood body outlet.
■ Connect the flange to the outlet on the shelf over the hood using a flexible or rigid pipe with a diameter of 120 mm.
■ Fix the pipe in position using suitable pipe clamps (not supplied).
■ Fix the grille (8) which can be installed only in one direction on the recirculation air outlet using the 2 12e (2,9 x 9,5) screws.
■ Ensure that the carbon filters have been inserted.
Usage with carbon filter
■ Insert the Connector (15) into the Support bracket (7.3) and fix it with a screw.
■ Insert the connection extension pieces laterally (14.1) in connection (15).
■ Make sure that the outlet of the extension pieces (14.1) is horizontally and vertically aligned with the chimney outlets.
■ Connect the air outlet connection (15) to the hood body outlet using either a flexible or rigid pipe with a diameter of 150 mm (the choice of which is left to the installer).
■ Ensure that the carbon filters have been inserted.

Flue assembly

Upper flue ;
■ Slightly widen the two sides of the upper flue and hook them behind the brackets (7.2.1), making sure that they are well seated.
- Secure the sides of the brackets using the 4 12c screws (2.9 x 9.5) supplied.
■ Make sure that the extensions pieces are aligned with the flue outlets.
Lower flue ;
■ Slightly widen the two sides of the flue and hook them between the upper flue and the wall, making sure that they are well seated.
■ Fix the lower part laterally to the hood body using the 2 12c (2.9 x 9.5) screws supplied.
Transportation
Disconnect the appliance from mains supply and remove the hood first if you need it to be transported. Transport the appliance with its original package if possible, and observe the transport markings on the original package. If the original package is not available, pack the appliance so that it will not be damaged.
Disposal of packaging
Package materials may be risky for children. Keep all packaging materials away from the children and dispose them off by classifying them as per the waste instructions. Do not dispose of with regular household waste.
Package of your product is made of recyclable materials.
OPERATING YOUR APPLIANCE
Use the high suction speed in cases of concentrated kitchen vapors. It is recommended that the cooker hood suction is switched on for 5 minutes prior to cooking and to leave
in operation during cooking and for another 15 minutes approximately after terminating cooking.
Touch control
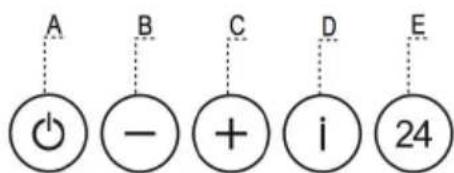

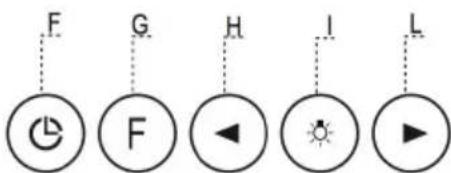
A. Switches the extractor motor on and off at the latest selected speed. Indicates the selected speed on the screen.
B. Decreases the suction speed. The number of LEDs lit on the screen decreases.
C. Decreases the suction speed. The number of LEDs lit on the screen increases.
D. Auto-Off intense ventilation: By pressing this key it is possible to start the intensive speed from any previously selected speed except the Auto-off or air cleaning function. This speed has been timed at 10 minutes. After that time the system automatically activates the latest selected speed. This function is suitable for cooking conditions when vapours and smells are at maximum level. "I" flashes on the screen and all LEDS are lit. Press this key to stop the function.
E. Air cleaning feature: By pressing this key it is possible to set up the motor to a suction speed at 100 m3/h . 24 appears and the LEDs extinguish one by one. Press this key to stop the function.
F. Automatic shutdown: By pressing this key it is possible to set the automatic shutdown of the motor and the lighting to 30 minutes.
This function is suitable for a complete elimination of residual cooking odours. Only operates when the motor is on (not while the air cleaning or intensive ventilation function is active). Press this key to stop the function. A flashing clock-symbol appears. Press this key to stop the function.
G. Filter saturation indicator: By pressing this key for about 2 seconds it is possible to reset the filter saturation alarm. After 100 working hours a drop-symbol appears. Metal grease filters have to be washed. While using with a carbon filter, after 200 working hours C appears. Carbon filters have to replaced in this case.
H. By pressing this key the intensity of the light can be decreased.
I. Turns the lighting system on and off at maximum intensity.
L. By pressing this key the intensity of the light can be increased.
Key panel lock
it is possible to lock the key panel when, for example, cleaning the glass. The motor and lights are switched off.
By pressing the F-key (auto-off) for about 5 seconds the key panel can be activated or deactivated. This function is confirmed by a beep and by moving motor LEDs on display.
Before all maintenance and cleaning operations, remove the plug of the appliance or turn off or remove the fuse!
Service your hood periodically!
Service is also required to prevent burning of oil filter besides obtaining better performance and better efficiency.
Cleaning the comfort panels

natural_image
Technical line drawing of a mechanical device with internal components and a close-up inset showing a component (no text or symbols)■ Pull the comfort panels to open them.
■ Disconnect the panel from the hood canopy by sliding the fixing pin lever.
■ The comfort panel must never be washed in a dishwasher.
■ Clean the outside using a damp cloth and neutral liquid detergent.
■ Clean the inside as well using a damp cloth and neutral detergent; do not use wet cloths or sponges, or jets of water; do not use abrasive substances.
■ When the above operation has been completed, hook the panel back to the hood canopy and close it by turning the knob in the opposite direction.
Metal grease filter
Filters can be washed in the dishwasher. Metal filters need to be washed every time a drop-symbol appears in the display or at least every 2 months. Hood shall be cleaned more often when it is used more frequently. Alarm reset:
Press the "G" key for at least 2 seconds.
Cleaning the filters
■ Pull the comfort panels to open them.
■ Remove the filters one by one pushing them towards the back side of the hood unit and simultaneously pulling downwards.
■ Any kind of bending of the filters has to be avoided when washing them. Before fitting them again into the hood make sure that they are completely dry. (The colour of the filter surface may change throughout the time but this has no influence to the filter efficiency).
■ When fitting the filters into the hood pay attention that they are mounted in correct direction with the handles facing outwards.
■ Close the comfort panel.
Attention:
■ Remove the filters one by one pushing them towards the back side of the hood and simultaneously pulling downwards and towards the center of the hood.
Carbon filter
This filter cannot be washed or regenerated. It must be replaced when the C appears on the display or at least once every 4 months.
The filter saturation alarm has to be activated before.
Activating the alarm signal:
In the recirculation version hoods the filter saturation alarm must be activated during the installation or later.
■ Switch off the hood and the lighting.
- Press the "E" key for about 5 seconds until the last two segments of the motor LEDs are lit on the display.
- By releasing the "E" key the clock icon starts to flash.
MAINTENANCE AND CLEANING
■ Within 3 seconds press the “D” key to activate/deactivate carbon filter saturation alarm.
■ “C” symbol lit - carbon filter saturation alarm ACTIVATED.
- “C” symbol unlit - carbon filter saturation alarm DEACTIVATED.
Replacing the carbon filter

natural_image
Illustration of a hand pressing down on a mechanical component with a downward arrow (no text or symbols)Resetting the alarm signal:
■ Switch off the motor and the lighting system.
- Press the “G” key for at least 2 seconds.
Replacing the filter:
■ Open the comfort panel.
■ Remove the metal grease filters.
■ Remove the carbon filter as indicated in the picture.
■ Place the filter again into its seat.
■ Place again the metal grease filters into their places.
Cleaning the hood
■ Hood must only be cleaned when it is unplugged from mains outlet or when the fuse is switched off!
■ Hood must not be cleaned with a vapor cleaner as it not ensured that it would operate safely afterwards due to water vapor.
Outer surfaces of the hood must be cleaned with a mild cleaning agent (e.g. dish soap). Do not use strong cleaning agents, abrasive agents or sharp objects.
Stainless steel surfaces shall be cleaned with a commercially available stainless steel cleaning agent and a soft, non-abrasive sponge or cloth. In order to prevent scratches, wiping action shall be performed on the direction of surface structure while you are cleaning the stainless steel surfaces.
Replacing the lamp
natural_image
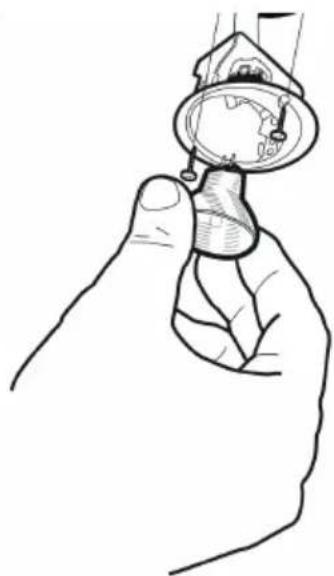
Line drawing of a hand holding a small object with a dome-like structure above it (no text or symbols)■ Remove the 2 screws fixing the lighting support, and pull it out of from the hood.
■ Remove the lamp from the support.
■ Replace with another of the same type, making sure that the two pins are properly inserted in the lamp holder socket holes.
■ Install the support, fixing it in place with the two screws removed in previous steps.
| Problem Explanation / | Suggestion |
| Hood operates incorrectly | Turn off the hood with keys and cut off electricity supply for a few seconds by removing the plug or closing the fuse. |
| Hood does not operate | Is the plug connected to mains outlet? Is the fuse in the household installation burnt off? Did you press the fan keys? |
| Suction power of the hood is inadequate | Is the correct fan level set? Is the oil filter or carbon filter cleaned in time? Is the air taken from the kitchen compensated with adequate amount of fresh air to prevent vacuuming? |
| Operating noise increased in the course of time | Have you conformed with the maintenance intervals of the filters; i.e. is any air passage possible? |
| Illumination is disabled | Is the fuse in the household installation burnt off? Is the lamp faulty? Is the new lamp seated correctly? |
| Filter saturation indicator flashes or lights up continuously | Refer to “Maintenance and cleaning” section for the oil filter or carbon filter saturation indicator. |
INFORMATION

This product conforms to European Directives 2004/108/EC, 2006/95/EC, 2009/125/EC and 2011/65/EU.
Power supply
Operating voltage: 220-240V\~, 50Hz
Technical and design modifications reserved!
Environmental note

The symbol on the product or on its packaging indicates that this product may not be treated as household waste. Instead it shall be handed over to the applicable collection point for the recycling of electrical and electronic equipment. By ensuring this product is disposed of correctly, you will help prevent potential negative consequences for the environment and human health, which could otherwise be caused by inappropriate waste handling of this product. For more detailed information about recycling of this product, please contact your local city office, your household waste disposal service or the shop where you purchased the product.
Guarantee for Refrigeration, Cooking Appliance, Washing Machines & Dishwashers
Your new Grundig product is guaranteed against the cost of breakdown repairs for 5 years from the date of the originals purchase.
"Please visit the "support" section on the Grundig website at www.grundig.co.uk to register your 5 year warranty.
What is covered?
- Repairs necessary as a result of faulty materials, defective components or manufacturing defect.
- The cost of functional replacement paris, but excluding consumable items.
- The labour costs of a Grundig approved repairer to carry out the repair.
What is note covered?
- Transil, delivery or accidental damage or misuse and abuse.
- Cabiner or appearance parts, including knobs, flobs, handles or container lids.
- Accessories or consumable items including but not limited to, ice trays, scropers, cutlery baskets, filiers and light bulbs.
- Repairs required as a result of unauthorised repair or inexport installation that fails to meet the requirements contained in the user instruction book.
• Repairs to products used on commercial or non residential household premises. - Loss of frozen food in freezers or fridge/freezers. (Food loss insurance is often included within your household contents insurance policy, or may be available separately from your retailer.)
Important notes
- Your Grundig product is designed and built for domestic household use only.
- the guarantee will be void if the product is installed or used in commercial or non-residential domestic household premises.
- The product must be correctly installed, located and operated in accordance with the instructions contained in the User Instructions Booklet provided.
• Professional installation by a qualified Electrical Domestic Appliance Installer is recommended for all Washing Machines, Dishwashers and Electric Cookers - Gas Cookers must only be installed by a Gas Safe (or BORD GAIS) registered Gas Intaller.
- The guarantee is given only within the boundaries of the United Kingdom and the Republic of Ireland.
- The guarantee is applicable only to new products and is note transferable if the product is resold.
- Grindig disclaims any liability for incidental or consequential damages.
- The guarantee does not in anyway diminish your statutory or legal rights.
Should you experience any difficulty in obtaining service please contact the Grundig Customer Helpline.
Tel : 0845 603 1234
0345 603 1234
e-mail : service@Grundig.co.uk
Please keep your purchase receipt or other proof of purchase in a safe place; you will need to have it should the product require attention under guarantee.
You should also complete the details below; it will help us assist you when requesting service. (The model number is printed on the Instruction Booklet and the serial number is printed on the Rating Label affixed to the appliance)
Model No:
Serial No:
Retailer:
Date of purchase:
For service under guarantee simply telephone the appropriate number below UK Mainland & Northern Ireland
0845 603 1234
0345 603 1234
Republic of Ireland
All Refrigeration, All Cookers
Washing Machines and Dishwashers
01 862 34 11
Before requesting service please check the trouble-shooting guide in the Operating Instructions as a charge may be levied where no fault is found even though your product may still be under guarantee. Service once the manufacturers guarantee has expired.
If you have purchased an extended guarantee please refer to the instructions contained within the extended guarantee agreement document. Otherwise please call the appropriate number above where service can be obtained at a charge.
Grundig, 1 Greenhill Crescent, Watford Herts WD18 8QU
FOR A GOOD REASON
GRUNDIG

- Please read this user manual first!
- TABLE OF CONTENTS
- Warnings 6-7
- Technical specification 8
- Installation 9-13
- Operating your appliance 14
- Maintenance and cleaning 15-16
- Troubleshooting suggestions 17
- Information 17
- Guarantee 18
- Service 19
- General appearance
- Note:
- Attention:
- Electrical connection
- Important:
- Assembly
- Wall drilling and bracket fixing
- Mounting the hood body
- Connections
- Air outlet in ducted version
- To install a pipe with a diameter of 150 mm:
- To install a pipe with a diameter of 120 mm:
- Usage with carbon filter
- Flue assembly
- Upper flue ;
- Lower flue ;
- Transportation
- Disposal of packaging
- OPERATING YOUR APPLIANCE
- Touch control
- Key panel lock
- Metal grease filter
- Cleaning the filters
- Carbon filter
- MAINTENANCE AND CLEANING
- Replacing the carbon filter
- Cleaning the hood
- Replacing the lamp
- INFORMATION
- Power supply
- Environmental note
- Guarantee for Refrigeration, Cooking Appliance, Washing Machines & Dishwashers
- "Please visit the "support" section on the Grundig website at www.grundig.co.uk to register your 5 year warranty.
- What is covered?
- What is note covered?
- Important notes
Brand : GRUNDIG
Model : GDK5782
Category : Range hood