
SL546ED - Lawn mower HUSQVARNA - Free user manual and instructions
Find the device manual for free SL546ED HUSQVARNA in PDF.

| Product Type | Electric Rotary Lawnmower |
| Brand | Husqvarna |
| Model | SL546ED |
| Cutting Width | 46 cm |
| Engine Power | 1.8 kW |
| Weight | 30.5 kg |
| Voltage / Frequency | 220-230 V ~ 50 Hz |
| Cutting Speed (Blade RPM) | 2900 rpm |
| Sound Power Level (Guaranteed) | 96 dB(A) |
| Vibration Level (ah) | 5.0 m/s² |
| Drive Type | Self-propelled (clutch lever) |
| Cutting Height Adjustment | Yes, 12 positions via levers |
| Grass Collection | Yes, with included grass catcher |
| Mulching Capability | Yes, with included mulching cap |
| Safety Features | Safety button, switch lever, blade brake |
| Handle Type | Foldable upper and lower handles |
| Wheel Type | 4 wheels (one with gear for self-propulsion) |
| Maintenance | Replace blade, clean deck, check cable regularly |
| Warranty | 2 years (subject to conditions) |
Frequently Asked Questions - SL546ED HUSQVARNA
User questions about SL546ED HUSQVARNA
0 question about this device. Answer the ones you know or ask your own.
Ask a new question about this device
Download the instructions for your Lawn mower in PDF format for free! Find your manual SL546ED - HUSQVARNA and take your electronic device back in hand. On this page are published all the documents necessary for the use of your device. SL546ED by HUSQVARNA.
USER MANUAL SL546ED HUSQVARNA
natural_image
Simple line drawing of a forklift inside a circle next to an electrical plug symbol (no text or labels)SL546E/SL546ED
GB Original Instructions
IMPORTANT INFORMATION
Read before use and retain for future reference
natural_image
Technical illustration of a mechanical housing component with internal components and mounting brackets (no text or symbols)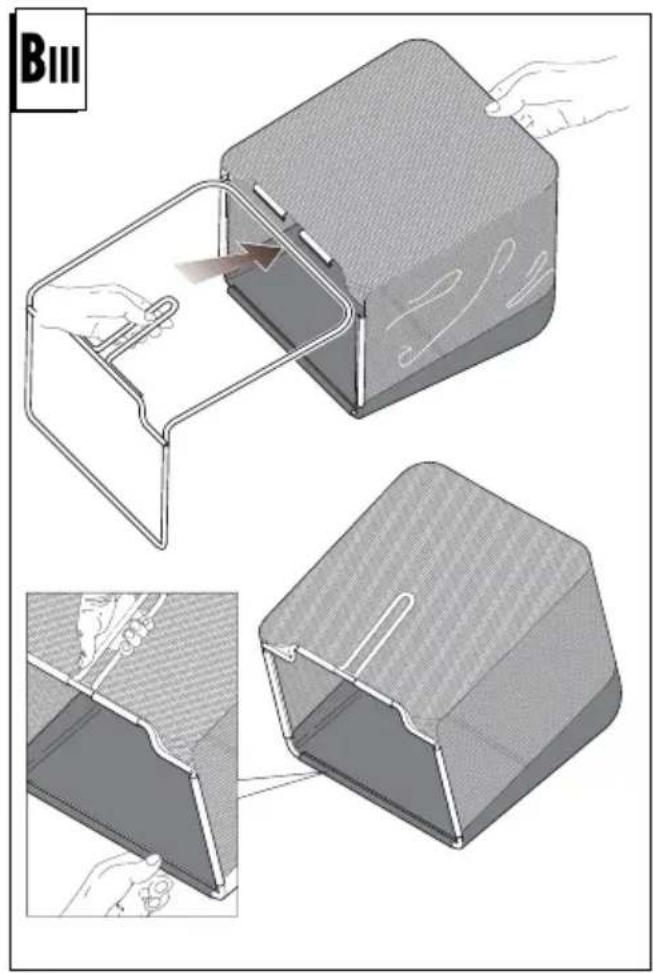
natural_image
Two technical diagrams showing a mechanical component with internal structure and mounting points, no text or symbols present.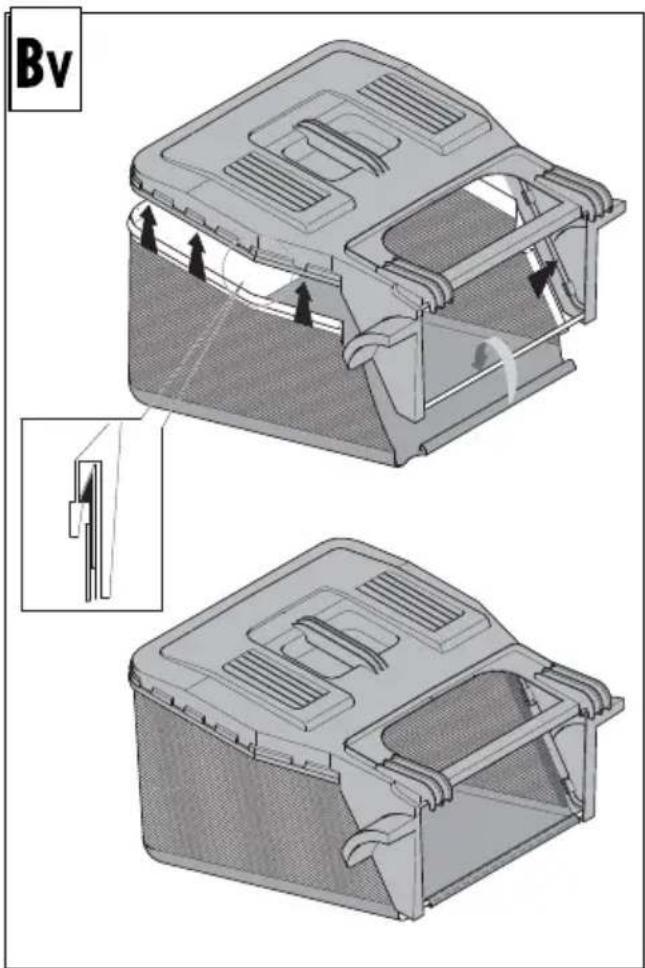


natural_image
Technical line drawing of a mechanical component with a shaded triangular section and connecting rods (no text or symbols)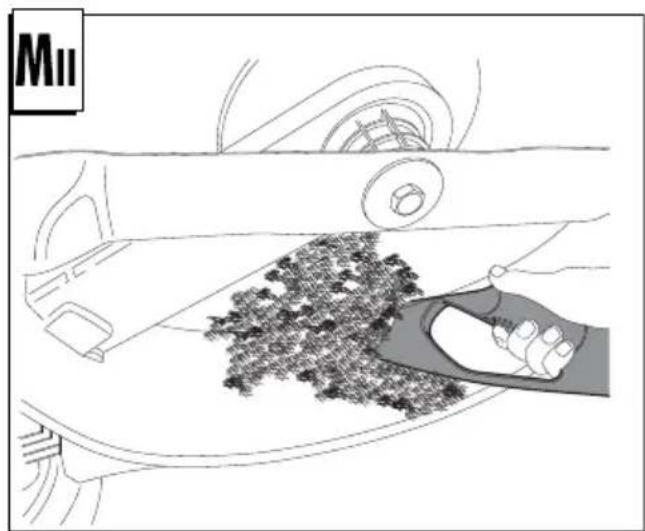
natural_image
Diagram showing a hand cleaning a car interior with a mesh material (no text or symbols)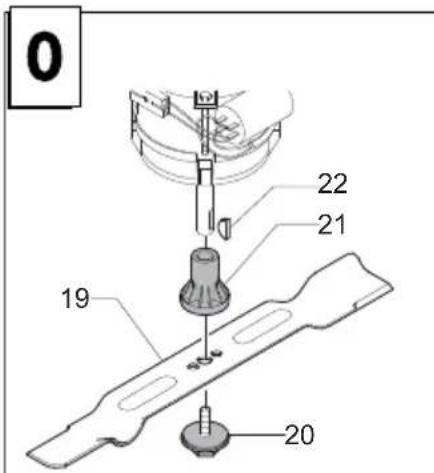

If not used properly this product can be dangerous! This product can cause serious injury to the operator and others, the warnings and safety instructions must be followed to ensure reasonable safety and efficiency in using this product. The operator is responsible for following the warning and safety instructions in this manual and on the product.
Explanation of Symbols on the product
Warning
Read the user instructions carefully to make sure you understand all the controls and what they do
Always keep the product on the ground when operating. Tilting or lifting the product may cause stones to be thrown out
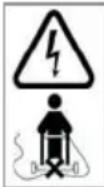
Keep bystanders away. Do not operater whilst people especially children or pets are in the area
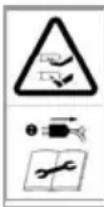
Beware of sharp blades - remove plug from mains before maintenance or if cable is damaged.
Blades continue to rotate after the machine is switched off.
Keep the supply cable away from the blade.
General
- This product is not intended for use by persons (including children) with reduced physical, sensory or mental capabilities, or lack of experience and knowledge, unless they have been given supervision or instruction concerning the use of the product by a person responsible for their safety. Children should be supervised to ensure that they do not play with the product. Local regulations may restrict the age of the operator.
- Never allow children or people unfamiliar with these instructions to use the product.
- Stop using the machine while people, especially children, or pets are nearby.
- Only use the product in the manner and for the functions described in these instructions.
- Never operate the product when you are tired, ill or under the influence of alcohol, drugs or medicine.
- The operator or user is responsible for accidents or hazards occurring to other people or their property.
Electrical
- The use of a Residual Current Device (R.C.D.) with a tripping current of not more than 30mA is recommended. Even with a R.C.D. installed 100% safety cannot be guaranteed and safe working practice must be followed at all times. Check your R.C.D. every time you use it.
- Before use, examine cable for signs of damage or ageing. If the cable is found to be defective, take the product to an Authorised Service Centre and have the cable replaced.
- Do not use the product if the electric cables are damaged or worn
-
Immediately disconnect from the mains electricity supply if the cable is cut, or the insulation is damaged. Do not touch the electric cable until the electrical supply has been disconnected. Do not repair a cut or damaged cable. Replace it with a new one.
-
Your extension cable must be uncoiled, coiled cables can overheat and reduce the efficiency of your mower.
- Keep cable away from product, always work away from the power point mowing up and down, never in circles.
- Do not pull cable around sharp objects.
- Always switch off at the mains before disconnecting any plug, cable connector or extension cable.
- Switch off, remove plug from mains and examine electric supply cable for damage or ageing before winding cable for storage. Do not repair a damaged cable, replace it with a new one. Use only Flymo replacement cable.
- Always wind cable carefully, avoiding kinking.
- Never carry the product by the cable.
- Never pull on the cable to disconnect any of the plugs.
- Use only on AC mains supply voltage shown on the product rating label.
- Husqvarna products are double insulated to EN60335. Under no circumstances should an earth be connected to any part of the product.
Cables
If you want to use an extension cable when operating your product, only th following cable dimensions should be used: 2
- 1.0 mm ^2 : max length 40 m
- 1.5 mm: max length 60 m
- 2.5 mm ^4 : max length 100 m
Minimum rating:
1.00mm ^2 size cable 10 amps 250 volts AC
1. Mains cables and extensions are available from your local Approved Service Centre.
2. Only use extension cables specifically designed for outdoor use.
Preparation
- While using your product always wear substantial footwear and long trousers. Do not operate the equipment when barefoot or wearing open sandl
- Make sure the lawn is clear of sticks, stones, bones, wire and debris; they could be thrown by the blade.
- Before using the machine and after any impact, check for signs of wear or damage and repair as necessary.
- Replace worn or damaged blades together with their fixings in sets to preserve balance.
Use
- Use the product only in daylight or good artificial light.
- Avoid operating your product in wet grass, where feasible.
- Take care in wet grass, you may lose your footing.
- On slopes, be extra careful of your footing and wear non-slip footwear.
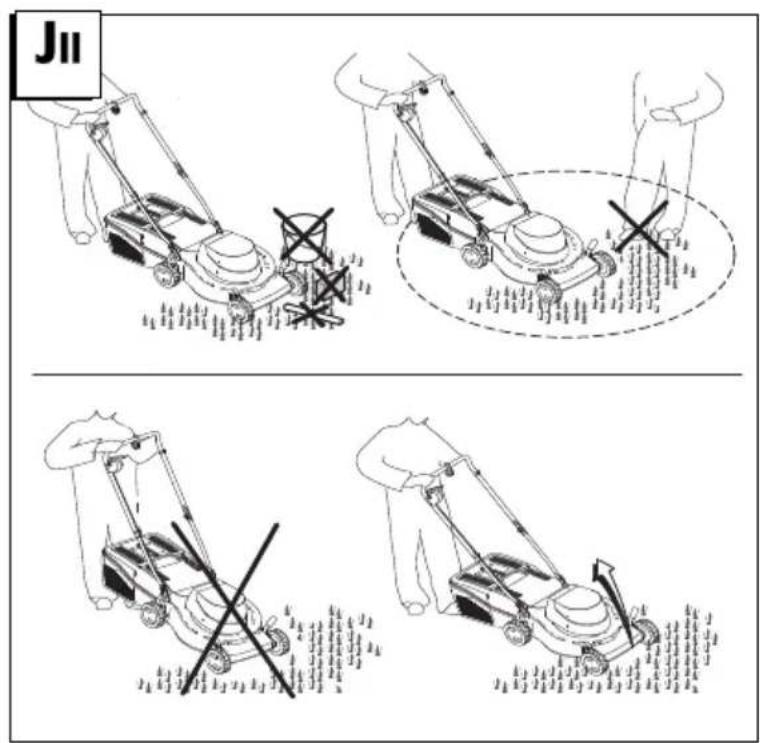
- Operate your product across the face of slopes, never up and down.
- Exercise extreme caution when changing direction on slopes. Walk never run.
- Using on banks and slopes can be dangerous. Do not mow on banks or steep slopes.
- Do not walk backwards when operating, you could trip.
- Never cut grass by pulling the product towards you.
- Switch off before pushing the product over surfaces other than grass.
- Never operate the product with damaged guards or without guards in place.
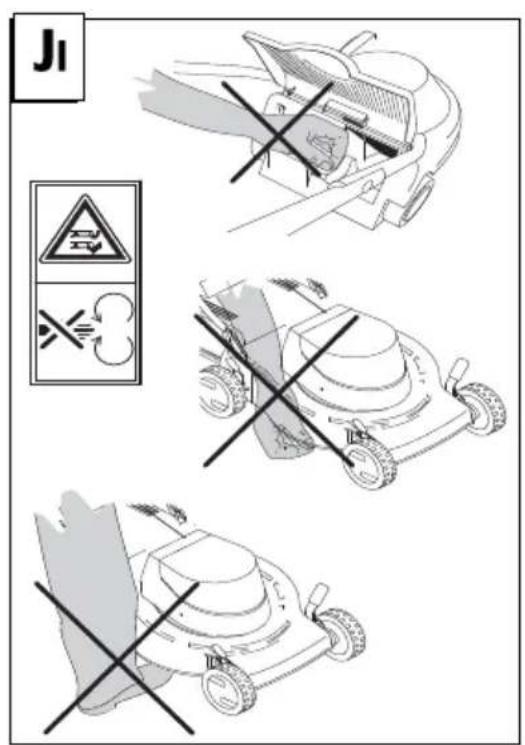
- Keep hands and feet away from the cutting means at all times and especially when switching on the motor.
- Do not tilt product when the motor is running, except when starting and stopping. In this case, do not tilt more than absolutely necessary and lift only the part which is away from the operator. Always ensure that both hands are in the operating position before returning the appliance to the ground.
-
Do not put hands near the grass discharge chute.
-
Never pick up or carry a product when it is operating or still connected to the mains supply.
- Remove the plug from the mains :
- before leaving the product unattended for any period;
- before clearing a blockage;
- before checking, cleaning or working on the appliance;
- if you hit an object. Do not use your product until you are sure that the entire product is in a safe operating condition.;
- if the product starts to vibrate abnormally. Check immediately. Excessive vibration can cause injury.
Maintenance and storage -
Caution: Do not touch rotating blade(s)
-
Keep all nuts, bolts and screws tight to be sure the product is in safe working condition.
- Check the grassbox frequently for wear or deterioration.
- Replace worn or damaged parts for safety.
- Only use the replacement blade and blade bolt specified for this product.
- Be careful during adjustment of the product to prevent entrapment of the fingers between moving blades and fixed parts of the machine.
- Store in a cool dry place and out of reach of children. Do not store outdoors.
- Allow the product to cool for at least 30 minutes before storing.

DESCRIPTION
GB - DESCRIPTION
1 Upper handles
2 Lower handles
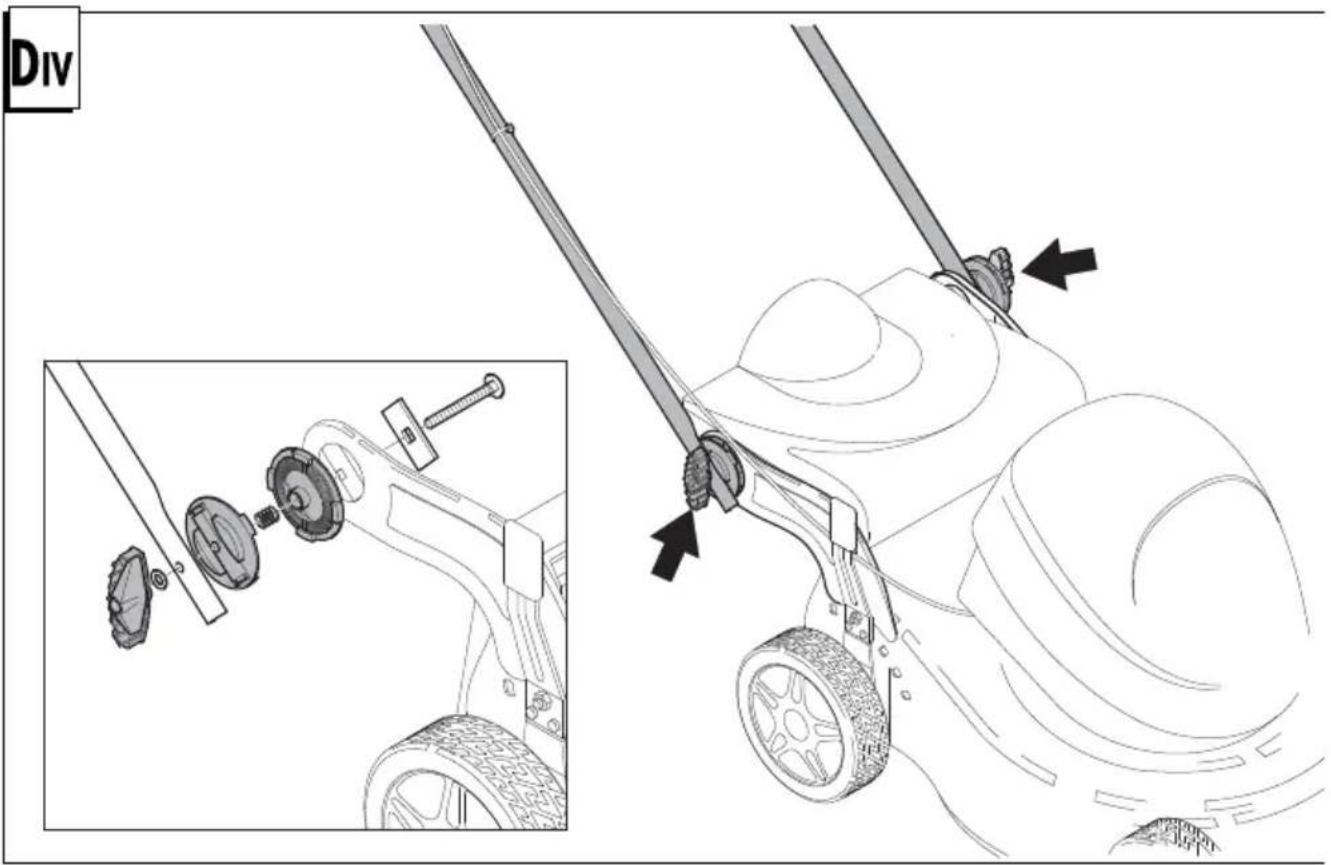
3 Fastening knobs for upper handles
4 Grass catcher
5 Safety button
6 Switch
7 Deck
8 Cable holder
9 Rear deflector wall
10 Motor cover
11 Switch lever
12 Levers for adjusting the cutting height
13 Clutch lever
14 Gearbox

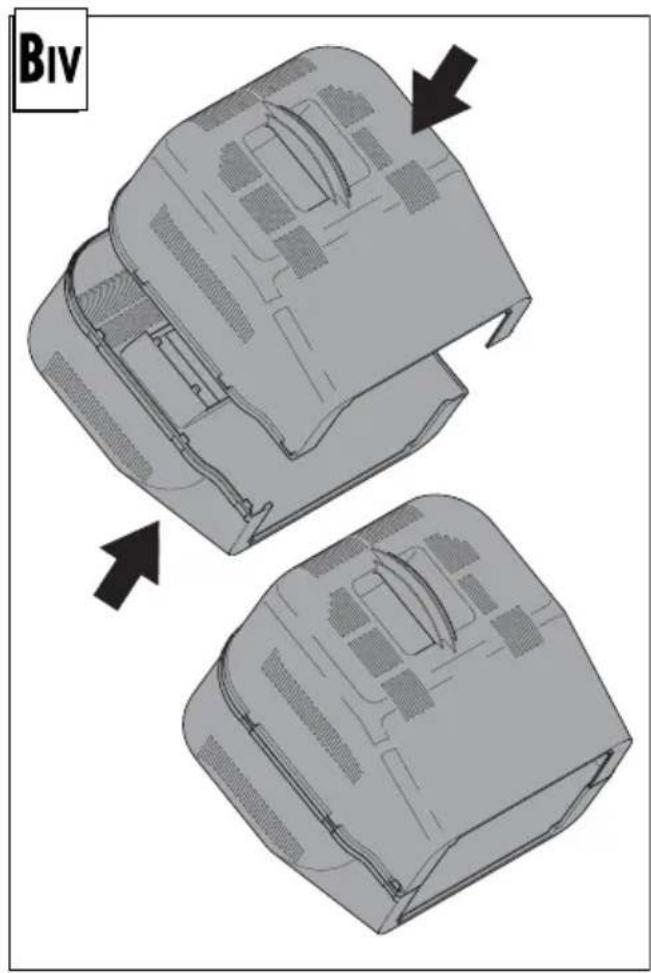
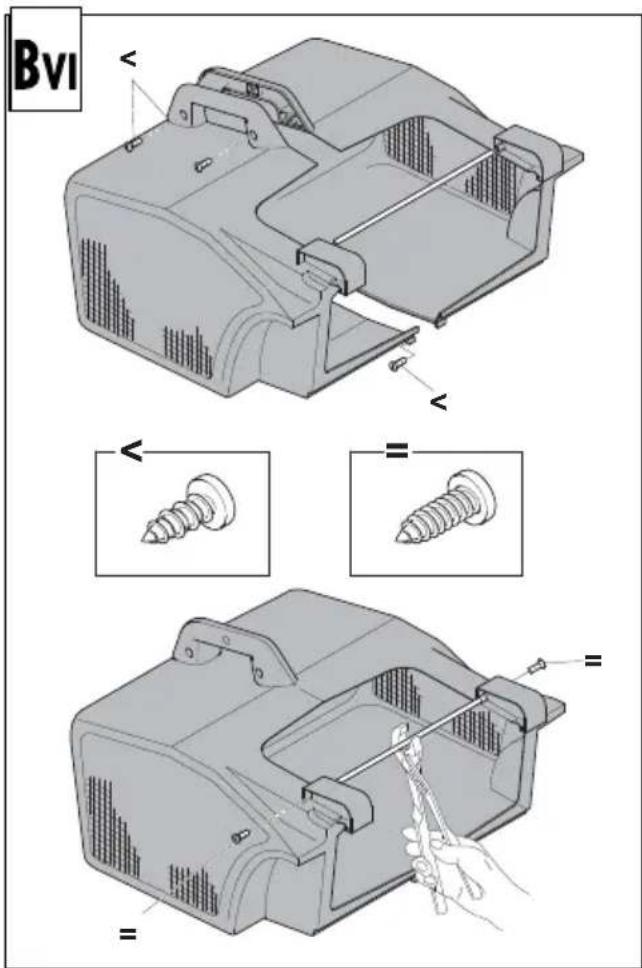
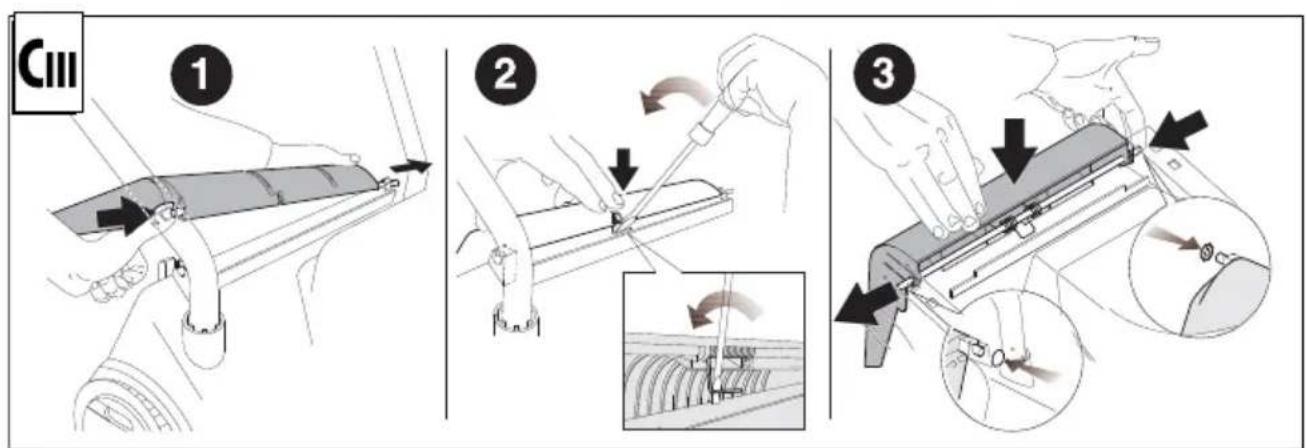
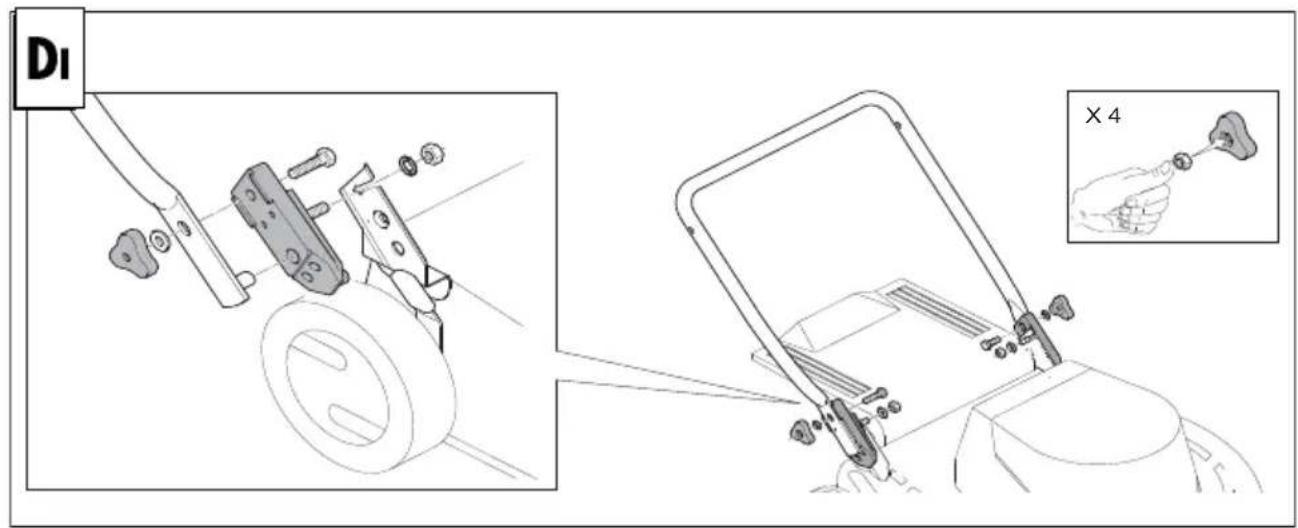
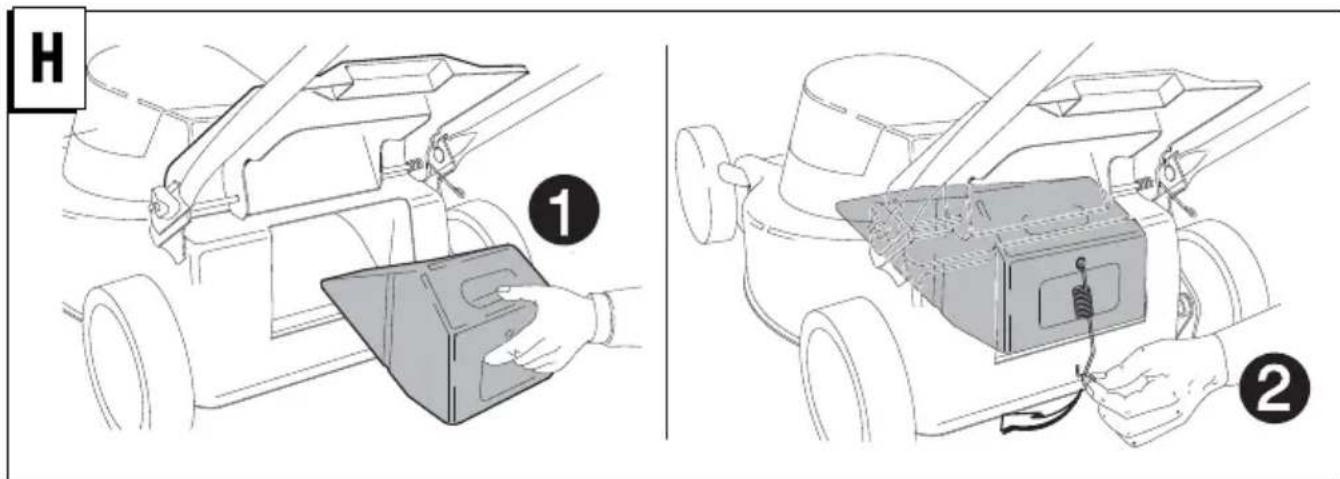
ASSEMBLY OF GRASS CATCHER

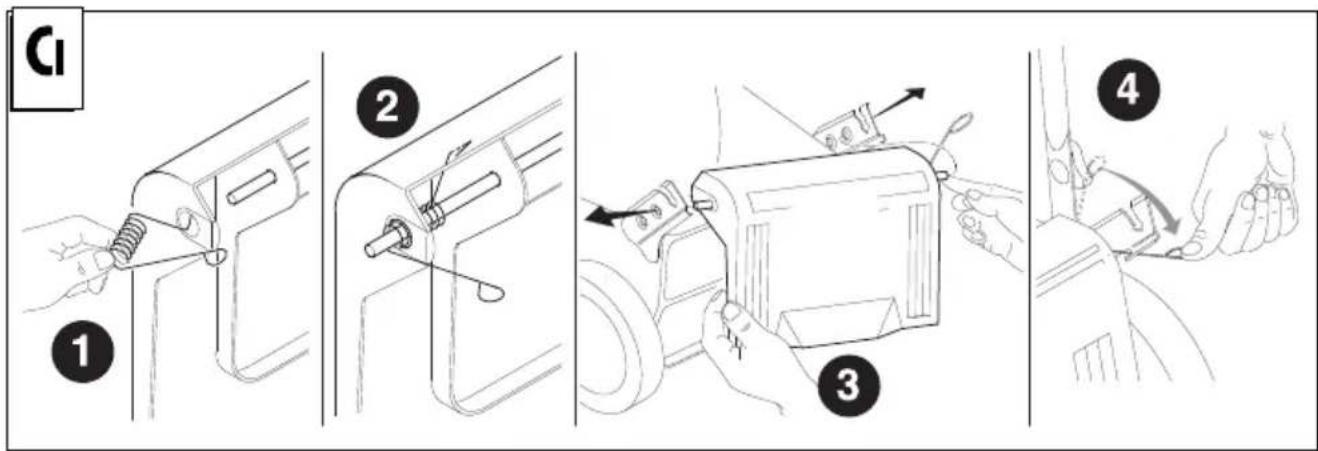
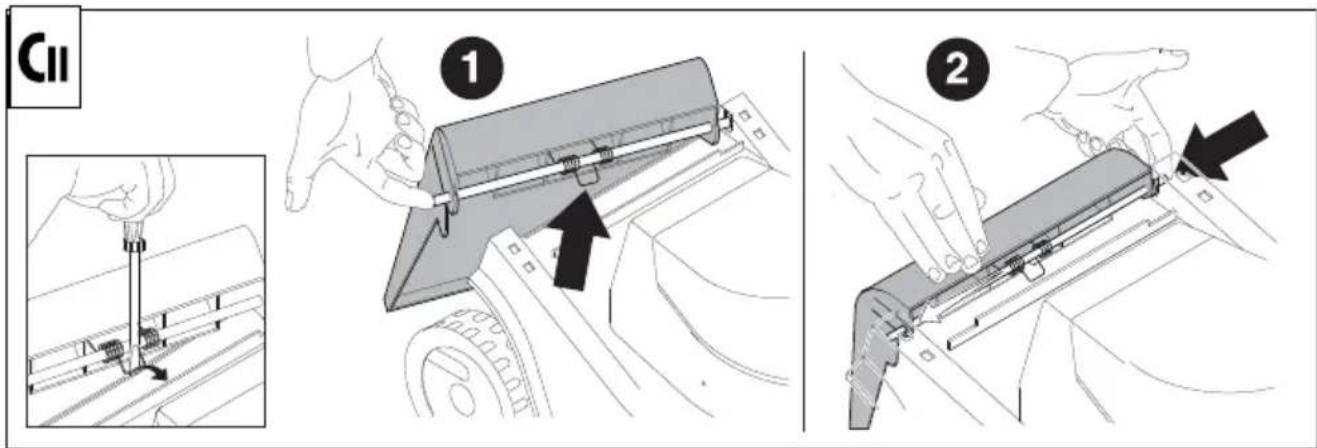
ASSEMBLY DEFLECTOR (for the models where it is included only)

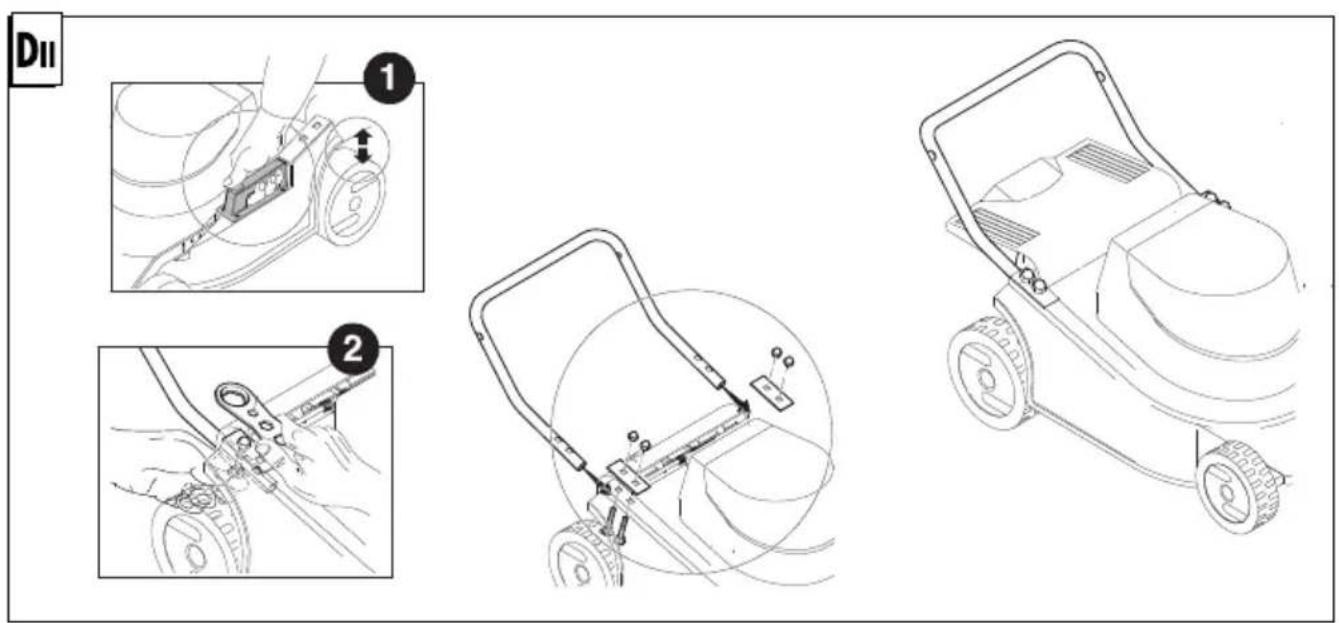
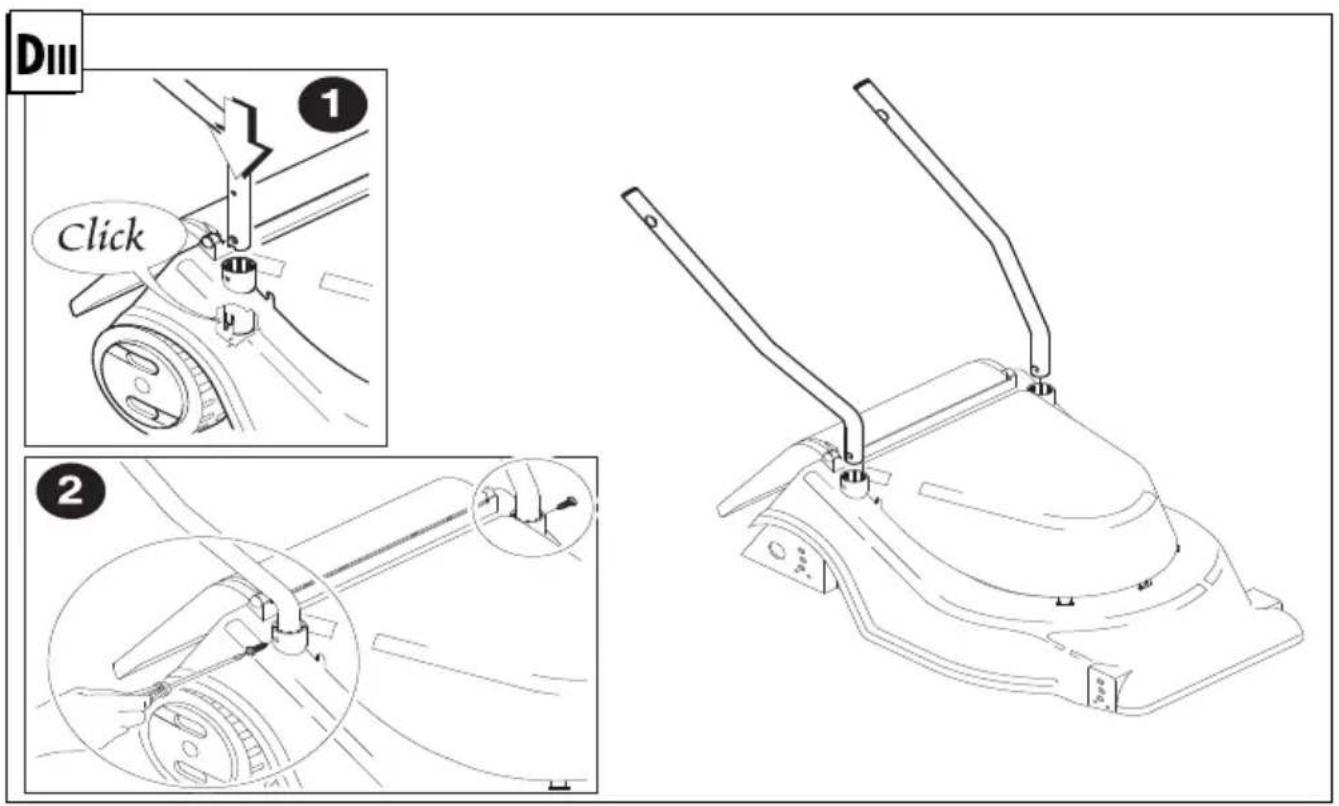
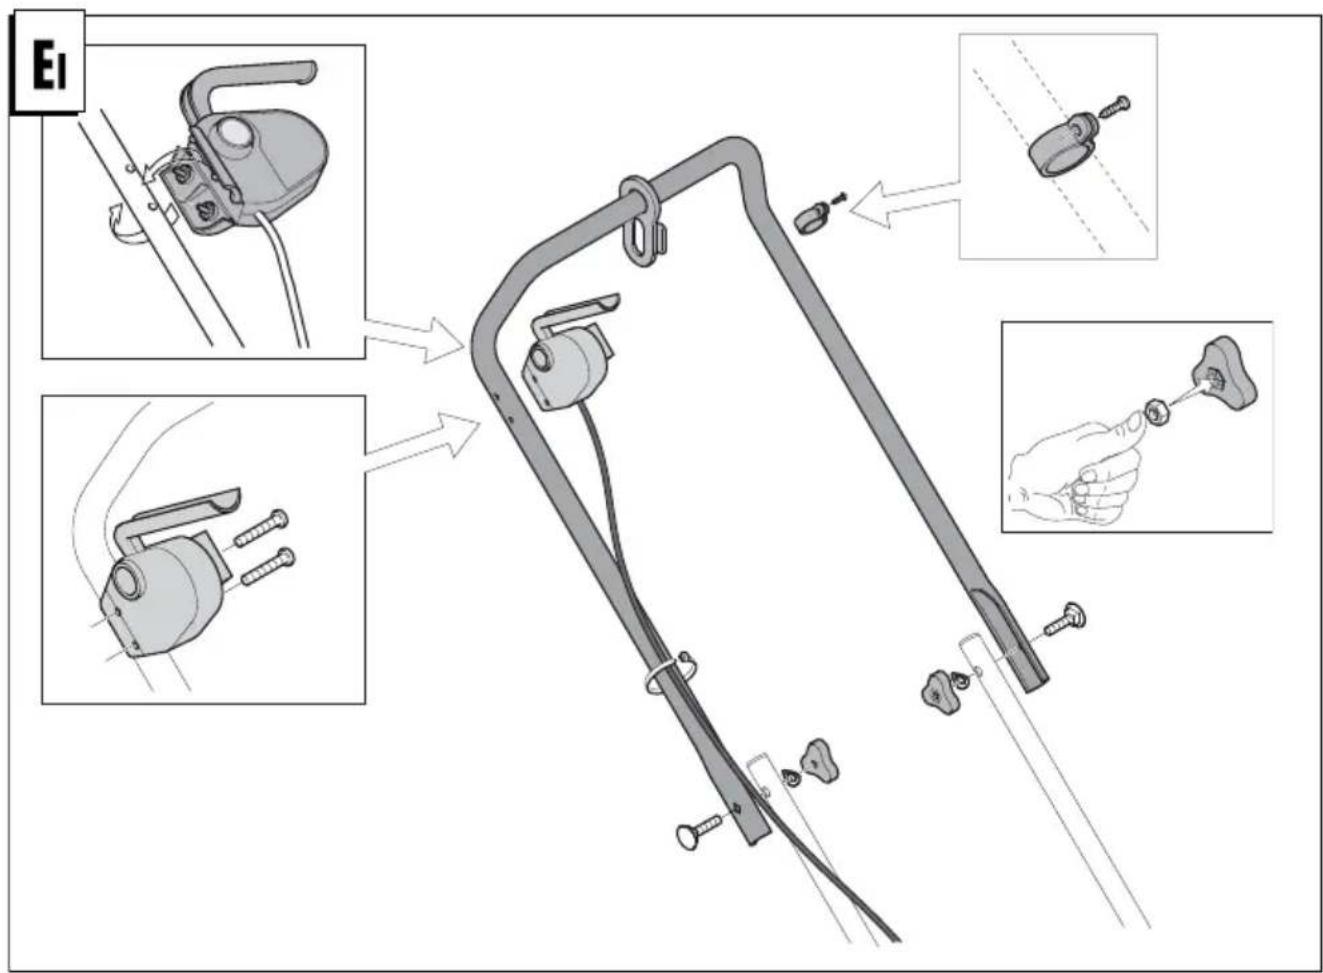
ASSEMBLY LOWER HANDLES

ASSEMBLY UPPER HANDLES

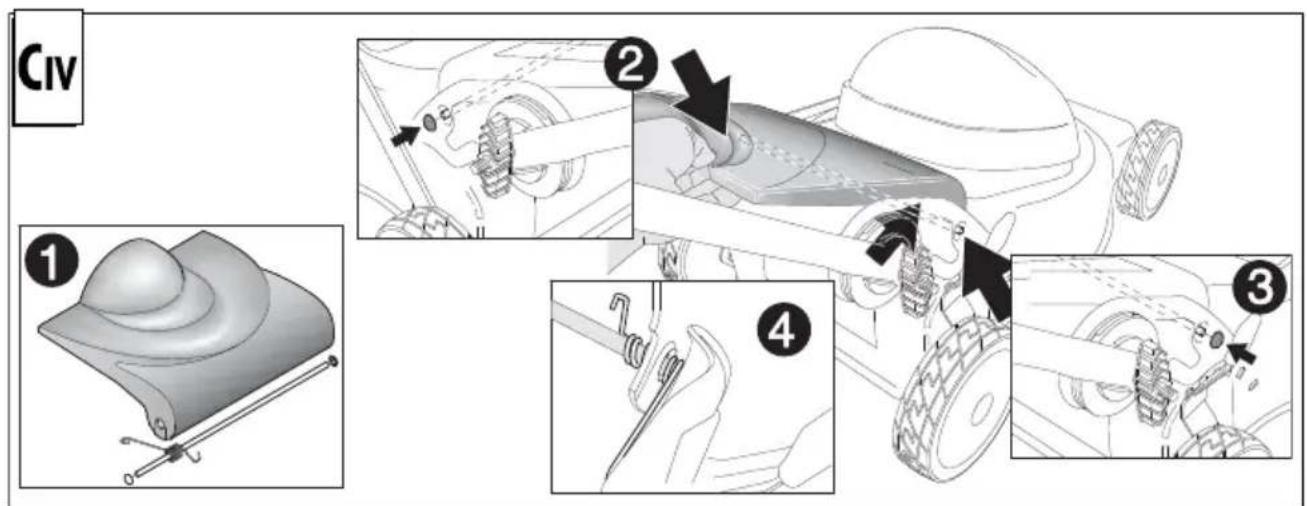
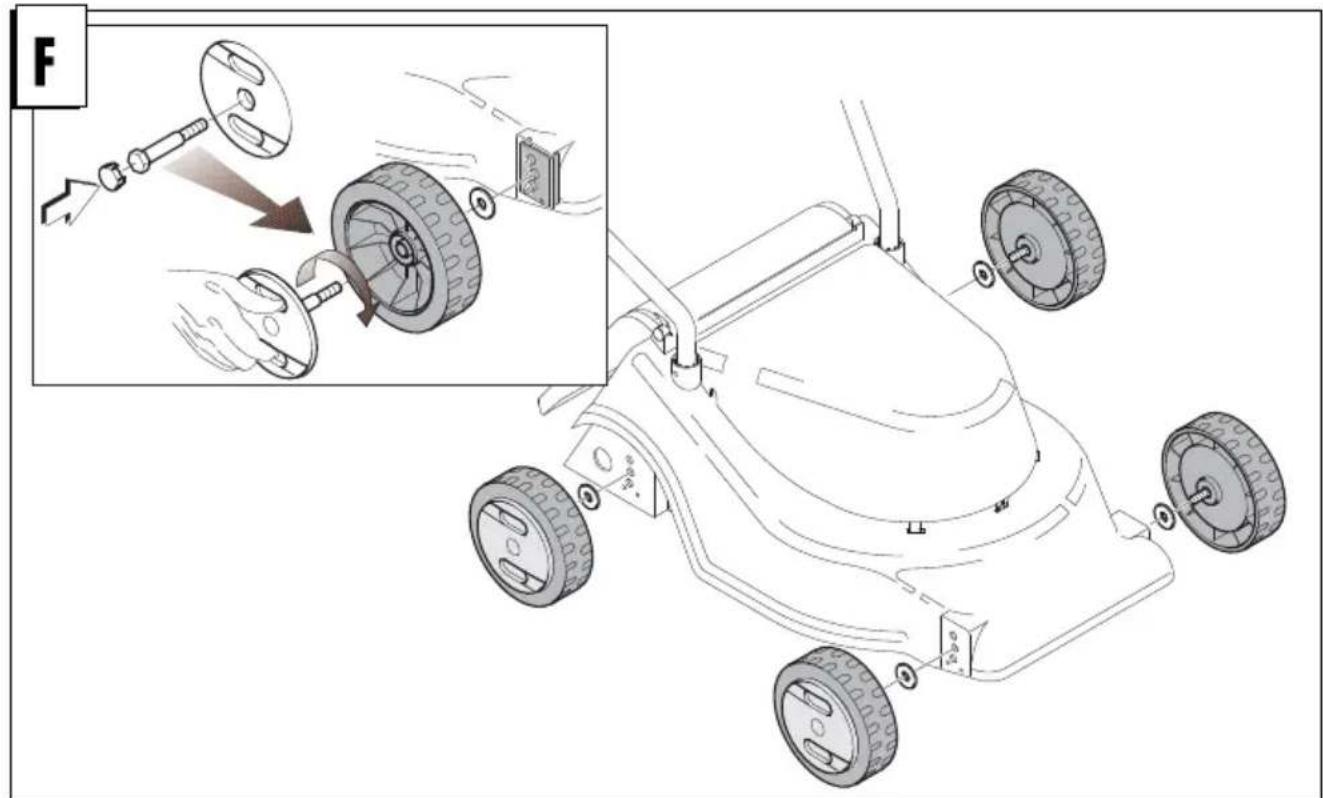
ASSEMBLY WHEEL (for the models where it is included only)

ADJUSTMENT OF HANDLES (for the models where it is included only)

MULCHING CAP INSERTION (for the models where it is included only)
To cut the grass with the mulching system (no grass collection), lift the rear deflector panel and insert the cap by fixing it with the spring as shown in the figure.

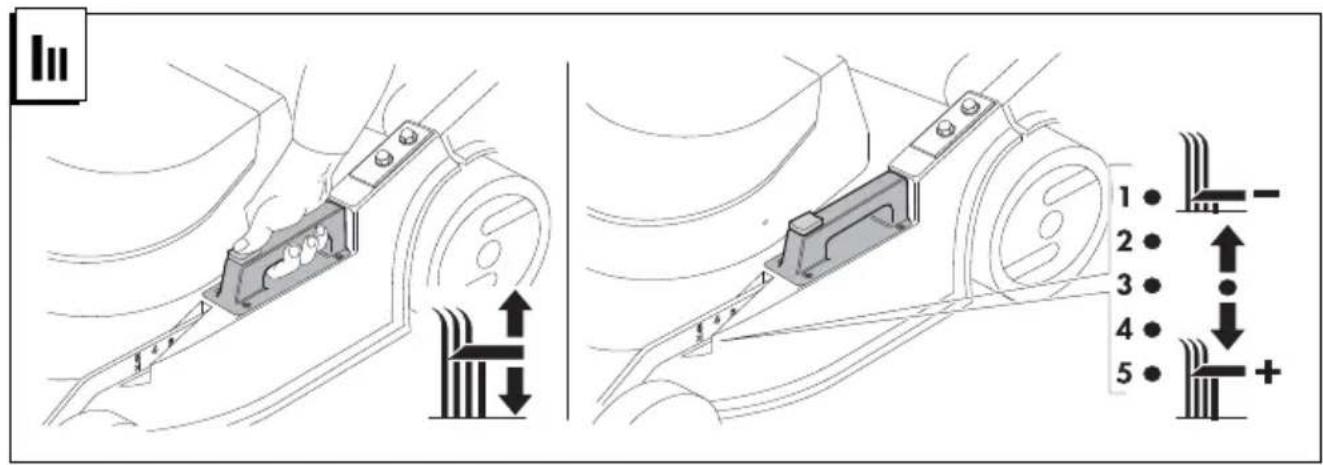
ADJUSTMENT OF CUTTING HEIGHT

SAFETY PRECAUTIONS

- Always operate with the deflector or grasscatcher in the correct position.
- Always stop the engine before removing the grasscatcher or adjusting the height of cut.
- Never place your hands or feet underneath the deck or into the grass discharge chute while the engine is running.

OPERATION
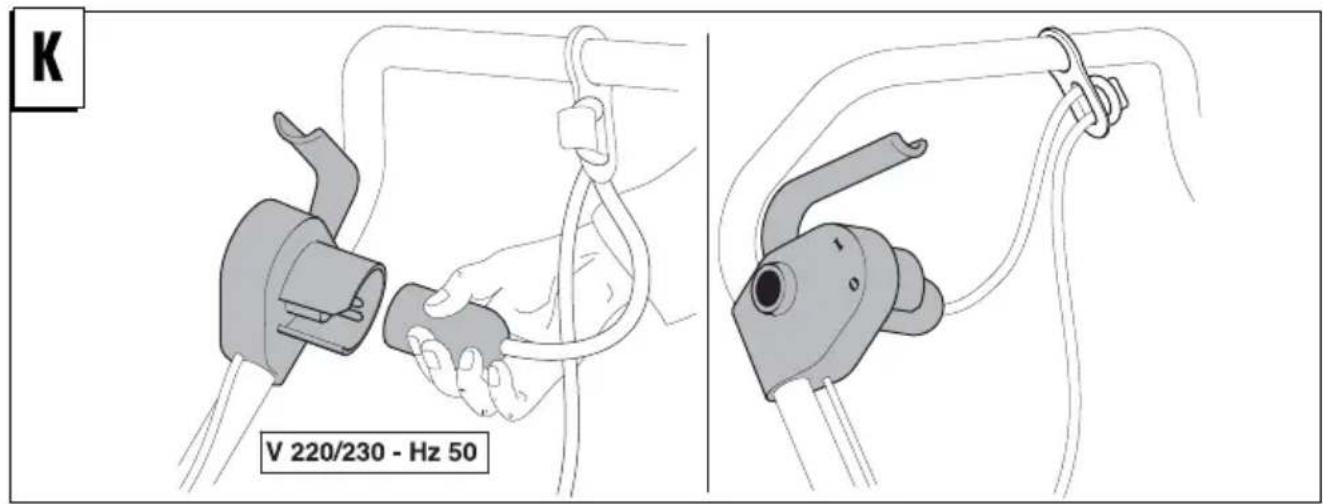
CONNECTION v220/230 - 50 Hz
ATTENTION MOTOR PROTECTOR
A motor cut -out device (motor protector) has been incorporated in the switch. Therefore, when reaching excessive cutting stress or overload, the motor will cut out automatically.
For re-starting, wait until the motor will be cool (approx. 5 to 10 minutes);
VERSION Manual lawn mower
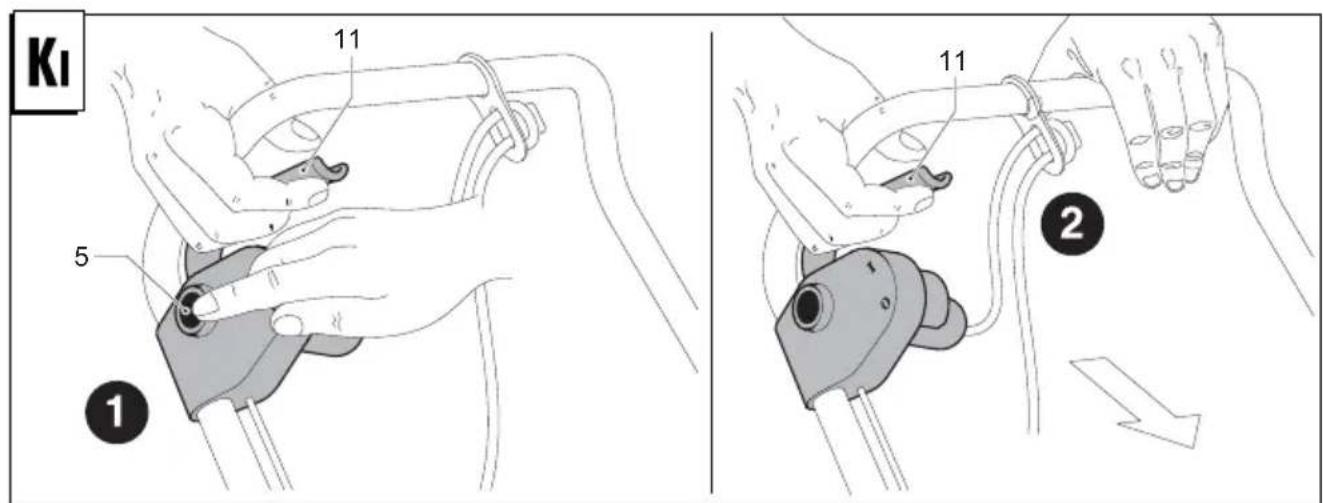
Before connecting up the lawn mower to the electric power supply, make sure that the mains supply voltage is 220-230V/50Hz and that a ground fault interrupter is installed on the mains circuit. Start the mower as follows:
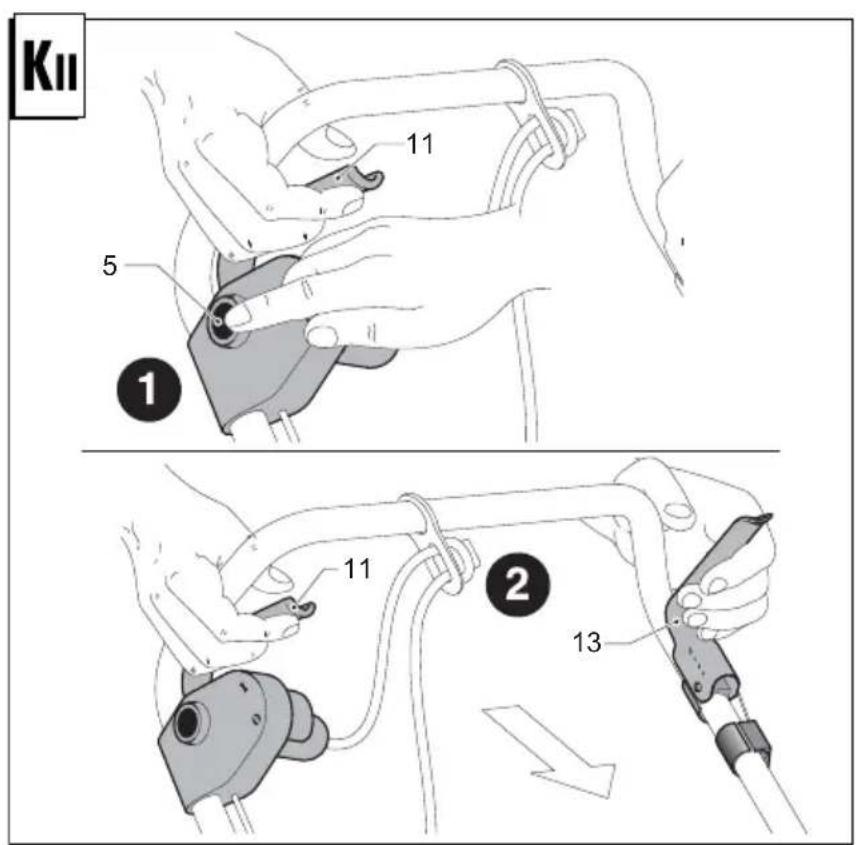
a) Press the safety push-button (5) to enable mower startup.
b) Start the mower by pulling the lever (11) towards the handle and keeping it pressed down. If you release the lever, the motor will stop.

CAUTION! The blade starts turning as soon as the mower is started.
VERSION Self-Propelled
Before connecting up the lawn mower to the electric power supply, make sure that the mains supply voltage is 220-230V/50Hz and that a ground fault interrupter is installed on the mains circuit. Start the mower as follows:
a) Press the safety push-button (5) to enable mower startup.
b) Start the mower by pulling the lever (11) towards the handle and keeping it pressed down. If you release the lever, the motor will stop.

CAUTION! The blade starts turning as soon as the mower is started.
MOWING
To cut the grass, push the lawn mower manually or insert the automatic advance gear.
How to insert automatic advance: Lift up the clutch lever (13) and keep it pressed in position.
How to disengage advance: Release the clutch lever.
MOWING
To cut the grass, push the lawn mower manually

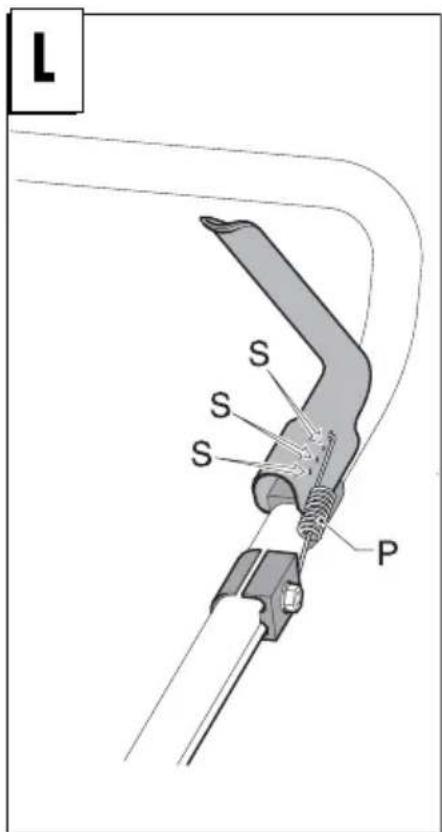
ADJUSTMENT OF CLUTCH CABLE (for self-propelled versions only)
Important: If, when you press the clutch lever, the automatic advance gear does not engage, the clutch cable should be adjusted by inserting the spring (P) in one of the subsequent holes (S) in the clutch lever (13).

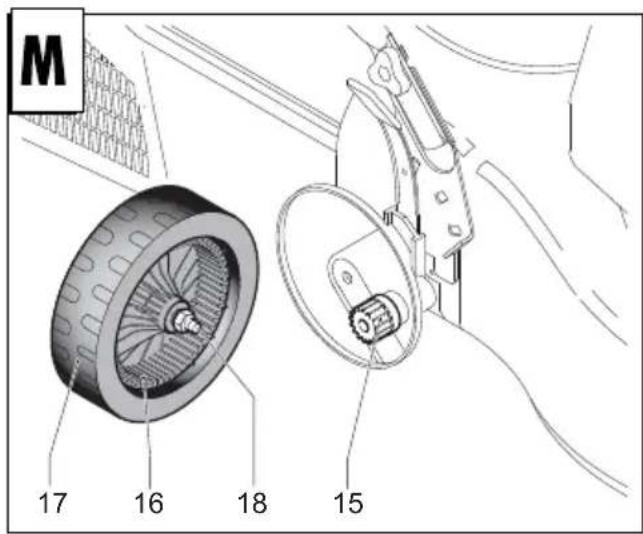
AUTOMATIC ADVANCEMENT (for self-propelled versions only)
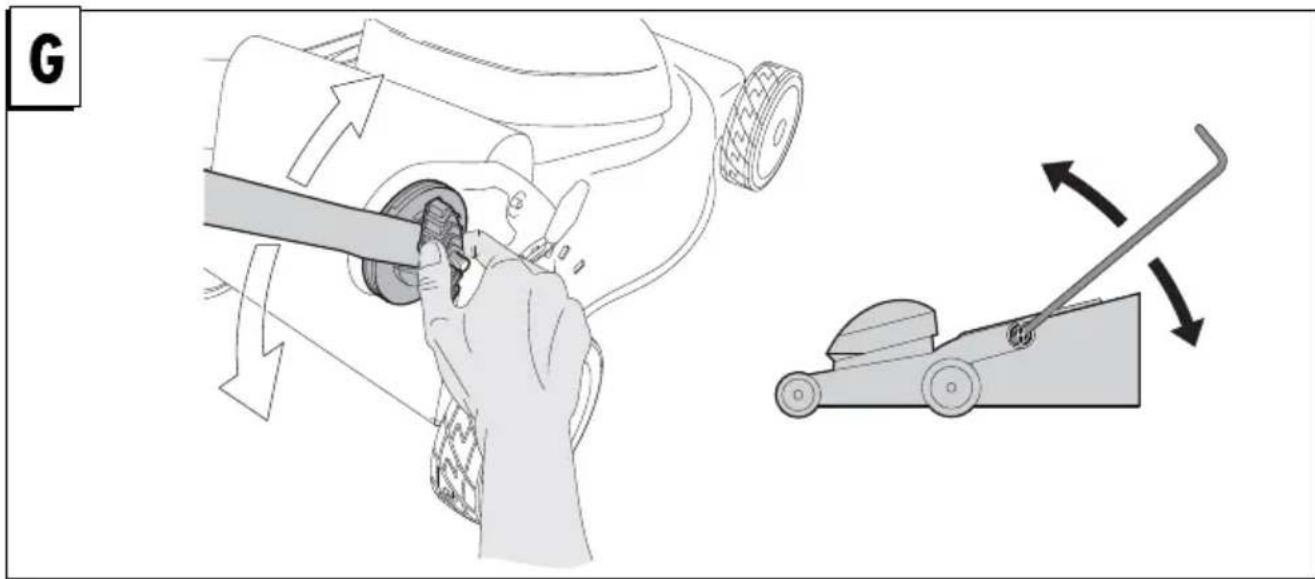
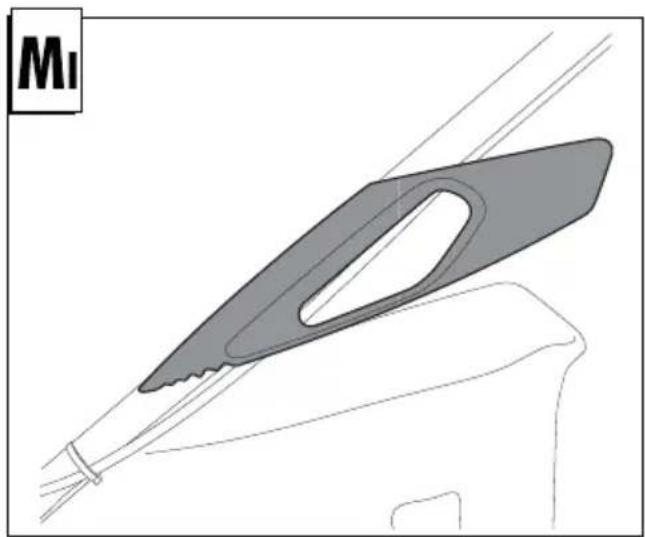
Periodically check the automatic advance assembly and make sure to keep it clean. In particular, the pinion (15) and the gear (16) must be kept perfectly clean. To carry
out this check, you must remove the wheel (17) by unscrewing the screw (18). Before reinstalling the wheel, put grease on the pinion and gear.

MAINTENANCE

Before carrying out any operations on the cutting tool, remove plug from mains
- Frequently check the mower and ensure that all grass deposits are removed from beneath the deck.
- Never clean the mower by pouring water over it: this may seriously damage the electrical system.
- Frequently remove the wheel screws clean with
petroleum and oil before replacing. Ball bearings must be greased before remounting.
- Frequently check the blade for damage.
- The lawn mower must be checked by a SERVICE DEALER.

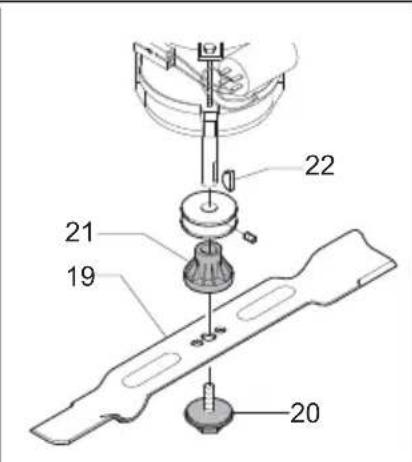
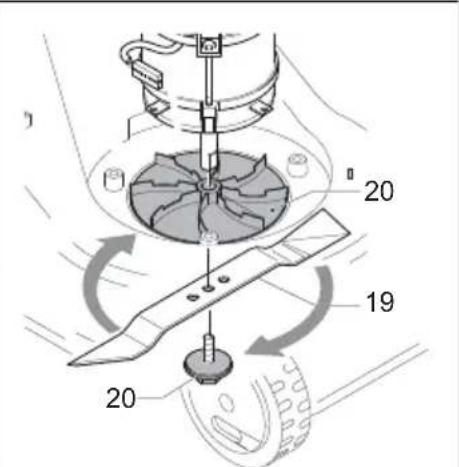
BLADE
• To remove the blade (19) unscrew the screw (20).
- Check the conditions of the blade-support (21), the key (22) and replace any parts which are damaged.
- When reassembling, make sure that the key (22) is
correctly seated in the shaft and that the cutting edges face in the direction of the engine rotation. The blade screw (20) must be torqued to 3,7 Kgm (35 Nm).
ENVIRONMENTAL INFORMATION
- Awareness of the environment must be considered when disposing of ‘end-of-life’ product.
- If necessary, contact your local authority for disposal information.

The symbol ☐ on the product or on its packaging indicates that this product may not be treated as household waste. Instead it shall be handed over to the applicable collection point for the recycling of electrical and electronic equipment.
By ensuring this product is disposed of correctly, you will help prevent potential negative consequences for the environment and human health, which could otherwise be caused by inappropriate waste handling of this product. For more detailed information about recycling of this product, please contact your local council office, your household waste disposal service or the shop where you purchased the product.
If any part is found to be defective due to faulty manufacture within the guarantee period, Husqvarna, through its Authorised Service Repairers will effect the repair or replacement to the customer free of charge providing:
(a) The fault is reported directly to the Authorised Repairer.
(b) Proof of purchase is provided.
(c) The fault is not caused by misuse, neglect or faulty adjustment by the user.
(d) The failure has not occurred through fair wear and tear.
(e) The machine has not been serviced or repaired, taken apart or tampered with by any person not authorised by Husqvarna.
(f) The machine has not been used for hire.
(g) The machine is owned by the original purchaser.
(h) The machine has not been used commercially.
* This guarantee is additional to, and in no way diminishes the customers statutory rights.
Failures due to the following are not covered, therefore it is important that you read the instructions contained in
this Operator's Manual and understand how to operate and maintain your machine:
Failures not covered by guarantee
* Failures as a result of not reporting an initial fault.
* Failures as a result of sudden impact.
* Failures as a result of not using the product in accordance with the instructions and recommendations contained in this Operator's Manual.
* Machines used for hire are not covered by this guarantee.
* The following items listed are considered as wearing parts and their life is dependent on regular maintenance and are, therefore not normally subject to a valid warranty claim: Blades, Electric Mains cable
* Caution!
Husqvama does not accept liability under the warranty for defects caused in whole or part, directly or indirectly by the fitting of replacement parts or additional parts that are not either manufactured or approved by Husqvama, or by the machine having been modified in any way.
SERVICE RECOMENDATIONS
- Your product is uniquely identified by a silver and black product rating label.
• We strongly recommend that your product is serviced at least every twelve months, more often in a professional application.
REPLACEMENT PARTS
Blade
Part no.: 531211017
EC DECLARATION OF CONFORMITY
Husqvarna AB, 561 82, Huskvarna, Sweden
Declare under our sole responsibility that the product(s);
Category.....Electric Rotary Lawnmower
Type(s) ...... SL546E, SL546ED
Identification of Series......See Product Rating Label
Year of Construction......See Product Rating Label
Conforms to the essential requirements & provisions of the following EC Directives:
2006/42/EC, 2004/108/EC, 2000/14/EC
based on the following EU harmonized standards applied:
EN60335-1, EN60335-2-77, EN836, EN50366, EN55014-1, EN61000-3-2, EN61000-3-3
The maximum A weighted sound pressure level L_PA at the operator's position, recorded on a sample of the above product(s) corresponds to the Level given in the table.
The maximum hand / arm vibration weighted value measured according to EN ISO 5349 on a sample of the above product(s) corresponds to the Value a_h given in the table.
2000/14/EC: The Measured Sound Power L_WA & Guaranteed Sound Power L_WA values are according to the tabulated figures.
Conformity Assessment Procedure...... Annex VI
Notified Body.... Intertek, Cleeve Road
Leatherhead, Surrey
KT22 7SB, England
Newton Aycliffe 28/09/2010
M.Bowden
Global R&D Director - Walk behind Husqvarna UK Ltd.
Keeper of technical documentation


| Type | SL546E | SL546ED |
| Width of Cut (cm) | 46 | 46 |
| Speed of rotation cutting device (rpm) | 2,900 | 2,900 |
| Power (kW) | 1.6 | 1.8 |
| Measured Sound Power L_WA (dB(A)) | 95 | 95 |
| Guaranteed Sound Power L_WA (dB(A)) | 96 | 96 |
| Level (dB(A)) | 84 | 84 |
| Uncertainty (dB(A)) | 2.5 | 2.5 |
| Value a_h (m/s ^2 ) | 5.0 | 5.0 |
| Uncertainty K of a_h (m/s ^3 ) | 1.5 | 1.5 |
| Weight (Kg) | 26 | 30.5 |
M.Bowden Global R&D Director – Schiebeversion Husqvarna UK Ltd.
POLSKA Husqvarna Poland Sp. z.o.o.
Outdoor Products South Africa (Pty) Ltd - t/a Husqvarna
Market Road Extension, Mkondeni, Pietermaritzburg
Tel: +27 33 3461379, Fax: +27 33 3461385, Internet: www.husqvarna.co.za
SCHWEIZ/SUISSE/SUIZZERA
Our policy of continuous improvement means that the specification of products may be altered from time to time without prior notice.
Copyright © 2010 Flymo S.A. All rights reserved. Flymo® and other product and feature names are registered or unregistered trademarks of Flymo S.A.
Husqvarna AB
561 82
Huskvarna
Sweden

- GB Original Instructions
- General
- Electrical
- Cables
- Minimum rating:
- Preparation
- Use
- DESCRIPTION
- GB - DESCRIPTION
- ASSEMBLY OF GRASS CATCHER
- ASSEMBLY DEFLECTOR (for the models where it is included only)
- ASSEMBLY LOWER HANDLES
- ASSEMBLY UPPER HANDLES
- ASSEMBLY WHEEL (for the models where it is included only)
- ADJUSTMENT OF HANDLES (for the models where it is included only)
- MULCHING CAP INSERTION (for the models where it is included only)
- ADJUSTMENT OF CUTTING HEIGHT
- SAFETY PRECAUTIONS
- OPERATION
- ATTENTION MOTOR PROTECTOR
- VERSION Manual lawn mower
- VERSION Self-Propelled
- MOWING
- ADJUSTMENT OF CLUTCH CABLE (for self-propelled versions only)
- AUTOMATIC ADVANCEMENT (for self-propelled versions only)
- MAINTENANCE
- Before carrying out any operations on the cutting tool, remove plug from mains
- BLADE
- ENVIRONMENTAL INFORMATION
- SERVICE RECOMENDATIONS
- REPLACEMENT PARTS
- EC DECLARATION OF CONFORMITY
Brand : HUSQVARNA
Model : SL546ED
Category : Lawn mower