
RW414361 - Fridge GAGGENAU - Free user manual and instructions
Find the device manual for free RW414361 GAGGENAU in PDF.


User questions about RW414361 GAGGENAU
0 question about this device. Answer the ones you know or ask your own.
Ask a new question about this device
Download the instructions for your Fridge in PDF format for free! Find your manual RW414361 - GAGGENAU and take your electronic device back in hand. On this page are published all the documents necessary for the use of your device. RW414361 by GAGGENAU.
USER MANUAL RW414361 GAGGENAU
Wine storage compartment
en Table of Contents
Safety and warning information 3
Information concerning disposal 4
Scope of delivery 4
Installing the appliance 5
Ambient temperature and ventilation 5
Connecting the appliance 5
Getting to know your appliance 6
Switching the appliance on 7
Set the language 8
Setting the temperature unit 8
Setting the temperature 8
Special functions 9
Alarm function 10
Usable capacity 10
Placing bottles in the refrigerator 11
Practical tips for storing wine 11
Drinking temperatures 11
Interior fittings 12
Switching off and disconnecting the appliance 13
Defrosting 13
Cleaning the appliance 13
Odours 13
Light (LED) 14
Tips for saving energy 14
Operating noises 14
Eliminating minor faults yourself 15
Customer service 16
Before you switch ON the appliance
Please read the operating and installation instructions carefully! They contain important information on how to install, use and maintain the appliance.
The manufacturer is not liable if you fail to comply with the instructions and warnings. Retain all documents for subsequent use or for the next owner.
Technical safety
The appliance contains a small quantity of environmentally friendly but flammable refrigerant R600a. Ensure that the tubing of the refrigerant circuit is not damaged during transportation and installation. Leaking refrigerant may cause eye injuries or ignite.
If damage has occurred
- Keep naked flames and/or ignition sources away from the appliance,
- thoroughly ventilate the room for several minutes,
- switch off the appliance and pull out the mains plug,
• inform customer service.
The more refrigerant an appliance contains, the larger the room must be in which the appliance is situated. Leaking refrigerant can form a flammable gas-air mixture in rooms which are too small.
The room must be at least 1 m^3 per 8 g of refrigerant. The amount of refrigerant in your appliance is indicated on the rating plate inside the appliance.
If the power cord of this appliance is damaged, it must be replaced by the manufacturer, customer service or a similarly qualified person. Improper installations and repairs may put the user at considerable risk.
Repairs may be performed by the manufacturer, customer service or a similarly qualified person only.
Only original parts supplied by the manufacturer may be used. The manufacturer guarantees that only these parts satisfy the safety requirements.
A extension cable may be purchased from customer service only.
Important information when using the appliance
- Never use electrical appliances inside the appliance (e.g. heater, electric ice maker, etc.). Explosion hazard!
- Never defrost or clean the appliance with a steam cleaner! The steam may penetrate electrical parts and cause a short-circuit. Risk of electric shock!
- Do not use pointed or sharp-edged implements to remove frost or layers of ice. You could damage the refrigerant tubes. Leaking refrigerant may cause eye injuries or ignite.
- Do not store products which contain flammable propellants (e.g. spray cans) or explosive substances in the appliance. Explosion hazard!
- Do not stand on or lean heavily against base of appliance, drawers or doors, etc
- For defrosting and cleaning, pull the mains plug out or switch off the fuse. Do not pull out the mains plug by tugging on the power cord.
- Store high-percentage alcohol tightly closed and standing up.
- Keep plastic parts and the door seal free of oil and grease. Otherwise, parts and door seal will become porous.
- Never cover or block the ventilation openings of the appliance!
- Avoiding placing children and vulnerable people at risk:
At risk are children, people who have limited physical, mental or sensory abilities, as well as people who have inadequate knowledge concerning safe operation of the appliance.
Ensure that children and vulnerable people have understood the hazards.
A person responsible for safety must supervise or instruct children and vulnerable people who are using the appliance.
Only children from 8 years and above may use the appliance.
Supervise children who are cleaning and maintaining the appliance.
Never allow children to play with the appliance.
Children in the household
- Keep children away from packaging and its parts.
Danger of suffocation from folding cartons and plastic film! - Do not allow children to play with the appliance!
- If the appliance features a lock: keep the key out of the reach of children!
General regulations
This appliance is designed exclusively for the storage of wine.
This appliance is intended for use in the home and the home environment.
The appliance is suppressed according to EU Directive 2004/108/EC.
The refrigeration circuit has been checked for leaks.
This product complies with the relevant safety regulations for electrical appliances (EN 60335-2-24).
This appliance is intended for use up to a maximum height of 2000 metres above sea level.
Information concerning disposal

Disposal of packaging
The packaging protects your appliance from damage during transit. All utilised materials are environmentally safe and recyclable. Please help us by disposing of the packaging in an environmentally friendly manner.
Please ask your dealer or inquire at your local authority about current means of disposal.

Disposal of your old appliance
Old appliances are not worthless rubbish! Valuable raw materials can be reclaimed by recycling old appliances.

This appliance is labelled in accordance with European Directive 2012/19/EU concerning used electrical and electronic appliances (waste electrical and electronic equipment - WEEE). The guideline determines the framework for the return and recycling of used appliances as applicable throughout the EU.

Warning
Redundant appliances
- Pull out the mains plug.
- Cut off the power cord and discard with the mains plug.
- Do not take out the trays and receptacles: children are therefore prevented from climbing in!
- Do not allow children to play with the appliance once it has spent its useful life. Danger of suffocation!
Refrigerators contain refrigerant and gases in the insulation. Refrigerant and gases must be disposed of professionally. Ensure that tubing of the refrigerant circuit is not damaged prior to proper disposal.
Scope of delivery
After unpacking all parts, check for any damage in transit.
If you have any complaints, please contact the dealer from whom you purchased the appliance or our customer service.
The delivery consists of the following parts:
Built-in appliance
- Interior fittings (depending on model)
- Bag containing installation materials
- Operating instructions
• Installation manual
- Customer service booklet
- Warranty enclosure
• Information on the energy consumption and noises
Installing the appliance
Have a technician install and connect the appliance according to the enclosed installation instructions.
Transporting
The appliance is heavy. Secure in position during transportation and installation.
Due to the weight/dimensions of the appliance and to minimise the risk of injury and damage to the appliance at least two persons are necessary to set-up the appliance safely.
Installation location
A dry, well ventilated room is suitable as an installation location. The installation location should not be exposed to direct sunlight and not placed near a heat source, e.g. a cooker, radiator, etc. If installation next to a heat source is unavoidable, use a suitable insulating plate or observe the following minimum distances from the heat source:
- 3 cm to electric or gas cookers.
- 30 cm to an oil or coal-fired cooker.
The floor of the installation location must not give way; if required, reinforce floor.
Ambient temperature and ventilation
Ambient temperature
The climate class can be found on the rating plate. The climate class indicates within which ambient temperatures the appliance can be operated.
| Climate class | Permitted ambient temperature |
| SN +10 °C to 32 °C | |
| N +16 °C to 32 °C | |
| ST +16 °C to 38 °C | |
| T +16 °C to 43 °C | |
Note
The appliance is fully functional within the room temperature limits of the indicated climatic class. If an appliance of climatic class SN is operated at colder room temperatures, the appliance will not be damaged up to a temperature of +5 °C.
Ventilation
Conduction of the heated air must not be obstructed. Otherwise, the refrigeration unit must work harder. This increases power consumption. Therefore: Never cover or block the ventilation opening!
Connecting the appliance
Have a technician install and connect the appliance according to the enclosed installation instructions.
Do not remove the transportation protection devices from the shelves and storage compartments until the appliance has been installed.
In addition to the statutory national regulations, observe the connection conditions of the local power supply companies.
After installing the appliance, wait at least 1 hour until the appliance starts up. During transportation the oil in the compressor may have flowed into the refrigeration system.
Before switching on the appliance for the first time, clean the interior of the appliance (see chapter "Cleaning the appliance").
Electrical connection
The socket must be near the appliance and also freely accessible following installation of the appliance.
The appliance complies with the protection class I. Connect the appliance to 220-240 V/50 Hz alternating current via a correctly installed socket with protective conductor. The socket must be fused with a 10 to 16 A fuse.
For appliances operated in non-European countries, check whether the stated voltage and current type on the rating plate match the values of your mains supply. These specifications can be found on the rating plate (see chapter "Customer service").
Warning
Never connect the appliance to electronic energy saver plugs. Our appliances can be used with mains and sine-controlled inverters. Mains-controlled inverters are used for photovoltaic systems which are connected directly to the national grid. Sine-controlled inverters must be used for isolated applications (e.g. on ships or in mountain lodges) which are not connected directly to the national grid.
Getting to know your appliance
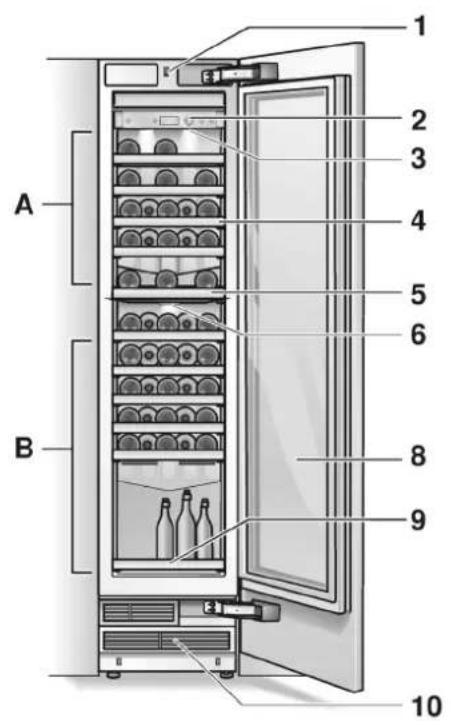
These operating instructions refer to several models. The diagrams may differ.
text_image
A B 1 2 3 4 5 6 8 9 10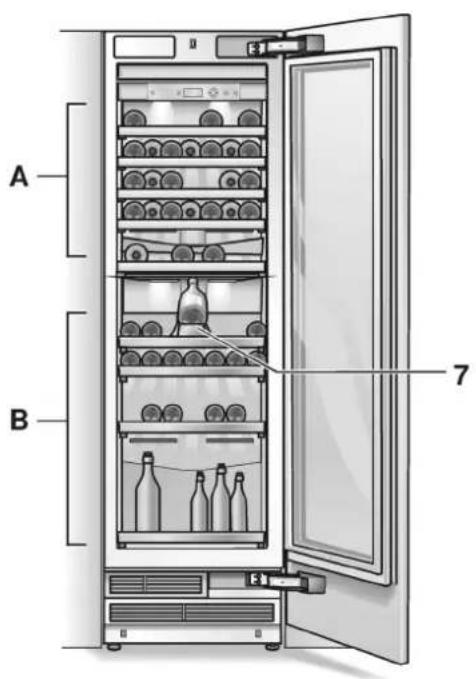
text_image
A B 7* Not all models.
A Upper climatic zone
B Lower climatic zone
1 Light switch
2 Controls
3 Light (LED) with switches for presentation lights
4 Shelf for wine bottles
5 Partition
6 Light (presentation light)
7 * Presentation attachment
8 Glass door
9 * Extendable shelf
10 Ventilation
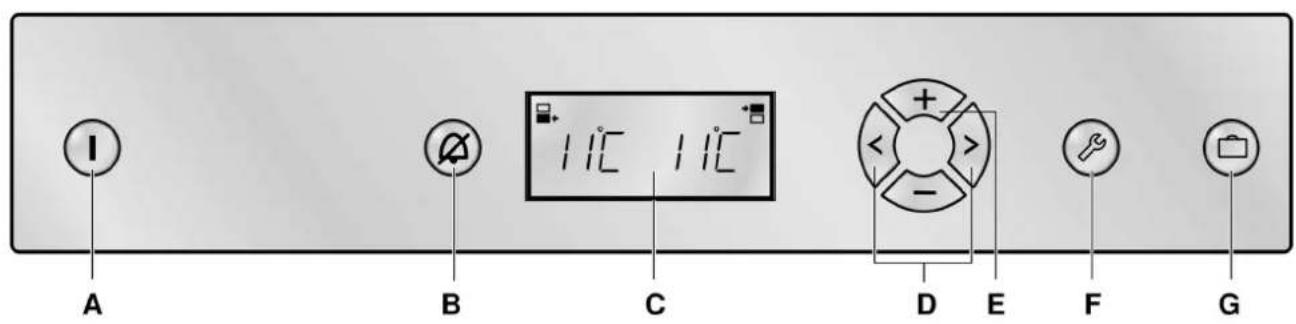
Controls
text_image
A B C D E F GA On/Off button ①
Serves to switch the whole appliance on and off.
B Alarm button
Used to switch off the warning signal, (see chapter Alarm function).
C Display panel
The temperatures in both climatic zones of the refrigerator compartment are shown in the display panel. Activated special functions are shown via "symbol".
The menus and setting options which are available are represented on the display panel in the setup mode, see chapter "Special functions".
D Selection buttons <>
The temperature setting is activated using the selection buttons (see chapter Setting the temperature).
For selecting a menu in the setup mode (see chapter Special functions).
E Setting buttons +/-
The temperature can be changed using the setting buttons (see chapter "Setting the temperature").
More settings can be selected in the setup mode, (see chapter "Special functions").
F "setup" button ⏻
This button starts and ends the setup mode. If the setup mode is ended using the setup button, the changes which have been made are stored.
G Holiday button
Is used to switch holiday mode on and off, (see chapter Special functions, section Holiday mode).
Note
A sound can be heard every time a button is actuated if this function is activated in the sound menu during the setup mode.
Symbols in the display field
Display for the upper climatic zone.
Display for the lower climatic zone
"Humidity" function is activated (see chapter "Special functions", section "Humidity function").
Holiday mode is activated, see chapter Special functions.
For the setting options in the set up mode, see chapter Special functions.
A warning message is displayed, see chapter Alarm function.
Switching the appliance on
Switch on the appliance with the On/Off button ①.
The appliance begins to cool. Light is switched on when the door is open.
Operating tip
After the appliance has been switched on, it may take several hours until the set temperature has been reached.
Set the language
The display languages can be changed according to the table in the chapter "Special functions", "Setup mode".
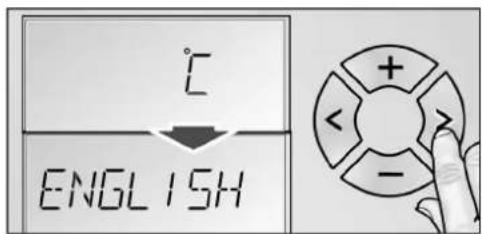
In order to change the display language:
- Press setup button Ⓞ.
- Press the < or > setting button, until the set language is displayed.
- Press the + or - setting button, until the desired language is displayed.
- Press the setup button Ⓞ, in order to store the settings. The set temperature is displayed again in the fascia.
Setting the temperature unit
The temperature can be displayed in degrees Celsius (°C) or degrees Fahrenheit (°F).
- Press setup button ⏻.
The first menu (temperature unit) is displayed. - Press the + or - setting button in order to switch between degrees Fahrenheit (°F) and degrees Celsius (°C).
- Press the setup button ⏻, in order to store the settings.
The set temperature is displayed again in the fascia.
Setting the temperature
The temperatures in both climatic zones can be set independently of each other from +5 °C to +20 °C.
We recommend a setting of +11 °C.
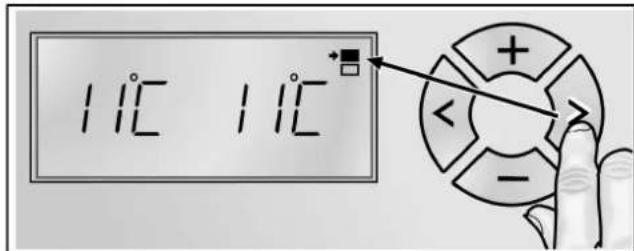
- Activate the setup mode with the selection button >.
- Select the required climatic zone.
text_image
11°C 11°C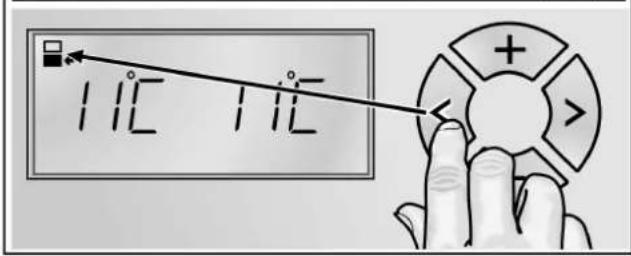
text_image
TIE TIE- Set the desired temperature with the + (warmer) or - (cooler) setting buttons.
Special functions
The following special functions can be selected or displayed:
Setup mode
In Setup mode you can make your personal settings.
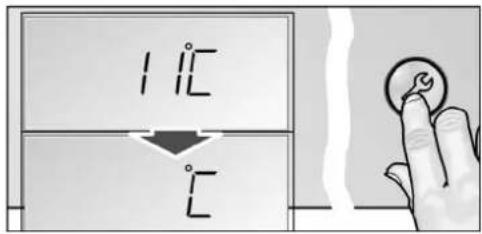
Switching on
Press setup button ⏻.
The first menu (temperature unit) is displayed in the fascia.
text_image
1.12 1.2Making settings
-
Switch on setup mode.
-
Press the selection button < or >. The next menu is displayed and its current setting (mostly ON or OFF).
text_image
℃ ENGLISH- Press the setting button + or -. The setting is saved, if the next menu is selected using < or >.
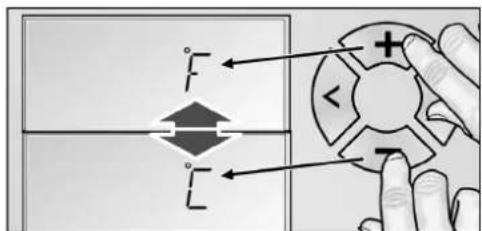
text_image
Diagram showing a hand holding a circular component with labeled points F and L, indicating a mechanical or electrical component.Switching off
Press setup button ⏻.
All of the changed settings are stored.
Note
If no button is selected within 20 seconds, the setup mode ends automatically. All of the changed settings are stored. The set temperature is displayed again in the fascia.
Menus in the setup mode
The following settings can be made.
| Menu Possible setting | |
| Temperature unit °C (degrees Celsius) | |
| °F (degrees Fahrenheit) | |
| Language Deutsch | |
| English | |
| French | |
| Danish | |
| Finnish | |
| Greek | |
| Dutch | |
| Italian | |
| Polish | |
| Portuguese | |
| Norwegian | |
| Russian | |
| Swedish | |
| Spanish | |
| Turkish | |
| Czech | |
| Sound On | |
| Off | |
| Humidity (lower climatic zone) | On |
| Off | |
| Humidity (upper climatic zone) | On |
| Off | |
Vacation mode
If absent for a prolonged period, you can switch the appliance to energy-saving vacation mode.
When vacation mode is switched on:
both climatic zones are set to a temperature of 12 °C,
● the humidity function is switched off,
• the light is switched off.
Switching on
Press Holiday button ☐.
VACATION is displayed in the display panel.
Switching off
Press Holiday button ☑.
The previous settings and temperature values are once again activated.
Rest mode
When Rest mode is switched on, the following settings are switched off:
Acoustic signal
- Interior light
- Messages on the display panel
- The background illumination of the display panel is reduced
- Buttons are locked
Switching on
- Press and hold down the setting button +.
- Press Holiday button ☐.
- Press the setting button + and hold down for 3 seconds longer. The symbol VACATION flashes on the display panel and RESTMODE is displayed.
Switching off
Press Holiday button Ⓞ.
The previous settings and temperature values are once again activated.
Humidity function
Independent from one another, the air humidity in the two climatic zones can be increased.
Switching on
- Press setup button ⏻.
- Press selection button > until HUMIDITY and the current setting (ON/OFF) are displayed for the particular climatic zone.
- Press the setting button +, in order to reset the setting.
- Press the setup button Ⓐ, in order to save the setting. HUMIDITYis displayed in the display panel.
Switching off
- Press setup button ⏻.
- Press selection button > until HUMIDITY and the current setting (ON/OFF) are displayed for the particular climatic zone.
- Press the setting button —, in order to reset the setting.
- Press the setup button Ⓜ, in order to save the setting. HUMIDITY goes out on the display panel.
Alarm function
Switching off the warning signal
Press the alarm button Ⓕ to switch off the warning signal.
Door alarm
The door alarm switches on if an appliance door is left open for longer than three minutes. Close the door to switch off the warning signal.
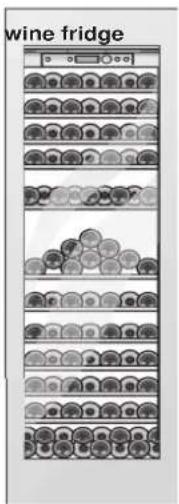
Usable capacity
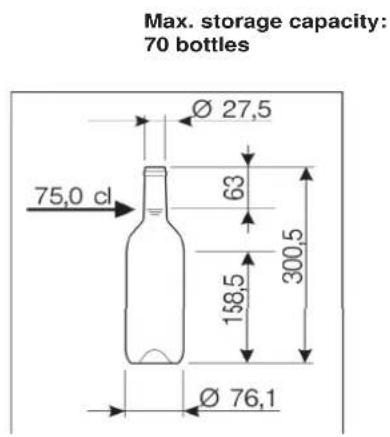
Information on the usable capacity can be found inside your appliance on the rating plate (see diagram at chapter "Customer service").
Storage examples
text_image
Max. storage capacity: 70 bottles Ø 27,5 75,0 cl 63 158,5 300,5 Ø 76,1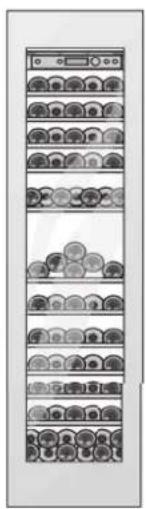
natural_image
Vertical panel with circular icons arranged in rows, no visible text or symbolsMax. storage capacity: 98 bottles
61.0 cm wine fridge45.7 cm
text_image
wine fridgePractical tips for storing wine
- Unpack bottles of wine – do not leave in crates or cardboard boxes – before storing in the refrigerator compartment.
- Place old bottles so that the cork is always wet. There should never be an air gap between the wine and the cork.
The open bottle shelves are especially suitable because they do not interrupt the air circulation. As a result, the atmospheric humidity which condenses on the bottles quickly dries again.
Before the wine is drunk, it should be "warmed up" (chambré): Place e.g. rosé wine on the table approx. 2–5 hours before drinking, red wine 4–5 hours before drinking. The wine will then be at the correct drinking temperature. Sparkling wine and Champagne should be cooled in the refrigerator shortly before drinking. - Remember that wine should always be cooled slightly lower than the ideal serving temperature, as its temperature increases as soon as it is poured into a glass!
Drinking temperatures
The correct serving temperature is crucial for the taste and therefore your enjoyment of the wine.
We recommend serving wine at the following drinking temperatures:
| Type of wine Drinking temperature | |
| Bordeaux red 18 °C | |
| Côtes du Rhône red/Barolo | 17 °C |
| Burgundy red/ Bordeaux red | 16 °C |
| Port 15 °C | |
| Young Burgundy red | 14 °C |
| Young red wine 12 °C | |
| Young Beaujolais/all white wines with little residual sugar | 11 °C |
| Old white wines/ Chardonnay | 10 °C |
| Sherry 9 °C | |
| Young white wines from late vintage | 8 °C |
| White wines Loire/ Entre-deux-Mers | 7 °C |
Interior fittings
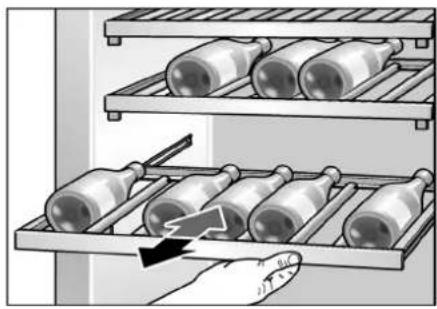
Taking out the shelves
You can take out or vary the shelves inside the appliance as required.
natural_image
Illustration of a hand using a directional arrow to move through cylindrical containers on a rack (no text or symbols)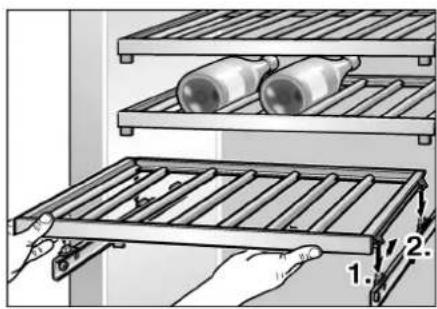
text_image
Diagram showing a hand holding a metal rack with two cylindrical containers, labeled with parts 1 and 2.Extendable shelf
* Not all models.
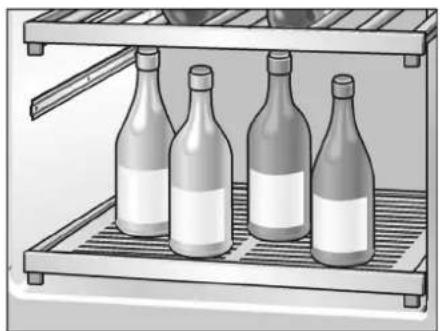
for the storage of wine bottles standing up:
- Remove the two lower shelves from the lower climatic zone.
- Insert the extendable shelf (optional accessory) into the bottom rails.
natural_image
Illustration of four bottles on a metal shelf, no text or symbols presentPresentation attachment
* Not all models.
You can take out or vary the attachment as required.

natural_image
Two-panel illustration showing hands using a tool to adjust or assemble bottles on a rack, with no visible text or symbols.Door lock
* Not all models.
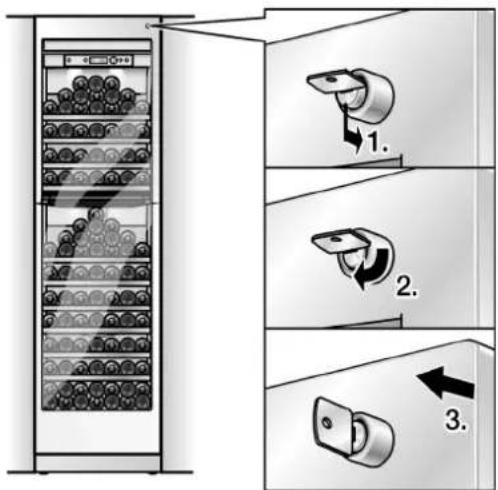
A door lock, available as an accessory, can be used to lock the wine fridge.
The door lock can be purchased from customer service (see chapter entitled Customer service) or from a GAGGENAU dealer.
text_image
Diagram showing three steps of a device with labeled components and directional arrows indicating movement.Switching off and disconnecting the appliance
Switching the appliance off
Press the On/Off button ①.
Refrigeration unit and light switch off.
Disconnecting the appliance
If you do not use the appliance for a prolonged period:
- Switch off the appliance.
- Pull out mains plug or switch off fuse.
- Clean the appliance.
- Leave the appliance door open.
Defrosting
Defrosting is actuated automatically.
Cleaning the appliance

Caution
- Do not use abrasive, chloride or acidic cleaning agents or solvents.
- Do not use scouring or abrasive sponges. The metallic surfaces could corrode.
- Never clean shelves and containers in the dishwasher. The parts may become deformed!
Proceed as follows:
- Before cleaning: Switch off the appliance.
- Pull out mains plug or switch off fuse.
- Clean the appliance with a soft cloth, lukewarm water and a little pH neutral washing-up liquid. The rinsing water must not run into the light.
- Wipe the door seal with clear water only and then wipe dry thoroughly.
- After cleaning reconnect and switch the appliance back on.
Interior fittings
All variable parts of the appliance can be taken out for cleaning (see chapter "Interior fittings").
Odours
If you experience unpleasant odours:
- Switch the appliance off.
- Take all food out of the appliance.
- Clean interior (see chapter "Cleaning the appliance").
- Clean all packages.
- Switch the appliance on again.
- Check whether the formation of odours is still occurring after 24 hours.
- Change odour filter (see chapter "Changing activated-carbon filter").
Changing activated-carbon filter
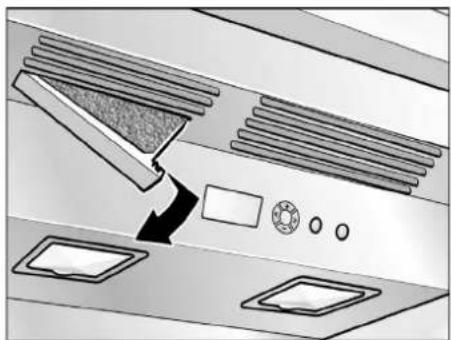
Spare filters are available from your dealer.
- Open the filter holder.
natural_image
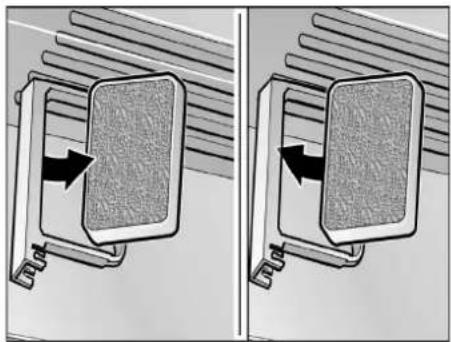
Diagram of a kitchen appliance with a knife inserted into a rack, showing components like a tray and fan (no text or symbols)- Take out used filter and replace with new one.
natural_image
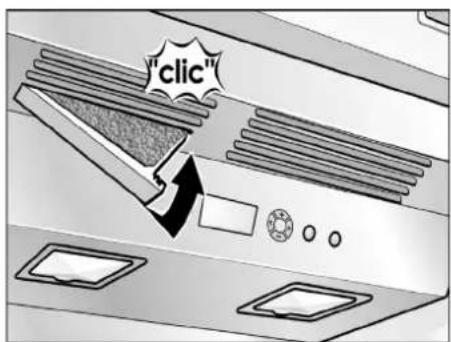
Two-panel diagram showing a mechanical device with arrows indicating motion or force direction (no text or symbols)- Close the filter holder.
text_image
"click"Light (LED)
Your appliance features a maintenance-free LED light.
These lights may be repaired by customer service or authorised technicians only.
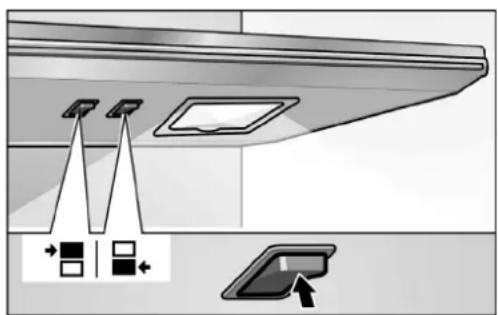
Presentation light
For presentation purposes the interior light can be switched on separately and permanently for the upper and lower climatic zones.
natural_image
Diagram of a kitchen appliance interior with kitchen utensils and control buttons (no text or symbols)If the presentation light is switched on, it also lights up when the door is closed. This way wine bottles are presented on the presentation part to full effect through the glass door.
If the presentation light is switched off, it only lights up when the door is closed.
Tips for saving energy
- Install the appliance in a dry, well ventilated room! The appliance should not be installed in direct sunlight or near a heat source (e.g. radiator, cooker).
If required, use an insulating plate. - Do not block the ventilation openings in the appliance.
- Allow warm drinks to cool down before placing in the appliance.
- Open the appliance as briefly as possible.
- The arrangement of the fittings does not affect the energy rating of the appliance.
Operating noises
Quite normal noises
Droning
Motors are running (e.g. refrigerating units, fan).
Bubbling, humming or gurgling noises
Refrigerant is flowing through the tubing.
Clicking
Motor, switches or solenoid valves are switching on/off.
Preventing noises
The appliance is not level
Please align the appliance with a spirit level. Use the height-adjustable feet or place packing underneath them.
The appliance is not free-standing
Please move the appliance away from adjacent units or appliances.
Containers or storage areas wobble or stick
Please check the removable parts and re-insert them correctly if required.
Bottles or receptacles are touching each other
Move the bottles or receptacles slightly away from each other.
Eliminating minor faults yourself
Before you call customer service:
Please check whether you can eliminate the fault yourself based on the following information.
Customer service will charge you for advice – even if the appliance is still under guarantee!
Appliance
| Fault Possible cause Remedial action | ||
| Appliance has no refrigeration capacity. | Appliance has been switched off. Press the On/Off button. | |
| Power failure. Check whether the power is on. | ||
| The light does not work. | The fuse has been switched off. Check the fuse. | |
| The display does not illuminate. | The mains plug has not been inserted properly. | Check whether the mains plug is secure. |
| The refrigerating unit is switching on more frequently and for longer. | Appliance opened frequently. Do not open the appliance unnecessarily. | |
| The ventilation openings have been covered. | Remove obstacles. | |
| The light (LED) does not work. The LED lamp is defective. Call customer service. | ||
| Light switch is jammed. Check whether it can be moved. | ||
| Display indicates “E..”. Electronics have detected a fault. Call customer service. | ||
| Display indicates “LOWPOWER”. | The mains voltage falls below the permitted limiting value. | When the mains voltage reaches the stipulated value again, the warning message goes out. If the warning message lasts for longer, inform the energy supply company. |
| Display indicates “HIGHVOLT”. The mains voltage exceeds the permitted limiting value. | When the mains voltage reaches the stipulated value again, the warning message goes out. If the warning message lasts for longer, inform the energy supply company. | |
Customer service
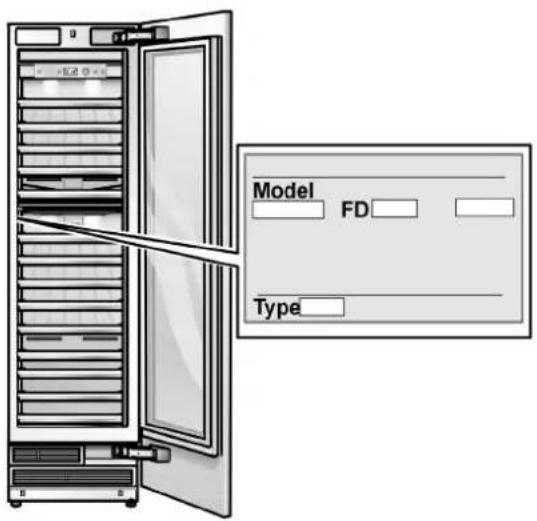
Your local customer service can be found in the telephone directory or in the customer-service index. Please provide customer service with the appliance product number (E-Nr.) and production number (FD-Nr.).
These specifications can be found on the rating plate.
To prevent unnecessary call-outs, please assist customer service by quoting the product and production numbers. This will save you additional costs.
text_image
Model FD TypeRepair order and advice on faults
Contact information for all countries can be found on the enclosed customer service list.
GB 0344 892 8988 Calls charged at local or mobile rate.
IE 01450 2655 0.03 € per
minute at peak.
Off peak 0.0088
€ per minute.
US 877 442 4436 toll-free