
RY492505 - Refrigerator GAGGENAU - Free user manual and instructions
Find the device manual for free RY492505 GAGGENAU in PDF.


| Product Type | Built-in refrigerator-freezer |
| Model | RY492505 |
| Brand | Gaggenau |
| Installation | Built-in, side-by-side capable |
| Dimensions (cut-out depth) | Min 610 mm, flush 635 mm |
| Weight | Up to 460 kg (depending on model) |
| Power Supply | 220-240 V, 50 Hz, 10-16 A fuse |
| Refrigerant | R600a (flammable, environmentally friendly) |
| Climate Class | SN, N, ST, T (10°C to 43°C) |
| Refrigerator Temperature Range | +2°C to +8°C (recommended +4°C) |
| Freezer Temperature Range | -24°C to -14°C (recommended -18°C) |
| NoFrost System | Yes, fully automatic |
| Ice Maker | Integrated automatic ice maker |
| Water Filter | Optional filter cartridge or water filter |
| Home Connect | Wi-Fi capable, remote control via app |
| Automatic Door Opening | Push-to-open or pull-to-open system |
| Controls | Touch fields with colour display |
| Special Modes | Fast cooling, fast freezing, holiday mode, eco mode, rest mode |
| Alarms | Door alarm, temperature alarm |
| Lighting | Maintenance-free LED |
| Condensation Protection | Heater in door pillar (3-door models) |
| Cleaning | Display lock for cleaning, stainless steel care instructions |
| Safety | Child lock, lock key away from children |
| Spare Parts | Original parts from manufacturer or Customer Service |
| Warranty | See enclosed warranty document |
Frequently Asked Questions - RY492505 GAGGENAU
User questions about RY492505 GAGGENAU
0 question about this device. Answer the ones you know or ask your own.
Ask a new question about this device
Download the instructions for your Refrigerator in PDF format for free! Find your manual RY492505 - GAGGENAU and take your electronic device back in hand. On this page are published all the documents necessary for the use of your device. RY492505 by GAGGENAU.
USER MANUAL RY492505 GAGGENAU
RB472303
RB492303
RY492303
RB492504
RY492505
Fridge-freezer
en Table of contents
Safety instructions 4
About these instructions 4
Risk of explosion 4
Risk of electric shock 4
Risk of cold burns 4
Risk of injury 4
Fire hazard/Danger due to refrigerants 5
Fire hazard 5
Avoiding placing children and vulnerable people at risk 5
Damage to property 5
Weight 5
Intended use 6
Green living 6
Packaging 6
Old appliances 6
Installation and connection 7
Scope of supply 7
Technical specifications 7
Installing the appliance 7
Built-in cut-out 7
Side-by-side installation 7
Tips for saving energy 8
Before using the appliance for the first time 9
Water connection 9
Electrical connection 9
Getting to know your appliance 10
2-door appliance 10
3-door appliance 11
Controls 12
Features 13
Operating the appliance 16
Switching on the appliance 16
Switching off and disconnecting the appliance 16
Setting the temperature 16
Fast cooling 16
Fast freezing 17
Display lock for cleaning 17
Holiday mode 17
Switching ice cube production on or off 17
Eco mode 18
Reset water filter counter 18
Self-test 18
Setting the brightness of the control panel 18
Setting up the display screen 18
Setting the touch field colour 18
Setting the touch field tone type 19
Setting the touch field tone volume 19
Setting the signal tone volume 19
Switching the water filter counter on and off 19
Dimming when door is opened and closed 19
Setting the temperature unit 19
Setting the language 20
Resetting to factory settings 20
Switching demo mode on or off 20
Rest mode 20
Automatic door opening 21
Switching on or switching off condensation protection 21
Home network 22
Automatic display lock for cleaning 22
Alarm 22
Door alarm 22
Temperature alarm 22
Home Connect 23
Setting up Home Connect 23
Connecting the refrigerator to the Home
Connect app 24
Installing updates for the Home Connect software 24
Customer Service access 24
Delete network settings 24
Information on data protection 25
Declaration of Conformity 25
Refrigerator compartment 25
Note when storing food 25
Note the chill zones in the refrigerator compartment 26
Vegetable container with humidity controller 26
Cold storage compartment 26
Freezer compartment 27
Freezing capacity 27
Fully utilising the freezer volume 27
Purchasing frozen food 27
When loading products, please note: 27
Freezing fresh food 28
Defrosting frozen food 28
Cleaning 29
Cleaning the display 29
Cleaning the appliance interior 29
Cleaning the equipment 29
Care instructions for stainless steel surfaces 29
Odours 30
Changing the odour filter 30
Noises 31
Normal noises 31
Preventing noises 31
Lighting 31
What to do in the event of a fault 32
Appliance 32
Ice maker 33
Customer Service 34
Appliance self-test 34
Obtaining advice and ordering repairs if a
fault occurs 34
⚠️ Safety instructions
This appliance complies with the relevant safety regulations for electrical appliances and is fitted with noise suppression.
The refrigeration circuit has been checked for leaks.
About these instructions
- Read and follow the instructions for installation and use. They contain important information on how to install, use and maintain the appliance.
- The manufacturer is not liable if you disregard the notifications and warnings in the operating and installation instructions.
- Retain all documents for subsequent use or for the next owner.
Risk of explosion
- Never use electric appliances inside the appliance (e.g. heaters or electric ice makers).
- Do not store products which contain flammable propellant (e.g. spray cans) or explosive substances in the appliance.
- Keep high-percentage alcohol tightly sealed and store in an upright position.
- Do not use additional means to accelerate the defrosting process other than those recommended by the manufacturer.
Risk of electric shock
Improper installations and repairs may put the user at considerable risk.
- When installing the appliance, ensure that the mains cable is not trapped or damaged.
- If the mains cable is damaged: immediately disconnect the appliance from the electricity supply.
- Do not use multi-outlet power strips, extension leads or adapters.
- Have the appliance repaired by the manufacturer, Customer Service or a similarly qualified person only.
- Use original parts supplied by the manufacturer only.
The manufacturer guarantees that these parts satisfy the safety requirements.
Risk of cold burns
- Never put frozen food straight from the freezer compartment into your mouth.
- Avoid prolonged contact between your skin and frozen food, ice or the tubes in the freezer compartment.
Risk of injury
Containers which contain carbonated beverages may burst.
Do not store containers which contain carbonated beverages in the freezer compartment.

Fire hazard/Danger due to refrigerants
The tubes of the refrigeration circuit convey a small quantity of an environmentally friendly but flammable refrigerant (R600a). It does not damage the ozone layer and does not contribute to the greenhouse effect. If refrigerant escapes, it may injure your eyes or ignite.
- Do not damage the tubes.
If the tubes are damaged:
- Keep naked flames and ignition sources away from the appliance.
- Ventilate the room.
- Switch off the appliance and pull out the mains plug.
- Please contact Customer Service.

Fire hazard
Portable multi-outlet power strips or power supplies may overheat, causing a fire. Never leave portable multi-outlet power strips or portable power supplies behind the appliance.
Avoiding placing children and vulnerable people at risk
At risk here are:
Children,
- People with limited physical, mental or sensory abilities,
- People who have inadequate knowledge concerning safe operation of the appliance.
Measures:
- Ensure that children and vulnerable people have understood the hazards.
- A person responsible for safety must supervise or instruct children and vulnerable people who are using the appliance.
- Only children aged 8 years and above may use the appliance.
- Supervise children who are cleaning and maintaining the appliance.
- Never allow children to play with the appliance.
Risk of suffocation
- If the appliance features a lock: keep the key out of the reach of children.
- Keep children away from the packaging and its parts.
Damage to property
To prevent damage to property:
- Do not stand or support yourself on the base, runners or doors.
- Keep plastic parts and door seals free of oil and grease.
- Pull on the mains plug – not the power cord.
Weight
The appliance is very heavy. The appliance should always be transported and set up by at least 2 persons.
→ "Installation and connection" on page 7
Intended use
Use this appliance
- Only for the cooling and freezing of food and for making ice.
- Only in the home and in the home environment.
- Only according to this user manual.
This appliance is intended for use up to a maximum height of 2000 metres above sea level.
Green living
Packaging
All materials are environmentally safe and recyclable:
- Dispose of packaging in an environmentally friendly manner.
- Please ask your dealer or inquire at your local authority about current means of disposal.
Old appliances
Valuable raw materials can be reclaimed by recycling old appliances.
⚠ Warning – Children may become locked in the appliance and suffocate!
Leave shelves and containers in the appliance to prevent children from climbing in.
- Keep children away from the redundant appliance.
Caution!
Refrigerant and harmful gases may escape.
Do not damage the tubes of the refrigerant circuit or the insulation.
1 Pull out the mains plug.
2 Cut through the power cable.
3 Have the appliance disposed of properly.

This appliance is labelled in accordance with European Directive 2012/19/EU on waste electrical and electronic equipment (WEEE).
This Directive provides an EU-wide framework for returning and recycling old appliances.
Installation and connection
Scope of supply
After unpacking all parts, check for any damage in transit.
If you have any complaints, contact the dealer from whom you purchased the appliance or our Customer Service.
→ "Customer Service" on page 34
The delivery consists of the following parts:
Built-in appliance
- Interior fittings (depending on model)
• Installation material
- User manual
• Installation instructions
- Customer service booklet
- Warranty enclosure
• Information on the energy consumption and noises
Technical specifications
Refrigerant, cubic capacity and further technical specifications can be found on the rating plate.
→ "Getting to know your appliance" on page 10
Installing the appliance
Installation location
The more refrigerant an appliance contains, the larger the room in which the appliance is situated must be. In rooms which are too small, leaking refrigerant can form a flammable gas-air mixture.
At least 1 m ^3 of room space is required per 8 g of refrigerant. The amount of refrigerant in your appliance is indicated on the rating plate inside the appliance.
→ "Getting to know your appliance" on page 10
The weight of the appliance may be up to 460 kg depending on the model. The base must be sufficiently stable, and should not give. If necessary, reinforce the floor.
Permitted room temperature
The permitted room temperature depends on the climate class of the appliance.
Information on the climate class can be found on the rating plate.
→ "Getting to know your appliance" on page 10
Climate class Permitted room temperature
| SN +10°C ... 32°C |
| N +16°C ... 32°C |
| ST +16°C ... 38°C |
| T +16°C ... 43°C |
The appliance is fully functional within the permitted room temperature.
If an appliance with climate class SN is operated at colder room temperatures, the appliance will not be damaged up to a room temperature of +5^ C.
Built-in cut-out
The cut-out must fulfil these criteria:
- Anti-tilt bracket fitted
- Cut-out depth min. 610 mm, for flush installation 635 mm
- Rectangular
- Sturdy – the side panels and the top must be min. 16 mm thick and securely attached to the floor or wall
- Depth of shortened side panels: min. 100 mm
Side-by-side installation
Observe the specifications in the installation instructions for a side-by-side installation.
If a partition wall is required between the appliances, it must be at least 16 mm wide.
Tips for saving energy
If you follow the instructions below, your appliance will use less power.
Note: The arrangement of the features does not affect the energy consumption of the appliance.
Installing the appliance
| Keep the appliance out of direct sunlight. The appliance needs to cool less frequently at low ambient | |
| Install the appliance as far away as possible from heating elements, cookers and other heat sources: | temperatures and therefore consumes less power. |
| At least 1 14 " (3 cm) from electric or gas cookers. | |
| At least 11 34 " (30 cm) from oil or solid-fuel cookers. | |
| Select an installation location with a room temperature of approx. 20°C. | |
| Do not cover or block the ventilation openings. If the warm air can escape, the appliance needs to cool less | |
| Ventilate the room daily. | frequently and therefore consumes less power. |
Using the appliance
| Open the appliance door only briefly. The air in the appliance will not warm up as much. The appli- | |
| Transport purchased food in a cool bag and place in the appliance quickly. | ance will need to cool less frequently, and therefore consume less power. |
| Allow warm food and beverages to cool down before placing in the appliance. | |
| Defrost frozen food in the refrigerator compartment to utilise the low temperature of the frozen food. | |
| Always leave a space between the food and the back wall. The air can then circulate and the humidity will remain constant. The appliance will need to cool less frequently, and therefore consume less power. | |
| Pack food airtight. | |
Do not cover or block the ventilation openings. The appliance consumes less power if warm air can escape.
Vacuum the ventilation openings once a year.
Before using the appliance for the first time
1 Remove information material, adhesive tape and protective film.
2 Clean the appliance. → "Cleaning" on page 29
Water connection
Caution!
- Installation and connection of the appliance must be carried out by qualified technicians according to the installation instructions supplied.
- To avoid damage to the appliance and to ensure its proper functioning, it should only be connected to a drinking water system.
- To avoid water damage, a shut-off valve must be installed.
Water pressure of drinking water system
Caution!
If the water pressure exceeds the maximum value, a pressure relief valve must be installed between the drinking water connection and the hose set to avoid damage to the appliance.
Note: If the water pressure is too low, this will impair the appliance functions.
Min. 0.2 Mpa (2 bar/29 psi)
Max. 0.8 Mpa (8 bar/116 psi)
Electrical connection
Caution!
Do not connect the appliance to electronic energy saver plugs.
Note: You can connect the appliance to mains-controlled and sine-controlled inverters.
Mains-controlled inverters are used for photovoltaic systems which are directly connected to the national grid. Sine-controlled inverters must be used for isolated applications. Isolated applications, e.g. on ships or in mountain lodges, which are not directly connected to the national grid.
1 After installing the appliance, wait at least 1 hour before connecting it to avoid damaging the compressor.
2 Connect the appliance to a correctly installed socket.
The socket must comply with the following data:
Socket with 220 V ... 240 V
Protective 50 Hz conductor
Fuse 10 A ... 16 A
Outside Europe: Check whether the indicated current type of the appliance corresponds with the values of your power supply. The appliance specifications are specified on the rating plate. → "Getting to know your appliance" on page 10
3 Connect the appliance to a socket near the appliance.
The socket must also be freely accessible after installation of the appliance.
⚠ Warning – Risk of electric shock!
If the length of the mains cable is insufficient, do NOT use multi-outlet power strips or extension leads. Instead, please contact Customer Service for alternative solutions.
Getting to know your appliance
2-door appliance
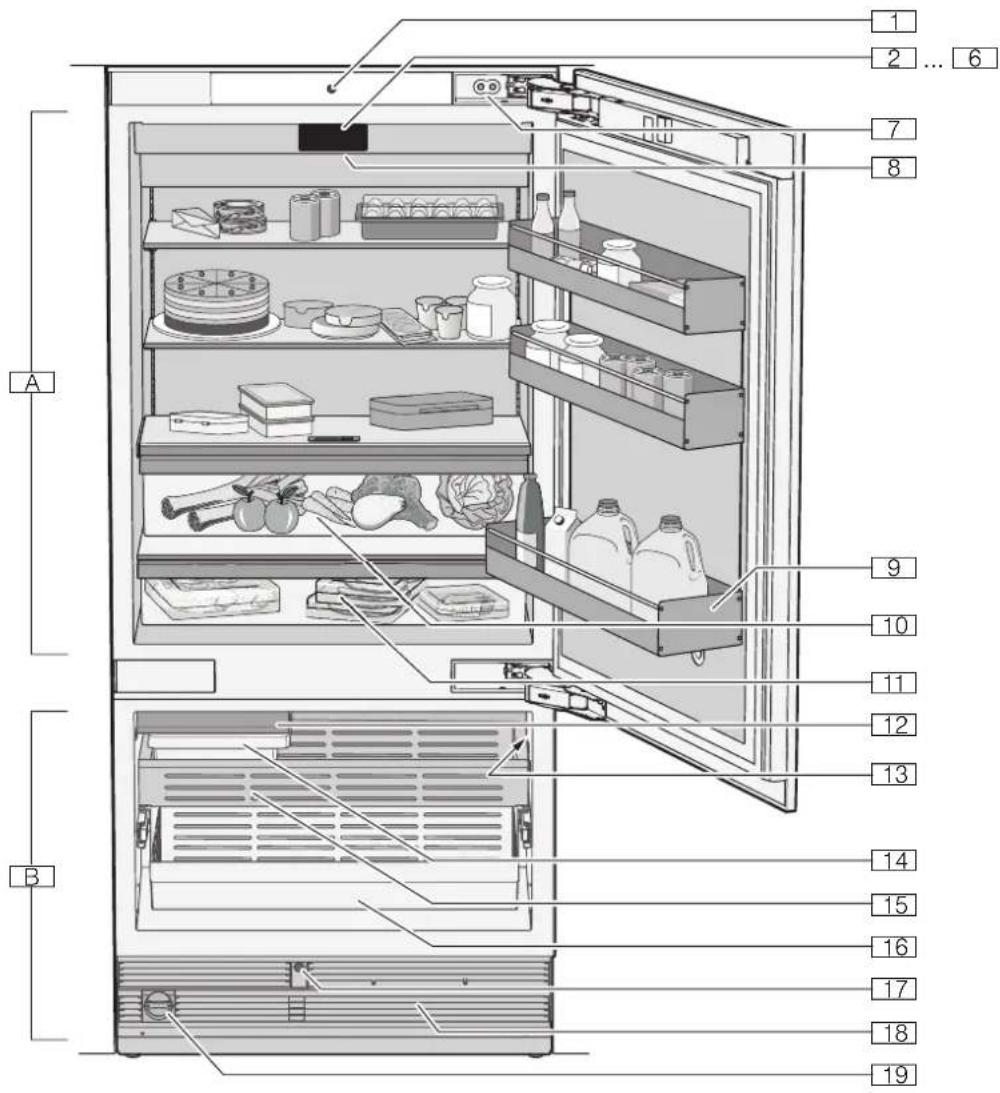
# Refrigerator compartment
+ Freezer compartment
(Automatic door opening refrigerator compartment
0...P Controls
X Door damper
`Main switch on/off
h Shelf for large bottles
)"Vegetable container with humidity controller
)* Cold storage compartment
)2 Ice maker
): Rating plate
)B Ice cube container
)J Frozen food container
)R Frozen food container (large)
)Z Automatic door opening freezer compartment
)b Ventilation opening
)j Particle filter
3-door appliance
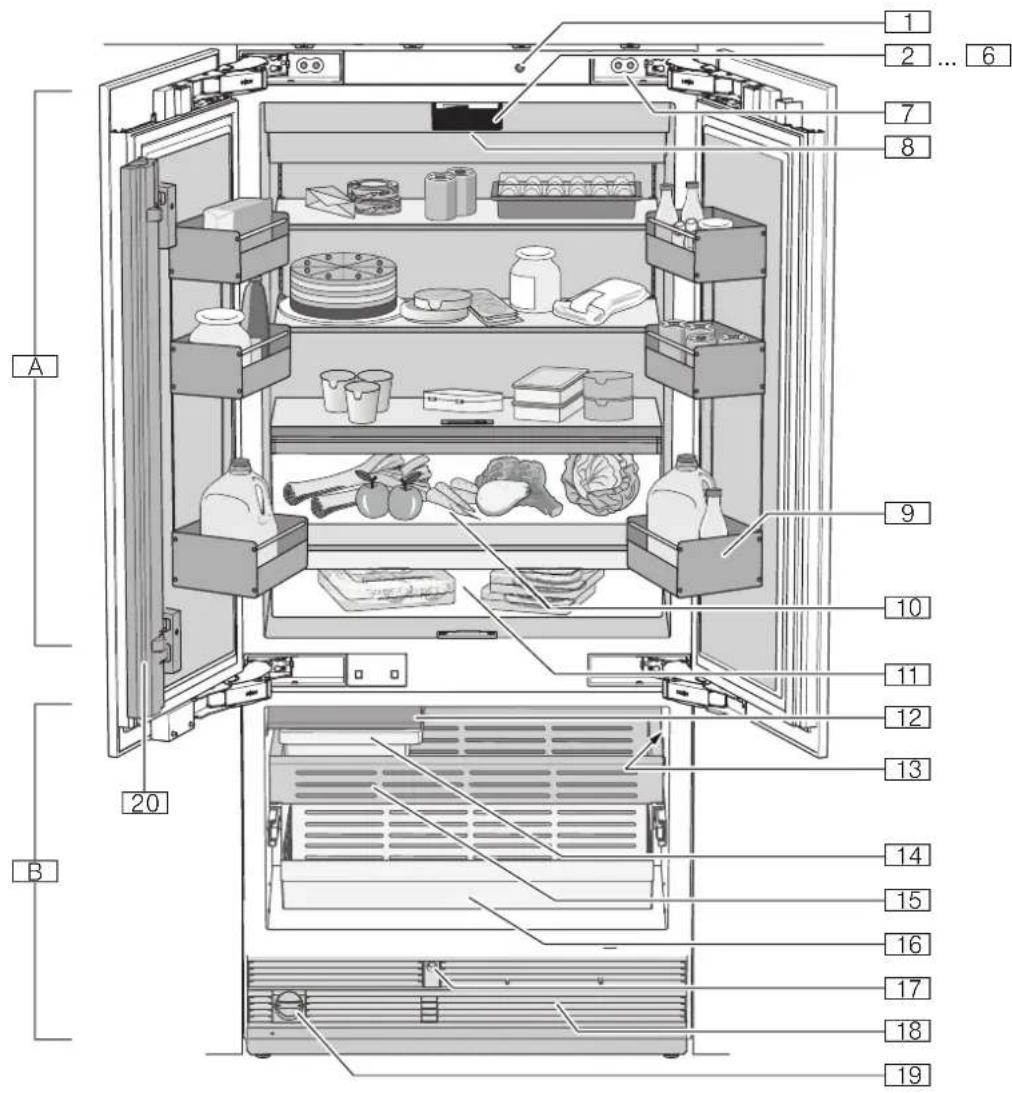
# Refrigerator compartment
+ Freezer compartment
(Automatic door opening
0...P Controls
X Door damper
Main switch on/off
h Shelf for large bottles
)"Vegetable container with humidity controller
)* Cold storage compartment
)2 Ice maker
): Rating plate
)B Ice cube container
)J Frozen food container
)R Frozen food container (large)
)Z Automatic door opening freezer compartment
)b Ventilation opening
)j Particle filter
1" Door pillar with condensation protection
Controls
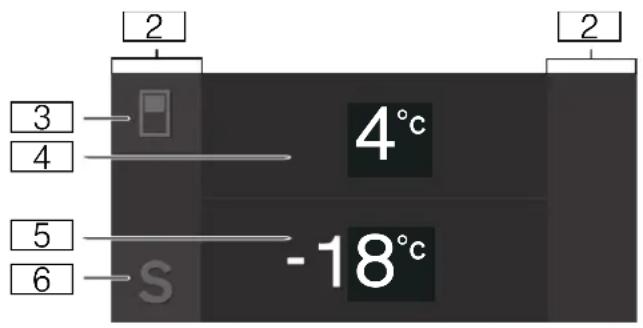
0 Touch fields
There are sensors under the touch fields. Touching the symbol calls up the respective function.
8 button
Opens the menu for changing the temperature.
@ Refrigerator compartment temperature display
Indicates the set temperature in ^ C/ ^ F.
H Freezer compartment temperature display
Indicates the set temperature in ^ C/ ^ F.
P S button
Opens main menu.
Main menu
Press S button to open the main menu.
In the main menu you can find:
Basic settings
• Display lock for cleaning
- Holiday mode
Ice cube production
Eco mode
- Reset water filter counter
Self-test
Rest mode (when active)
→ "Operating the appliance" on page 16
Basic settings menu
To access the Basic settings menu:
1 Press the S button.
2 Press < button to move to the menu item Basic settings.
3 Open menu using √ button.
In the Basic settings menu you will find the following sub-menus and setting options:
- Brightness
- Display screen
- Touch field colour
- Touch field tone type
- Touch field tone volume
• Signal tone volume
Water filter counter
Dimming when door is opened and closed
• Temperature unit
Language - Factory settings
Demo mode
Rest mode
● Automatic door opening refrigerator compartment
● Automatic door opening freezer compartment - Condensation protection (only on 3-door appliance)
Home network
• Automatic display lock for cleaning
→ "Operating the appliance" on page 16
Features
(not all models)
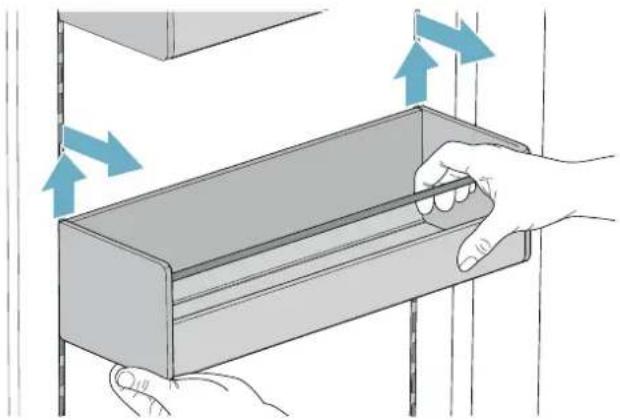
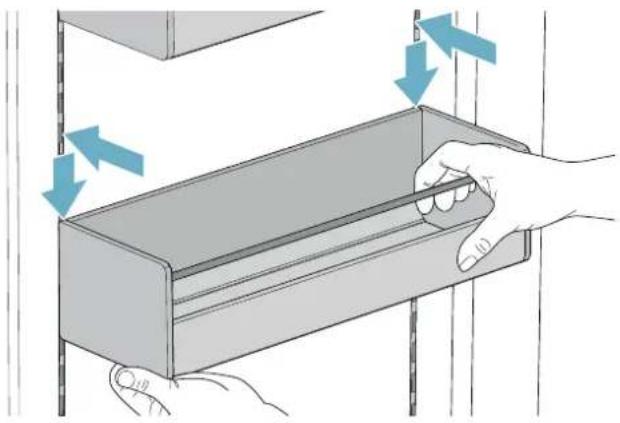
Storage compartment
You can remove and adjust the height of the storage compartment:
- Lift up storage compartment and remove.
natural_image
Illustration of a hand holding a rectangular object with blue arrows indicating direction, no text or symbols present- Clean the storage compartment if necessary and carefully put it back in the same or a new position.
natural_image
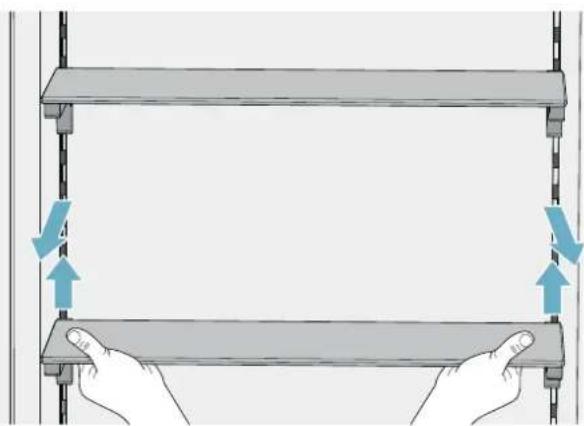
Illustration of a hand holding a rectangular container with arrows indicating force or movement (no text or symbols)Shelf
You can remove and adjust the shelf:
natural_image
Illustration of two hands holding a rectangular shelf with directional arrows indicating movement (no text or symbols)1 Lift shelf and remove.
2 When re-inserting, position hooks on back of shelf at same height to make it level.
Note:
Insert shelf carefully to avoid scratching appliance.
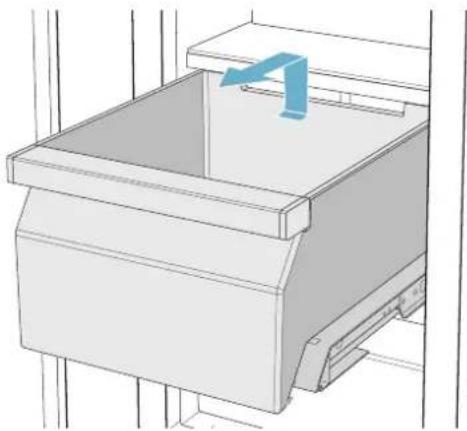
Container
You can remove the container:
- Press container to the rear,
- Lift the container at the rear and remove.
natural_image
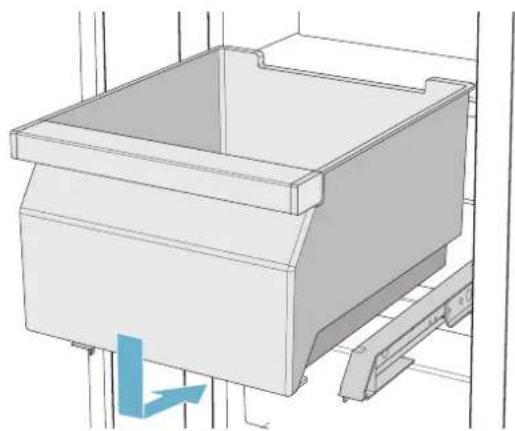
3D technical illustration of a mechanical assembly with a blue arrow indicating direction (no text or symbols)You can insert the container:
• Pull out telescopic rails all the way
- Place the container on the telescopic rails and push into the appliance until it engages.
natural_image
3D technical illustration of a mechanical housing or container with a blue directional arrow indicating force or movement (no text or symbols present)Ice maker
Caution!
Damage to the appliance!
Never store bottles or food in the ice cube container, even for short periods. This can block and damage the ice maker.
Ice cube production starts as soon as the appliance has reached the set temperature.
Notes
- Ice cube production stops automatically when the ice cube container is full.
- When using the appliance for the first time, discard ice cubes produced during the first 24 hours for hygiene reasons.
- If you have stopped ice cube production for several days, discard the first 30-40 ice cubes produced for hygiene reasons.
Information about switching ice cube production on and off
→ "Switching ice cube production on or off" on page 17
Ice pack
In the event of a power failure or a fault:
- The ice pack delays the warming of the stored frozen food.
You can take out the ice pack for temporarily keeping food cool, e.g. in a cool bag.
Filter cartridge with bypass
The supplied filter cartridge with bypass filters large particles out of the drinking water, but not bacteria or microbes.
The filter cartridge with bypass can be kept in the appliance permanently. You do not need to change the filter cartridge with bypass.
Note:
You can also use the appliance with a water filter. If you have replaced the filter cartridge with bypass with a water filter, you must switch the water filter counter on.
→ "Switching the water filter counter on and off" on page 19
The water filter must be changed regularly. When doing so, note the information on the water filter.
A new filter cartridge with bypass or a water filter can be obtained from Customer Service or a specialist dealer.
Clean the filter cartridge with bypass
The filter cartridge with bypass can be kept in the appliance permanently; it does not need to be changed. We recommend cleaning it once a year.
Clean the filter cartridge with bypass as follows:
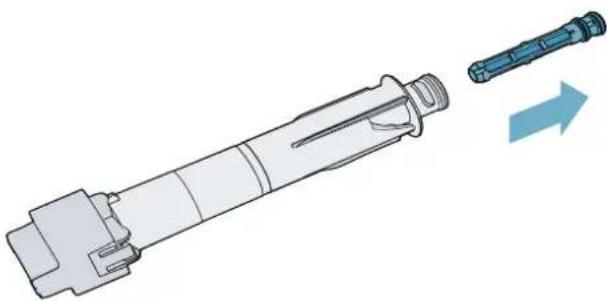
1 Turn the cap of the filter cartridge with bypass anticlockwise.
2 Pull out the filter cartridge with bypass.
3 Remove the inner filter at the rear of the filter cartridge with bypass.
natural_image
Technical illustration of a mechanical component with an arrow indicating direction (no text or symbols present)4 Clean the filter under running water.
5 Replace the filter at the rear of the filter cartridge with bypass.
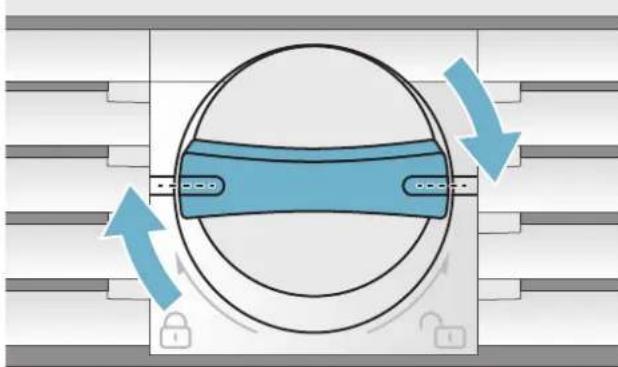
6 Insert the filter cartridge with bypass into the filter opening as far as it will go.
Note:
The cap must be kept vertical when doing this.
7 Turn the filter cartridge with bypass clockwise to the marking.
Note:
If you do not turn the filter cartridge with bypass far enough, water will leak out, causing damage.
natural_image
Diagram of a mechanical or electrical component with circular body and blue bands, showing directional arrows (no text or symbols)Changing the filter cartridge with bypass or replacing it with a water filter
The filter cartridge with bypass can be kept in the appliance permanently; it does not need to be changed. However, you can replace the filter cartridge with bypass if necessary or replace it with a water filter.
Note:
After installing a water filter or filter cartridge with bypass, discard all the ice cubes produced over the first 24 hours.
1 Turn the cap of the filter cartridge with bypass anticlockwise.
2 Pull out the filter cartridge with bypass.
3 Remove the protective cap of the new water filter or the new filter cartridge with bypass.
4 Remove the cap of the old filter cartridge with bypass and put it on the new water filter or filter cartridge with bypass.
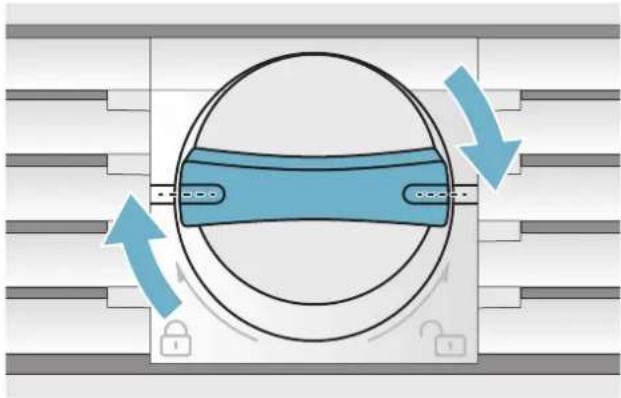
5 Slide the new water filter or filter cartridge with bypass into the filter opening as far as it will go.
Note:
The cap must be kept vertical when doing this.
6 Turn the water filter or filter cartridge with bypass clockwise to the marking.
Note:
If you do not turn the water filter or the filter cartridge with bypass far enough, water will leak out, causing damage.
natural_image
Diagram of a mechanical or electrical component with circular motion arrows indicating rotation and locking mechanism (no text or symbols)7 When installing a water filter: switch the water filter counter on. → "Reset water filter counter" on page 18
Note:
The water filter counter is not required when using a filter cartridge with bypass and therefore remains switched off.
8 Discard the ice cubes produced over the first 24 hours.
9 Drain the water from the old filter cartridge.
Note:
You can dispose of the filter cartridge with bypass which has been removed in your household waste.
Operating the appliance
Switching on the appliance
1 Press the main On/Off switch.
The appliance starts refrigerating, and the light switches on when the door is open.
2 Set the required temperature.
→ "Setting the temperature" on page 16
Operating tips
- After the appliance has been switched on, it may take several hours until the set temperatures have been reached. Do not put in any food until the selected temperature has been reached.
- The fully automatic NoFrost system ensures that the freezer compartment remains free of ice. Defrosting is not required.
- The sides of the housing are heated slightly in certain areas. This prevents condensation in the area of the door seal.
- If the freezer compartment door cannot be immediately re-opened after it has been closed, wait until the resulting low pressure has equalised.
Switching off and disconnecting the appliance
Switching off the appliance
- Press the main On/Off switch.
The appliance will stop refrigerating.
Disconnecting the appliance
Caution!
Deterioration in water quality
The water supply must be turned off 3 hours before disconnecting. This prevents mould forming due to unused water.
If you are not going to use the appliance for a long period:
1 Turn off the water supply to the appliance and wait 3 hours.
2 Remove the food.
3 Press the main On/Off switch.
4 Pull out the mains plug or switch off the fuse. The appliance will stop refrigerating.
5 Empty the ice cube container and clean the appliance.
→ "Cleaning" on page 29
6 Leave the appliance open.
Setting the temperature
Recommended temperature
Refrigerator compartment: +4°C
Freezer compartment: -18^
Setting the refrigerator and freezer compartment temperature
1 Use button to select the desired compartment.
2 Keep pressing /+ button until the display indicates the desired temperature.
3 The appliance stores the setting and automatically returns to the main screen after a few seconds.
Fast cooling
Fast cooling cools the refrigerator compartment as cold as possible.
Switch on fast cooling e.g.:
- before placing large quantities of food in the compartment
• for cooling drinks quickly
Note:
When fast cooling is switched on, increased operating noises may occur.
After approx. 6 hours, the appliance switches to normal operation.
Switching on fast cooling:
1 To open the menu for setting the temperature, press button.
2 Press * button.
When fast cooling is switched on, the symbol * appears on the display.
3 The appliance stores the setting and automatically returns to the main screen after a few seconds.
Switching off fast cooling:
1 To open the menu for setting the temperature, press button.
2 Press ✗ button.
When fast cooling is switched off, the symbol * disappears from the display.
3 The appliance stores the setting and automatically returns to the main screen after a few seconds.
Fast freezing
Fast freezing cools the freezer compartment as cold as possible.
Switch on fast freezing e.g.:
• to quickly freeze food right through to the centre
- 4 ... 6 hours before inserting food weighing 2 kg or more
• to use the freezing capacity
Note:
When fast freezing is switched on, increased operating noise may occur.
After approx. 2 12 days, the appliance switches to normal operation.
Switching on fast freezing:
1 To open the menu for setting the temperature, press
■ button and select the freezer compartment with
■ button.
2 Press * * button.
When fast freezing is switched on, the symbol ^* appears on the display.
3 The appliance stores the setting and automatically returns to the main screen after a few seconds.
Switching off fast freezing:
1 To open the menu for setting the temperature, press
■ button and select the freezer compartment with
■ button.
2 Press ✗ button.
When fast freezing is switched off, the symbol ^* disappears from the display.
3 The appliance stores the setting and automatically returns to the main screen after a few seconds.
Display lock for cleaning
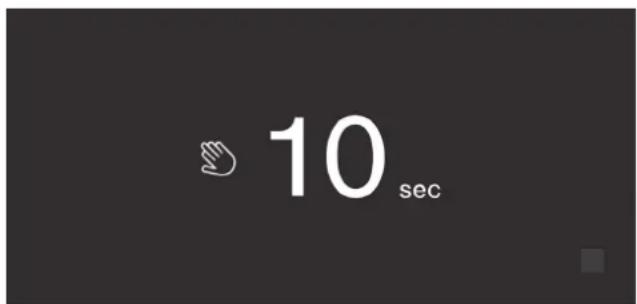
You can use this function to switch off the touch function of the controls for 10 seconds. During this time you can clean the display.
→ "Cleaning the display" on page 29
1 Press S button to open the main menu.
2 Press ▶ button.
The cleaning display appears and the countdown starts.
Holiday mode
When leaving the appliance for a long period of time, you can switch it over to energy-saving holiday mode.
Do not store any food in the refrigerator compartment during this time.
The appliance automatically sets the following temperatures:
● Refrigerator compartment: +14°C
- Freezer compartment: unchanged
Ice cube production is deactivated.
Switching Holiday mode on or off
Switching on:
1 Press S button to open the main menu.
2 Use > button to move to the menu item Holiday mode.
3 Press the ▶ button.
4 Press the √ button.
5 Confirm the following prompt with √ button and remove all perishable food from the refrigerator compartment.
The temperature is changed and the display shows the new temperature.
Switching off:
To switch off holiday mode, press ■ button on the home screen.
Switching ice cube production on or off
Caution!
Damage to the appliance!
Never store bottles or food in the ice cube container, even for short periods. This can block and damage the ice maker.
Ice cube production starts as soon as the appliance has reached the set temperature.
Note:
Ice cube production stops automatically when the ice cube container is full.
Switching ice maker on or off
1 Press S button to open the main menu.
2 Use > button to move to the menu item Ice cube production.
3 Press ▶/■ button.
Eco mode
Eco mode switches the appliance to energy-saving operation.
The appliance automatically sets the following temperatures:
• Refrigerator compartment: +6°C
- Freezer compartment: -16^
Switching Eco mode on or off
1 Press S button to open the main menu.
2 Press > button to move to the menu item Eco mode.
3 Press ▶/■ button.
The temperature is changed and the display shows the new temperature. When Eco mode is switched off, the recommended temperature is set.
Note:
You can also switch Eco mode on or off by adjusting the temperature with the -/+ buttons.
Reset water filter counter
If you are using a water filter in your appliance instead of the particle filter supplied, you have to reset the water filter counter whenever you have replaced the water filter.
→ "Switching the water filter counter on and off" on page 19
1 Press S button to open the main menu.
2 Use > button to move to the menu item Reset water filter counter.
3 Press √ button to confirm and confirm the query again with √ button.
Note:
If you cancel the query or take longer than 10 seconds to make an input, the water filter counter will not be reset.
Self-test
This function can be used to start fault analysis on your appliance.
→ "Appliance self-test" on page 34
Setting the brightness of the control panel
1 Press S button to open the main menu.
2 Press < button to move to the menu item Basic settings.
3 Press √ button.
4 Press _ button to open the menu item Brightness.
5 Press <> buttons to set the required brightness.
6 Press √ button.
The setting is saved.
7 Press X button to exit the menu.
Setting up the display screen
You can choose between the settings Reduced and Standard. With the setting Reduced only the temperature and active special functions are displayed on the control panel after a short period without operation. If the touch fields are touched, all buttons will be visible again.
With the setting Standard all buttons always remain visible.
1 Press S button to open the main menu.
2 Press < button to move to the menu item Basic settings.
3 Press √ button.
4 Use > button to move to the menu item Display screen.
5 Press _ button.
6 Press <> buttons to move to the required setting.
7 Press √ button.
The setting is saved.
8 Press X button to exit the menu.
Setting the touch field colour
1 Press S button to open the main menu.
2 Press < button to move to the menu item Basic settings.
3 Press √ button.
4 Press > button to move to the menu item Touch field colour.
5 Press _ button.
6 Press <> buttons to move to the required setting.
7 Press √ button.
The setting is saved.
8 Press X button to exit the menu.
Setting the touch field tone type
You can change or switch off the sound of the tones generated when pressing buttons.
1 Press S button to open the main menu.
2 Press < button to move to the menu item Basic settings.
3 Press √ button to open the menu item.
4 Press > button to move to the menu item Touch field tone type.
5 Press _ button to open the menu item.
6 Press <> buttons to select the required setting.
7 Press √ button.
The setting is saved.
8 Press X button to exit the menu.
Setting the touch field tone volume
You can adjust the volume level of the sounds generated when pressing buttons.
1 Press S button to open the main menu.
2 Press < button to move to the menu item Basic settings.
3 Press √ button to open the menu item.
4 Press > button to move to the menu item Touch field tone volume.
5 Press _ button to open the menu item.
6 Press <> buttons to select the required setting.
7 Press √ button.
The setting is saved.
8 Press X button to exit the menu.
Setting the signal tone volume
You can adjust the volume level of the signal tones generated e.g. with alarms.
1 Press S button to open the main menu.
2 Press < button to move to the menu item Basic settings.
3 Press √ button to open the menu item.
4 Press > button to move to the menu item Signal tone volume.
5 Press _ button to open the menu item.
6 Press <> buttons to select the required setting.
7 Press √ button.
The setting is saved.
8 Press X button to exit the menu.
Switching the water filter counter on and off
If you have replaced the particle filter with a water filter, switch the water filter counter on. This will remind you to replace the water filter in good time.
1 Press S button to open the main menu.
2 Use < button to move to the Basic settings menu.
3 Press √ button.
4 Use > button to move to the menu item Water filter counter.
5 To change the setting, press _ button.
6 Select the required setting.
7 Confirm the selection by pressing √ button.
Dimming when door is opened and closed
If dimming is switched on, the light will slowly become brighter when the door is opened, and then slowly darker when it is closed.
Switching dimming on or off when opening and closing the door
1 Press S button to open the main menu.
2 Press < button to move to the menu item Basic settings.
3 Press √ button.
4 Press > button to move to the menu item Dimming when opening and closing the door.
5 Press _ button.
6 Press > button to move to the menu item On or Off. Press √ button to confirm.
Setting the temperature unit
You can choose between the unit °C and °F.
1 Press S button to open the main menu.
2 Press < button to move to the menu item Basic settings.
3 Press √ button.
4 Press < button to move to the menu item Temperature unit.
5 Press _ button.
6 Press <> buttons to move to the required unit.
7 Press √ button.
The unit will be changed.
8 Press X button to exit the menu.
Setting the language
1 Press S button to open the main menu.
2 Press < button to move to the menu item Basic settings.
3 Press √ button.
4 Press < button to move to the menu item Language.
5 Press _ button.
6 Press <> buttons to move to the required language.
7 Press √ button.
The display restarts, and the start screen is displayed.
Resetting to factory settings
1 Press S button to open the main menu.
2 Press < button to move to the menu item Basic settings.
3 Press √ button.
4 Press < button to move to the menu item Factory settings.
5 Press _ button.
A signal tone sounds and a message to confirm reset appears.
6 Press √ button.
All settings are reset to the factory settings.
7 Press X button to exit the menu.
Switching demo mode on or off
The cooling function of the appliance is switched off. All other functions can be used.
Note:
Do not store any food in demo mode as the appliance remains at room temperature.
1 Press S button to open the main menu.
2 Press < button to move to the menu item Basic settings.
3 Press √ button.
4 Press < button to move to the menu item Demo mode.
5 Press _ button.
6 Press <> buttons to select the setting On or Off.
7 Press √ button.
The setting is saved.
8 Press X button to exit the menu.
Rest mode
The appliance switches off the following:
• Automatic door opening
Note:
With handle-free installation, please note that you will not be supported when opening the door during this time. To open the door in this case, reach from below under the bottom panel of the unit.
Ice maker
Audible signals
- Interior lighting
- Messages on the display
Background illumination of display is reduced
Switching rest mode on or off
Displaying or hiding Rest mode in the main menu
To use Rest mode, you first have to display the function in the main menu:
1 Press S button to open the main menu.
2 Press < button to move to the menu item Basic settings.
3 Press √ button.
4 Press < button to move to the menu item Rest mode. Press _ button.
5 Press > buttons to move to the menu item Available or Not available. Confirm by pressing √ button.
6 Press X button to exit the menu.
The function is displayed or hidden in the main menu.
Switching Rest mode on
1 Press S button to open the main menu.
2 Press ⏻ button to open the view Rest mode duration.
3 Use -/+ buttons to change the duration.
4 Press ▶ button to start.
The appliance switches all listed functions off.
Switching Rest mode off
- After the selected time elapses, the appliance switches to normal operation.
- To end Rest mode before expiry of the selected time, press ■ button.
Automatic door opening
The automatic door opening function supports you in opening the door.
As soon as you activate this function, automatic door opening moves out and supports you in opening the door.
Caution!
Repeatedly closing the door too early will cause automatic door opening to fail or wear out.
Do not close the door as long as automatic door opening is still moved out.
If you have nevertheless closed the door, leave it closed for 5 minutes. Automatic door opening will re-adjust itself.
Open the menu item Automatic door opening:
1 Press S button to open the main menu.
2 Use < button to move to the Basic settings menu.
3 Press √ button to open the menu.
4 Use > button to move to the menu item Automatic door opening.
5 To change the setting, press _ button.
Open menu item Automatic door opening of freezer compartment:
1 Press S button to open the main menu.
2 Use < button to move to the Basic settings menu.
3 Press √ button.
4 Use > button to move to the menu item Automatic door opening.
5 To change the setting, press _ button.
Switching on Push-to-open system
In an installation situation without handles you can select the Push-to-open system. Your appliance will then open a crack if you press lightly on the door.
Note:
Please note that automatic door opening is disabled if Rest mode is activated.
1 Open menu item Automatic door opening of refrigerator compartment or freezer compartment.
2 Select menu item Push-to-open system.
3 Press √ button.
4 Select menu item Opening force. Here you can select the level of force required to activate automatic door opening.
5 Select menu item Opening duration. Here you can select how long the door should remain open a crack before it closes again automatically.
Note:
If the door remains open a crack, the appliance checks once a second whether the door is still ajar. After the selected opening duration elapses, the appliance will close the door automatically.
Switching on Pull-to-open system
In an installation situation with handles you can select the Pull-to-open system. Your appliance will support you in opening the door as soon as you pull on the handle.
1 Open menu item Automatic door opening of refrigerator compartment or freezer compartment.
2 Select menu item Pull-to-open system.
3 Press √ button.
4 Select menu item Opening force. Here you can select the level of force required to activate automatic door opening.
Switching off automatic door opening
1 Open the menu item Automatic door opening.
2 Select menu item Off.
3 Press √ button.
Switching on or switching off condensation protection
This function is only available with 3-door appliances. 3-door appliances are equipped with a door pillar with condensation protection.
You can open the left-hand door of the refrigerator compartment without opening the right-hand door beforehand.
Caution!
Never open the door pillar when the door is open! It can get jammed when closing the door and become damaged, or itself damage the front furniture panel of the right-hand door.
A heater is built into the door pillar to prevent condensation. Switching condensation protection on or off switches the heater on and off.
1 Press S button to open the main menu.
2 Press < button to move to the menu item Basic settings.
3 Press √ button.
4 Press the < button to move to the menu item Condensation protection.
5 To change the setting, press _ button.
Home network
You can use this function to establish a connection between the refrigerator and your mobile device.
→ "Home Connect" on page 23
Automatic display lock for cleaning
You can use this function to select whether the clean lock is switched on automatically when the door is opened.
1 Press S button to open the main menu.
2 Press < button to move to the Basic settings menu item.
3 Press √ button.
4 Use < button to move to the Automatic display lock for cleaning menu item.
5 To change the setting, press _ button.
Alarm
Door alarm
If the appliance door is open for a long time, the door alarm switches on. A message appears on the control panel.
Turning off the door alarm
- Close the door.
Note: To mute the door alarm, you only have to acknowledge the message on the control panel. If the door remains opens a few more minutes, the message will appear again.
Temperature alarm
If the freezer compartment becomes too warm, the temperature alarm is switched on. A message appears on the control panel. The message shows the warmest temperature reached in the freezer compartment.
Caution!
Bacteria may develop during the defrosting process and spoil the frozen food
Do not refreeze food after it has been defrosted or started to defrost.
Refreeze food only after cooking. Do not store frozen food for the maximum storage period.
Note: The alarm may be actuated without risk to the food in the following cases:
- The appliance is put into service and does not yet contain any food.
- Large quantities of fresh food are placed in the appliance.
- The freezer compartment door has been open too long.
Switching off the temperature alarm
1 Check that the cause of the temperature alarm has been eliminated.
2 Press √ button to acknowledge the message. The message disappears. The control panel again indicates the set temperature.
From this time on, the warmest temperature is measured again and saved.
Home Connect
This appliance is Wi-Fi-capable and can be remotely controlled using a mobile device.
Note: Wi-Fi is a registered trademark of the Wi-Fi Alliance.
In the following cases, the appliance functions like a refrigerator without a network connection and can still be operated manually using the controls:
The appliance is not connected to a home network.
- The Home Connect service is not available in the country in which the appliance is set up. For an overview of the countries in which Home Connect is available, see www.home-connect.com.
Note: Please observe the safety instructions in this user manual. Ensure that these are also observed if you operate the appliance via the Home Connect app and are not at home when doing so.
→ "Safety instructions" on page 4
Please also follow the instructions in the Home Connect app.
Setting up Home Connect
Notes
- Wait at least 2 minutes after switching on the appliance before setting up Home Connect. Only then is the internal appliance initialisation complete.
- Observe the Home Connect supplementary sheet, which is either enclosed with the appliance or available for download with the instructions under www.gaggenau.com. Enter the E-number of your appliance in the search field.
You can connect your appliance to the home WLAN network (Wi-Fi) in 3 basic steps.
1 Install the app.
2 Connect your refrigerator to the home WLAN network (Wi-Fi).
3 Connect your refrigerator to the Home Connect app.
Home network menu
Here's how to open the Home network menu:
1 Press the S button to open the main menu.
2 Press the < button to move to the menu item Basic settings.
3 Press the √ button to open the menu item.
4 Press the < button to move to the menu item Home network.
5 Press the _ button to open the menu item.
Note: The first time you open the menu, you will be automatically guided through initial setup. Follow the instructions on the control panel. For further information, please also see the following chapters.
6 Press the <> buttons to select the required submenu.
7 Press the X button to exit the menu.
The following submenus can be found in the Home network menu:
- Connecting
- Connect to app
- Software update
- Delete network settings
Setting up the connection to the home network
The first time you open the menu, you will be automatically guided through initial setup. Follow the instructions on the control panel.
1 Install the Home Connect app on your mobile device.
2 Open the Home network menu on your refrigerator.
3 Open the app on your mobile device.
4 Log in or register with the app if access is not yet available.
5 Check the router of your home network to see if a WPS function is available for automatic connection.
6 If this function is available, start automatic network connection with √ button.
Follow the instructions on the control panel.
7 Start manual network connection if this function is not available, if you're not sure whether the function is available or if automatic network connection fails. The refrigerator temporarily generates its own network for connecting the mobile device.
8 Start manual network connection in the app of your mobile device.
As soon as the refrigerator is connected to the mobile device, a connection between the refrigerator and your home network is established.
Note: If the connection cannot be established, check whether there is sufficient reception.
→ "Verify signal strength" on page 23
Verify signal strength
The signal strength is displayed in the start window of the Home network menu. The signal strength should be at least 50 %. If the signal strength is too low, the connection could be interrupted.
Improving the signal strength
- Place the router closer to the refrigerator.
- Ensure that the connection is not interfered with by screening walls.
• Install a repeater to make the signal stronger.
Connecting the refrigerator to the Home Connect app
Use this menu to connect your refrigerator to mobile devices.
1 Install the Home Connect app on your mobile device and log in or register.
2 Open the Home network menu on your refrigerator.
3 Press > button to move to the menu item Connect to app.
4 Press _ button to open the menu item.
5 Confirm the message to display the refrigerator in the app.
6 Open the app and wait until the refrigerator is displayed. Use Add to confirm the connection between the app and the refrigerator. If the refrigerator is not displayed automatically, click on Add appliance in the app and follow the instructions. As soon as your refrigerator is displayed, add it with +.
7 Follow the instructions in the app until the process is complete.
Installing updates for the Home Connect software
The refrigerator checks at regular intervals whether updates are available for the Home Connect software.
If an update is available, a small S exclamation mark appears on the S^ button.
Installing the update:
1 Press S^ button.
The special menu Home network note opens.
2 Press √ button to open the menu item.
A note window with the necessary steps for installing the new software appears.
3 To close the note window, press √ button.
4 Open the Home network menu on your refrigerator.
→ "Setting up Home Connect" on page 23
5 Press > button to move to the menu item Software update.
6 Press _ button to open the menu item.
Note: The _ button is only visible if an update is available.
Installing new software.
7 A note appears as soon as installation is complete.
8 Press √ button to close the note.
Customer Service access
If you contact Customer Service, they can access your appliance and view its status after you have given your consent. You need to have your appliance connected to your home network in order to do this.
Further information about Customer Service access and its availability in your country is available under www.home-connect.com in the Help & Support area.
1 Contact Customer Service.
→ "Customer Service" on page 34
2 Confirm the start of Customer Service access in the app.
During Customer Service access, the symbol 📋 appears on the control panel.
3 As soon as Customer Service has obtained the necessary data, they will end their access.
Note: You can interrupt remote diagnostics early by switching off Customer Service access in the Home Connect app.
Delete network settings
If there is a problem when trying to establish a connection or if you would like to register the appliance in a different WLAN home network (Wi-Fi), the Home Connect settings can be reset.
1 Open the Home network menu on your refrigerator.
2 Press > button to move to the menu item Delete network settings.
3 Press _ button to open the menu item.
4 Confirm the message to delete the network settings.
To reconnect the appliance to the WLAN home network (Wi-Fi), perform initial setup again.
→ "Setting up the connection to the home network" on page 23
Information on data protection
The first time your Home Connect appliance is registered on a WLAN home network connected to the Internet (Wi-Fi), your appliance will transmit the following types of data to the Home Connect server (initial registration):
- Unique appliance identification (consisting of appliance codes as well as the MAC address of the installed Wi-Fi communication module).
- Security certificate of the Wi-Fi communication module (to ensure a secure data connection).
- The current software and hardware version of your home appliance.
- Status of any previous resetting to factory settings.
This initial registration prepares the Home Connect functions for use and is only required when you want to use these Home Connect functions for the first time.
Note: Please note that the Home Connect functions can only be utilised with the Home Connect app. Information on data protection can be called up in the Home Connect app.
Declaration of Conformity
Gaggenau Hausgeräte GmbH hereby declares that the appliance with Home Connect functionality meets the essential requirements and other relevant provisions of Directive 2014/53/EU.
A detailed RED Declaration of Conformity can be found online at www.gaggenau.com among the additional documents on the product page for your appliance.

2.4 GHz band: 100 mW max. 5 GHz band: 100 mW max.

BE BG CZ DK DE EE IE EL
ES FR HR IT CY LV LT LU
HU MT NL AT PL PT RO SI
SK FI SE UK NO CH TR
5 GHz WLAN: for indoor use only
Refrigerator compartment
The refrigerator compartment is suitable for storing meat, sausages, fish, dairy products, eggs, ready meals and pastries.
The temperature can be set anywhere between +2°C and +8°C.
The refrigerator compartment can also be used to store highly perishable foods in the short to medium term. The lower the temperature selected, the slower the enzymatic and chemical processes and deterioration caused by micro-organisms. A temperature of +4°C or lower ensures optimum freshness and safety of the stored foods.
Note when storing food
Note: Avoid contact between food and the rear panel. Otherwise, the air circulation will be impaired and food or packaging may freeze to the rear panel.
- Store food when fresh and undamaged.
The quality and freshness will then be retained for longer. - In the case of convenience products and bottled goods, do not exceed the minimum sell-by date or use-by date specified by the manufacturer.
- To retain aroma, colour and freshness, pack or cover food well before placing it in the appliance.
This will prevent flavours being transferred between foods and the plastic parts from becoming discoloured. - Leave warm food and beverages to cool down before placing them in the refrigerator compartment.
Note the chill zones in the refrigerator compartment
The air circulation in the refrigerator compartment creates different chill zones.
Coldest zone
The coldest zone is in the interior at the rear wall and in the chill compartment.
Note: Store perishable food (e.g. fish, sausages and meat) in the coldest zone.
Warmest zone
The warmest zone is at the very top of the door.
Note: Store products such as hard cheese and butter in the warmest zone. Cheese can continue to release its flavour, and the butter will still be easy to spread.
Vegetable container with humidity controller
The vegetable container is the best storage location for fresh fruit and vegetables. You can adjust the humidity in the vegetable container via the humidity controller and a special seal. This allows fresh fruit and vegetables to be stored up to twice as long as with conventional storage.
The humidity in the vegetable container can be set according to the type and amount of products to be stored:
- Mainly fruit or large loads – set lower humidity with controller position ♂
- Mainly vegetables or mixed or small loads – set higher humidity with controller position △□□
Notes
- Fruit sensitive to cold (e.g. pineapples, bananas, papayas and citrus fruit) and vegetables sensitive to cold (e.g. aubergines, cucumbers, courgettes, peppers, tomatoes and potatoes) should be stored outside the appliance at temperatures of approx. +8°C ... +12°C for optimum preservation of quality and flavour.
- Condensation may form in the vegetable container depending on the food and quantity stored. Remove condensation with a dry cloth and adjust the humidity in the vegetable container with the humidity controller.
Cold storage compartment
The chill compartment has lower temperatures than the refrigerator compartment. Temperatures below 0^ C may occur.
Ideal for storing fish, meat and sausage.
Note: Not suitable for storing lettuce, vegetables or food that is sensitive to the cold.
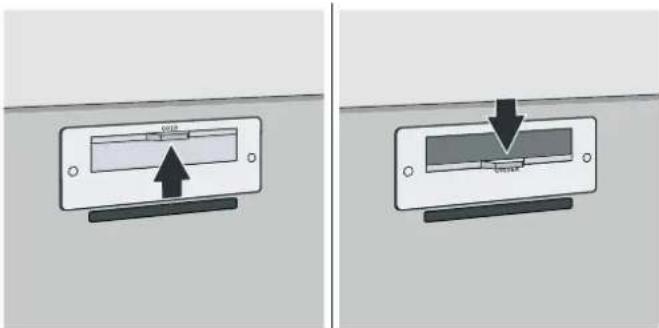
The temperature of the chill compartments can be varied using the ventilation opening. Push the temperature controller down to make the temperature lower. Push the temperature controller up to make the temperature higher.
Freezer compartment
The freezer compartment is suitable for:
- Storing frozen food
Making ice cubes - Freezing food
The temperature can be set anywhere between -24^ and -14^ .
The freezer compartment can be used to store perishable foods for long periods almost without any noticeable reduction in quality, as the low temperatures considerably slow down or stop deterioration. The appearance, flavour and all the valuable ingredients are largely retained.
The time between putting fresh food in the freezer compartment and it freezing solid depends on the following factors:
Set temperature
Type of food
● Amount of food in the freezer compartment
• Quantity and type of storage
Freezing capacity
Information on the freezing capacity can be found on the rating plate.
→ "Getting to know your appliance" on page 10
To use the freezing capacity, switch on fast freezing before placing the fresh food in the freezer compartment.
→ "Fast freezing" on page 17
Prerequisites for freezing capacity
1 Approx. 24 hours before inserting fresh produce: switch on fast freezing.
→ "Fast freezing" on page 17
2 Take the container out of the freezer compartment and stack the food directly on the shelves and on the floor of the freezer compartment.
3 Fill the upper compartment with food first. This is where the food will freeze most quickly.
4 If the top compartment does not have enough space, store the remaining quantity in the compartment underneath.
Fully utilising the freezer volume
To place the maximum quantity of frozen food in the freezer compartment:
- Remove the frozen food container (small).
- Store the food in the frozen food container (large).
Purchasing frozen food
- Check the packaging is not damaged.
- Check there is a sell-by date.
- The temperature in the supermarket freezer must be -18^ or lower.
- Do not interrupt the freezing chain. If possible, transport frozen food in a cool bag and place in the freezer compartment quickly.
When loading products, please note:
- Freeze large quantities of food in the top compartment.
Food will freeze very quickly and gently here. - Distribute food across the compartments or frozen food containers, leaving plenty of space.
- Do not bring food to be frozen into contact with food already frozen.
If required, restack frozen food in the frozen food containers. - Important for unrestricted air circulation in appliance:
Push in frozen food containers as far as they will go.
Freezing fresh food
Freeze only fresh and undamaged food.
Food which is boiled, fried or baked is more suitable for freezing than food which is raw.
Before freezing food, make preparations appropriate to the food in order to retain the best possible nutritional value, flavour and colour:
- Vegetables: wash, chop, blanch.
- Fruit: wash, pit and perhaps peel, possibly add sugar or ascorbic acid solution.
Information on how to do this can be found in the relevant literature.
Suitable for freezing
Baked goods
Fish and seafood
Meat
- Poultry and game
• Vegetables, fruit and herbs
- Eggs without shells
● Dairy products, e.g. cheese, butter and quark
- Ready meals and leftovers, e.g. soups, stews, cooked meat and fish, potato dishes, bakes and desserts
Not suitable for freezing
- Types of vegetables which are usually eaten raw, e.g. lettuce or radishes
• Unpeeled or hard boiled eggs - Grapes
● Whole apples, pears and peaches - Yoghurt, soured milk, sour cream, creme fraiche and mayonnaise
Packing frozen food
The correct type of packaging and material selection are decisive factors in the retention of the product quality, and prevent the development of freezer burn.
1 Place food in packaging.
2 Squeeze out the air.
3 Pack food airtight to prevent it from losing flavour and drying out.
4 Label packaging with contents and date of freezing.
Suitable packaging:
- Plastic film
- Tubular film made of polyethylene (PE)
- Aluminium foil
- Freezer containers
Suitable sealing materials:
Rubber bands
- Plastic clips
• Cold-resistant adhesive tape
Unsuitable packaging:
- Wrapping paper
- Greaseproof paper
Cellophane - Rubbish bags and used shopping bags
Shelf life of frozen food at -18^ C
Fish, sausage, ready meals, baked goods: Up to 6 months
Meat, poultry: Up to 8 months
Fruit, vegetables: Up to
12 months
Defrosting frozen food
The defrosting method must be adjusted to the food and application in order to retain the best possible product quality.
Defrosting methods:
- In the refrigerator compartment (especially suitable for animal-based foods such as fish, meat, cheese, quark)
- At room temperature (bread)
- In the microwave (food for immediate consumption or immediate preparation)
In the oven/cooker (food for immediate consumption or immediate preparation)
Caution!
Do not refreeze food after it has been defrosted or started to defrost. You can only refreeze the food after it has been used for a ready-to-eat meal (boiled or fried).
The frozen food can no longer be stored for the maximum duration.
Cleaning
Caution!
Avoid damaging the appliance and the fittings.
- Do not use abrasive, chloride or acidic cleaning agents or solvents.
- Do not use scouring or abrasive sponges. Metallic surfaces may corrode.
- Never clean shelves or containers in the dishwasher.
These parts may become deformed.
Cleaning the display
The change in temperature and humidity can cause the controls to steam up.
Switch the clean lock on before cleaning.
→ "Display lock for cleaning" on page 17
Use a clean microfibre cloth for cleaning.
Cleaning the appliance interior
Proceed as follows:
1 Press the main On/Off switch.
2 Take out the food and store in a cool location. Place ice pack (if available) on the food.
3 Clean the appliance with a soft cloth, lukewarm water and a little pH-neutral washing-up liquid.
The rinsing water must not run into the light or through the drainage hole into the evaporation area.
4 Wipe the door seal with clean water and dry thoroughly with a cloth.
5 Switch appliance back on and put in food.
Caution!
Cleaning the equipment
To clean, take the variable parts out of the appliance. → "Features" on page 13
Care instructions for stainless steel surfaces
When taking care of and cleaning stainless steel surfaces, use only cleaning agents that are suitable for stainless steel and a stainless steel cleaning cloth.
You can purchase a suitable stainless steel cleaning cloth from Customer Service.
To prevent visible scratches, clean the stainless steel surface in the direction of the grain.
Odours
If you experience unpleasant odours:
1 Pull out the mains plug or switch off the fuse.
2 Take all food out of the appliance.
3 Clean the inside.
→ "Cleaning" on page 29
4 Clean all packages.
5 Seal strong-smelling food to prevent odours from forming.
6 Switch the appliance on again.
7 Place food in the appliance.
8 Check whether odours are still occurring after 24 hours.
9 Change the odour filter.
→ "Changing the odour filter" on page 30
Changing the odour filter
Replacement filters are available from your Customer Service team.
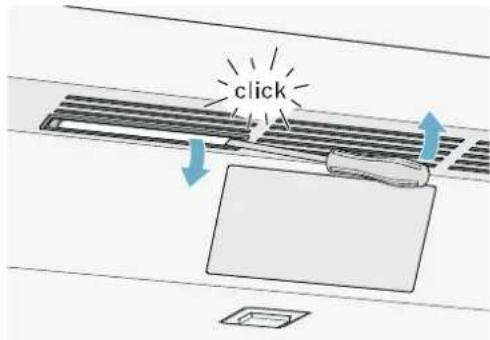
1 Open the filter holder with a slotted screwdriver.
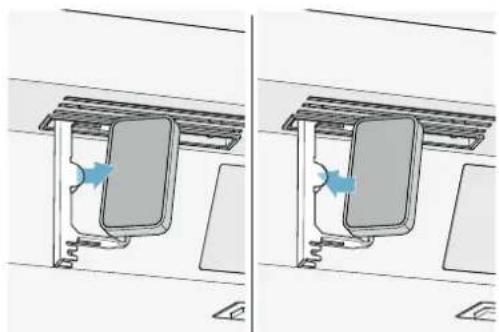
2 Remove the used odour filter and replace with a new odour filter.
natural_image
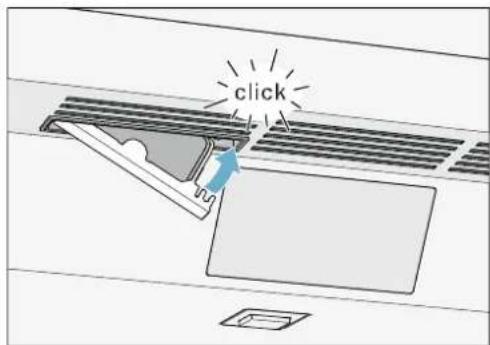
Diagram showing two identical views of a shared storage unit with internal components and airflow direction arrows (no text or symbols)3 Close the filter holder.
Noises
Normal noises
Droning: A motor is running, e.g. refrigerating unit, fan.
Bubbling, buzzing or gurgling: Refrigerant is flowing through the tubes.
Clicking: The motor, switches or solenoid valves are switching on and off.
Cracking: Automatic defrosting is running.
Preventing noises
Appliance is not level: Align appliance using a spirit level. If required, place a little packing underneath.
Containers, shelves or storage compartments wobble or stick: Check the removable fittings and re-insert if required.
Lighting
Your appliance features a maintenance-free LED light.
Only Customer Service or authorised technicians may repair the light.
What to do in the event of a fault
Before you call Customer Service, use this table to check whether you can rectify the fault yourself.
Appliance
| Temperature differs greatly from the set value. | |
| Switch off appliance for 5 minutes.→ "Switching off and disconnecting the appliance" on page 16If the temperature is too warm, check temperature again after a couple of hours.If the temperature is too cold, check temperature again on the following day. | |
Displays do not illuminate.
| The mains plug has not been inserted properly. Connect mains plug. |
| The fuse has been tripped. Check the fuses. |
| The power has failed. Check whether the power is on. |
The refrigeration unit is switching on more frequently and for longer.
| The appliance has been opened frequently. Do not open the appliance unnecessarily. |
| The ventilation openings are covered up. Remove obstructions. |
| Large quantities of fresh food have been put in. Switch on super cooling promptly in advance. |
Appliance is not cooling, display and lighting are lit.
| Demo mode is switched on. Switch Demo mode off. | → | "Switching demo mode on or off" on page 20 |
The door does not open when pressed.
| A special mode has switched off automatic door opening. To open the door, reach from below under the bottom panel of the unit or switch off special mode.→ "Switching rest mode on or off" on page 20 |
| Pull-to-open is switched on. Switch the appliance to Push-to-open.→ "Automatic door opening" on page 21 |
| The opening force is set too high. Select a lower setting for the opening force.→ "Automatic door opening" on page 21 |
| The fuse has tripped. Check the fuses. |
| The power has failed. Check whether the power is on. |
Ice maker
The ice maker is not functioning.
| Ice cube production is switched off. Switch on ice cube production. | |
| Freezer compartment is too warm. Set the temperature lower. → "Operating the appliance" on page 16 | |
| Ice cube container is not properly inserted. Insert ice cube container fully. | |
| The ice maker is without power. Call Customer Service. → "Customer Service" on page 34 | |
| No water supply. Check water connection and contact technician if necessary. | |
| Low water pressure. Only connect appliance to pipes with sufficient water pres- sure. | |
| Kink in water hose. Turn off water supply, straighten out kink. Replace water hose if necessary. |
Too few or deformed ice cubes, water pressure lower than usual.
| After switching on or removing many ice cubes, there will be too few in the ice cube container. | It takes around 24 hours for an empty ice cube container to fill up. |
| Ice cube production stops even though the ice cube container is not yet full. | Do not store the ice shovel on the ice in the ice cube container. Otherwise, the sensor will not detect the actual fill level of the container. |
| Low water pressure. Only connect appliance to pipes with sufficient water pressure. | |
| The water filter is blocked or needs to be replaced. Change water filter. | |
| Freezer compartment is too warm. Set the temperature lower. → "Operating the appliance" on page 16 | |
Water is leaking out of the appliance.
| Water connection is not watertight. Check that the connections are fastened firmly and the water hose is undamaged.If the water hose is damaged, contact Customer Service and have it replaced. Replacement must be performed by Customer Service or a similarly qualified person. Use original parts supplied by the manufacturer only. |
Customer Service
If you are unable to rectify the fault, please contact our Customer Service. We will always finds a suitable solution to avoid unnecessary visits by technicians.
The contact information for your nearest Customer Service office can be found here or on the enclosed Customer Service list.
When calling, please state the product number (E-Nr.) and the production number (FD), which can be found on the rating plate.
→ "Getting to know your appliance" on page 10
You can trust in the manufacturer's expertise. You can therefore be sure that the repair is carried out by trained service technicians who carry original spare parts for your home appliances.
Appliance self-test
Your appliance features a self-test programme; this displays the fault which your Customer Service team can rectify.
1 Press S button to open the main menu.
2 Press > button to move to the Self-test menu item.
3 Press √ button to start the self-test. The self-test starts.
4 If faults are present, they will be displayed. In this case, follow the instructions.
5 The appliance restarts.
6 The message that the self-test has finished is displayed for 10 seconds. To acknowledge the message, press √ button.
When the self-test has ended, the appliance switches over to normal operation.
Obtaining advice and ordering repairs if a fault occurs
Contact information for all countries can be found on the enclosed Customer Service list.
GB 0344 892 8988 Calls charged at local or mobile rate.
IE 01450 2655 0.03 € per minute at peak. Off peak 0.0088 € per minute.
US 877 442 4436 toll-free
- en Table of contents
- Safety instructions 4
- Intended use 6
- Green living 6
- Installation and connection 7
- Getting to know your appliance 10
- Operating the appliance 16
- Alarm 22
- Home Connect 23
- Refrigerator compartment 25
- Freezer compartment 27
- Cleaning 29
- Odours 30
- Noises 31
- Lighting 31
- What to do in the event of a fault 32
- Customer Service 34
- ⚠️ Safety instructions
- About these instructions
- Risk of explosion
- Risk of electric shock
- Risk of cold burns
- Risk of injury
- Fire hazard/Danger due to refrigerants
- Fire hazard
- Avoiding placing children and vulnerable people at risk
- Measures:
- Risk of suffocation
- Damage to property
- Weight
- Intended use
- Use this appliance
- Green living
- Packaging
- Old appliances
- ⚠ Warning – Children may become locked in the appliance and suffocate!
- Caution!
- Installation and connection
- Scope of supply
- Technical specifications
- Installing the appliance
- Installation location
- Permitted room temperature
- Built-in cut-out
- Side-by-side installation
- Tips for saving energy
- Before using the appliance for the first time
- Water connection
- Water pressure of drinking water system
- Electrical connection
- Getting to know your appliance
- 2-door appliance
- 3-door appliance
- Controls
- Touch fields
- button
- P S button
- Main menu
- Basic settings menu
- Features
- Storage compartment
- Shelf
- Container
- Ice maker
- Damage to the appliance!
- Notes
- Ice pack
- Filter cartridge with bypass
- Note:
- Clean the filter cartridge with bypass
- Changing the filter cartridge with bypass or replacing it with a water filter
- Operating the appliance
- Switching on the appliance
- Press the main On/Off switch.
- Set the required temperature.
- Operating tips
- Switching off and disconnecting the appliance
- Switching off the appliance
- - Press the main On/Off switch.
- Disconnecting the appliance
- Setting the temperature
- Recommended temperature
- Setting the refrigerator and freezer compartment temperature
- Fast cooling
- Fast freezing
- Display lock for cleaning
- Holiday mode
- The appliance automatically sets the following temperatures:
- Switching Holiday mode on or off
- Switching on:
- Switching off:
- Switching ice cube production on or off
- Switching ice maker on or off
- Eco mode
- Switching Eco mode on or off
- Reset water filter counter
- Self-test
- Setting the brightness of the control panel
- Setting up the display screen
- Setting the touch field colour
- Setting the touch field tone type
- Setting the touch field tone volume
- Setting the signal tone volume
- Switching the water filter counter on and off
- Dimming when door is opened and closed
- Switching dimming on or off when opening and closing the door
- Setting the temperature unit
- Setting the language
- Resetting to factory settings
- Switching demo mode on or off
- Rest mode
- Switching rest mode on or off
- Displaying or hiding Rest mode in the main menu
- Switching Rest mode on
- Switching Rest mode off
- Automatic door opening
- Open the menu item Automatic door opening:
- Open menu item Automatic door opening of freezer compartment:
- Switching on Push-to-open system
- Switching on Pull-to-open system
- Switching off automatic door opening
- Switching on or switching off condensation protection
- Home network
- Automatic display lock for cleaning
- Alarm
- Door alarm
- Turning off the door alarm
- Temperature alarm
- Switching off the temperature alarm
- Home Connect
- Setting up Home Connect
- Home network menu
- Setting up the connection to the home network
- Verify signal strength
- Improving the signal strength
- Connecting the refrigerator to the Home Connect app
- Installing updates for the Home Connect software
- Customer Service access
- Delete network settings
- Information on data protection
- Declaration of Conformity
- Refrigerator compartment
- Note when storing food
- Note the chill zones in the refrigerator compartment
- Coldest zone
- Warmest zone
- Vegetable container with humidity controller
- Cold storage compartment
- Freezer compartment
- Freezing capacity
- Prerequisites for freezing capacity
- Fully utilising the freezer volume
- Purchasing frozen food
- When loading products, please note:
- Freezing fresh food
- Suitable for freezing
- Not suitable for freezing
- Packing frozen food
- Shelf life of frozen food at -18° C
- Defrosting frozen food
- Cleaning
- Cleaning the display
- Cleaning the appliance interior
- Cleaning the equipment
- Care instructions for stainless steel surfaces
- Odours
- Changing the odour filter
- Noises
- Normal noises
- Preventing noises
- Lighting
- What to do in the event of a fault
- Customer Service
- Appliance self-test
- Obtaining advice and ordering repairs if a fault occurs
Brand : GAGGENAU
Model : RY492505
Category : Refrigerator