
TEW-811DRU - Router TRENDNET - Free user manual and instructions
Find the device manual for free TEW-811DRU TRENDNET in PDF.


| Product Type | AC1200 Dual Band Wireless Router |
| Model | TEW-811DRU |
| Brand | TRENDnet |
| Wireless Standard | IEEE 802.11a/b/g/n/ac |
| Frequency Band | Dual Band (2.4 GHz & 5 GHz) |
| Wireless Data Rate | Up to 300 Mbps (2.4 GHz) + 867 Mbps (5 GHz) |
| Ports | 1x Gigabit WAN (Internet), 4x Gigabit LAN |
| USB Port | 1x USB 2.0 |
| Power Supply | 12V DC, 2A |
| Power Adapter | Included |
| Network Cable | Included (1.5 m / 5 ft.) |
| Quick Installation Guide | Included (Multi-Language) |
| CD-ROM | Included (Utility, User's Guide, GPL/LGPL info) |
| LED Indicators | Power, Internet, LAN (1-4), Wireless Bands (2.4G, 5G) |
| Security | WPA/WPA2 pre-encrypted with unique key |
| Default Login | Username: admin / Password: (unique, on sticker) |
| Management URL | http://tew-811dru |
| Setup Wizard | Internet Connection Setup Wizard |
| Warranty | 3 Year Limited |
| Certifications | CE, FCC Part 15, EN 300 328, EN 301 489, EN 301 893, EN 62311 |
| Technical Support | Toll-free US/Canada: 855-373-4741 (M-F 7AM-6PM PST), After hours: 866-845-3673 |
Frequently Asked Questions - TEW-811DRU TRENDNET
User questions about TEW-811DRU TRENDNET
0 question about this device. Answer the ones you know or ask your own.
Ask a new question about this device
Download the instructions for your Router in PDF format for free! Find your manual TEW-811DRU - TRENDNET and take your electronic device back in hand. On this page are published all the documents necessary for the use of your device. TEW-811DRU by TRENDNET.
USER MANUAL TEW-811DRU TRENDNET
natural_image
Black TRENDNET wireless device with control panel and indicator lights (no readable text beyond branding)• AC1200 Dual Band Wireless Router
TEW-811DRU
• Quick Installation Guide (1)
1. Before You Start
Package Contents
- TEW-811DRU
• Multi-Language Quick Installation Guide
• CD-ROM (Utility and User's Guide)
• Network cable (1.5 m / 5 ft.)
• Power adapter (12V DC, 2A)
Installation Requirements
• A computer with a wired or wireless network adapter and Web browser
- Broadband internet
- Installed modem
2. Installation
- Verify that you have an Internet connection.
- Power down your modem.
- Disconnect the network cable from your modem and your computer.
- Connect your modem to the TEW-811DRU's Internet port (yellow).
- Connect your computer to one of the TEW-811DRU's LAN ports.
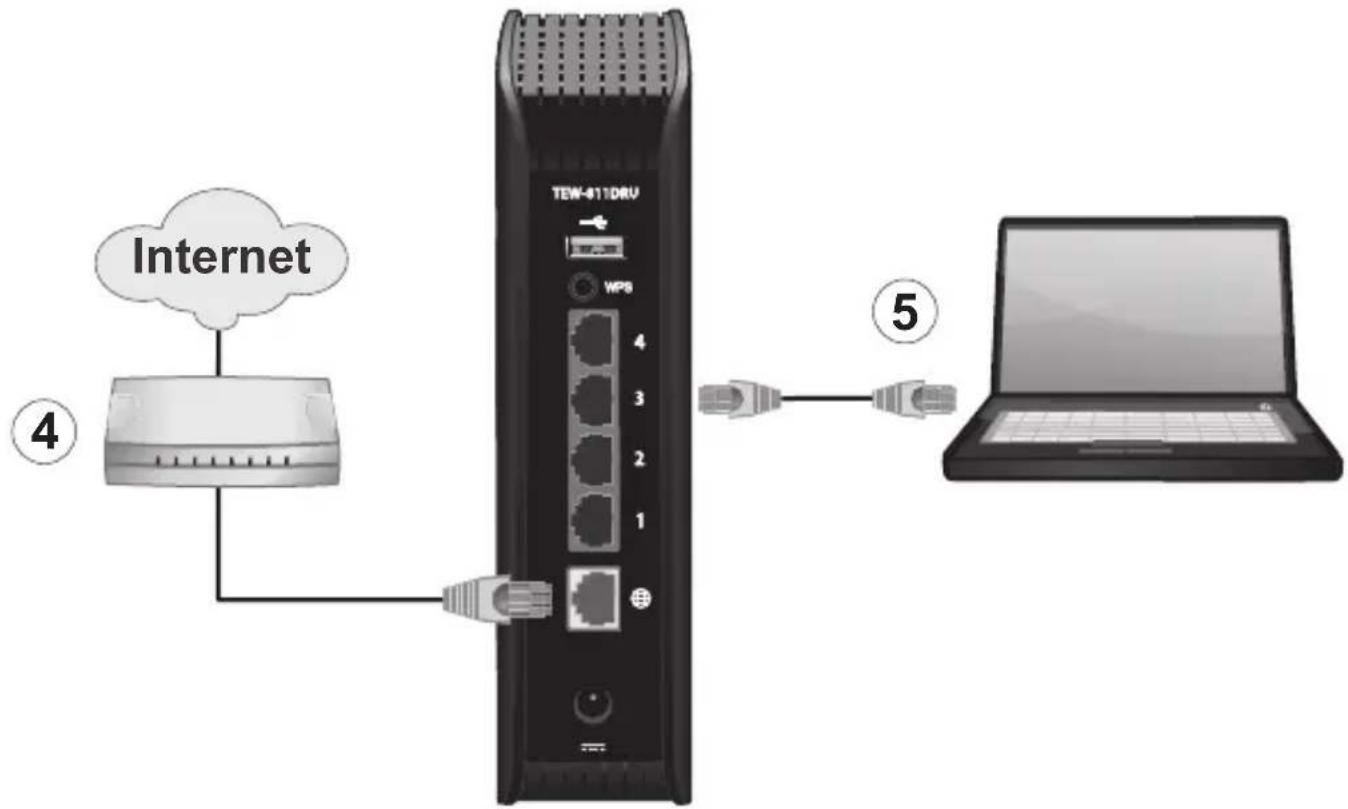
flowchart
graph TD
    A["Internet"] --> B["TEW-811 DRU"]
    B --> C["Laptop"]
    style A fill:#f9f,stroke:#333
    style B fill:#ccf,stroke:#333
    style C fill:#cfc,stroke:#333
- Connect the power adapter to the TEW-811DRU and then to a power outlet.
-
Power on your modem. Wait until the LEDs indicate that modem is fully booted up. For more information on your modem's LEDs, please consult with your modem's user's guide.
-
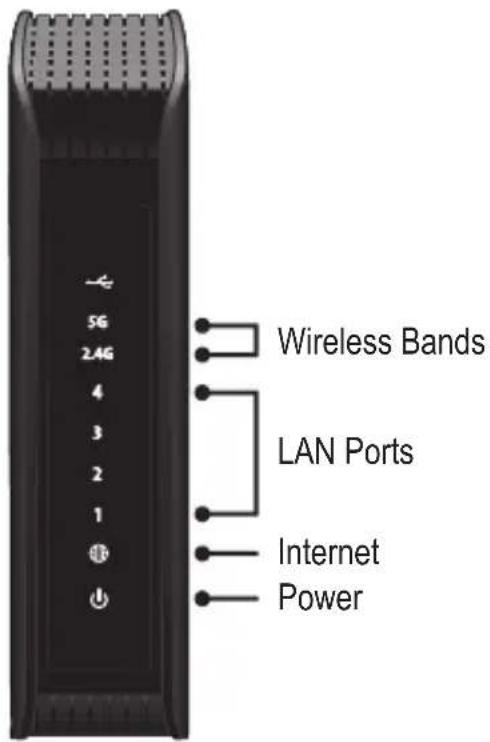
Verify that the status LED indicators on the front of the router are illuminated: Power, Internet (Blinking), LAN Ports (1, 2, 3, 4), and Wireless Bands (5G, 2.4G).
text_image
5G 2.4G 4 3 2 1 ① ② Wireless Bands LAN Ports Internet PowerNote: It is recommended that you configure the Wireless Router from a wired computer.
- Open your web browser, type http://tew-811dru in the Address bar, and then press Enter.

text_image
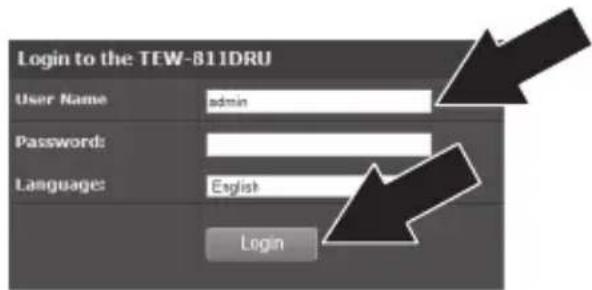
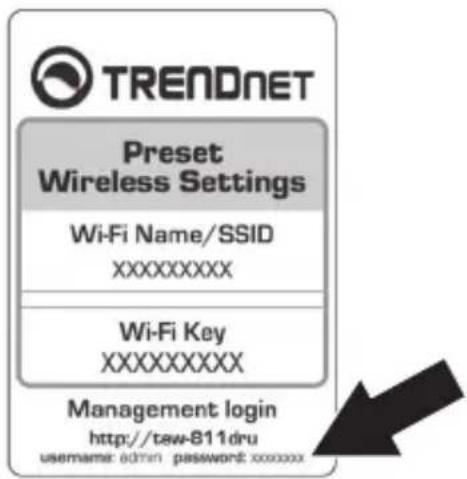
http://tew-811dru- Enter your User Name and Password, select your preferred language, and then click Login. You can find the unique password on a sticker on the front of the router and on the label on the bottom of the router.
text_image
Login to the TEW-811DRU User Name: admin Password: Language: English LoginUser Name: admin
Password: XXXXXXXXX
Note: User name and Password are case sensitive.
text_image
TREADNET Preset Wireless Settings Wi-Fi Name/SSID XXXXXXXXX Wi-Fi Key XXXXXXXXX Management login http://taw-811dru username: admin password: xxxxxxxx-
Click Wizard.
-
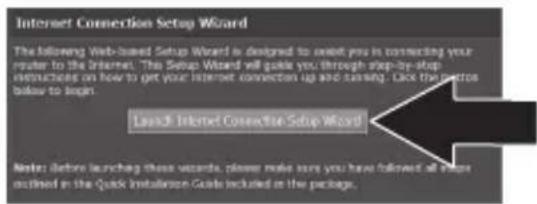
Click Launch Internet Connection Setup Wizard.
text_image
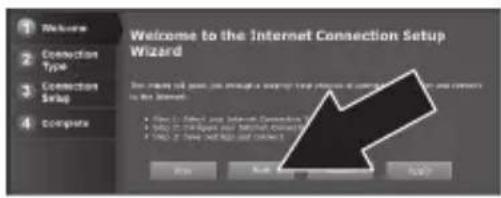
Internet Connection Setup Wizard The following Web-based Setup Wizard is designed to await you in connecting your router to the Internet. The Setup Wizard will guide you through step-by-step instructions on how to get your Internet connection up and saving. Click the retro below to begin. Lays 3. Internet Connection Setup Wizard! Notes: Before launching these events, please make sure you have followed all steps outlined in the Quick Installation Guide included in the package.13. Click Next.
text_image
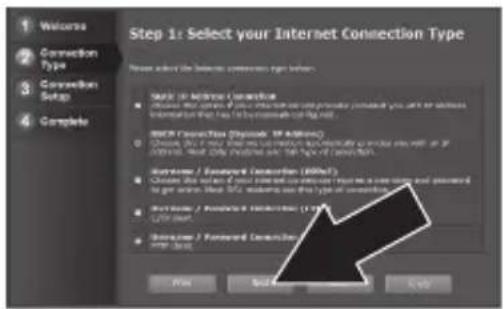
Welcome to the Internet Connection Setup Wizard 2 Connection Type 3 Connection Setup 4 Compute • Use all sites for access to the Internet Connection Setup (e.g. or any connection to the Internet) • Use all sites for access to the Internet Connection Setup (e.g. or any connection to the Internet) • Use all sites for access to the Internet Connection Setup (e.g. or any connection to the Internet) • Use all sites for access to the Internet Connection Setup (e.g. or any connection to the Internet) • Use all sites for access to the Internet Connection Setup (e.g. or any connection to the Internet)- Select DHCP Connection (Dynamic IP Address). Then click Next. (Dynamic IP is typical for most Internet services. Verify service with your Internet service provider.) Note: If you have a service other than Dynamic IP, refer to the User's Guide for installation instructions.
text_image
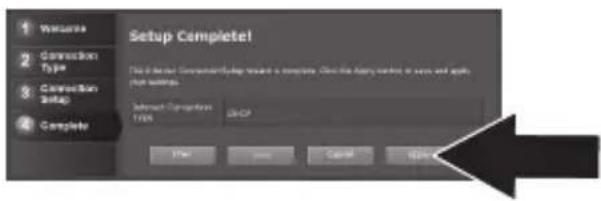
Step 1: Select your Internet Connection Type Please select the Internet Connection Type button. Start / Add Options Connection Choose the link option if you interact with the internet provider (which only can be wireless) or any connection type. This is also connected to the Web page. Switch Connection (Appendix: Web Application) Choose the link option if you interact with the internet provider (which only can be wireless) or any connection type. This is also connected to the Web page. Browse / Forward Connection (Add/Remove) Choose the link option if you interact with the internet provider (which only can be wireless) or any connection type. This is also connected to the Web page. Browse / Forward Connection (Add/Remove) Choose the link option if you interact with the internet provider (which only can be wireless) or any connection type. This is also connected to the Web page. Find Help Help15. Click Apply.
text_image
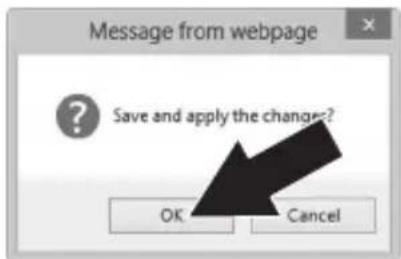
1 2 3 4 Setup Complete1 File 8-Back Connection Setup version is complete. Check the Array needed to save and apply their settings. Select Completion TYPE: ON/OFF OK Cancel Help16. Click Ok.
text_image
Message from webpage Save and apply the changes? OK Cancel-
Open up your browser and enter in a website (e.g. www.trendnet.com) to verify that you have an Internet connection.
-
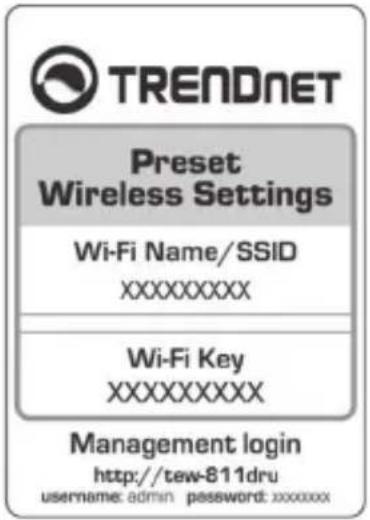
For added security the TEW-811DRU's wireless network is pre-encrypted with its own unique network security key. You can find the unique security key and the pre-assigned network name (SSID) on a sticker on the front of the router and on the label on the bottom of the router. You will need this information to connect to the router.
text_image
TRENDNET Preset Wireless Settings Wi-Fi Name/SSID XXXXXXXXX Wi-Fi Key XXXXXXXXX Management login http://tew-811dru username: admin password: xxxxxxxxNote:
For instructions on using your USB device with the TEW-811DRU, please refer to the user's guide on the provided CD-ROM.
Wireless router installation is now complete.
For detailed information regarding the TEW-811DRU's configuration and advanced settings, please refer to the User's Guide CD-ROM, or TRENDnet's website at http://www.trendnet.com.
Toll Free English Technical Support
US/Canada: 855-373-4741
Hours: Monday-Friday 7:00 AM- 6:00 PM, Pacific Standard Time. After hours: 866-845-3673
Company Informa on:
Company Name:
TRENDnet, Inc.
Company Address:
20675 Manha an Place
Torrance, CA 90501
USA
Product Informa on:
Product Descrip on:
AC1200 Dual Band Wireless Router
Model Number:
TEW-811DRU
Brand Name:
TRENDnet

text_image
CE!Technical Standards:
EN 300 328 V1.7.1: 10-2006 Class B
EN 301 489-1 V1.9.2: 09-2011
EN 301 489-17 V2.2.1:09-2012
EN 301 893 V1.6.1: 11-2011
EN 62311: 2008
Regula on (EC) No. 1275/2008
Regula on (EC) No. 278/2009
Declar a on:
This product is herewith con rmed to comply with the Direc ve of 1999/5/EC, 2006/95/EC and 2009/125/EC.
I hereby declare that the products and devices men oned above are consistent with the standards and provisions of the guidelines.
Sonny Su
Name
May 16, 2013
Date
Director of Technology
Title

Signature
。
-
-
广力云智慧零售收银系统
-
[Non-Text]
[Non-Text]
广力云智慧零售收银系统
[Non-Text]
广力云智慧零售收银系统
[Non-Text]
[Non-Text]
[Non-Text]
[Non-Text]
[Non-Text]
[Non-Text]
[Non-Text]
[Non-Text]
[Non-Text]
[Non-Text]
[Non-Text]
[Non-Text]
[Non-Text]
[Non-Text]
[Non-Text]
[Non-Text]
[Non-Text]
[Non-Text]
[Non-Text]
[Non-Text]
广力云智慧零售收银系统
[Non-Text]
[Non-Text]
[Non-Text]
[Non-Text]
[Non-Text]
[Non-Text]
[Non-Text]
[Non-Text]
[Non-Text]
[Non-Text]
[Non-Text]
[Non-Text]
[Non-Text]
[Non-Text]
[Non-Text]
[Non-Text]
[Non-Text]
[Non-Text]
[Non-Text]
[Non-Text]
[Non-Text]
[Non-Text]
[Non-Text]
[Non-Text]
[Non-Text]
[Non-Text]
[Non-Text]
[Non-Text]
[Non-Text]
[Non-Text]
[Non-Text]
[Non-Text]
[Non-Text]
[Non-Text]
[Non-Text]
[Non-Text]
[Non-Text]
[Non-Text]
[Non-Text]
[Non-Text]
[Non-Text]
[Non-Text]
[Non-Text]
[Non-Text]
[Non-Text]
[Non-Text]
[Non-Text]
[Non-Text]
[Non-Text]
[Non-Text]
[Non-Text]
[Non-Text]
[Non-Text]
[Non-Text]
[Non-Text]
[Non-Text]
[Non-Text]
[Non-Text]
[Non-Text]
[Non-Text]
[Non-Text]
[Non-Text]
[Non-Text]
[Non-Text]
[Non-Text]
[Non-Text]
[Non-Text]
[Non-Text]
[Non-Text]
[Non-Text]
[Non-Text]
[Non-Text]
[Non-Text]
[Non-Text]
[Non-Text]
[Non-Text]
[Non-Text]
[Non-Text]
[Non-Text]
[Non-Text]
[Non-Text]
[Non-Text]
[Non-Text]
[Non-Text]
[Non-Text]
GPL/LGPL General Information
This TRENDnet product includes free software written by third party developers. These codes are subject to the GNU General Public License ("GPL") or GNU Lesser General Public License ("LGPL"). These codes are distributed WITHOUT WARRANTY and are subject to the copyrights of the developers. TRENDnet does not provide technical support for these codes. The details of the GNU GPL and LGPL are included in the product CD-ROM.
Please also go to (http://www.gnu.org/licenses/gpl.txt) or (http://www.gnu.org/licenses/lgpl.txt) for specific terms of each license.
The source codes are available for download from TRENDnet's web site (http://trendnet.com/downloads/list_gpl.asp) for at least three years from the product shipping date.
You could also request the source codes by contacting TRENDnet.
20675 Manhattan Place, Torrance, CA 90501, USA. Tel: +1-310-961-5500 Fax: +1-310-961-5511
TRENDnet warrants its products against defects in material and workmanship, under normal use and service, for the following length of time from the date of purchase. Warranty: 3 year limited warranty (When Applicable: 1 year warranty for power adapter, power supply, and cooling fan components.) Visit TRENDnet.com to review the full warranty policy, rights, and restrictions for this product.
Garantie Limitée
This device complies with Part 15 of the FCC Rules. Operation is subject to the following two conditions:
(1) This device may not cause harmful interference.
(2) This device must accept any interference received. Including interference that may cause undesired operation.




Waste electrical an electronic products must not be disposed of with household waste. Please recycle where facilities exist. Check with your Local Authority or Retailer for recycling advice.
Note
The Manufacturer is not responsible for any radio or TV interference caused by unauthorized modifications to this equipment. Such modifications could void the user's authority to operate the equipment.
Advertencia
If you have any questions regarding the product installation, please contact our Technical Support.
Toll free US/Canada: 1-866-845-3673
http://www.trendnet.com/support/
Product Warranty Registration
Please take a moment to register your
product online. Go to TRENDnet's website at:
http://www.trendnet.com/register
TRENDnet
20675 Manhattan Place, Torrance, CA 90501. USA
Copyright © 2013. All Rights Reserved. TRENDnet.