
TEW-711BR - Router TRENDNET - Free user manual and instructions
Find the device manual for free TEW-711BR TRENDNET in PDF.


| Product Type | Wireless Router |
| Model | TEW-711BR |
| Brand | TRENDnet |
| Wireless Standard | IEEE 802.11b/g/n |
| Frequency Band | 2.4 GHz |
| Maximum Wireless Speed | 150 Mbps |
| Number of LAN Ports | 4 x 10/100 Mbps Fast Ethernet |
| WAN Port | 1 x 10/100 Mbps Fast Ethernet |
| Antenna Type | 1 x External Detachable Antenna |
| Security Protocols | WEP, WPA/WPA2, WPA-PSK/WPA2-PSK |
| Dimensions (W x D x H) | 160 x 110 x 30 mm (6.3 x 4.3 x 1.2 in) |
| Weight | Approx. 200 g (0.44 lbs) |
| Power Supply | 5V DC, 1A via external adapter |
| Power Consumption | Max 5W |
| Standards | IEEE 802.3, 802.3u, 802.11b/g/n |
| Advanced Features | NAT, DHCP, Firewall, QoS, WDS Bridge, Port Forwarding |
| Setup | Web-based interface (HTTP/HTTPS) |
| Package Contents | TEW-711BR Router, Power Adapter, Quick Installation Guide, CD-ROM, Ethernet Cable |
| Operating Temperature | 0°C to 40°C (32°F to 104°F) |
| Humidity | 10% to 90% (non-condensing) |
| Certifications | FCC, CE |
| Maintenance | Keep in a well-ventilated area; clean with dry cloth; avoid liquids |
| Spare Parts/Repairability | Contact TRENDnet support; typical lifespan 3-5 years; not user-serviceable |
| General Information | Ideal for home or small office; supports up to 253 users via DHCP |
Frequently Asked Questions - TEW-711BR TRENDNET
User questions about TEW-711BR TRENDNET
0 question about this device. Answer the ones you know or ask your own.
Ask a new question about this device
Download the instructions for your Router in PDF format for free! Find your manual TEW-711BR - TRENDNET and take your electronic device back in hand. On this page are published all the documents necessary for the use of your device. TEW-711BR by TRENDNET.
USER MANUAL TEW-711BR TRENDNET
natural_image
Exterior view of a TRENNET wireless router with a single antenna (no visible text or symbols on the device body)N150 Wireless Home Router
TEW-711BR
TRENDnet User's Guide
Table of Contents
Contents
Product Overview ....1
Package Contents .... 1
Features 1
Product Hardware Features.... 2
Application Diagram 4
Basic Router Setup....5
Creating a Home Network 5
Router Installation 6
Connect additional wired devices to your network....9
Wireless Networking and Security 10
How to choose the type of security for your wireless network .... 10
Secure your wireless network 11
Connect wireless devices to your router 13
Connect wireless devices using WPS....14
Basic wireless settings 16
Steps to improve wireless connectivity.... 18
Advanced wireless settings.... 19
Access Control Filters 20
Access control basics 20
MAC address filters 20
Domain/URL Filters 21
Protocol/IP filters 22
Firewall rules 23
Advanced Router Setup....25
Access your router management page.... 25
Set your router date and time....26
Manually configure your Internet connection 26
IPv6 Internet Connection Settings.... 27
Clone a MAC address.... 27
Change your router IP address.... 28
Set up the DHCP server on your router 28
Set up DHCP reservation 29
Enable/disable UPnP on your router 30
Allow/deny VPN connections through your router 30
Allow/deny multicast streaming.... 31
Identify your network on the Internet 31
Allow remote access to your router management page.... 32
Open a device on your network to the Internet.... 32
DMZ....32
Virtual Server 33
Special Applications 35
Add static routes to your router.... 36
Enable dynamic routing on your router 38
Router Maintenance & Monitoring 39
Reset your router to factory defaults 39
Router Default Settings 39
Backup and restore your router configuration settings.... 40
Restart your router 42
Check connectivity using the router management page.... 42
Check the router system information 43
View your router log....44
TRENDnet User's Guide
Table of Contents
Configure your router log 45
View your router packet statistics 46
View wireless devices connected to your router.... 46
Router Management Page Structure ....47
Technical Specifications....48
Troubleshooting....50
Appendix 51
Product Overview
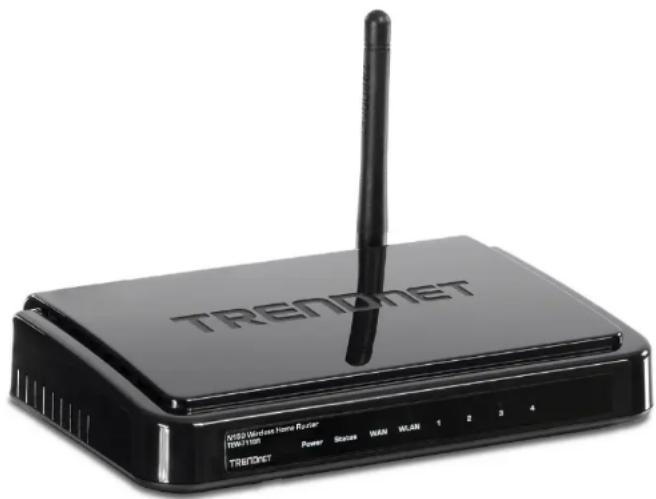
natural_image
Black TREADT wireless router with antenna and control buttons (no visible text or symbols on device body)TEW-711BR
Package Contents
In addition to your router, the package includes:
• Multi-Language Quick Installation Guide
• CD-ROM (User's Guide)
• Network cable (1.5 m / 5 ft.)
• Power adapter (5V DC, 1A)
If any package contents are missing or damaged, please contact the retail store, online retailer, or reseller/distributor from which the product was purchased.
Features
TRENDnet's N150 Wireless Home Router, model TEW-711BR, offers proven 150 Mbps wireless n networking to share files, play games, and surf the internet. Embedded GREENnet technology reduces power consumption by up to 50%. For your convenience the wireless network is setup and pre-encrypted out of the box.
Ease of Use
Easy Setup
Get up and running in minutes with the intuitive guided setup
One Touch Connection
Securely connect to the router at the touch of the Wi-Fi Protected Setup (WPS) button
Access Control
Pre-Encrypted
For your convenience the wireless network is pre-encrypted with its own unique password
Parental Controls
Control access to specific websites and manage which devices can access the router
Performance
N150 Wireless
Reliable 150 Mbps Wireless N
Ethernet Ports
Ethernet ports to hardwire up to four devices
Energy Savings
Embedded GREENnet technology reduces power consumption by up to 50%
IPv6
IPv6 network support
*Maximum wireless signal rates are referenced from IEEE 802.11 theoretical specifications. Actual data throughput and coverage will vary depending on interference, network traffic, building materials and other conditions.
TRENDnet User's Guide
TEW-711BR
Product Hardware Features
Rear View

natural_image
Black wireless router device with a single antenna and ports, no visible text or symbols on the device body.- Reset Button – Use an item such as a paperclip to push and hold this button for 15 seconds and release to reset your router to its factory defaults.
• LAN Ports – Connect Ethernet cables (also called network cables) from your router LAN ports to your wired network devices. - WAN Port—Connect an Ethernet cable from your router WAN port to your modem.
- Power Port – Connect the included power adapter from your router power port and to an available power outlet.
- Antenna – The antenna broadcasts wireless network signals.
TRENDnet User's Guide
TEW-711BR
Front View

natural_image
Black TREADT home router with antenna and control panel (no visible text or symbols on device body)- Power LED -This LED indicator is solid green when your router is powered on. Otherwise if this LED indicator is off, there is no power to your router.
- Status LED - This LED indicator is blinking green when your router is ready and working successfully. If this LED indicator is solid green on or off, your router is not receiving power or not working properly.
- WAN (Link/Activity) LED – This LED indicator is solid green when your router WAN port is physically connected to the modem Network port (also called network port) successfully with a Network cable. The LED indicator will be blinking green while data is transmitted or received through the WAN port of your router.
- WLAN (Link/Activity) LED – This LED indicator is blinking green when the wireless is "On" and functioning properly on your router. This LED indicator will be blinking green rapidly while data is transmitted or received by your wireless clients or wireless network devices connected to your router.
- LAN 1-4 (Link/Activity) LEDs – These LED indicators are solid green when the LAN ports are successfully connected to your wired network devices (which are turned on). These LED indicators will blink green while data is transmitted or received through your router's LAN ports.
TRENDnet User's Guide
TEW-711BR
Side View

natural_image
Close-up of a black electronic device with ventilation slots and a USB port (no visible text or symbols)- WPS (Wi-Fi Protected Setup) – Push and hold this button for 3 seconds to activate WPS. The button LED is blinking blue when WPS is activated.
Application Diagram
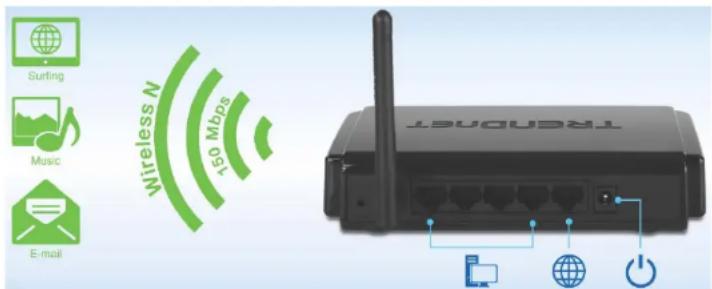
The router is installed near the modem (typically supplied by your ISP "Internet Service Provider") and physically connected to it from the router's WAN port to the modem's network port which connects to the Internet. Wireless signals from the router are broadcasted to wireless clients such as laptops (with wireless capability) thereby providing Internet access.
Basic Router Setup
Creating a Home Network
What is a network?
A network is a group of computers or devices that can communicate with each other. A home network of more than one computer or device also typically includes Internet access, which requires a router.
A typical home network may include multiple computers, a media player/server, a printer, a modem, and a router. A large home network may also have a switch, additional routers, access points, and many Internet-capable media devices such as TVs, game consoles, and Internet cameras.
- Modem – Connects a computer or router to the Internet or ISP (Internet Service Provider).
- Router – Connects multiple devices to the Internet.
- Switch –Connect several wired network devices to your home network. Your router has a built-in network switch (the LAN port 1-4). If you have more wired network devices than available Ethernet ports on your router, you will need an additional switch to add more wired connections.
How to set up a home network
-
For a network that includes Internet access, you'll need:
-
Computers/devices with an Ethernet port (also called network port) or wireless networking capabilities.
-
A modem and Internet service to your home, provided by your ISP (modem typically supplied by your ISP).
• A router to connect multiple devices to the Internet. -
Make sure that your modem is working properly. Your modem is often provided by your Internet Service Provider (ISP) when you sign up for Internet service. If your modem is not working contact your ISP to verify functionality.
- Set up your router. See "How to setup your router" below.
- To connect additional wired computers or wired network devices to your network, see "Connect additional wired devices to your network" on page 9.
- To set up wireless networking on your router, see "Wireless Networking and Security" on page 10.
How to setup your router
Refer to the Quick Installation Guide or continue to the next section "Router Installation" on page 6 for more detailed installation instructions.
Where to find more help
In addition to this User's Guide, you can find help below:
- http://www.trendnet.com/support (documents, downloads, and FAQs are available from this Web page)
TRENDnet User's Guide
TEW-711BR
Router Installation
Before you Install
Many Internet Service Providers (ISPs) allow your router to connect to the Internet without verifying the information fields listed below. Skip this section for now and if your router cannot connect to the Internet using the standard installation process, come back to this page and contact your ISP to verify required ISP specification fields listed below.
1. Obtain IP Address Automatically (DHCP)
Host Name (Optional)
Clone Mac Address (Optional)
2. Fixed IP address
WAN IP Address: ____. ____. ____.
(e.g. 215.24.24.129)
WAN Subnet Mask: ____. ____. ____
WAN Gateway IP Address: ____. ____. ____.
DNS Server Address 1: ____. ____. ____
DNS Server Address 2: ____. ____. ____
3. PPPoE to obtain IP automatically
User Name: ____
Password:
Verify Password: ____
4. PPPoE with a fixed IP address
User Name: ____
Password:
Verify Password: ____
IP Address: ____. ____. ____. (e.g. 215.24.24.129)
5. PPTP or Russian PPTP
Type (Dynamic IP or Static IP)
My IP Address: ____. ____. ____
(e.g. 215.24.24.129)
Subnet Mask: ____. ____. ____
Gateway: ____. ____. ____
Server IP: ____. ____. ____
PPTP Account: ____
PPTP Password: ____
Retype Password: ____
6. L2TP or Russia L2TP
Type (Dynamic IP or Static IP)
My IP Address: ____. ____. ____
(e.g. 215.24.24.129)
Subnet Mask: ____. ____. ____
Gateway: ____. ____. ____
Server IP: ____. ____. ____
L2TP Account:
L2TP Password:
Retype Password: ____
7. Russia PPPoE
Type (Dynamic IP or Static IP)
User Name: ____
Password:
Verify Password: ____
IP Address: ____. ____. ____ (e.g. 215.24.24.129)
TRENDnet User's Guide
TEW-711BR
Hardware Installation
- Verify that you have an Internet connection when connecting your computer directly to your modem.

flowchart
graph LR
    PC["PC"] -->|Wireless Link| Cable[" Cable/DSL Modem "]
    Cable --> Internet[" Internet "]
- Turn off your modem.
- Disconnect the Network cable from your computer to your modem.
- Using a Network cable, connect your computer to one of the four LAN ports on the router.
- Using another Network cable, connect the WAN port on the router to your modem.
- Plug in the power adapter, connect it to the router's power port, and then push the On/Off Power Switch to the "On" position (pushed in).
- Turn on your modem.

- Verify that the following front panel LED indicators on your router: Power (Solid Green), Status (Blinking Green), LAN 1, 2, 3, or 4 (Solid/Blinking Green for ports for which devices are connected), WAN (Solid/Blinking Green), and WLAN (Blinking Green).

TRENDnet User's Guide
TEW-711BR
Setup Wizard
- Open your web browser (e.g. Internet Explorer, Firefox, Safari, Chrome, or Opera) and the wizard will automatically appear.
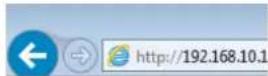
Note: If you have already configured your router before, the wizard will no longer appear automatically. In your web browser, go to http://tew-711br or you can access the router management using the default IP address http://192.168.10.1. Your router will prompt you for a user name and password. Enter your user name and password and click Login, then click on Wizard.

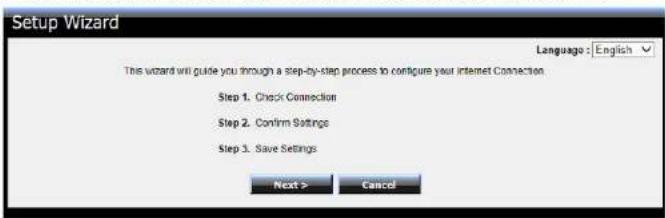
- Select your language from the drop-down list at the top right and click Next.
- Please wait for the wizard to automatically detect your Internet connection.
If the wizard is unable to detect your Internet connection type, you will be prompted to manually select and configure your Internet connection settings. Select your Internet connection type and click Next.
Note: Dynamic IP (DHCP) is typical for most Internet services. You can verify your settings with your Internet Service Provider.

- Confirm your settings. This window displays your predefined router wireless settings and click Save to complete the wizard. Please wait for the settings to be applied.
Note: For added security, the router wireless network is pre-encrypted with its own unique wireless network security key. You can find the unique network security key and the pre-assigned network name (SSID) on a sticker on the top of the router and on a label on the bottom of the router. You will need this information to connect to the router. To change the network security key, refer to page 11 "Secure your wireless network". If the router is reset to factory defaults, the wireless encryption will reset to the network security key printed on the product labels of the router.


Connect additional wired devices to your network
You can connect additional computers or other network enabled devices to your network by using Ethernet cables to connect them to one of the available LAN ports labeled 1,2,3,4 on your router. Check the status of the LED indicators (1, 2, 3, or 4) on the front panel of your router to ensure the physical cable connection from your computer or device.
Note: If you encounter issues connecting to your network, there may be a problem with your computer or device network settings. Please ensure that your computer or device network settings (also called TCP/IP settings) are configured to obtain IP address settings automatically (also called dynamic IP address or DHCP) and to Obtain DNS Server address settings automatically.

flowchart
graph TD
    A["WiFi"] --> B["Network Storage"]
    A --> C["IP Camera"]
    A --> D["Computer"]
    A --> E["Computer"]
Wireless Networking and Security
How to choose the type of security for your wireless network
Setting up wireless security is very important. Leaving your wireless network open and unsecure could expose your entire network and personal files to outsiders. TRENDnet recommends reading through this entire section and setting up wireless security on your new router.
There are a few different wireless security types supported in wireless networking each having its own characteristics which may be more suitable for your wireless network taking into consideration compatibility, performance, as well as the security strength along with using older wireless networking hardware (also called legacy hardware).
It is strongly recommended to enable wireless security to prevent unwanted users from accessing your network and network resources (personal documents, media, etc.).
In general, it is recommended that you choose the security type with the highest strength and performance supported by the wireless computers and devices in your network. Please review the security types to determine which one you should use for your network.
Wireless Encryption Types
- WEP: Legacy encryption method supported by older 802.11b/g hardware. This is the oldest and least secure type of wireless encryption. It is generally not recommended to use this encryption standard, however if you have old 802.11 b or 802.11g wireless adapters or computers with old embedded wireless
cards(wireless clients), you may have to set your router to WEP to allow the old adapters to connect to the router. Note: This encryption standard will limit connection speeds to 54Mbps.
- WPA: This encryption is significantly more robust than the WEP technology. Much of the older 802.11g hardware was been upgraded (with firmware/driver upgrades) to support this encryption standard. Total wireless speeds under this encryption type however are limited to 54Mbps.
- WPA-Auto: This setting provides the router with the ability to detect wireless devices using either WPA or WPA2 encryption. Your wireless network will automatically change the encryption setting based on the first wireless device connected. For example, if the first wireless client that connects to your wireless network uses WPA encryption your wireless network will use WPA encryption. Only when all wireless clients disconnect to the network and a wireless client with WPA2 encryption connects your wireless network will then change to WPA2 encryption. NOTE: WPA2 encryption supports 802.11n speeds and WPA encryption will limit your connection speeds to 54Mbps
- WPA2: This is the most secure wireless encryption available today, similar to WPA encryption but more robust. This encryption standard also supports the highest connection speeds. TRENDnet recommends setting your router to this encryption standard. If you find that one of your wireless network devices does not support WPA2 encryption, then set your router to either WPA or WPA-Auto encryption.
Note: Check the specifications of your wireless network adapters and wireless appliances to verify the highest level of encryption supported.
TRENDnet User's Guide
TEW-711BR
Below is brief comparison chart of the wireless security types and the recommended configuration depending on which type you choose for your wireless network.
| Security Standard | WEP | WPA | WPA2 |
| Compatible Wireless Standards | IEEE 802.11a/b/g(802.11n devices will operate at 802.11g to connect using this standard) | IEEE 802.11a/b/g(802.11n devices will operate at 802.11g to connect using this standard) | IEEE 802.11a/b/g/n |
| Highest Performance Under This Setting | Up to 54Mbps | Up to 54Mbps | Up to 450Mbps* |
| Encryption Strength | Low | Medium | High |
| Additional Options | Open System or Shared Key, HEX or ASCII, Different key sizes | TKIP or AES, Preshared Key or RADIUS | TKIP or AES, Preshared Key or RADIUS |
| Recommended Configuration | Open System ASCII 13 characters | TKIP Preshared Key 8-63 characters | AES Preshared Key 8-63 characters |
*Dependent on the maximum 802.11n data rate supported by the device (150Mbps, 300Mbps, or 450Mbps)
Secure your wireless network
Wireless > Security
After you have determined which security type to use for your wireless network (see "How to choose the security type for your wireless network" on page 10), you can set up wireless security.
- Log into your router management page (see "Access your router management page" on page 25).
- Click on Wireless, and click on Security.
- Click on the Authentication Type drop-down list to select your wireless security type.

TRENDnet User's Guide
TEW-711BR
Selecting WEP:
If selecting WEP (Wired Equivalent Privacy), please review the WEP settings to configure and click Apply to save the changes.

- WEP—Choose Open System or Shared Key.
Note: It is recommended to use Open System because it is known to be more secure than Shared Key.
• Mode – Choose HEX or ASCII.
Note: It is recommended to use ASCII because of the much larger character set that can be used to create the key.
- WEP Key – Choose the key length 64-bit or 128-bit.
Note: It is recommended to use 128-bit because it is more secure to use a key that consists of more characters.
• Key 1-4
- This is where you enter the password or key needed for a computer to connect to the router wirelessly
- You can define up to 4 passwords or 4 keys. Only one key can be active at a given time. Most users simply define one key.
○ Choose a key index 1, 2, 3, or 4 and enter the key.
When connecting to the router, the client must match both the password and the Key number. (e.g. if you have activated Key 2 with a
password of 12345, then the client must select: Key 2 (entering Key 1, 3, or 4 will block the ability to connect) and enter password 12345)
Selecting WPA, WPA-Auto, or WPA2 (WPA2 recommended):

First, from the Authentication Type row, select WPA, WPA-Auto, or WPA2.
Then from the PSK/EAP row, select either PSK or EAP
• PSK stands for Preshared Key
- EAP stands for Extensive Authentication Protocol, also called Remote Authentication Dial-In User Service or RADIUS).
Note: EAP requires an external RADIUS server, PSK only requires you to create a passphrase.
The following section outlines options when selecting PSK (Preshared Key Protocol),
| WEP Key Format HEX ASCII | ||
| Character set | 0-9 & A-F, a-f only | Alphanumeric (a,b,C,?,*,/,1,2, etc.) |
| 64-bit key length | 10 characters | 5 characters |
| 128-bit key length | 26 characters | 13 characters |
Select a Cipher Type. When selecting WPA security, it is recommended to use TKIP.
- When selecting WPA-Auto security, it is recommended to use AES.
- When selecting WPA2 security, it is recommended to use AES.
TRENDnet User's Guide
TEW-711BR
Create your Wireless security Passphrase (password or key):
• Passphrase – Enter the passphrase.
- This is the password or key that is used to connect your computer to this router wirelessly
- Confirmed Passphrase – Re-enter the passphrase.
Note: 8-63 alphanumeric characters (a,b,C,?,*,/,1,2, etc.)
The following section outlines options when selecting EAP (Extensive Authentication Protocol),
EAP (Extensible Authentication Protocol) is also called Remote Authentication Dial-In User Service or RADIUS.
Select a Cipher Type
- When selecting WPA security, it is recommended to use TKIP.
- When selecting WPA-Auto security, it is recommended to use AES.
- When selecting WPA2 security, it is recommended to use AES.
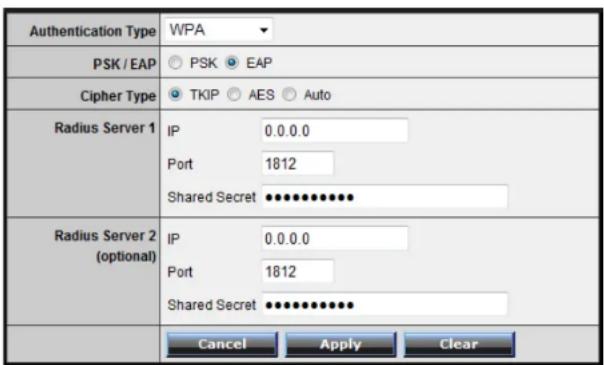
• RADIUS Server 1/2 - Configure the RADIUS server settings.
Note: RADIUS Server 2 is optional and can be configured as a backup if there are any issues with RADIUS Server 1.
- IP – Enter the IP address of the RADIUS server. (e.g. 192.168.10.250)
- Port – Enter the port your RADIUS server is configured to use for RADIUS authentication.
Note: It is recommended to use port 1812.
- Shared Secret – Enter the shared secret used to authorize your router with your RADIUS server.
Connect wireless devices to your router
A variety of wireless network devices can connect to your wireless network such as:
- Gaming Consoles
- Internet enabled TVs
• Network media players - Smart Phones
- Wireless Laptop computers
- Wireless IP cameras
Each device may have its own software utility for searching and connecting to available wireless networks, therefore, you must refer to the User's Manual/Guide of your wireless client device to determine how to search and connect to this router's wireless network.
See the "Appendix" on page 51 for general information on connecting to a wireless network.
Connect wireless devices using WPS
WPS (Wi-Fi Protected Setup) is a feature that makes it easy to connect devices to your wireless network. If your wireless devices support WPS, you can use this feature to easily add wireless devices to your network.
Note: You will not be able to use WPS if you set the SSID Broadcast setting to Disabled.
There are two methods the WPS feature can easily connect your wireless devices to your network.
- Push Button Configuration (PBC) method
- RECOMMENDED Hardware Push Button method—with an external button located physically on your router and on your client device - WPS Software/Virtual Push Button - located in router management page
- PIN (Personal Identification Number) Method - located in router management page
Note: Refer to your wireless device documentation for details on the operation of WPS.
Recommended Hardware Push Button (PBC) Method
- Note it is recommended that a wireless key (passphrase or password) is created before connecting clients using the PBC method. If no wireless key is defined when connecting via PBC, the router will automatically create an encryption key that is 64 characters long. This 64 character key will then have to be used if one has to connect computers to the router using the traditional connection method.
To add a wireless device to your network, simply push the WPS button on the wireless device you are connecting(consult client device User's Guide for length of time), then push and hold the WPS button located on your router for 3 seconds and release it. A blue LED on your router WPS button will flash indicating that the WPS setup process has been activated on your router. (See "Product Hardware Features" on page 2)
For connecting additional WPS supported devices, repeat this process for each additional device.
PBC (Software/Virtual Push Button)
Wireless >WiFi Protected Setup
In addition to the hardware push button located physically on your router, the router management page also has push button which is a software or virtual push button you can click to activate WPS on your router.
- Log into your router management page (see "Access your router management page" on page 25).
- Click on Wireless, and click on WPS.
- To add a wireless device to your network, simply the push the WPS button on the wireless device (consult wireless device's User's Guide for length of time), you are connecting, then in your router management page next to Push Button Configuration, click Start PBC.
Push Button
Configuration

- You will receive a message counting down indicating the WPS process is activated on your router.
Please press down the Push Button (physical or virtual) on the wireless device you are adding to your wireless network within 110 seconds ...
- You will receive a success message indicate that the wireless device successfully connected using WPS.
Applied Change Successfully!.

TRENDnet User's Guide
TEW-711BR
PIN (Personal Identification Number)
Wireless >WiFi Protected Setup
If your wireless device has WPS PIN (typically an 8-digit code printed on the wireless device product label or located in the wireless device wireless software utility), you can use this method.
- Log into your router management page (see "Access your router management page" on page 25).
- Click on Wireless, and click on WPS.
- Next to Client PIN Number, enter the WPS PIN of the wireless device you are connecting and click Start PIN.

Note: You may need to initiate the WPS PIN on your wireless device first when using this method. Refer to your wireless device documentation for details on the operation of WPS.
WPS PIN Security
Wireless >WiFi Protected Setup
To protect your wireless network against WPS PIN attacks, the WPS Auto Lock Down State feature will automatically disable the WPS PIN method after 10 failed WPS PIN attempts. Once lock down state is activated, the WPS PIN method will be disabled until you access the router management page and unlock it.
- Log into your router management page (see "Access your router management page" on page 25).
-
Click on Wireless, and click on WPS.
-
If Auto-lock-down-state is activated, the status will display as Locked. To unlock this state and re-enable WPS PIN method, click Unlock.

- To save changes, click Apply.
TRENDnet User's Guide
TEW-711BR
Basic wireless settings
Wireless > Basic
This section outlines available management options under the Basic Wireless sub tab.
- Log into your router management page (see "Access your router management page" on page 25).
- Click on Wireless, and click on Basic.
- To save changes to this section, click Apply when finished.

- Wireless
- Enabled turns on the wireless networking on your router (by default it is enabled).
- Disabled turns off wireless networking on your router.
Note: It is recommended to leave the wireless setting to Enabled unless you do not plan on connecting any wireless computers or devices to your network.

- SSID – This acronym stands for Service Set Identifier and is the name of your wireless network. It differentiates your wireless network from others around you. By default, the router's wireless name is unique to the device. If you choose to change the SSID, change it to a name that you can easily remember.
| Auto Channel | ✓ |
| Channel | 6 |
| 802.11 Mode | 2.4Ghz 802.11b/g/n mixed mode |
- Auto Channel – In North America, this router can broadcast on 1 of 11 Channels (13 in Europe and other countries). Selecting Auto Channel enables the router to automatically select the best Channel for wireless communication.
- Channel – To manually set the channel on which the router will broadcast, uncheck Auto Channel, then click the drop-down list and select the desired Channel for wireless communication. The goal is to select the Channel that is least used by neighboring wireless networks.
• 802.11 Mode - Select the appropriate mode for your network.
2.4GHz 802.11b/g/n mixed mode – Select this mode for the best compatibility. This mode allows older 802.11b and 802.11g wireless devices to connect to the router in addition to newer 802.11n devices.
2.4GHz 802.11b/g mixed mode – This mode only allows devices to connect to the router using older and slow 802.11b or 802.11g technology and it thereby reduces the router's maximum speed to 54Mbps (typically not recommended).
2.4GHz 802.11n only mode – This mode only allows newer 802.11n devices to connect to your router. This mode does ensure the highest speed and security for your network, however if you have older 802.11g wireless clients, they will no longer be able to connect to this router.
TRENDnet User's Guide
TEW-711BR
2.4GHz 802.11g only mode – This mode only allows devices to connect to the router using older and slow 802.11g technology (typically not recommended).
2.4GHz 802.11b only mode – This mode only allows devices to connect to the router using older and slow 802.11b technology (typically not recommended).
Note: Please check the specifications on your wireless devices for the highest wireless capability supported first before applying these settings. If you are unsure, it is recommended that you keep the default setting (2.4GHz 802.11b/g/n mixed mode) for the best compatibility.
When applying the 802.11 mode setting, please keep in mind the following:
- Wireless devices that support 802.11n are backwards compatible and can connect wirelessly at 802.11g or 802.11b.
- Connecting at 802.11b or 802.11g will limit the capability of your 802.11n supported wireless devices from obtaining higher performance and data rates.
- Allowing 802.11b or 802.11g devices to connect to an 802.11n capable wireless network may degrade the wireless network performance below the higher performance and data rates of 802.11n.
- Wireless devices that only support 802.11b or 802.11g will not be able to connect to a wireless network that is set to 802.11n only mode.
- Wireless devices that only support 802.11b will not be able to connect to a wireless network that is set to 802.11g only mode.
| Channel Width | 20 MHz |
| SSID Broadcast | Enabled Disabled |
| WMM | Enabled Disabled |
- Channel Width – This setting only applies to wireless devices connecting at 802.11n. Select the appropriate channel width for your wireless network.
- 20 MHz – This mode operates using a single 20MHz channel for wireless devices connecting at 802.11n. This setting may provide more
stability than Auto 20/40 MHz for connectivity in busy wireless environments where there are several wireless networks in the area.
Auto 20/40 MHz – This mode can automatically switch between using a single 20MHz channel or 40MHz (two 20MHz channels). When 40MHz is active, this mode is capable of providing higher performance only if the wireless devices support the 40MHz channel width. Enabling 20/40MHz typically results in substantial performance increases when connecting to an 802.11n client.
- SSID Broadcast
- Enabled allows wireless devices to search and discover your wireless network name (also called SSID) broadcasted by your router.
- Disabled turns off the ability for wireless devices to find your network. It is still possible for wireless devices to be configured to connect to your wireless network.
Note: Setting this option to Disabled, will disable WPS functionality.
- WMM – Wi-Fi Multimedia is a Quality of Service (QoS) feature which prioritizes audio and video data packets. This feature requires the wireless device to also support WMM. Click Enabled (recommended) or Disabled to turn this feature on or off on your router.
Steps to improve wireless connectivity
There are a number of factors that can impact the range of wireless devices. Follow these tips to help improve your wireless connectivity:
- Keep the number of obstructions to a minimum. Each obstruction can reduce the range of a wireless device. Position the wireless devices in a manner that will minimize the amount of obstructions between them.
a. For the widest coverage area, install your router near the center of your home, and near the ceiling, if possible.
b. Avoid placing the router on or near metal objects (such as file cabinets and metal furniture), reflective surfaces (such as glass or mirrors), and masonry walls.
c. Any obstruction can weaken the wireless signal (even non-metallic objects), so the fewer obstructions between the router and the wireless device, the better.
d. Place the router in a location away from other electronics, motors, and fluorescent lighting.
e. Many environmental variables can affect the router's performance, so if your wireless signal is weak, place the router in several locations and test the signal strength to determine the ideal position.
-
Building materials can have a large impact on your wireless signal. In an indoor environment, try to position the wireless devices so that the signal passes through less dense material such as dry wall. Dense materials like metal, solid wood, glass or even furniture may block or degrade the signal.
-
Antenna orientation can also have a large impact on your wireless signal. Use the wireless adapter's site survey tool to determine the best antenna orientation for your wireless devices.
- Interference from devices that produce RF (radio frequency) noise can also impact your signal. Position your wireless devices away from anything that generates RF noise, such as microwaves, radios and baby monitors.
If possible, upgrade wireless network interfaces (such as wireless cards in computers) from older wireless standards to 802.11n. If a wirelessly networked device uses an older standard, the performance of the entire wireless network may be slower. If you are still experiencing low or no signal consider repositioning the wireless devices or installing additional access points.
TRENDnet User's Guide
TEW-711BR
Advanced wireless settings
Wireless > Advanced
These settings are advanced options that can be configured to change advanced wireless broadcast specifications. It is recommended that these settings remain set to their default values unless you are knowledgeable about the effects of changing these values. Changing these settings incorrectly can degrade performance.
| Beacon Interval | 100 | (default: 100 msec, range: 25~1000) |
| RTS Threshold | 2346 | (default: 2346, range: 256~2346) |
| Fragmentation Threshold | 2346 only) | (default: 2346, range: 1500~2346, even number |
| DTIM Interval | 1 | (default: 1, range: 1~255) |
| Cancel | Apply |
- Beacon Interval – A beacon is a management frame used in wireless networks that transmitted periodically to announce the presence and provide information about the router's wireless network. The interval is the amount time between each beacon transmission.
Default Value:100 milliseconds (range: 100-1000)
- RTS Threshold – The Request To Send (RTS) function is part of the networking protocol. A wireless device that needs to send data will send a RTS before sending the data in question. The destination wireless device will send a response called Clear to Send (CTS). The RTS Threshold defines the smallest data packet size allowed to initiate the RTS/CTS function.
Default Value: 2347 (range: 1-2347)
- Fragmentation Threshold – Fragmentation in wireless networks is the process of breaking down data communications into smaller data packets in order to improve data efficiency when transferring or receiving data between wireless devices. The fragmentation threshold defines the maximum size of the data packets that are broken down.
Default Value: 2346 (range: 256\~2346, even numbers only)
- DTIM Interval – A Delivery Traffic Indication Message (DTIM) is an informational message that is sent as part of a beacon by an access point (your wireless router) to a wireless client (wireless device or connecting station) in sleep mode to provide an alert that data is awaiting delivery. The DTIM Interval (also called Data Beacon Rate) is the amount of time between DTIM transmissions included in part of a beacon.
Default Value: 1 (range: 1-255)
Access Control Filters
Access control basics
Access > Filter
MAC address filters
Access > Filter > MAC Filters
Every network device has a unique, 12-digit MAC (Media Access Control) address. Using MAC filters, you can allow or deny specific computers and other devices from using this router's wired or wireless network.
- Log into your router management page (see "Access your router management page" on page 25).
- Click on Access, click on Filter, and click on MAC Filters.
| Filters | Filters are used to allow or deny LAN/WLAN users from accessing the local network (LAN/WLAN), web management, and/or Internet. MAC Filters Domain/URL Blocking Protocol/IP Filters |
- Add the MAC addresses to the MAC Table first before applying the MAC filter function.
Note: MAC filter can be configured to allow access to the listed MAC address and deny all others unlisted or vice versa. The recommended function is to choose to only allow access to the MAC addresses listed and deny all others unlisted because it is easier to determine the MAC addresses of devices in your network then to determine which MAC addresses you do not want to allow access.
- Name – Enter a name for the MAC address entry.
• MAC Address – Enter the 12-digit MAC address.(e.g. 00-11-22-AA-BB-CC)
Note: You can check the Dynamic DHCP List for the MAC addresses of the devices on your network, see "Setup the DHCP server on your router" on page 31 or refer to your computer or device documentation to find the MAC address.
| MAC Table | Name: | trendnet1 |
| MAC Address: | 48 - 5B - 39 - 2C - FB - 36 |
Click Add to save the new MAC address entry to the MAC Table. After clicking Add, the MAC address entry will appear in the list below. Repeat for each device.
| Name | MAC Address |
| trendnet1 | 48:5B:39:2C:FB:36 |
- Add – Saves a new MAC address entry.

To modify an existing MAC address entry, click on the entry in the MAC Table. When selected, the entry will be highlighted.

- Delete – Removes an existing MAC address entry.
- Update – Modifies an existing MAC address entry.
-
Cancel – Discard changes to an existing MAC address entry.
-
Review the MAC Filter options.
TRENDnet User's Guide
TEW-711BR
- Disabled – disables MAC address filter.
- Only Allow computers/devices with MAC addresses listed below to access the local network (LAN/WLAN), web management, and the Internet.
- Only Deny computers/devices with MAC addresses listed below to access the local network (LAN/WLAN), web management, and the Internet
Note: Do not configure this setting until you have added the MAC addresses to the MAC Table first. The recommended option is to only Allow access to the MAC addresses listed and deny all others unlisted.
MAC Filters
Disabled
Only Allow computers/devices with MAC addresses listed below to access the local network (LAN/WLAN), web management, and the Internet.
Only Deny computers/devices with MAC addresses listed below to access the local network (LAN/WLAN), web management, and the Internet.
Note: Please add the MAC address using the MAC Table section below first, then select the option to "Only Allow" or "Only Deny", and click "Apply".
Click Apply to save the changes.

Domain/URL Filters
Access > Filter > Domain/URL Blocking
You may want to allow or block computers or devices on your network access to specific websites (e.g. www.trendnet.com, etc.), also called domains or URLs (Uniform Resource Locators). You may also enter a keyword (e.g. instead of complete URL to generally allow or block computers or devices access to websites that may contain the keyword in the URL or on the web page.
- Log into your router management page (see "Access your router management page" on page 25).
- Click on Access, click on Filter, and click on Domain/URL Blocking.
| Filters | Filters are used to allow or deny LAN/WLAN users from accessing the local network (LAN/WLAN), web management, and/or Internet. |
| ○ MAC Filters ● Domain/URL Blocking ○ Protocol/IP Filters |
-
Review the Domain/URL blocking options.
-
Disabled – disables domain/URL blocking
- Allow users to access all domains listed. (Deny access to all other unlisted websites)
- Deny users to access all domains listed.
(Allow access to all other unlisted websites)
TRENDnet User's Guide
TEW-711BR
Click Apply to save the changes.

Disabled
Allow users to access all domains list.
Deny users to access all domains list.

- Under Domain Blocking click on Allow or Deny. The Domains List will then appear. Enter the Website/URL/domain (e.g. www.trendnet.com) or keyword (e.g. trendnet) to allow or block access and click Add to add this to the domains list. The entry will be listed below. Repeat for each additional website or keyword added.
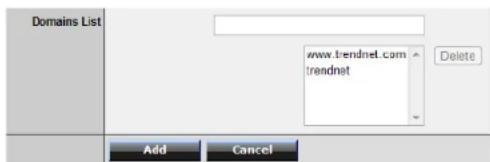
- Cancel - Discard changes to the domains list.
- Delete -Delete an existing website/URL/domain or keyword entry, click on the entry in the Domains List. When selected, the entry will be highlighted. Click Delete to remove it from the list.


- Go back to the Domain Blocking section and confirm you want to Allow or Deny access to the Domains List. It is generally easier to manage a list of Domains for which access is denied.
- In Domain Blocking click on Apply to save the selected settings.
Protocol/IP filters
Access > Filter > Protocol/IP Filters
You may want to block computers or devices on your network access to specific ports (used or required by a specific application) to the Internet.
- Log into your router management page (see "Access your router management page" on page 25).
- Click on Access, click on Filter, and click on Protocol/IP Filters.
| Filters | Filters are used to allow or deny LAN/WLAN users from accessing the local network (LAN/WLAN), web management, and/or Internet. |
| ○ MAC Filters ○ Domain/URL Blocking ○ Protocol/IP Filters |
To simplify configuration, there is a list of commonly used pre-defined Protocol/IP Filters to modify otherwise, you can choose to manually add a new Protocol/IP Filter.
| Name | Protocol | Port Range | IP Range | |
| Filter FTP | Any | 20-21 | 0.0.0.0-0.0.0.0 | |
| Filter HTTP | Any | 80-80 | 0.0.0.0-0.0.0.0 | |
| Filter HTTPS | Any | 443-443 | 0.0.0.0-0.0.0.0 | |
| Filter DNS | Any | 53-53 | 0.0.0.0-0.0.0.0 | |
| Filter SMTP | Any | 25-25 | 0.0.0.0-0.0.0.0 | |
| Filter POP3 | Any | 110-110 | 0.0.0.0-0.0.0.0 | |
| Filter Telnet | Any | 23-23 | 0.0.0.0-0.0.0.0 |
-
Review the protocol/IP filter settings.
-
Enabled – Selecting Enabled turns on the Protocol/IP Filter and selecting Disabled turns it off.
- Name – Enter a name for the Protocol/IP Filter.
TRENDnet User's Guide
TEW-711BR
- Protocol – Select the protocol type to filter. TCP, UDP, or you can select * to choose all protocol types.
- Port – Enter the port number or port range numbers to block. (e.g. 80-80 or 20-21).
- IP Range – Enter the IP address or IP address range to apply the protocol/IP filter. (e.g. 192.168.10.20-192.168.10.20 or 192.168.10.20-192.168.10.30).
Note: The filter will not be applied to IP addresses outside of the range specified.
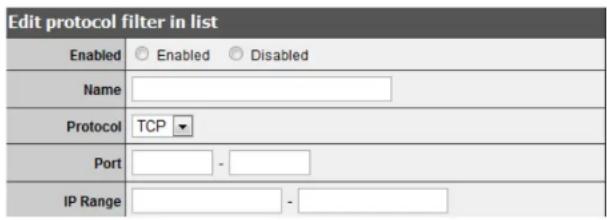
- Add – Saves new protocol/IP filter.

To modify an existing protocol/IP filter, click on the entry in the Protocol/IP Filters list. When selected, the entry will be highlighted.

- Delete – Removes an existing protocol/IP filter.
- Update – Modifies an existing protocol/IP filter.
- Cancel – Discard changes to an existing protocol/IP filter.
Firewall rules
Access > Firewall Rule
You may want specify inbound or outbound access control to allow/deny sources (or Internet IP addresses) to your network from the Internet or from computers or devices on your network to the Internet. Firewall rules may allow for more granular control of specific inbound and outbound access between your network and the Internet. It is recommended that these settings remain set to default unless you are knowledgeable about the effects of changing the firewall rule configuration. It is possible to have undesirable functionality from your router if these settings are improperly modified.
- Log into your router management page (see "Access your router management page" on page 25).
- Click on Access, click on Filter, and click on Firewall Rule.
- In the list, there are two default rules specific which cannot be modified. One rule to deny all access from the Internet to your network for security and the other to allow all access from your network to the Internet. Any additional rules will take precedence over the default rules.
| Action | Name | Source | Destination | Protocol | |
| ☑ | Deny | Default | WAN,* | LAN,* | **,* |
| ☑ | Allow | Default | LAN,* | WAN,* | **,* |
TRENDnet User's Guide
TEW-711BR
4. Review the firewall rule settings.
- Enabled – Selecting Enabled turns on the firewall ruler and selecting Disabled turns it off.
- Name – Enter a name for the firewall rule.
- Action – Select Allow will allow access and selecting Deny will block or deny access.
-
Source – Configure the source information for the firewall rule.
-
Interface - Click the drop-down list and select LAN (from your network) or WAN (from the Internet) depending on where the traffic will be coming from.
- IP Range Start – Changes the starting address for the firewall rule to apply (e.g. 192.168.1.20)
- IP Range End – Changes the last address for the firewall rule to apply (e.g. 192.168.1.30)
Note: The IP Range Start and End specify the range of IP addresses that the firewall rule will apply. Both fields need to be completed so use the same value to specify a single IP address.
- Destination – Configure the destination information for the firewall rule.
- Interface - Click the drop-down list and select LAN (your network) or WAN (Internet) depending on where the traffic will be coming from.
- IP Range Start – Changes the starting address for the firewall rule to apply (e.g. 192.168.10.20)
- IP Range End – Changes the last address for the firewall rule to apply (e.g. 192.168.10.30)
Note: The IP Range Start and End specify the range of IP addresses that the firewall rule will apply. Both fields need to be completed so use the same value to specify a single IP address.
- Protocol – Select the protocol type to filter. TCP, UDP, ICMP, or you can select * to choose all protocol types. Below, enter the port number or range of port numbers to apply the firewall rule. (e.g. 80-80 or 20-21). For all ports, use the port range 1 - 65534.
| Enable | Enabled Disabled | |||
| Name | ||||
| Action | Allow Deny | |||
| Interface | IP Range Start | IP Range End | Protocol | |
| Source | LAN | |||
| Destination | WAN | TCP | ||
| - | ||||
- Add – Saves new firewall rule.
- Update – Modifies an existing firewall rule.
- Delete – Removes an existing firewall rule.
- New -Saves new firewall rule.
- Cancel – Discard changes to an existing firewall rule.

- Priority Up – Moves an existing firewall rule one step higher in priority.
- Priority Down – Moves an existing firewall rule one step below in priority.
- Update Priority – Save updated changes to priority.
Note: Top position in the list is the highest priority, bottom position in the list is the lowest priority.
| Action | Name | Source | Destination | Protocol | |
| ☑ | Allow | trendnet1_rule | LAN. 192.168.10.101 | WAN.* | *,1 - 65534 |
| ☑ | Deny | Default | WAN.* | LAN.* | *,* |
| ☑ | Allow | Default | LAN.* | WAN.* | *,* |
To modify an existing firewall rule, click on the rule in the firewall rules list. When selected, the entry will be highlighted.
| √ | Allow | trendnet1_rule | LAN: 192.168.10.101 | WAN: * | *,1 - 65534 |
TRENDnet User's Guide
TEW-711BR
Advanced Router Setup
Access your router management page
Note: Your router management page URL/domain name http://tew-711br or IP address http://192.168.10.1 is accessed through the use of your Internet web browser (e.g. Internet Explorer*, Firefox*, Chrome™, Safari*, Opera™) and will be referenced frequently in this User's Guide.
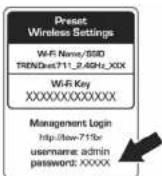
- Open your web browser and go to URL/domain name http://tew-711br or IP address http://192.168.10.1. Your router will prompt you for a user name and password.

- For added security, the router is preconfigured with a unique password. You can find the Password on a sticker on the side of the router and on the label on the bottom of the router. Enter your Username and Password, select your preferred language, then click Login.
User Name: admin
Password: (xxxxxxxx)
Note: User Name and Password are case sensitive.

Change your router login password
Main > Password
-
Log into your router management page (see "Access your router management page" on page 25).
-
Click on Main, and click on Password.
-
Under the Administrator section, in the New Password field, enter the new password, and in the Confirm Password field, retype the new password again to confirm.
-
To save changes, click Apply.

Note: If you change the router login password, you will need to access the router management page using the User Name "admin" and the new password instead of the default password "admin".
User (Optional): The User account is an additional account used for viewing the settings on the router management page only. Accessing the router management page using the User account will restrict access to viewing only and will not allow any settings to be changed.
Default User Name: user Default Password: user
Set your router date and time
Main > Time
- Log into your router management page (see "Access your router management page" on page 25).
- Click on Main, and click on Time.
- Next to Time Zone, click the drop-down list to select your Time Zone.
-
Next to Synchronize the clock with, you can choose one of the following options:
-
Manual – Set your router date and time manually in the Set Time section. To save changes, click Apply.
Note: Time is specified in 24-hour format. OR - Automatic – Set your router date and time to synchronize with an NTP (Network Time Protocol) server address (e.g. pool.ntp.org). Enter the NTP server address next to Default NTP server, (e.g. pool.ntp.org). Next to Daylight Saving, set the annual range when daylight saving is activated. To save changes, click Apply.
Note: NTP servers are used for computers and other network devices to synchronize time across an entire network.
- You can verify the time/date settings next to Local Time at the top of the page. Local Time displays the current date and time set on your router.

Manually configure your Internet connection
Main > WAN
- Log into your router management page (see "Access your router management page" on page 25).
- Click on Main, and click on WAN.
- In the Connection Type drop-down list, click the type of Internet connection provided by your Internet Service Provider (ISP).
- Complete the fields required by your ISP.
-
Complete the optional settings only if required by your ISP.
-
To save changes, click Apply.

Note: If you are unsure which Internet connection type you are using, please contact your ISP. Note: If your ISP requires a host name to be specified, you can specify it under Main > LAN & DHCP Server, in the Host Name field. To save changes, click Apply at bottom of the page.
TRENDnet User's Guide
TEW-711BR
IPv6 Internet Connection Settings
Main > IPv6
IPv6 (Internet Protocol Version 6) is a new protocol that significantly increases the number of available Internet public IP addresses due to the 128-bit IP address structure versus IPv4 32-bit address structure. In addition, there are several integrated enhancements compared to the most commonly used and well known IPv4 (Internet Protocol Version 4) such as:
• Integrated IPsec – Better Security
- Integrated Quality of Service (QoS) – Lower latency for real-time applications
- Higher Efficiency of Routing – Less transmission overhead and smaller routing tables
• Easier configuration of addressing
Note: In order to use IPv6 Internet connection settings, it is required that your ISP provide you with the IPv6 service. Please contact your ISP for availability and more information about the IPv6 service.
- Log into your router management page (see "Access your router management page" on page 25).
- Click on Main and click on IPv6.
- Review the IPv6 Internet Connection settings and enter information settings specified by your ISP. Then click Apply to save the changes.

Select the IPv6 connection type provided by your ISP.
- Static IPv6
• Auto-configuration (SLAAC/DHCPv6) - PPPoE
- 6to4
- Link-Local Only
Clone a MAC address
Main > WAN
On any home network, each network device has a unique MAC (Media Access Control) address. Some ISPs register the MAC address of the device (usually a router or a computer) connected directly to the modem. If your computer MAC address is already registered with your ISP and to prevent the re-provisioning and registration process of a new MAC address with your ISP, then you can clone the address (assign the registered MAC address of your previous device to your new router). If you want to use the MAC address from the previous device (computer or old router that directly connected to the modem, you should first determine the MAC address of the device or computer and manually enter it into your router using the clone MAC address feature.
Note: For many ISPs that provide dynamic IP addresses automatically, typically, the stored MAC address in the modem is reset each time you restart the modem. If you are installing this router for the first time, turn your modem before connecting the router to your modem. To clear your modem stored MAC address, typically the procedure is to disconnect power from the modem for approximately one minute, then reconnect the power. For more details on this procedure, refer to your modem's User Guide/Manual or contact your ISP.
-
Log into your router management page (see "Access your router management page" on page 25).
-
Click on Main, and click on WAN.
-
Under your Internet connection settings, find the MAC Address section shown below.

- Click either Clone MAC Address to clone the MAC address of the computer you are currently using or manually enter the 12-digit MAC address of your old router.
- To save changes, click Apply.

TRENDnet User's Guide
TEW-711BR
Change your router IP address
Main > LAN & DHCP Server
In most cases, you do not need to change your router IP address settings. Typically, the router IP address settings only needs to be changed, if you plan to use another router in your network with the same IP address settings, if you are connecting your router to an existing network that is already using the IP address settings your router is using, or if you are experiencing problems establishing VPN connections to your office network through your router.
Note: If you are not encountering any issues or are not faced with one of the cases described above or similar, it is recommended to keep your router IP address settings as default.
Default Router IP Address: 192.168.10.1
Default Router Network: 192.168.10.0 / 255.255.255.0
- Log into your router management page (see "Access your router management page" on page 25).
- Click on Main, and click on LAN & DHCP Server.
- Enter the router IP address settings.
| IP Address | 192.168.10.1 |
| Subnet Mask | 255.255.255.0 |
- IP Address – Enter the new router IP address. (e.g. 192.168.200.1)
- Subnet Mask – Enter the new router subnet mask. (e.g. 255.255.255.0)
Note: The DHCP address range will change automatically to your new router IP address settings so you do not have to change the DHCP address range manually to match your new router IP address settings.
- To save changes, click Apply.
Note: You will need to access your router management page using your new router IP address to access the router management page. (e.g. Instead of using the default http://192.168.10.1 using your new router IP address will use the following format using your new router IP address http://(new.router.ipaddress.here) to access your router management page.
Set up the DHCP server on your router
Main > LAN & DHCP Server
Your router can be used as a DHCP (Dynamic Host Configuration Protocol) server to automatically assign an IP address to each computer or device on your network. The DHCP server is enabled by default on your router. If you already have a DHCP server on your network, or if you do not want to use your router as a DHCP server, you can disable this setting. It is recommended to leave this setting enabled.
- Log into your router management page (see "Access your router management page" on page 25).
- Click on Main, and click on LAN & DHCP Server.
-
Review the DHCP Server settings.
-
DHCP Server – Enable or Disable the DHCP server.
- Start IP – Changes the starting address for the DHCP server range. (e.g. 192.168.10.20)
- End IP – Changes the last address for the DHCP server range. (e.g. 192.168.10.30)
Note: The Start IP and End IP specify the range of IP addresses to automatically assign to computers or devices on your network.
TRENDnet User's Guide
TEW-711BR
- Domain Name (Optional) – Specifies a domain name to assign to computers or devices. (e.g. trendnet.com)
- Lease Time – Click the drop-down list to select the lease time.
Note: The DHCP lease time is the amount of time a computer or device can keep an IP address assigned by the DHCP server. When the lease time expires, the computer or device will renew the IP address lease with the DHCP server, otherwise, if there is no attempt to renew the lease, the DHCP server will reallocate the IP address to be assigned to another computer or device.
- To save changes, click Apply.
| DHCP Server | EnabledDisabled |
| Start IP | 192.168.10.101 |
| End IP | 192.168.10.199 |
| Domain Name | |
| Lease Time | 1 Week▼ |
Dynamic DHCP List – You can view the list of active lease entries for computers or devices that have been assigned IP addresses automatically from the DHCP server on your router.
| Dynamic DHCP List | ||
| Host Name | IP Address | MAC Address |
| 192.168.10.101 | 48:5B:39:2C:FB:36 | |
Set up DHCP reservation
Main > LAN & DHCP Server
DHCP (Dynamic Host Configuration Protocol) reservation (also called Static DHCP) allows your router to assign a fixed IP address from the DHCP server IP address range to a specific device on your network. Assigning a fixed IP address can allow you to easily keep track of the IP addresses used on your network by your computers or devices for future reference or configuration such as virtual server (also called port forwarding, see "Virtual Server" on page 33) or special applications (also called port triggering, see "Special Applications" on page 35).
- Log into your router management page (see "Access your router management page" on page 25).
- Click on Main, and click on LAN & DHCP Server.
-
Review the DHCP reservation settings.
-
Static DHCP—Enable or Disable the DHCP reservation feature.
- Name – Enter a name for the reservation.
- IP Address – Enter the IP address to assign to the reservation. (e.g. 192.168.10.101)
Note: You cannot assign IP addresses outside of the DHCP range. The IP address is required to be within the DHCP IP address range (Start IP & End IP).
- MAC Address – Enter the MAC (Media Access Control) address of the computer or network device to assign to the reservation. (e.g. 00:11:22:AA:BB:CC)
- Add - Saves the reservation.

TRENDnet User's Guide
TEW-711BR
Static DHCP List – You can view the list of reservations for computers or devices that have been created in this list.
| Static DHCP List | ||
| Host Name | IP Address | MAC Address |
| trendnet1 | 192.168.10.101 | 48:5B:39:2C:FB:36 |
To modify an existing reservation, click on the entry in the Static DHCP list. When selected, the entry will be highlighted.
| trendnet1 | 192.168.10.101 | 48:5B:39:2C:FB:36 |
- Update – Saves changes to an existing reservation.
- Delete – Removes an existing reservation.
- Cancel – Discards changes to existing reservation.
Enable/disable UPnP on your router
Management > Remote Management
UPnP (Universal Plug and Play) allows devices connected to a network to discover each other and automatically open the connections or services for specific applications (e.g. instant messenger, online gaming applications, etc.) UPnP is enabled on your router by default to allow specific applications required by your computers or devices to allow connections through your router as they are needed.
- Log into your router management page (see "Access your router management page" on page 25).
- Click on Management, and click on Remote Management.
- Next to UPnP, click Enabled or Disabled to turn the feature on or off on your router.
Note: It is recommended to leave this setting enabled, otherwise, you may encounter issues with applications that utilize UPnP in order allow the required communication between your computers or devices and the Internet.
- To save changes, click Apply.
UPnP Enabled Disabled
Allow/deny VPN connections through your router
Management > Remote Management
A Virtual Private Network (VPN) is a network that uses a public network, such as the Internet, to provide secure communications between a remote computer or network and another network. Some offices often provide VPN access to their networks to enable employees to work from their remote office/home office, or while traveling.
If your office or place of work has allowed and authorized access for you to access their network through VPN, the default VPN settings in your router have been configured to pass through the most common types of VPN protocols, which typically do not require any additional configuration changes.
- Log into your router management page (see "Access your router management page" on page 25).
- Click on Management, and click on Remote Management.
- Next to PPTP, L2TP, or IPsec (depending the VPN protocol your corporation requires) click Enabled or Disabled to turn the VPN pass through feature on or off on your router.
Note: It is recommended to leave these settings enabled.
- To save changes, click Apply.
| PPTP | Enabled | Disabled |
| L2TP | Enabled | Disabled |
| IPSec | Enabled | Disabled |
TRENDnet User's Guide
TEW-711BR
Allow/deny multicast streaming
Management > Remote Management
In some cases, applications require multicast communication (also called IP multicast which is the delivery of information to a specific group of computers or devices in a single transmission) typically used in media streaming applications. Multicast streaming is enabled by default on your router to allow applications that require multicast communication through your router which typically does not require additional configuration changes.
-
Log into your router management page (see "Access your router management page" on page 25).
-
Click on Management, and click on Remote Management.
-
Next to Multicast Stream, click Enabled or Disabled to turn the feature on or off on your router.
Note: It is recommended to leave this setting enabled.
- To save changes, click Apply.
Multicast Stream

Enabled

Disabled
Identify your network on the Internet
Main > Dynamic DNS
Since most ISPs constantly change your home IP address, providing access to devices on your home or small office Local Area Network (such as IP Cameras) from the Internet requires setting up a Dynamic DNS service and entering the parameters into this management area. Dynamic DNS services allow your router to confirm its location to the given Dynamic DNS service, thereby providing the Dynamic DNS service with the ability to provide a virtual fixed IP address for your network. This means that even though your ISP is always changing your IP address, the Dynamic DNS service will be able to identify your network using a fixed address—one that can be used to view home IP Camera and other devices on your local area network.
Note: First, you will need to sign up for one of the DDNS service providers listed in the Server Address drop-down list.
-
Sign up for one of the DDNS available service providers list under Server Address. (e.g. dyndns.com, no-ip.com, etc.)
-
Log into your router management page (see "Access your router management page" on page 25).
-
Click on Main and click on Dynamic DNS.
-
Next to DDNS, click Enabled.
-
In the Server Address drop-down list, select the provider you selected, and enter your information in the fields.
-
Host Name: Personal URL provided to you by your Dynamic DNS service provider (e.g. www.trendnet.dyndns.biz)
- User Name: The user name needed to log in to your Dynamic DNS service account
-
Password: This is the password to gain access to Dynamic DNS service (NOT your router or wireless network password) for which you have signed up to.
-
To save changes, click Apply.

Allow remote access to your router management page
Management > Remote Management
You may want to make changes to your router from a remote location such at your office or another location while away from your home.
- Log into your router management page (see "Access your router management page" on page 25).
- Click on Management, and click on Remote Management.
- Under the HTTP section, click Enabled.
- Port—It is recommended to leave this setting as 8080.
Note: If you have configured port 8080 for another configuration section such as virtual server or special application, please change the port to use. (Recommended port range 1024-65534)
- Remote IP Range – It is recommended to leave this setting as *, to allow remote access from anywhere on the Internet.
Note: You can enter a specific range of Internet IP addresses that are allowed to access your router management page, all others will be denied.

- To save changes, click Apply.
Open a device on your network to the Internet
This router can provide access to devices on your local area network to the Internet using the Virtual Server, Special Application, method (DMZ NOT recommended).
DMZ
Access > DMZ
You may want to expose a specific computer or device on your network to the Internet to allow anyone to access it. Your router includes the DMZ (Demilitarized Zone) feature that makes all the ports and services available on the WAN/Internet side of the router and forwards them to a single IP address (computer or network device) on your network. The DMZ feature is an easy way of allowing access from the Internet however, it is a very insecure technology and will open local area network to greater threats from Internet attacks. It is strongly recommended to use Virtual Server (also called port forwarding, see "Virtual Server" on page 33) to allow access to your computers or network devices from the Internet.
- Make the computer or network device (for which you are establishing a DMZ link) has a static IP address (or you can use the DHCP reservation feature to ensure the device has a fixed IP address) (see "Set up DHCP reservation" on page 29).
A. Signing up for a Dynamic DNS service (outlined in the DDNS section) will provide identification of the router's network from the Internet. - Log into your router management page (see "Access your router management page" on page 25).
- Click on Access, and click on DMZ.
- Next to DMZ Enable, click Enabled
- Next to DMZ Host IP, enter the IP address you assigned to the computer or network device to expose to the Internet.
- To save changes, click Apply.

TRENDnet User's Guide
TEW-711BR
Virtual Server
Access > Virtual Server
Virtual Server (also called port forwarding) allows you to define specific ports (used or required by a specific application) and forward them to a single IP address (a computer or device) on your network. Using this feature is more secure compared to using DMZ (see DMZ on page 32) in which DMZ forwards all ports instead of only specific ports used by an application. An example would be forwarding a port to an IP camera (TRENDnet IP cameras default to HTTP TCP port 80 for remote access web requests) on your network to be able to view it over the Internet.
Since most ISPs constantly change your home IP address, to be able to access the Virtual Server port(s) from the Internet it is recommended to setup Dynamic DNS service (See DynDNS section).
-
Log into your router management page (see "Access your router management page" on page 25).
-
Click on Access, and click on Virtual Server.
| Name | Protocol | LAN Server | |
| Virtual Server FTP | TCP 21/21 | 0.0.0.0 | |
| Virtual Server HTTP | TCP 80/80 | 0.0.0.0 | |
| Virtual Server HTTPS | TCP 443/443 | 0.0.0.0 | |
| Virtual Server DNS | UDP 53/53 | 0.0.0.0 | |
| Virtual Server SMTP | TCP 25/25 | 0.0.0.0 | |
| Virtual Server POP3 | TCP 110/110 | 0.0.0.0 | |
| Virtual Server Telnet | TCP 23/23 | 0.0.0.0 | |
| PPTP | TCP 1723/1723 | 0.0.0.0 | |
| NetMeeting | TCP 1720/1720 | 0.0.0.0 |
To simplify configuration, there is a list of commonly used pre-defined virtual server entries to modify, otherwise, you can choose to manually add a new virtual server.

-
Review the virtual server settings.
-
Enabled – Selecting Enabled turns on the virtual server and selecting Disabled turns off the virtual server.
- Name – Enter a name for the virtual server.
- Protocol – Select the protocol required for your device. TCP, UDP, or you can select Both to choose both TCP & UDP (recommended).
Note: Please refer to the device documentation to determine which ports and protocols are required.
- Private Port – Enter the port number required by your device. Refer to the connecting device's documentation for reference to the network port(s) required.
- Public Port – Enter the port number used to access the device from the Internet.
Note: The Public Port can be assigned a different port number than the Private Port (also known as port redirection), however it is recommended to use the same port number for both settings. Please refer to the device documentation to determine which ports and protocols are required.
- LAN Server – Enter the IP address of the device to forward the port (e.g. 192.168.10.101).
Note: You should assign a static IP address to the device or use DHCP reservation to ensure the IP address of the device does not change.
- Add – Saves a new virtual server entry.
TRENDnet User's Guide
TEW-711BR
- Delete – Removes an existing virtual server.
- Update – Modifies an existing virtual server.
- Cancel – Discard changes to an existing virtual server.

Example: To forward TCP port 80 to your IP camera
- Setup DynDNS service (See DynDNS section).
-
Access TRENDnet IP Camera management page and forward Port 80 (see product documentation)
-
Make sure to configure your network/IP camera to use a static IP address or you can use the DHCP reservation feature (see "Set up DHCP reservation" on page 29).
Note: You may need to reference your camera documentation on configuring a static IP address. - Log into your router management page (see "Access your router management page" on page 25).
- Click on Access, and click on Virtual Server.
- In the list below, click the pre-defined virtual server entry named Virtual Server HTTP.

Note: The selected item will be highlighted in yellow when selected.
- The fields will be populated with the selected pre-defined virtual server entry.

- Click Enabled to turn on this virtual server.
- Next to Name, you can enter another name for the virtual server, otherwise, leave the default name.
- Next to Protocol, make sure TCP is selected in the drop-down list.
- The Private Port and Public Port, make sure port number 80 is configured for both settings.
- Next to LAN Server, enter the IP address assigned to the camera. (e.g. 192.168.10.101)
- To save the changes, click Update.

TRENDnet User's Guide
TEW-711BR
Special Applications
Access > Special AP
Special applications (also called port triggering) is typically used for online gaming applications or communication applications that require a range of ports or several ports to be dynamically opened on request to a device on your network. The router will wait for a request on a specific port or range of ports (or trigger port/port range) from a device on your network and once a request is detected by your router, the router will forward a single port or multiple ports (or incoming port/port range) to the device on your network. This feature is not typically used as most devices and routers currently use UPnP (Universal Plug and Play) to automatically configure your router to allow access for applications. See "Enable/disable UPnP on your router" on page 30.
Note: Please refer to the device documentation to determine if your device supports UPnP first, before configuring this feature.
-
Log into your router management page (see "Access your router management page" on page 25).
-
Click on Access, and click on Special AP.
| Name | Trigger Port Range | Incoming Port | |
| Battle.net | Any 6112-6112 | Any 6112 | |
| Dialpad | Any 7175-7175 | Any 51200-51201,51210 | |
| ICU II | Any 2019-2019 | Any 2000-2038,2025-2051,2069,2085,3010-3030 | |
| PC-to-Phone | Any 12053-12053 | Any 12120,12122,24150-24220 | |
| Quick Time 4 | Any 554-554 | Any 6970-6999 |
To simplify configuration, there is a list of commonly used pre-defined special application entries to modify, otherwise, you can choose to manually add a new special application.
| Enabled | Enabled Disabled |
| Name | |
| Trigger | Protocol TCP Port Range - |
| Incoming | Protocol TCP Port |
-
Review the special application settings.
-
Enabled – Selecting Enabled turns on the special application and selecting Disabled turns it off.
- Name – Enter a name for the special application.
- Trigger – Port or port range requested by the device.
- Protocol – Select the protocol requested by the device. TCP, UDP, or you can select Both to choose both TCP and UDP.
- Port Range – Enter the ports or port range requested by the device. (e.g. 554-554 or 6112-6112).
Note: Please refer to the device documentation to determine which ports and protocols are required.
- Incoming – Port(s) forwarded to the device.
- Protocol – Select the protocol to be forwarded to the device. TCP, UDP, or you can select Both to choose both TCP and UDP.
- Port Range – Enter the ports or port range to be forwarded to the device.
(e.g. 2000-2038,2069,2081,2200-2210).
Note: Please refer to the device documentation to determine which ports and protocols are required.
TRENDnet User's Guide
TEW-711BR
- Add – Saves a new special application.

To modify an existing application, click on the entry in the special applications list. When selected, the entry will be highlighted.

- Delete – Removes an existing special application.
- Update – Modifies an existing special application.
- Cancel – Discard changes to an existing special application.
Add static routes to your router
Routing > Static
You may want set up your router to route computers or devices on your network to other local networks through other routers. Generally, different networks can be determined by the IP addressing assigned to those networks. Generally speaking and for the case of an example, your network may have 192.168.10.x IP addressing and another network may have 192.168.20.x IP addressing and because the IP addressing of these two networks are different, they are separate networks. In order to communicate between the two separate networks, static routing needs to be configured. Below is an example diagram where routing is needed for devices and computers on your network to access the other network.
Note: Configuring this feature assumes that you have some general networking knowledge.
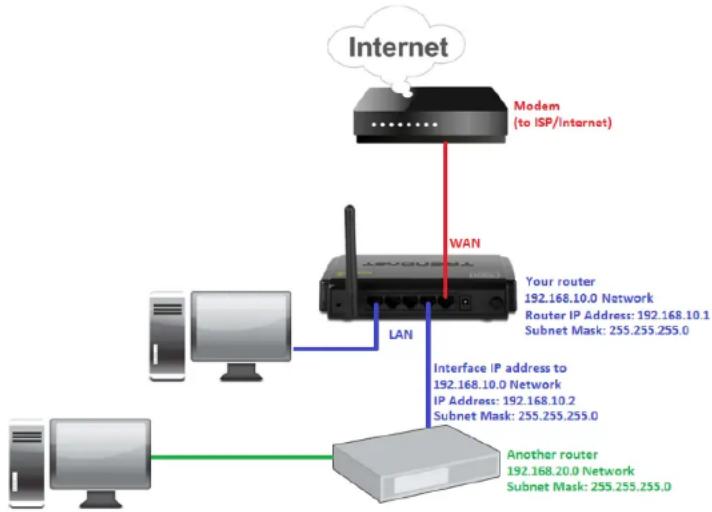
flowchart
graph TD
    A["Internet"] --> B["Modem (to ISP/internet)"]
    B --> C["WAN"]
    C --> D["LAN"]
    D --> E["Other Devices"]
    E --> F["Another router"]
    style A fill:#f9f,stroke:#333
    style B fill:#ccf,stroke:#333
    style C fill:#cfc,stroke:#333
    style D fill:#fcc,stroke:#333
    style E fill:#cff,stroke:#333
    style F fill:#ffc,stroke:#333
TRENDnet User's Guide
TEW-711BR
- Log into your router management page (see "Access your router management page" on page 25).
- Click on Routing, and click on Static.
-
Review the static route settings.
-
Network Address – Enter the IP network address of the destination network for the route. (e.g. 192.168.20.0)
- Network Mask – Enter the subnet mask of the destination network for the route. (e.g. 255.255.255.0)
- Gateway Address – Enter the gateway to the destination network for the route. (e.g. 192.168.10.2)
- Interface – Click the drop-down list and select the Interface on your router where the route is active. (e.g. LAN)
- Metric – Enter the metric or priority of the route. The metric range is 1-15, the lowest number 1 being the highest priority. (e.g. 1)
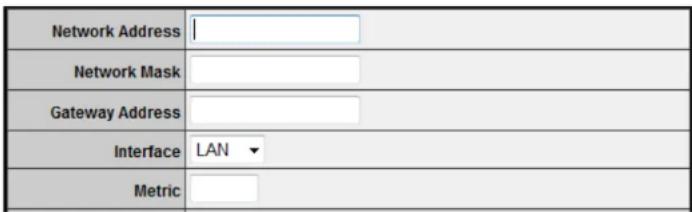
- Add – Saves the static route.

To modify an existing reservation, click on the entry in the static route list. When selected, the entry will be highlighted.
| 192.168.20.0 | 255.255.255.0 | 192.168.10.2 | LAN | 1 |
- Update – Saves changes to an existing static route.
- Delete – Removes an existing static route.
- Cancel – Discards changes to existing static route.
Enable dynamic routing on your router
Routing > Dynamic
You may want to setup your router to route computers or devices on your network to other local networks through other routers. If other routers support dynamic routing such as RIP (Routing Information Protocol), you can enable this feature on your router to automatically learn the required routes to reach those networks. It is required that the same dynamic routing protocol and version is also enabled on the other routers in order your router and the other routers to exchange information about the network.
Note: Configuring this feature assumes that you have some general networking knowledge.
-
Log into your router management page (see "Access your router management page" on page 25).
-
Click on Routing, and click on Dynamic.
-
Select the appropriate dynamic routing protocol and version communicate with other routers.
- Transmit – Allows your router to send out network information to other routers so other routers can dynamically build routes to your network.
- Disabled – Disable sending routing information from your router to other routers.
- RIP 1 - Sends out routing information to other routers using the RIP version 1 protocol.
- RIP 2 – Sends out routing information to other routers using the RIP version 2 protocol (recommended if supported by both devices).
- Receive - Allows your router to receive network information from other router so your router can build routes to other networks.
- Disabled – Disable receiving routing information from other routers to your router.
- RIP 1 - Receive routing information from other routers using the RIP version 1 protocol.
- RIP 2 – Receive routing information from other routers using the RIP version 2 protocol.
| Transmit | Disabled RIP 1 RIP 2 |
| Receive | Disabled RIP 1 RIP 2 |
- Click Apply to save the changes or click Cancel to discard the changes.

Router Maintenance & Monitoring
Reset your router to factory defaults
Tools > Settings
You may want to reset your router to factory defaults if you are encountering difficulties with your router and have attempted all other troubleshooting. Before you reset your router to defaults, if possible, you should backup your router configuration first, see "Backup and restore your router configuration settings" on page 40.
There are two methods that can be used to reset your router to factory defaults.
- Reset Button – Located on the rear panel of your router, see "Product Hardware Features" on page 2. Use this method if you are encountering difficulties with accessing your router management page.
OR
- Router Management Page
- Log into your router management page (see "Access your router management page" on page 25).
- Click on Tools and click on Settings.
- Under Restore factory default settings, click Restore. When prompted to confirm this action, click OK.
Restore factory default settings
Restore
Restore
Router Default Settings
| Administrator User Name admin | |
| Administrator Password Please refer to sticker or device label | |
| Router Default URL | http://tew-711br |
| Router IP Address 192.168.10.1 | |
| Router Subnet Mask 255.255.255.0 | |
| DHCP Server IP Range | 192.168.10.101-192.168.199 |
| Wireless Enabled | |
| Wireless Network Name/Security Key | Please refer to sticker or device label |
TRENDnet User's Guide
TEW-711BR
Backup and restore your router configuration settings
Tools > Settings
You may have added many customized settings to your router and in the case that you need to reset your router to default, all your customized settings would be lost and would require you to manually reconfigure all of your router settings instead of simply restoring from a backed up router configuration file.
To backup your router configuration:
- Log into your router management page (see "Access your router management page" on page 25).
- Click on Tools and click on Settings.
- Under Save Configuration Settings and next to Save Settings, click Save.

- Depending on your web browser settings, you may be prompted to save a file (specify the location) or the file may be downloaded automatically to the web browser settings default download folder. (Default Filename: cfg.bin)
To restore your router configuration:
- Log into your router management page (see "Access your router management page" on page 25).
-
Click on Tools and click on Settings.
-
Under Restore Configuration Settings, next to Load Settings, depending on your web browser, click on Browse or Choose File.


A separate file navigation window should open.
- Select the router configuration file to restore and click Load. (Default Filename: cfg.bin). If prompted, click Yes or OK.
- Wait for the router to restore settings.
TRENDnet User's Guide
TEW-711BR
Upgrade your router firmware
Tools > Firmware
TRENDnet may periodically release firmware upgrades that may add features or fix problems associated with your TRENDnet router model and version. To check if there is a firmware upgrade available for your device, please check your TRENDnet model and version using the link. http://www.trendnet.com/downloads/
In addition, it is also important to verify if the latest firmware version is newer than the one your router is currently running. To identify the firmware that is currently loaded on your router, log in to the router, click on the Status tab and then on the Device Information sub-tab. The firmware used by the router is listed at the top of this page. If there is a newer version available, also review the release notes to check if there were any new features you may want or if any problems were fixed that you may have been experiencing.
-
If a firmware upgrade is available, download the firmware to your computer.
-
Unzip the file to a folder on your computer.
Please note the following:
- Do not interrupt the firmware upgrade process. Do not turn off the device or press the Reset button during the upgrade.
- If you are upgrade the firmware using a laptop computer, ensure that the laptop is connected to a power source or ensure that the battery is fully charged.
- Disable sleep mode on your computer as this may interrupt the firmware upgrade process.
- Do not upgrade the firmware using a wireless connection, only using a wired network connection.
-
Any interruptions during the firmware upgrade process may permanently damage your router.
-
Log into your router management page (see "Access your router management page" on page 25).
- Click on Status and click on Device Information to check your router's current firmware version at the top of the page.
Firmware Version:
- Click on Tools and click on Firmware.
- Depending on your web browser, next to Upgrade Firmware, click Browse or Choose File.


- Navigate to the folder on your computer where the unzipped firmware file (.bin) is located and select it.
- Click Upgrade. If prompted, click Yes or OK.

TRENDnet User's Guide
TEW-711BR
Restart your router
Tools > Restart
You may want to restart your router if you are encountering difficulties with your router and have attempted all other troubleshooting.
There are two methods that can be used to restart your router.
- Turn the router off for 10 seconds using the router On/Off switch located on the rear panel of your router, see "Product Hardware Features" on page 2.
Use this method if you are encountering difficulties with accessing your router management page. This is also known as a hard reboot or power cycle.
OR -
Router Management Page – This is also known as a soft reboot or restart.
-
Log into your router management page (see "Access your router management page" on page 25).
- Click on Tools and click on Restart. If prompted, click Yes or OK.

Check connectivity using the router management page
Tools > Ping Test
For troubleshooting purposes, you may want to check your router connectivity using the ping (also known as a network connectivity test) test tool on your router management page.
- Log into your router management page (see "Access your router management page" on page 25).
- Click on Tools and click on Ping Test.
- Enter in the IP address (e.g. 192.168.10.101) or host name (e.g. www.trendnet.com) to test.
- Click Ping.

- You will receive a success or fail result message of the address you entered providing a basic indicating of the router's connectivity to the Internet or devices that are connected to your network. Click Back to bring you back to the Ping Test page.

TRENDnet User's Guide
TEW-711BR
Check the router system information
Status > Device Information
You may want to check the system information of your router such as WAN (Internet) connectivity, wireless and wired network settings, router MAC address, and firmware version.
- Log into your router management page (see "Access your router management page" on page 25).
- Click on Status and click on Device Information.
-
Review the device information.
-
Firmware Version – The current firmware version your router is running.
- Router Up Time – The duration your router has been running continuously without a restart/power cycle (hard or soft reboot) or reset.
Firmware Version:
Router up time :
WAN (Internet) Information
- MAC Address – The current MAC address used by your router's WAN port or interface configuration.
- Connection – Displays the current WAN (Internet) connection status. When using DHCP Client (or Dynamic IP address) Internet connection type, you will provide the option to Release and Renew your IP address settings.
Renew Release
Other Internet connection types such as PPPoE will provide the option to
Connect and Disconnect. Connect Disconnect
- IP Address – The current IP address assigned to your router WAN port or interface configuration.
- Subnet Mask - The current subnet mask assigned to your router WAN port or interface configuration.
- Default Gateway – The current gateway assigned to your router WAN port or interface configuration.
- DNS (Domain Name System) – The current DNS address(es) assigned to your router port or interface configuration.
| WAN | |
| MAC Address | |
| Connection | |
| IP Address | |
| Subnet Mask | |
| Default Gateway | |
| DNS | |
Wireless Information
- MAC Address – The current MAC address of your router's wireless or interface configuration.
- Connection – Displays the status if your wireless functionality on your router is enabled or disabled.
- SSID – Displays the current wireless network name assigned to your router.
- Channel – Displays the current wireless channel your router is operating.
- Authentication – Displays the current wireless security configured on your router.
| Wireless | |
| MAC Address | |
| Connection | |
| SSID | |
| Channel | |
| Authentication | |
TRENDnet User's Guide
TEW-711BR
Wired LAN Information
- MAC Address – The current MAC address of your router's wired LAN or interface configuration.
- IP Address - Displays your router's current IP address.
- Subnet Mask – Displays your router's current subnet mask.
- DHCP Server - Display your router's DHCP server status, enabled or disabled, and provides a link to the DHCP client listing. DHCP Table
| LAN | |
| MAC Address | |
| IP Address | |
| Subnet Mask | |
| DHCP Server | |
View your router log
Status > Log
Your router log can be used to obtain activity information on the functionality of your router or for troubleshooting purposes.
- Log into your router management page (see "Access your router management page" on page 25).
- Click on Status and click on Log.
-
Review the device log information.
-
Time – Displays the time of the log entry. If the time is inaccurate, make sure to set the router date and time correctly. (See "Set your router date and time" on page 26)
- Type – Displays a notification regarding the type of log.
- Message – Displays the log message.
| Time | Type | Message |
| Sep 1 01:38:57 | user.warn | kernel: wlan0: A STA is expired - 00:14:D1:90:5E:A7 |
| Sep 1 01:38:53 | user.warn | kernel: wlan0: A wireless client is associated - 7C:ED:8D:2E:9F:B3 |
| Sep 1 01:38:53 | user.warn | kernel: wlan0: A wireless client is associated - 7C:ED:8D:2E:9F:B3 |
Router Log Navigation
- First Page – Displays the first page of the log.
- Last Page – Displays the last page of the log.
- Previous Page – Display the log page previous to the current. The Page: 1/1 will display the current page.
- Next Page – Displays the log page next to the current.
• Clear Log - Clears all logging - Refresh - The Page: 1/1 will display the current page.

TRENDnet User's Guide
TEW-711BR
Configure your router log
Status > Log Setting
You may want send your router log to your e-mail address or to an external log server (also known as Syslog server) so you can check it periodically while away from home. You may also want to only see specific categories of logging.
Send router logs to your e-mail address
- Log into your router management page (see "Access your router management page" on page 25).
- Click on Status and click on Log Setting.
-
Review the e-mail log settings.
-
SMTP Authentication – Set this option to Enabled if your e-mail service requires authentication. If not, leave this setting to Disabled.
Note: If you are unsure of this setting check with your e-mail service provider if authentication is required. - SMTP Account – Enter your account user name for your e-mail service.
- SMTP Password – Enter your password for your e-mail service.
- SMTP Server – Enter the IP address (e.g. 10.10.10.10) or domain name (e.g. mail.trendnet.com) of your e-mail server.
- SMTP Server Port – Enter the port used by your e-mail service. (e.g. Default SMTP Server Port: 25)
- From Email Address – Enter a sender e-mail address. (e.g. router@trendnet.com)
Note: This does not need to be real e-mail address, only used for identification purposes when checking your e-mail.
• To Email Address – Enter your e-mail address.
- Email Log Now – Click this option to send an e-mail with the current router log using your email settings.
-
Email Logs – Select when you want the router log to be e-mailed.
-
When log is full – The router log will be e-mailed to your e-mail address when router internal log is full.
- Click the drop-down list and configure to e-mail logs according to a set schedule. Once on a specific day of the week or once every day.

- To save changes, click Apply.

Send router logs to an external log server
- Log into your router management page (see "Access your router management page" on page 25).
TRENDnet User's Guide
TEW-711BR
- Click on Status and click on Log Setting.
- Next to Syslog Server, enter the IP address of the external log server to send router logging.

- To save changes, click Apply.

Set the types or categories to include in logging
- Log into your router management page (see "Access your router management page" on page 25).
- Click on Status and click on Log Setting.
- Next to Log Type, check the types or categories to include in logging.
| Log Type | ✓ System Activity ✓ Debug Information ✓ Attacks ✓ Dropped Packets ✓ Notice |
- To save changes, click Apply.

View your router packet statistics
Status > Statistics
You may want to check your router packet statistics for informational purposes only.
- Log into your router management page (see "Access your router management page" on page 25).
- Click on Status and click on Statistic.
- The table displays the amount of packets sent and received on your router's wired LAN, wireless, and WAN (Internet).
| Utilization (packets) | LAN | Wireless | WAN | |
| Send | Peak | 60175 | 8661 | 18701 |
| Receive | Peak | 49091 | 272459 | 13773 |
View wireless devices connected to your router
Status > Wireless
You may want to check the wireless devices connected to your router.
- Log into your router management page (see "Access your router management page" on page 25).
- Click on Status and click on Wireless.
- The table displays the amount time each wireless device has been connected and the MAC address of each wireless device.
| Connected Time | MAC Address |
| 01:06:31 | 7c:ed:8d:2e:9f:b3 |
Router Management Page Structure
Main
• LAN & DHCP Server
o Static DHCP Reservation
• WAN
○ Clone MAC Address
- Password
- Time
- Dynamic DNS
• IPv6
Wireless
- Basic
- Security
- Advanced
• Wi-Fi Protected Setup
Status
• Device Information
- Log
- Log Setting
-
Email Log
o Syslog
○ Log Type -
Statistic
- Wireless
Routing
- Static
• Dynamic - Routing Table
Access
- Filter
o MAC Filters
○ Domain/URL Blocking
- Protocol/IP Filters
- Virtual Server
- Special AP
• DMZ - Firewall Rule
Management
- Remote Management
Routing
- Static
- Dynamic
- Routing Table
Tools
- Restart
-
Settings
-
Save Configuration Settings
○ Restore Configuration Settings
o Reset to Factory Default -
Firmware
- Upgrade Firmware
- Ping Test
Wizard
- Setup Wizard
TRENDnet User's Guide
TEW-711BR
Technical Specifications
Standards
- IEEE 802.3
- IEEE 802.3x
- IEEE 802.3u
- IEEE 802.3az
- IEEE 802.11b
- IEEE 802.11g
- Based on IEEE 802.11n technology
Hardware Interface
• 4 x 10/100 Mbps LAN ports
• 1 x 10/100 Mbps WAN port
• WPS button (Press and hold for 3 seconds to activate)
- Reset button (Press and hold for 10 seconds to reset to factory)
• LED indicators (Power, Status, WAN, WLAN, LAN 1-4)
Access Control
• Wireless encryption: WEP, WPA/WPA2-PSK, WPA/WPA2-RADIUS
- Firewall: NAT, SPI, Virtual Server, Special Applications, DMZ Host, PPTP/L2TP/IPsec VPN Passthrough, Multicast Passthrough, allow/deny ping request from internet
• Parental (Access) Controls: MAC, URL, IP Filter
Quality of Service
• WMM
Internet Connection Types
• Dynamic IP (DHCP)
- Static IP (Fixed)
- PPPoE (Dynamic IP/Static IP)
• PPTP (Dynamic IP/Static IP)
• L2TP(Dynamic IP/Static IP)
• Russia PPPoE (Dynamic IP/Static IP)
• Russia PPTP (Dynamic IP/Static IP)
• Russia L2TP (Dynamic IP/Static IP)
• IPv6 (Static, Auto-configuration (SLAAC/DHCPv6), Link-Local, PPPoE, 6to4)
Management/Monitoring
• Local/remote web based management
- Upgrade firmware
- Backup/restore configuration
- Logging – internal/syslog/email
- Reboot
- Restore to factory defaults
- Ping test
Routing
- Static
• Dynamic (RIP v1/2)
Special Features
• Dynamic DNS support for dyn.com, no-ip.com, and easydns.com
• Multi-Language interface: English, Spanish, German, Russian
Frequency
• 2.412 - 2.484 GHz
Modulation
• 802.11b: CCK (11 Mbps & 5.5 Mbps), DQPSK (2 Mbps), DBPSK (1 Mbps)
• 802.11g: OFDM with BPSK, QPSK and 16/64-QAM
• 802.11n: BPSK, QPSK, 16-QAM, 64-QAM with OFDM
Media Access Protocol
• CSMA/CA with ACK
Antenna Gain
• 1 x 2 dBi external dipole
TRENDnet User's Guide
TEW-711BR
Wireless Output Power/Receiving Sensitivity
- 802.11b: FCC: 16 dBm (max.), ETSI: 15 dBm (max.)/-86 dBm (typical) @ 11 Mbps
- 802.11g: FCC: 14 dBm (max.), ETSI: 14 dBm (max.)/-74 dBm (typical) @ 54 Mbps
- 802.11n: FCC: 14 dBm (max.), ETSI: 14 dBm (max.)/-67 dBm (typical) @ 150 Mbps
Wireless Channels
• FCC: 1-11
• ETSI: 1-13
Power
• Input: 100 – 240 V AC, 50 - 60 Hz, 0.19 A
• Output: 5 V DC, 1 A external power adapter
• Consumption: 2.8 Watts (max.)
Temperature
• Operating: 0 – 40 °C (32 – 104 °F)
• Storage: -10 - 70 °C (-14 - 158 °F)
Operating Humidity
• Max. 95% non-condensing
Certifications
• CE
• FCC
Dimensions
• 158 x 109 x 34 mm (6.2 x 4.3 x 1.3 in)
Weight
• 187 g (6.6 oz.)
*Maximum wireless signal rates are referenced from IEEE 802.11 theoretical specifications. Actual data throughput and coverage will vary depending on interference, network traffic, building materials and other conditions.
Troubleshooting
Q: I typed http://192.168.10.1 in my Internet Browser Address Bar, but an error message says "The page cannot be displayed." How can I access the router management page?
Answer:
- Check your hardware settings again. See "Router Installation" on page 2.
- Make sure the LAN and WLAN lights are lit.
- Make sure your network adapter TCP/IP settings are set to Obtain an IP address automatically or DHCP (see the steps below).
- Make sure your computer is connected to one of the router's LAN ports
- Press on the factory reset button for 15 seconds, the release.
Windows ® 7/8/8.1
a. Go into the Control Panel, click Network and Sharing Center.
b. Click Change Adapter Settings, right-click the Local Area Connection icon.
c. Then click Properties and click Internet Protocol Version 4 (TCP/IPv4).
d. Then click Obtain an IP address automatically and click OK.
Windows® Vista
a. Go into the Control Panel, click Network and Internet.
b. Click Manage Network Connections, right-click the Local Area Connection icon and click Properties.
c. Click Internet Protocol Version (TCP/IPv4) and then click Properties.
d. Then click Obtain an IP address automatically and click OK.
Windows® XP/2000
a. Go into the Control Panel, double-click the Network Connections icon
b. Right-click the Local Area Connection icon and the click Properties.
c. Click Internet Protocol (TCP/IP) and click Properties.
d. Then click Obtain an IP address automatically and click OK.
Note: If you are experiencing difficulties, please contact your computer or operating system manufacturer for assistance.
Q: I am not sure what type of Internet Account Type I have for my Cable/DSL connection. How do I find out?
Answer:
Contact your Internet Service Provider (ISP) for the correct information.
Q: The Wizard does not appear when I access the router. What should I do? Answer:
- Click on Wizard on the left hand side.
- Near the top of the browser, "Pop-up blocked" message may appear. Right click on the message and select Always Allow Pop-ups from This Site.
- Disable your browser's pop up blocker.
Q: I went through the Wizard, but I cannot get onto the Internet. What should I do? Answer:
- Verify that you can get onto the Internet with a direct connection into your modem (meaning plug your computer directly to the modem and verify that your single computer (without the help of the router) can access the Internet).
- Power cycle your modem and router. Unplug the power to the modem and router. Wait 30 seconds, and then reconnect the power to the modem. Wait for the modem to fully boot up, and then reconnect the power to the router.
- Contact your ISP and verify all the information that you have in regards to your Internet connection settings is correct.
Q: I cannot connect wirelessly to the router. What should I do? Answer:
- Double check that the WLAN light on the router is lit.
- Power cycle the router. Unplug the power to the router. Wait 15 seconds, then plug the power back in to the router.
- Contact the manufacturer of your wireless network adapter and make sure the wireless network adapter is configured with the proper SSID. The preset SSID is TRENDnet(model_number).
- To verify whether or not wireless is enabled, login to the router management page, click on Wireless.
- Please see "Steps to improve wireless connectivity" on page 19 if you continue to have wireless connectivity problems.
TRENDnet User's Guide
TEW-711BR
Appendix
How to find your IP address?
Note: Please note that although the following procedures provided to follow for your operating system on configuring your network settings can be used as general guidelines, however, it is strongly recommended that you consult your computer or operating system manufacturer directly for assistance on the proper procedure for configuring network settings.
Command Prompt Method
Windows® 2000/XP/Vista/7/8/8.1
- On your keyboard, press Windows Logo+R keys simultaneously to bring up the Run dialog box.
- In the dialog box, type cmd to bring up the command prompt.
- In the command prompt, type ipconfig /all to display your IP address settings.
MAC OS ® X
- Navigate to your Applications folder and open Utilities.
- Double-click on Terminal to launch the command prompt.
- In the command prompt, type ipconfig getifaddr
to display the wired or wireless IP address settings.
Note: en0 is typically the wired Ethernet and en1 is typically the wireless Airport interface.
Graphical Method
MAC OS ® 10.5-10.9
- From the Apple menu, select System Preferences.
- In System Preferences, from the View menu, select Network.
- In the Network preference window, click a network port (e.g., Ethernet, AirPort, modem). If you are connected, you'll see your IP address settings under "Status:"
MAC OS ® 10.4
-
From the Apple menu, select Location, and then Network Preferences.
-
In the Network Preference window, next to "Show:", select Network Status. You'll see your network status and your IP address settings displayed.
Note: If you are experiencing difficulties, please contact your computer or operating system manufacturer for assistance.
How to configure your network settings to obtain an IP address automatically or use DHCP?
Note: Please note that although the following procedures provided to follow for your operating system on configuring your network settings can be used as general guidelines, however, it is strongly recommended that you consult your computer or operating system manufacturer directly for assistance on the proper procedure for configuring network settings.
Windows ® 7/8/8.1
a. Go into the Control Panel, click Network and Sharing Center.
b. Click Change Adapter Settings, right-click the Local Area Connection icon.
c. Then click Properties and click Internet Protocol Version 4 (TCP/IPv4).
d. Then click Obtain an IP address automatically and click OK.
Windows® Vista
a. Go into the Control Panel, click Network and Internet.
b. Click Manage Network Connections, right-click the Local Area Connection icon and click Properties.
c. Click Internet Protocol Version (TCP/IPv4) and then click Properties.
d. Then click Obtain an IP address automatically and click OK.
Windows® XP/2000
a. Go into the Control Panel, double-click the Network Connections icon
b. Right-click the Local Area Connection icon and the click Properties.
c. Click Internet Protocol (TCP/IP) and click Properties.
d. Then click Obtain an IP address automatically and click OK.
MAC OS ® 10.4-10.9
a. From the Apple, drop-down list, select System Preferences.
b. Click the Network icon.
c. From the Location drop-down list, select Automatic.
d. Select and view your Ethernet connection.
In MAC OS 10.4, from the Show drop-down list, select Built-in Ethernet and select the TCP/IP tab.
In MAC OS 10.5-10.9, in the left column, select Ethernet.
e. Configure TCP/IP to use DHCP.
In MAC 10.4, from the Configure IPv4, drop-down list, select Using DHCP and click the Apply Now button.
TRENDnet User's Guide
TEW-711BR
In MAC 10.5 & 10.6, from the Configure drop-down list, select Using DHCP and click the Apply button.
In MAC 10.7-10.9, from the Configure IPv4 drop-down list, select Using DHCP and click the Apply button.
f. Restart your computer.
Note: If you are experiencing difficulties, please contact your computer or operating system manufacturer for assistance.
How to find your MAC address?
In Windows ® 2000/XP/Vista/7/8/8.1,
Your computer MAC addresses are also displayed in this window, however, you can type getmac -v to display the MAC addresses only.
In MAC OS ® 10.7-10.9,
-
Apple Menu > System Preferences > Network
-
Select Ethernet from the list on the left.
-
Click the Advanced button.
-
On the Hardware tab, the MAC Address is your wired MAC Address.
In MAC OS ® 10.5/10.6,
-
Apple Menu > System Preferences > Network
-
Select Ethernet from the list on the left.
-
Click the Advanced button.
-
On the Ethernet tab, the Ethernet ID is your MAC Address.
In MAC OS® 10.4,
-
Apple Menu > System Preferences > Network
-
From the Show menu, select Built-in Ethernet.
-
On the Ethernet tab, the Ethernet ID is your MAC Address.
How to connect to a wireless network using the built-in Windows utility?
Note: Please note that although the following procedures provided to follow for your operating system on configuring your network settings can be used as general guidelines, however, it is strongly recommended that you consult your computer or operating system manufacturer directly for assistance on the proper procedure for connecting to a wireless network using the built-in utility.
Windows ® 7/8/8.1
- Open Connect to a Network by clicking the network icon (or 📄) in the notification area.
- In the list of available wireless networks, click the wireless network you would like to connect to, then click Connect.
- You may be prompted to enter a security key in order to connect to the network.
- Enter in the security key corresponding to the wireless network, and click OK.
Windows® Vista
- Open Connect to a Network by clicking the Start Button. 📋 and then click Connect To.
- In the Show list, click Wireless.
- In the list of available wireless networks, click the wireless network you would like to connect to, then click Connect.
- You may be prompted to enter a security key in order to connect to the network.
- Enter in the security key corresponding to the wireless network, and click OK.
Windows® XP
- Right-click the network icon in the notification area, then click View Available Wireless Networks.
- In Connect to a Network, under Available Networks, click the wireless network you would like to connect to.
- You may be prompted to enter a security key in order to connect to the network.
- Enter in the security key corresponding to the wireless network, and click Connect.
Federal Communication Commission Interference Statement
This equipment has been tested and found to comply with the limits for a Class B digital device, pursuant to Part 15 of the FCC Rules. These limits are designed to provide reasonable protection against harmful interference in a residential installation. This equipment generates, uses and can radiate radio frequency energy and, if not installed and used in accordance with the instructions, may cause harmful interference to radio communications. However, there is no guarantee that interference will not occur in a particular installation. If this equipment does cause harmful interference to radio or television reception, which can be determined by turning the equipment off and on, the user is encouraged to try to correct the interference by one of the following measures:
• Reorient or relocate the receiving antenna.
- Increase the separation between the equipment and receiver.
- Connect the equipment into an outlet on a circuit different from that to which the receiver is connected.
- Consult the dealer or an experienced radio/TV technician for help.
FCC Caution: Any changes or modifications not expressly approved by the party responsible for compliance could void the user's authority to operate this equipment.
This device complies with Part 15 of the FCC Rules. Operation is subject to the following two conditions: (1) This device may not cause harmful interference, and (2) this device must accept any interference received, including interference that may cause undesired operation.
IMPORTANT NOTE:
FCC Radiation Exposure Statement:
This equipment complies with FCC radiation exposure limits set forth for an uncontrolled environment. This equipment should be installed and operated with minimum distance 20cm between the radiator & your body.
This transmitter must not be co-located or operating in conjunction with any other antenna or transmitter.
The availability of some specific channels and/or operational frequency bands are country dependent and are firmware programmed at the factory to match the intended destination. The firmware setting is not accessible by the end user.

RoHS
This product is RoHS compliant.

Europe – EU Declaration of Conformity
This product is herewith confirmed to comply with the Directive of 1999/5/EC, 2006/95/EC, and 2009/125/EC.
EC No. 278/2009
EN60950-1: 2006 + A11: 2009 + A1: 2010 + A12: 2011
Safety of Information Technology Equipment

EN 50385: 2002
Product standard to demonstrate the compliance of radio base stations and fixed terminal stations for wireless telecommunication systems with the basic restrictions or the reference levels related to human exposure to radio frequency electromagnetic fields (110MHz - 40 GHz) - General public
EN 300 328 V1.8.1 (2012-06)
Electromagnetic compatibility and Radio spectrum Matters (ERM); Wideband transmission systems; Data transmission equipment operating in the 2,4 GHz ISM band and using wide band modulation techniques; Harmonized EN covering essential requirements under article 3.2 of the R&TTE Directive
EN 301 489-1 V1.9.1 (2011-09)
Electromagnetic compatibility and Radio Spectrum Matters (ERM); ElectroMagnetic Compatibility (EMC) standard for radio equipment and services; Part 1: Common technical requirements
EN 301 489-17 V2.2.1 (2012-09)
Electromagnetic compatibility and Radio spectrum Matters (ERM); ElectroMagnetic Compatibility (EMC) standard for radio equipment and services; Part 17: Specific conditions for 2,4 GHz wideband transmission systems and 5 GHz high performance RLAN equipment
This device is a 2.4 GHz wideband transmission system (transceiver), intended for use in all EU member states and EFTA countries, except in France and Italy where restrictive use applies. In Italy the end-user should apply for a license at the national spectrum authorities in order to obtain authorization to use the device for setting up outdoor radio links and/or for supplying public access to telecommunications and/or network services. This device may not be used for setting up outdoor radio links in France and in some areas the RF output power may be limited to 10 mW EIRP in the frequency range of 2454 – 2483.5 MHz. For detailed information the end-user should contact the national spectrum authority in France.
TRENDnet User's Guide
TEW-711BR
| csČesky [Czech] | TRENDnet tímto prohlăšuje, že tento TEW-711BR je ve shodě se základními požadavky a dalšími příslušnými ustanoveními směrnice 1999/5/ES, 2006/95/ES, a 2009/125/ES. |
| daDansk [Danish] | Undertegnede TRENDnet erklærer herved, at følgende udstyr TEW-711BR overholder de væsentlige krav og øvrige relevante krav i direktiv 1999/5/EF, 2006/95/EF, og 2009/125/EF. |
| deDeutsch [German] | Hiermit erklärt TRENDnet, dass sich das Gerät TEW-711BR in Übereinstimmung mit den grundlegenden Anforderungen und den übrigen einschlägigen Bestimmungen der Richtlinie 1999/5/EG, 2006/95/EG und 2009/125/EG befindet. |
| etEesti [Estonian] | Käesolevaga kinnitab TRENDnet seadme TEW-711BR vastavust direktilvi 1999/5/EÜ, 2006/95/EÜ ja 2009/125/EÜ põhinõuetele ja nimetatud direktiivist tulenevatele teistele asjakohastele sätetele. |
| enEnglish | Hereby, TRENDnet, declares that this TEW-711BR is in compliance with the essential requirements and other relevant provisions of Directive 1999/5/EC, 2006/95/EC, and 2009/125/EC. |
| esEspañol [Spanish] | Por medio de la presente TRENDnet declara que el TEW-711BR cumple con los requisitos esenciales y cualesquiera otras disposiciones aplicables o exigibles de la Directiva 1999/5/CE, 2006/95/CE, 2009/125/CE y. |
| elEλληνυκή [Greek] | ME THN ΠΑΡΟΥΣΑΤRENDnet ΔΗΛΩΝΕΙ ΟΤΙΤΕW-711BRΣΥΜΜΟΡΦΩΝΕΤΑΙ ΠΡΟΣ ΤΙΣ ΟΥΣΙΩΔΕΙΣ ΑΠΑΙΤΗΣΕΙΣ ΚΑΙ ΤΙΣ ΛΟΙΠΕΣ ΣΧΕΤΙΚΕΣ ΔΙΑΤΑΞΕΙΣ ΤΗΣ ΟΔΗΓΙΑΣ 1999/5/ΕΚ, 2006/95/ΕΚ, 2009/125/ΕΚ καλ. |
| frFrançais [French] | Par la présente TRENDnet déclare que l'appareil TEW-711BR est conforme aux exigences essentielles et aux autres dispositions pertinentes de la directive 1999/5/CE, 2006/95/CE, 2009/125/CE et. |
| itItaliano[Italian] | Con la presente TRENDnet dichiara che questo TEW-711BR è conforme ai requisiti essenziali ed alle altre disposizioni pertinenti stabilite dalla direttiva 1999/5/CE, 2006/95/CE e 2009/125/CE. |
| lvLatviski [Latvian] | AršoTRENDnetdeklarē, ka TEW-711BR atbilstDirektīvas 1999/5/ΕΚ, 2006/95/ΕΚ, un 2009/125/ΕΚ būtiskajāmprasībām un citiemar to saistitajiemnoteikumiem. |
| ltLietuvių [Lithuanian] | Šiuo TRENDnet deklaruoja, kad šis TEW-711BR atitinka esminius reikalavimus ir kitas 1999/5/EB, 2006/95/EB ir 2009/125/EB |
| Direktyvos nuostatas. | |
| NLNederlands [Dutch] | Hierbij verklaart TRENDnet dat het toestel TEW-711BR in overeenstemming is met de essentiële eisen en de andere relevante bepalingen van richtlijn 1999/5/EG, 2006/95/EG, en 2009/125/EG. |
| mtMalti [Maltese] | Hawnhekk, TRENDnet, jiddikjara li dan TEW-711BR jikkonforma mal-ħtligijiet essenzjali u ma provvedimenti oħrajn relevanti li hemm fid-Dirrettiva 1999/5/KE, 2006/95/KE, u 2009/125/KE. |
| huMagyar [Hungarian] | Alulírott, TRENDnet nyilatkozom, hogy a TEW-711BRmegfelel a vonatkozó alapvető követelményeknek és az 1999/5/EK irányelv, a 2006/95/EK és a 2009/125/EK irányelv egyéb előirásainak. |
| plPolski [Polish] | Niniejszym TRENDnet oświadcza, że TEW-711BR jest zgodny z zasadniczymi wymogami oraz pozostałymi stosownymi postanowleniami Dyrektywy 1999/5/WE, 2006/95/WE I 2009/125/WE. |
| ptPortuguês [Portuguese] | TRENDnet declara que este TEW-711BR está conforme com os requisitos essencials e outras disposições da Directiva 1999/5/CE, 2006/95/CE e 2009/125/CE. |
| slSlovensko [Slovenian] | TRENDnet izjavlja, da je ta TEW-711BR v skladu z bistvenimi zahtevami in ostalimi relevantnimi določili direktive 1999/5/ES, 2006/95/ES in 2009/125/ES. |
| ssSlovensky [Slovak] | TRENDnettýmtovyhlasuje, že TEW-711BRsplňazákladnépožiadavky a všetkypríslušnéustanoveniaSmernice 1999/5/ES, 2006/95/ES, a 2009/125/ES. |
| fiSuomi [Finnish] | TRENDnet vakuuttaa täten että TEW-711BR tyyppinen laite on direktiivin 1999/5/EY, 2006/95/EY ja 2009/125/EY oleellisten vaatimusten ja sită koskevien direktiivin muiden ehtojen mukainen. |
| svSvenska [Swedish] | Härmed intygar TRENDnet att denna TEW-711BR står I överensstämmelse med de väsentliga egenskapskrav och övriga relevanta bestämmelser som framgår av direktiv 1999/5/EG, 2006/95/EG och 2009/125/EG. |
Limited Warranty
TRENDnet warrants its products against defects in material and workmanship, under normal use and service, for the following lengths of time from the date of purchase.
TEW-711BR - 3 Years Warranty
AC/DC Power Adapter, Cooling Fan, and Power Supply carry 1 year warranty.
If a product does not operate as warranted during the applicable warranty period, TRENDnet shall reserve the right, at its expense, to repair or replace the defective product or part and deliver an equivalent product or part to the customer. The repair/replacement unit's warranty continues from the original date of purchase. All products that are replaced become the property of TRENDnet. Replacement products may be new or reconditioned. TRENDnet does not issue refunds or credit. Please contact the point-of-purchase for their return policies.
TRENDnet shall not be responsible for any software, firmware, information, or memory data of customer contained in, stored on, or integrated with any products returned to TRENDnet pursuant to any warranty.
There are no user serviceable parts inside the product. Do not remove or attempt to service the product by any unauthorized service center. This warranty is voided if (i) the product has been modified or repaired by any unauthorized service center, (ii) the product was subject to accident, abuse, or improper use (iii) the product was subject to conditions more severe than those specified in the manual.
Warranty service may be obtained by contacting TRENDnet within the applicable warranty period and providing a copy of the dated proof of the purchase. Upon proper submission of required documentation a Return Material Authorization (RMA) number will be issued. An RMA number is required in order to initiate warranty service support for all TRENDnet products. Products that are sent to TRENDnet for RMA service must have the RMA number marked on the outside of return packages and sent to TRENDnet prepaid, insured and packaged appropriately for safe shipment. Customers shipping from outside of the USA and Canada are responsible for return shipping fees. Customers shipping from outside of the USA are responsible for custom charges, including but not limited to, duty, tax, and other fees.
WARRANTIES EXCLUSIVE: IF THE TRENDNET PRODUCT DOES NOT OPERATE AS WARRANTED ABOVE, THE CUSTOMER'S SOLE REMEDY SHALL BE, AT TRENDNET'S OPTION, REPAIR OR REPLACE. THE FOREGOING WARRANTIES AND REMEDIES ARE EXCLUSIVE AND ARE IN LIEU OF ALL OTHER WARRANTIES, EXPRESSED OR IMPLIED, EITHER IN FACT OR BY OPERATION OF LAW, STATUTORY OR OTHERWISE, INCLUDING
WARRANTIES OF MERCHANTABILITY AND FITNESS FOR A PARTICULAR PURPOSE. TRENDNET NEITHER ASSUMES NOR AUTHORIZES ANY OTHER PERSON TO ASSUME FOR IT ANY OTHER LIABILITY IN CONNECTION WITH THE SALE, INSTALLATION MAINTENANCE OR USE OF TRENDNET'S PRODUCTS.
TRENDNET SHALL NOT BE LIABLE UNDER THIS WARRANTY IF ITS TESTING AND EXAMINATION DISCLOSE THAT THE ALLEGED DEFECT IN THE PRODUCT DOES NOT EXIST OR WAS CAUSED BY CUSTOMER'S OR ANY THIRD PERSON'S MISUSE, NEGLECT, IMPROPER INSTALLATION OR TESTING, UNAUTHORIZED ATTEMPTS TO REPAIR OR MODIFY, OR ANY OTHER CAUSE BEYOND THE RANGE OF THE INTENDED USE, OR BY ACCIDENT, FIRE, LIGHTNING, OR OTHER HAZARD.
LIMITATION OF LIABILITY: TO THE FULL EXTENT ALLOWED BY LAW TRENDNET ALSO EXCLUDES FOR ITSELF AND ITS SUPPLIERS ANY LIABILITY, WHETHER BASED IN CONTRACT OR TORT (INCLUDING NEGLIGENCE), FOR INCIDENTAL, CONSEQUENTIAL, INDIRECT, SPECIAL, OR PUNITIVE DAMAGES OF ANY KIND, OR FOR LOSS OF REVENUE OR PROFITS, LOSS OF BUSINESS, LOSS OF INFORMATION OR DATE, OR OTHER FINANCIAL LOSS ARISING OUT OF OR IN CONNECTION WITH THE SALE, INSTALLATION, MAINTENANCE, USE, PERFORMANCE, FAILURE, OR INTERRUPTION OF THE POSSIBILITY OF SUCH DAMAGES, AND LIMITS ITS LIABILITY TO REPAIR, REPLACEMENT, OR REFUND OF THE PURCHASE PRICE PAID, AT TRENDNET'S OPTION. THIS DISCLAIMER OF LIABILITY FOR DAMAGES WILL NOT BE AFFECTED IF ANY REMEDY PROVIDED HEREIN SHALL FAIL OF ITS ESSENTIAL PURPOSE.
Governing Law: This Limited Warranty shall be governed by the laws of the state of California.
Some TRENDnet products include software code written by third party developers. These codes are subject to the GNU General Public License ("GPL") or GNU Lesser General Public License ("LGPL").
Go to http://www.trendnet.com/gpl or http://www.trendnet.com Download section and look for the desired TRENDnet product to access to the GPL Code or LGPL Code. These codes are distributed WITHOUT WARRANTY and are subject to the copyrights of the developers. TRENDnet does not provide technical support for these codes. Please go to http://www.gnu.org/licenses/gpl.txt or http://www.gnu.org/licenses/lgpl.txt for specific terms of each license.
PWP05202009v2 2014/6/3
TRENDNET®
Product Warranty Registration
Please take a moment to register your product online. Go to TRENDnet's website at http://www.trendnet.com/register
TRENDnet
20675 Manhattan Place
Torrance, CA 90501. USA
Copyright ©2014. All Rights Reserved. TRENDnet.
- TRENDnet User's Guide
- Table of Contents
- Contents
- Product Overview ....1
- Basic Router Setup....5
- Wireless Networking and Security 10
- Access Control Filters 20
- Advanced Router Setup....25
- Router Maintenance & Monitoring 39
- Package Contents
- Features
- Ease of Use
- Easy Setup
- One Touch Connection
- Access Control
- Pre-Encrypted
- Parental Controls
- Performance
- N150 Wireless
- Ethernet Ports
- Energy Savings
- IPv6
- Product Hardware Features
- TEW-711BR
- Basic Router Setup
- Creating a Home Network
- How to set up a home network
- How to setup your router
- Where to find more help
- Router Installation
- Before you Install
- Obtain IP Address Automatically (DHCP)
- Fixed IP address
- PPPoE to obtain IP automatically
- PPPoE with a fixed IP address
- PPTP or Russian PPTP
- L2TP or Russia L2TP
- Russia PPPoE
- Hardware Installation
- Setup Wizard
- Connect additional wired devices to your network
- Wireless Networking and Security
- How to choose the type of security for your wireless network
- Wireless Encryption Types
- Secure your wireless network
- Selecting WEP:
- - WEP—Choose Open System or Shared Key.
- • Mode – Choose HEX or ASCII.
- - WEP Key – Choose the key length 64-bit or 128-bit.
- • Key 1-4
- Then from the PSK/EAP row, select either PSK or EAP
- Connect wireless devices to your router
- Connect wireless devices using WPS
- Recommended Hardware Push Button (PBC) Method
- PBC (Software/Virtual Push Button)
- PIN (Personal Identification Number)
- WPS PIN Security
- Basic wireless settings
- - Wireless
- - SSID Broadcast
- Steps to improve wireless connectivity
- Advanced wireless settings
- Access Control Filters
- Access control basics
- MAC address filters
- MAC Filters
- Domain/URL Filters
- Protocol/IP filters
- Firewall rules
- Review the firewall rule settings.
- Advanced Router Setup
- Access your router management page
- Change your router login password
- Set your router date and time
- Manually configure your Internet connection
- IPv6 Internet Connection Settings
- Clone a MAC address
- Change your router IP address
- Set up the DHCP server on your router
- Set up DHCP reservation
- Enable/disable UPnP on your router
- Allow/deny VPN connections through your router
- Allow/deny multicast streaming
- Identify your network on the Internet
- Allow remote access to your router management page
- Open a device on your network to the Internet
- DMZ
- Virtual Server
- Example: To forward TCP port 80 to your IP camera
- Special Applications
- Add static routes to your router
- Enable dynamic routing on your router
- Router Maintenance & Monitoring
- Reset your router to factory defaults
- Backup and restore your router configuration settings
- To backup your router configuration:
- To restore your router configuration:
- Upgrade your router firmware
- Please note the following:
- Firmware Version:
- Restart your router
- Check connectivity using the router management page
- Check the router system information
- WAN (Internet) Information
- Wireless Information
- Wired LAN Information
- View your router log
- Router Log Navigation
- Configure your router log
- Send router logs to your e-mail address
- Send router logs to an external log server
- Set the types or categories to include in logging
- View your router packet statistics
- View wireless devices connected to your router
- Router Management Page Structure
- Main
- Wireless
- Status
- Routing
- Access
- Management
- Tools
- Wizard
- Technical Specifications
- Standards
- Hardware Interface
- Quality of Service
- Internet Connection Types
- Management/Monitoring
- Special Features
- Frequency
- Modulation
- Media Access Protocol
- Antenna Gain
- Wireless Output Power/Receiving Sensitivity
- Wireless Channels
- Power
- Temperature
- Operating Humidity
- Certifications
- Dimensions
- Weight
- Troubleshooting
- Answer:
- Windows ® 7/8/8.1
- Windows® Vista
- Windows® XP/2000
- Appendix
- How to find your IP address?
- Command Prompt Method
- Windows® 2000/XP/Vista/7/8/8.1
- MAC OS ® X
- Graphical Method
- MAC OS ® 10.5-10.9
- MAC OS ® 10.4
- MAC OS ® 10.4-10.9
- Windows® XP
- Federal Communication Commission Interference Statement
- IMPORTANT NOTE:
- FCC Radiation Exposure Statement:
- RoHS
- Europe – EU Declaration of Conformity
- EC No. 278/2009
- EN 50385: 2002
- EN 300 328 V1.8.1 (2012-06)
- EN 301 489-1 V1.9.1 (2011-09)
- EN 301 489-17 V2.2.1 (2012-09)
- Limited Warranty
- TRENDNET®
- Product Warranty Registration
Brand : TRENDNET
Model : TEW-711BR
Category : Router