
KS 9310 - Refrigerator TECHWOOD - Free user manual and instructions
Find the device manual for free KS 9310 TECHWOOD in PDF.


| Product Type | Fridge-Freezer Combination (Single Compressor) |
| Brand | Techwood |
| Model | KS 9310 |
| Power Supply | 220-240V or 200-230V, 50 Hz |
| Refrigerant | R600a (isobutane), flammable |
| Climate Class | T (16-43°C), ST (16-38°C), N (16-32°C), SN (10-32°C) |
| Thermostat Control | Rotary knob, positions 1 to 5 |
| Super Freeze Function | Yes, via switch (activates orange lamp) |
| Low Ambient Switch | Yes, for ambient temperature below 18°C |
| Display Panel | Green (power on), Red (insufficient cooling), Orange (super freeze active) |
| Refrigerator Compartment Features | Adjustable shelves, crisper, meat tray, egg holder, bottle holder, aroma box |
| Freezer Compartment | Drawers, fast freezing shelf, ice tray compartment |
| Defrosting | Automatic in refrigerator compartment; manual in freezer compartment (use plastic scraper) |
| Interior Light | Max 15 W bulb, replaceable |
| Door Reversibility | Yes, instructions provided in manual |
| Levelling Feet | Two front adjustable levelling feet |
| Accessories Included | Ice tray, bottle holder, plastic scraper, wall spacers |
| Cleaning Method | Use bicarbonate of soda and lukewarm water; clean condenser annually |
| Safety Features | R600a warning, child lock removal for old units, ventilation requirements |
| Installation Clearances | At least 50 cm from heat sources, 15 cm top clearance, 2 cm from other fridges |
Frequently Asked Questions - KS 9310 TECHWOOD
User questions about KS 9310 TECHWOOD
0 question about this device. Answer the ones you know or ask your own.
Ask a new question about this device
Download the instructions for your Refrigerator in PDF format for free! Find your manual KS 9310 - TECHWOOD and take your electronic device back in hand. On this page are published all the documents necessary for the use of your device. KS 9310 by TECHWOOD.
USER MANUAL KS 9310 TECHWOOD
instruction booklet; 17-32
KOELKAST/VRIEZER/COMBINATIE
(MET ENKELE COMPRESSOR)
natural_image
Interior view of a white stainless steel refrigerator with open doors and internal compartments (no visible text or labels)Inhalt
BEVOR SIE DAS GERÄT BENUTZEN 2
natural_image
Illustration of three hands performing rope knotting techniques (no text or symbols)natural_image
Cartoon illustration of a distressed refrigerator with arms and legs, showing facial expressions (no text or symbols)
natural_image
Two diagrams showing a coiled tube with internal structures and directional arrows, no text or symbols present.
natural_image
Cartoon illustration of a smiling refrigerator with thumbs up and a bowl of food nearby (no text or symbols)natural_image
Technical line drawing of a mechanical component with a central cylindrical part and directional arrows indicating motion (no text or symbols)SUPER-FROST-SCHALTER
0:AUS.
I: EIN.
natural_image
Illustration showing three different hand positions: a keyboard, a scroll with curved arrows, and a hand holding a tool with a black X (no text or symbols)Flaschenhalter
natural_image
Simple line drawing of a bottle mounted on a base (no text or symbols)TEIL-3. EINLEGEN VON LEBENSMITTELN IN DAS GERÄT
Kühlteil
natural_image
Simple line drawing of a structural beam or support with a small circular hole at one end (no text or symbols)
natural_image
Diagram showing a hand holding a circular object with an arrow pointing to a textured surface, no text or symbols present.TEIL-5. TRANSPORT UND STANDORTWECHSEL
natural_image
Simple line drawing of two children playing a board game (no text or symbols)natural_image
Line drawing of a door frame with hand positioning and label Abb. 2 (no text or symbols on the diagram itself)natural_image
Line drawing of a hand using a tool to adjust or install a mechanical component (no text or symbols present)
natural_image
Line drawing of a hand using a screwdriver to adjust a small component (no text or symbols present)Abb. 4
Abb. 3
Safety Instructions 18
Recommendations....19
Installation and Switching On The Appliance 20
Before Switching On 20
THE VARIOUS FUNCTION AND POSSIBILITIES ......21
Thermostat Setting 21
Super freeze and low ambient switch 22
Display panel 23
Turning On The Appliance 23
Accessories 24
Ice tray 24
Bottle holder 24
ARRANGING FOOD IN THE APPLIANCE 25
Refrigerator Compartment 25
Freezer Compartment 25
CLEANING AND MAINTENANCE 26
Defrosting refrigerator compartment 26
Defrosting Freezer compartment 27
Replacing the Refrigerator Light Bulb 27
TRANSPORTATION AND CHANGING OF INSTALLATION POSITION ......28
Changing of Door Opening Direction 28
BEFORE CALLING YOUR AFTER SALES SERVICE ....31
THE PARTS OF THE APPLIANCE AND THE COMPARTMENTS ......32
PART 1. BEFORE USING THE APPLIANCE
Safety Instructions
- If the model contains R600a-see name plate under refrigerant (the coolant isobutane), naturals gas that, is very environmentally friendly but also combustible. When transporting and installing the unit care must be taken to ensure that none of the refrigeration circuit components become damaged. In the event of damage avoid naked flames or ignition sources and ventilate the room in which the unit is placed for a few minutes.
Warning: Keep ventilation openings in appliance enclosure or in structure for building in, clear of obstruction.
- Do not use mechanical devices or other artificial means to accelerate the defrosting process.
- Do not use electrical appliances in the refrigerator or freezer compartment of the appliance.
- If this appliance is to replace an old refrigerator with a lock; break or remove the lock as a safety measure before storing it, to protect children while playing might lock themselves inside.
- Old refrigerators and freezers contain insulation gases and refrigerant, which must be disposed of properly. Entrust the disposal of a scrap unit categorically to competence of your local waste disposal service and contact your local authority or your dealer if you have any questions. Please ensure that the pipe of work of your refrigerating unit does not get damaged prior to being picked-up by the relevant waste disposal service.
Important note:
Please read this booklet before installing and switching on this appliance. The manufacturer assumes no responsibility for incorrect installation and usage as described in this booklet.
Conformity Information
- Tropical Class is defined for the environment temperatures between 16°C and 43°C in accordance with the TS EN ISO 15502 Standards.
- The appliance is designed in compliance with the EN15502, IEC60335-1 / IEC60335-2-24, 2004/108/EC standards.
Recommendations
Warning: Do not use mechanical devices or other means to accelerate the defrosting process, other than those recommended by the manufacturer. Do not use electrical appliances inside the food storage compartments of the appliance, unless they are of the type recommended by the manufacturer. Keep ventilation openings, in the appliance enclosure or in the built-in structure, clear of obstruction. Do not damage the refrigerant circuit.
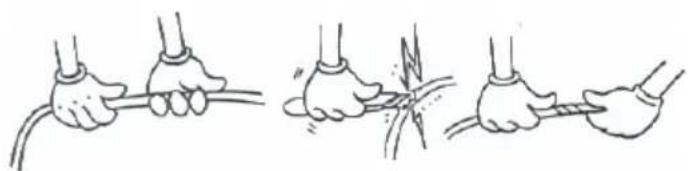
- Do not use adapters or shunts which could cause overheating or burning.
- Do not plug old, warped power supply cables.
- Do not twist and bend the cables.
natural_image
Illustration of three hands performing a rope knotting technique (no text or symbols present)- Do not allow children to play with the appliance. Children must NEVER sit on drawers/shelves or hang from the door.
- Do not use sharp metal objects for removing ice on the freezer compartment; they could puncture the refrigerator circuit and cause unrepairable damage to the unit. Use the plastic scraper provided.
- Do not plug the power supply with wet hands.
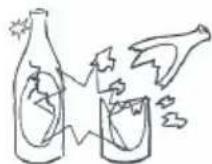
- Do not place containers (glass bottles or tin containers) of liquids into the freezer especially gassy liquids as they could cause the container to burst during freezing.
- Bottles that contain a high percentage of alcohol must be sealed well and placed vertically in the refrigerator.
- Do not touch the cooling surfaces, especially with wet hands as you could be burnt or hurt.
- Do not eat ice, which have just been removed from the freezer.
- If the supply cord is damaged it must be replaced by the manufacturer or service agent or appointed qualified person.
- The appliance is not intended for use by people (including children) with reduced physical, sensory or mental capabilities, or lack of experience and knowledge, unless they have been given supervision or instruction concerning use of the appliance by a person responsible for their safety. Children should be supervised to ensure that they don't play with the appliance.
- If the supply cord is damaged it must be replaced by the manufacturer or service agent or similar qualified people in order to avoid a hazard.


natural_image
Cartoon illustration of a person peeking out of a door, with arms and legs (no text or symbols)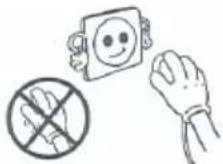

Installation and Switching On The Appliance
- This appliance is connecting to 220-240V or 200-230V and 50 Hz. Please check nameneplate of appliance and be sure voltage range suitable to your mains voltage.
- You can offer help from the service to install and switching on the appliance.
- Before making the connection to the power supply, ensure that the voltage on the name plate corresponds to the voltage of electrical system in your home.
- If the socket does not match the refrigerator plug, replace the plug with a suitable one (at least 16 A)
- Insert the plug into a socket with an efficient ground connection. If the socket has no ground contact or the plug does not match, we suggest you to call an authorised electrician for assistance.
- The plug should be accessible after the appliance is positioned.
- Manufacturer is not responsible for failure to complete the ground connection as described in this booklet.
- Do not place the appliance in direct sunlight.
- Do not use in open air and shall not be exposed to the rain.
- Place the refrigerator far from heat sources and in a well-ventilated position. The refrigerator should be at least 50 cm from radiators, gas or coal stoves and 5 cm far from electrical stoves.
- Keep the top free for at least 15 cm.
- Fit the plastic wall spacers to the condenser at the back of the refrigerator in order to prevent leaning to the wall for good performance.
- Do not place heavy and lots of things on the appliance.
- If the appliance is installed next to another refrigerator or freezer, observe a minimum distance of 2cm to prevent condensation.
- The appliance must be stand firmly and level on the floor Use the two front levelling-feet to compensate for an even floor.
- The outside of the appliance and the accessories inside should be cleaned with a solution of water and liquid soap; the inside of the appliance with sodium bicarbonate dissolved in lukewarm water. After drying replace all the accessories.

natural_image
Cartoon illustration of a refrigerator with a sad face, showing its exterior view and interior features (no text or symbols)Before Switching On
- Wait after 3 hours before plugging the appliance in to the main power to ensure proper performance.
- There can be an odour when you first switch on the appliance. It will disappear after the appliance starts to cool.

PART 2. THE VARIOUS FUNCTION AND POSSIBILITIES
Thermostat Setting
FREEZER & REFRIGERATOR THERMOSTAT

Freezer thermostat automatically regulates the inside temperature of the compartments. By rotating the knob from position 1 to 5, colder temperatures can be obtained.
Freezer & Refrigerator Thermostat Setting;
1 - 2 : For short-term storage of food in the freezer compartment, you can set the knob between minimum and medium position.
3 - 4 : For long-term storage of food in the freezer compartment, you can set knob medium position.
5 : For freezing the fresh food. The appliance will work longer. So after you get the cold condition you must position to previous position.
Your fridge is designed to operate in the ambient temperature intervals stated in the standards, according to the climate class stated in the information label. We do not recommend operating your fridge out of stated temperatures value limits in terms of cooling effectiveness.
| Climate Class | Ambient Temperature (°C) |
| T | Between 16 and 43 (°C) |
| ST | Between 16 and 38 (°C) |
| N | Between 16 and 32 (°C) |
| SN | Between 10 and 32 (°C) |
Super freeze and low ambient switch (In some models)

natural_image
Technical line drawing of a mechanical component with a central circular feature and directional arrow (no text or symbols)low ambient switch
0 : OFF Position.
I: ON Position.
a) Super freezing: If ambient temperature is more than 18° C, This switch can be used as superfreeze switch.
Super freeze switch should be used for freezing the fresh food or when the RED lamp on the head panel is ON. (RED lamp on the head panel becomes ON when there is insufficient cooling).
The appliance will work longer when you activate this switch. So after you get the cold condition (or the Red lamp on the head panel is off) you must return to previous position.
At the ambient temperature more than 18°C , if superfreezing function doesn't want to be used, it must always be set to OFF position.
b) Low ambient performance: If ambient temperature is less than 18° C, this switch can also be used as a low ambient switch for good low ambient performance.
In low ambient temperatures, this switch heats the fridge part to prevent extra cooling / freezing.
Display panel
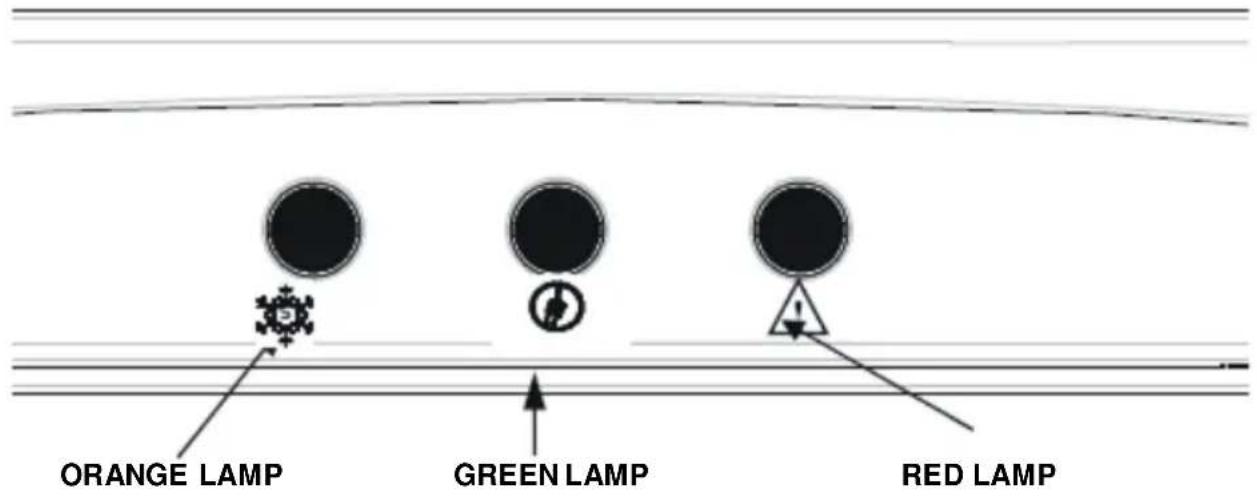
ORANGE LAMP: When the "Super Switch" operation is on (Super Switch is on-1 position), the orange lamp will turn on.
GREEN LAMP: When the appliance is connected to the power supply, the green lamp on the display panel will turn on automatically.
RED LAMP: When the freezer compartment is not cold enough, the red lamp will turn on. Set the super switch "1" position until the red lamp is off. After you get the cold condition you must position to "0" position.
Turning On The Appliance
Once the appliance has been connected to the power supply make sure that the GREEN lamp is on. Then turn the thermostat dial to position "5" (max position) and switch the super switch ON until the RED lamp is off (Note that; for best internal temperature the indicator in the thermostat should be positioned between 2 and 4.)
- When you first switch on the appliance, for starting a suitable cooling, the appliance should work with in 24 hours continuously until it cools down to sufficient temperature.
• In this time do not open the door so often and place a lot of food inside the appliance. - If the unit is switched off or unplugged, you must allow at least 5 minutes before restarting or re-plugged the unit in order not to damage the compressor.
Accessories
Ice tray
- Fill the ice tray with water and place in freezer compartment.
• After the water completely turned into ice, you can twist the tray as shown below to get the ice cube.

natural_image
Illustration showing three hand positions: a keyboard, a scroll with arrows indicating rotation, and a hand holding a pencil crossed out (no text or symbols)Bottle holder (Only some models)
- In order to prevent the bottles to slip or fall over you can use the bottle holder. You can also prevent making noise that will be done when you open or close the door.
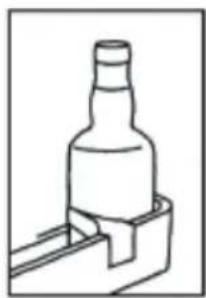
natural_image
Simple line drawing of a bottle mounted on a base (no text or symbols)PART 3. ARRANGING FOOD IN THE APPLIANCE
Refrigerator Compartment
- To reduce humidity and consequent increase of frost never place liquids in unsealed containers in the refrigerator. Frost tends to concentrate in the coldest parts of the evaporator and in time will require more frequent defrosting.
- Never place warm food in the refrigerator. Warm food should be allowed to cool at room temperature and should be arranged to ensure adequate air circulation in the refrigerator compartment.
- Nothing should touch to refrigerator back wall as it will cause frost and the packages can stick here. Do not open the refrigerator door too frequently.
- Arrange the meat and cleaned fish (wrapped in packages or sheets of plastic) which you will use in 1-2 days.
- You can put the fruits and vegetables into crisper without packing.
Freezer Compartment
- The use of freezer is, storing of deep-frozen or frozen food for long periods of time and making ice cubes.
- Do not put fresh and warm food to the freezer door shelves to be frozen. Only use for storage of frozen food.
- Do not put fresh and warm food with frozen food side by side as it can thaw the frozen food.
- While freezing fresh food (i.e. meat, fish and mincemeat) divide them in parts you will use in one time.
- For storing the frozen food; the instructions shown on frozen food packages should always be followed carefully and if no information is provided food should not be stored for more than 3 months from the purchased date.
- When buying frozen food ensure that these have been frozen at suitable temperatures and that the packing is intact.
- Frozen food should be transported in appropriate containers to maintain the quality of the food and should be returned to the freezing surfaces of the unit in the shortest possible time.
- If a package of frozen food shows the sign of humidity and abnormal swelling it is probable that it has been previously stored at an unsuitable temperature and that the contents have deteriorated.
- The storage life of frozen food depends on the room temperature, thermostat setting, how often the door is opened, the type of food and the length of time required to transport the product from the shop to your home. Always follow the instructions printed on the package and never exceed the maximum storage life indicated.
- Use the fast freezing shelf to freeze home cooking (and the food which is wanted to freeze) more quickly because of the freezing room's greater freezing power. Fast freezing shelves are the middle drawers of the freezer compartment (see in page 32)
PART 4. CLEANING AND MAINTENANCE
- Disconnect unit from the power supply before cleaning.
- Do not clean the appliance by pouring water.
- The refrigerator and freezer compartment should be cleaned periodically using a solution of bicarbonate of soda and lukewarm water
- Clean the accessories separately with soap and water. Do not clean them in the washing machine.
- Do not use abrasive products, detergents or soaps. After washing, rinse with clean water and dry carefully. When the cleaning operations have been completed reconnect the plug of the unit with dry hands.
- You should clean the condenser (back of the appliance) with broom ones a year in order to provide energy saving and increase the productivity.
THE POWER SUPPLY MUST BE DISCONNECTED.
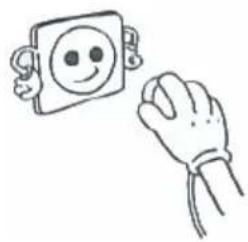
natural_image
Simple line drawing of a hand holding a smiling square electrical outlet with a smile (no text or symbols)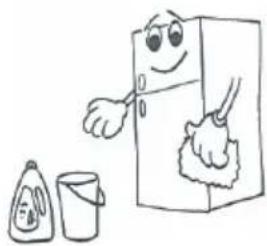
natural_image
Cartoon illustration of a refrigerator with a smiling face, accompanied by a cup and a bag (no text or symbols)
natural_image
Cartoon illustration of a refrigerator with a sad face and two smaller food containers nearby (no text or symbols)
natural_image
Illustration of a hand holding a tool inside a rack (no text or symbols visible)Defrosting refrigerator compartment
- Defrosting occurs fully automatically in refrigerator compartment during operation; the defrosted water collected by the evaporating tray and evaporates automatically.
- The evaporating tray and water drain hole (back of the refrigerator crisper shelf) should be cleaned periodically to prevent the water from collecting on the bottom of the refrigerator instead of flowing out.

natural_image
Simple line drawing of a structural beam or support with a small circular hole at one end (no text or symbols)
natural_image
Diagram showing a hand holding a circular object with an arrow pointing to a textured surface, no text or symbols present.Defrosting Freezer compartment
- The frost, which covers the shelves of the freezer compartment, should be removed periodically.
- Do not use sharp metal objects for this operation. They could puncture the refrigerator circuit and cause irreparable damage to the unit. Use the plastic scraper provided.
- When there is more than 5 mm of frost on the shelves, defrosting must be done.
- Before defrosting operation, place the frozen food in a cool place after wrapping them in sheets of newspaper in order to obtain its temperature steady for long time.
• To accelerate the defrosting process place one or more basins of warm water in the freezer compartment.

natural_image
Line drawing of a kitchen appliance interior showing a hand cleaning the base with a cloth (no text or symbols)- Dry the inside of the compartment with a sponge or a clean cloth.
- Once the unit has been defrosted, place the food into freezer and remember to consume them in a short period of time.
Replacing the Refrigerator Light Bulb
- Unplug the unit from the power supply,
- Remove the refrigerator light cover (A) by pressing the hooks placed both sides of the cover.
- Change the present light bulb (B) with a new one (not more than 15 W).
- Place the light cover in its place and plug the unit.

PART-5.
TRANSPORTATION AND CHANGING OF INSTALLATION POSITION
Transportation and Changing of Installation Position
- The original packages and foamed polystyrene (PS) can be concealed if required.
- In transportation the appliance should be tied with a wide stripe or a strong rope. The rules written on the corrugated box must be applied while transporting.
- Before transporting or changing old installation position, all the moving objects (i.e., shelves, crisper...) should be taken out or fixed with bands in order to prevent the shake.

natural_image
Simple line drawing of two children playing a board game (no text or symbols)Changing of Door Opening Direction
1- Unscrew the two screws which are fixing the middle hinge. (Fig-1) Also remove the two middle hinge screw caps (big) on the left side.

2- Remove the refrigerator and freezer door from cabinet by pulling towards to you together with the middle hinge. (Fig-2)

natural_image
Line drawing of a door with a hand adjusting the handle (no text or symbols)3- Lie down the appliance to the left side. Dismantle both stationary foot and unscrew the bottom hinge fixing screws and remove it. (Fig-3) Unscrew the bottom hinge pin and screw in the next hole.(Fig-4) Then screw the hinge to left side of the refrigerator. Screw the both stationary foot.

natural_image
Line drawing of a hand using a tool to adjust or install a mechanical component (no text or symbols visible)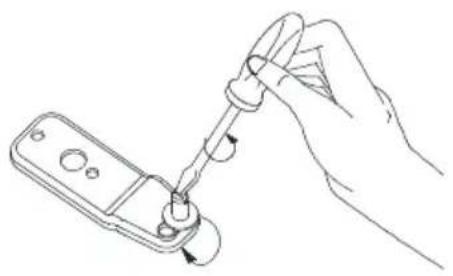
natural_image
Line drawing of a hand using a pipette to apply liquid into a small electronic device (no text or symbols present)Fig. 4
Fig. 3
4- Place the two middle hinge screw caps (big) as shown in the figure. (Fig-5)
(You can find the new caps in the user manual bag)

Fig. 5
5-Unscrew the pin of the top hinge.
(Fig-6/Detail-A) and screw it to the left hinge.
(Fig-6/Detail-B)
Detail. B
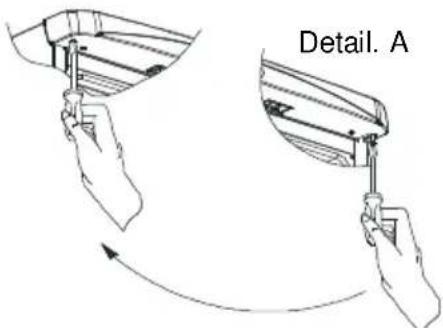
Fig. 6
6- Replace the top bushing and top bushing cap. (Fig-7) Remove the bottom bush reassemble it to the left hole. (Fig-7)

7- Replace the top bushing and top bushing cap. (Fig-8) (You can use the bushing cap that is put in the user manual bag)
Remove the bottom bush and reassemble it to the left side. (Fig-8)

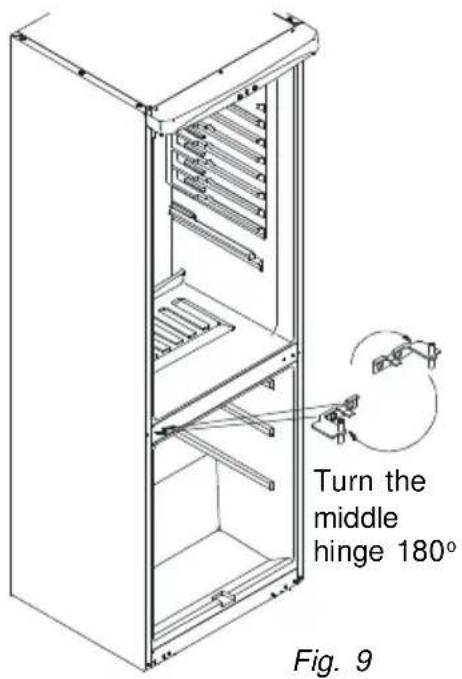
8- Turn the middle hinge 180° . Assemble the freezer door and refrigerator door together with middle hinge. (Reverse operation of item 2) Fix the middle hinge by tightening the screws. (Fig-9)
PART 6. BEFORE CALLING YOUR AFTER SALES SERVICE
If your refrigerator is not working properly, it may be a minor problem, therefore check the following, before calling an electrician to save time and money.
What to do if your appliance does not operate;
Check that;
- There is no power, (Green lamp is off)
- The general switch in your home is disconnected,
- The thermostat setting is on « 0 »position ,
- The socket is not sufficient. To check this, plug in another appliance that you know which is working into the same socket.
What to do if your appliance performs poorly; (Red lamp is on)
Check that;
- You have overloaded the appliance,
- The thermostat setting is "1" position (if so set the thermostat dial suitable value)
• The doors are closed perfectly, - There is no dust on the condenser,
- There is enough place at the rear and side walls.
If there is noise;
The cooling gas which circulates in the refrigerator circuit may make a slight noise (bubbling sound) even when the compressor is not running. Do not worry this is quite normal. If these sounds are different check that;
• The appliance is well levelled
- Nothing is touching the rear.
- The stuffs on the appliance are vibrating.
If there is water in the lower part of the refrigerator,
Check that;
- The drain hole for defrost water is not clogged(Use defrost drain plug to clean the drain hole)
Recommendations
- If the appliance is not used for long time (for example during the summer holidays) unplug and clean the appliance and leave the door open to prevent the formation of mildew and smell.
- To stop the appliance completely, unplug from main socket (for cleaning and when the doors are left open)
PART-7.
THE PARTS OF THE APPLIANCE AND THE COMPARTMENTS
1) DISPLAY PANEL
2) THERMOSTAT DIAL
3) REFRIGERATOR SHELF
4) REFRIGERATOR LAMP&COVER
5) LAMP SWITCH
6) MEAT TRAY
7) CRISPER SHELF
8) CRISPER
9) TOP SHELF
10) TOP SHELF COVER
11) EGG SHELF
12) EGG HOLDER
13) AROMA BOX
14) BOTTOM SHELF
15) BOTTLE HOLDER
16) ICE TRAY
17) ICE TRAY COMPARTMENT SHELF
18) FREEZER ROOM COVER
19) FREEZER COMP. DRAWER
20) FREEZER COMP. BOTTOM DRAWER
21) LEVELLING FOOT
22) KICK PLATE
See in page
This presentation is only for information about the parts of the appliance. Parts may vary according to the appliance model.
Inhoud
VOORDAT U HET APPARAAT GAAT GEBRUIKEN 34
natural_image
Illustration showing three hand positions demonstrating a cable or wire manipulation technique (no text or symbols present)natural_image
Cartoon illustration of a refrigerator with a smiling face, showing its exterior view and interior features (no text or symbols)natural_image
Technical line drawing of a mechanical component with a circular feature and directional arrow (no text or symbols)REGELING VAN DE VRIEZER
0 : UIT-positie
I: AAN-positie
natural_image
Illustration showing three hand positions: abacus, moving cart with arrows, and holding a crossed-out object (no text or symbols)natural_image
Simple line drawing of a bottle mounted on a stand (no text or symbols)DEEL 3. DE INDELING VAN HET VOEDSEL IN HET APPARAAT
Koelcompartiment
natural_image
Illustration of various household appliances and food items including a refrigerator, washing machine, and kitchenware (no text or symbols)natural_image
Technical line drawing of a mechanical component with an inset showing a hand holding a circular component (no text or symbols present)natural_image
Line drawing of a door with an open door, showing a hand cleaning a surface near a window (no text or symbols)DEEL 5. TRANSPORT EN VERANDERING VAN PLAATS
natural_image
Simple line drawing of two children playing a board game (no text or symbols)natural_image
Line drawing of a door with a hand adjusting the handle, labeled 'Afbeelding 2' (no other text or symbols)natural_image
Line drawing of a hand using a tool to adjust or install a mechanical component (no text or symbols visible)
natural_image
Line drawing of a hand using a screwdriver to adjust or install a small component (no text or symbols present)Afbeelding 4
Afbeelding 3
Afbeelding 6
- KOELKAST/VRIEZER/COMBINATIE
- Inhalt
- BEVOR SIE DAS GERÄT BENUTZEN 2
- Flaschenhalter
- TEIL-3. EINLEGEN VON LEBENSMITTELN IN DAS GERÄT
- Kühlteil
- TEIL-5. TRANSPORT UND STANDORTWECHSEL
- THE VARIOUS FUNCTION AND POSSIBILITIES ......21
- ARRANGING FOOD IN THE APPLIANCE 25
- CLEANING AND MAINTENANCE 26
- TRANSPORTATION AND CHANGING OF INSTALLATION POSITION ......28
- BEFORE CALLING YOUR AFTER SALES SERVICE ....31
- THE PARTS OF THE APPLIANCE AND THE COMPARTMENTS ......32
- PART 1. BEFORE USING THE APPLIANCE
- Safety Instructions
- Important note:
- Conformity Information
- Recommendations
- Installation and Switching On The Appliance
- Before Switching On
- PART 2. THE VARIOUS FUNCTION AND POSSIBILITIES
- Thermostat Setting
- Freezer & Refrigerator Thermostat Setting;
- Super freeze and low ambient switch (In some models)
- Display panel
- Turning On The Appliance
- Accessories
- Ice tray
- Bottle holder (Only some models)
- PART 3. ARRANGING FOOD IN THE APPLIANCE
- Refrigerator Compartment
- Freezer Compartment
- PART 4. CLEANING AND MAINTENANCE
- Defrosting refrigerator compartment
- Defrosting Freezer compartment
- Replacing the Refrigerator Light Bulb
- PART-5.
- TRANSPORTATION AND CHANGING OF INSTALLATION POSITION
- Changing of Door Opening Direction
- PART 6. BEFORE CALLING YOUR AFTER SALES SERVICE
- What to do if your appliance does not operate;
- Check that;
- What to do if your appliance performs poorly; (Red lamp is on)
- If there is noise;
- If there is water in the lower part of the refrigerator,
- PART-7.
- THE PARTS OF THE APPLIANCE AND THE COMPARTMENTS
- Inhoud
- VOORDAT U HET APPARAAT GAAT GEBRUIKEN 34
- DEEL 3. DE INDELING VAN HET VOEDSEL IN HET APPARAAT
- Koelcompartiment
- DEEL 5. TRANSPORT EN VERANDERING VAN PLAATS
- Afbeelding 3
Brand : TECHWOOD
Model : KS 9310
Category : Refrigerator