
MMP-351 - Hi-Fi System DENVER - Free user manual and instructions
Find the device manual for free MMP-351 DENVER in PDF.


| Product Type | Hi-Fi System |
| Brand | Denver |
| Model | MMP-351 |
| Dimensions (approx.) | 350 x 250 x 150 mm (main unit) |
| Weight (approx.) | 2.5 kg |
| Power Supply | AC 230V~50Hz or 2x AA batteries (remote) |
| Power Consumption | 15 W |
| Radio Bands | FM, AM |
| CD Playback | CD, CD-R, CD-RW, MP3 |
| Anti-Shock Protection | 35 seconds (CD), 95 seconds (MP3) |
| Cassette Deck | Playback and recording |
| Output Power | 2 x 5 W RMS |
| Speaker Configuration | 2 detachable speakers |
| Remote Control | Yes, with 2x AA batteries |
| Audio Inputs | Mic jack (3.5 mm), stereo headphone jack |
| Maintenance | Clean tape heads regularly; avoid moisture |
| Safety | Do not expose to rain or moisture; no user-serviceable parts |
| Accessories Included | AC power cord, FM antenna, remote controller, speakers |
Frequently Asked Questions - MMP-351 DENVER
User questions about MMP-351 DENVER
0 question about this device. Answer the ones you know or ask your own.
Ask a new question about this device
Download the instructions for your Hi-Fi System in PDF format for free! Find your manual MMP-351 - DENVER and take your electronic device back in hand. On this page are published all the documents necessary for the use of your device. MMP-351 by DENVER.
USER MANUAL MMP-351 DENVER
- Power Button
- Function Switch (CD, MP3 / TAPE /RADIO)
- Band Switch
- Bass Boost Button
- Volume Control Knob
- Tuning Knob
- CD/MP3 LED Display
- Dial Pointer
- CD/MP3 Play/Pause Button
- CD/MP3 Stop Button
- CD/MP3 MODE Button
- CD/MP3 "+10" Button
- CD/MP3 Skip/Search Forward Button ▶
- CD/MP3 Skip/Search Backward Button ◀◀
- Power/Standby LED Indicator
- INTO LED Indicator
- RANDOM LED Indicator
-
MP3 LED Indicator
-
FM Stereo LED Indicator
- Cassette Compartment
- Cassette Key Control Door
- Mic Jack
- Cassette Record Button
- Cassette Play Button
- Cassette Rewind Button
- Cassette Fast Forward Button
- Cassette Stop/Eject Button
- Cassette Pause Button
- Stereo Headphone Jack
- CD Door
- Speaker Terminal (L/R)
- Remote Sensor
- AC Power Cord
- FM Antenna
- Speaker Box Left
- Speaker Box Right
- Program LED Indicator
- Repeat LED Indicator
AC OPERATION
Before operating, please check carefully that the voltage indicated on your set corresponds to the voltage of your local area.
-
Plug the AC POWER CORD into a standard AC outlet.
-
Press the POWER button to start the unit.
POWER/STANDBY LED indicator will light-up to indicate unit is connected to the power source properly.
Insert the SPEAKER PLUG of the SPEAKER BOXES to the SPEAKER TERMINAL on the rear of the unit.
RADIO OPERATION
- Slide the FUNCTION switch to the "RADIO" position.
- Slide the BAND switch to the desired waveband.
- Turn the TUNING knob to your desired radio station.
- Adjust the sound level by pressing the VOLUME control knob Up or Down.
- To turn off the radio, press the POWER button to "OFF" position.
FM STEREO INDICATOR
Slide the BAND switch to FM ST. position, the FM STEREO indicator will light when listening to a strong station that is broadcasting in stereo. When the FM stereo reception is weak, slide the BAND switch to FM position, in this case this reception will be monaural.
ANTENNAS
For best reception, fully extend the FM Antenna to receive FM stations. For AM reception, the unit has a built-in antenna, and it may be necessary to turn the whole unit for best reception.
BASS BOOST
At all volume levels, push the BASS BOOST button to "ON" position to enhance the low frequency sound. To release the super bass, simply push this button once again.
MIC JACK
Connect Dynamic hand microphone to MIC JACK for Mic recording.
STEREO HEADPHONE JACK
For private listening, insert the plug of a pair of stereo headphone into the STEREO HEADPHONE JACK and adjust the VOLUME CONTROL knob accordingly. During the use of a headphone, the Speakers will be automatically disconnected.
CASSETTE OPERATION
Tape Playback
- Press the STOP/EJECT button to open the cassette door.
- Insert a pre-recorded cassette tape into the CASSETTE COMPARTMENT and close the cassette door.
- Slide the FUNCTION switch to the TAPE position.
- Press the PLAY button.
- Adjust the VOLUME CONTROL knob to your desired listening level.
- To stop the tape, press the STOP/EJECT button.
- Press the STOP/EJECT button again to open the cassette door.
Fast Forward and Rewind
The tape can be fast forwarded or rewound by pressing the FAST FORWARD button or REWIND button respectively.
Pause Function
During playback or recording, the tape can be stopped temporarily by pressing the PAUSE button. To continue playback or recording, press the PAUSE button again.
Auto Stop System
When the tape runs to the end during playback or recording, the cassette operation will be stopped automatically.
Note: When fast forwarding or rewinding, the STOP button must be pressed when the tape runs to the end.
CAUTION
To avoid damage to the cassette mechanism or to the cassette tapes, always press the STOP/EJECT button between each operation!
- Tune to a desired radio program as described in the "RADIO OPERATION" section.
- Insert a blank cassette tape into the CASSETTE COMPARTMENT.
-
Press the PAUSE button.
-
Press the RECORD button. The PLAY button is engaged simultaneously to start recording. With the built-in Automatic Level Control (ALC), the best recording quality is automatically adjusted. Changing the volume level will not affect the recording. Press the PAUSE button to release the pause function and start recording.
- To stop recording temporarily, press the PAUSE button. To continue the recording, press the PAUSE button once again.
- Press the STOP/EJECT button to stop recording.
- When the tape runs to its end, the cassette operation will be stopped automatically.
CD/MP3 OPERATION
- This unit can play CD-R, CD-RW and MP3 disc.
- For CD disc playing, it has 35 seconds ESP anti-shock.
For MP3 disc playing, it has 95 seconds ESP anti-shock.
- Should skipping of tracks occur during CD/MP3 playing, try turning the volume down.
- While CD/MP3 is playing, do not open the CD Door.
Normal Disc Playback.
- Open the CD Door by lifting the front of the CD Door. Put a CD/MP3 disc into the CD COMPARTMENT and close the door. Set the FUNCTION switch to "MP3/CD" position. Ensure the label side of the disc is facing upwards.
- When the CD Door is closed with a disc inside, LED DISPLAY will show "rE" for a few seconds. Afterwards, it'll show the total number of tracks on the disc, then starts playing the first track "001" automatically.
NOTE :
- If MP3 disc is played, MP3 LED INDICATOR will light up automatically.
- If the CD DOOR is not closed, LED DISPLAY will show "OP".
- If there's no disc inside the CD COMPARTMENT, LED DISPLAY will show "00".
- After playing all the tracks inside the disc, LED DISPLAY will show the total number of tracks on the disc.
Play/Pause Mode
- When the CD/MP3 PLAY/PAUSE button is pressed during "STOP" mode, the first track will be played. The LED DISPLAY will show the specific track being played.
-
To pause a CD/MP3 while it is playing, press the CD/MP3 PLAY/PAUSE button once. The CD/MP3 LED DISPLAY will flash continuously.
-
Although the sound stops, the disc will continue to spin. To re-start playing, press the CD/MP3 PLAY/PAUSE button once again. The music will start from the exact position where it was interrupted.
- To stop the CD/MP3 playing, press the CD/MP3 STOP button once whether the CD/MP3 is in Play or Pause mode.
Skip and Search Mode
- During play or pause mode, when the SKIP FORWARD "▶" or SKIP BACKWARD "◀" button is pressed once, it will go to the next track or back to the beginning of the track.
NOTE : The use of "+ 10" button
By pressing “+10” Button once, each time the track number can be advanced by ten numbers for speed track selection; afterwards press the CD/MP3 SKIP FORWARD ▶ or SKIP BACKWARD ◀ Button to adjust the single digit track number.
Example : To select Track No. 86 in MP3 disc ; press "+10" Button eight times, LED DISPLAY will show "0.80"; then press the CD/MP3 SKIP FORWARD ▶ Button six times, LED DISPLAY will show Track No "086".
- During play or pause mode, when the SKIP FORWARD "▶▶" or CD SKIP BACKWARD "◀◀" button is pressed and held, it will search the track with high speed forward or backward playback and the LED DISPLAY will show "---" or " [-" respectively.
Various Playing Mode
There are 3 play modes can be selected by pressing the MODE button.
For CD disc : While CD disc is playing, press the MODE button in following sequence :
Press once → Repeat 1 (single track)
Press twice → Repeat All
Press three times, then press PLAY/PAUSE button → Intro play.
Press four times, then press PLAY/PAUSE button → Random play.
For MP3 disc : While the MP3 disc is playing, press the MODE button in following sequence :
Press once → Repeat 1 (single track)
Press twice → Repeat 1 (single directory)
Press three times → Repeat All
Press four times, then press PLAY/PAUSE button → Intro play.
Press five times, then press PLAY/PAUSE button → Random play.
Repeat Play Mode
For CD disc : While the CD disc is playing,
- Press the MODE button once: the REPEAT LED Indicator will light and flash continuously, this single CD track will be repeated.
- Press the MODE button twice: the REPEAT LED Indicator will stay lit. The whole disc will be played continuously.
- Cancelling Repeat mode : press the MODE button until the REPEAT LED Indicator is turned off.
For MP3 disc : While the MP3 disc is playing,
- Press the MODE button once: the REPEAT LED Indicator will light and flash slowly, this single MP3 track will be repeated.
- Press the MODE button twice: the REPEAT LED Indicator will light and flash rapidly, this Directory of track will be repeated.
NOTE : For MP3 disc, it is divided into several directories. Each directory consists of several tracks of music.
- Press the MODE button three times :the REPEAT LED Indicator will stay lit. The whole disc will be played continuously.
- Cancelling Repeat mode : press the MODE button until the REPEAT LED Indicator is turned off.
Intro Play Mode
This feature allows all musical tracks to be played for 10 seconds only in a sequential order.
For CD disc : While the CD disc is playing,
- Press the MODE button three times : the INTRO LED Indicator will light, then press the CD/MP3 PLAY/PAUSE Button once.
For MP3 disc : While the MP3 disc is playing,
- Press the MODE button four times: the INTRO LED Indicator will light, then press the CD/MP3 PLAY/PAUSE Button once.
- To cancel the Intro play mode, simply press the CD/MP3 PLAY/PAUSE button once and the INTRO LED Indicator will turn off automatically.
Random Play Mode
This feature allows the track on the disc to be played in a random order.
For CD disc : While the CD disc is playing, press the MODE button four times. The RANDOM LED Indicator will light, press the CD/MP3 PLAY/PAUSE button once.
For MP3 disc : While the MP3 disc is playing, press the MODE button five times. The RANDOM LED Indicator will light, press the CD/MP3 PLAY/PAUSE button once.
To cancel the Random Play mode, simply press the CD/MP3 PLAY/PAUSE button once and the RANDOM LED Indicator will turn off automatically.
Program Mode
- During the CD/MP3 stop mode, press the MODE button once, the LED DISPLAY will show "P.D1". Press the CD SKIP FORWARD "▶" or CD SKIP BACKWARD "◀" button to your desired musical track, the LED DISPLAY will show the appropriate track number. Press the MODE button again to store the desired track in memory.
NOTE : you may press "+10" button to advance the track number.
- Repeat above procedure until all desired tracks have been programmed. A total of 20 tracks can be stored in memory.
- To check the program you have stored after complete programming, press the CD/MP3 SKIP FORWARD ▶ Button step by step.
- To start the PROGRAMMED playback, press the CD/MP3 PLAY/PAUSE button once and the PROGRAM LED Indicator will light up.
- To cancel the PROGRAMMED play mode, simply open the CD DOOR or press the CD/MP3 STOP button once during the CD/MP3 stop mode.
Recording From CD Player
- Slide the FUNCTION switch to "CD/MP3" position.
- Put a CD/MP3 into the CD compartment with the label side upward.
- Insert a blank cassette into the CASSETTE COMPARTMENT and press PAUSE button of the cassette deck.
- Press the RECORD button and PLAY button simultaneously for recording stand-by. With the built-in ALC, the best recording quality is adjusted automatically.
- Activate the CD/MP3 player, playing in a desired track as described in the CD/MP3 OPERATION section. Release the PAUSE button of the cassette deck to start recording.
- To stop recording temporarily, press the PAUSE button. To continue recording, press the PAUSE button again.
- Press STOP/EJECT button of the cassette deck to stop recording. Then stop CD playback by pressing the CD STOP button of the CD player.
Slide open the BATTERY DOOR, install two "AA" size or UM-3 batteries according to the polarity diagram inside the battery compartment of the Remote Controller.
BATTERY REPLACEMENT
When batteries become weak, the operating distance of the Remote Controller is greatly reduced and you will need to replace batteries.
USING THE REMOTE CONTROLLER CORRECTLY
- Point the Remote Controller at the REMOTE SENSOR locates on the main unit.
- The function of the button is the same as the corresponding control on the main unit.
- When there is a strong ambient light source, the performance of the infrared REMOTE SENSOR may be degraded causing unreliable operation.
-
The recommended effective distance for remote operation is about 5 meters.
-
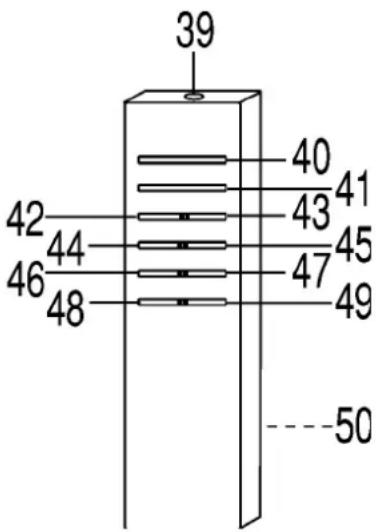
Power Button
a) While the main unit is in operation, press the Power Button (40) once, the unit will go to Standby Mode and Power/Standby LED Indicator (15) will turn from green to red color. b) Press the Power Button (40) again and it will resume to normal play function.
NOTE :
When the Power/Standby LED Indicator (15) is in red color, the unit is only in Standby Mode. Press the Power button (1) locates on the main unit to turn off the unit completely.
- Play/Pause Button
Press to start play or pause temporarily in CD/MP3 Mode.
- CD/MP "+10" Button
Press to advance the track number by ten numbers each time.
- Stop Button
Press to stop CD play.
- CD/MP3 MODE Button
Press to play Repeat, Intro and Random function.
- Mute Button
Press to silence the sound output.
-
-
- Skip/Search "-" / "+"
-
Skip or Search backward / forward for the desired track or passage in CD mode.
48.+ 49. Volume "-" / "+"
Press to adjust the volume.
- Battery Door
Slide open the battery door, then insert two "AA" size or UM-3 batteries according to the polarity diagram inside the battery compartment.
NOTE :
If the Remote Controller is not to be used for a long time, remove the batteries to prevent possible damage through battery.
Do not mix different types of battery or old batteries with new ones.
MAINTENANCE
CLEANING THE TAPE HEADS
Clear the heads frequently to remove dust and tape residue. Dirt on the heads will impair the sound quality of both recording and playback.
WARNING:
TO PREVENT FIRE OR SHOCK HAZARD, DO NOT EXPOSE THE APPLIANCE TO RAIN OR MOISTURE. DO NOT REMOVE COVER, PILOT LAMPS SOLDERED IN PLACE. NO USER SERVICEABLE PARTS INSIDE. REFER SERVICING TO QUALIFIED SERVICE PERSONNEL.
VENTILATION WARNING
THE NORMAL VENTILATION OF PRODUCT SHALL NOT BE IMPEDED FOR INTENDED USE
DRIPPING WARNING
THE PRODUCT SHALL NOT BE EXPOSED TO DRIPPING OR SPLASHING AND THAT NO OBJECTS FILLED WITH LIQUIDS, SUCH AS VASES, SHALL BE PLACED ON THE PRODUCT.
ALL RIGHTS RESERVED
COPY RIGHT DENVER ELECTRONICS A/S
CE
www.denver-electronics.com
- AC OPERATION
- RADIO OPERATION
- FM STEREO INDICATOR
- ANTENNAS
- BASS BOOST
- MIC JACK
- STEREO HEADPHONE JACK
- CASSETTE OPERATION
- Tape Playback
- Fast Forward and Rewind
- Pause Function
- Auto Stop System
- CAUTION
- CD/MP3 OPERATION
- Normal Disc Playback.
- NOTE :
- Play/Pause Mode
- Skip and Search Mode
- Various Playing Mode
- Repeat Play Mode
- Intro Play Mode
- Random Play Mode
- Program Mode
- Recording From CD Player
- BATTERY REPLACEMENT
- USING THE REMOTE CONTROLLER CORRECTLY
- MAINTENANCE
- WARNING:
- VENTILATION WARNING
- DRIPPING WARNING
Brand : DENVER
Model : MMP-351
Category : Hi-Fi System