
MHA-062 - Hi-Fi System Marquant - Free user manual and instructions
Find the device manual for free MHA-062 Marquant in PDF.


| Product Type | Hi-Fi System |
| Brand | Marquant |
| Model | MHA-062 |
| Dimensions (approx.) | 200 x 250 x 150 mm |
| Weight (approx.) | 3.5 kg |
| Power Supply | AC/DC power adapter, 12 V DC input |
| Output Power | 2 x 10 W RMS |
| Display Type | LCD |
| Disc Player | CD/CD-R/CD-RW, MP3/WMA |
| Radio | FM, 10 presets |
| Connectivity | USB port, SD/MMC card reader, AUX input (3.5 mm audio jack), microphone jack, speaker outputs |
| Main Functions | CD playback, FM radio, USB/SD, AUX, microphone, recording, alarm, sleep timer |
| Equalizer | EQ presets: Rock, Pop, Classic, Jazz, Flat |
| Playback Modes | Repeat (1, all, album), random, intro, programmed (20 CD tracks, 99 MP3) |
| Recording | From CD or USB/card to external device |
| Wake-up Alarm | Programmable with source: tuner, CD, USB, card, AUX |
| Remote Control | Yes, included |
| Housing Material | Plastic |
| Supplied Accessories | Power adapter, remote control |
| Safety Instructions | Do not expose to water, do not block ventilation, use in a temperate climate |
| Cleaning | Dry, soft cloth, do not use solvents |
Frequently Asked Questions - MHA-062 Marquant
User questions about MHA-062 Marquant
0 question about this device. Answer the ones you know or ask your own.
Ask a new question about this device
Download the instructions for your Hi-Fi System in PDF format for free! Find your manual MHA-062 - Marquant and take your electronic device back in hand. On this page are published all the documents necessary for the use of your device. MHA-062 by Marquant.
USER MANUAL MHA-062 Marquant
natural_image
Line drawing of three different speaker models with circular and rectangular heads (no text or symbols)Please read and follow these instructions before using your unit.
CE
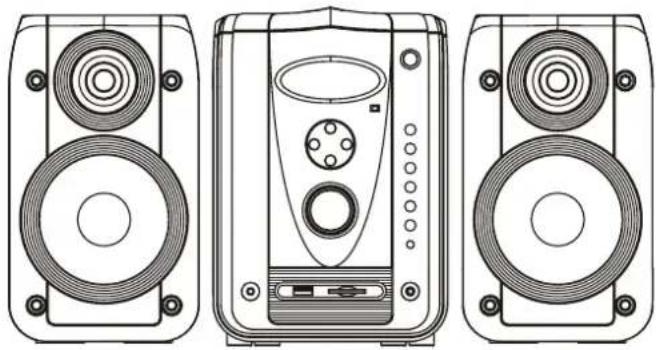
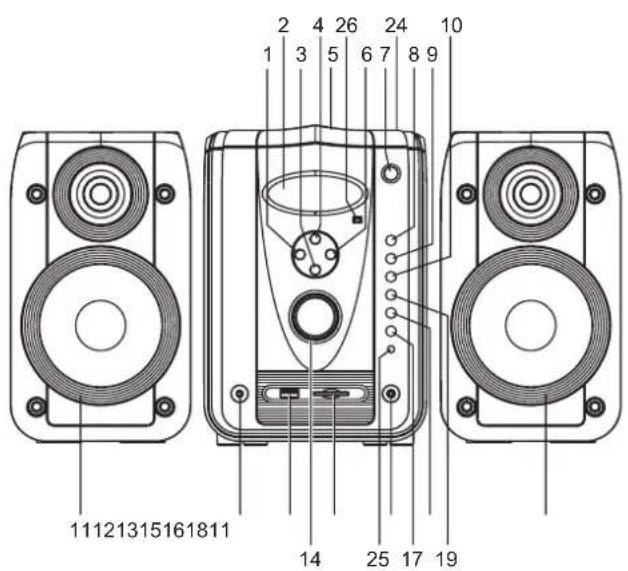
LOCATION OF CONTROLS


- TUNING/SKIP DOWN BUTTON
- LCD DISPLAY
- STOP BUTTON
- PLAY/PAUSE BUTTON
- CD DOOR
- TUNING/SKIP UP BUTTON
- CD DOOR OPEN BUTTON
- POWER BUTTON
-
FUNCTION BUTTON
-
PROG/MEM/TIME BUTTON
- SPEAKERS
- PHONES JACK
- USB PORT
- VOLUME CONTROL
- SD/MMC CARD SLOT
- AUDIO IN JACK
- EQ/RECORD BUTTON
-
RANDOM/M-BUTTON
-
REPEAT/M+ BUTTON
- SPEAKER CORD
- DC IN JACK
- FM ANTENNA JACK
- SPEAKER L/R JACKS
- CD DOOR CLOSE AREA
- MIC JACK
- REMOTE SENSOR
- RATING LABEL
Illustration of the Keys on the Remote Controller and Their Main Functions
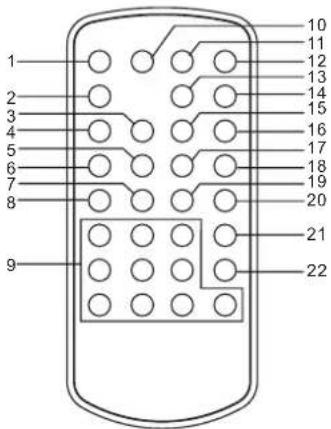
- POWER BUTTON
- FUNCTION BUTTON
- REC/DEL BUTTON
- M + BUTTON
- SKIP/SEARCH&TUNING&TIME/ALARM ADJUST BACKWARD BUTTON
- M - BUTTON
- REPEAT BUTTON
- ID3 BUTTON
- NUMERIC BUTTONS
- EQ BUTTON
-
MUTE BUTTON
-
RANDOM BUTTON
- SLEEP BUTTON
- VOLUME UP BUTTON
- PLAY/PAUSE BUTTON
- VOLUME DOWN BUTTON
- INTRO BUTTON
- SKIP/SEARCH&TUNING&TIME/ALARM ADJUST FORWARD BUTTON
- STOP BUTTON
- PROG/MEM BUTTON
- ALARM BUTTON
- TIME BUTTON
AC OPERATION
Plug one end of the AC adaptor into the DC input jack, then plug the other end into AC wall outlet.

CONNECTING THE SPEAKERS
Press clip on the rear of the unit for plugging the speaker cord into the speaker jack.
(Ensure that you observe the color coding when connecting R/L speaker cord).
CONNECT THE FM ANTENNA (not supplied) TO THE FM ANTENNA JACK

natural_image
Technical line drawing of a device rear panel with internal components and a cable connector (no text or symbols)DIGITAL CLOCK SETTING
HOW TO SET TIME CORRECTLY (In standby mode)
Press and hold TIME button on the remote or PROGRAM/MEM/TIME button on the main unit until hour flashes on the display, by now utilize TUNING/SKIP button on the main unit or SKIP/SEARCH&TUNING&TIME/ALARM ADJUST button on the remote to adjust until the desired time is displayed. Press TIME Button on the remote or PROGRAM/MEM/TIME Button on the main unit to confirm your setting. Then minute flashes, and use TUNING/SKIP button on the main unit or SKIP/SEARCH & TUNING&TIME/ALARM ADJUST button on the remote to adjust until the desired time is displayed. Again press TIME button on the remote or PROGRAM/MEM/TIME button on the main unit to confirm.
SLEEP
Press the SLEEP button on the remote in music play mode or Radio broadcasts, the player enters the sleep mode, press the button again the display changes Sleep time in a sequence as follows:

When the SLEEP function is activated, the player goes to standby mode, at the moment playback or broadcasting reaches the Preset Sleep time.
HOW TO SET THE ALARM (In standby mode)
Press and hold ALARM Button until TURN ON shows on the display, and press the ALARM button again to enter the alarm setup menu with the hour flashes, utilize TUNING/SKIP button on the main unit or SKIP/SEARCH&TUNING&TIME/ALARM ADJUST button on the remote to adjust until the desired time is displayed. Press ALARM button to confirm, then the minute time flashes in the LCD, again utilize TUNING/SKIP button on the main unit or SKIP/SEARCH&TUNING&TIME/ALARM ADJUST button on the remote to adjust. Press ALARM button to confirm your setting, TURN OFF shows on the LCD, press ALARM button to enter a menu with the hour flashes. Follow the turn on time setting steps to set the turn off time. After finishing setting, you will see TUNER showing on the LCD, press SKIP/SEARCH&TUNING&TIME /ALARM ADJUST FORWARD button repeatedly to select TUNER, CD, USB, CARD, AUX for choosing the wake up mode.
DISC PLAYBACK
- Press POWER button to turn on the player and Press FUNCTION button until the player enters disc mode.
- Press CD OPEN button to insert a disc onto the CD tray and close the tray by hand via CD door close area.
- It will start playback automatically after the player reads the disc successfully.
VARIOUS PLAY MODE OF CD PLAYBACK STOP BUTTON
Press STOP button on the main unit or press STOP button on the remote in music play mode to stop playing and show total track numbers and display time. Press PLAY/PAUSE button to resume playback.
SKIPPING TRACKS AND SEARCHING BETWEEN TRACKS
Press TUNING/SKIP button on the main unit or SKIP/SEARCH FORWARD & BACKWARD button on the remote to skip the tracks ahead or backward. Press and hold SKIP/SEARCH buttons on the remote or TUNING/SKIP button on the unit to initiate high-rate scanning between tracks forward or backward respectively; release the pressed button to begin playback of music at normal speed.
SHOWING INFORMATION OF TRACKS
Press ID3 button on the remote to show some information for tracks (e.g artist name, track number, and so on). Note: It needs the file support.
RECORD SONG FROM DISC TO EXTERNAL MEMORY DEVICE
Press the REC/DEL button on the remote or press EQ/RECORD button on the unit once to start recording song from disc to external memory device during playback. After finishing record, it will resume normal playback automatically. (You can record songs from the disc to the compatible external storing media devices, the record also can be done among the compatible external storing media devices.) To delete the file, press the skip/search buttons to select file you want to delete, and then press and hold the REC/DEL button on the remote to delete the file during playback. (Note: The delete function only works in USB and CARD mode.)
REPEAT MODES
In CD playing mode, Press REPEAT button on the remote or press REPEAT/M+ button on the main unit once to repeat the current track; the LCD shows the icon for single track repeat. Press this button twice to repeat all tracks; the LCD shows the corresponding icon for repeat all. Press the button three times to cancel repeat, the repeat icon will disappear.
In MP3/WMA playing mode, press REPEAT button once to repeat current track, twice to repeat album, three time to repeat tracks as a whole, four times to cancel repeat.
RANDOM PLAY
Press RANDOM button once in play mode to activate random playback immediately; the player will pick up tracks in a random sequence for playback. You may press this button once again to exit random play mode and return to normal playback.
INTRO SCAN PLAY
Press INTRO button once in play mode to activate introscan playback immediately; the player play the first 10 seconds of each track in a sequential order from the first track. You may press this button once again to exit introscan play mode and return to normal playback from the track it's arrived at.
EQ SELECTION
Press EQ button on the remote or press and hold EQ button on the unit continuously during disc playback mode to select EQ sound effects among ROCK, POP, CLASSIC, JAZZ and FLAT.
PROGRAM BUTTON
To program tracks, follow the steps below:
- Press PROGRAM/MEM/TIME Button on the main unit or press PROGRAM/MEM button on the remote in CD/MP3/WMA Stop mode.
- Press SKIP/SEARCH buttons to select tracks during CD/MP3/WMA program mode.
- Press the PROGRAM/MEM/TIME Button on the main unit or press PROGRAM/MEM button on the remote to save this track to memory and step into the next programming step.
- Repeat the processes specified above to go on with the programming.
-
After programming is finished, press the PLAY/PAUSE button to enter Program Playback.
-
A total of 20 tracks can be programmed for CD, and 99 tracks for MP3/WMA. You may press STOP button to terminate programmed playback. In program stop mode, press STOP button again to clear the programming.
Press FUNCTION button to enter Tuner mode. Press TUNING/SKIP button on the main unit or SKIP/SEARCH&TUNING&TIME/ALARM ADJUST FORWARD or BACKWARD buttons to Manually tune the frequency. Press and hold SKIP/SEARCH&TUNING&TIME/ALARM ADJUST buttons or TUNING/SKIP button for 2 seconds to automatically tune the radio frequency. When the tuning goes to one station available, broadcasting starts immediately.
To store the current radio station, follow the steps below:
- Press TUNING BACKWARD or FORWARD button to select your desired frequency first.
- Press PROG/MEM/TIME button on the main unit or PROG/MEM button on the remote.
- Then press M+ or M- button to select a memory position.
- Then press PROG/MEM/TIME button on the main unit or PROG/MEM button on the remote again to store the frequency.
- Repeat the processes specified above to go on with the storing.
- To recall the preset station frequency, press the M+/M-buttons. A total 10 stations can be stored in Memory for FM.
EXTERNAL MEMORY MEDIA OPERATION (USB/MMC & SD CARD)
Prepare the player for External Memory media operation
Insert a USB data traveller into the USB port; Press FUNCTION button continuously until the player enters USB mode; after this USB is successfully detected and read, it will start playback automatically.
OR
Insert an SD/MMC card into the card slot; Press FUNCTION button continuously until the player enters card mode; after this SD/MMC card is successfully detected and read, it will start playback automatically. You may play the files stored in the storage media much in the same way as you do the MP3 disc.
CAUTION: To avoid electronic static discharge, don't touch the USB port and card slot during playback.
AUDIO IN
Any audio signal can be input through the AUDIO IN jacks, and this set the function as a power amplifier.
- Press the FUNCTION button to enter AUX mode.
-
Insert the plugs of the commercially audio line cable which is available in most audio stores into the Audio in JACK, and the other small connector into the LINE OUT JACK of signal source (other CD player, recorder etc).
-
Press the PLAY button of the signal source to start playback.
-
Adjust the VOLUME of this set. The VOLUME control of the signal source will not work any more.
USE THIS PLAYER WHILE SINGING SONGS
Power the player on. You may sing with a microphone. To it for this end, you need:
-
A Standard Microphone;
-
Connect the one-pin plug to the Mic jack of this player.
IMPORTANT SAFETY INSTRUCTIONS
- The apparatus shall not be exposed to dripping or splashing and that no objects filled with liquids, such as vases, shall be placed on the apparatus.
- The AC/DC adaptor should not be obstructed or should be easily accessed during intended use. To be completely disconnected the power input, the AC/DC adapter should be disconnected from the mains completely.
- No naked flame sources, such as lighted candles, should be placed on the apparatus.
- Minimum distances 2.0cm around the apparatus for sufficient ventilation. The ventilation should not be impeded by covering the ventilation openings with items, such as newspapers, table-cloths, curtains, etc.
- The use of apparatus is in tropical and/or moderate climates.
- Attention should be drawn to the environmental aspects of battery disposal.
- CAUTION: Danger of explosion if battery is incorrectly replaced. Replace only with the same or equivalent type.
- Battery shall not be exposed to excessive heat such as sunshine, fire or the like.
- Excessive sound pressure from earphones and headphones can cause hearing loss.
- The marking plate is located at the back of the apparatus.
TROUBLE SHOOTING CHECK LIST & HELPFUL HINTS
SHOULD YOUR SET HAVE A PROBLEM, CHECK THE FOLLOWING:
| PROBLEM | CHECK THE FOLLOWING |
| Set does not work on AC | Does the AC outlet being used actually have AC power? |
| No sound | Is the Volume Control at MIN?Is headphone in jack?Is play OFF? |
| Remote control won't work. | Check that the battery is inserted in the "+" and "-" direction properly.The battery may be flat. Replace it with a new one.Check that the signal transmission is directed at the remote control sensor on the player.Remove the obstacle between the remote control and remote control sensor. |
| CD does not rotate | Is outlet alive? Check outlet with a lamp or other appliance.Make sure the CD function is on. |
| CD does not play | If the Display indicates no disc, this means the CD disc is upside down.Open the door, remove the CD, flip it over and insert correctly.The printed side up.Is the lens very dirty? Gently clean lens with a soft cloth or CD cleaner. (Available at most stores)Is the CD function is on?Is the CD Play/Pause Button pressed during playback? |
| Disc skips parts of songs | Disc has a defect. Try cleaning the disc with a clean rag or disc cleaner.If this does not help the disc may be damaged.Is the lens very dirty? Gently clean the lens. |
Made in China
MARQUANT®
GEBRUIKSHANDLEIDING
DRAAGBARE CD/MP3/WMA DISCSPELER STEREO RADIO MET USB & SD/MMC KAARTLEZER
Model: MHA-062
natural_image
Technical line drawing of three different speaker models with circular and rectangular components (no text or symbols)natural_image
Technical line drawing of a device rear panel with internal components and wiring (no text or symbols)INSTELLEN VAN DIGITALE KLOK INSTELLEN VAN DE JUISTE TIJD (In stand-by modus)
natural_image
Technical line drawing of three different speaker models with no visible text or symbolsnatural_image
Technical line drawing of a device rear panel with connectors and internal components (no text or symbols)RÉGLAGE DE L'HORLOGE NUMÉRIQUE COMMENT REGLER CORRECTEMENT L'HEURE (en mode veille)
natural_image
Technical line drawing of three different speaker models with circular and rectangular components (no text or symbols)CE

Geräteübersicht

Geräteübersicht
natural_image
Technical line drawing of a device rear panel with internal components and connectors (no text or symbols)natural_image
Illustration showing two different techniques for handling a circular object, one with a magnified view and the other without a crosshair (no text or symbols present)
- Illustration of the Keys on the Remote Controller and Their Main Functions
- AC OPERATION
- CONNECTING THE SPEAKERS
- CONNECT THE FM ANTENNA (not supplied) TO THE FM ANTENNA JACK
- DIGITAL CLOCK SETTING
- HOW TO SET TIME CORRECTLY (In standby mode)
- SLEEP
- HOW TO SET THE ALARM (In standby mode)
- DISC PLAYBACK
- VARIOUS PLAY MODE OF CD PLAYBACK STOP BUTTON
- SKIPPING TRACKS AND SEARCHING BETWEEN TRACKS
- SHOWING INFORMATION OF TRACKS
- RECORD SONG FROM DISC TO EXTERNAL MEMORY DEVICE
- REPEAT MODES
- RANDOM PLAY
- INTRO SCAN PLAY
- EQ SELECTION
- PROGRAM BUTTON
- To store the current radio station, follow the steps below:
- EXTERNAL MEMORY MEDIA OPERATION (USB/MMC & SD CARD)
- Prepare the player for External Memory media operation
- OR
- AUDIO IN
- USE THIS PLAYER WHILE SINGING SONGS
- IMPORTANT SAFETY INSTRUCTIONS
- TROUBLE SHOOTING CHECK LIST & HELPFUL HINTS
- MARQUANT®
- GEBRUIKSHANDLEIDING
- DRAAGBARE CD/MP3/WMA DISCSPELER STEREO RADIO MET USB & SD/MMC KAARTLEZER
- INSTELLEN VAN DIGITALE KLOK INSTELLEN VAN DE JUISTE TIJD (In stand-by modus)
- RÉGLAGE DE L'HORLOGE NUMÉRIQUE COMMENT REGLER CORRECTEMENT L'HEURE (en mode veille)
- Geräteübersicht
Brand : Marquant
Model : MHA-062
Category : Hi-Fi System