SDV48-AM - Portable DVD Player Nextbase - Free user manual and instructions
Find the device manual for free SDV48-AM Nextbase in PDF.


User questions about SDV48-AM Nextbase
0 question about this device. Answer the ones you know or ask your own.
Ask a new question about this device
Download the instructions for your Portable DVD Player in PDF format for free! Find your manual SDV48-AM - Nextbase and take your electronic device back in hand. On this page are published all the documents necessary for the use of your device. SDV48-AM by Nextbase.
USER MANUAL SDV48-AM Nextbase
| SDV48-A | SDV49-A |
| SDV48-AM | SDV49-AM |
| SDV48-AC | SDV49-AC |
7", 9" Portable DVD Player Tragbarer 7- & 9-Zoll DVD-Player
natural_image
Line drawing of a rectangular toaster oven with control panel and indicator lights (no text or symbols)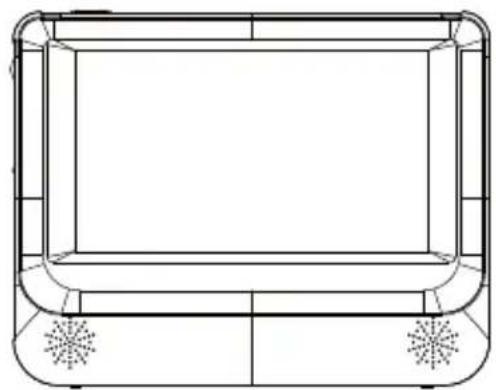
natural_image
Line drawing of a rectangular electronic device with four small fans at the base (no text or symbols)Safety Precautions....3
Package Contents....4
Primary Controls 5
System Connection....6
In Car Installation....11
Remote Control Operation....15
Basic Operation 17
System Setup 28
Specification....31
Internal Battery 32
Troubleshooting 35
This manul covers as the following models:
1) SDV48-A / SDV49-A Single DVD player.
2) SDV48-AM / SDV49-AM Single DVD player + monitor.
3) SDV48-AC / SDV49-AC Twin DVD player.
The model number of your product is clearly marked on the box.
Safety Precautions
Thank you for choosing a SDV48/SDV49 portable DVD player. This unit incorporates the latest state of art electronics and is designed for use at home, in hotels and in offices etc for your enjoyment. The compact size makes carrying easier, as well as use. Please read this manual carefully prior to use and keep it for later reference.
text_image
WARNING RISK OF ELECTRIC SHOCK. DONOT OPENLASER
| Type | Semiconductor laser GaAlAs |
| Wave length | 650 nm/780nm |
| Output Power | 5mW |
| Beam divergence | 60degree |
text_image
LASER RADIATION DO NOT VIEW DIRECTLY WITH OPTICAL INSTRUMENTS CLASS 1M LASER PRODUCTWarning: To reduce the risk of fire or electric shock, do not expose this player to rain or moisture.
- Please read this instruction manual carefully and follow all the requirements for safe operation of the player & accessories.
- Do not use this player near water. Do not place any container with liquid inside, above the player.
- Do not install near any heat sources such as radiators, heat registers, stoves, or other apparatus (including amplifiers) that produce heat.
- Unplug this unit during lightning storms or when unused for a long time.
- Cleaning: Unplug the player, use only dry cloth to clean. Do not use liquid detergent or other cleaning agents.
- Only use accessories specified by the manufacturer.
- Refer all servicing to the Next base Service Centre. Servicing is required when the unit has been damaged in any way, such as power supply cord or plug is damaged, liquid has been spilled or objects have fallen on to the unit, exposed to moisture, or does not operate normally. Don't try to repair the player by yourself, because of the danger of high voltage and electric shock.
- Do not use irregular shaped discs such as heart or star-shaped discs as they may cause the unit to malfunction.
SPECIAL NOTE REGARDING USE OF THE PLAYER IN A VEHICLE
• We strongly advise against the driver of a vehicle using this product, whilst moving.
- Most countries and states have laws which prohibit or severely restrict the use of the product in vehicles while driving, where the driver can see the screen. Please adhere to these laws.
- Do not leave the product in places where the temperature is extremely low (about-10 °C or lower) or extremely high (about 60 °C or higher), such as inside the passenger cabin or trunk in midsummer. Doing so may warp the outer case or reduce the performance or quality of the battery pack.
Always switch the engine on before connecting power to the product.
Always disconnect the power play before switching off the engine.
SPECIAL NOTE REGARDING USE OF THE PLAYER ON AEROPLANES
This product may be allowed to be used on an aero plane at the discretion of the airline. Always conform to the instructions given with respect to the use of electronic devices whilst traveling on an aero plane.
©
Primary Controls
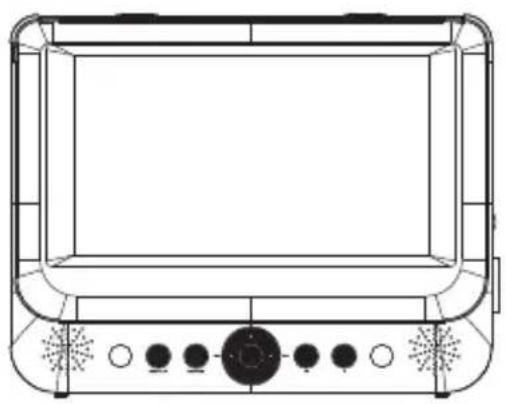
DVD Player SDV48 series
- Open Button
- Power ON-OFF/CHARGE switch
- SETUP Button
- MODE Button
- OK / Enter Button
- Play/Pause
- STOP Button
- DC IN 9-12V
- DC OUT
(applicable to -AM master only)
21
- AV/IN OUT
- Earphone Jack
- Volume Control
- SD/MMC Card Slot
- USB Port (For memory stick only)
- Stand (Pull out to use and click back to stow)
- LCD Screen
- Headrest Mount Strap Guide
- Speakers
- Indicator Lights Blue = Power On
$$ \text { Red } = \text { Battery Charging } $$
$$ \text { Green } = \text { Battery Fully Charged } $$
- Rating Label Position
Monitor (SDV48-AM Only)
- Power ON/OFF Switch
- Volume Control
- Earphone jack
- AV IN
-
DC IN 9-12V
-
LCD Screen
- Headrest mount strap guide
- Speakers
- Brightness control
- Rating Label Position
10
©
©

©
©
In Car Installation
- Fit the headrest mount to the DVD Player / Monitor as required.
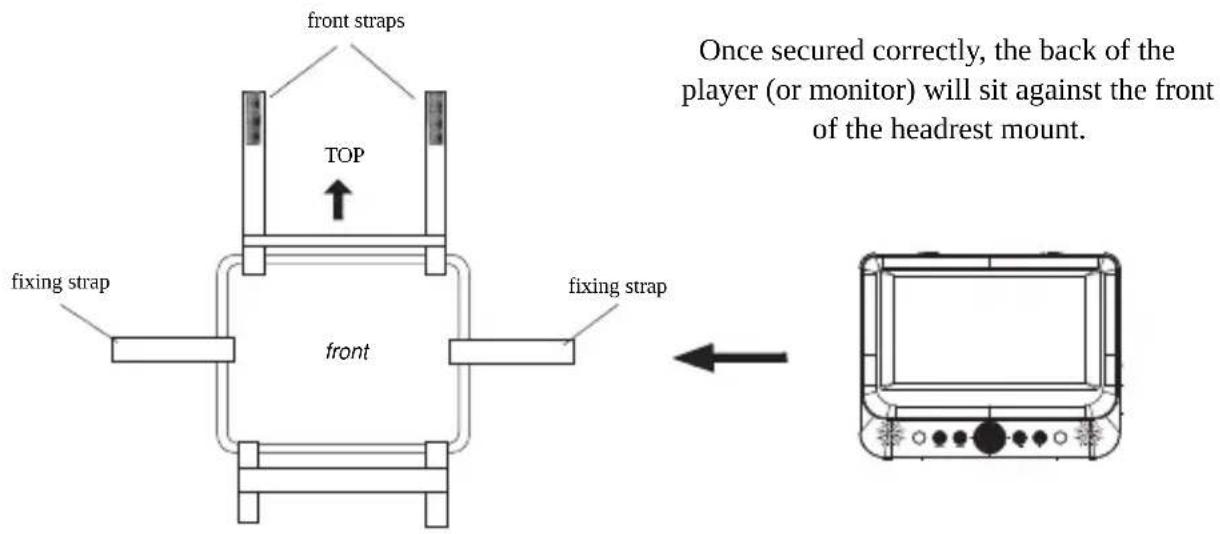
text_image
front straps TOP fixing strap front fixing strap Once secured correctly, the back of the player (or monitor) will sit against the front of the headrest mount.Turn the headrest mount and player around so the backs are facing you.
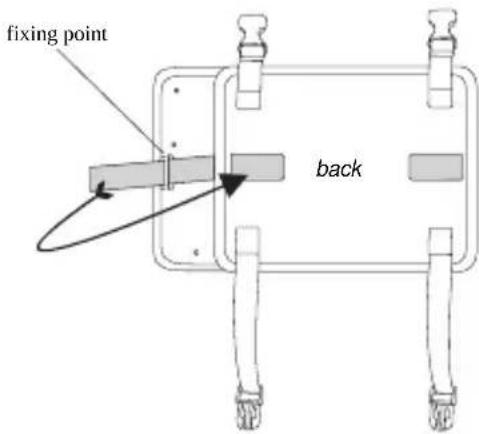
text_image
fixing point backSlide the fixing strap through the left-hand fixing point on the back of the player or monitor, as shown.
Fold the strap over on to the back of the headrest mount and secure firmly.
Repeat process for the other strap.
Ensure the DVD player or monitor is mounted centrally.
Turn the headrest and player around so the front is facing you.
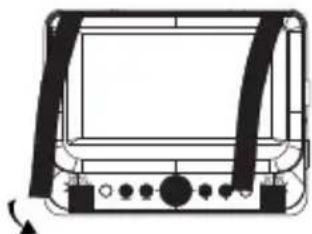
natural_image
Line drawing of a device front panel with control buttons and a scroll wheel (no text or symbols)Using the front straps secure the player or monitor as shown.
NOTE: For SDV48-AM /SDV49-AM products the same design headrest mount is used for both the player and monitor.
©

Connecting to an external TV screen
SDV49 series
The unit can be connected to an external TV set. Please see below.
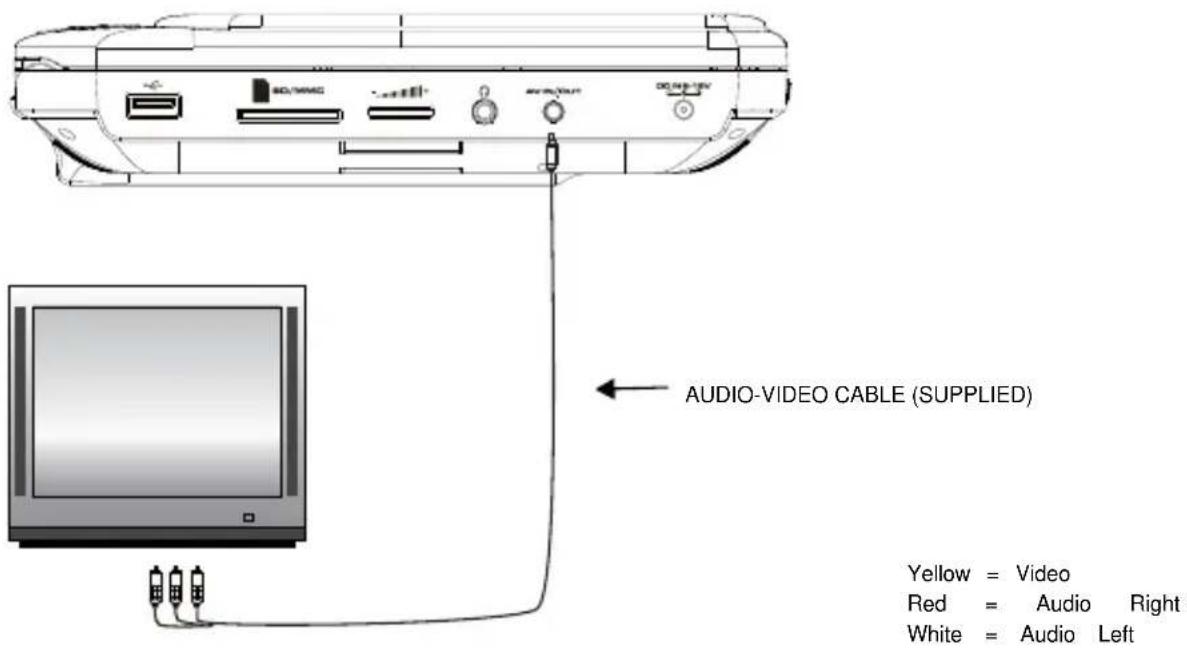
text_image
AUDIO-VIDEO CABLE (SUPPLIED) Yellow = Video Red = Audio Right White = Audio LeftConnecting to an external AV source
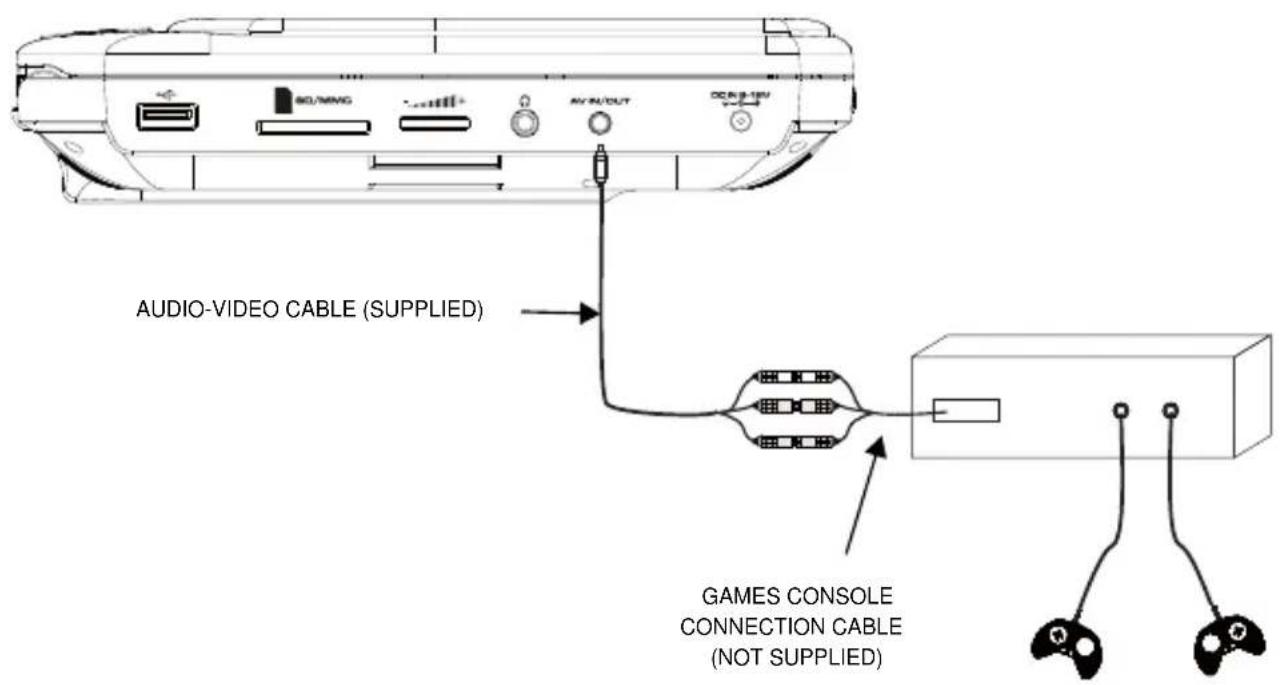
The unit can be connected to an external AV source, such as a games console. Please see below.
text_image
AUDIO-VIDEO CABLE (SUPPLIED) GAMES CONSOLE CONNECTION CABLE (NOT SUPPLIED)Press DVD/IN on the remote control to switch between DVD playback and the AV-IN mode. Once connected correctly, the image and sound will appear on the player.
Remote Control Operation
text_image
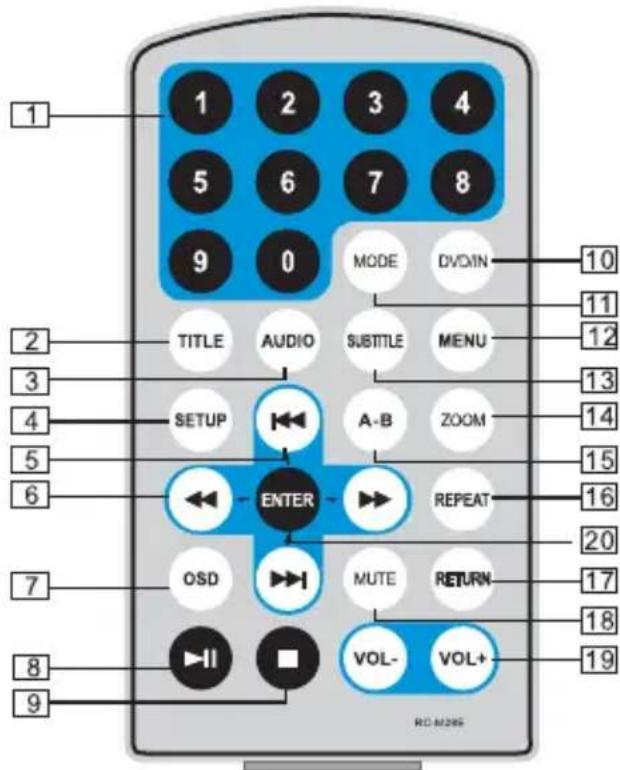
1 2 3 4 5 6 7 8 9 0 MODE DV0IN TITLE AUDIO SUBTITLE MENU 10 11 12 13 14 15 16 20 ENTER REPEAT OSD MUTE RETURN- 17 18 VOL- VOL+ 19 RD-M285- Number buttons
- TITLE (To display title information)
- AUDIO (To select audio language)
- SETUP(To go to, or exit setup menu)
- <<|> buttons (To go to previous or next chapter / track or scene during playback) DOWN / UP when navigating menus
- <</▶buttons (To scan forward /backward at 2,4,8,16 or 32 times speed) LEFT / RIGHT when navigating menus
- OSD - On Screen Display. (To display disc information during playing such as elapsed and remaining)
- Play/Pause
-
Stop (Press once to stop playback, then press ▶ to resume playback from the point where you stopped. Press stop button twice to stop playback completely.
-
DVD / IN (DVD playback or AV input mode)
- MODE (To select the source of either DVD / SD/MMC / USB)
- Menu (To enter or exit DVD menu)
- Subtitle (To select a subtitle language, when playing a DVD disc)
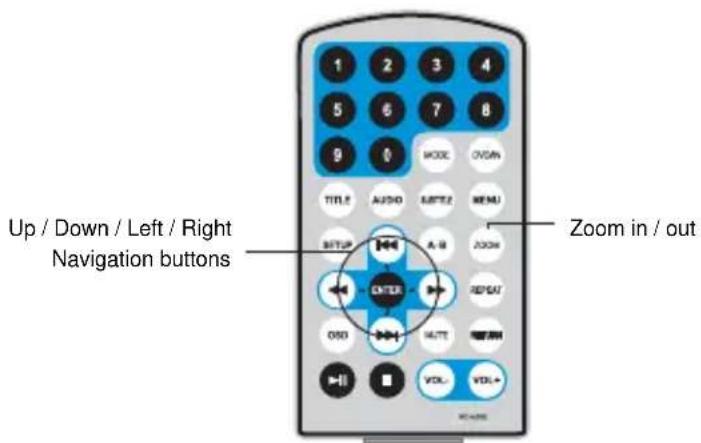
- ZOOM (To zoom in/out the image during playback)
- A-B (Repeat a specific portion from point A to B. Press it again to cancel repeat playback)
- Repeat (To Repeat playing title, chapter or track)
- Return (To return to the main menu)
- MUTE (To mute / unmute the sound)
- VOL+/- (To adjust the volume)
- Enter (To confirm an entry)
©
Basic Operation
Playback of Media from disc.
DivX
-
DVD mode is the default after power is switched ON, but can also be selected by pressing MODE. Press or to highlight DVD, then press OK.
-
Carefully Open the LCD screen and insert a disc on to the spindle with the label side facing towards you.
Once the LCD screen is fully open, do not use force to open further
PLEASE NOTE:
Damage caused to the DVD player by opening the LCD screen beyond the design limit is not covered under the manufacturers warranty.
- Close the LCD screen. The player will load the disc and start playing.
- Press once to stop playback; then press to resume playback from the point where you stopped. Press twice to stop playback completely.
- During playback, press to pause; press it again to resume playback.
- When the playing is finished, please turn the power off by sliding the ON/OFF switch to OFF.
- For some DVD discs with Title or Chapter menus, press the "MENU" button to enter the menu page, and use to select. Press ENTER to confirm.
Note: Please do not disconnect USB devices or unplug SD/MMC cards whilst they are playing. Functional failure may occur, with the possible loss of data from the USB stick or SD/MMC card.
Title
Menu
Navigation buttons
ENTER
©
©
Zoom In / Out

During playback of movies, you can Zoom In or Zoom Out from the image.
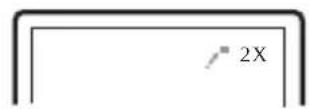
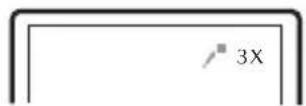
During playback, press the "Zoom" button, the image will be enlarged; press it again the image will be enlarged again; press it fourth time, the image will zoom out, press it repeatedly and the image will return to normal status.
When the image is enlarged, user can press Up, Down, Left or Right to move the image.

text_image
Up / Down / Left / Right Navigation buttons Zoom in / out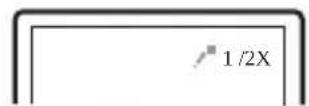
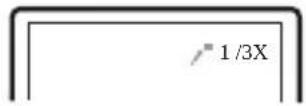
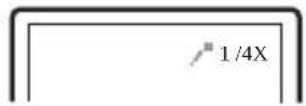
ZOOM remains on-screen whenever this function is selected.
This is normal and NOT a defect. During the zoom function, the FFWD, REV, PREV and NEXT do not work as the direction control is for the Up, Down, Left and Right position of the Zoomed image. The ZOOM label remains on-screen to remind you of this fact.
Exit the zoom function to enable the normal FFWD, REV, PREV and NEXT function once again.
Note
You can however press the REPEAT button 4 times until "REPEAT OFF" is shown. This removes the zoom magnification icon and has no other effect. Do not forget to press ZOOM to restore normal viewing to operate the FFWD, REV, PREV and NEXT functions once again.
Photo display from disc
- Place a disc into the player, containing photos in JPG format. The player will start to read and playback the photographs.
- Press "MENU" to browse JPG files.
- Press ◀◀▶▶ to select a specific JPG file and press "ENTER" button to confirm viewing. Note: You can press MENU to return to the folder list. Press ▶▶ or "ENTER" to preview the file selected.
- To rotate the picture counter-clockwise, press “◀”. To rotate the picture clockwise, press “▶”.
- Press the OSD button when viewing pictures, to select different transitions between photos, as follows:
a. From top to bottom
b. From bottom to top
c. From left side to right side
d. From right side to left side
e. From left top to right bottom
f. From right top to left bottom
g. From left bottom to right top
h. From right bottom to left top
i. From horizontal center to both sides
j. From vertical center to both sides
k. From top and bottom to center.
I. From right and left to center.
m. From four window's top side to bottom side.
n. From four window's left side to right side.
o. From 4 edges to center.
-
Whilst viewing files, “∅” may appear when pressing “Subtitle”, “Audio”, “A-B” or “Title” etc. During photo playback, these options are unavailable.
-
When viewing JPG files, press "■", to stop and then the pictures will be displayed in thumbnail mode, press UP, DOWN, LEFT, RIGHT and then "ENTER" button to select one picture to view.
MP3 Playback from disc
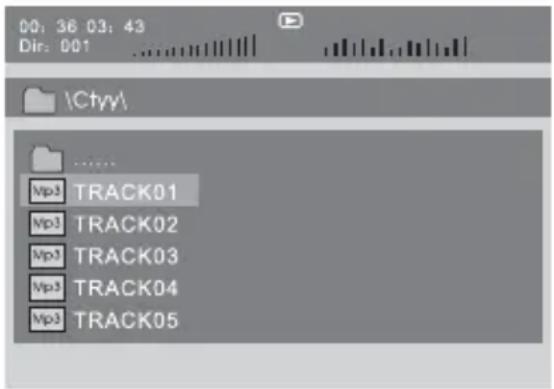
- Place a disc containing MP3 files in to the player. Press UP, DOWN, LEFT, RIGHT to navigate and then "ENTER" to choose an MP3 file. Press "▶II" or the "ENTER" button to play the file selected.
text_image
00: 36 03: 43 Dir: 001 \Ctyy\ ... Mp3 TRACK01 Mp3 TRACK02 Mp3 TRACK03 Mp3 TRACK04 Mp3 TRACK05©
Browser Mode
Photo Mode
Music Mode
Movie Mode
For a detailed explanation of each mode, please see subsequent pages.
Browser Mode
Mp3
Mp3
Mp3
Mp3
Mp3
In the Browser Mode, the player will show the list of files and folders on the selected device (SD/MMC or USB).
Press the Up, Down button to highlight the required file and press “ENTER” to play.
Press “ ” to enter the folder.
Press “ ” to exit the folder.
Note: If you want to return to the Main Menu, first, the system must be displaying the List of files and folders, and then you can press the "RETURN" KEY to return to the Main Menu.
Photo Mode
natural_image
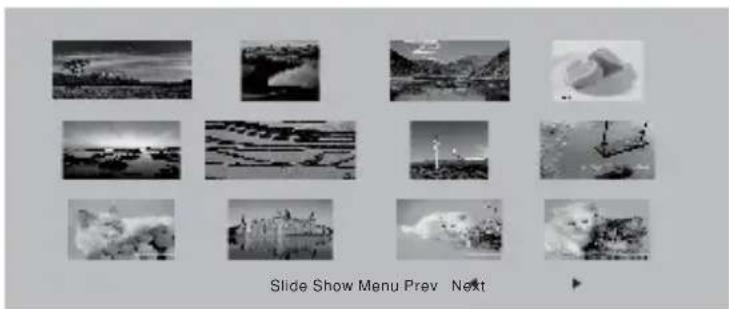
Grid of grayscale landscape photos showing landscapes and structures, no text or symbols presentIn the Photo Mode, the player will show the thumbnail view first.
Press Up, Down, Left, Right to select the desired photo then press "ENTER" to start the slideshow from that point. Press "▶II" to pause on any one specific photo.
From the thumbnail view, you can press Down, to move the cursor to the menu at the bottom of the screen. This has four options.
Slide Show: Starts the slide show of the thumbnails shown
Menu: Options for the slide show (zoom, rotate etc)
Prev: Previous page of thumbnails
Next: Next page of thumbnails
When viewing the photos, there are a number of options available:
- To rotate the picture counter-clockwise, press “◀”.
To rotate the picture clockwise, press “▶”.
- Press the OSD button when viewing pictures, to select different transitions between photos, as follows:
a. From top to bottom
b. From bottom to top
c. From left side to right side
d. From right side to left side
e. From left top to right bottom
f. From right top to left bottom
g. From left bottom to right top
h. From right bottom to left top
i. From horizontal center to both sides
j. From vertical center to both sides
k. From top and bottom to center.
I. From right and left to center.
m. From four window's top side to bottom side.
n. From four window's left side to right side.
o. From 4 edges to center.
-
Whilst viewing files, “∅” may appear when pressing “Subtitle”, “Audio”, “A-B” or “Title” etc. During photo playback, these options are unavailable.
-
When viewing photo files, press "■" or "RETURN" key to return to the thumbnail mode.
Note: If want to return the Main Menu, you can Press "Return" key in the thumbnail mode.
Music Mode
text_image
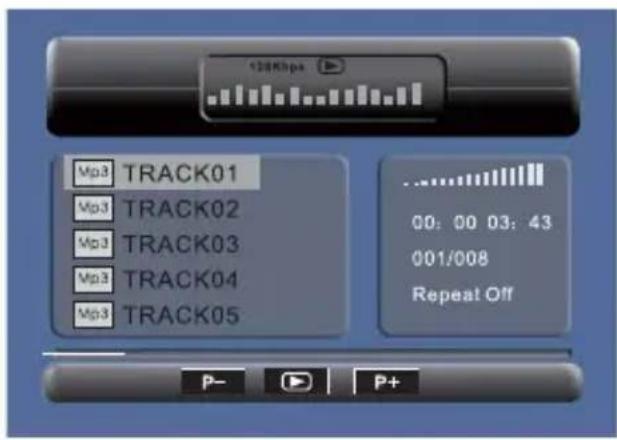
128Kbps MP3 TRACK01 MP3 TRACK02 MP3 TRACK03 MP3 TRACK04 MP3 TRACK05 00: 00 03: 43 001/008 Repeat Off P- P+In Music Mode, the player will show the list of playable music files.
Press Up, Down to select the desired track and "ENTER", to play.
Press “◀/▼” to fast forward /backward the music during playback.
When stopped, press the Right or Left to highlight the lower menu options, as follows:
P- Page Up
P+ Page Down
Play
Note: Press "Return" Key to Return to the Main Menu.
Movie Mode
text_image
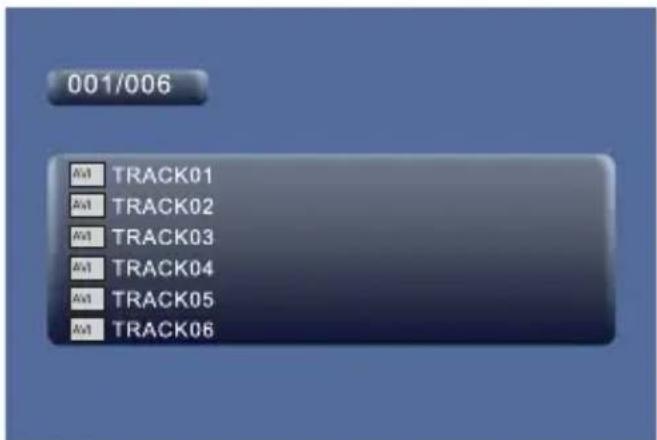
001/006 AVI TRACK01 AVI TRACK02 AVI TRACK03 AVI TRACK04 AVI TRACK05 AVI TRACK06In the Movie Mode, the player will show a list of playable Movie files, such as MP2, DivX etc. Press Up, Down to select the desired movie and then "ENTER" to play.
When playing a movie you can press "MENU" or the "RETURN" Key to go back to the list of playable movie files.
If you want to return to the Main Menu, Please Press the "Return" key when the list of movie files is displayed.
NOTE:
For details upon playable movie formats and recommendations, see later in this manual.
©
©
©
©
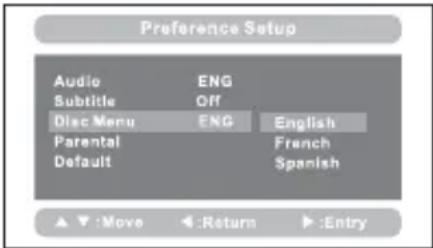 | Disc Menu:This function allows you to choose the menu language from the DVD disc.Default is English.The disc menu language depends upon the information available upon each disc. |
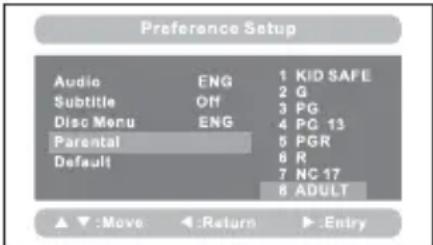 | Parental:Enter this option to set the parental control level, to prevent unsuitable disc scenes being watched by children.Optional parental control levels: KID SAFE, G, PG, PG 13, PGR, R, NC17, ADULT.The default of this option is ADULT.The default password: 8888. |
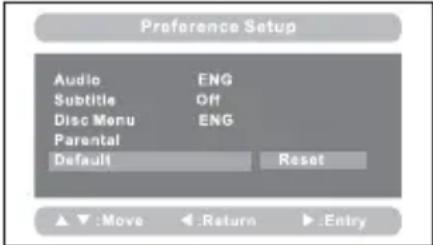 | Default:Select this item and press the “ENTER” button to reset all settings to the original factory settings.This includes reset of the region setting to multiregional. |
Specification
Compatible disc: DVD / VCD / CD / MP3 / DIVX / DVD±R / DVD±RW
Signal system: PAL/NTSC
Panel size: SDV48 series: 7"
SDV49
series:
Panel resolution: SDV48 series: 480 x 234 RGB
SDV49 series: 640 x 234 RGB
Frequency response: 20 Hz to 20 kHz
Video output: 1 Vp-p/75 Ohm, unbalanced (Composite video)
Audio output: 1.4Vrms/10kOhm (Stereo Audio)
Audio S/N: Better than 80 dB
Dynamic range: Better than 85 dB
Laser: Semiconductor Laser, Wave Length: 650 mm/795 mm
Power source: DC 9-12V
Mains adaptor:
Input: 100-240V 50-60Hz
Output: 9VDC 1A
Car adaptor:
Input: 12V (not for use with 24V systems)
Fuse Type: SDV48-A / SDV49-A & SDV48-AM / SDV49-AM
Fuse Type: SDV48-AC / SDV49-AC
Battery:
Type: Lithium Polymer
Capacity: SDV48 series: 850mAh
SDV49 series:1000mAh
Voltage: 7.4V
Power consumption: <10W for all model types
Remote Control Battery:
Type: CR2025
USB stick: Max. size 8GB, formatted FAT or FAT32
SD/MMC card: Max. size 8GB, formatted FAT or FAT32
Operating temperature: 0\~40°C
Storage temperature: 0\~50°C
Dimensions:
DVD Player: SDV48 Series: 212 x 167 x 40 mm
SDV49 Series: 245 x 190 x 42 mm
Monitor: SDV48 Series: 212 x 167 x 25 mm
SDV49 Series: 245 x 190 x 30 mm
Weight:
DVD Player: SDV48 Series: 0.70Kg
SDV49 Series: 0.91Kg
Monitor: SDV48 Series: 0.35Kg
SDV49 Series: 0.52Kg
Internal Battery
The DVD Player incorporates an integral Lithium Polymer battery for high performance and optimum playback times. The battery has no memory effect and be charged safely, regardless of whether the battery is fully or partially discharged.
Playback time is approximately 2 hours after a full battery charge, when used under normal operating conditions.
Battery Charging
Connect the DVD player to the supplied power supply (either the AC Adaptor or 12V Car Adaptor) and switch the Player to OFF/CHARGE.
If the player is turned on, then charging stops, but playback will continue from the external power source and NOT drain the battery.
Always unplug from the AC Adaptor or Car Adaptor once charging is complete.
LED Indicator light
Green / Red flashing = player is checking battery level
Red = charging
Green = fully charged
Blue = Power on
Battery Replacement
The integral battery is not user replaceable once exhausted (approx. 300 charging cycles).
Please contact your NEXTBASE Authorised Service Centre for a replacement battery to be fitted by a qualified engineer.
Low Battery Warning
A low battery warning will appear on-screen when the battery is nearly exhausted.
Please connect the supplied power source (car power cable or mains adaptor) at this time to either continue using the player, or recharge the battery.
Caution: Danger of explosion if battery is incorrectly replaced. Replace only with the same or equivalent type.
battery charge time paragraph
Charge time for a fully discharged battery is approximately:
SDV48 1.25 to 1.75 hours
SDV49 2.15 to 2.30 hours

©
Troubleshooting
Problem
Solution
No sound or distorted sound Turn the volume UP on both the remote control AND the volume wheel on the side of the player (and monitor). Ensure that the MUTE key has not been pressed. If using an SDV48-AC / SDV49-AC make sure that the interconnection cable is NOT fitted if watching different movies on the 2 screens.
Can't advance through a movie You can't advance through the opening credits and copyright warnings at the beginning of a movie as the disk is programmed to prevent this.
The icon appears on screen The requested operation is not allowed or available at this time.
The picture is pixelated or distorted The disc may be damaged or dirty. Clean the disc or change to another one.
The disc will not play The disc may be damaged or dirty. Clean the disc or change to another one. Poor playback may be caused by dirt on the laser lens, use a clean, dry cotton bud (add pure alcohol sparingly if available) and wipe across the lens VERY gently, the lens is held by spring suspension, so be very gentle.
No sound from the speakers Check the player by using headphones. If these are working normally then the headphone connector is damaged and needs repairing.
Remote control doesn't work Remove the battery isolating tape from original delivery. Approach player more closely or remove any obstructions. Replace battery for new. Type CR2025.
No picture Check that the screen is closed firmly. Check the broken screen identification information. Check the DV/IN button has the DVD option chosen.
Lines on the screen Check the broken screen identification page. Any permanent diagonal lines are indication of breakage. The screen glass does NOT fall out, as this is a safety feature.
| Problem | Solution |
| USB media will not play Video, Music | and Photo's may not be of the correct format.Ensure that any video recording is an official DivX type.(See earlier in manual) Music, MP3 and Photo JPEG formats.Use only USB sticks plugged directly to the USB socket and formatted in FAT 32.Check media device is not damaged. |
| SD/MMC Card media will not play Video | Music and Photo's may not be of the correct format.Ensure that any video recording is an official DivX type.(See earlier in manual) Music, MP3 and Photo JPEG formats.Check SD/MMC card is inserted correctly and is not damaged. |
| DVD player will not work Turn Power switch to ON. Battery may be exhausted.Connect the car adaptor or AC adaptor to DC-IN socket.Check the player LED indicator illuminates to show player is receiving power. If the player LED indicators do not illuminate then check cables for damage and correct connection.Check the fuse in the car adaptor (see earlier section of the manual). Re-check by using the domestic mains adaptor. | |
| Monitor will not work Turn Power switch to ON. There is no battery in the monitor, so ensure that the external 12Vdc supply is working, by plugging directly to the monitor DC-IN socket.If working, check power supply cables for damage and correct connection.Check the fuse in the car adaptor (see earlier section of the manual). Re-check by using the domestic mains adaptor. | |
| Monitor shows no audio or video image | Check the AV connection cable between DVD player and monitor is connected correctly and plugs are fully inserted.Check for power to the monitor, see earlier section. |
| Second screen in a SDV48-AC / SDV49-AC system does not show the image from the other DVD player | Press the DVD / IN button on the remote control to enable this feature. |
Problem
Solution
| Battery will not charge Ensure the main power switch is set to OFF / CHARGE and an external power supply is correctly connected. Check the GREEN / RED battery indicator on the player illuminates. If the problem persists then a battery fault may be present, contact the NEXTBASE Authorised Service Centre. | |
| Player runs on battery, but for a short time only | Fully discharge the battery. Recharge fully by connection to power supply and setting power switch to OFF / CHARGE position. Wait until GREEN charge indicator illuminates. |
| Battery is exhausted; contact the NEXTBASE Authorised Service Centre. | |
| Player will not play a DVD and shows “Wrong Region.” | The region code of the disc inserted does not match the authorised region of the player. Perform a RESET to the default settings, to reset the DVD player to multiregional. See the SETUP section of this manual under PREFERENCES and then RESET to the default settings. |
| ZOOM remains on-screen whenever this function is selected. | This is normal and NOT a defect. During the zoom function, the FFWD, REV, PREV and NEXT do not work as the control is for the Up, Down, Left and Right Position of the Zoomed image. The ZOOM label remains on-screen to remind you of this fact. Exit the zoom function to enable the normal FFWD, REV, Prev and NEXT function once again. |
SDV48-A SDV49-A
SDV48-AM SDV49-AM
SDV48-AC SDV49-AC
Tragbarer 7- & 9-Zoll DVD-Player
Bedienungsanleitung
©
Sicherheitshinweise
SDV48-A / SDV49-A x 1 SDV48-AM / SDV49-AM x 1 SDV48-AC / SDV49-AC x 2
SDV48-AM / SDV49-AM x 2
SDV48-A / SDV49-A x 1 SDV48-AM / SDV49-AM x 1 SDV48-AC / SDV49-AC x 2
SDV48-A / SDV49-A x 1 SDV48-AM / SDV49-AM x 1
SDV48-A / SDV49-A x 1 SDV48-AM / SDV49-AM x 1
SDV48-A / SDV49-A x 1 SDV48-AM / SDV49-AM x 1 SDV48-AC / SDV49-AC x 2
SDV48-AC / SDV49-AC: 2,0 A
Abschrauben
natural_image
Line drawing of a device with control panel and buttons (no text or symbols)natural_image
Diagram of a medical device with attached tubing and rotating arrows indicating rotation (no text or symbols)natural_image
Line drawing of two connected devices with ports and cables (no text or symbols)flowchart
graph LR
    A["Chapter"] --> B["Title"]
    B --> C["All"]
    C --> D["Repeat off"]
flowchart
graph LR
    A["Repeat one"] --> B["Repeat folder"]
    B --> C["Repeat off"]
text_image
2X 3X 4X 1/2X 1/3X 1/4XSlide Show Menu Prev Next
text_image
128Kbps Mp3 TRACK01 Mp3 TRACK02 Mp3 TRACK03 Mp3 TRACK04 Mp3 TRACK05 00: 00 03: 43 001/008 Repeat Off P- P+text_image
CD RIP Options Track Speed Normal Track 01 03:56 Style 1284bps Track 02 03:56 Device USB 1 Track 03 03:56 SUMMARY Track 04 03:56 Selected Track 0 Track 05 03:56 Selected Time 50:50 Track 06 03:56 Start Exit Selected all Selected nanotext_image
CD RIP Ripping Selected track Track Progress Track 01 9% Total Progress Cancel SUMMARY Now ripping Track 01/01text_image
Video Setup TV Type PAL PAL TV AV-OUT Settings NTSC TV Screen Settings ▲ ▼ :Move ◀ :Return ▶ :Entrytext_image
Video Setup TV Type* PAL AV-OUT Settings Screen Settings ▲ :Move ←:Return ▶:Entrytext_image
Preference Setup Audio ENG English Subtitle Off French Disc Menu ENG Spanish Parental Default ▲ ▼ :Move ◄ :Return ► :Entrynatural_image
Diagram of a toaster front panel with a black explosion spike and control buttons (no text or symbols)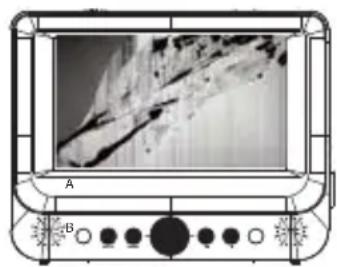
natural_image
Front view of a portable TV or audio device with a screen displaying a textured image and control knobs (no visible text or symbols)Pixelausfälle
NEXT BASE® one step further
SDV48_49 SERIES-NB ENG MANUAL A2