Filter System Pro Classic 600 - Water pump Swim & Fun - Free user manual and instructions
Find the device manual for free Filter System Pro Classic 600 Swim & Fun in PDF.


User questions about Filter System Pro Classic 600 Swim & Fun
0 question about this device. Answer the ones you know or ask your own.
Ask a new question about this device
Download the instructions for your Water pump in PDF format for free! Find your manual Filter System Pro Classic 600 - Swim & Fun and take your electronic device back in hand. On this page are published all the documents necessary for the use of your device. Filter System Pro Classic 600 by Swim & Fun.
USER MANUAL Filter System Pro Classic 600 Swim & Fun
natural_image
Black industrial water filter unit with pump and motor (no visible text or symbols)USER MANUAL
Filter System Pro Classic
600 (Art. 1042)
Accessories 3
Danish 6
Swedish.... 19
Finnish 32
Norwegian 45
English.... 58
German 71
Dutch 84
Polish 97
FILTER MATERIAL
Either Filterballs or sand can be used as a filter material.
Filterballs (Art. 1069): Besides a high filtration capacity (down to 1 micron), Filterballs are water-saving as you do not need to continuously backwash. Instead, you can simply wash the Filterballs in the washing machine (without soap), or by hand, when the season is over. Compared to other filter materials Filterballs have a minimal water resistance, which gives a higher water flow. This means that the filter system can circulate all the pool water faster, which in turn means less energy consumption. Another great advantage is the light weight of the Filterballs. This is great news for your back when it comes to emptying the filter tank! 100g Filterballs are equivalent to an entire 3.57 kg sand.
Filter sand (Art. 1760): Sand is historically the most common filter material. And with good reason. The natural material picks up particles down to 40 micron. On the other hand, sand, and especially wet sand, is mega heavy. Therefore, it is recommended that the filter system is located in its intended position before the tank is filled with sand. Sand also requires ongoing backwashing, a minimum of 2-4 times per month, in order to clean the sand. This means that you use more water when you choose sand as a filter material. In a pool with 30-40,000 litres of water, between 180 and 240 litres of water is used per backwash.
Powerful pump and large filter tank
The system comes with a powerful pump that is proportionate in capacity to the filter tank size and the pool volume specified in the specifications below. The pump must have enough power to be able to circulate all the pool water 5 times a day - through the filter material. As a general rule, the cleaning capacity of the pump must as a minimum be the pool water volume divided by 5. The pump is suitable for use in salt water.
Fitting and hose connection
The system can be mounted directly on all pools with a regular pump outlet, and is suitable for use with standard hoses of ∅50 mm. Filter material and hoses for pools are not included.
| Specifications | Sand Filterballs | |
| Operation over pressure 1.5 bar | ||
| Cord length including plug 1.5 metres | ||
| Max. ambient temperature 35 °C | ||
| Min. ambient temperature -4 °C | ||
| Maximum pool size in litres 60.000 liter | ||
| Pump power 600 W | ||
| Pumpe Flow Rate 17.000 l/h | ||
| Qmax l/min - | ||
| Hmax m 10 | ||
| Flow Rate Filtermateriale 12 | 180 l/t 12.700 l/t | |
| Tank volumen | 75 L | |
| Volumen Filtermateriale | 75 kg | 2.100 g |
| EI-installation | Automatisk differential switch (30 mA) | |
| Pressure gauge | Yes | |
| Pre-filter | Yes | |
| Filter tank size mm | ∅ 500 | |
| Power | 230V/50 Hz | |
| EI-installation | Automatic differential switch (30 mA) | |
| Hose connection mm | ∅32/38/50 | |
| Pump type | Self-priming | |
PURE BATHING PLEASURE
Swim & Fun Scandinavia offer water care products and pool accessories for all pool sizes. Choose between multi-products such as our EasyPool disposable dispenser that keeps the water clean and inviting, even when you are not at home. Or try the practical chlorine-free Combi Tabs that are easily added to the water via a floating dispenser or directly into the skimmer. Do you prefer to dose the water care products separately, they can all be pur-chased individually in practical 1 l/1 kg tubs - all with childproof caps and detailed instructions. In that case, we recommend the practical spoon with built-in weight.
Keep in mind: successful water care is based on a balanced pH level. The water must be neutral (value between 7.0 and 7.4). You can easily test the water's pH level with Swim & Fun Test Strips. If the value is below 7.0 raise with pH Plus. If above 7.4 lower with pH Minus.
Besides pools, sand filter systems and basic pool accessories Swim & Fun offer many opportunities to make the bathing experience even better: Outdoor solar showers, Sun heaters, LED pool lamps and much more.

text_image
JOIN OUR NEWSLETTER and get tips, tricks and good advice about pool care directly to your mailbox!Visit swim-fun.com and learn more about pool care.
POOL CLEANERS
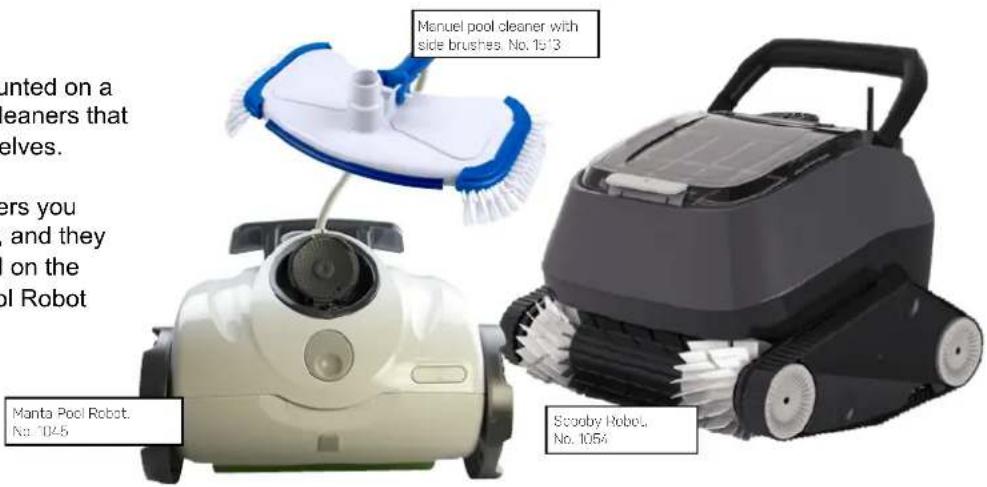
There are both manual ones mounted on a telescopic rod and robotic pool cleaners that do the job perfectly all by them selves.
Swim & Fun's robotic pool cleaners you simply connect to a power outlet, and they will automatically clean your pool on the bottom and/or sides. Scooby Pool Robot even cleans the pool walls and waterline.
text_image
Manuel pool cleaner with side brushes. No. 15'13 Manta Pool Robot. No. 1045 Scooby Robot. No. 1054HEAT PUMPS PLUG & PLAY
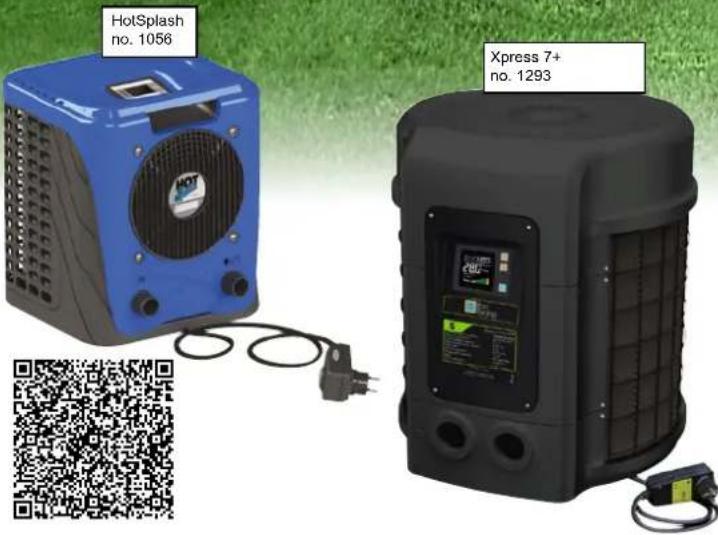
• Zero cost of installation
• High energy efficiency
- Quiet
- Easy to operate
text_image
HotSplash no. 1056 Xpress 7+ no. 1293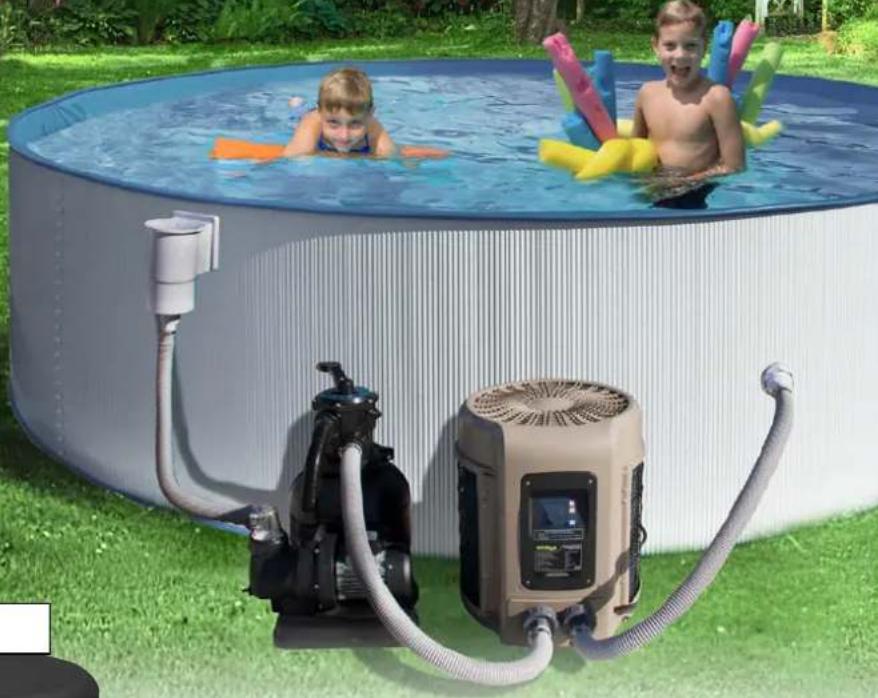
natural_image
Outdoor baby pool with two children in swimming, connected by a water purifier and coiled tubing (no text or symbols visible)The Swim & Fun Xpress heat pump collects energy from the air and transfers it to the pool water. For each used kW the heat pump produces 5 kW to the pool. It is a very energy efficient and environmentally friendly solution, because more than 80% of the energy produced by the Xpress heat pump, is collected from the air.
You can enjoy the bathing experience in the comfortably heated pool water, even though the pump is operating, as the pump is also very quiet.
COVERS
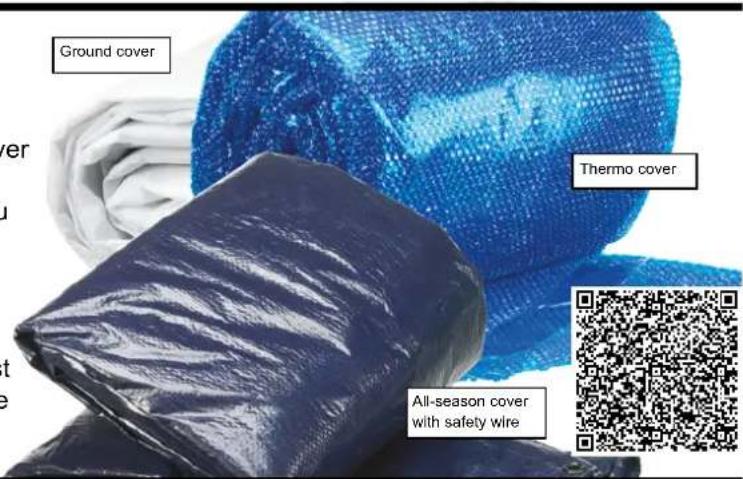
There are pool covers for various purposes. A standard pool cover that prevents dirt in the water. A summer cover with thermo function will help maintain the temperature of the bath water during the season, and is a must if you have solar heaters or heat pumps connected to your pool. A winter cover, or all-season cover, with wire lock provides security and protects against evaporation. At the same time it prevents sunlight to enter the pool, which can cause increased algae development. And last but not least, a ground cover under the pool protects the liner from sharp elements.
text_image
Ground cover Thermo cover All-season cover with safety wire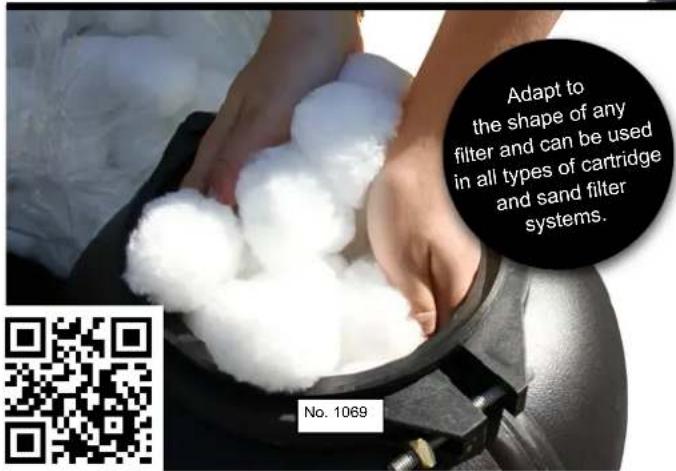
text_image
Adapt to the shape of any filter and can be used in all types of cartridge and sand filter systems. No. 1069FILTERBALLS GIVES YOU CRYSTAL-CLEAR POOL WA- TER
Filterballs have a superior filtering effect compared to normal filter sand or loose cartridge filters.
Filterballs form an effective filter layer that adapts to the shape of any filter and catches suspended particles in the water down to 10 micrometres. (Filter sand catches suspended particles down to 40-50 micrometres.)
Filterballs are also much easier to handle – 700 grammes of Filterballs replace 25 kg of filter sand. Read more at swim-fun.com and find your nearest distributor.
natural_image
Woman in black swimsuit standing outdoors near a showerhead and stone fence, surrounded by greenery (no text or symbols visible)SOLAR SHOWERS
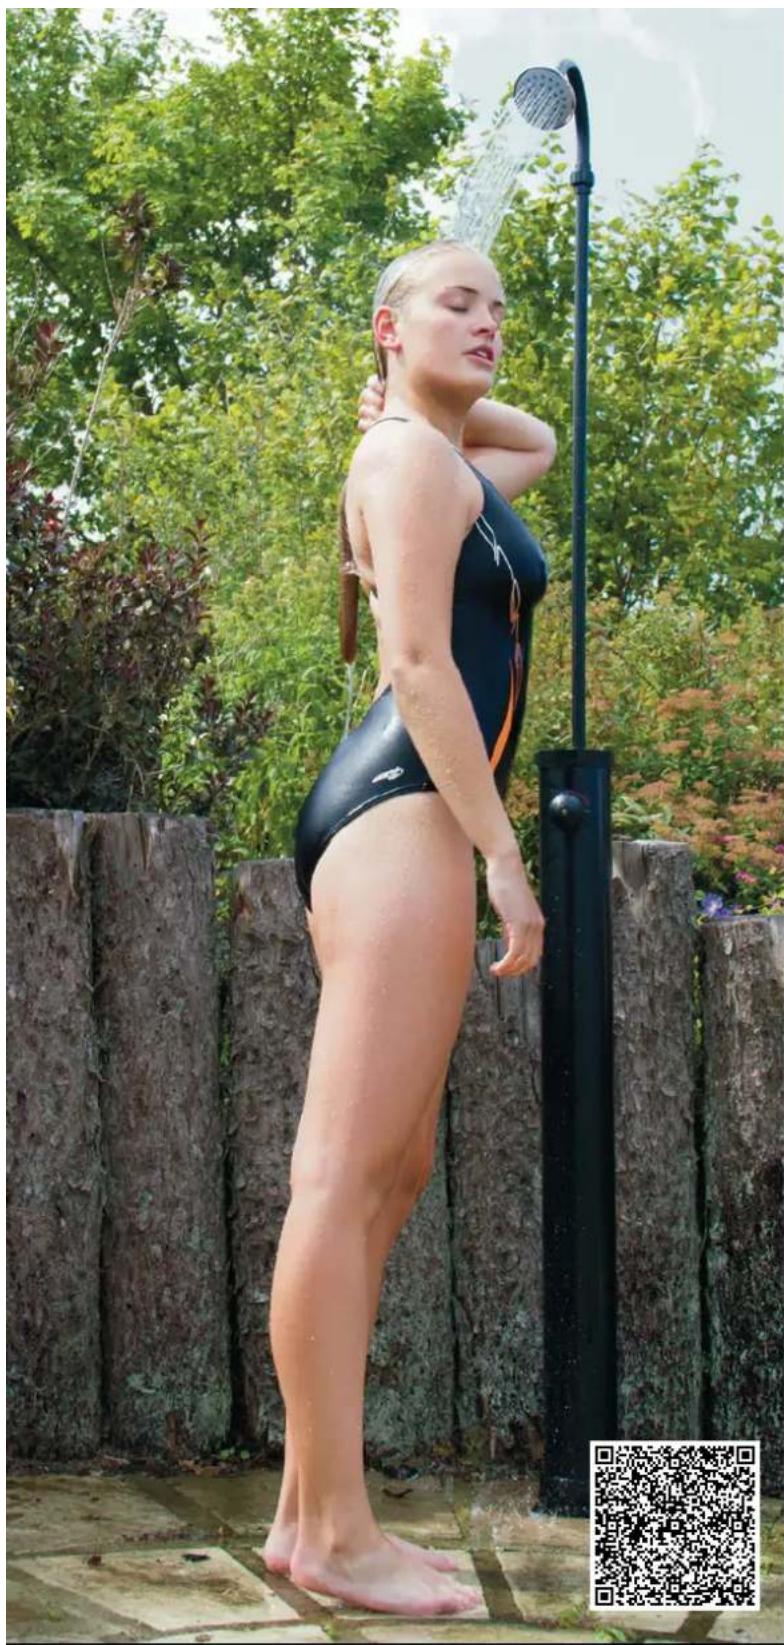
If you jump in the pool without rinsing yourself under a shower first, you add 200 times more bacteria to the poolwater. A garden shower near the pool makes it easy for everybody to take a quick rinse before dipping in.
And why settle for cold water when you can choose a solar shower where the water is heated by the sun's rays completely for free.
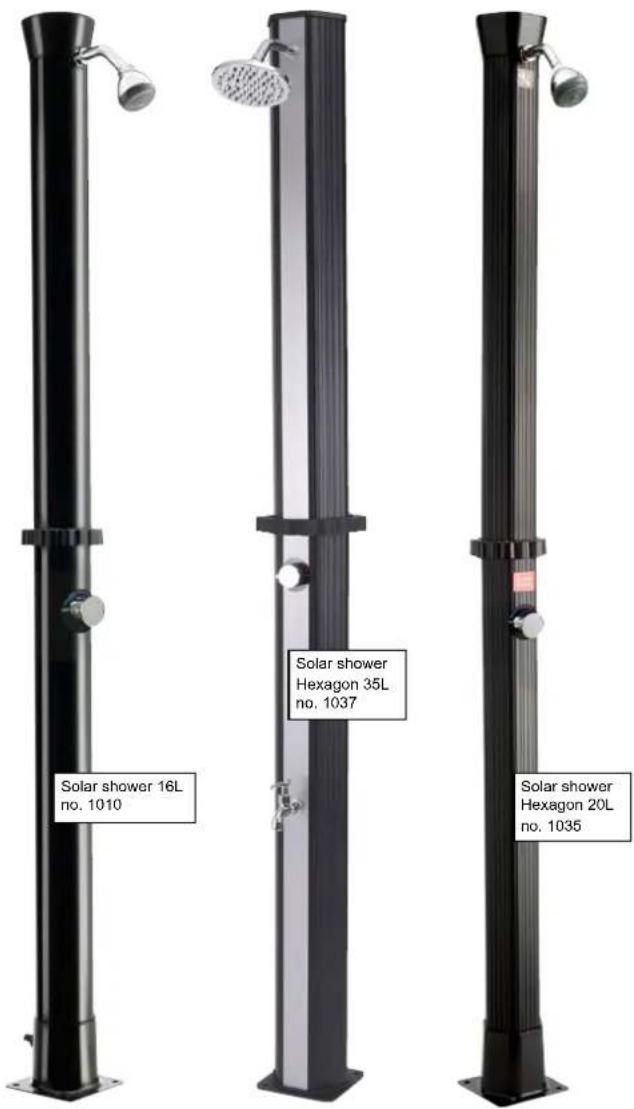
Our solar showers are easy to install as you simply connect it to a garden hose.
text_image
Solar shower 16L no. 1010 Solar shower Hexagon 35L no. 1037 Solar shower Hexagon 20L no. 1035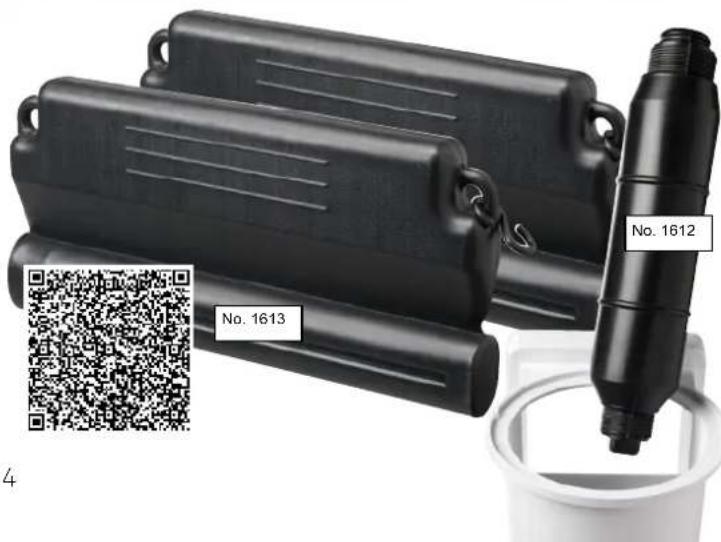
text_image
No. 1612 No. 1613 4AVOID FROST DAMAGES TO THE POOL, LINER AND SKIMMER
When pools are left with water during the winter, frost may expand the water, thus causing damage to the liner and walls. Winterfloaters and skimmer iceprotectors equalizes pressure to avoid damage.
The winterfloaters can be joined and fitted with a cord across the pool. If your pool is large, you may want to connect several together.
Indholdsfortegnelse
natural_image
Black industrial water filter unit with pump and motor (no visible text or symbols)| Specifikationer | Sand Filterballs | |
| Anbefalet poolstørrelse 60 | .000 liter | |
| Pumpekraft 600 W | ||
| Pumpe Flow Rate 17.000 | /t | |
| Flow Rate Filtermateriale | 2.180 l/t 12.700 l/t | |
| Tank volumen 75 L | ||
| Volumen Filtermateriale | 75 kg | 2.100 g |
| Slange tilslutning (mm) | 32/38/50 | |
| El-installation | Automatisk differential switch (30 mA) | |
natural_image
Technical line drawing of a mechanical device with no visible text or symbols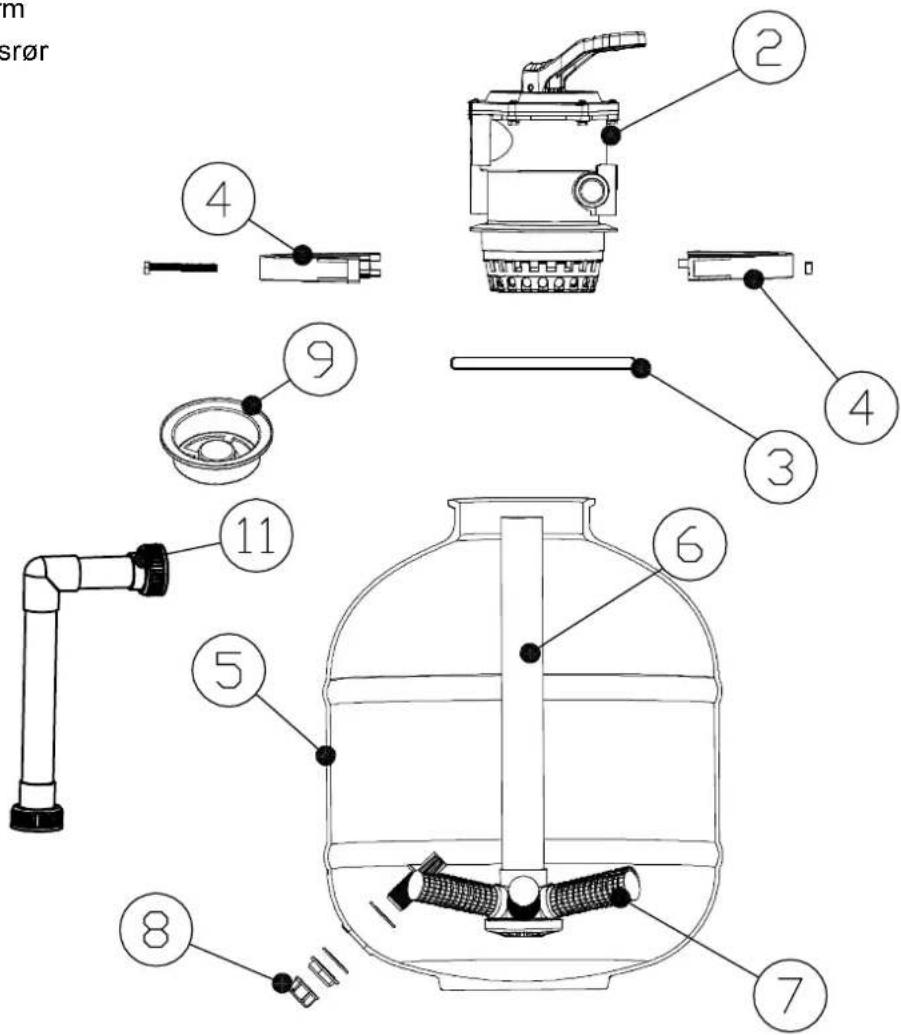
text_image
m srør ② ④ ③ ④ ⑤ ⑥ ⑦ ⑧ ⑨ ⑪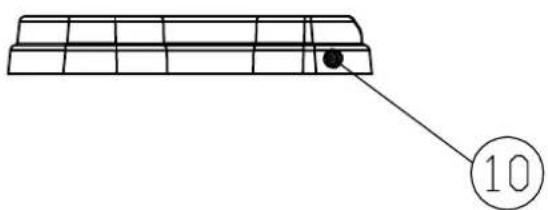
natural_image
Simple line drawing of a rectangular structure with a black dot and a circled number 10 pointing to its edge (no text or symbols beyond the number)4.1 Samling af filterdele
natural_image
Illustration showing three steps of a container being filled: adding a lid, pouring liquid into a jar, and adding granular material (no text or symbols)natural_image
Technical line drawing of a pressure vessel and pump assembly (no text or symbols)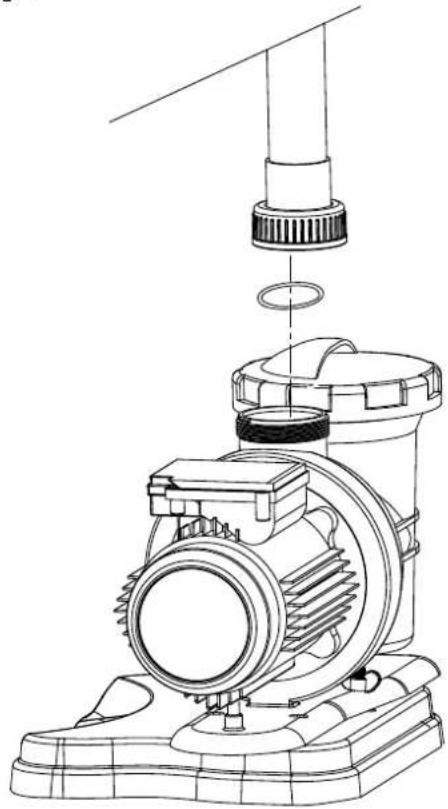
natural_image
Technical line drawing of a mechanical pump assembly with no visible text or symbolsnatural_image
Black industrial water filter unit with pump and motor (no visible text or symbols)natural_image
Technical line drawing of a mechanical pump or motor assembly (no text or symbols)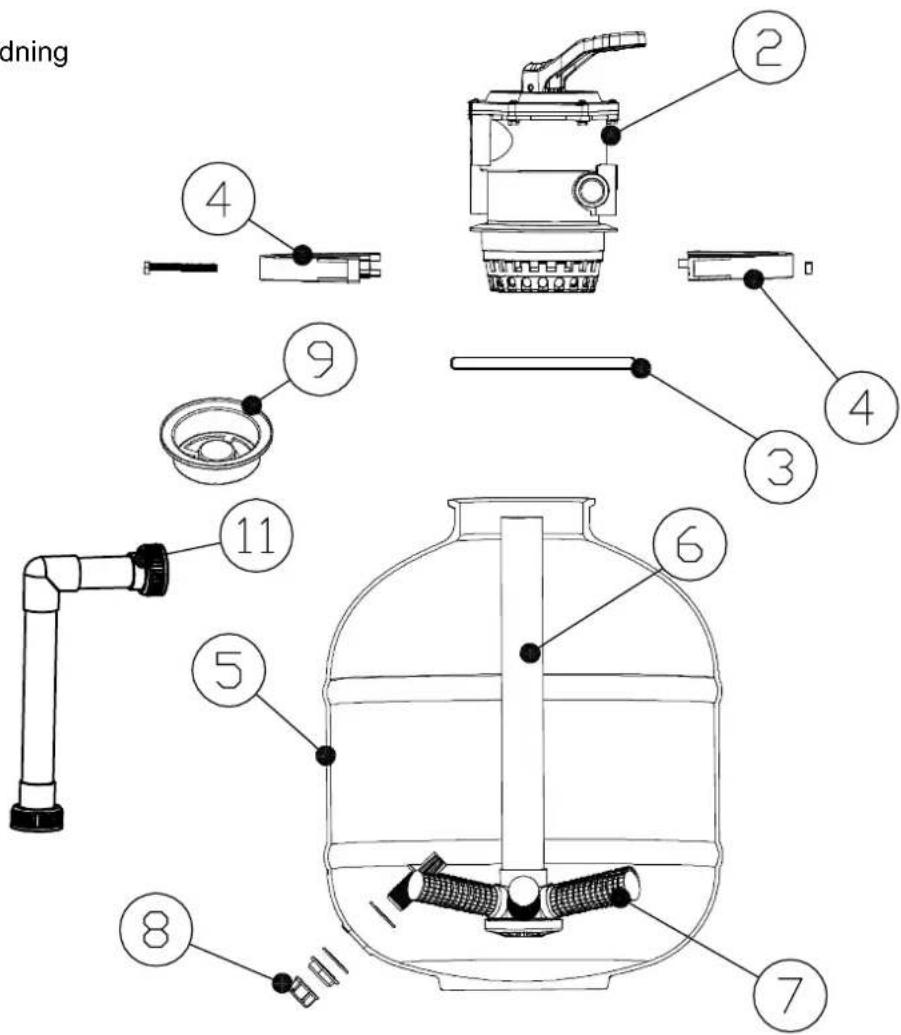
text_image
dning ② ④ ⑨ ③ ④ ⑪ ⑤ ⑥ ⑦ ⑧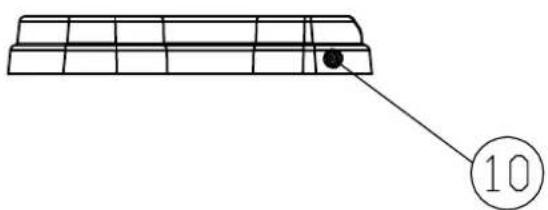
natural_image
Simple line drawing of a rectangular structure with a black dot and a circled number 10, no text or symbols present.natural_image
Illustration showing three steps of a container being filled with liquid, including pouring and adding (no text or symbols)natural_image
Technical line drawing of two mechanical pump assemblies with internal components and mounting brackets (no text or symbols)text_image
Fig 9 ① ② ③ ④natural_image
Black industrial water filter unit with pump and motor (no visible text or symbols)natural_image
Technical line drawing of a mechanical device with no visible text or symbols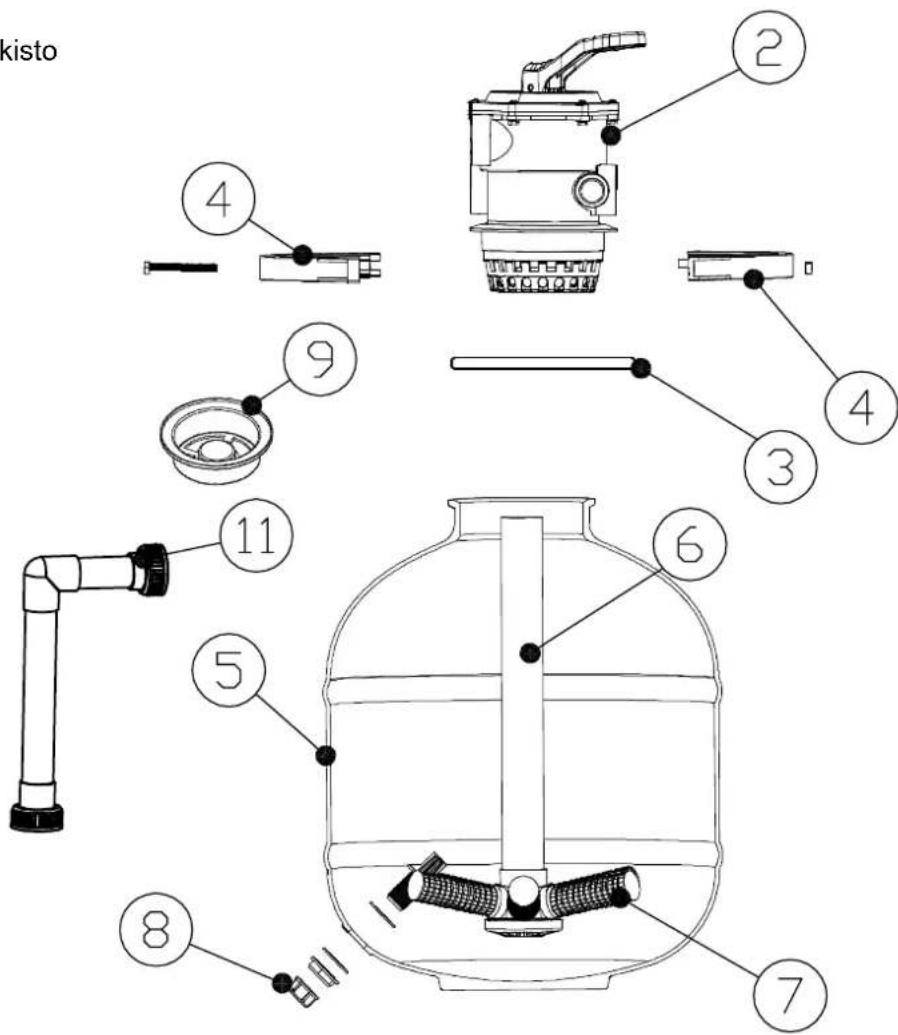
text_image
kisto ② ④ ⑨ ③ ④ ⑪ ⑤ ⑥ ⑦ ⑧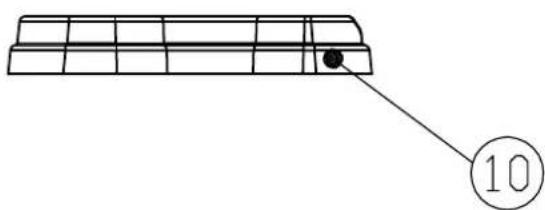
natural_image
Simple line drawing of a rectangular structure with a black dot and a circled number 10, no text or symbols present.natural_image
Technical line drawing of two mechanical components with no visible text or symbolsnatural_image
Black industrial water filter unit with pump and motor (no visible text or symbols)natural_image
Technical line drawing of a mechanical device with no visible text or symbols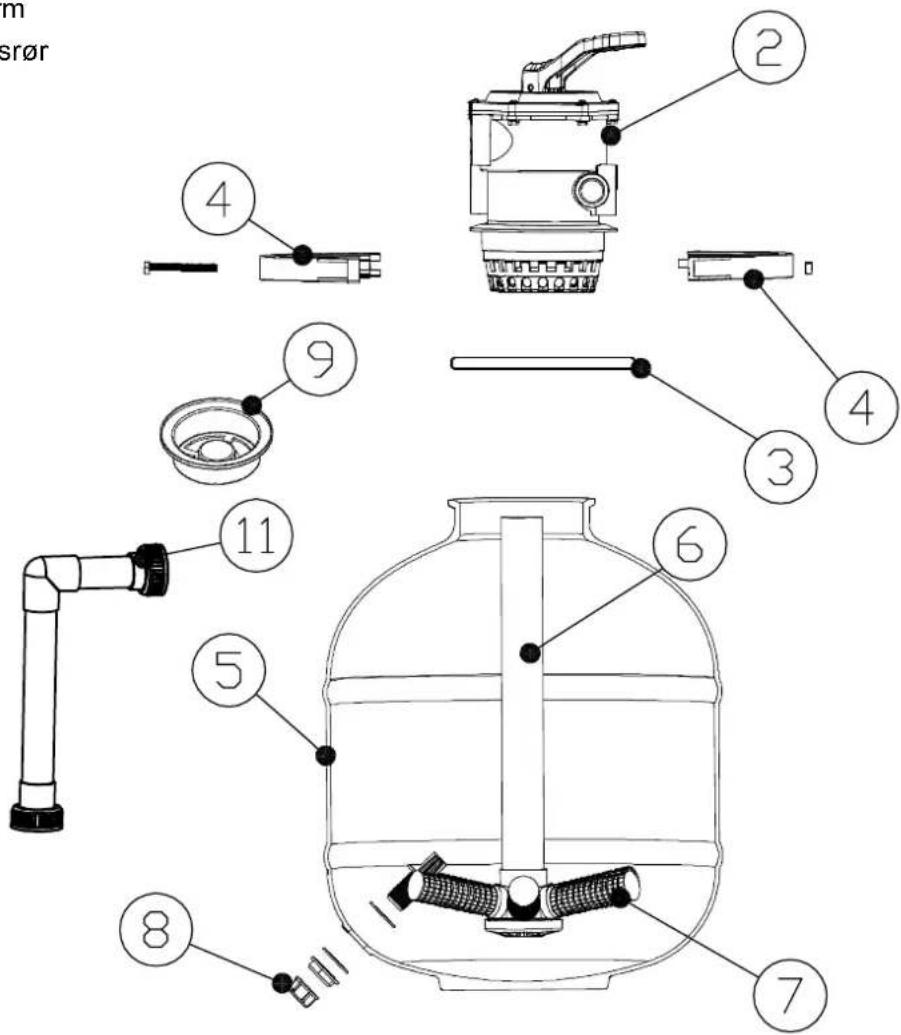
text_image
m srør ② ④ ③ ④ ⑤ ⑥ ⑦ ⑧ ⑨ ⑪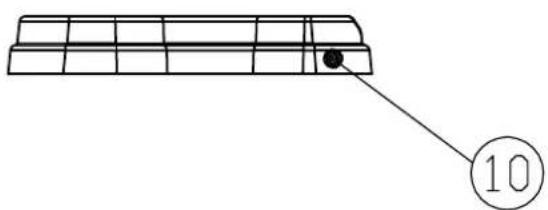
natural_image
Simple line drawing of a rectangular structure with a black dot and a circled number 10, no text or symbols present.natural_image
Illustration showing three steps of a container being filled with liquid, labeled Figure 4 and Figure 3 (no text or symbols on the diagrams themselves)natural_image
Technical line drawing of two mechanical pump assemblies with internal components and mounting brackets (no text or symbols)- Connecting to power source 60
- Instructions for assembly 61
- Parts and installation.... 62
4.1 Filter parts installation 63
4.2 Connection of hosepipes.... 65
-
Start-Up and Backwash 65
-
Cleaning the bottom of the pool 66
- Storing in winter 68
- Maintenance suggestions and accessories. 68
- Trouble shooting.... 69
- Spare parts.... 70
| Specifications | Sand Filterballs | |
| Recommended pool size 60,000 liter | ||
| Pump Power 600 W | ||
| Pump Flow Rate 17,000 l/h | ||
| Flow Rate Filter Material 12,180 l/h 12,700 l/h | ||
| Tank volume 75 l | ||
| Volume Filtermaterial 75 kg 2,100 g | ||
| Hose connection (mm) 32/38/50 | ||
| Electrical installation | Automatic differential switch (30 mA) | |
natural_image
Black industrial water filter unit with pump and motor (no visible text or symbols)Claims & technical questions
Contact Swim & Fun Scandinavia at swim-fun.com/Support
Should it be necessary to submit the unit for service, it must be well packaged so as to protect it from damage during transport. It is your responsibility that the unit will arrive safely. Add name, address, phone number and e-mail! Always remember to explain what is wrong with the unit.
1. In general
Filtermateriale is not included. Your Pool Filter System has been engineered and manufactured to our highest standard for dependability, ease of operation and safety. With proper care, it will give you years of durable, trouble-free performance.
Filtersand
First use appr. 25 kg filter sand particle size of 0.7 mm – 1.2 mm to completely cover the sand guard filters on the manifold. Then fill the tank up by using appr. 50 kg filter sand particle size of 0,40 mm – 0,80 mm.
Filterballs (Art. 1069)
Fill with 2,100 g. Filterballs
Important!
Prior to assembling and using this product, carefully read and adhere to all caution and important notices located throughout this manual. Failure to comply with these instructions may damage the product or cause serious personal injury or death.
Due to the constant technical evolution of this product, we reserve the right to incorporate modifications to the product for its betterment.
1.1 Safety warnings
Safety details for the electrical installation
- Risk of suction entrapment hazard, which, if not avoided can result in serious injury or death. Do not block pump suction at the pump or in the pool as this can cause severe injury or death.
- Electrical wiring MUST be installed by a trained professional and adhere to local code and regulations. NEVER service this unit with the electrical power cord connected.
- Avoid electric shock. DO NOT USE power extension cords. The electrical supply cable must not be buried. Make sure that the electrical cable is not damage (for example by a lawnmower).
- Connect ONLY to a Ground-Fault Circuit Interrupter (GFCI) power outlet. Consult a qualified, professional electrician for safe and proper installation of the required electrical outlet.
- Incorrectly installed equipment may fail, causing severe injuries or damage to the pump-filter system.
- Never place or submerge the filter and/or pump in water.
- Trapped air in the pump-filter system may cause the tank cover to be blown off which can result in death, serious injury, or damage to the pump-filter system. Ensure all air is out of the system before operating.
- NEVER use the valve lever as a handle to carry or lift the filter.
- NEVER change the position of the Multi-Port Valve while the system is operating. ALWAYS unplug the system first.
• Install this product at least 3.5 m away from the pool to prevent children from using the system to access the pool, and KEEP CHILDREN AWAY from all electrical equipment. - Never PLUG or UNPLUG this unit from an electrical source while standing in water or with wet hands.
- Do not use any petroleum based lubricant. Petroleum based products will destroy plastic parts.
- Do NOT operate the system while the pool is in use.
- NEVER ALLOW CHILDREN TO OPERATE THIS EQUIPMENT.
- The water temperature must not exceed 35^ or drop under minus 4^ C .
1.2 Warranty
The warranty period is 24 months and is according to the national laws regarding consumer purchase. The warranty period applies from the date of purchase on your purchase receipt. The receipt must be presented at service calls during the warranty period. It is therefore important that you save your sales receipt. The manufacturer guarantees safe operation and product liability based on the following specific conditions:
- Filter system installed and used in accordance with the manual's instructions.
- Use only original spare parts
The warranty does not cover normal wear and tear, scratches, abrasions or cosmetic damage.
More specifically, the warranty does not cover damage caused if:
- Improper use or handling, including frost damages
- Fall or shock
• Repairs, alterations or etc. performed by anyone other than Swim & Fun Scandinavia - Improper storing in extremely high or low temperatures, including frost.
Wear include:
- O-rings
- Manometer
- Leaks occurred between seals and hoses and hose connections in general.
In the event of guarantee claims please contact your dealer. When returning a defective product, it must be packed in such a way that it is not damaged during transport. It is your responsibility that the product arrives safely. You must state your name, address, phone number and preferably your e-mail address, to enable returning the product to you! Always remember to state what is wrong with your product.
Beware!
When loosen the filter hose couplings always make sure that the hoses on both suction and pressure side are closed, to prevent water from getting into the pump. There is no warranty for damages caused by flooding of the pump.
2. Connecting to power source
The pump must be connected to the electric network by a 30 mA differential switch. Always disconnect the pump from the electric network before carrying out any kind of operation on the filter or pump.
Always remember to use a ground plug and an HFI / HPFI relay.
3. Instructions for assembly and installation
For the Filter System to function, it needs a skimmer (a device to clean the pool water surface). It can be a skimmer built into the steel wall, or a raised skimmer fixed to the steel wall.
To order replacement parts, please contact your supplier indicating the type of the system/pool.
Beware!
Disconnect the plug before starting to do any work.
Before installing the filter pump unit, identify the position in which it is to be installed, as once it has been filled up with sand, the filter is hard to move due to its weight.
Determine the place for the filter system between the skimmer and the pump inlet with af minimum distance of 3.5 meter between the pool wall and the filter system. We recommend placing the filter system on concrete slabs or similar. The filter system must in no way be placed in a low place or directly on the earth, where there is a risk of flooding or overheating of the motor.
Inground or partially integrated pools
Always place the filter system under the water surface in the pool and in level with the pool floor in the pool, so that the water can flow naturally towards the pump.
Is the system used with an inground pool, you have to place the filter system correspondingly lower into a shaft/pit in the ground, so the water can flow by itself into the pump. Be sure that the shaft/pit stays dry. There should be an outlet/drain to lead the water out of the shaft/pit. It is also advisable to install a submergible pump with a float switch in case of flooding. Check that the installation is in no way closed hermatically, this could damage the pump due to the formation of water condensation.
The size of the pit must be big enough to allow maintenance or repair of the system. Contact your supplier for necessary spare parts like the flexible tubes, the metal clips or the filter material (not included).
4. Parts and installation
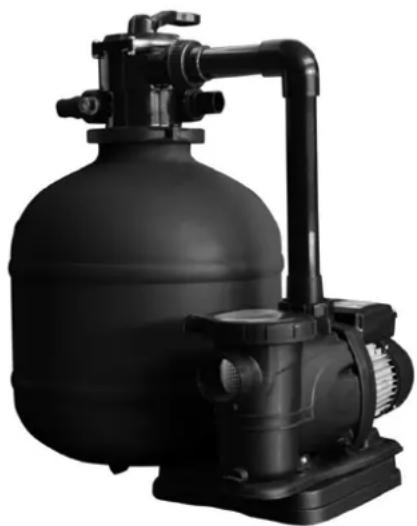
The filter system is made up of the following parts
- Pump
- Valve
- Gasket
- Closing flange
- Filter tank
- Tube with a manifold
- Small sand guard filters
- Drain valve
- Spignot
- Supporting base
- Tube - hose pipe
natural_image
Technical line drawing of a mechanical device with no visible text or symbols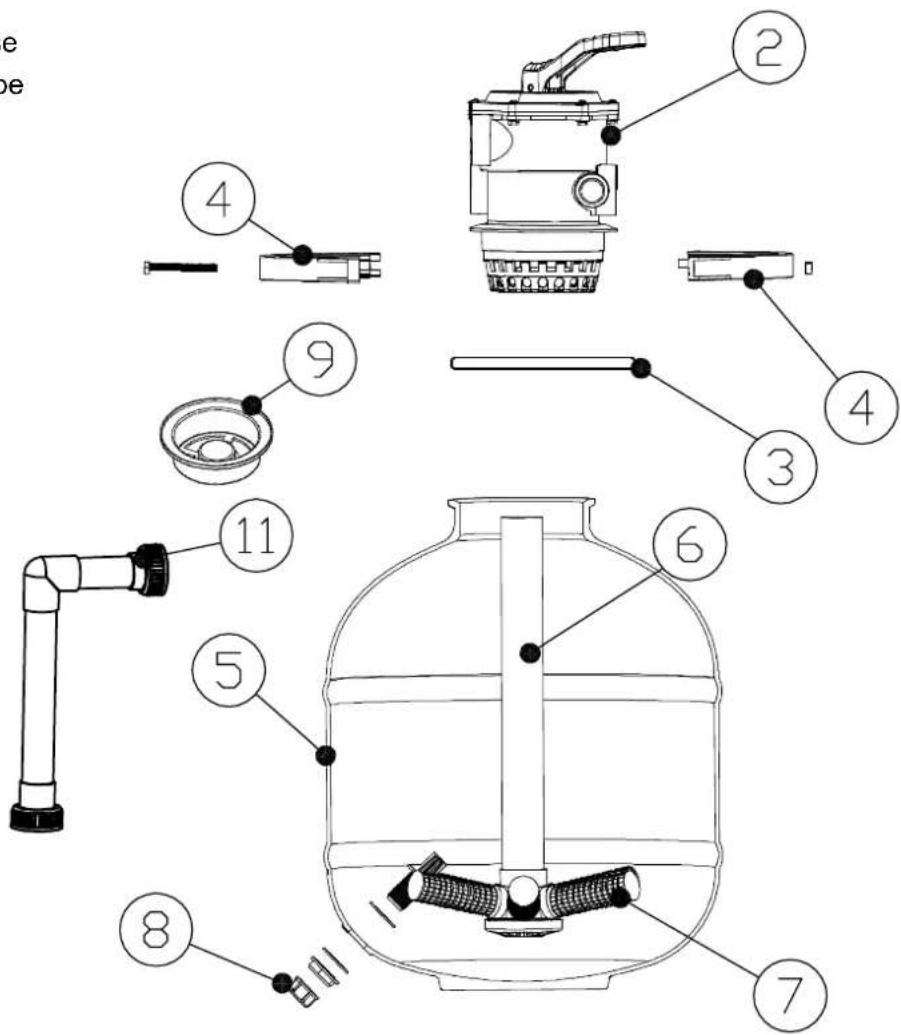
text_image
Technical diagram of a water pump assembly with numbered components for identification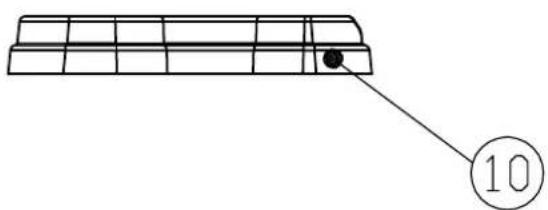
natural_image
Simple line drawing of a rectangular structure with a black dot and a circled number 10 pointing to its edge (no text or symbols beyond the number)4.1 Filter parts installation
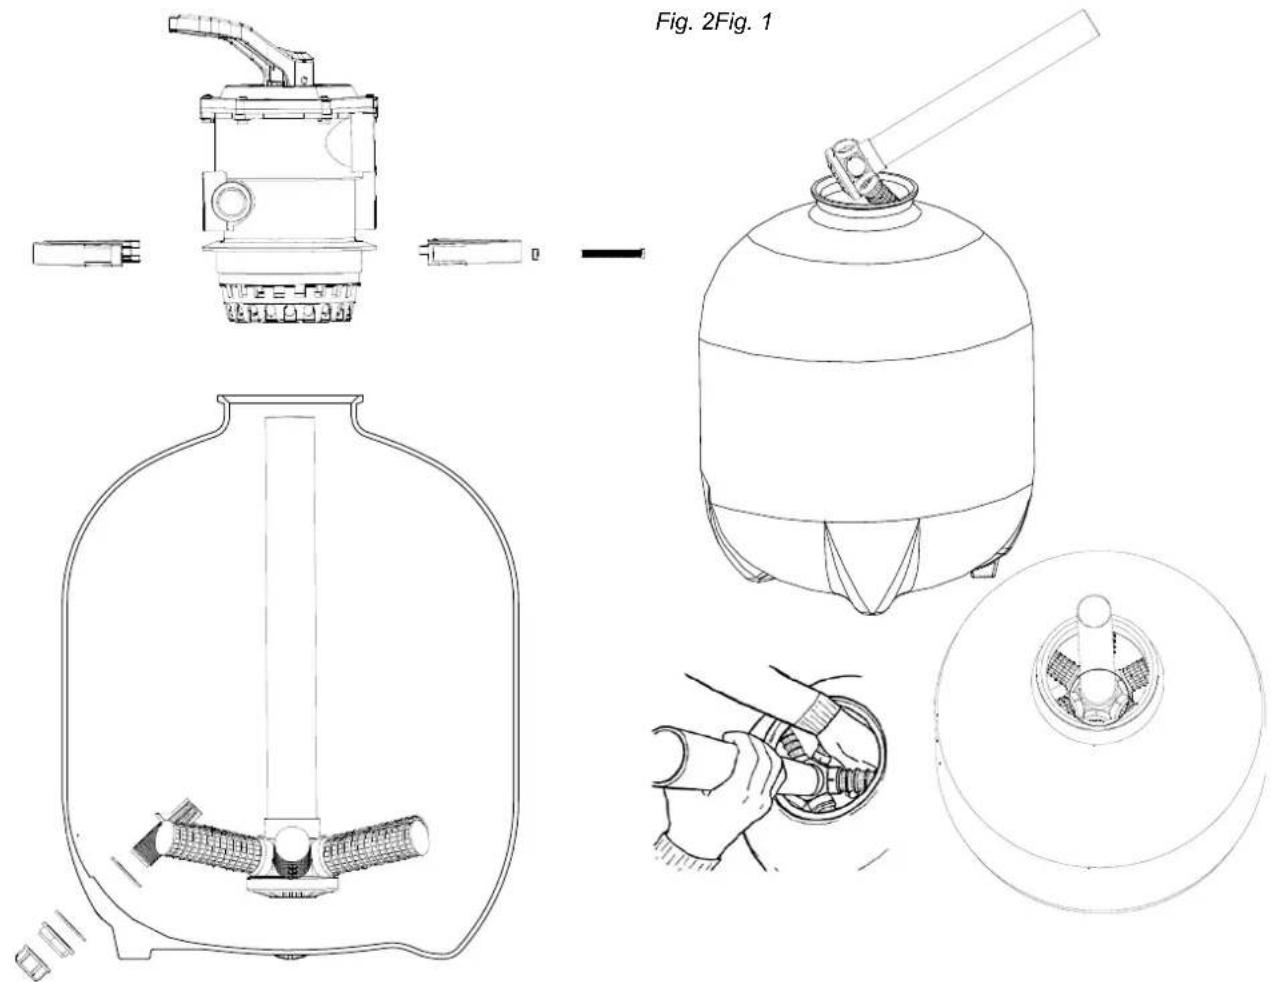
Insert the tube with the manifold in the tank (fig.1) and screw the small sand guard filters to the manifold (fig.2).
text_image
Fig. 2Fig. 1Place the completed manifold on the foundation in the middle of the tank and fill halfway with water to stabilize it. Make sure that the star-shaped gauze is well centralized in the bottom of the filter and that the purge screw is tight.
Fill the tank with filtermaterial (see volume under section 1).
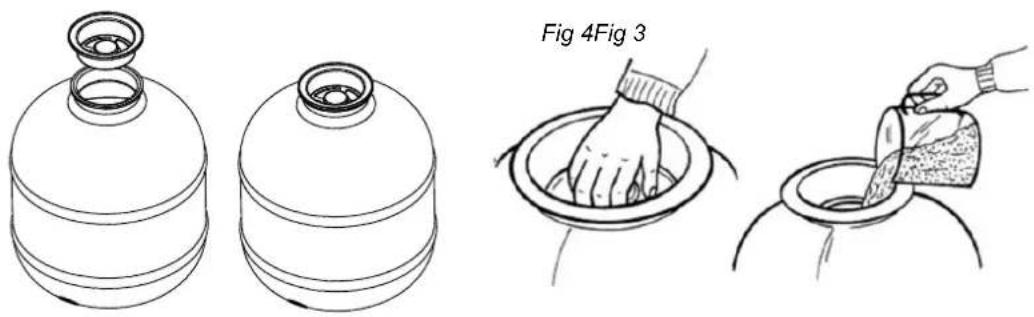
If you use sand: To prevent sand from getting into the manifold during filling, and make sure that the tube is centered on the manifold, place the spigot (part no. 9) on the mouth of the container as shown in fig. 3 & 4.
natural_image
Illustration showing three steps of a container being filled with liquid, including pouring and adding (no text or symbols)Remove the spigot and clean the filter mouth carefully.
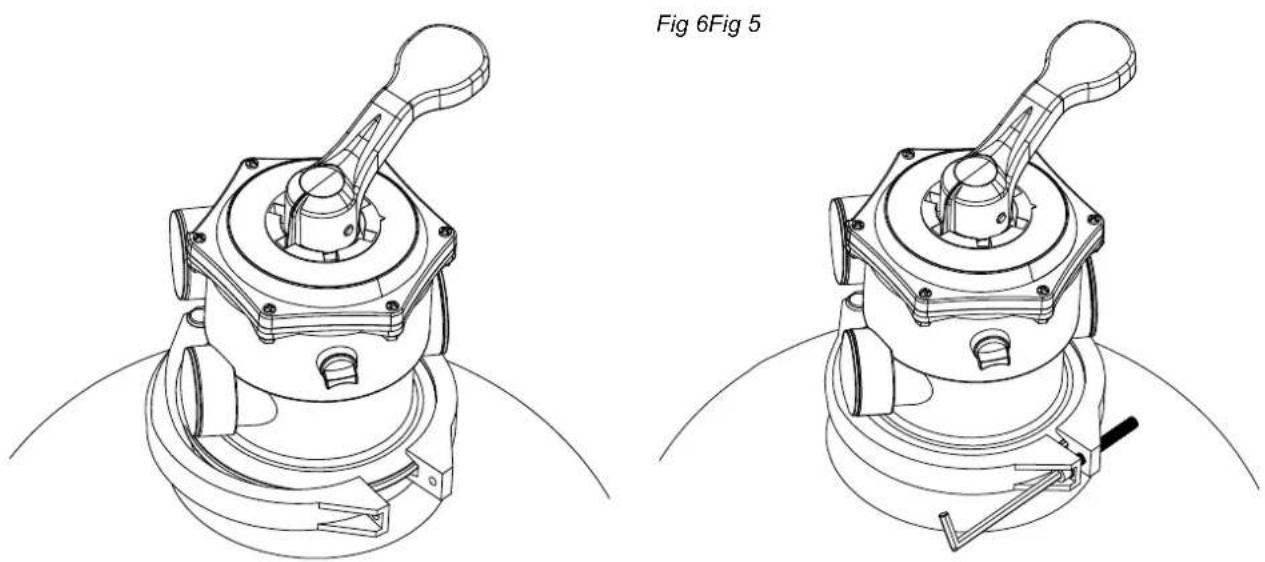
Now put the valve as well as the joint onto the upper edge of the filter. The connection between the upper part of the filter or valve is made with the collar. The collar is secured with a screw and a nut (see fig. 5 & 6).
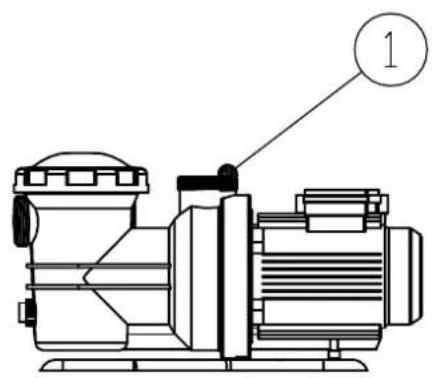
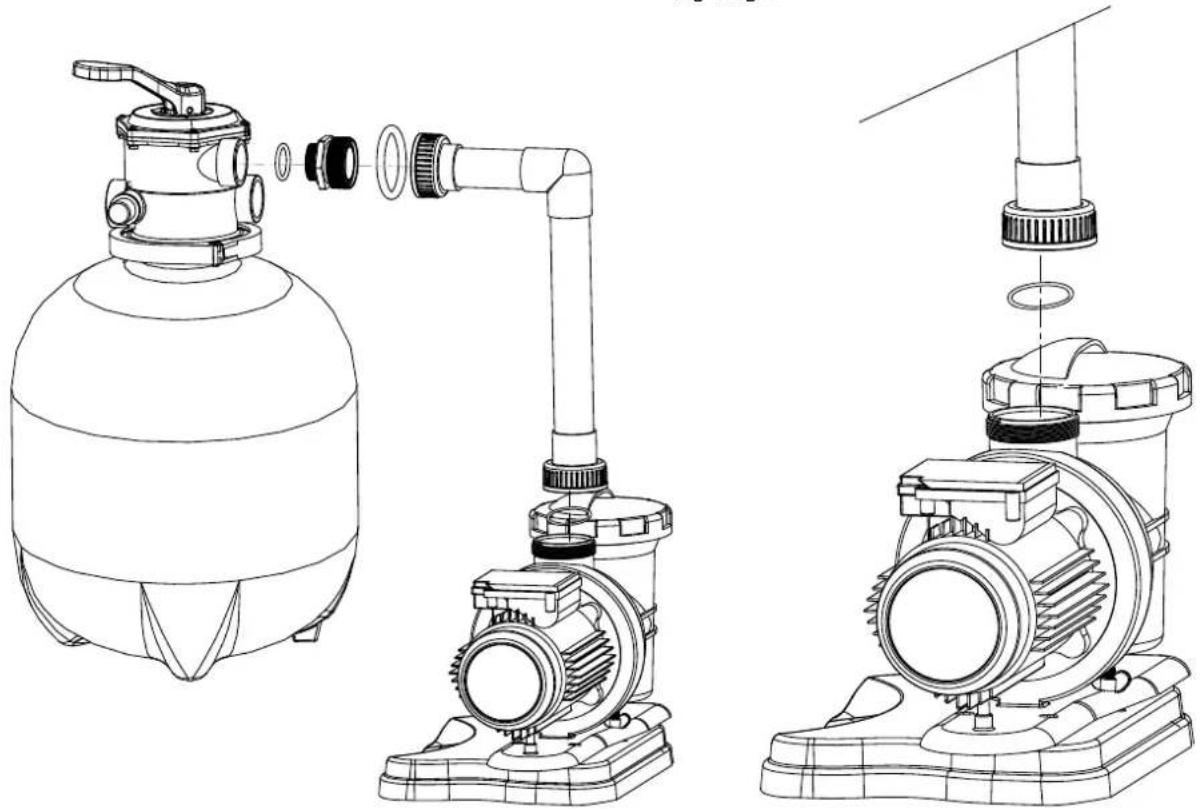
Connect the pipe with the pump and valve properly (fig. 7 & 8).
Fig 8Fig 7
natural_image
Technical line drawing of two mechanical pump assemblies with internal components and mounting brackets (no text or symbols)Finally, install the hoseconnectors and hoses that connect the filter system to the pool. Make the joints watertight with PTFE tape.
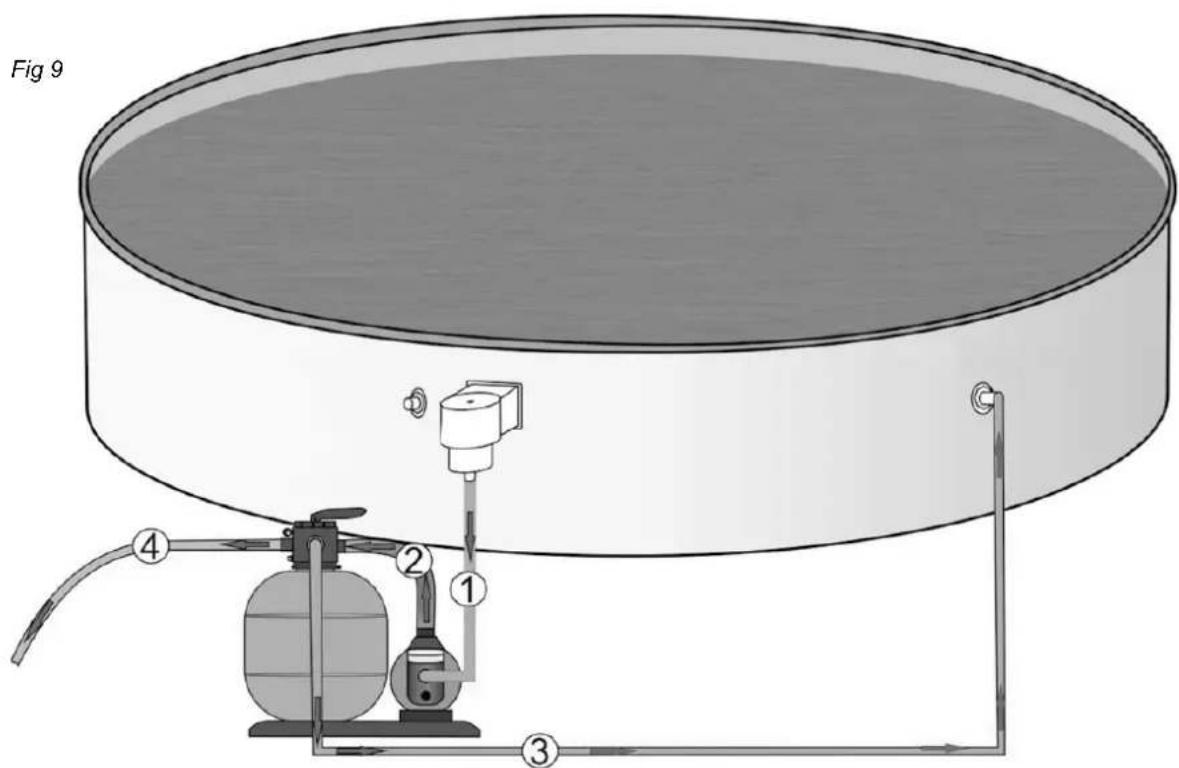
4.2 Connection of hosepipes to the pump
- Skimmer Circuit: Connecting the skimmer to the hose connection in the front of the pump.
- Vacuum hosepipe: Joining the upper connection of the pump to the hose connection designated "PUMP" on the valve.
- Return hosepipe: Joining the valve connection designated "RETURN" to the inlet connector of the pool.
- Wastewater hosepipe: Joining "BACKWASH" to a hosepipe directed to a water drain.
Secure all the connections with metal clips.
text_image
Fig 9 ① ② ③ ④5. Starting up & Backwash procedure
The pool must be full of water up to the mid hight of the skimmer. The water must circulate to the pump. (Be sure that the tank is placed under the water surface, so the water can flow naturally in the hose towards the pump.)
Now purge the air from the filter system. If some exists, open slightly the top of the pre-filter of the pump until the water enters the pre-filter.
Warning!
The filter system must no be used without water.
The water ensures the cooling. The substitution guarantee does not apply in the case of use without water.
Place the valve selector in position BACKWASH. Only this way can the pump be started. Begin a cycle of BACKWASH of 2 to 3 minutes. Then switch off the pump and put it in RINSE position.
Important note!
Before changing the position of the selector valve, STOP the pump.
The RINSE cycle lasts +/- 30 seconds. Switch off the pump again and put the selector valve in FILTRATION position. Evacuate the water from BACKWASH & RINSE to the hosepipe or onto the lawn.
We recommend doing 2 filtration cycles of 4 to 5 hours a day.
It is also in FILTRATION position that the pool floor is vacuumed. After the vacuuming of the pool floor or when the pressure increases (2 or 3 levels) on the gauge, it is necessary to do a RINSE cycle.
After a BACKWASH, it is imperative to do a RINSE cycle for about 30 seconds. This permits the sand to be deposited in the filter.
The EMPTY mode also permits vacuuming the pool floor and leading impurities (e.g. algea) directly to a water drain instead of returning it to the filter material. During this cycle the water from the bottom of the pool is vacuumed to the exterior. Afterwards water must be added to restore the water level in the pool.
Note when using filter sand
We recommend that you run the BACKWASH procedure minimum once a week.
The filtering process leads to a continuous capture of impurities in the filter sand. This ongoing process will lead also to an increased pressure inside the tank, when the water are pressed through the filter material. The filter system manometer shows the pressure inside the tank. If the pressure rises with approx. 0.2 -0.3 bar above the first gauges level (approx. 0.4 bar) when the filter and sand was completely new and pure, it is time for a backwash.
6. Cleaning the bottom of the pool
The vacuuming of the pool floor is carried out in FILTRATION position of the valve.
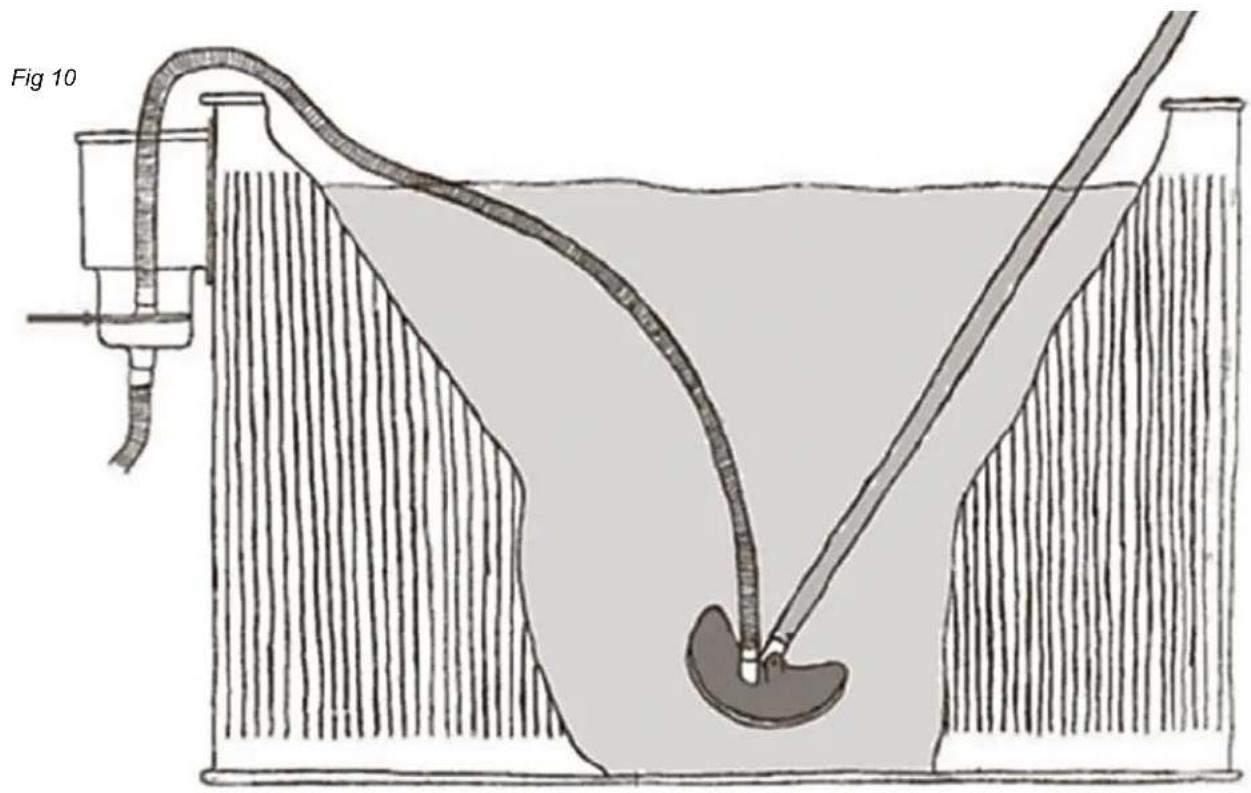
Switch the pump off. Use a hose clamp to connect a pool hose to the round suction plate of the pool skimmer (See fig. 10). Alternatively place a pool hose into the bottom of the skimmer. This will demand a sucking hose with a special muff connector. Make sure to remove all air from the hose before cleaning.
The air will come out by filling the hose with water when holding it in front of the inlet to the pool while the pump is running.
text_image
Fig 10Important
The hose pipe of the floor cleaner must be completely full of water so the pump does not suck air. When this is done the pump can be started. If air enters the filter system, stop the pump and purge the floor cleaner.
The cleaning devise could be a weighted vacuum head with brushes (Article 1513) mounted on a telescopic pole.
Start the pump and move the cleaning devise slowly. Moving it too quickly will raise the impurities from the pool floor.
When cleaning is finished follow the BACKWASH procedure under setion 5.
Beware!
NEVER use the valve lever as a handle to carry or lift the filter. It is not made for that use. The handle will simply break off.
7. Storing in winter
At the end of the bathing season, disconnect the hoses, remove water from the filter by opening the drain valve (8). Water MUST be emptied from the pump as well and it must be placed in a dry place, where it cannot be damaged by the cold. The pump and filter tank cannot endure frost – frost will damage the materiel and the warranty is no longer valid.
Changing filter materials
Filterballs: Vi recommend changing the Filterballs at the beginning of each season. They can however also be washed in the washing machine without the use of soap.
Filtersand: We recommend to change the filter sand once a year.
8. Maintenance suggestions and accessories
The filtration cycles (2 x 4/5 hours a day), regular BACKWASH of the filter (2 to 3 minutes) once a week if you are using filter sand as filtermaterial, and cleaning the pool floor/waterline, are all necessary for maintaining the pool water.
What the filter system does not eliminate are the alges, bacteria and other microorganisms that cloud and colour the water and affect the water purity and hygiene.
Specific products exist to prevent their appearance and eliminate them. With a correct dose, these products do not cause harm or any problems to the filter system, pool or bathers, but guarantee a pool perfectly disinfected.
Water care products
For specific water care products see page 2 and visit swim-fun.com for product specifications, guides, tips and useful information on how you maintain crystal clear pool water.
9. Trouble shooting
| ProblemCauseSolution | ||
| At start the pump is running but not pumping water into the pool. | Air trapped inside suction hose. Pump is not placed at ground level of the pool. No water passage through hoses? | The pump must be located at ground level below the water line! Prime the hoses. |
| The pressure gauge shows a pressure exceeding 1.0 bar | Dirty filter sand Carry out a backwash of the filter sand | |
| Pressure is to low Suction | hose/skimmer basket/pump or filter to valve can be blocked by leaves or debris | Clean suction hose/pool skimmer and top valve. Check feeding hose connections for air. |
| Water escapes from backwash valve. | The gasket around the valve is dirty and leaky. Grit in the gasket. | The valve should be removed from the filter lid, the gasket should be cleaned. |
| Leaking filter connection (between filter and top valve) | Damaged gasket or sand Inspect the gasket and replace with a new one if necessary. | |
| The pump is not running | The filter system has been deactivated by the filter timer or a filter control. The plug is not connected. The HFI device turns the pump off. Damaged pump motor. | Examine the settings. Connect the plug. Turn on the HFI device again. If it immediately turns itself off again this means that the pump or the HFI device is damaged. Replace the pump. |
| Sand in the pool If the filter | sand is new, there may be small grains which are washed out or the filter tank. | Carry out repeated backwash until the backwash return water is totally clear. |
Repairs of the filter and pump may only be performed by a qualified, professional firm. Otherwise, the warranty will be void.
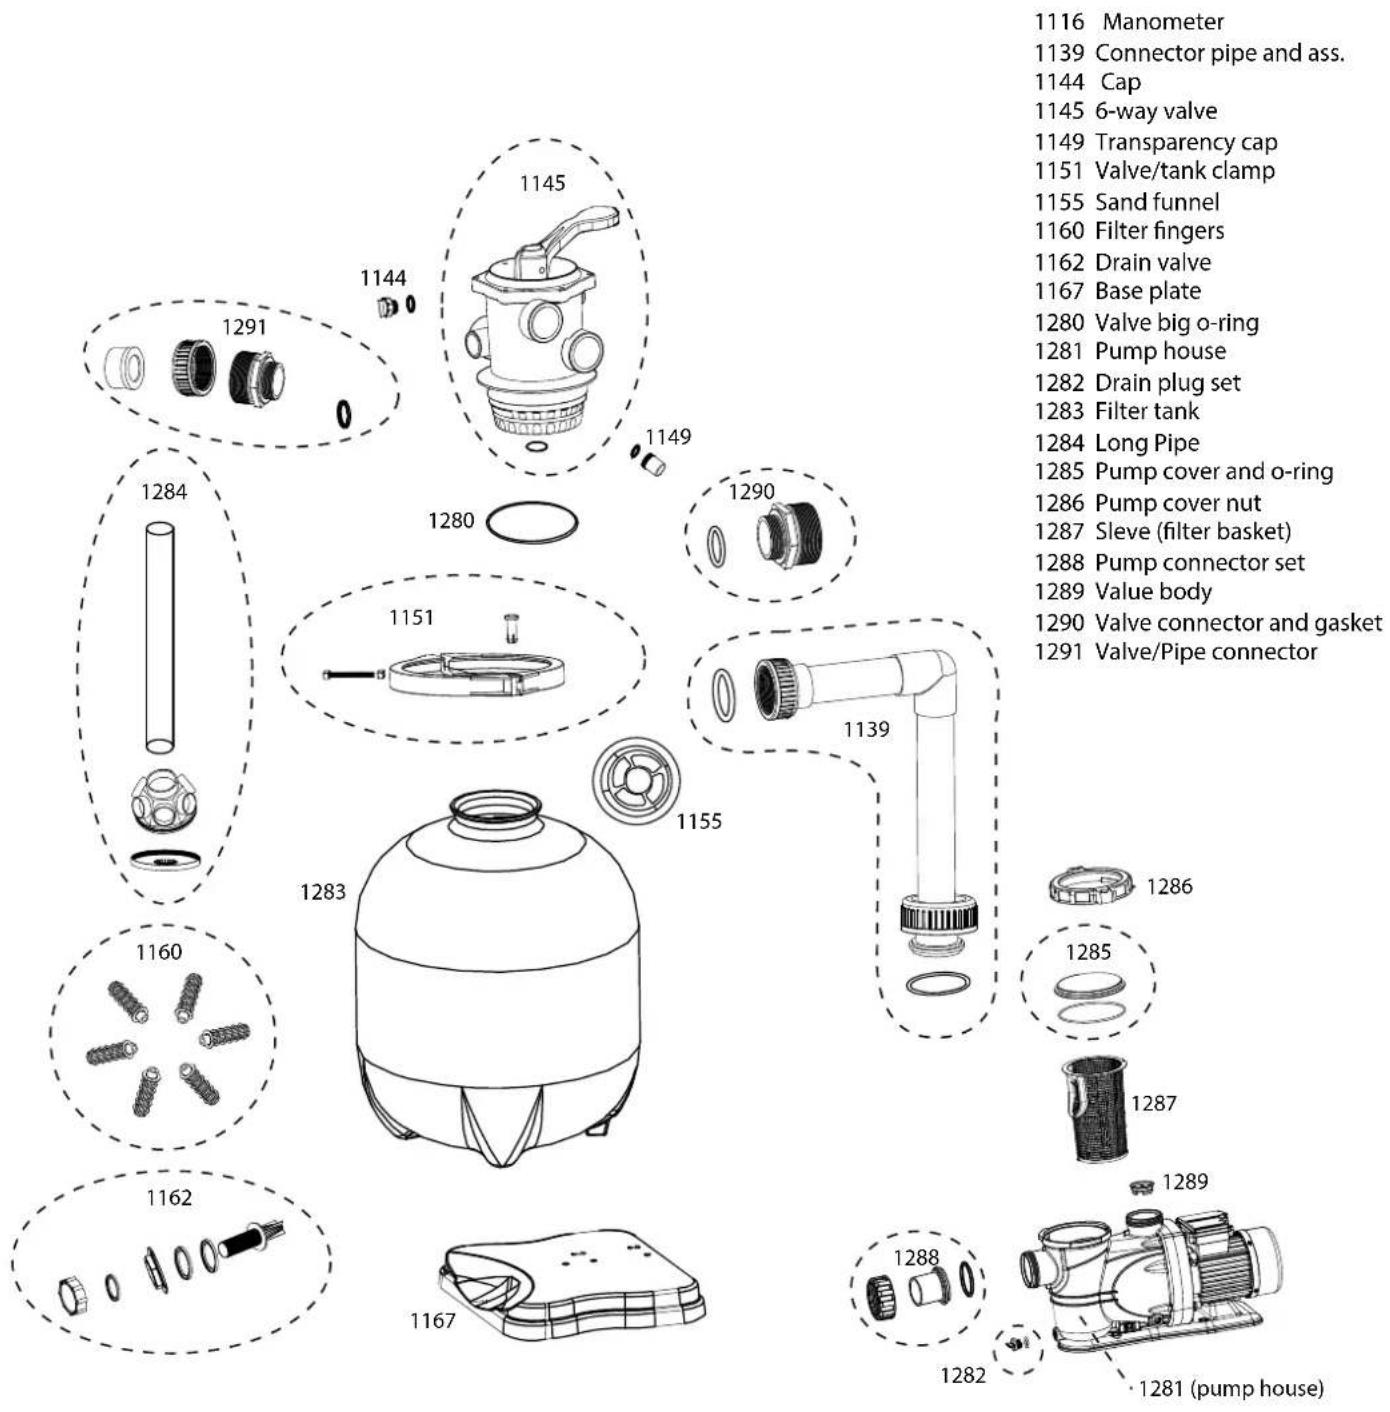
10. Spare parts
Contact the retailer for buying spare parts
text_image
1116 Manometer 1139 Connector pipe and ass. 1144 Cap 1145 6-way valve 1149 Transparency cap 1151 Valve/tank clamp 1155 Sand funnel 1160 Filter fingers 1162 Drain valve 1167 Base plate 1280 Valve big o-ring 1281 Pump house 1282 Drain plug set 1283 Filter tank 1284 Long Pipe 1285 Pump cover and o-ring 1286 Pump cover nut 1287 Sleve (filter basket) 1288 Pump connector set 1289 Value body 1290 Valve connector and gasket 1291 Valve/Pipe connector 1284 1280 1284 1283 1151 1139 1155 1283 1286 1285 1160 1287 1289 1162 1167 1288 1282 1281 (pump house)Inhaltsverzeichnis
- Allgemeines.... 71
natural_image
Black industrial water filter unit with pump and motor (no visible text or symbols)natural_image
Simple line drawing of a rectangular structure with a black dot and a circled number 10, no text or symbols present.natural_image
Technical line drawing of two mechanical pump assemblies with internal components and mounting brackets (no text or symbols)natural_image
Diagram of a U-tube manometer with liquid level, showing fluid flow and measurement setup (no text or labels)Wichtig
natural_image
Black industrial water filter unit with pump and control panel (no visible text or symbols)Swim & Fun Scandinavia op swim-fun.com/Support
text_image
Technical diagram of a water pump system with numbered components for identificationnatural_image
Illustration showing three steps of a container being filled: adding a lid, pouring liquid into a container, and adding granular material (no text or symbols)natural_image
Technical line drawing of two mechanical components with no visible text or symbolsnatural_image
Black industrial water filter unit with pump and control panel (no visible text or symbols)natural_image
Technical line drawing of a mechanical device with no visible text or symbols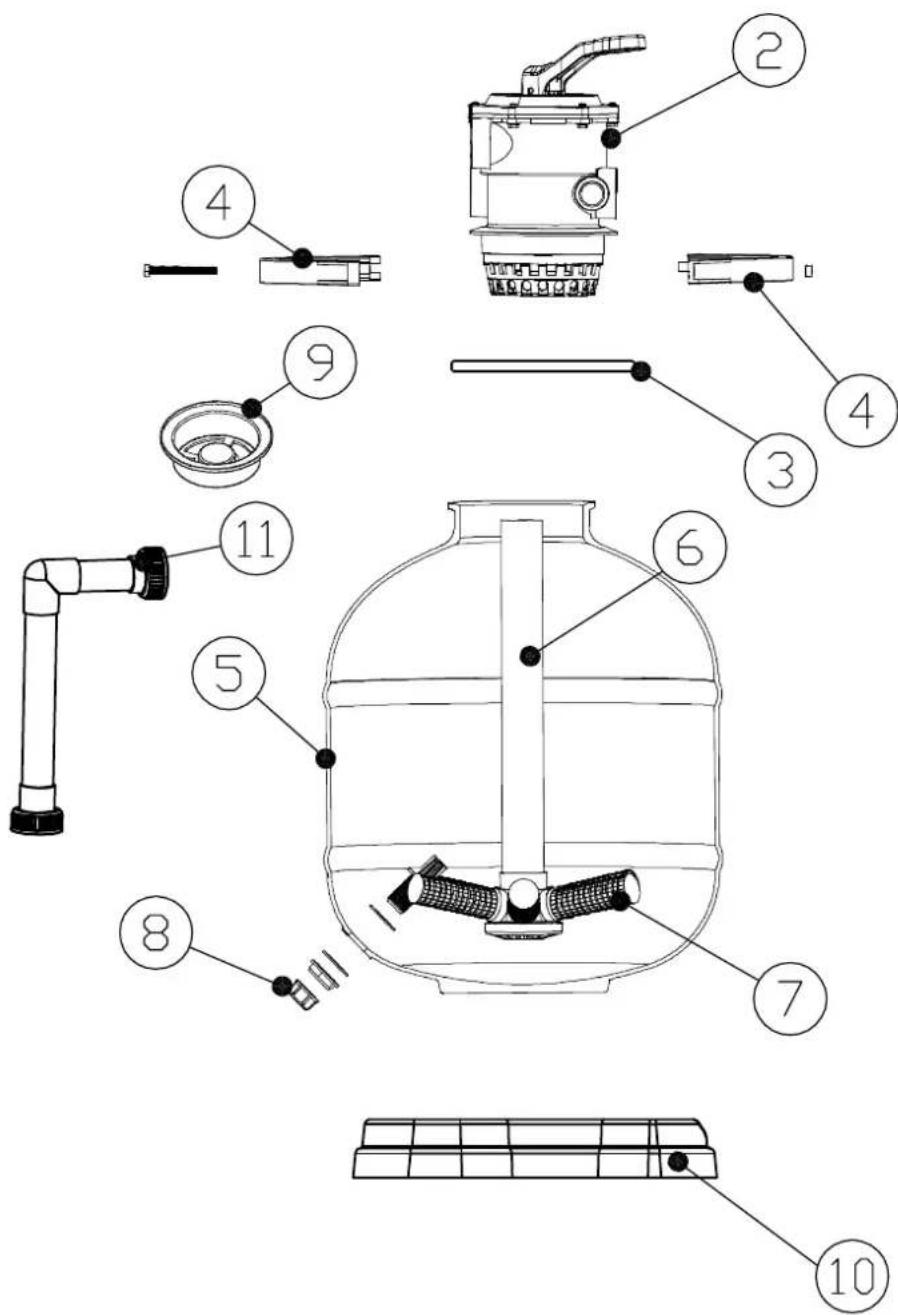
text_image
Technical diagram of a mechanical device with numbered components for identificationnatural_image
Technical line drawings of two industrial pump assemblies with mechanical components and mounting features (no text or labels)text_image
swim & fun scandinavia© All rights reserved Swim & Fun Scandinavia ApS 2019
Swim & Fun ApS
Ledreborg Allé 128 K, DK-4000 Roskilde
info@swim-fun.dk · www.swim-fun.com