
LCT8F - Dishwasher VOX - Free user manual and instructions
Find the device manual for free LCT8F VOX in PDF.


| Product Type | Dishwasher |
| Brand | VOX |
| Model | LCT8F |
| Capacity | 6 place settings |
| Dimensions (H x W x D) | 85 x 45 x 60 cm (free-standing) |
| Weight | Approx. 30 kg (estimated) |
| Energy Efficiency Class | F |
| Energy Consumption (eco cycle) | 0.61 kWh |
| Water Consumption (eco cycle) | 6.5 L |
| Program Duration (eco cycle) | 3:50 h:min |
| Noise Level | 49 dB(A) re 1 pW (Class C) |
| Number of Programs | 5: Intensive, Universal, ECO, Glass, Rapid |
| Water Softener | Yes, adjustable (levels H1-H6) |
| Rinse Aid Dispenser | Yes, adjustable dosage |
| Salt Container | Yes, approx. 1 kg capacity |
| Safety Features | Overflow protection, child lock not specified, earthing instruction |
| Spare Parts Availability | Up to 7 years (motors, pumps, heaters, PCB, etc.); up to 10 years (door hinges, seals, spray arms, filters, racks) |
| Installation Type | Free-standing or built-in (with decorative panel) |
| Control Panel | Electronic with LED indicators |
| Material | Stainless steel interior (assumed) |
Frequently Asked Questions - LCT8F VOX
User questions about LCT8F VOX
0 question about this device. Answer the ones you know or ask your own.
Ask a new question about this device
Download the instructions for your Dishwasher in PDF format for free! Find your manual LCT8F - VOX and take your electronic device back in hand. On this page are published all the documents necessary for the use of your device. LCT8F by VOX.
USER MANUAL LCT8F VOX
natural_image
Abstract black and white geometric pattern with diagonal stripes (no text or symbols)VOX
ELECTRONICS
ENG
SRP
SLV
BOS
HRV
POR
BGR
LCT8F
INSTRUCTION MANUAL DISHWASHER
UPUTSTVO ZA UPOTREBU MAŠINA ZA PRANJE SUDOVA
NAVODILA ZA UPORABO POMIVALNI STROJ
UPUTSTVO ZA UPOTREBU MAŠINA ZA PRANJE SUDOVA
UPUTE ZA UPORABU PERILICA POSUĐA
MANUAL DE INSTRUÇÕES MÁQUINA DE LAVAR LOIÇA
РЪКОВОДСТВО ЗА УПОТРЕБА СЪДОМИЯЛНА МАШИНА

natural_image
Abstract black-and-white geometric pattern with diagonal stripes inside a circle (no text or symbols)VOX
ELECTRONICS
ENG
LCT8F
INSTRUCTION MANUAL DISHWASHER
natural_image
Simple line drawing of a 3D printer or scanner device inside a circular frame (no text or symbols)Dishwasher Instruction Manual
PART I: Generic Version LCT8F
CONTENTS
01
02
03
04
05
06
07
3 SAFETY INFORMATION
8 PRODUCT OVERVIEW
9 USING YOUR DISHWASHER
9 Loading The Salt Into The Softener
11 MAINTENANCE AND CLEANING
11 External Care
11 Internal Care
13 Caring For The Dishwasher
15 INSTALLATION INSTRUCTION
15 About Power Connection
16 Water Supply And Drain
17 Connection Of Drain Hoses
18 Position The Appliance
18 Built-In Installation
23 TROUBLESHOOTING TIPS
25 Availability of Spare parts
30 LOADING THE BASKETS

NOTE:
- Reviewing the section on troubleshooting Tips will help you solve some common problems by yourself.
- If you cannot solve the problems by yourself, please ask for help from a professional technician.
- The manufacturer, following a policy of constant development and updating of the product, may make modifications without giving prior notice.
- If lost or out-of-date, you can receive a new user manual from the manufacturer or responsible vendor.
SAFETY INFORMATION
WARNING
When using your dishwasher, follow the precautions listed below:
- Installation and repair can only be carried out by a qualified technician
- This appliance is intended to be used in household and similar applications such as:
-staff kitchen areas in shops, offices and other working environments;
-farm houses;
-by clients in hotels, motels and other residential type environments;
-bed and breakfast type environments.
- This appliance can be used by children aged from 8 years and above and persons with reduced physical, sensory or mental capabilities or lack of experience and knowledge if they have been given supervision or instruction concerning use of the appliance in a safe way and understand the hazards involved.
- Children shall not play with the appliance. Cleaning and user maintenance shall not be done by children without supervision. (For EN60335-1)
This appliance is not intended for use by persons (including children) with reduced physical, sensory or
mental capabilities, or lack of experience and knowledge, unless they have been given supervision or instruction concerning use of the appliance by a person responsible for their safety. (For IEC60335-1)
- Packaging material could be dangerous for children!
- This appliance is for indoor household use only.
To protect against the risk of electrical shock, do not immerse the unit, cord or plug in water or other liquid. - Please unplug before cleaning and performing maintenance on the appliance.
- Use a soft cloth moistened with mild soap, and then use a dry cloth to wipe it again.

Earthing Instructions
- This appliance must be earthed. In the event of a malfunction or breakdown, earthing will reduce the risk of an electric shock by providing a path of least resistance of electric current. This appliance is equipped with an earthing conductor plug.
- The plug must be plugged into an appropriate outlet that is installed and earthed in accordance with all local codes and ordinances.
- Improper connection of the equipment-earthing conductor can result in the risk of an electric shock.
-
Check with a qualified electrician or service representative if you are in doubt whether the appliance is properly grounded.
-
Do not modify the plug provided with the appliance; If it does not fit the outlet.
- Have a proper outlet installed by a qualified electrician.
- Do not abuse, sit on, or stand on the door or dish rack of the dishwasher.
- Do not operate your dishwasher unless all enclosure panels are properly in place.
- Open the door very carefully if the dishwasher is operating, there is a risk of water squirting out.
- Do not place any heavy objects on or stand on the door when it is open. The appliance could tip forward.
- When loading items to be washed:
1) Locate sharp items so that they are not likely to damage the door seal;
2) Warning: Knives and other utensils with sharp points must be loaded in the basket with their points facing down or placed in a horizontal position.
- Some dishwasher detergents are strongly alkaline. They can be extremely dangerous if swallowed. Avoid contact with the skin and eyes and keep children away from the dishwasher when the door is open.
- Check that the detergent powder is empty after completion of the wash cycle.
- Do not wash plastic items unless they are marked "dishwasher safe" or the equivalent.
- For unmarked plastic items not so marked, check the manufacturer's recommendations.
- Use only detergent and rinse agents recommended for use in an automatic dishwasher.
- Never use soap, laundry detergent, or hand washing detergent in your dishwasher.
- The door should not be left open, since this could increase the risk of tripping.
If the supply cord is damaged, it must be replaced by the manufacturer or its service agent or a similarly qualified person in order to avoid a hazard. - During installation, the power supply must not be excessively or dangerously bent or flattened.
- Do not tamper with controls.
- The appliance needs to be connected to the main water valve using new hose sets. Old sets should not be reused.
- To save energy, in stand by mode, the appliance will switch off automatically while there is no any operation in 15 minutes.
The maximum number of place settings to be washed is 6.
The maximum permissible inlet water pressure is 1MPa.
The minimum permissible inlet water pressure is 0.04MPa.
Disposal
- For disposing of package and the appliance please go to a recycling center. Therefore cut off the power supply cable and make the door closing device unusable.
natural_image
Symbol of a trash bin crossed with no text or numbers, representing waste sorting or restriction (no text present)- Cardboard packaging is manufactured from recycled paper and should be disposed in the waste paper collection for recycling.
- By ensuring this product is disposed of correctly, you will help prevent potential negative consequences for the environment and human health, which could otherwise be caused by inappropriate waste handling of this product.
- For more detailed information about recycling of this product, please contact your local city office and your household waste disposal service.
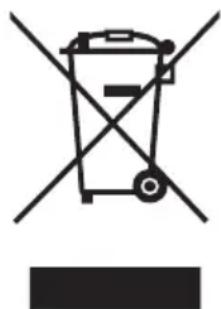
- DISPOSAL: Do not dispose this product as unsorted municipal waste. Collection of such waste separately for special treatment is necessary.
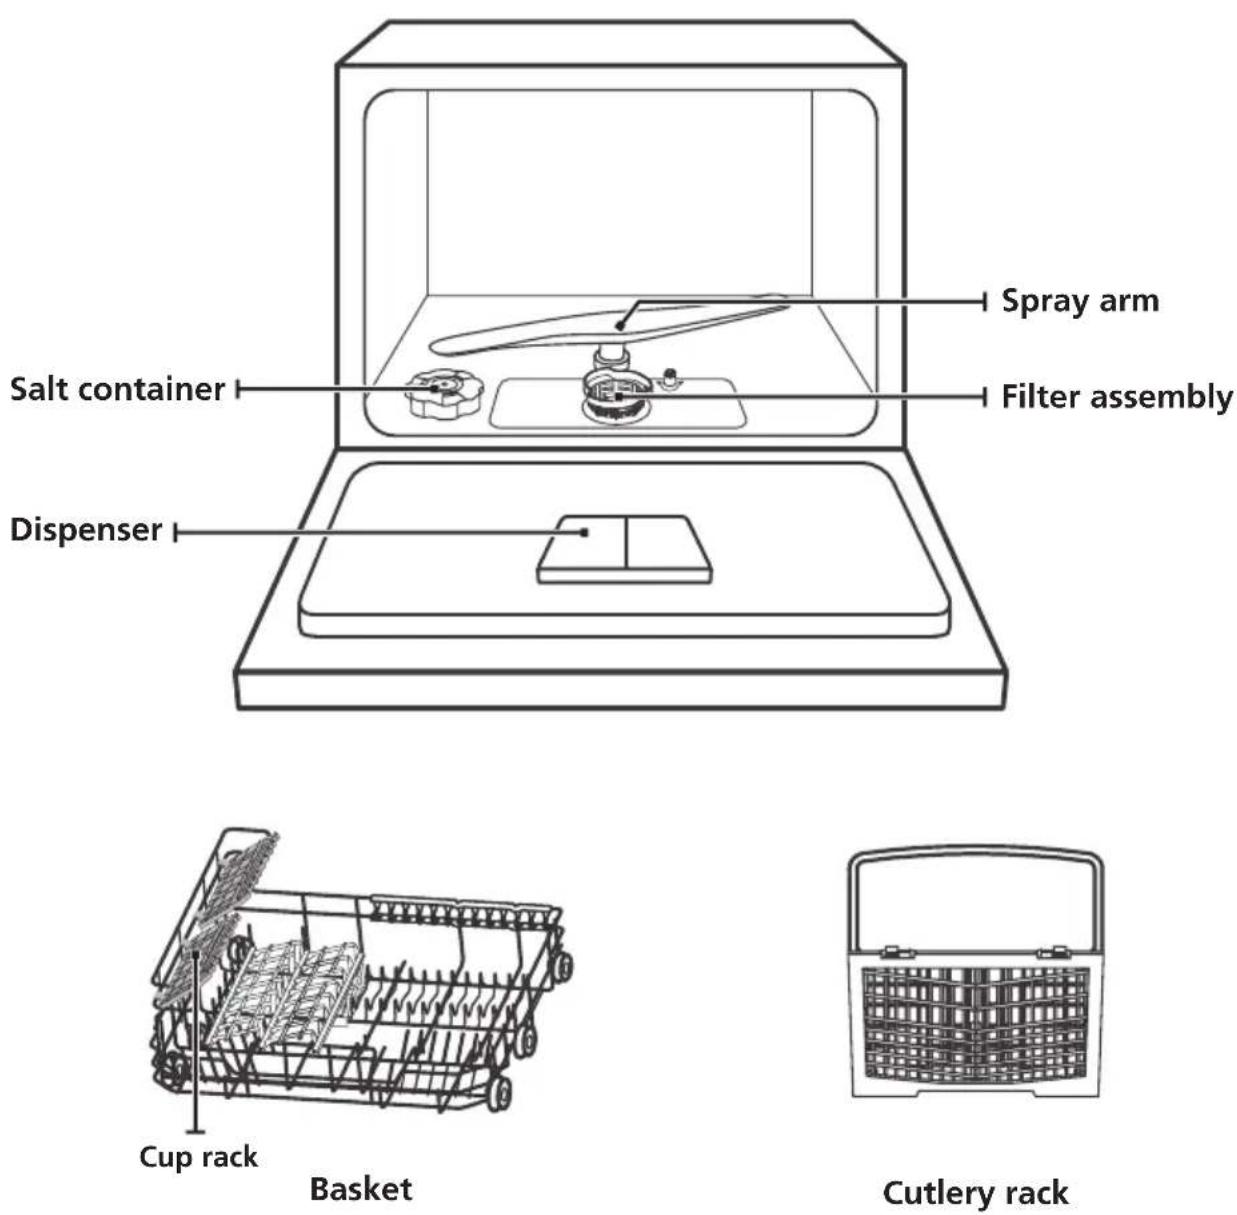
PRODUCT OVERVIEW
IMPORTANT:
To get the best performance from your dishwasher, read all operating instructions before using it for the first time.

NOTE:
Pictures are only for reference, different models may be different.
Please prevail in kind.
USING YOUR DISHWASHER
Before using your dishwasher :

flowchart
graph LR
    A["SALT"] --> B["Tube with bar chart inside"]
    B --> C["Water bath with liquid being dried"]
    C --> D["Reaction: brush drops on a surface"]
- Set the water softener
- Loading the Salt Into the Softener
- Loading the basket
- Fill the dispenser

Please check the section 1 "Water Softener" of PART II: Special Version, If you need to set the water softener.
Loading The Salt Into The Softener

NOTE:
If your model does not have any water softener, you may skip this section.
Always use salt intended for dishwasher use.
The salt container is located beneath the basket and should be filled as explained in the following:
WARNING
• Only use salt specifically designed for dishwashers use!
Every other type of salt not specifically designed for dishwasher use, especially table salt, will damage the water softener. In case of damages caused by the use of unsuitable salt the manufacturer does not give any warranty nor is liable for any damages caused.
• Only fill with salt before running a cycle.
This will prevent any grains of salt or salty water, which may have been spilled, remaining on the bottom of the machine for any period of time, which may cause corrosion.
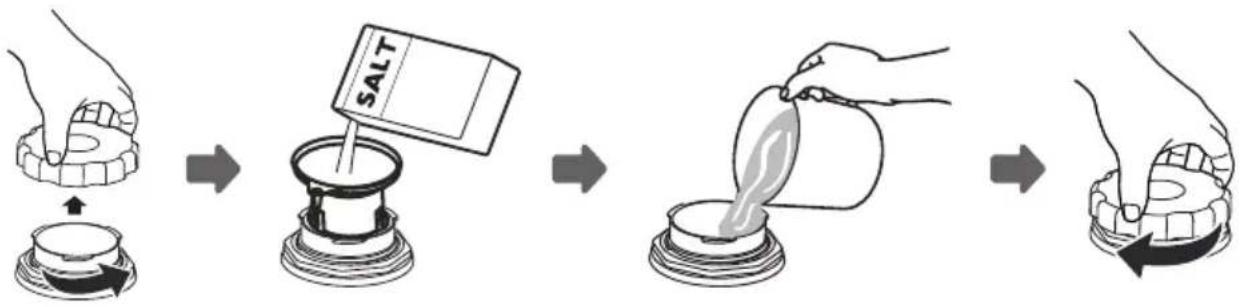
Please follow the steps below for adding dishwasher salt:
flowchart
graph LR
    A["Hand holding plate with salt"] --> B["Salt mixing bowl"]
    B --> C["Add salt to stand mixer"]
    C --> D["Heating salt from plate"]
    D --> E["Final container with salt and inlet"]
-
Remove the basket and unscrew the reservoir cap.
-
Place the end of the funnel (supplied) into the hole and pour in about 1kg of dishwasher salt.
-
Before first wash, fill the salt container to its maximum limit with water, It is normal for a small amount of water to come out of the salt container.
-
After filling the container, screw back the cap tightly.
-
The salt warning light will stop being after the salt container has been filled with salt.
-
Immediately after filling the salt into the salt container, a washing program should be started (We suggest to use a short program). Otherwise the filter system, pump or other important parts of the machine may be damaged by salty water. This is out of warranty.

NOTE:
- The salt container must only be refilled when the salt warning light ( ⇌ ) in the control panel comes on. Depending on how well the salt dissolves, the salt warning light may still be on even though the salt container is filled.
If there is no salt warning light in the control panel (for some Models), you can estimate when to fill the salt into the softener by the cycles that the dishwasher has run.
• If salt has spilled, run a soak or quick program to remove it.
MAINTENANCE AND CLEANING
- External Care
The door and the door seal
Clean the door seals regularly with a soft damp cloth to remove food deposits. When the dishwasher is being loaded, food and drink residues may drip onto the sides of the dishwasher door. These surfaces are outside the wash cabinet and are not accessed by water from the spray arm. Any deposits should be wiped off before the door is closed.
The control panel
If cleaning is required, the control panel should be wiped with a soft damp cloth only.
WARNING
- To avoid penetration of water into the door lock and electrical components, do not use a spray cleaner of any kind.
- Never use abrasive cleaners or scouring pads on the outer surfaces because they may scratch the finish. Some paper towels may also scratch or leave marks on the surface.
- Internal Care
Filtering system
The filtering system in the base of the wash cabinet retains coarse debris from the washing cycle, including foreign objects such as tooth picks or shards. The collected coarse debris may cause the filters to clog. Check the condition of the filters regularly, carefully remove foreign objects and clean the parts of the filtering system if necessary with water. Follow the steps below to clean the filter.

NOTE:
Pictures are only for reference, different models of the filtering system and spray arm may be different. Please prevail in kind.
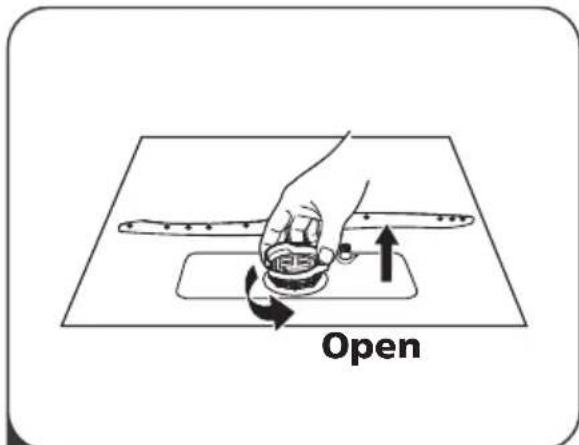
1 Hold the coarse filter and rotate it anticlockwise to unlock the filter. Lift the filter upwards and out of the dishwasher.
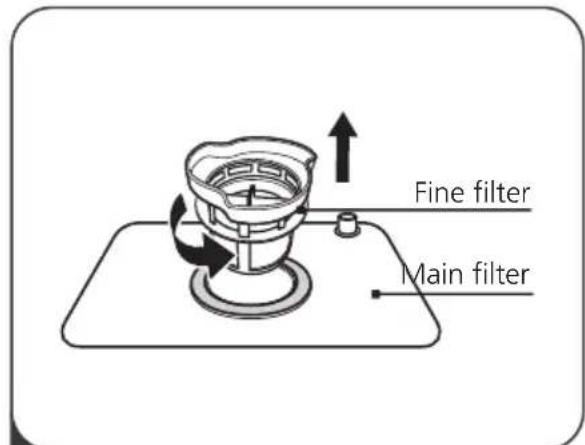
2 Lift fine filter up from main filter.
natural_image
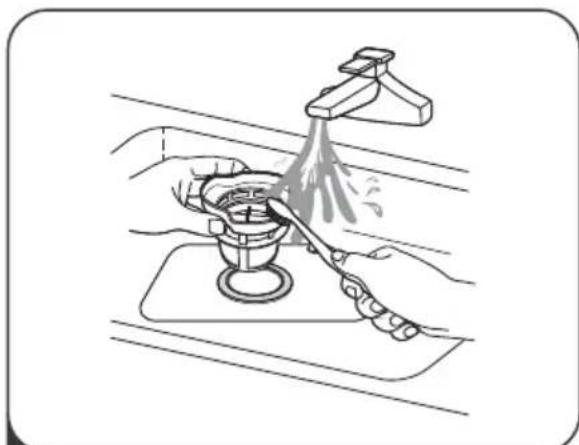
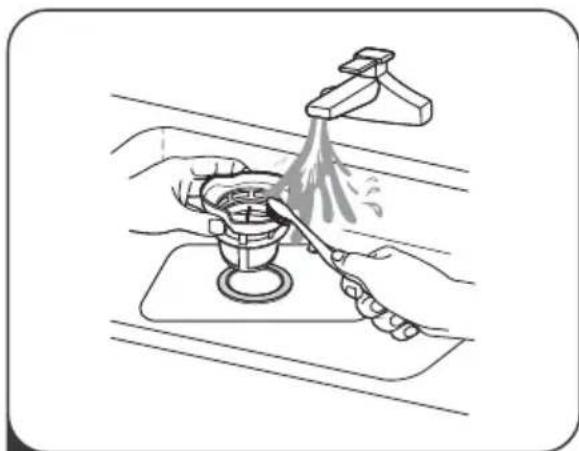
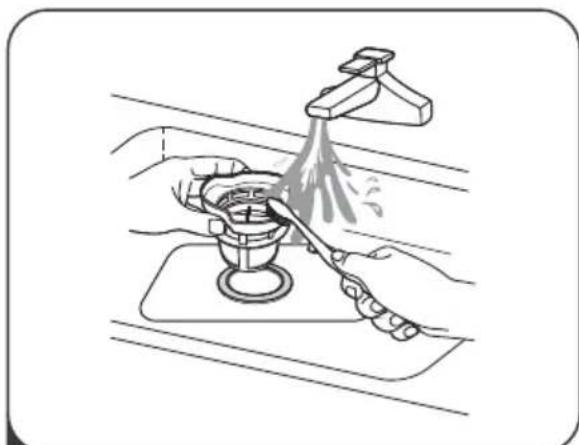
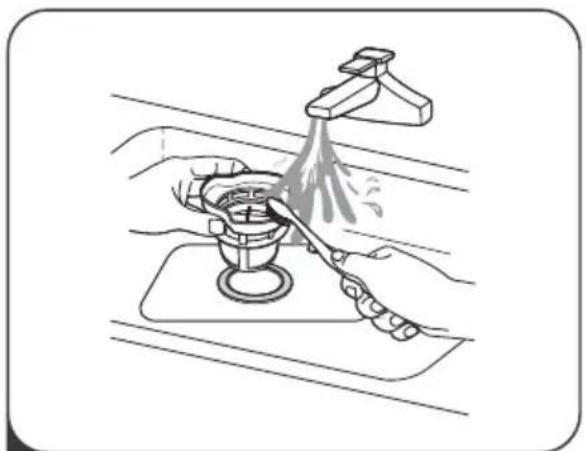
Illustration of a hand washing a cup with a tool, no text or symbols present3 Larger food remnants can be cleaned by rinsing the filter under running water. For a more thorough clean, use a soft cleaning brush.
natural_image
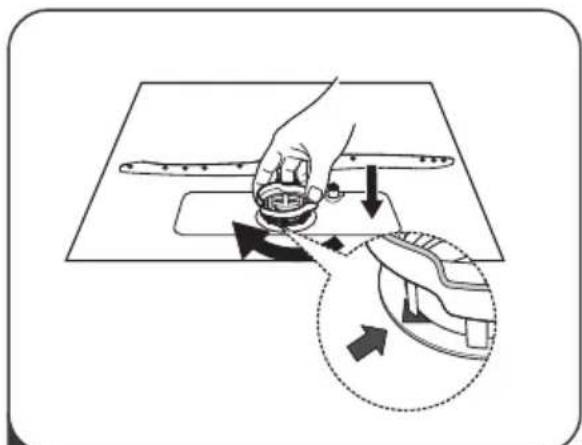
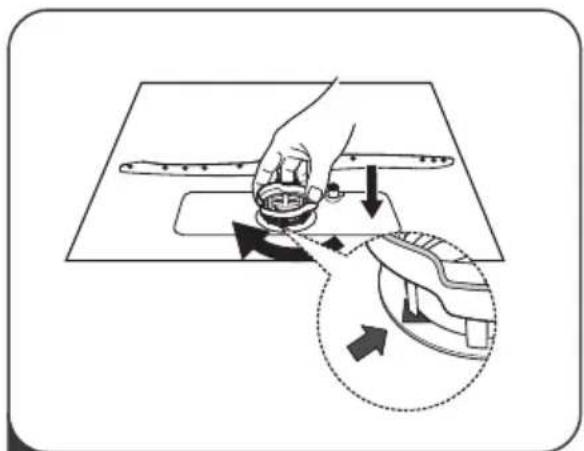
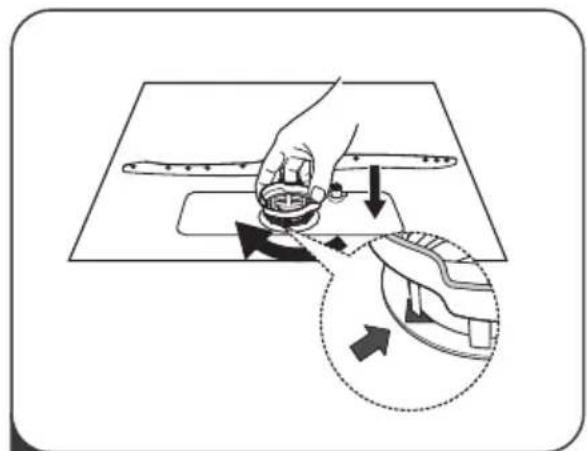
Illustration of a hand turning a mechanical component with arrows indicating motion (no text or symbols)4 Reassemble the filters in the reverse order of the disassembly, replace the filter insert, and rotate clockwise to the close arrow.
WARNING
- Do not over tighten the filters. Put the filters back in sequence securely, otherwise coarse debris could get into the system and cause a blockage.
- Never use the dishwasher without filters in place. Improper replacement of the filter may reduce the performance level of the appliance and damage dishes and utensils.
Spray arm
It is necessary to clean the spray arm regularly for hard water chemicals will clog the spray arm jets and bearings.
To clean the spray arm, follow the instructions below:
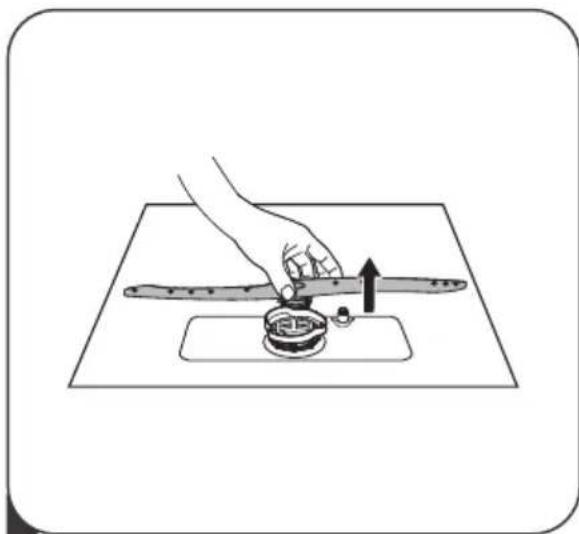
natural_image
Illustration of a hand using a tool to cut a cylindrical object on a flat surface, with an arrow indicating the process (no text or symbols present)1 To remove the spray arm, pull out the spray arm upward.
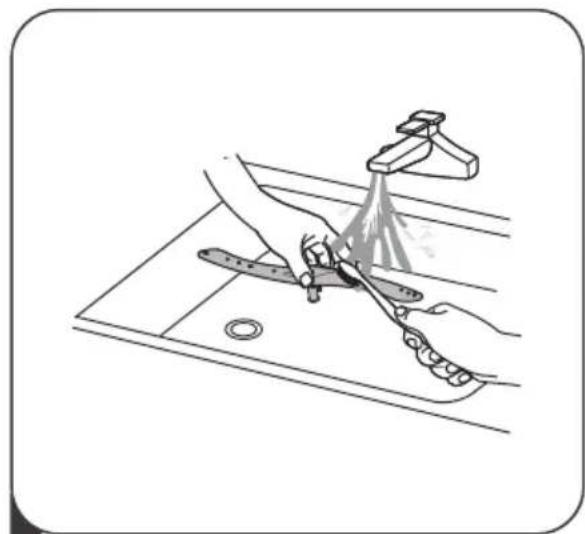
natural_image
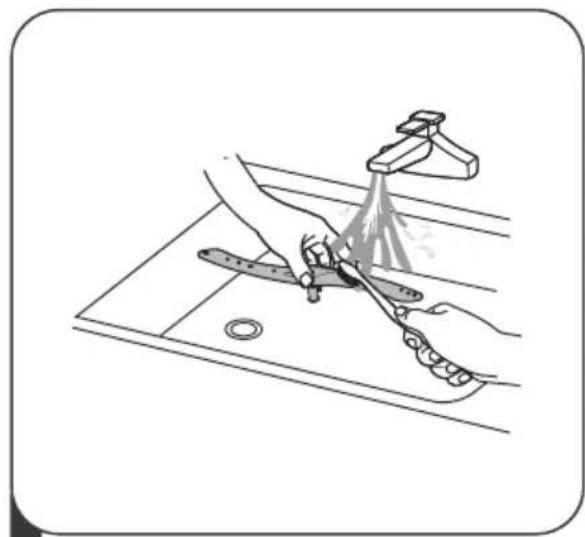
Illustration of hands using a spray gun to clean or wash air on a kitchen sink (no text or symbols)2 Wash the spray arm in soapy and warm water and use a soft brush to clean the jets. Replace them after rinsing them thoroughly.
Caring For The Dishwasher
Frost precaution
please take frost protection measures on the dishwasher in winter. Every after washing cycles, please operate as follows:
- Cut off the electrical power to the dishwasher at the supply source.
- Turn off the water supply and disconnect the water inlet pipe from the water valve.
- Drain the water from the inlet pipe and water valve. (Use a pan to gather the water)
- Reconnect the water inlet pipe to the water valve.
- Remove the filter at the bottom of the tub and use a sponge to soak up water in the sump.
After every wash
After every wash, turn off the water supply to the appliance and leave the door slightly open so that moisture and odors are not trapped inside.
Remove the plug
Before cleaning or performing maintenance, always remove the plug from the socket.
No solvents or abrasive cleaning
To clean the exterior and rubber parts of the dishwasher, do not use solvents or abrasive cleaning products. Only use a cloth with warm soapy water.
To remove spots or stains from the surface of the interior, use a cloth dampened with water an a little vinegar, or a cleaning product made specifically for dishwashers.
When not in use for a longtime
It is recommend that you run a wash cycle with the dishwasher empty and then remove the plug from the socket, turn off the water supply and leave the door of the appliance slightly open. This will help the door seals to last longer and prevent odors from forming within the appliance.
Moving the appliance
If the appliance must be moved, try to keep it in the vertical position. If absolutely necessary, it can be positioned on its back.
Seals
One of the factors that cause odours to form in the dishwasher is food that remains trapped in the seals. Periodic cleaning with a damp sponge will prevent this from occurring.
INSTALLATION INSTRUCTION
WARNING

natural_image
Symbolic illustration of a hand with a lightning bolt and serrated line, representing electrical hazard (no text or labels)Electrical Shock Hazard
Disconnect electrical power before installing dishwasher.
Failure to do so could result in death or electrical shock.
Attention
The installation of the pipes and electrical equipments should be done by professionals.
• About Power Connection
WARNING
For personal safety:
- Do not use an extension cord or an adapter plug with this appliance.
- Do not, under any circumstances, cut or remove the earthing connection from the power cord.
Electrical requirements
Please look at the rating label to know the rating voltage and connect the dishwasher to the appropriate power supply. Use the required fuse 10A/13A/16A, time delay fuse or circuit breaker recommended and provide separate circuit serving only this appliance.
Electrical connection
Ensure the voltage and frequency of the power being corresponds to those on the rating plate. Only insert the plug into an electrical socket which is earthed properly. If the electrical socket to which the appliance must be connected is not appropriate for the plug, replace the socket, rather than using a adaptors or the like as they could cause overheating and burns.
⚠ Ensure that proper earthing exists before use
Water Supply And Drain
Cold water connection
Connect the cold water supply hose to a threaded 3/4(inch) connector and make sure that it is fastened tightly in place.
If the water pipes are new or have not been used for an extended period of time, let the water run to make sure that the water is clear. This precaution is needed to avoid the risk of the water inlet to be blocked and damage the appliance.
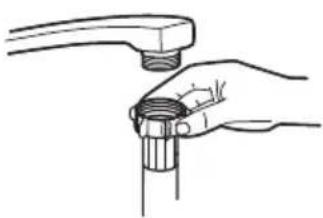
natural_image
Line drawing of a hand holding a wrench, no text or symbols presentordinary supply hose
natural_image
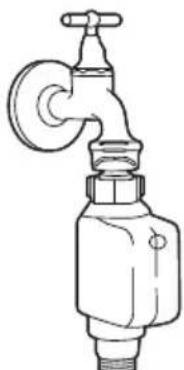
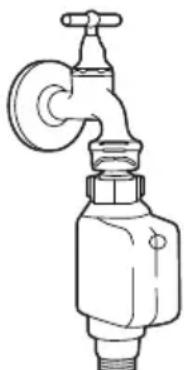
Line drawing of a faucet with a valve and handle (no text or symbols)safety supply hose
About the safety supply hose
The safety supply hose consists of the double walls. The hose's system guarantees its intervention by blocking the flow of water in case of the supply hose breaking and when the air space between the supply hose itself and the outer corrugated hose is full of water.
WARNING
A hose that attaches to a sink spray can burst if it is installed on the same water line as the dishwasher. If your sink has one, it is recommended that the hose be disconnected and the hole plugged.
How to connect the safety supply hose
- Pull The safety supply hoses completely out from storage compartment located at rear of dishwasher.
- Tighter the screws of the safety supply hose to the faucet with thread 3/4inch.
- Turn water fully on before starting the dishwasher.
How to disconnect the safety supply hose
- Turn off the water.
- Unscrew the safety supply hose from the faucet.
Connection Of Drain Hoses
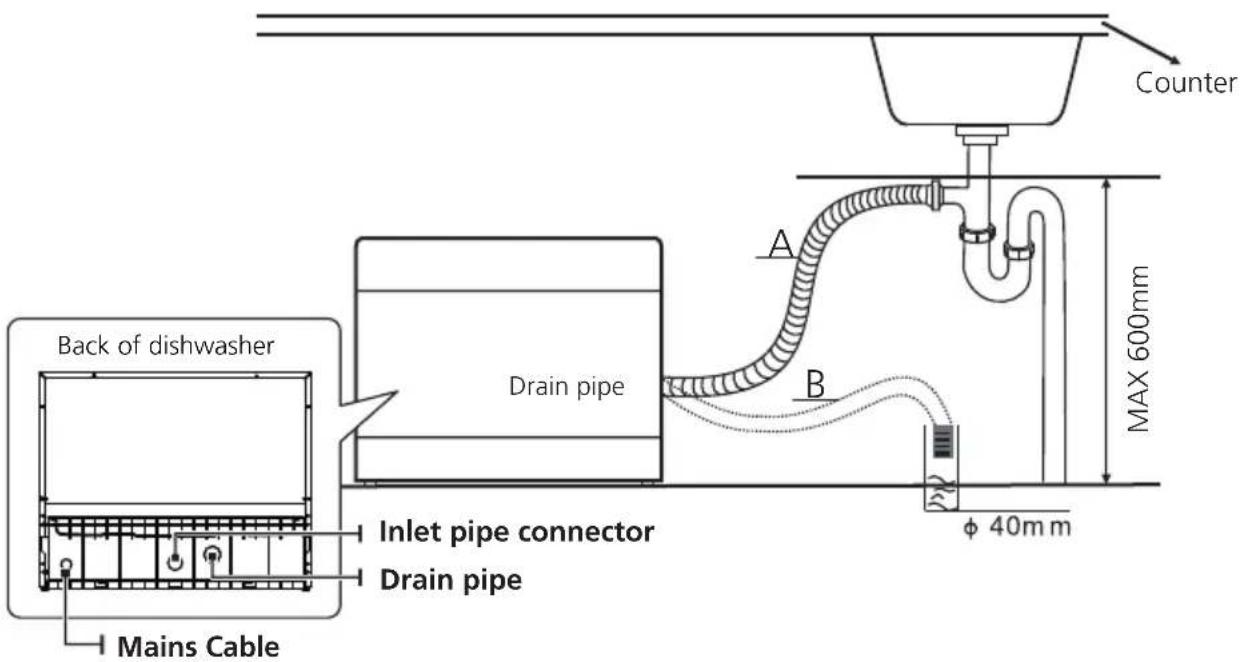
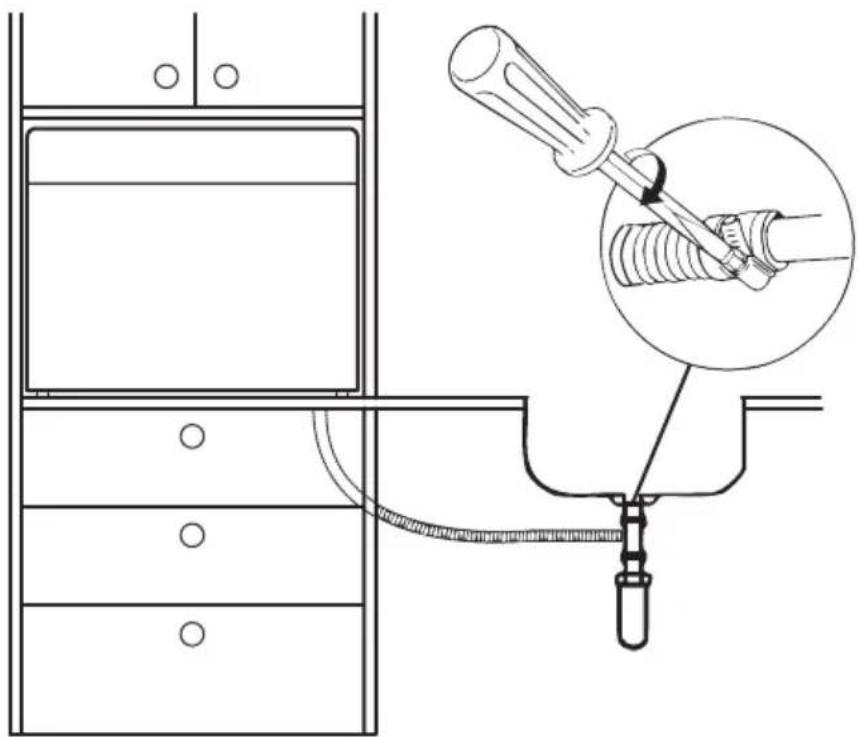
Insert the drain hose into a drain pipe with a minimum diameter of 4 cm, or let it run into the sink, making sure to avoid bending or crimping it. The height of drain pipe must be less than 600mm. The free end of the hose must not be immersed in water to avoid the back flow of it.

Please securely fix the drain hose in either position A or position B
natural_image
Technical line drawing of a screwdriver inserted into a pipe in a storage cabinet (no text or symbols)How to drain excess water from hoses
If the sink is 1000 higher from the floor, the excess water in hoses cannot be drained directly into the sink. It will be necessary to drain excess water from hoses into a bowl or suitable container that is held outside and lower than the sink.
Water outlet
Connect the water drain hose. The drain hose must be correctly fitted to avoid water leaks. Ensure that the water drain hose is not kinked or squashed.
Extension hose
If you need a drain hose extension, make sure to use a similar drain hose.
It must be no longer than 4 meters; otherwise the cleaning effect of the dishwasher could be reduced.
Syphon connection
The waste connection must be at a height less than 100 cm (maximum) from the bottom of the dish. The water drain hose should be fixed.
Position The Appliance
Position the appliance in the desired location. The back should rest against the wall behind it, and the sides, along the adjacent cabinets or walls. The dishwasher is equipped with water supply and drain hoses that can be positioned either to the right or the left sides to facilitate proper installation.
Built-In Installation
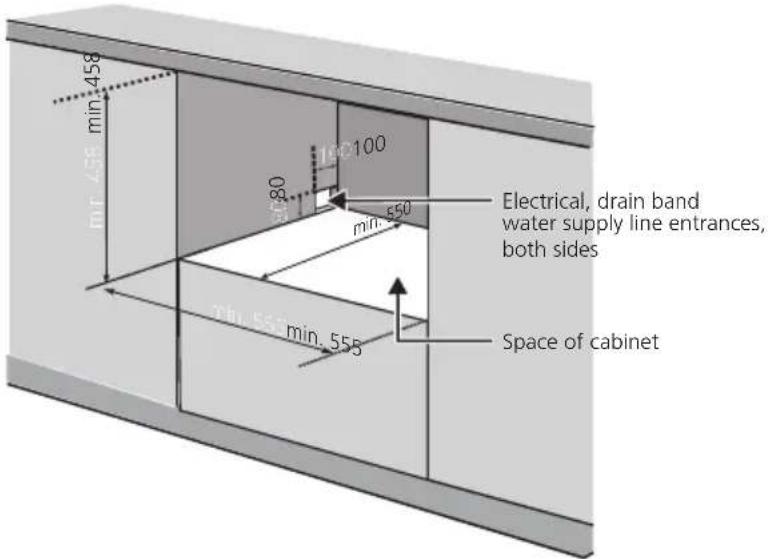
Step 1a:
If only the body into cabinets, please make this map the size of the cabinet hole.
Step 1b:
If the entire decorative panel into the cabinet also, the size of A should be equal to D +9.5; size B should be equal to C+6;
Meanwhile, the cabinet around the inward booster:
both sides of the (C-555) / 2 +3; C, D and E as the second step within the relevant size decorative panels.
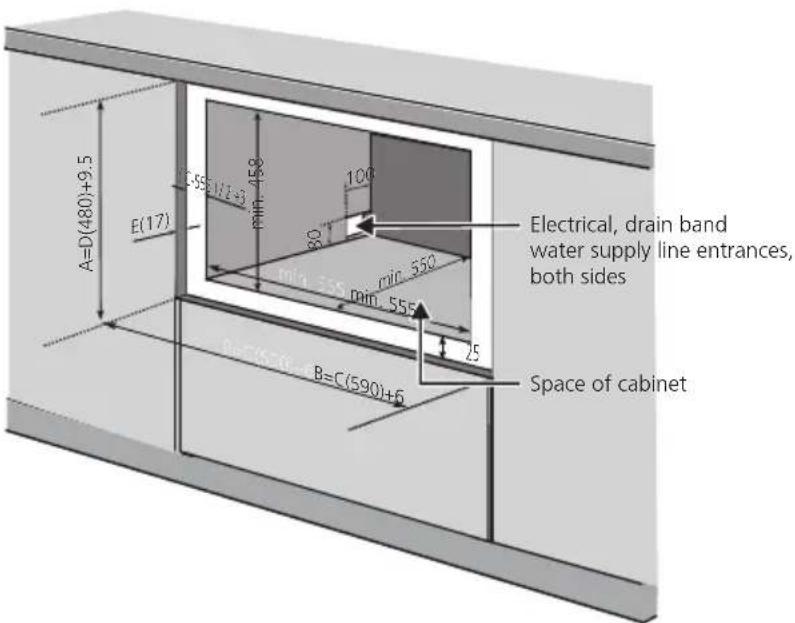
Step 2: Aesthetic panel's dimensions and installation
Weight of the decorative panel should be min 3Kg-max 4Kg.
Dim. A and B could be alterable by handle,
Dim. C, D and E could be alterable by fact,
Dim. E should be in range 16\~22mm, besides the appliance assembling decorative panel.
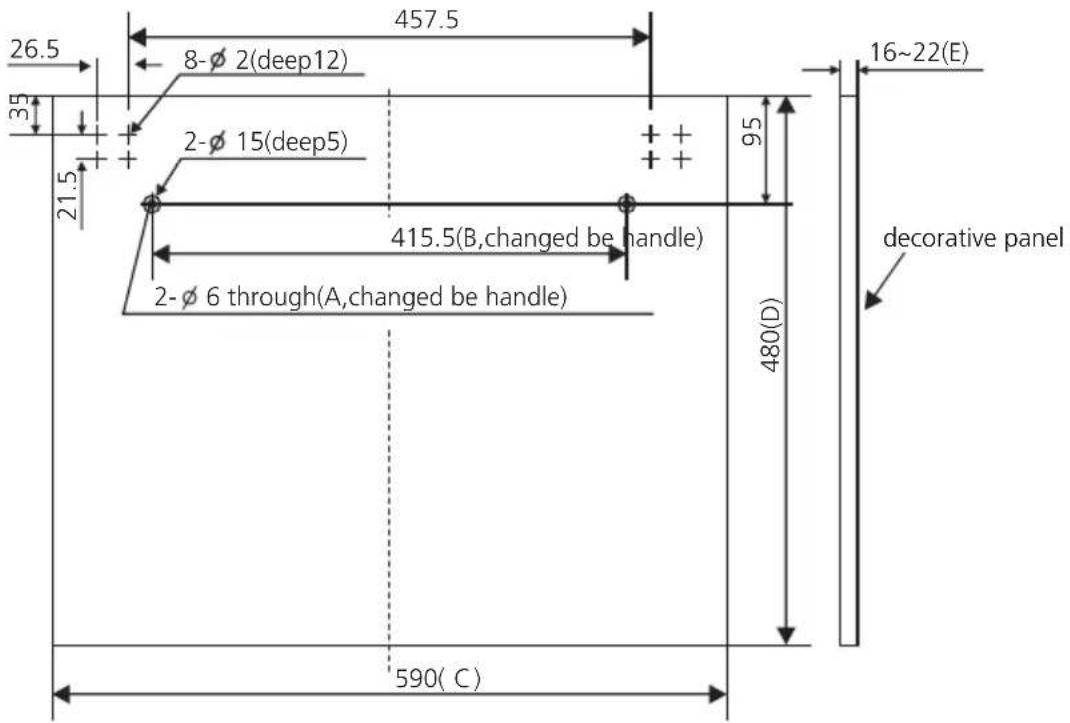
(Unit: mm)
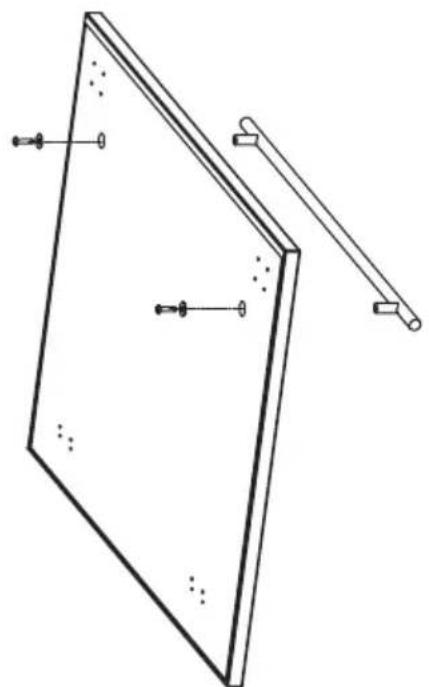
Step 3: Assemble the decorative panel

NOTE:
If the machine with a decorative plate, no this step.
natural_image
Line drawing of a rectangular panel with a diagonal rod extending outward, showing internal components and mounting holes (no text or symbols)Step 4:
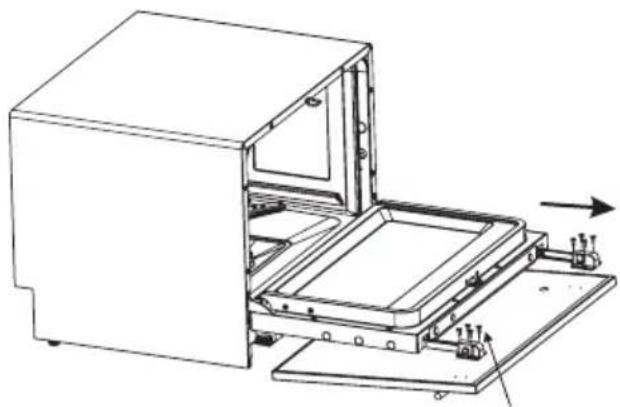
Assemble the decorative door on the dishwasher, as figure. First install screw between the cabinet base board and decorative panel, in all 16; then pull glide from out door groove, case 8-screw between decorative panels and glide.
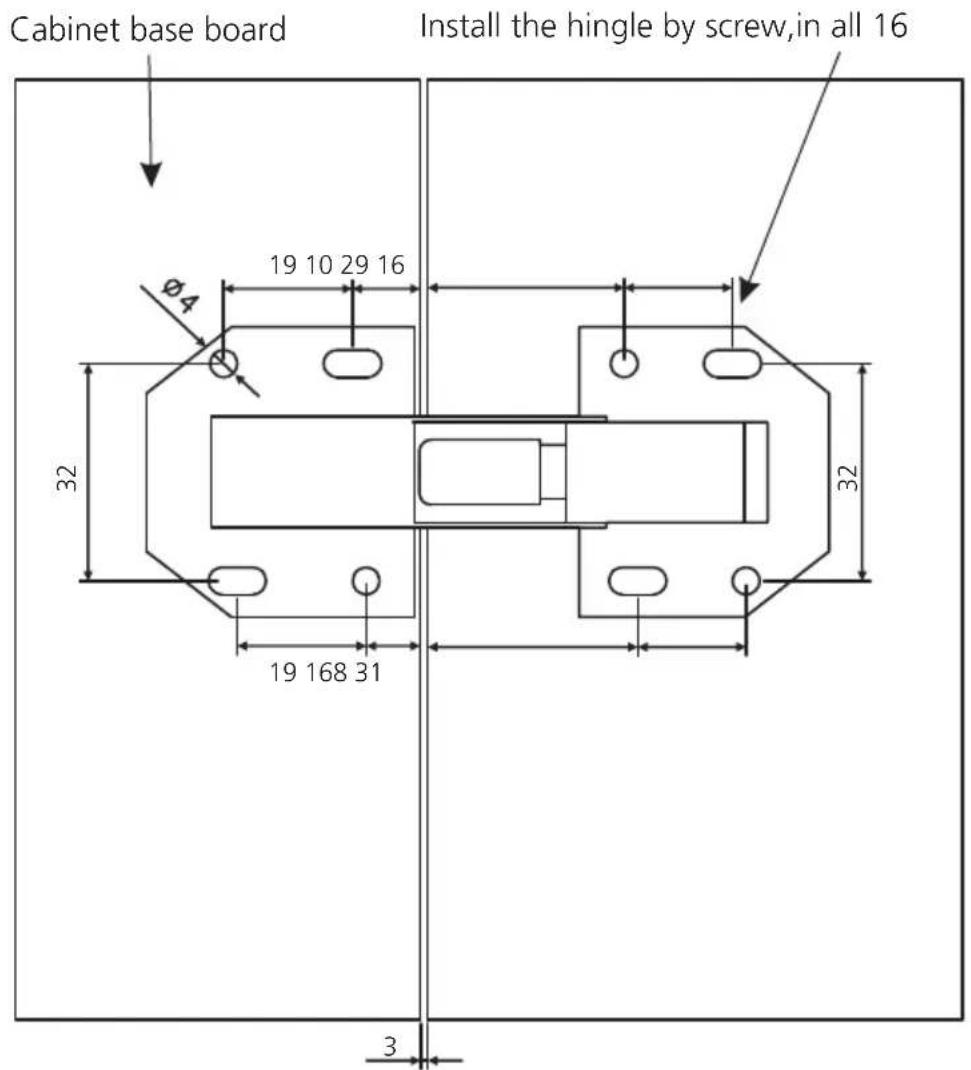
Decorative panel
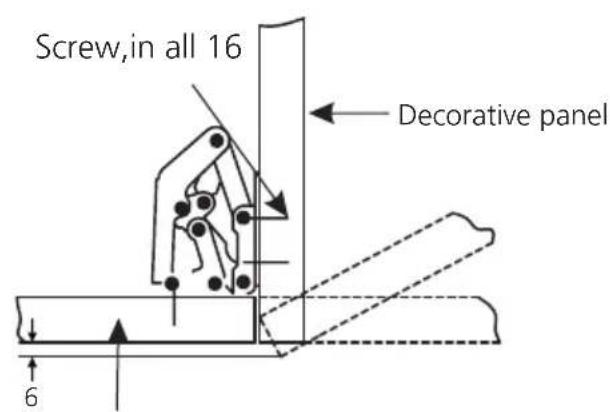
Cabinet base board
natural_image
Technical line drawing of a mechanical device with internal components and mounting base (no text or symbols)Screw, in all 8
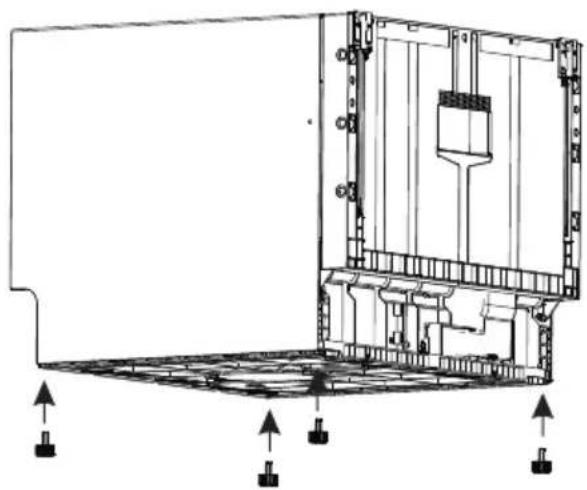
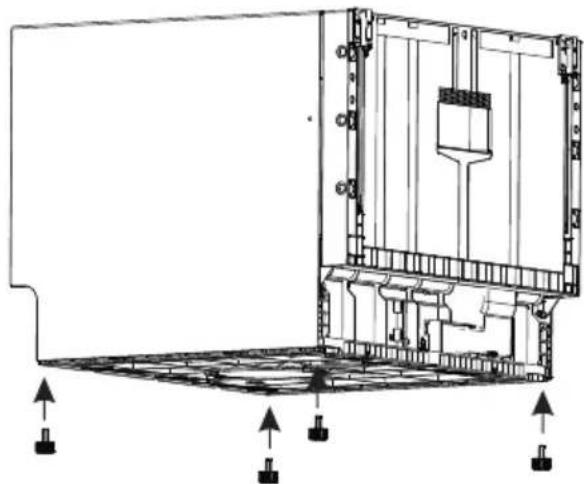
Step 5: Install the adjust screw into the base
natural_image
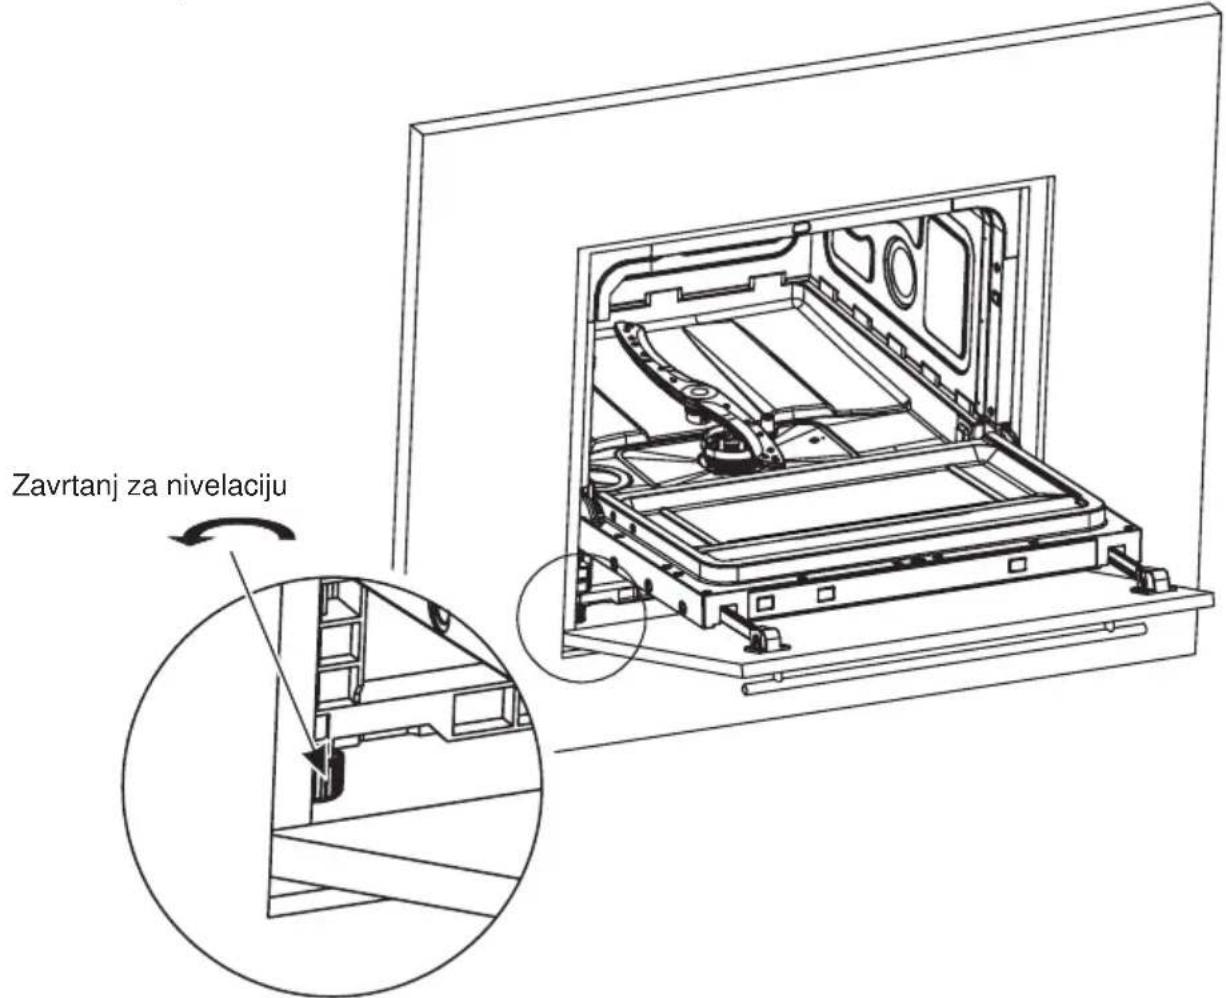
Technical line drawing of a mechanical assembly with no visible text or symbolsStep 6:
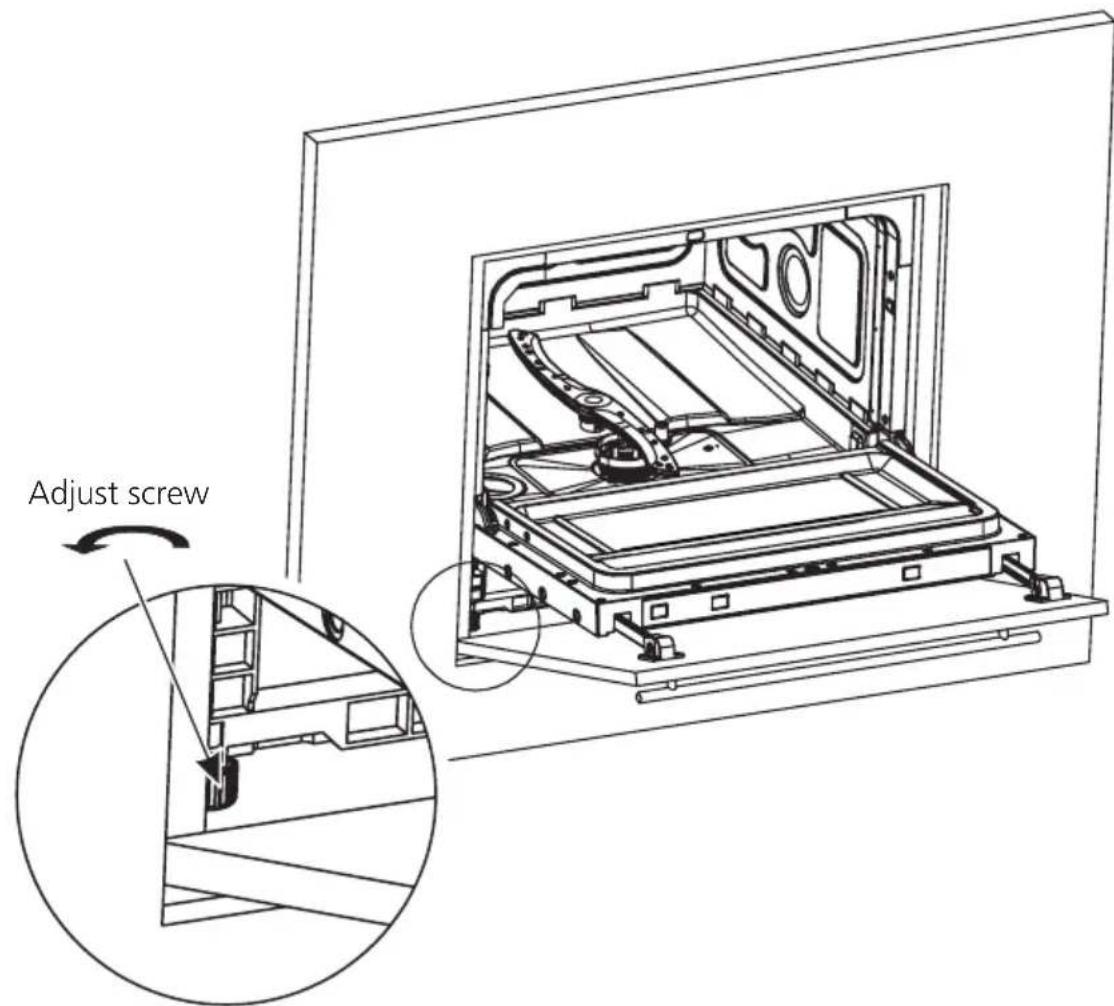
Install the dishwasher in aperture, but not full, as figure, adjust screw, let its bottom align aperture's base, then push dishwasher full.
TROUBLESHOOTING TIPS
Before Calling For Service
Reviewing the charts on the following pages may save you from calling for service.
| Problem Possible causes Solution | ||
| Dishwasher doesn't start | Fuse blown, or the circuit breaker tripped. | Replace fuse or reset circuit breaker.Remove any other appliances sharing the same circuit with the dishwasher. |
| Power supply is not turned on. | Make sure the dishwasher is turned on and the door is closed securely.Make sure the power cord is properly plugged into the wall socket. | |
| Door of dishwasher not properly closed. | Make sure to close the door property and latch it. | |
| Water not pumped from dishwasher | Kink in drain hose | Check drain hose. |
| Filter clogged. | Check the coarse filter.(see section titled "Internal Care") | |
| Kitchen sink clogged. | Check the kitchen sink to make sure it is draining well. If the problem is the kitchen sink that is not draining, you may need a plumber rather than a serviceman for dishwashers. | |
| Suds in the tub | Improper detergent | Use only the special dishwasher detergent to avoid suds. If this occurred, open the dishwasher and let suds evaporate.Add 1 gallon of cold water to the tub.Close and latch the dishwasher, then Start any wash cycle to drain out the water. Repeat if necessary. |
| Spilled rinse-aid. Always wipe up rinse-aid spills immediately. | ||
| Stained tub interior | Detergent with colourant may have been used. | Make sure that the detergent has no colourant. |
| White film on inside surface | Hard water minerals. To clean the interior, use a damp sponge with dishwasher detergent and wear rubber gloves. Never use any other cleaner than dishwasher detergent for the risk of foaming or suds. | |
| Problem Possible Causes What To Do | ||
| There are rust stains on cutlery | The affected items are not corrosion resistant. | Avoid washing items that are not corrosion resistant in the dishwasher. |
| A program was not run after dishwasher salt was added. Traces of salt have gotten into the wash cycle. | Always run the quick wash program. without any crockery in the dishwasher and without selecting the Turbo function (if present), after adding dishwasher salt. | |
| The lid of the softer is loose. | Check the lip. Ensure the fix is fine. | |
| Knocking noise in the wash cabinet | The spray arm is knocking against an item in a basket. | Interrupt the program, and rearrange the items which are obstructing the spray arm. |
| Rattling noise in the wash cabinet | Item of crockery are loose in the wash cabinet. | Interrupt the program, and rearrange the items of crockery. |
| Knocking noise in the water pipes | This may be caused by on-site installation or the cross-section of the piping. | This has no influence on the dishwasher function. If in doubt, contact a qualified plumber. |
| The dishes are not clean | The dishes were not loaded correctly. | See PART II “Preparing And Loading Dishes”. |
| The programme was not powerful enough. | Select a more intensive programme. | |
| Not enough detergent was dispensed. | Use more detergent, or change your detergent. | |
| Item are blocking the path of spray arm. | Rearrange the items so that the spray can rotate freely. | |
| The filter combination in the base of wash cabinet is not clean or is not correctly fitted. This may cause the spray arm jets to get blocked. | Clean and/or fit the filter correctly. Clean the spray arm jets. | |
| Cloudiness on glassware. | Combination of soft water and too much detergent. | Use less detergent if you have soft water and select a shorter cycle to wash the glassware and to get them clean. |
| Black or grey marks on dishes | Aluminium utensils have rubbed against dishes | Use a mild abrasive cleaner to eliminate those marks. |
| Detergent left in dispenser cups | Dishes block detergent dispenser cups | Re-loading the dishes properly. |
| The dishes are not drying | Improper loading Load the dishwasher as suggested in the directions. | |
| Dishes are removed too soon | Do not empty your dishwasher immediately after washing. Open the door slightly so that the steam can escape. Begin unloading the dishwasher only once the dishes are barely warm to the touch. | |
| Wrong program has been selected. | In short programs the washing temperature is lower. This also lowers cleaning performance. Choose a program with a long washing time. | |
| Use of cutlery with a low-quality coating. | Water drainage is more difficult with these items. Cutlery or dishes of this type are not suitable for washing in the dishwasher. | |
WARNING
Self-repair or non-professional repair may cause serious risks to the safety of the user of the appliance and impact warranty.
Availability of the Spare parts
Seven years after placing the last unit of the model on the market: Motor, circulation and drain pump, heaters and heating elements, including heat pumps (separately or bundled), piping and related equipment including all hoses, valves, filters and aqua stops, structural and interior parts related to door assemblies (separately or bundled), printed circuit boards, electronic displays, pressure switches, thermostats and sensors, software and firmware including reset software.
Ten years after placing the last unit of the model on the market: Door hinge and seals, other seals, spray arms, drain filters, interior racks and plastic peripherals such as baskets and lids.
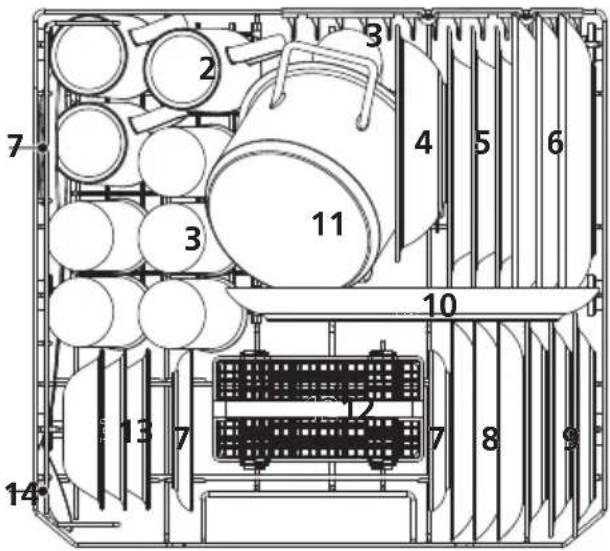
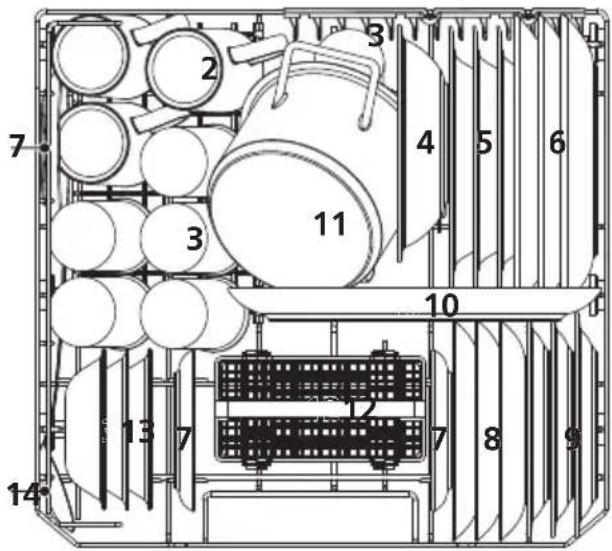
LOADING THE BASKETS ACCORDING TO EN60436:
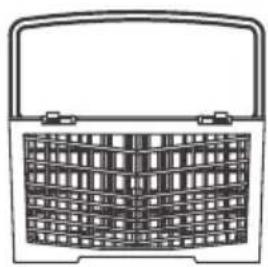
1.Basket:
with the cup rack without the cup rack
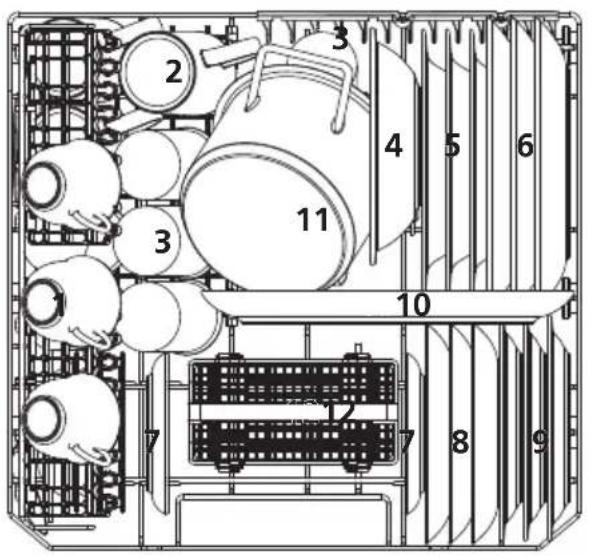
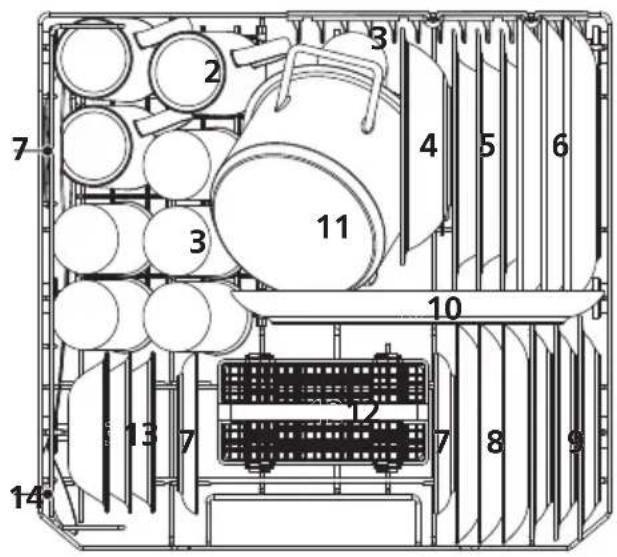
| Number | Item |
| 1 | Cups |
| 2 | Mugs |
| 3 | Glasses |
| 4 | Melamine bowl |
| 5 | Soup plates |
| 6 | Dinner plates |
| 7 | Saucers |
| Number | Item |
| 8 | Dessert dishes |
| 9 | Melamine dessert plates |
| 10 | Oval platter |
| 11 | Small pot |
| 12 | Cutlery basket |
| 13 | Dessert bowls |
| 14 | Serving spoon |
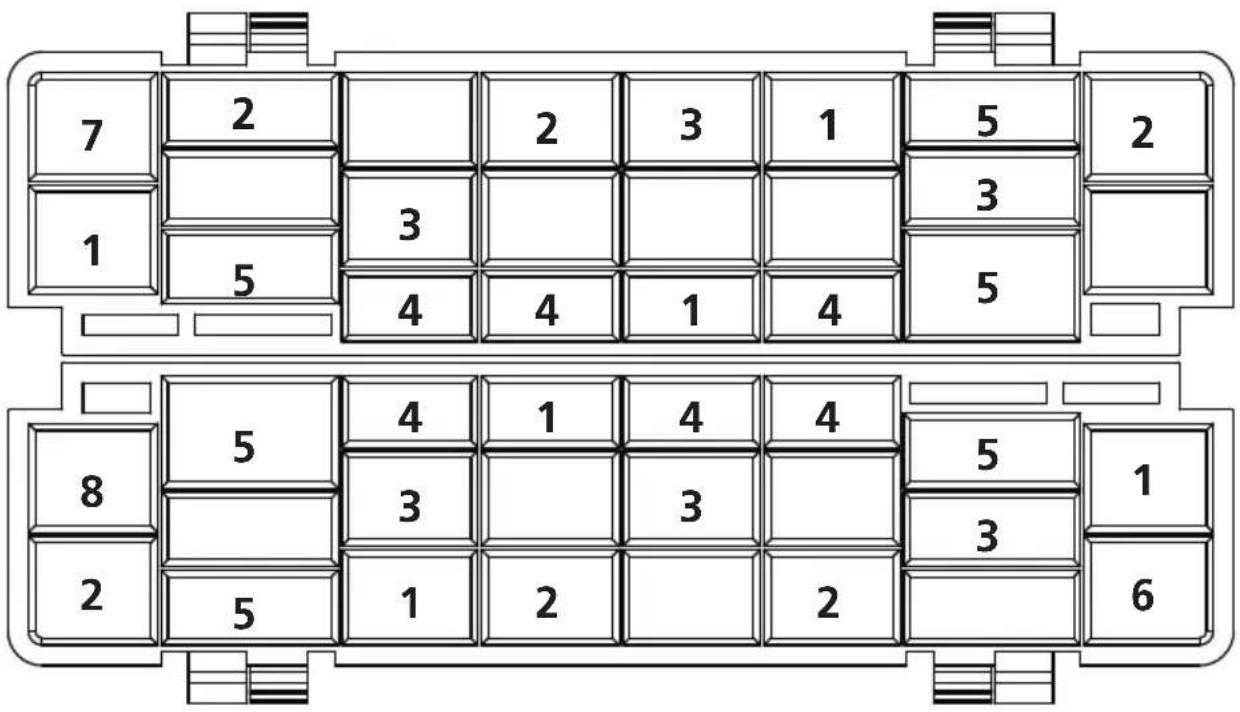
2.Cutlery basket:
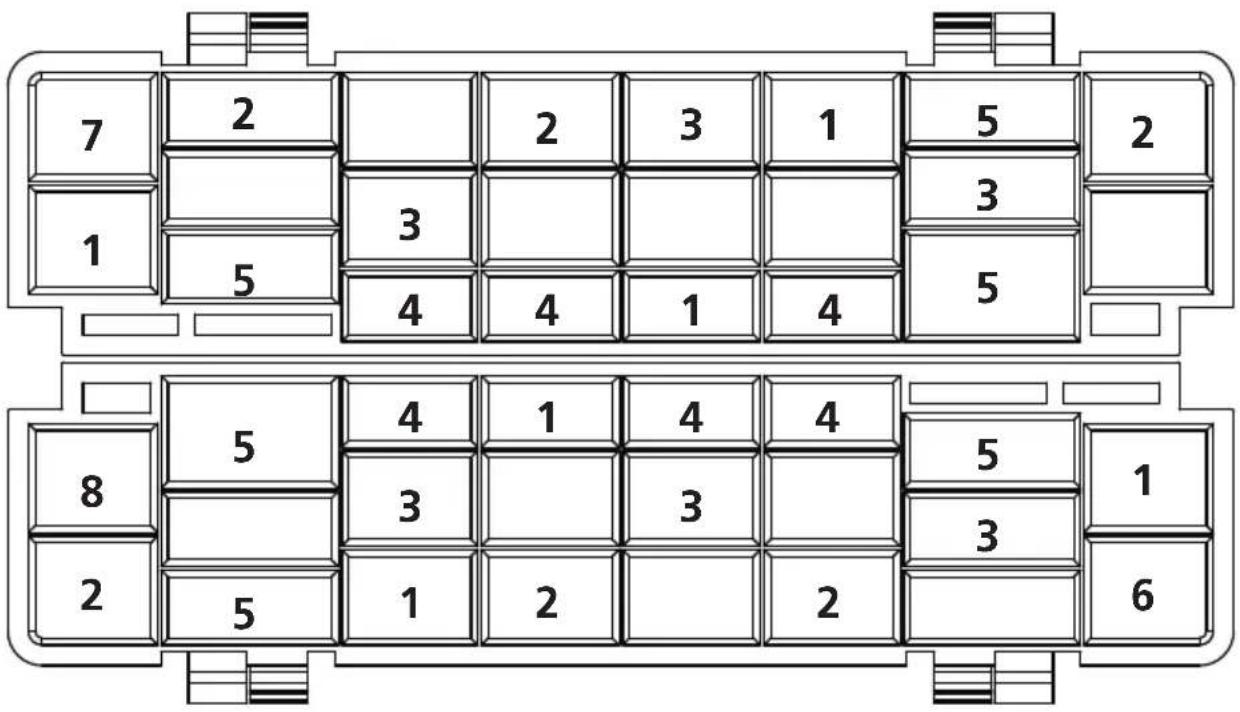
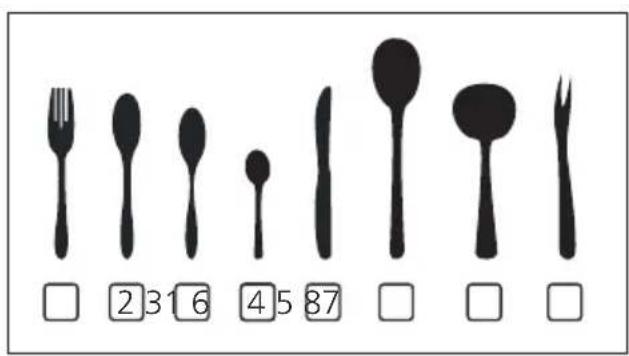
Information for comparability tests in accordance with EN60436
• Capacity: 6 place settings
- Program: ECO
- Rinse aid setting: Max
- Softener setting: H4
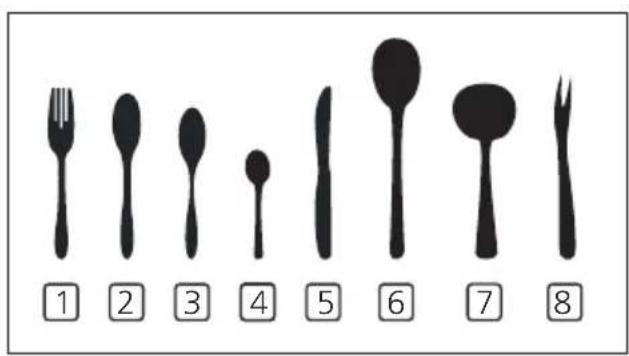
| Number | Item |
| 1 | Forks |
| 2 | Soup spoons |
| 3 | Dessert spoons |
| 4 | Teaspoons |
| 5 | Knives |
| 6 | Serving spoons |
| 7 | Gravy ladles |
| 8 | Serving forks |
natural_image
Simple line drawing of a 3D printer or scanner device inside a circular frame (no text or symbols)Dishwasher Instruction Manual
PART II: Special Version LCT8F
CONTENTS
01
4 USING YOUR DISHWASHER
4 Control Panel
6 Water Softener
7 Preparing And Loading Dishes
10 Function Of The Rinse Aid And Detergent
11 Filling The Rinse Aid Reservoir
12 Filling The Detergent Dispenser
13 PROGRAMMING THE DISHWASHER
02
13 Wash Cycle Table
14 Starting A Cycle Wash
14 Changing The Program Mid-cycle
15 Forget To Add A Dish?
03
15 ERROR CODES
04
16 TECHNICAL INFORMATION

NOTE:
- If you cannot solve the problems by yourself, please ask for help from a professional technician.
- The manufacturer, following a policy of constant development and updating of the product, may make modifications without giving prior notice.
- If lost or out-of-date, you can receive a new user manual from the manufacturer or responsible vendor.
QUICK USER GUIDE
Please read the corresponding content on the instruction manual for detailed operating method.
natural_image
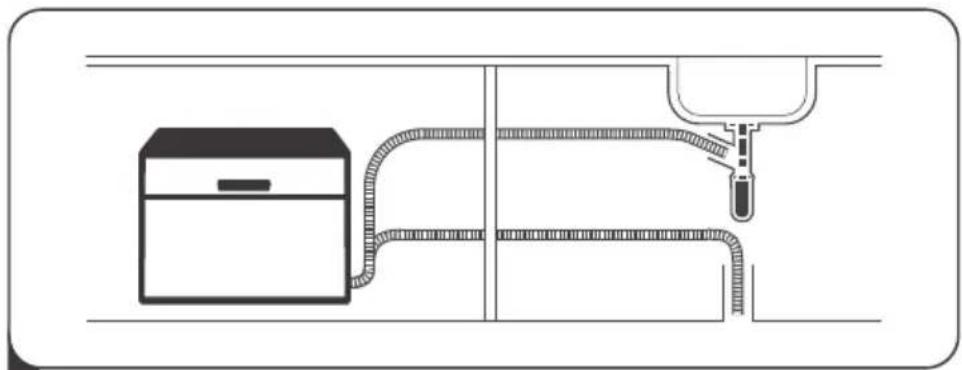
Pure diagram of a ceiling structure with pipes and a box, no text or symbols present1 Install the dishwasher
(Please check the section 5 "INSTALLATION INSTRUCTION")
of PART I : Generic Version.)
natural_image
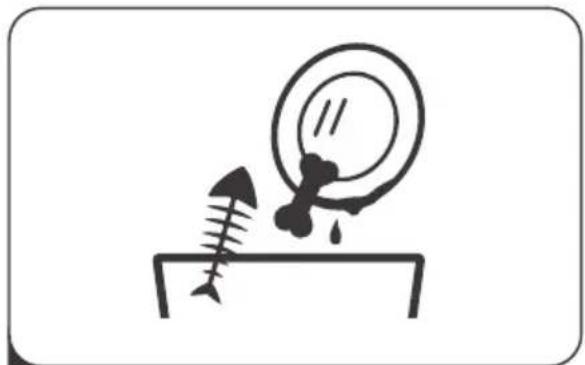
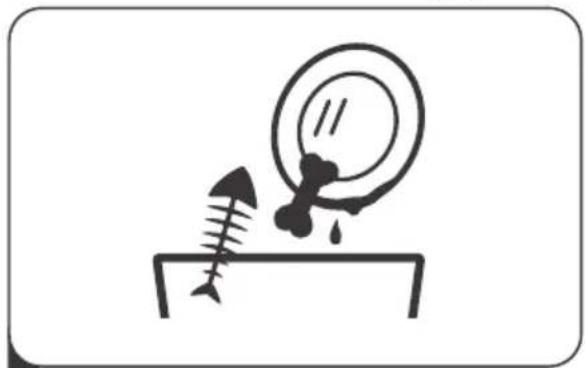
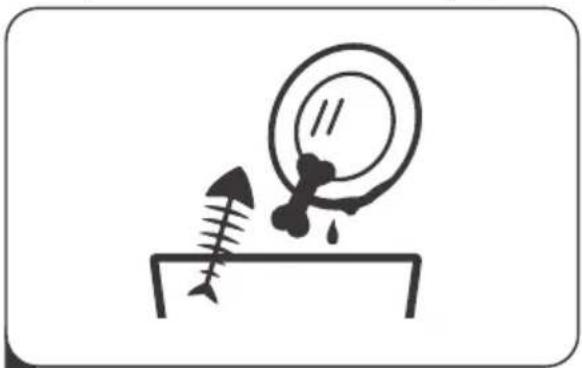
Simple line drawing of a fish and a magnifying glass above a surface, no text or symbols present.2 Removing the larger residue on the cutlery
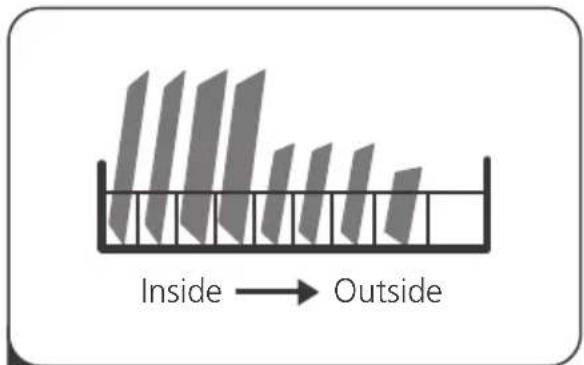
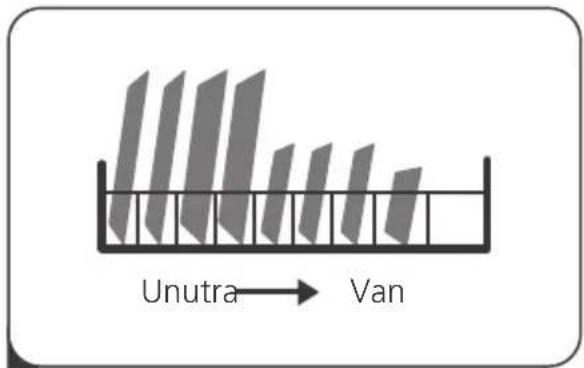
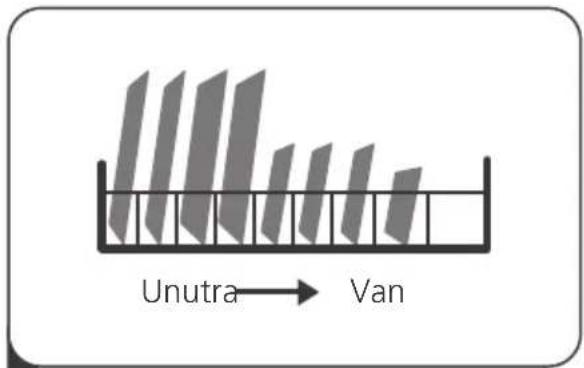
3 Loading the baskets
natural_image
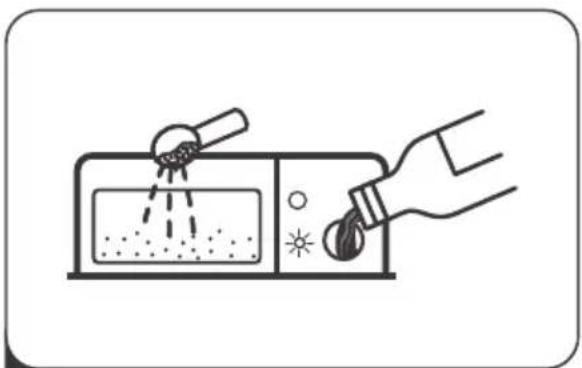
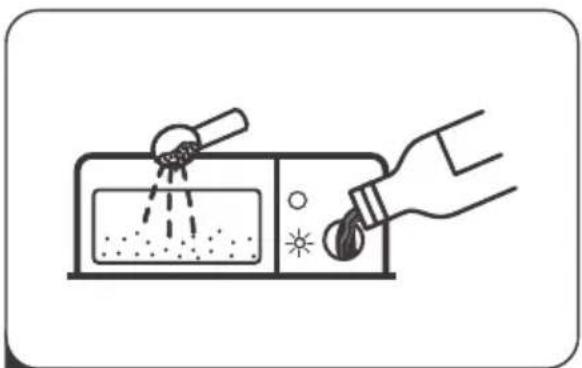
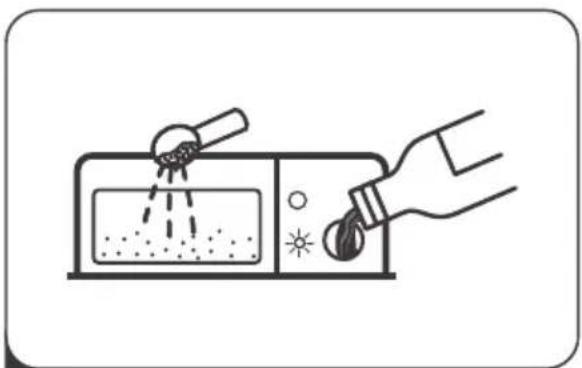
Illustration of a hand pouring liquid into a digital kitchen appliance with a tool (no text or symbols)4 Filling the dispenser Selecting a program a
natural_image
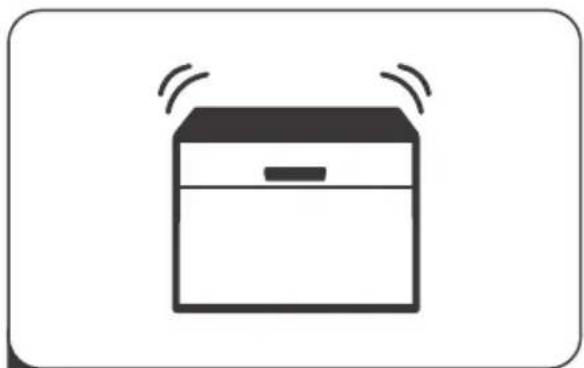
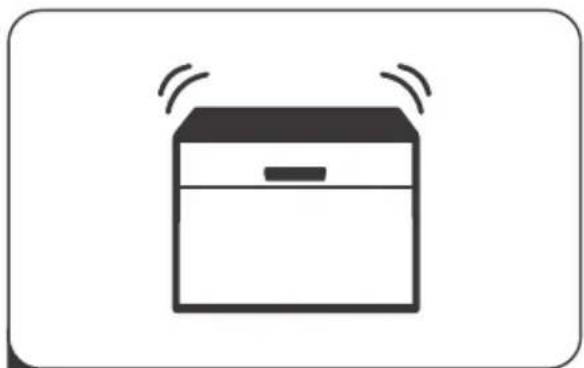
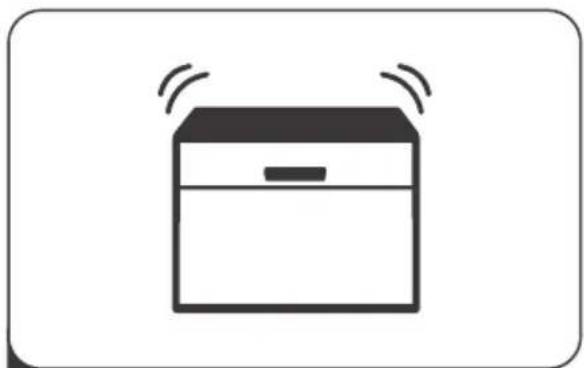
Simple line drawing of a box with sound waves above it (no text or symbols)5 running the dishwasher
USING YOUR DISHWASHER
Control Panel
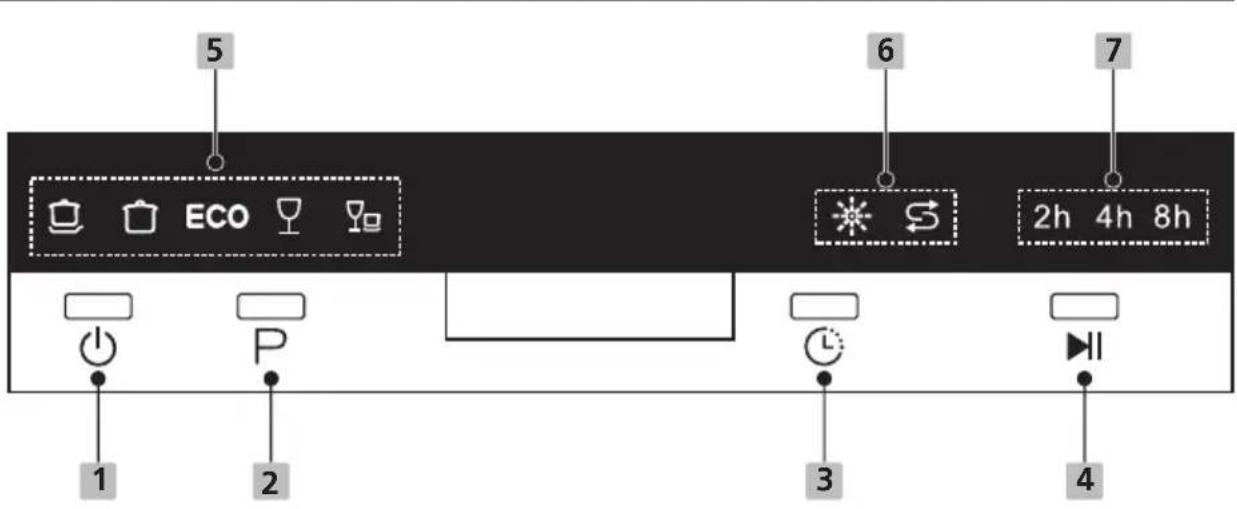
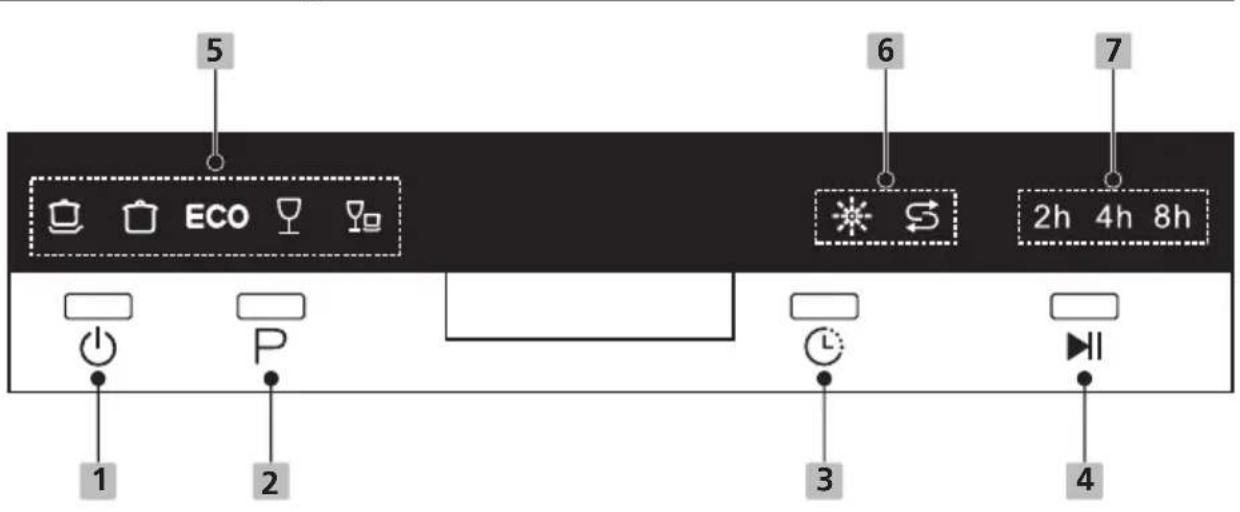
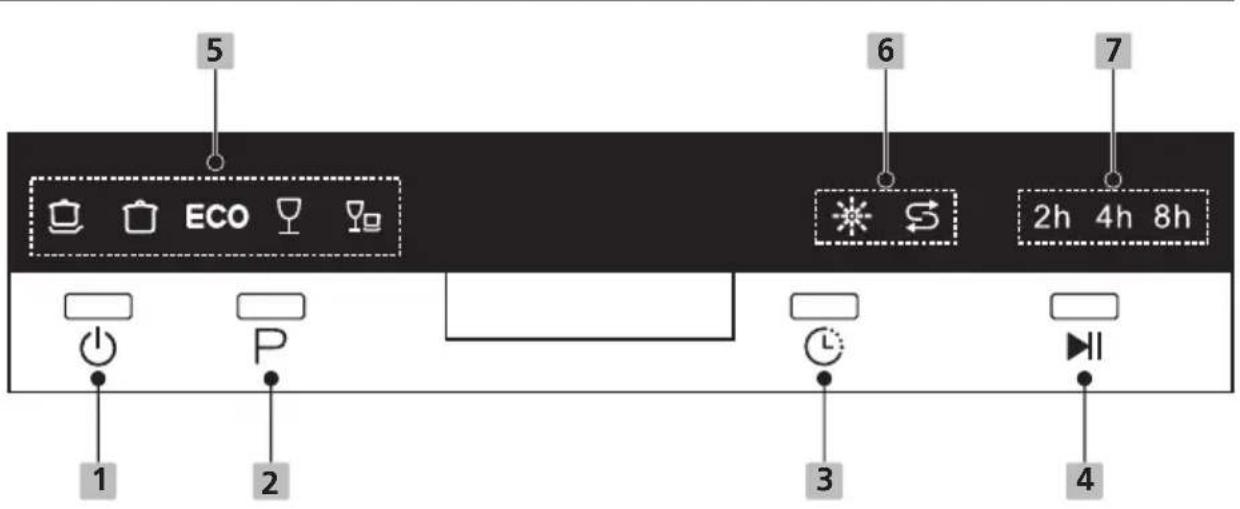
Operation (Button)
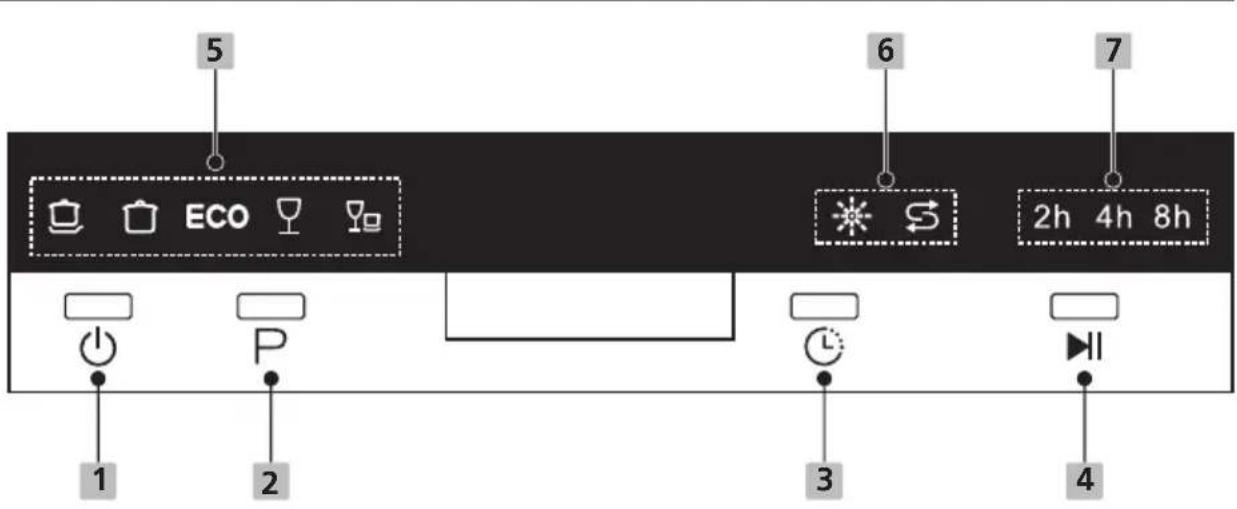
| 1 Power | Press this button to turn on your dishwasher. |
| 2 Program | Press this button to select the appropriate washing program, corresponding indicator will be lit. |
| 3 Delay | Press the button to set the delay time.. |
| 4 Start / Pause | Press the button to start the selected washing program or pause the working program. |
Display
| 5 Program indicator |  IntensiveFor heaviest soiled crockery, and normally soiled pots, pans, dishes etc. With dried-on food. IntensiveFor heaviest soiled crockery, and normally soiled pots, pans, dishes etc. With dried-on food. |
 UniversalFor normally soiled loads, such as pots, plates, glasses and lightly soiled pans. UniversalFor normally soiled loads, such as pots, plates, glasses and lightly soiled pans. | |
| 5 Program indicator | ECO ECOThis is standard program, it is suitable to clean normally soiled tableware and it is the most efficient program in terms of its combined energy and water consumption for that type of tableware.[04ZZ] GlassFor lightly soiled crockery and glass. RapidA shorter wash for lightly soiled loads that do not need drying. RapidA shorter wash for lightly soiled loads that do not need drying. |
| 6 Warning indicator |  Rinse AidIf the “※” indicator is lit, it means the dishwasher is low on dishwasher rinse aid and requires a refill. Rinse AidIf the “※” indicator is lit, it means the dishwasher is low on dishwasher rinse aid and requires a refill. SaltIf the “≦” indicator is lit, it means the dishwasher is low on dishwasher salt and needs to be refilled. SaltIf the “≦” indicator is lit, it means the dishwasher is low on dishwasher salt and needs to be refilled. |
| 7 Delay time | To show the delay time.(2h/4h/6h/8h),6h is indicated by 2h and 4h simultaneously. |
• Water Softener
The water softener must be set manually, using the water hardness dial.
The water softener is designed to remove minerals and salts from the water, which would have a detrimental or adverse effect on the operation of the appliance.
The more minerals there are, the harder your water is.
The softener should be adjusted according to the hardness of the water in your area. Your local Water Authority can advise you on the hardness of the water in your area.
Adjusting salt consumption
The dishwasher is designed to allow for adjustment in the amount of salt consumed based on the hardness of the water used. This is intended to optimise and customise the level of salt consumption.
Please follow the steps below for adjustment in salt consumption.
- Switch on the appliance;
- Press the Program button for more than 5 seconds to start the water softener set model within 60 seconds after the appliance was switched on;
- Press the Program button to select the proper set according to your local environment, the sets will change in the following sequence:
$$ H 1 - > H 2 - > H 3 - > H 4 - > H 5 - > H 6; $$
- Without any operation in five seconds, the machine will exit from set mode, the machine is into standby status
| WATER HARDNESS | Water softener level | Regeneration occurs every X program sequence | Digital display stalls | |
| ^*dH^1)2) | Mmol/Mmol/l | |||
| 0 - 5 | 0 - 0.9 | H1 | No regeneration | H1-> Rapid indicator lights |
| 6 - 11 | 1.0 - 2.0 | H2 | 10 | H2-> Glass indicator lights |
| 12 - 17 | 2.1 - 3.0 | H3* | 5 | H3-> Glass, rapid indicators light |
| 18 - 22 | 3.1 - 4.0 | H4 | 3 | H4-> Eco indicator lights |
| 23 - 34 | 4.1 - 6.1 | H5 | 2 | H5-> Eco, rapid indicator lights |
| 35 - 55 | 6.2 - 8.0 | H6 | 1 | H6-> Eco, Glass indicator lights |
1) German degree of measurement for the water hardness
2) millimol, international unit for water hardness
* factory setting H3
Every cycle with a regeneration operation consumes additional 2.0 litres of water, the energy consumption increases by 0.02 kWh and the programme extents by 4 minutes.

Please check the section 3 "Loading The Salt Into The Softener" of PART I: Generic Version, If your dishwasher lacks salt.

NOTE:
If your model does not have any water softener, you may skip this section. Water Softener
The hardness of the water varies from place to place. If hard water is used in the dishwasher, deposits will form on the dishes and utensils.
The appliance is equipped with a special softener that uses a salt container specifically designed to eliminate lime and minerals from the water.
Preparing And Loading Dishes
- Consider buying utensils which are identified as dishwasher-proof.
- For particular items, select a program with the lowest possible temperature.
- To prevent damage, do not take glass and cutlery out of the dishwasher immediately after the program has ended.
For washing the following cutlery/dishes
Are not suitable
• Cutlery with wooden, horn china or mother-of-pearl handles
• Plastic items that are not heat resistant
- Older cutlery with glued parts that are not temperature resistant
• Bonded cutlery items or dishes
- Pewter or cooper items
- Crystal glass
• Steel items subject to rusting
- Wooden platters
• Items made from synthetic fibres
Are of limited suitability
• Some types of glasses can become dull after a large number of washes
• Silver and aluminum parts have a tendency to discolour during washing
- Glazed patterns may fade if machine washed frequently
Recommendations for loading the dishwasher
Scrape off any large amounts of leftover food. Soften remnants of burnt food in pans. It is not necessary to rinse the dishes under running water.
For best performance of the dishwasher, follow these loading guidelines.
(Features and appearance of baskets and cutlery baskets may vary from your model.)
Place objects in the dishwasher in following way:
- Items such as cups, glasses, pots/pans, etc. are faced downwards.
- Curved items, or ones with recesses, should be loaded aslant so that water can run off.
- All utensils are stacked securely and can not tip over.
- All utensils are placed in the way that the spray arms can rotate freely during washing.
- Load hollow items such as cups, glasses, pans etc. With the opening facing downwards so that water cannot collect in the container or a deep base.
- Dishes and items of cutlery must not lie inside one another, or cover each other.
• To avoid damage, glasses should not touch one another. - The upper basket is designed to hold more delicate and lighter dishware such as glasses, coffee and tea cups.
- Long bladed knives stored in an upright position are a potential hazard!
- Long and / or sharp items of cutlery such as carving knives must be positioned horizontally in the upper basket.
- Please do not overload your dishwasher. This is important for good results and for reasonable consumption of energy.

NOTE:
Very small items should not be washed in the dishwasher as they could easily fall out of the basket.
WARNING

Items will be hot! To prevent damage, do not take glass and cutlery out of the dishwasher for around 15 minutes after the program has ended.
Loading the basket
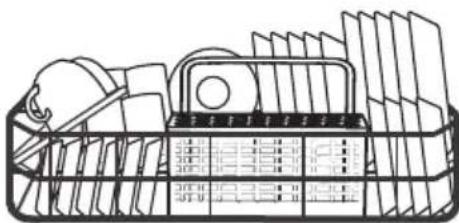
All tableware can't be placed face up, in order to improve the cleaning area and washing performance, it is recommended to place the dirty side towards the spray arm.
Please don't let tableware out of basket bottom to make sure not block the moving of the spray arm. The maximum diameter advised for plates in front of the detergent dispenser is of 19 cm, this not to hamper the opening of it.
natural_image
Line drawing of a basket filled with books and documents, no text or symbols presentLoading the cutlery basket
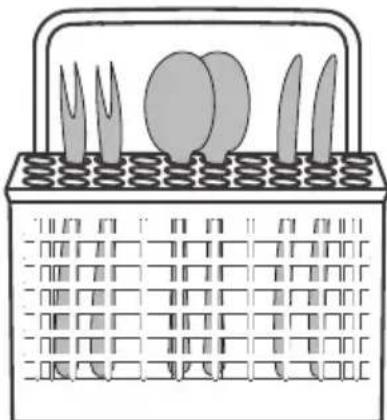
For personal safety and a top quality cleaning, place the silverware in the basket making sure that:
• They do not nest together.
• Silverware is placed with the handles-down.
- But place knives and other potentially dangerous utensils are placed handles-up.
natural_image
Illustration of a basket containing cutlery and food items (no text or symbols)WARNING

natural_image
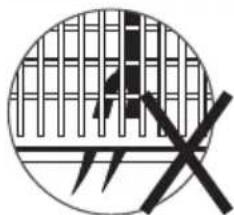
Circular diagram with grid lines and a crossed X symbol (no text or labels)Do not let any item extend through the bottom.
Always load sharp utensils with the sharp point down!

For the best washing effect, please load the baskets refer to standard loading options on last section of PART I: Generic Version
Function Of The Rinse Aid And Detergent
The rinse aid is released during the final rinse to prevent water from forming droplets on your dishes, which can leave spots and streaks. It also improves drying by allowing water to roll off the dishes. Your dishwasher is designed to use liquid rinse aids.
WARNING
Only use branded rinse aid for dishwasher. Never fill the rinse aid dispenser with any other substances (e.g. Dishwasher cleaning agent, liquid detergent). This would damage the appliance.
When to refill the rinse aid dispenser
Unless the rinse-aid warning light ( ✉ ) on the control panel is on, you can always estimate the amount from the color of the optical level indicator located next to the cap. When the rinse-aid container is full, the indicator will be fully dark. The size of the dark dot decreases as the rinse-aid diminishes. You should never let the rinse aid level be less than 1/4 full.
As the rinse aid diminishes, the size of the black dot on the rinse aid level indicator changes, as illustrated below.
Full
3/4 full 1/2 full 1/4 full

○ Empty
Function of detergent
The chemical ingredients that compose the detergent are necessary to remove, crush and dispense all dirt out of the dishwasher. Most of the commercial quality detergents are suitable for this purpose.
WARNING
• Proper Use of Detergent
Use only detergent specifically made for dishwashers use. Keep your detergent fresh and dry.
Don't put powdered detergent into the dispenser until you are ready to wash dishes.

Dishwasher detergent is corrosive! Keep dishwasher detergent out of the reach of children.
Filling The Rinse Aid Reservoir
natural_image
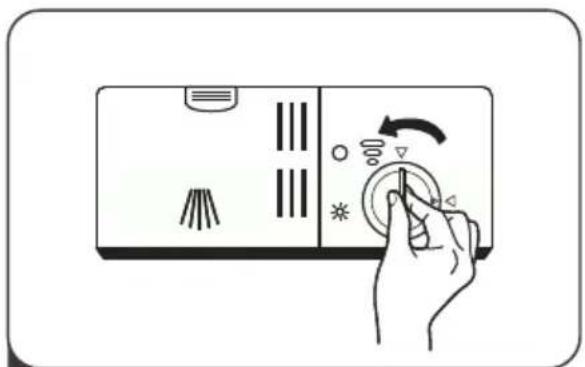
Illustration of a hand pressing down on a control panel with icons and arrows (no text or symbols)1 Remove the rinse aid reservoir cap by rotating it counterclockwise.
natural_image
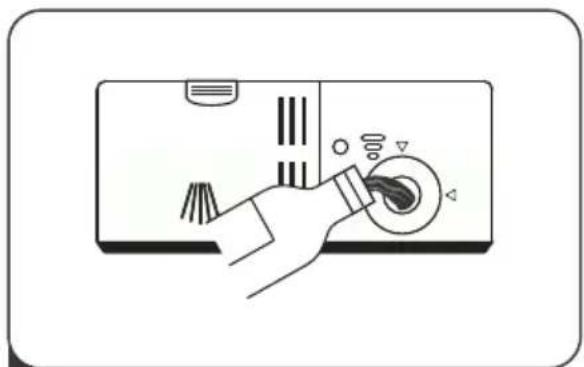
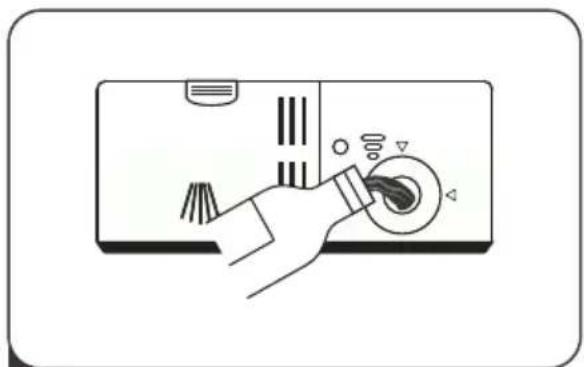
Illustration of a hand pressing down on a device with a circular button and adjustment knobs (no text or symbols)2 Carefully pour in the rinse-aid into its dispenser, whilst avoiding it to overflow.
natural_image
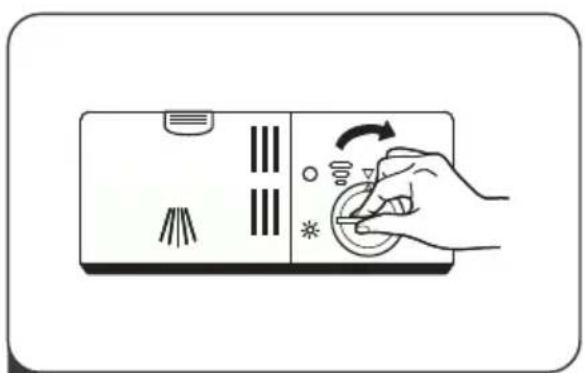
Illustration of a hand pressing down on a device panel with icons for buttons and indicators (no text or symbols)3 Close the rinse aid reservoir cap by rotating it clockwise.
NOTE:
Clean up any spilled rinse aid with an absorbent cloth to avoid excessive foaming during the next wash.
Adjusting the rinse aid reservoir
natural_image
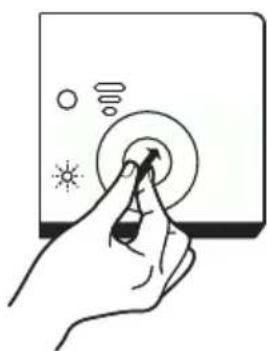
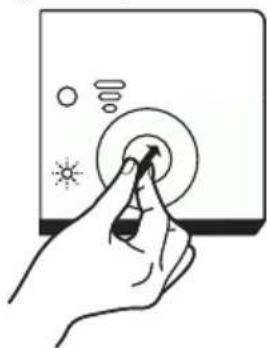
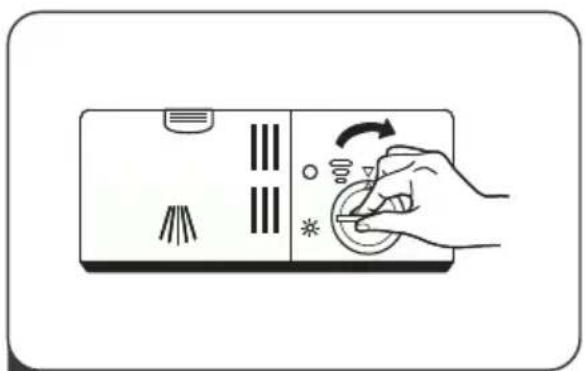
Hand inserting a button into a device (no text or symbols visible)Turn the rinse aid indicator dial to a number. The higher the number, the more rinse aid the dishwasher uses.
If the dishes are not drying properly or are spotted, adjust the dial to the next higher number until your dishes are spot-free. Reduce it if there are sticky whitish stains on your dishes or a bluish film on glassware or knife blades.
Filling The Detergent Dispenser
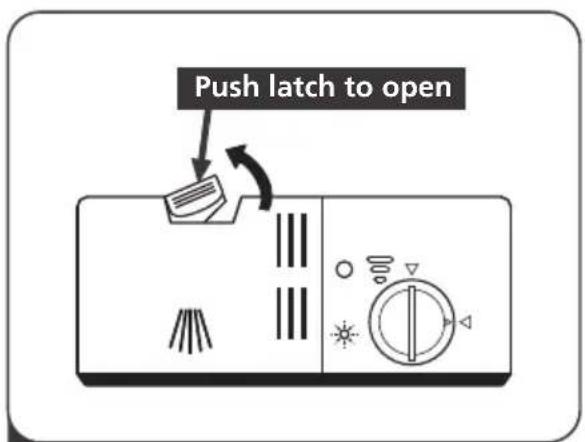
1 Press the release catch on the detergent dispenser to open the cover.
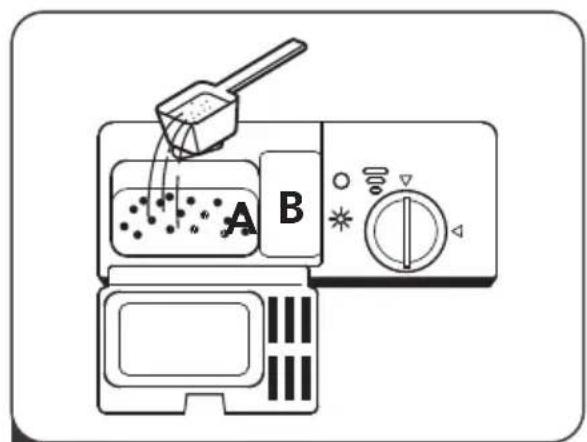
2 Add detergent into the larger cavity (A) for the main wash cycle. For more heavily soiled wash loads, also add some detergent into the smaller cavity (B) for the pre-wash cycle.
natural_image
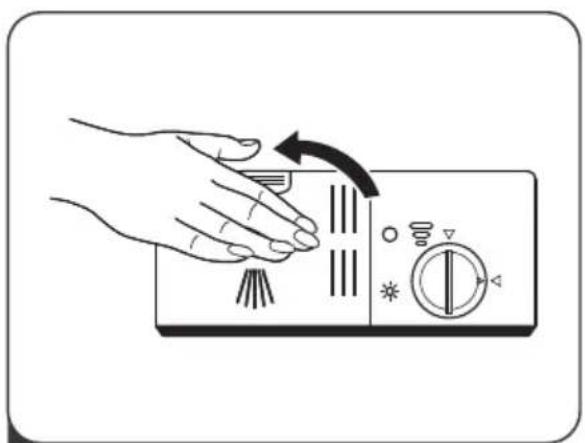
Illustration of a hand pressing down on a kitchen control panel with directional arrows (no text or symbols)3 Close the cover and press on it until it locks into place.

NOTE:
- Be aware that depending on the soiling of water, setting may be different.
- Please observe the manufacturer's recommendations on the detergent packaging.
PROGRAMMING THE DISHWASHER
Wash Cycle Table
The table below shows which programs are best for the levels of food residue on them and how much detergent is needed. It also show various information about the programs.
( ● )Means: need to fill rinse into the Rinse-Aid Dispenser.
| Program | Description Of Cycle | Detergent Pre/Main | Running Time(min) | Energy (Kwh) | Water (L) | Rinse Aid |
 Intensive Intensive | Pre-wash(50°C)Wash(70°C)RinseRinseRinse(70°C)Drying | 4/10g | 140 | 1.2 | 9.6 | ● |
 Universal Universal | Pre-washWash(60°C)RinseRinse(70°C)Drying | 4/10g | 120 | 1.05 | 7.7 | ● |
| ECO(*EN 60436) | Pre-washWash(45°C)Rinse(65°C)Drying | 14g | 230 | 0.613 | 6.5 | ● |
 Glass Glass | Wash(45°C)RinseRinse(60°C)Drying | 14g | 75 | 0.65 | 5.8 | ● |
 Rapid Rapid | Wash(40°C)RinseRinse | 12g | 30 0.5 5.8 | 0.5 5.8 | ○ |

NOTE:
ECO The ECO program is suitable to clean normally soiled tableware, that for this (*EN60436) use, it is the most efficient program in terms of its combined energy and water consumption, and it is used to assess compliance with the EU eco design legislation.
Saving energy
- Pre-rinsing of tableware items leads to increased water and energy consumption and is not recommended.
- Washing tableware in a household dishwasher usually consumes less energy and water in the use phase than hand dishwashing when the household dishwasher is used according to the instructions.
Starting A Cycle Wash
- Draw out the basket, load the dishes and push them back.
- Pour in the detergent.
- Insert the plug into the socket. The power supply refer to last page "Product fiche". Make sure that the water supply is turned on to full pressure.
- Close the door, press the Power button, to switch on the machine.
- Choose a program, the response light will turn on. Then press the Start/Pause button, the dishwasher will start its cycle.
Changing The Program Mid-cycle
A wash cycle can only be changed if it has been running for a short time otherwise, the detergent may have already been released and the dishwasher may have already drained the wash water. If this is the case, the dishwasher needs to be reset and the detergent dispenser must be refilled. To reset the dishwasher, follow the instructions below:
- Press the Start/Pause button to pause the washing.
- Press Program button for more than 3 seconds - the program will cancel.
- Press the Program button to select the desired program.
- Press the Start/Pause button, after 1 seconds, the dishwasher will start.

flowchart
graph LR
    A["Hand gesture"] --> B["3 sec hand icon"]
    B --> C["ECO device with icons"]
    C --> D["Hand gesture with motion indicator"]
Forget To Add A Dish?
A forgotten dish can be added any time before the detergent dispenser opens. If this is the case, follow the instructions below:
- Press the Start/Pause button to pause the washing.
- Wait 5 seconds then open the door.
- Add the forgotten dishes.
- Close the door.
- Press the Start/Pause button after 10 seconds, the dishwasher will start.

flowchart
graph LR
    A["Foot"] --> B["After 5 sec"]
    B --> C["Brushing & Cleaning"]
    C --> D["Toile & Dish"]
    D --> E["Toile & Shoe"]
WARNING

natural_image
Simple line drawing of a box with a lid and handle, no text or symbols presentIt is dangerous to open the door mid-cycle, as hot steam may scald you.
ERROR CODES
If there is a malfunction, the dishwasher will display error codes to identify these:
| Codes | Meanings | Possible Causes |
| The Rapid indicator flickers fleetly | Longer inlet time. | Faucets is not opened, or water intake is restricted, or water pressure is too low. |
| The Rapid and Glass flickers fleetly | Not reaching required temperature. | Malfunction of heating element. |
| The ECO indicator flickers fleetly | Overflow. | Some element of dishwasher leaks. |
| The Universal, ECO and Rapid indicator flickers fleetly | Failure of communication between main PCB with display pcb. | Open circuit or break wiring for the communication. |
WARNING
- If overflow occurs, turn off the main water supply before calling a service.
- If there is water in the base pan because of an overfill or small leak, the water should be removed before restarting the dishwasher.
- If there is an error code that cannot be solved, please request professional assistance.
TECHNICAL INFORMATION
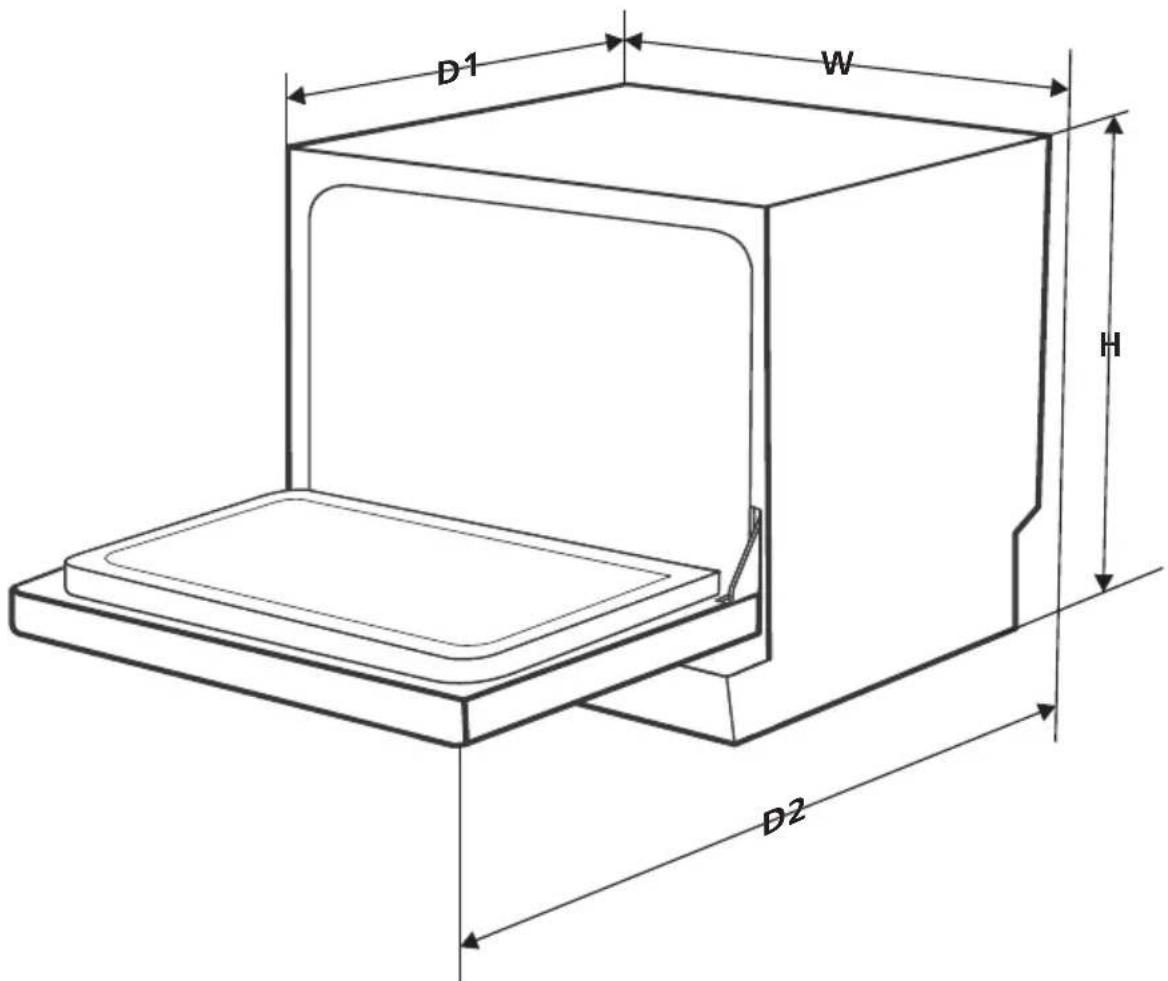
| Height (H) | 438mm |
| Width (W) | 550mm |
| Depth (D1) | 500mm (with the door closed) |
| Depth (D2) | 812mm (with the door opened 90° ) |
Product information sheet(EN 60436)
Supplier's name or trade mark: VOX
Supplier's address ( ^b ):
Model identifier: LCT8F
General product parameters:
| Parameter Value | Parameter Value | |||
| Rated capacity (a) (ps) | 6 | Dimensions in cm | Height | 85 |
| Width | 45 | |||
| Depth | 60 | |||
| EEI (a) | 61,9 | Energy efficiency class (a) F ( ) c | ||
| Cleaning performance index (a) | 1,125 | Drying performance index (a) | 1,065 | |
| Energy consumption in kWh [per cycle], based on the eco programme using cold water fill. Actual energy consumption will depend on how the appliance is used. | 0,61 | Water consumption in litres [per cycle], based on the eco program. Actual water consumption will depend on how the appliance is used and on the hardness of the water. | 6,5 | |
| Program duration (a) (h:min) | 3:50 | Type | Free standing | |
| Airborne acoustical noise emissions (a) (dB(A) re 1 pW) | 49 | Airborne acoustical noise emission class (a) | C (c) | |
| Off-mode (W) | 0,49 | Standby mode (W) | N/A | |
| Delay start (W) (if applicable) | 1,00 | Networked standby (W) (if applicable) | N/A | |
Minimum duration of the guarantee offered by the supplier (b): 24 months
Additional information:
Weblink to the supplier's website, where the information in point 6 of Annex II to Commission Regulation (EU) 2019/2022 (1) (b) is found: www.voxelectronics.com
(a) for the eco program.
(b) changes to these items shall not be considered relevant for the purposes of paragraph 4 of Article 4 of Regulation (EU) 2017/1369.
(c) if the product database automatically generates the definitive content of this cell the supplier shall not enter these data.
(1) Commission Regulation (EU) 2019/2022 of 1 October 2019 laying down eco design requirements for household dishwashers pursuant to Directive 2009/125/EC of the European Parliament and of the Council amending Commission Regulation (EC) No 1275/2008 and repealing Commission Regulation (EU) No 1016/2010 (see page 267 of this Official Journal).

VOX
ELECTRONICS

natural_image
Abstract black-and-white geometric pattern with diagonal stripes (no text or symbols)VOX
ELECTRONICS
SRP
LCT8F
UPUTSTVO ZA UPOTREBU MAŠINA ZA PRANJE SUDOVA
natural_image
Line drawing of a 3D printer or scanner device with internal compartments, enclosed in a circular frame (no text or symbols)Mašina za pranje sudova
Uputstvo za upotrebu
DEO: I Generička verzija
LCT8F
SADRŽAJ
01
BEZBEDNOSNA UPUTSTVA
02
IZGLED PROIZVODA
03
UPOTREBA SUDOMAŠINE
Stavljanje soli u omekšivač
04
ČIŠĆENJE I ODRŽAVANJE
Održavanje spoljašnosti
Održavanje unutrašnjosti
Održavanje sudomašine
05
UPUTSTVA ZA INSTALACIJU
O priključku za napajanje
Snabdevanje vodom i odvod
Priključak odvodnih creva
Postavljanje uređaja
Ugradna instalacija
06
REŠAVANJE PROBLEMA
25 Dostupnost rezervnih delova
07
PUNJENJE KORPI

NAPOMENA:
BEZBEDNOSNA UPUTSTVA
UPOZORENJE
natural_image
Symbol of a trash bin crossed out by two diagonal lines (no text or numbers present)- Kartonska ambalaža je proizvedena od recikliranog papira i treba da se odlaže u kontejnere za prikupljanje starog papira za reciklažu.
- Pravilnim odlaganjem ovog proizvoda, pomažete u sprečavanju eventualnih negativnih posledica po okolinu i ljudsko zdravlje do kojih može doći usled nepravilnog odlaganja ovog proizvoda.
natural_image
Technical line drawing of a mechanical harvesting machine with no visible text or symbolsStalak
za čaše
Korpa
natural_image
Line drawing of a woven basket with handle and side supports (no text or symbols)Stalak za escajg

NAPOMENA:
Ove slike su samo za informacije o delovima uređaja.
flowchart
graph LR
    A["SALT"] --> B["Unutra Extraction"]
    B --> C["Van Extraction"]
    C --> D["Adder to Dish with Beaker"]
- Podešavanje omekšivača vode
- Dodavanje soli u omekšivač
- Punjenje korpe posuđem
- Punjenje posude za deterdžent

flowchart
graph LR
    A["Hand holding a salt container"] --> B["Salt being added to a container"]
    B --> C["Hear pouring salt into a container"]
    C --> D["Hand holding a salt container"]
- Sklonite korpu i odvrnite zatvarač pregrade za so.
- Postavite (isporučeni) levak u otvor za dodavanje soli i sipajte oko 1 kg soli za sudomašinu.
- Pre prvog pranja, napunite posudu za so vodom do maksimalne granice. Normalno je da iz posude za so izađe mala količina vode.
- Nakon punjenja pregrade, vratite poklopac i čvrsto zategnite.
- Lampica za upozorenje za so prestaće da svetli nakon što je posuda za so napunjena solju.
- Neposredno nakon punjenja soli u posudu za so, treba započeti program pranja (predlažemo da koristite kratki program). U suprotnom sistem slane vode može oštetiti sistem filtera, pumpu ili druge važne delove mašine. Ovo je van garancije.

NAPOMENA:
- Podignite fini filter sa glavnog filtera.
natural_image
Illustration of hands using a tool to clean or wash a surface, no text or symbols present- Veći ostaci hrane mogu se očistiti ispiranjem filtera ispod mlaza vode. Za temeljnije čišćenje koristite meku četku za čišćenje.
natural_image
Diagram showing a hand adjusting a mechanical component with an inset close-up of the detail (no text or symbols)- Ponovo sastavite filtere obrnutim redosledom od redosleda rastavljanja, vratite filter i okrećite ga u smeru kazaljke na satu do strelice za zatvaranje.
UPOZORENJE
- Nemojte preterano da zatežete filtere. Vratite filtere na mesto tačnim redosledom kako biste sprečili ulazak velikih ostataka hrane u sistem za filtriranje i pravljenje blokade.
- Nikada ne koristite mašinu za pranje posuđa bez postavljenih filtera. Nepravilna zamena filtera može smanjiti uspešan rad uređaja i oštetiti posuđe i pribor.
Raspršivač
natural_image
Illustration of a hand using a tool to press or install a mechanical component on a flat surface (no text or symbols)natural_image
Illustration of hands using a spray gun to clean a small aircraft on a kitchen sink (no text or symbols)natural_image
Symbolic illustration of a hand with a lightning bolt and smoke trail (no text or symbols)natural_image
Line drawing of a hand holding a pipe fitting with a handle (no text or symbols)natural_image
Line drawing of a faucet with a valve and handle (no text or symbols)natural_image
Technical line drawing of a mechanical assembly with a magnified inset showing a tool interacting with a threaded component (no text or symbols present)Kako ispustiti višak vode iz creva
Ako je sudopera viša od 1.000 mm od tla na kojem je postavljena mašina za pranje sudova, višak vode ne može da se izliva direktno u sudoperu. Tada je neophodno da ocedite višak vode iz creva u prikladnu posudu koja stoji niže od sudopere.
Odvod vode
Povežite crevo za odvod vode. Odvodno crevo mora biti pravilno postavljeno kako bi se izbeglo curenje vode. Vodite računa da odvodno crevo nije iskrivljeno ili zgnječeno.
Produžno crevo
Ako vam je potreban produžetak za odvodno crevo postarajte se da ono bude slično postojećem. Ne sme biti duže od 4m, inače se efekat mašine za pranje sudova može smanjiti.
natural_image
Technical line drawing of a tilted rectangular panel with attached rod (no text or symbols)Korak 4:
Postavite dekorativnu ploču na sudomašinu, kao što je prikazano na slici. Prvo postavite zavrtnje na donju ploču elementa i na dekorativnu ploču, u svih 16 otvora; zatim izvucite spoljni poklopac vrata iz klizišta, navijte 8 zavrtnja između dekorativnog panela i klizača.
natural_image
Technical line drawing of a mechanical assembly with no visible text or symbolsKorak 6:
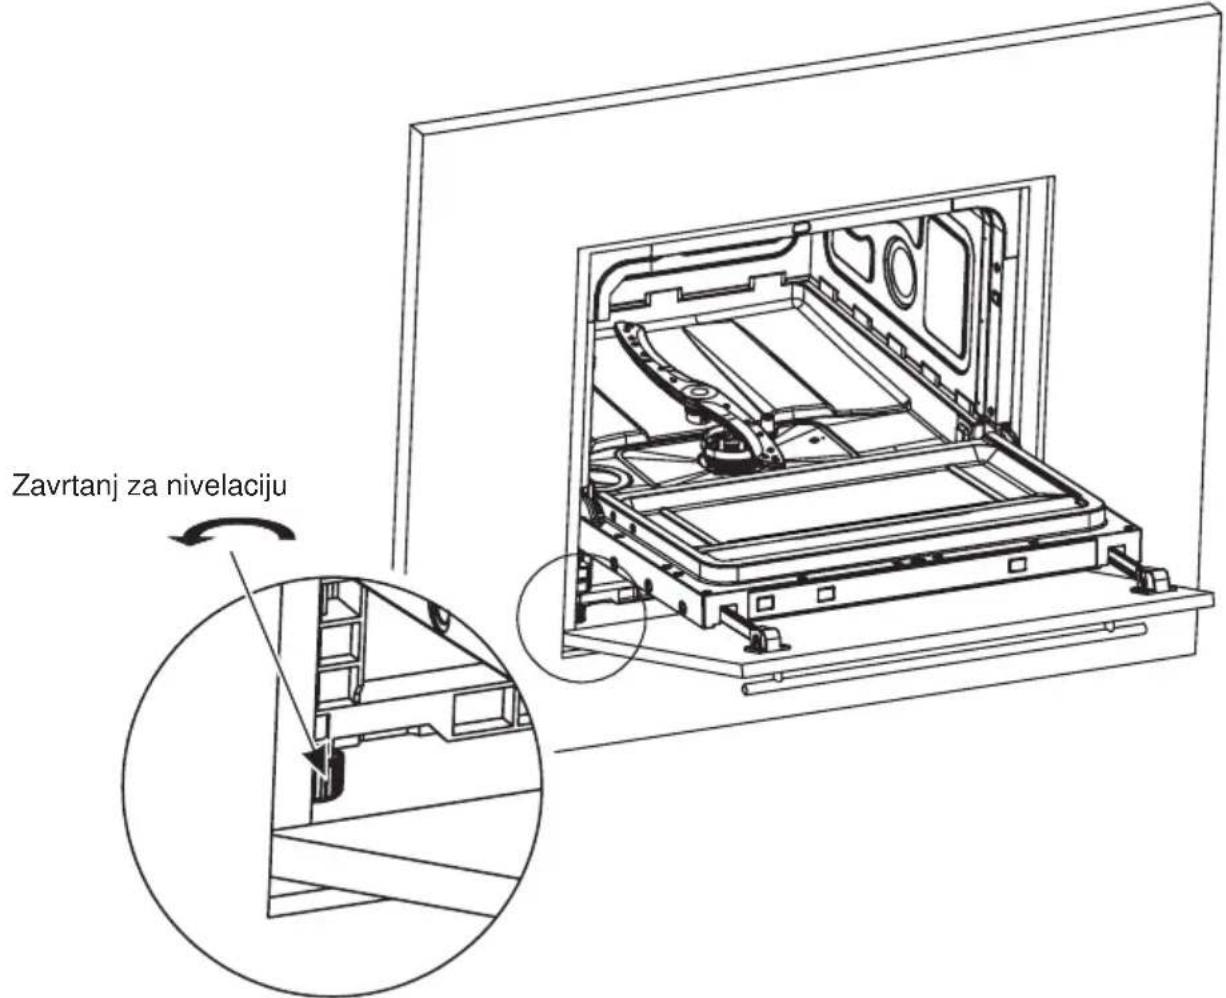
Stavite sudomašinu u otvore elementa, ali ne sasvim, kao na slici; nivelišite zavrtnjima za nivelaciju dno mašine sa osnovom elementa, pa tek onda sasvim umetnite mašinu unutra.
Rešavanje problema
bez stalka za čaše
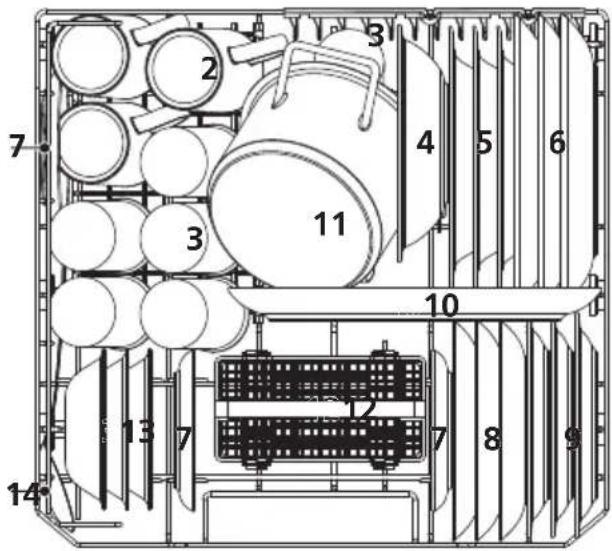
| Broj | Predmet |
| 1 | Šoljice |
| 2 | Šolje |
| 3 | Čaše |
| 4 | Melamin posuda |
| 5 | Duboki tanjiri |
| 6 | Plitki tanjiri |
| 7 | Tacne |
| Broj | Predmet |
| 8 | Desertni tanjiri |
| 9 | Melamin desertni tanjiri |
| 10 | Ovalni tanjir |
| 11 | Mala šerpa |
| 12 | Korpa za escajg |
| 13 | Činije za desert |
| 14 | Kašika za serviranje |
2.Korpa za escajg:
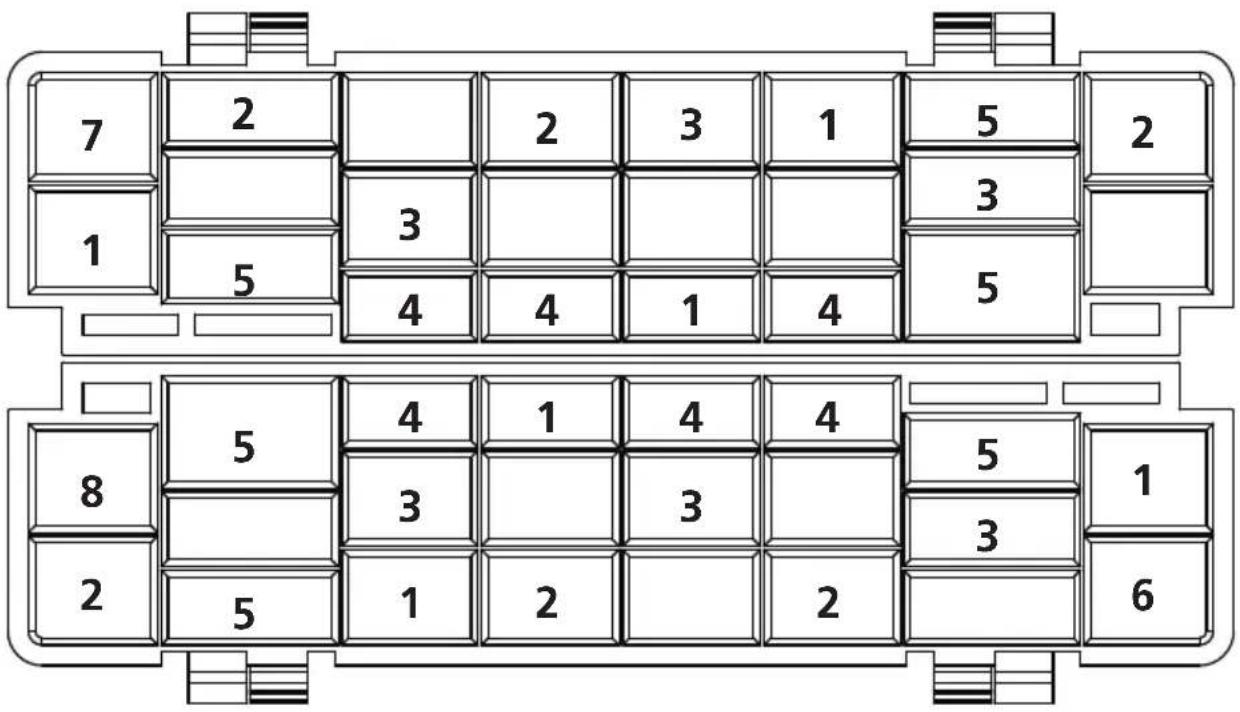
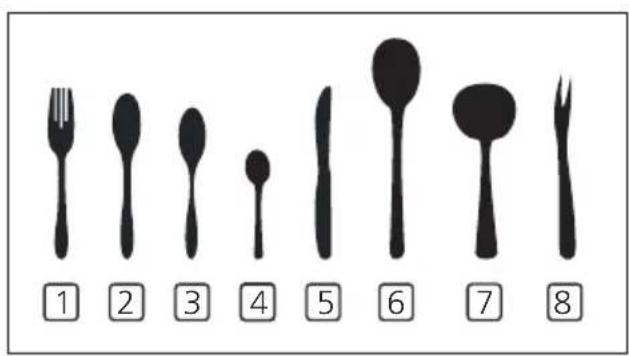
Podaci o kampatibilnosti u skladu sa EN60436
- Kapacitet: 6 kompleta
- Program: EKO
• Podešavanje nivoa ispiranja: Max
• Podešavanje omekšivača: H4
| Broj | Premet |
| 1 | Viljuške |
| 2 | Supene kašike |
| 3 | Desertne kašike |
| 4 | Kafene kašike |
| 5 | Noževi |
| 6 | Kašike za serviranje |
| 7 | Kutlače |
| 8 | Viljuške za serviranje |
natural_image
Simple line drawing of a 3D printer or scanner device inside a circular frame (no text or symbols)natural_image
Pure diagram of a ceiling system with a cabinet and pipe, no text or symbols present1 Instaliranje mašine za sudove
(Pogledajte odeljak 5 "UPUTSTVO ZA INSTALICIJU" iz dela I : Generička verzija.)
natural_image
Simple line drawing of a hammer and sickle on a surface with a magnified plate (no text or symbols)2 Uklanjanje većih ostataka hrane sa posuđa
3 Punjenje korpi
natural_image
Illustration of a hand using a power tool to clean or wash liquid from a microwave oven (no text or symbols)4 Punjenje posude za deterdžent
natural_image
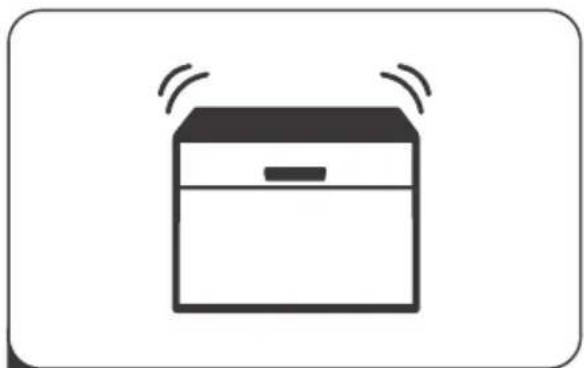
Simple line drawing of a box with sound waves above it (no text or symbols)5 Biranje programa i puštanje sudomašine u rad
UPOTREBA MAŠINE ZA SUDOVE
Kontrolna tabla
Operacija (Dugme)
| 1 Power | Pritisnite ovo dugme da biste uključili mašinu. |
| 2 Program | Pritisnite ovo dugme da biste izabrali odgovarajući program pranja, odgovarajući indikator će zasvetleti. |
| 3 Delay | Pritisnite dugme da biste podesili vreme odloženog pranja. |
| 4 Start / Pause | Pritisnite dugme da biste izabrali program pranja ili pauzirali program koji je u toku. |
Displej
| 5 Indikatorprograma |  IntenzivanZa veoma zaprljano posuđe i normalno zaprljane šerpe,tiganje, sudove i slično, sa ostacima sasušene hrane. IntenzivanZa veoma zaprljano posuđe i normalno zaprljane šerpe,tiganje, sudove i slično, sa ostacima sasušene hrane. | |
 UniverzalniZa standardno zaprljano posuđe poput šerpi, tanjira, čaša imalo zaprljane tiganje. UniverzalniZa standardno zaprljano posuđe poput šerpi, tanjira, čaša imalo zaprljane tiganje. | ||
| 5 Indikator programa | ECO EKOOvo je standardni program, pogodan je za čišćenje normalno zaprljanog posuđa i najefikasniji je program u pogledu kombinovane potrošnje energije i vode za tu vrstu posuđa. | |
 | ČašeZa malo zaprljano posuđe i čaše. | |
 | Brzo pranjeKratki program za malo zaprljano posuđe kome nije potrebno sušenje. | |
| 6 Indikator upozorenja |  | Sredstvo za ispiranjeKada “※” indikator zasvetli, to znači da u sudomašini ima malo sredstva za ispiranje, treba dopuniti. |
 | SoKada “≦” indikator zasvetli, to znači da u sudomašini ima malo soli, treba dopuniti. | |
| 7 Vreme odloženog pranja | Vreme odlaganja: 2h/4h/6h/8h (za 6h odlaganja: istovremeno svetle lampice 2h i 4h) | |
natural_image
Line drawing of a shopping basket filled with items including shoes, books, and documents (no text or symbols)Punjenje korpe za escajg
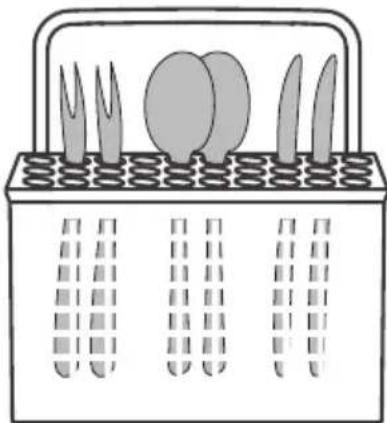
Radi lične sigurnosti i što boljeg kvaliteta pranja stavljajte escajg u korpu tako da ste sigurni da:
- Pribor nije zbijen,
• Drške pribora su stavljene nadole. - Noževi i drugi opasan pribor su stavljeni sa drškama nagore.
natural_image
Illustration of a basket containing cutlery and food items (no text or symbols)
UPOZORENJE

natural_image
Simple geometric diagram with a circle and a cross mark (no text or symbols)natural_image
Illustration of a hand pressing down on a control panel with icons and arrows (no text or symbols)natural_image
Illustration of a hand pressing down on a device with a circular button and adjustment knobs (no text or symbols)2 Pažljivo ulijte sredstvo za ispiranje u posudu, pazeći da se ne prelije.
natural_image
Illustration of a hand operating a device with control buttons and a scroll (no text or symbols)3 Zatvorite poklopac posude sredstva za ispiranje rotiranjem u smeru kazaljke na satu.
NAPOMENA:
Očistite proliveno sredstvo za ispiranje upijajućom krpom kako biste izbegli prekomerno stvaranje pene prilikom sledećeg pranja.
Podešavanje posude sredstva za ispiranje
natural_image
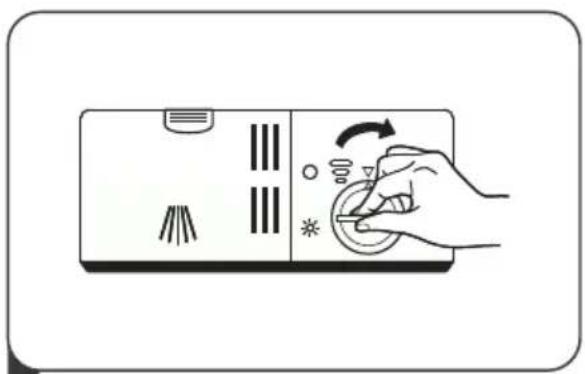
Hand touching a circular button with icons around it, no text or symbols presentOkrenite indikator sredstva za ispiranje na određeni broj. Što je broj veći, mašina za pranje sudova koristi više sredstva za ispiranje. Ako se posuđe ne suši kako treba ili ima mrlje, podesite indikator na veći broj dok posuđe ne bude bez mrlja. Smanjite broj indikatora ukoliko na sudovima postoje lepljive beličaste mrlje ili fleke na staklenom posuđu ili sečivima noževa.
• Dodavanje deterdženta
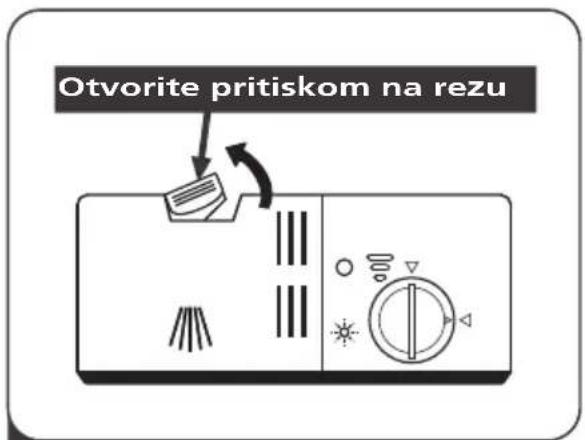
1 Pritisnite bravicu za otvaranje na posudi za deterdžent da biste otvorili poklopac.
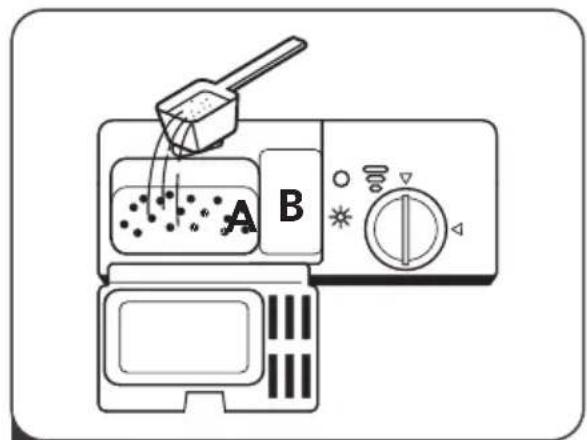
natural_image
Illustration of a hand pressing down on a kitchen air conditioner panel with a hand adjusting the button (no text or symbols)3 Zatvorite poklopac i pritisnite dok se ne zaključa.

NAPOMENA:
- Imajte na umu da podešavanje može biti različito u zavisnosti od čistoće vode.
- Obratite pažnju na preporuke proizvođača na pakovanju deterdženta.
PODEŠAVANJE PROGRAMA SUDOMAŠINE • Tabela sa ciklusima pranja
Tabela ispod prikazuje kako odabrati program u zavisnosti od zaprljanosti sudova i koliko deterdženta treba upotrebiti. U tabeli su takođe prikazani podaci o programima.
( ● ) Označava da treba dopuniti sredstvo za ispiranje.
| Program | Opis ciklusa | Deterdžent Pre/Glavni | Vreme trajanja(min) | Energija (Kwh) | Voda (L) | Dodatno ispiranje |
 Intensive Intensive | Predpranje(50°C)Pranje(70°C)IspiranjeIspiranjeIspiranje(70°C)Sušenje | 4/10g | 140 | 1.2 | 9.6 | ● |
 Universal Universal | PredpranjePranje (60°C)IspiranjeIspiranje(70°C)Sušenje | 4/10g | 120 | 1.05 | 7.7 | ● |
| ECO(*EN 60436) | PredpranjePranje(45°C)Ispiranje(65°C)Sušenje | 14g | 230 | 0.613 | 6.5 | ● |
| [X464]Glass | Pranje(45°C)IspiranjeIspiranje(60°C)Sušenje | 14g | 75 | 0.65 | 5.8 | ● |
 Rapid Rapid | Pranje(40°C)IspiranjeIspiranje | 12g | 30 0.5 5.8 | 0.5 5.8 | ○ |

NAPOMENA:
natural_image
Simple line drawing of a box with a lid and handle, no text or symbols presentOpasno je otvarati vrata u toku ciklusa pranja, jer vas vruća para može opeći.
ŠIFRE GREŠAKA
natural_image
Simple line drawing of a 3D printer or scanner device inside a circular frame (no text or symbols)Pomivalni stroj
Navodila za uporabo
natural_image
Symbol of a trash bin crossed with no text or numbers, representing waste sorting or restriction (no text present)flowchart
graph LR
    A["SALT"] --> B["Notranjost"]
    B --> C["Zunanjost"]
    C --> D["Water washing machine"]
flowchart
graph LR
    A["Hand holding plate with salt"] --> B["Add salt to a small bowl"]
    B --> C["Salt being poured into a container"]
    C --> D["Hear pouring liquid into a pot"]
    D --> E["Hear adding salt to a small bowl"]
2 Dvignite fini filter iz glavnega.
natural_image
Illustration of hands using a tool to clean or wash a pipe on a kitchen sink (no text or symbols)natural_image
Diagram showing a hand operating a mechanical component with an inset close-up of the motion (no text or symbols)natural_image
Illustration of a hand using a tool to press or install a mechanical component on a flat surface (no text or symbols)1 Da bi jo odstranili, izvlecite brizgalno ročico navzgor.
natural_image
Line drawing of hands using a tool to clean or spray liquid onto a kitchen sink (no text or symbols)natural_image
Silhouette of a hand with a lightning bolt symbol indicating electrical hazard (no text or symbols present)natural_image
Line drawing of a hand holding a wrench, no text or symbols presentnatural_image
Line drawing of a faucet with a valve and handle (no text or symbols)natural_image
Technical line drawing of a screwdriver inserted into a component, showing internal threading and assembly (no text or symbols)natural_image
Line drawing of a rectangular panel with a diagonal support and two small protrusions, no text or symbols present.Korak 4:
natural_image
Technical line drawing of a mechanical device with internal components and mounting base (no text or symbols)Vijaki dim. 8
Korak 5: Privijte vijake za prilagajanje položaja na osnovo stroja
natural_image
Technical line drawing of a mechanical assembly with no visible text or symbolsKorak 6:
natural_image
Simple line drawing of a 3D printer or scanner device inside a circular frame (no text or symbols)Pomivalni stroj
Navodila za uporabo
natural_image
Pure diagram of a ceiling system with a cabinet and pipe routing (no text or symbols)natural_image
Simple line drawing of a hammer and sickle on a surface with a magnified plate (no text or symbols)natural_image
Illustration of a hand pouring liquid into a microwave oven with a dropper (no text or symbols)4 dodajte čistilno sredstvo v dozirnik Izberite 5 program in zaženite pomivanje
natural_image
Simple line drawing of a box with sound waves above it (no text or symbols)UPORABA POMIVALNEGA STROJA
Nadzorna plošča
Upravljanje (Tipke)
natural_image
Line drawing of a shopping basket filled with books and documents (no text or symbols)natural_image
Line drawing of a basket containing six cutlery items (storks, ovals, blades) with no text or symbolsPOZOR
natural_image
Circular diagram with grid lines and a crossed X symbol (no text or labels)3/4 full 1/2 full 1/4 full


Empty
natural_image
Illustration of a hand pressing down on a control panel with icons and arrows (no text or symbols)1 Odstranite pokrov posode sredstva za izpiranje tako, da ga obračate v nasprotni smeri urinega kazalca.
natural_image
Illustration of a hand pressing down on a device with buttons and a knob (no text or symbols)2 Skrbno nalijte sredstvo za izpiranje v njegov dozirnik in pazite, da se ne bo prelivalo.
natural_image
Illustration of a hand pressing down on a device panel with icons for buttons and a scroll (no text or symbols)3 Zaprite pokrov posode sredstav za izpiranje tako, da ga obrnete v smeri urinega kazalca.
OPOMBA:
natural_image
Hand pressing a button on a device screen with icons for lighting, sound, and battery (no text or symbols)natural_image
Illustration of a hand pressing down on a kitchen control panel with directional arrows (no text or symbols)3 Zaprite pokrov in ga potisnite navzdol, dokler ne zaskoči na svoje mest.

OPOMBA:
flowchart
graph LR
    A["Foot"] --> B["50 sec."]
    B --> C["Hand manipulation with bar chart"]
    C --> D["Water washing machine"]
    D --> E["Foot down foot"]
POZOR

natural_image
Simple line drawing of a box with a lid and handle, no text or symbols presentnatural_image
Line drawing of a 3D printer or scanner device with internal compartments, enclosed in a circular frame (no text or symbols)Mašina za pranje sudova
Uputstvo za upotrebu
DIO: I Generička verzija
LCT8F
SADRŽAJ
01
SIGURNOSNA UPUTSTVA
02
IZGLED PROIZVODA
03
UPOTREBA MAŠINE
Stavljanje soli u omekšivač
04
ČIŠĆENJE I ODRŽAVANJE
Održavanje spoljašnosti
Održavanje unutrašnjosti
Održavanje mašine za pranje posuđa
05
UPUTSTVA ZA INSTALACIJU
O priključku za napajanje
Snabdijevanje vodom i odvod
Priključak odvodnih crijeva
Postavljanje uređaja
Ugradbena instalacija
06
RJEŠAVANJE PROBLEMA
25 Dostupnost rezervnih dijelova
07
26 PUNJENJE KORPI

NAPOMENA:
natural_image
Simple line drawing of a trash bin crossed with diagonal lines, no text or symbols present- Kartonska ambalaža je proizvedena od recikliranog papira i treba se odložiti u kontejnere za prikupljanje starog papira za reciklažu.
- Pravilnim odlaganjem ovog proizvoda, pomažete u sprječavanju eventualnih negativnih posljedica po okolinu i ljudsko zdravlje do kojih može doći uslijed nepravilnog odlaganja ovog proizvoda.
flowchart
graph LR
    A["SALT"] --> B["Unutra → Van"]
    B --> C["Color Gradient Visualization"]
- Podešavanje omekšivača vode
- Dodavanje soli u omekšivač
- Punjenje korpe posuđem
- Punjenje posude za deterdžent

Molimo pogledajte odjeljak 1 „Omekšivač vode“ iz dijela II : Posebna verzija, ukoliko je potrebno podesiti omekšivač vode.
Dodavanje soli u omekšivač

NAPOMENA:
flowchart
graph LR
    A["Hand holding a salt container"] --> B["Salt being added to a container"]
    B --> C["Hear pouring salt into a container"]
    C --> D["Hand holding a salt container"]
- Sklonite korpu i odvrnite zatvarač pregrade za so.
- Postavite (isporučeni) lijevak u otvor za dodavanje soli i sipajte oko 1 kg soli za sudomašinu.
-
Prije prvog pranja, napunite posudu za so vodom do maksimalne granice. Normalno je da iz posude za so izađe mala količina vode.
-
Nakon punjenja pregrade, vratite poklopac i čvrsto zategnite.
-
Lampica za upozorenje za so prestaće da svijetli nakon što je posuda za so napunjena solju.
-
Neposredno nakon punjenja soli u posudu za so, treba započeti program pranja (predlažemo da koristite kratki program). U suprotnom sistem slane vode može oštetiti sistem filtera, pumpu ili druge važne dijelove mašine. Ovo je van garancije.

NAPOMENA:
- Posuda za sol smije se dopunjavati samo kada se na kontrolnoj tabli upali lampica upozorenja za so. ⇌ U zavisnosti od toga koliko se dobro so rastvara, lampica upozorenja za so može i dalje da svijetli iako je posuda za so napunjena.
Ako na kontrolnoj tabli nema lampice upozorenja za so (kod nekih modela), možete procijeniti kada treba dodati so u omekšivač prema ciklusima koje je mašina za pranje sudova pokrenula. - Ukoliko se so prelila, uključite natapanje ili brzi program da bi se uklonio višak soli.
ČIŠĆENJE I ODRŽAVANJE
• Održavanje spoljašnosti
Vrata i brtva na vratima
Redovno čistite brtve na vratima mekom vlažnom krpom da biste uklonili naslage hrane. Kada se mašina za pranje posuđa puni, ostaci hrane i pića mogu iscuriti na bočne strane vrata mašine za pranje posuđa. Ove površine su izvan dijela za pranje i ne pristupa im voda iz prskalice. Sve naslage treba obrisati prije nego što se vrata zatvore.
Kontrolna tabla
Ako je potrebno čišćenje, kontrolnu tablu brišite samo mekom, vlažnom krpom.
⚠ UPOZORENJE
- Da biste izbjegli prodor vode u bravu vrata i električne komponente, nemojte koristiti nikakva sredstva za čišćenje u spreju.
- Nikada ne upotrebljavajte abrazivna sredstva za čišćenje ili spužve za ribanje spoljnih površina, jer mogu ogrebati površinu. Neki papirni ubrusi mogu takođe ogrebati površinu ili ostaviti tragove na njoj.
- Podignite fini filter sa glavnog filtera.
natural_image
Line drawing of a hand washing a faucet with a tool, no text or symbols present- Veći ostaci hrane mogu se očistiti ispiranjem filtera ispod mlaza vode. Za temeljnije čišćenje koristite meku četku za čišćenje.
natural_image
Diagram showing a hand operating a mechanical component with an inset close-up of the mechanism (no text or symbols)natural_image
Illustration of a hand using a tool to cut a cylindrical object on a flat surface, with an arrow indicating motion (no text or symbols)natural_image
Illustration of hands using a spray gun to clean a small aircraft on a kitchen sink (no text or symbols)natural_image
Symbolic illustration of a hand with a lightning bolt and smoke trail (no text or symbols)natural_image
Line drawing of a hand holding a pipe fitting with a handle (no text or symbols)obično crijevo za dovod
natural_image
Line drawing of a faucet with a valve and handle (no text or symbols)sigurnosno crijevo za dovod
natural_image
Technical line drawing of a mechanical assembly with a magnified inset showing a tool interacting with a threaded component (no text or symbols present)natural_image
Line drawing of a rectangular panel with a diagonal support and two vertical connectors (no text or symbols)Korak 4:
Postavite dekorativnu ploču na sudomašinu, kao što je prikazano na slici. Prvo postavite zavrtnje na donju ploču elementa i na dekorativnu ploču, u svih 16 otvora; zatim izvucite spoljni poklopac vrata iz klizišta, navijte 8 zavrtnja između dekorativnog panela i klizača.
natural_image
Technical line drawing of a mechanical device with internal components and mounting base (no text or symbols)natural_image
Technical line drawing of a mechanical assembly with no visible text or symbolsKorak 6:
Stavite sudomašinu u otvore elementa, ali ne sasvim, kao na slici; nivelišite zavrtnjima za nivelaciju dno mašine sa osnovom elementa, pa tek onda sasvim postavite mašinu unutra.
Rješavanje problema
bez stalka za čaše
| Broj | Predmet |
| 1 | Šoljice |
| 2 | Šolje |
| 3 | Čaše |
| 4 | Melamin posuda |
| 5 | Duboki tanjiri |
| 6 | Plitki tanjiri |
| 7 | Tacne |
| Broj | Predmet |
| 8 | Desertni tanjiri |
| 9 | Melamin desertni tanjiri |
| 10 | Ovalni tanjir |
| 11 | Mala šerpa |
| 12 | Korpa za escajg |
| 13 | Činije za desert |
| 14 | Kašika za serviranje |
2.Korpa za escajg:
Podaci o kampatibilnosti u skladu sa EN60436
- Kapacitet: 6 kompleta
- Program: EKO
• Podešavanje nivoa ispiranja: Max
• Podešavanje omekšivača: H4
| Broj | Premet |
| 1 | Viljuške |
| 2 | Supene kašike |
| 3 | Desertne kašike |
| 4 | Kafene kašike |
| 5 | Noževi |
| 6 | Kašike za serviranje |
| 7 | Kutlače |
| 8 | Viljuške za serviranje |
natural_image
Simple line drawing of a 3D printer or scanner device inside a circular frame (no text or symbols)Mašina za pranje sudova
Uputstvo za upotrebu
natural_image
Pure diagram of a ceiling system with a cabinet and pipe, no text or symbols present1 Instaliranje mašine za sudove
(Pogledajte ojdeljak 5 "UPUTSTVO ZA INSTALICIJU" iz
dijela I : Generička verzija.)
natural_image
Simple line drawing of a screw and a plate with a hammer, no text or symbols present2 Uklanjanje većih ostataka hrane sa posuđa
3 Punjenje korpi
natural_image
Illustration of a hand pouring liquid from a container into a microwave oven using a tool (no text or symbols)4 Punjenje posude za deterdžent
natural_image
Simple line drawing of a box with sound waves above it (no text or symbols)5 Biranje programa i puštanje sudomašine u rad
UPOTREBA MAŠINE ZA SUDOVE
Kontrolna tabla
Operacija (Dugme)
| 1 Power | Pritisnite ovo dugme da biste uključili mašinu. |
| 2 Program | Pritisnite ovo dugme da biste izabrali odgovarajući program pranja, odgovarajući indikator će zasvijetleti. |
| 3 Delay | Pritisnite dugme da biste podesili vrijeme odloženog pranja. |
| 4 Start / Pause | Pritisnite dugme da biste izabrali program pranja ili pauzirali program koji je u toku. |
Displej
| 5 Indikatorprograma | IntenzivanZa veoma zaprljano posuđe i normalno zaprljane šerpe,tiganje, sudove i slično, sa ostacima sasušene hrane. |
| UniverzalniZa standardno zaprljano posuđe poput šerpi, tanjira, čaša imalo zaprljane tiganje. | |
| 5Indikatorprograma | ECO EKOOvo je standardni program, pogodan je za čišćenjenormalno zaprljanog posuđa i najefikasniji je program upogledu kombinovane potrošnje energije i vode za tu vrstu posuđa.[SC78] ČašeZa malo zaprljano posuđe i čaše. Brzo pranjeKratki program za malo zaprljano posuđe kome nije potrebno sušenje. |
| 6Indikatorupozorenja | Sredstvo za ispiranjeKada “※” indikator zasvijetli, to znači da u sudomašiniima malo sredstva za ispiranje, treba dopuniti.[CZW7] SoKada “≦” indikator zasvijetli, to znači da u sudomašini ima malosoli, treba dopuniti. |
| 7 Vreme odloženog pranja | Vrijeme odlaganja: 2h/4h/6h/8h (za 6h odlaganja:istovremeno svijetle lampice 2h i 4h) |
natural_image
Illustration of a shopping basket filled with items including a pencil, scissors, and books (no text or symbols visible)Punjenje korpe za escajg
Radi lične sigurnosti i što boljeg kvaliteta pranja stavljajte escajg u korpu tako da ste sigurni da:
- Pribor nije zbijen,
• Drške pribora su stavljene nadolje. - Noževi i drugi opasan pribor su stavljeni sa drškama nagore.
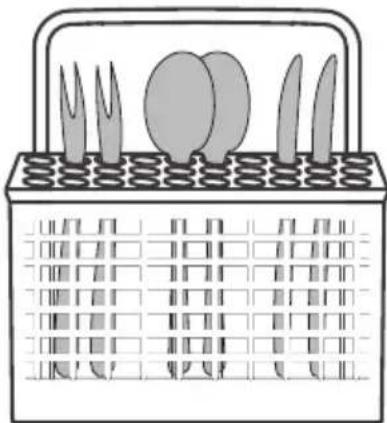
natural_image
Illustration of a basket containing six kitchen utensils (stewed, flat, round, knife, plate, fork) with no text or symbols.
UPOZORENJE
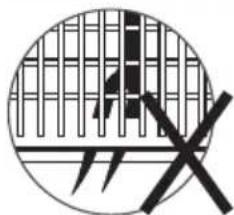
natural_image
Circular diagram with grid lines and a crossed X symbol (no text or labels)natural_image
Illustration of a hand pressing down on a device control panel with icons and arrows (no text or symbols)natural_image
Illustration of a hand pressing down on a device with buttons and a knob (no text or symbols)2 Pažljivo ulijte sredstvo za ispiranje u posudu, pazeći da se ne prelije.
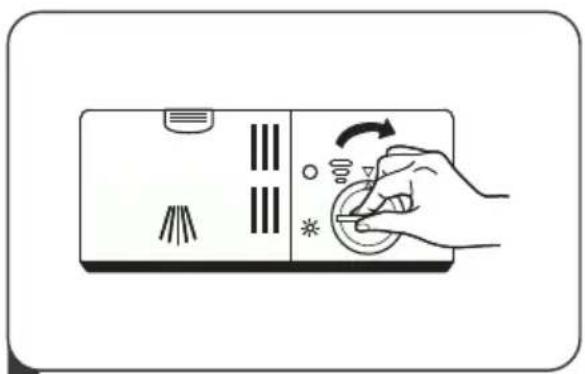
natural_image
Illustration of a hand operating a device with control buttons and a scroll (no text or symbols)natural_image
Hand touching a circular button with icons around it, no text or symbols presentOkrenite indikator sredstva za ispiranje na određeni broj. Što je broj veći, mašina za pranje sudova koristi više sredstva za ispiranje. Ako se posuđe ne suši kako treba ili ima mrlje, podesite indikator na veći broj dok posuđe ne bude bez mrlja.
Smanjite broj indikatora ukoliko na sudovima postoje ljepljive bjeličaste mrlje ili mrlje na staklenom posuđu ili sječivima noževa.
• Dodavanje deterdženta
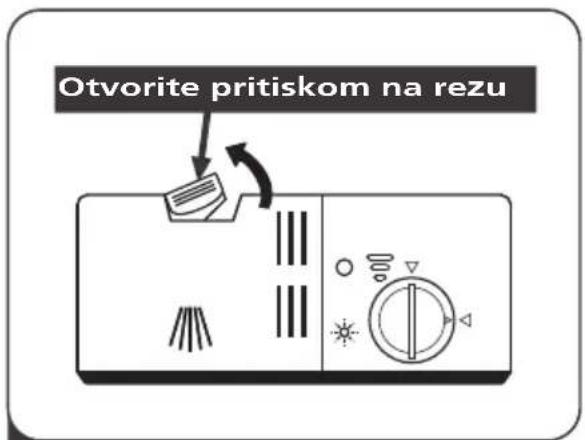
1 Pritisnite bravicu za otvaranje na posudi za deterdžent da biste otvorili poklopac.
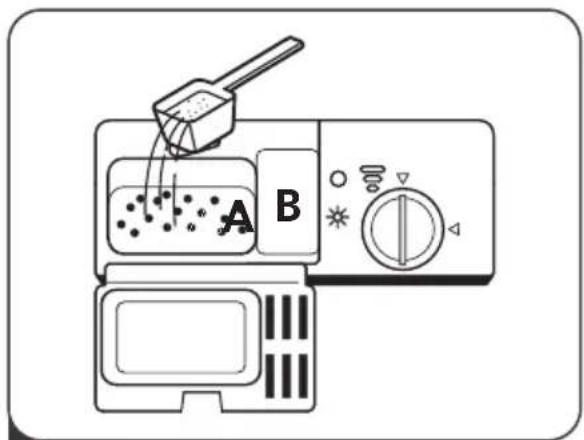
natural_image
Illustration of a hand pressing down on a kitchen air conditioner panel with a hand adjusting the button (no text or symbols)3 Zatvorite poklopac i pritisnite dok se ne zaključa.

NAPOMENA:
- Imajte na umu da podešavanje može biti različito u zavisnosti od čistoće vode.
- Obratite pažnju na preporuke proizvođača na pakovanju deterdženta.
PODEŠAVANJE PROGRAMA SUDOMAŠINE
Tabela sa ciklusima pranja
Tabela ispod prikazuje kako odabrati program u zavisnosti od zaprljanosti sudova i koliko deterdženta treba upotrebiti. U tabeli su takođe prikazani podaci o programima.
( ● ) Označava da treba dopuniti sredstvo za ispiranje.
| Program | Opis ciklusa | Deterdžent Pre/Glavni | Vrijeme trajanja(min) | Energija (Kwh) | Voda (L) | Dodatno ispiranje |
 Intensive Intensive | Predpranje(50°C)Pranje(70°C)IspiranjeIspiranjeIspiranje(70°C)Sušenje | 4/10g | 140 | 1.2 | 9.6 | ● |
 Universal Universal | PredpranjePranje (60°C)IspiranjeIspiranje(70°C)Sušenje | 4/10g | 120 | 1.05 | 7.7 | ● |
| ECO(*EN 60436) | PredpranjePranje(45°C)Ispiranje(65°C)Sušenje | 14g | 230 | 0.613 | 6.5 | ● |
 Glass Glass | Pranje(45°C)IspiranjeIspiranje(60°C)Sušenje | 14g | 75 | 0.65 | 5.8 | ● |
 Rapid Rapid | Pranje(40°C)IspiranjeIspiranje | 12g | 30 0.5 5.8 | 0.5 5.8 | ○ |

NAPOMENA:
ECO : ECO program prikladan je za čišćenje normalno zaprljanog (*EN60436) posuđa, jer je za ovu upotrebu najefikasniji program u pogledu njegove kombinirane potrošnje energije i vode, a koristi se za procjenu usklađenosti sa zakonodavstvom EU o ekološkom dizajnu.
Ušteda energije
- Prethodno ispiranje posuđa dovodi do povećane potrošnje vode i energije i ne preporučuje se.
- Pranje posuđa u kućnoj mašini za posuđe obično troši manje energije i vode u fazi upotrebe od ručnog pranja kada se mašina za posuđe koristi prema uputstvima.
Uključivanje ciklusa pranja
- Izvicite korpu, napunite je sudovima i vratite nazad.
- Sipajte deterdžent.
- Stavite utikač u utičnicu. Napajanje je u skladu sa posljednjom stranicom „Pregled proizvoda“. Obavezno uključite dovod vode pod punim pritiskom.
- Zatvorite vrata mašine, pritisnite dugme Power da biste uključili mašinu.
- Izaberite program, a odgovarajuća lampica će zasvijetleti. Zatim pritisnite Start/Pause dugme i mašina će početi ciklus pranja.
Mijenjanje programa dok je pranje u toku
Ciklus pranja može se promijeniti samo ako je mašina radila kratko vrijeme, inače je deterdžent već pušten, a sudomašina je možda već ispraznila vodu za pranje. Ako je to slučaj, sudomašinu treba resetovati, a posudu za deterdžent ponovo napuniti. Da biste resetovali sudomašinu, slijedite uputstva u nastavku:
- Pritisnite Start/Pause dugme kako biste pauzirali pranje.
- Pritisnite Program dugme i držite više od 3 sekunde - program će biti otkazan.
- Pritisnite Program dugme kako biste izabrali željeni program.
- Pritisnite Start/Pause dugme, nakon 1 sekunde mašina će početi sa radom.

flowchart
graph LR
    A["Hand gesture"] --> B["3 sekunde"]
    B --> C["ECO"]
    C --> D["Green footprint"]
Zaboravili ste da stavite neki sud?
natural_image
Abstract black and white geometric pattern with diagonal stripes (no text or symbols)VOX
ELECTRONICS
HRV
LCT8F
UPUTE ZA UPORABU PERILICA POSUĐA
natural_image
Line drawing of a 3D printer or scanner device with internal compartments, enclosed in a circular frame (no text or symbols)Perilica posuđa
Upute za uporabu
DIO: I Generička verzija
LCT8F
SADRŽAJ
01
02
03
04
05
06
07
3
SIGURNOSNE UPUTE
8
IZGLED PROIZVODA
9
UPORABA PERILICE
9
Stavljanje soli u omekšivač
11
ČIŠĆENJE I ODRŽAVANJE
11
natural_image
Symbol of a trash bin crossed with diagonal lines and a blank rectangular block below (no text or labels)IZGLED PROIZVODA
! VAŽNO:
Za najbolje rezultate rada perilice posuđa, prije prve upotrebe, proučite cjelokupne upute
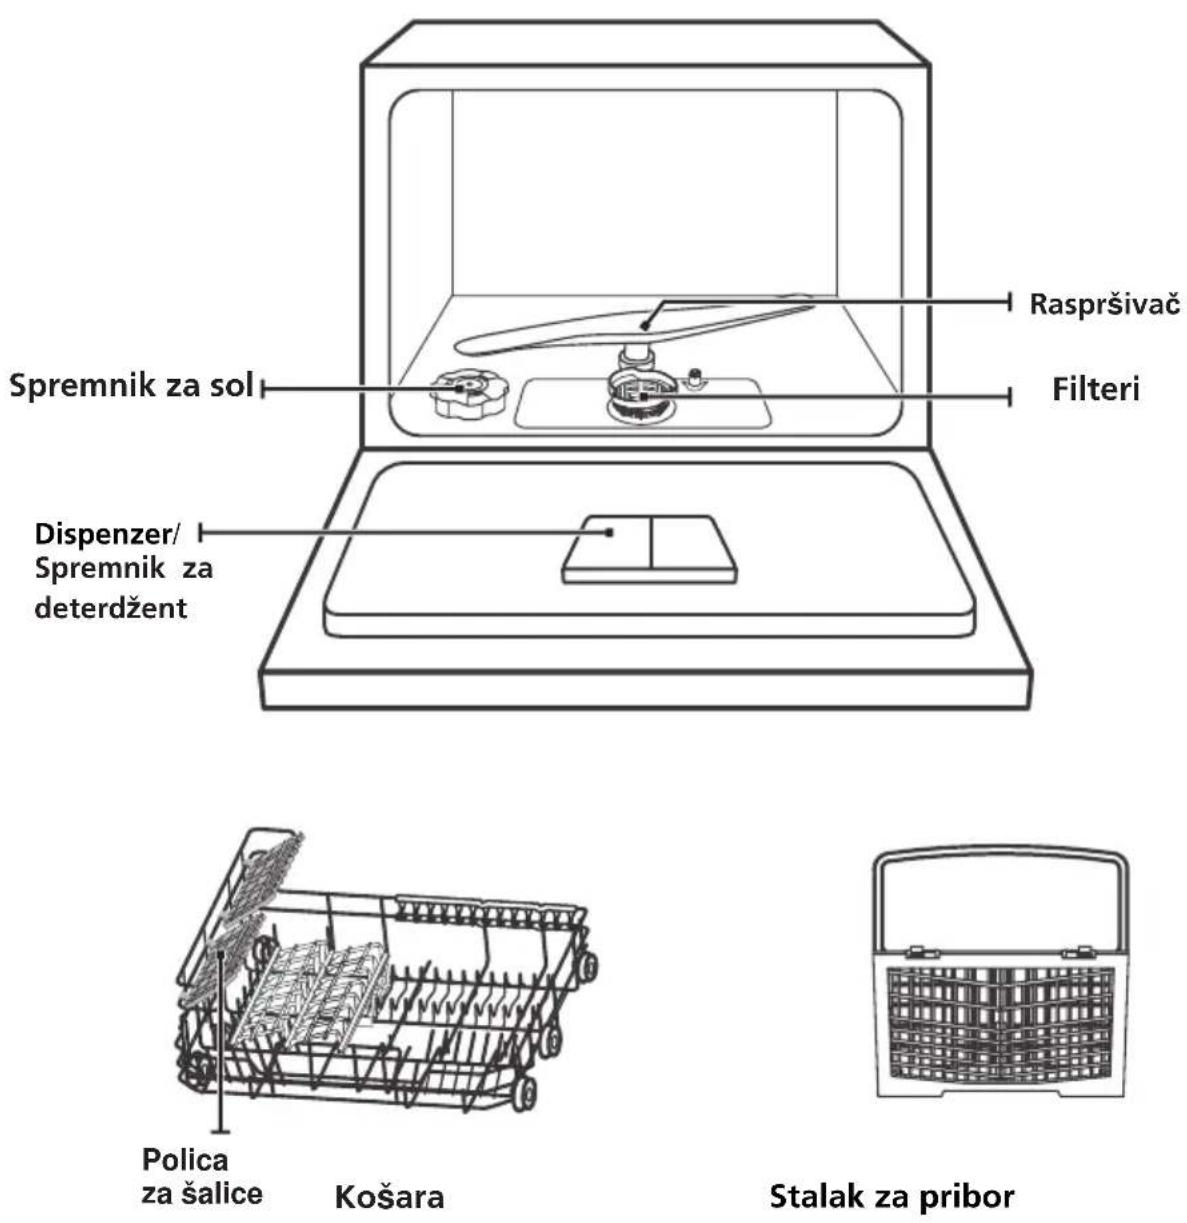

NAPOMENA:
flowchart
graph LR
    A["SALT"] --> B["Unutra → Van"]
    B --> C["Hand pouring liquid into microwave oven"]
- Podešavanje omekšivača vode 2.
Dodavanje soli u omekšivač
flowchart
graph LR
    A["Hand mixing ring with salt"] --> B["Add salt"]
    B --> C["Salt with a pencil"]
    C --> D["Add salt into container"]
    D --> E["Heating salt with liquid"]
    E --> F["Final cleaning step"]
- Sklonite košaru i odvrnite zatvarač spremnika za sol.
- Postavite (isporučeni) lijevak u otvor za dodavanje soli i sipajte oko 1 kg soli za perilicu.
-
Prije prvog pranja, napunite spremnik za sol vodom do maksimalne granice. Normalno je da iz spremnika za sol izađe mala količina vode.
-
Nakon punjenja spremnika, vratite poklopac i čvrsto zategnite.
-
Žarulja za upozorenje za sol prestaće svijetleti nakon što je spremnik za sol napunjen solju.
-
Neposredno nakon punjenja soli u spremnik za sol, treba započeti program pranja (predlažemo korištenje kratki program). U suprotnom sustav slane vode može oštetiti sustav filtera, pumpu ili druge važne dijelove perilice. Ovo je izvan jamstva.

NAPOMENA:
- Spremnik za sol smije se dopunjavati samo kada se na kontrolnoj tabli upali žarulja upozorenja za sol. Ovisno o tome koliko se dobro sol rastvara, žarulja upozorenja za sol može i dalje svijetleti iako je spremnik za sol napunjen.
Ako na kontrolnoj tabli nema žarulje upozorenja za sol (kod nekih modela), možete procijeniti kada treba dodati sol u omekšivač prema ciklusima koje je perilica posuđa pokrenula. - Ukoliko se sol prelila, uključite natapanje ili brzi program da bi se uklonio višak soli.
ČIŠĆENJE I ODRŽAVANJE
- Podignite fini filter sa glavnog filtera.
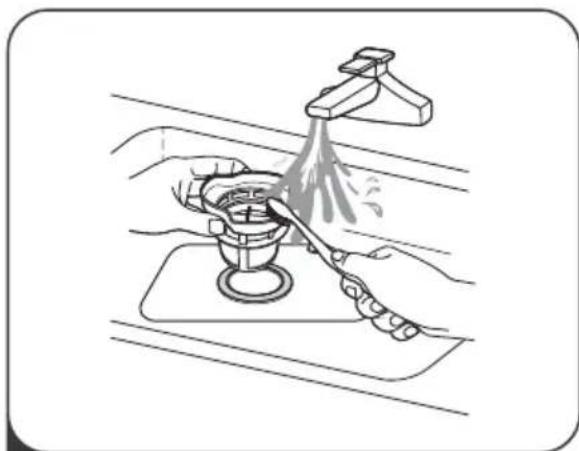
natural_image
Illustration of a hand washing a showerhead on a surface, with no text or symbols present.- Veći ostaci hrane mogu se očistiti ispiranjem filtera ispod mlaza vode. Za temeljito čišćenje koristite meku četku za čišćenje.
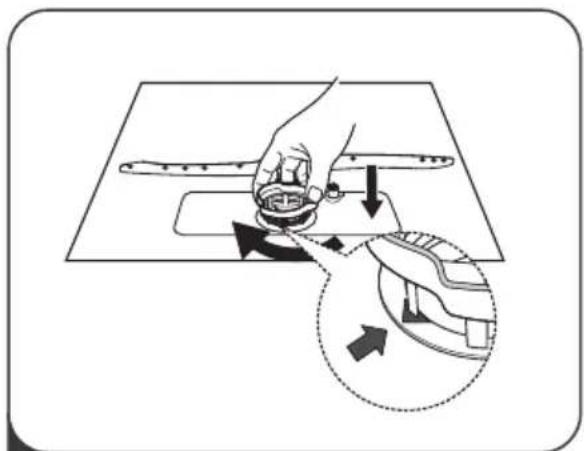
natural_image
Diagram showing a hand operating a mechanical component with an inset close-up of the mechanism (no text or symbols)natural_image
Illustration of a hand using a tool to press or install a mechanical component on a flat surface (no text or symbols)natural_image
Illustration of hands using a spray gun to clean a small aircraft on a kitchen sink (no text or symbols)natural_image
Symbolic illustration of a hand with a lightning bolt and smoke trail (no text or symbols)natural_image
Line drawing of a hand holding a pipe fitting with a handle (no text or symbols)obično crijevo za dovod
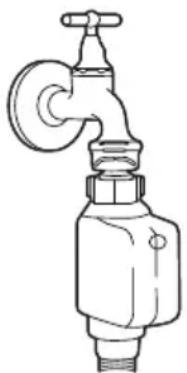
natural_image
Line drawing of a faucet with a valve handle (no text or symbols)sigurnosno crijevo za dovod
Cijev za siguran dovod vode
natural_image
Technical line drawing of a mechanical assembly with a magnified inset showing a tool interacting with a threaded component (no text or symbols present)natural_image
Line drawing of a rectangular panel with a diagonal support and two side connectors (no text or symbols)Korak 4:
Postavite dekorativnu ploču na perilicu, kao što je prikazano na slici. Prvo postavite zavrtnje na donju ploču elementa i na dekorativnu ploču, u svih 16 otvora; zatim izvucite spoljni poklopac vrata iz klizišta, navijte 8 zavrtnja između dekorativnog panela i klizača.
natural_image
Technical line drawing of a mechanical device with internal components and mounting base (no text or symbols)natural_image
Technical line drawing of a mechanical assembly with no visible text or symbolsKorak 6:
Stavite perilicu u otvore elementa, ali ne sasvim, kao na slici; nivelirajte zavrtnjima za niveliranje dna perilice sa osnovom elementa, potom sasvim postavite perilicu unutar prostora.
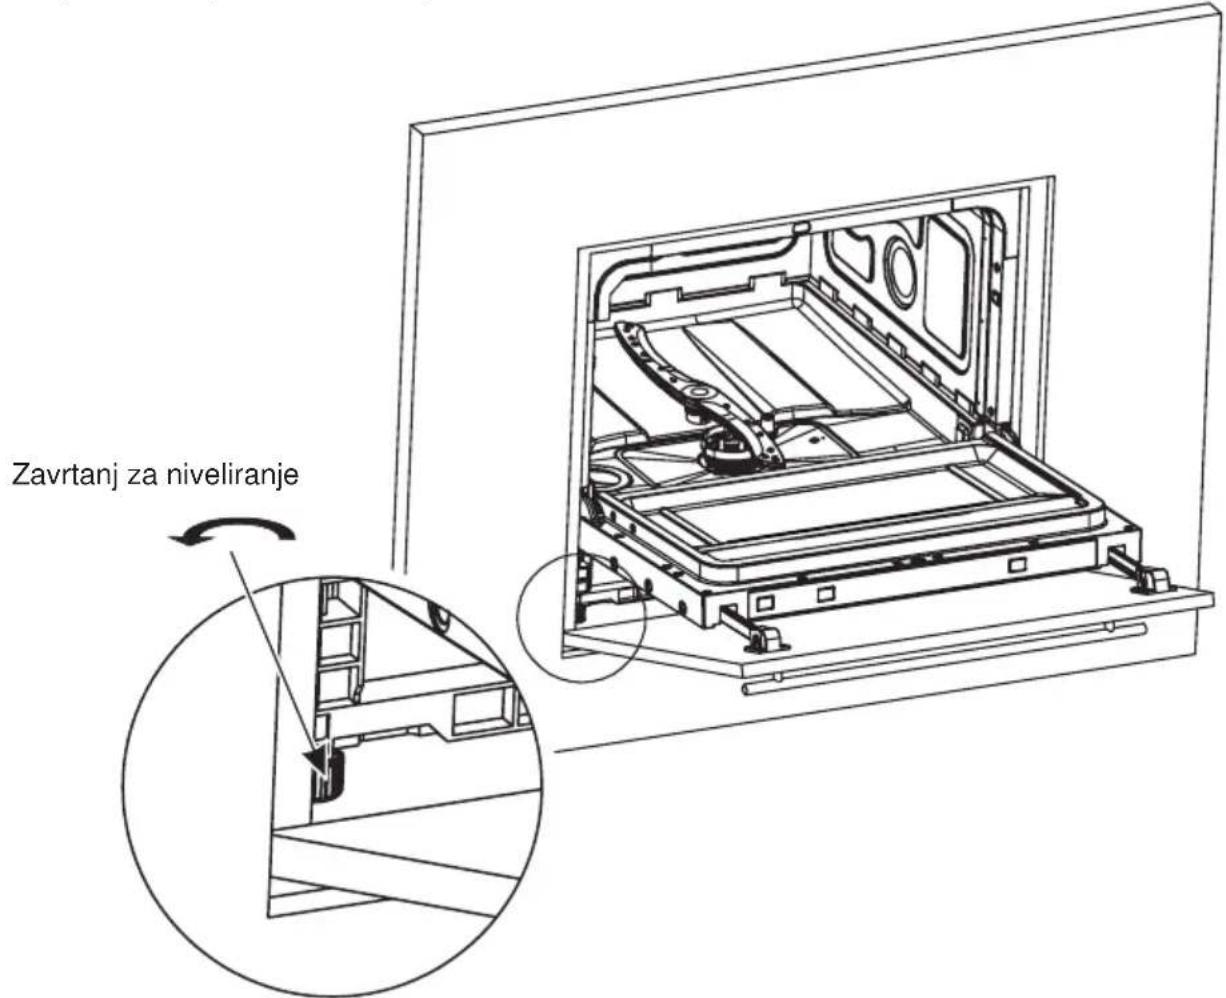
Rješavanje problema
bez stalka za čaše
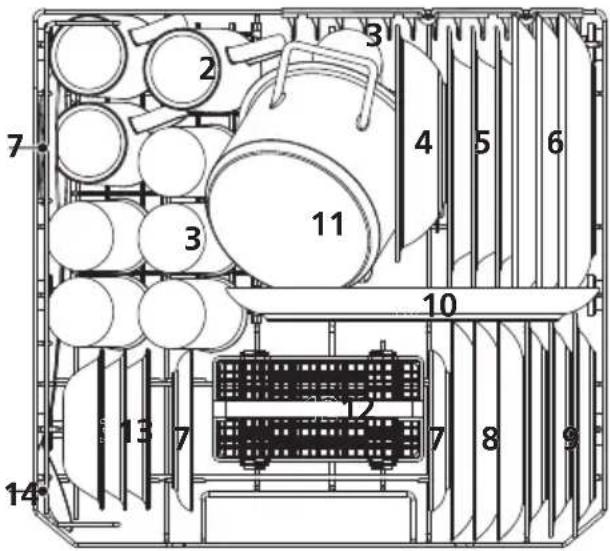
| Broj | Predmet |
| 1 | Šalice za kavu |
| 2 | Šalice |
| 3 | Čaše |
| 4 | Melamin zdjela |
| 5 | Duboki tanjuri |
| 6 | Plitki tanjuri |
| 7 | Tacne |
| Broj | Predmet |
| 8 | Desertni tanjuri |
| 9 | Melamin desertni tanjuri |
| 10 | Ovalni tanjur |
| 11 | Mala posuda |
| 12 | Korpa za pribor |
| 13 | Zdjele za desert |
| 14 | Žlica za serviranje |
2.Košara za pribor:
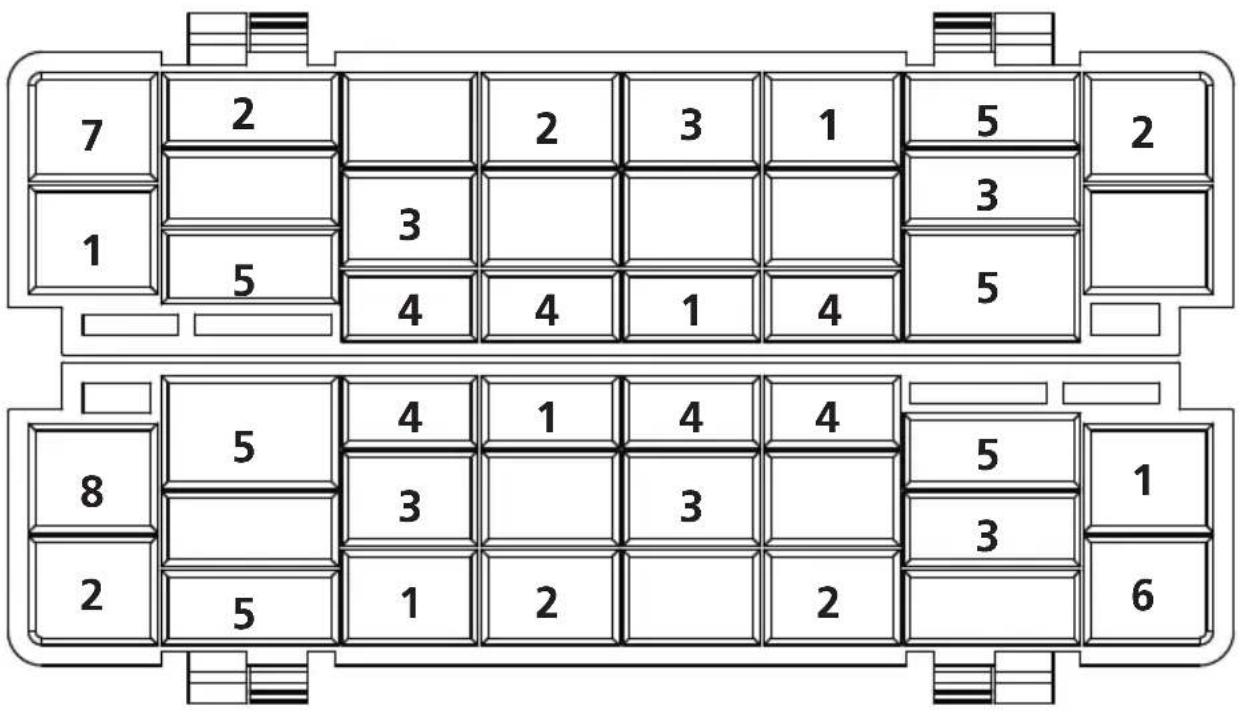
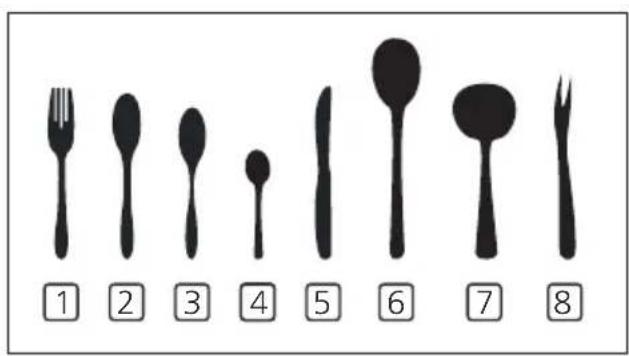
Podaci o kampatibilnosti u sukladu sa EN60436
- Kapaciteta: 6 kompleta
• Program: EKO
• Podešavanje razine ispiranja: Max
• Podešavanje omekšivača: H4
| Broj | Premet |
| 1 | Vilice |
| 2 | Jušne žlice |
| 3 | Desertne žlice |
| 4 | Kafene žličice |
| 5 | Noževi |
| 6 | Žlice za serviranje |
| 7 | Kutlače za juhu |
| 8 | Vilice za serviranje |
natural_image
Simple line drawing of a 3D printer or scanner device inside a circular frame (no text or symbols)Perilica posuđa
Upute za uporabu
natural_image
Pure diagram of a ceiling structure with pipes and a cabinet (no text or symbols)1 Postavljanje perilice posuđa
(Pogledajte ojdeljak 5 "UPUTE ZA POSTAVLJANJE" iz
dijela I : Generička verzija.)
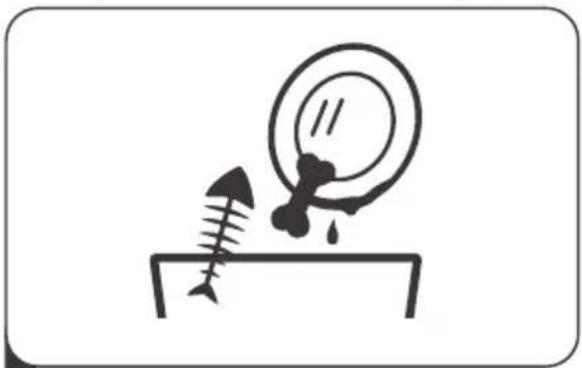
natural_image
Simple line drawing of a screw and disc on a surface, with no text or symbols present.2 Uklanjanje većih ostataka hrane sa posuđa
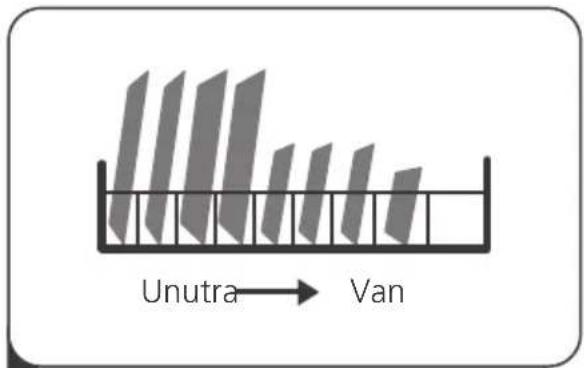
3 Punjenje košara
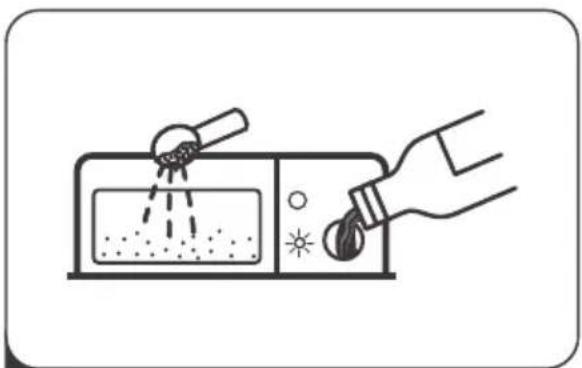
natural_image
Line drawing of a hand pouring liquid from a container into a microwave oven (no text or symbols)4 Punjenje spremnika za deterdžent perilice
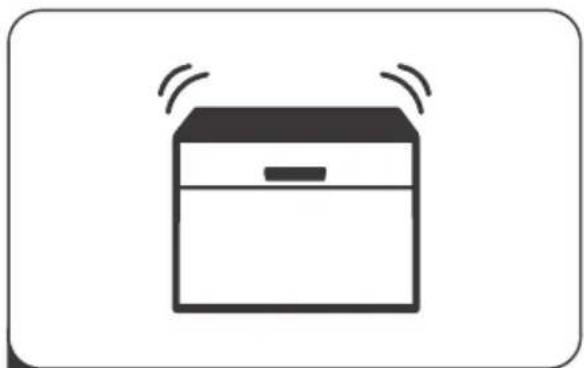
natural_image
Simple line drawing of a box with sound waves above it (no text or symbols)natural_image
Line drawing of a shopping basket filled with items including a tray, boxes, and a bag (no text or symbols)Punjenje košare za pribor
Radi osobne sigurnosti i što bolje kvalitete pranja stavljajte pribor u košaru tako da ste sigurni da:
- Pribor nije zbijen,
- Drške pribora su stavljene nadolje.
- Noževi i drugi opasan pribor su stavljeni sa drškama nagore.
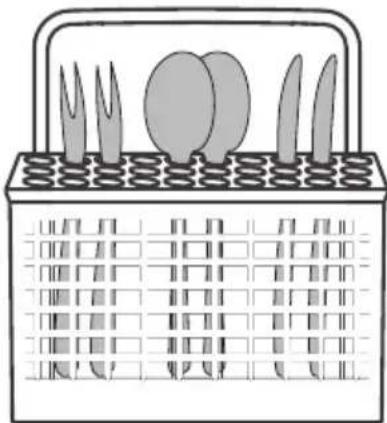
natural_image
Illustration of a basket containing cutlery and food items (no text or symbols)
UPOZORENJE
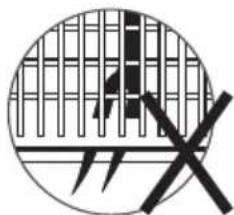
natural_image
Circular diagram with grid lines and a crossed X symbol (no text or labels)Ne dozvolite da ni jedan predmet propada kroz dno košare.
natural_image
Illustration of a hand pressing down on a control panel with icons and arrows (no text or symbols)natural_image
Illustration of a hand pressing down on a device with a circular button and control knob (no text or symbols)2 Pažljivo ulijte sredstvo za ispiranje u spremnik, pazeći da se ne prelije.
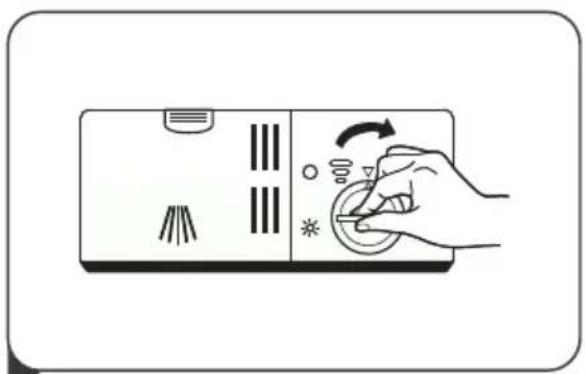
natural_image
Illustration of a hand pressing down on a device panel with control buttons and icons (no text or symbols)natural_image
Hand touching a circular button with icons around it, no text or symbols presentOkrenite indikator sredstva za ispiranje na određeni broj. Što je broj veći, perilica posuđa koristi više sredstva za ispiranje. Ako se posuđe ne suši kako treba ili ima mrlje, podesite indikator na veći broj dok posuđe ne bude bez mrlja.
Smanjite broj indikatora ukoliko na posuđu postoje ljepljive bjeličaste mrlje ili mrlje na staklenom posuđu ili sječivima noževa.
• Dodavanje deterdženta
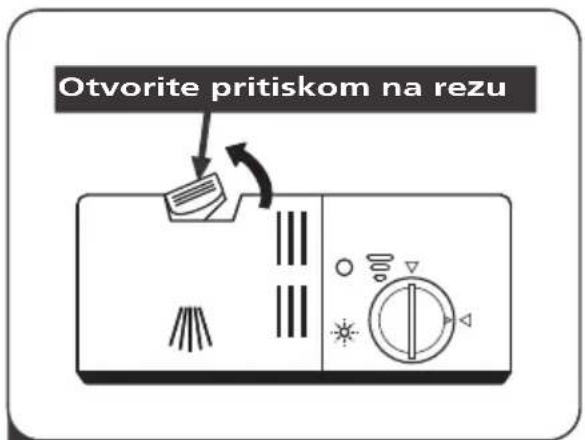
1 Pritisnite bravicu za otvaranje na posudi za deterdžent da biste otvorili poklopac.
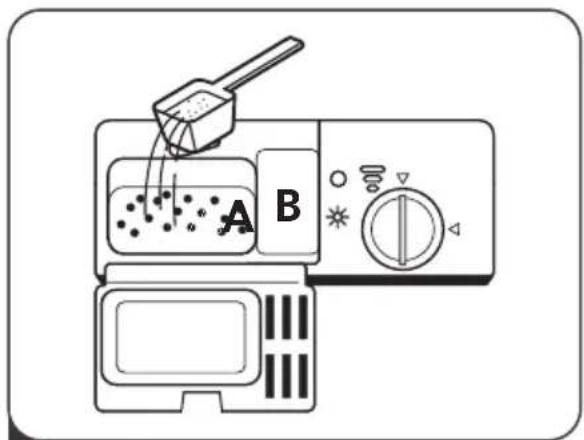
natural_image
Illustration of a hand pressing down on a kitchen air conditioner panel with a hand adjusting the button (no text or symbols)3 Zatvorite poklopac i pritisnite dok se ne zabravi.
NAPOMENA:
- Imajte na umu da podešavanje može biti različito ovisno o čistoći vode.
- Obratite pažnju na preporuke proizvođača na pakiranju deterdženta.
PODEŠAVANJE PROGRAMA PERILICE
Tabela sa ciklusima pranja
flowchart
graph LR
    A["Socks with soap"] --> B["Box with hand holding lid"]
    B --> C["Shipped down shirt with brush, down arrow"]
    C --> D["Shipped down door with cloth, down arrow"]
    D --> E["Shipped down bag with cloth, down arrow"]
UPOZORENJE

natural_image
Simple line drawing of a box with a lid and a drop, no text or symbols present.natural_image
Line drawing of a 3D printer or scanner device with internal compartments, enclosed in a circular frame (no text or symbols)natural_image
Symbol of a trash bin crossed with no text or numbers, representing waste sorting or disposal (no text present)flowchart
graph LR
    A["SALT"] --> B["Dentro → Fora"]
    B --> C["Final mixing with color change"]
flowchart
graph LR
    A["Hand holding a salt container"] --> B["Salt being added to a container"]
    B --> C["Hear pouring salt into a container"]
    C --> D["Hand holding a salt container"]
natural_image
Illustration of hands using a tool to clean or wash a surface, no text or symbols presentnatural_image
Diagram showing a hand adjusting a mechanical component with an inset close-up of the detail (no text or symbols)natural_image
Illustration of a hand using a tool to press or install a mechanical component on a flat surface (no text or symbols)1
natural_image
Illustration of hands using a spray gun to clean or spray the surface of an aircraft (no text or symbols present)2
natural_image
Symbolic illustration of a hand with a lightning bolt and smoke trail (no text or symbols)natural_image
Illustration of a hand holding a faucet with a threaded pipe (no text or symbols)natural_image
Line drawing of a faucet with a valve handle (no text or symbols)natural_image
Technical line drawing of a mechanical assembly with a magnified inset showing a tool interacting with a threaded component (no text or symbols present)natural_image
Line drawing of a rectangular panel with a diagonal support and two vertical connectors (no text or symbols)Passo 4:
natural_image
Technical line drawing of a mechanical assembly with no visible text or symbolsPasso 6:
Sem o porta-copos
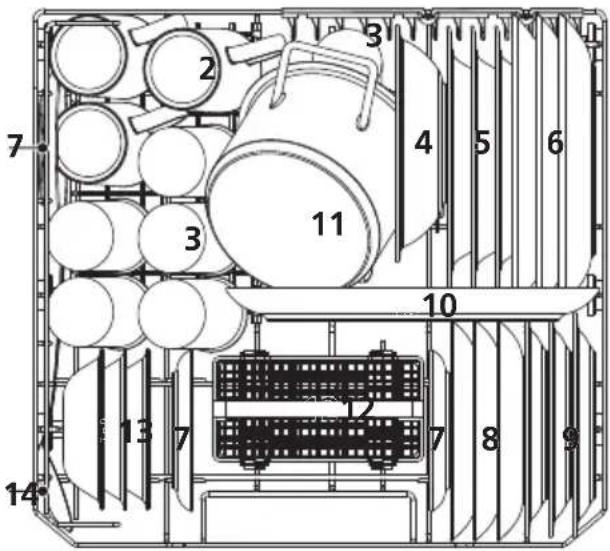
| Número | Iten |
| 1 | Chávenas |
| 2 | Canecas |
| 3 | Vidros |
| 4 | Saladeiras de melanima |
| 5 | Pratos de sopa |
| 6 | Pratos de jantar |
| 7 | Pires de molhos |
natural_image
Simple line drawing of a 3D printer or scanner device inside a circular frame (no text or symbols)natural_image
Technical line drawing of a ceiling-mounted air conditioner unit with piping and control panel (no text or symbols)natural_image
Simple line drawing of a fish and a bowl pouring liquid from a surface (no text or symbols)natural_image
Illustration of a hand using a power tool to clean water from a digital kitchen appliance (no text or symbols)natural_image
Simple line drawing of a box with sound waves above it (no text or symbols)Seleccionar um programa e iniciar a máquina
UTILIZAR A SUA MÁQUINA
Painel de Controlo
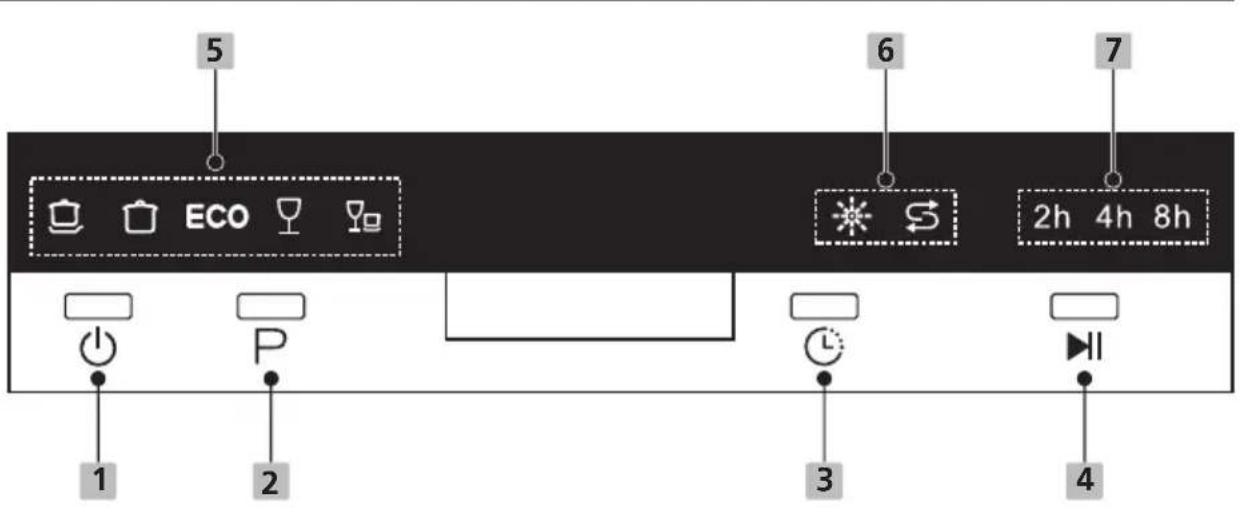
Operação (Botão)
natural_image
Line drawing of a shopping basket filled with items including shoes, books, and pens (no text or symbols)natural_image
Illustration of a basket containing cutlery and a bowl with a spoon (no text or symbols)AVISO

natural_image
Simple geometric diagram with a circle and a cross mark (no text or symbols)natural_image
Illustration of a hand pressing down on a control panel with icons and arrows (no text or symbols)natural_image
Illustration of a hand operating a device with a circular dial and adjustment knobs (no text or symbols)natural_image
Illustration of a hand pressing down on a device panel with icons for buttons and indicators (no text or symbols)natural_image
Hand pressing a button on a device screen with icons for lighting and sound (no text or symbols)natural_image
Illustration of a hand pressing down on a kitchen air conditioner panel with a hand adjusting the button (no text or symbols)flowchart
graph LR
    A["Foot"] --> B["Brush"]
    B --> C["Brush with brush drop"]
    C --> D["Brush with brush drop"]
    D --> E["Brush with brush drop"]
    E --> F["Brush with brush drop"]
AVISO

natural_image
Simple line drawing of a box with a lid and handle, no text or symbols presentnatural_image
Abstract black-and-white geometric pattern with diagonal stripes (no text or symbols)VOX
ELECTRONICS
BGR
LCT8F
РЪКОВОДСТВО ЗА УПОТРЕБА СЪДОМИЯЛНА МАШИНА
Съдомиялна машина
natural_image
Symbol of a trash bin crossed out by a diagonal line, representing no waste or discharge (no text or labels)
ПРЕГЛЕД НА ПРОДУКТА
ВАЖНО:
flowchart
graph LR
    A["SALT"] --> B["Otvětře → Otvěnka"]
    B --> C["Evaporation with grating and microwave"]
flowchart
graph LR
    A["Hand holding a salt container"] --> B["Salt with salt container"]
    B --> C["Add salt to a container with a salt container"]
    C --> D["Hearts from steps"]
    D --> E["Hearts from the container with a salt container"]
natural_image
Illustration of a kitchen sink with a hand spraying water from a faucet (no text or symbols)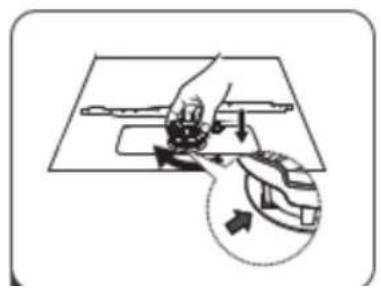
natural_image
Illustration of a hand pressing down on a mechanical component with an arrow indicating motion (no text or symbols)Пръскащо рамо
natural_image
Illustration of a hand using a tool to press or install a mechanical component on a flat surface (no text or symbols)natural_image
Illustration of hands using a spray gun to clean a small aircraft on a kitchen sink (no text or symbols)natural_image
Symbolic illustration of a hand with a lightning bolt and smoke trail (no text or numbers)| Номер | Артикул |
| 1 | Чаши за кафе |
| 2 | Чаши за чай |
| 3 | Чаши за вода |
| 4 | Меламинова купа |
| 5 | Чинии за супа |
| 6 | Чинии за вечеря |
| 7 Чинийки | |
| Номер | Артикул |
| 8 | Десертни чинии |
| 9 | Меламинови десертни чинии |
| 10 | Овално плато |
| 11 | Малка тенджера |
| 12 | Кошница за прибори |
| 13 | Десертни купички |
| 14 | Лъжица за сервиране |
natural_image
Simple line drawing of a 3D printer or scanner device inside a circular frame (no text or symbols)Съдомиялна машина
natural_image
Pure technical diagram of a piping system with a cabinet and valve (no text or symbols)natural_image
Simple line drawing of a screw and a magnifying glass on a surface (no text or symbols)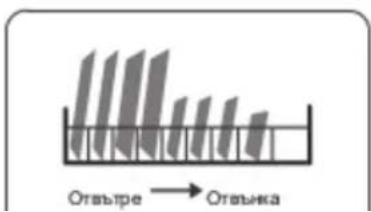
ИЗПОЛЗВАНЕ НА ВАШАТА СЪДОМИЯЛНА
Контролен панел
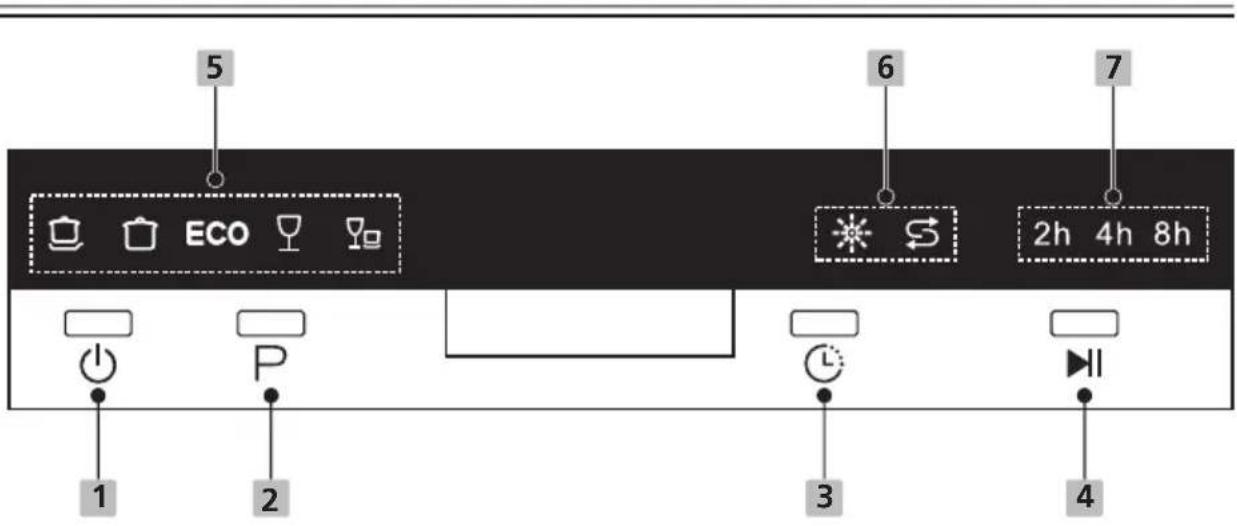
Операция (бутон)
natural_image
Line drawing of a shopping basket filled with items including a handbag, scissors, and books (no text or symbols)natural_image
Line drawing of a basket containing cutlery and food items (no text or symbols)ПРЕДУПРЕЖДЕНИЕ

natural_image
Circular diagram with grid lines and a crossed X symbol (no text or labels)natural_image
Illustration of a hand interacting with a touchscreen device (no text or symbols visible)1
natural_image
Illustration of a hand holding a camera lens inside a device (no text or symbols)natural_image
Illustration of a hand using a tool to adjust or install a device (no text or symbols visible)3
natural_image
Illustration of a hand pressing down on a kitchen air conditioner panel with a directional arrow (no text or symbols)flowchart
graph LR
    A["Foot"] --> B["5-second mark"]
    B --> C["Battery with battery recycling"]
    C --> D["Recycle with battery"]
    D --> E["Shoe with shoe"]
ПРЕДУПРЕЖДЕНИЕ

natural_image
Simple line drawing of a box with a lid and handle, no text or symbols present
- VOX
- ELECTRONICS
- LCT8F
- Dishwasher Instruction Manual
- CONTENTS
- NOTE:
- SAFETY INFORMATION
- WARNING
- When using your dishwasher, follow the precautions listed below:
- Earthing Instructions
- Disposal
- PRODUCT OVERVIEW
- IMPORTANT:
- USING YOUR DISHWASHER
- Loading The Salt Into The Softener
- MAINTENANCE AND CLEANING
- - External Care
- The door and the door seal
- The control panel
- - Internal Care
- Filtering system
- Spray arm
- Caring For The Dishwasher
- Frost precaution
- After every wash
- Remove the plug
- No solvents or abrasive cleaning
- When not in use for a longtime
- Moving the appliance
- Seals
- INSTALLATION INSTRUCTION
- Electrical Shock Hazard
- Attention
- • About Power Connection
- Electrical requirements
- Electrical connection
- ⚠ Ensure that proper earthing exists before use
- Water Supply And Drain
- Cold water connection
- About the safety supply hose
- How to connect the safety supply hose
- How to disconnect the safety supply hose
- Connection Of Drain Hoses
- How to drain excess water from hoses
- Water outlet
- Extension hose
- Syphon connection
- Position The Appliance
- Built-In Installation
- Step 1a:
- Step 1b:
- Step 2: Aesthetic panel's dimensions and installation
- Step 3: Assemble the decorative panel
- Step 4:
- Step 5: Install the adjust screw into the base
- Step 6:
- TROUBLESHOOTING TIPS
- Before Calling For Service
- Availability of the Spare parts
- LOADING THE BASKETS ACCORDING TO EN60436:
- 1.Basket:
- 2.Cutlery basket:
- USING YOUR DISHWASHER
- PROGRAMMING THE DISHWASHER
- ERROR CODES
- TECHNICAL INFORMATION
- QUICK USER GUIDE
- Control Panel
- Operation (Button)
- Display
- • Water Softener
- Adjusting salt consumption
- Preparing And Loading Dishes
- For washing the following cutlery/dishes
- Are not suitable
- Are of limited suitability
- Recommendations for loading the dishwasher
- (Features and appearance of baskets and cutlery baskets may vary from your model.)
- Loading the basket
- Loading the cutlery basket
- Function Of The Rinse Aid And Detergent
- When to refill the rinse aid dispenser
- Function of detergent
- Filling The Rinse Aid Reservoir
- Adjusting the rinse aid reservoir
- Filling The Detergent Dispenser
- PROGRAMMING THE DISHWASHER
- Wash Cycle Table
- Saving energy
- Starting A Cycle Wash
- Changing The Program Mid-cycle
- Forget To Add A Dish?
- ERROR CODES
- TECHNICAL INFORMATION
- Product information sheet(EN 60436)
- Supplier's name or trade mark: VOX
- Supplier's address ( b ):
- Minimum duration of the guarantee offered by the supplier (b): 24 months
- Additional information:
- Mašina za pranje sudova
- Uputstvo za upotrebu
- SADRŽAJ
- NAPOMENA:
- BEZBEDNOSNA UPUTSTVA
- UPOZORENJE
- Raspršivač
- Kako ispustiti višak vode iz creva
- Odvod vode
- Produžno crevo
- Korak 4:
- Korak 6:
- Rešavanje problema
- 2.Korpa za escajg:
- UPOTREBA MAŠINE ZA SUDOVE
- Kontrolna tabla
- Operacija (Dugme)
- Displej
- Punjenje korpe za escajg
- Podešavanje posude sredstva za ispiranje
- • Dodavanje deterdženta
- PODEŠAVANJE PROGRAMA SUDOMAŠINE • Tabela sa ciklusima pranja
- ŠIFRE GREŠAKA
- Pomivalni stroj
- Navodila za uporabo
- Korak 5: Privijte vijake za prilagajanje položaja na osnovo stroja
- UPORABA POMIVALNEGA STROJA
- POZOR
- OPOMBA:
- Dodavanje soli u omekšivač
- ČIŠĆENJE I ODRŽAVANJE
- • Održavanje spoljašnosti
- Vrata i brtva na vratima
- ⚠ UPOZORENJE
- Rješavanje problema
- PODEŠAVANJE PROGRAMA SUDOMAŠINE
- Tabela sa ciklusima pranja
- Ušteda energije
- Uključivanje ciklusa pranja
- Mijenjanje programa dok je pranje u toku
- Zaboravili ste da stavite neki sud?
- Perilica posuđa
- Upute za uporabu
- IZGLED PROIZVODA
- ! VAŽNO:
- Cijev za siguran dovod vode
- 2.Košara za pribor:
- Punjenje košare za pribor
- PODEŠAVANJE PROGRAMA PERILICE
- Passo 4:
- Passo 6:
- UTILIZAR A SUA MÁQUINA
- Painel de Controlo
- AVISO
- Съдомиялна машина
- ПРЕГЛЕД НА ПРОДУКТА
- ВАЖНО:
- Пръскащо рамо
- ИЗПОЛЗВАНЕ НА ВАШАТА СЪДОМИЯЛНА
- Контролен панел
- ПРЕДУПРЕЖДЕНИЕ
Brand : VOX
Model : LCT8F
Category : Dishwasher