
Kangaroo Dual - Charging Station / Dock Natec - Free user manual and instructions
Find the device manual for free Kangaroo Dual Natec in PDF.


| Product Type | USB 3.0 Dual Bay HDD Docking Station |
| Brand | Natec |
| Model | Kangaroo Dual |
| Interface | USB 3.0 with UASP support (backward compatible with USB 2.0) |
| Transfer Speed | Up to 6 Gbps (USB 3.0) |
| Supported Drives | 2.5" & 3.5" SATA I/II/III HDD or SSD |
| Maximum Capacity | 2 x 4TB or higher (total capacity depends on drives) |
| Functions | Device mode (dual external drives), Duplicator (Clone) mode, One Touch Backup (OTB) |
| LED Indicators | Power / data access / clone progress (4 LEDs show percentage) |
| Power Supply | AC 100-240V, 50/60Hz, 0.8A; DC 12V, 2.5A adapter included |
| Plug & Play | Yes (no driver needed for Windows 2000/XP/Vista/7/8/10, Mac OS 10.x or above) |
| Clone Mode | Independent cloning without PC: source in bay A, destination in bay B, press clone button for 3 seconds |
| One Touch Backup | Backup via one button (requires PC software, downloadable from Natec website) |
| Package Contents | Docking station, USB 3.0 cable, power adapter, user manual |
| Warranty | 24 months |
| Certifications | CE, RoHS, WEEE |
Frequently Asked Questions - Kangaroo Dual Natec
User questions about Kangaroo Dual Natec
0 question about this device. Answer the ones you know or ask your own.
Ask a new question about this device
Download the instructions for your Charging Station / Dock in PDF format for free! Find your manual Kangaroo Dual - Natec and take your electronic device back in hand. On this page are published all the documents necessary for the use of your device. Kangaroo Dual by Natec.
USER MANUAL Kangaroo Dual Natec
natural born technology

KANGAROO DUAL
User Manual
USER MANUAL
Natec Kangaroo Dual USB 3.0
HDD Docking Station
EN PL
Thank you for purchasing our Natec Kangaroo Dual USB 3.0 HDD Docking Station.
For your safety and the satisfaction of using this product, please read this manual carefully before installation.
PRODUCT FEATURES:
• Supports USB 3.0 with UASP up to 6Gbps
• Supports 2.5" & 3.5" SATA I/II/III HDD or SSD
• Supports capacity 2x4TB or above
• Supports One Touch Backup or Duplicate
(OTB need software to support with PC connected,
Clone no need software to support without PC.)
• LED indicates power and data access and progress
• Supports plug & play
- Powered AC 100\~240V 50\~60Hz 0.8A,
DC 12V2.5A
PACKAGE CONTENTS:
• HDD Docking Station
- USB 3.0 cable
- User's manual
• Power adapter(12V/2.5A)
SYSTEM REQUIREMENTS:
- USB 3.0 port or USB 2.0 port (if the device is connected to an USB 2.0 port, the transfer speed will down to 480Mbps)
- Windows 2000 / XP / Vista / Win7 / Win8 / Win10 / Mac OS 10.X or above (No driver installation needed)
- OTB function does not work under Windows 98 and Mac.
HARDWARE SETUP:
Note: Images are for example only. Actual positions of switches or connectors and pieces may vary depending on the model.
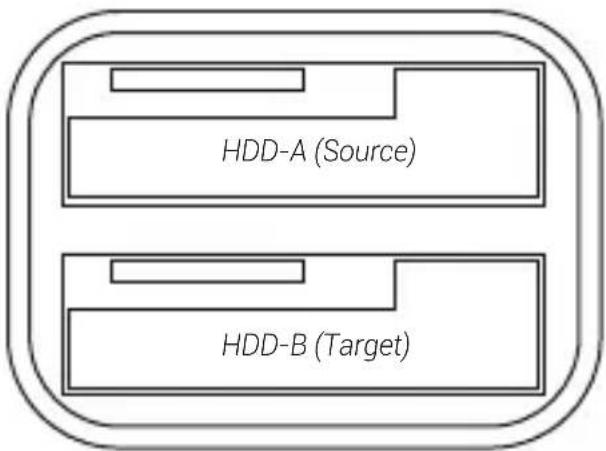

Duplicator (CLONE) Mode
This section will introduce how to clone a hard disk without the need of a PC.
EN PL
Note! The Duplicator Mode only works when the docking station is NOT connected to a PC via the USB cable.
For clone function, you need two hard drives:
Source Disk: drive with the data you want to duplicate (clone).
Destination Disk: in which you want to store the data of the source disk.
Attention: The capacity of the destination disk should be equal or larger than the source disk.
Begin to duplicate
- Make sure that those hard drives have no bad sectors. Bad sectors will cause unpredictable problems.
- Put the Source Disk into the A bay, then put the Destination Disk into the B bay.
Please make sure that those hard drives are correctly and firmly connected to SATA connectors of the docking station.
- Connect the power adapter to the docking station and power outlet.
- Press the power button to power up the docking station.
- Wait at least 10s till the docking station is prepared.
Caution! All data on your Destination HD will be lost. If you have important data on the HD, please back up the data before beginning the Clone operation.
- Keep pressing the Clone button for 3 seconds to begin duplication.
During the Clone process, those LED indicators will flash to show the percentage of the progress.
Begin Clone process: four LED flash one by one.
One LED stays solid: 25%
Two LED stays solid: 50%
Three LED stays solid: 75%
Four LED stays solid: 100%
When the four LED all stay solid, the process of the Clone had been finished.
- When the process of the Clone is finished, please press the power button on turn off the docking station.
Please take out those hard drives carefully because they may be very hot.
Note!
- Those hard drives may become hot during the Clone process.
-
The Clone process may take various hours to finish.
-
Those hard drives may produce noise during the Clone process.
- A Cloned drive also takes over the disk ID from the master drive. This causes Windows Vista,Win7/8 to shut down one of the drives if both drives are placed into the HDD docking
after cloning. The disk can be switched "online" again in the Windows option "Disk Management".
EN PL
Device Mode
The device mode permits the docking station to act as external dual hard drives that allows you to backup the data of your computer to those external hard drives.
- Make sure that those hard drives have no bad sectors. Bad sectors will cause unpredictable problems.
- Put one or two hard drives into the docking station. Please make sure that those hard drives are correctly and firmly connected to those SATA connectors of the docking station.
- Connect the USB cable to the docking station and to a PC.
- Connect the power adapter to the docking station and to power outlet.
- Power up the docking station by pressing the power button.
- Now the computer should detect the new hardware.
In Windows 2000/XP/Vista/7/8 or above it is not necessary to install drivers. If Windows can't recognize the docking station, please refer to the FAQ for more information.
OTB function (One Touch Backup)
The OTB function lets you backup your data by just pressing one button. It's an easy way to backup your important data to an external hard drive.
For more information, please visit our website (www.natec-zone.com) to download the file about OTB introduction and operate software.
FORMATTING YOUR HARD DISK
WARNING!
Before you partition your hard disk, please be aware that this will destroy all your existing data on the drive, so make sure you have a backup! This step is usually only required the first time you install a factory new hard drive or if you want to change the existing format.
Information about file system formats
Windows File System Formats
There are two file system formats for Windows user: NTFS and FAT32.
Use NTFS if you use the drive only with Windows XP, Windows Vista, and or Windows 7/8/10 (performance will generally be greater when compared to FAT32). This file system is compatible in read only mode with
Mac OS 10.3 and higher.
When the HD capacity you want to partition is below 32GB, you can choose FAT32 format.
Use FAT32 if you use your hard disk with both Windows and Mac. Maximum single file size is 4GB.
Mac File System Formats
There are two possible file system formats for Mac users: Mac OS Extended (HFS+) and FAT32.
Use HFS+ if you use the drive on Mac system only; performance will generally be greater when compared to FAT32. This file system is not compatible with Windows OS.
Use FAT32 if you use your drive with both Windows and Mac. Maximum single file size is 4GB.
Create partition and format
Before beginning, connect your docking station to a PC. The HD should be mounted into the docking station correctly. If your HD has been formatted, please skip this chapter.
The following instructions will help you to partition and format your HD in the Disk Management of Windows XP. The operation under Windows VISTA or Win7 is similar.
Step 1: Right click on the [My Computer] icon, click [Manager] to initialize the Disk Management program. You can also click [Start] -> [Control Panel] -> [Administrative Tools] -> [Computer Management].
Step 2: Please click [Disk Management], right click the [Unallocated] disk and point the [New partition]. The HD appears unallocated only when your HD is not partitioned. If your HD has been partitioned and formatted, please skip this part.
Step 3: Follow up the installation of [Partition Wizard] to operate the disk of partition and format.
Step 4: Go to [My computer], locate the removable drive on the list, right-click on it and select [Format] from the drop-down list, follow the instructions to complete the formatting process.
Step 5: Click [My Computer] and confirm that the new [Removable] icon appears.
Important!
Product is covered with 24-month warranty. Always keep a backup copy of files from your hard drive connected to docking station. Manufacturer does not take responsibility for damages resulting from lost data due to wrong operation or malfunction of the product, the software, personal computers or peripheral
devices. The manufacturer is not liable for damage resulting from misuse of the docking station.
EN PL
FAQs
Q: Does your computer's configuration meet the minimum system requirements for use with this drive?
A: See System Requirements
Q: Did you follow the correct installation steps for the specific interface and operating system?
A: Review the Hardware Setup
Q: After plugging the USB port, the drive is not spinning at all, why?
A: Check both ends of the USB cable and make sure that they are fully seated in their respective ports. Try disconnecting the cable, waiting 10-sec, and then reconnecting it. If the drive is still not recognized, restart your computer and try again.
Q: Has the drive been formatted?
A: See section: Create partition and format.
GENERAL INFORMATION
- Product covered with 24-month warranty.
- CE The safe product, conforming to the EU requirements.
- Rohs The product is made in accordance with RoHS European standards.
- The WEEE symbol (the crossed-out wheeled bin) using indicates that this product in not home waste. Appropriate waste management aids in avoiding consequences which are harmful for people and environment and result from dangerous materials used in the device, as well as improper storage and processing. Segregated household waste collection aids recycle materials and components of which the device was made. In order to get detailed information about recycling this product please contact your retailer or a local authority.
INSTRUKCJA OBSŁUGI
Natec Kangaroo Dual USB 3.0
natural_image
Simple line drawing of a rectangular device with horizontal stripes and a small square button at the bottom (no text or symbols)Tryb klonowania
Visit our website


- natural born technology
- KANGAROO DUAL
- User Manual
- Natec Kangaroo Dual USB 3.0
- HDD Docking Station
- PRODUCT FEATURES:
- PACKAGE CONTENTS:
- SYSTEM REQUIREMENTS:
- HARDWARE SETUP:
- Duplicator (CLONE) Mode
- Begin to duplicate
- Note!
- Device Mode
- OTB function (One Touch Backup)
- FORMATTING YOUR HARD DISK
- WARNING!
- Information about file system formats
- Windows File System Formats
- Mac File System Formats
- Create partition and format
- Important!
- FAQs
- GENERAL INFORMATION
- INSTRUKCJA OBSŁUGI
- Tryb klonowania
Brand : Natec
Model : Kangaroo Dual
Category : Charging Station / Dock