
PSP6509i - Washing machine Concept - Free user manual and instructions
Find the device manual for free PSP6509i Concept in PDF.


| Product Type | Washer-Dryer |
| Brand | Concept |
| Model | PSP6509i |
| Maximum Washing Capacity | 9.0 kg |
| Maximum Drying Capacity | 6.0 kg |
| Maximum Spin Speed | 1400 rpm |
| Number of Programs | 15 |
| Operating Voltage / Frequency | 220-240 V / 50 Hz |
| Water Pressure Range | 0.1 - 1 MPa |
| Dimensions (H x W x D) | 845 x 597 x 582 mm |
| Energy Efficiency Class | Not specified (refer to energy label) |
| Noise Level (Wash/Spin/Dry) | Not specified |
| Control Type | Electronic with touch buttons and program knob |
| Display | Digital screen |
| Detergent Drawer | 3 compartments (pre-wash, main wash, softener) |
| Additional Functions | Pre-wash, Extra Rinse, Anti-allergic, Easy Ironing, Save Zone, Delay Timer, Memory, Child Lock |
| Drum Material | Stainless steel |
| Pump Filter | Cleanable, located behind front cover |
| Water Inlet Filters | Two filters (faucet side and machine side) |
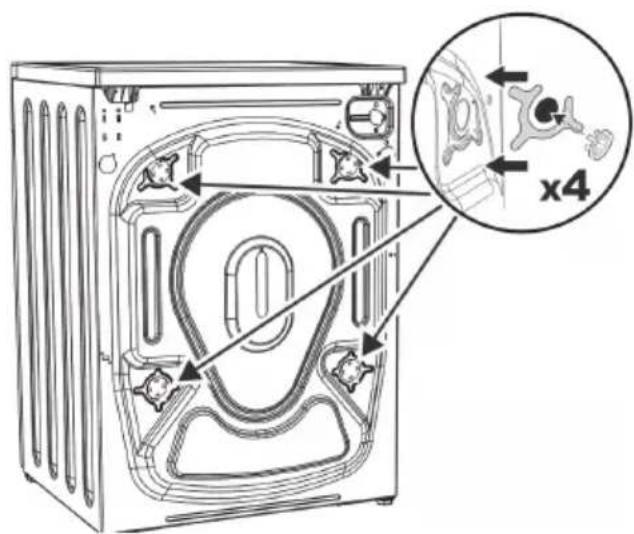
| Transport Safety Screws | Must be removed before use (4 screws at back) |
Frequently Asked Questions - PSP6509i Concept
User questions about PSP6509i Concept
0 question about this device. Answer the ones you know or ask your own.
Ask a new question about this device
Download the instructions for your Washing machine in PDF format for free! Find your manual PSP6509i - Concept and take your electronic device back in hand. On this page are published all the documents necessary for the use of your device. PSP6509i by Concept.
USER MANUAL PSP6509i Concept
natural_image
White disposable washing machine with black lid and digital display (no visible text or symbols)PSP6509i
CZ
natural_image
Pure electrical circuit lines without any symbolsnatural_image
Illustration of two workers in uniform carrying a large front-loading washing machine (no text or symbols)
natural_image
Line drawing of two hands holding a small object, possibly a tool or device, with no visible text or symbols.natural_image
Symbol of a trash bin crossed with two crossed lines, no text or labels presentnatural_image
Simple line drawing of a gear and wrench icon inside a rounded rectangle (no text or symbols)natural_image
Technical line drawing of a mechanical component with symmetrical slots and central hub (no text or symbols)
natural_image
Line drawing of a front-loading washing machine with a thumbs-up gesture (no text or symbols)natural_image
Mechanical gear assembly diagram with no text or symbolsnatural_image
Mechanical diagram showing a gear assembly with a rotating shaft and nut (no text or symbols)natural_image
Simple line drawing of a washing machine with a black X symbol crossed out, no text or labels present.
natural_image
Coiled cable with two connectors (no text or symbols visible)natural_image
Diagram of a mechanical device with arrows indicating assembly or operation (no text or symbols present)natural_image
Illustration of a kitchen sink with a curved pipe and fittings (no text or symbols)natural_image
Line drawing of a washing machine with an inset close-up showing internal components (no text or symbols)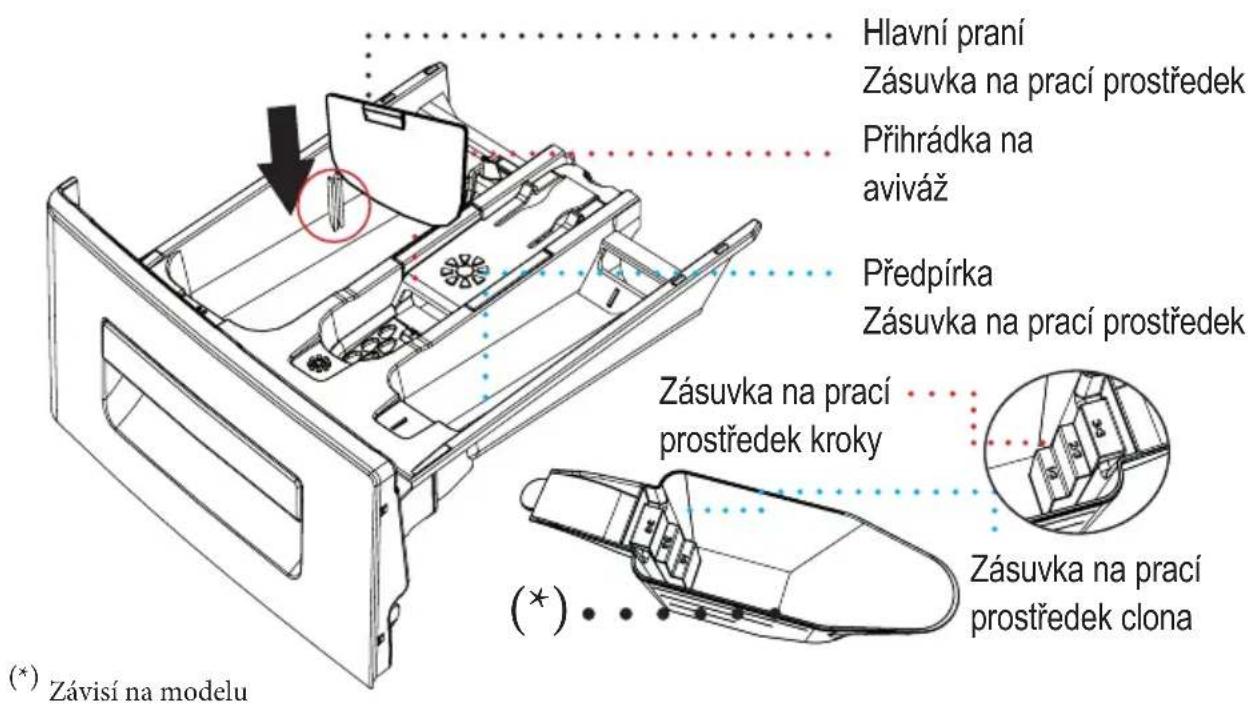
natural_image
Technical line drawing of a mechanical device with internal components and no visible text or symbolsnatural_image
Technical line drawing of a mechanical device with internal components and mounting base (no text or symbols)natural_image
Technical line drawing of a mechanical device with internal components and mounting base (no text or symbols)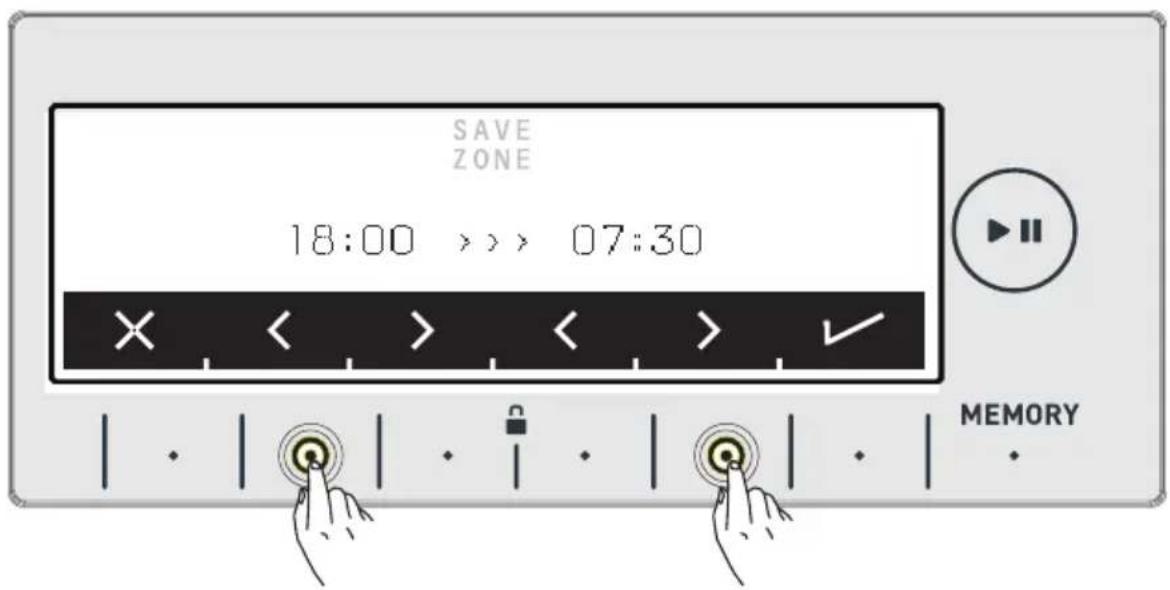
natural_image
Line drawing of a hand using a tool to adjust or install a mechanical component (no text or symbols present)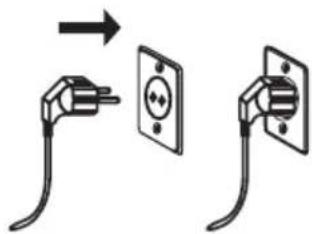
Třídění prádla

natural_image
Line drawing of a front-loading washing machine with a circular vent and side panel (no text or symbols)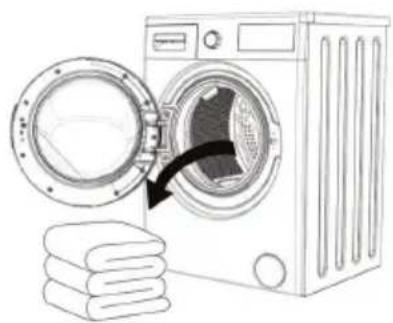
natural_image
Line drawing of a washing machine with a door open and clothes stacked nearby (no text or symbols)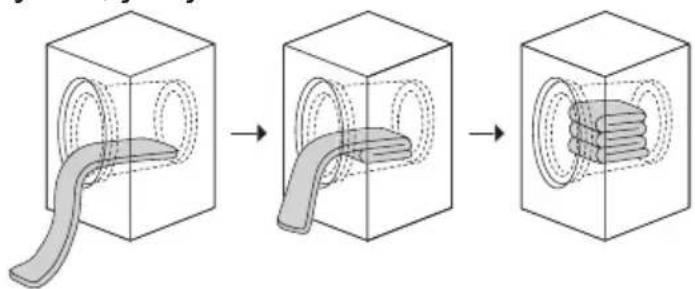
natural_image
Three-step diagram showing a 3D cube being cut with a curved ribbon, then partially assembled into a cylindrical structure (no text or symbols)natural_image
Line drawing of a front-loading washing machine with a circular dial and scroll wheel, showing no text or symbols.Suché k zavěšení

• Krok suše- ní.
• Konec pro- gramu.
natural_image
Illustration of a hand adjusting a pipe fitting with a black arrow indicating clockwise motion (no text or symbols)natural_image
Technical line drawing of a vehicle door panel with adjustment knobs and a black arrow pointing to the handle (no text or symbols)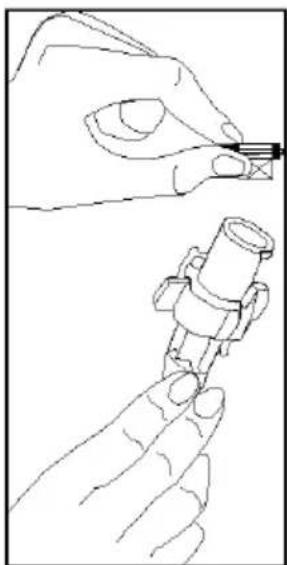
natural_image
Line drawing of a hand holding a small mechanical component, no text or symbols presentnatural_image
Illustration of a hand using a tool to adjust or install a machine component, with no visible text or symbols.natural_image
Illustration of a hand inserting a device into a washing machine (no text or symbols visible)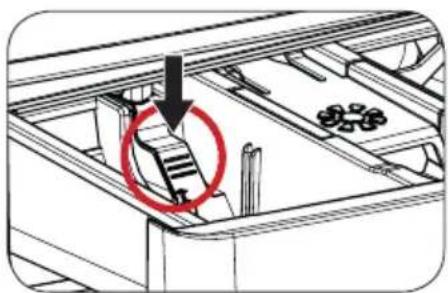
natural_image
Technical diagram of a mechanical assembly with a red circle highlighting a step and a black arrow indicating direction (no text or symbols present)natural_image
Line drawing of a refrigerator interior with fans and doors (no text or symbols)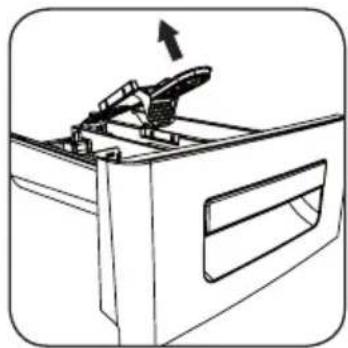
natural_image
Line drawing of a kitchen appliance with a handle and drawer, showing a mechanical component (no text or symbols)
natural_image
Diagram of a mechanical lever system with an upward arrow indicating motion (no text or symbols present)Čištění bubnu
natural_image
Illustration of a hand using a tool to clean or inspect a circular component, with no visible text or symbols.natural_image
Simple line drawing of a cooking pot with a lid and handle, no text or symbols presentnatural_image
Illustration of a mechanical component with a cylindrical housing and a metallic ring, no text or symbols presentnatural_image
Diagram of a mechanical device with rotating components and directional arrows indicating motion (no text or symbols)natural_image
Illustration of a hand holding a tool near a faucet, with no visible text or symbolsnatural_image
Simple line drawing of a container with a lid inserted into a container (no text or symbols)natural_image
Simple line drawing of a mechanical component with a circular arrow indicating direction (no text or symbols)CONCEPT POLSKA sp. z o.o.
natural_image
White conceptual washing machine with black lid and digital display (no visible text or symbols on main body)PRED POUŽITÍM PRÁČKY
Správne použitie
natural_image
Simple line drawing of a cable with a plug and connector, intersected by two intersecting lines (no text or symbols)natural_image
Illustration of two workers carrying a large washing machine (no text or symbols)
Práčku musia prenášat' aspoň 2 l'u-dia.

Bezpečnost' detí!
natural_image
Line drawing of a hand holding a small object, possibly a folded paper or tool, with no visible text or symbols.natural_image
Symbol of a trash bin crossed with two crossed lines, no text or labels presentnatural_image
Simple line drawing of a gear and wrench icon (no text or symbols)natural_image
Technical line drawing of a mechanical component with symmetrical slots and central hub (no text or symbols)
natural_image
Line drawing of a front-loading washing machine with a thumbs-up icon (no text or symbols)natural_image
Mechanical component diagram showing a bolt and nut assembly with a curved arrow indicating rotation (no text or symbols)natural_image
Mechanical gear assembly diagram showing a bolt and nut with a curved arrow indicating motion (no text or symbols)natural_image
Simple line drawing of a washing machine with a black X symbol crossed out, no text or labels present.
natural_image
Coiled cable with two connectors (no text or symbols visible)• V balení hadice je 1 tesnenie na zabránenie úniku vody v pripojeniach. Dajte toto tesnenie ku koncu novej hadice prívodu vody na strane batérie.
natural_image
Mechanical assembly diagram showing a valve mechanism with directional arrows (no text or labels)natural_image
Illustration of a kitchen sink with a curved pipe and faucet (no text or symbols)natural_image
Line drawing of a washing machine with an inset showing internal components (no text or symbols)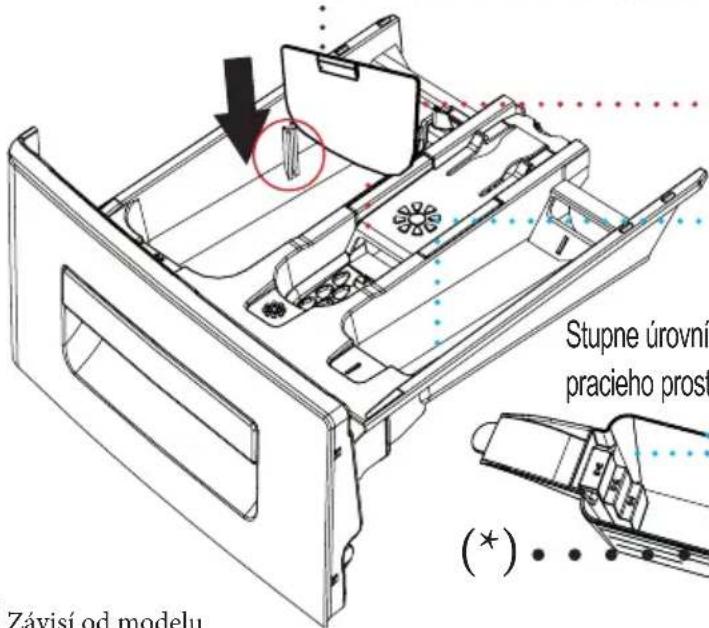
natural_image
Technical line drawing of a boat hull with no visible text or symbols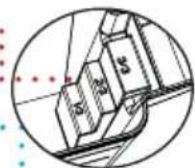
natural_image
Technical line drawing of a mechanical device with internal components and housing (no text or symbols)natural_image
Technical line drawing of a mechanical device with internal components and mounting base (no text or symbols)natural_image
Technical line drawing of a mechanical device with internal components and mounting base (no text or symbols)Priehradka na prací prostriedok na predpieranie:
- Vaša práčka vás vyzve, aby ste potvrdili nastavenie správneho času. Dotykom tlačidla so symbolom √ prejdite do menu nastavenia.
Pomocou tlačidla so symbolom možete odíst bez nastavenia.
natural_image
Illustration of a hand using a tool to adjust or install a mechanical component (no text or symbols visible)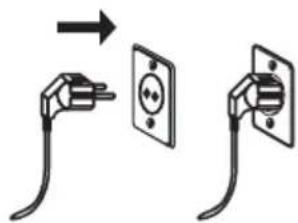
Triedenie bielizne

natural_image
Three black-and-white diagrams showing different types of anchor or connector configurations, with one labeled 'OK' (no text or symbols on diagrams)natural_image
Line drawing of a washing machine with a circular door and side panel, showing a right-hand rule (no text or symbols)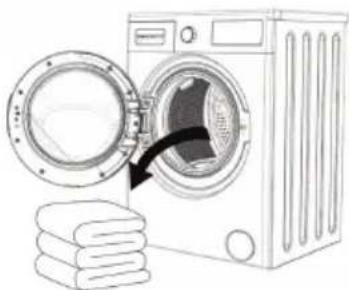
natural_image
Illustration of a washing machine with a door open and stacked clothes nearby (no text or symbols)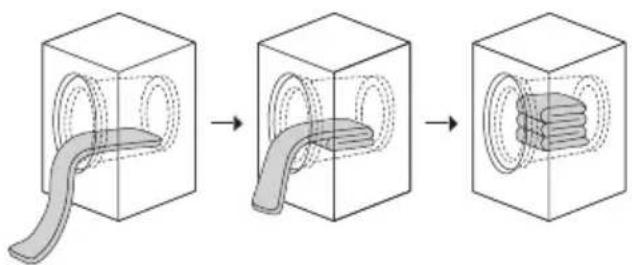
natural_image
Three-step diagram showing a 3D cube being cut with a curved ribbon, then into a 2D cube with layered internal structure (no text or symbols)- Môžete to uložit' stlačením tlačidla so symbolom √

▶Tlačidlo Štart/Pauza
Spustenie programu
• Krok suše- nia.
natural_image
Illustration of a hand using a tool to adjust or install a mechanical component (no text or symbols visible)natural_image
Technical line drawing of a mechanical component with no visible text or symbols
natural_image
Line drawing of a hand holding a small mechanical component, no text or symbols presentnatural_image
Illustration of a hand using a tool to open a machine (no text or symbols visible)natural_image
Two-step diagram showing a hand operating a washing machine with arrows indicating motion, and a close-up of the door mechanism inside a washing machine (no text or symbols)natural_image
Line drawing of a refrigerator interior with fans and doors (no text or symbols)
natural_image
Line drawing of a kitchen appliance with a tool on top and a handle, no text or symbols present
natural_image
Diagram of a mechanical lever system with an upward arrow indicating motion (no text or symbols present)Čistenie bubna
natural_image
Illustration of a hand inserting a device into a circular component, with no visible text or symbols.natural_image
Illustration of a cooking pot with a ladle and lid, no text or symbols presentnatural_image
Simple line drawing of a container with an open lid and a handle, no text or symbols present- Zachyt'te vypustenú vodu do nádoby.
natural_image
Diagram of a mechanical assembly with rotating components and directional arrows indicating motion (no text or symbols)natural_image
Illustration of a medical procedure with surgical tools and a surgical instrument (no text or symbols)natural_image
Simple line drawing of a mechanical component with a circular inset showing internal components (no text or symbols)natural_image
Simple line drawing of a door with a circular component and an arrow indicating direction (no text or symbols)| CHYBOVÝ KÓD | ⚠ NO WATERCheck watersupply. |  |
CONCEPT POLSKA sp. z o.o.
natural_image
White conceptual washing machine with black lid and digital display (no visible text or symbols on main body)
UWAGA!
natural_image
Illustration of two workers carrying a large front-loading washing machine (no text or symbols)PRZED PIERWSZYM UŻYCIEM

Uwaga!
natural_image
Line drawing of two hands holding a piece of paper or tape (no text or symbols)natural_image
Technical line drawing of a mechanical component with symmetrical cutouts and mounting features (no text or symbols)
Uwaga!
USTAWIENIE URZĄDZENIA
natural_image
Simple line drawing of a washing machine with a black X symbol crossed out, no text or labels present.Uwaga! • Nigc
natural_image
Line drawing of a coiled hose with two connectors (no text or symbols)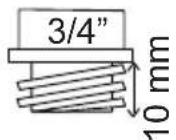
natural_image
Illustration of a hand using a tool to adjust or install a wall-mounted component (no text or symbols present)natural_image
Illustration of a shower drain with pipe and valve (no text or symbols)natural_image
Line drawing of a washing machine with an inset showing internal components (no text or symbols)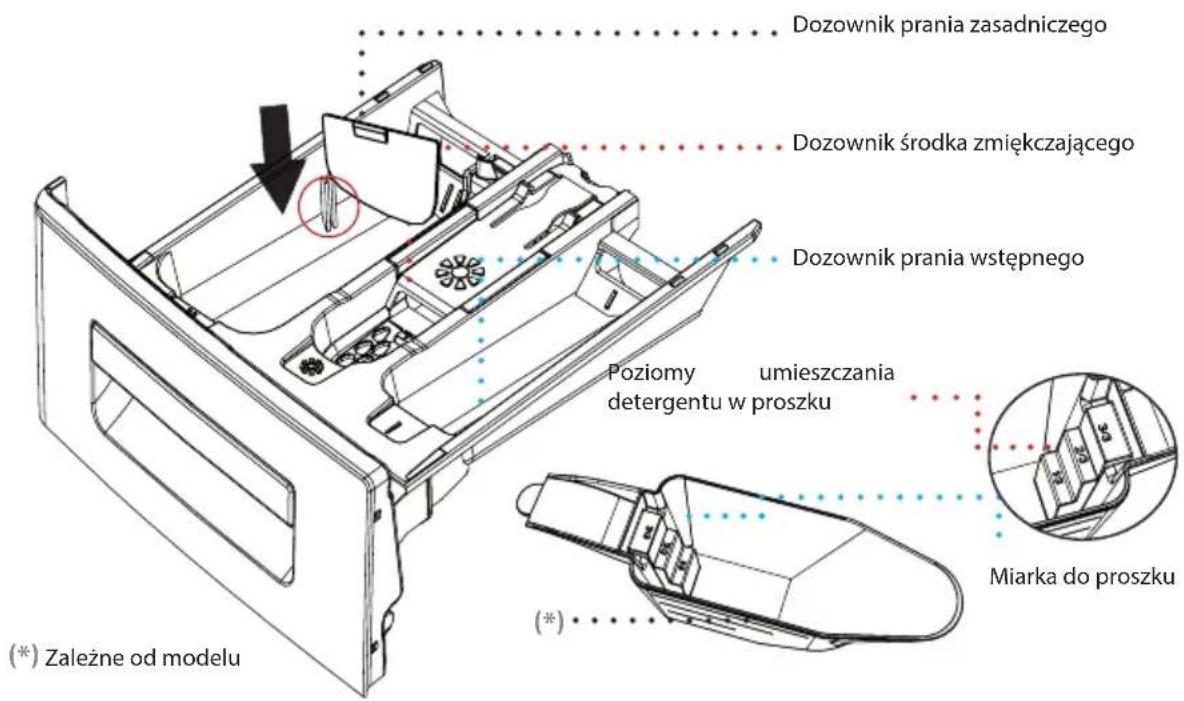
natural_image
Technical line drawing of a mechanical device with internal components and mounting base (no text or symbols)dozoWnik deterGentU PrAniA zAsAdniczeGo:
natural_image
Technical line drawing of a mechanical device with internal components and mounting base (no text or symbols)dozoWnik deterGentU do zMiĘkczAniA, krochMAleniA:
natural_image
Technical line drawing of a mechanical device with internal components and mounting base (no text or symbols)dozoWnik deterGentU PrAniA WstEPneGo:
natural_image
Hand using a tool to adjust or install a mechanical component (no text or symbols visible)
SEGREGACJA BIELIZNY
flowchart
graph TD
    A["Machine"] --> B["Shelter with cloth"]
    B --> C["Shelter with fabric swatch"]
    C --> D["Finished product box with fabric swatches"]

OBSŁUGA OPCJI PRANIA
Przycisk stArt / PAUzA

• UrUchAMiAnie ProGrAMU
OBSŁUGA OPCJI PRANIA

OBSŁUGA OPCJI PRANIA
Wybór PodProGrAMÓW (tkAniny delikAtne)
natural_image
Illustration showing two different installation methods: one using a plug, the other handling a valve or bulb (no text or symbols present)
Uwaga!
natural_image
Technical line drawing of a mechanical component with no visible text or symbols
natural_image
Line drawing of a hand holding a pen and a cylindrical object, no text or symbols presentnatural_image
Illustration of a hand operating a mechanical device with a black arrow indicating direction (no text or symbols present)natural_image
Illustration of a hand using a tool to adjust or install a washing machine component (no text or symbols visible)
natural_image
Technical diagram of a mechanical assembly with a red circle highlighting a step and component (no text or symbols present)natural_image
Line drawing of a refrigerator interior with airbags and decorative fans (no text or symbols)
natural_image
Line drawing of a mechanical device with an arrow indicating direction (no text or symbols)
natural_image
Diagram of a mechanical lever system with an upward arrow indicating motion (no text or symbols present)czyszczenie bĘbnA
natural_image
Illustration of a hand holding a pen with a magnifying glass, showing a downward arrow (no text or symbols)natural_image
Illustration of a hand inserting a ball into a mechanical component (no text or symbols visible)natural_image
Illustration of a kitchen utensil pouring liquid into a bowl (no text or symbols)natural_image
Technical line drawing of a mechanical assembly with a cylindrical component and a circular housing (no text or symbols)natural_image
Diagram showing mechanical components with arrows indicating motion or force direction (no text or symbols)natural_image
Illustration of a hand holding a pen and a bottle, with a faucet pouring liquid from above (no text or symbols)natural_image
Line drawing of a washing machine interior with a circular component inserted into the sink (no text or symbols)natural_image
Simple line drawing of a pipe opening with a circular component and directional arrow (no text or symbols)CONCEPT POLSKA sp. z o.o.
natural_image
White conceptual washing machine with black lid and digital display (no visible text or symbols on main body)PIRMS IERİCES LIETOŠANAS Pareizais lietojums
natural_image
Simple line drawing of a mechanical device with intersecting lines (no text or symbols)natural_image
Illustration of two workers in uniform standing beside a large washing machine (no text or symbols)
natural_image
Line drawing of a hand holding a piece of paper or tape (no text or symbols)IEPAKOJUMS UN APKÄRTËJÄ VIDE
IEPAKOJUMA UN NOLIETOTĀS IERĪCES IZ-MEŠANA PAREIZĀ VEIDĀ
natural_image
Symbol of a trash bin with crossed lines indicating no waste or restriction (no text or labels)natural_image
Simple line drawing of a gear and wrench icon inside a rounded rectangle (no text or symbols)natural_image
Technical line drawing of a mechanical component with symmetrical cutouts and mounting holes (no text or symbols)
natural_image
Line drawing of a washing machine with a circular vent and side control panel, accompanied by a thumbs-up gesture (no text or symbols)natural_image
Mechanical gear assembly diagram with rotation arrow (no text or symbols)natural_image
Diagram of a mechanical gear assembly with a rotating arrow indicating motion (no text or symbols)natural_image
Simple line drawing of a washing machine with a black X symbol crossed out, no text or symbols present.natural_image
Coiled medical tubing with two connectors (no text or symbols visible)natural_image
Illustration of a kitchen sink with a curved pipe and fittings (no text or symbols)natural_image
Line drawing of a washing machine with an inset showing internal components (no text or symbols)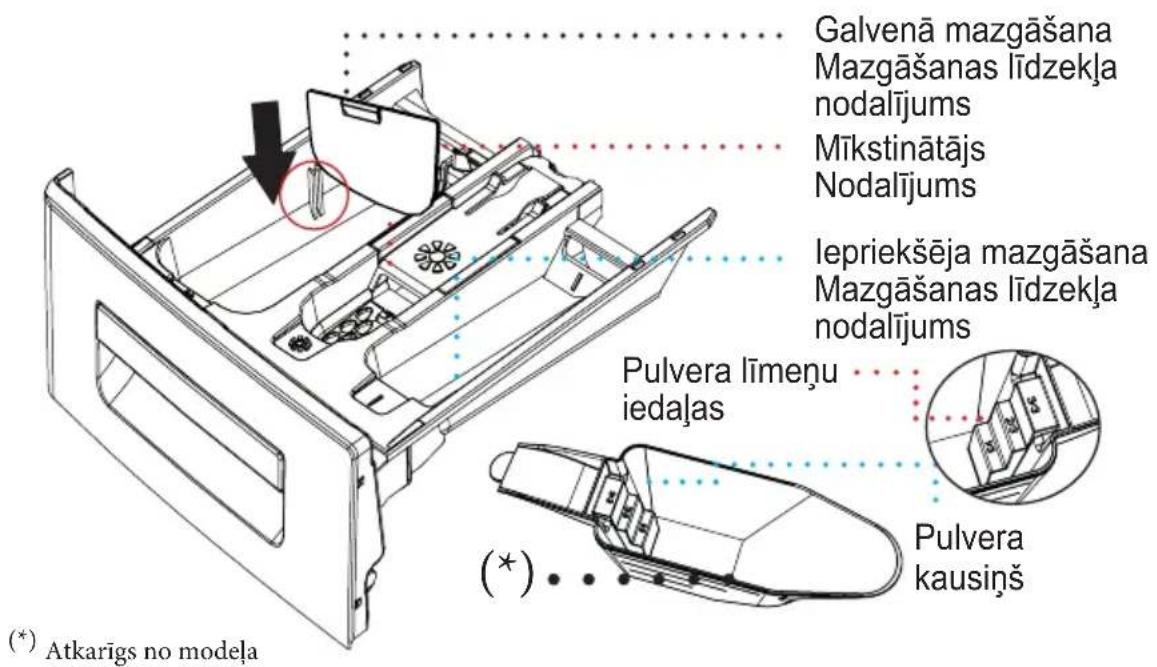
natural_image
Technical line drawing of a mechanical device with internal components and housing (no text or symbols)natural_image
Technical line drawing of a mechanical device with internal components and mounting base (no text or symbols)natural_image
Technical line drawing of a mechanical device with internal components and mounting base (no text or symbols)- Izmantojot simbola bogu, atlasiet valodu, kuru vēlaties lietot.
- Izmantojot simbola √ pogu, apstipriniet valodas atlasi.
natural_image
Illustration of a hand using a tool to adjust or install a mechanical component (no text or symbols visible)
Vejas škirošana

natural_image
Line drawing of a washing machine with a circular door and side panel, showing a right-hand rule (no text or symbols)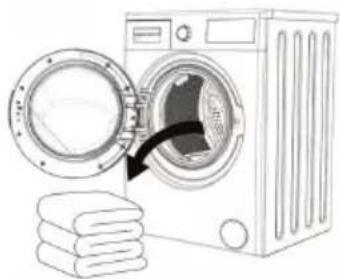
natural_image
Illustration of a washing machine with a door open, showing internal components and a stack of clothes (no text or symbols)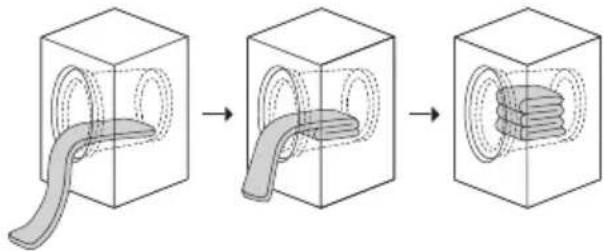
natural_image
Three-step diagram showing a mechanical component being processed into a cube, with no visible text or symbols.natural_image
Line drawing of a washing machine with a circular dial and directional arrow, no text or symbols presentŽāvēšana izkarot
- Tos varat saglabāt, pieskaroties simbola pōgai.
Apakšprogrammu atlase (Extras)
Atlasot papildu (extras) programmu ar programmu pogu, ir redzamas
natural_image
Illustration of a hand using a tool to adjust or install a mechanical component (no text or symbols visible)natural_image
Technical line drawing of a mechanical component with no visible text or symbols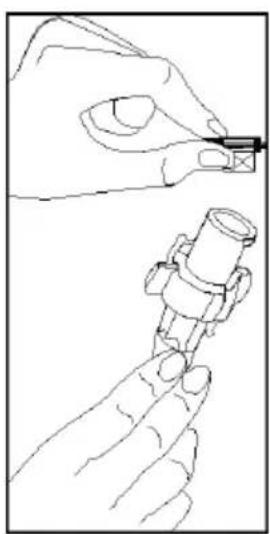
natural_image
Line drawing of a hand holding a small mechanical component, no text or symbols presentnatural_image
Illustration of a hand opening a device into a rack with a black arrow indicating the process (no text or symbols present)natural_image
Illustration of a hand inserting a device into a machine (no text or symbols visible)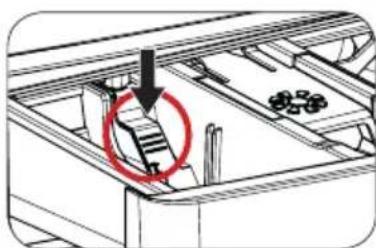
natural_image
Technical diagram of a mechanical assembly with a red circle highlighting a step and a black arrow indicating direction (no text or symbols present)natural_image
Illustration of a hand using a tool to insert a mechanical component, with no visible text or symbols.natural_image
Illustration of a cooking pot with a lid and handle, no text or symbols presentnatural_image
Illustration of a mechanical component with a cylindrical housing and an open circular component (no text or symbols)natural_image
Diagram showing mechanical components with arrows indicating motion, no text or symbols presentnatural_image
Illustration of a hand using a tool to lift a pipe into a bottle (no text or symbols present)natural_image
Simple line drawing of a door with a circular opening and a small bowl inserted (no text or symbols)natural_image
Simple line drawing of a pipe or tube with an arrow indicating direction (no text or symbols)CONCEPT POLSKA sp. z o.o.
natural_image
White conceptual washing machine with black lid and digital display (no visible text or symbols on main body)EN
BEFORE USING YOUR MACHINE Correct Use
- Read this user's manual.
- Your machine is designed to be used in domestic environments. Using it for commercial purposes shall cause your warranty to be void.
- Do not let your pets near the machine.
- Please check the packaging of your machine before installation, and the outer surface of the machine after the packaging has been removed. Do not operate damaged machines or machines with opened packaging.
- This appliance is not intended for use by people (including children) with reduced physical, sensory or mental capabilities, or lack of experience or know-ledge, unless they have been given supervision or instruction concerning use of the appliance by a person responsible for their safety.
- Please use your machine for laundry that is specified as washable and dryable after washing by their manufacturer on their label.
- You must remove the transportation safety screws before your machine's first use. The machine will malfunction if it is operated with the transport safety screws still in place and this will void your warranty.
- Your machine warranty does not cover damage caused by external factors (floods, fire, rodents etc.)
- Please do not throw away this user manual. Store it in a safe place. It might be needed by you or the next user.
Note: Machinery specifications may vary depending on the product purchased.
Replacement of drive belt, only by authorized service. Only original spare belt: 42006396 Optibelt 6 EPJ 1236
General warnings
- The necessary ambient temperature for your machine's ideal operation is 15-25°.
- Frozen hoses can tear and explode. In regions where the temperature is below zero, the electronic card may not operate safely.
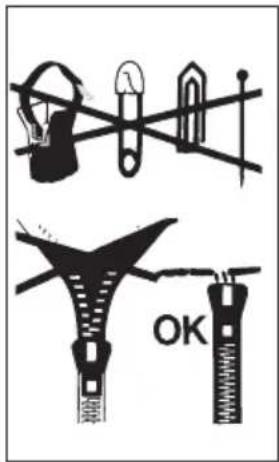
- Please ensure that the clothes you will load into your machine do not have foreign substances (nails, needles, coins, lighters, matches, clips etc.) in their pockets. These foreign substances can damage your machine.
- It is advised that the first washing operation is conducted by putting 1/2 scale detergent in compartment number 2 of the detergent drawer and run the machine without any clothes in on the “DRUM CLEANING” program.
- As detergent or softener exposed to air for a long time may cause residues, only put your detergent or softener in the detergent drawer at the beginning of each wash.
- It is advised that you unplug your machine and close the water inlet tap if you will not use your machine for a long time. You should also leave the door of your machine open to prevent bad odours forming due to humidity.
- Some water might be left in your machine due to trials and tests conducted for Quality Control procedures during production. This causes no harm to your machine.
- Keep the document bag that came inside your machine that contains the user manual out of the reach of children and babies to prevent the risk of suffocation.
- Keep small parts found in the document part away from the reach of children and babies.
- Use pre-wash programs only for very dirty laundry.
- You should not load your machine with the amount of laundry that will exceed the maximum laundry amount specified in the washing or drying program you have chosen.
- In case of any malfunction, unplug the machine and close the tap first. Do not attempt to repair by yourself and consult the nearest authorized service company.
- Never open the detergent compartment when the appliance is running.
- Never force the door open when the machine is running.
- Please adhere to the manufacturers' advice regarding the use of fabric conditioner or similar products you will use in your machine.
- While your machine is in the drying process, please do not stop your machine before the program ends.
If you have to do this, remove all your laundry fast and spread them on an appropriate place immediately to allow them to cool down.
- Set up your machine in a place where its door can be completely opened. (Do not set up your machine in places where its door cannot be fully opened.)
- Set up your machine in locations that can be ventilated and might have constant air circulation.

Safety warnings
You must read these warnings. Ignoring these warnings may put you or your loved ones at risk of fatal injuries.

Burn risk!
- Do not touch the discharge hose or the water discharged during the discharging process as the appliance may reach high temperatures when running.
- Open the door of the machine all the way after the drying process. Do not touch the door glass. Burn hazard may occur due to high temperature.

Electrocution risk!
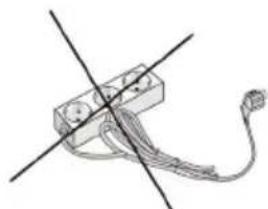
- Do not use multiple plugs or extension cords.
natural_image
Pure electrical circuit lines without any symbols- Do not plug in damaged plugs or plugs with torn cables.
- Never pull from the cable when unplugging.
• Grab the plug when unplugging. - Do not plug-in or out the plug from the receptacle with wet hands to prevent electric shock.
- Never touch the machine with a wet or damp hand or foot.
- Call the nearest authorized service company for assistance if the power cord malfunctions.

Flooding risk!
- Check whether the water flows fast or not before hanging the discharge hose on the sink.
• Take necessary measures to prevent the hose you hung from slipping. - The backfiring force of a hose that is not places appropriately can move the hose from the place it is hung on the sink. Take measures to prevent the plug in your sink from plugging the sink hole.
! Explosion risk!
- As there is a drying function on your machine, make sure that materials like stain removing chemicals or washing gas that you might have applied on your laundry earlier are properly rinsed and purged. There might be a risk of explosion when you run your machine with the drying function otherwise.
! Fire risk!
- Unwashed dry laundry must not be dried in your machine.
- Do not keep flammable or explosive liquids near your machine.
- Materials stained with food oil, acetone, alcohol, petrol, kerosene, stain remover, turpentine, beeswax and beeswax remover must first be washed with an extra amount of detergent and hot water before being put through the drying process. There might be a risk of fire when you run your machine with the drying function otherwise.
- If you're going to choose a washing and drying program, do not place a detergent dose adjustment device/ball into your machine. They might pose a fire risk.
- Laundry must not be dried in the machine under the conditions specified below due to the risk of fire:
- If laundry is not washed.
- If oil stains and other stains on the laundry (food oils, balms and cosmetic remains, kitchen swab etc.) are not cleaned enough.
- Laundry cleaned with industrial chemicals.
- Laundry that has high amount of foam-sponge-rubber or rubber-like parts and accessories on.
-Rubber, sponge(latex), shower bonnet, watertight textile products, rubber based objects and clothes or pillows filled with rubber sponge must not be dried in the washing machine with the drying function.
- Stuffed and damaged parts (pillows or jackets).
The sponge parts dangling outside these stuffings might catch fire during the drying process.
- The sulphur in paint-removing materials might cause corrosion. Thus, never use paint-removing materials in your machine.
- Please ensure that detergent cups are not left inside the laundry. These plastic cups might melt during drying and damage your machine and laundry.
- Laundry that has had a stain removal process applied must be rinsed thoroughly before washing.
- Never use products that contain solvent material (like washing gas) in your machine.
- Remove all the objects in the pockets of your laundry (needles, paperclips, lighters, matches etc.) when loading your machine. Fire and Explosion risk may occur.

Fall and injury risk!
- Do not climb on your machine. The upper table of your machine may break and you might get injured.
- Tidy the hose, cable and packaging of your machine during installation. You might trip over and fall.
- Do not turn your machine upside down, or on its side.
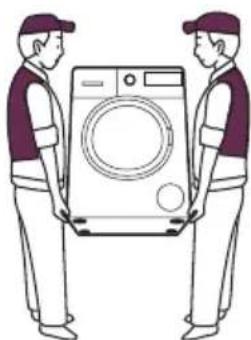
- Do not lift your machine by holding it from extruding parts (detergent drawer, door). These parts might break and cause you injury.
- There's a risk of tripping and injury if the materials like hoses and cables are not property stored after your machine is installed.
natural_image
Illustration of two workers in uniform standing beside a large washing machine (no text or symbols)
Machine must be carried by 2 people or more.

Child safety!
- Do not allow your children to play with the machine. It is an electrically driven appliance.
- Do not leave children unattended near the machine. Children might lock themselves into the machine.
- The door glass and machine surface might be extremely hot during your machine's operation.
- It is therefore especially important that children do not touch the machine as it may damage their skin.
natural_image
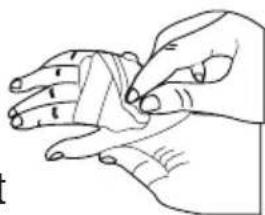
Line drawing of a hand holding a piece of paper or tape (no text or symbols)- Keep packaging material away from children.
- Poisoning might occur if the detergent and other washing aids are consumed, and eye or skin irritation might occur if they come into contact with the skin. Keep the cleaning materials where children cannot reach them.
PACKAGING AND THE ENVIRONMENT
DISPOSING OF PACKAGING AND YOUR OLD MACHINE RESPONSIBLY
Removal of packaging materials
Packaging materials protect your machine from the damage that might occur during transportation. Please recycle you packaging materials.
Recycled material provides both raw material savings and decreases waste production
Removal of old machine
Old electrical devices might still contain salvageable parts.
So, never throw your old devices that you do not use into the waste.

Ensure the parts of your old electronic or electrical devices are reused by giving them to your local recycling centre.
Please ensure your old appliances are kept in an appropriate place for the safety of children until they are taken outside the house.
SAVINGS & EFFICIENCY INFORMATION
Some important information to get more efficiency out of your machine:
- The amount of laundry you put in your washing machine should not exceed the maximum amount indicated. By avoiding overloading, your machine shall run more efficiently.
- Not using pre-wash feature for normal and lightly soiled laundry shall save electricity and water.
OVERVIEW OF YOUR DEVICE
General Appearance
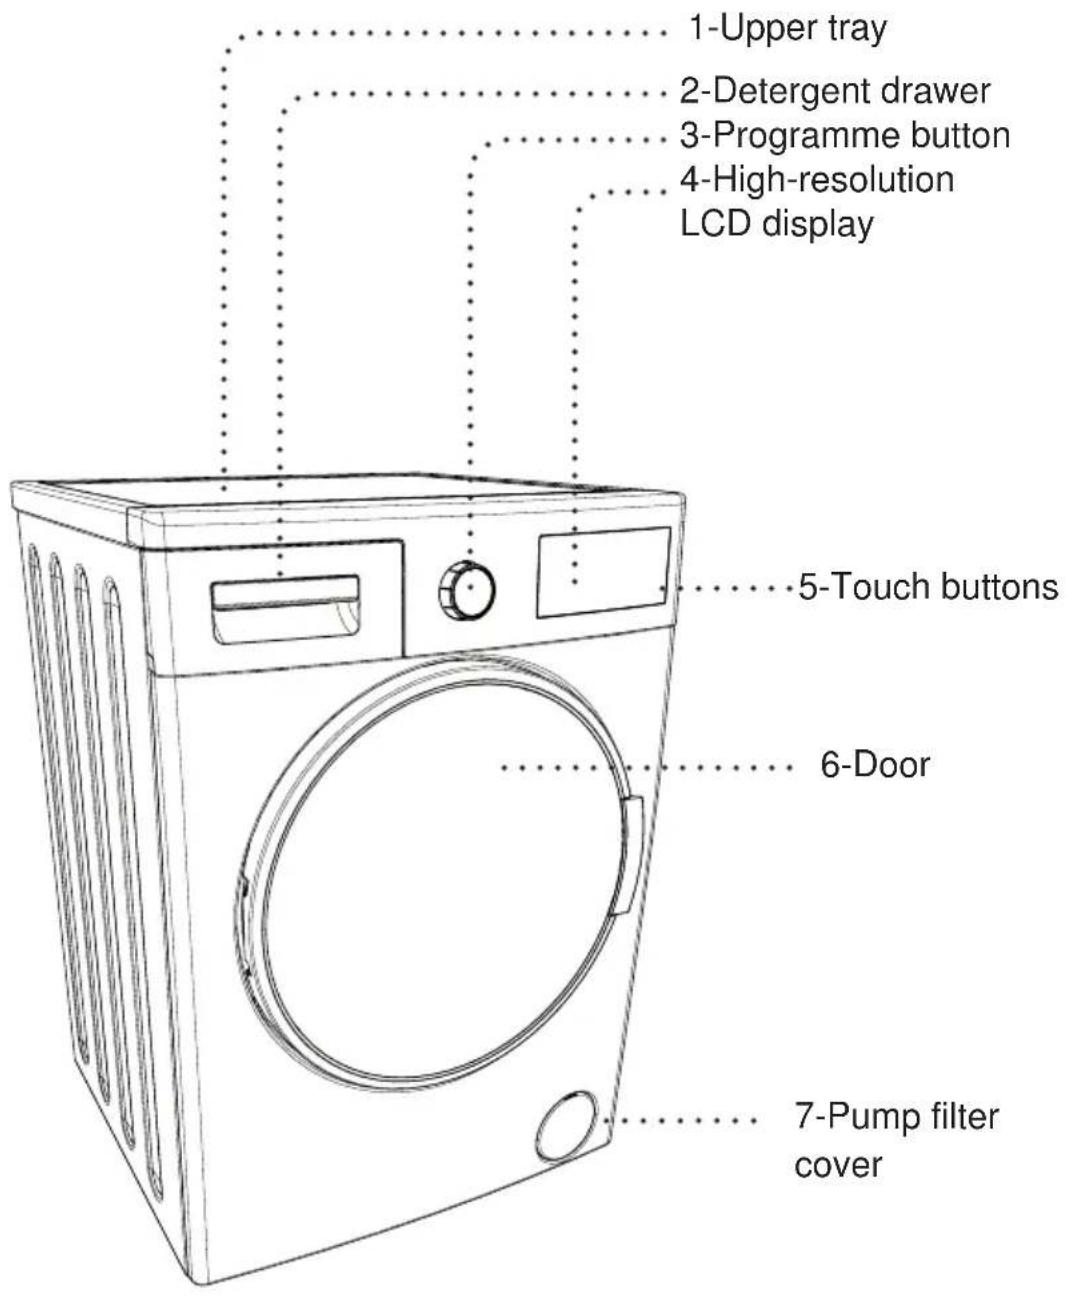
General Appearance
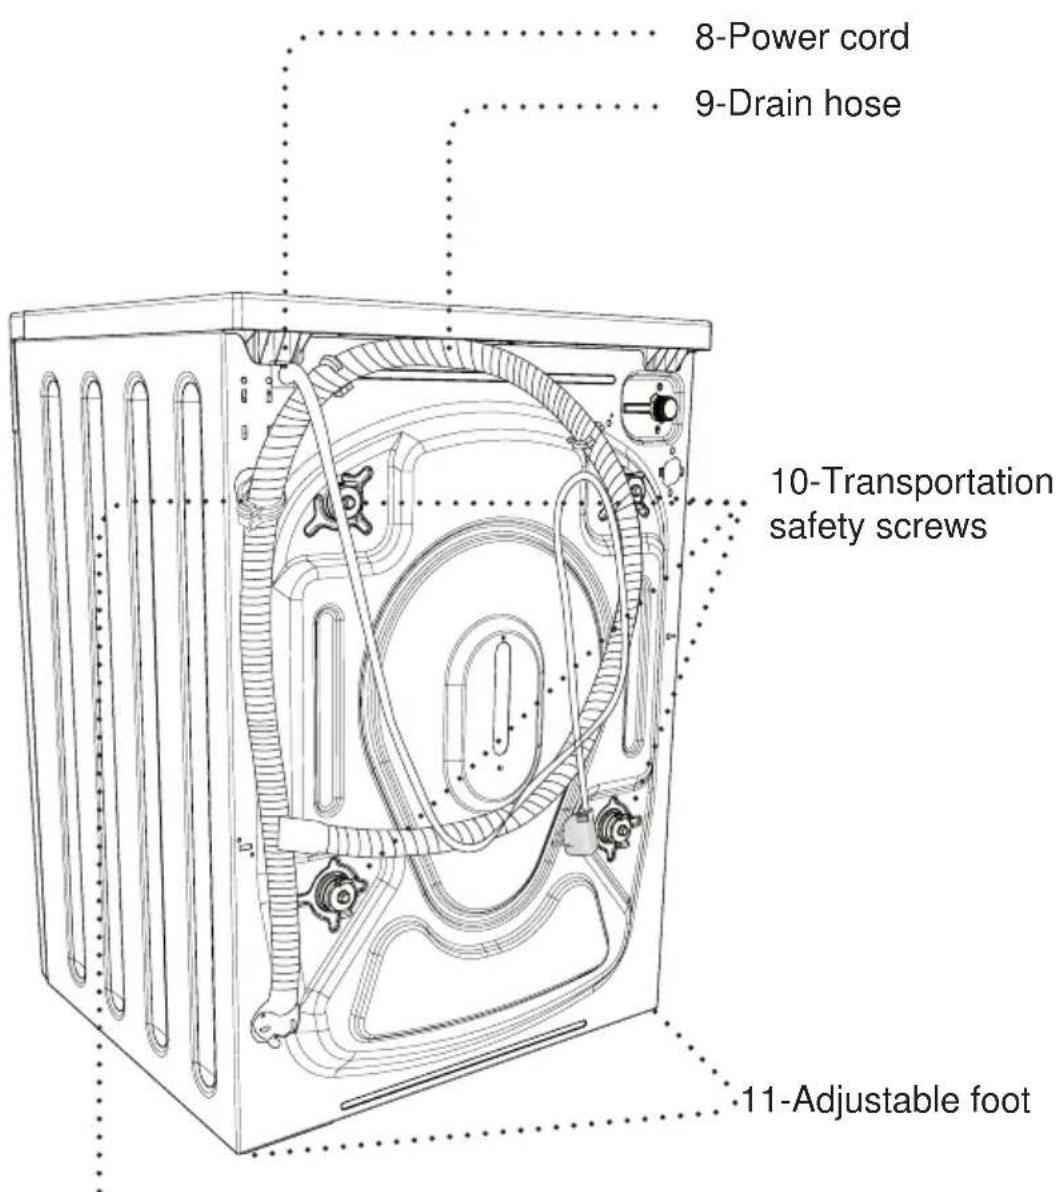
12-Drain hose holding plastic:
(The operation of the machine will be affected if this plastic part is removed. So please don't remove this plastic part under any condition.)
Technical Specifications
| Maximum washing capacity (dry laundry) (kg) | 9.0 |
| * Maximum drying capacity (kg) | 6.0 |
| Spin speed (rev / min) | 1400 |
| Number of programs | 15 |
| Operating voltage / frequency (V/Hz) | 220-240 / 50 |
| Water pressure (Mpa) | Maximum:1Minimum:0.1 |
| Dimensions (hxwxl) (mm) | 845x597x582 |
| * Unwashed dry laundry must not be dried in your machine. | |
SETTING UP THE MACHINE
natural_image
Simple line drawing of a gear and wrench icon inside a rounded rectangle (no text or symbols)Have your machine installed only by an authorized service company.
Removing transportation safety screws
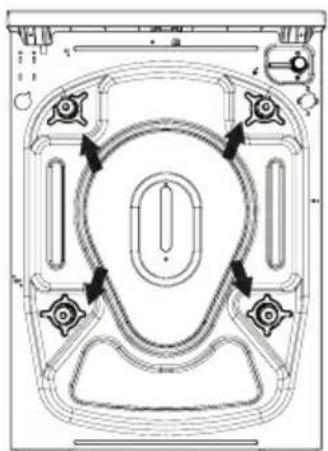
natural_image
Technical line drawing of a mechanical component with symmetrical cutouts and mounting holes (no text or symbols)
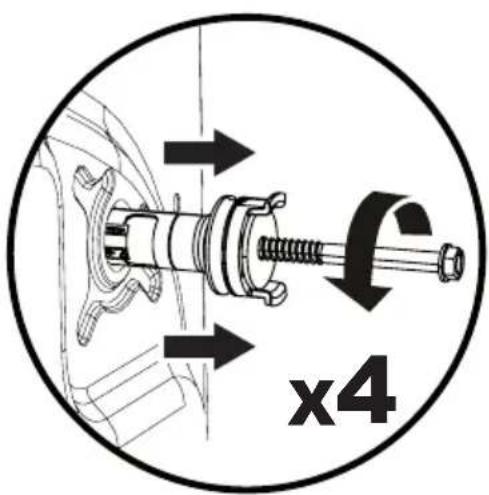
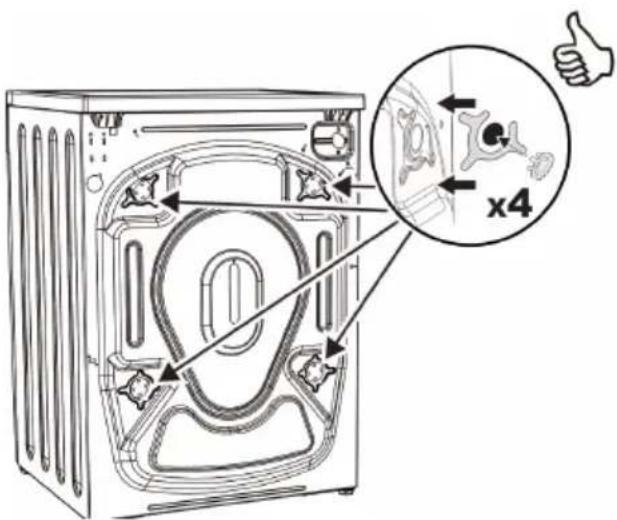
Before operating your machine, you must remove the transport safety screws on the backside of the machine.
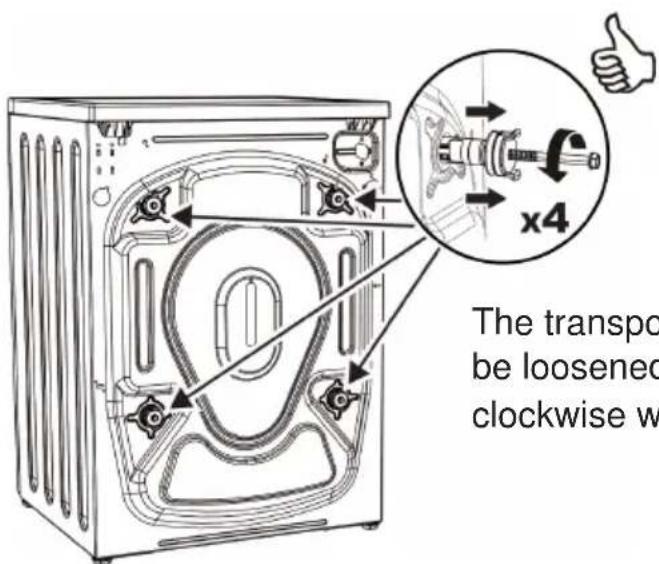
The transport safety screws should be loosened by rotating them counter clockwise with an appropriate wrench.
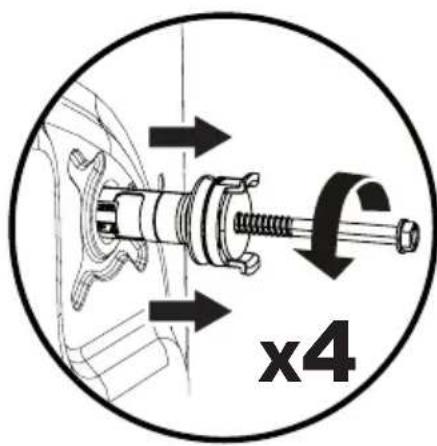
Transport screws should then be removed by pulling them out. The removed transport safety screws should be stored to be used again in case the machine needs to be transported again, e.g. if moving house.
NOTE: You must remove the transportation screws from your machine before first use. Faults occurring in machines operated with transport screws still fitted shall be out of the scope of the warranty.
Place the plastic transportation screw caps found in the accessory bag in the gaps left by the transportation screws.
Placing the machine and adjusting the adjustable foot
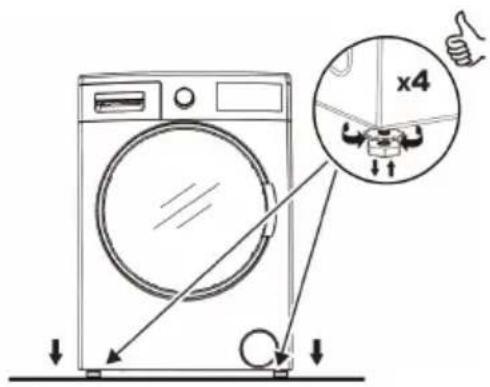
Do not install your machine on a carpet or such ground that will block ventilation from the base.
To ensure silent and vibration-free operation of your machine, it should be deployed on a non-sliding and firm ground.
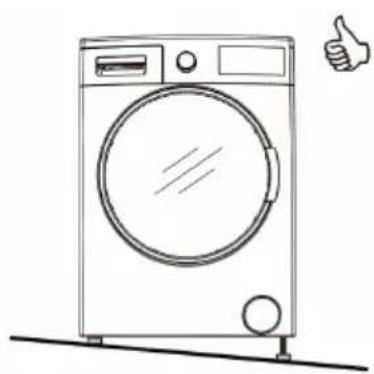
natural_image
Line drawing of a washing machine with a plus sign and thumbs-up gesture (no text or symbols on the device itself)You can adjust the balance of your machine by a gauge from the top.
natural_image
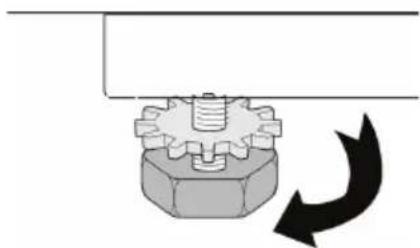
Mechanical gear assembly diagram with no visible text or symbolsYou can adjust the balance of your machine by the adjustable foot.
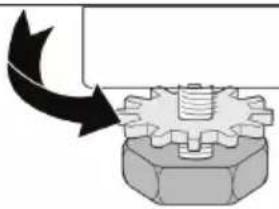
- Loosen the plastic adjustment nut.
- Adjust the feet upward and downward by rotating them.
natural_image
Mechanical gear assembly diagram showing a bolt and nut (no text or labels)- Tighten the plastic adjustment nut after balance is achieved.
natural_image
Simple line drawing of a washing machine with a black X symbol crossed out, no text or labels present.
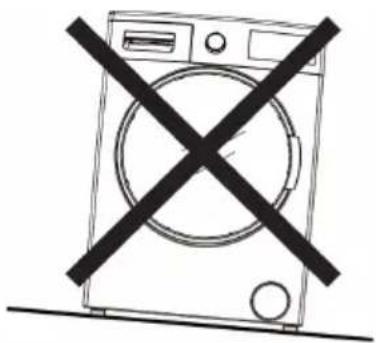
- Never put cardboard, wood or suchlike materials under your machine if you are intending to stabilize the distortions on the ground. - When cleaning the ground, on which your machine rests, be careful not to disrupt the machine's stability.
Electrical connection
Your washer-dryer is adjusted for 220-240V and 50Hz.
- The mains cord of your machine is equipped with a specific grounded plug.
- The mains plug should always be inserted to a grounded receptacle of 10 amperes. The fuse
current value of the power line connected to this plug should also be 10 amperes.
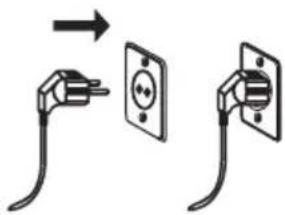
- If you don't have such a receptacle and fuse conforming with this, please have it done by a qualified electrician.
- We do not take responsibility for damages that occur due to ungrounded usage.
Note: Operating your machine under low voltage will cause the life cycle of your machine to be reduced and its performance to be restricted.
Water inlet connection
- Operate your machine with cold water only.
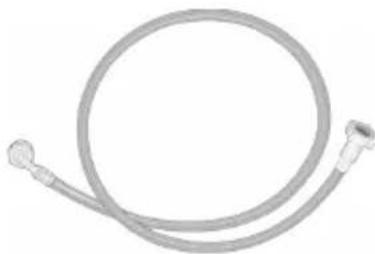
- Use only the new water inlet hoses given with your machine or purchased through authorized dealers.
natural_image
Coiled medical tubing with two connectors (no text or symbols visible)- 1 gasket is included in the hose packaging to prevent water leaks in connections. Fit this gasket to the end of new water inlet hose on the side of faucet.
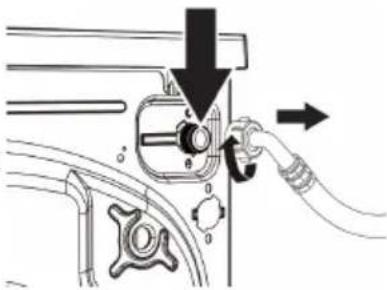
- Connect the white end of the water inlet hose to the water entrance valve on the back of the machine. Tighten plastic parts on the hose using your hand.
natural_image
Diagram of a mechanical device with arrows indicating assembly or adjustment (no text or symbols present)- Connect the other end of the water inlet hose to a 3/4" water tap with threads. Tighten plastic parts on the hose using your hand.
- In uncertain conditions, have the connection works done by a qualified plumber.
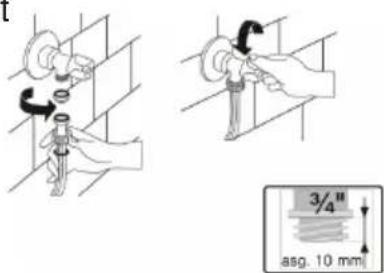
- Ensure that points of contact do not leak after you have made the connections.
- Flow of water with pressure of 0.1-1 Mpa will allow your machine to operate more efficiently (0.1 Mpa pressure means that more than 8 litres of water will flow through a fully-opened faucet per minute).
- Ensure that the new water inlet hoses are not bent, broken, crushed or resized.
Note: Use only the new water inlet hose coming with your machine when making the water inlet connections. Never use old, used or damaged water inlet hoses.
Water draining connection
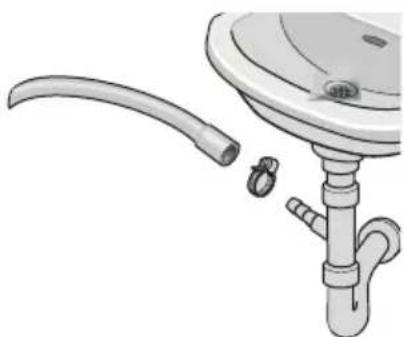
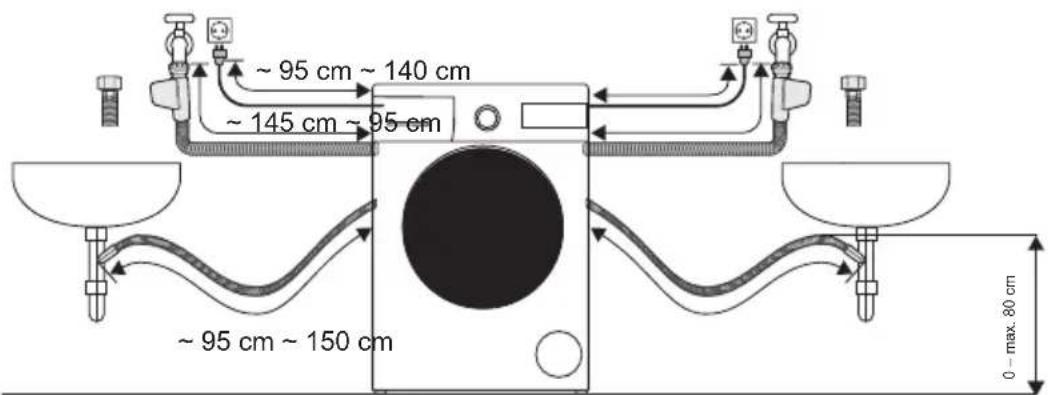
- Connect the water drain hose to a waste water drain hole or a special apparatus connected to the outlet elbow of the sink placed at a maximum height of 80 cm.
natural_image
Illustration of a faucet with a curved pipe and two small fittings (no text or symbols)- Never attempt to extend the water discharge hose by jointing.
- Do not put your machine's water discharge hose into any container, bucket or bathtub.
- Make sure that the water discharge hose does not bend, buckle, get crushed or extended.
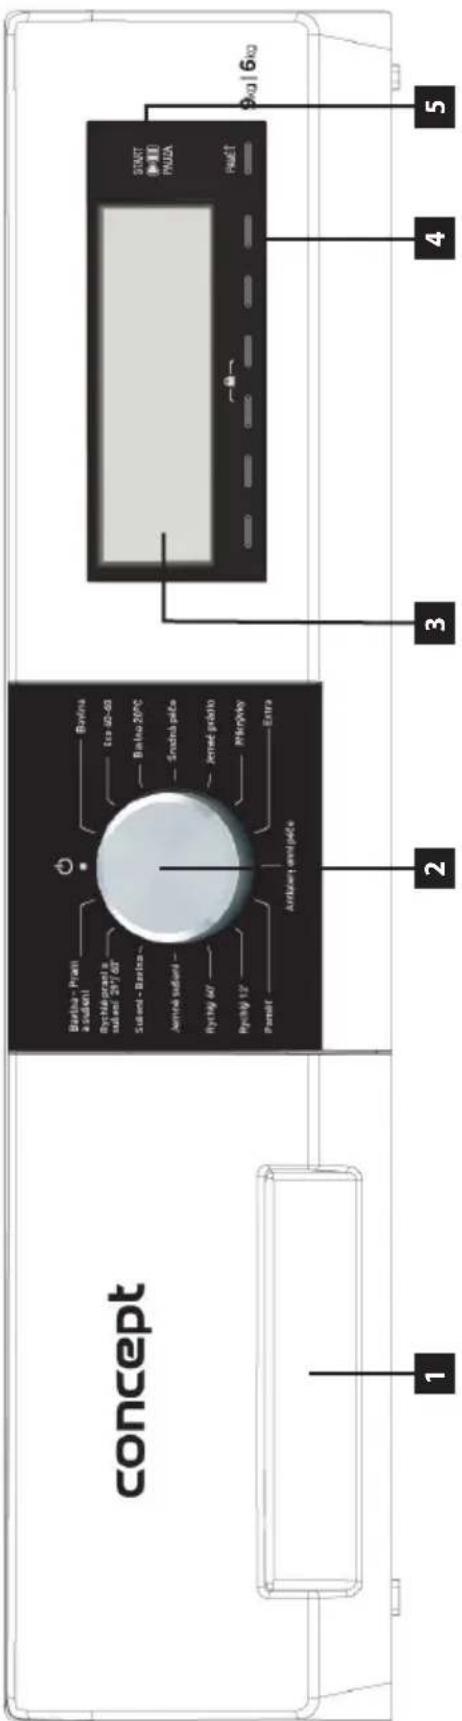
1- Detergent drawer
5-Start/Pause button: You can start your machine
and make it pause with this button.
CONTROL PANEL
2- Program knob: You may select the programme you wish to use via the program knob. You may set the program selection operation by rotating the programme knob in both directions. Ensure that the programme knob is exactly on the programme you want to select.
3- Info Screen: In this screen, you can see the features of the washing or drying program you selected and also get information about the machine's status.
4-Adjustment and additional function buttons: The buttons on your machine are touch buttons. You only have to touch them lightly to make a selection.
Detergent drawer general view

natural_image
Line drawing of a washing machine with an inset showing internal components (no text or symbols)When you want to wash your laundry with liquid detergent, you can use the liquid detergent apparatus. You can use your liquid detergent in all programs without pre-wash. For this, plug the liquid detergent apparatus to second compartment of the detergent drawer (present in your machine) and adjust the liquid detergent amount (use liquid detergent in the amounts the detergent manufacturers foresee). Do not exceed the part that is labeled Max., use only for liquid detergent, remove this from its place during powder detergent use.)
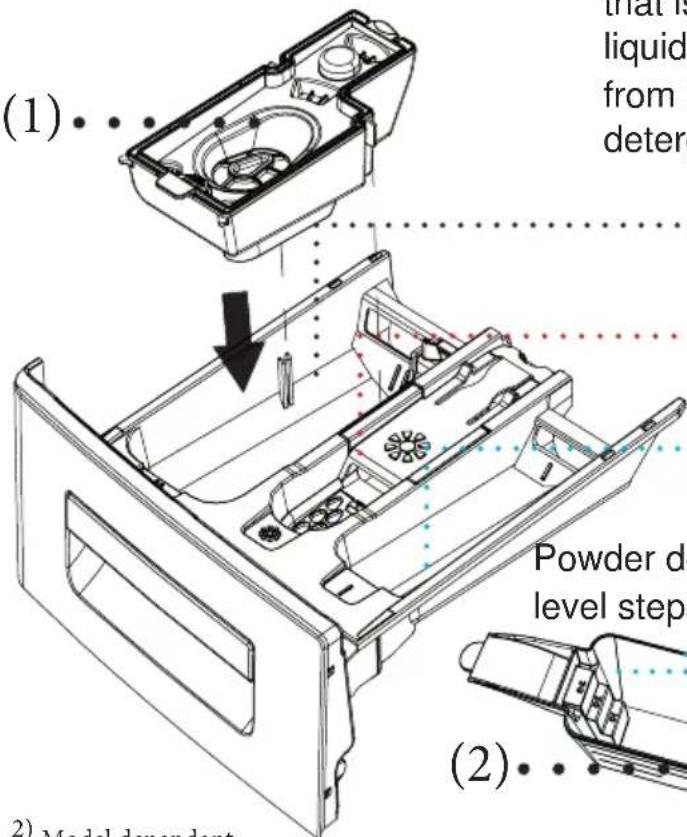
Main Wash
Detergent Compartment
Softener
Compartment
Pre-Wash
Detergent Compartment
Powder detergent level steps
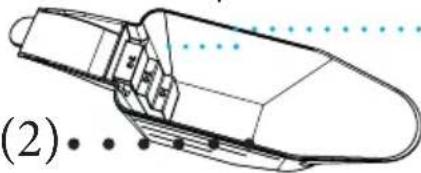
natural_image
Line drawing of a boat hull with visible hull, hull, and side panels (no text or symbols)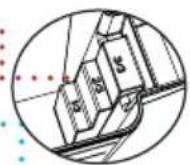
Powder detergent scoop
(1_2) Model dependant
Detergent drawer compartments
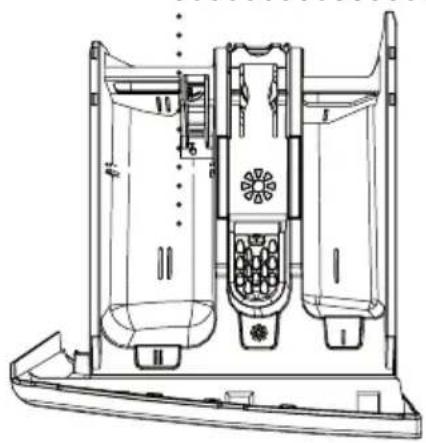
Main wash detergent compartment:
natural_image
Technical line drawing of a mechanical device with internal components and mounting base (no text or symbols)In this compartment, only materials like detergent (liquid or powder) or anti-lime. You can find the liquid detergent apparatus for your liquid detergent inside your machine during the first set up.(*)

natural_image
Technical line drawing of a mechanical device with internal components and no visible text or symbolsSoftener, starching, detergent compartment:
In this compartment, materials like softener for your laundry can be used (it is advised that you use the amount and type the manufacturer recommends). The softeners you use for your may sometimes remain in this compartment. The reason for this is that softener is not fluidal. To prevent this, it is recommended to use liquid softeners that are more fluidal or use the softener by diluting.
natural_image
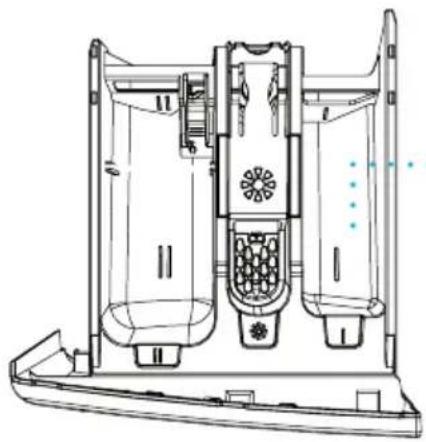
Technical line drawing of a mechanical device with internal components and mounting base (no text or symbols)Pre-Wash detergent compartment:
This compartment should be used only when pre-wash feature is selected. It is recommended that pre-wash feature used only for very dirty laundry.
(*) Model dependant
Programme Knob

You can select the programme you want to wash your laundry in with the programme knob. You may set the programme selection operation by rotating the programme knob in both directions. Ensure that the programme button is exactly on the programme you want to select.
Adjusting machine settings
To make the first settings of your washer-dryer:
- Plug in your machine.
- Open the water tap.
- Turn the programme knob.

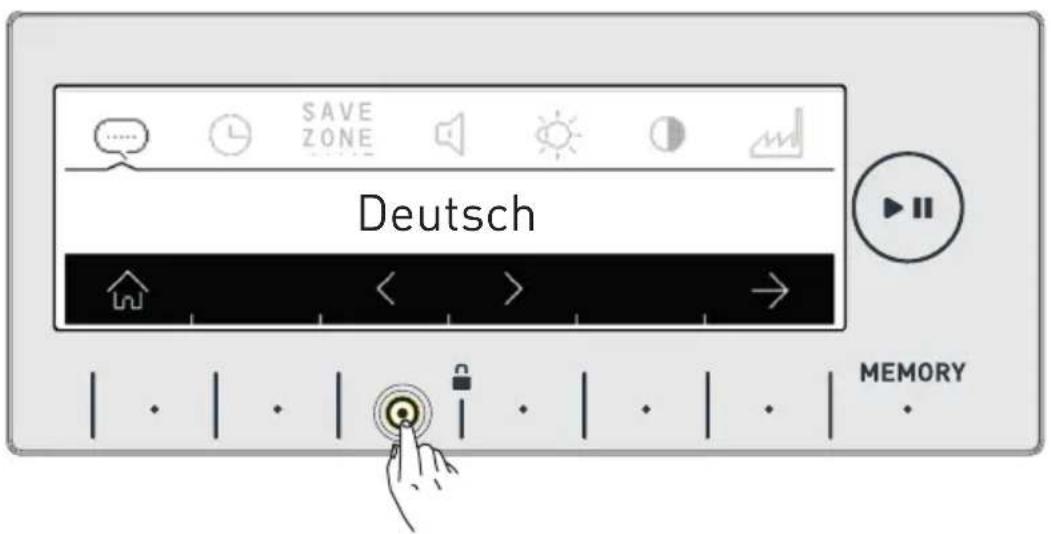
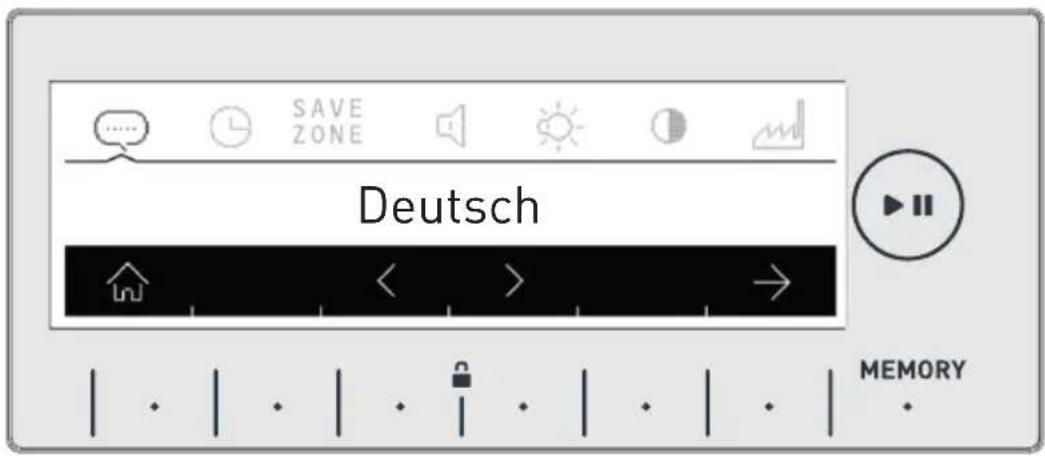
Language selection setting
- The first thing that will be displayed on the main screen is the language selection setting.
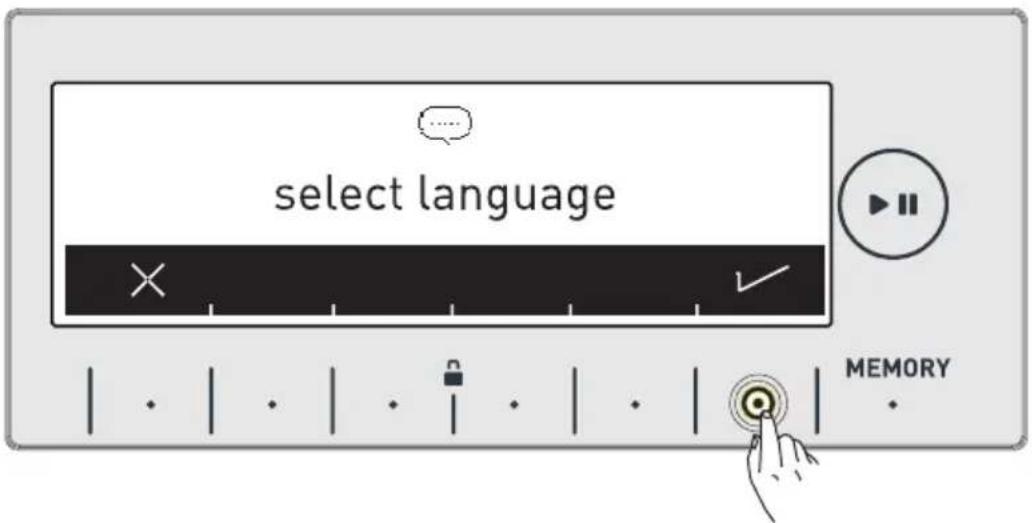
- Go to the language you wish the use with the symbol button.
- You can exit the language selection screen without making a selection with the symbol button.
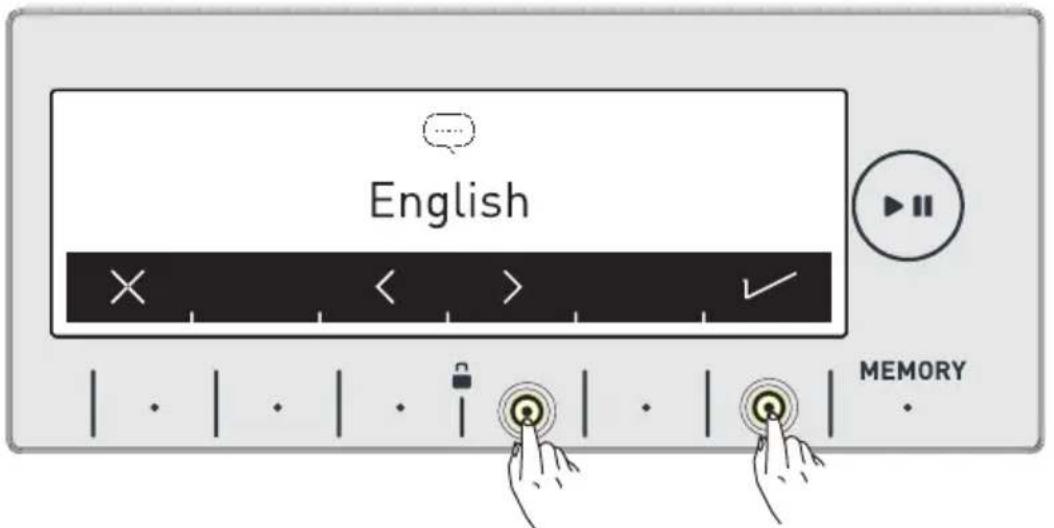
- Go to the language you wish the use with the symbol buttons.
- Approve your language selection with the symbol button.
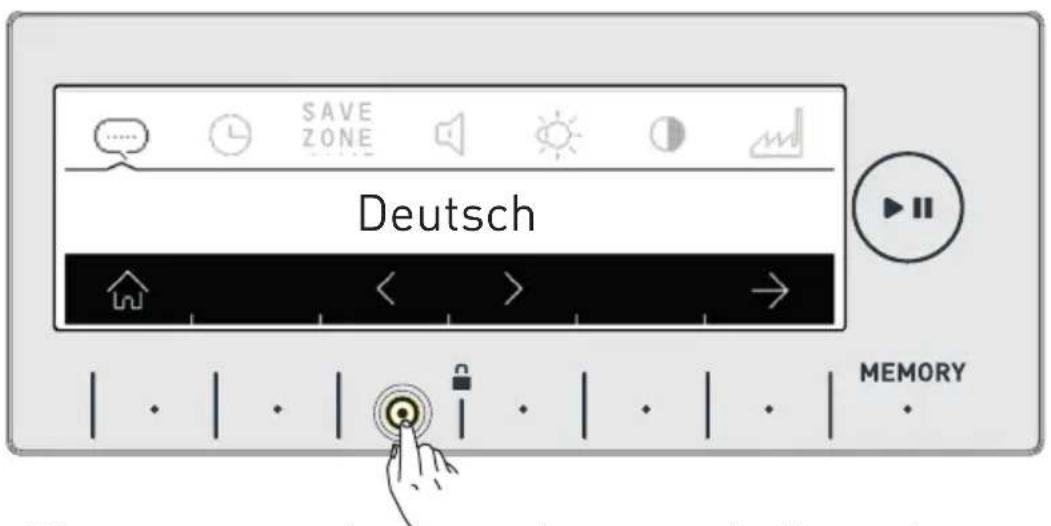
- When you want to change your language selection again, you can make the language selection by going into the language selection page and using the symbol buttons.
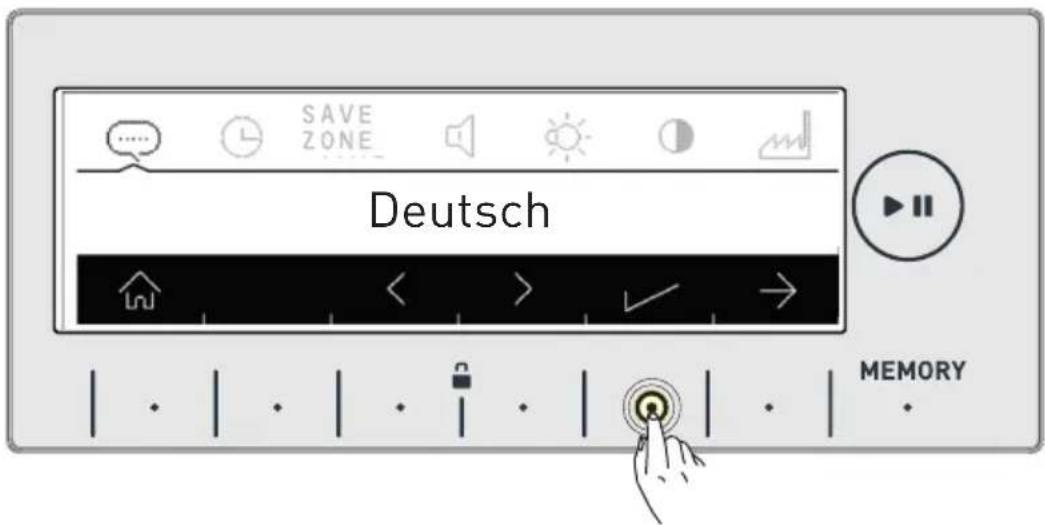
- Touch the √ button to save the language you selected.
- You will be asked to confirm the language selection on screen.
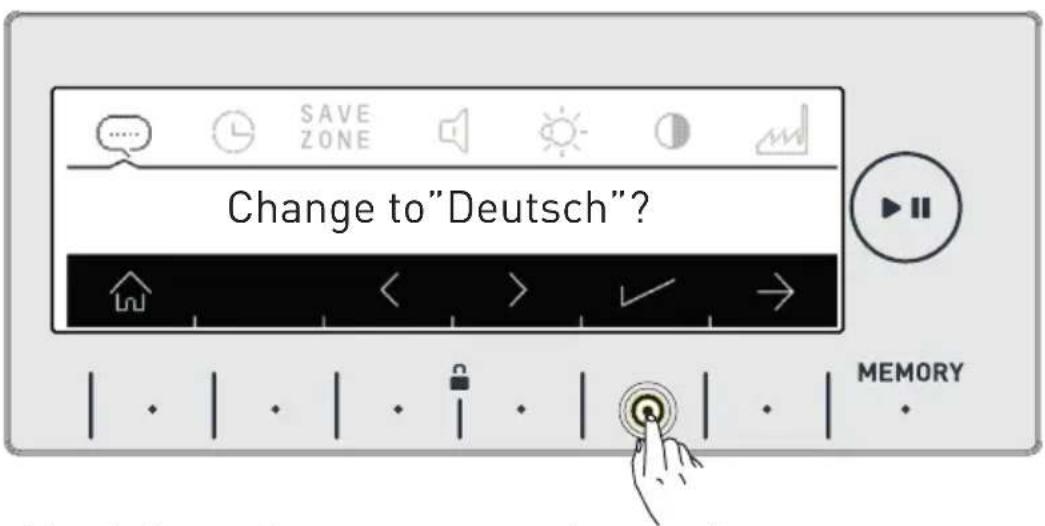
- Touch the √ button to approve the selection.
- If you believe you have selected the wrong language, touch the ✗ button and re-make the language selection.
- When you approve the language change, the language you have selected will be active.
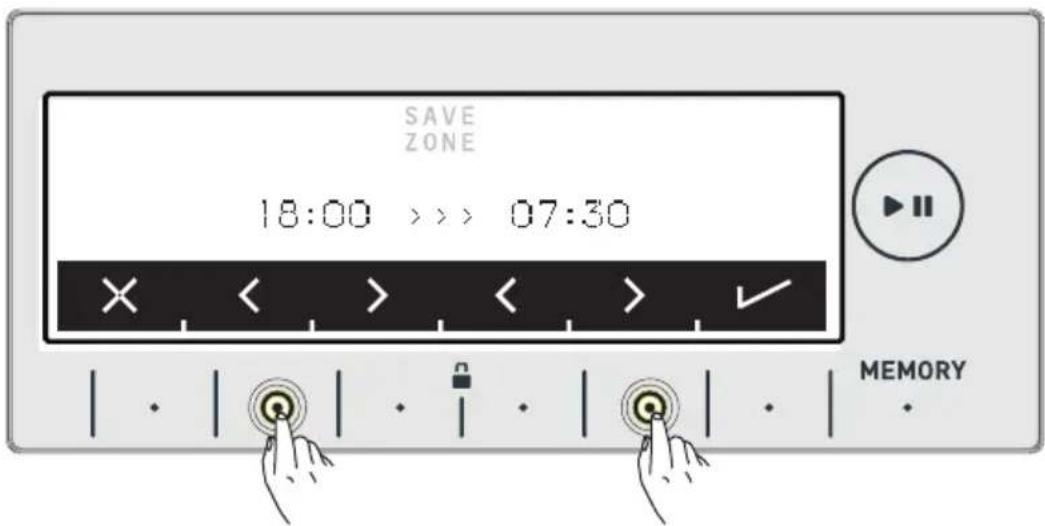
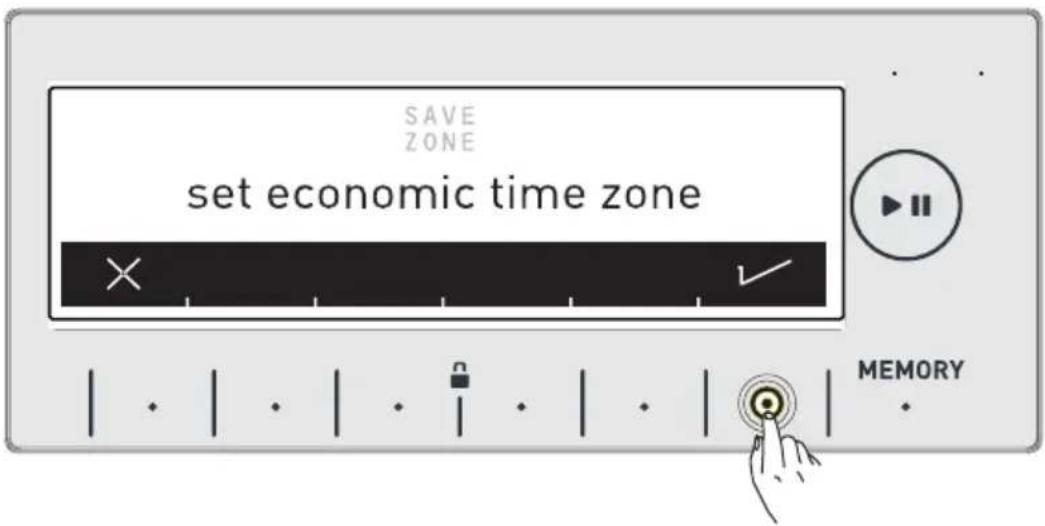
SAVE Save Zone Setting
ZONE (Economic time interval)
- The electrical energy consumption cost changes during the day according to the time intervals set by electricity providers. You can learn these intervals from electricity providers and set your save zone running hours, and have your machine run between these hours you determined.
Note: Your mains electricity must be connected to a counter with a smart-counter feature to be able to provide this energy saving.
- Touch the √ symbol button to make this adjustment.
- If you want to do it later, touch the ✗ symbol button.
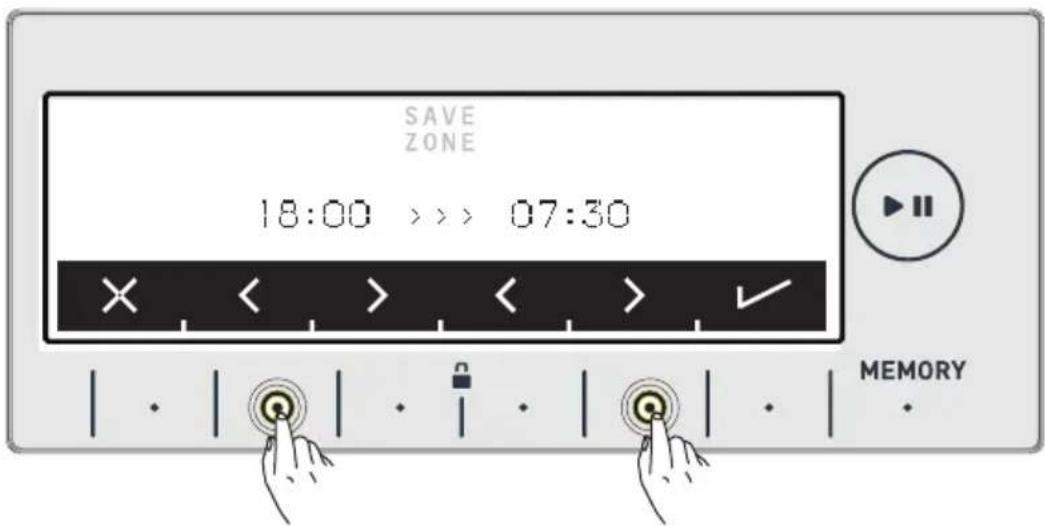
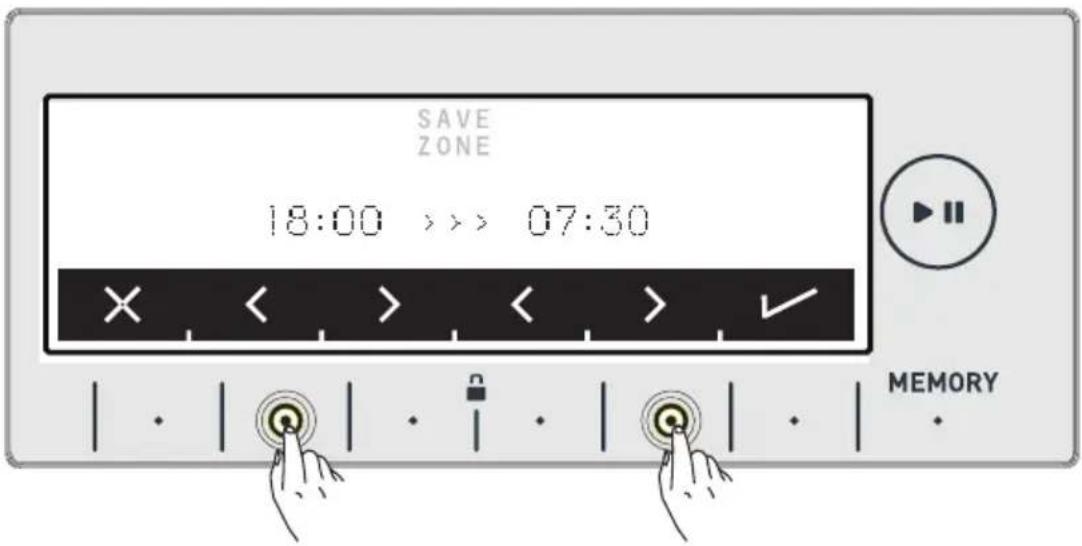
- You can adjust the Save Zone interval by touching the buttons of symbols <> See page 60 to activate the Save Zone interval additional function.
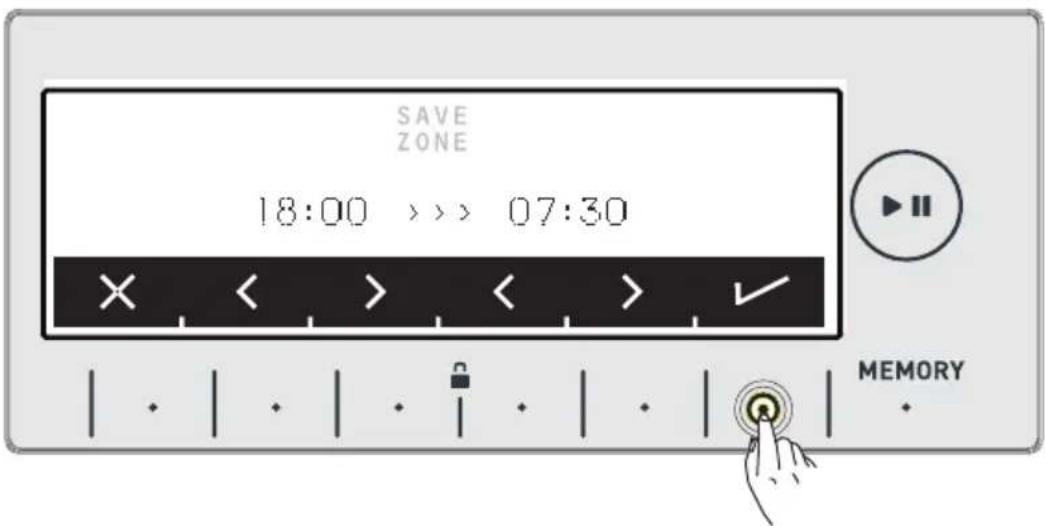
- Approve your selection by touching the symbol button.
Current time setting
- We advise that you set the correct time at the point of installation.
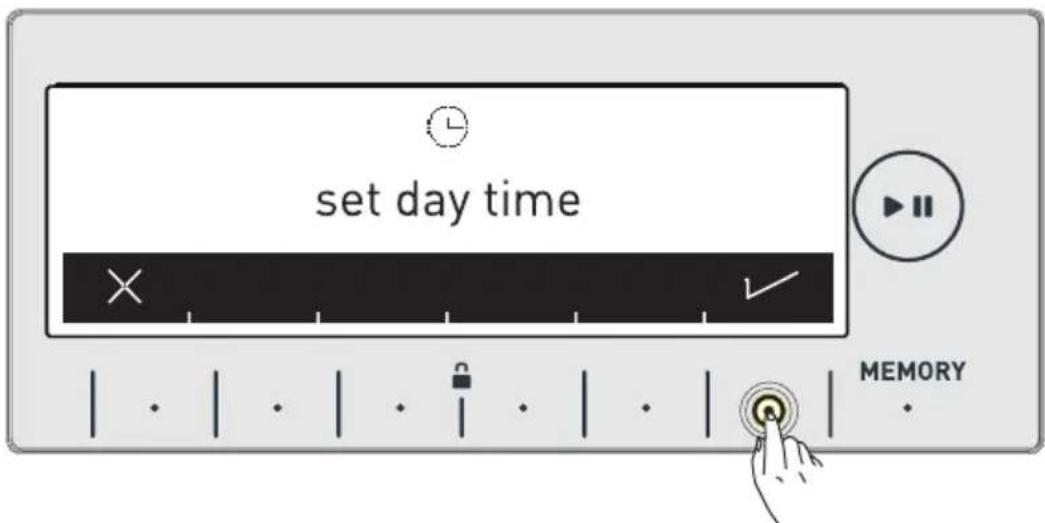
- Your machine will ask your approval for setting the current time. Go to the setting menu by touching the √ symbol button.
✗ symbol button allows you to exit without setting.
Note: You must set the current time correctly. Otherwise, operation of other related functions will be affected.
Note: Recorded time information will be reset if you keep your machine unplugged for longer than 15 days. In such a case your machine will ask you again for the time setting when you next turn it on.
- Please make the current hour and minute settings by touching the >> symbol buttons.
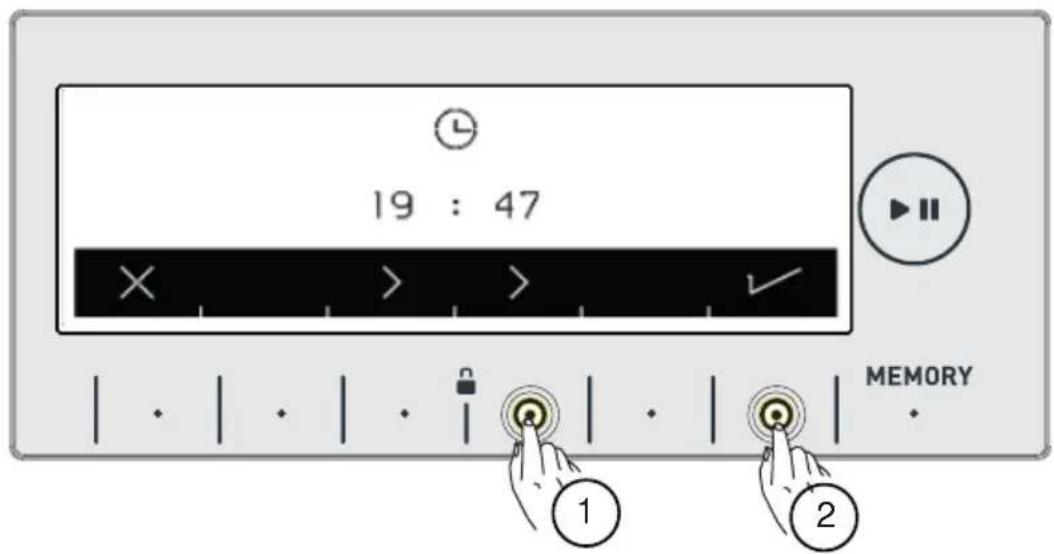
• After setting the current time, approve by pressing the √ symbol button.
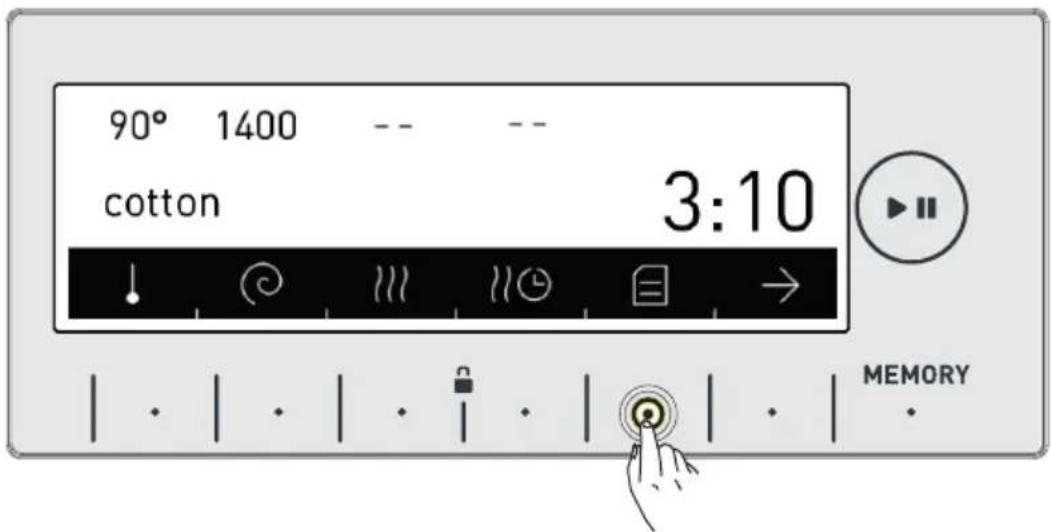
- Your machine will automatically go to the main screen of the programme you have selected. Go to the appliance settings menu by touching the button of 📄 symbol on this screen.

Sound Adjustment
- You can make the sound adjustment of your appliance by pressing the <symbol buttons.

symbol denotes that the warning sounds of your appliance is on.
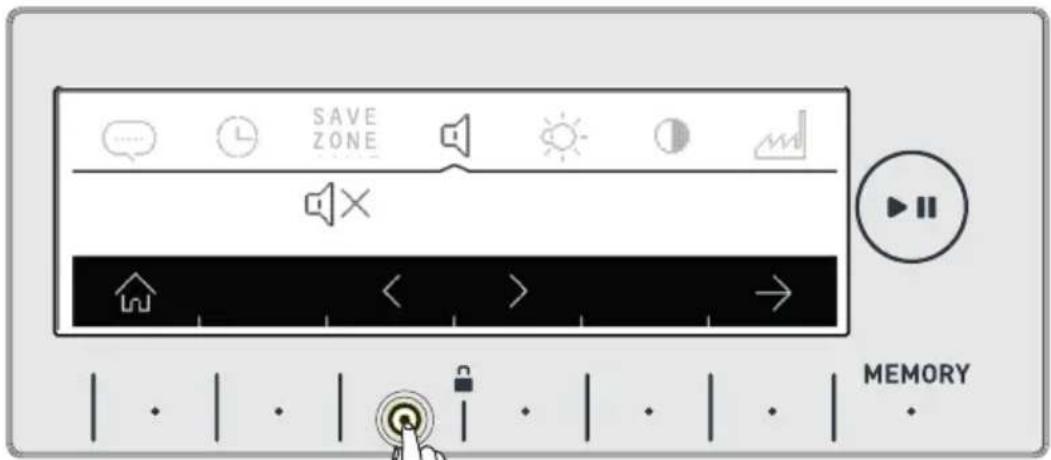
! symbol denotes that the warning sounds of your appliance are off.

Screen brightness setting
- You can adjust the screen brightness of your appliance by touching the symbols.
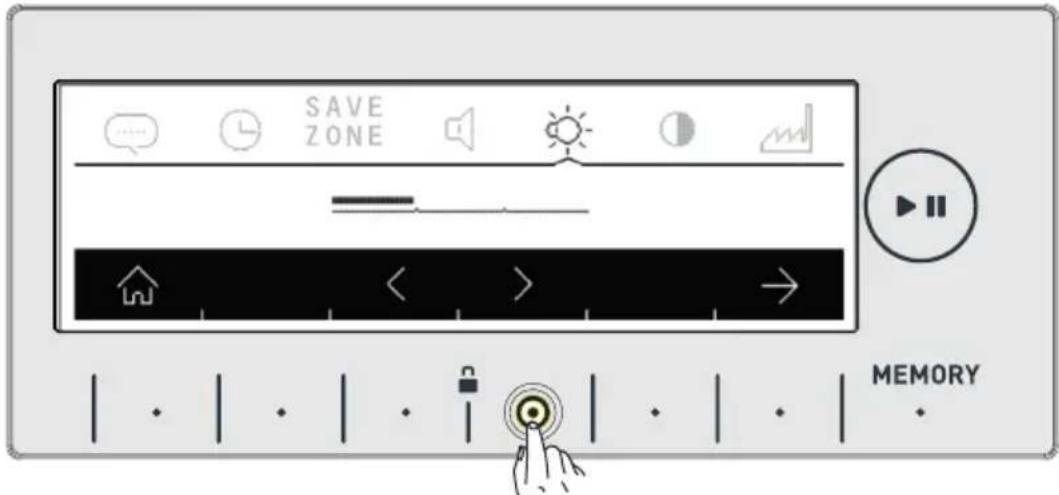
- Adjust the screen contract of your appliance by touching the symbol button.

Screen contrast setting
- You can adjust the screen contrast your appliance by touching the <> symbol buttons.
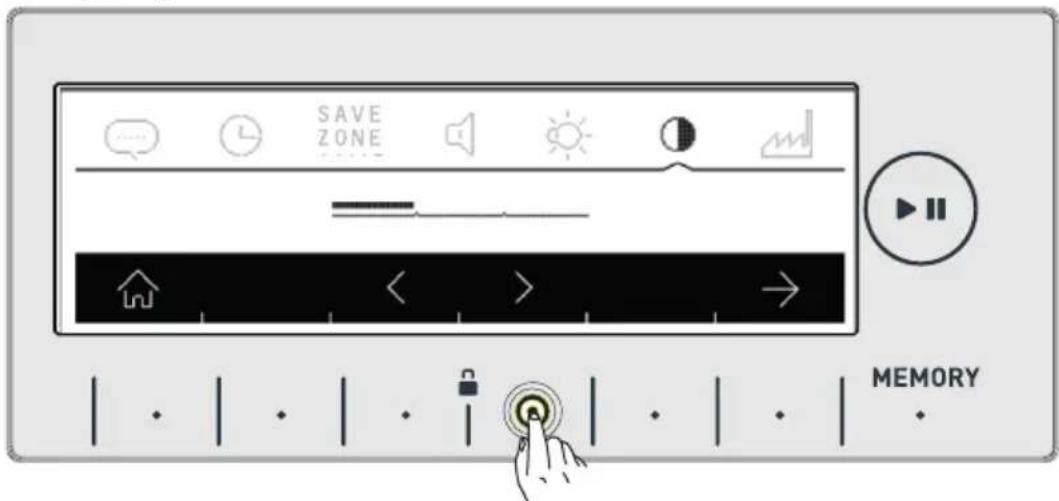
- You can go to the ‘revert to factory settings’ screen by touching the → symbol.

Revert to factory settings
If you want to revert your appliance to the factory default settings:
- Touch the symbol.

- You will be asked on screen if you want to reset to Factory Settings.
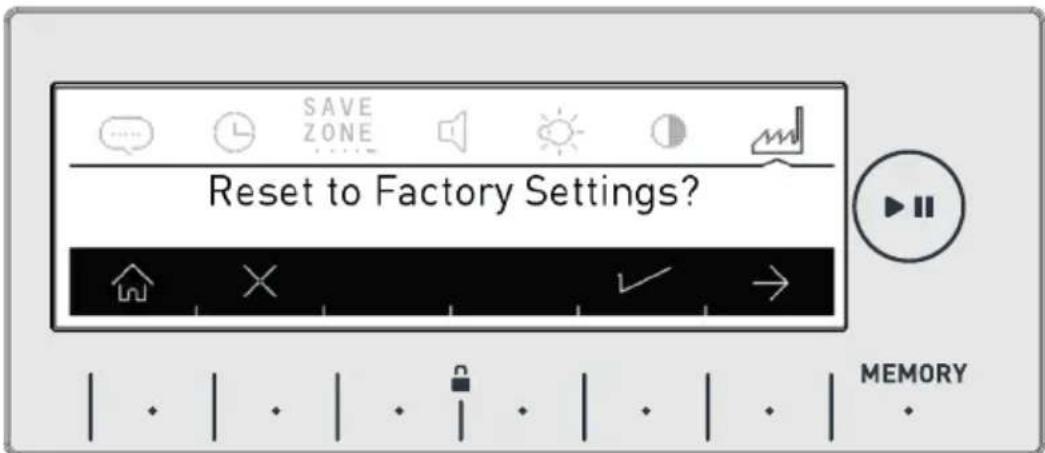
- Touch the √ symbol to approve the selection.
- If you want to cancel the selection touch the symbol.
- You can return to the main screen by touching the button.

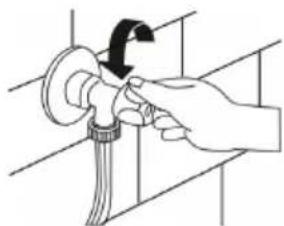
WASHING OPERATION
- Open the tap. - Plug in your machine.
natural_image
Illustration of a hand using a tool to adjust or install a mechanical component (no text or symbols visible)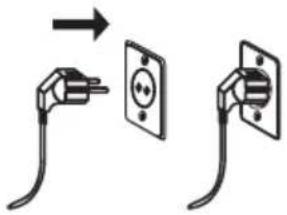
Sorting laundry
Your laundry has product labels on them that specify

their appropriate washing conditions. Wash or dry your laundry according to the specifications on the product label.
- Sort your laundry according to their type (cotton, synthetic, delicates, wool, etc.), washing temperature (cold, 30°C, 40°C, 60°C, 90°C), their level of dirtiness (less dirty, dirty, very dirty).
- Never wash your coloured and white laundry together.
- Wash your coloured laundries separately in the first washing as they may bleed.
- Ensure that there are no metallic materials on your laundries or in the pockets; if so, take them out.
WARNING: Any malfunctions occurring due to foreign materials getting in your machine are not covered by warranty.
- Zip up and button up your laundries.
- Remove the metallic or plastic hooks of curtains or place them in a washing net or bag and then muzzle them.
- Reverse textiles such as pants, knitwear, t-shirts and sweat suits.
- Wash socks, handkerchiefs and suchlike small laundries in a washing net.
Explanation of washing symbols
| Sturdy Material | Ironing temperature maximum 110°C | ||
| Delicates fabric | No ironing | ||
| 95 | Maximum washing temperature is 95°C | A Can be dry cleaned with all kinds of solvents | |
| 60 | Maximum washing water temperature 60°C | P Can be cleaned only with perchloride, lighter gas, alcohol or R113. | |
| 40 | Maximum washing water temperature 40°C | F Can be cleaned only with perchloride, lighter gas, alcohol or R113. | |
| 30 | Maximum washing water temperature 30°C | ⊗ No dry cleaning | |
| Hand washing | — Leave on flat surface | ||
| Dry cleaning only | III Hang when wet | ||
| Can be bleached in cold water | □ Dry by hanging | ||
| Do not use bleacher. | ● Drying in normal temperature dryer | ||
| Ironing temperature maximum 200°C | ○ Low temperature | ||
| Ironing temperature maximum 150°C | ✕ Do not dry in drying |
Placing laundry into the machine
- Open the loading door of your machine.
- Check inside the drum of your machine. There might be laundry left inside from previous washes. If there is, empty your machine before selecting your programme.
- Place your laundry into the machine by spreading them well. Fold objects like quilts and blankets that you will load into the machine as shown below.

natural_image
Line drawing of a washing machine with a circular door and side panel (no text or symbols)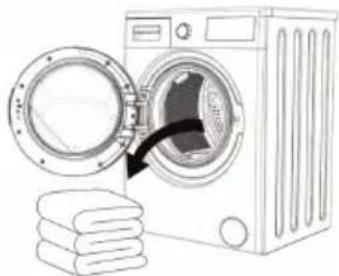
natural_image
Illustration of a washing machine with a door open and clothes stacked nearby (no text or symbols)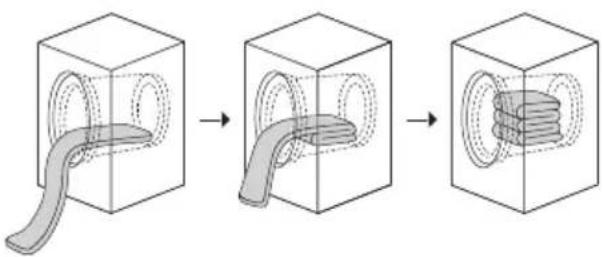
natural_image
Three-step diagram showing a mechanical component being processed into a transparent cube, with no visible text or symbols.- If you continue to operate your washing machine whilst overloaded, washing and drying performances will be affected. Additionally, your washing machine can be damaged and you may see your clothes get yellow after drying programs.
- Put each item of laundry separately.
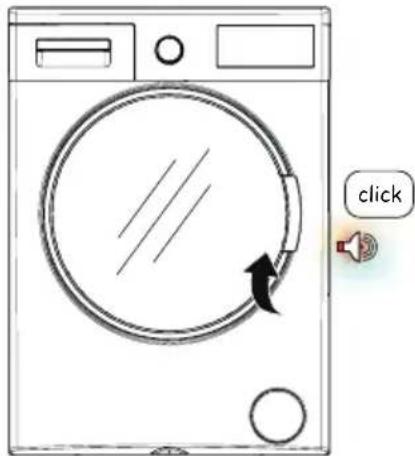
- Ensure that no laundry is stuck between the cover and bellow seal when closing the door of your machine.
- Ensure that the machine door is completely closed.
- Tightly shut the door of your machine or the machine won't start the washing operation.
natural_image
Line drawing of a washing machine with a circular dial and directional arrow, no text or symbols presentChoice of detergent and placing into the machine
The amount of detergent you will put in your machine will depend on the following criteria:
- Your detergent utilization will be based on the degree of contamination of your laundries.
- Do not prewash your less stained laundries and put the correct amount of detergent in the 2nd compartment of the detergent drawer.
- The Pre-wash feature might be used for your very dirty laundry. If you are going to do a pre-wash, place 1/4 of the detergent you would normally put in the detergent compartment into the compartment numbered 1, and put the remaining 3/4 to the compartment numbered 2.
- Use detergents produced for automatic washing machine in your machine. Adhere to the advice of detergent manufacturers while determining the amount of detergent you should use with your laundry.
• The higher the degree of hardness of the water the more detergent you will use.
• The amount of the detergent you will use will increase as the amount of your laundry increases.
- Put the softener in the softener compartment in the detergent drawer. Do not exceed the MAX level. Otherwise, softener will flow into washing water through flushing.
- Softeners with high density are required to be thinned to a degree before being put in the drawer. Because high-density softener will clog the flush and block the flow of the softener.
- You can use your liquid detergent in all programs without pre-wash. For this, plug the liquid detergent apparatus to second compartment of the detergent drawer (present in your machine) and adjust the liquid detergent amount (use liquid detergent in the amounts the detergent manufacturers foresee). Do not exceed the part that is labeled Max, use only for liquid detergent, remove this from its place during powder detergent use.)

If you are going to select a washing or drying programme, do not place a detergent dosage adjustment device/ball in your machine. They might pose a fire risk.
Program selection
- Select the washing programme you desire by the programme knob.
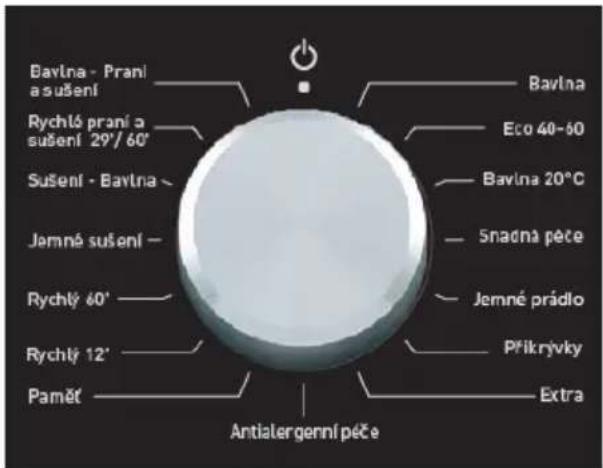
- The programme name and features will be shown on the screen.

- You can make the temperature adjustment (*, 20°, 30°, 40°, 60°, 90°) by touching the | symbol button.
- You can make the spinning adjustment (∅, 400,600,800,1000, 1200, 1400) by touching the symbol buttons.
Note: After setting the spin speed, if you select a drying programme, your machine shall set the spin speed automatically to enhance drying performance.
If you want your laundry dried at the end of washing
- You can select the drying setting you wish to use by touching the symbol button.
Cupboard dry
- Recommended for laundry that you will put in the cupboard directly.
- If you want to select the cupboard dry feature, touch the symbol button until you see the □ symbol on the screen.
Note: If the [☐] symbol does not appear on the screen when you want to select the cupboard dry function, it means this drying feature is not used in the washing programme you selected.

Hanger dry
- Recommended for laundry that requires hanger drying.
- If you want to select the hanger dry feature, touch the symbol button until you see the symbol on the screen.
Note: If the ⚠ symbol does not appear on the screen when you want to select the hanger dry feature, it means that the washing programme you selected does not use this drying feature.

Iron dry
- Recommended for laundry that you will iron before use.
- If you want to select the iron dry feature, touch the symbol button until you see the △ symbol on the screen.
Note: If the 🔒 symbol does not appear on the screen when you want to select the iron dry feature, it means that the washing programme you selected does not use this drying feature.
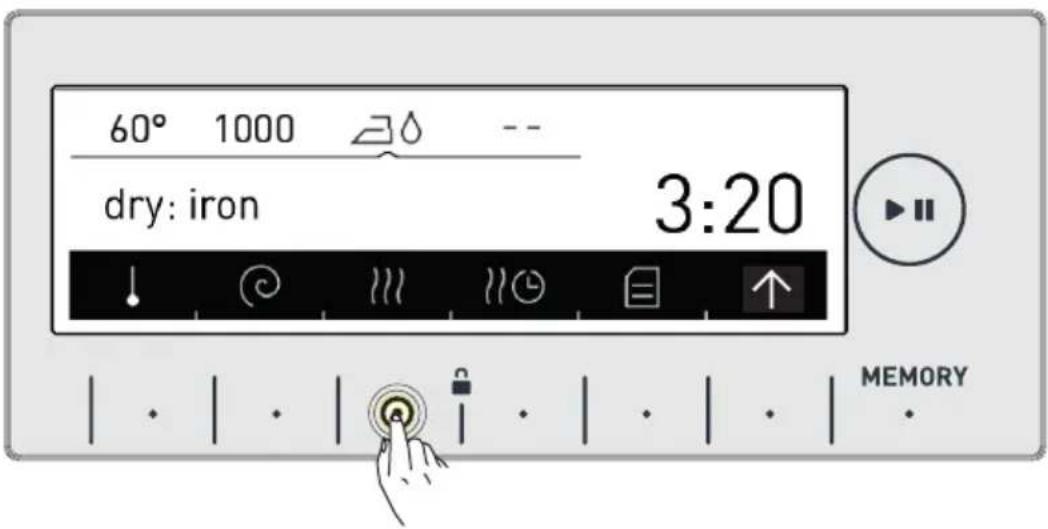
- If user select a drying option after washing program, can use table below.
| 1 kg 2-3 kg 4-5-6 kg | ||
| Iron Dry | × x | |
| Hanger Dry | x | |
| Cupboard Dry | x |
Drying with duration
If you want to use a time-set drying programme;
- Touch the 11 symbol on the screen.
- Drying selections will be displayed on your machine screen as 30, 60 and 120 minutes.
Note: If one of the 30^min 60^min 120^min symbols are not displayed on the screen when you wish to select the duration drying feature, it means this drying feature cannot be used in the programme you selected or the load amount in the machine is not appropriate for that duration of drying.
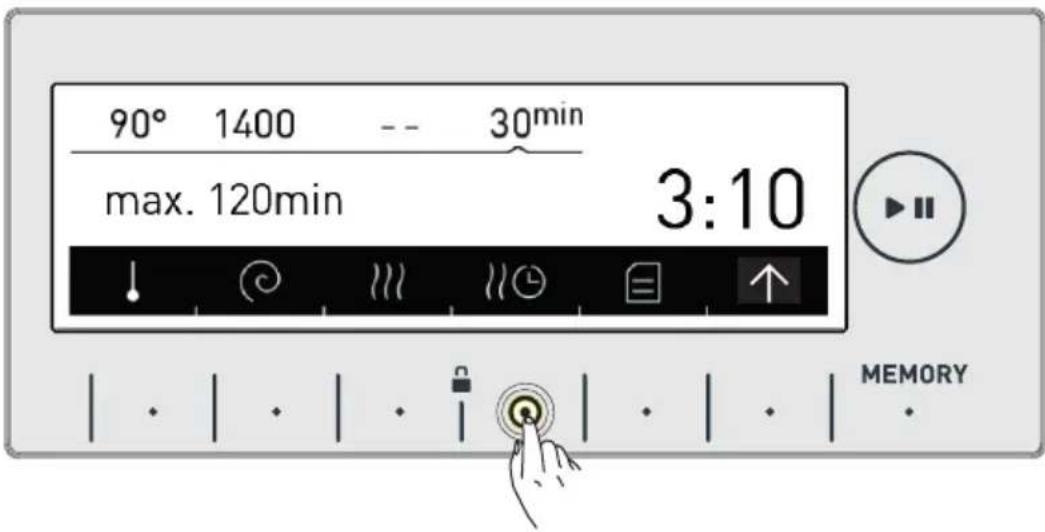
| Duration Drying Programs | |
| Amount of laundry to dry Re | commended drying time |
| 1 kg 30 minutes | |
| 2 kg 60 minutes | |
| 3,5 kg 120 minutes | |
| If the amount of laundry to be dried is above 3,5kg, it is advised that one of the options of Cupboard, Hanger or iron drying is selected. | |
Additional Functions
Before starting the programme, you can optionally select an additional function.
- Press the button of an additional function you would like to select.
Additional functions may not be available due to the programme you selected or the amount of laundry you put in your machine.
Why an additional function may not be available:
-It is not compatible with a function you have selected previously.
- There may not be enough time left on the current programme to carry out the additional function you wish to select
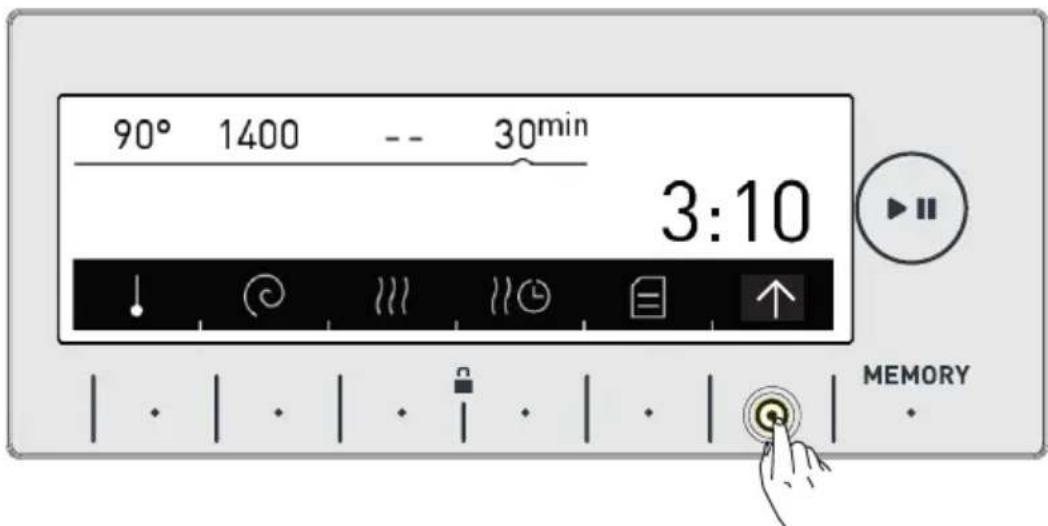
- Touch the symbol button to arrive on the additional function view.
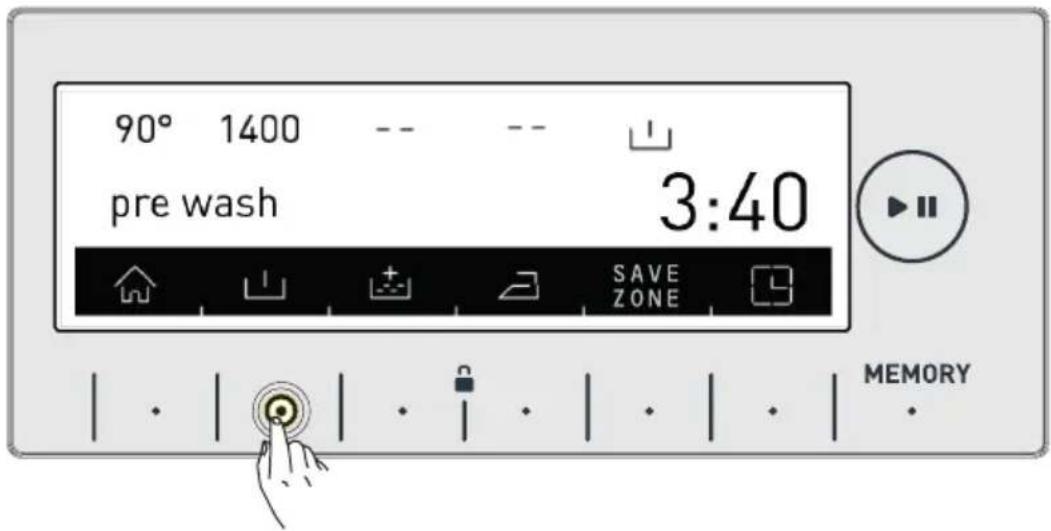
Pre-wash additional function
You can give your heavily soiled laundry a pre-wash before the main wash using this function. When using this function, you should put detergent in the front washing compartment of the detergent drawer.
- Touch the □ symbol button to activate the pre-wash additional function.
Note: If the □ symbol is not displayed on the screen when you want to choose the pre-wash additional function, it means that this feature can not be used in the washing programme you selected.

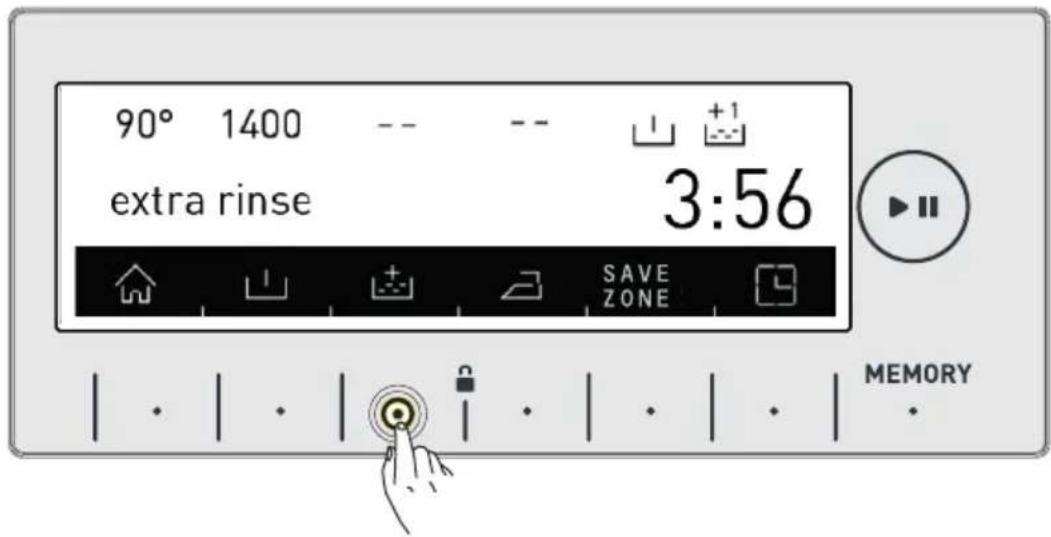
Extra rinse function
You can add an additional rinse or rinses to your laundry by using this function. Your machine offers you 3 rinsing options for this additional feature.
: One additional rinse is made at the end of washing.
+2 : Two additional rinses are made at the end of washing.
+3 : Three additional rinses are made at the end of washing.
- If you want to make more than one rinsing, touch the symbol button until you see the number of rinses you wish.
Note: If the symbol is not displayed on the screen when you want to choose the additional rinsing function, it means that this feature is not used in the washing programme you selected.
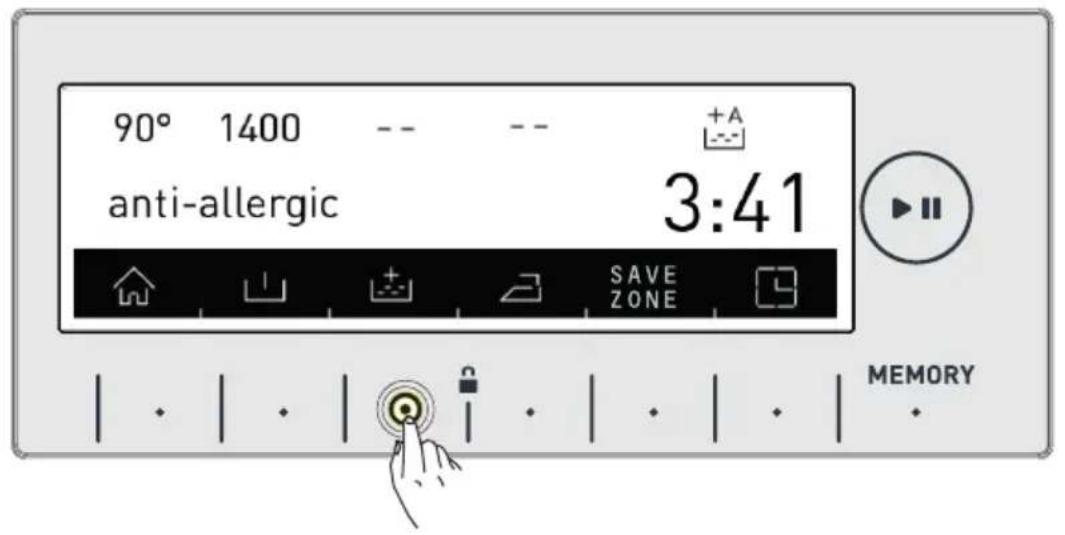
Anti-allergic additional function
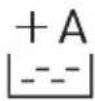
You can add this additional rinse operation to your laundry by using this function. Your machine will carry out all rinsing steps with hot water (it is recommended for laundry worn on delicates skin, baby clothes, underwear)
- Touch the + symbol button until you see the +A symbol to activate the anti-allergic additional function.
Note: If the +A symbol is not displayed on the screen when you want to select the anti-allergic additional function, it means that the washing programme you selected does not use this feature.
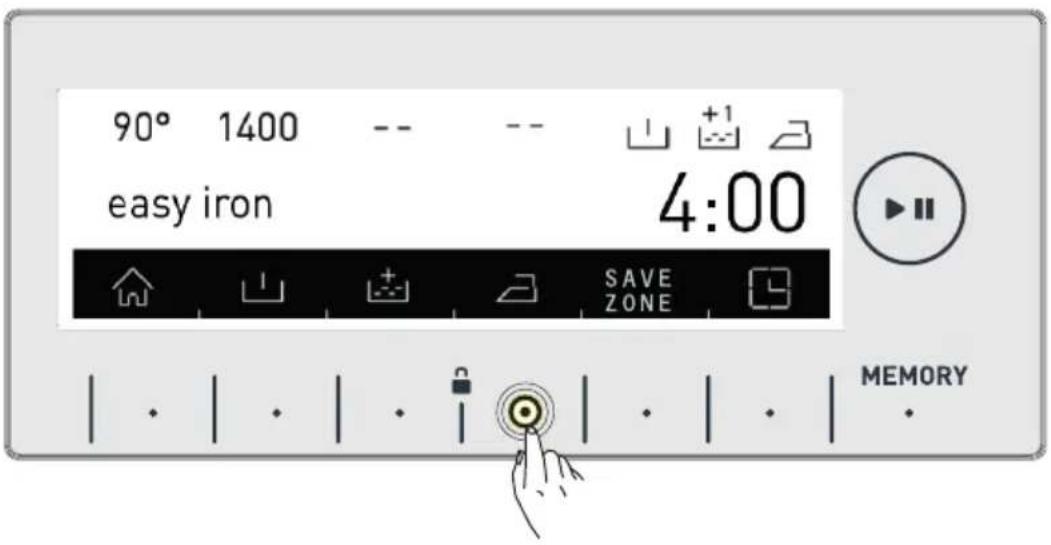
Easy ironing additional function
- You can make your laundry be less wrinkled at the end of the wash by using this additional function.
- Touch the symbol button to activate the easy ironing additional function.
Note: If the symbol is not displayed on the screen when you want to select the easy ironing additional function, it means that the washing programme you selected does not use this feature.
SAVE ZONE Economic time interval additional function
- You must make the Save Zone setting from the settings section for this function to work efficiently (see page 36).
- If you want to activate the Save Zone function touch the button of SAVE ZONE symbol.
- You will see SAVE ZONE symbol is activated on the screen.
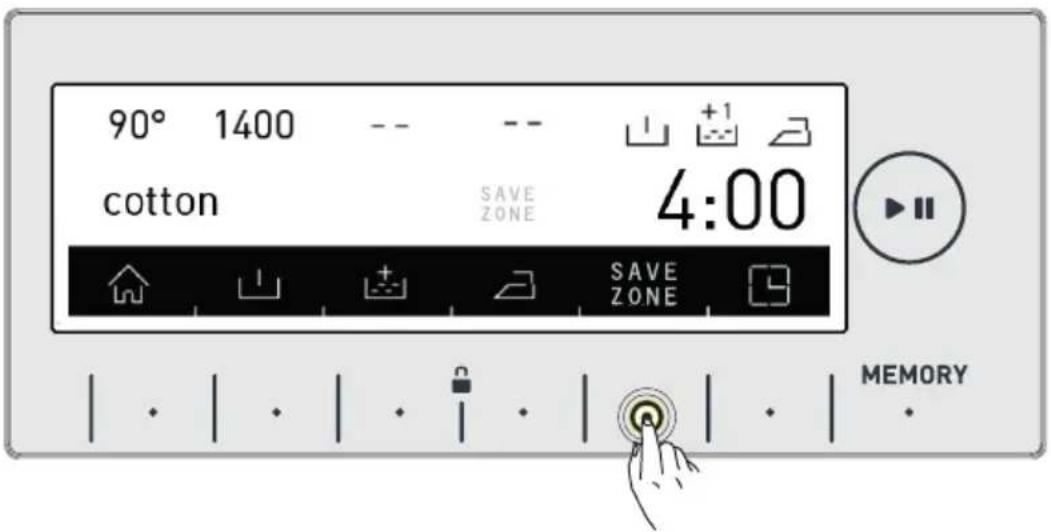
- The Save Zone feat be constantly displayed on the scre-en until it is shut off. To shut off, the Save Zone additional function button must be pressed.
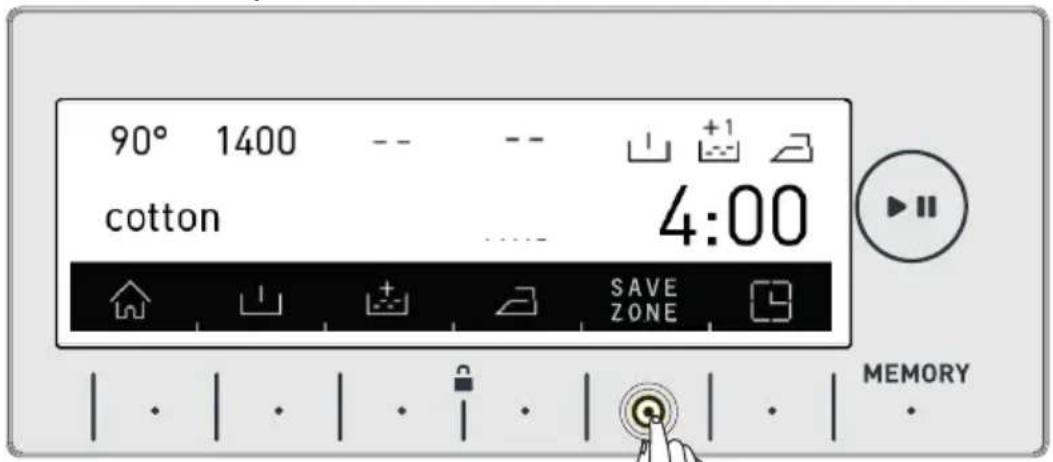
- If you want to run a program while the Save Zone feature is active, touch the button of ⏻ symbol. The starting time of the programme will automatically be delayed until the economic time interval. The programme “starting time” and the programme duration will be shown on the display with certain intervals.
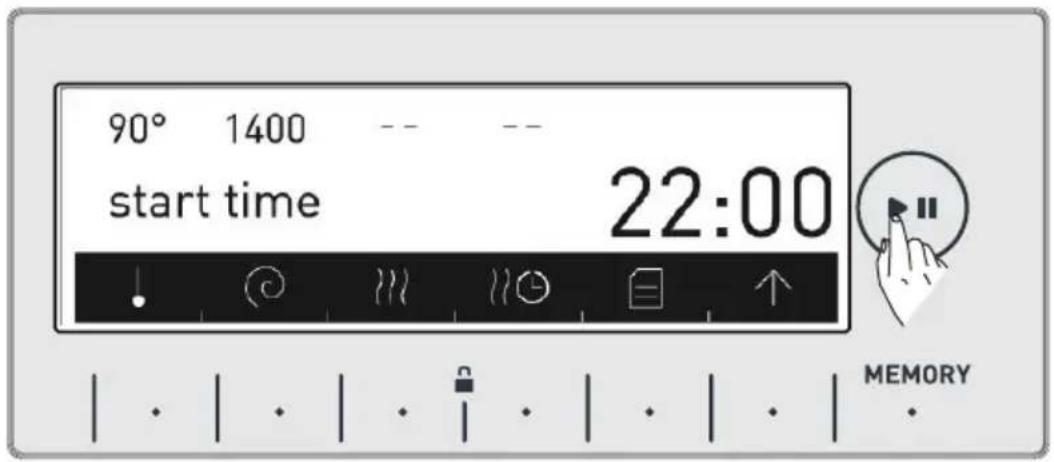
- If you don't want to run the programme you have selected between the Save Zone hours, touch the ⏻ button again. "save zone cancelled" text will be displayed on the screen.
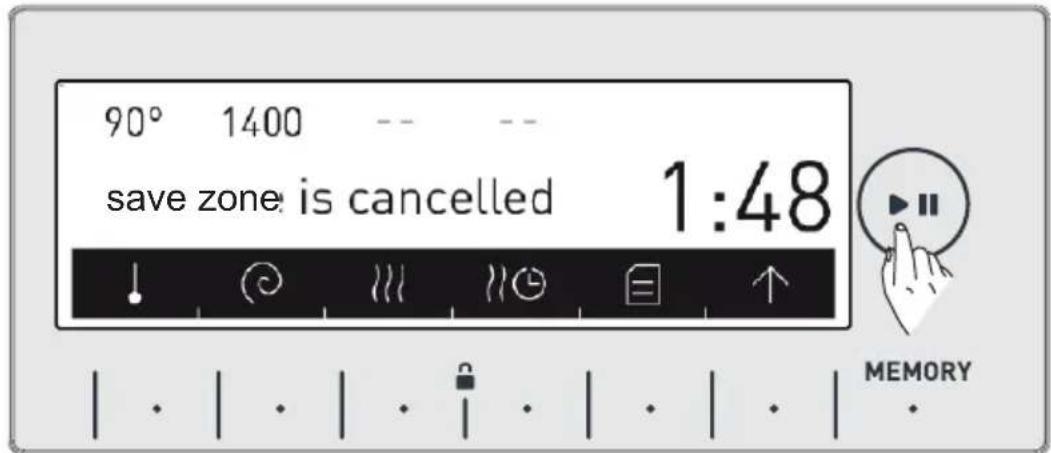
- Your machine will return to the main screen of the programme you have selected in 3 seconds. To start the programme, run the programme you selected by touching the start/pause button.
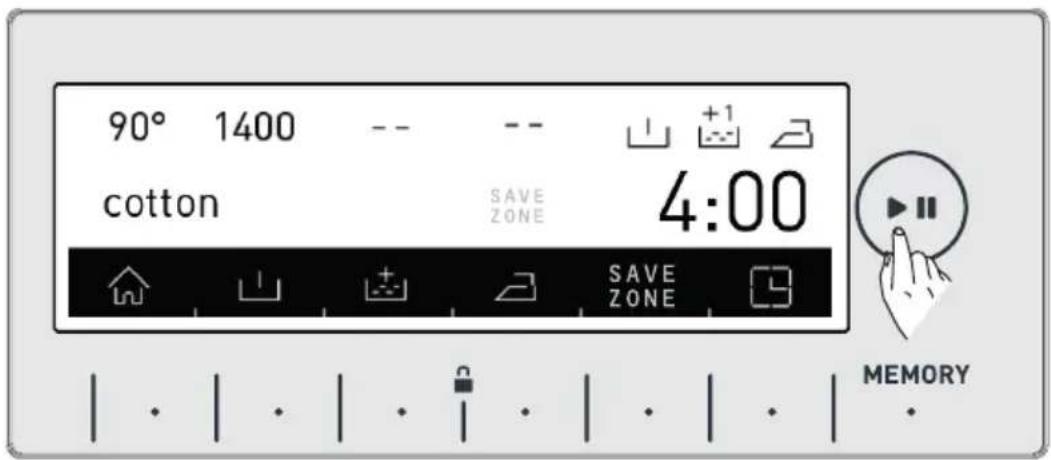
Delay Time / Finish time adjustment additional function
- By using this function, you can delay your machine starting the washing operation by 10 minutes up to 23 hours 50 minutes or you can set the wash to finish at a certain time.
• To activate this additional function, touch the symbol.
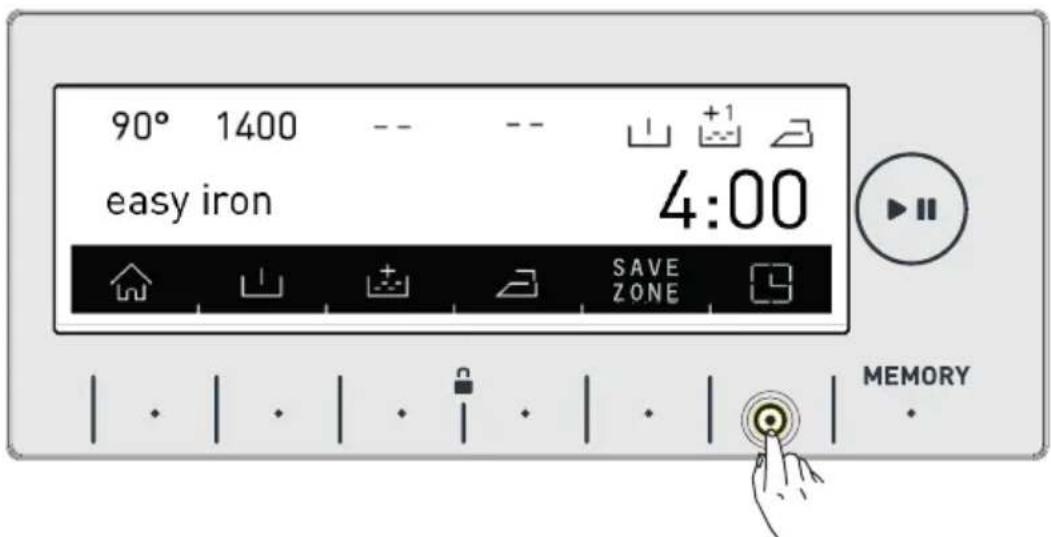
- The current time shall be displayed on the screen for a short duration.
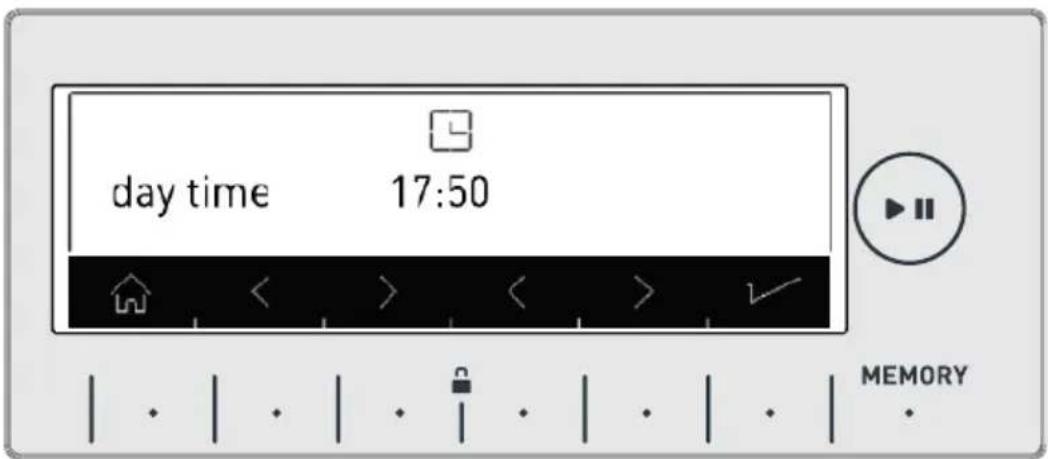
- The screen displaying the current time will automatically return to the screen that displays the delay time / finish time.
- On this screen, you can delay the washing time, or make the washing operation end at a time you wish by touching the <> symbol buttons.
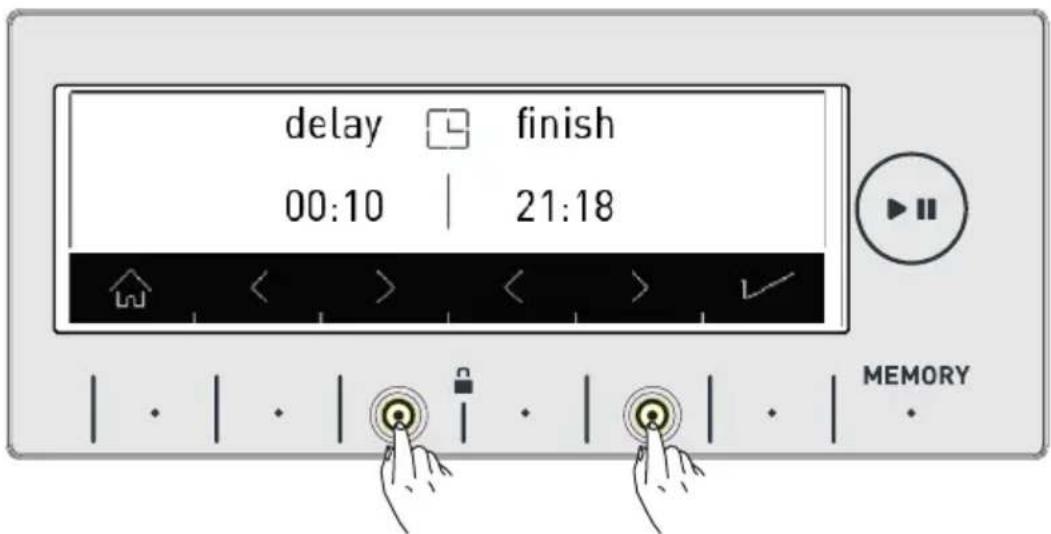
Note: The current time setting must be accurate to be able to use this function correctly. See page 38 to change the current time setting.
Memory record function button (MEMORY)
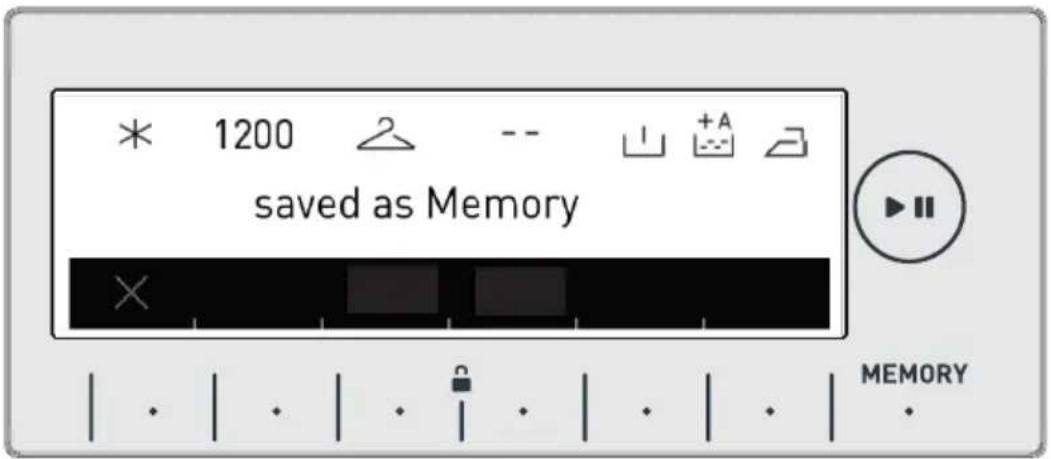
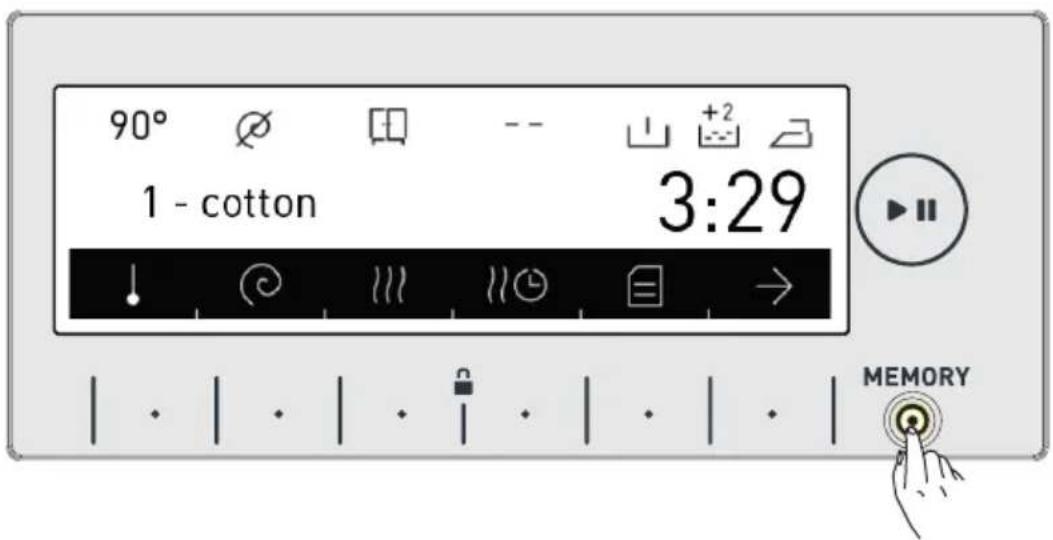
With this feature of your machine, you can store the washing and drying programme you have used before or programme settings you have performed before by simply touching a button without taking your time with this memory option. Thus, you can wash and dry your laundry without performing these settings again. Select the settings you would like to store in the memory on the display and touch the favorite record button.
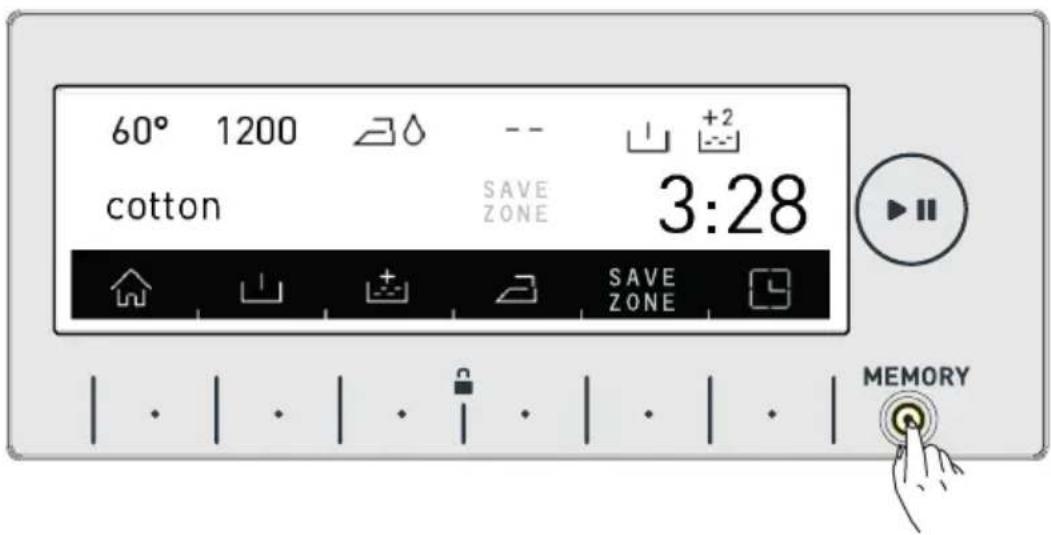
- If you would like to make changes on the washing and drying programme before storing, you can return to the programme menu by pressing ✗ button.
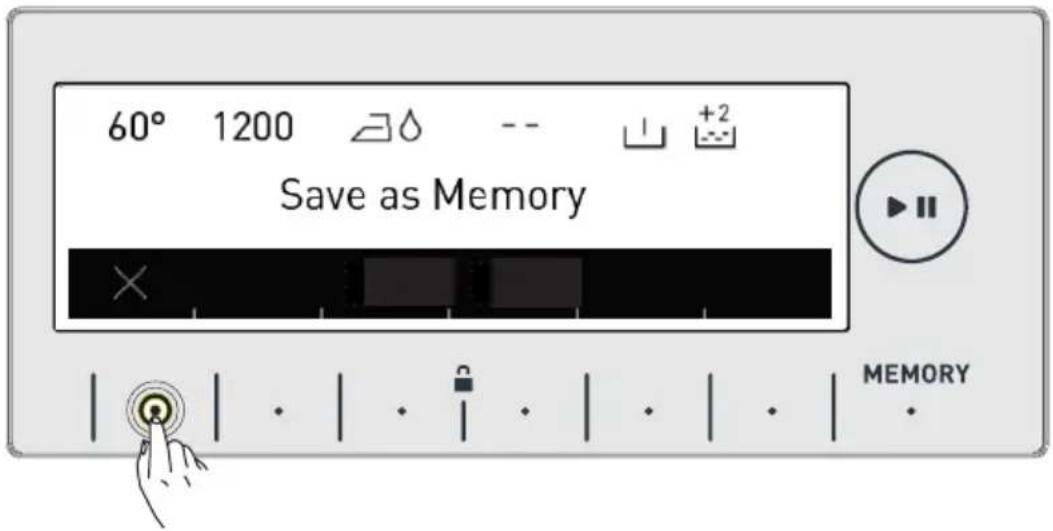
You can touch the favorite button again when you have performed the change you desire.
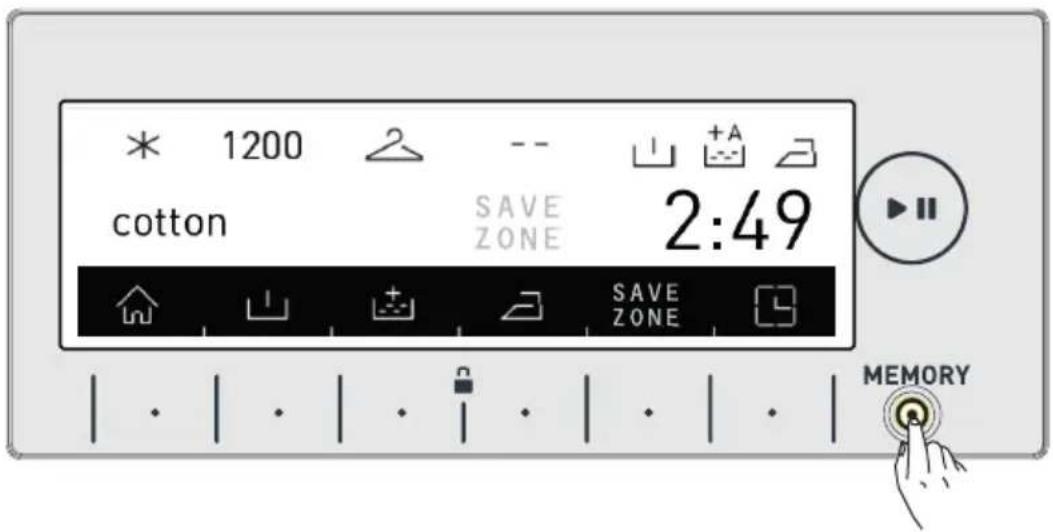
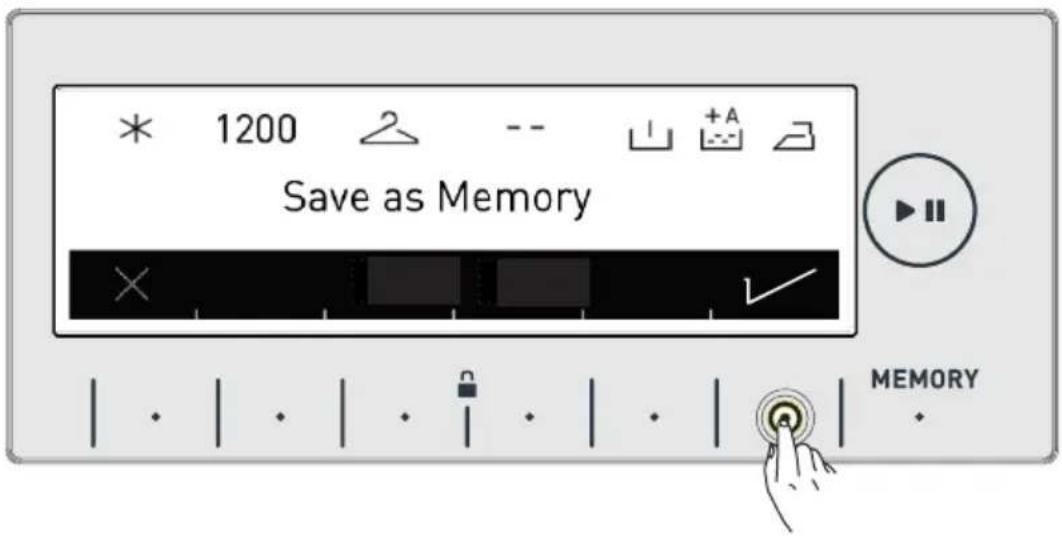
- You can store it by pressing a symbol button.
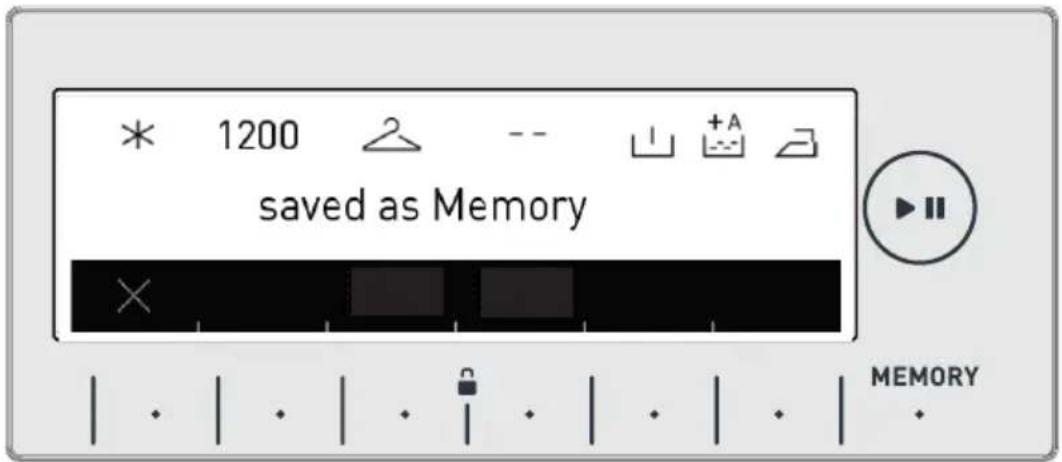
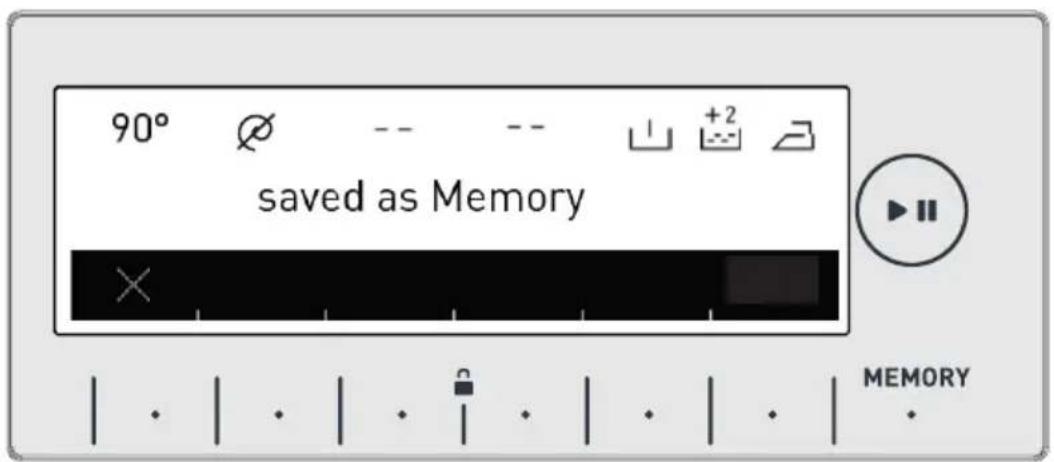
- A screen as shown above shall be displayed when the storing is complete and your machine shall automatically return to the main screen of the washing or drying programme where you performed the setting operation.
- You can wash your laundry or select other programme by pressing start/hold button to perform washing.
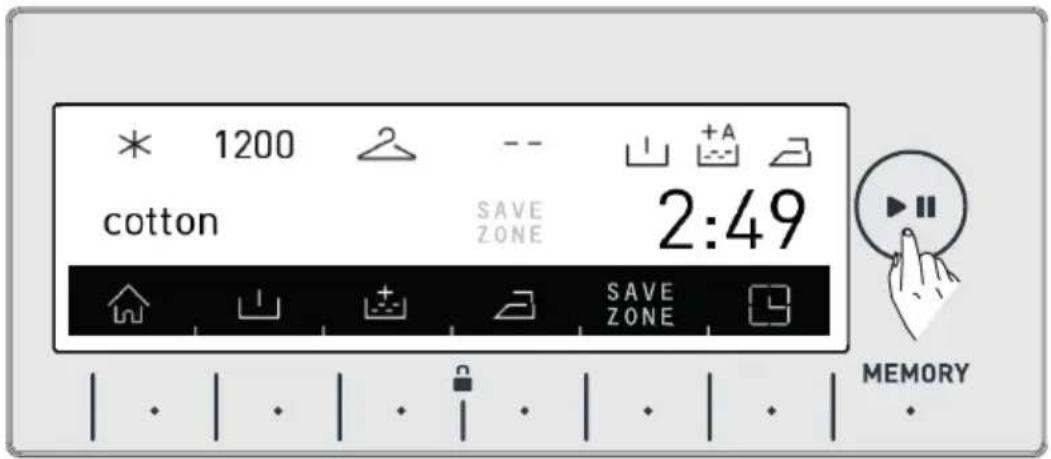
- If you would like to use the programme you have stored in the memory, you can rotate the programme selection button to memory step and perform your selection as shown in the figure below.
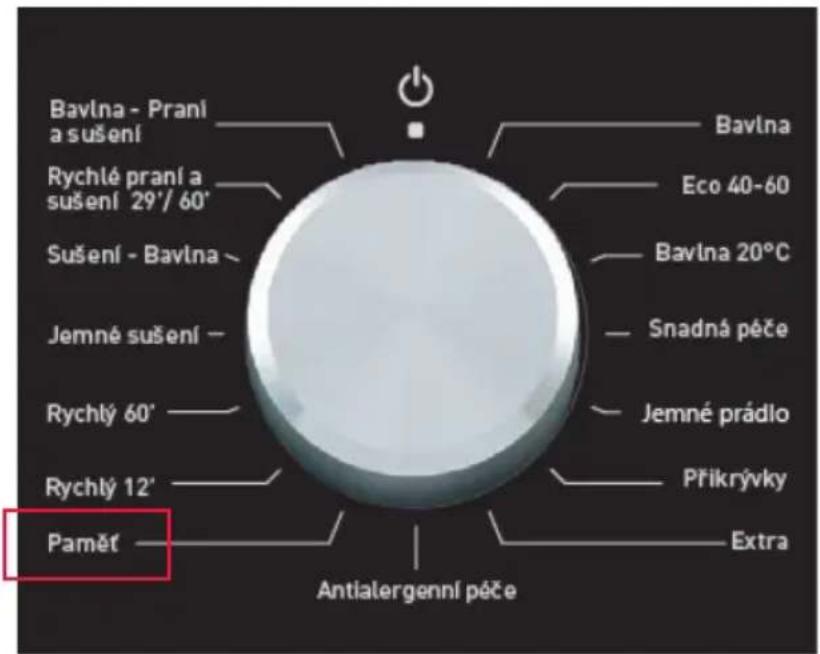
- If you would like to change the settings you have stored in the memory, select the memory option or perform the programme combination setting on any programme and touch the (MEMORY) button.
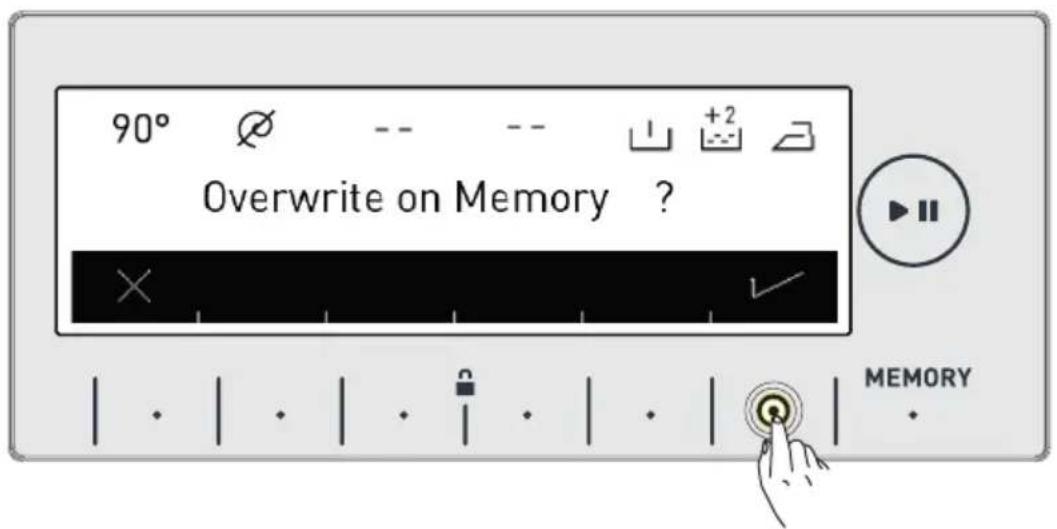
- If you would store a new programme on a previously stored programme, a confirmation dialog to confirm your selection shall be displayed on the screen, you can confirm your selection by pressing √ symbol button.
• This would allow you to store a new memory programme.
Start/Pause button Starting the programme
- You can start the programme you have selected by touching the Start/Pause button
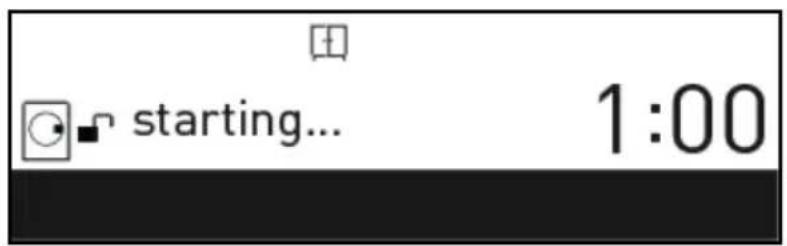
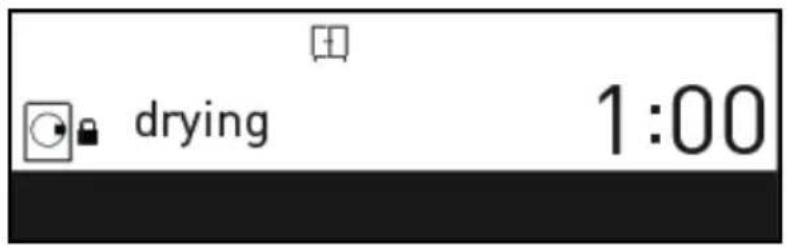
- When you turn your machine on, the programme you have selected will be active on the screen. The screens below are an example of what is displayed on screen during washing operations.
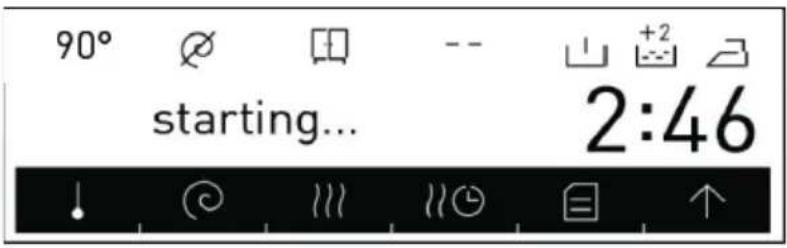
- Washing programme is ready.

- Washing programme is active.
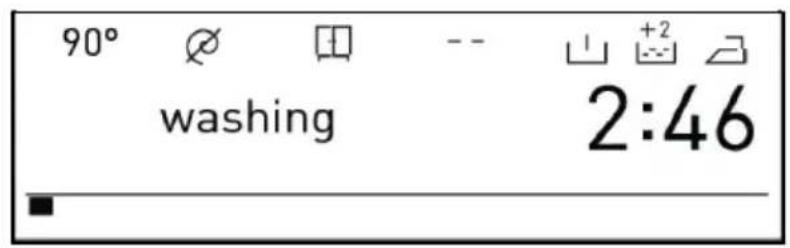
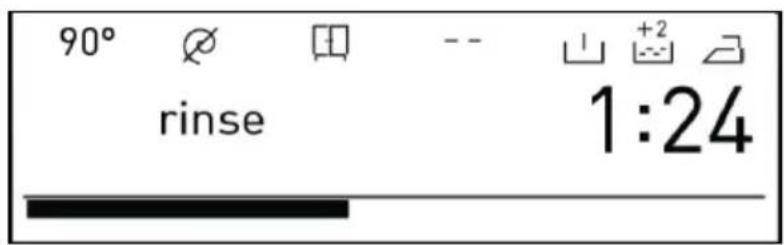
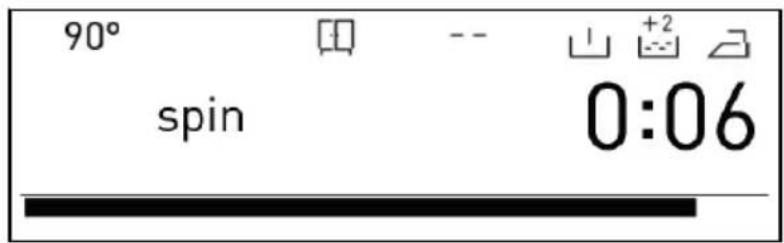

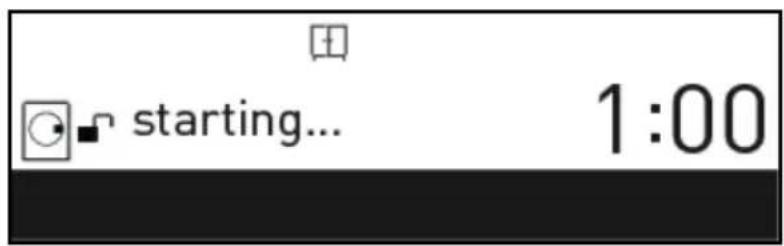
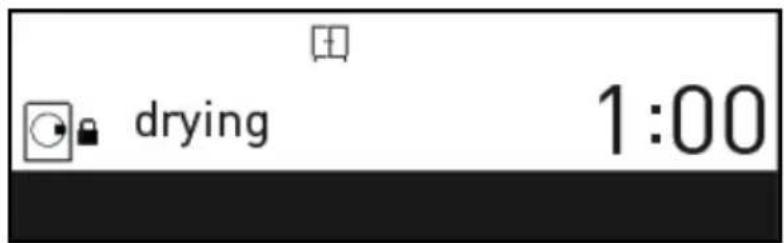
- Washing step.
• Rinsing step. - Spinning step.
• Drying programme ready.
• Drying programme selected.
• Drying programme active.
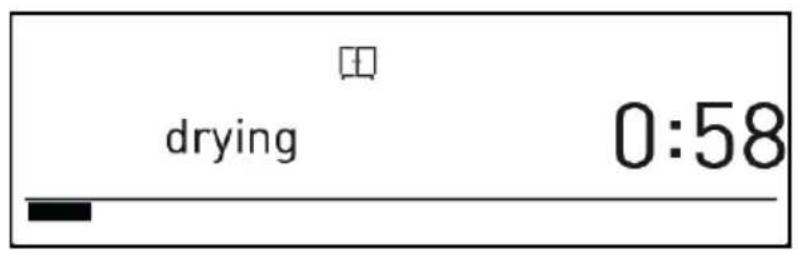
- Drying step.
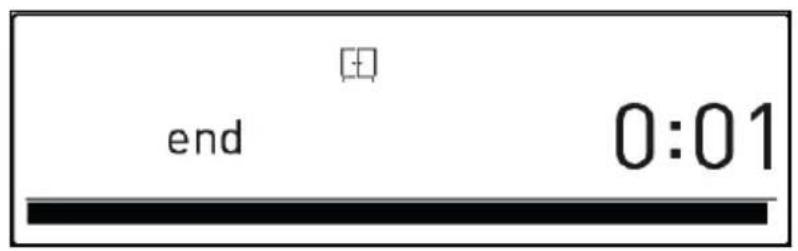
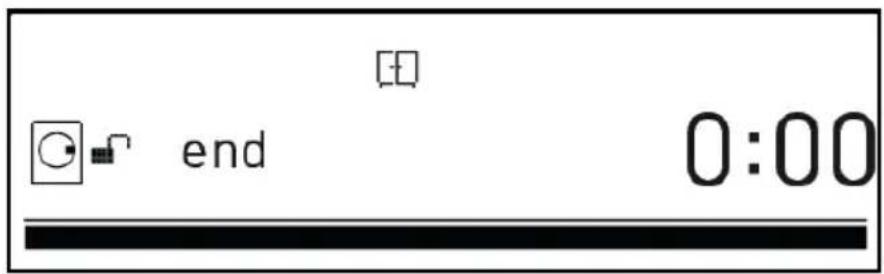
• Programme end.
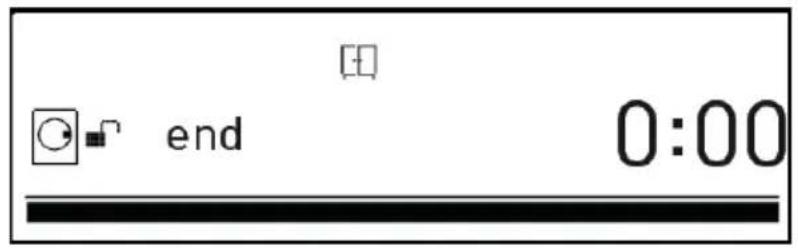
• Programme end door unlocked.
Pausing a programme / Adding laundry
- You can pause or restart the programme you have selected with the ▶ button. You can use this function when you want to add laundry to your machine.
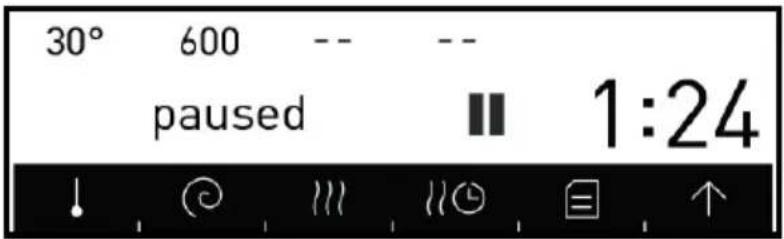
- Washing stopped.
- If symbol is displayed on the screen, you can open the door of your machine and add laundry.
- If 📄 symbol is displayed on the screen you machine has passed the laundry adding step.
Cancelling a programme
If you want to cancel a programme that is running:
- Switch the programme button to the the CANCEL position.
- Your machine will stop the washing operation and the programme will be cancelled.
- To get rid of the water accumulated in the machine switch the programme button to any programme.
- Your machine will perform the necessary discharge operation and cancel the programme.
- You can run your machine by selecting a new programme.
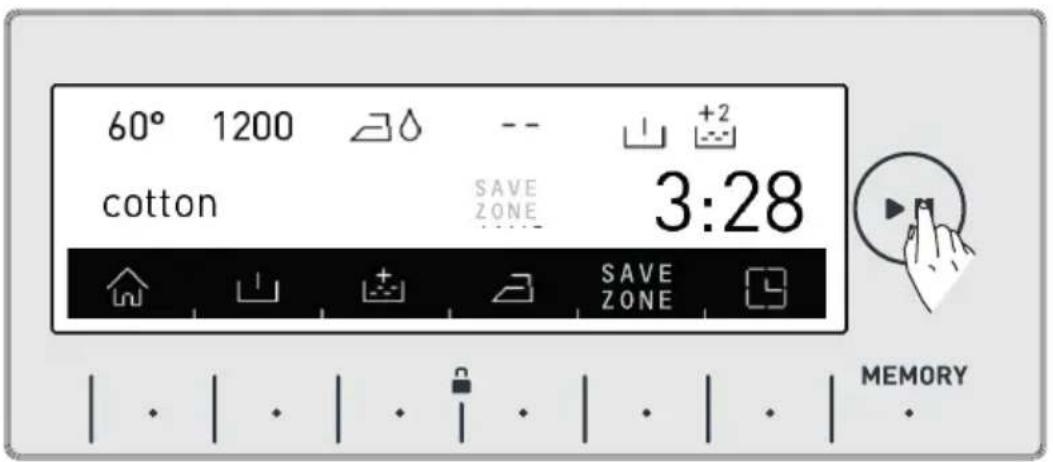
Finishing a programme
Your machine will stop by itself as soon as the programme you have selected finishes.
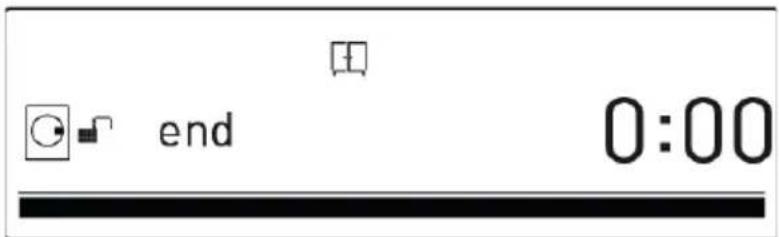
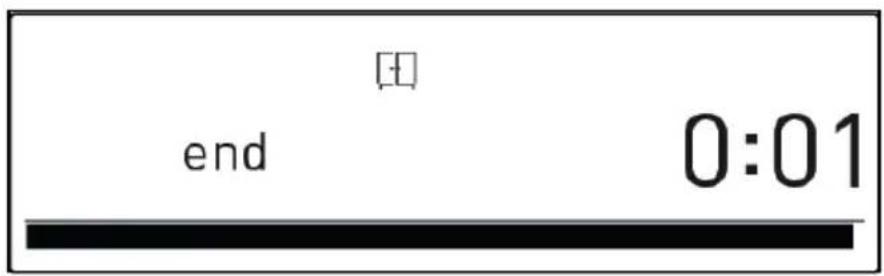
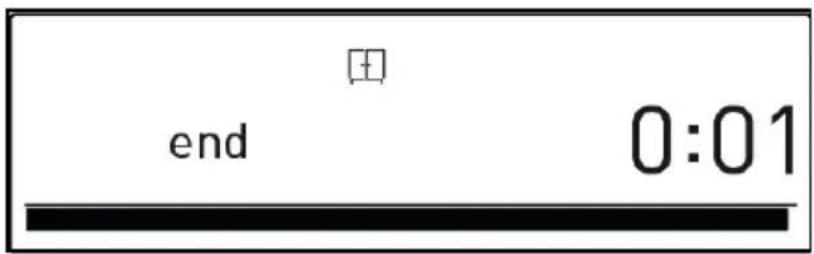
- "end" is displayed on the screen.
- You can open the machine's door and remove the laundry.
- Leave the door of your machine open after removing the laundry so that the machine can dry out.
- Switch the programme button to the CANCEL position.
- Unplug your machine.
- Turn the water faucet off.

If you are not satisfied with the drying level of your laundry, select the best drying programme for your laundry and dry your laundry again.
Note: Your machine has a cooling stage that cools down your laundry at the end of the drying operation. This cooling stage is designed to prevent users from being harmed as they remove the

Child Lock
Your machine has a child lock so that the programme flow is not affected if the function buttons are pressed or the programme knob is turned while the machine is washing or drying.
Child lock engages after both of the 🔔 buttons next to the symbol are pressed for more than 3 seconds.
The following warning text will be displayed after the child lock engages.
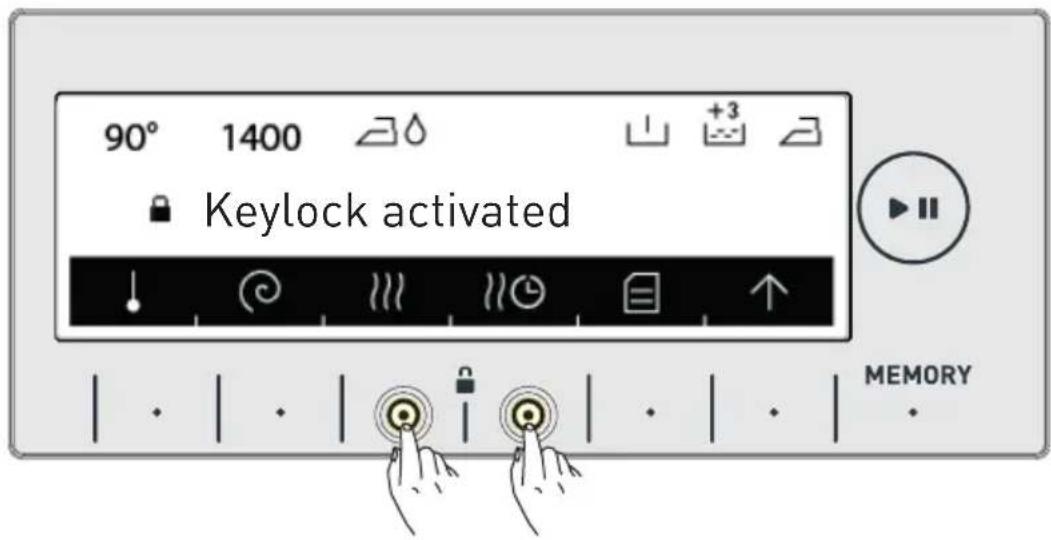
The following text will be displayed if any buttons are pressed while the child lock is engaged.
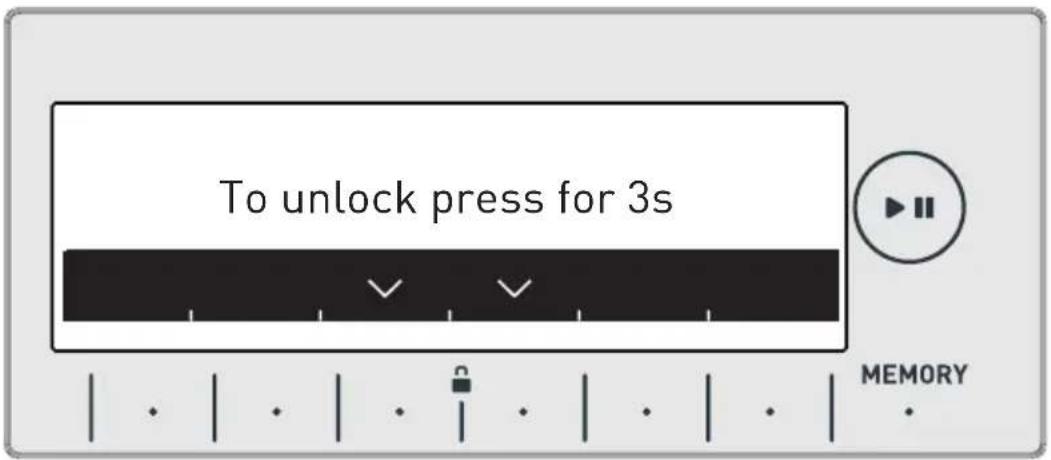
If the child lock is engaged while any programme is running and the programme knob is switched to the CANCEL position ⏻ and another programme is selected, the programme previously selected continues from where it left. No change will occur.
To disengage the child lock, you need to press the
| · | · | buttons for more than 3 seconds. The following warning text will be displayed after the child lock disengages.
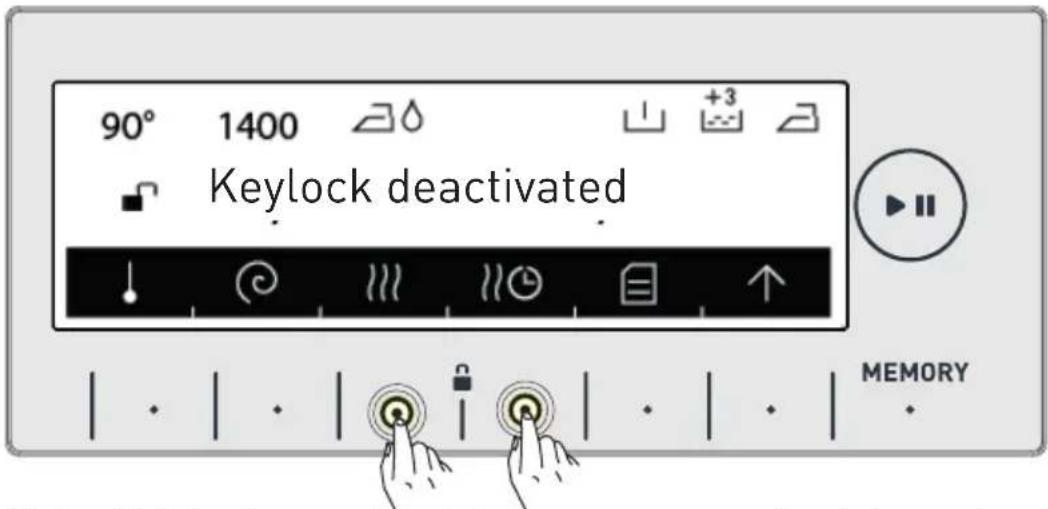
Note: Child lock cannot lock the pump cover or the detergent drawer of your machine.
Program Table
| Cotton | |
| Selectable washing temperatures (°C) | 90°*-80°-70°-60°-50°-40°-30°-Cold wash |
| Maximum washing/drying capacity (kg) | 9.0 / 6.0 |
| Selectable spin speed (rev / min) | (No spin), 400, 600, 800, 1000, 1200, 1400* |
| Laundry type / Descriptions | Heat resistant, cotton and linen textile.. (Underwear, bed sheet, tablecloth, towel (max. 4.5 kg) |
| Selectable additional functions ** | |
| Selectable drying functions ** | |
| Eco 40 - 60 | |
| Selectable washing temperatures (°C) | 40°*-60° |
| Maximum washing/drying capacity (kg) | 9.0 / 6.0 |
| Selectable spin speed (rev / min) | ∅(No spin), 400, 600, 800, 1000, 1200, 1400* |
| Laundry type / Descriptions | Cotton and linen textiles (underwear, bed sheet, tablecloth, towel (max. 4.5 kg) |
| Selectable additional functions ** | |
| Selectable drying functions ** | |
(*) Programme factory default settings.
(**) When you want to select more than one additional function, the additional functions you wish to select may not comply with each other.
Do not dry towels, cotton and linens, and synthetic and synthetic mix clothes together. For drying select the most appropriate drying program for the clothes.
NOTE: THE PROGRAM DURATION MIGHT CHANGE ACCORDING TO THE AMOUNT OF LAUNDRY, TAP WATER, AMBIENT TEMPERATURE AND SELECTED ADDITIONAL FUNCTIONS.
Program Table
| Cotton 20°C | |
| Selectable washing temperatures (°C) | 20°*-Cold wash |
| Maximum washing/drying capacity (kg) | 4.0 / 4.0 |
| Selectable spin speed (rev / min) | ∅ (No spin), 400, 600, 800, 1000, 1200, 1400* |
| Laundry type / Descriptions | Less dirty, cotton and linen textiles. (bed sheet, tablecloth, towel (max. 2. 0 kg) |
| Selectable additional functions ** | |
| Selectable drying functions ** | |
(*) Programme factory default settings.
(**) When you want to select more than one additional function, the additional functions you wish to select may not comply with each other.
Do not dry towels, cotton and linens, and synthetic and synthetic mix clothes together.
For drying select the most appropriate drying program for the clothes.
NOTE: THE PROGRAM DURATION MIGHT CHANGE ACCORDING TO THE AMOUNT OF LAUNDRY, TAP WATER, AMBIENT TEMPERATURE AND SELECTED ADDITIONAL FUNCTIONS.
Program Table
Synthetic***Curtain***
| Easy Care | |
| Selectable washing temperatures (°C) | 60°*-40°-30°-Cold wash |
| Maximum washing/drying capacity (kg) | 3.5 / - |
| Selectable spin speed (rev / min) | (No spin), 400, 600,800,1000,1200 * |
| Laundry type / Descriptions | Synthetic and synthetic mix textiles.(synthetic content shirt, blouse, socks etc.) |
| Selectable additional functions ** | |
| Selectable drying functions ** | |
| Selectable washing temperatures (°C) | 40°*-30°-Cold wash |
| Maximum washing/drying capacity (kg) | 2,5 / - |
| Selectable spin speed (rev / min) | ∅ (No spin), 400, 600* |
| Laundry type / Descriptions | Wash your curtains only with this programme. |
| Selectable additional functions ** | ∅ +1 +2 +3 SAVE ZONE |
| Selectable drying functions ** | - |
(*) Programme factory default settings.
(**) When you want to select more than one additional function, the additional functions you wish to select may not comply with each other.
(***) These are sub-programmes. Refer to page 90 for programme selection.
Do not dry towels, cotton and linens, and synthetic and synthetic mix clothes together.
For drying select the most appropriate drying program for the clothes.
NOTE: THE PROGRAM DURATION MIGHT CHANGE ACCORDING TO THE AMOUNT OF LAUNDRY, TAP WATER, AMBIENT TEMPERATURE AND SELECTED ADDITIONAL FUNCTIONS.
Program Table
| Delicate | ||
| Wool *** | Selectable washing temperatures (°C) | 40°*-30°-Cold wash |
| Maximum washing capacity (kg) | 2,5 | |
| Selectable spin speed (rev / min) | ∅(No spin), 400,600* | |
| Laundry type / Descriptions | Woollen and wool mix laundry with machine wash labels. | |
| Selectable additional functions ** | ∅+1+2+3SAVE ZONE | |
| Selectable drying functions ** | - | |
| Silk *** | Selectable washing temperatures (°C) | 30°*-Cold wash |
| Maximum washing capacity (kg) | 2,5 | |
| Selectable spin speed (rev / min) | ∅(No spin), 400,600* | |
| Laundry type / Descriptions | Silk mixture laundry with machine wash labels. | |
| Selectable additional functions ** | ∅+1+2+3SAVE ZONE | |
| Selectable drying functions ** | - | |
(*) Programme factory default settings.
(**) When you want to select more than one additional function, the additional functions you wish to select may not comply with each other.
(***) These are sub-programmes. Refer to page 92 for programme selection.
Do not dry towels, cotton and linens, and synthetic and synthetic mix clothes together.
For drying select the most appropriate drying program for the clothes.
NOTE: THE PROGRAM DURATION MIGHT CHANGE ACCORDING TO THE AMOUNT OF LAUNDRY, TAP WATER, AMBIENT TEMPERATURE AND SELECTED ADDITIONAL FUNCTIONS.
Program Table
Duvet
| Selectable washing temperatures (°C) | 40°*-30°-Cold wash |
| Maximum washing capacity (kg) | - |
| Selectable spin speed (rev / min) | ∅(No spin), 400, 600,800* |
| Laundry type / Descriptions | You can wash your fibre duvet that have machine washable label with this programme. (max. 2.5 kg) |
| Selectable additional functions ** | ∅ ∩ +1 +2 +3 +4 SAVE ZONE |
| Selectable drying functions ** | - |
(*) Programme factory default settings.
(**) When you want to select more than one additional function, the additional functions you wish to select may not comply with each other.
Do not dry towels, cotton and linens, and synthetic and synthetic mix clothes together.
For drying select the most appropriate drying program for the clothes.
NOTE: THE PROGRAM DURATION MIGHT CHANGE ACCORDING TO THE AMOUNT OF LAUNDRY, TAP WATER, AMBIENT TEMPERATURE AND SELECTED ADDITIONAL FUNCTIONS.
Program Table
Extras
| Refresh*** | Selectable washing temperatures (°C) | Cold wash * |
| Maximum laundry capacity (kg) | 1,0 | |
| Selectable spin speed (rev / min) | - | |
| Laundry type / Descriptions | Laundry that is not dirty and has odours on. Note: This programme is not a washing programme. It only breathes hot air onto your laundry and refreshes them. | |
| Selectable additional functions ** | SAVE ZONE | |
| Selectable drying functions ** | - | |
| Rinse *** | Selectable washing temperatures (°C) | Cold wash * |
| Maximum washing/drying capacity (kg) | 9.0 / 6.0 | |
| Selectable spin speed (rev / min) | (No spin), 400, 600, 800, 1000, 1200, 1400* | |
| Laundry type / Descriptions | If you want to additionally rinse your laundries upon completion of washing operation, you may use this programme for any kind of laundries. | |
| Selectable additional functions ** | SAVE ZONE | |
| Selectable drying functions ** | 30min 60min 120min |
(*) Programme factory default settings.
(**) When you want to select more than one additional function, the additional functions you wish to select may not comply with each other.
Do not dry towels, cotton and linens, and synthetic and synthetic mix clothes together.
For drying select the most appropriate drying program for the clothes.
NOTE: THE PROGRAM DURATION MIGHT CHANGE ACCORDING TO THE AMOUNT OF LAUNDRY, TAP WATER, AMBIENT TEMPERATURE AND SELECTED ADDITIONAL FUNCTIONS.
Program Table
Extras
| Spin*** | Selectable washing temperatures (°C) | Cold wash * |
| Maximum washing/drying capacity (kg) | 9.0 / 6.0 | |
| Selectable spin speed (rev / min) | 400, 600, 800, 1000, 1200, 1400* | |
| Laundry type / Descriptions | When you want to make an additional spinning to your laundry after the washing step, you can use this programme for all kinds of laundry. | |
| Selectable additional functions ** | ||
| Selectable drying functions ** | ||
| Drain *** | Selectable washing temperatures (°C) | Cold wash * |
| Maximum washing/drying capacity (kg) | 9.0 / 6.0 | |
| Selectable spin speed (rev / min) | ||
| Laundry type / Descriptions | It makes the water inside the machine to be draining. | |
| Selectable additional functions ** | ||
| Selectable drying functions ** | - |
(*) Programme factory default settings.
(**) When you want to select more than one additional function, the additional functions you wish to select may not comply with each other.
(***) These are sub-programmes. Refer to page 94 for programme selection. Do not dry towels, cotton and linens, and synthetic and synthetic mix clothes together. For drying select the most appropriate drying program for the clothes.
NOTE: THE PROGRAM DURATION MIGHT CHANGE ACCORDING TO THE AMOUNT OF LAUNDRY, TAP WATER, AMBIENT TEMPERATURE AND SELECTED ADDITIONAL FUNCTIONS.
Program Table
Extras
| Drum clean *** | Selectable washing temperatures (°C) | 80°* |
| Maximum washing/drying capacity (kg) | - | |
| Selectable spin speed (rev / min) | - | |
| Laundry type / Descriptions | It is washing drum cleaning programme. It must be used without laundry. | |
| Selectable additional functions ** | SAVE.ZONE | |
| Selectable drying functions ** | - | |
| Synthetics Wash & Dry*** | Selectable washing temperatures (°C) | 60°-40°*-30°-Cold wash |
| Maximum laundry capacity (kg) | 3,5/3,5 | |
| Selectable spin speed (rev / min) | 600* | |
| Laundry type / Descriptions | Synthetic and synthetic mix textiles.(synthetic content shirt, blouse, socks etc.) | |
| Selectable additional functions ** | ||
| Selectable drying functions ** |
(*) Programme factory default settings.
(**) When you want to select more than one additional function, the additional functions you wish to select may not comply with each other.
(***) These are sub-programmes. Refer to page 94 for programme selection.
Do not dry towels, cotton and linens, and synthetic and synthetic mix clothes together. For drying select the most appropriate drying program for the clothes.
NOTE: THE PROGRAM DURATION MIGHT CHANGE ACCORDING TO THE AMOUNT OF LAUNDRY, TAP WATER, AMBIENT TEMPERATURE AND SELECTED ADDITIONAL FUNCTIONS.
Program Table
| Allergy Safe | |
| Selectable washing temperatures (°C) | 60°* - 50° - 40° - 30° Cold wash |
| Maximum washing/drying capacity (kg) | 4.5 / 4.5 |
| Selectable spin speed (rev / min) | ∅ (No spin), 400, 600, 800* |
| Laundry type / Descriptions | Baby dresses |
| Selectable additional functions ** | |
| Selectable drying functions ** | |
(*) Programme factory default settings.
(**) When you want to select more than one additional function, the additional functions you wish to select may not comply with each other.
Do not dry towels, cotton and linens, and synthetic and synthetic mix clothes together.
For drying select the most appropriate drying program for the clothes.
NOTE: THE PROGRAM DURATION MIGHT CHANGE ACCORDING TO THE AMOUNT OF LAUNDRY, TAP WATER, AMBIENT TEMPERATURE AND SELECTED ADDITIONAL FUNCTIONS.
Program Table
| rapid 12 min | |
| Selectable washing temperatures (°C) | 30°*-Cold wash |
| Maximum washing/drying capacity (kg) | 2,0 / 2,0 |
| Selectable spin speed (rev / min) | ∅ (No spin), 400, 600, 800* |
| Laundry type / Descriptions | You can wash your less dirty, cotton, coloured and linen textiles in a short time as 12 minutes.Note: As the washing period is short, less amount of detergent is required to be used compared to other programmes. The programme period will increase if your machine detects instable loading. |
| Selectable additional functions ** | ∅ ∩ ☐ SAVE ZONE |
| Selectable drying functions ** | ∅ ☑ ∩ ∩ 30min 60min 120min |
Fast 60 min.
| Selectable washing temperatures (°C) | 60°*- 50°-40°- 30°-Cold wash |
| Maximum washing/drying capacity (kg) | 4.0 / 4.0 |
| Selectable spin speed (rev / min) | (No spin), 400, 600, 800, 1000, 12001400* |
| Laundry type / Descriptions | Dirty, cotton, coloured and linen textiles.(The washing duration for loads of 2kg and under is 30 minutes) |
| Selectable additional functions ** | |
| Selectable drying functions ** |
(*) Programme factory default settings.
(**) When you want to select more than one additional function, the additional functions you wish to select may not comply with each other.
Do not dry towels, cotton and linens, and synthetic and synthetic mix clothes together.
For drying select the most appropriate drying program for the clothes.
NOTE: THE PROGRAM DURATION MIGHT CHANGE ACCORDING TO THE AMOUNT OF LAUNDRY, TAP WATER, AMBIENT TEMPERATURE AND SELECTED ADDITIONAL FUNCTIONS.
Dry
Program Table
| Gentle Dry | |
| Selectable washing temperatures (°C) | Cold wash * |
| Maximum drying capacity (kg) | 3,5 |
| Selectable spin speed (rev / min) | - |
| Laundry type / Descriptions | Cotton laundry with machine dryable label. |
| Selectable additional functions ** | |
| Selectable drying functions ** | |
Cotton Dry
| Selectable washing temperatures (°C) | Cold wash * |
| Maximum drying capacity (kg) | 6,0 kg |
| Selectable spin speed (rev / min) | - |
| Laundry type / Descriptions | Cotton laundry with machine dryable label. |
| Selectable additional functions ** | |
| Selectable drying functions ** |
(*) Programme factory default settings.
(**) When you want to select more than one additional function, the additional functions you wish to select may not comply with each other.
(***) These are sub-programmes. Refer to page 94 for programme selection.
Do not dry towels, cotton and linens, and synthetic and synthetic mix clothes together.
For drying select the most appropriate drying program for the clothes.
NOTE: THE PROGRAM DURATION MIGHT CHANGE ACCORDING TO THE AMOUNT OF LAUNDRY, TAP WATER, AMBIENT TEMPERATURE AND SELECTED ADDITIONAL FUNCTIONS.
| Program Table | |
| Quick Wash & Dry | |
| Selectable washing temperatures (°C) | 30°*-Cold wash |
| Maximum washing/drying capacity (kg) | 0,5 kg (3 shirts) (29 minutes) / 0,5 |
| Selectable spin speed (rev / min) | 800* |
| Laundry type / Descriptions | Cotton, coloured and linen laundry with machine dryable label.Note: It determines the duration of the programme itself according to the amount of laundry you will load into the machine. |
| Selectable additional functions ** | |
| Selectable drying functions ** | |
(*) Programme factory default settings.
(**) When you want to select more than one additional function, the additional functions you wish to select may not comply with each other.
Do not dry towels, cotton and linens, and synthetic and synthetic mix clothes together. For drying select the most appropriate drying program for the clothes.
NOTE: THE PROGRAM DURATION MIGHT CHANGE ACCORDING TO THE AMOUNT OF LAUNDRY, TAP WATER, AMBIENT TEMPERATURE AND SELECTED ADDITIONAL FUNCTIONS.
| Program Table | |
| Cotton Wash & Dry | |
| Selectable washing temperatures (°C) | 90°-80°-70°-60°-50°-40°* - 30°- Cold wash |
| Maximum washing/drying capacity (kg) | 6,0 / 6,0 |
| Selectable spin speed (rev / min) | 1400* |
| Laundry type / Descriptions | Cotton and linen textiles (underwear, bed sheet, tablecloth, towel (max. 3.0 kg) |
| Selectable additional functions ** | SAVE ZONE |
| Selectable drying functions ** | 30min 60min 120min |
(*) Programme factory default settings.
(**) When you want to select more than one additional function, the additional functions you wish to select may not comply with each other.
Do not dry towels, cotton and linens, and synthetic and synthetic mix clothes together.
For drying select the most appropriate drying program for the clothes.
NOTE: THE PROGRAM DURATION MIGHT CHANGE ACCORDING TO THE AMOUNT OF LAUNDRY, TAP WATER, AMBIENT TEMPERATURE AND SELECTED ADDITIONAL FUNCTIONS.
The Eco 40-60 programme is able to clean normally soiled cotton laundry declared to be washable at 40^ C or 60^ C, together in the same cycle, and that this programme is used to assess the compliance with the EU ecodesign legislation.
The wash and dry cycle is able to clean normally soiled cotton laundry declared to be washable at 40^ C or 60^ C, together in the same cycle, and to dry it in such a way that it can be immediately stored in a cupboard, and that this programme is used to assess the compliance with the EU ecodesign legislation.
To start EN62512 and (EU) 2019/2014 regulation test program, Cotton W&D program should be used in 40 0C with cupboard dry level selection.
- For household washer-dryers; the wash and dry cycle is able to clean normally soiled cotton laundry declared to be washable at 40°C or 60°C, together in the same cycle, and to dry it in such a way that it can be immediately stored in a cupboard, and that this programme is used to assess the compliance with the EU ecodesign legislation.
- The most efficient programmes in terms of energy consumption are generally those that perform at lower temperatures and longer duration.
- Loading the household washer-dryer up to the capacity indicated by the manufacturer for the respective programmes will contribute to energy and water savings.
- Program duration, energy consumption and water consumption values may vary according to wash load weight and type, selected extra functions, tap water and ambient temperature.
- It's recommended to use liquid detergent for the washing programmes at low temperature. The amount of detergent to be used may vary depending on the amount of laundry and the level of dirtiness of the laundry. Please follow the detergent manufacturers' recommendations for the amount of the detergent to be used.
- The noise and remaining moisture content are influenced by the spinning speed. The higher spinning speed in the spinning phase, the higher noise and the lower remaining moisture content.
- You can access the product database where the model information is stored by reading the QR code on the energy label.
| Wash and Dry | Cotton 20 | Fast 60' | Synthetic | Eco 40-60 | Cotton 60 | Cotton 90 | Programme Name | |
| 6.4 | 4,5.0 | 4,5.0 | 3,5.0 | 9 | 9.0 | 9.2 | Rated Capacity kg | |
| 63.2,46 | 2,22.01:49 | 80.01:00 | 72.02:00 | 1,064 | 96.03:55 | 18.03:20 | Rated Capacity kWh/cycle | Energy Consumption |
| 09.00.05 | 45.20 | 34.58 | 52.52 | 0.497 | 49.47 | 76.81 | 1/2 Load | |
| 100.00 | 53% | 53% | 53% | 0.192 | 53% | 53% | 1/4 Load | |
| 96 | 03.49 | Rated Capacity | Programme Duration Hours:Minutes | |||||
| 38.27 | 02.54 | 1/2 Load | ||||||
| 02.54 | 1/4 Load | Water Consumption Litres/Cycle | ||||||
| 58 | Rated Capacity | max. Temperature °C | ||||||
| 38 | 1/2 Load | |||||||
| 36 | 1/4 Load | |||||||
| 45 | Rated Capacity | |||||||
| 30 | 1/2 Load | |||||||
| 23 | 1/4 Load | |||||||
| 53% | Rated Capacity | Remaining Moisture Content % 1400 Rpm | ||||||
| 53% | 1/2 Load | |||||||
| 53% | 1/4 Load |
Important Informations
- Use detergents, softeners and other additives suitable for automatic washing machines only. Excessive foam has occurred and automatic foam absorption system has been activated due to too much detergent usage.
• We recommend that periodic cleaning for washing machine every 2 months. For periodic cleaning please use Drum Clean programme. If your machine do not have Drum Clean programme, use Cottons-90 programme. When required, use limescale removers manufactured specifically for washing machines only. - Never force the door open when your Washing Machine is running. You can open the door of your machine 2 minutes after the completion of a washing operation. *
- Never force the door open when your Washing Machine is running. The door will open immediately after the washing cycle has ended. *
- The installation and repairing procedures should always carried out by the Authorised Service Agent in order to avoid possible risks. The manufacturer shall not be held liable for damages that may arise from procedures carried out by unauthorised persons.
(*) Specifications may vary depending on the machine purchased.
Selecting sub-programmes Easy care
When you select the Easy care programme from the programme knob, you will see two sub-program options.
1-Synthetics
2-Curtain
- You can make sub-programme selections by touching the symbol buttons.
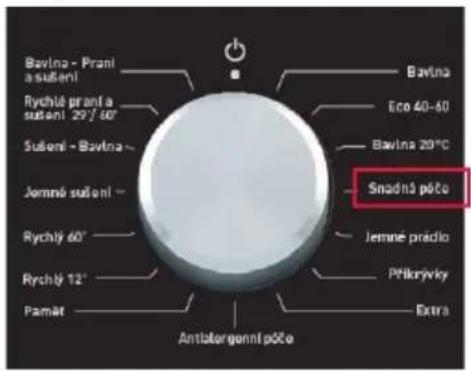
- You can activate the programme you want to select by touching the symbol button.
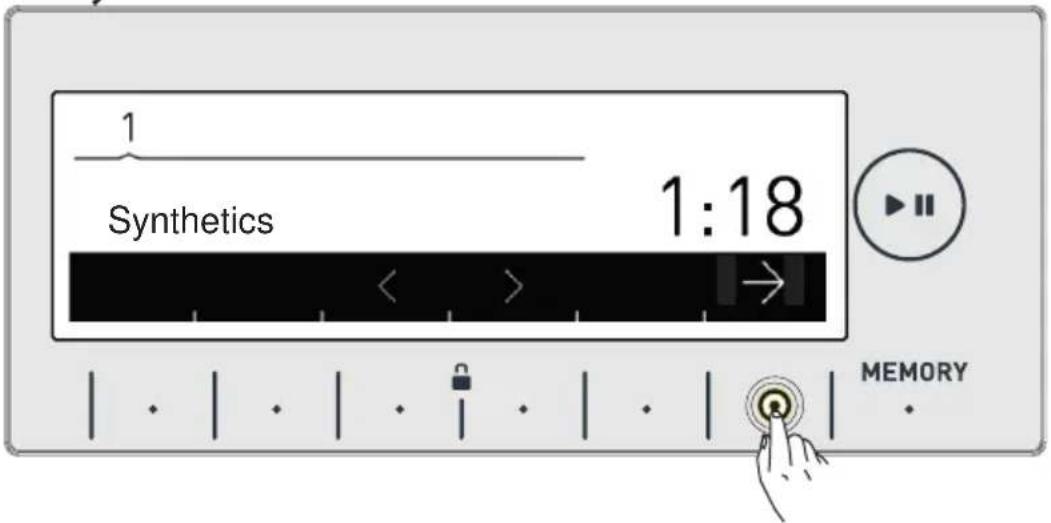
• After the selection has been activated, the electronic display will return to the main screen of the programme you have selected automatically. You can select other features you want to select on this screen and run the machine by pressing the Start/Pause button.

Selecting sub-programmes (Delicates)
When you select the delicates programme from the programme knob, you will see two sub-program options.
1- Wool
2-Silk
- You can make sub-programme selections by touching the symbol buttons.

- You can activate the programme you want to select by touching the symbol button.
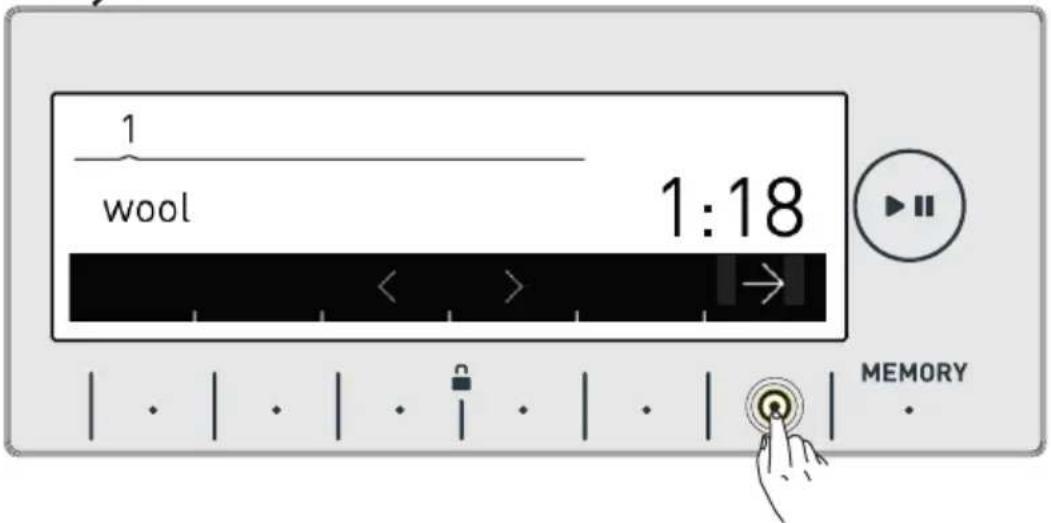
• After the selection has been activated, the electronic display will return to the main screen of the programme you have selected automatically. You can select other features you want to select on this screen and run the machine by pressing the Start/Pause button.
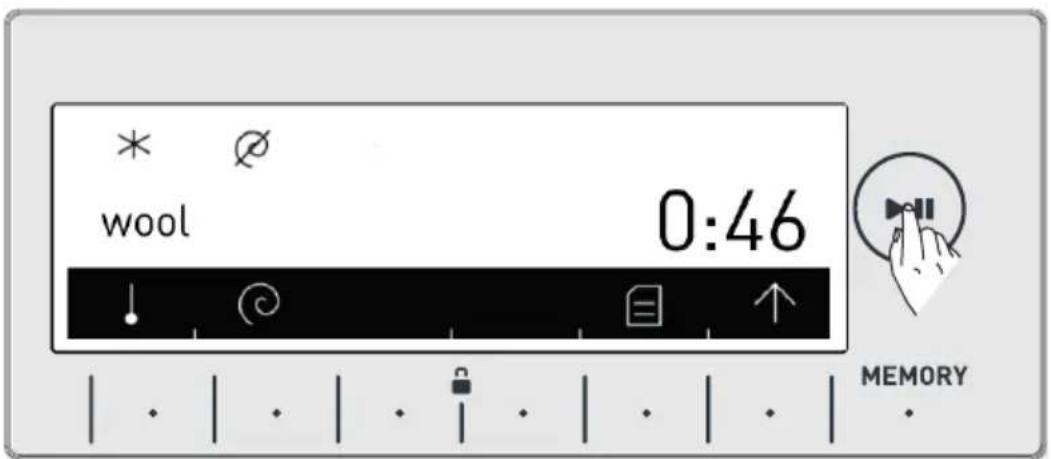
Selecting sub-programmes (Extras)
When you select the extras programme from the programme knob, you will see 6 sub-program options.
1- Refresh
2- Rinse
3- Spin
4- Drain
5- Drum clean
6- Synthetics Wash & Dry
- You can make the sub-programme selections by touching the <> symbol buttons.
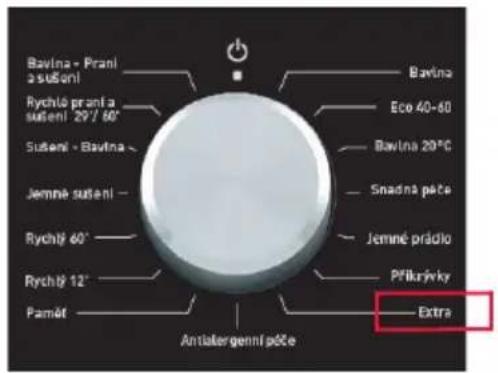
- You can activate the programme you want to select by touching the symbol button.
• After the selection has been activated, the electronic display will return to the main screen of the programme you have selected automatically. You can select other features you want to select on this screen and run the machine by pressing the Start/Pause button.
MAINTENANCE AND CLEANING OF YOUR MACHINE


Unplug your machine before starting the maintenance and cleaning of your machine.
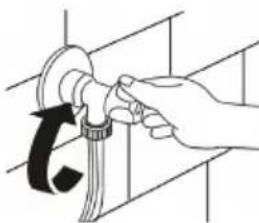
natural_image
Hand holding a pipe fitting with a black arrow indicating clockwise motion (no text or symbols)Turn off the water inlet before starting the maintenance and cleaning of your machine.

Notice !
Your machine's parts might be damaged if cleaners with solvent agents are used. Do not use cleaning materials with solvent agents.
Water inlet filters
Filters are in place to prevent foreign substances entering the machine and can be found both on the faucet side of the inlet hose and on the ends of water valves along the water inlet hose of your machine. If your machine cannot intake a sufficient amount of water despite the water faucet being open, these filters should be cleaned.
- Disconnect the ends of the water inlet hose from the tap and the machine.
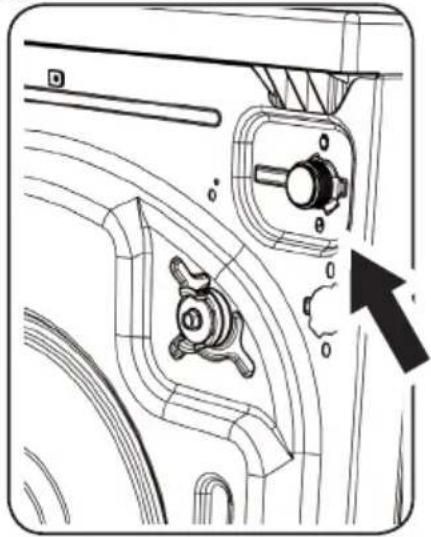
natural_image
Technical line drawing of a mechanical component with no visible text or symbols
natural_image
Line drawing of a hand holding a small mechanical component, no text or symbols present- Remove the filter of the water inlet valve on your machine with a pair of pliers. Clean thoroughly using water and a brush.
• Disassemble the filter on the faucet side of the water inlet hose manually and clean it.
- Once the filters are cleaned, put them correctly back in place.
Detergent drawer maintenance and cleaning
- Your detergents may form residue in the detergent drawer and detergent drawer slot. Remove the detergent drawer in regular intervals to clean the formed residue. In order to remove the detergent drawer from its place:
* Pull the detergent drawing all the way back.
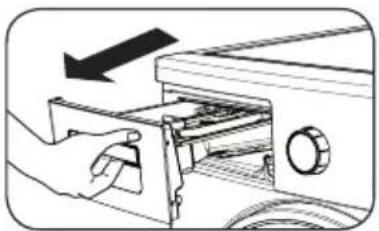
natural_image
Illustration of a hand using a sewing machine to adjust or install a component, with no visible text or symbols.- Press the region shown below inside the detergent drawer you have pulled all the way back, and continue pulling and remove the detergent drawer from its place.
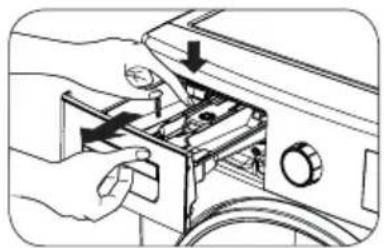
natural_image
Illustration of a hand inserting a device into a washing machine (no text or symbols visible)
natural_image
Technical diagram of a mechanical assembly with a red circle highlighting a step and a black arrow indicating direction (no text or symbols present)- Rinse with a brush and lots of water.
- Collect the residues inside the detergent drawer slot so that they don't fall inside your machine.
- Dry the detergent drawer with a towel or dry cloth and place it back.
- Do not wash your detergent drawer in a dishwasher.
Siphon cover
Remove the detergent drawer from its place (see page 99). Remove the siphon plug as shown in the picture and clean the softener residues thoroughly. Replace the cleaned siphon plug. Check whether the it completely fits.
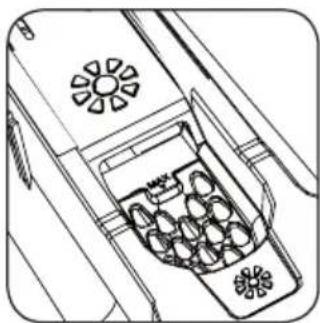
natural_image
Line drawing of a refrigerator interior with air conditioner unit (no text or symbols)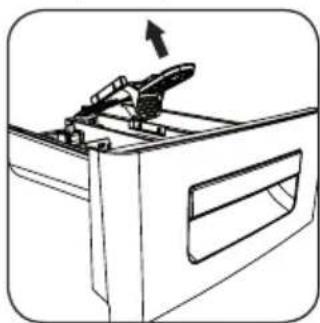
natural_image
Line drawing of a kitchen drawer with an arrow indicating direction (no text or symbols)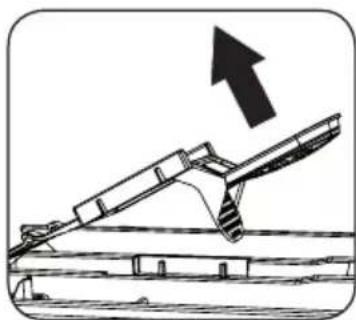
natural_image
Diagram of a mechanical lever system with an upward arrow indicating motion (no text or symbols present)Drum Cleaning
Do not leave metal parts like needle, paper clip, coins inside your machine. This machines cause rust to form inside the drum. Use a non-chloride cleaning agent to clean these rust stains and comply with the warnings of the cleaning agent manufacturer. For the cleaning of the rust stains, denitely do not use wire wool or similar hard objects.
Body Cleaning
Clean the outer body of your machine with a non-corrosive, inam- mable cleaning agent. After rinsing the body of the machine you cleaned with some clean water, dry with a soft and dry cloth.
Pump filter maintenance and cleaning
This machine contains a filter system that prevents threads left over from your laundry and other small materials from entering the pump during the discharge operation after a completed wash cycle. This is to protect and prolong the life of the pump. It is recommended that you clean your pump filter once every 2 months.
To clean the pump filter:
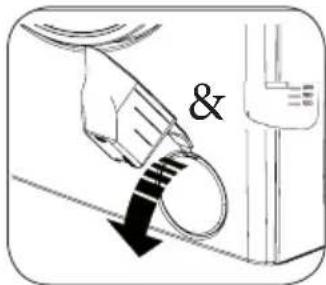
- You may use the washing powder spade supplied with your machine or liquid detergent level plate to open the pump cover.
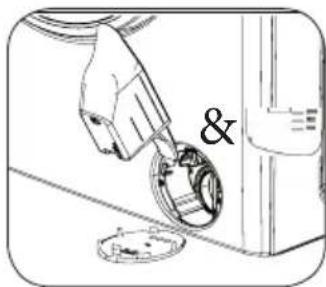
natural_image
Illustration of a hand using a tool to insert a mechanical component, with no visible text or symbols.- Lodge the end part of the plastic part to the opening of the cover and press backwards. The cover will be opened.
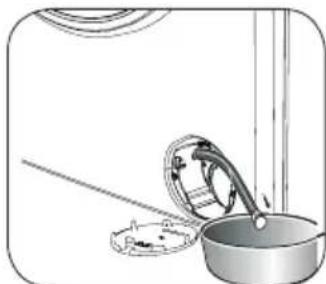
natural_image
Simple line drawing of a kitchen sink with a lid and handle, no text or symbols present- Pull the black rubber hose and detach it from its clamp, place a container under it and remove its plug.
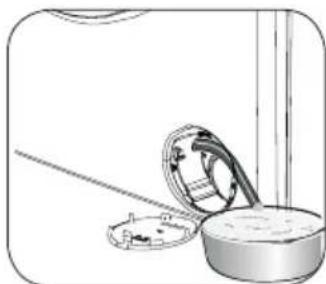
natural_image
Illustration of a mechanical component with a cylindrical housing and a circular inset showing internal components (no text or symbols)- Collect the discharged water in the container.
Note: According to the amount of water inside the machine, you may have you empty the water collection container a few times.
- Put back the plug of the black rubber hose after discharging the water.
- Mount the black rubber hose back to its clamp.
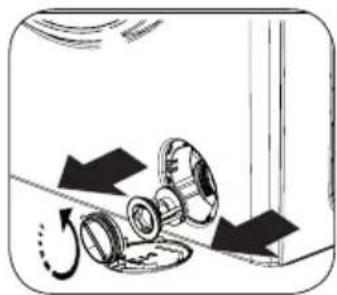
natural_image
Diagram showing mechanical components with arrows indicating motion, no text or symbols present- Loosen the filter cover by turning it counter-clockwise, and remove by pulling.
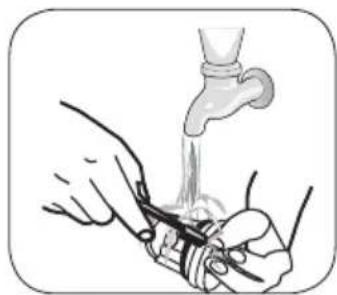
natural_image
Illustration of a hand using a tool to lift or lift a pipe onto a surface, with no visible text or symbols.- Clean the foreign materials inside the liter with the help of a brush.
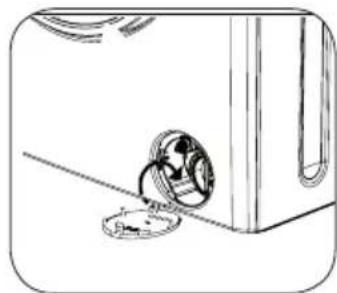
natural_image
Simple line drawing of a mechanical component with a circular inset showing internal components (no text or symbols)•After cleaning the filter replace the filter cover and tighten by turning clockwise.
- Please note that filter cover will leak water unless properly placed back.
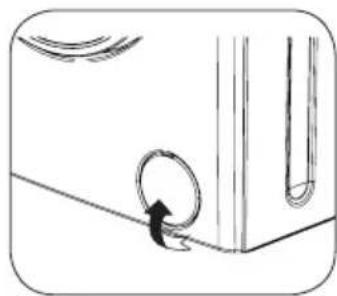
natural_image
Simple line drawing of a pipe or pipe system with a circular component and directional arrow (no text or symbols)- You can close the pump cover reverse of how you opened it.
- While closing the pump cover, ensure that the parts inside the cover meet the holes on the front panel side.
Troubleshooting
All repairing operations required for your machine should be carried out by an authorised service company. If your machine requires a repair or if you cannot solve an issue with the information provided below, then you should:
- Unplug the machine.
- Close the water tap.
- Contact the nearest authorised service company.
| FAULT POSSIBLE CAUSE REMOVING METHODS | ||
| Your machine will not start. | It is not plugged in. | Insert the plug into the socket. |
| Your fuse is defective | Change your fuse. | |
| Mains supply is cut off. | Check the mains supply. | |
| Start/Pause button is not pressed. | Press the start/pause button. | |
| The program knob is in stop (off) position. | Bring the program knob on the desired position. | |
| The door off your machine is not closed properly. | Close the door of your machine. | |
| No water is entering the machine. | Your tap is closed. | Open the tap. |
| Check the water inlet hose. | Water inlet hose may be twisted. | |
| Water inlet hose may be blocked. | Clean the water inlet hose filters.(*) | |
| Valve inlet filter is blocked. | Clean the valve inlet filters. (*) | |
| The door of your machine is not closed properly. | Close the door of your machine. | |
(*) See page 98
| FAULT POSSIBLE CAUSE REMOVING METHODS | ||
| Your machine does not discharge | Discharging hose clogged or twisted. | Check the discharging hose. |
| Pump filter clogged. | Clean the pump filter.(**) | |
| Your machine vibrates. | You machine's feet are not adjusted. | Adjust the feet of your machine. (*** ) |
| Transportation Safety screws are not removed. | Remove the transportation safety screws from your machine (****) | |
| Your machine only has a small amount of laundry inside. | This will not prevent the operation of your machine. | |
| Your machine is overloaded with laundry or the laundry is not distributed evenly. | Do not put more laundry in than the amount recommended and make sure it is loaded evenly. | |
| Your machine rests on a hard surface. | Avoid installing your machine on hard surfaces. When settling your machine, leave 2 cm space between it and walls or hard surfaces. | |
(**) See page 101
(***) See page 23
(****) See page 21
(**) See page 101
(***) See page 23
(****) See page 21
| FAULT POSSIBLE CAUSE REMOVING METHODS | ||
| Excessive foam is formed in the detergent drawer. | Excessive amount of detergent used. | Press the Start/Pause button. To eliminate foam formation, mix a spoon of softener with half a litre of water, and pour the mixture in the detergent drawer. After 5-10 minutes, press the Start/Pause button again. In your next washing operation, adjust the detergent dose accordingly. |
| Wrong detergent used. | Use detergents produced only for automatic washing machines in your machine. | |
| Unsatisfactory washing result. | The contamination degree of your laundry does not match the programme you have chosen. | Select programmes appropriate for your laundry's level of dirtiness. (See page 78 programme table) |
| Amount of detergent used insufficient. | Adjust the level of detergent according to the amount and level of dirtiness of your laundry. | |
| Your machine has more than the maximum capacity laundry inside the machine. | Load your machine with an amount of laundry that does not exceed the maximum laundry capacity. | |
| As soon as the machine is loaded with water, water discharges. | The end of the water drain hose is too low for the machine. | Set the water drain hose to an appropriate height. (***** ) |
| No water appears in the drum during washing. | No fault.Water is in the unseen part of the drum. | - |
| Laundry has detergent residues on them. | Non-dissolving particles of some detergents may adhere to your laundries as white spots. | Perform an extra rinsing by setting your machine to “Rinsing” programme, or clean the spots using a brush after your laundry dries. |
| Laundry have detergent residues on them. | The reason for these spots may be oil, cream or ointment. | Apply the maximum amount of detergent instructed by the detergent manufacturer in the next washing operation. |
| Spinning operation is not performed or runs late. | No fault.Unbalanced load control system has been activated. | The unbalanced load control system will try to spread your laundry evenly. The spinning operation will begin after your laundry is spread. Place the laundry in the machine in a balanced fashion next time. |
(****) See page 27.
| FAULT POSSIBLE CAUSE REMOVING METHODS | ||
| The load detection system on the screen does not work while loading the machine. | Laundry is placed into the machine without choosing a washing or drying programme. | Remove the laundry in your machine. Switch the programme knob to CANCEL position [IMAGE] reselect the programme you want to select. Load the laundry in the machine and run. |
| Laundry remains damp after the drying operation. | Appropriate drying programme is not selected.The maximum load capacity for the selected programme might be exceeded. | Select a drying programme appropriate for your laundry (see page 78 for the programme table) |
Automatic fault warnings and what needs to be done
Your machine is equipped with systems which are capable of both taking necessary precautions and warning you in case of any breakdown by means of continuous self-checking during washing operations.
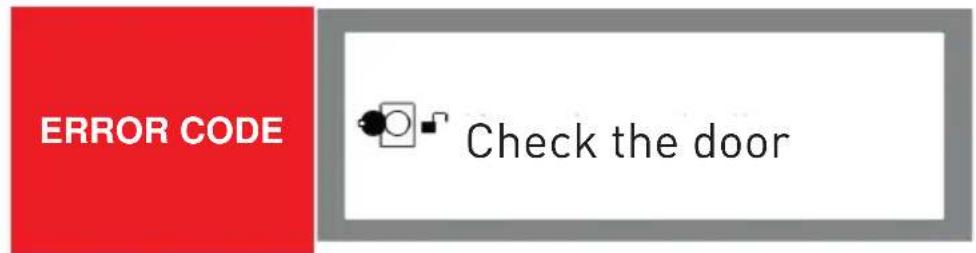
| POSSIBLE FAULT | The door of your machine is left open. |
| WHAT TO DO | Close the machine door. If your machine persists to indicate fault, turn off your machine, unplug it and contact the nearest authorised service company immediately. |
| ERROR CODE | NO WATERCheck water supply. |
| POSSIBLE FAULT | Water cut-off or low mains water pressure. |
| WHAT TO DO | - Water tap may be closed. Check.- Mains water may be cut-off. Check.- If so, switch the programme knob to CANCEL position. ⏻- You can select a programme and run your machine after the mains water is supplied.- Mains water pressure may be low. Check.- Water inlet hose may be twisted. Check.- Water inlet hose may be clogged.- Clean water inlet hose and valve inlet filters. (*)If the problem persists, unplug your machine, turn off your tap and contact the nearest authorised service company. |
(*) See page 98.
| ERROR CODE | [PZCC] PUMPUnplug the machine. |  |
| POSSIBLE FAULT | Pump is damaged, pump filter is clogged or pump electrical connection is malfunctioning. | |
| WHAT TO DO | Clean the pump(**)filter.If the problem persists, contact the nearest authorised service company. | |
| ERROR CODE |  FILTERCheck filter. FILTERCheck filter. |  |
| POSSIBLE FAULT | Pump is damaged or pump filter is clogged or pump electrical connection is malfunctioning. | |
| WHAT TO DO | -Pump filter may be clogged.- Clean the pump filter. (**) - Drain hose may be clogged or twisted.- Check the Drain hose.- If the problem persists, contact the nearest authorised service company. | |
(**) See page 101.
| ERROR CODE | OVERFLOWClose tap. |
| POSSIBLE FAULT | Your machine has excessive amount of water. |
| WHAT TO DO | Your machine will drain water by itself. Pursuant to draining operation, turn off your machine and unplug it. Turn off your faucet and contact the nearest authorised service company. |
| ERROR CODE | VOLTAGEOut of range. | - V + |
| POSSIBLE FAULT | Mains voltage is high or low. |
| WHAT TO DO | There might be a fluctuation on the energy fed to your machine, check if the socket you have your machine plugged into is grounded. Have an electrician measure the amount of voltage coming to your house. If there is no problem in the electricity, unplug your machine and inform the nearest service company. |
CONCEPT POLSKA sp. z o.o.


- Třídění prádla
- Suché k zavěšení
- Čištění bubnu
- CONCEPT POLSKA sp. z o.o.
- PRED POUŽITÍM PRÁČKY
- Správne použitie
- Bezpečnost' detí!
- Priehradka na prací prostriedok na predpieranie:
- Triedenie bielizne
- ▶Tlačidlo Štart/Pauza
- Spustenie programu
- Čistenie bubna
- PRZED PIERWSZYM UŻYCIEM
- Uwaga!
- USTAWIENIE URZĄDZENIA
- Uwaga! • Nigc
- dozoWnik deterGentU PrAniA zAsAdniczeGo:
- dozoWnik deterGentU do zMiĘkczAniA, krochMAleniA:
- dozoWnik deterGentU PrAniA WstEPneGo:
- SEGREGACJA BIELIZNY
- OBSŁUGA OPCJI PRANIA
- Przycisk stArt / PAUzA
- • UrUchAMiAnie ProGrAMU
- Wybór PodProGrAMÓW (tkAniny delikAtne)
- czyszczenie bĘbnA
- PIRMS IERİCES LIETOŠANAS Pareizais lietojums
- IEPAKOJUMS UN APKÄRTËJÄ VIDE
- IEPAKOJUMA UN NOLIETOTĀS IERĪCES IZ-MEŠANA PAREIZĀ VEIDĀ
- Vejas škirošana
- Žāvēšana izkarot
- Apakšprogrammu atlase (Extras)
- BEFORE USING YOUR MACHINE Correct Use
- General warnings
- Safety warnings
- Burn risk!
- Electrocution risk!
- Flooding risk!
- ! Explosion risk!
- ! Fire risk!
- Fall and injury risk!
- Child safety!
- PACKAGING AND THE ENVIRONMENT
- DISPOSING OF PACKAGING AND YOUR OLD MACHINE RESPONSIBLY
- Removal of packaging materials
- Removal of old machine
- SAVINGS & EFFICIENCY INFORMATION
- OVERVIEW OF YOUR DEVICE
- General Appearance
- SETTING UP THE MACHINE
- Removing transportation safety screws
- Placing the machine and adjusting the adjustable foot
- Electrical connection
- Water inlet connection
- Water draining connection
- CONTROL PANEL
- Detergent drawer general view
- Detergent drawer compartments
- Main wash detergent compartment:
- Softener, starching, detergent compartment:
- Pre-Wash detergent compartment:
- Adjusting machine settings
- Language selection setting
- SAVE Save Zone Setting
- ZONE (Economic time interval)
- Current time setting
- Sound Adjustment
- Screen brightness setting
- Screen contrast setting
- Revert to factory settings
- WASHING OPERATION
- Sorting laundry
- Explanation of washing symbols
- Placing laundry into the machine
- Choice of detergent and placing into the machine
- Program selection
- If you want your laundry dried at the end of washing
- Cupboard dry
- Hanger dry
- Iron dry
- Drying with duration
- Additional Functions
- Pre-wash additional function
- Extra rinse function
- Anti-allergic additional function
- Easy ironing additional function
- SAVE ZONE Economic time interval additional function
- Delay Time / Finish time adjustment additional function
- Memory record function button (MEMORY)
- Start/Pause button Starting the programme
- Pausing a programme / Adding laundry
- Cancelling a programme
- Finishing a programme
- Child Lock
- Program Table
- Important Informations
- Selecting sub-programmes Easy care
- Selecting sub-programmes (Delicates)
- Selecting sub-programmes (Extras)
- MAINTENANCE AND CLEANING OF YOUR MACHINE
- Notice !
- Water inlet filters
- Detergent drawer maintenance and cleaning
- Siphon cover
- Drum Cleaning
- Body Cleaning
- Pump filter maintenance and cleaning
- Troubleshooting
- Automatic fault warnings and what needs to be done
Brand : Concept
Model : PSP6509i
Category : Washing machine