
PTZ-N2204I-D3 - Security Camera HiWatch - Free user manual and instructions
Find the device manual for free PTZ-N2204I-D3 HiWatch in PDF.


| Product Type | PTZ Security Camera |
| Power Supply | 12 VDC |
| Video Output | BNC (for test) |
| Network Interface | Ethernet (RJ-45) |
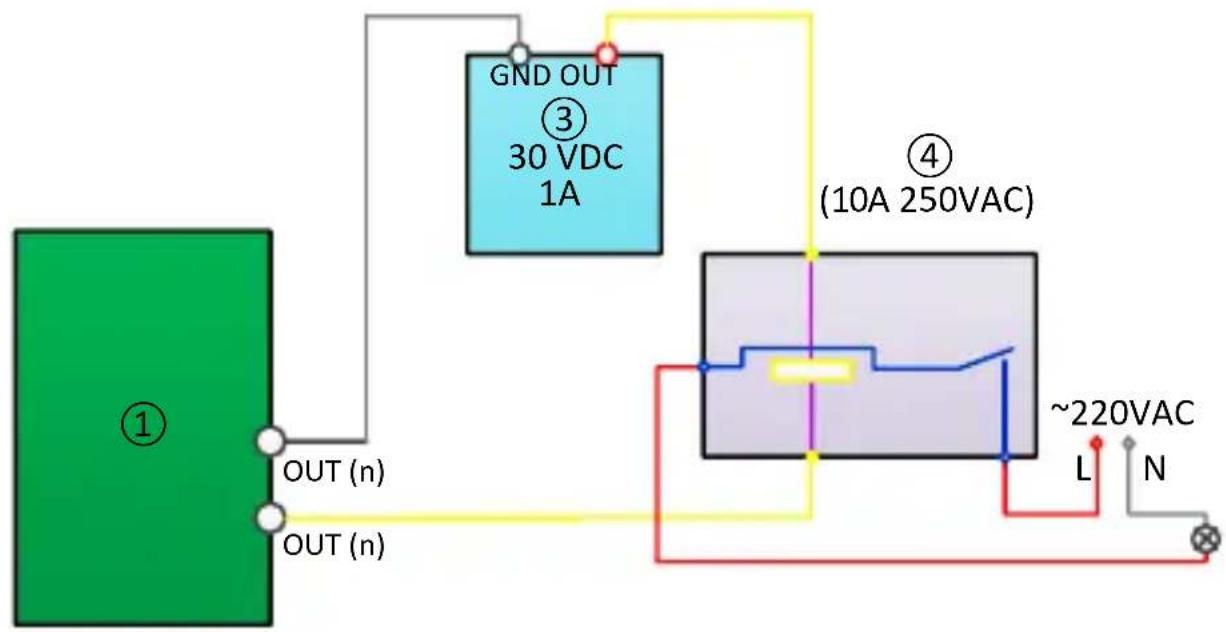
| Alarm I/O | 1 alarm input, 1 alarm output (relay, 30VDC/1A or 250VAC/10A) |
| Audio | 1 audio input (line-in) |
| RS-485 | Yes (for PTZ control) |
| Memory Card Slot | MicroSD (not included) |
| Reset Button | Press for 10 seconds to restore defaults |
| Mounting Type | Ceiling or wall (bracket optional) |
| Waterproof Rating | IP66 (outdoor use with waterproof accessories) |
| Illuminator | IR LED (Risk Group 1, do not stare) |
| Weight | Approx. 1.5 kg (3.3 lbs) |
| Dimensions (approx.) | 200 x 200 x 300 mm (7.9 x 7.9 x 11.8 in) |
| Operating Temperature | -30 °C to 60 °C (-22 °F to 140 °F) |
| Humidity | 90% or less (non-condensing) |
| Protection Class | Class A digital device (FCC), CE compliant |
| Cleaning | Use soft dry cloth; avoid alkaline detergents |
| Maintenance | Regular replacement of electrolytic capacitors; contact dealer |
| Safety Certifications | FCC Part 15, IC, CE, RoHS, WEEE |
Frequently Asked Questions - PTZ-N2204I-D3 HiWatch
User questions about PTZ-N2204I-D3 HiWatch
0 question about this device. Answer the ones you know or ask your own.
Ask a new question about this device
Download the instructions for your Security Camera in PDF format for free! Find your manual PTZ-N2204I-D3 - HiWatch and take your electronic device back in hand. On this page are published all the documents necessary for the use of your device. PTZ-N2204I-D3 by HiWatch.
USER MANUAL PTZ-N2204I-D3 HiWatch
natural_image
Line drawing of a mechanical device with a circular base and attached sensor or sensor (no text or symbols)HiWatch
HiWatch
C
C1
C2.1
natural_image
Diagram of a mechanical assembly with pulleys and a central circular component, no text or symbols presentHiWatch
C2.2
natural_image
Diagram of a ceiling-mounted device with internal components and lock mechanism (no text or symbols)C3.1
natural_image
Technical line drawing of a mechanical assembly before and after transformation (no text or symbols)C3.2
natural_image
Technical line drawing of a mechanical component before and after assembly, showing internal components and mounting holes (no text or symbols)HiWatch
C3.3
natural_image
Technical line drawing of a mechanical component with three protruding rods and internal structure (no text or symbols)C3.4
natural_image
Technical line drawing of a mechanical device with a circular component and two switches below (no text or symbols)C3.5
natural_image
Technical line drawing of a ceiling-mounted device with a spherical component and curved internal structure (no text or symbols)HiWatch
D
1
flowchart
graph TD
    A["Initial cable"] --> B["Assembly step 1"]
    B --> C["Assembly step 2"]
    C --> D["Final assembly with cable"]

    subgraph Initial
    E["Wire connection"]
    F["Close-up cable"]
    end

    subgraph Final
    G["Final cable"]
    H["Final cable"]
    end

    style Initial fill:#f9f,stroke:#333
    style Final fill:#bbf,stroke:#333
2
natural_image
Three-step illustration showing a hand holding a tool, with arrows indicating the process (no text or symbols present)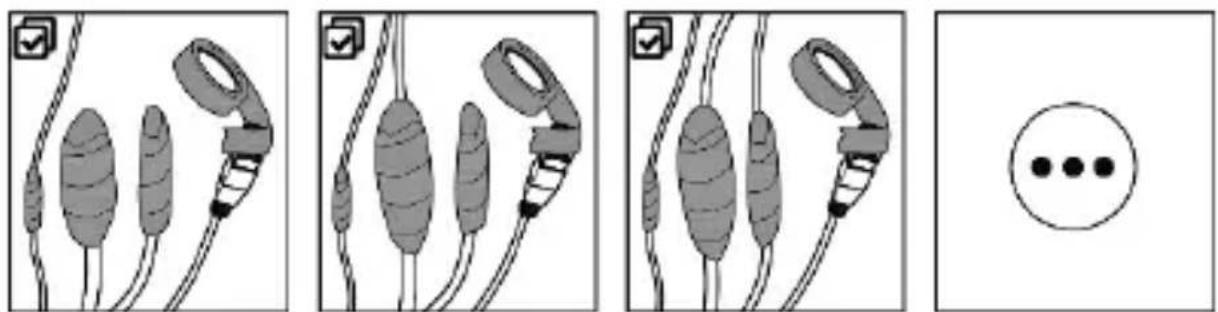
E
English

Product appearance is for reference only and may differ from the actual product.
Cable Description (Page 1 – A)
Notes:
The cables vary depending on different camera models.
- Power Cord: Supports 12 VDC power supply.
- Video Cable: Connect BNC Cable to test the video output.
- RS-485
- Alarm Cable: Connect terminal ALARM-IN with GND interface, and connect terminal ALARM-OUT with ALARM-COM interface.
- Audio Cable: Connect terminal AUDIO-IN with GND interface.
- Network Cable: Connect the network interface with network cable.
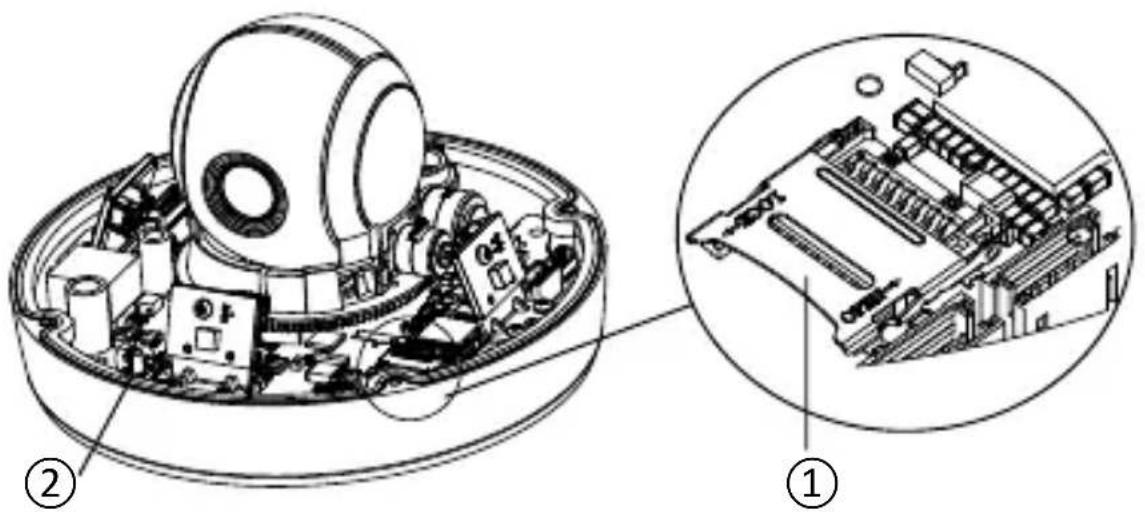
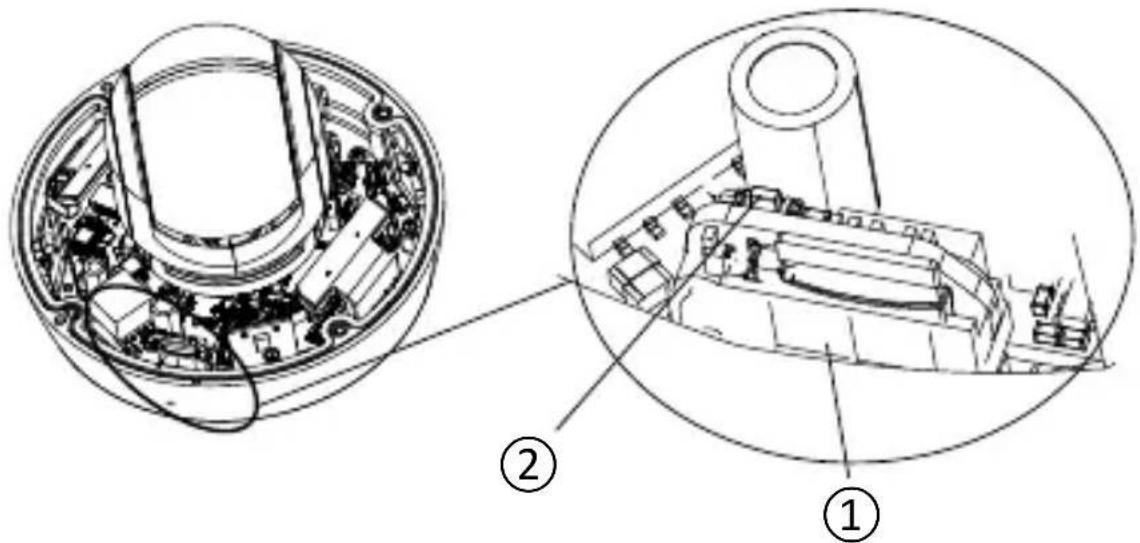
Install the Memory Card (Page 1 – B)
① Memory card slot
② Reset button: Press reset button for about 10 s when the camera is powering on or rebooting to restore the default settings, including the user name, password, IP address, port No., etc.
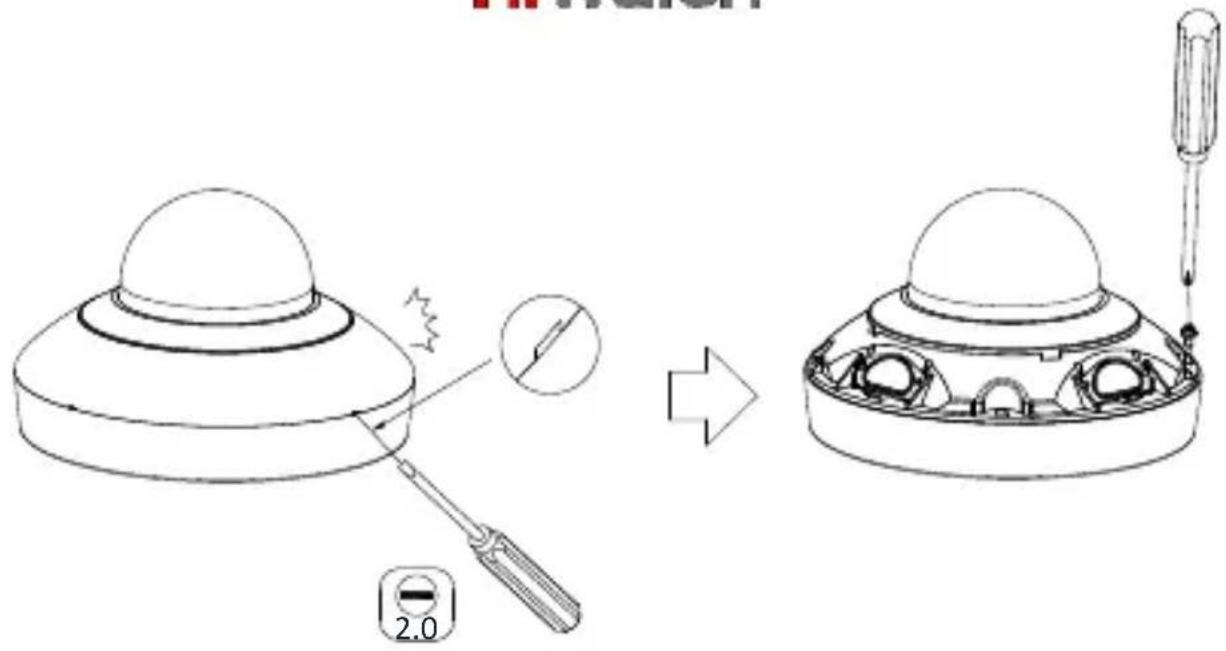
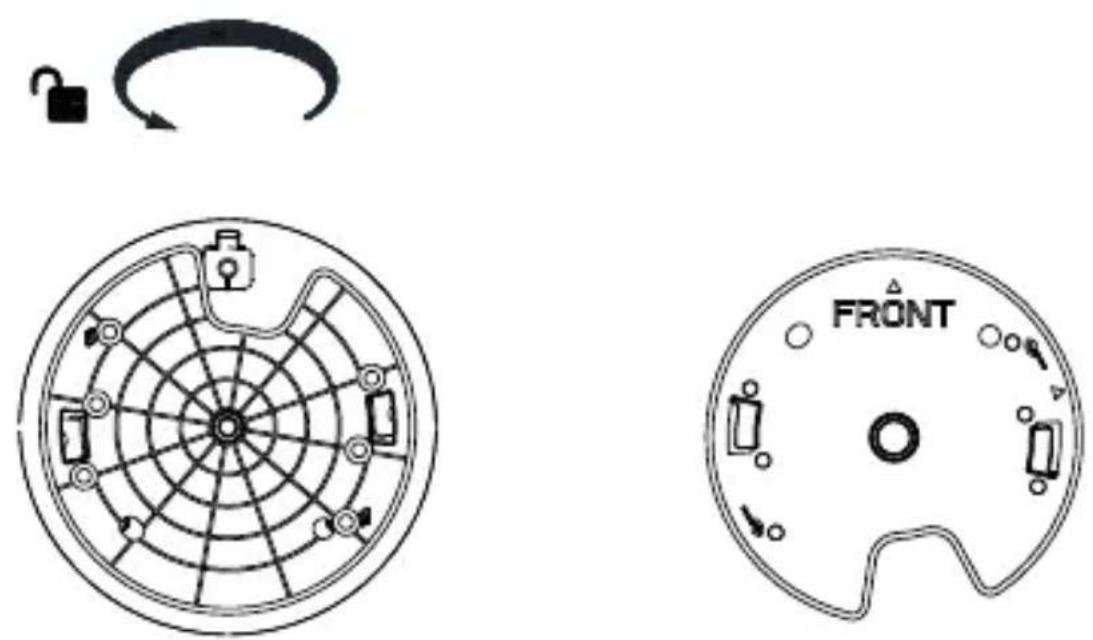
Install the Camera (Page 3 – C)
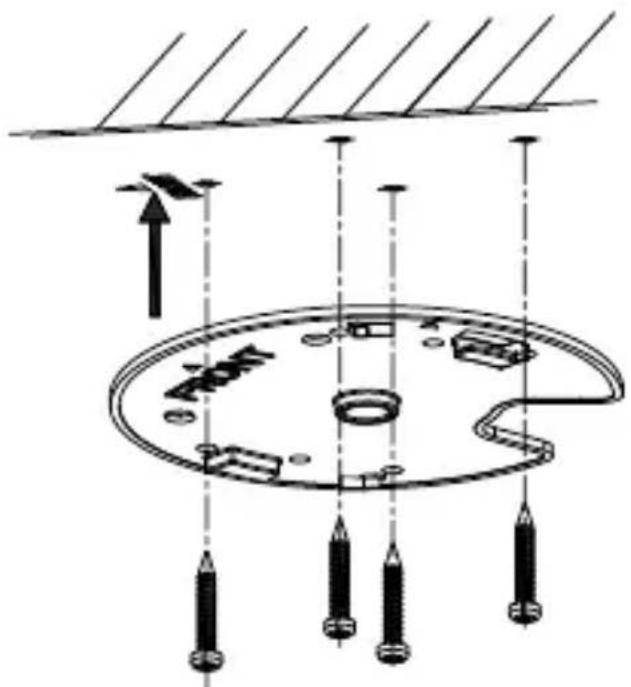
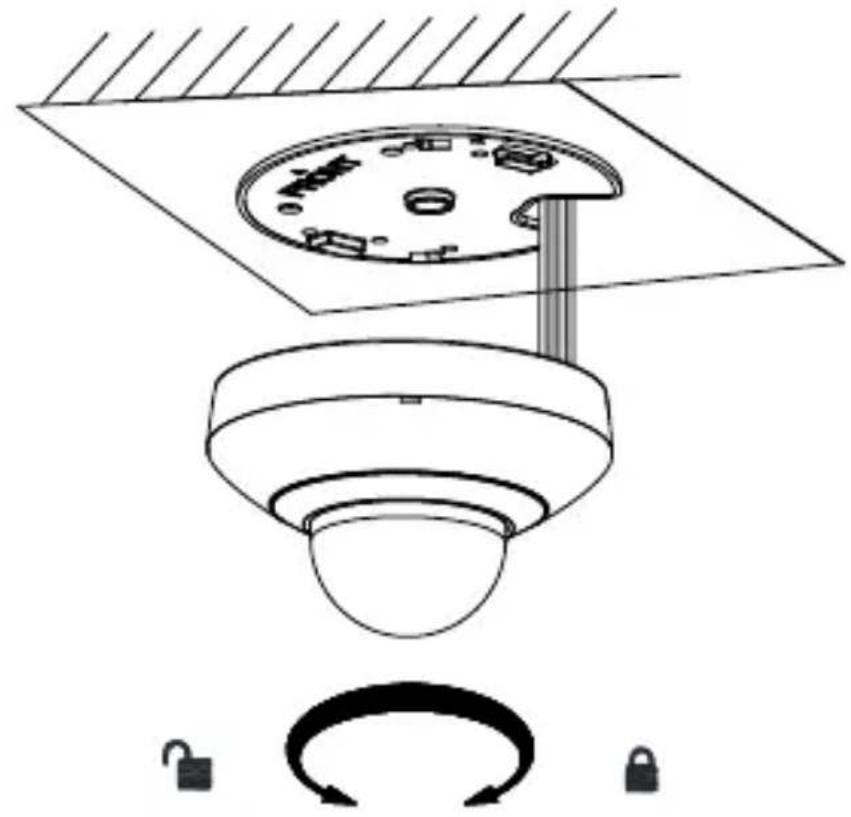
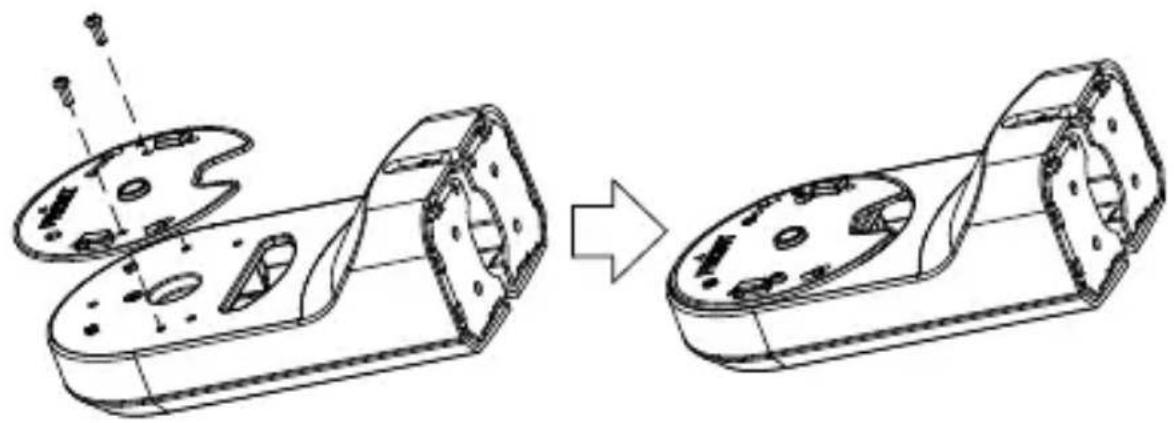
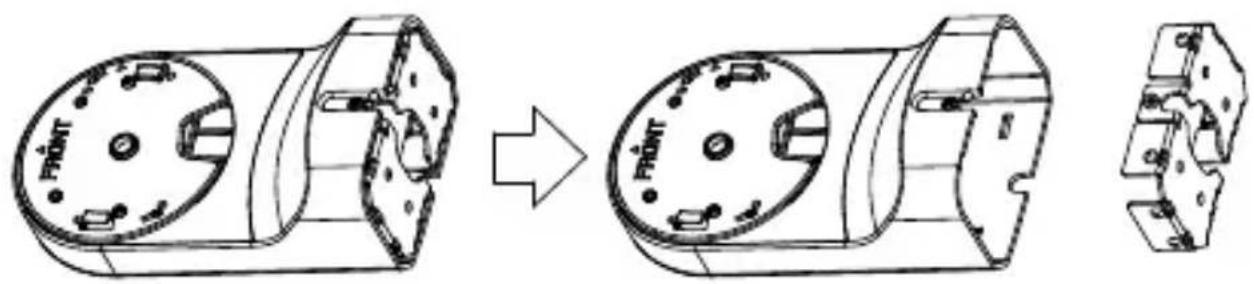
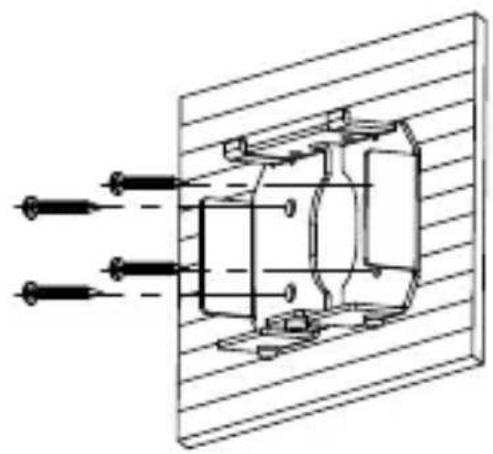
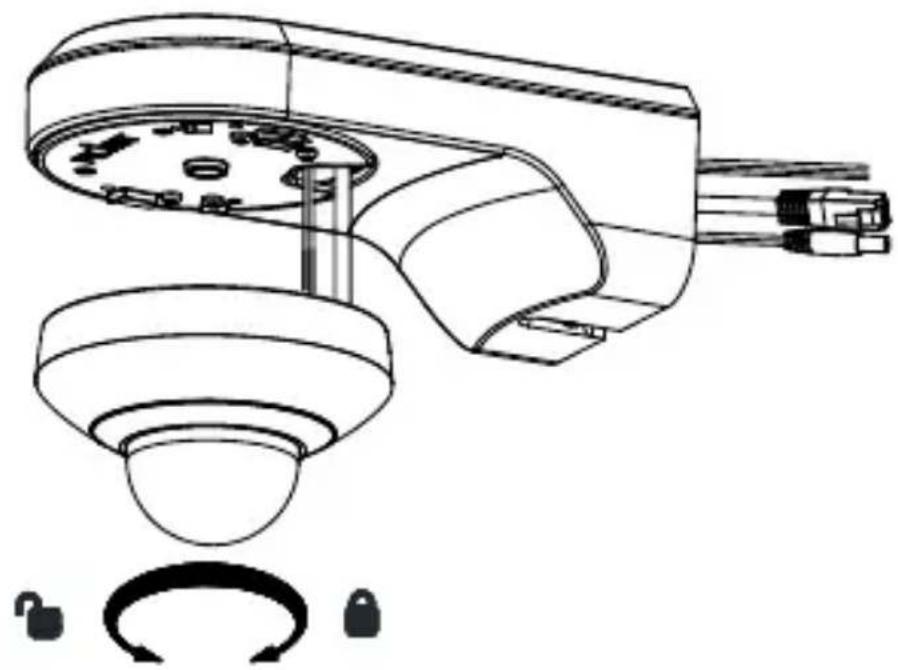
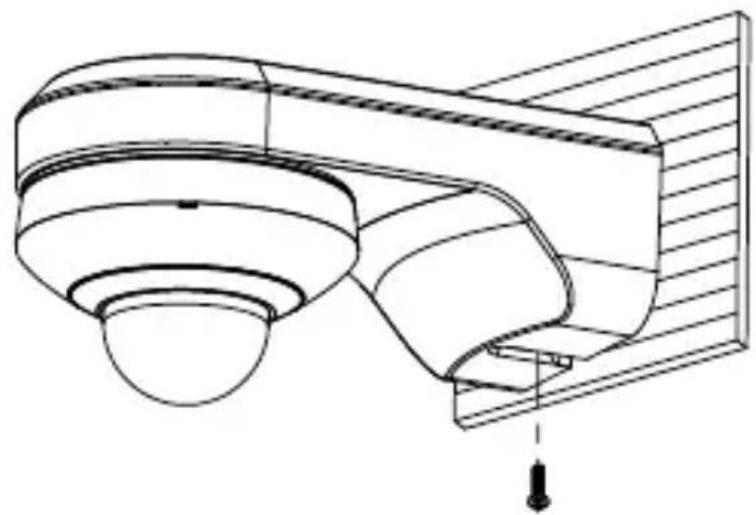
Remove the installation plate from the bottom of the camera (C1) and mount the camera on the ceiling or wall:
● Ceiling mounting (C2.1-2.2)
● Wall mounting with bracket (purchased separately) (C3.1-3.5)
Notes:
The installation steps for different camera types are similar. The diagrams use one type for illustration.
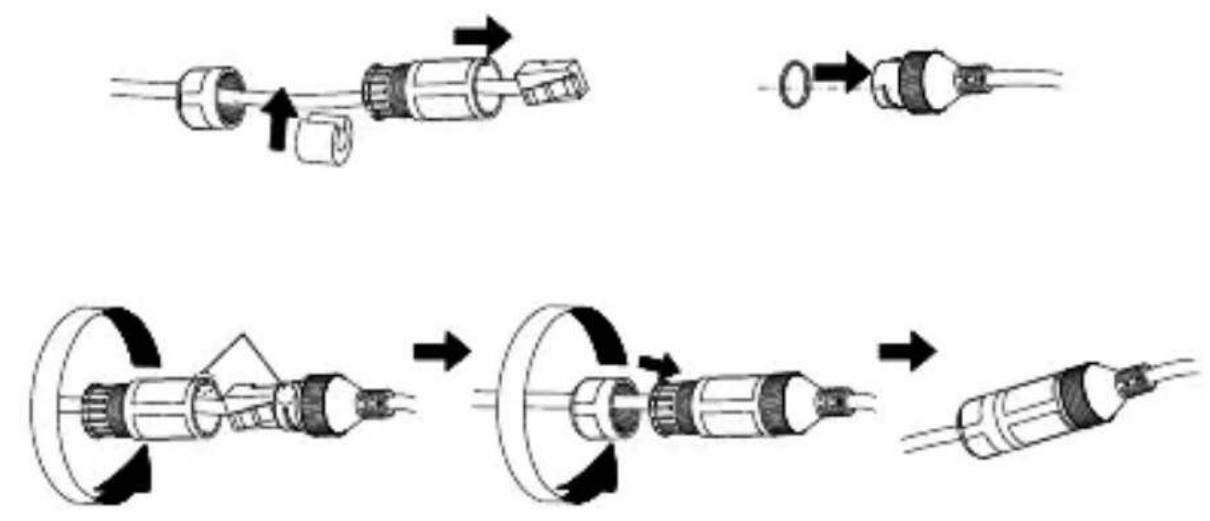
Waterproof for Outdoor Installation (Page 6 – D)
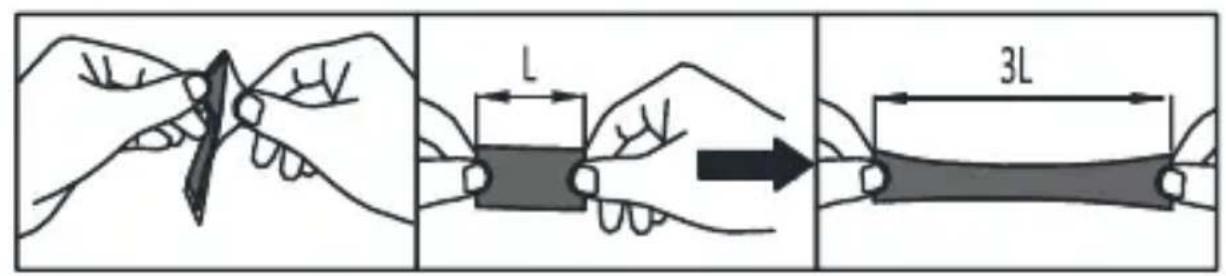
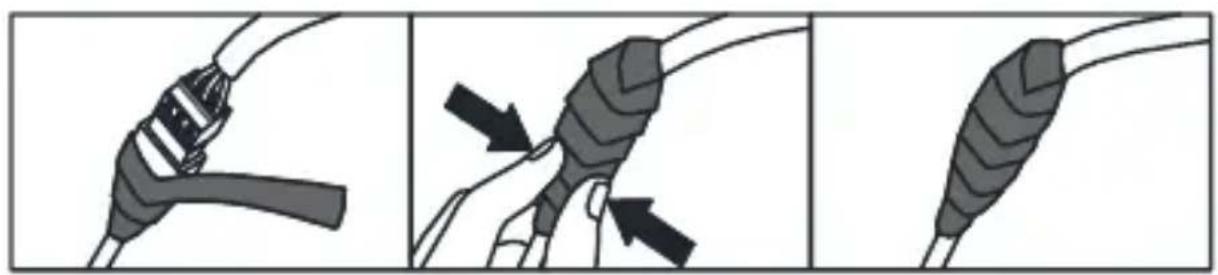
- Install network cable waterproof jacket.
- Use supplied waterproof tape to protect cable connectors and unused cables.
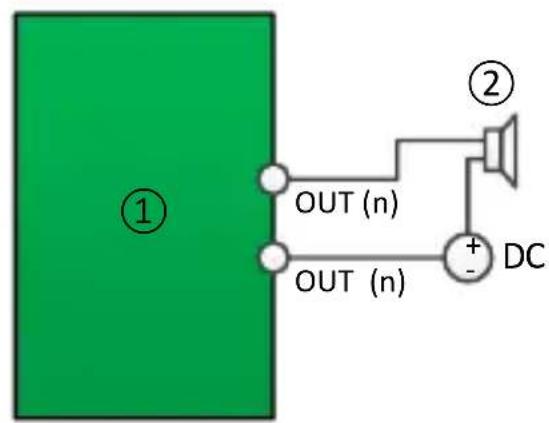
Alarm Output (Page 7 – E)
① Relay output
② DC load
③ Power supply
④ JQC-3FG Relay
Protective Measures for Outdoor Installation (Page 7 – F1)
Activate and Access Network Camera (Page 7 – F2)
© 2021 Hangzhou Hikvision Digital Technology Co., Ltd. All rights reserved.
About this Manual
The Manual includes instructions for using and managing the Product. Pictures, charts, images and all other information hereinafter are for description and explanation only. The information contained in the Manual is subject to change, without notice, due to firmware updates or other reasons. Please find the latest version of this Manual at the Hikvision website (https://www.hikvision.com/). Please use this Manual with the guidance and assistance of professionals trained in supporting the Product.
Trademarks
HIKVISION and other
Hikvision's trademarks and logos are the properties of Hikvision in various jurisdictions.
Other trademarks and logos mentioned are the properties of their respective owners.
HiWatch
DISCLAIMER
TO THE MAXIMUM EXTENT PERMITTED BY APPLICABLE LAW, THIS MANUAL AND THE PRODUCT DESCRIBED, WITH ITS HARDWARE, SOFTWARE AND FIRMWARE, ARE PROVIDED "AS IS" AND "WITH ALL FAULTS AND ERRORS". HIKVISION MAKES NO WARRANTIES, EXPRESS OR IMPLIED, INCLUDING WITHOUT LIMITATION, MERCHANTABILITY, SATISFACTORY QUALITY, OR FITNESS FOR A PARTICULAR PURPOSE. THE USE OF THE PRODUCT BY YOU IS AT YOUR OWN RISK. IN NO EVENT WILL HIKVISION BE LIABLE TO YOU FOR ANY SPECIAL, CONSEQUENTIAL, INCIDENTAL, OR INDIRECT DAMAGES, INCLUDING, AMONG OTHERS, DAMAGES FOR LOSS OF BUSINESS PROFITS, BUSINESS INTERRUPTION, OR LOSS OF DATA, CORRUPTION OF SYSTEMS, OR LOSS OF DOCUMENTATION, WHETHER BASED ON BREACH OF CONTRACT, TORT (INCLUDING NEGLIGENCE), PRODUCT LIABILITY, OR OTHERWISE, IN CONNECTION WITH THE USE OF THE PRODUCT, EVEN IF HIKVISION HAS BEEN ADVISED OF THE POSSIBILITY OF SUCH DAMAGES OR LOSS.
YOU ACKNOWLEDGE THAT THE NATURE OF THE INTERNET PROVIDES FOR INHERENT SECURITY RISKS, AND HIKVISION SHALL NOT TAKE ANY RESPONSIBILITIES FOR ABNORMAL OPERATION, PRIVACY LEAKAGE OR OTHER DAMAGES RESULTING FROM CYBER-ATTACK, HACKER ATTACK, VIRUS INFECTION, OR OTHER INTERNET SECURITY RISKS; HOWEVER, HIKVISION WILL PROVIDE TIMELY TECHNICAL SUPPORT IF REQUIRED.
YOU AGREE TO USE THIS PRODUCT IN COMPLIANCE WITH ALL APPLICABLE LAWS, AND YOU ARE SOLELY RESPONSIBLE FOR ENSURING THAT YOUR USE CONFORMS TO THE
APPLICABLE LAW. ESPECIALLY, YOU ARE RESPONSIBLE, FOR USING THIS PRODUCT IN A MANNER THAT DOES NOT INFRINGE ON THE RIGHTS OF THIRD PARTIES, INCLUDING WITHOUT LIMITATION, RIGHTS OF PUBLICITY, INTELLECTUAL PROPERTY RIGHTS, OR DATA PROTECTION AND OTHER PRIVACY RIGHTS. YOU SHALL NOT USE THIS PRODUCT FOR ANY PROHIBITED END-USES, INCLUDING THE DEVELOPMENT OR PRODUCTION OF WEAPONS OF MASS DESTRUCTION, THE DEVELOPMENT OR PRODUCTION OF CHEMICAL OR BIOLOGICAL WEAPONS, ANY ACTIVITIES IN THE CONTEXT RELATED TO ANY NUCLEAR EXPLOSIVE OR UNSAFE NUCLEAR FUEL-CYCLE, OR IN SUPPORT OF HUMAN RIGHTS ABUSES.
IN THE EVENT OF ANY CONFLICTS BETWEEN THIS MANUAL AND THE APPLICABLE LAW, THE LATER PREVAILS.
Regulatory Information
FCC Information
Please take attention that changes or modification not expressly approved by the party responsible for compliance could void the user's authority to operate the equipment.
FCC compliance: This equipment has been tested and found to comply with the limits for a Class A digital device, pursuant to part 15 of the FCC Rules. These limits are designed to provide reasonable protection against harmful interference in a residential installation. This equipment generates, uses and can radiate radio frequency energy and, if not installed and used in accordance with the instructions, may cause harmful interference to radio communications. However, there is no guarantee that interference will not occur in a particular installation. If this
HiWatch
equipment does cause harmful interference to radio or television reception, which can be determined by turning the equipment off and on, the user is encouraged to try to correct the interference by one or more of the following measures:
—Reorient or relocate the receiving antenna.
—Increase the separation between the equipment and receiver.
—Connect the equipment into an outlet on a circuit different from that to which the receiver is connected.
—Consult the dealer or an experienced radio/TV technician for help.
The equipment with Wi-Fi function should be installed and operated with a minimum distance 20cm between the radiator and your body.
FCC Conditions
This device complies with part 15 of the FCC Rules. Operation is subject to the following two conditions:
-
This device may not cause harmful interference.
-
This device must accept any interference received, including interference that may cause undesired operation.
EU Conformity Statement
This product and - if applicable - the supplied accessories too are
marked with "CE" and comply therefore with the applicable harmonized European standards listed under the Low Voltage Directive 2014/35/EU, the EMC Directive 2014/30/EU, the RoHS Directive 2011/65/EU, and RE Directive 2014/53/EU (for devices with Wi-Fi function).
2012/19/EU (WEEE directive): Products marked with this symbol cannot be disposed of as unsorted municipal waste in the European Union. For proper recycling, return this product to your local supplier upon the purchase of equivalent new equipment, or dispose of it at designated collection points. For more information, please see: www.recyclethis.info.
2006/66/EC (battery directive): This product contains a battery that cannot be disposed of as unsorted municipal waste
in the European Union. See the product documentation for specific battery information. The battery is marked with this symbol, which may include lettering to indicate cadmium (Cd), lead (Pb), or mercury (Hg). For proper recycling, return the battery to your supplier or to a designated collection point. For more information, please see: www.recyclethis.info.
Industry Canada ICES-003 Compliance
For devices without Wi-Fi function
This device meets the CAN ICES-3 (A)/NMB-3(A) standards requirements.
For devices with Wi-Fi function
This device meets the CAN ICES-3 (B)/NMB-3(B) standards requirements.
This device complies with Industry Canada licence-exempt RSS standard(s). Operation is subject to the following two conditions:
(1) this device may not cause interference, and (2) this device must accept any interference, including interference that may cause undesired operation of the device.
(2) l'utilisateur de l'appareil doit accepter tout brouillage radioélectrique subi, même si le brouillage est susceptible d'en compromettre le fonctionnement. Under Industry Canada regulations, this radio transmitter may only operate using an antenna of a type and maximum (or lesser) gain approved for the transmitter by Industry Canada. To reduce potential radio interference to other users, the antenna type and its gain should be so chosen that the equivalent isotropically radiated power (e.i.r.p.) is not more than that necessary for successful communication.
This equipment complies with FCC/IC RSS-102 radiation exposure limits set forth for an uncontrolled environment. This equipment should be installed and operated with minimum distance 20cm between the radiator & your body.
Laws and Regulations
The device should be used in compliance with local laws, electrical safety regulations, and fire prevention regulations.
Electrical Safety
CAUTION: To reduce the risk of fire, replace only with the same type and rating of fuse.
Battery
This equipment is not suitable for use in locations where children are likely to be present.
CAUTION: Risk of explosion if the battery is replaced by an incorrect type.
Improper replacement of the battery with an incorrect type may defeat a safeguard (for example, in the case of some lithium battery types). Do not dispose of the battery into fire or a hot oven, or mechanically crush or cut the battery, which may result in an explosion.
Do not leave the battery in an extremely high temperature surrounding environment, which may result in an explosion or the leakage of flammable liquid or gas.
Do not subject the battery to extremely low air pressure, which may result in an explosion or the leakage of flammable liquid or gas. Dispose of used batteries according
to the instructions.

Cautions
Fire Prevention
No naked flame sources, such as lighted candles, should be placed on the equipment.
The serial port of the equipment is used for debugging only.
Hot Surface
CAUTION: Hot parts! Burned fingers when handling the parts.
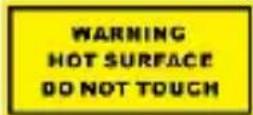
This sticker is to
indicate that the marked item can be hot and should not be touched without taking care. Wait one-half hour after switching off before handling parts.
The device with this sticker is intended for installation in a restricted access location. Access can only be gained by service persons or by users who have been instructed about the reasons for the restrictions applied to the location and about any precautions that shall be taken.
Installation
Install the equipment according to the instructions in this manual.
To prevent injury, this equipment must be securely attached to the ceiling/wall in accordance with the installation instructions.
Be sure that there is enough space to install the device and accessories.
Make sure that the wall is strong enough to withstand at least 8 times the weight of the device and the mount.
Make sure that the power has been disconnected before you wire, install, or disassemble the device.
Transportation
Keep the device in original or similar packaging while transporting it.
Do not drop the product or subject it to physical shock.
Power Supply
The power source should meet limited power source or PS2 requirements according to IEC 60950-1 or IEC 62368-1 standard. Refer to the device label for the standard power supply. Please make sure your power supply matches with your device.
Use a power adapter provided by qualified manufacturers. It is recommended to provide an independent power adapter for each device as adapter overload may cause over-heating or a fire hazard.
System Security
Please understand that you have the responsibility to configure all the passwords and other security settings about the device, and keep your user name and password.
Maintenance
If the product does not work properly, please contact your dealer or the nearest service center. We shall not assume any responsibility for problems caused by unauthorized repair or maintenance.
A few device components (e.g., electrolytic capacitor) require regular replacement. The average lifespan varies, so periodic checking is recommended. Contact your dealer for details.
Cleaning
Please use a soft and dry cloth to clean the interior and exterior surfaces. Do not use alkaline detergents.
Using Environment
When any laser equipment is in use, make sure that the device lens is not exposed to the laser beam, or it may burn out.
Do not aim the lens at the sun or any other bright light.
HiWatch
To avoid heat accumulation, good ventilation is required for a proper operating environment.
DO NOT expose the device to extremely hot, cold, dusty, corrosive, saline-alkali, or damp environments. For temperature and humidity requirements, see device specification.
DO NOT expose the device to high electromagnetic radiation.
Illuminator
Make sure that there is no reflective surface too close to the device lens. The light from the device may reflect back into the lens causing reflection. The beam of the light at the distance of 200 mm is classified as Risk Group 1 (RG1). Possible hazardous optical radiation emitted from this product. DO NOT stare at operating light source. May be harmful to the eyes. If appropriate shielding or eye protection is not available, turn on the light only at a safe distance or in the area that is not directly exposed to the light when installing or maintaining the device.
Emergency
If smoke, odor, or noise arises from the device, immediately turn off the power, unplug the power cable, and contact the service center.
Time Synchronization
Set up device time manually for the first time access if the local time is not synchronized with that of the network. Visit the device via web browser/client software and go to time settings interface.
Русский
- HiWatch
- C
- D
- English
- Cable Description (Page 1 – A)
- Notes:
- Install the Memory Card (Page 1 – B)
- Install the Camera (Page 3 – C)
- Waterproof for Outdoor Installation (Page 6 – D)
- Alarm Output (Page 7 – E)
- Protective Measures for Outdoor Installation (Page 7 – F1)
- Activate and Access Network Camera (Page 7 – F2)
- © 2021 Hangzhou Hikvision Digital Technology Co., Ltd. All rights reserved.
- About this Manual
- Trademarks
- HIKVISION and other
- DISCLAIMER
- Regulatory Information
- FCC Information
- FCC Conditions
- EU Conformity Statement
- Industry Canada ICES-003 Compliance
- For devices without Wi-Fi function
- For devices with Wi-Fi function
- Laws and Regulations
- Electrical Safety
- Battery
- Cautions
- Fire Prevention
- Hot Surface
- Installation
- Transportation
- Power Supply
- System Security
- Maintenance
- Cleaning
- Using Environment
- Illuminator
- Emergency
- Time Synchronization
- Русский
Brand : HiWatch
Model : PTZ-N2204I-D3
Category : Security Camera