
Terrabox T3 - Receiver TECHNISAT - Free user manual and instructions
Find the device manual for free Terrabox T3 TECHNISAT in PDF.


| Product Type | Satellite Receiver |
| Brand | TechniSat |
| Model | Terrabox T3 |
| Dimensions (approx.) | 20 x 15 x 4 cm |
| Weight (approx.) | 0.5 kg |
| Power Supply | 12V DC, 1A |
| Video Output | HDMI, SCART |
| Audio Output | HDMI, Digital Optical |
| Tuner Type | DVB-S2 |
| Number of Tuners | 1 |
| DiSEqC Support | Yes, 1.0/1.1 |
| USB Port | 1 x USB 2.0 |
| Ethernet Port | Yes, 10/100 |
| HDD Support | External via USB |
| Channel Memory | 4000 channels |
| Electronic Program Guide | Yes, 7-day |
| Parental Control | Yes |
| Maintenance | Wipe with a soft dry cloth; avoid liquids |
| Safety | Do not expose to moisture; unplug during storms |
| Spare Parts / Repairability | Contact TechniSat service center |
Frequently Asked Questions - Terrabox T3 TECHNISAT
User questions about Terrabox T3 TECHNISAT
0 question about this device. Answer the ones you know or ask your own.
Ask a new question about this device
Download the instructions for your Receiver in PDF format for free! Find your manual Terrabox T3 - TECHNISAT and take your electronic device back in hand. On this page are published all the documents necessary for the use of your device. Terrabox T3 by TECHNISAT.
USER MANUAL Terrabox T3 TECHNISAT
natural_image
Interior scene of a man seated at a table with tea set and teapot, no visible text or symbolsDVB-T2 receiver with USB recording function
Foreword
Dear Customer,
thank you for choosing TechniSat TERRABOX T3 Digital Terrestrial Receiver.
This user manual is intended to help you learn about and make the most of the extensive features of your new device. It will help you to use your digital receiver safely and as intended.
The manual is intended for anyone who installs, connects, operates, cleans or disposes of the receiver. Keep this manual in a safe place for future reference.
Detailed information on the operation of the unit is provided in the digital version of the manual, the latest version of which can be found on the TechniSat website at www.technisat.pl.
We have tried to make the manual as clear and concise as possible.
The device's range of functions is constantly being extended by software updates. As a result, certain functionalities may be added that are not explained in the manual. For this reason, please visit the TechniSat homepage from time to time to download the latest version of the user manual.
We wish you much pleasure in using the TechniSat TERRABOX T3.
TechniSat team
Contents
1 Pictures and description of the device....4
2 Please read first 6
2.1 Purpose of the device....6
2.2 Safety instructions....6
2.3 Interruptions in operation 9
2.4 Important information about backing up data....9
2.5 Remote control / Battery change 9
2.6 Disposal instructions....9
3 Connecting the receiver....10
3.1 Connection to power supply 10
3.2 Connecting to a TV 10
3.3 USB connector 10
3.4 Connecting the antenna cable....10
3.5 First start-up....11
4 Basic operation....11
4.1 Turning the device on / off 11
4.2 Calling up the main menu and menu navigation....11
4.3 List of programs....12
4.4 Picture settings....14
4.5 Channel search....15
4.6 Time....17
4.7 Options 18
4.8 System 18
4.9 USB 20
4.10 DVR configuration 21
5 Useful functions....21
5.1 EPG....22
5.2 Teletext 23
5.3 Selecting an audio track....24
5.4 Subtitles 24
5.5 Recording 24
5.6 TimeShift....25
5.7 Information about the program....26
6 Legal information....26
7 Service Information and Warranty....27
8 Cleaning....28
9 Specification....28
10 Pictures and description of the device
Remote controller
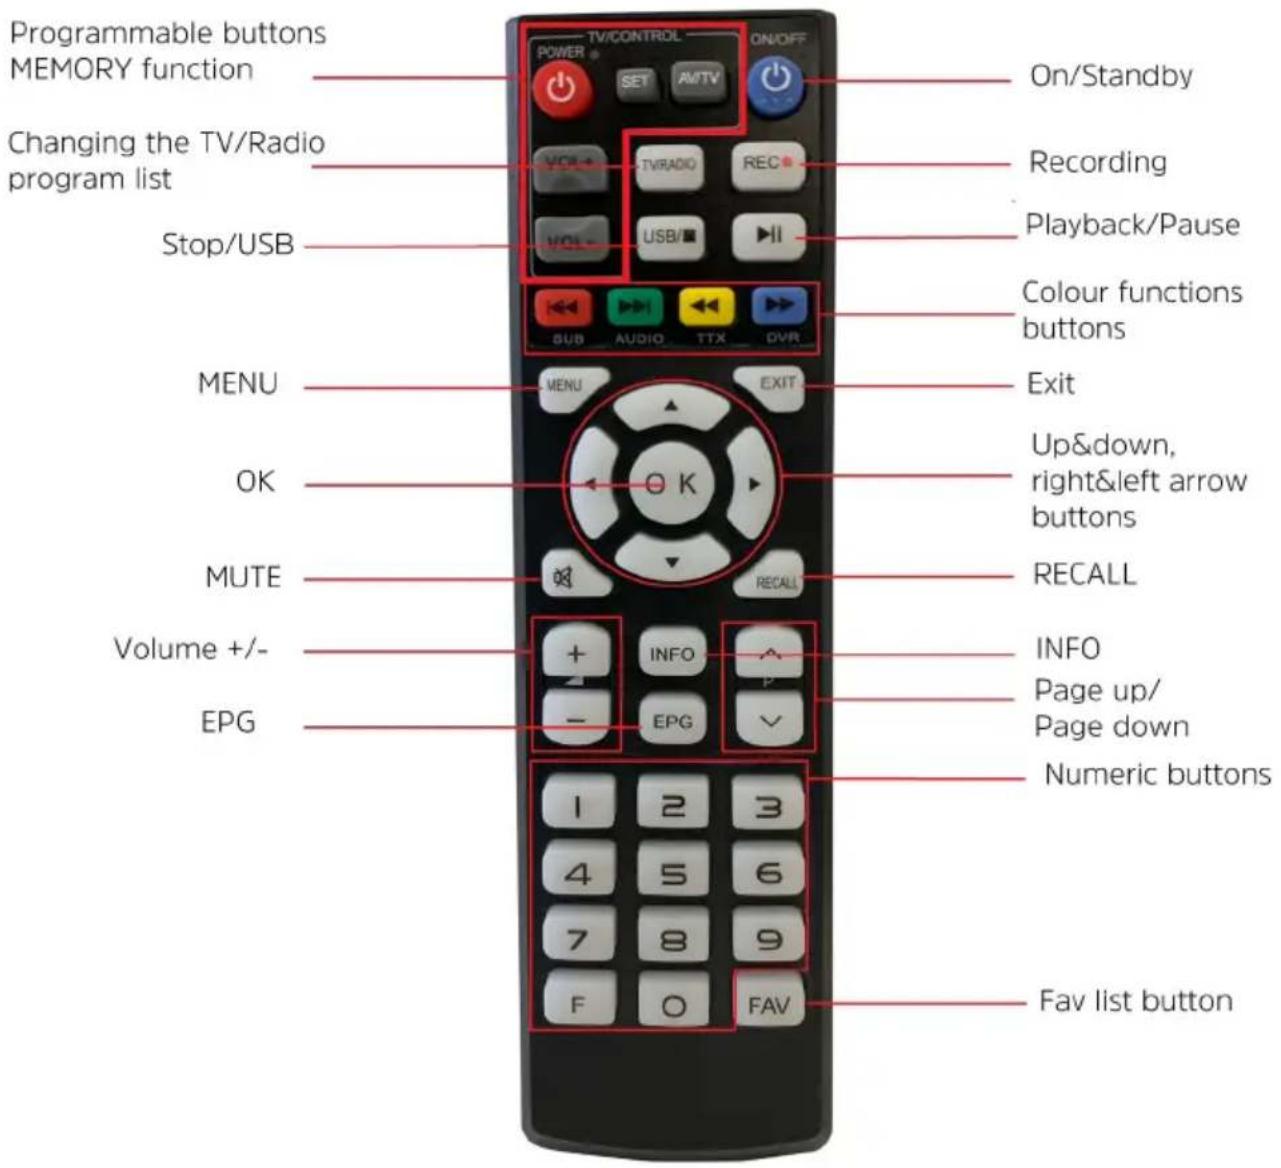
MEMORY function
Some of the remote control buttons can be freely programmed. This function allows to transfer some functions of TV remote control to decoder remote control. Thanks to this function, user may e.g. switch on the TV set, change volume or choose signal source.
Programming the buttons with the MEMORY function
Press the SET button longer until the red LED on the decoder remote control lights up solidly.
Next, press the button you wish to program on the decoder remote control. The LED starts blinking.
Press the button on the TV remote control that you want to transfer to the decoder remote control. The TV remote control and the decoder remote control should be 3-5 cm apart, with their transmitters facing each other.Once the button is programmed, the red LED stops flashing and turns solid. The remote control is ready to program the next button.
Program the next button as described above.
Once programming is complete, press the "SET" button briefly. The red LED stops flashing and the newly assigned button functions are saved.
When programming the buttons, it is very important that the remote controls are close to each other, with the transmitters facing each other directly. Only such an arrangement will allow for correct programming.
Device front
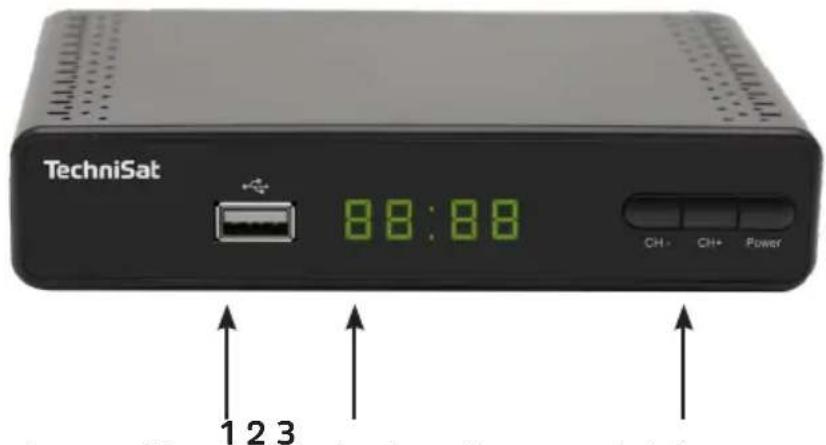
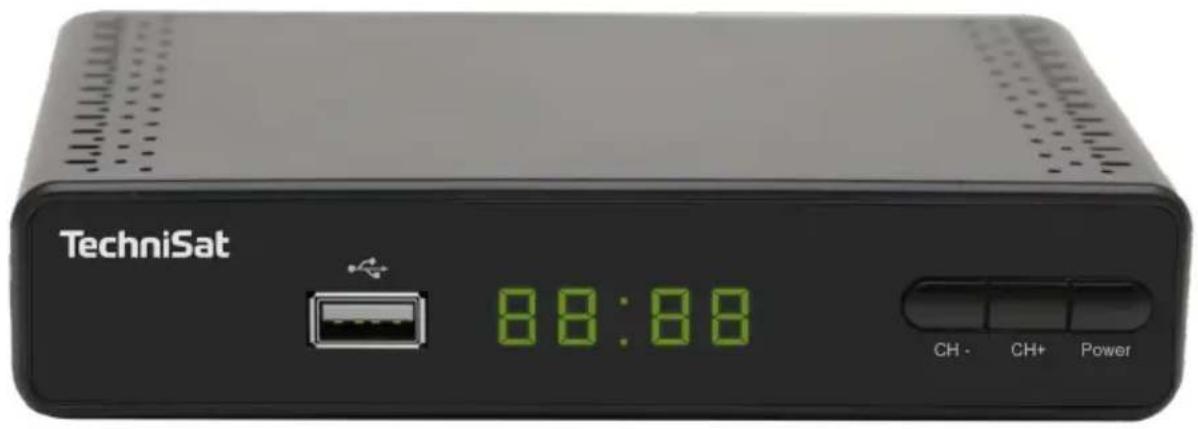
1 USB slot (recording, multimedia playback, software update)
2 LED display
3 Buttons. CH-/CH+ channel change, Power - On/Standby
Device back
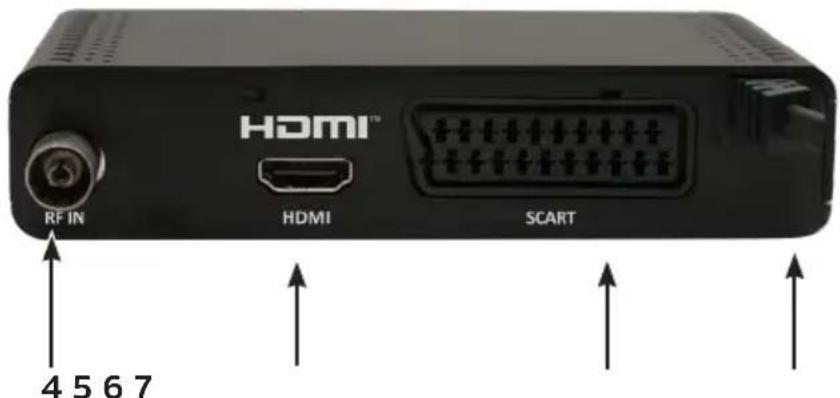
4 RF input
5 HDMI - output
6 SCART
7 Power cable (AC 110-240V, \~50/60Hz)
11 Please read first
Before connecting and commissioning the device, first check the delivery for completeness and read the safety instructions.
The scope of delivery for the TERRABOX T3 includes:
1x DVB-T2 receiver,
1x operating manual,
1x remote control with MEMORY function
11.1 Purpose of the device
Digital receiver TERRABOX T3 is used for receiving digital terrestrial broadcast channels. It is designed exclusively for this purpose. Observe all information contained in this manual, especially the safety instructions. Any other use is considered inappropriate and may result in property damage or even personal injury. TechniSat Digital cannot be held liable for damage caused by misuse.
11.2 Safety instructions
For your protection, please read the safety precautions carefully before operating your new device. The manufacturer is not liable for damage caused by improper handling or failure to observe the safety precautions.
Electrical equipment may experience leakage currents due to their function. These are permissible and harmless, even if they may be perceived as a slight "tingling". To avoid these leakage currents, new installation or connection of mains-powered equipment (receiver, TV, etc.) must always be carried out in a de-energized state, i.e. all equipment must be disconnected from the mains..
- The device can only be used in moderate climates.


- To ensure proper ventilation, place the unit on a smooth, level surface and do not place any objects on the cover of the unit. The ventilation slots through which heat escapes from the interior must be uncovered.
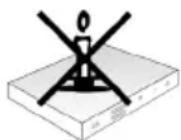
- Do not place any burning objects, such as lighted candles, on top of the unit.
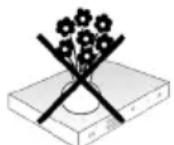
- Do not expose the unit to dripping or splashing and do not place objects filled with liquids, such as vases, on the unit. If water enters the unit, unplug the unit immediately and contact the service shop.
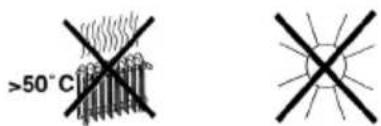
- Do not use any heat sources near the device that will additionally heat it up.
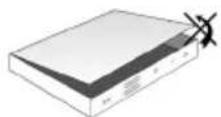
- Do not insert any objects through the ventilation slots.
- Never open the device! There is a risk of electric shock. Any necessary intervention should only be carried out by trained personnel.
In the following cases, unplug the unit from the mains and ask a specialist for assistance:
The power cable or plug is damaged
The unit has been exposed to moisture or liquid has penetrated into it.
In case of serious malfunctions
In case of serious external damage
lection Class II - Protection Class II electrical equipment is electrical equipment that has continuous double and/or reinforced insulation and no protective conductor connection. The enclosure of an insulated Class II electrical device may partially or completely provide additional or reinforced insulation.
All of the following instructions must be observed for proper use of the device and to prevent defects.
- The unit should only be operated in moderate climates.
- To ensure sufficient ventilation, place the unit on a smooth, level surface and do not place any objects on the cover of the unit. Do not cover any ventilation slots that may be present.
-
Do not place any burning objects, such as lighted candles, on top of the unit.
-
Do not expose the unit to dripping or splashing and do not place objects filled with liquids, such as vases, on the unit. If water enters the unit, unplug the unit immediately and call for service.
- Do not use any heat sources near the machine that will further heat the machine.
- Do not insert any objects through the ventilation slots.
- Use only accessories approved for the device.
- Regularly check the power cord for damage and do not use it if it is damaged.
- When disconnecting the power adapter from the electrical outlet, pull on the plug, not the cord.
- This appliance is not intended for use by persons (including children) with limited physical, sensory or mental abilities, or persons without experience and/or knowledge, unless they have received supervision or instruction in the use of the appliance from a person responsible for their safety.
- Children must be supervised to ensure that they do not play with the appliance.

Battery handling
- The unit's remote control can only be powered by batteries approved for this unit.
- Normal batteries cannot be recharged. Batteries must not be reactivated by other means, disassembled, heated or thrown into an open flame (risk of explosion!).
- Clean the battery contacts and the device contacts before insertion.
- Incorrectly inserted batteries can cause the battery to explode!
- Replace batteries only with the correct type and model number.
- Do not expose the batteries to extreme conditions. Do not place on radiators or in direct sunlight!
- Leaking or damaged batteries can cause burns if they come into contact with the skin. Use appropriate protective gloves in this case. Clean the battery compartment with a dry cloth..

ger of suffocation! The packaging and its parts should not be left to children. Risk of suffocation due to foil and other packaging materials.
11.3 Interruptions in operation
During thunderstorms or longer periods of disuse (e.g. vacations), disconnect the device from the mains and remove the antenna cable. Before disconnecting the device from the mains, first switch it to standby mode and wait until the red LED lights up.
11.4 Important Note on Backing Up Data
We recommend removing all memory media or data carriers before returning the receiver to a specialist dealer for repair.
Restoring data is not part of maintenance or repair work. TechniSat is not responsible for any loss or damage to data during repair.
11.5 Remote controller / Battery replacement
Open the battery compartment cover on the back of the remote control by pressing lightly on the latch and pulling it down.
Insert the supplied batteries, taking care to observe the correct polarity (marking visible in the battery compartment).
Close the battery compartment again.
11.6 Disposal instructions
The packaging of your device consists of recyclable materials only.

When the product has reached the end of its useful life, do not dispose of it with other household waste, but bring it to a collection point for the recycling of electrical and electronic equipment.

This equipment has been designed and manufactured with high quality materials and components, which are recyclable. The symbol of the crossed-out wheeled bin indicates that this product is subject to separate collection in accordance with Directive 2012/19/EU of the European Parliament and of the Council and Directive 2006/66/EC of the European Parliament and of the Council and informs you that electrical and electronic equipment as well as batteries and accumulators, after their end of life, must not be disposed of with other household waste. The user is obliged to hand it over to an entity running a waste electrical and electronic equipment, batteries and accumulators collection system for such waste, including to an appropriate store, local collection point or municipal unit. Waste equipment may have a harmful impact on the environment and human health due to the potential content of hazardous substances, mixtures and components. Household plays an important role in contributing to reuse and recovery, including recycling, of waste equipment. At this stage, attitudes are formed that affect the preservation of the common good, which is a clean environment. Households are also one of the largest users of small equipment, and its rational management affects the recovery of secondary raw materials. Penalties may be imposed for incorrect disposal of this product in accordance with national legislation.
Important note on disposal of batteries/accumulators: Batteries/accumulators may contain toxic substances that are harmful to the environment. Therefore, it is necessary to dispose of batteries/accumulators in accordance with applicable laws. Never dispose of batteries/accumulators in normal household waste. You can dispose of used batteries/accumulators at your dealer or at special recycling facilities free of charge.
12 Connecting the receiver
12.1 Connecting to power supply
The Digital Receiver should not be connected to the mains until the unit is fully connected to the signal and the TV. This will prevent damage to the Digital Receiver or other components.
After making all connections according to the following points, connect the receiver to the power supply.
Please ensure that the power cord is easily and quickly accessible.
12.2 Connecting to TV set
Please connect an HDMI cable to your TV and to the HDMI output of the Digital Receiver (5). If your TV is properly equipped, it will automatically switch to HDMI input when the digital receiver is turned on. Optionally you can also connect your receiver to your TV set in analogue mode (connection with EURO-SCART cable (6)).
12.3 USB slot
The USB socket (3) is used for software updates, recording and multimedia playback (music, videos, photos).
The receiver supports all types of hard drives up to 1TB in external enclosures that are equipped with an independent power supply. The only condition is that the hard drive has one primary partition that is formatted in NTSF (recommended) or FAT32.
We recommend that you regularly archive your data on a PC. A large number of files with recordings may slow down cooperation with the receiver (slow loading of the file list).
12.4 Connecting the antenna cable
Connect the cable from your DVB-T/T2 antenna to the RF-Input of the receiver (4).
Please also refer to the Antenna Setup item in the User Manual.
12.5 First start-up
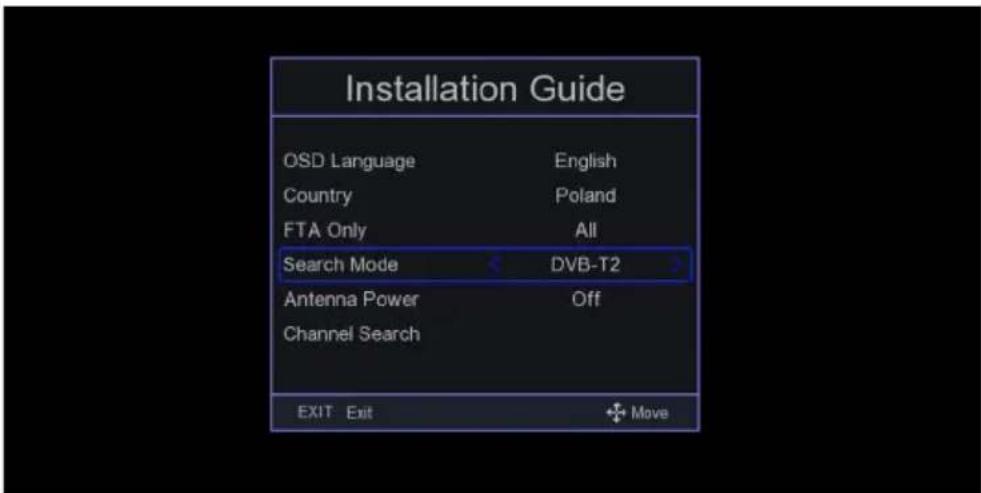
The receiver must be configured during initial startup.
With the arrow buttons, select the menu language and the country in which the receiver will operate.
Then use the OK button to confirm your selection. The receiver starts searching for available programmes.
13 Basic operation
Dear Customer, the following points will introduce you to the user interface that allows you to use many of the receiver's settings and functions. Some buttons on the remote control give you direct access to the functions of the unit. Some of these buttons are labeled, for example EPG, MENU, OK, or colored for ease of use. Other buttons are multi-functional and their operation depends on the menu location selected by the user. Below is a brief description of how to use some of the unit's functions available through the menus.
- The up/down arrow keys move the cursor in the menu and change the channel.
- The le/right arrow keys move the cursor le and right.
- The EXIT key is used to exit a menu or function.
- When using a submenu, the OK key is used to confirm the selection.

Caution - Indicates an important note that must be followed to avoid malfunction or unintended operation of the unit.

Note - Indicates a note about the function being described, as well as a related function.
13.1 Turning the device on / o
If the unit is in standby mode, you can turn it on by pressing the On/Standby button on the remote control.
To turn on the receiver, press the On/Standby button again.
13.2 Calling up the main menu and menu navigation
The following example shows how to access the main menu and call up the submenus. The purpose of the example is to call up the screen setup menu.
When you press the Menu key, the main menu on the screen opens first.
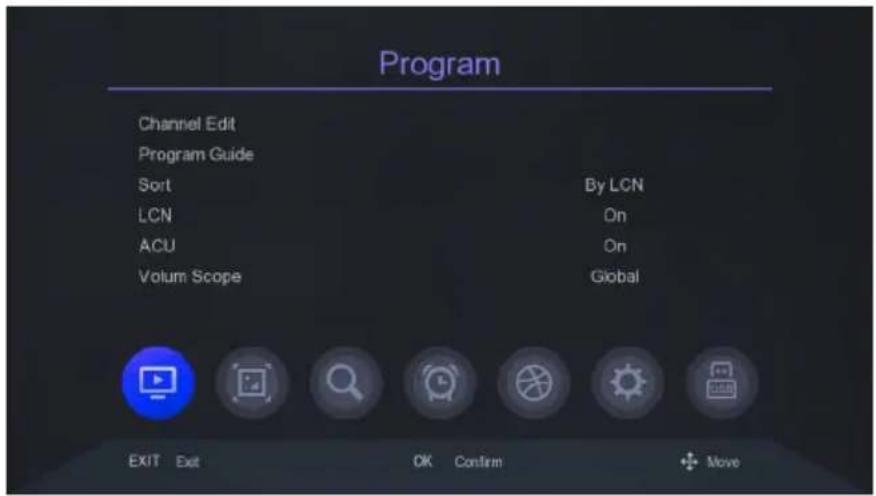
New menu items can be selected by moving the highlight to that item with the up/down or right/left arrow keys.
Pressing the "OK" key opens the next menu item or accepts the selection made.
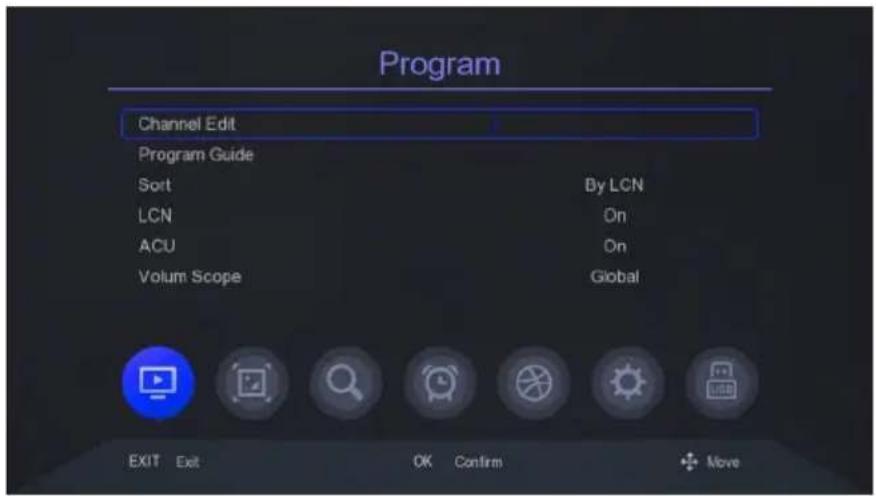
13.3 Channel list
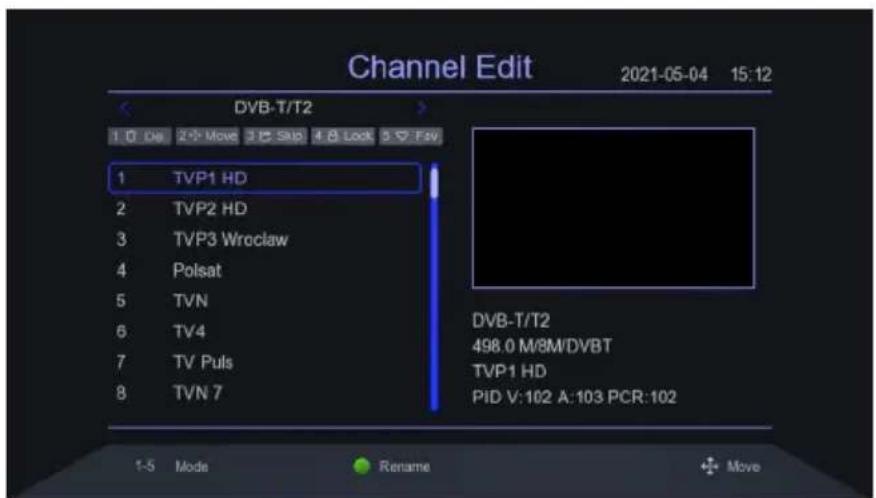
In this menu, you can edit the list of TV channels. Editing is done with the numeric buttons on the remote control. Select the desired option with the numeric buttons and confirm with "OK" on the selected channel in order to use it.
Removing a program from the list.
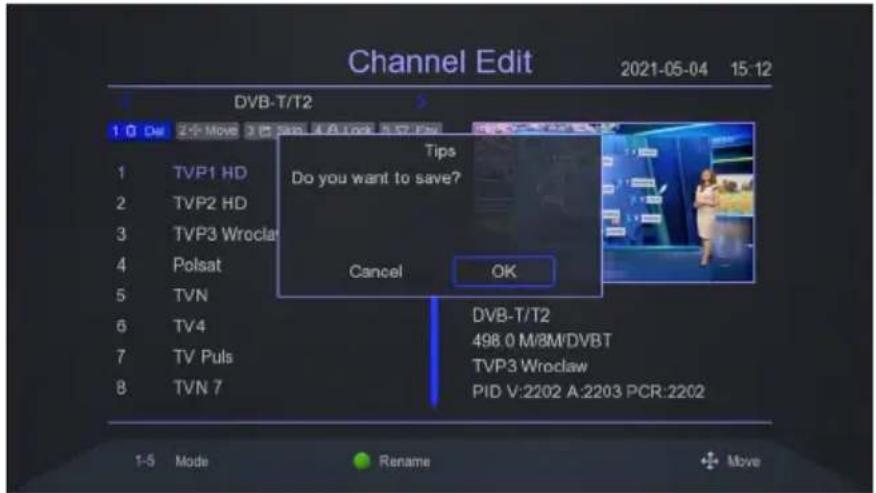
To delete a program, press "1" "Del" and confirm with "OK".
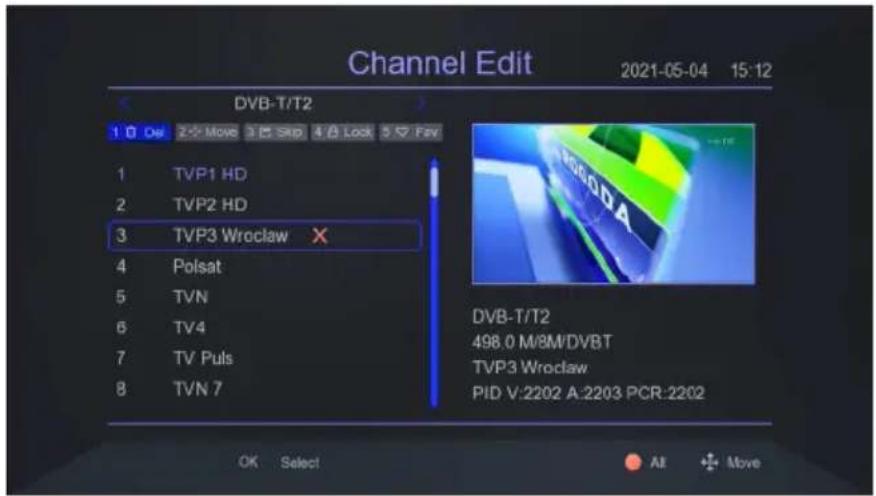
After exiting the menu with "EXIT", confirm the changes.
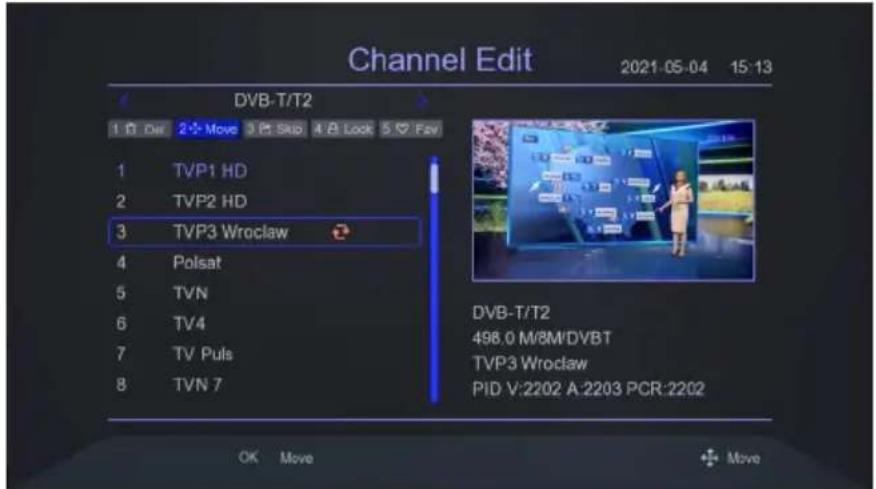
Moving a program in the program list
In order to move the program to another number in the list, press the number button "2" "Move" then confirm with the "OK" button. Using the "up/down" buttons, select a new position in the program list. Confirm your choice with the "OK" button.
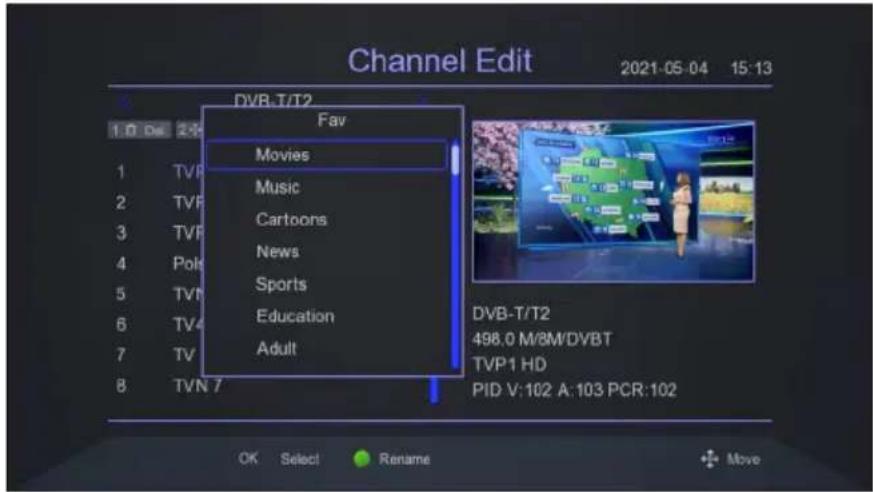
Adding a program to the thematic favorites list
The receiver allows you to create thematic favourite lists. In order to add a program to such a list, select the program and press the numerical button "5" "FAV" and confirm with "OK". Next, select the type of list to which the selected program will be added and confirm with "OK".
13.4 Picture settings
The video settings menu allows you to change video parameters.
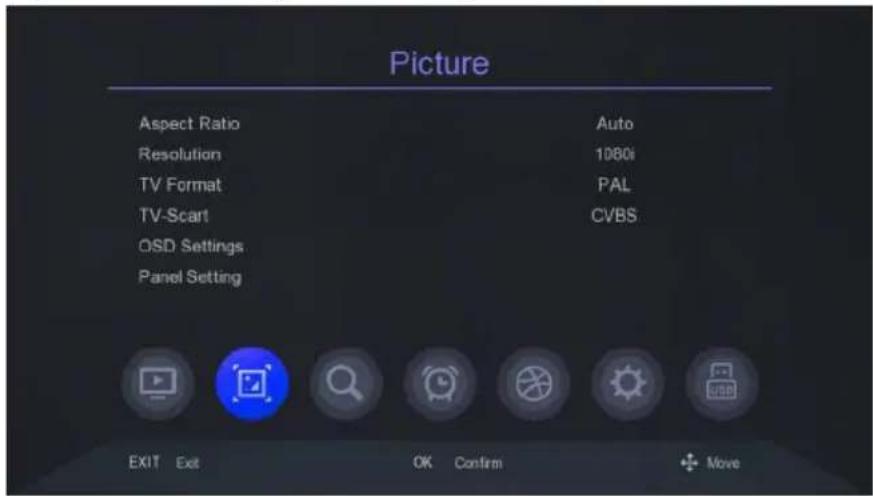
Aspect Radio
Scaling selection; Auto, 16:9 Wide Screen, 16:9 Pillarbox, 16:9 Pan Scan, 4:3 LetterBox, 4:3 Pan Scan, 4:3 Full (full).
Screen resolution
Supported resolutions: 576i, 576p, 720p, 1080i, 1080p.
Default value is 1080i.
Before changing the resolution, please check if your TV can display the image in the chosen resolution.
TV format
Available formats are: PAL i NTSC
Default one is PAL
TV-Scart
Supported modes: CVBS i RGB
OSD Settings
Contains an option to change the appearance of the menu. User can change transparency, brightness, chroma, contrast or display time of info banner.
LED display settings
This menu allows you to control the brightness of the LED display used on the body of the decoder. Additionally, it is possible to set time display instead of channel number during operation.
13.5 Channel search
Program search menu is used to set parameters of antenna installation and to search channels from terrestrial signal. The user can search automatically or manually. In addition, the receiver allows you to select a search mode or change the search country.
Automatic scan
The receiver searches frequency by frequency according to the stored list. Frequency list depends on chosen country.
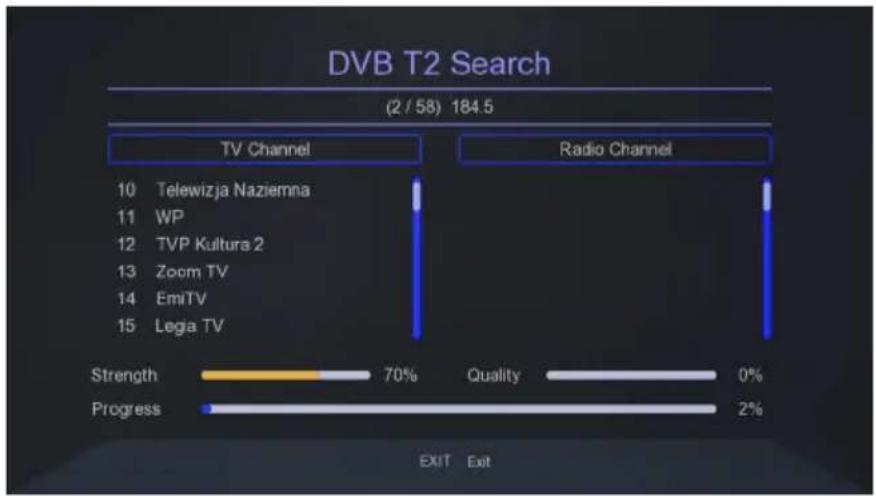
Confirm your choice with "OK". The receiver will ask you if you want to delete all programs before scanning. Confirm your choice with "OK". The programs will be found and added to the program list automatically.
bar
DVB T2 Search | Channel | Strength (%) | Progress (%) | | :--- | :--- | :--- | | Telewizja Naziemna | 10 | | | WP | 11 | | | TVP Kultura 2 | 12 | | | Zoom TV | 13 | | | EmiTV | 14 | | | Lega TV | 15 | | (2 / 58) 184.5 Exit ExitThe programs will be sorted according to the settings in the main menu. Default setting is sorting by LCN numbering.
The receiver scans DVB-T/T2 channels according to country-specific specifications. The country selected by default depends on the initial settings applied. You can change this setting in the search menu.
Manual channel search
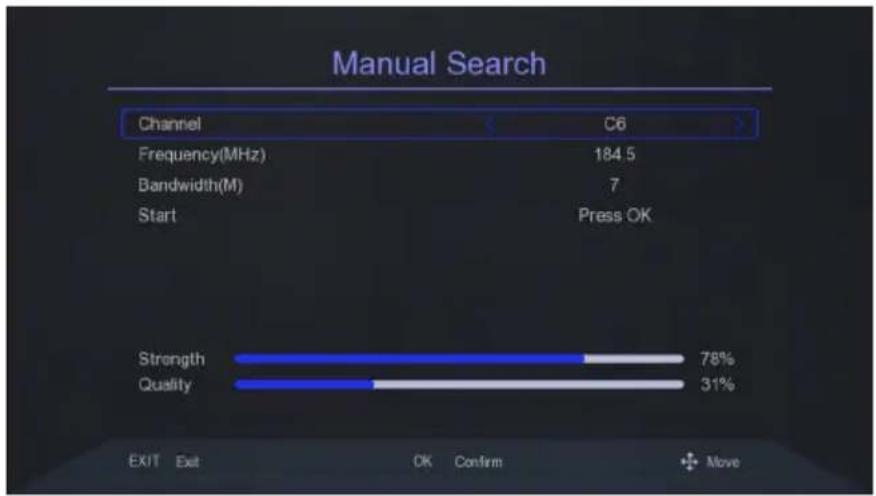
Manual Search allows you to scan a specific DVB-T channel.
To start a manual search, please select the "Manual search" field using the "up/down" buttons.
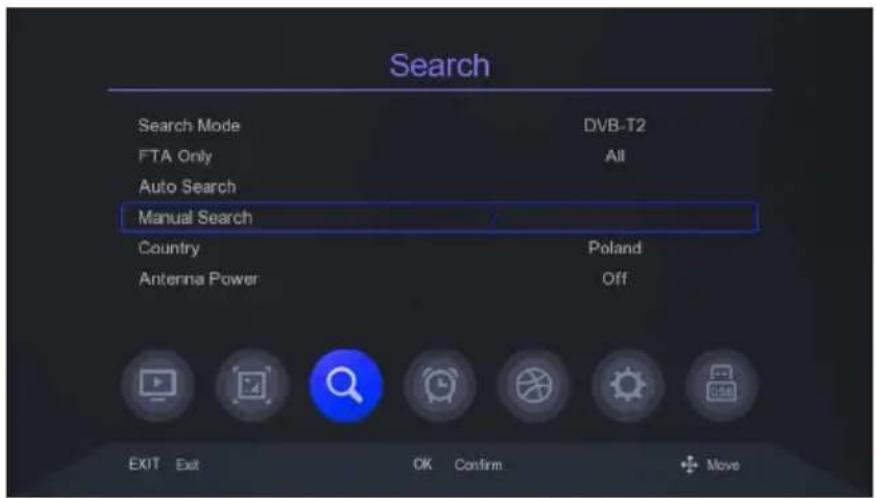
Confirm your selection with the "OK" button. Select the channel you wish to search with the left/right buttons. Confirm your selection by selecting "Start" and pressing the "OK" button.
bar
Manual Search | Channel | Value | Percentage (%) | | :--- | :--- | :--- | | C6 | | | | Frequency(MHz) | 184.5 | | | Bandwidth(M) | 7 | | | Start | Press OK | | | Strength | 78 | | | Quality | 31 | | EXIT Exit OK Confirm MoveAntenna power supply
The device can power an antenna amplifier with 5V voltage.
To power the amplifier with 5V, switch with the up/down arrow buttons to the "Antenna Power" position.
Using the right/left arrow buttons, select "on" to activate the power supply or select "off" to deactivate the power supply

I default, the antenna power is turned off. Before turning on the power, lease check the specifications of the built-in antenna amplifier.
13.6 Time
This menu is used to set the time, region, and allows you to automatically turn off/on the decoder after a specified time. Additionally, you can find here options related to timers for recording and changing programs.
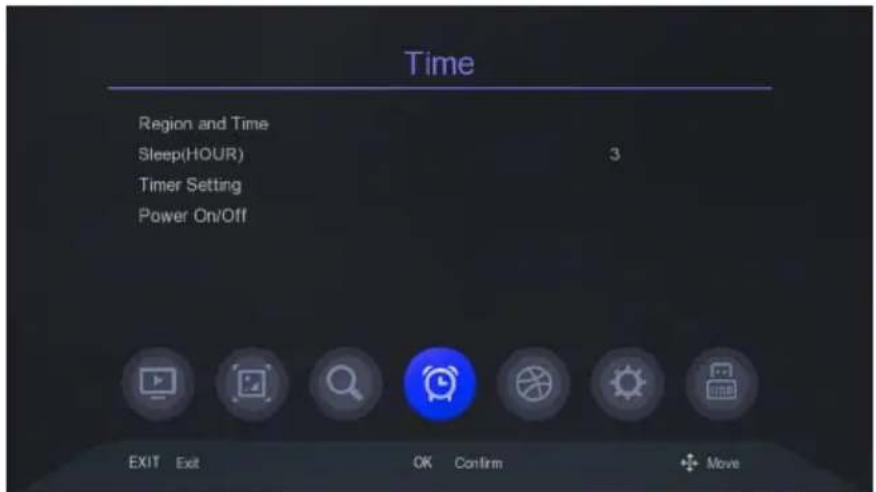
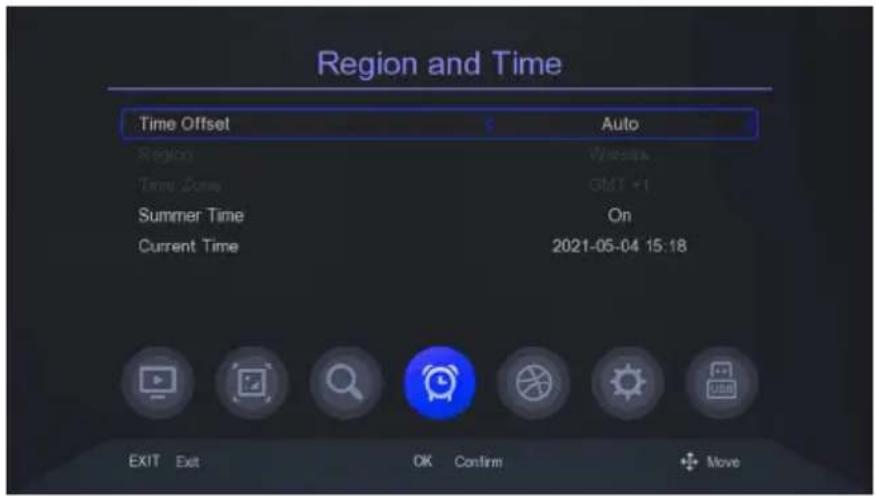
Region and time
The receiver can automatically acquire the time and date from the signal (recommended) or you can set the time manually. When using GMT, select the appropriate time shift value (e.g. +1 hour for Poland) and enable or disable daylight saving time, depending on the time of year.
Sleep (hour)
The time after which the receiver is automatically switched off if it is not operated.
Default setting is 3 hours.
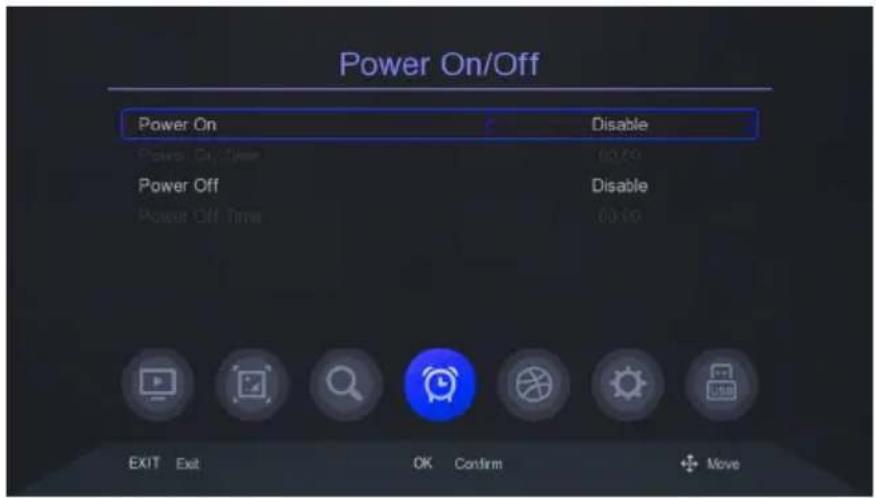
Power on/off
Possibility of programming the automatic switching on and off of the receiver according to the preset time
13.7 Additional options
This menu is used to specify the language in which the menu, EPG, subtitles and teletext are displayed. The primary and secondary language options relate to the audio soundtracks.
If a channel supports more than one audio track, by default the receiver will search for audio tracks in the selected languages in that order.
☑ subtitle language, similar to audio tracks, this specifies the subtitle language to be used, if such subtitles are available and active.
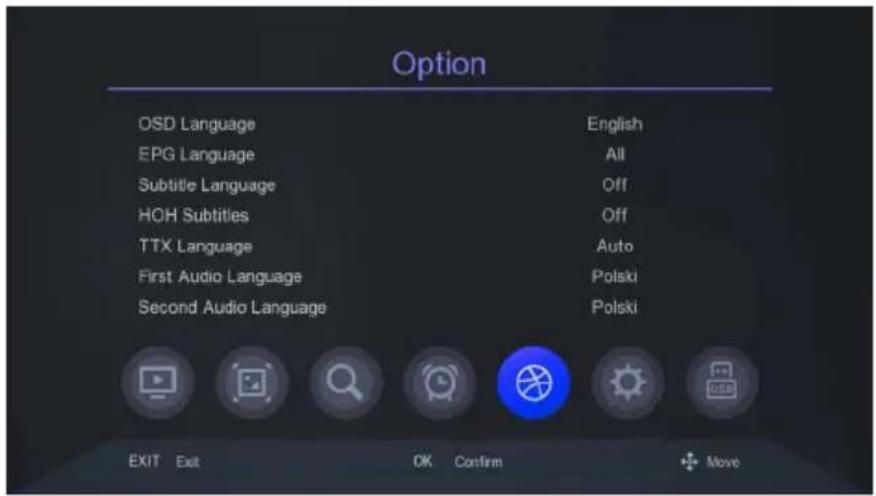
In this menu you can also choose to display subtitles for the deaf (if broadcast).
13.8 System
The System menu allows you to change system settings including parental controls, software updates.
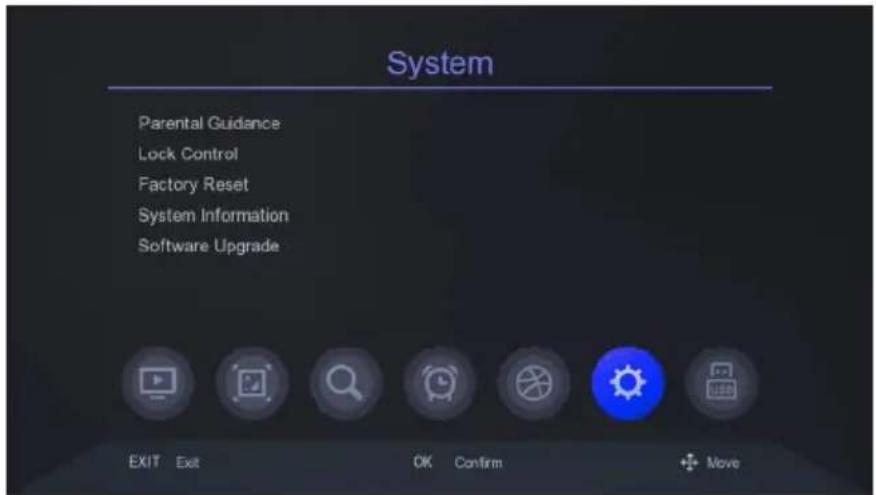

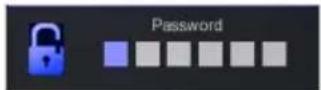
cess to some settings is password protected. The default password is "000000"
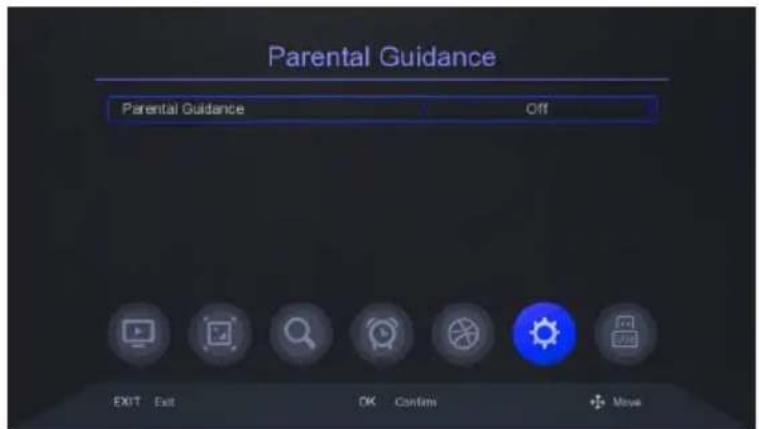
Parental control
Allows you to block inappropriate content from, for example, children.
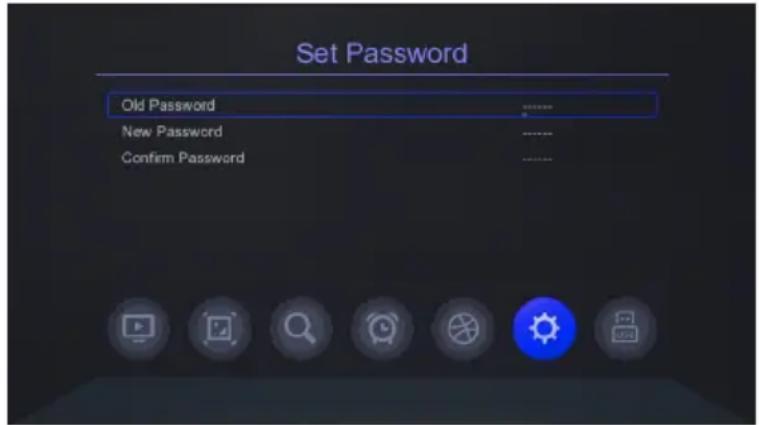
Access control
This option allows you to change the default password to your own. Please choose your new password carefully as it is not possible to revert to the default password if you forget your new password.
Fatory settings
In this menu you can restore the default settings of the receiver.
Restoring the default settings removes all user settings and restores the default channel list. All user changes, including channel list and terrestrial antenna settings configuration, will be deleted!
System information
This menu displays, among other things, information about the software.
Software update
This menu is used to update the receiver. The latest software is available at www.technisat.com.
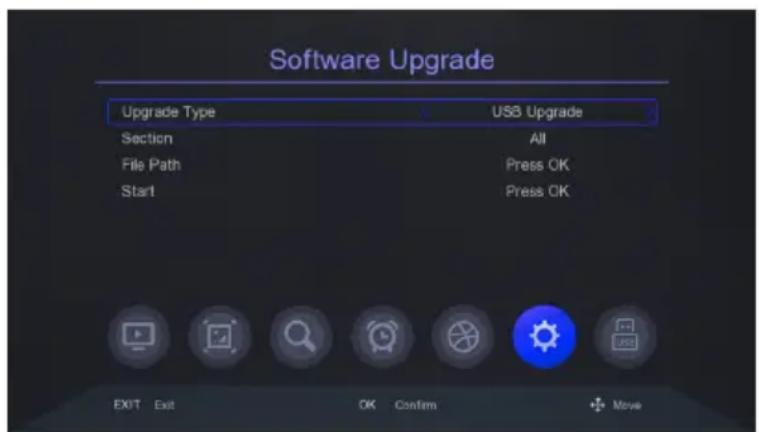
Unzip the downloaded file and save it on an external USB stick and then connect it to your receiver.
Go to "System" and using left/right buttons select "Software Update" and confirm with "OK".
Then using UP/DOWN keys select "File Path" and confirm update file on USB disk.
After selecting the file path, start the update by selecting "Start" and confirming with "OK".
CAUTION: Do not disconnect the receiver from the power supply while the update is in progress!
13.9 USB
This menu allows settings for media playback, recording, and configuration of the connected USB memory device including its formatting.
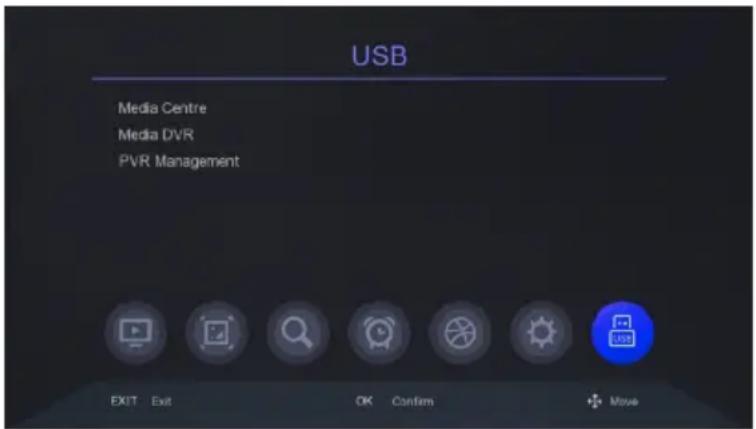
Multimedia
The multimedia menu allows you to access the multimedia stored on the USB drive. The user can access photos, music, videos and recordings.
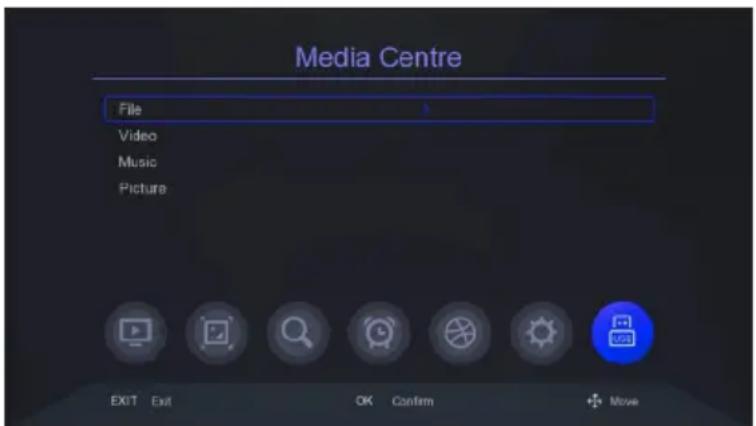
File
Calls up the file navigator The player supports music, video and picture files.
Video
The player allows you to watch video files. You can also play high resolution files.
Music
Calls up the music player. The player supports music files such as MP3. When playing music, there are several additional functions that can be operated using the function keys described at the bottom of the screen
Pictures
The player allows you to view JPEG, BMP photos. When viewing photos, there are several additional functions that can be operated using the function keys described at the bottom of the screen.
Supported video files: mkv, avi, ts, mp4, mpg, flv, vob, trp, tp, mov, dvr, mpeg, m2ts
Supported audio files: mp3, m4a, ac3
Supported picture files: jpg, jpeg, bmp, png.
NOTE:
- Playback of some files may fail or be incorrect.
- Copy-protected content cannot be played.
- Playback may be temporarily interrupted (image freeze, faster/slower playback, etc.) when changing the audio language (audio track).
- A damaged movie file may not be played back properly.
- The playback of movie files with video bitrate over 30 Mbps may not be correct.
13.10 PVR Management
Timeshift
This option allows you to adjust the buffer for the TimeShift option. The TimeShift function allows you to stop the current broadcast at any time by pressing the "pause/play" button and resume it after a pause by pressing the "pause/play" button again.
Duration of recording
Maximum time for a single recorded file.
Section Record
This option allows you to create and save files for the Timeshift function. When this option is disabled, Timeshift recordings are not saved.
HDD information
Additionally, here you will find information about the total as well as the occupied capacity for the connected USB drive.
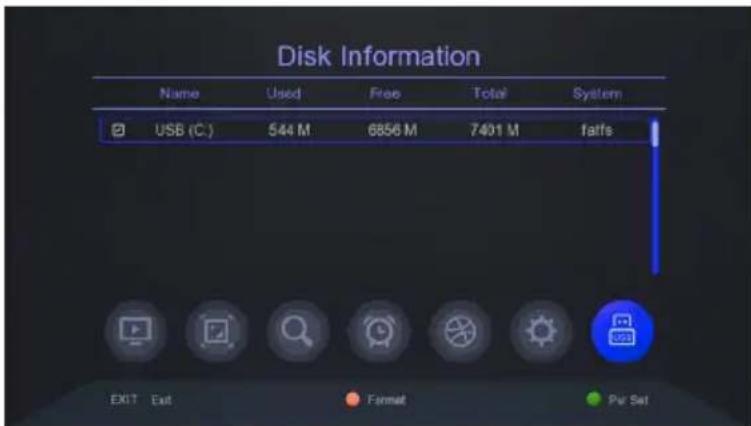
With the red function button you can format the connected USB stick. This function allows you to clean and prepare the USB drive for use with the TerraBox T3.
With the green button you assign the hard disk to the DVR recording function and thus set it as default device.
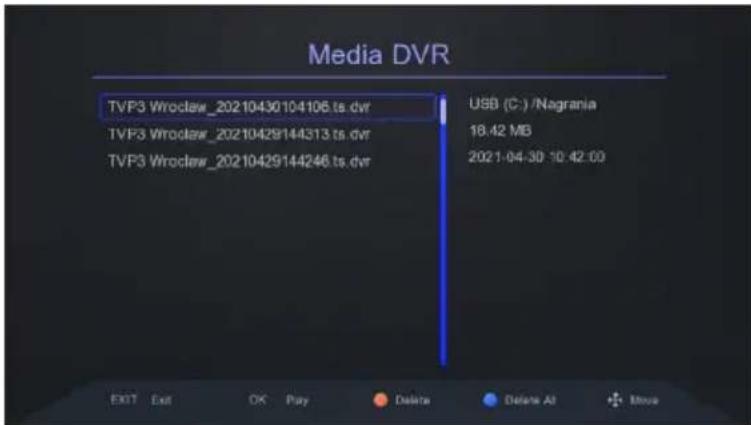
13.11 Media PVR
Use this option to play back recordings made with the receiver. Use the "right" and "left" arrow buttons to move within the current recording and press the "pause/play" button to start viewing from the selected moment.
14 Useful functions
14.1 EPG
This function displays the program guide. The content of current, future and detailed information depends on what the station is broadcasting. Select the desired program to display detailed program information. Please note that the availability of this information depends on the broadcaster.
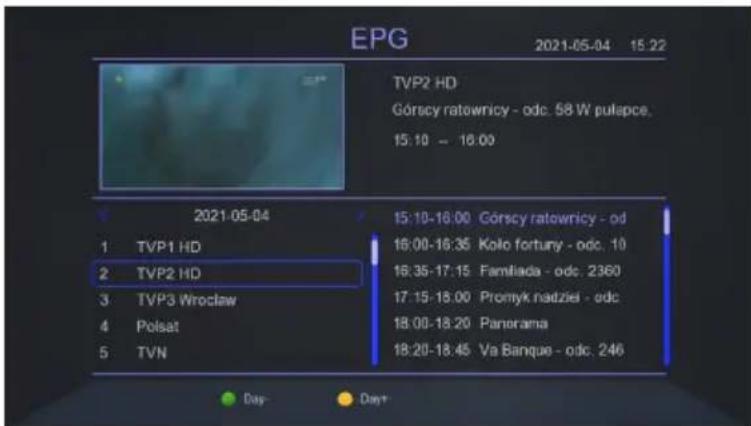
After selecting a program, you can use the timer function ("OK" button) to automatically schedule the viewing or recording of that program.
You can change the day of the EPG display with the green and yellow function button
14.2 Teletext
This function displays teletext provided it is broadcast by the selected TV station. Please note that the correct code page (diacritical marks) is displayed depending on the language settings made in the language settings menu!
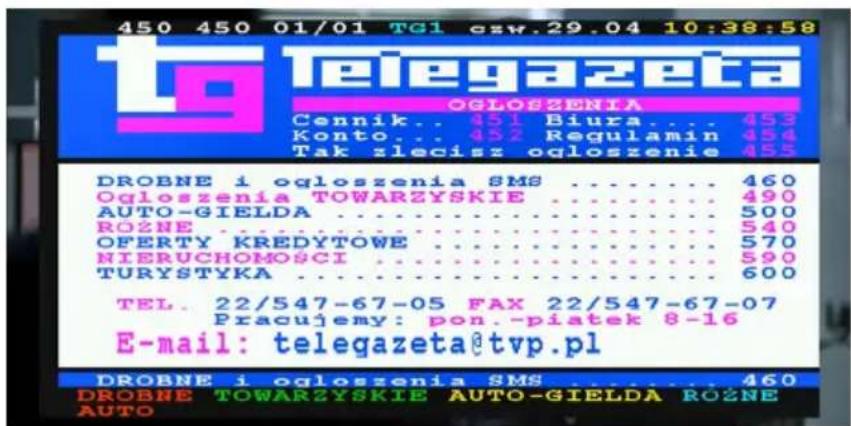
To call up the teletext, press the "TTX" button (yellow function key).
14.3 Selecting an audio track
The "Audio" button displays a window with available audio tracks. You can select any of the broadcast soundtracks.
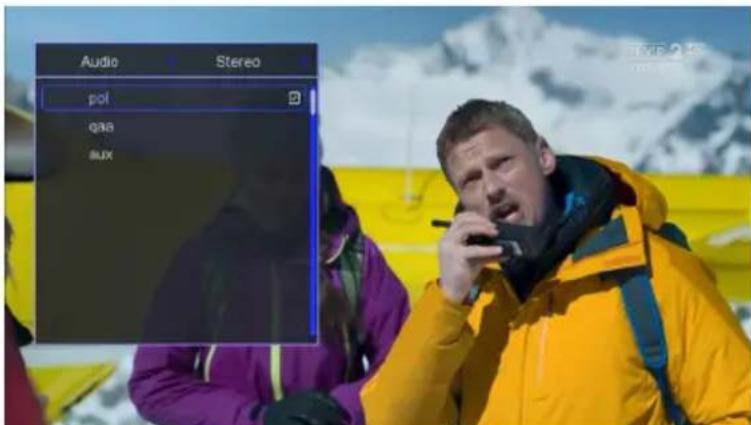
Availability of audio tracks depends on the broadcaster.
14.4 Subtitles
The receiver allows you to display the subtitles broadcast for the program. Please note that the availability of subtitles and the way in which they are displayed depends on the broadcaster.
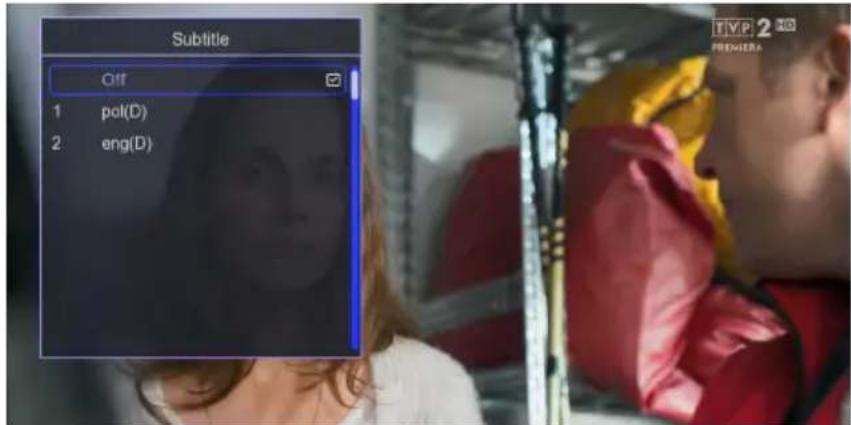
To display the list of available subtitles for a TV program, press the "SUB" button (red function button).
Select the desired subtitle language with the "up/down" buttons. Confirm your selection with the "OK" button.
14.5 Recording
The receiver allows you to record programs. This function is available only when an external USB memory device is properly connected to the receiver.
In order to call the recording function, please press the "REC" button.
The receiver will immediately start to record the program onto a hard disk connected to the USB port.
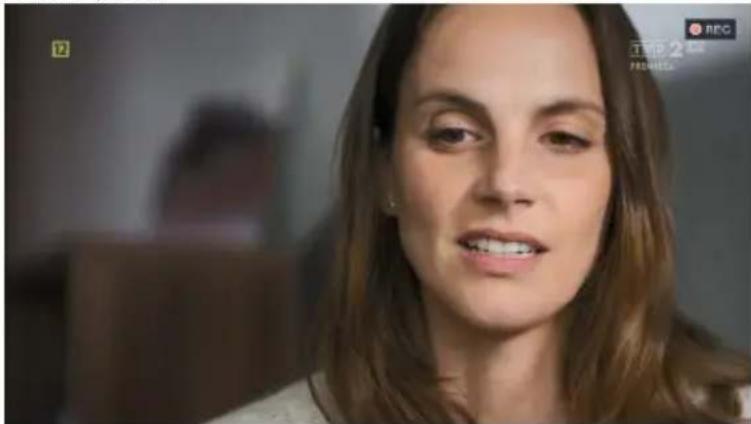
During recording you can call up the program list ("OK" button) and play another program (SEMI TWIN TUNER function).
SEMI TWIN TUNER function works only when recording one program and watching another one, which is located on the same multiplex (frequency) as the recorded program.
i Recording function requires a connected USB memory device.
14.6 TIMESHIFT
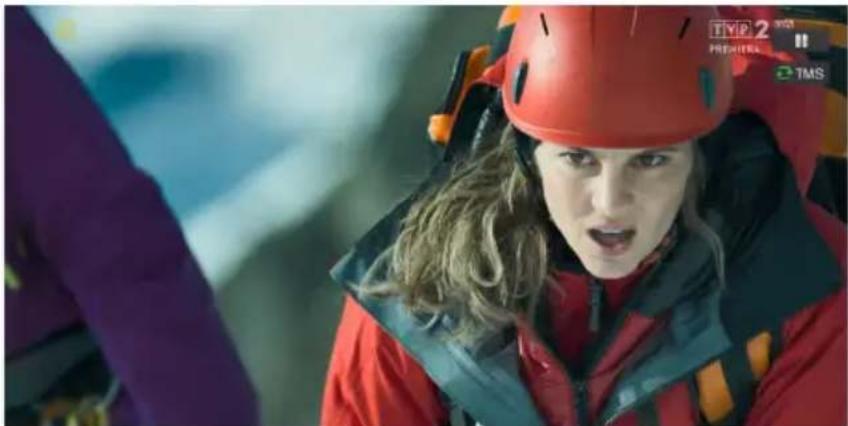
The TIMESHIFT function allows you to pause a TV program and then resume it from the same point.
To activate the TimeShift function, press the Pause button.
natural_image
Person in red gear and helmet with visible 'TYP 2 PRESTERS' logo, no readable text or symbols on backgroundTo resume the paused material, please press the "pause/playback" button.
To stop the TimeShift function, please press the "Stop" button.
During the TimeShift function it is possible to scroll the program both forward and backward (blue and yellow scroll buttons).
14.7 Information about the program
The receiver displays information about the current and next program (if such information is provided by the broadcaster).
Pressing the "Info" button will display the information bar for the current channel.
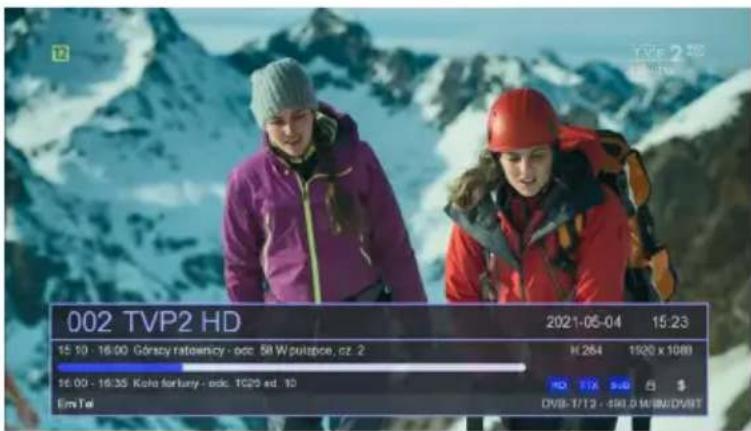
Pressing the "Info" button again shows the signal measurement bar.
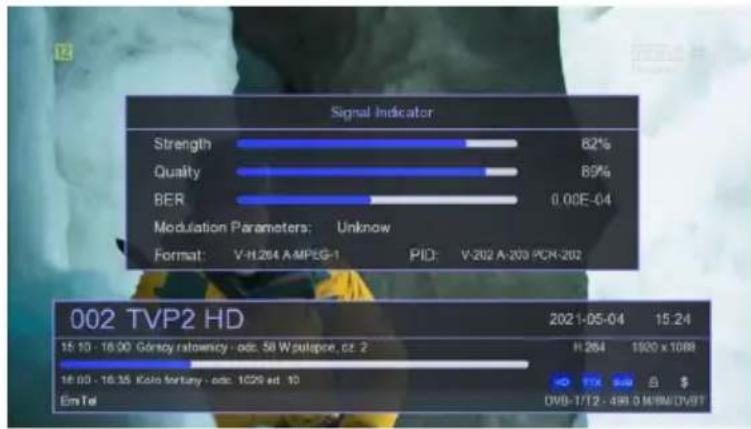
bar
| Statistic | Value | | --------- | ----- | | Strength | 82% | | Quality | 89% | | BER | 0.00E-04 | | Format | V-H.264 A-MPEG-1 PID: V-202 A-203 PCR-202 | | 002 TVP2 HD | 2021-05-04 15.24 | | 15:10 - 16:00 Gorscy ratowency - odc: 58 Wzutepce, cz. 2 | H.264 1020 x 1088 | | 16:00 - 16:35 Kolo fortany - odc: 1C29 ed. 10 | $ DVB-1/12 - 499.0 M/BV/DV/97 | | Em Tel | DVB-1/12 - 499.0 M/BV/DV/97 |The signal level and quality measurement strip can be used for precise alignment of a terrestrial antenna. Setting up or fixing the antenna one should remember that measuring strips have some delay.
15 Legal information
TechniSat hereby declares that the TERRABOX T3 radio type device (0000/4927) complies with Directive 2014/53/EU (RED) and RoHS (2011/65/EU and 2015/863). The full text of the EU declaration of conformity is available at www.technisat.pl

Changes and misprints reserved. As of 01/21. Reproduction and duplication only with permission of the publisher. The latest version of the manual is available in PDF format in the download area of the homepage www.technisat.pl
TechniSat is not responsible for damage to the product caused by external factors, wear and tear or improper handling, unauthorized repairs, modifications or accidents.

The terms HDMI, HDMI High-Definition Multimedia Interface and the HDMI logo are trademarks or registered trademarks of HDMI Licensing Administrator, Inc.
Manufactured under license from Dolby Laboratories. Dolby, Dolby Audio, Pro Logic, and the double-D symbol are trademarks of Dolby Laboratories.

Covered by one or more patent claims listed at patentlist.hevcadvance.com. The names of companies, institutions or brands mentioned are trademarks or registered trademarks of their respective owners. TechniSat and TERRABOX T3
(0000/4927) are registered trademarks of the following company: TechniSat Digital GmbH.
16 Service Information and Warranty
This product is quality tested and has a statutory warranty period of 24 months from the date of purchase. Please keep your invoice as proof of purchase. For warranty claims, please contact the product seller or manufacturer.
in case of questions and information or if you have a problem with this device, our technical hotline is available: Monday. - to Friday, from 8:00 a.m. to 4:00 p.m. on telephone number: +71 310 41 48
The guarantor, within the scope of the granted warranty, undertakes to remove all defects of the product at its own expense. Removal of defects will be carried out by replacing the defective product with a new one, free from defects or its repair.
In order to benefit from the warranty, the buyer is obliged to report the defectiveness of the product at the point of sale where it was purchased and deliver the defective product there together with proof of purchase. The product should be delivered complete
The warranty does not cover product defects caused by the purchaser or resulting from:
- use or installation of the product in a manner inconsistent with the operating instructions,
- improper storage or maintenance of the product,
- repairs or modifications to the product carried out by unauthorized persons,
- liquids or foreign bodies getting into the product,
- lightning strikes and short circuits in the power supply.
The provisions of the guarantee do not exclude, limit or suspend the rights of purchasers (consumers) arising from generally applicable law.
Obtaining detailed information about the Product, including the rules and procedures of warranty proceedings, assigning a RMA number is possible by phone 71 310 41 48 or by email serwis@technisat.com, on working days, from 8:00 to 16:00.
17 Cleaning
Do not clean the unit with a wet cloth or under running water.
i Pull out the USB plug and turn off the device before cleaning!
Do not use sponges, cleaning powders or solvents such as alcohol or gasoline.
Do not use any of the following: salt water, insecticides, spirits, chlorinated or acidic solvents (ammonium chloride).
i Clean the housing with a soft cloth.
If necessary, use a cotton cloth with small amounts of a water-based or alcohol-based, non-alkali soap solution. Rub the surface gently with the cotton cloth.
18 Specification
Tuner
Frequency input: VHF + UHF (170 - 230 MHz, 470 - 870 MHz)
Supply voltage: 5V/30mA
Demodulation DVB-T + DVB-T2
Input: 1 x IEC female connector
Wideo decoding
Supported video compressions MPEG 2 (MP@ML, MP@HL), H.264 (MPEG 4 part 10/AVC:MP@L3, HP@L4.), H.265 (HEVC)
Supported resolution up to 1920x1080 max. 60 fps
Audio decoding
Supported audio compressions MPEG-1 & MPEG-2 Layer I, II oraz III (MP3) Dolby Digital Plus (Stereo Downmix), AC3/E-AC3
Connectors
HDMI HDCP 1.4b, typ A.
EURO-SCART CVBS
RF Input 75 Ohm, IEC female
USB 2.0; recording, multimedia playback, software update. Type A
Power supply
Input AC 110-240V \~50/60Hz
Power consumption <10 W
Power consumption in standby <0,5 W
General
Housing dimensions 142 mm x 84 mm x 30 mm
Netto weight 174 g
Remote controller
Dimensions 182 mm x 49 mm x 23 mm
MEMORY function YES, 4 programmable buttons

- Foreword
- Contents
- Pictures and description of the device....4
- Please read first 6
- Connecting the receiver....10
- Basic operation....11
- Useful functions....21
- Legal information....26
- Pictures and description of the device
- Remote controller
- MEMORY function
- Programming the buttons with the MEMORY function
- Device front
- Device back
- Please read first
- Purpose of the device
- Safety instructions
- In the following cases, unplug the unit from the mains and ask a specialist for assistance:
- Battery handling
- Interruptions in operation
- Important Note on Backing Up Data
- Remote controller / Battery replacement
- Disposal instructions
- Connecting the receiver
- Connecting to power supply
- Connecting to TV set
- USB slot
- Connecting the antenna cable
- First start-up
- Basic operation
- Turning the device on / o
- Calling up the main menu and menu navigation
- Channel list
- Removing a program from the list.
- Moving a program in the program list
- Adding a program to the thematic favorites list
- Picture settings
- Aspect Radio
- Screen resolution
- TV format
- TV-Scart
- OSD Settings
- LED display settings
- Channel search
- Automatic scan
- Manual channel search
- Antenna power supply
- Time
- Region and time
- Sleep (hour)
- Power on/off
- Additional options
- System
- Parental control
- Access control
- Fatory settings
- System information
- Software update
- CAUTION: Do not disconnect the receiver from the power supply while the update is in progress!
- USB
- Multimedia
- File
- Video
- Music
- Pictures
- NOTE:
- PVR Management
- Timeshift
- Duration of recording
- Section Record
- HDD information
- Media PVR
- Useful functions
- EPG
- Teletext
- Selecting an audio track
- Subtitles
- Recording
- TIMESHIFT
- Information about the program
- Legal information
- Service Information and Warranty
- Cleaning
- Specification
- Tuner
- Wideo decoding
- Audio decoding
- Connectors
- Power supply
- General
Brand : TECHNISAT
Model : Terrabox T3
Category : Receiver