Atmos 4762 90000 - Vacuum Sealer Eta - Free user manual and instructions
Find the device manual for free Atmos 4762 90000 Eta in PDF.


| Product Type | Vacuum Sealer |
| Brand | Eta |
| Model | Atmos 4762 90000 |
| Dimensions (mm) | 400 x 195 x 100 |
| Weight (kg) | About 2.2 |
| Power Supply | 220-240 V, 50/60 Hz (refer to type label for exact wattage, typically 200-300 W) |
| Protection Class | II |
| Standby Power | < 0.5 W |
| Functions | Vacuum sealing, sealing only, marinating, external vacuum packing; adjustable intensity (normal/gentle); dry/moist food selection |
| Safety Features | Hot surface warning; max 15 min continuous use with 10 min cooldown; do not immerse; keep away from children; no automatic timers |
| Cleaning and Maintenance | Wipe exterior with damp cloth; clean interior with paper towel; do not use abrasive cleaners; carefully clean sealing wire if plastic adheres |
| Accessories Included | Extraction hose, vacuum-packing box (1000 ml), storage compartment for roll, cutter |
| Spare Parts and Repairability | Use only original parts; repairs must be done by qualified service |
| Intended Use | Household only; not for commercial use |
| Environmental Disposal | Do not dispose with municipal waste; recycle at designated collection points |
Frequently Asked Questions - Atmos 4762 90000 Eta
User questions about Atmos 4762 90000 Eta
0 question about this device. Answer the ones you know or ask your own.
Ask a new question about this device
Download the instructions for your Vacuum Sealer in PDF format for free! Find your manual Atmos 4762 90000 - Eta and take your electronic device back in hand. On this page are published all the documents necessary for the use of your device. Atmos 4762 90000 by Eta.
USER MANUAL Atmos 4762 90000 Eta
Vacuum sealer • USER MANUAL

20-25
natural_image
Exterior view of a modern ATMOS professional branded device with black and white casing (no visible text or symbols on body)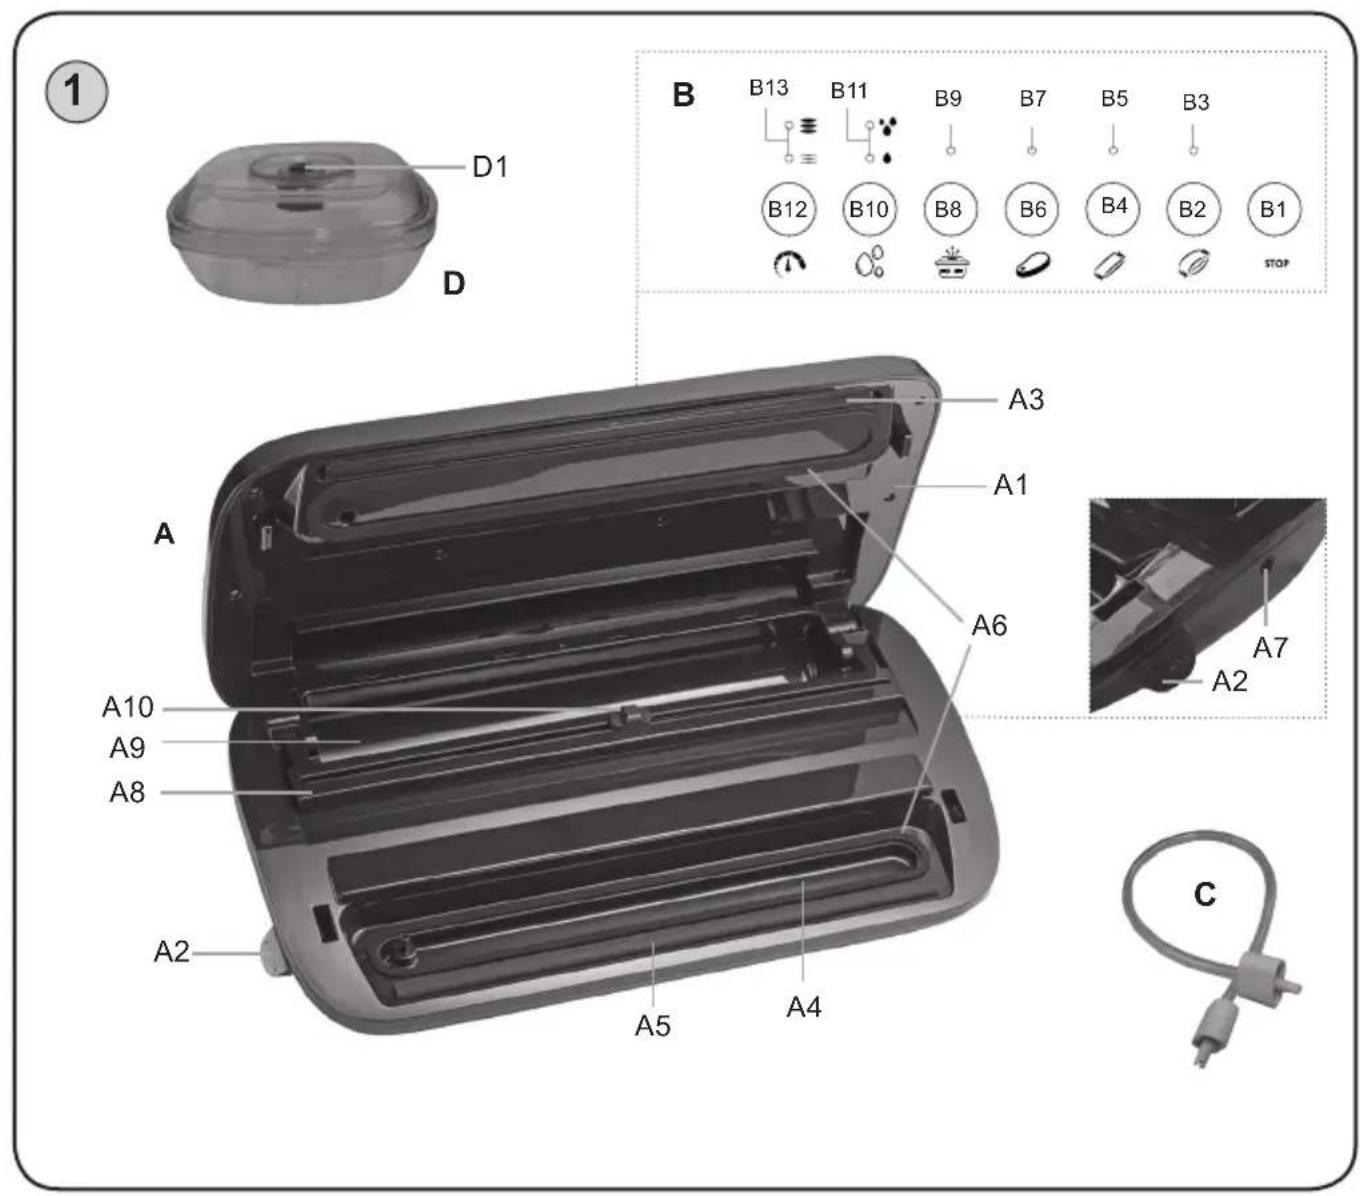
natural_image
Two-panel black-and-white photo showing a hand holding a tool near a device, labeled A and B (no text or symbols on the device itself)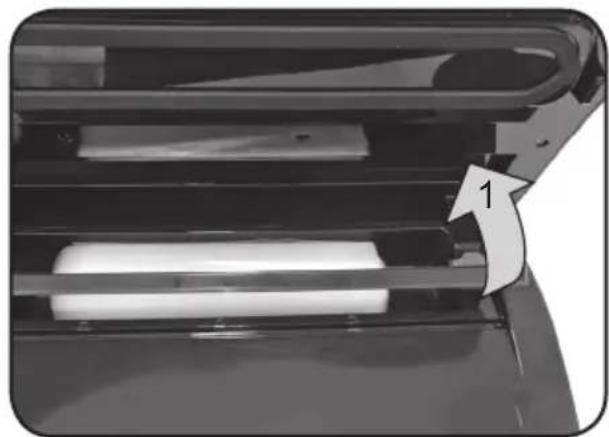
natural_image
Close-up of a mechanical device with a numbered arrow pointing to a component (no visible text or symbols)4
natural_image
Black-and-white photo of a printer with a paper roll being inserted, showing no visible text or symbols.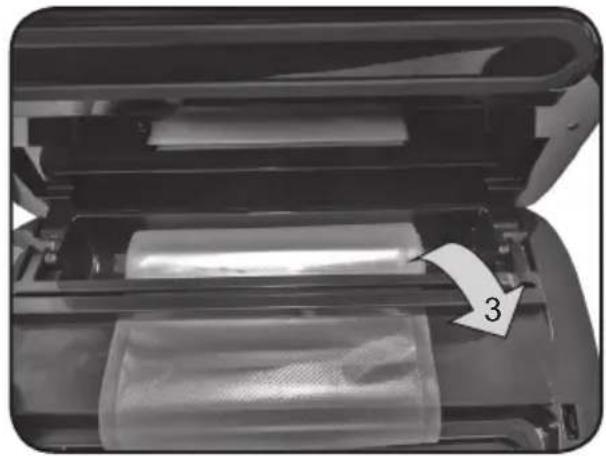
natural_image
Close-up of a printer's internal structure showing rollers and casing, with a numbered arrow pointing to a component (no text or symbols visible)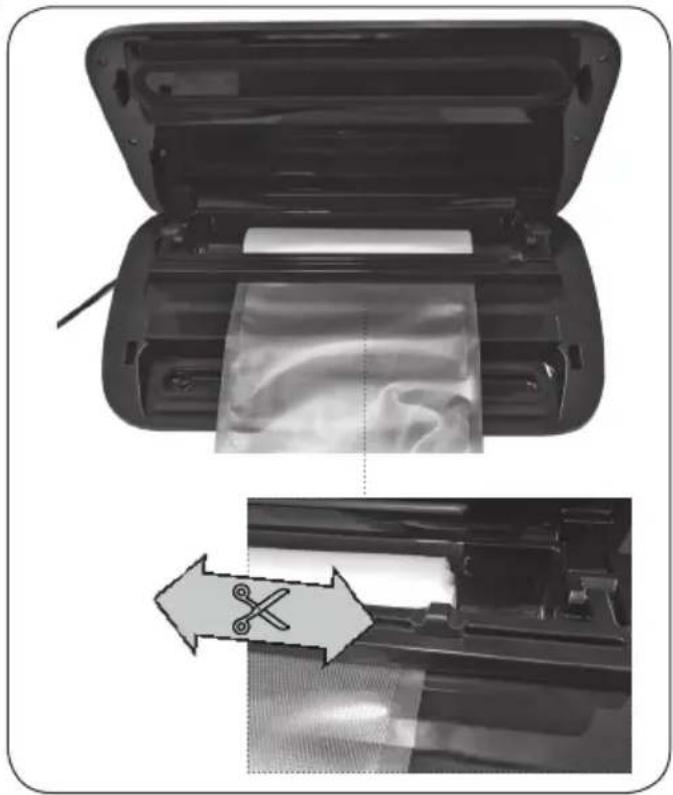
natural_image
Diagram showing a device with open lid and internal plastic sheet, before and after assembly (no text or symbols)Vakuovačka
eta 4762
ATMOS
NÁVOD K OBSLUZE
Dear customer, thank you for purchasing our product. Please read the operating instructions carefully before putting the appliance into operation and keep these instructions including the warranty, the receipt and, if possible, the box with the internal packing.
I. GENERAL SAFETY INSTRUCTIONS
GENERAL PROVISIONS:
- Consider the instructions for use as a part of the appliance and pass them on to any other user of the appliance.
- Check whether the data on the type label corresponds with the voltage in your socket. The power cord plug may only be connected to the electrical socket complying with the applicable standards.
- This appliance may only be used by children aged 8 years or older, and persons with reduced physical, sensory or mental capabilities or lack of experience and knowledge if they have been given supervision or instruction concerning use of the appliance in a safe way and understand the hazards involved. Children shall not play with the appliance. Cleaning and user maintenance shall not be made by children without supervision. Children younger than 8 years must be kept out of reach of the appliance and its power cord.
- Do not leave the appliance running without attendance and check it during the whole process of welding!
- Before replacing accessories or accessible parts, before assembly and disassembly, before cleaning or maintenance, turn off the appliance and disconnect it from the mains by pulling the power cord from the power socket!
- Always unplug the appliance from power supply if you leave it unattended and before assembly, disassembly or cleaning.
- Never use the appliance if the power cord or power plug are damaged, if the appliance is not correctly operating or if it has fallen on the floor and been damaged, or if it has fallen into water. In such cases take the appliance to a professional service centre to verify its safety and correct function.
- Pay careful attention when handling the appliance to avoid injury, (e.g. burns).
- CAUTION – Do not use the appliance with a program, time switch or any other part that turns the appliance on automatically as there is a risk of fire if the appliance is not covered or placed properly.
- The appliance has a hot surface. Persons insensitive to heat must be careful when using the appliance.
- When the appliance is in operation, prevent pets, plants or insects from getting in contact with it.
- The appliance is intended for home use and for similar purposes (in shops, offices and similar sites, in hotels, motels and other residential premises, or in facilities providing bed and breakfast service). It is not intended for commercial use!
- Do not plug the power cord in the electrical socket and do not unplug it with wet hands or by pulling the power cord!
- Never immerse the appliance into water or any other liquid (even its parts)!
- Holes for air ventilation must not be covered. Do not insert or throw any objects into the holes.
- Avoid contact with the sealing wire when hot.
- The producer does not undertake any responsibility for damage caused by improper use of the appliance (e.g. deterioration of food, injury, burning, scalding, fire, etc.) and its guarantee does not cover the appliance in the case of failure to comply with the safety warning above.
USE OF THE APPLIANCE:
- After completion of the vacuum process leave the cover of the appliance open for the welding part to cool down.
- CAUTION – The appliance is not designed for constant operation. Do not use the welder constantly for longer than 15 minutes, then leave it to cool down for approx. 10 minutes.
- It is not intended for outdoors use.
- The appliance must not be used in damp or wet environment and in any environment with the danger of fire or explosion (spaces where chemicals, fuels, oils, gases, paints and other flammable or volatile materials are stored).
- Prevent penetration of liquid inside the air exhaustion section A4!
- Do not seal fluids in liquid state. If you want to store liquid food (such as soups), first freeze the food in an appropriate container, cut the food into pieces, put in bags and seal/vacuum them. Put the individual bags into freezer.
- Do not place the appliance on unstable, fragile or flammable surfaces (e.g. glass, paper, plastic, wooden varnished boards and various fabric/table cloths).
- Use the appliance in the working position only at places with no risk of turning over and in sufficient distance from heat sources (e.g. heater, stove, cooker, oven, grill), flammable objects (e.g. curtains, drapes, etc.) and wet surfaces (e.g. sinks, wash basins, etc.).
POWER CORD:
- If the power cord of the appliance is corrupted, it has to be replaced by the manufacturer, its service technician or a similarly qualified person so as to prevent dangerous situations.
- Never put the power cord on hot surfaces and never let it hang over table edge or worktop edge. If the cord is caught or pulled, e.g. by children, the appliance may overturn and fall down, causing a serious injury!
- The power cord must not be damaged with sharp or hot objects, open fire, it must not be sunk into water or bent over sharp edges.
- In order to ensure safety and proper function of the appliance, use only original spare parts and accessories approved by the manufacturer.
- Only use this appliance for the purpose it was designed for, as specified in this manual. Never use the appliance for any other purpose.
II. DESCRIPTION OF THE CONTROLS
A - bag sealer body
A1 - lid
A2 – buttons for releasing the lid
A3 – welding part
A4 – the sucking area
A5 – sealing gasket
A6 – airproof loop of sponge
A7 – port for external extraction
A8 – hinged holder
A9 – compartment for vacuum bag roll storage
A10 – vacuum bag roll cutter
B - control panel
B1 - STOP button
B2 – sealing button
B3 – sealing indicator light
B4 – vacuuming + sealing button
B5 – vacuuming + sealing indicator light
B6 – marinating button
B7 – marinating signal light
B8 – external vacuum-packing button
B9 – external vacuum-packing signal light
B10 – button for selecting the type of food
B11 – signal lights for the selected type of food
B12 – button for setting the vacuum-packing intensity
B13 – signal lights for the selected vacuum-packing intensity
C - extraction hose
D - vacuum-packing box
D1 – release valve
Optional accessories:
Cling film: 3m long and 28cm wide – ETA176200010
Extraction hose - ETA476200210
Vacuum-packing box (capacity: 1000ml) – ETA476200200
Vacuum-packing box (capacity: 2000 ml) – ETA476292000
III. INSTRUCTIONS FOR USE
Remove all packaging materials and take out the appliance. Remove all adhesive foils, stickers or papers from the appliance.
BAG SEALER FUNCTIONS
1) B12 button for setting the vacuum-packing intensity
It is used to set the vacuum-packing intensity. The selected mode is indicated by the appropriate indicator B13:
≡ = Normal (faster extraction for normal vacuum-packing)
= gentle mode (slower extraction for vacuum-packing of more fragile food)
2) B10 button for selecting the type of food
It is used to set whether you wish to vacuum-pack dry food or moist food.
The setting is indicated by the appropriate indicator light B11:
• = dry food
= Moist food
3) B8 button for external vacuum-packing (vacuum-packing in the vacuum-packing box) It is used to remove air from the vacuum-packing box through the extraction hose. When the button is activated, air is removed from the vacuum-packing box. This operation is indicated by the signal light B9. When the hose is connected to the port for external extraction and the other end is connected to the vacuum-packing box, press the B8 button. When switched off, remove the hose (from the vacuum-packing box first).
Caution
- The correct function of the appliance is guaranteed only if you use the vacuum-packing boxes supplied by the manufacturer. Request the vacuum-packing boxes from your distributor.
- When removing food from the vacuum-packing box, make sure to release the vacuum first by pressing down the valve D1 in the middle of the cover.
4) B6 marinating button
Vacuum-packing opens the food pores which significantly reduces the time of the marinating process from several hours to approx. 20 minutes. The programme works in cycles, during which it gradually extracts and removes air. The programme is intended to be used with the vacuum-packing box. This operation is indicated by the signal light B7.
5) Vacuum-packing + sealing (B4 button)
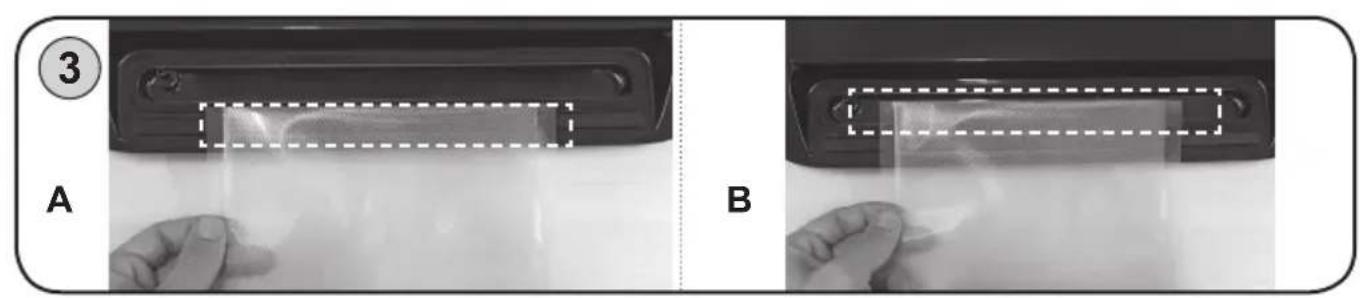
When this feature is activated, the vacuum sealer will remove air from the vacuum bag first (extraction area) and then produce a strong, seamless seal. This operation is indicated by the signal light B5. Place the bag as indicated in Fig. 3B.
6) B2 sealing button
When activated, the vacuum sealer will produce a strong, seamless seal.
This operation is indicated by the signal light B3. Place the bag as indicated in Fig. 3A.
7) B1 STOP button
It is used to stop the activated operation B2, B4, B6 and B8.
A) Standard operation
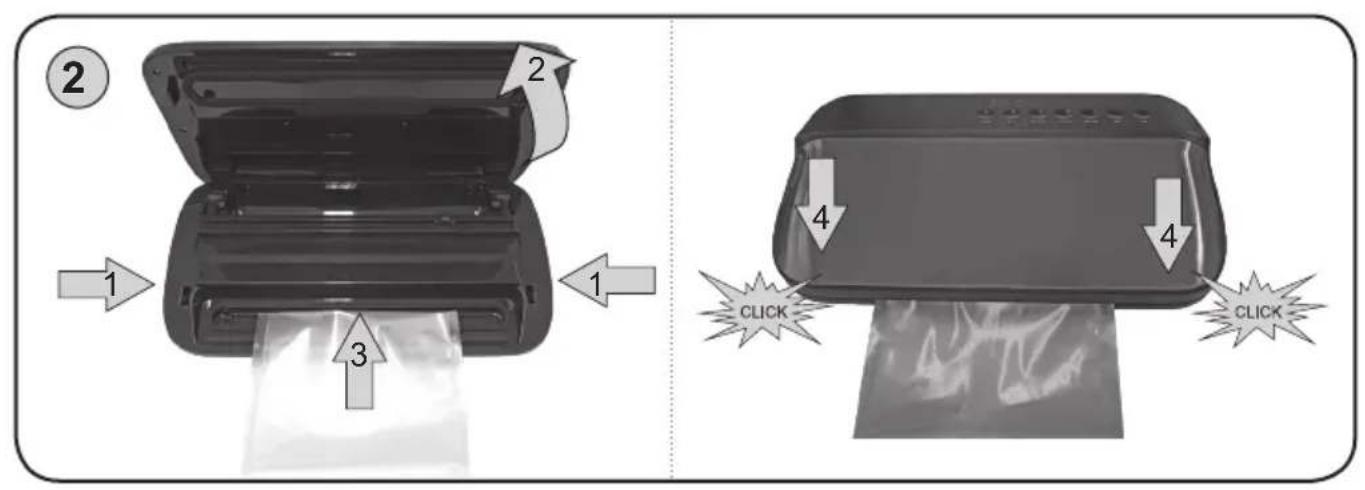
Connect the appliance to the mains. Set the vacuum-packing intensity and the type of food according to the selected ingredient. Follow the instructions provided in Fig. 2:
- Press the A2 button and open the cover A1.
-
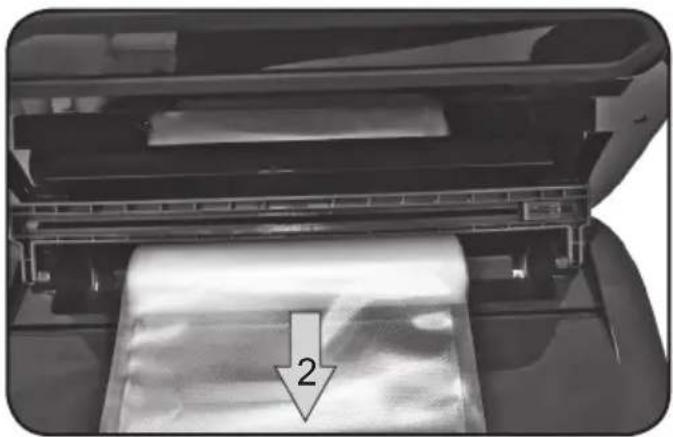
When you are making a bag from the vacuum bag roll (none of the two ends sealed), place it in the compartment for vacuum bag roll storage and prepare and cut the required length according to Fig. 4. Place one end of the cut film onto the seal A5 and seal it according to point 4 below (seal/vacuum-pack the other end
as usual). -
Close the cover A1 and press down the cover edges so as to lock it (you will hear a click).
- Press the button with the required operation (B2, B4 or B6). When this operation is activated, it is indicated by signal lights B3, B5 and B7.
- When the appropriate signal light goes out, the operation has been completed. You can now open the cover A1 (press the A2 button first) and remove the film/bag.
Notice
- Proper functionality of the appliance is assured only when using the foils supplied by the manufacturer. Request these foils at your retailer. Do not use plastic bags. At the same time you can re-weld many foods in their original packaging (eg bags of potato chips).
- The vacuum sealer is used to seal cling foil up to the max. width of 280 mm.
B) Using an external container (features B6, B8)
Connect the appliance to the mains. Place ingredients to the vacuum-packing box D and close the cover properly. Connect one end of the extraction hose C to the port for external extraction A7 and the other one to the external vacuum-packing box D.
Select the button/feature for marinating B6 or external vacuum-packing B8 as required. This operation is indicated by the appropriate signal light. When the operation has been completed, remove the hose from the cover of the vacuum-packing box first. To open the box, release the vacuum first by pressing down the cover in the middle.
IV. CARING FOR YOUR VACUUM SEALER
Do not clean appliance if is hot. After each use, wipe the outer parts with a damp soft cloth. To clean the inner parts of the appliance, wipe all pieces of food and liquids with a paper cloth. Leave to dry properly before next use. Do not use abrasive and agressive cleaning agents! If the power cord becomes stained, wipe it with a damp cloth. The colour change of the surface in time is normal. This change does not change the qualities of the surface in any way and is not a reason to return this appliance! If particles of plastic adhere to the sealing wire, wipe them off carefully to avoid damage to the wire. If can help to carry out a sealing operation the lid and pressing fully down without a bag in position. This will heat the wire and soften any plastic adhering to it.
BAGS
Before reusing a bag, we recommend properly washing it in warm water with a small amount of dishwasher detergent, and rinsing in clear water. Place the bag so that water can flow out from inside the bag. Before reusing, dry the bag thoroughly.
VACUUM-PACKING BOX
Rinse the vacuum-packing box and parts thereof with water and detergent (or wash them in a dish-washer). Allow all the parts to dry out properly before next use or storage.
V. ENVIRONMENTAL PROTECTION

If the dimensions allow, there are labels of materials used for production of packing, components and accessories as well as their recycling on all parts. The symbols specified on the product or in the accompanying documentation mean that the used electric or electronic products must not be disposed of together with municipal waste. For proper disposal of the product, hand it over at special collection places where it will be taken over free of charge. Suitable disposal of the product can help to maintain valuable natural resources and to prevent possible negative impacts on the environment and human health, which could be the possible consequences of improper waste disposal. Ask for more details at the local authorities or in the nearest collection site. Fines can be imposed for improper disposal of this type of waste in agreement with the national regulations. If the appliance is to be put out of operation for good, after disconnecting it from power supply we recommend cutting off the power cord and thus it will not be possible to use the appliance again.
Expert service must do the large maintenance or to intervene into inside parts of the appliance! Non-observance of the instructions of the manufacturer cancels the right for guarantee repair!
VI. TECHNICAL DATA
Voltage (V) shown on the type label of the appliance
Absorbed power (W) shown on the type label of the appliance
Weight (kg) approximately 2.2
Protection class of the appliance II.
Size, (mm): 400 x 195 x 100
Input in standby mode is < 0,50 W
The manufacturer reserves the right to change the technical specifications and accessories for the respective models.
WARNINGS AND SYMBOLS USED ON THE APPLIANCE, PACKAGING OR IN THE INSTRUCTIONS MANUAL:
HOUSEHOLD USE ONLY; DO NOT IMMERSE IN WATER OR OTHER LIQUIDS;


TO AVOID DANGER OF SUFFOCATION, KEEP THIS PLASTIC BAG AWAY FROM BABIES AND CHILDREN. DO NOT USE THIS BAG IN CRIBS, BEDS, CARRIAGES OR PLAYPENS. THIS BAG IS NOT
A TOY.
Fólia hegesztő gép
eta 4762
ATMOS
HASZNÁLATI UTASÍTÁS


- Vakuovačka
- eta 4762
- ATMOS
- NÁVOD K OBSLUZE
- GENERAL SAFETY INSTRUCTIONS
- GENERAL PROVISIONS:
- USE OF THE APPLIANCE:
- POWER CORD:
- DESCRIPTION OF THE CONTROLS
- A - bag sealer body
- B - control panel
- C - extraction hose
- D - vacuum-packing box
- Optional accessories:
- INSTRUCTIONS FOR USE
- BAG SEALER FUNCTIONS
- 1) B12 button for setting the vacuum-packing intensity
- 2) B10 button for selecting the type of food
- Caution
- 4) B6 marinating button
- 5) Vacuum-packing + sealing (B4 button)
- 6) B2 sealing button
- 7) B1 STOP button
- A) Standard operation
- Notice
- B) Using an external container (features B6, B8)
- CARING FOR YOUR VACUUM SEALER
- BAGS
- VACUUM-PACKING BOX
- ENVIRONMENTAL PROTECTION
- TECHNICAL DATA
- Fólia hegesztő gép
- HASZNÁLATI UTASÍTÁS
Brand : Eta
Model : Atmos 4762 90000
Category : Vacuum Sealer