
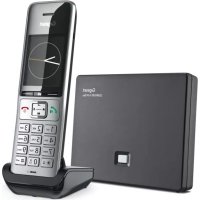
DA611 - Desk Phone GIGASET - Free user manual and instructions
Find the device manual for free DA611 GIGASET in PDF.


| Product Type | Desk Phone |
| Dimensions (approx.) | 220 x 170 x 80 mm |
| Weight (approx.) | 400 g |
| Power Supply | Via telephone line (no mains adapter required) |
| Display | LCD with symbols and text |
| Keypad | 12 alphanumeric keys, control key, hands-free key, mute key, redial key, recall key, speed dial keys |
| Phonebook Capacity | 100 entries (max. 32 digits, 16 characters) |
| Call List Capacity | 50 entries (last incoming calls) |
| Speed Dial | 10 keys (0-9) |
| Hands-Free Function | Yes, via speaker and microphone |
| Open Listening | Yes, during handset use |
| VIP Melody | Yes, assignable to contacts |
| Key Lock | Yes, prevents unauthorized use |
| Emergency Numbers | Pre-set 110, 112; one additional programmable |
| Direct Call (Baby Call) | Yes, dials stored number on any key press |
| Call Block | Up to 3 numbers (5 digits each) |
| Mute Function | Microphone off, microphone & speaker off, or mute melody |
| Ringer Settings | 10 melodies, 5 volume levels, selectable ringer mode |
| Dialing Modes | Tone (DTMF) and Pulse |
| Flash Time Settings | 90, 120, 270, 375, 600 ms |
| PABX Support | Up to 3 dialing prefixes, adjustable pause length |
| LED Indicator | Hands-free key LED for calls and messages |
| Care Instructions | Wipe with damp or antistatic cloth; avoid solvents |
| Operating Temperature | +5°C to +40°C |
Frequently Asked Questions - DA611 GIGASET
User questions about DA611 GIGASET
0 question about this device. Answer the ones you know or ask your own.
Ask a new question about this device
Download the instructions for your Desk Phone in PDF format for free! Find your manual DA611 - GIGASET and take your electronic device back in hand. On this page are published all the documents necessary for the use of your device. DA611 by GIGASET.
USER MANUAL DA611 GIGASET
Дисплей и бутони
- Phone setup → Language
Изберете Delete entry/Delete all и потвърдете с OK.
◆ ⚠ ⚠ ⚠ ⚠ ⚠ ⚠ ⚠ ⚠ ⚠ ⚠ ⚠ ⚠ ⚠ ⚠ ⚠ ⚠ ⚠ ⚠ ⚠ ⚠ ⚠ ⚠ ⚠ ⚠ ⚠ ⚠ ⚠ ⚠ ⚠ ⚠ ⚠ ⚠ ⚠ ⚠
→ Phone setup → Language
→ Phone setup → Date/time
→ Phone setup → Speaker LED
→ Audio setup → Handset Volume
→ Audio setup → Speaker Volume
→ Audio setup → Mute mode
→ Audio setup → VIP Melody
→ Security → Key lock
→ Security → Emergency
→ Security → Direct call
→ Security → Call block
→ Phone setup → Area code
→ Phone setup → Dial mode
→ Phone setup → Flash time
→ Phone setup → PABX code
8 Star key, selecting/deselecting the ring tone (press and hold)
9 Hash key, selecting/deselecting the key lock (press and hold)
bg en hr sr 1
10 Hands-free key
11 Keys for setting the volume of the handset, speaker and ring tone
12 Microphone for hands-free use
LED
Hands-free key
▶ flashes on incoming call
▶ lights up when the call is transferred to the speaker
Connecting the telephone
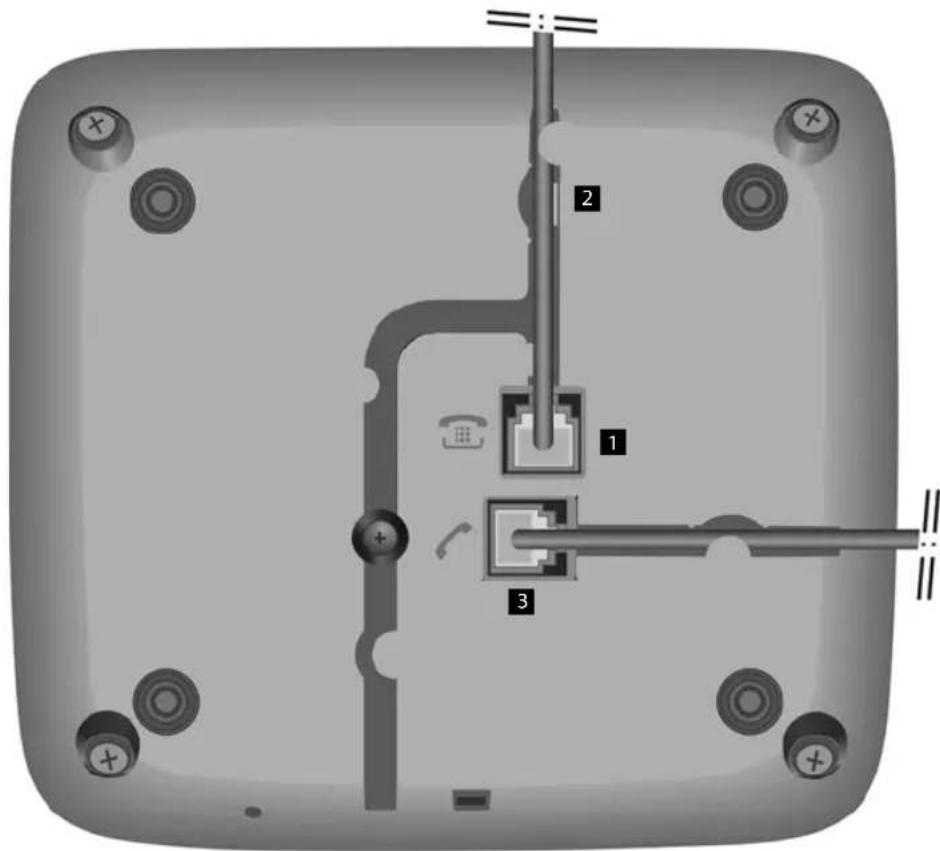
Connect the telephone connector (1) to the main telephone socket. Use the telephone cable supplied. You may need a phone adapter depending on your country. Power is supplied over the telephone line. A mains adapters is not necessary.
▶ Guide the cable through the cable channel (2).
▶ Connect the handset to the telephone using the coiled cable (3).
Notes
◆First use
- Lift the handset for 5 seconds and place it back in the cradle.
- Lift the handset again. You will hear the free tone and the device is now ready to be used.
The phone is connected to the power source via the phone line. In case of a power cut (e.g. if the PBX is switched off at night), the above mentioned steps need to be repeated. Phonebook entries and speed dialling destinations are stored indefinitely.
◆ The device is designed to be used as a single-line system (on the main extension or a telephone system).
It cannot be operated as a second phone on a line splitter.
◆Operation on a PBX or router
The private branch exchange (PBX) or the router must supply the phone with continuous DC voltage, even when ringing. If this is not the case, the phone may switch off briefly when ringing. As a result, saved information may be lost. Refer to the operating manual for your PBX or router for information in this regard or contact the manufacturer.
2 bg en hr sr
Table of contents
Overview Gigaset DA611.... 1
Connecting the telephone 2
Notes 2
Safety precautions 4
Setting up the telephone for use 4
Operating the telephone 4
Display 4
Control key 5
Writing and editing texts 5
Text input 5
Menu 5
Phonebook, call list and redial list 5
Menu tree 6
Telephoning 6
Making a call 6
Incoming calls 7
Using open listening / hands-free 7
Settings during a call 8
Using the phonebook 8
Using the call list (CLIP) 9
Using speed dialling numbers .... 10
Adjusting the telephone 10
Basic settings....10
Setting the volume 10
Setting the ringer....11
Security settings 11
Locking the telephone....11
Emergency calls 11
Direct calling (baby call) 12
Blocking numbers 12
Network services 12
Caller display (CLIP) 12
Recall key 12
Setting up of dialling code 12
Operation on a PABX 12
Special functions/Recall key 12
Changing the dialling mode/flash time 12
Setting dialling prefixes 13
Other settings 13
Standard characters 13
Appendix 14
Care 14
Contact with liquid 14
Questions and answers .... 14
Environment 14
Disposal 14
Authorisation....14
Contacts....14
Index 15
Safety precautions
When installing, connecting and operating the telephone, always observe the following precautions:
◆Only use the jacks and leads supplied.
◆Only connect the connecting lead to the intended socket.
◆Only connect the approved accessories
◆Lay the connecting lead where it will not cause accidents.
◆Position the telephone on a non-slip surface.
◆For your safety and protection, the telephone may not be used in the bath or shower rooms (wet locations). The telephone is not splash proof.
- Never expose the telephone to sources of heat, direct sunlight or other electrical devices.
◆Protect your telephone from moisture, dust, corrosive liquids and vapours.
◆Never open up the telephone yourself.
◆Do not touch the plug contact with pointed or metallic objects.
◆Do not carry the telephone by the leads.
◆If you give your Gigaset DA611 to someone else, make sure you also give them the operating manual. Your Gigaset DA611 has a permanent memory, so you may want to delete any stored numbers before passing it on.
Setting up the telephone for use
Recommended installation of telephone:
◆Do not expose the telephone to direct sunlight or other sources of heat.
◆Operate at temperatures of between +5°C and +40°C.
◆Maintain a distance of at least one metre between the telephone and radio equipment, e.g. radio telephones, radio paging equipment or TV sets. Otherwise telephone communication could be impaired.
◆Do not install the telephone in dusty rooms as this can limit the service life of the telephone.
◆ Furniture lacquer and polish can be adversely affected by contact with parts of the unit (e.g. feet).
Operating the telephone
The keypad and the display are available to operate your Gigaset DA611. In addition, the display menu together with the control key provides access to the configuration and use of the many functions of the telephone. All usage possibilities are described in the handbook.
Note
Some of your telephone's functions may only be available without restriction if they are supported by your and the caller's network provider, e.g. functions for which information on the caller's telephone number is required.
This applies for the following functions, for example:
◆Displaying the number of an incoming call ( → page 7)
◆Indicating a caller with VIP melody ( → page 7)
◆Call list ( → page 9)
Display
Depending on the operating situation the display shows different information, e.g. date and time. You can set the date and time and the format in which they are displayed ( page 10).
Symbols provide information on the status of your telephone.
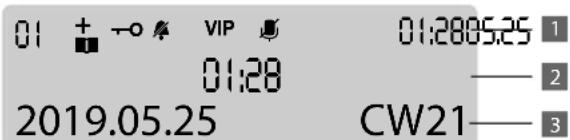
1 Symbol bar: date and time (depending on situation)
2 Time (in idle mode); call duration, numbers, settings (depending on situation)
3 Date and calendar week, missed calls (in idle mode); menu selection, options, names (depending on situation)
Display symbols
☐ Number of an entry in the phonebook or a call list or of a speed dial key
+ Flashes for a new entry in the call list if the caller's number transmission (CLIP) is active ( page 12)
Phonebook open
→ Key lock activated
Ringer switched off
Mute mode activated
VIP Flashes on incoming VIP call
Is indicated if at least one entry with activated VIP mode is present in the phonebook ( page 8).
Display language
On delivery the display language is set to English. Other languages are available and you can change the language if you wish (→ page 10).
Control key
You activate the functions and navigate the menus using the control key. The functions offered depend on the operating situation.
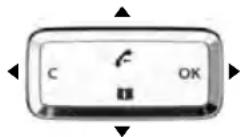
In standby:

Open the call list
Open phonebook

In menus and lists:
Scrolls one entry upwards/downwards.
Hold down: Scrolls the list fast upwards/downwards.
While editing time setting:
Moves forwards/backwards one position.
While editing names and numbers:
Moves the cursor to the left/right.
Hold down: Moves the cursor fast to the left/right.
In menus and lists: Exits the menu or list.
While changing settings:
Terminates the action without changing the setting.
While editing names and numbers:
Deletes the character to the left of the cursor.
Hold down: Deletes the line.
If the entry is empty: Exits the editing mode.

Phone number entered: Dials the phone number.
In menus and lists: Opens the sub/context menu.
While editing entries/changing settings:
Saves the edits or activates the selected settings.
Writing and editing texts
Text input

Enter text using the keypad.
Multiple letters and numbers are assigned to each key between
1 — and 9 ××7 and 0, * ▲ and # -0. You enter a specific character by pressing the corresponding key several times.
You will find a table of applicable characters in the Appendix → page 13.
Moving the cursor


To move the cursor to the left/right in the text, press the control key upwards/downwards.
Deleting/correcting characters
C
Press the left-hand side of the control key. The character to the left of the cursor is deleted. Press and hold down to delete the whole line.
Menu
The functions of your telephone are offered to you via a menu that consists of several levels.
▶ Press the ☐ key to open the menu.
The menu functions and submenu functions where necessary are displayed in the bottom line of the display.
▶ Scroll with the control key ☐ to the required function and press the right-hand side of the control key ☐, (OK) to confirm your selection.
▶ Press (C) in order to return to the previous menu level.
▶ Press the ☐ key to return to the start menu.
Note
To exit the menu without saving any previous entries simply lift and then hang up the handset. After a short time the display will then once again show the standby mode.
Description of the menu selection steps
The steps to select a menu function are set out in these operating instructions as follows:

Phone setup → Language
This is accessed as follows:
▶ Open the menu using the ☐ key.
Using the control key □, select the entry Phone setup and press the right-hand side of the control key □, (OK).
Using the control key □, select the entry Language and press the right-hand side of the control key □, (OK).
Phonebook, call list and redial list
Phonebook, call list and redial list can be opened using the menu or keys.
Using the menu
▶ Press the ☐ key to open the menu.
▶ Select Call list (CLIP) or Phonebook or Redial in order to open the desired list.
Using keys
Open the call list using the control key □.
■ Open the phonebook using the control key □.
→ P Open the redial list.
The first list entry will be displayed in each case.
▶ Scroll with the control key ▶ to the desired entry and press the right-hand side of the control key ▶, (OK) to open the context menu.
Menu tree
The complete menu tree of the display menu is depicted below.
| Call list (CLIP) Entry 1-50 | Call back | → page 7 | |
| Save number | → page 9 | ||
| Delete entry | → page 9 | ||
| Delete all | → page 9 | ||
| Phonebook | New entry | → page 8 | |
| Entry 1-100 | Dial entry | → page 6 | |
| Edit entry | → page 9 | ||
| New entry | → page 8 | ||
| Delete entry | → page 8 | ||
| Delete all | → page 9 | ||
| Security | Key lock | → page 11 | |
| Emergency | → page 12 | ||
| Direct call | → page 12 | ||
| Call block | → page 12 | ||
| Phone setup | Language | → page 10 | |
| Date/time | → page 10 | ||
| Dial mode | → page 12 | ||
| Flash time | → page 12 | ||
| PABX code | → page 13 | ||
| Date/Time format | → page 10 | ||
| Area code | → page 12 | ||
| Speaker LED | → page 10 | ||
| Audio setup | Ring tones | → page 11 | |
| VIP Melody | → page 11 | ||
| Handset Volume | → page 10 | ||
| Speaker Volume | → page 11 | ||
| Mute mode | → page 11 | ||
| Ringer mode | → page 11 | ||
| Redial | Entry 1 - 5 | Dial entry | → page 7 |
| Save number | |||
| Delete entry | |||
| Delete all | |||
Telephoning
In addition to the handset, you can also call using the speaker (hands-free function). In the following instructions, the symbol ↗ also always stands for ▶.
Making a call
Entering the telephone number using the keypad
Dial the number, lift the handset.
or Lift the handset, dial the number.
Instead of lifting the handset:
Press the hands-free key to make a call via the speaker. You can switch over at any time during the conversation.
Making a correction when entering the telephone number (only possible if the handset is in its cradle):
C Press the control key to delete a digit entered in error to the left of the cursor.
Dialling from the phonebook
If you have already saved numbers in your phonebook (→ page 8), you can make a call directly from the phonebook.
Open the phonebook using the control key ▼.
Searching for an entry
Select an entry. Hold down the top or bottom of the key to scroll fast in the list.
Enter letters (→ page 5). The first entry starting with this letter is displayed.
Dialling numbers
Lift the handset.
or
OK Open the context menu.
Select Dial entry and confirm with OK. The call is initiated via the speaker. To make the call using the handset, simply lift the handset.
Note
You can also first lift the handset before opening the phonebook.
Dialling from the call list
The call list contains the numbers of the last 50 incoming calls.
Requirement: Telephone number display is possible for incoming calls ( page 12).
Multiple calls from one number are only displayed once (with the information of the last call). If the name is transmitted or the number is saved to the phonebook, the accompanying name is also displayed.
Open the call list using the control key □.
Select the number or name.
either ...
Lift the handset.
... or
OK Open the context menu.
Select Call back and initiate the call using the speaker with OK. To make the call using the handset, simply lift the handset.
Note
You can also first lift the handset before opening the call list.
Last number redial
The last five numbers dialled are automatically saved (each a max. of 32 digits).
Dialling the last saved number:
→ P Lift the handset, press the redial key.
Dialling one of the last five numbers saved:
P Press the redial key.
or
→ Redial
Select the number.
Lift the handset.
or
Initiate the call using the speaker with OK.
Speed dialling
10 numbers can be saved for speed dial on the number keys 0 ... 9 ( page 10).
Press the speed dial key.
0 ... 9 _wxyz Press the speed dial number key.
Lift the handset or press the □.
or
OK Open the context menu.
Select Dial entry and confirm with OK.
The number stored on the number key is dialled.
Note
You can also first lift the handset before pressing the speed dial key and then press OK.
bg en hr sr 7
Dialling pauses
One or more dialling pauses can be entered using P (not at 1st digit). Pauses are transferred to the memory and are necessary for certain extension systems (e.g. 0 P 2368).
The length of the pause can be set to 1, 3 or 6 seconds ( page 13).
Incoming calls
Incoming calls are indicated by the ring tone and in the display.
For number displays (→ page 12), the number is visible in the display and the + symbol flashes. This symbol disappears when you answer the call or (if you don't answer) by calling up the call list. The name is also displayed for callers who are stored in the phonebook or speed dial keys with names.
If the VIP mode is activated ( page 11) the VIP symbol flashes in the display and the VIP ring tone signals the call.
Accepting a call
Lift the handset.
or
Press the hands-free key to accept the call via the speaker.
Call waiting
An incoming call is indicated during the conversation. You will hear the call waiting tone. The display shows the caller number if the number can be displayed, and the name if it is saved in the phonebook or the speed dial keys ( page 8).
R Press the callback key to accept the call.
R Press the callback key again to end the second call and to return to the first call.
Using open listening / hands-free
Switching open listening on/off
The persons present in the room can listen to the call over the speaker. During the call using the handset:
Press the hands-free key to switch open listening on or off. When the speaker is switched on and the handset is picked up, open listening is switched on. In this case, the hands-free microphone is switched off.
When the speaker is switched on and the handset is in the cradle, hands-free via the hands-free microphone is switched on.
Switching from open listening to hands-free:
Replace the handset while holding down the hands-free key.
Switching hands-free on/off
You can also make a call via the microphone with the handset in the cradle. The optimum distance from the microphone is approx. 50 cm.
Switching on hands-free during a call
Replace the handset while holding down the hands-free key.
Switching on hands-free prior to dialling
Hands-free key, wait for dial tone.
Switching off hands-free
Lift the handset during the call. The call is transferred to the handset.
Ending a call
Press the hands-free key during a call via the speaker.
Settings during a call
The settings described below can also be changed in the menu
(→ page 10).
Setting the handset volume
There are three adjustable levels.
+ / - Set the volume using the volume up/volume down keys.
The set volume is shown in the display.
Setting the speaker volume
There are seven adjustable levels.
During hands-free speaking or open listening:
+ / - Set the volume using the volume up/volume down keys.
The set volume is shown in the display.
Mute
You can switch off the microphone or handset and microphone during a call according to the setting of the mute function ( page 11):
Press the mute key to switch the mute function on or off.
During muting of the microphone, a melody can be played.
Once the telephone has been muted this is indicated in the display with the 🔔 symbol.
Changing the ringer and ringer volume
While the telephone is ringing, the volume and ringer can be changed.
Changing the volume
+ / - Set the ringer volume with the volume up/volume down keys (5 levels, 0=silent).
Changing the melody
0 ... 9 _xyz Select the ringtone with the numeric keys (choice of 10).
Using the phonebook
Your Gigaset DA611 contains a phonebook in which you can save up to 100 entries, each with a maximum of 32 digits for numbers and 16 characters for names.
You can make a call ( page 6), add new entries and manage and modify entries ( page 8) using the phonebook.
You can manually enter numbers and names or transfer them from the call list ( page 9). You can also allocate VIP mode to a number.
The ☐ symbol is indicated in the display if the phonebook has been opened. The phonebook entry number is also visible (01... 99, 00 is shown for 100). If there is at least one VIP entry in the phonebook, this is indicated in the display via the VIP symbol.
Opening the phonebook
In standby:
Press the control key □.
or
→ Phonebook
Searching for an entry
Select an entry.

Enter letters ( page 5). The name of the first entry starting with this letter is displayed.
Note
If you press * , the entry is set as a VIP entry or the setting is deleted.
Saving numbers
Open the phonebook.
The first entry in the list is displayed.

Select New entry and confirm with OK.

Enter number and confirm with OK.

Enter name and confirm with OK.
Save to PBK? appears on the display.
Either: Store in the phonebook
OK Press the control key.

Choose VIP mode and confirm with OK.
Or: Store on a speed dial key
0 ... 9
Press the speed dial key and the speed dial number key. The display shows Saved.
Editing an entry
Open the phonebook.
The first entry in the list is displayed.
Select the entry and open the context menu with OK.

Select Edit entry and confirm with OK.
Change the number and confirm with OK.

Change the name and confirm with OK.
Save to PBK? appears on the display.
Either: Store in the phonebook
OK Press the control key.
Choose VIP mode and confirm with OK.
Or: Store on a speed dial key
0 ... 9
Press the speed dial key and the speed dial number key.
The display shows Saved.
Deleting an entry / Deleting all entries
Open the phonebook.
The first entry in the list is displayed.

Select an entry and open the context menu with OK.

Select Delete entry to delete the selected entry or Delete
all to delete all entries and confirm with OK.
OK Press the control key to confirm the action.
Using the call list (CLIP)
Incoming calls are saved if the number is transmitted ( page 12). Up to 50 calls are saved. If the number is the same, only the last incoming call is saved. The oldest call is automatically deleted when there are more than 50 calls. If transmitted, the caller's name is also displayed. If the caller is saved to the phonebook or on a speed dial key, the phonebook name is used. If there are any missed calls in the list the + symbol flashes and the display shows New call.
You can use the call list for the following functions:
▶ Calling a number from the list (→ page 7).
Saving a number in the phonebook or on a speed dial key.
Opening the call list
You can open the call list in idle mode or when the handset is lifted.
Press the control key □.
or
→ Call list (CLIP)
Transferring a number from the call list to the phonebook
Open the call list.
Select the entry and open the context menu with OK.

Select Save number and confirm with OK.

Change the number (if required) and confirm with OK.

Enter or edit the name and confirm with OK.
Save to PBK? appears on the display.
Either: Store in the phonebook
OK Press the control key.
Choose VIP mode and confirm with OK.
Or: Store on a speed dial key
0 ... 9
Press the speed dial key and the speed dial number key.
The display shows Saved.
Deleting an entry / Deleting all entries
Open the call list.
Select an entry and open the context menu with OK.
Select Delete entry to delete the selected entry or Delete all to delete all entries and confirm with OK.
OK Press the control key to confirm the action.
Using speed dialling numbers
You can save 10 numbers for speed dial on the number keys (each with max. 32 digits for numbers and 16 characters for names).
Press the speed dial key.
0 ... 9 _vxyz Choose a speed dial key and press OK.
If the key is already allocated, the content is displayed, else Empty.
Dial number: → page 7
Storing/changing number
OK Open context menu.
Select Edit entry and confirm with OK.
Enter or edit number and confirm with OK.
Enter or edit name and confirm with OK.
OK Press the control key to save the entry.
Deleting speed dial keys
0 ... 9
Press the speed dial key and the speed dial number key.
OK Open context menu.
Select Delete entry/Delete all and confirm with OK.
OK Press the control key to confirm the action.
Notes
When storing speed dial numbers, please note the following:
◆ *♠ and # -o are saved regardless of the set dialling mode but are only dialled with tone dialling mode (→ page 12).
◆If the number entered is longer than 32 digits, only the first 32 digits are stored.
Adjusting the telephone
Basic settings
All basic settings are accessed via the menu Phone setup.
The current setting is marked at the right-hand side of the display with *.
Changing the Language
You can change the language for display messages. There are four languages to choose from.
→ Phone setup → Language
Select the desired language and confirm with OK.
OK Press the control key to save the setting.
Setting the date and time
You can adjust the current date manually and change the format of the display. The time is updated by incoming calls with telephone number displays. You can adjust this setting if necessary (→ page 13).
→ Phone setup → Date/time
Enter 6-digit date (DDMMYY).
Enter 4-digit time (HHMM).
OK Confirm entry.
The entry is always performed as described here, regardless of the set date and time format.
Setting the Date/Time format
→ Phone setup → Date/Time format
Select the date format and confirm with OK. For example: 31. December 2019
YYYY.MM.DD: 2019.12.31
DD.MM.YYYY: 31.12.2019
DD/MM/YYYY: 31/12/2019
MM/DD/YYYY: 12/31/2019
OK Press the control key to save the setting.
Select the required time format and confirm with OK.
24h: 24 hour format
12h: 12 hour format
OK Press the control key to save the setting.
Set LED on hands-free key
You can specify when the telephone LED (key ☐) should flash in idle mode.
→ Phone setup → Speaker LED
Select the required setting and confirm with OK. Off: never (except of an incoming call)
Incoming Call: for new missed calls
Messages: for new messages not yet listened (if the net-
work provider signals the receipt of messages)
On: for new missed calls and messages
OK Press the control key to save the setting.
Setting the volume
Handset and speaker volumes can be set using the menu or changed during the telephone conversation directly using the keys (→ page 8).
Setting the handset volume
There are three adjustable levels.
→ Audio setup → Handset Volume
Select the required volume and confirm with OK.
The current value will be displayed.
Setting the speaker volume
There are seven adjustable levels.
→ Audio setup → Speaker Volume
Select the required volume and confirm with OK. The current value will be displayed.
Hinweis
Instead of using the □ key you can also use the - / + keys.
Mute
You can mute only the microphone or the speaker and microphone.
→ Audio setup → Mute mode
Select the required function and confirm with OK. Microphone off: You are still able to hear the person on the end of the line, however they cannot hear you. Micro&Spk. Off: The telephone is completely muted. Mute melody: Whilst in mute mode, the person on the other end of the line hears a melody.
The set function can also be activated using the mute key during a call ( page 8).
Setting the ringer
The following optional settings are available:
▶ Melody and volume
▶ VIP Melody
▶ Switching the ringer off
Setting the melody and volume
You can set the ringer melody and volume or switch the ringer off. There are 10 different ringers available, the volume can be adjusted in 5 levels (0=silent).
Note
The melodies are played over the speaker if you lift the handset before commencing with the settings.
You can also change both settings directly using the keys while the telephone is ringing ( page 8).
→ Audio setup → Ring tones

Select the required ringer.
0 ... 9wxrz Ringer 1 - 10
- / + Set the volume for the ringer currently selected.
Change the ringer playing speed (1 = slow, 3 = fast).
OK Press the control key to save the setting.
Note
The ring melody can only sound perfectly when the ring pulse arrives from the telephone network. The length of the pulses may differ from network to network. It is therefore possible that some ring tones for selection may seem clipped. If this is the case please select another ring tone.
Setting the VIP Melody
You can set one of the ringers as VIP Melody. When you have assigned a number from the phonebook VIP mode status (→ page 8), an incoming call from this number will be indicated with the VIP Melody ring tone.
→ Audio setup → VIP Melody
Select the required ringer.
0 ... 9 wrvz Ringer 1 - 10
- / + Set the volume for the ringer currently selected.
Change the ringer playing speed (1 = slow, 3 = fast).
OK Press the control key to save the setting.
Setting the ring mode
If you do not wish to be disturbed, you can switch off the telephone's ringer. The three following optional settings are available: All tones off, VIP only (see above), All tones on (default setting).
→ Audio setup → Ringer mode
Select the required setting and confirm with OK.
OK Press the control key to save the setting.
Switching the ring tone off using the key
Hold the key down to switch the ring tone off and back on. Once the ring tone has been switched off, this is indicated with the symbol in the display.
Security settings
Locking the telephone
You can secure your telephone against unauthorised access by using the Key lock.
Setting up the Key lock
When the Key lock is activated, all keys are locked, with the exception of the hands-free key and the stored emergency numbers ( page 11).
Activating the Key lock
When the telephone is on stand-by, press and hold down the lock key.
or
→ Security → Key lock
Deactivating the Key lock
# - Hold down the lock key.
Once the key lock has been switched on, this is indicated with the 0 symbol and Key locked in the display.
Emergency calls
There are two emergency numbers stored in the telephone as a default setting (110, 112). You can store an additional emergency number with a max. of 28 digits. These emergency numbers can also be selected when the Key lock is switched on.
Selecting an emergency number

Lift the handset.

Enter the emergency number.
Emergency is indicated in the display.
Saving the emergency number

→ Security → Emergency

... 9 wzz Enter the emergency number and confirm with OK.
Direct calling (baby call)
When direct calling is activated, the stored number is dialled by pressing any key after lifting the handset (except for the keys ▶, − and +).
Activating direct calling

→ Security → Direct call

... 9 wxyz Enter the direct calling number and confirm with OK.
Direct calling is activated and indicated in the display.
Deactivating direct calling

Press the menu key.
Blocking numbers
You can block phone calls to specific dialling codes (e.g. chargeable codes), max. 3 numbers with 5 digits each.

→ Security → Call block

Select Call block 1 (or 2 or 3) and confirm with OK.

... 9 Enter the call block number and confirm with OK.
Network services
Public telephone systems offer you – in some cases only on request – a range of helpful, additional services (e.g. call forwarding, callback when busy, withheld number, etc.). These services can be selected using specified key combinations, of which your network provider will notify you.
Caller display (CLIP)
If the caller display service is activated, an incoming call is shown on the display with the number and saved in the call list.
Prerequisite: The network provider supports the following service features and the number transfer is not withheld by the caller:
◆CLI (Calling Line Identification): The caller's number is transferred.
◆CLIP (Calling Line Identification Presentation): The caller's number is displayed.
You can transfer this number to the phonebook and edit it ( page 8). If you have saved the local dialling code ( page 12), a call with the same dialling code is automatically only displayed as the number without the dialling code.
Recall key
In public telephone systems the recall key (flash) is required for the use of various additional services; e.g. for "callback when busy". If necessary, the flash time on your telephone must be adjusted to the requirements of the telephone system (→ page 12).
Setting up of dialling code
If necessary you can change the default setting for the area code for your connection which is saved in the telephone. The number saved here is then used to display only the number of the person calling without area code in the call lists, provided that they have the same area code.

Phone setup → Area code
The default number is displayed.

9 wxyz Enter the new area code (max. 6 digits) and confirm with OK.
Operation on a PABX
Special functions/Recall key
During an external call, you can make an enquiry or forward the call. To do this, press the recall key R. The subsequent procedure depends on your PABX. To set the recall key, the telephone's flash time must be set consistently with your PABX. Please refer to the operating instructions for your PABX.
Changing the dialling mode/flash time
The telephone supports the following dialling modes:
◆Tone dialling
◆Pulse dialling
Depending on your PABX, you may need to change your phone's dialling mode or the flash time. (Default setting: Tone dialling)
Changing the dialling mode

Phone setup → Dial mode

Select Tone or Pulse and confirm with OK.
Changing the flash time
You can change the flash time if the dialling mode is set to tone dialling (see above) (default setting 90 ms).

Phone setup → Flash time

Select flash time, the following values are available: 90, 120, 270, 375, 600 ms and confirm with OK.
Temporary switch to tone dialling in "Pulse" position
To use functions that require tone dialling (e.g. remote control of answering machine), you can set the telephone to tone dialling for the duration of the call.
After the connection is established:

Press the star key.
After the connection is terminated, the setting reverts to pulse dialling.
Setting dialling prefixes
If your phone is connected to a PABX, you may have to use a dialling prefix to make external calls. You can save up to three prefixes in your telephone.
If a dialling prefix is recognised during dialling, a dialling pause will automatically be applied. You can adjust the time of the dialling pause if necessary ( page 13).
→ Phone setup → PABX code
The current setting is displayed.
0 ... 9 Enter the dialling prefix (1 to 3 digits) and confirm with OK.
Use the control key to switch between the dialling prefixes:
Press the control key up/downwards in order to jump left/right
Other settings
In addition to the options described in section Adjusting the telephone ( page 10), you can perform further settings with the help of Feature codes (e.g. reset the factory settings). These are summarised in the following table.
Default settings are displayed in bold. If there is no bold value for a setting, the presetting is country-dependent.
☐ 1 Press the menu key and 1.
Enter the key sequence for the Feature code and confirm with OK.
| Key sequence | Value | Description | |
| 02 | 0 | 1 s | Sets the length of the pause that can be inserted with the pause key |
| 1 | 3 s | ||
| 2 | 6 s | ||
| 25 | 0 | Restores all settings to the factory settings | |
| 1 | Deletes the contents of all programmable direct dial keys | ||
| 2 | Deletes PABX codes | ||
| 3 | Restores all network service codes | ||
| 4 | Deletes all stored numbers (not phonebook) | ||
| 50 | 0 | Time display off | Sets the time format |
| 1 | 24 hour format | ||
| 2 | 12 hour format | ||
| 57 | 0 | Deactivate | Interval for the LED (hands-free key) on incoming call |
| 1 | 500 ms/500 ms | ||
| 2 | 30 ms/70 ms | ||
| 70 | 0 | Deactivate | Eliminates click tone at the beginning or end of ringer. If network transmits only a very short ringer impuls, the click tone can be prevented by deactivating (setting 0) the setting. |
| 1 | Activate | ||
| 83 | 0 | Deactivate | Withholds the first ringer. With this setting, it is possible to determine, if an incoming call comes from a VIP number, and to select a VIP ring tone instead of the normal ring tone. |
| 1 | Activate | ||
| 2 | Automatic | ||
| Key sequence | Value | Description | |
| 88 0-9 | Settings | 0-90 = minimum contrast5 = default setting9 = maximum contrast | Sets the contrast of the display. |
| 91 | 01 | 1.5 : 12 : 1 | Sets the pulse ratio for pulse dial-ling |
| 92 | 01234 | 85 / 85 ms85 / 110 ms85 / 140 ms110 / 110 ms70 / 70 ms | Sets signal time/signal pause for tone dialling |
| #2 | 01 | ActivateDeactivate | Updates time automatically according to CLIP information |
| #4 0 | 1 | RingerAC | Start signal for CLIP recognition. If CLIP does not function with the default setting 0, select setting "AC". |
| #6 0-9 | Seconds | Settings 0 (3s) - 9 (12s)Default setting: 5 (8s) | Time for termination of an incoming call. For example: setting value is 5, means 8 seconds. |
Standard characters
The following characters can be entered using the keypad:
Standard
| Key 1x 2x 3x 4x 5x 6x 7x 8x 9x 10x 11x 12x 13x 14x | ||||||||||||||
| 1- | 1 | € | £ | $ | ¥ | α | ||||||||
| 2 | A | B | C | 2 | Ä | Ä | Ä | Ä | Ä | Ç | ||||
| 3 | D | E | F | 3 | Ë | É | Ë | Ê | ||||||
| 4 | G | H | I | 4 | Ï | Í | Ì | Î | ||||||
| 5 | J | K | L | 5 | ||||||||||
| 6 | M | N | O | 6 | Ö | Ñ | Ó | Ò | Ö | Ö | ||||
| 7 | P | Q | R | S | 7 | |||||||||
| 8 | T | U | V | 8 | Ü | Ú | Ü | Ü | ||||||
| 9 | W | X | Y | Z | 9 | Ÿ | Ÿ | Æ | ∅ | Ä | ||||
| 0 | . | , | ? | ! | 0 | + | - | : | ¿ | i | " | ' | ; | - |
| * | * | / | ( | ) | < | = | > | % | ||||||
| # | # | @ | \ | & | § | |||||||||
*) Space
Appendix
Care
Wipe the unit with a damp cloth or an antistatic cloth. Do not use solvents or microfibre cloths. Never use a dry cloth; this can cause static.
Contact with liquid ⚠!
If the device comes into contact with liquid:
1 Allow the liquid to drain from the device.
2 Pat all parts dry. Place the device (the keypad facing down) in a dry, warm place for at least 72 hours (not in a microwave, oven etc.).
3 Do not switch on the device again until it is completely dry.
When it has fully dried out, you will normally be able to use it again. In rare cases, contact with chemical substances can cause changes to the telephone's exterior. Due to the wide variety of chemical products available on the market, it was not possible to test all substances.
Questions and answers
You lift the handset, but don't hear the free tone:
Lift the handset for 5 seconds, put it back in the cradle and lift it again.
You lift the handset but you hear no dialling tone:
Is the connecting lead correctly plugged into the telephone and the telephone socket?
The dialling tone is audible but the telephone will not dial:
The connection is OK. Is the dialling mode set correctly?
The other party cannot hear you:
Mute activated?
Regular pulse noises can be heard during a call:
The connection is receiving metering pulses from the exchange, which the telephone cannot interpret. Contact your network operator.
Environment
Our environmental statement
We at Gigaset Communications GmbH are aware of our social responsibility. That is why we actively take steps to create a better world. In all areas of our business – from product planning and production to sales and waste of disposal – following our environmental conscience in everything we do is of utmost importance to us.
Learn more about our earth-friendly products and processes online at www.gigaset.com.
Environmental management system

Gigaset Communications GmbH is certified pursuant to the international standards ISO 14001 and ISO 9001.
ISO 14001 (Environment): Certified since September 2007 by TüV SÜD Management Service GmbH.
ISO 9001 (Quality): Certified since 17/02/1994 by TüV SÜD Management Service GmbH.
14 bg en hr sr
Disposal
All electrical and electronic equipment must be disposed of separately from general household waste using the sites designated by local authorities.

If a product displays this symbol of a crossed-out rubbish bin, the product is subject to European Directive 2012/19/EU.
The appropriate disposal and separate collection of used equipment serve to prevent potential harm to the environ-
ment and to health. They are a precondition for the re-use and recycling of used electrical and electronic equipment.
For further information on disposing of your used equipment, please contact your local authority or your refuse collection service.
Authorisation
This device is intended for analogue phone lines in your network.
Country-specific requirements have been taken into consideration.
We, Gigaset Communications GmbH, declare that this device meets the essential requirements and other relevant regulations laid down in Directive 2014/30/EU and 2014/35/EU.
A copy of the Declaration of Conformity is available at this Internet address:
www.gigaset.com/docs
Contacts
If you should encounter any problems when operating the telephone connected to a communication system with analogue network access, please contact the network operator responsible or your dealer.
Index
A
Authorisation ....14
B
Baby call 12
Blocking dialling codes....12
Blocking numbers....12
C
Call list....9
Dialling from 7
Saving numbers 9
Caller display....12
Changing the dialling mode....12
CLI, CLIP....12
Connectors....2
Contact with liquid 14
Contacts 14
Control key....5
D
Date and time....10
Dialling code....12
Dialling prefixes....13
Dialling, telephone number....6
Direct calling....12
Display....4
Display symbols 4
Disposal....14
E
Emergency calls....11
Entering characters....5, 13
Environment....14
F
Flash time....12
Function code....13
H
Hands-free....7
Hands-free key 1
Hash key 1
K
Key lock....1, 11
Keys 1
L
Language 4,10
Last number redial 7
LED....1,10
M
Menu....5
Menu key....1
Menu tree 6
Mute 8
Mute key 1
N
Network services....12
0
Open listening....7
P
Phonebook
Dialling from....6
Saving numbers 8
Pulse dialling 12
R
Recall key....1, 12
Redial list 7
Redial/pause key.... 1
Restore factory settings....13
Ringer 8
Setting 11
Switching off 11
Ringer volume 8
s
Safety precautions 4
Saving
Number 8
Setting the volume 11
Handset 8
Speaker....8
Speed dial key 1,8,9
from call lst 9
Speed dial number
Dialing 7
Storing 10
Star key....1
T
Telephone Changing the language .... 10
Installing 4
Locking....11
Setting the date/time 10
Text entry....5
Tone dialling....12
v
VIP melody 11
Volume keys 1
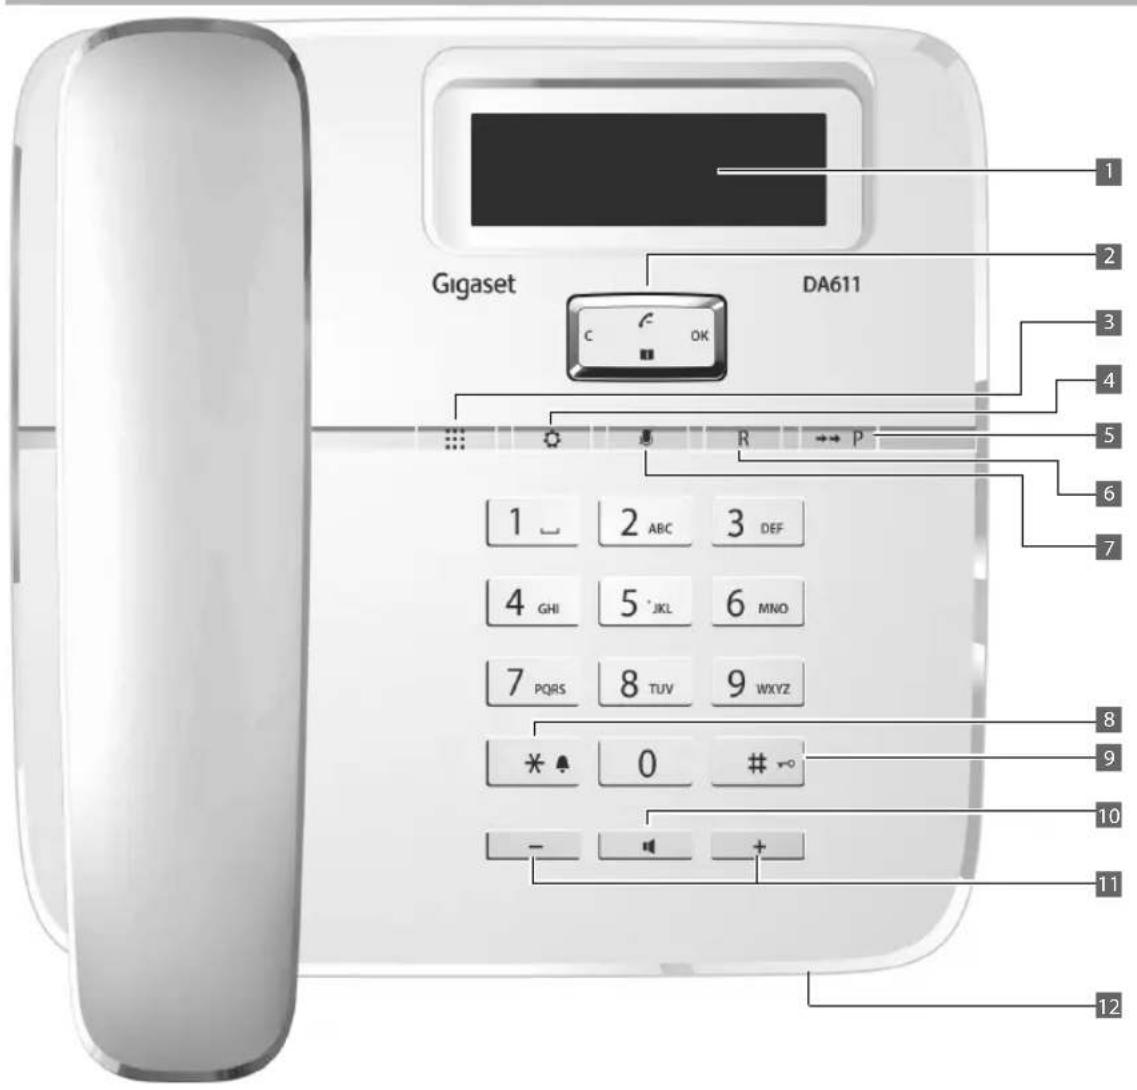
Zaslon i tipke
1 Z a s→str.4) n (
2 Upravljačka tipka ( → str. 5)
3 Tipke brzog biranja
4 Tipka izbornika
5 Tipka ponavljanja biranja/tipka pauze
6 Tipka povratnog upita
7 Tipka za isključivanje mikrofona
8 Zvijezda-tipka, uklj./isključivanje tona zvona (dugo pritiskanje)
9 Ljestve-tipka, uklj./isključivanje blokade tipki (dugo pritiskanje)
10 Tipka zvučnika (handsfree)
bg en hr sr 1
11 Tipke za podešavanje glasnoće slušalice, zvučnika i tona zvona
12 Mikrofon za "handsfree"
Svjetlosno pokazivanje (LED)
Tipka zvučnika
→ Phone setup → Language
Izaberite željeni jezik i potvrdite s OK.
→ Phone setup → Date/time
Unesite datum 6-znamenkasto (DDMMGG).
Vrijeme unesite 4-znamenkasto (HHMM).
OK Potvrdite.
→ Phone setup → Speaker LED
Izaberite željenu postavku i potvrdite s OK.
Off: nikad (osim za dolazni poziv)
Incoming Call: za nove propuštene pozive
Messages: za nove poruke koje još nisu poslušane (ako mrežni pružatelj usluga daje signal o primitku novih poruka)
On: za nove propuštene pozive i poruke
→ Audio setup → Handset Volume
Podesite glasnoću i potvrdite s OK.
→ Audio setup → Speaker Volume
Podesite glasnoću i potvrdite s OK.
→ Audio setup → Mute mode
Izaberite željenu funkciju i potvrdite s OK. Microphone off: Čujete svog sudionika u razgovoru, no on vas više ne može čuti. Micro&Spk. Off: Telefon je potpuno stišan. Mute melody: Tijekom stišavanja vaš sudionik u razgovoru čuje melodija.
→ Audio setup → VIP Melody
Izaberite željeni ton zvona.
0 ... 9 wzx Ton zvona 1 - 10
→ Security → Key lock
Deaktiviranje Key lock
# → Pritisnite dugo tipku za blokiranje.
Ako je uključena blokada tipki, to je prikazano na zaslonu sa simbolom -0.
bg en hr sr 11
Pozivi u nuždi
U telefonu su pohranjena dva broja za pozive u nuždi kao predpodešenje (110, 112). Možete pohraniti daljni pozivni broj za pozive u nuždi s maksimalno 28 znamenki. Ovi pozivni brojevi mogu biti birani i ako je blokada tipki uključena.
→ Security → Emergency
→ Security → Direct call
0 ... 9wxrz Unesite direktni pozivni broj i potvrdite s OK.
Direktni poziv je aktiviran i prikazan na zaslonu.
Deaktiviranje direktnog poziva
- Izaberite tipku izbornika.
Blokiranje broja
Pozive prema određenim predbrojevima (npr. plativi predbrojevi) možete blokirati, maksimalno 3 broja s po 5 znamenki.
→ Security → Call block
Call block 1 (npr. 2 ili 3) izaberite i potvrdite s OK.
0 ... 9wxrz Unesite broj za blokiranje i potvrdite s OK.
Mrežne usluge
Javne telefonske centrale nude vam - u nekim slučajevima samo nakon upita - jedan niz korisnih, dodatnih usluga (npr. preusmjerenje poziva, povratni upit ako zauzeto, susprezanje pozivnog broja itd.). Te usluge pozivate određenim kombinacijama tipki, koje možete saznati od vašeg mrežnog operatera.
U izborniku telefona možete pozvati i aktivirati te usluge, kao i odrediti odgovarajuće kombinacije tipki ili prilagoditi prema potrebi. Jedna lista unaprijed podešenih kombinacija tipki naći ćete u dodatku ( → str. 15).
☐ → Phone setup → Area code
Predpostavljeni broj je prikazan.
0 ... 9 www Unesite novi predbroj (maks. 6 znamenki) i potvrdite s OK.
Korištenje na privatnoj telefonskoj centrali
Posebne funkcije/tipka povratnog upita
→ Phone setup → Dial mode
Izaberite Tone ili Pulse i potvrdite s OK.
→ Phone setup → Flash time
Izaberite flash vrijeme, sljedeće vrijednosti stoje na raspolaganju: 90, 120, 270, 375, 600 ms i potvrdite s OK.
U „Puls“-poziciji privremeno prebacivanje na tonsko biranje
→ Phone setup → PABX code
Phone setup → Language
→ Phone setup → Language
→ Phone setup → Date/time
○ → Phone setup → Speaker LED
→ Audio setup → Handset Volume
→ Audio setup → Speaker Volume
→ Audio setup → Mute mode
→ Audio setup → VIP Melody
→ Security → Key lock
→ Security → Emergency
≡ → Security → Direct call
→ Security → Call block
Изаберите ставку Call block 1 (или 2 или 3) и потврдите тастером OK.
→ Phone setup → Area code
→ Phone setup → Dial mode
Изаберите ставке Tone или Pulse и потврдите тастером OK.
→ Phone setup → Flash time
→ Phone setup → PABX code
© Gigaset Communications GmbH 2019
Subject to availability.
All rights reserved. Rights of modification reserved.
www.gigaset.com
A30350-M212-R622-1-X119


- Дисплей и бутони
- Hands-free key
- LED
- Connecting the telephone
- Notes
- ◆First use
- ◆ The device is designed to be used as a single-line system (on the main extension or a telephone system).
- ◆Operation on a PBX or router
- bg en hr sr
- Table of contents
- Safety precautions
- Setting up the telephone for use
- Operating the telephone
- Note
- Display
- Display symbols
- Display language
- Control key
- In menus and lists:
- While editing time setting:
- While editing names and numbers:
- While changing settings:
- While editing entries/changing settings:
- Writing and editing texts
- Text input
- Moving the cursor
- Deleting/correcting characters
- Menu
- Description of the menu selection steps
- Phonebook, call list and redial list
- Using the menu
- Using keys
- Menu tree
- Telephoning
- Making a call
- Dialling from the phonebook
- Dialling from the call list
- Last number redial
- Speed dialling
- Dialling pauses
- Incoming calls
- Accepting a call
- Call waiting
- Using open listening / hands-free
- Switching open listening on/off
- Switching hands-free on/off
- Settings during a call
- Setting the handset volume
- Setting the speaker volume
- Mute
- Changing the ringer and ringer volume
- Changing the volume
- Changing the melody
- Using the phonebook
- Opening the phonebook
- Searching for an entry
- Saving numbers
- Either: Store in the phonebook
- Or: Store on a speed dial key
- Editing an entry
- Deleting an entry / Deleting all entries
- Using the call list (CLIP)
- Opening the call list
- Transferring a number from the call list to the phonebook
- Using speed dialling numbers
- Storing/changing number
- Deleting speed dial keys
- Adjusting the telephone
- Basic settings
- Changing the Language
- Setting the date and time
- Setting the Date/Time format
- Set LED on hands-free key
- Setting the volume
- Setting the ringer
- Setting the melody and volume
- Setting the VIP Melody
- Setting the ring mode
- Switching the ring tone off using the key
- Security settings
- Locking the telephone
- Setting up the Key lock
- Activating the Key lock
- Deactivating the Key lock
- Emergency calls
- Selecting an emergency number
- Saving the emergency number
- Direct calling (baby call)
- Activating direct calling
- Deactivating direct calling
- Blocking numbers
- Network services
- Caller display (CLIP)
- Recall key
- Setting up of dialling code
- Operation on a PABX
- Special functions/Recall key
- Changing the dialling mode/flash time
- Changing the dialling mode
- Changing the flash time
- Temporary switch to tone dialling in "Pulse" position
- Setting dialling prefixes
- Other settings
- Standard characters
- Appendix
- Care
- Contact with liquid ⚠!
- Questions and answers
- Environment
- Our environmental statement
- Environmental management system
- Disposal
- Authorisation
- Contacts
- Index
- A
- B
- C
- D
- E
- F
- H
- K
- L
- M
- N
- 0
- P
- R
- s
- T
- v
- Zaslon i tipke
- Svjetlosno pokazivanje (LED)
- Deaktiviranje Key lock
- Pozivi u nuždi
- Deaktiviranje direktnog poziva
- Blokiranje broja
- Mrežne usluge
- Korištenje na privatnoj telefonskoj centrali
- Posebne funkcije/tipka povratnog upita
- U „Puls“-poziciji privremeno prebacivanje na tonsko biranje
Brand : GIGASET
Model : DA611
Category : Desk Phone