
TC-WE605S - Cassette player SONY - Free user manual and instructions
Find the device manual for free TC-WE605S SONY in PDF.


User questions about TC-WE605S SONY
0 question about this device. Answer the ones you know or ask your own.
Ask a new question about this device
Download the instructions for your Cassette player in PDF format for free! Find your manual TC-WE605S - SONY and take your electronic device back in hand. On this page are published all the documents necessary for the use of your device. TC-WE605S by SONY.
USER MANUAL TC-WE605S SONY
Stereo Cassette Deck
Operating Instructions
TC-WA8ESA
TC-WA7ESA
TC-WE805S
TC-WE705S
TC-WE605S
TC-WR550Z
TC-WE505
II 1996 by Sony Corporation
WARNING
To prevent fire or shock hazard, do not expose the unit to rain or moisture.
For the customers in the United States
text_image
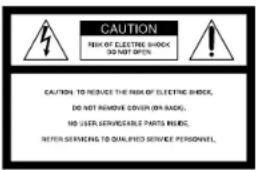
CAUTION RISK OF ELECTRIC SHOCK DO NOT OPEN CAUTION TO REDUCE THE RISK OF ELECTRIC SHOCK, DO NOT REMOVE COVER (OR BACK). NO USER SERVICEABLE PARTS INSIDE, REFER SERVICING TO QUALIFIED SERVICE PERSONNEL.
This symbol is intended to alert the user to the presence of uninsulated "dangerous voltage" within the product's enclosure that may be of sufficient magnitude to constitute a risk of electric shock to persons.

This symbol is intended to alert the user to the presence of important operating and maintenance (servicing) instructions in the literature accompanying the appliance.
Owner's Record
The model and serial numbers are located on the rear of the unit. Record these numbers in the spaces provided below. Refer to them whenever you call upon your Sony dealer regarding this product.
Model No. ____ Serial No. ____
INFORMATION
This equipment has been tested and found to comply with the limits for a Class B digital device, pursuant to Part 15 of the FCC Rules.
These limits are designed to provide reasonable protection against harmful interference in a residential installation. This equipment generates, uses, and can radiate radio frequency energy and, if not installed and used in accordance with the instructions, may cause harmful interference to radio communications. However, there is no guarantee that interference will not occur in a particular installation. If this equipment does cause harmful interference to radio or television reception, which can be determined by turning the equipment off and on, the user is encouraged to try to correct the interference by one or more of the following measures:
- Reorient or relocate the receiving antenna.
- Increase the separation between the equipment and receiver.
- Connect the equipment into an outlet on a circuit different from that to which the receiver is connected.
- Consult the dealer or an experienced radio/TV technician for help.
CAUTION
You are cautioned that any changes or modifications not expressly approved in this manual could void your authority to operate this equipment.
For the customers in Canada CAUTION
TO PREVENT ELECTRIC SHOCK, DO NOT USE THIS POLARIZED AC PLUG WITH AN EXTENSION CORD, RECEPTACLE OR OTHER OUTLET UNLESS THE BLADES CAN BE FULLY INSERTED TO PREVENT BLADE EXPOSURE.
NOTICE FOR THE CUSTOMERS IN THE UNITED KINGDOM
A moulded plug complying with BS 1363 is fitted to this equipment for your safety and convenience.
Should the fuse in the plug supplied need to be replaced, a 5 AMP fuse approved by ASTA or BSI to BS 1362, (i.e. marked with ◇ or ▼ mark) must be used.
If the plug supplied with this equipment has a detachable fuse cover, be sure to attach the fuse cover after you change the fuse. Never use the plug without the fuse cover. If you should lose the fuse cover, please contact your nearest Sony service station.
IMPORTANT
If the plug supplied is not suitable for the socket outlets in your home, it should be cut off and an appropriate plug fitted in accordance with the following instructions.
The wires in this mains lead are coloured in accordance with the following code:
Blue: Neutral Brown: Live
As the colours of the wires in the mains lead of this apparatus may not correspond with the coloured markings identifying the terminals in your plug, proceed as follows:
The wire which is coloured blue must be connected to the terminal which is marked with the letter N or coloured black. The wire which is coloured brown must be connected to the terminal which is marked with the letter L or coloured red. Do not connect either wire to the earth terminal in the plug which is marked by the letter E or by the safety earth symbol 12 or coloured green or green-and-yellow.
WARNING
To prevent shock hazard, do not insert the plug cut off from the mains lead into a socket outlet. This plug cannot be used and should be destroyed.
Welcome!
Thank you for purchasing the Sony Stereo Cassette Deck. Before operating the unit, please read this manual thoroughly and retain it for future reference.
About This Manual
The instructions in this manual are for models TC-WA8ESA, WA7ESA, WE805S, WE705S, WE605S, WR550Z and WF505. Check your model number by looking at the rear panel of your tape deck. In this manual, the TC-WE805S is the model used for illustration purposes. Any difference in operation is clearly indicated in the text, for example, "TC-WA8ESA/WE805S only."
Differences among the models
The seven models covered by this manual are distinguished by their features, as listed in the tables below. Check the tables to verify the features available on your tape deck before you start operating it.
| Feature\Model WA8ESA | WA7ESA | WE805SWE705S |
| Pitch control | ● | |
| High-speed fast-forwarding and rewinding | ● | ● |
| Dolby S | ● | ● |
| CD synchro-recording | ● |
| Feature\Model WE605S | WR550Z | WE505 |
| Pitch control | ● | |
| High-speed fast-forwarding and rewinding | ||
| Dolby S | ● | ● |
| CD synchro-recording | ● |
Of the seven models, only the TC-WA8ESA and WE805S are capable of recording on both decks. Relay recording and simultaneous recording are therefore featured on these two models only.
Convention
The following icon is used in this manual:

Indicates hints and tips for making the task easier.
TABLE OF CONTENTS
Getting Started
Unpacking 4
Hooking Up the System 4
Playing a Tape 5
Recording on a Tape 6
Advanced Playback Operations
Locating a Track (Multi-AMS/Auto Play/Memory Play) 8
Creating Your Own Program (RMS Play) 9
Advanced Recording Operations
Adjusting Bias and Recording Level Calibration Automatically 11 Adjusting the Recording Level Automatically (Auto Rec Level) 12 Fading In and Out (Fader) 13 Dubbing a Tape 13 Recording on Both Decks in Succession (Relay Recording) (TC-WA8ESA/WE805S only) 14 Recoding the Same Source on Both Decks (Simultaneous Recording (TC-WA8ESA/WE805S only) 15 Recording Your Own Program (RMS Dubbing) 15 Inserting a Blank Space During Recording (Record Muting) 16 Synchro-Recording With a CD Player Through a Control A1 Cable (TC-WE805S/WE705S/WE605S only) 16
Additional Information
Precautions 18
Notes on Cassette Tapes 18
Cleaning 19
Troubleshooting 20
Specifications 21
Glossary 22
Index 22
Unpacking
Check that you received the following items:
• Audio connecting cords (2)
Hooking Up the System
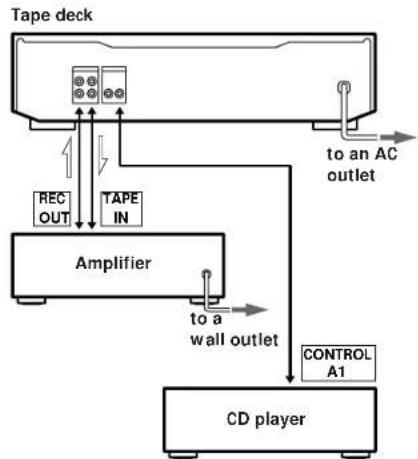
This section describes how to hook up the tape deck to an amplifier or a CD player equipped with CONTROL A1 connectors (TC-WE805S/WE705S/WE605S only). Be sure to turn off the power of each component before making the connections.
flowchart
graph TD
    A["Tape deck"] --> B["TOB"]
    B --> C["TOB OUT"]
    B --> D["TOB IN"]
    C --> E["to an AC outlet"]
    D --> F["to a wall outlet"]
    G["Amplifier"] --> H["CD player"]
    I["CONTROL A1"] --> H
: Signal flow
Hookups
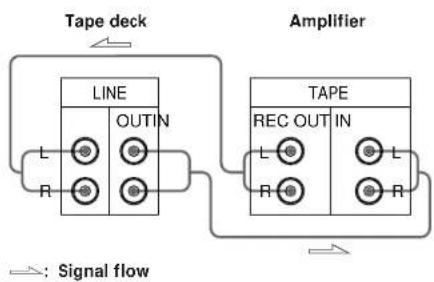
- Connecting the tape deck to an amplifier
Connect the amplifier to the LINE IN/OUT connectors using the supplied audio connecting cords. When connecting an audio connecting cord, be sure to match the color-coded cord to the appropriate jacks on the components: Red (right) to Red and White (left) to White. Be sure to make connections firmly to avoid hum and noise.
flowchart
graph TD
    A["Tape deck"] --> B["LINE"]
    B --> C["L OUTIN"]
    B --> D["R OUTIN"]
    E["Amplifier"] --> F["TAPE"]
    F --> G["REC OUT IN"]
    F --> H["L OUTIN"]
    F --> I["R OUTIN"]
    G --> J["L OUTIN"]
    G --> K["R OUTIN"]
    H --> L["L OUTIN"]
    H --> M["R OUTIN"]
    I --> N["L OUTIN"]
    I --> O["R OUTIN"]
    style A fill:#f9f,stroke:#333
    style E fill:#f9f,stroke:#333
    style F fill:#ccf,stroke:#333
    style G fill:#ccf,stroke:#333
    style H fill:#ccf,stroke:#333
    style I fill:#ccf,stroke:#333
- Connecting the tape deck to a CD player equipped with a CONTROL A1 connector (TC-WE805S/WE705S/WE605S only)
For information on connections through the CONTROL A1 connectors, refer to the pamphlet included with this manual.
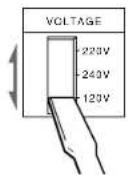
Setting the voltage selector (only on models supplied with a voltage selector)
Check that the voltage selector on the rear panel of the tape deck is set to the local power line voltage. If not, set the selector to the correct position using a screwdriver before connecting the AC power cord to an AC outlet.
Connecting the AC power cord
Connect the AC power cord to an AC outlet.
Where do I go next?
Now you're ready to use your tape deck. For basic operations, go to pages 5 to 7; for advanced operations, go to the sections starting from page 8.
Basic Operations
Playing a Tape
text_image
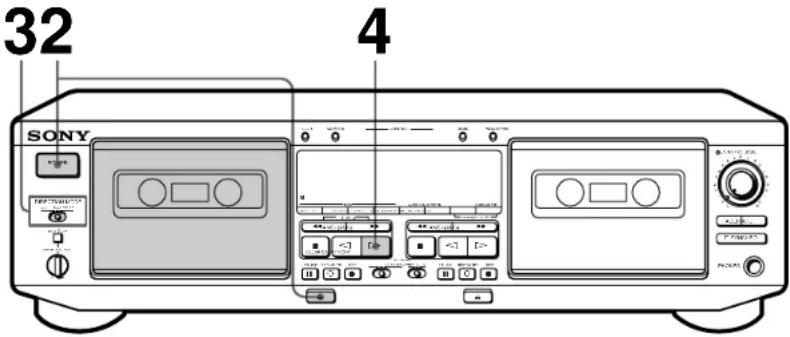
32 4 SONY• See page 4 for hookup information.
- You can use either deck for playback.

To adjust the pitch (Pitch Control function) (TC-WE805S/WE705S/WE505 only)

Push in the PITCH CONTROL button to activate Pitch Control function and turn the control clockwise to raise the pitch or counterclockwise to lower it. You can adjust the pitch during playback on deck A or normal-speed dubbing (but not during RMS play or RMS dubbing).

To play a tape recorded with the Dolby NR* system
Set DOLBY NR to ON and select the same position that the tape was recorded in—B, C, or S (unavailable on the TC-WE505).

You can connect the headphones to PHONES
* Dolby noise reduction manufactured under license from Dolby Laboratories Licensing Corporation.
"DOLBY" and the double-D symbol □□ are trademarks of Dolby Laboratories Licensing Corporation.
1 Turn on the amplifier and select the tape deck position.
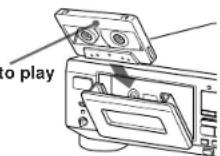
2 Press POWER, and then press and insert a cassette.
With the side you want to play facing you
3 Set DIRECTION MODE.
| To play back | Set to |
| One side only | |
| Both sides continuously* | |
| Both decks in succession* | RELAY |
* The deck automatically stops after playing back five times.
4 Press ▷.
The deck starts playing. Adjust the volume on the amplifier.
Do not press POWER or while the tape deck is operating. If you do so, the tape may be damaged.
| To | Press |
| Stop playing | ■ |
| Start playback from the reverse side | ◀ |
| Pause | PAUSE II. Press the button again to resume play. |
| Fast-forward or rewind | ▶▶ or ◀◀ when the deck is stopped |
| Increase the tape fast-forward or rewind speed (High-Speed Fast-Forwarding and Rewinding functions) (TC-WA8ESA/WA7ESA/WE805S/WE705S only) | ▶▶ or ◀◀ again during fast-forwarding or rewinding |
| Take out the cassette | ≡ after stopping playing |
Basic Operations
Recording on a Tape
text_image
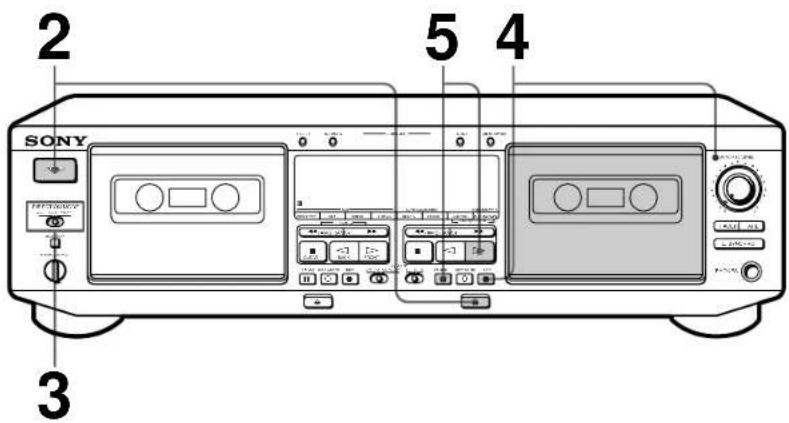
2 5 4 SONY 3• See page 4 for hookup information.
- Recording is possible on both decks A and B on the TC-WA8ESA and WE805S, but only on deck B on all other models.
• See "Dubbing a Tape" (page 13) to make a copy of the tape.
1 Turn on the amplifier and play the program source you want to record.
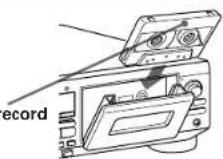
2 Press POWER, and then press and insert a cassette.
With the side you want to record facing you
3 Set DIRECTION MODE.
To record on
Set to
Only one side ⇌
Both sides*
* Recording stops when the tape reaches the end of reverse side.
4 Press REC ●.
▷ lights up for recording on the side facing you. If it doesn't, press ▷ once.
The tape deck automatically adjusts the recording level (see page 12). After the AUTO indicator lights up continuously, stop playing the program source. If you wish to adjust the recording level manually, see "To adjust the recording level manually" on page 7.
Do not press POWER or while the tape deck is operating. If you do so, the tape may be damaged.

To protect recordings against accidental erasure Break out the record-protect tab(s) (see page 18).

The Dolby HX PRO* system automatically works during recording Distortion and noise in the high-frequency response are reduced to produce high-quality sound that can be enjoyed even during playback on other tape decks.
* HX Pro headroom extension originated by Bang & Olufsen and manufactured under license from Dolby Laboratories Licensing Corporation.
"DOLBY", the double-D symbol and "HX PRO" are trademarks of Dolby Laboratories Licensing Corporation.
5 Press PAUSE II or ▷. Recording starts.
6 Start playing the program source.
| To | Press |
| Stop recording | ■ |
| Start recording from the reverse side twice in Step 5 | |
| Pause PAUSE ■. Press the button again toresume recording. | |
| Take out the cassette ≅ after stopping recording | |
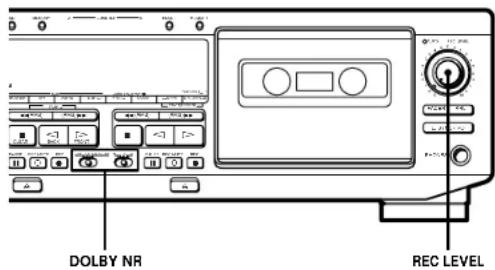
Use these switches (controls) to perform additional operations
text_image
DOLBY NR REC LEVELTo record with the Dolby NR system
Set DOLBY NR to ON, and select B, C, or S (unavailable on the TC-WE505) before you start recording.
To record FM broadcasts with the Dolby NR system
If the FM reception is unsatisfactory, set DOLBY NR to ON FILTER (multiplex filter) (see page 22).
To adjust the recording level manually
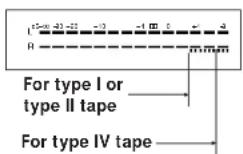
After pressing REC ● in Step 4 on page 6, turn REC LEVEL so that the peak level meters reach the recommended level for the corresponding tape type. After completing the adjustments, stop playing the program source, then continue the procedure from Step 5.
Locating a Track (Multi-AMS/Auto Play/Memory Play)
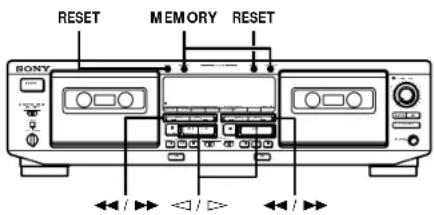
You can locate the following/previous tracks within a range of 30 tracks (Multi-AMS: Automatic Music Sensor) or the beginning of a tape quickly (Auto Play). You can even locate a specific point anywhere on a tape (Memory Play).
text_image
RESET MEMORY RESET BONYNote
Check the direction indicator of the deck you use. When you locate a track on the reverse side (when ◀ lights up), press the button(s) in the parentheses.
| To locate | Press |
| The beginning of the next or succeeding tracks (Multi-AMS) | ▶▶ (or ◀◀) as many times as you want during playback. For example, to locate 2 tracks ahead, press twice. |
| The beginning of the current track (Multi-AMS) | ◀◀ (or ▶▶) once during playback |
| The beginning of the preceding tracks (Multi-AMS) | ◀◀ (or ▶▶) as many times as you want during playback. For example, to locate 2 tracks behind, press three times. |
| The beginning of a tape (Auto Play) | MEMORY on the deck being used repeatedly until “M” disappears in the display . Then press ◀◀ (or ▶▶) while holding down □> (or ◀◀). |
| A particular point on a tape (Memory Play) | MEMORY on the deck being used repeatedly until “M” appears in the display. Find the point you want, then press RESET to reset the tape counter and to memorize the point. To locate the memorized point and start playback, press ◀◀ (or ▶▶) while holding down □> (or ◀◀). (Press ◀◀ or ▶▶ to stop at “0.00” (TC-WA8ESA/WA7ESA/WE805S/ WE705S only) or at “0000” (TC- WE605S/WR550Z/WE505 only). ) |
Notes
- The Multi-AMS function may not work correctly if:
— the blank space between tracks is less than 4 seconds long.
— there is a passage of low frequencies or very low volume within a track.
— the signal strength of the left and right channels are very different.
- The Multi-AMS function is inoperative on a deck whenever the other deck is playing, recording (except during dubbing), or in pause.
- Even if DIRECTION MODE is set to , the deck stops when the current side reaches the end during Multi-AMS operation.
- The tape counters are reset to "0.00" (TC-WA8ESA/WA7ESA/WE805S/WE705S only) or to "0000" (TC-WE605S/WR550Z/WE505 only) when you turn off the tape deck.
Creating Your Own Program (RMS Play)
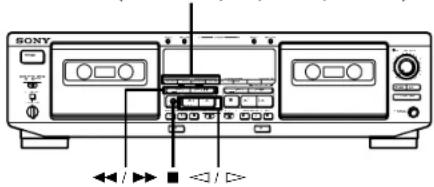
By creating a program, you can play back tracks on deck A in any order that you want. The Random Music Sensor (RMS) function lets you create a program of up to 28 tracks, from the 1st to the 14th tracks on each side of the tape.
RMS buttons (RMS/START, SET, CHECK, DISPLAY)
text_image
SONY ▶/▶ ▼/▶1 Press RMS/START.
"RMS" and a flashing cursor appear in the display.
2 Press (BACK) or (FRONT) to select the side of the tape.
◀ or ▷ appears in the display.
3 Press ◀◀ or ▶▶ repeatedly until the track number you want appears in the display.
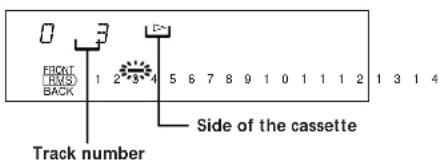
text_image
0 3 FRONT RMS BACK 1 2 3 4 5 6 7 8 9 1 0 1 1 1 2 1 3 1 4 Side of the cassette Track number4 Press SET to store your selection.
To program the same track again, press SET once more.
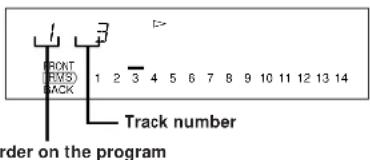
text_image
FRONT RWS BACK 1 2 3 4 5 6 7 8 9 10 11 12 13 14 Track number order on the program5 Repeat Steps 2 to 4 to program more tracks.
If "FULL" appears in the display
This means that you've already programmed 28 tracks and can't program any more.
6 Press RMS/START to start RMS Play.
The peak level meters appear in the display.
To stop RMS Play
Press ■ (CLEAR) once. The RMS program still remains.
To cancel RMS Play
Press ■ (CLEAR) repeatedly until the peak level meters appear in the display or eject the tape in deck A. When RMS Play is canceled, the RMS program is automatically erased.
To alternate between the RMS and peak level meter displays
Press DISPLAY.

You can play the program again after RMS Play ends
Press RMS/START.
Notes
- During RMS play, you can only use CHECK, DISPLAY, ■
on deck A, and ■, ◀◀, ▶▶ on deck B. - The RMS function may not work properly if a blank space between tracks is short.
- If there is a long blank space between tracks, the deck may fast-forward a portion of the blank space.
- If your program includes a number for a track that does not exist, the deck will skip that number during RMS Play.
Checking the order of tracks in the program
Press CHECK.
Each time you press this button, the display shows the track numbers in the order they were programmed.
After the last track in the program, "End" appears in the display.
Advanced Playback Operations
Adding tracks to the end of a program
Press ■ (CLEAR) once, and follow Steps 2 to 5 in "Creating Your Own Program (RMS Play)" on page 9.

To create another program
Press ■ (CLEAR) until the order on the program returns to 0 and the cursor flashes above track number 1 in the display, then follow Steps 2 to 5 on page 9.

You can use your Sony remote to perform RMS programming
If your Sony stereo receiver's remote has RMS buttons, do the following steps.
1 Turn on the receiver and press TAPE.
2 Press RMS/START.
3 Press ▶ or ◀ to select the front or reverse side of the tape, and the number keys and the >10 key to specify the tracks.
4 Press RMS/START again to start RMS Play.
Note
For more information on the availability of Sony stereo receiver remotes with RMS capability, contact your nearest Sony dealer.
Adjusting Bias and Recording Level Calibration Automatically
Since there are many different types of cassettes on the market, your tape deck automatically sets the appropriate equalization characteristics and bias current for each tape type (ATS: Automatic Tape Selection). However, you can get better recording results by doing the automatic bias current and the recording level calibration. You can do automatic calibration on either deck (TC-WA8ESA/WE805S only) or only on deck B (on all other models).
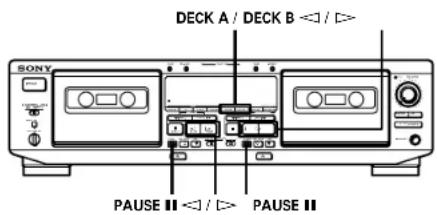
text_image
SONY DECK A / DECK B1 Insert the cassette you want to record on into deck B or into either deck (TC-WA8ESA/WE805S only).
Make sure the record-protect tabs on the cassette have not been removed.
2 Press DECK A or DECK B on the TC-WA8ESA and WE805S, or AUTO CAL on all other models until "CAL" appears in the display.
3 Press ▷ or ◀ to select the side of the tape to be recorded.
| To select | Press |
| The front side ▷ | |
| The reverse side ◁ |
4 Press PAUSE II to start the automatic calibration procedure.
The automatic calibration procedure starts (i.e., recording test tones, rewinding, and playing back).
During the calibration, the counter changes from 9 to 0.
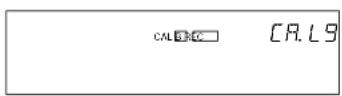
When the automatic calibration procedure ends, the tape rewinds to the original position, the counter returns to normal and the tape deck stops.
5 Start the actual recording (see page 6).
To cancel the automatic calibration function
Press ■ on the deck you're using.
If “A” or “B” on the TC-WA8ESA and WE805S or “CAL” on all other models flashes continuously
The automatic calibration procedure has been interrupted by:
— The end of the tape. Reverse the tape direction or rewind the tape to a new position that allows recording of the test tone.
— Damaged tape or dirty heads. Change the cassette or clean and demagnetize the heads (see page 19).
Updating the calibration setting
If you insert a cassette and "A CAL" or "CAL B" on the TC-WA8ESA and WE805S or "CAL" on all other models appears in the display, it means that automatic calibration data in that deck for that tape type (I, II or IV) exists. However, we recommend that you repeat the automatic calbraion procedure each time you insert a new cassette since cassettes of the same type also vary in their characteristics.
Before recalibrating, be sure to turn off "A CAL" or "CAL B" on the TC-WA8ESA and WE805S or "CAL" on all other models by pressing DECK A or DECK B on the TC-WA8ESA and WE805S or AUTO CAL on all other models. Then start from Step 2 of the automatic calibration procedure.
Adjusting the Recording Level Automatically (Auto Rec Level)
The Auto Rec Level function automatically measures the peak signal level and adjusts the recording level accordingly. Please note that the Auto Rec Level function is provided for deck B only on the TC-WE7ESA, WE705S, WE605S, WR550Z and WE505. On the TC-WA8ESA and WE805S, the Auto Rec Level function operates during normal recording, Relay Recording or Simultaneous Recording on either deck.
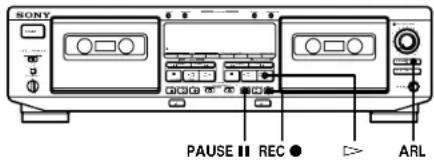
text_image
SONY PAUSE REC ARL1 Follow Steps 1 to 3 of "Recording on a Tape" on page 6.
Make sure that record-protect tabs on the cassette have not been removed.
2 Press REC ●.
The AUTO indicator flashes and the deck automatically adjusts the recording level. The AUTO indicator lights up continuously after the recording level has been adjusted.
3 Press PAUSE || or ▷. Recording starts.
To cancel the Auto Rec Level function
Press ARL or turn REC LEVEL so that the AUTO indicator goes off. If you do either of these during recording, recording will continue but with the Auto Rec Level function turned off.
To stop recording
Press ■.

How the Auto Rec Level function adjusts the recording level
While the AUTO indicator is flashing, the deck sets the recording level as high as possible without causing distortion. If the signal level rises excessively after the start of recording, the deck gradually decreases the recording level.

You should adjust the recording level manually with REC LEVEL in the following cases:
—The recording level cannot be adjusted properly due to excessive noise in the program source.
—The program source level is too low and the recording level does not increase.
During a quiet passage in a program source such as classical music, the recording level may not increase for some time. If a high sound level is expected later on in the track, play that portion first so that the right adjustment can be obtained.
—The recording level does not decrease for a long time. The Auto Rec Level function may not work properly when you try to record sound produced by a graphic equalizer that has extremely high-level signals.

To record with the optimum recording level
- To prevent changes in the recording level after recording starts, press REC ● while playing the highest sound level portion of the program source to be recorded. The result is a more natural-sounding recording.
- If you play the entire program source after the AUTO indicator has stopped flashing and is lit continuously, the deck will set the recording level for the portion of the program source with the highest signal level.

Recording level setting remains even after the recording has ended
After you have finished recording with the Auto Rec Level Function, the AUTO indicator remains on and the recording level setting remains the same. To cancel the setting, do one of the following:
- Press ARL to turn off the AUTO indicator
- Turn REC LEVEL
- Turn the deck off.
Fading In and Out (Fader)
You can gradually increase the recording level at the beginning of a recording (fade in) or gradually decrease the recording level at the end of a recording (fade out).
It is convenient to use this function, for example, when the tape reaches to its end and you don't want the track to be cut off abruptly.
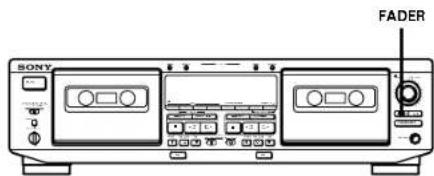
text_image
SONY FADERTo Do the following:
| Fade in 1 Follow Steps 1 to 4 of “Recording on a Tape” on page 6. |
| 2 Press FADER. During fade-in, the AUTO indicator flashes. When the fade-in has completed, the AUTO indicator lights up if the Auto Rec Level function is working, or goes off if the Auto Rec Level function is not working. |
| Fade out Press FADER when you want to start fading out while recording. When the fade-out has completed, “REC” flashes in the display and the deck pauses. |
Note
Fade-in or fade-out is not possible when you have used REC LEVEL to manually set the recording level to 0 (minimum) (see page 7).
Dubbing a Tape
You can copy a tape in deck A to a tape in deck B at normal or high speed.
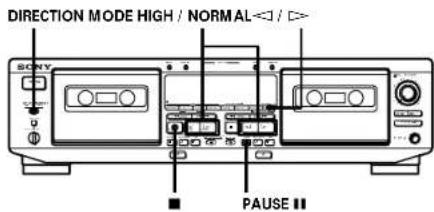
text_image
DIRECTION MODE HIGH / NORMAL ■ PAUSE ■1 Insert the recorded cassette into deck A and a blank cassette into deck B. Make sure the record-protect tabs on the cassette in deck B have not been removed.
2 Select the side(s) to be recorded on.
| To record on | Set DIRECTION MODE to |
| One side | |
| Both sides . | Recording on the reverse side on deck B starts independently of playback on deck A. |
| RELAY.Recording on the reverse side on deck B starts simultaneously with playback of the reverse side on deck A. |
3 Select the dubbing speed.
| To select | Press HIGH/NORMAL |
| Normal speed Once | |
| High speed Twice |
"HIGH" or "NORM" appears in the display. The tape deck changes to dubbing standby.
4 Select the side from which to start dubbing.
| To record from Press |
| The front side [> |
| The reverse side < |
5 Press PAUSE II on deck B to start dubbing.
To stop dubbing
| During Press | |
| Normal-speed dubbing | ■ on deck B |
| High-speed dubbing | ■ on either deck |
Advanced Recording Operations

During high-speed dubbing
Only ■ is operative.

You don't have to adjust the recording level or select the Dolby NR system during dubbing
Dubbing is automatically performed with the same recording level and Dolby NR system as the original in deck A. If, however, you want to monitor the sound during normal-speed dubbing, set DOLBY NR to match the tape in deck A (see page 5).

You can adjust the pitch of the playback on deck A (TC-WE805S/WE705S/WE505 only)
See page 5.
Note
If a TV set is placed near the tape deck, noise may occur during high-speed dubbing. In that case, turn the television set off or move it away from the tape deck.
Dubbing only specific portions
You can do this only during the normal-speed dubbing.
1 Press ■ on deck A at the portion you want to skip.
Deck B changes to recording pause.
2 Locate the point you want to resume recording on deck A, then stop the tape.
3 Press PAUSE II on deck B to resume dubbing.
Recording on Both Decks in Succession (Relay Recording)
(TC-WA8ESA/WE805S only)
You can make a continuous recording that starts on a cassette in deck A and ends on a cassette in deck B.
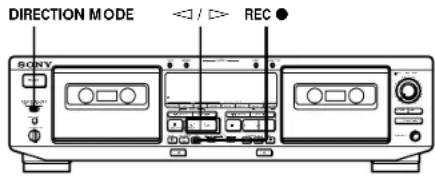
text_image
DIRECTION MODE REC ● SONY1 Insert blank cassettes into both decks. Make sure that record-protect tabs on the cassettes have not been removed.
2 Select the Dolby NR system (see page 7).
3 Set DIRECTION MODE to RELAY.
4 Press REC ● on deck A. Deck A changes to recording pause.
5 Start playing the program source.
6 Adjust the recording level manually, if necessary (see page 7).
7 Start recording.
To record from Press
| The front side ▷ on deck A |
| The reverse side ≤slant on deck A |
To stop Relay Recording
| During | Press |
| Recording on deck A ■ on deck A | |
| Recording on deck B ■ on deck B | |
Note
Make sure that on deck B appears in the display. If it doesn't, press on deck B once; otherwise, Relay Recording stops when the reverse side of the cassette in deck B finishes.
Recording the Same Source on Both Decks (Simultaneous Recording)
(TC-WA8ESA/WE805S only)
You can record the same source on cassettes in deck A and B at the same time.
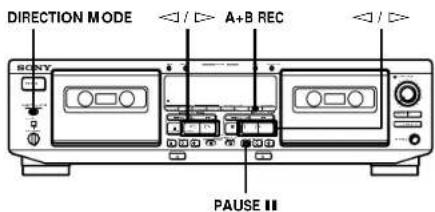
text_image
DIRECTION MODE A+B REC /> /> SONY PAUSE II1 Insert blank cassettes into both decks. Make sure that record-protect tabs on the cassettes have not been removed.
2 Select the Dolby NR system (see page 7).
3 Select the side(s) to be recorded on.
| To record on | Set DIRECTION MODE to |
| Only one side | |
| Both sides |
4 Press A+B REC.
Both decks change to recording pause.
5 Start playing the program source.
6 Adjust the recording level manually, if necessary (see page 7).
7 Select the side you want to start recording from on both decks.
| To record from | Press |
| The front side | |
| The reverse side |
8 Press PAUSE II on deck B. Simultaneous Recording starts.
To stop Simultaneous Recording
Press ■ on both decks.

PAUSE II and REC MUTE O (see page 16) on deck B can control both decks at the same time
During Simultaneous Recording, PAUSE II and RFC MUTE O on deck B control both decks, but not PAUSE II and REC MUTE O on deck A.
Recording Your Own Program (RMS Dubbing)
You can record an RMS program that you've created (see "Creating Your Own Program (RMS Play)" on page 9). This function works only at normal speed.
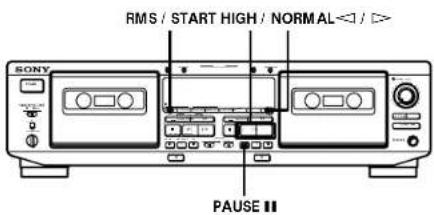
text_image
RMS / START HIGH / NORMAL <1 / >> SONY PAUSE1 Insert the recorded cassette into deck A and a blank cassette into deck B.
Make sure the record-protect tabs on the cassette in deck B have not been removed.
2 Program tracks on deck A (see Steps 1 to 5 on page 9).
3 Press HIGH/NORMAL once to change the tape deck to dubbing standby.
4 Select the side of the tape in deck B you want to record on.
| To start recording | Press |
| On the front side | |
| On the reverse side |
5 Press RMS/START or PAUSE II on deck B to start RMS Dubbing.
To stop RMS Dubbing
Press ■ on deck B. The RMS program remains even after RMS Dubbing stops.

To insert a blank space on the tape before you start RMS Dubbing
You can insert a blank space of 4 seconds or more on the tape in deck B by pressing REC MUTE O after Step 4.
For details, see "Inserting a Blank Space During Recording (Record Muting)" on page 16.

A blank of 10 seconds is automatically inserted on the tape when you start RMS Dubbing if:
— you insert a new cassette into deck B. — the tape in deck B is completely rewound to its beginning and automatically stopped.
Inserting a Blank Space During Recording (Record Muting)
You can insert a blank space of 4 seconds between each track. The blank spaces allow you to locate the start of specific tracks afterwards using the Multi-AMS function (see page 8). You can also use this function to erase unwanted portions on a tape.
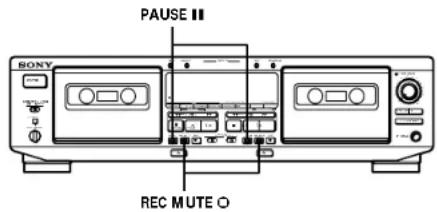
text_image
PAUSE II SONY REC MUTE O1 Start recording.
2 Press REC MUTE ☐ where you want to insert a blank space.
"REC" flashes in the display and a blank is recorded on the tape.
After 4 seconds, ■ lights up and the tape deck changes to recording pause.
3 Press PAUSE II to resume recording.

If you want to insert a blank space longer than 4 seconds
Hold down REC MUTE O as long as you want. After 4 seconds, "REC" flashes faster.
When you release REC MUTE 0, Ⅱ lights up and the tape deck changes to recording pause.
Press PAUSE II to resume recording.
Synchro-Recording With a CD Player Through a Control A1 Cable
(TC-WE805S/WE705S/WE605S only)
By pressing SYNCHRO, you can perform synchro-recording on your tape deck with a Sony CD player connected to the CONTROL A1 connector through a control A1 cable (see page 4). The control A1 cable supports advanced functions not possible with the commander-based CD synchro-recording function on previous models. Further information on the various operations made possible by a control A1 cable is provided in the pamphlet attached to this manual.
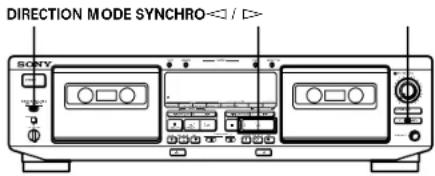
text_image
DIRECTION MODE SYNCHRO ← / ▶ SONY1 Set the source selector on the amplifier to CD player.
2 Insert a CD into the CD player.
3 Select the play mode (CONTINUE, SHUFFLE, or PROGRAM) of the CD player.
4 Insert a cassette into deck B.
5 Select the side(s) to be recorded on.
| To record on | Set DIRECTION MODE to |
| Only one side | |
| Both sides | or RELAY |
6 Select the side you want to start recording from on deck B.
| To record from | Press |
| The front side | |
| The reverse side |
7 Press SYNCHRO.
If your CD player has the Peak Search function:
The SYNCHRO button indicator lights up and the CD player locates the highest signal level among the tracks to be recorded as the tape deck adjusts the recording level. When the recording level adjustment is completed, CD Synchro-Recording starts.
If your CD player does not have the Peak Search function:
The CD player changes to play pause and deck B to recording pause. Press PAUSE ■ on deck B to start Synchro-Recording.
To stop CD Synchro-Recording
Press ■ on deck B or the CD player.

You can use an optional remote to operate the CD player
To start CD play, press ■ twice; to pause CD play, press ■ once; to locate a CD track, press ◀◀ or ▶▶.

If the SYNCHRO button indicator goes off after flashing three times
The tape cannot be recorded on because the record-protect tab(s) on the cassette has (have) been removed.

Length of tape used for recording
Tracks on a CD differ in length. Classical music CDs and others often have tracks that exceed the recording time of a single cassette side. In this case, record the tape manually.

When recording from the middle of the tape
A tape that is inserted and has not been played or recorded on is assumed by the deck to be a new tape, even if the present location is in the middle of the tape. The deck will transport the tape for 10 seconds before starting CD Synchro-Recording to bypass the portion corresponding with the leader. To begin CD Synchro-Recording without the ten-seconds delay, play or record on the tape for a few seconds before starting the CD Synchro-Recording procedure.

If the tape ends during CD Synchro-Recording on the front side of the tape (▷ lights up) and DIRECTION MODE is set to ⇌ or RELAY
Recording of the track ends immediately, the tape direction is reversed, and recording starts again from the beginning of the track. If the tape ends on the reverse side of the tape ( lights up), CD Synchro-Recording stops and the CD player stops playing.
Notes
• To prevent interruption of the recording process, do not press any operation buttons on the CD player during CD Synchro-Recording.
- Certain operation buttons on the tape deck are disabled during CD Synchro-Recording.
Precautions
On safety
- Do not disassemble the cabinet — this may result in an electrical shock. Refer servicing to qualified personnel only.
- Should any solid object or liquid fall into the cabinet, unplug the tape deck and have it checked by qualified personnel before operating it any further.
On power sources
- Before operating the tape deck, check that the operating voltage of the tape deck is identical with your local power supply. The operating voltage is indicated on the nameplate at the rear of the tape deck.
- If you are not going to use the tape deck for a long time, be sure to disconnect the tape deck from the wall outlet. To disconnect the AC power cord, grasp the plug itself; never pull the cord.
- AC power cord must be changed only at the qualified service shop.
On operation
- Because of a safety mechanism, the function buttons will not operate if the cassette holder is not completely closed, if there is no cassette in the cassette holder, or if a cassette has been incorrectly inserted into the cassette holder.
- Be sure to stop the tape before turning off the tape deck. Otherwise, the tape may be damaged.
On placement
- Place the tape deck in a location with adequate ventilation to prevent heat build-up in the tape deck.
- Do not place the tape deck:
— on a soft surface such as a rug that might block the ventilation holes on the bottom.
— in a location near heat sources.
— in a place subject to direct sunlight.
— in an inclined position.
— in a place subject to excessive dust or mechanical shock.
On cleaning the tape deck
Clean the cabinet, panel and controls with a soft cloth slightly moistened with a mild detergent solution. Do not use any type of abrasive pad, scouring powder or solvent such as alcohol or benzine.
For the customers in the United States
For detailed safety precautions, see the leaflet "IMPORTANT SAFEGUARDS".
If you have any questions or problems concerning your tape deck, please consult your nearest Sony dealer.
Notes on Cassette Tapes
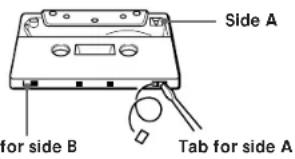
To protect a recording on side A or B
Break out the respective tab.
text_image
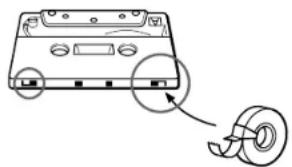
Side A for side B Tab for side ATo record on a tape with a missing record-protect tab
Cover the respective tab hole with adhesive tape.
natural_image
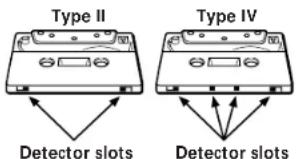
Diagram of a CD-ROM drive with a tape roll, showing no text or symbols on the device itselfWhen you are using a type II or type IV tape, be careful not to cover the detector slots that the deck uses to determine the tape type.
text_image
Type II Type IV Detector slots Detector slotsOn tapes longer than 90 minutes
We do not recommend the use of tapes longer than 90 minutes except for a long continuous recording or playback. They are very thin and tend to stretch easily.
On handling cassettes
• To prevent the heads and tape path from getting dirty, avoid touching the tape surface of a cassette.
- Place cassettes away from equipment with magnets, such as speakers and amplifiers, which may cause tape distortion or erase the recordings.
- Do not expose cassettes to direct sunlight, extremely cold temperature, or moisture.
Cleaning
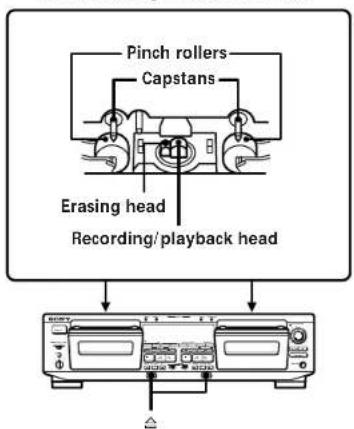
Head assembly of the TC-WE805S
text_image
Pinch rollers Capstans Erasing head Recording/playback headDemagnetizing the heads
After 20 to 30 hours of use, or when you notice a hissing sound or loss of high frequencies, demagnetize the heads with a commercially available demagnetizer for tape decks. Please refer to the instructions of the demagnetizer.
Cleaning the heads and tape path
Clean the heads and tape path of the tape deck after every 10 hours of operation to guard against:
- low-quality sound
• a decrease in sound level
• excessive wow or flutter - sound dropout
- incomplete erasure
• impairment of recording function
To ensure better recording, we recommend that you clean the heads and tape path before every recording.
1 Press to open the cassette holder. Grasp the front cover on both sides and gently lift to remove it.
2 With the tape deck turned off, wipe the heads, the pinch rollers and the capstans with a cotton swab slightly moistened with alcohol or a commercially available cleaning fluid for tape decks.
3 Replace the front cover.
Troubleshooting
If you've experienced any of the following difficulties while using the tape deck, use this troubleshooting guide to help you remedy the problem. Should the problem persist, consult your nearest Sony dealer.
The function buttons do not work.
The tape deck has been just turned on and does not operate for about 3 seconds. Wait until ■ stops flashing.
→ Check that the cassette is inserted correctly and the cassette holder is closed completely.
The tape deck does not play or record.
→ There is no cassette in the cassette holder.
→ The tape has come to the end.
→ The tape is slack. Take up the tape slack.
→ The record-protect tab has been removed from the cassette (see page 18).
→ Make sure the amplifier setting is correct.
→ Check that the tape deck connections are secure.
→ The heads and tape path are dirty. Clean them (see page 19).
→ The recording/playback head is magnetized. Demagnetize it (see page 19).
There is excessive wow, flutter or sound drop-out.
→ The capstans and pinch rollers are dirty. Clean them (see page 19).
There is a decrease in sound level, sound drop-out, or poor reproduction of high frequencies./The tape does not erase completely./Noise increases.
→ The recording/playback or crasing head and tape path are dirty. Clean them (see page 19).
The recording/playback or erasing head is magnetized. Demagnetize it (see page 19).
There is hum or noise.
The tape deck is placed near a TV or VCR. Move the tape deck away from the TV or VCR.
The tape deck is placed on or under the amplifier. Move the tape deck away from the amplifier.
There is an unbalanced tone.
→ Check that DOLBY NR position is the same as when the tape was recorded. An unbalanced tone may result when a tape recorded in the S Dolby NR system is played back in B or C system, or when a tape recorded in the B or C Dolby NR system is played back in the S system (unavailable on the TC-WE505).
→ The tape deck is placed near a TV or VCR. Move the tape deck away from the TV or VCR.
The tape stops before the tape has been fully rewound.
→ The tape is slack. Take up the tape slack.
If "M" is shown in the display, press MEMORY repeatedly until "M" disappears.
→ The cassette shell is bent. Use another cassette.
The Multi-AMS function does not work properly.
One of the tracks contains a long pause, a passage of low frequencies or very low volume, or a gradual increase or decrease in volume.
The space before a track is less than 4 seconds long. Insert a blank space of 4 seconds using REC MUTE O.
→ The signal strength of the left and right channels are very different.
→ There is noise in the space before a track.
→ You pressed ▶▶ (or ◀◀) immediately before the beginning of the next track or immediately after the beginning of the current track.
The DOLBY NR function does not work properly during playback.
The Pitch Control function is on and the frequency characteristics of the sound is altered. Push the PITCH CONTROL button again to turn off the function.
The High-Speed Fast-Forwarding and Rewinding functions do not work (TC-WA8ESA/WA7ESA/WE805S/WE705S only).
→ You pressed ▶▶ (or ◀◀) when there is little tape remaining in that direction. This is to protect the tape.
There is excessively loud tape transport noise during fast-forwarding or rewinding.
→ This noise is caused by the cassette and is not a mechanical problem.
does not work.
The tape deck is playing back or recording. Press ■ or PAUSE ■ to stop playback or recording before pressing △.
A power failure has occurred, the tape deck has been turned off or the power cord has been disconnected during tape operation. Reconnect the power or turn off the tape deck, then on again.
Specifications
System
Recording system
4-track 2-channel stereo
Fast-winding time (approx.)
90 sec. (with Sony C-60 cassette)
High-speed fast-winding time (approx.) (TC-WA8ESA, TC-WA7ESA, TC-WE805S and TC-WE705S only)
45 sec. (with Sony C-60 cassette)
Bias
AC bias
Signal-to-noise ratio (at peak level and weighted with Dolby NR off)
Type I tape, Sony Type I (NORMAL): 55 dB
Type II tape, Sony Type II (HIGI): 57 dB
Type IV tape, Sony Type IV (METAL): 58 dB
S/N ratio improvement (approximate values)
With Dolby B NR on: 5 dB at 1 kHz, 10 dB at 5 kHz
With Dolby C NR on: 15 dB at 500 Hz, 20 dB at 1 kHz
With Dolby S NR on (unavailable on the TC-WE505):
10 dB at 100 Hz, 24 dB at 1 kHz
Harmonic distortion
0.4% (with Type I tape, Sony Type I (NORMAL):
160 nWb/m 315 Hz, 3rd H.D.)
1.8% (with Type IV tape, Sony Type IV (METAL):
250 nWb/m 315 Hz, 3rd H.D.)
Frequency response (Dolby NR off)
| Tape type | |
| Type I tape, Sony Type I(NORMAL) | 30 - 16,000 Hz (±3 dB, IEC),20 - 17,000 Hz (±6 dB) |
| Type II tape, Sony Type II (IIIGII) | 30 - 17,000 Hz (±3 dB, IEC),20 - 18,000 Hz (±6 dB) |
| Type IV tape, Sony Type IV(METAL) | 30 - 19,000 Hz (±3 dB, IEC),20 - 20,000 Hz (±6 dB),30 - 13,000 Hz (±3 dB, -4 dB recording) |
Wow and flutter
| TC-WABESA/WA7ESA/WE805S/WE705S/WE605S/WR550Z | TC-WE505 |
| ±0.13% W. Peak (IEC) | ±0.14% W. Peak (IEC) |
| 0.07% W. RMS (NAB) | 0.08% W. RMS (NAB) |
| ±0.18% W. Peak (DIN) | ±0.19% W. Peak (DIN) |
Variable pitch range (approx.) (TC-WE805S, TC-WE705S and TC-WE505 only)
-30 to +30%
Inputs
Line Inputs (phono Jacks)
Sensitivity: 0.16 V
Input impedance: 47 kilohms
Outputs
Line outputs (phono jacks)
Rated output level: 0.5 V at a load impedance of
47 kilohms
Load impedance: Over 10 kilohms
Headphones (stereo phone Jack)
Output level: 0.25 mW at a load impedance of
32 ohms
General
Power requirements
| Power requirementsWhere purchased | |
| U.S.A. and Canada 120 V AC, 60 Hz | |
| U.K., Continental Europe, China and certain countries in Asia | 220 - 230 V AC, 50/60 Hz |
| Australia | 240 V AC, 50/60 Hz |
| Other countries | 120/220/240 V AC, 50/60 Hz |
Power consumption
26W (TC-WA7ESA, TC-WE705S, TC-WE605S, TC-
WR550Z and TC-WE505)
28W (TC-WA8ESA and TC-WE805S)
Dimensions (approx) (w/h/d)
Model for U.K. and Australia:
430 · 120 · 303 mm (w/h/d)
(17 - 4 3/4 · 12 inches)
Model for other countries:
430 · 120 · 290 mm (w/h/d)
(17 - 4 ^3 /4 · 11 ^1 /2 inches)
including projecting parts and controls
Mass (approx.)
4.2 kg (9 lbs 5 oz)
Supplied accessories
Audio connecting cords (2 phono plugs - 2 phono
plugs) (2)
Optional accessory
Remote commander RM-J910
Design and specifications are subject to change without notice.
Additional Information
Glossary
ATS
Automatic Tape Selection. The tape deck automatically sets the appropriate equalization characteristics and bias current according to the type of tape inserted in the deck.
Automatic calibration
The automatic adjustment of the bias current and recording level for the inserted tape.
This adjustment works together with the deck's ATS (Automatic Tape Selection, see above) to get the best possible recording results on any tape.
Auto rec level function
A function that automatically sets the recording level according to the peak signal level of the program source prior to recording.
When active, this function gradually decreases the recording level when the signal level rises excessively during recording.
Dolby HX PRO system
A system that reduces distortion and noise in high-frequency response during recording. A tape recorded with this system produces the same high-quality sound even when played on other tape decks.
Dolby NR (noise reduction) system
A system that eliminates tape hiss noise by boosting low-level signals in the high-frequency range during recording, then lowering them during playback.
There are four types of systems: A, B, C and S (unavailable on the TC-WE505). Type A is for professional use (and is not available on your tape deck), and types B, C and S are for consumer use. Type S has the maximum noise reduction capability, followed by types C and B.
Multi-AMS
Multi-Automatic Music Sensor is a function that locates the beginning of up to 30 tracks before or after the current track by detecting the blank space (of over 4 seconds) between tracks.
Multiplex filter
A filter for eliminating the 19-kHz stereo carrier and the 38-kHz sub-carrier signals that may impair the Dolby NR system. Though tuners are usually equipped with this filter, if you got poor results when recording FM broadcasts with the Dolby NR system, your tuner may not have a filter or the filter may not be working. In this case, set the DOLBY NR switch on the tape deck to ON FILTER.
Test tones
Signals (10-kHz and 400-Hz) generated by the tape deck for bias current and recording level calibration.
Index
Index
A, B
Adjusting recording level automatically. See Auto rec level recording level manually 7 volume 5
Accessories optional 21 supplied 4, 21
ATS 11,22
Audio connecting cord 4, 21 Auto play 8
Automatic Music Sensor. See Multi-AMS
Automatic calibration 11, 22
Automatic Tape Selection. See ATS
Auto rec level 12, 22
C
Cassette. See Tape CD synchro-recording 16
Cleaning cabinet 18
heads and tape path 19
Connecting. See Hooking up
Control A1 cable 16
D, E, F, G
Difference among the models 3
Dolby HX PRO system 7, 22
Dolby NR system 5, 7, 22
Dubbing high-speed dubbing 13 normal-speed dubbing 13 only specific portions 14 RMS dubbing 15
Fader 13
Fading
in. See Fader
out. See Fader
FILTER. See Multiplex filter
H, I, J, K
Heads
cleaning 19
demagnetizing 19
High-speed
fast-forwarding function 5
rewinding function 5
Hooking up
hookups 4
overview 4
Insert
blank space 16
cassette 5,6
L
Locating
beginning of the tape 8
particular point 8
tracks 8
M, N, O
Memory play 8
Multi-ÁMS 8,22
Multiplex filter 7, 22
P, Q
Pitch control function 5
Playing
auto play 8
basic play 5
memory play 8
RMS play 9
R
Random Music Sensor. See RMS play or dubbing
Recording
basic recording 6
CD synchro-recording 16
FM broadcasts 7
on both decks in succession. See Relay
recording
the same source on both decks. See
Simultaneous recording
Record muting 16
Relay recording 14
Remote commander 21
RMS dubbing 15
RMS play
adding tracks 10
checking the order of tracks 9
S
Searching. See Locating
Simultaneous recording 15
Specifications 21
T
Tape
ejecting 5,7
notes 18
path cleaning 19
protect the recording 18
type 18
Test tones 11, 22
Troubleshooting 20
U, V, W, X, Y, Z
Unpacking 4
Names of Controls
Buttons
A+B REC (simultaneous recording) 15
ARL (automatic recording level adjustment) 12
AUTO CAL 11
CHECK 9
DECK A/DECK B 11
DISPLAY 9
(eject) 5 - 7, 19
FADER 13
HIGH/NORMAL 13,15
MEMORY 8
PAUSE Ⅲ 5, 6, 11 - 13, 15, 16
PITCH CONTROL 5
REC (recording) ● 6, 12, 14
REC MUTE (record muting) ◦ 16
RESET 8
RMS/START 9,15
SET 9
SYNCHRO 16
■ (stop/RMS CLEAR) 9, 13
(forward play/RMS FRONT) 5, 6, 8, 9, 11 - 16
◀ (reverse play/RMS BACK) 8, 9, 11, 13 - 16
▶, ◀◀ (fast-forwarding and rewinding/AMS/
RMS +/−) 8,9
Switches
DIRECTION MODE 5, 6, 13 - 16
DOLBY NR 7
POWER 5,6
Controls
PITCH CONTROL 5
REC (recording) LEVEL 6
Jacks
CONTROL A1 4
LINE IN 4
LINE OUT 4
PHONES 5
Others
AUTO indicator 6
Cassette holder 5, 6, 19
Peak level meters 7