
Walkman WM-FX20 - Cassette player SONY - Free user manual and instructions
Find the device manual for free Walkman WM-FX20 SONY in PDF.


User questions about Walkman WM-FX20 SONY
0 question about this device. Answer the ones you know or ask your own.
Ask a new question about this device
Download the instructions for your Cassette player in PDF format for free! Find your manual Walkman WM-FX20 - SONY and take your electronic device back in hand. On this page are published all the documents necessary for the use of your device. Walkman WM-FX20 by SONY.
USER MANUAL Walkman WM-FX20 SONY
Radio Cassette Player
WM-FX20
Operating Instructions
Before operating the unit, please read this manual thoroughly and retain it for future reference.
Owner's Record
The model number is located on the bottom and the serial number is located inside the cassette holder. Record these numbers in the spaces provided below. Refer to them whenever you call upon your Sony dealer regarding this product.
Model No. WM-FX20
Serial No.
PROPERTY OF THE NATIONAL TECHNICAL DEPT. FILE COPY
Sony Corporation © 1991 Printed in Japan
Specifications
| Radio section | |
| Frequency range | FM 87.5 ~ 106MHzAM 530 ~ 1,710 Hz (10 kHz sleep) |
| Antenna | Flat headphone contact antennaAmI built-in intertable antenna |
| Tape taper section | |
| Frequency response | 40 ~ 15,000 Hz |
| Power output | 10 millV + 10 mill 260 or DC operation |
| Headphones (davies minijack) load impedance 8 ~ 3000 | |
| Power requirements | 3 V DC |
| Two RF (size AA) batteriesDC 3 V 3 V jack accutsOptional Sony EDP-500B battery case for use with H2O (size D) batteries | |
| Davies down AC D2M power adapter for use on 120 V AC 50 HzOptional Sony DCC-70 car battery used for use with 12 V car battery | |
| Battery life | Approx. 9 hours on televisualback and approx. 36 hours on FM reception using Sony alkaline batteries AM3 (N) |
| Dimensions | Approx. 50 × 126 × 45 mm x (in/Hz) not incl. projecting parts and controls |
| Weight | Approx. 278 ugJ batteries and belt clip |
| Accessories applied | Slavic headphones (1)Bell clip (1)Battery tube (1) |
| Design and specifications subject to change without notice | |
Optional accessories
AC power adaptor AC-02
Battery case EBP-2008 Gas battery cost DCC-20
Your dealer may not handle some of the above listed optional accessories. Please ask the dealer for detailed information about the optional accessories available in your country.
Metro: Los Angeles, the recommended AC power adoption of
Note: One only the second manufacturer's power. Equipment for battery-cured manufactured by Sony
Polarity of the plugs of other manufacturers may be different

Precautions
Kandling your Walkman
• Operate the unit on 3 V DC.
For AC operation and car battery operation, use accessories
recommended for the unit. Do not use any other type.
- Avoid exposure to temperature extremes, direct sunlight, moisture,
sand, dust or mechanical shock. Never leave the unit in a car parked
in the sun
- If the unit has not been used for a long time, set it in playback mode for
a few minutes before inserting a cassette.
Tips on headphone listening
- Do not listen with headphones while driving, cycling, etc.
- Listen at a moderate volume to avoid damaging your ears and to avoid
disturbing those close to you.
Note on cassette longer than 50 minutes
The use of cassettes longer than 90 minutes is not recommended except for long continuous playback.
If you have any question or problem concerning your unit that is not
covered in this manual, please consult your nearest Sony dealer.
Installing Batteries
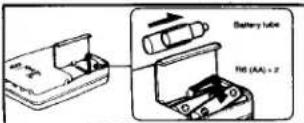
How to attach the battery compartment lid
If the battery compartment lid is detached by an accidental drop.
excessive force etc., attach it as illustrated in the numbered order.

Other Power Sources
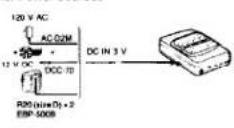
Notes on batteries
- Remove the batteries when you will not use the unit for a long time to
prevent damage from battery leakage and corrosion
• The internal batteries are disconnected when you plug a cord into DC
IN3V
• When the batteries are run down, the BATT indicator glows faintly and
the sound becomes unstable. By a new set of batteries in this case.
• Replace the batteries within 15 minutes.
• If 15 minutes have passed without batteries, all the nearest stations.
current time, and alarm time are canceled.
Do not remove the betteries for 15 minutes
• Inert one battery into the supplied tube to avoid naveling a short
- Insert the battery into the supplied tube to avoid casing a short circuit.
CROSA
Clock Operation
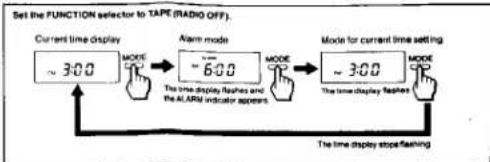
How to Use the MODE Button
You can change the operation mode in sequence by pressing the MODE button
The alarm mode display and the display of the mode for current time setting will automatically return to the current time display after about 10 seconds.
flowchart
graph TD
    A["Current time display ~300"] --> B["MODE"]
    B --> C["Alarm mode -600"]
    C --> D["MODE"]
    D --> E["Mode for current time setting ~300"]
    E --> F["MODE"]
    F --> G["The time display stop flashing"]
    G --> H["The time display flashes and the ALARM indicator appears"]
Setting the Current Time
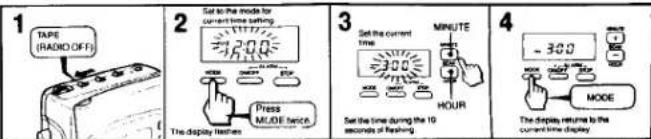
text_image
1 TAPE (RADIO OFF) 2 Set to the mode for current time setting 3 Set the current time MINUTE HOUR 4 Set the time during the 10 seconds of flashing - 300 MODE The display returns to the current time display- When you been pressing the HOUR and MINUTE buttons, the digits
advance in sequence
- The hour display does not advance even when the minute display
returns to "90" after '59
- Replace the batteries within 15 minutes, or the time you set will be
Canceled
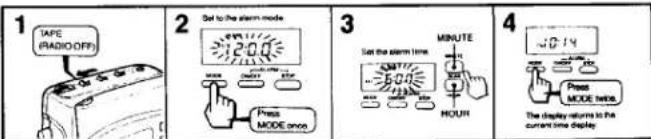
text_image
1 SAFE (RADIO/OFF) 2 Set to the alarm mode 3 Set the alarm time MINUTE Press MODE once HOUR 4 The display returns to the current time display
text_image
5 The ALARM and ON indicators appear on the display. Alarm setting is completed. The alarm will be heard at the time set. • The ALARM and ON indications appear on the display regardless of the current time since you will see the alarm. • The alarm will be heard from the inside of the unit. You also can hear it through the headphones when you operate the hope or noise.To stop the alarm
ALARM
STOP
(1)
[Non-Text]
[Unreadable]
• If you
stop
stop
minutes.
• The preset alarm time is not canceled by pressing the ALAHM STOP
button
To cancel the alarm
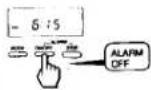
ALARM and ON indicators go off
。
[Non-Text]
-
-
[Non-Text]
广力云智慧零售收银系统
-
m = 311
[Non-Text]
-
[Non-Text]
[Non-Text]
[Non-Text]
-
-
-
-
-
[Non-Text]
-
[Non-Text]
-
广力云
7.1.1
[Non-Text]
[Non-Text]
(二)
(No text)
-
-
-
-
广力云智慧零售收银系统
广力云智慧零售收银系统
广力云智慧零售收银系统
-
三、表决
[Non-Text]
-
广力云智慧零售收银系统
-
1
广力云智慧零售收银系统
广力云智慧零售收银系统
广力云智慧零售收银系统
[Non-Text]
[Non-Text]
[Non-Text]
[Non-Text]
[Non-Text]
[Non-Text]
[Non-Text]
[Non-Text]
[Non-Text]
[Non-Text]
[Non-Text]
[Non-Text]
[Non-Text]
[Non-Text]
[Non-Text]
[Non-Text]
[Non-Text]
[Non-Text]
[Non-Text]
[Non-Text]
[Non-Text]
[Non-Text]
[Non-Text]
[Non-Text]
1.2
[Non-Text]
[Non-Text]
[Non-Text]
[Non-Text]
[Non-Text]
[Non-Text]
[Non-Text]
[Non-Text]
[Non-Text]
[Non-Text]
[Non-Text]
[Non-Text]
[Non-Text]
[Non-Text]
[Non-Text]
[Non-Text]
广力云智慧零售收银系统
广力云智慧零售收银系统
[Non-Text]
[Non-Text]
广力云智慧零售收银系统
广力云
3
。
F
[Non-Text]
[Non-Text]
[Non-Text]
[Non-Text]
[Non-Text]
[Non-Text]
[Non-Text]
[Non-Text]
[Non-Text]
[Non-Text]
[Non-Text]
[Non-Text]
[Non-Text]
[Non-Text]
[Non-Text]
[Non-Text]
[Non-Text]
[Non-Text]
[Non-Text]
[Non-Text]
[Non-Text]
[Non-Text]
[Non-Text]
[Non-Text]
[Non-Text]
[Non-Text]
[Non-Text]
[Non-Text]
[Non-Text]
[Non-Text]
[Non-Text]
[Non-Text]
[Non-Text]
[Non-Text]
[Non-Text]
[Non-Text]
[Non-Text]
[Non-Text]
[Non-Text]
[Non-Text]
[Non-Text]
[Non-Text]
[Non-Text]
[Non-Text]
[Non-Text]
[Non-Text]
[Non-Text]
[Non-Text]
[Non-Text]
[Non-Text]
[Non-Text]
[Non-Text]
[Non-Text]
[Non-Text]
[Non-Text]
[Non-Text]
[Non-Text]
[Non-Text]
[Non-Text]
[Non-Text]
[Non-Text]
[Non-Text]
[Non-Text]
[Non-Text]
[Non-Text]
[Non-Text]
[Non-Text]
[Non-Text]
[Non-Text]
[Non-Text]
[Non-Text]
[Non-Text]
[Non-Text]
[Non-Text]
[Non-Text]
[Non-Text]
[Non-Text]
[Non-Text]
[Non-Text]
[Non-Text]
[Non-Text]
[Non-Text]
[Non-Text]
[Non-Text]
[Non-Text]
[Non-Text]
[Non-Text]
[Non-Text]
[Non-Text]
[Non-Text]
[Non-Text]
[Non-Text]
[Non-Text]
[Non-Text]
[Non-Text]
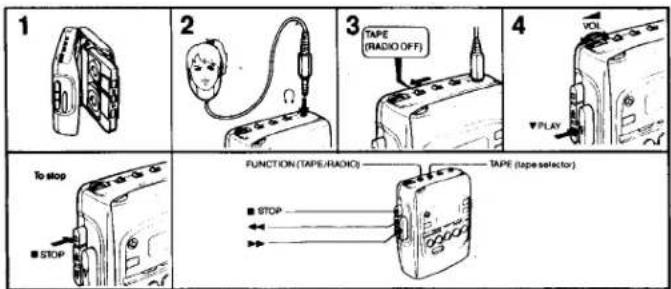
Note on playback
• Do not open the cassette holder while the tape is running
Radio Reception
text_image
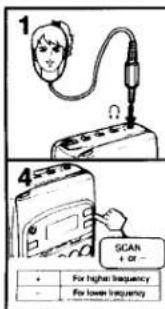
1 4 SCAN + or - For higher frequency - For lower frequency
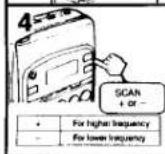
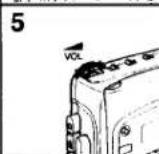
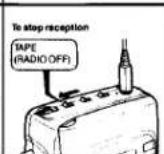

text_image
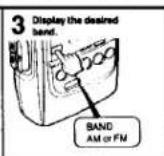
FM Since the headphone cord serves as an FM entensive extend slot better reception. AM Since the reception is affected by the direction of the unit, rotate the unit horizontally for optimum reception. To reduce FM cone Use the FM SENS detector. For PM reception, normally set to DX. If the stereo sound is very noisy set to LOCAL. The sound becomes monocular but the nose will be reduced. DX LOCAL FM SENSYou can preset up to 10 AM and/or FM stations
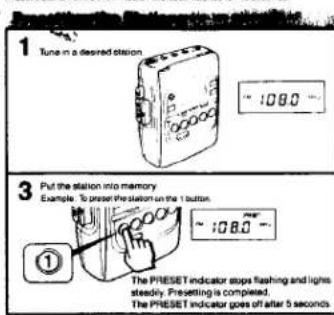
Preset a station while the PRESET indicator flashes for 10 seconds.
text_image
1 Tune in a desired station ~ 108.0 3 Put the station into memory Example. To press the station on the 1 button. ~ 108.0 ① The PRESET indicator stops flashing and lights steady. Presetting is compiled. The PRESET indicator goes off after 5 seconds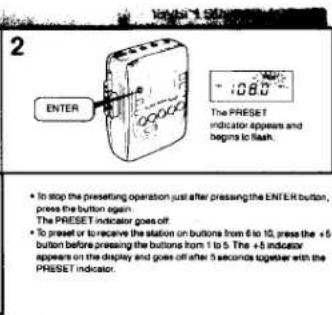
text_image
2 ENTER The PRESET indicator appears and begins to flash. • To stop the presetting operation just after pressing the ENTER button, press the button again. The PRESET indicator goes off. • To preset or to receive the station on buttons from 6 to 10, press the +5 button before pressing the buttons from 1 to 5. The +5 indicator appears on the display and goes off after 5 seconds together with the PRESET indicator.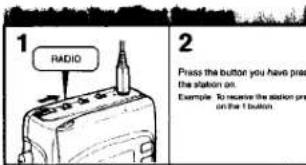
text_image
1 RADIO 2 Press the button you have press the station on. Example. To receive the station press on the 1 button.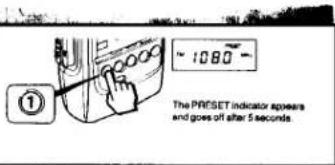
text_image
1080 The PRESET indicator appears and goes off after 5 seconds.
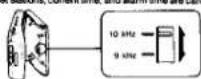
The AM tuning interval is factory preset to 10 kHz in order to match the local frequency allocation system. If you use the receiver in an area where the frequency allocation system is based on 9 kHz interval, change the position of the switch with a thin instrument as the illustration on the right shows.
Note
If you change the interval, all preset stations, current time, and alarm time are canceled.

When you use the unit for the first time or when you have let the unit without batteries for a long time, the display may show incorrect information or the preset stations may not be received correctly. If this happens, set the switch to the other position with a thin instrument, and reset the switch to the original position.
All the preset stations, cutout time, and alarm time are cancelled
text_image
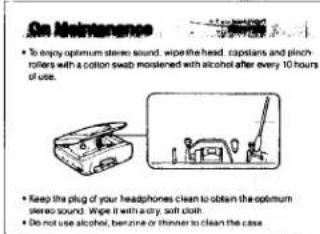
On Maintenance • To enjoy optimum stereo sound, wipe the head, capstans and pinch rollers with a cotton swab moistened with alcohol after every 10 hours of use. • Keep the plug of your headphones clean to obtain the optimum stereo sound. Wipe it with a soft, soft cloth • Do not use alcohol, benzone or thinner to clean the case.
