
EH503e - Projector OPTOMA - Free user manual and instructions
Find the device manual for free EH503e OPTOMA in PDF.

 FR
FR
 AR
AR
 CS
CS
 DA
DA
 DE
DE
 EL
EL
 EN
EN
 ES
ES
 FA
FA
 FI
FI
 HU
HU
 ID
ID
 IT
IT
 JA
JA
 KO
KO
 NL
NL
 PL
PL
 PT
PT
 RO
RO
 RU
RU
 SK
SK
 SV
SV
 TH
TH
 TR
TR
 VI
VI
 ZH
ZH
 ZH-TW
ZH-TW
| Product type | DLP projector |
| Native resolution | 1920 x 1080 (Full HD) |
| Brightness | 4000 lumens |
| Contrast ratio | 20 000:1 |
| Lamp life | Up to 15,000 hours (Eco mode) |
| Power supply | 100-240 V, 50/60 Hz |
| Power consumption | 300 W (max) |
| Dimensions (L x l x h) | 31,5 x 22,4 x 10,0 cm |
| Weight | 3,5 kg |
| Keystone correction | Vertical and horizontal |
| Zoom | Manual, 1,1x |
| Focus | Manual |
| Built-in speaker | 10 W |
| Video inputs | 2x HDMI, 1x VGA, 1x USB (Media Reader) |
| Network connectivity | RJ45 (LAN), RS232 |
| 3D function | Yes (DLP Link) |
| Filter cleaning | Every 500 hours of use |
| Security | Kensington lock, password, auto power off |
| Spare parts available | Lamp, air filter, remote control |
| Repairability index | 6,5/10 (estimation) |
| Brand and model | Optoma EH503e |
Frequently Asked Questions - EH503e OPTOMA
User questions about EH503e OPTOMA
0 question about this device. Answer the ones you know or ask your own.
Ask a new question about this device
Download the instructions for your Projector in PDF format for free! Find your manual EH503e - OPTOMA and take your electronic device back in hand. On this page are published all the documents necessary for the use of your device. EH503e by OPTOMA.
USER MANUAL EH503e OPTOMA
Safety Information ....3
Class B emissions limits....3
Important Safety Instruction....3
Risk Group 2....4
Precautions....5
Eye Safety Warnings....7
Introduction 8
Product Features 8
Package Overview 9
Product Overview....10
Main Unit....10
Control Panel....11
Rear View....12
Remote Control....13
Installation....14
Connecting the Projector....14
Connect to Computer / Notebook....14
Connect to Video Sources....15
Installing or Removing the Optional Lens....16
Removing the Existing Lens From the Projector 16
Installing the New Lens....17
Powering On/Off the Projector 18
Powering On the Projector....18
Powering Off the Projector....20
Warning Indicator 20
Adjusting the Projected Image....21
Adjusting the Projector's Height....21
Adjusting Projected Image Position Using Lens Shift....21
Adjusting the vertical image position 22
Adjusting the horizontal image position 23
Lens Shift Range Diagram....24
Adjusting the Zoom / Focus....25
Adjusting Projection Image Size (XGA) 26
Adjusting Projection Image Size (WUXGA)....28
Adjusting Projection Image Size (1080P) 30
User Controls 32
Control Panel 32
Remote Control 33
On-screen Display Menus....35
How to operate 35
Menu Tree....36
Image 38
Display....44
Setup 47
Options 60
LAN_RJ45....69
Table of Contents
Appendices 79
Troubleshooting....79
Image Problems 79
Intermission Problems 81
HDMI Q & A 82
Projector Status Indication 83
Remote Control Problems 84
Audio Problems 84
Replacing the Lamp 85
Cleaning the Projector 87
Compatibility Modes....88
Video Compatibility....88
Video timing detail describe....88
Computer Compatibility - VESA standards....89
RS232 Commands 92
RS232 Protocol Function List....93
Telnet Commands....97
AMX Device Discovery commands 97
PJLink™ supported commands....98
Trademarks....100
Ceiling Installation....101
Optoma Global Offices....102
Regulation & Safety notices....104
Operation conditions....105
Safety Information
 | The lightning flash with arrow head within an equilateral triangle is intended to alert the user to the presence of uninsulated “dangerous voltage” within the product’s enclosure that may be of sufficient magnitude to constitute a risk of electric shock to persons. |
 | The exclamation point within an equilateral triangle is intended to alert the user to the presence of import operating and maintenance (servicing) instructions in the literature accompanying the appliance. |
WARNING: TO REDUCE THE RISK OF FIRE OR ELECTRIC SHOCK, DO NOT EXPOSE THE PROJECTOR TO RAIN OR MOISTURE. DANGEROUS HIGH VOLTAGES ARE PRESENT INSIDE THE ENCLOSURE. DO NOT OPEN THE CABINET.
REFER SERVICING TO QUALIFIED PERSONNEL ONLY.
Class B emissions limits
This Class B digital apparatus meets all requirements of the Canadian Interference-Causing Equipment Regulations.
Important Safety Instruction
- Read these instructions -before using this projector.
- Keep these instructions -for future reference.
- Follow all instructions.
- Install in accordance with the manufacturer's instructions :
A. Do not block any ventilation openings. To ensure reliable operation of the projector and to protect it from overheating, put the projector in a position and location that will not interfere with its proper ventilation. For example, do not place the projector on a bed, sofa, carpet, or similar surface that may block the ventilation openings. Do not put it in an enclosure, such as a bookcase or a cabinet that may keep air from flowing through its ventilation openings.
B. Do not use this projector near water or moisture. To reduce the risk of fire or electric shock, do not expose the projector to rain or moisture.
C. Do not install near any heat sources, such as radiators, heaters, stoves or other apparatus (including amplifiers) that produce heat.
- Clean only with a dry cloth.
- Only use attachments/accessories specified by the manufacturer.
- Refer all servicing to qualified service personnel. Servicing is required when the projector has been damaged in any way, such as:
☐ Power supply cord or plug is damaged.
☐ Liquids have spilled or objects have fallen into the apparatus.
☐ The projector has been exposed to rain or moisture, does not operate normally, or has been dropped.
Usage Notice
Do not attempt to service this projector yourself. Opening or removing covers may expose you to dangerous voltages or other hazards. Please call Optoma to be referred to an authorized service center near you.
- Do not let objects or liquids enter the projector as they may touch dangerous voltage points or short-out parts that could result in a fire or electric shock.
- See projector enclosure for safety related markings.
- The projector should not be adjusted or repaired by anyone except properly qualified service personnel.
Risk Group 2
As with any bright light source, do not stare into the beam, RG2 IEC 62471-5:2015.
Precautions

Please follow all warnings, precautions and maintenance as recommended in this user's guide.
Warning - Do not look into the projector's lens when the lamp is on. The bright light may damage your eyes.
Warning - To reduce the risk of fire or electric shock, do not expose this projector to rain or moisture.
■ Warning - Please do not open or disassemble the projector as this may cause electric shock.
Warning - When replacing the lamp, please allow unit to cool down, and follow all replacement instructions. See page 85.
■ Warning - This projector will detect the life of the lamp itself. Please be sure to change the lamp when it shows warning messages.
Warning - Use the "Lamp Reset" function from the on-screen display "Options | Lamp Setting" menu after replacing the lamp module (see page 67).
Warning - When switching the projector off, please ensure the cooling cycle has been completed before disconnecting the power. Allow 90 seconds for the projector to cool down.
Warning - Do not use the lens cap when projector is in operation.
Warning - When the lamp is approaching the end of its life, the message “Lamp is approaching the end of its useful life” displays on the screen. Please contact your local reseller or service center to change the lamp as soon as possible.

When the lamp reaches the end of its life, the projector will not turn back on until the lamp module has been replaced. To replace the lamp, follow the procedures listed under "Replacing the Lamp" on page 85.
Do:
◆ Turn off the product before cleaning.
Use a soft cloth moistened with a mild detergent to clean the display housing.
✿ Disconnect the power plug from the AC outlet if the product is not being used for a long period of time.
Do not:
Block the ventilation slots and openings on the unit.
Use abrasive cleaners, waxes or solvents to clean the unit.
Use under the following conditions:
- In extremely hot, cold or humid environments. Ensure that the ambient room temperature is within 5-40 °C and relative humidity is 10-85% (max.), non-condensing.
- In areas susceptible to excessive dust and dirt.
- Near any appliance that generates a strong magnetic field.
- In direct sunlight.
Eye Safety Warnings
natural_image
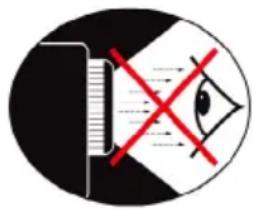
Symbolic image of a computer monitor with a red X mark and eye, enclosed in a circle (no text or numbers present)Avoid staring directly into the projector's beam of light at all times.
Minimize standing facing into the beam. Keep your back to the beam as much as possible.
■ Using a stick or laser pointer is recommended to avoid the need for the presenter to enter the beam.
- Ensure that projectors are located out of the line of sight from the screen to the audience; this ensures that, when presenters look at the audience, they do not also have to stare at the projector lamp. The best way to achieve this is by ceiling-mounting the projector rather than placing it on floor or table top.
When projector is used in a classroom, adequately supervise students when they are asked to point out something on the screen.
In order to minimize the lamp power needed, use room blinds to reduce ambient light levels.
Product Features
This product is a single chip 0.7" XGA, 0.67 WUXGA and 1080P series DLP® projector. Outstanding features include:
Texas Instruments Single chip DLP® Technology
◆ Computer Compatibility:
Apple Macintosh, iMac, and VESA Standards: UXGA, SXGA+, SXGA, WXGA, XGA, SVGA, VGA
◆ Video Compatibility:
■ NTSC, NTSC4.43
■ PAL/PAL-M/PAL-N/SECAM
■ SDTV and EDTV compatible
■ HDTV compatible (720p, 1080i, 1080p)
- Auto source detection with user definable settings
◆ Fully featured IR remote control with wired remote control
◆ User friendly multilingual On Screen Menu
◆ Advanced digital keystone correction and high quality full screen image re-scaling
◆ User friendly control panel
◆ Macintosh and PC compatible
HDMI compatible
◆ Closed Captioning equipped
◆ DisplayPort compatible
Full 3D Support
Eco AV Mute
◆ Wireless dongle support (via VGA port)
USB Charger
Package Overview
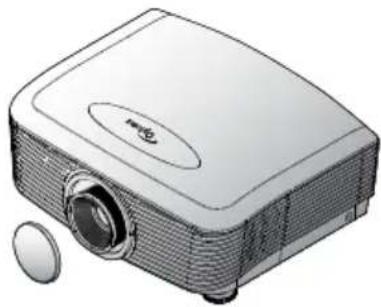
This projector comes with all the items shown below. Check to make sure your unit is complete. Contact your dealer immediately if anything is missing.
natural_image
Illustration of a projector with a circular lens and two small circular components (no text or symbols)Projector with lens cap
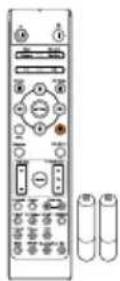
IR Remote Control (with 2 x AAA Batteries)
natural_image
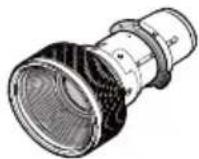
Line drawing of a U2D cable with two connectors (no text or symbols)Option Lens (Standard lens/
Long throw lens/ New short lens/ Semi Short Throw lens/ Super Long Throw lens)
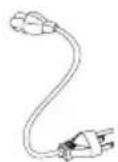
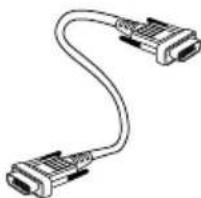
Power Cord 1.8m VGA Cable 1.8m

Due to the difference in applications for each country, some regions may have different accessories.
For European warrant information please visit www.optomaeurope.com
natural_image
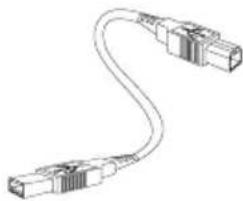
Line drawing of a U-shaped cable with two connectors (no text or symbols)USB Cable (A to B) 1.8m (optional)
Documentation:
User's Manual
☑ Warranty Card
Quick Start Card
WEEE Card
Product Overview Main Unit
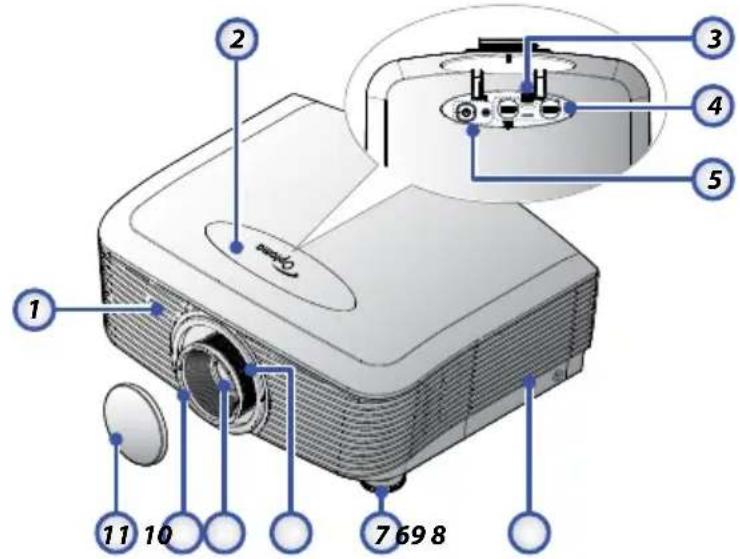
- Front IR Receiver
- Focus
- Top Cover 11.
Lens CAP - Lens Release Button
- Power Button
- Vertical and Horizontal Lens 13. LED Indicators Shift Adjustment Controls 14. Input/Output Connections
- Control Panel 15. Back IR Receiver
- Lamp Cover 16. Main Power Switch
- Tilt-Adjustment foot 17. Power Socket
- Zoom 18. Security Bar
- Lens 19. Kensington™ Lock
Control Panel
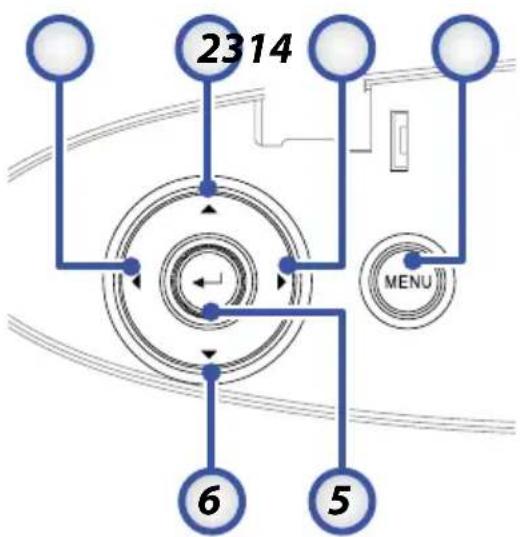
flowchart
graph TD
    A["2314"] --> B["6"]
    A --> C["5"]
    D["MENU"] --> B
    D --> C
- Source / ◀
- Keystone + / ▲
- Re-Sync / ▶
- Menu
- Enter
- Keystone - / ▼

AUDIO2-IN: Share with DVI & BNC audio input.
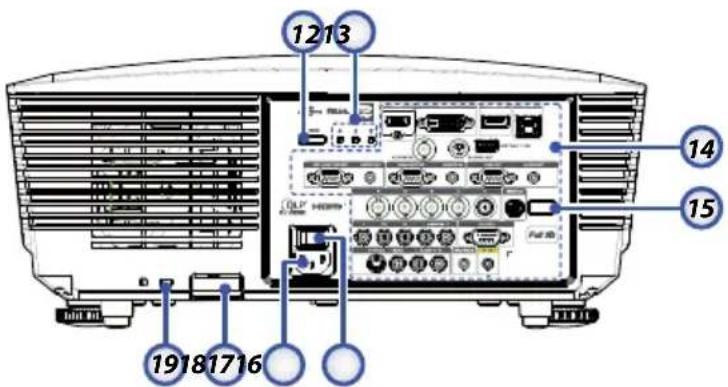
Rear View
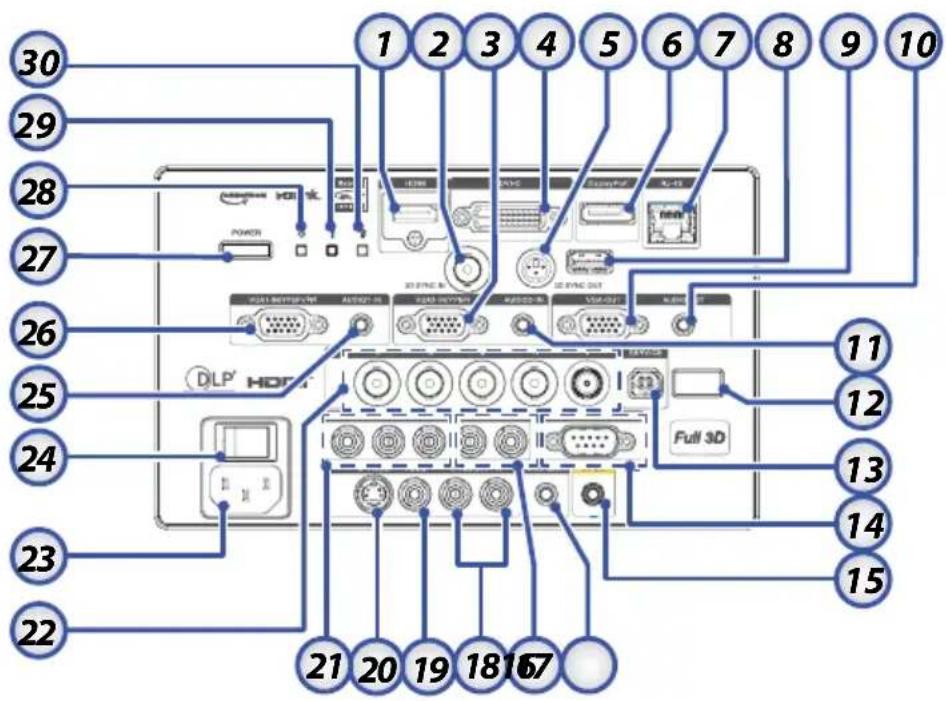
-
HDMI Connector 16. WIRED REMOTE (3.5mm jack)
-
3D SYNC IN 17.
AUDIO IN L/R RCA (YPbPr) Connectors
- VGA 2/ YPbPr Connector 18.
AUDIO IN L/R RCA (Video/S-Video) Connectors
-
DVI-D Connector 19. VIDEO Connector
-
3D SYNC OUT 20. S-VIDEO Connector
-
DisplayPort 21. YPbPr Connectors
-
RJ-45 Connector 22. BNC Connectors
-
USB Power 23. Power Socket
-
VGA OUT 24. Main Power Switch
-
AUDIO OUT 3.5mm Jack 25. AUDIO IN (VGA1) Connector
-
AUDIO 2 IN (VGA2) Connector 26. VGA 1/ SCART/ YPbPr Connector
-
Back IR Receiver 27. Power Button
-
SERVICE
-
Power LED
-
RS-232 Connector
-
Temp LED
-
12V OUT Connector
30 Lamp LED
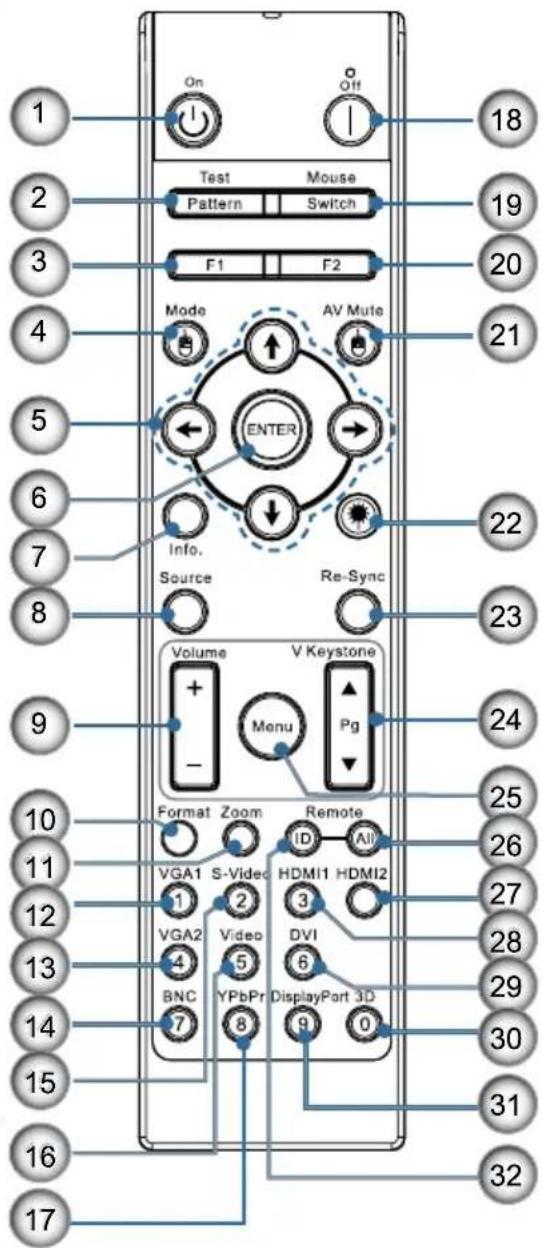
Remote Control

Due to the difference in applications for each country, some regions may have different accessories.
Due to generic remote, some function is model dependent.

CAUTION Use of controls, adjustments or performance of procedures other than those specified herein may result in hazardous laser light exposure.
Complies with FDA performance standards for laser products except for deviations pursuant to Laser Notice No. 50, dated June 24, 2007.
- Power On
- Test Pattern
- Function 1 (Assignable)
- Display mode / Mouse Left Key
- Four Directional Select Keys
- Enter
- Information Panel
- Source
- Volume +/-
- Format (Aspect Ratio)
- Zoom
- VGA1/1 (Number Button for password input)
- VGA2/4
- BNC/7
- S-Video/2
- Video/5
- YPbPr/8
- Power Off
- Mouse Switch
- Function 2 (Assignable)
- AV Mute / Mouse Right Key
- Laser (DO NOT POINT IN EYES)
- Re-Sync
- V Keystone +/-
- Menu
- Remote code All
- HDMI2
- HDMI1/3
- DVI/6
- 3D/0
- DisplayPort/9
- Remote code 01\~99
Connecting the Projector Connect to Computer / Notebook
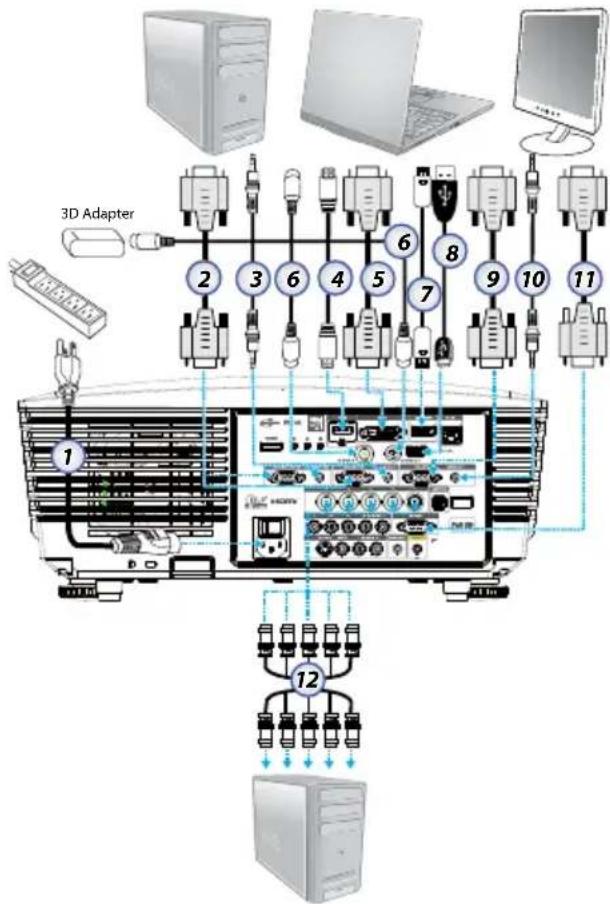

Due to the difference in applications for each country, some regions may have different accessories.
AUDIO2-IN: Share with DVI & BNC audio input.
3D Sync connection: In: Connect 3D-sync in cable from a computer or an enabled device. Out: Connect 3D IR glasses receiver unit.
- Power Cord
- VGA Cable
- Audio-in Cable *
- HDMI Cable *
- DVI-D Cable *
- 3D Sync Cable *
- DisplayPort Cable *
- USB Power Charger *
-
VGA-out Cable (Available for VGA1 VGA signal loop through)
-
Audio-out (Optional RCA to 3.5mm jack cable)
-
RS-232 Cable *
- BNC Cable *
*(Optional accessory)
Connect to Video Sources

Due to the difference in applications for each country, some regions may have different accessories.
AUDIO2-IN: Share with DVI & BNC audio input.
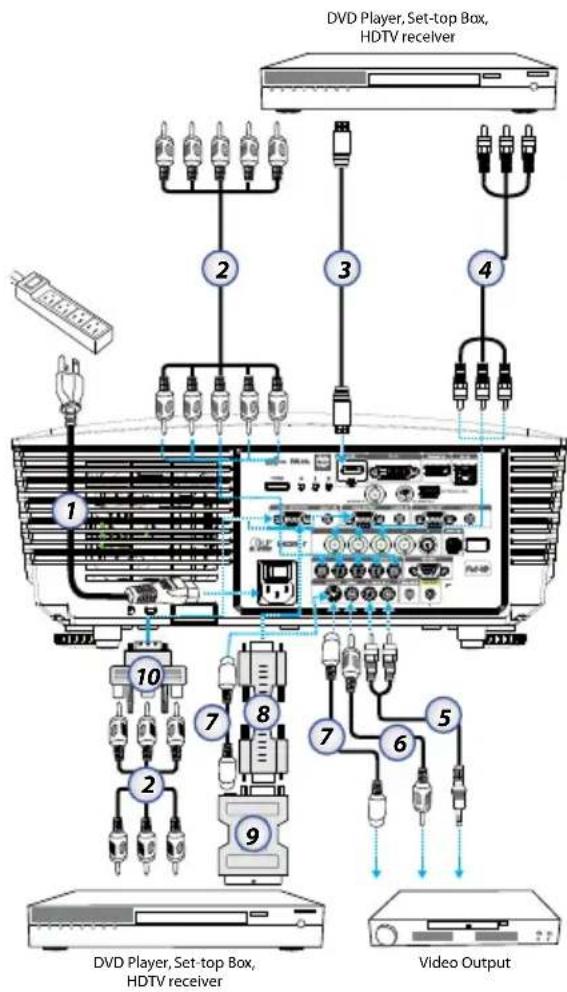
- Power Cord
- Component Cable *
- HDMI Cable*
- BNC Cable *
- Audio-in Cable *
- Video Cable *
- S-Video Cable *
- VGA Cable
- SCART to RGB & S-Video Adapter *
- RGB to Component Adapter *
*(Optional accessory)
Installing or Removing the Optional Lens
Caution
- Do not shake or place excessive pressure on the projector or the lens components as the projector and lens components contain precision parts.
- Before removing or installing the lens, be sure to turn off the projector, wait until the cooling fans stop, and turn off the main power switch.
- Do not touch the lens surface when removing or installing the lens.
- Keep fingerprints, dust or oil off the lens surface. Do not scratch the lens surface.
• Work on a level surface with a soft cloth under it to avoid scratching. - If you remove and store the lens, attach the lens cap to the projector to keep off dust and dirt.
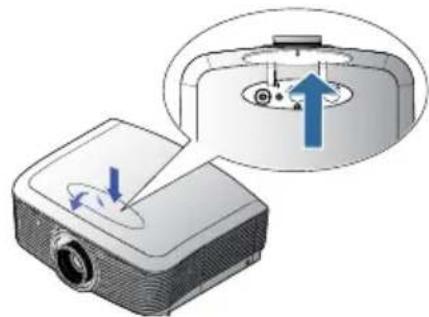
Removing the Existing Lens From the Projector

Removal of the plastic body cap before inserting a lens for the first time.
- Push down and release the top cover to open.
- Push the LENSE RELEASE button to the unlock position.
- Grasp the lens.
- Rotate the lens counterclockwise. The existing lens will be disengaged.
natural_image
Diagram showing a projector with an arrow indicating rotation and direction (no text or symbols present)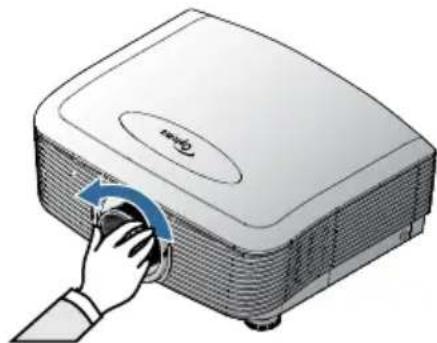
natural_image
Illustration of a projector with a hand operating the button (no text or symbols visible)- Pull out the existing lens slowly.
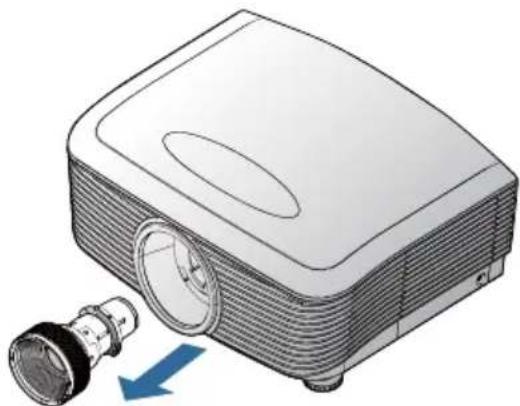
natural_image
Illustration of a projector with a blue arrow indicating compression or disassembly (no text or symbols present)Installing the New Lens
Remove both end caps from the lens.
- Align the flange and correctly position at the 11 o'clock position as shown in the picture.
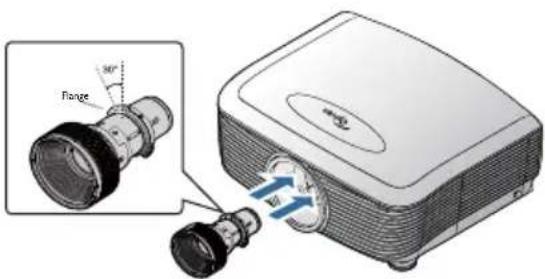
- Rotate the lens clockwise until you feel it click into place.
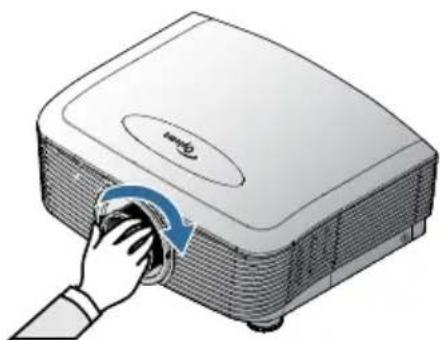
natural_image
Illustration of a projector with a hand cleaning the front panel (no text or symbols visible)Powering On/Off the Projector Powering On the Projector
- Remove the lens cover.
- Connect the power cord to the projector.
- Turn On the connected devices.
- Ensure the Power LED turns red and then press the power button to turn On the projector.
The Power LED will now flash blue.

✿ Turn on the projector first and then select the signal sources.
The startup screen will display in approximately 30 seconds. The first time you use the projector, you can select your preferred language and Power Mode setup after the startup screen display.
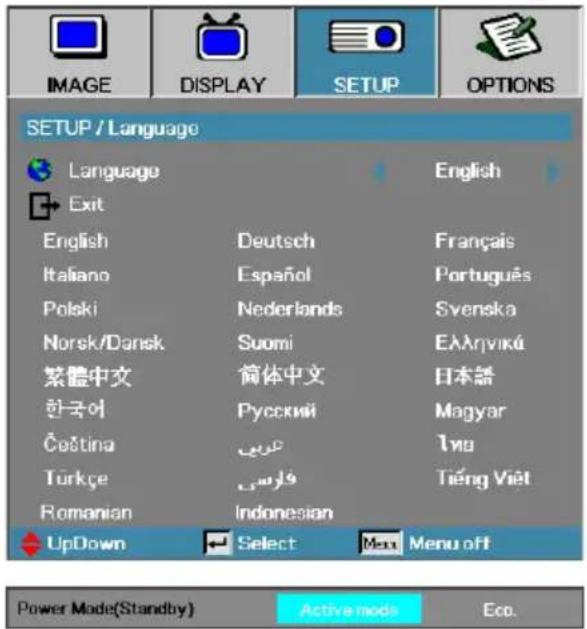
If the connected device is a PC, ensure the display is set to output to the projector via the connected output. (Check the user manual of the PC to determine the appropriate Fn key combination to change display output.)
See Security Setting on page 50 if security lock is enabled.
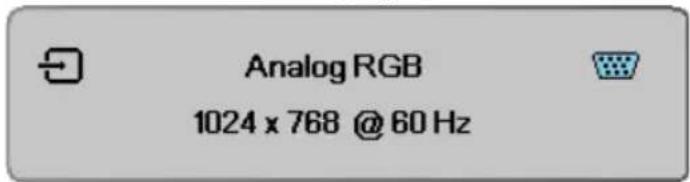
- If more than one input device is connected, press the "Source" button sequentially to switch between devices.
For direct source selection, see page 33.
Powering Off the Projector
- Press POWER to turn off the projector lamp, a message displays on the projector's screen.

Power Off?
Press power key again.
- Press POWER again to confirm, otherwise the message disappears after 15 seconds.
- The cooling fans continue to operate for about 180 seconds for cooling cycle and the Power Led will turn blue. When the light is solid red, the projector has entered standby mode.
(If you wish to turn the projector back on, you must wait until the projector has completed the cooling cycle and has entered standby mode. Once in standby mode, simply press POWER to restart the projector.)
- Turn off the main power switch. Disconnect the power cord from the electrical outlet and the projector.
- Do not turn on the projector immediately following a power off procedure.
Warning Indicator
When the LAMP LED indicator lights red, the projector will automatically shut itself down. Please contact your local reseller or service center. See page 83.
When the TEMP LED is on a steady (not flashing) red, the projector will automatically shut itself down. Under normal conditions, the projector can be switched on again after it has cooled down. If the problem persists, you should contact your local dealer or our service center. See page 83.
When the TEMP LED flashes red, it indicates the fan has failed. Please contact your local dealer or our service center. See page 83.
Adjusting the Projected Image Adjusting the Projector's Height
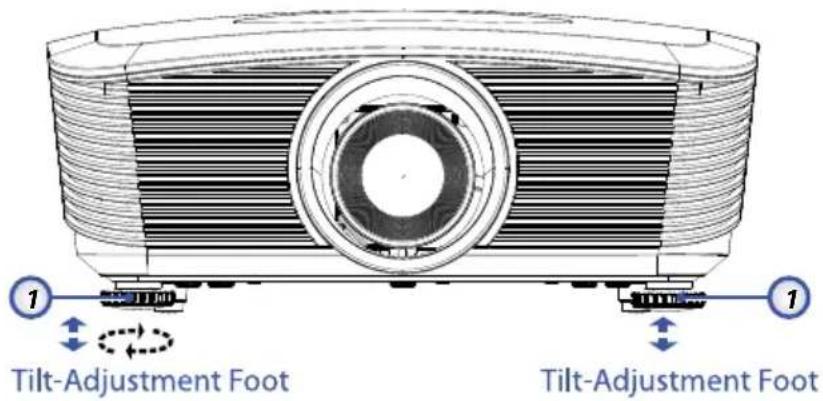
The projector is equipped with elevator foot for adjusting the image height.
To raise the image:
Use screw in foot ① to rise the image to the desired height angle and fine-tune the display angle.
To lower the image:
Use screw in foot ① to lower the image to the desired height angle and to fine-tune the display angle.
Adjusting Projected Image Position Using Lens Shift Screw for ensure the lens position Lens Release

Suggest to loosen the screw before lens shift adjustment and tighten up after finished adjustment.
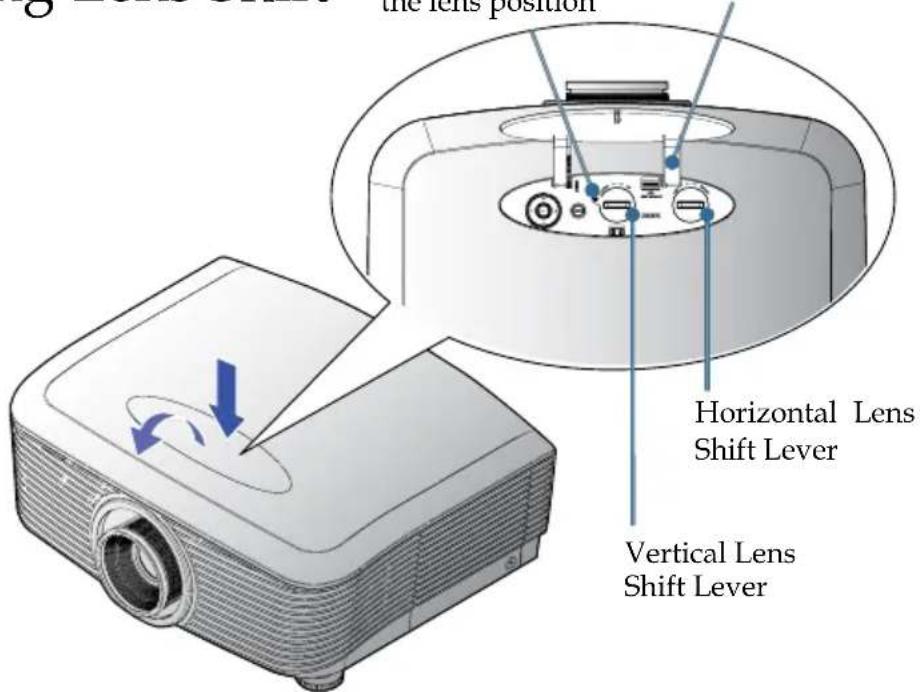
The Lens Shift function can be used to adjust the position of the projected image either horizontally or vertically within the range detailed below.
Adjusting the vertical image position
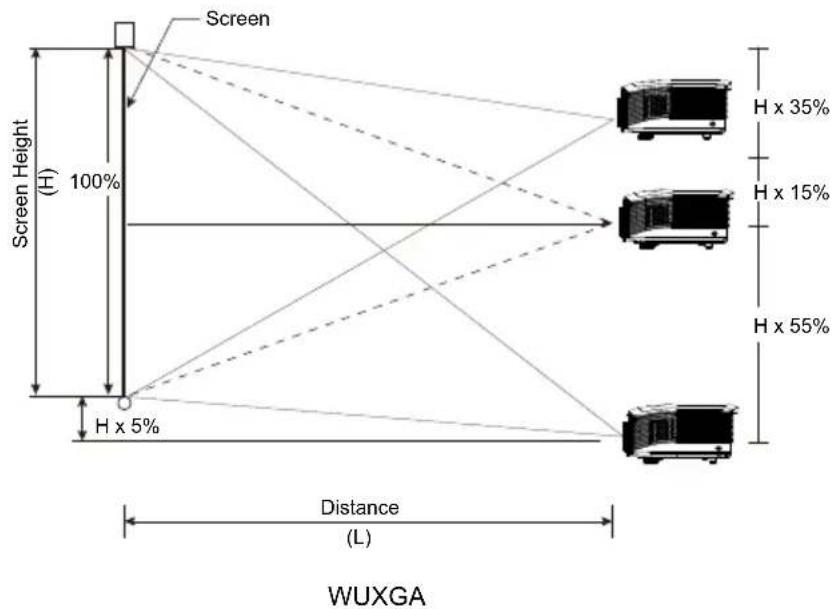
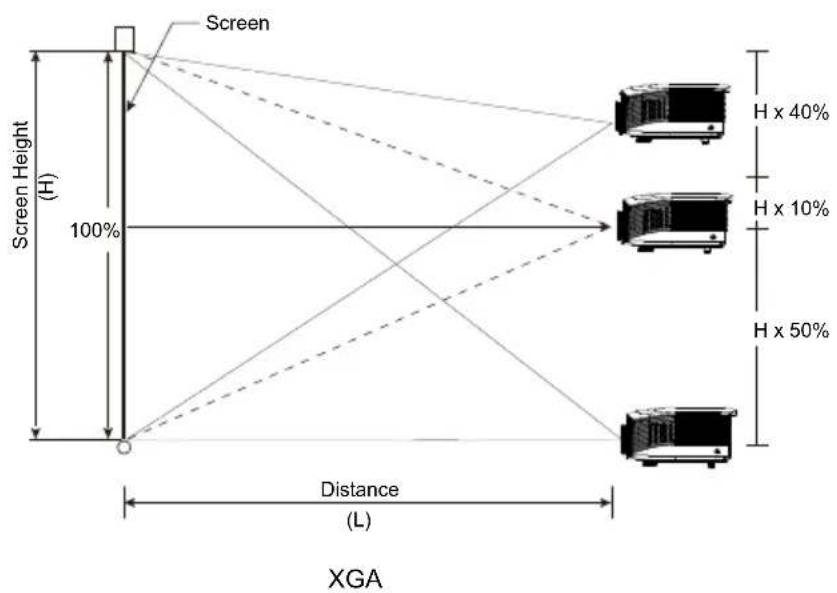
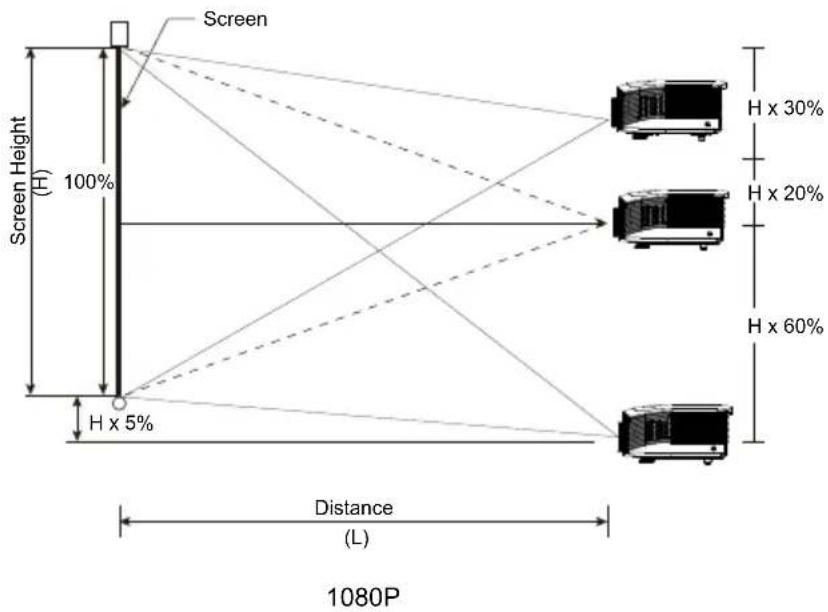
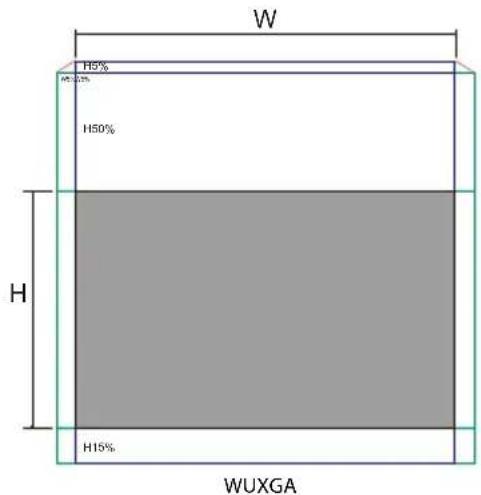
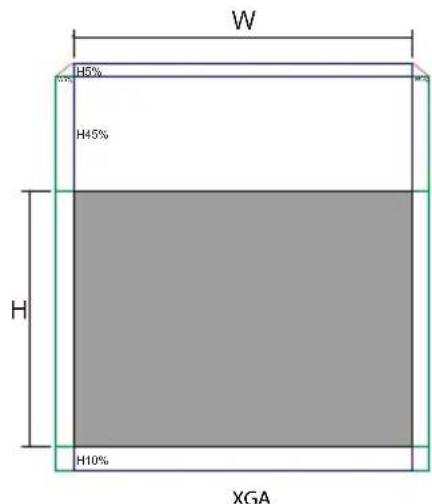
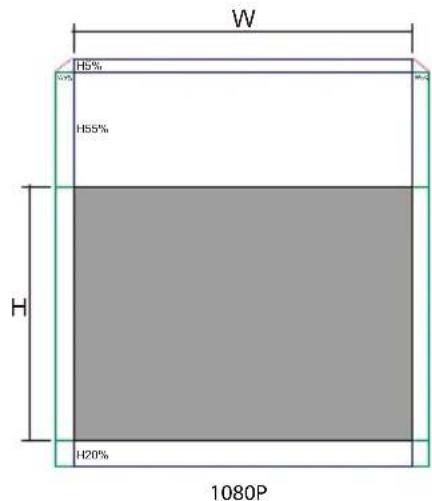
The vertical image height can be adjusted between 50% and -10% for XGA, 55% and -15% for WUXGA, 60% and -20% for 1080P of offset position. Please consult the Lens Shift Range diagram below for further clarification.
Adjusting the horizontal image position
With the lens in the center position the horizontal image position can be adjusted to the left or right by up to a maximum of 5% of the image width. Please consult the Lens Shift Range diagram below for further clarification.
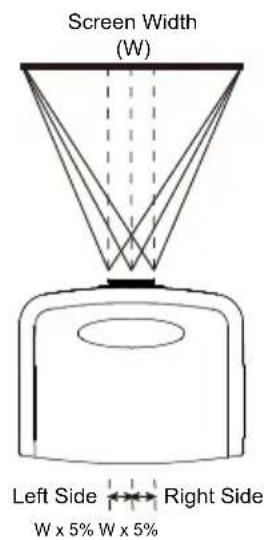
Lens Shift Range Diagram
When W and H at 0% offset position The max. H up shift=Hx55% The max. H down shift=Hx15% The max. W shift=Wx5%
When max. W shift is Wx5% Max. H shift=Hx50% When max. H shift is Hx55% Max. W shift=Hx0%
When W and H at 0% offset position The max. H up shift=Hx50% The max. H down shift=Hx10% The max. W shift=Wx5%
When max. W shift is Wx5% Max. H shift=Hx45% When max. H shift is Hx50% Max. W shift=Hx0%
When W and H at 0% offset position The max. H up shift=Hx60% The max. H down shift=Hx20% The max. W shift=Wx5%
When max. W shift is Wx5% Max. H shift=Hx55% When max. H shift is Hx60% Max. W shift=Hx0%
Adjusting the Zoom / Focus
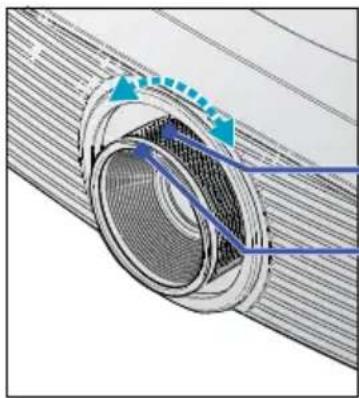
You may turn the zoom ring to zoom in or out. To focus the image, rotate the focus ring until the image is clear. The projector will focus at distances. See pages 26-30.
natural_image
Technical diagram of a mechanical component with a meshed circular opening and blue arrows indicating motion or flow (no text or symbols)Zoom Ring Focus Ring
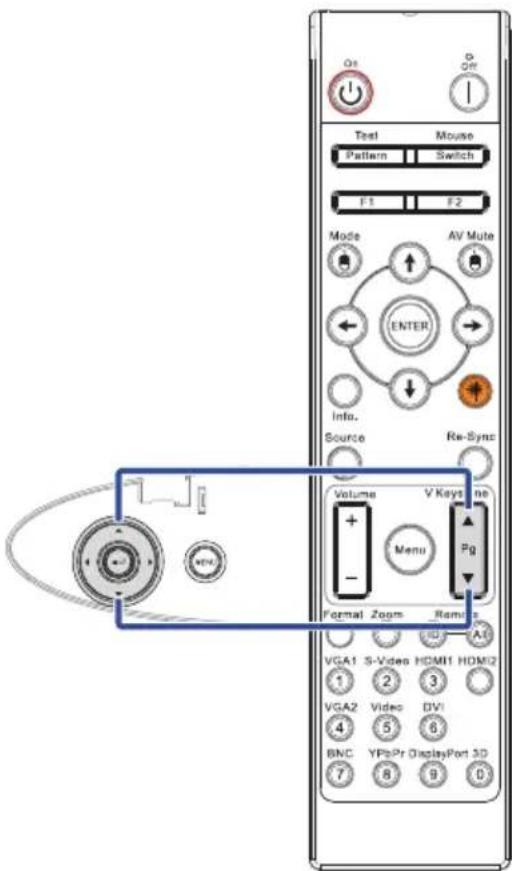
Use the keystone buttons to correct image distortion. They can be found on the remote control and on the projector's control panel.

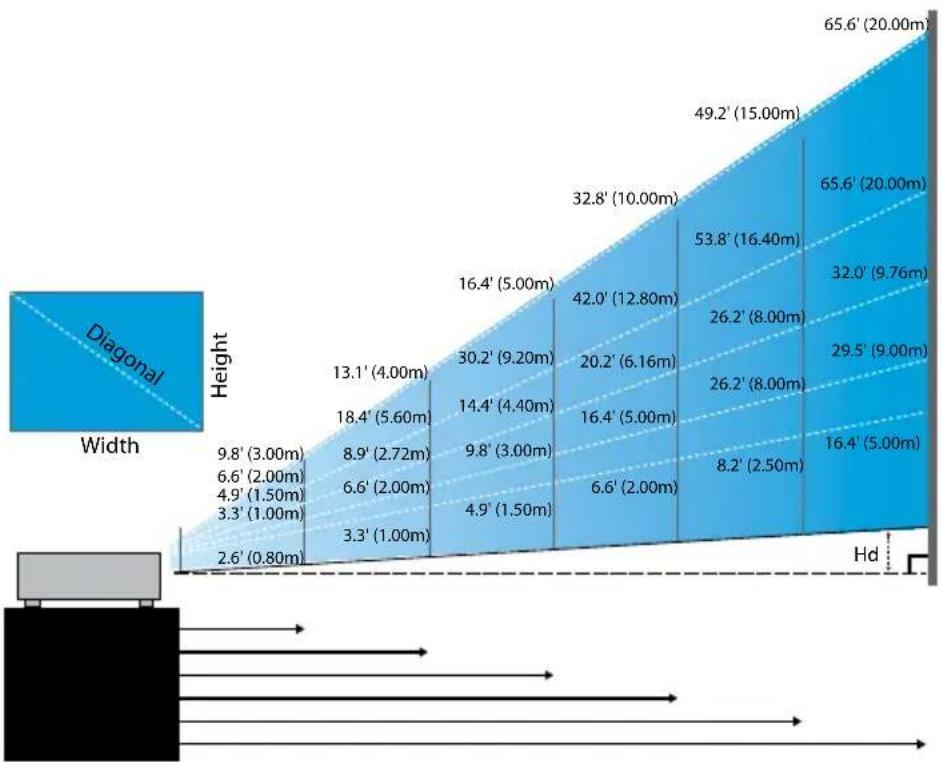
Adjusting Projection Image Size (XGA)
heatmap
| Height | 9.8' (3.00m) | 6.6' (2.00m) | 4.9' (1.50m) | 3.3' (1.00m) | 2.6' (0.80m) | |---|---|---|---|---|---| | 13.1' (4.00m) | 18.4' (5.60m) | 8.9' (2.72m) | 6.6' (2.00m) | 3.3' (1.00m) | | | 30.2' (9.20m) | 14.4' (4.40m) | 9.8' (3.00m) | 4.9' (1.50m) | 6.6' (2.00m) | | | 16.4' (5.00m) | 16.4' (5.00m) | 20.2' (6.16m) | 26.2' (8.00m) | 8.2' (2.50m) | | | 32.8' (10.00m) | 42.0' (12.80m) | 26.2' (8.00m) | 29.5' (9.00m) | 32.0' (9.76m) | | | 49.2' (15.00m) | 53.8' (16.40m) | 26.2' (8.00m) | 29.5' (9.00m) | 32.0' (9.76m) | | | 65.6' (20.00m) | 65.6' (20.00m) | 32.8' (10.00m) | 49.2' (15.00m) | 65.6' (20.00m) | | Hd indicates spatial dimensions.New Short lens: offset=50%
| Screen (Diagonal) | 48.6"(123.5cm) | 60.8"(154.3cm) | 91.1"(231.5cm) | 121.5"(308.6cm) | 151.9"(385.8cm) | 303.8"(771.6cm) |
| Screen size | 38.9"x29.2"96.8x74.1cm | 48.6"x36.5"123.5x92.6cm | 72.9"x54.7"185.2x138.9cm | 97.2"x72.9"246.9x185.2cm | 121.5"x91.1"308.6x231.5cm | 243.0"x182.3"617.3x463.0cm |
| Distance | 2.6'(0.80m) | 3.3'(1.00m) | 4.9'(1.50m) | 6.6'(2.00m) | 8.2'(2.50m) | 16.4'(5.00m) |
Semi Short Throw lens: offset=50%
| Screen (Diagonal) | Max. | 43.2" (109.6cm) | 86.3" (219.3cm) | 129.5" (328.9cm) | 215.8" (548.2cm) | 345.4" (877.2cm) | 388.5" (986.8cm) |
| Min. | 36.5" (92.8cm) | 73.1" (185.6cm) | 109.6" (278.4cm) | 182.7" (464.0cm) | 292.3" (742.4cm) | 328.8" (835.2cm) | |
| Screen size | Max (WxH). | 34.5"x25.9" 87.7x65.8cm | 69.1"x51.8" 175.4 x131.6cm | 103.6"x77.7" 263.2x197.4cm | 172.7"x129.5" 438.6 x328.9cm | 276.3"x207.2" 701.8x526.3cm | 310.8"x233.1" 789.5 x592.1cm |
| Min. (WxH) | 29.2"x21.9" 74.2 x55.7cm | 58.5"x43.8" 148.5 x111.4cm | 87.7"x65.8" 222.7 x167.0cm | 146.1"x109.6" 371.2 x278.4cm | 233.8"x175.4" 593.9 x445.4cm | 263.1"x197.3" 668.2 x501.1cm | |
| Distance | 3.3' (1.00m) | 6.6' (2.00m) | 9.8' (3.00m) | 16.4' (5.00m) | 26.2' (8.00m) | 29.5' (9.00m) | |
STD lens: offset=50%
| Screen (Diagonal) | Max. | 46.1" (117.2cm) | 83.7" (212.5cm) | 135.3" (343.8cm) | 189.5" (481.3cm) | 246.1" (625.0cm) | 300.2" (762.5cm) |
| Min. | 36.9" (93.8cm) | 66.9" (170.0cm) | 108.3" (275.0cm) | 151.6" (385.0cm) | 196.9" (500.0cm) | 240.2" (610.0cm) | |
| Screen size | Max (WxH). | 36.9"x27.7" 93.8x70.3cm | 66.9"x50.2" 170.0 x127.5cm | 108.3"x81.2" 275.0 x206.3cm | 151.6"x113.7" 385.0 x288.8cm | 196.9"x147.6" 500.0 x375.0cm | 240.2"x180.1" 610.0 x457.5cm |
| Min. (WxH) | 29.5"x22.1" 75.0 x56.3cm | 53.5"x40.2" 136.0 x102.0cm | 86.6"x65.0" 220.0 x165.0cm | 121.3"x90.9" 308.0 x231.0cm | 157.5"x118.1" 400.0 x300.0cm | 192.1"x144.1" 488.0 x366.0cm | |
| Distance | 4.9' (1.50m) | 8.9' (2.72m) | 14.4' (4.40m) | 20.2' (6.16m) | 26.2' (8.00m) | 32.0' (9.76m) | |
Long lens: offset=50%
| Screen (Diagonal) | Max. | 49.2" (125.0cm) | 137.8" (350.0cm) | 226.4" (575.0cm) | 315.0" (800.0cm) | 403.5" (1025.0cm) | 492.1" (1250.0cm) |
| Min. | 32.8" (83.3cm) | 91.9" (233.3cm) | 150.9" (383.3cm) | 210.0" (533.3cm) | 269.0" (683.3cm) | 328.1" (833.3cm) | |
| Screen size | Max (WxH). | 39.4"x29.5" 100.0x75.0cm | 110.2"x82.7" 280.0x210.0cm | 181.1"x135.8" 460.0x345.0cm | 252.0"x189.0" 640.0x480.0cm | 322.8"x242.1" 820.0x615.0cm | 393.7"x295.3" 1000.0x750.0cm |
| Min. (WxH) | 26.2"x19.7" 66.7x50.0cm | 73.5"x55.1" 186.7x140.0cm | 120.7"x90.6" 306.7x230.0cm | 168.0"x126.0" 426.7x320.0cm | 215.2"x161.4" 546.7x410.0cm | 262.5"x196.9" 666.7x500.0cm | |
| Distance | 6.6'(2.00m) 18.4'(5.60m) 30.2'(9.20m) 42.0'(12.80m) 53.8'(16.40m) 65.6'(20.00m) | ||||||
Super Long Throw lens: offset=50%
| Screen (Diagonal) | Max. | 47.5" (120.6cm) | 63.3" (160.8cm) | 79.1" (201.0cm) | 158.2" (401.9cm) | 237.4" (602.9cm) | 316.5" (803.9cm) |
| Min. | 28.5" (72.4cm) | 38.0" (96.5cm) | 47.5" (120.7cm) | 95.0" (241.3cm) | 142.5" (362.0cm) | 190.0" (482.6cm) | |
| Screen size | Max (WxH). | 38.0"x28.5" 96.5x72.3cm | 50.6"x38.0" 128.6 x96.5cm | 63.3"x47.5" 160.8 x120.6cm | 126.6"x94.9" 321.5 x241.2cm | 189.9"x142.4" 482.3 x361.7cm | 253.2"x189.9" 643.1 x482.3cm |
| Min. (WxH) | 22.8"x17.1" 57.9 x43.4cm | 30.4"x22.8" 77.2 x57.9cm | 38.0"x28.5" 96.5 x72.4cm | 76.0"x57.0" 193.1 x177.8cm | 114.0"x85.5" 289.6 x217.2cm | 152.0"x114.0" 386.1 x289.6cm | |
| Distance | 9.8' (3.00m) 13.1' (4.00m) 16.4' (5.00m) 32.8' (10.00m) 49.2' (15.00m) 65.6' (20.00m) | ||||||
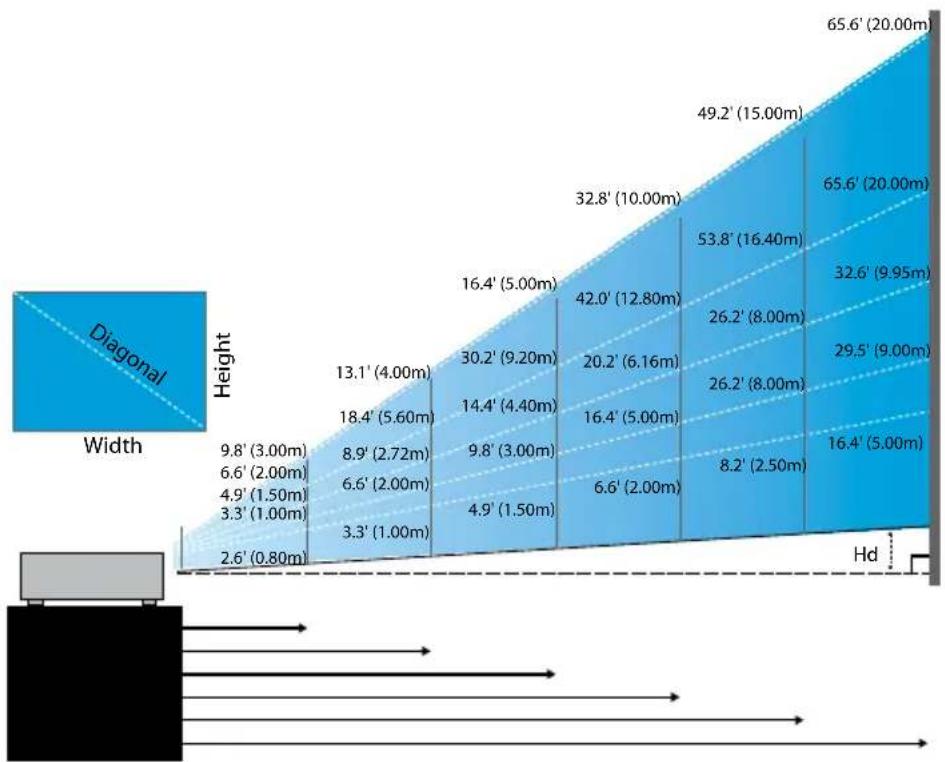
Adjusting Projection Image Size (WUXGA)
heatmap
| Width | Height | Value | | :--- | :--- | :--- | | 2.6' (0.80m) | 9.8' (3.00m) | 13.1' (4.00m) | | 3.3' (1.00m) | 6.6' (2.00m) | 18.4' (5.60m) | | 4.9' (1.50m) | 8.9' (2.72m) | 30.2' (9.20m) | | 6.6' (2.00m) | 6.6' (2.00m) | 14.4' (4.40m) | | 9.8' (3.00m) | 3.3' (1.00m) | 9.8' (3.00m) | | 13.1' (4.00m) | 16.4' (5.00m) | 16.4' (5.00m) | | 16.4' (5.00m) | 30.2' (9.20m) | 20.2' (6.16m) | | 16.4' (5.00m) | 42.0' (12.80m) | 53.8' (16.40m) | | 4.9' (1.50m) | 6.6' (2.00m) | 6.6' (2.00m) | | 8.2' (2.50m) | 8.9' (2.72m) | 8.2' (2.50m) | | 29.5' (9.00m) | 32.6' (9.95m) | 32.6' (9.95m) | | 49.2' (15.00m) | 32.8' (10.00m) | 53.8' (16.40m) | | 65.6' (20.00m) | 65.6' (20.00m) | 65.6' (20.00m) |New Short lens: offset=55%
| Screen (Diagonal) | 47.7"(121.3cm) | 59.7"(151.6cm) | 89.5"(227.4cm) | 119.3"(303.1cm) | 149.2"(378.9cm) | 298.4"(757.9cm) |
| Screen size (WxHl) | 40.5"x25.3"102.8x64.3cm | 50.6"x31.6"128.5x80.3cm | 75.9"x47.4"192.8x120.5cm | 101.2"x63.3"257.1x160.7cm | 126.5"x79.1"321.3x200.8cm | 253.0"x158.1"642.7x401.7cm |
| Hd | 1.3"(3.2cm) | 1.6"(4.0cm) | 2.4"(6.0cm) | 3.2"(8.0cm) | 4.0"(10.0cm) | 7.9"(20.1cm) |
| Distance | 2.6'(0.80m) | 3.3'(1.00m) | 4.9'(1.50m) | 6.6'(2.00m) | 8.2'(2.50m) | 16.4'(5.00m) |
Semi Short Throw lens: offset=55%
| Screen (Diagonal) | Max. | 42.2" (107.2cm) | 84.4" (214.4cm) | 126.6" (321.6cm) | 211.0" (536.0cm) | 337.7" (857.6cm) | 379.9" (964.8cm) |
| Min. | 35.7" (90.7cm) | 71.4" (181.4cm) | 107.1" (272.1cm) | 178.6" (453.6cm) | 285.7" (725.7cm) | 321.4" (816.4cm) | |
| Screen size (WxHl) | Max | 35.8"x22.4" 90.9x56.8cm | 71.6"x44.7" 181.8x113.6cm | 107.4"x67.1" 272.7x170.5cm | 179.0"x111.8" 454.5x284.1cm | 286.3"x179.0" 727.3x454.5cm | 322.1"x201.3" 818.2x511.4cm |
| Min. | 30.3"x18.9" 76.9x48.1cm | 60.6"x37.9" 153.8x96.2cm | 90.9"x56.8" 230.8x144.2cm | 151.4"x94.6" 384.6x240.4cm | 242.3"x151.4" 615.4x384.6cm | 272.6"x170.4" 692.3x432.7cm | |
| Hd | Max. | 1.1" (2.8cm) | 2.2" (5.7cm) | 3.4" (8.5cm) | 5.6" (14.2cm) | 8.9" (22.7cm) | 10.1" (25.6cm) |
| Min. | 0.9" (2.4cm) | 1.9" (4.8cm) | 2.8" (7.2cm) | 4.7" (12.0cm) | 7.6" (19.2cm) | 8.5" (21.6cm) | |
| Distance | 3.3' (1.00m) | 6.6' (2.00m) | 9.8' (3.00m) | 16.4' (5.00m) | 26.2' (8.00m) | 29.5' (9.00m) | |
STD lens: offset=55%
| Screen (Diagonal) | Max. | 45.2" (114.9cm) | 82.0" (208.3cm) | 132.6" (336.9cm) | 185.7" (471.7cm) | 241.2" (612.6cm) | 300.0" (761.9cm) |
| Min. | 36.1" (91.7cm) | 65.4" (166.2cm) | 105.8" (268.8cm) | 148.2" (376.4cm) | 192.4" (488.8cm) | 239.4" (608.0cm) | |
| Screen size (WxHl) | Max | 38.3"x24.0" 97.4x60.9cm | 69.5"x43.5" 176.6x110.4cm | 112.5"x70.3" 285.7x178.6cm | 137.5"x98.4" 400.0x250.0cm | 204.5"x127.8" 519.5x324.7cm | 254.4"x159.0" 646.1x403.8cm |
| Min. | 30.6"x19.1" 77.7x48.6cm | 55.5"x34.7" 140.9x88.1cm | 89.8"x56.1" 228.0x142.5cm | 125.7"x78.5" 319.2x199.5cm | 163.2"x102.0" 414.5x259.1cm | 203.0"x126.9" 515.5x322.2cm | |
| Hd | Max. | 1.2" (3.0cm) 2.2" (5.5cm) 3.5" (8.9cm) 4.9" (12.5cm) 6.4" (16.2cm) 7.9" (20.2cm) | |||||
| Min. | 1.0" (2.4cm) 1.7" (4.4cm) 2.8" (7.1cm) 3.9" (10.0cm) 5.1" (13.0cm) 6.3" (16.1cm) | ||||||
| Distance | 4.9' (1.50m) 8.9' (2.72m) 14.4' (4.40m) 20.2' (6.16m) 26.2' (8.00m) 32.6' (9.95m) | ||||||
Long lens: offset=55%
| Screen (Diagonal) | Max. | 48.1" (122.2cm) | 134.7" (342.2cm) | 221.3" (562.1cm) | 307.9" (782.1cm) | 394.5" (1002.1cm) | 481.1" (1222.0cm) |
| Min. | 32.0" (81.3cm) | 89.7" (227.7cm) | 147.3" (374.1cm) | 204.9" (520.5cm) | 262.6" (666.9cm) | 320.2" (813.3cm) | |
| Screen size (WxHl) | Max | 40.8"x25.5" 103.6x64.8cm | 114.2"x71.4" 290.2x181.3cm | 187.7"x117.3" 476.7x297.9cm | 261.1"x163.2" 663.2x414.5cm | 334.5"x209.1" 849.7x531.1cm | 408.0"x255.0" 1036.0x647.7cm |
| Min. | 27.2"x17.0" 69.0x43.1cm | 76.0"x47.5" 193.1x120.7cm | 124.9"x78.1" 317.2x198.3cm | 173.8"x108.6" 441.4x275.9cm | 222.6"x139.2" 565.5x353.4cm | 271.5"x169.7" 689.7x431.0cm | |
| Hd | Max. | 1.3" (3.2cm) 3.6" | (9.1cm) 5.9" (14.9cm) | 8.2" (20.7cm) 10.5" (26.6cm) | 12.7" (3.4cm) | ||
| Min. | 0.8" (2.2cm) 2.4" | (6.0cm) 3.9" (9.9cm) | 5.4" (13.8cm) | 7.0" (17.7cm) | 8.5" (21.6cm) | ||
| Distance | 6.6' (2.00m) 18.4' (5.60m) 30.2' (9.20m) 42.0' (12.80m) 53.8' (16.40m) 65.6' (20.00m) | ||||||
Super Long Throw lens: offset=55%
| Screen (Diagonal) | Max. | 46.4" (117.9cm) | 61.9" (157.2cm) | 77.4" (196.5cm) | 154.8" (393.1cm) | 232.1" (589.6cm) | 309.5" (786.2cm) |
| Min. | 27.9" (70.8cm) | 37.1" (94.3cm) | 46.4" (117.9cm) | 92.9" (235.8cm) | 139.3" (353.8cm) | 185.7" (471.7cm) | |
| Screen size (WxHl) | Max | 39.4"x24.6" 100.0x62.5cm | 52.5"x32.8" 133.3x83.3cm | 65.6"x41.0" 166.7x104.2cm | 131.2"x82.0" 333.3x208.3cm | 196.9"x123.0" 500.0x312.5cm | 262.5"x164.0" 666.7x416.7cm |
| Min. | 23.6"x14.8" 60.0x37.5cm | 31.5"x19.7" 80.0x50.0cm | 39.4"x24.6" 100.0x62.5cm | 78.7"x49.2" 200.0x125.0cm | 118.1"x73.8" 300.0x187.5cm | 157.5"x98.4" 400.0x250.0cm | |
| Hd | Max. | 1.2" (3.1cm) 1.6" | (4.2cm) 2.1" (5.2cm) | 4.1" (10.4cm) 6.2" | (15.6cm) 8.2" (20.8cm) | ||
| Min. | 0.7" (1.9cm) 1.0" | (2.5cm) 1.2" (3.1cm) | 2.5" (6.3cm) 3.7" | (9.4cm) 4.9" (12.5cm) | |||
| Distance | 9.8" (3.00m) 13.1" (4.00m) 16.4" (5.00m) 32.8" (10.00m) 49.2" (15.00m) 65.6" (20.00m) | ||||||
Adjusting Projection Image Size (1080P)
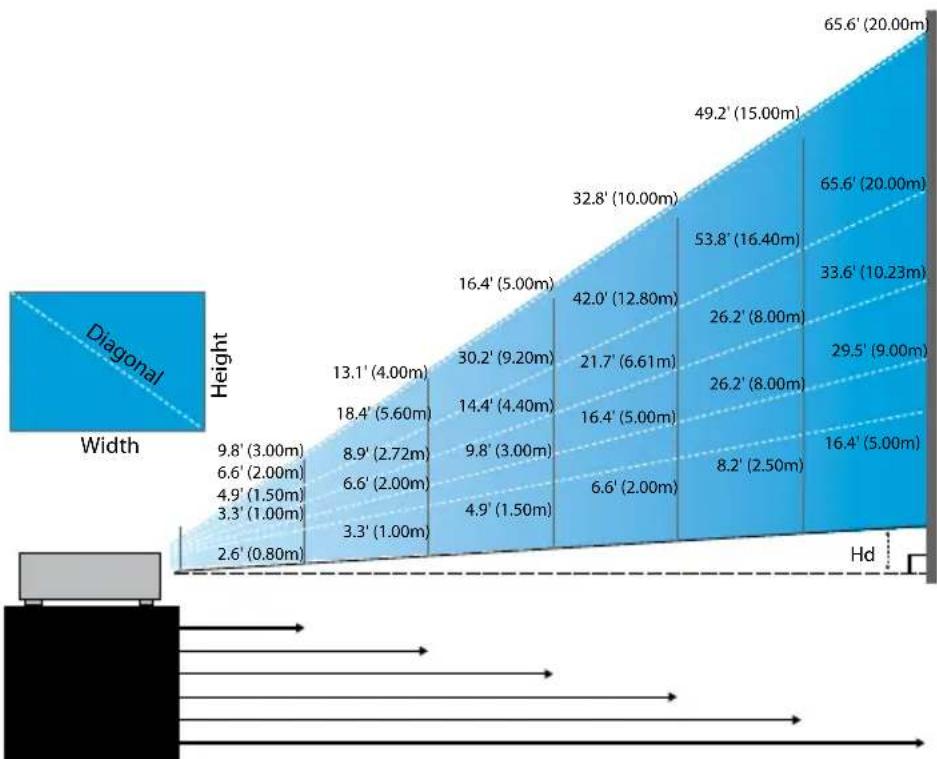
heatmap
| Height | 9.8' (3.00m) | 6.6' (2.00m) | 4.9' (1.50m) | 3.3' (1.00m) | 2.6' (0.80m) | |---|---|---|---|---|---| | 13.1' (4.00m) | 18.4' (5.60m) | 8.9' (2.72m) | 6.6' (2.00m) | 3.3' (1.00m) | | | 30.2' (9.20m) | 14.4' (4.40m) | 9.8' (3.00m) | 4.9' (1.50m) | | | | 16.4' (5.00m) | 16.4' (5.00m) | 21.7' (6.61m) | 6.6' (2.00m) | | | | 32.8' (10.00m) | 42.0' (12.80m) | 26.2' (8.00m) | 26.2' (8.00m) | 8.2' (2.50m) | | | 49.2' (15.00m) | 53.8' (16.40m) | 29.5' (9.00m) | 33.6' (10.23m) | 65.6' (20.00m) | | | 65.6' (20.00m) | 65.6' (20.00m) | 33.6' (10.23m) | 29.5' (9.00m) | 16.4' (5.00m) | |New Short lens: offset=60%
| Screen (Diagonal) | 46.4"(118.0cm) | 58.1"(147.5cm) | 87.1"(221.2cm) | 116.1"(294.9cm) | 145.2"(368.7cm) | 290.3"(737.4cm) |
| Screen size | 40.5"x22.8"102.8x57.8cm | 50.6"x28.5"128.5x72.3cm | 75.9"x42.7"192.8x108.56cm | 101.2"x56.9"257.1x144.6cm | 126.5"x71.2"321.3x180.8cm | 253.0"x142.3"642.7x361.5cm |
| Hd | 2.3"(5.8cm) | 2.8"(7.2cm) | 4.3"(10.8cm) | 5.7"(14.5cm) | 7.1"(18.1cm) | 14.2"(36.2cm) |
| Distance | 2.6'(0.80m) | 3.3'(1.00m) | 4.9'(1.50m) | 6.6'(2.00m) | 8.2'(2.50m) | 16.4'(5.00m) |
Semi Short Throw lens: offset=60%
| Screen (Diagonal) | Max. | 41.1" (104.3cm) | 82.1" (208.6cm) | 123.2" (312.9cm) | 205.3" (521.5cm) | 328.5" (834.4cm) | 369.6" (938.7cm) |
| Min. | 34.7" (88.3cm) | 69.5" (176.5cm) | 104.2" (264.8cm) | 173.7" (441.3cm) | 278.0" (706.1cm) | 312.7" (794.3cm) | |
| Screen size (WxHl) | Max | 35.8"x20.1" 90.9x51.1cm | 71.6"x40.3" 181.8x102.3cm | 107.4"x60.4" 272.7x153.4cm | 179.0"x100.7" 454.5x255.7cm | 286.3"x161.1" 727.3x409.1cm | 322.1"x181.2" 818.2x460.2cm |
| Min. | 30.3"x17.0" 76.9x43.3cm | 60.6"x34.1" 153.8x86.5cm | 90.9"x51.1" 230.8x129.8cm | 151.4"x85.2" 384.6x216.3cm | 242.3"x136.3" 615.4x346.2cm | 272.6"x153.3" 692.3x389.4cm | |
| Hd | Max. | 2.0" (5.1cm) | 4.0" (10.2cm) | 6.0" (15.3cm) | 10.1" (25.6cm) | 16.1" (40.9cm) | 18.1" (46.0cm) |
| Min. | 1.7" (4.3cm) | 3.4" (8.7cm) | 5.1" (13.0cm) | 8.5" (21.6cm) | 13.6" (34.6cm) | 15.3" (38.9cm) | |
| Distance | 3.3' (1.00m) | 6.6' (2.00m) | 9.8' (3.00m) | 16.4' (5.00m) | 26.2' (8.00m) | 29.5' (9.00m) | |
STD lens: offset=60%
| Screen (Diagonal) | Max. | 44.0" (111.8cm) | 79.8" (202.6cm) | 129.1" (327.8cm) | 193.9" (492.5cm) | 234.7" (596.0cm) | 300.1" (762.2cm) |
| Min. | 35.1" (89.2cm) | 63.7" (161.7cm) | 103.0" (261.6cm) | 154.7" (393.0cm) | 187.2" (475.6cm) | 239.4" (608.2cm) | |
| Screen size | Max (WxH). | 38.3"x21.6" 97.4x54.8cm | 69.5"x39.1" 176.6x99.4cm | 112.5"x63.3" 285.7x160.7cm | 169.0"x95.1" 429.2x241.4cm | 204.5"x115.0" 519.5x292.2cm | 261.5"x147.1" 664.3x373.7cm |
| Min. (WxH) | 30.6"x17.2" 77.7x43.7cm | 55.5"x31.2" 140.9x79.3cm | 89.8"x50.5" 228.0x128.2cm | 134.8"x75.8" 342.5x192.6cm | 163.2"x91.8" 414.5x233.2cm | 208.7"x117.4" 530.1x298.2cm | |
| Hd | Max. | 2.2" (5.5cm) 3.9" | (9.9cm) 6.3" (16.1cm) | 9.5" (24.1cm) 11.5" | (29.2cm) 14.7" | (37.4cm) | |
| Min. | 1.7" (4.4cm) 3.1" | (7.9cm) 5.0" (12.8cm) | 7.6" (19.3cm) 9.2" | (23.3cm) 11.7" | (29.8cm) | ||
| Distance | 4.9' (1.50m) 8.9' (2.72m) 14.4' (4.40m) 21.7' (6.61m) 26.2' (8.00m) 33.6' (10.28m) | ||||||
Long lens: offset=60%
| Screen (Diagonal) | Max. | 46.8" (118.9cm) | 131.1" (332.9cm) | 215.3" (546.9cm) | 299.6" (760.9cm) | 383.8" (974.9cm) | 468.1" (1189.0cm) |
| Min. | 31.2" (79.1cm) | 87.2" (221.6cm) | 143.3" (364.0cm) | 199.4" (506.4cm) | 255.5" (648.8cm) | 311.5" (791.3cm) | |
| Screen size | Max (WxH). | 40.8"x22.9" 103.6x58.3cm | 114.2"x64.3" 290.2x163.2cm | 187.7"x105.6" 476.7x268.1cm | 261.1"x146.9" 663.2x373.1cm | 334.5"x188.2" 849.7x478.0cm | 408.0"x229.5" 1036.3x582.9cm |
| Min. (WxH) | 27.2"x15.3" 69.0x38.8cm | 76.0"x42.8" 193.1x108.6cm | 124.9"x70.3" 317.2x178.4cm | 173.8"x97.7" 441.4x248.3cm | 222.6"x125.2" 565.5x318.1cm | 271.5"x152.7" 689.7x387.9cm | |
| Hd | Max. | 2.3" (5.8cm) 6.4" | (16.3cm) 10.6" (26.6cm) | 14.7" (37.3cm) | 18.8" (47.8cm) 22.9" | (58.3cm) | |
| Min. | 1.5" (3.9cm) 4.3" | (10.9cm) 7.0" (17.8cm) | 9.8" (24.8cm) | 12.5" (31.8cm) 15.3" | (8.8cm) | ||
| Distance | 6.6' (2.00m) 18.4' (5.60m) 30.2' (9.20m) 42.0' (12.80m) 53.8' (16.40m) 65.6' (20.00m) | ||||||
Super Long Throw lens: offset=60%
| Screen (Diagonal) | Max. | 45.2" (114.7cm) | 60.2" (153.0cm) | 75.3" (191.2cm) | 150.6" (382.4cm) | 225.9" (573.7cm) | 301.1" (764.9cm) |
| Min. | 27.1" (68.8cm) | 36.1" (91.8cm) | 45.2" (117.7cm) | 90.3" (229.5cm) | 135.5" (344.2cm) | 180.7" (458.9cm) | |
| Screen size (WxHl) | Max | 39.4"x22.1" 100.0x56.3cm | 52.5"x29.5" 133.3x75.0cm | 65.6"x36.9" 166.7x93.8cm | 131.2"x73.8" 333.3x187.5cm | 196.9"x110.7" 500.0x281.3cm | 262.5"x147.6" 666.7x375.0cm |
| Min. | 23.6"x13.3" 60.0x33.8cm | 31.5"x17.7" 80.0x45.0cm | 39.4"x22.1" 100.0x56.3cm | 78.7"x44.3" 200.0x112.5cm | 118.1"x66.4" 300.0x168.8cm | 157.5"x88.6" 400.0x225.0cm | |
| Hd | Max. | 2.2" (5.6cm) 3.0" (7.5cm) 3.7" (9.4cm) 7.4" (18.8cm) 11.1" (28.1cm) 14.8" (37.5cm) | |||||
| Min. | 1.3" (3.4cm) 1.8" (4.5cm) 2.2" (5.6cm) 4.4" (11.3cm) 6.6" (16.9cm) 8.9" (22.5cm) | ||||||
| Distance | 9.8' (3.00m) 13.1' (4.00m) 16.4' (5.00m) 32.8' (10.00m) 49.2' (15.00m) 65.6' (20.00m) | ||||||
Control Panel
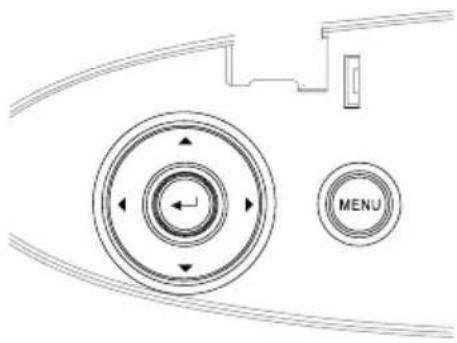
| Using the Control Panel | |
| ▲/Keystone+(Up arrow) | Adjust the image Keystone positively.Navigates and changes settings in the OSD. |
| ◄/Source(Left arrow) | Press Source to select an input signal.Navigates and changes settings in the OSD. |
| Enter Confirm your item selection. | |
| ►/Re-Sync(Right arrow) | Automatically synchronizes the projector to the input source.Navigates and changes settings in the OSD. |
| Menu | Press Menu to launch the on-screen display(OSD) menu. To exit OSD, Press Menu again. |
Remote Control
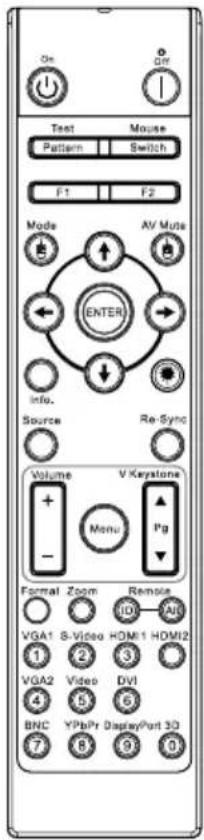

Due to the difference in applications for each country, some regions may have different accessories.
Due to generic remote, some function is model dependent.
| Using the Remote Control | |
| Power On/Off | Refer to the “Powering On the Projector” on page 18.Refer to the “Powering Off the Projector” on page 20. |
| Test Pattern Refer to the “Test Pattern” on page 61. | |
| Mouse Switch | When connecting your PC to the projector through USB, press Mouse Switch to activate/ inactivate the mouse mode and control your PC using the remote. |
| Function 1 (F1) Refer to the “Function 1” on page 64. | |
| Function 2 (F2) Refer to the “Function 2” on page 64. | |
| Mode( [IMAGE] ) | Mode - Refer to the “Display Mode” on page 38.◦ In the mouse mode, use◦as emulation of USB mouse left click via USB. |
| AV Mute( [IMAGE] ) | AV Mute - Momentarily turns off/on the audio and video.◦ In the mouse mode, use◦as emulation of USB mouse right click via USB. |
| Four Directional Select Keys | 1. Use ▲▼◀▶ to select items or make adjustments to your selection.2. In the mouse mode, use ▲▼◀▶ as emulation of directional keys. |
| Enter | 1. Confirm your item selection.2. In the mouse mode, as emulation keyboard enter key. |
| Info Refer to the “Information” on page 62. | |
| Press ⚪ operate the on-screen pointer (DO NOT POINT IN EYES). | |
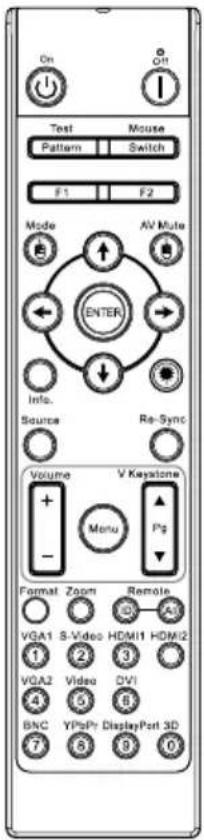

Due to the difference in applications for each country, some regions may have different accessories.
Due to generic remote, some function is model dependent.
| Using the Remote Control | |
| Source Press Source to search for source. | |
| Re-Sync | Automatically synchronize the projector to the input source. |
| Menu | Press Menu to launch the on-screen display (OSD) menu. To exit OSD, press Menu again. |
| Volume +/- Press Volume +/- to adjust volume. | |
| V Keystone +/- | Adjusts image distortion caused by tilting the projector. ( ± 30 degrees) |
| Format Refer to the “Format” on page 44. | |
| Zoom Press Zoom to zoom out images. | |
| Remote ID | Press until Power LED is flashing then press 01~99 to set the particular remote code. |
| Remote All Press to set remote code to all. | |
| VGA1 | Press VGA1 to choose source from VGA- IN connector. |
| S-Video Press S-Video to choose S-Video source. | |
| HDMI Press HDMI to choose HDMI source. | |
| Re-sync | Automatically synchronizes the projector to the input source. |
| VGA2 | Press VGA2 to choose source from VGA- IN connector. |
| Video | Press Video to choose Composite video source. |
| DVI | Press DVI to choose source from DVI-D connector. |
| BNC Press BNC to choose BNC source. | |
| YPbPr Press YPbPr to choose YPbPr source. | |
| DisplayPort | Press DisplayPort to choose DisplayPort source. |
| 3D Press 3D to turn on/off 3D menu. | |
On-screen Display Menus
The Projector has multilingual On-screen Display menus that allow you to make image adjustments and change a variety of settings. The projector will automatically detect the source.
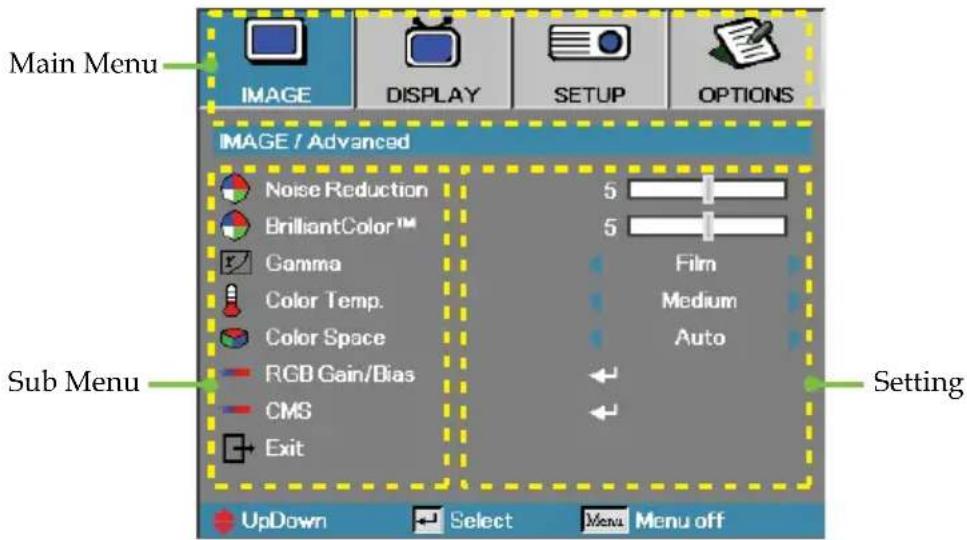
How to operate
- To open the OSD menu, press Menu on the Remote Control or Projector Keypad.
- When OSD is displayed, use ◀▶ keys to select any item in the main menu. While making a selection on a particular page, press ▼ or Enter to enter sub menu.
- Use ▲▼ keys to select the desired item and adjust the settings by ◀▶ key.
- Select the next item to be adjusted in the sub menu and adjust as described above.
- Press Enter to confirm, and the screen will return to the main menu.
- To exit, press Menu again. The OSD menu back to last level projector will automatically save the new settings.
Menu Tree

(#) "Color" and "Tint" is only supported in for YUV video sources..
(*) "3D" is only available when a compatible signal is supplied..
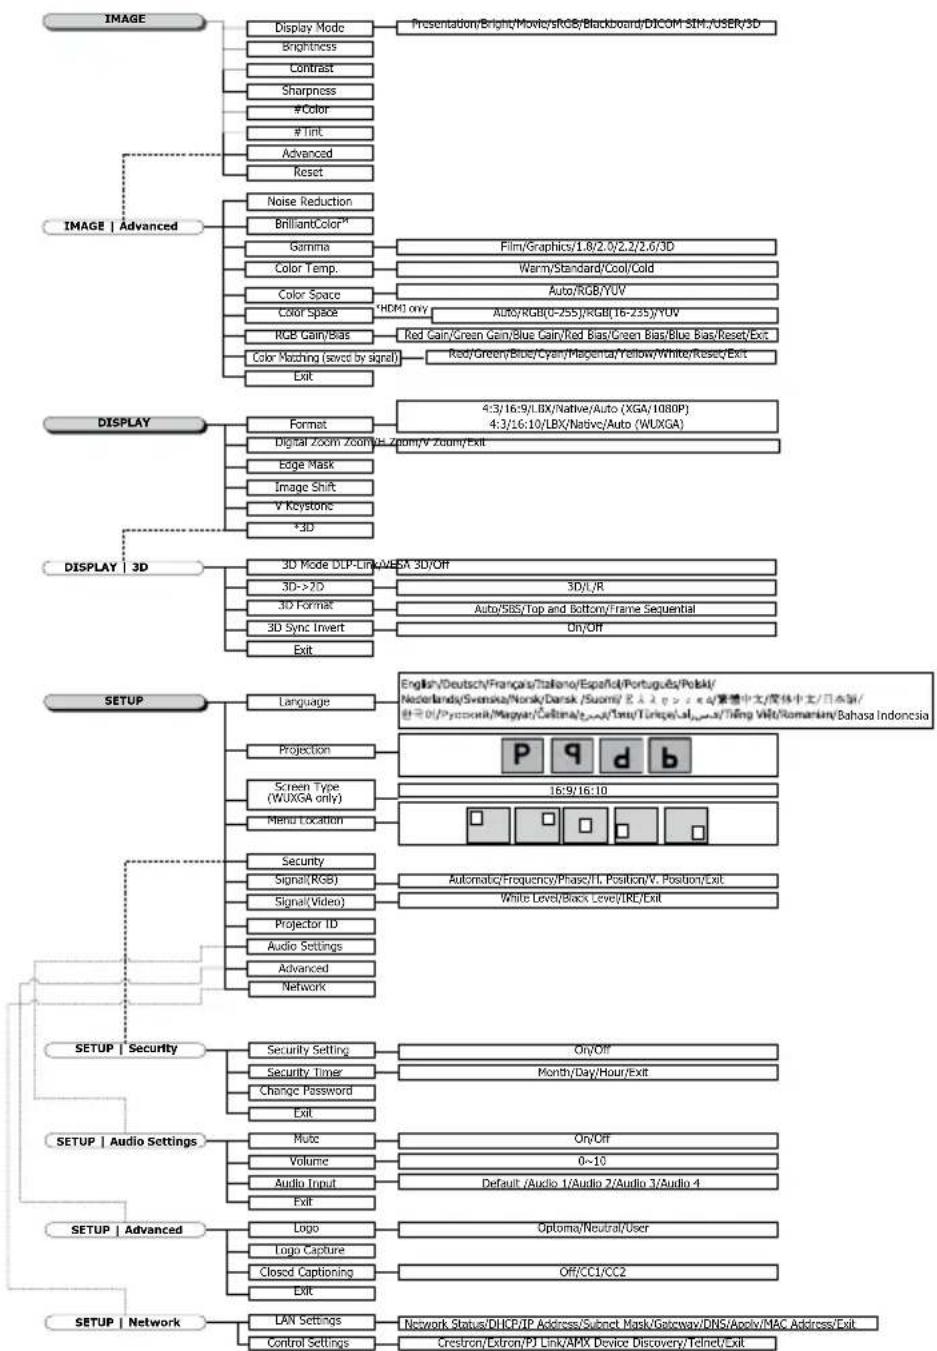
flowchart
graph TD
    A["IMAGE"] --> B["Display Mode"]
    B --> C["Brightness"]
    B --> D["Contrast"]
    B --> E["Sharpness"]
    B --> F["#Color"]
    B --> G["#Tint"]
    B --> H["Advanced"]
    B --> I["Reset"]
    A --> J["IMAGE | Advanced"]
    J --> K["Noise Reduction"]
    K --> L["BrilliantColor™"]
    L --> M["Gamma"]
    M --> N["Film/Graphics/1.8/2.0/2.2/2.6/3D"]
    L --> O["Color Temp."]
    O --> P["Warm/Standard/Cool/Cold"]
    L --> Q["Color Space"]
    Q --> R["Auto/RGB/YUV"]
    Q --> S["Color Space"]
    S --> T["HDMI only"]
    T --> U["Auto/RGB(0-255)/RGB(16-235)/YUV"]
    L --> V["RGB Gain/Bias"]
    V --> W["Red Gain/Green Gain/Blue Gain/Red Bias/Green Bias/Blue Bias/Reset/Exit"]
    V --> X["Color Matching (saved by signal)"]
    X --> Y["Red/Greeny/Blue/Cyan/Magenta/Yellow/White/Reset/Exit"]
    X --> Z["Exit"]
    A --> AA["DISPLAY"]
    AA --> AB["Format"]
    AB --> AC["Digital Zoom Zoom/H Zoom/V Zoom/Exit"]
    AA --> AD["Edge Mask"]
    AD --> AE["Image Shift"]
    AD --> AF["V Keystone"]
    AD --> AG["*3D"]
    A --> AH["DISPLAY | 3D"]
    AH --> AI["3D Mode DLP-Link/AEGA 3D/Off"]
    AH --> AJ["3D->2D"]
    AH --> AK["3D Format"]
    AH --> AL["3D Sync Invert"]
    AH --> AM["Exit"]
    A --> AN["SETUP"]
    AN --> AO["Language"]
    AO --> AP["Projection"]
    AP --> AQ["P q d b"]
    AO --> AR["Screen Type (WUXGA only)"]
    AR --> AS["Menu Location"]
    AS --> AT["16:9/16:10"]
    AT --> AU["Square Block Icon"]
    AU --> AV["Security"]
    AV --> AW["Signal(Kos)"]
    AW --> AX["Automatic/Frequency/Phase/II, Position/V, Position/Exit"]
    AX --> AY["Signal(Video)"]
    AY --> AZ["White Level/black Level/IRE/Exit"]
    AV --> BA["Projector ID"]
    BA --> BB["Audio Settings"]
    BB --> BC["Network"]
    AN --> BD["SETUP | Security"]
    BD --> BE["Security Setting"]
    BE --> BF["On/Off"]
    BE --> BG["Security Timer"]
    BE --> BH["Change Password"]
    BE --> BI["Exit"]
    AN --> BJ["SETUP | Audio Settings"]
    BJ --> BK["Mute"]
    BK --> BL["Volume"]
    BL --> BM["Default /Audio 1/Audio 2/Audio 3/Audio 4"]
    BJ --> BN["Audio Input"]
    BN --> BO["Exit"]
    AN --> BP["SETUP | Advanced"]
    BP --> BQ["Logo"]
    BQ --> BR["Optoma/Neutral/User"]
    BP --> BS["Logo Capture"]
    BS --> BT["Closed Captioning"]
    BP --> BU["Exit"]
    AN --> BV["SETUP | Network"]
    BV --> BW["LAN Settings"]
    BW --> BX["Network Status/DLICP/IP Address/Subnet Mark/Getaway/DNS/Apolv/MAC Address/Exit"]
    BV --> BY["Control Settings"]
    BY --> BZ["Crestron/Extron/PJ Link/APX Device Discovery/Telnet/Exit"]
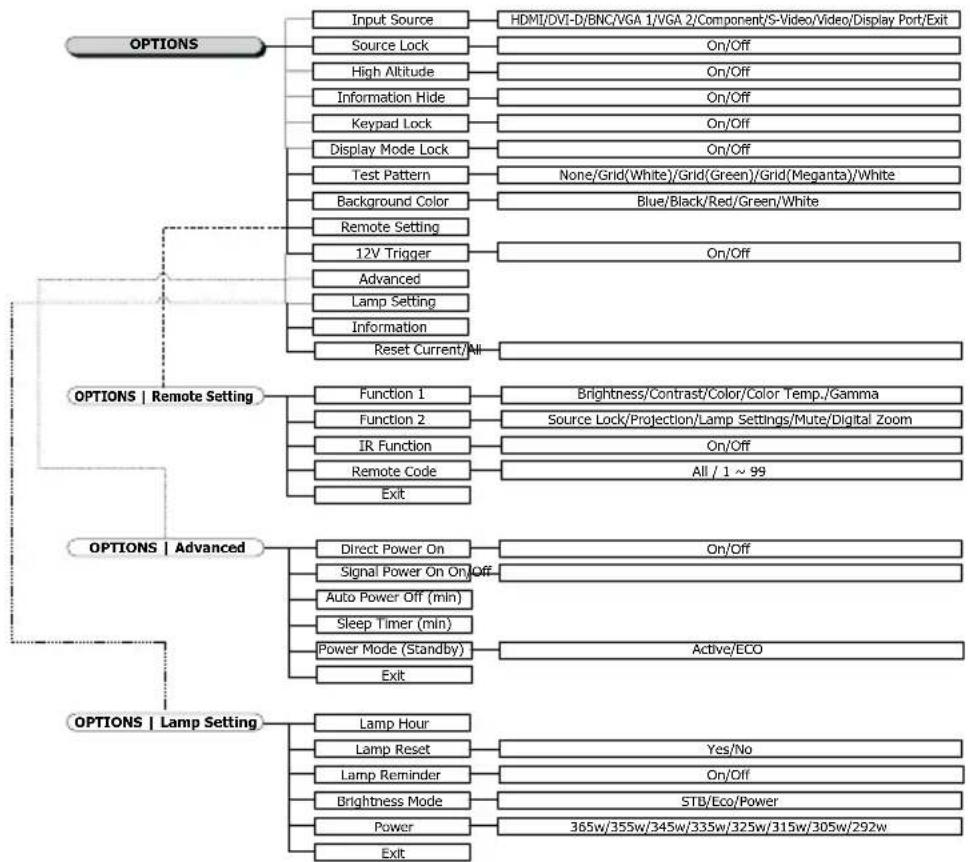
flowchart
graph TD
    A["OPTIONS"] --> B["Input Source"]
    A --> C["Source Lock"]
    A --> D["High Altitude"]
    A --> E["Information Hide"]
    A --> F["Keypad Lock"]
    A --> G["Display Mode Lock"]
    A --> H["Test Pattern"]
    A --> I["Background Color"]
    A --> J["Remote Setting"]
    A --> K["12V Trigger"]
    A --> L["Advanced"]
    A --> M["Lamp Setting"]
    A --> N["Information"]
    A --> O["Reset Current/All"]

    P["OPTIONS | Remote Setting"] --> Q["Function 1"]
    P --> R["Function 2"]
    P --> S["IR Function"]
    P --> T["Remote Code"]
    P --> U["Exit"]

    V["OPTIONS | Advanced"] --> W["Direct Power On"]
    V --> X["Signal Power On Off"]
    V --> Y["Auto Power Off (min)"]
    V --> Z["Sleep Timer (min)"]
    V --> AA["Power Mode (Standby)"]
    V --> AB["Exit"]

    AC["OPTIONS | Lamp Setting"] --> AD["Lamp Hour"]
    AC --> AE["Lamp Reset"]
    AC --> AF["Lamp Reminder"]
    AC --> AG["Brightness Mode"]
    AC --> AH["Power"]
    AC --> AI["Exit"]

    AJ["HDMI/DVI-D/BNC/VGA 1/VGA 2/Component/S-Video/Video/Display Port/Exit"] --> AK["On/Off"]
    AJ --> AL["On/Off"]
    AJ --> AM["On/Off"]
    AJ --> AN["None/Grid(White)/Grid(Green)/Grid(Meganta)/White"]
    AJ --> AO["Blue/Black/Red/Green/White"]

    AP["Brightness/Contrast/Color/Color Temp./Gamma"] --> AQ["Source Lock/Projection/Lamp Settings/Mute/Digital Zoom"]
    AP --> AR["On/Off"]
    AP --> AS["All / 1 ~ 99"]

    AT["Active/ECO"] --> AU["On/Off"]

    AV["Yes/No"] --> AW["On/Off"]

    AX["STB/Eco/Power"] --> AY["365w/355w/345w/335w/325w/315w/305w/292w"] --> AZ
Image
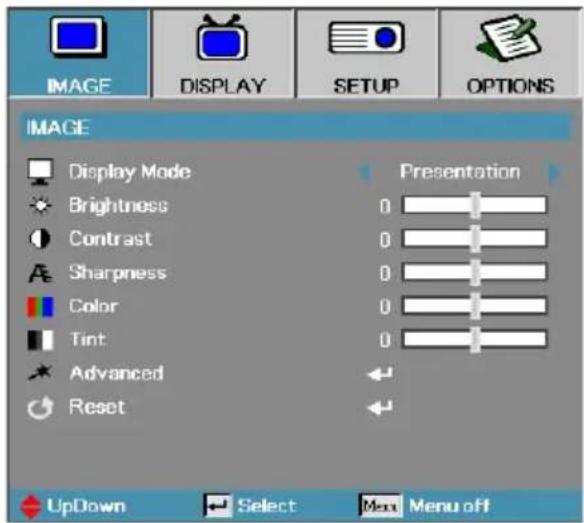
Display Mode
There are many factory presets optimized for various types of images.
Presentation: Good color and brightness from PC input.
Bright: Maximum brightness from PC input.
▶ Movie: For home theater.
sRGB: Standardised accurate color.
Blackboard: This mode should be selected to achieve optimum color settings when projecting onto a blackboard (green).
DICOM SIM: This display mode simulates the grayscale/gamma performance of equipment used for “Digital Imaging and Com munications in Medicine” (DICOM).
Important: This mode should NEVER be used for medical diagnosis, it is for education/training purposes only.
User: User's own settings.
3D: User adjustable setting for 3D viewing.
Brightness
Adjust the brightness of the image.
Press ◀ to darken image.
▶ Press ▶ to lighten the image.
Contrast
The contrast controls the degree of difference between the lightest and darkest parts of the picture.
Press ◀ to decrease the contrast.
▶ Press ▶ to increase the contrast.
Image
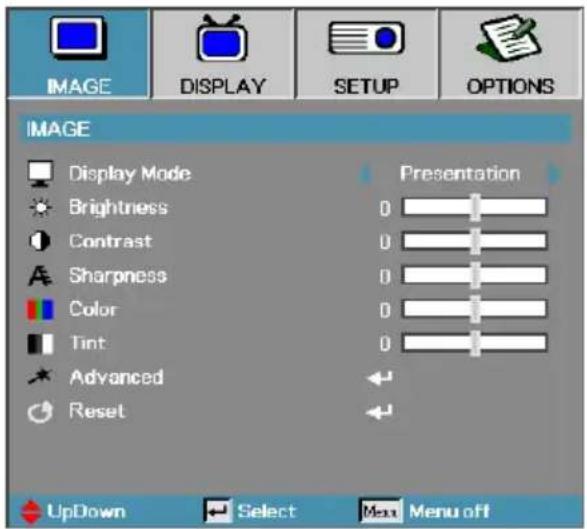
Sharpness
Adjusts the sharpness of the image.
Press ◀ to decrease the sharpness.
▶ Press ▶ to increase the sharpness.
Color
Adjusts a video image from black and white to full color saturation.
Press ◀ to decrease the amount of color in the image.
▶ Press ▶ to increase the amount of color in the image.
Tint
Adjusts the color balance of red and green.
Press ◀ to increase the amount of green in the image.
Press ▶ to increase the amount of red in the image.
Advanced
Enter the Advanced menu. Select advanced display options such as Noise Reduction, BrilliantColor™, Gamma, Color Temp., Color Space, RGB Gain/Bias, Color Matching, and Exit. See page 40 for more information.
Image | Advanced
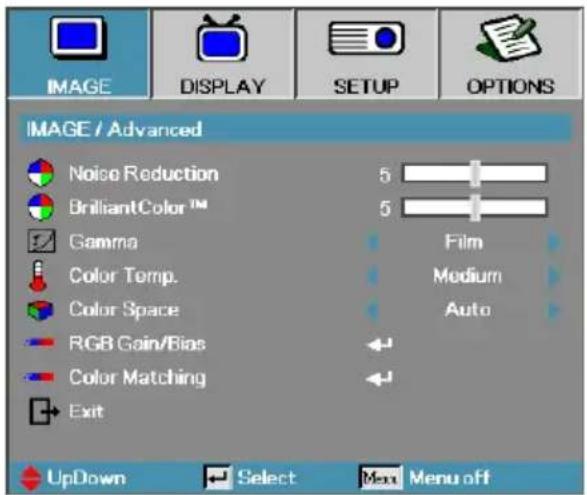
Noise Reduction
The motion Adaptive Noise Reduction reduces the amount of visible noise in interlaced signals. The range is from "0" to "10". (0=Off)
BrilliantColor™
This adjustable item utilizes a new color-processing algorithm and system level enhancements to enable higher brightness while providing true, more vibrant colors in picture. The range is from 0 to 10. If you prefer a stronger enhanced image, adjust toward the maximum setting. For a smoother, more natural image, adjust toward the minimum setting.
Gamma
Choose the Gamma type from Film, Graphics, 1.8, 2.0, 2.2, 2.6 or 3D.
Color Temp
Adjust the color temperature. Cold temperature, the screen looks colder; with Warm temperature, the screen looks warmer.
Color Space
Select an appropriate color matrix type from AUTO, RGB, YUV.
For HDMI only: Select color matrix from Auto, RGB (0-255), RGB (16-235), YUV.
RGB Gain/Bias
This setting is used to adjust the balance of red, green and blue in grays/white. Enter the RGB Gain/Bias menu. Select the Red/Green/Blue Gain for brightness adjustments and Bias for contrast adjustments for the whole picture. See page 41 for more details
Color Matching
Enter the Color Matching menu. See page 42 for more details.
Image | Advanced | RGB Gain/Bias
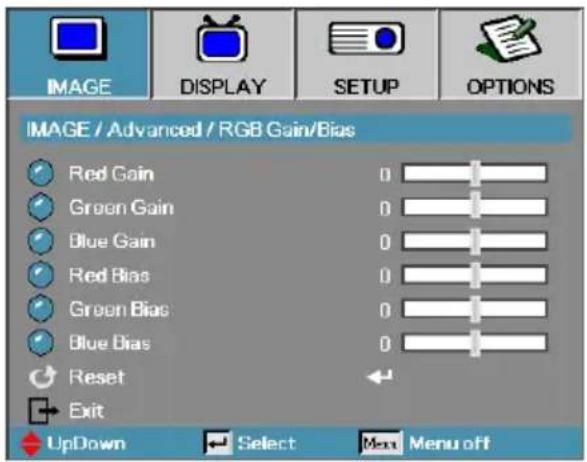
This setting is used to adjust the balance of red, green and blue in grays/white.
Gain
Set RGB Gain to adjust the Brightness of the follow in brighter shades:
Red – balance the gain value for red.
Green—balance the gain value for green.
Blue—balance the gain value for blue.
Bias
Set RGB Gain to adjust the Brightness of the follow in darker shades:
Red – balance the bias value for red.
Green—balance the bias value for green.
Blue—balance the bias value for blue.
Image | Advanced | Color Matching
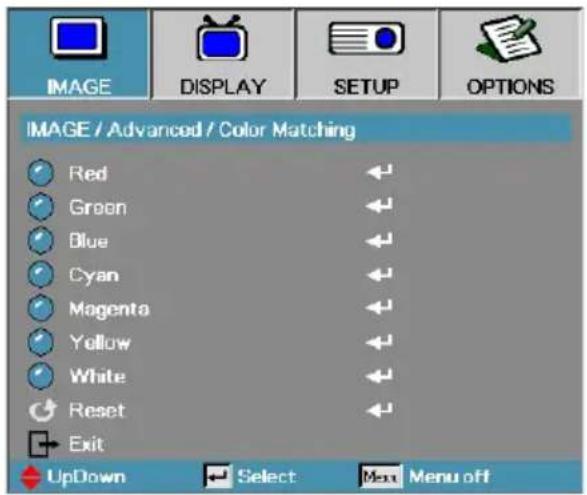
Colors (Except White)
Press ▲▼ to select a color and press Enter to adjust the hue, saturation, and gain settings.

Green, Blue, Cyan, Yellow, Magenta can be separate adjust by each color HSG.
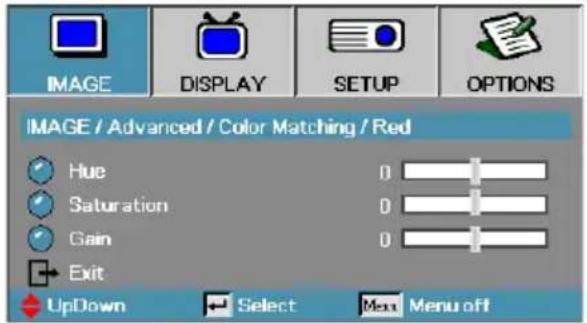
Press ▲▼ to select Hue, Saturation, or Gain and press ◀▶ to adjust the settings.
Image | Advanced | Color Matching
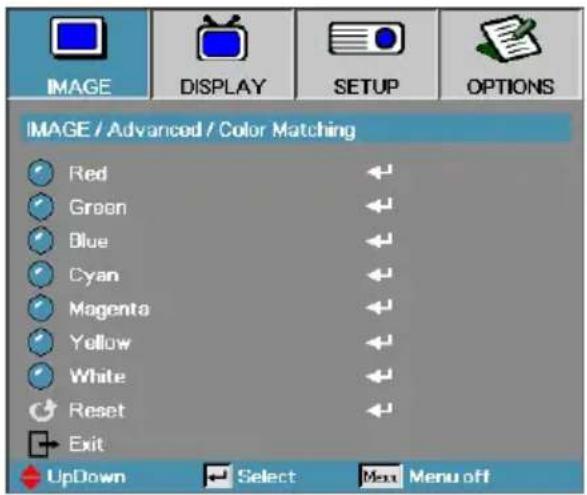
White
Press ▲▼ to select White and press Enter.

White can be adjust Red, Green, Blue color by each.
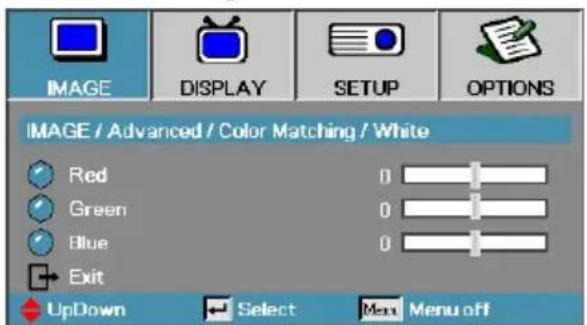
Press ▲▼ to select Red, Green, or Blue and press ◀▶ to adjust the settings.
Reset
Reset all Color Setting values to the factory default.
Display
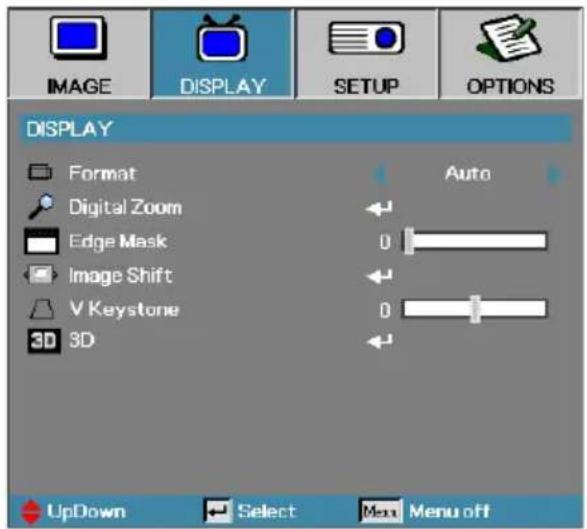
Format
Use this function to choose your desired aspect ratio.
4:3: This format is for 4x3 input sources not enhanced for Wide screen TV.
16:9 (XGA/1080P) | 16:10 (WUXGA): This format is for 16x9 input sources, like HDTV and DVD enhanced for Wide screen TV.
LBX: This format is for non-16x9, letterbox source and for users who use an external 16x9 lens to display 2.35:1 aspect ratio using full resolution.
Native: Depends on the resolution of the input source – No scaling is performed.
Auto: Automatically selects the appropriate format.
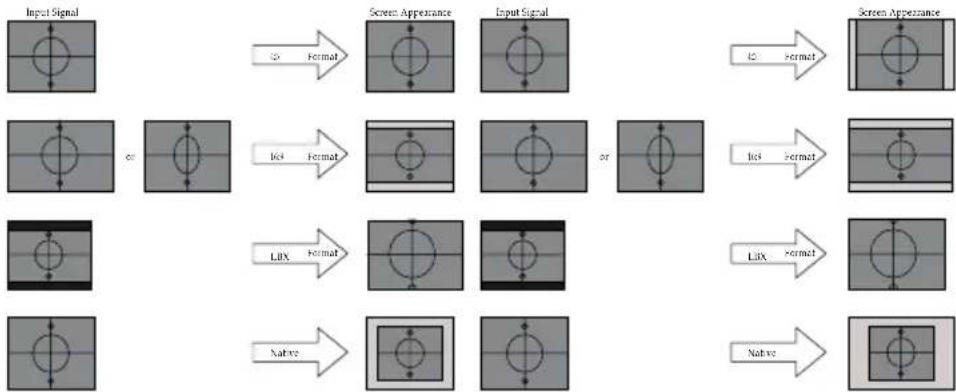
flowchart
graph LR
    A["Input Signal"] --> B["Screen Appearance"]
    B --> C["Input Signal"]
    C --> D["Screen Appearance"]
    D --> E["Output"]

    F["Input Signal"] --> G["or"]
    G --> H["Lix Format"]
    H --> I["or"]
    I --> J["Lix Format"]
    J --> K["Output"]

    L["Input Signal"] --> M["or"]
    M --> N["Lix Format"]
    N --> O["or"]
    O --> P["Lix Format"]
    P --> Q["Output"]

    R["Input Signal"] --> S["or"]
    S --> T["Lix Format"]
    T --> U["or"]
    U --> V["Lix Format"]
    V --> W["Output"]

    X["Input Signal"] --> Y["or"]
    Y --> Z["Lix Format"]
    Z --> AA["or"]
    AA --> AB["Lix Format"]
    AB --> AC["Output"]

    AD["Input Signal"] --> AE["or"]
    AE --> AF["Lix Format"]
    AF --> AG["or"]
    AG --> AH["Lix Format"]
    AH --> AI["Output"]

    AJ["Input Signal"] --> AK["or"]
    AK --> AL["Lix Format"]
    AL --> AM["or"]
    AM --> AN["Lix Format"]
    AN --> AO["Output"]

    AP["Input Signal"] --> AQ["or"]
    AQ --> AR["Lix Format"]
    AR --> AS["or"]
    AS --> AT["Lix Format"]
    AT --> AU["Output"]

    AV["Input Signal"] --> AW["or"]
    AW --> AX["Lix Format"]
    AX --> AY["or"]
    AY --> AZ["Lix Format"]
    AZ --> BA["Output"]

    BB["Input Signal"] --> BC["or"]
    BC --> BD["Lix Format"]
    BD --> BE["or"]
    BE --> BF["Lix Format"]
    BF --> BG["Output"]

    BH["Input Signal"] --> BI["or"]
    BI --> BJ["Lix Format"]
    BJ --> BK["or"]
    BK --> BL["Lix Format"]
    BL --> BM["Output"]

    BN["Input Signal"] --> BO["or"]
    BO --> BP["Lix Format"]
    BP --> BQ["or"]
    BQ --> BR["Lix Format"]
    BR --> BS["Output"]

    BT["Input Signal"] --> BU["or"]
    BU --> BV["Lix Format"]
    BV --> BW["or"]
    BW --> BX["Lix Format"]
    BX --> BY["Output"]

    BZ["Input Signal"] --> CA["or"]
    CA --> CB["Lix Format"]
    CB --> CC["or"]
    CC --> CD["Lix Format"]
    CD --> CE["Output"]

    CF["Input Signal"] --> CG["or"]
    CG --> CH["Lix Format"]
    CH --> CI["or"]
    CI --> CJ["Lix Format"]
    CJ --> CK["Output"]

    CE --> CR["Output"]


    style AF fill:#f9f,stroke:#333
XGA
WUXGA/1080P
Display
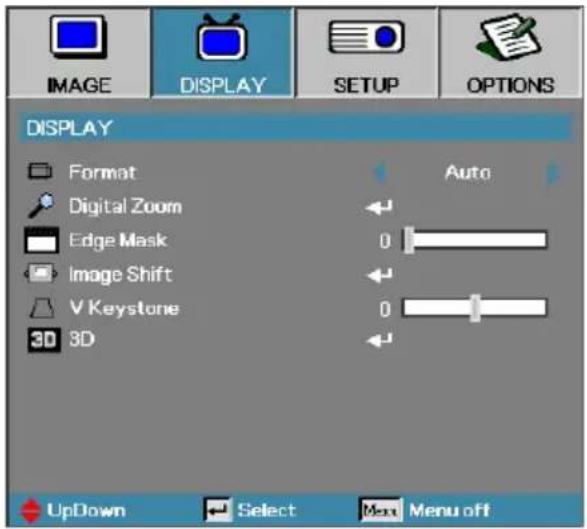
Digital Zoom
▶ Press ◀ to reduce the size of the image.
▶ Press ▶ to magnify an image on the projected screen.
Edge Mask
Edge Mask function removes the noise in a video image. Edge Mask the image to remove video encoding noise on the edge of video source.
Image Shift
Shifts the projected image position horizontally or vertically.
Press ◀▶ to move the image horizontally on the projected screen.
Press ▲▼ to move the image vertically on the projected screen.
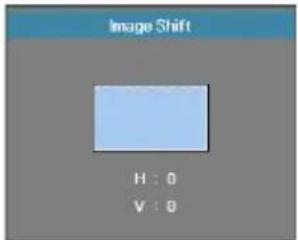
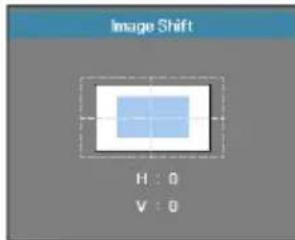
When Zoom ≤ 0 When Zoom > 0
V Keystone
Press ◀ or ▶ to compensate for vertical images distortion when the projector is positioned at an angle to the screen.
3D
Enter the 3D menu. Select 3D options such as 3D Mode, 3D->2D, 3D Format, and 3D Sync Invert. See page 46 for more information.
Display | 3D
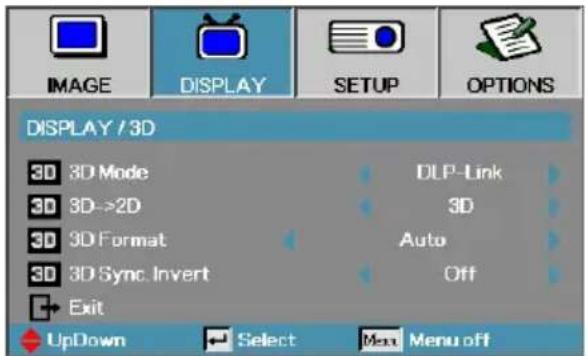
3D Mode
DLP Link: Select DLP Link to use optimized settings for DLP Link 3D Glasses.
▶ VESA 3D: Select VESA 3D to use optimized settings for IR-based 3D images.
Off: Select "Off" to turn off 3D mode.
3D→2D
Press ◀ or ▶ to select projector display 3D content in 2D (Left) or 2D(Right) without using 3D glasses to enjoy 3D content. This setting can also be used for dual projector passive 3D installations.
3D Format
Auto: When a 3D identification signal is detected, the 3D format is selected automatically. (For HDMI 1.4 3D sources only)
SBS: Display 3D signal in Side-by-Side format.
Top and Bottom: Display 3D signal in Top and Bottom format.
Frame Sequential: Display 3D signal in Frame Sequential format.
3D Sync. Invert
Press ◀ or ▶ to enable or disable the 3D Sync invert function to invert images.
Setup
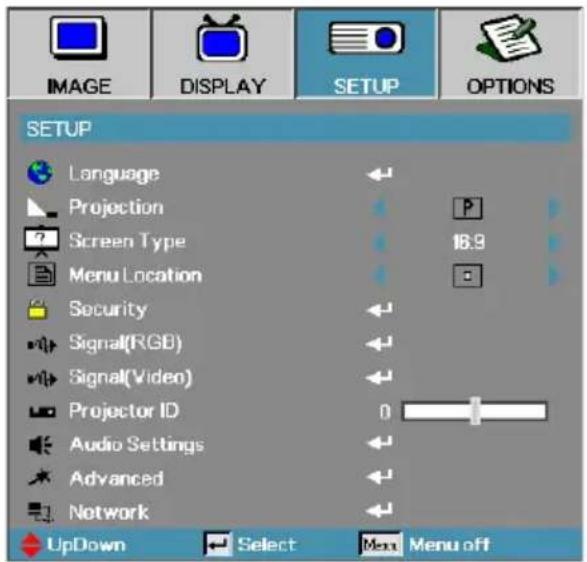
Language
Enter the Language menu. Select the multilingual OSD menu. See page 49 for more information.
Projection
Select projection method:
Front Desktop
The factory default setting.
Near Desktop
When you select this function, the projector reverses the image so you can project from behind a translucent screen.
Front Ceiling
When you select this function, the projector turns the image upside down for ceiling-mounted projection.
▶ Rear Ceiling
When you select this function, the projector reverses and turns the image upside down at same time. You can project from behind a translucent screen with ceiling mounted projection.
Screen Type (WUXGA only)
Press ◀▶ to set the aspect ratio to 16:9 or 16:10. This function only supports WUXGA.
Menu Location
Choose the menu location on the display screen.
Setup
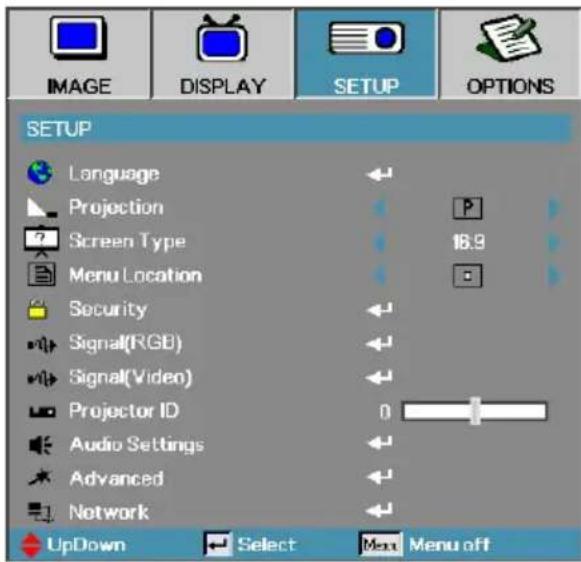
Security
Enter the Security menu. Access the projector's security features. See page 50 for more information.
Signal (RGB)
Enter the Signal (RGB) menu. Set projector signal properties. The function is available when input source is support VGA 1/VGA 2/BNC. See page 53 for more information.
Signal(Video)
Enter the Signal (Video) menu. Set projector signal properties. The function is available when input source is support Video signal. See page 54 for more information.
Projector ID
Select a two digit projector ID from All through 99.
Audio Settings
Enter the Audio menu. Set audio level properties. See page 55 for more information.
Advanced
Enter the Advanced menu. Select the screen display during startup. See page 56 for more information.
Network
Allows access to controls for web, PJ-Link, and IP commands. See page 57 for more information.
Setup | Language
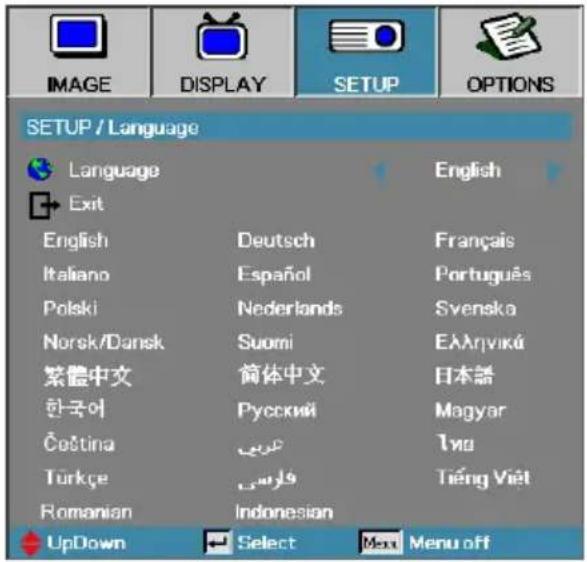
Language
Choose the multilingual OSD menu. Press ENTER (◀) into the sub menu and then use the Left (◀) or Right (▶) key to select your preferred language.
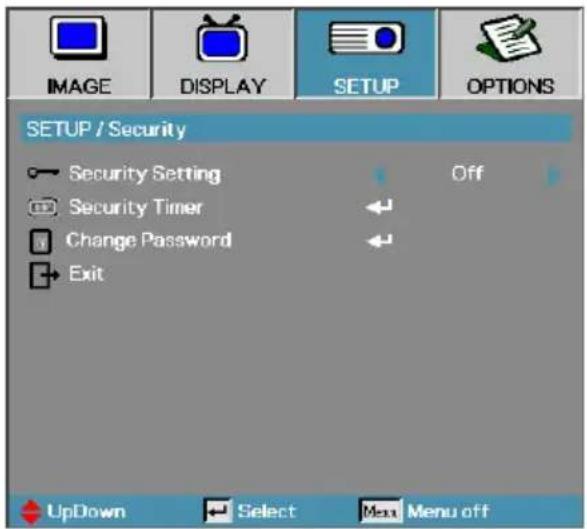
Setup | Security
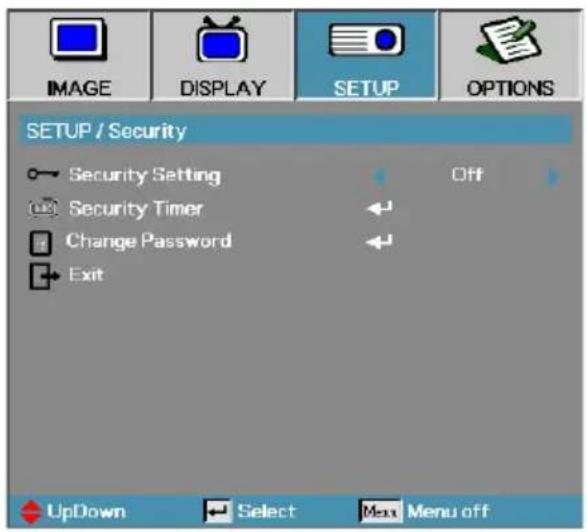

The default password: 1, 2, 3, 4, 5.
Security Setting
Enable or disable the security password.
Enabled – the current password is required to power on the projector and access the Security menu.
- Disabled – no password is required for any function.
When security is enabled, the following screen displays at startup and before access to the Security menu is allowed:
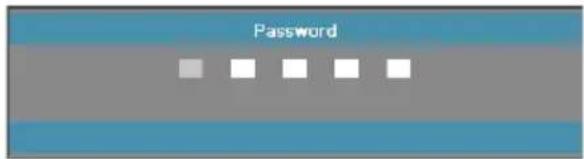
Setup | Security
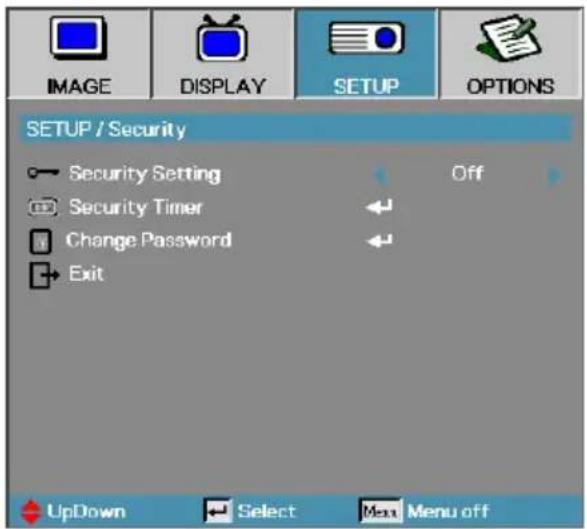
Security Timer
Enter the Security Timer sub menu.
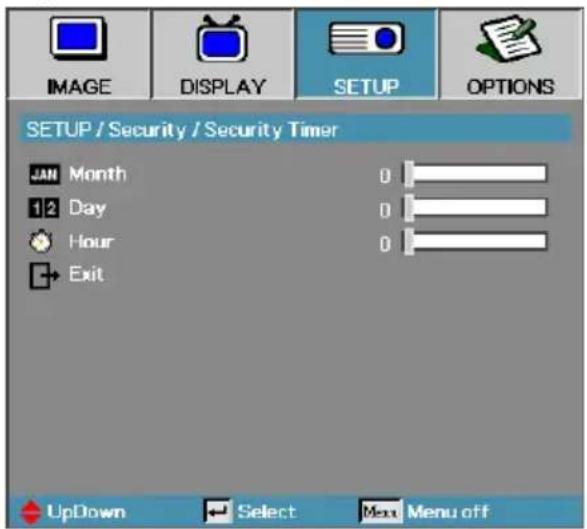

No password is required to access Setup | Security unless the Security Timer or Security Setting are enabled.
Enter the Months, Days, and hours that the projector can be used without entering the password. Exiting to the Setup menu activates the Security Timer.
Once activated, the projector requires a password on the specified dates and times to allow power on and access to the security menu. If the projector is in use and the Security Timer is active, the following screen displays 60 seconds before the password is required.
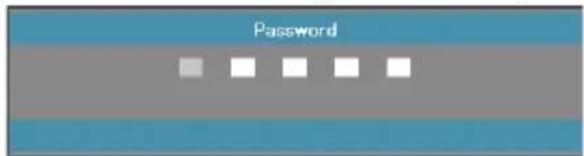
Setup | Security

If the incorrect password is entered three times, the device auto shutdowns after 10 seconds.

If the new passwords do not match, the password screen redisplays.
Change Password
Use this submenu to change the security password for the projector.
-
Select Change Password from the Security submenu. The Confirm Change Password dialog box displays.
-
Select Yes.
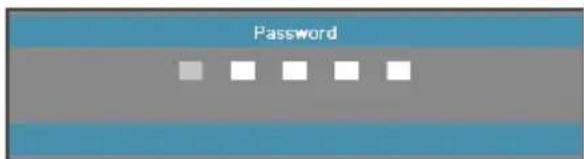
- Enter the default password <1> <2> <3> <4> <5>. A second password screen displays.
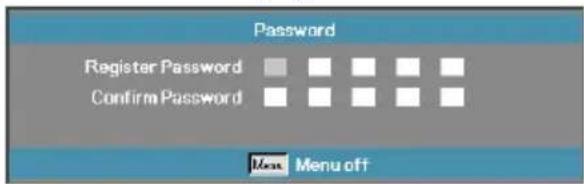
- Enter the new password twice for verification.
Setup | Signal (RGB)
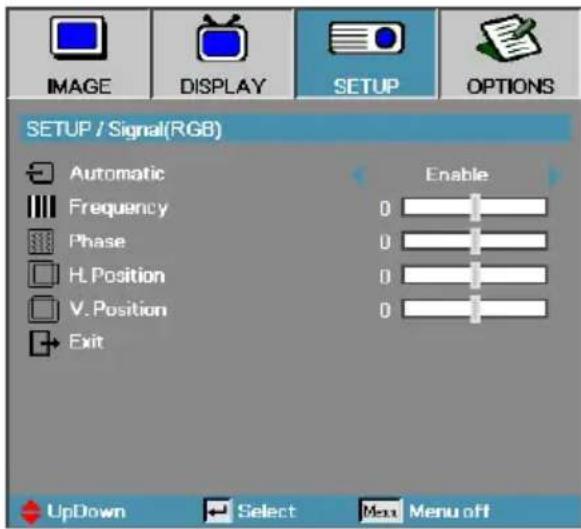
Automatic
Set Automatic to On or Off to lock or unlock the Phase and Frequency features.
Off—disable auto lock.
On—enable auto lock.
Frequency
Change the display data frequency to match the frequency of your computer's graphics card. If you experience a vertical flickering bar, use this function to make an adjustment.
Phase
Phase synchronizes the signal timing of the display with the graphics card. If you experience an unstable or flickering image, use this function to correct it.
H. Position
Press ◀ to move the image left.
▶ Press ▶ to move the image right.
V. Position
▶ Press ◀ to move the image down.
▶ Press ▶ to move the image up.
Setup | Signal (Video)
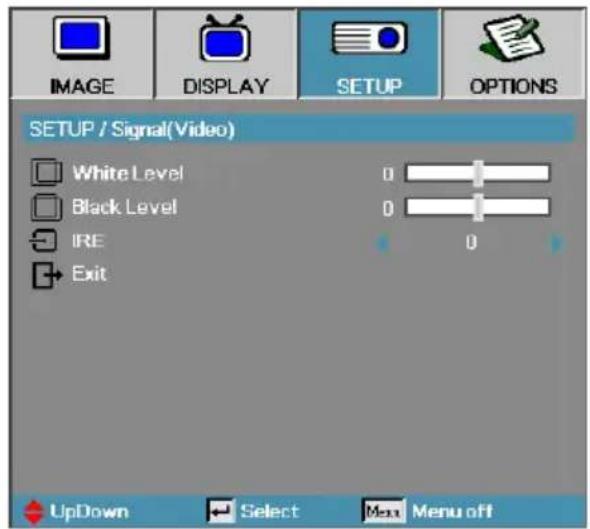
White Level
Allow user to adjust Black Level when input source is Video or S-Video signals. Press ◀▶ to adjust the White Level.
Black Level
Allow user to adjust Black Level when input source is Video or S-Video signals. Press ◀▶ to adjust the Black Level.
IRE
Press ◀▶ to adjust measurement of video signals.
Setup | Audio Settings
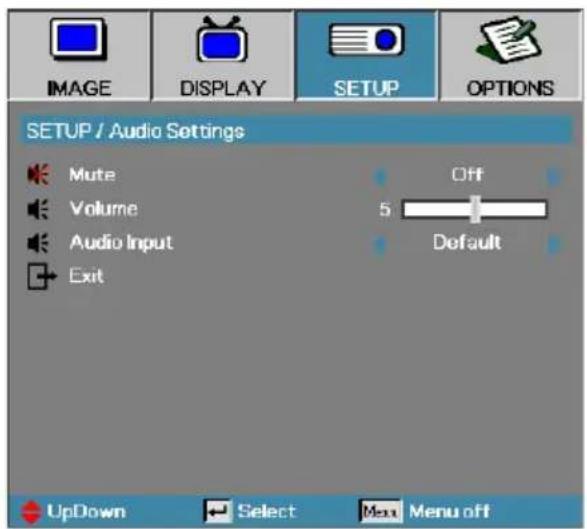
Mute
Toggle the audio on or off.
Off—Audio out is turned on.
On – Audio out is turned off.
Volume
Press ◀▶ to decrease(increase) for Audio-out.
Audio Input
Press ◀▶ to select audio source input.
Setup | Advanced
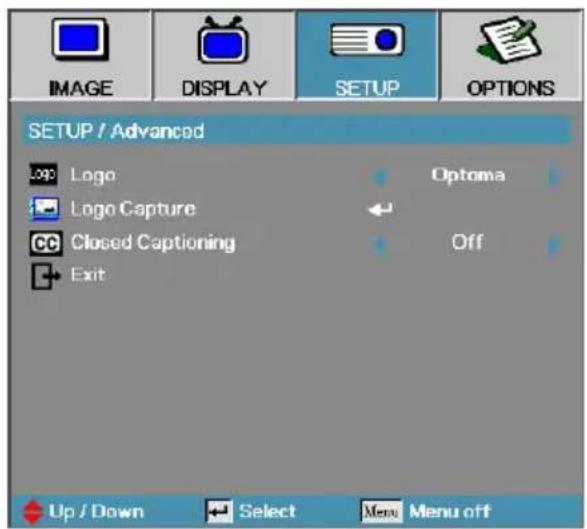
Logo
Select the screen to display during startup.
Optoma – the supplied default startup screen.
Neutral – is Background Color.
User—customized screen capture using the Logo Capture function.
Logo Capture
Capture a displayed screen to use as the startup screen.
- Display the desired screen on the projector.
- Select Logo Capture from the Advanced menu.
A confirmation screen displays.

Only one startup screen can be saved at once. Subsequent captures overwrite previous files limited in 1920 x 1200 (Refer Appendices Timing Table)
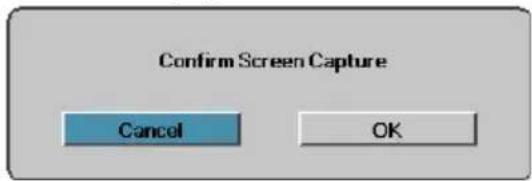
- Select OK. Screen capture in progress will display. When finished, Screen capture Succeeded will display. The captured screen is saved as User in the logo menu.
Closed Captioning
Select the screen to display closed captioning
Off-the supplied default setting.
- CC1/CC2-closed captioning type select.
Setup | Network
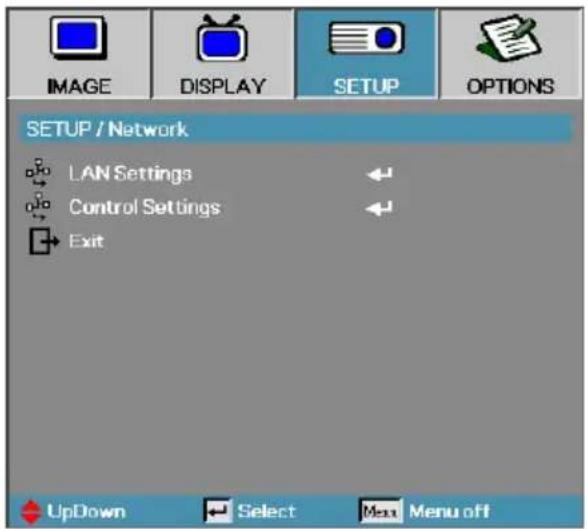
LAN Settings
Enter the LAN Settings menu. See page 58 for more information.
Control Settings
Enter the Control Settings menu. See page 59 for more information.
Setup | LAN Settings
![IMAGE DISPLAY SETUP OPTIONS SETUP / Network / LAN Settings Network State Connect DHCP On IP Address 255.255.255.255 Subnet Mask 255.255.255.255 Gateway 255.255.255.255 DNS 255.255.255.255 Apply ← MAC Address [C8:0A:A9:93:F8:44] Exit UpDown Select Menu off](/content/2026/05/759312/images/7b2b508fb87d28cde1444f31b52e7d68591b86f406debfdf2cc96aaddeda4d78.jpg)

Network sub-menu can only be accessed if a network cable is connected.
If the connection is successful, the OSD display will show the following dialogue box.
Network State – to display network information.
DHCP:
On: Assign an IP address to the projector from the DHCP server automatically.
Off: Assign an IP address manually.
IP Address—Select an IP address
Subnet Mask—Select subnet mask number.
Gateway—Select the default gateway of the network connected to the projector.
DNS—Select DNS number.
Apply—Press Enter to apply the selection.
▶ MAC Address – Read only.
Setup | Control Settings
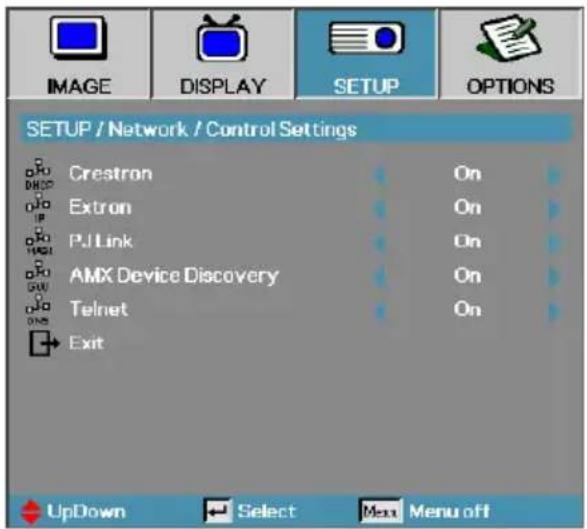
Crestron
Press ◀▶ to check to enable/disable Crestron.
Extron
Press ◀▶ to check to enable/disable Extron.
PJ Link
Press ◀▶ to check to enable/disable PJ Link.
AMX Device Discovery
Press ◀▶ to check to enable/disable AMX Device Discovery.
Telent
Press ◀▶ to check to enable/disable Telnet.
Options
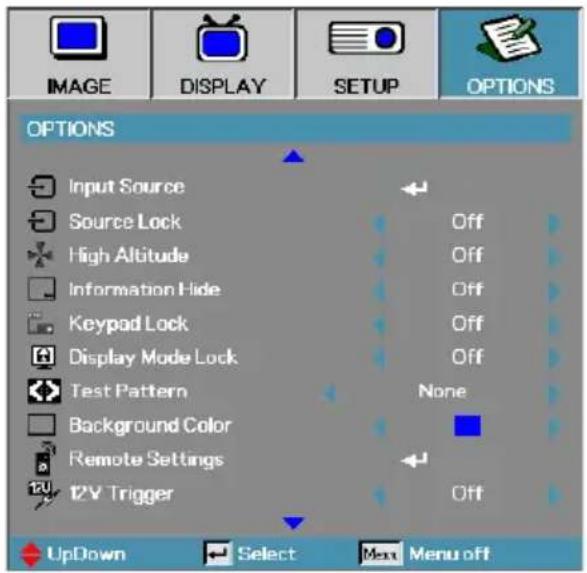
Input Source
Enter the Input Source submenu. Select the sources to scan for at startup. See page 63 for more information.
Source Lock
Lock the current source as the only available source, even if the cable is unplugged.
On-only the current source is recognized as an input source.
Off—all sources selected in Options | Input Source are recognized as an input source.
High Altitude
Adjust the fan speed to reflect the environment.
On – increases fan speed for high temperature, humidity, or altitude.
▶ Off—regular fan speed for normal conditions.
Information Hide
Suppress informational messages on the projected screen.
On—no status messages appear on screen during operation.
Off – status messages appear as normal on screen during operation.
Options
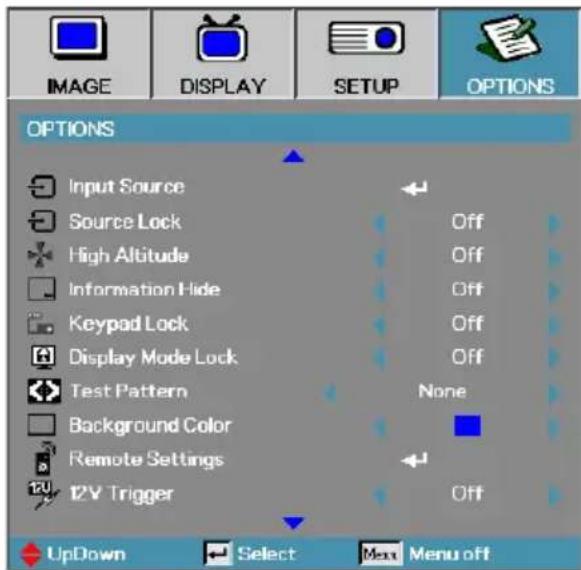
Keypad Lock
Lock the buttons on the projector top panel.
On—a warning message displays to confirm keypad lock.

Off – projector keypad functions as normal.
Display Mode Lock
Press ◀▶ to select display mode function whether lock or not. When Display Mode Lock set to On, the Display Mode function can't be adjusted by user.
Test Pattern
Display a test pattern. There are Grid (White, Green, Magenta), White and None.
Background Color
Select the desired background color for the projected image when no source is detected.
Remote Settings
Enter the Remote settings. See page 64 for more information.
12V Trigger
Press ◀▶ to select 12V Trigger whether output or not.
Options
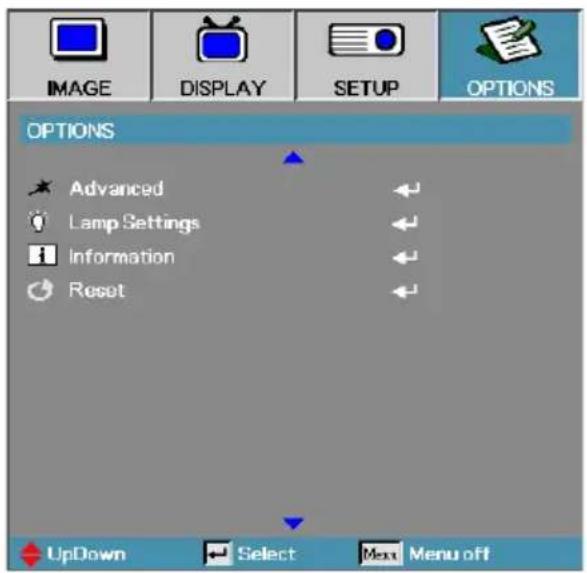
Advanced
Enter the Advanced menu. See pages 65 for more details.
Lamp Setting
Enter the Lamp Setting menu. See pages 67-68 for more details.
Information
Show the projector information.
Reset
Reset all Options to default factory settings.


When Power mode (Standby) is set to Eco, the VGA & Audio pass-through, RS232 and RJ45 will be deactivated when the projector is in standby.
Options | Input Source
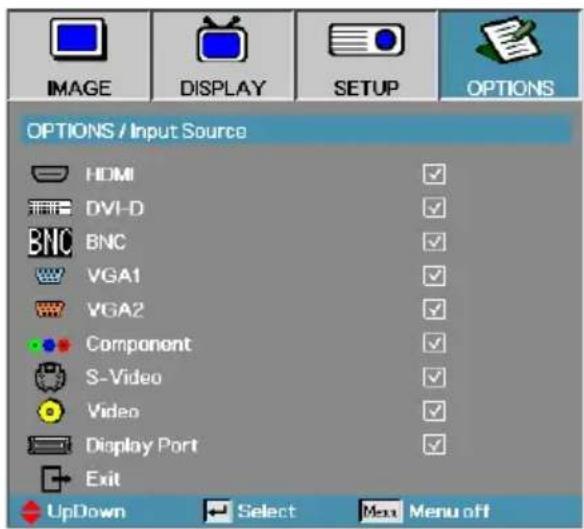

If all sources are deselected, the projector cannot display any images. Always leave at least one source selected.
Input Source
Use this option to enable / disable input sources. Press ▲ or ▼ to select a source, then press ◀ or ▶ to enable / disable it. Press ← (Enter) to finalize the selection. The projector will not search inputs that are de-selected.
Options | Remote Settings
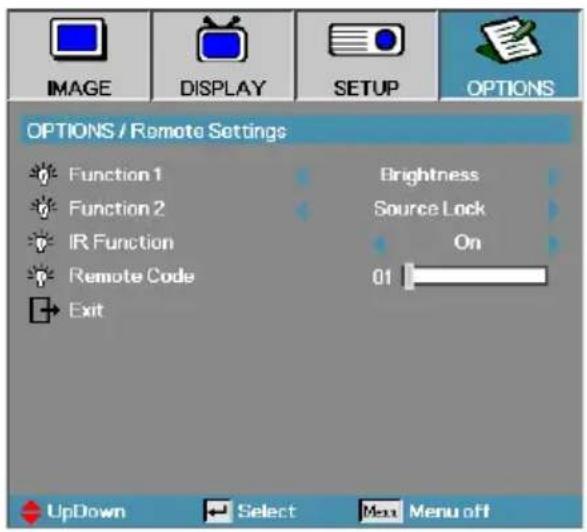
Function 1
Set F1 key as a hotkey for Brightness, Contrast, Color, Color Temp. or Gamma function.
Function 2
Set F2 key as a hotkey for Source Lock, Projection, Lamp Settings, Mute, Digital Zoom or Volume function.
IR Function
Enable or Disable projector's IR function.
Remote Code
Press ◀▶ to set Remote custom code and press ← (Enter) to change to the setting.
Options | Advanced
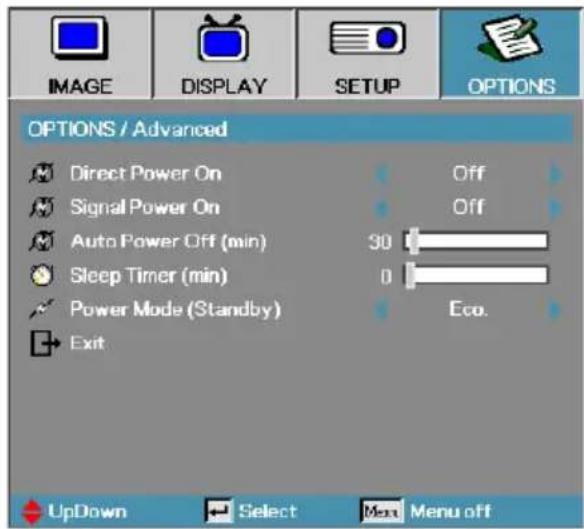
Direct Power On
Enable or disable Direct Power On.
On—the projector powers on automatically when AC power is supplied.
▶ Off – the projector must be powered on as normal.
Signal Power On
Enable or disable Signal Power On.
On—the projector powers on automatically when an active signal is detected.
▶ Off — disable the power on trigger by active signal is detected.

- Optional feature depends on model and region.
- Only available on Standby Mode is Active.
- If projector is turned off with keeping input the signal source (the last image source showing on screen), it will not re-start unless:
a. Terminate the last image source and input any signal source again.
b. Unplug and re-plug the projector power again.
- Signal power on will ignore "source lock" setting.
Auto Power Off (min)
Set the Auto Power Off interval. The projector powers off the lamp after 30 minutes of no signal by default. The following warning is displayed 60 seconds before power off.
The projector will automatically shutdown after 60 sec.
Options | Advanced
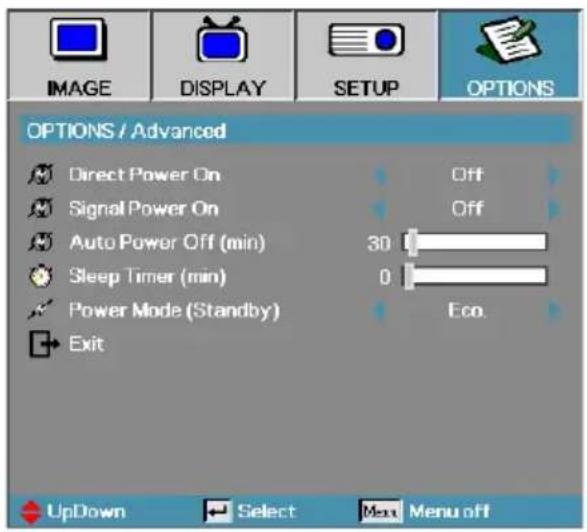
Sleep Timer (min)
Set the Sleep Timer interval. The projector powers off after the specified time period of inactivity (regardless of signal). The following warning is displayed 60 seconds before power off.
The projector will automatically shutdown after 60 sec.
Power Mode (Standby)
Eco.: Choose "Eco." to save power dissipation further < 0.5W.
Active: Choose "Active" to return to normal standby and the VGA out port will be enabled.
Options | Lamp Setting
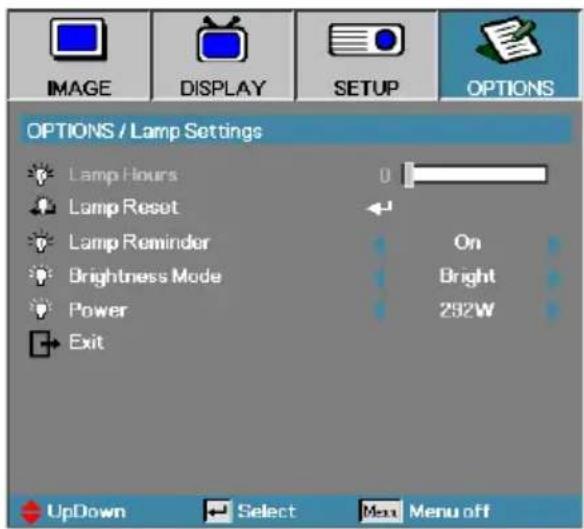
Lamp Hour
Displays the number of hours the lamp has been active. This item is for display only.
Lamp Reset
After replacing the lamp, reset the lamp counter to accurately reflect the new lamp's life span.
- Select Lamp Reset. A confirmation screen displays.
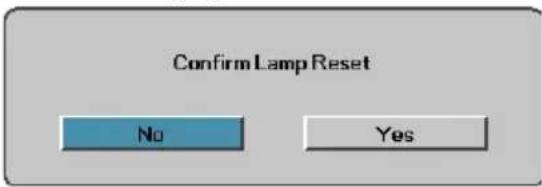
- Select Yes to reset the lamp counter to zero.
Lamp Reminder
Enable or disable the lamp life span reminder.
On—a warning message displays when remaining lamp life is less than 30 hours.

▶ Off – no warning message displays.
Options | Lamp Setting
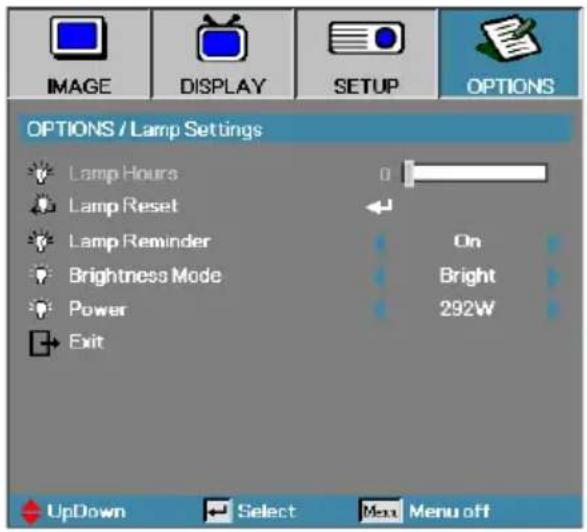
Brightness Mode
Select the lamp brightness mode.
Bright—the default setting.
Eco—lower brightness setting to conserve lamp life.
Power—Select to display the Power mode function.
Power
Press ◀▶ to select the lamp mode for 365W brightness or 292W brightness to save lamp life. The function is only available when Brightness Mode is Power.

✿ Projector connects to LAN, please use Ethernet Normal Cable.
- Peer-to-peer (PC connects to Projector directly), please use Ethernet Crossover Cable.
LAN\_RJ45
For simplicity and ease of operation, the Optoma projector provides diverse networking and remote management features.
The LAN/RJ45 function of the projector through a network, such as remotely manage: Power On/Off, Brightness and Contrast settings. Also, projector status information, such as: Video-Source, Sound-Mute, etc.
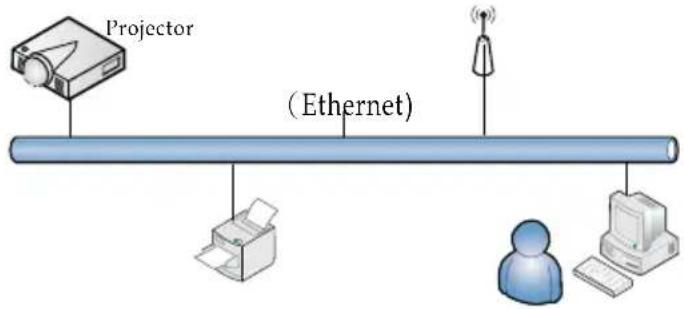
The projector can be controlled by a PC (Laptop) or other external device via LAN/RJ45 port and compatible with Crestron / Extron / AMX (Device Discovery) / PJLink.
Crestron is a registered trademark of Crestron Electronics, Inc. of the United States.
Extron is a registered trademark of Extron Electronics, Inc. of the United States.
AMX is a registered trademark of AMX LLC of the United States.
PJLink applied for trademark and logo registration in Japan, the United States of America, and other countries by JBMIA.
Supported External Devices
This projector is supported by the specified commands of the Crestron Electronics controller and related software (ex, RoomView®).
http://www.crestron.com/
This projector is compliant to support Extron device(s) for reference.
http://www.extron.com/
This projector is supported by AMX (Device Discovery).
http://www.amx.com/
This projector supports all commands of PJLink Class1 (Version 1.00).
http://pjlink.jbmia.or.jp/english/
For more detail of information about the diverse types of external devices which can be connected to the LAN/RJ45 port and remote/control the projector, as well as the related control commands supporting for each external device, kindly please get contact with the Support-Service directly.
LAN RJ45
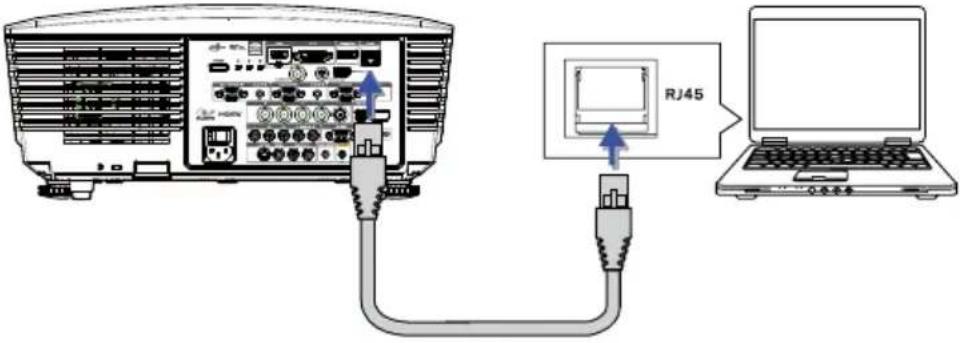
- Connect an RJ45 cable to RJ45 ports on the projector and the PC (Laptop).
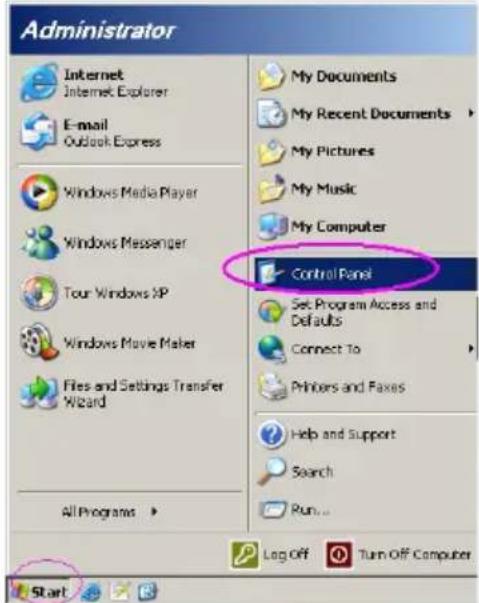
- On the PC (Laptop), select Start -> Control Panel-> Network Connections.
- Right Click on your Local Area Connection, and select Property.
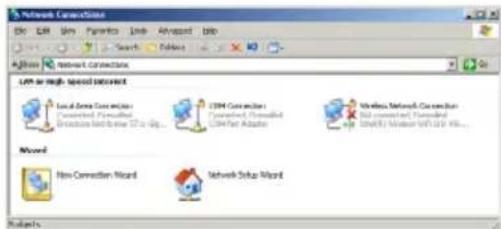
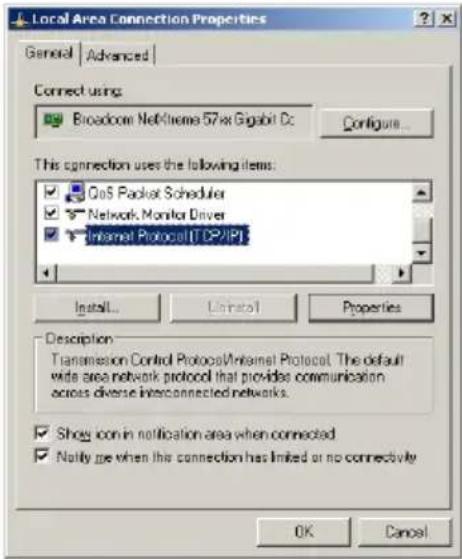
- In the Properties window, select the General tab, and select Internet Protocol (TCP/IP).
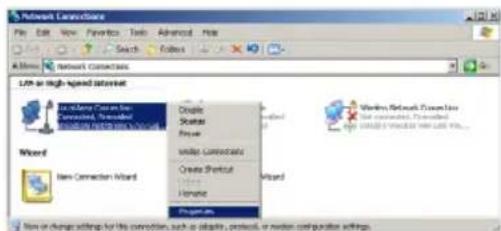
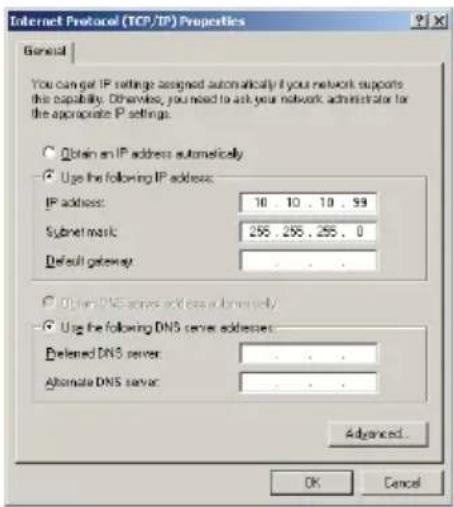
- Click Properties.
- Fill in the IP address and Subnet mask, then press OK.
User Controls
- Press the Menu button on the projector.
- Select OSD->SETUP->Network Settings->Lan Settings.
- After getting into Network Status, input the following:
DHCP: Off
IP Address: 10.10.10.10
Subnet Mask: 255.255.255.0
Gateway: 0.0.0.0
DNS: 0.0.0.0
-
Press ◀Enter) / ▶ to confirm settings.
-
Open a web browser (ex, Microsoft Internet Explorer with Adobe Flash Player 9.0 or higher).
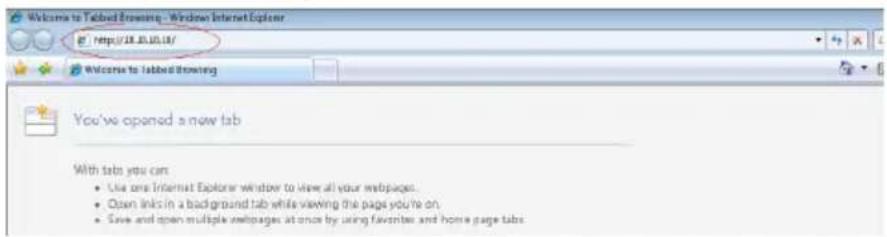
- In the Address bar, input the IP address: 10.10.10.10.
- Press ◀Enter) / ▶.
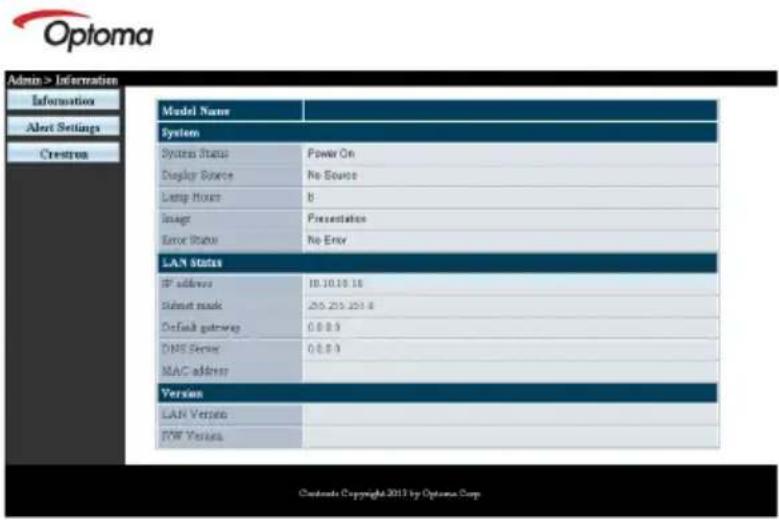
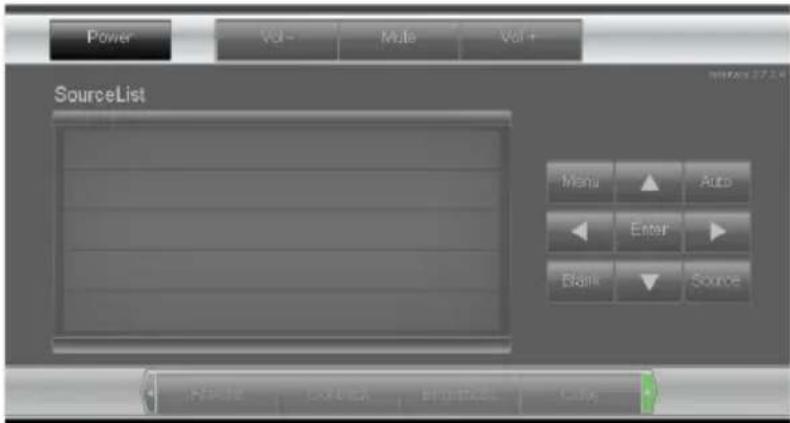
The projector is setup for remote management. The LAN/RJ45 function displays as follows.

For more information, please visit http://www.crestron.com

Expansion Options
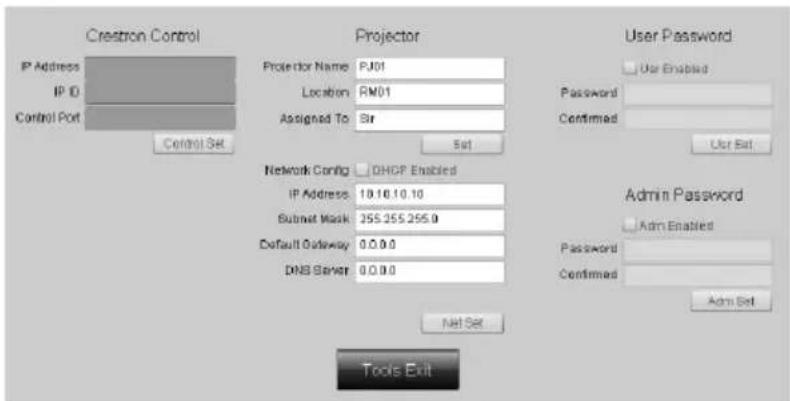
| Category Item Input-Length | ||
| Crestron Control | IP Address 15 | |
| IP ID 3 | ||
| Port 5 | ||
| Projector | Projector Name 10 | |
| Location 10 | ||
| Assigned To 10 | ||
| Network Configuration | DHCP (Enabled) (N/A) | |
| IP Address 15 | ||
| Subnet Mask 15 | ||
| Default Gateway 15 | ||
| DNS Server 15 | ||
| User Password | Enabled (N/A) | |
| New Password 10 | ||
| Confirm 10 | ||
| Admin Password | Enabled (N/A) | |
| New Password 10 | ||
| Confirm 10 | ||
For more information, please visit http://www.crestron.com.
Preparing Email Alerts
-
Make sure that user can access the homepage of LAN RJ45 function by web browser (for ex-ample, Microsoft Internet Explorer v6.01/v8.0).
-
From the Homepage of LAN/RJ45, click Alert Settings.
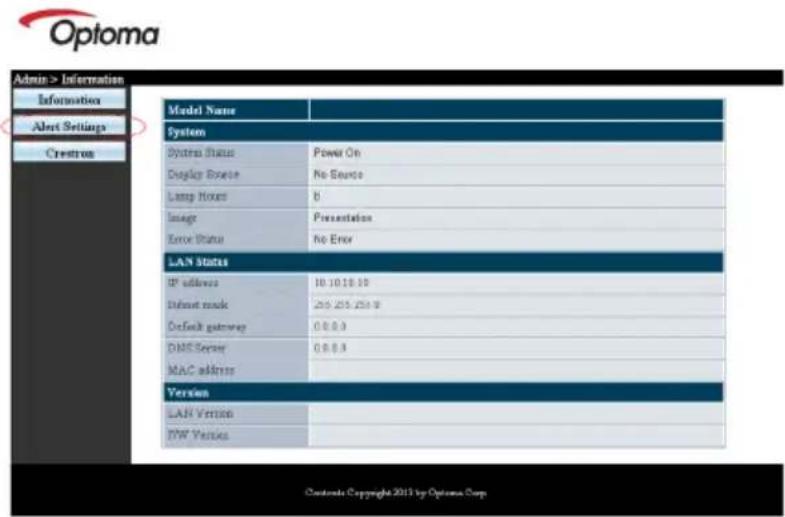
- By default, these input boxes in Alert Settings are blank.
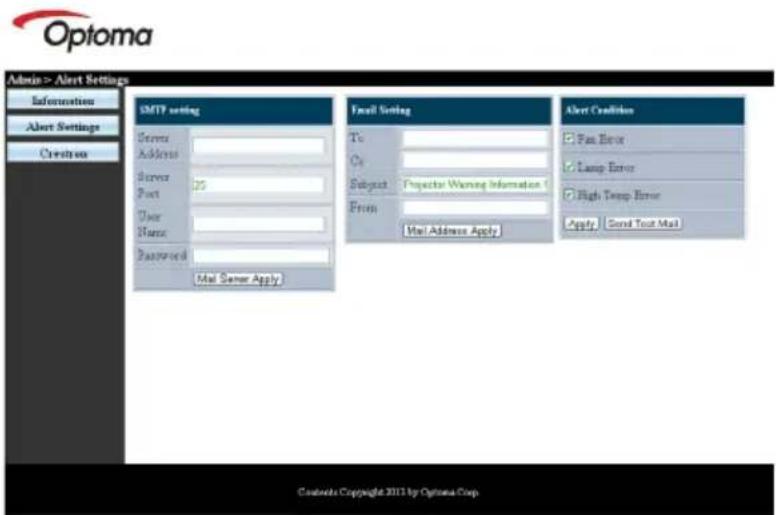
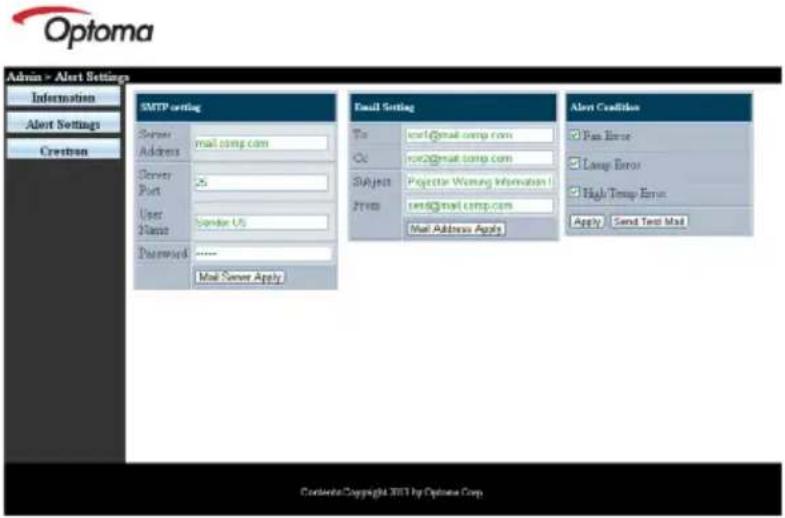
- For Sending alert mail, input the following:
The SMTP field is the mail server for sending out email (SMTP protocol). This is a required field.
The To field is the recipient's email address (for example, the projector administrator). This is a required field.
The Cc field sends a carbon copy of the alert to the specified email address. This is an optional field (for example, the projector administrator's assistant).

Fill in all fields as specified. User can click Send Test Mail to test what setting is correct. For successful sending an email alert, you must select alert conditions and enter a correct email address.
The From field is the sender's email address (for example, the projector administrator). This is a required field.
Select the alert conditions by checking the desired boxes.
RS232 by Telnet Function
Besides projector connected to RS232 interface with "Hyper-Terminal" communication by dedicated RS232 command control, there is alternative RS232 command control way, so called "RS232 by TELNET" for LAN/RJ45 interface.
Quick Start-Guide for "RS232 by TELNET"
Check and get the IP-Address on OSD of the projector.
Make sure that laptop/PC can access the web-page of the projector. Make sure that "Windows Firewall" setting to be disabled in case of "TELNET" function filtering out by laptop/PC.
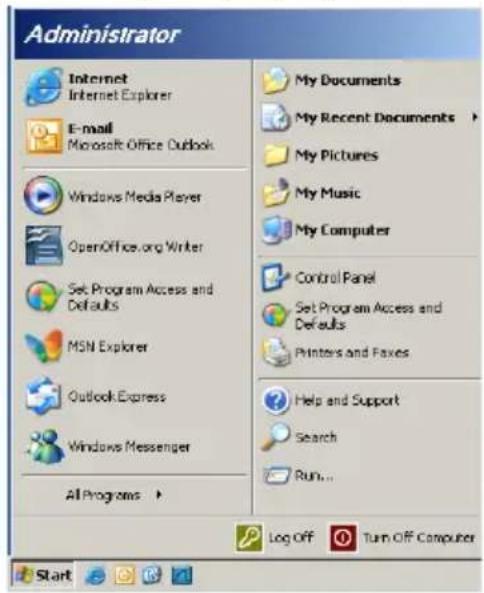
- Start => All Programs => Accessories => Command Prompt.
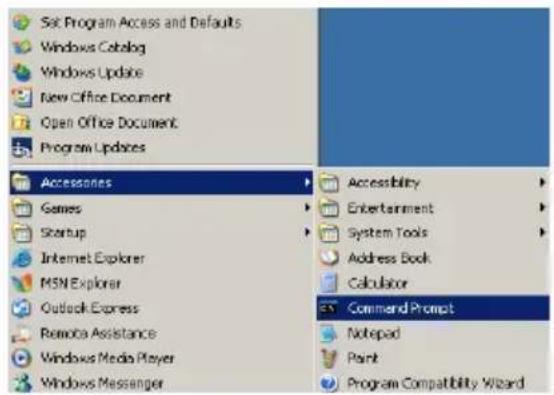
- Input the command format like the below:
telnet ttt.xxx.yyy.zzz 23 ("Enter" key pressed)
(ttt.xxx.yyy.zzz: IP-Address of the projector)
- If Telnet-Connection ready, and user can have RS232 command input, then "Enter" key pressed, the RS232 command will be workable.
How to have TELNET enabled in Windows VISTA / 7
By default installation for Windows VISTA, "TELNET" function is not included. But end-user can have it by way of "Turn Windows features On or Off" to be enabled.
- Open "Control Panel" in Windows VISTA.
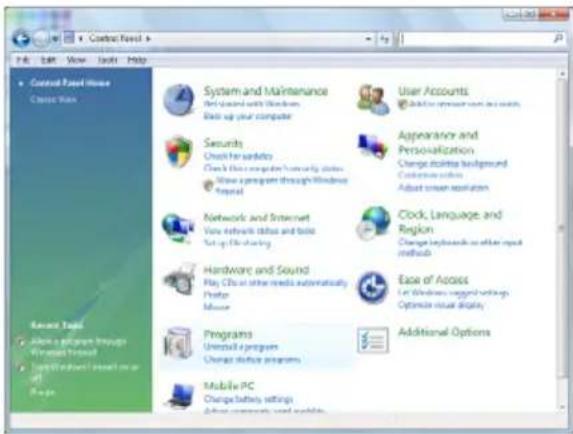
- Open "Programs".
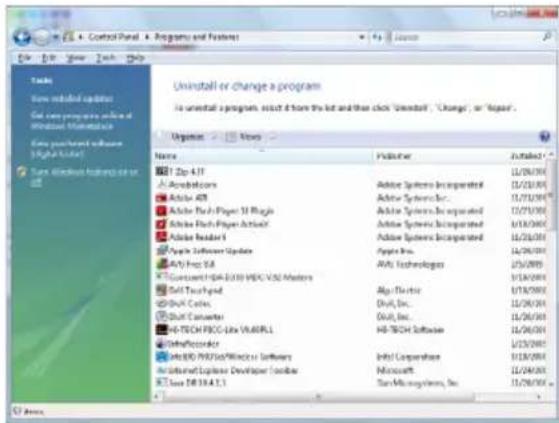
3 Select "Turn Windows features on or off" to open.
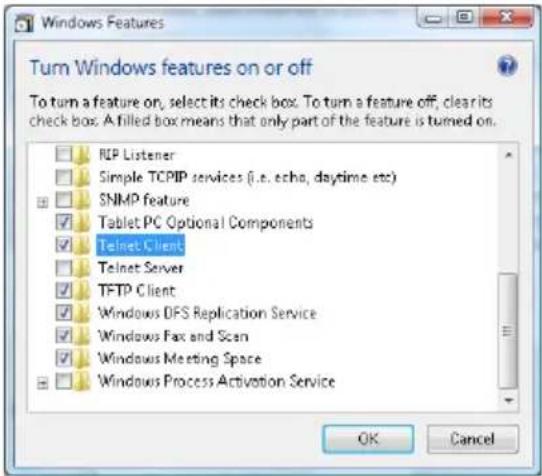
- Have "Telnet Client" option checked, then press "OK" button.
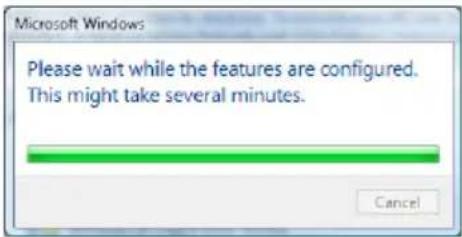
Specsheet for "RS232 by TELNET":
- Telnet: TCP.
- Telnet port: 23 (for more detail, kindly please get contact with the service agent or team).
- Telnet utility: Windows "TELNET.exe" (console mode).
- Disconnection for RS232-by-Telnet control normally: Close Windows Telnet utility directly after TELNET connection ready.
Limitation 1 for Telnet-Control: there is less than 50 bytes for successive network payload for Telnet-Control application.
Limitation 2 for Telnet-Control: there is less than 26 bytes for one complete RS232 command for Telnet-Control.
Limitation 3 for Telnet-Control: Minimum delay for next RS232 command must be more than 200 (ms).
(*, In Windows XP built-in "TELNET.exe" utility, "Enter" key pressed will have "Carriage-Return" and "New-Line" code.)
Troubleshooting
If you experience a problem with your projector, please refer to the following information. If a problem persists, please contact your local reseller or service center.
Image Problems
No image appears on-screen
▶ Ensure all the cables and power connections are correctly and securely connected as described in the Installation section.
▶ Ensure all the pins of connectors are not bent or broken.
▶ Check if the projection lamp has been securely installed. Please refer to the Replacing the Lamp section.
Make sure you have removed the lens cap and the projector is switched on.
Partial, scrolling or incorrectly displayed image
▶ Press Re-Sync on the remote.
▶ If you are using a PC:
For Windows 95, 98, 2000, XP:
- Open the My Computer icon, the Control Panel folder, and then double click on the Display icon.
- Select the Settings tab.
- Verify that your display resolution setting is lower than or equal to UXGA (1600 x 1200).
- Click on the Advanced Properties button.
If the projector is still not projecting the whole image, you will also need to change the monitor display you are using. Refer to the following steps. - Verify the resolution setting is lower than or equal to UXGA (1600 x 1200).
- Select the Change button under the Monitor tab.
- Click on Show all devices. Next, select Standard monitor types under the SP box; choose the resolution mode you need under the "Models" box.
- Verify that the resolution setting of the monitor display is lower than or equal to UXGA (1600 x 1200). (*)
▶ If you are using a Notebook:
- First, follow the steps above to adjust resolution of the computer.
- Press the toggle output settings. Example: [Fn]+[F4]
| Acer ⇒ [Fn]+[F5] | IBM/Lenovo ⇒ [Fn]+[F7] |
| Asus ⇒ [Fn]+[F8] | HP/Compaq ⇒ [Fn]+[F4] |
| Dell ⇒ [Fn]+[F8] | NEC ⇒ [Fn]+[F3] |
| Gateway ⇒ [Fn]+[F4] | Toshiba ⇒ [Fn]+[F5] |
Mac Apple:
System Preference Display Arrangement Mirror display
If you experience difficulty changing resolutions or your monitor freezes, restart all equipment including the projector.
The screen of the Notebook or PowerBook computer is not displaying your presentation
▶ If you are using a Notebook:
Some Notebooks may deactivate their own screens when a second display device is in use. Each has a different way to be reactivated. Refer to your computer's manual for detailed information.
Image is unstable or flickering
▶ Use Phase to correct it. See page 53 for more information.
Change the monitor color setting on your computer.
Image has vertical flickering bar
Use Frequency to make an adjustment. See page 53 for more information.
▶ Check and reconfigure the display mode of your graphic card to make it compatible with the projector.
Image is out of focus
▶ Make sure the lens cap is removed.
Adjusts the Focus Ring on the projector lens.
Make sure the projection screen is between the required distances from the projector. See pages 26-28 for more information.
The image is stretched when displaying 16:9 DVD title
When you play anamorphic DVD or 16:9 DVD, the projector will show the best image in 16:9 format in OSD. If you play 4:3 format DVD title, please change the format as 4:3 in projector OSD. If the image is still stretched, you will also need to adjust the aspect ratio by referring to the following:
Please setup the display format as 16:9 (wide) aspect ratio type on your DVD player.
Image is too small or too large
Adjust the Zoom Ring on the top of the projector.
Move the projector closer to or further from the screen.
Press Menu button on the remote control or projector panel, go to Display | Format and try the different settings.
Image has slanted sides
If possible, reposition the projector so that it is centered on the screen and below the bottom of the screen.
Press Keystone +/- on the remote control until the sides are vertical.
Image is reversed
Select Setup | Projection from the OSD and adjust the projection direction.
Intermission Problems
The projector stops responding to all controls
If possible, turn off the projector, then unplug the power cord and wait at least 60 seconds before reconnecting power.
Lamp burns out or makes a popping sound
When the lamp reaches its end of life, it will burn out and may make a loud popping sound. If this happens, the projector will not turn on until the lamp module has been replaced. To replace the lamp, follow the procedures in Replacing the Lamp on page 85.
HDMI Q & A
What is the difference between a "Standard" HDMI cable and a "High-Speed" HDMI cable?
Recently, HDMI Licensing, LLC announced that cables would be tested as Standard or High-Speed cables.
Standard (or "category 1") HDMI cables have been tested to perform at speeds of 75Mhz or up to 2.25Gbps, which is the equivalent of a 720p/1080i signal.
High Speed (or “category 2”) HDMI cables have been tested to perform at speeds of 340Mhz or up to 10.2Gbps, which is the highest bandwidth currently available over an HDMI cable and can successfully handle 1080p signals including those at increased color depths and/or increased refresh rates from the Source. High-Speed cables are also able to accommodate higher resolution displays, such as WQXGA cinema monitors (resolution of 2560 x 1600).
How do I run HDMI cables longer than 10 meters?
There are many HDMI Adopters working on HDMI solutions that extend a cable's effective distance from the typical 10 meter range to much longer lengths. These companies manufacture a variety of solutions that include active cables (active electronics built into cables that boost and extend the cable's signal), repeaters, amplifiers as well as CAT5/6 and fiber solutions.
How can I tell if a cable is an HDMI certified cable?
All HDMI products are required to be certified by the manufacturer as part of the HDMI Compliance Test Specification. However, there may be instances where cables bearing the HDMI logo are available but have not been properly tested. HDMI Licensing, LLC actively investigates these instances to ensure that the HDMI trademark is properly used in the market. We recommend that consumers buy their cables from a reputable source and a company that is trusted.
For more detail information check: http://www.hdmi.org/learningcenter/faq.aspx#49
Projector Status Indication
| Message | Power LED Power LED Temp LED | Lamp LED | ||
| (Green) (Red) (Red) (Red) | ||||
| Operating | On 0 0 0 | |||
| Warm up or Cooling down | Flashing (0.5 sec) | 0 0 0 | ||
| Standby | 0 On 0 0 | |||
| T1 temperature over temperature | 0 | Flashing | On | 0 |
| Thermal break | 0 4 0 0 | |||
| Lamp error | 0 | Flashing | 0 | On |
| Fan error | 0 | Flashing Flashing | 0 | |
| Lamp door open | 0 7 0 0 | |||
| DMD error | 0 8 0 0 | |||
| Color wheel error | 0 9 0 | 0 | ||
* Power LED will be ON when OSD appears and OFF when OSD disappears.
The digit represents the number of led blinks.
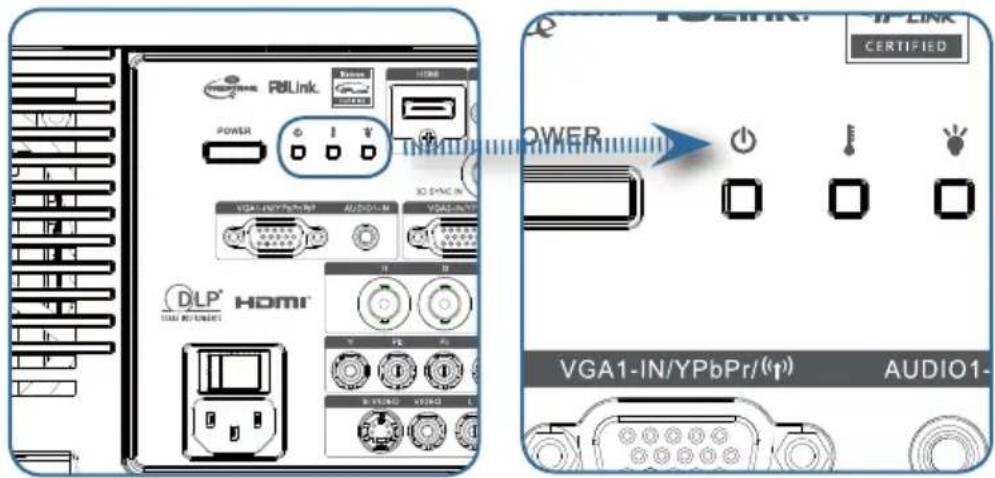
Message Reminders
Replacing the lamp:

Lamp is approaching the end of its useful life
▶ Out of range: (see the following for more information)

Signal out of range lower image resolution.
Remote Control Problems
If the remote control does not work
▶ Check the operating angle for the remote control is approximately ±15^ .
Make sure there are no obstructions between the remote control and the projector. Move to within 7m (23 ft) of the projector.
Make sure the batteries are inserted correctly.
Replace weak batteries in the remote control.
Audio Problems
There is no sound
Adjust the volume on the remote control.
Adjust the volume of the audio source.
▶ Check the audio cable connection.
Test the source audio output with other speakers.
▶ Have the projector serviced.
The sound is distorted
▶ Check the audio cable connection.
Test the source audio output with other speakers.
▶ Have the projector serviced.
Replacing the Lamp
The projection lamp should be replaced when it burns out. It should only be replaced with a certified replacement part, which you can order from your local dealer.
Important:
The lamp contains a certain amount of mercury and should be disposed of according to local ordinance regulations.
Avoid touching the glass surface of the new lamp, doing so may shorten its operation life.

Warning:
Be sure to turn off and unplug the projector at least an hour before replacing the lamp. Failure to do so could result in a severe burn.
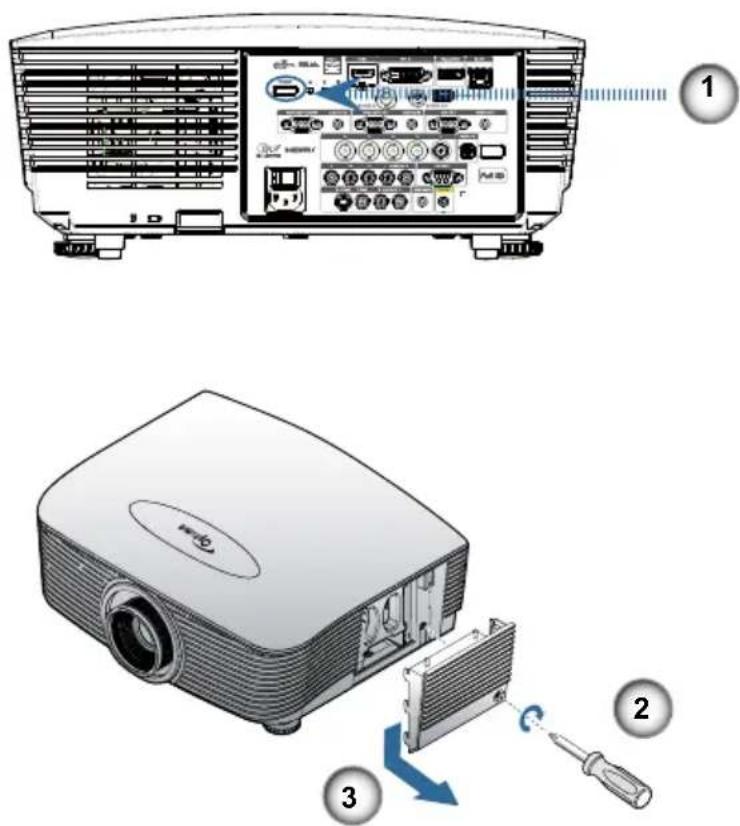
Appendices
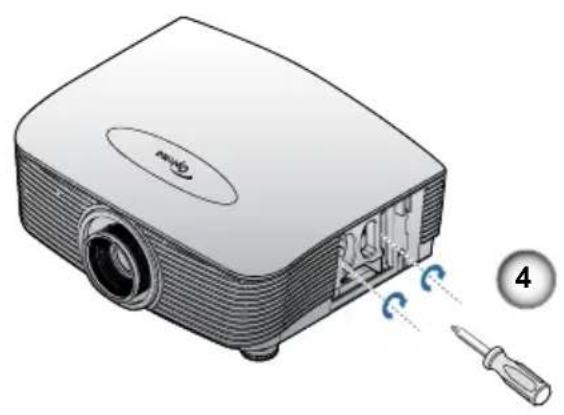
natural_image
Illustration of a projector with screwdriver and camera, showing internal components and motion arrows (no text or symbols)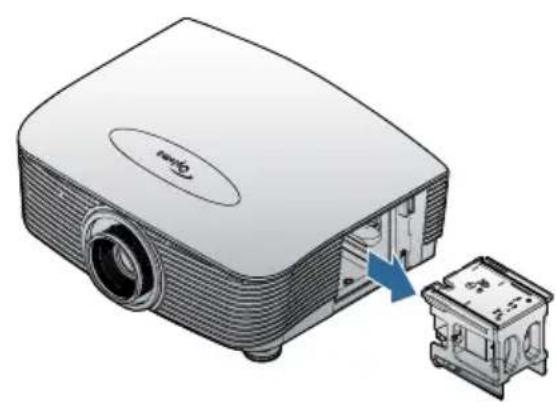
natural_image
Illustration of a projector with a small inset showing internal components (no text or symbols)-
Switch off the power to the projector by pressing the Power button.
-
Allow the projector to cool down at least 30 minutes.
-
Disconnect the power cord.
-
Unlock the lamp cover.
-
Pull up and remove the cover.
-
Use a screwdriver to remove the screws from the lamp module.
-
Pull out the lamp module.
To replace the lamp module, reverse the previous steps.
After replacing the lamp, the lamp hours counter must be reset. See page 67 for more information.
Cleaning the Projector
Cleaning the projector to remove dust and grime will help ensure trouble-free operation.
Warning:
Be sure to turn off and unplug the projector at least an hour before cleaning. Failure to do so could result in a severe burn.
Use only a dampened cloth when cleaning. Do not allow water to enter the ventilation openings on the projector.
If a little water gets into the projector interior while cleaning, leave unplugged in a well-ventilated room for several hours before using.
If a lot of water gets into the projector interior when cleaning, have the projector serviced.
Cleaning the Lens
You can purchase optic lens cleaner from most camera stores. Refer to the following to clean the pro-jector lens.
-
Apply a little optic lens cleaner to a clean soft cloth.
(Do not apply the cleaner directly to the lens.) -
Lightly wipe the lens in a circular motion.
Caution:
Do not use abrasive cleaners or solvents.
To prevent discoloration or fading, avoid getting cleaner on the projector case.
Cleaning the Case
Refer to the following to clean the projector case.
- Wipe off dust with a clean dampened cloth.
- Moisten the cloth with warm water and mild detergent (such as used to wash dishes), and then wipe the case.
- Rinse all detergent from the cloth and wipe the projector again.
Caution:
To prevent discoloration or fading of the case, do not use abrasive alcohol-based cleaners.
Compatibility Modes
Video Compatibility
| NTSC NTSC | M/J, 3.58MHz, 4.43MHz | |
| PAL PAL B | D/G/H/I/M/N, 4.43MHz | |
| SECAM | SECAM B/D/G/K/K1/L, 4.25/4.4 MHz | |
| SDTV 480i/p, 576i/p | ||
| HDTV | 720p(50/60Hz), 1080i(50/60Hz), 1080P(50/60Hz) | |
Video timing detail describe

For wide screen resolution (WXGA), the compatibility support is dependent on Notebook/PC models.
| Signal Resolution | Refresh Rate(Hz) | Notes | |
| TV(NTSC) 720 | X 480 60 | For Composite Video/S-Video | |
| TV(PAL, SECAM) | 720 X 576 50 | ||
| SDTV(480i) 720 | X 480 60 | For Component | |
| SDTV(480p) 720 | X 480 60 | ||
| SDTV(576i) 720 | X 576 50 | ||
| SDTV(576p) 720 | X 576 50 | ||
| HDTV(720p) 1280 | X 720 50/60 | ||
| HDTV(1080i) 1920 | X1080 50/60 | ||
| HDTV(1080p) 1920 | X1080 24/50/60 | ||
Computer Compatibility - VESA standards
Computer Signal (Analog RGB Compatible
| Signal Resolution Refresh Rate(Hz) Notes for Mac | |||
| VGA 640 x | 480 60/67/72/ | 85 Mac 60/72/85 | |
| SVGA 800 x | 600 | 56/60(*2)/72/85/120(*2) | Mac 60/72/85 |
| XGA 1024 x | 768 | 50/60(*2)/70/75/85/120(*2) | Mac 60/70/75/85 |
| HDTV (720p) | 1280 x 720 50/60 | (*2)/120(*2) | Mac 60 |
| WXGA 1280 x | 768 60/75/85 | Mac 60/75/85 | |
| 1280 x 800 50/60 | Mac 60 | ||
| WXGA 1366 x | 768 60 | ||
| SXGA 1280 x | 1024 60/75/85 | Mac 60/75 | |
| SXGA+ | 1400 x 1050 | 60 | |
| UXGA | 1600 x 1200 | 60 | |
| HDTV (1080p) | 1920 x 1080 | 24/50/60 Mac | 60 |
| WUXGA | 1920 x 1200(*1) | 60/50 Mac 60 | |
(*1) 1920 x 1200 @60Hz only support RB(reduced blanking).
(*2) To support frame squencial 3D.

◆ Native resolution supports 50Hz.
Input Signal for HDMI/DVI-D
| Signal Resolution Refresh Rate(Hz) Notes for Mac | |||
| VGA 640 x | 480 60 Mac 60 | 72/85 | |
| SVGA 800 x | 600 | 60^(*2) /72/85/120(*2) | Mac 60/72/85 |
| XGA 1024 x | 768 | 50/60(*2)/70/75/85/120(*2) | Mac 60/70/75/85 |
| SDTV(480i) 720 x | 480 60 | ||
| SDTV(480p) 720 x | 480 60 | ||
| SDTV(576i) 720 x | 576 50 | ||
| SDTV(576p) 720 x | 576 50 | ||
| WSVGA(1024 x 600) | 1024 x 600 60 | (*2) | |
| HDTV(720p) 1280 x | 720 | 50(*2)/60/120(*2) | Mac 60 |
| WXGA 1280 x | 768 60/75/85 | Mac 75 | |
| 1280 x 800 60 | 50 Mac 60 | ||
| WXGA 1366 x | 768 | 60 | |
| SXGA 1280 x | 1024 60/75/85 | Mac 60/75 | |
| SXGA+ | 1400 x 1050 | 60 | |
| UXGA | 1600 x 1200 | 60 | |
| HDTV (1080i) | 1920 x 1080 | 50/60 | |
| HDTV (1080p) | 1920 x 1080 | 24/30/50/60 Mac 60 | |
| WUXGA | 1920 x 1200(*1) | 60/50 | Mac 60 |
(*1) 1920 x 1200 @60Hz only support RB(reduced blanking).
(*2) To support frame squencial 3D.
True 3D Video Compatibility table
| Input Resolutions | Input timing | ||
| HDMI 1.4a3D Input | 1280 x 720p @50Hz Top - and - Bottom | ||
| 1280 x 720p @60Hz Top - and - Bottom | |||
| 1280 x 720p @50Hz Frame packing | |||
| 1280 x 720p @60Hz Frame packing | |||
| 1920 x 1080i @50Hz Side- by-Side (Half) | |||
| 1920 x 1080i @60Hz Side- by-Side (Half) | |||
| 1920 x 1080p @24Hz Top - and - Bottom | |||
| 1920 x 1080p @24 Hz Frame packing | |||
| HDMI 1.3 | 1920 x 1080i @50Hz | Side-by-Side (Half) | SBS mode is on |
| 1920 x 1080i @60Hz | |||
| 1280 x 720p @50Hz | |||
| 1280 x 720p @60Hz | |||
| 1920 x 1080i @50Hz | Top-and-Bottom | TAB mode is on | |
| 1920 x 1080i @60Hz | |||
| 1280 x 720P @50Hz | |||
| 1280 x 720P @60Hz | |||
| 480i HQFS | |||
RS232 Commands
RS232 Connector
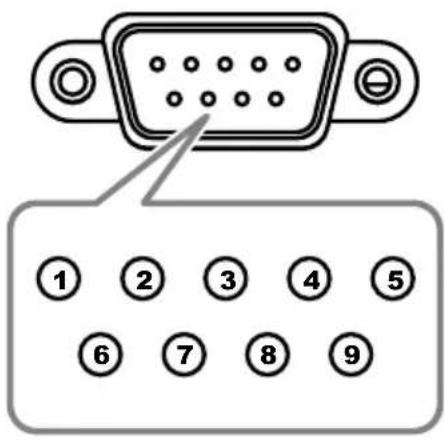
Pin No Specification
| 1 N/A |
| 2 RXD |
| 3 TXD |
| 4 DTR |
| 5 GND |
| 6 DSR |
| 7 RTS |
| 8 CTS |
| 9 N/A |
RS232 Protocol Function List
RS232 Commands

Due to the difference application for each model. Function is dependent on the model purchased.
| 232 ASCII Code | HEX Code | Function | Description |
| ~XX00 1 | 7E 30 30 30 30 30 20 31 0D | Power ON | |
| ~XX00 0 | 7E 30 30 30 30 30 20 30 0D | Power OFF | (0/2 for backward compatible) |
| ~XX00 1 ~nnnn | 7E 30 30 30 30 30 20 31 20 a 0DPower ON with Password | ~nnnn = ~0000 (a=7E 30 30 30 30) | |
| 93 93 93 93 E7=a(9999~ | |||
| ~XX01 1 | 7E 30 30 30 31 20 31 0D | Resync | |
| ~XX02 1 | 7E 30 30 30 32 20 31 0D | AV Mute | On |
| ~XX02 0 | 7E 30 30 30 32 20 30 0D | ||
| ~XX03 1 | 7E 30 30 30 33 20 31 0D | Mute | On |
| ~XX03 0 | 7E 30 30 30 33 20 30 0D | ||
| ~XX04 1 | 7E 30 30 30 34 20 31 0D | Freeze | |
| ~XX04 0 | 7E 30 30 30 34 20 30 0D | Unfreeze | (0/2 for backward compatible) |
| ~XX05 1 | 7E 30 30 30 35 20 31 0D | Zoom Plus | |
| ~XX06 1 | 7E 30 30 30 36 20 31 0D | Zoom Minus | |
| ~XX12 1 | 7E 30 30 31 32 20 31 0D | Direct Source Commands | HDMI |
| ~XX12 2 | 7E 30 30 31 32 20 32 0D | ||
| ~XX12 4 | 7E 30 30 31 32 20 34 0D | DVI-D | |
| D0 53 02 23 13502100XE7 | 1AGV | ||
| 3 02 23 13502100XE7 D0 6 | 2 AGV | ||
| ~XX12 8 | 7E 30 30 31 32 20 38 0D | VGA1 Component | |
| ~XX12 9 | 7E 30 30 31 32 20 39 0D | S-Video | |
| D0 03 13 02 23 13 03 23 23ediv | |||
| D0 33 13 02 23en0303030VG | |||
| D0 43 13 02 23 13 03 23 23ediv | |||
| ~XX12 20 | 7E 30 30 31 32 20 32 30 0D | DisplayPort | |
| ~XX20 1 | 7E 30 30 32 30 20 31 0D | Display Mode | Presentation |
| ~XX20 2 | 7E 30 30 32 30 20 32 0D | Bright | |
| ~XX20 3 | 7E 30 30 32 30 20 33 0D | Movie | |
| ~XX20 4 | 7E 30 30 32 30 20 34 0D | sRGB | |
| ~XX20 5 | 7E 30 30 32 30 20 35 0D | User | |
| ~XX20 7 | 7E 30 30 32 30 20 37 0D | Blackboard | |
| ~XX20 13 | 7E 30 30 32 30 21 33 0D | DICOM SIM. | |
| D0 93 02 03 2300200XE7 | D3 | ||
| ~XX21 n | 7E 30 30 32 31 20 a 0D | Brightness | n = -50 (a=2D 35 30) ~ 50 (a=35 30) |
| ~XX22 n | 7E 30 30 32 32 20 a 0D | Contrast | n = -50 (a=2D 35 30) ~ 50 (a=35 30) |
| ~XX23 n | 7E 30 30 32 33 20 a 0D | Sharpness | n = 1 (a=31) ~ 15 (a=31 35) |
| ~XX44 n | 7E 30 30 34 34 20 a 0D | Tint | n = -50 (a=2D 35 30) ~ 50 (a=35 30) |
| ~XX45 n | 7E 30 30 34 35 20 a 0D | Color | n = -50 (a=2D 35 30) ~ 50 (a=35 30) |
| ~XX327 n | 7E 58 58 33 32 37 20 a 0D | Color Matching | Red Hue |
| ~XX328 n | 7E 58 58 33 32 38 20 a 0D | Green Hue | |
| ~XX329 n | 7E 58 58 33 32 39 20 a 0D | Blue Hue | |
| ~XX330 n | 7E 58 58 33 33 30 20 a 0D | Cyan Hu | |
| ~XX331 n | 7E 58 58 33 33 31 20 a 0D | Yellow Hue | |
| ~XX332 n | 7E 58 58 33 33 32 20 a 0D | Magenta Hue | |
| ~XX333 n | 7E 58 58 33 33 33 20 a 0D | Cyan Hue | |
| ~XX333 n | 7E 58 58 33 33 33 20 a 0D | Red Saturation | |
| ~XX334 n | 7E 58 58 33 33 34 20 a 0D | Green Saturation | |
| ~XX335 n | 7E 58 58 33 33 35 20 a 0D | Blue Saturation | |
| ~XX336 n | 7E 58 58 33 33 36 20 a 0D | Cyan Saturation | |
| ~XX337 n | 7E 58 58 33 33 37 20 a 0D | Yellow Saturation | |
| ~XX338 n | 7E 58 58 33 33 38 20 a 0D | Magenta Saturation | |
| ~XX339 n | 7E 58 58 33 33 39 20 a 0D | Red Gain | |
| ~XX340 n | 7E 58 58 33 34 30 20 a 0D | Green Gain | |
| ~XX341 n | 7E 58 58 33 34 31 20 a 0D | Blue Gain | |
| ~XX342 n | 7E 58 58 33 34 32 20 a 0D | Cyan Gain | |
| ~XX343 n | 7E 58 58 33 34 33 20 a 0D | Yellow Gain | |
| ~XX344 n | 7E 58 58 33 34 34 20 a 0D | Magenta Gain | |
| ~XX345 n | 7E 58 58 33 34 35 20 a 0D | White/R | |
| ~XX346 n | 7E 58 58 33 34 36 20 a 0D | White/G | |
| ~XX347 n | 7E 58 58 33 34 37 20 a 0D | White/B | |
| ~XX215 1 | 7E 30 30 32 31 35 20 31 0D | Reset | |
| ~XX24 n | 7E 30 30 32 34 20 a 0D | RGB Gain/Bias | Red Gain |
| ~XX25 n | 7E 30 30 32 35 20 a 0D | Green Gain | |
| ~XX26 n | 7E 30 30 32 36 20 a 0D | Blue Gain | |
| ~XX27 n | 7E 30 30 32 37 20 a 0D | Red Bias | |
| ~XX28 n | 7E 30 30 32 38 20 a 0D | Green Bias | |
| ~XX29 n | 7E 30 30 32 39 20 a 0D | Blue Bias | |
| ~XX33 n | 7E 30 30 33 33 20 a 0D | Reset | |
| ~XX34 n | 7E 30 30 33 34 20 a 0D | BrilliantColorTM | |
| ~XX196 n | 7E 30 30 31 39 36 20 a 0D | Noise Reduction | |
| ~XX35 1 | 7E 30 30 33 35 20 31 0D | Gamma | Film |
| D0 33 02 5 | scihparG | ||
| ~XX35 5 | 7E 30 30 33 35 20 35 0D | 1.8 | |
| D0 63 02 53 330530XE7 | 0.2 | ||
| D0 73 02 53 3370530XE7 | 2.2 | ||
sdnammo
edoc IICSA ni >RC< rof edoc XE
\~XX35 8 7E 30 30 33 35 20 38 0D 2.6 \~XX35 9 7E 30 30 33 35 20 39 0D 3D
| ~XX36 3 | 7E 30 30 33 36 20 30 0D | Color Temp. | Warm |
| ~XX36 0 | 7E 30 30 33 36 20 31 0D | Standard | |
| ~XX36 1 | 7E 30 30 33 36 20 32 0D | Cool | |
| ~XX36 2 | 7E 30 30 33 36 20 33 0D | Cold | |
| ~XX37 1 | 7E 30 30 33 37 20 31 0D | Color Space | Auto |
| ~XX37 2 | 7E 30 30 33 37 20 32 0D | RGB\ RGB(0-255) | |
| ~XX37 3 | 7E 30 30 33 37 20 33 0D | YUV | |
| ~XX37 4 | 7E 30 30 33 37 20 34 0D | RGB(16 - 235) | |
| ~XX73 n | 7E 30 30 37 33 20 a 0D | Signal (RGB) Frequency | n = -5 (a=2D 35) ~ 5 (a=35) By signal |
| ~XX74 n | 7E 30 30 37 34 20 a 0D | Phase n = 0 (a=30) ~ 31 (a=33 31) By signal | |
| ~XX91 1 | 7E 30 30 39 31 20 31 0D | Automatic Enable | |
| ~XX91 0 | 7E 30 30 39 31 20 30 0D | Disable | |
| ~XX75 n | 7E 30 30 37 35 20 a 0D | H. Position n = -5 (a=2D 35) ~ 5 (a=35) By timing | |
| ~XX76 n | 7E 30 30 37 36 20 a 0D | V. Position n = -5 (a=2D 35) ~ 5 (a=35) By timing |
| ~XX200 n | 7E 30 30 32 30 30 20 a 0D | Signal(Video) White Level | |
| ~XX201 n | 7E 30 30 32 30 | 30 21 a 0D | Black Level |
| ~XX204 1 | 7E 30 30 32 30 30 21 31 0D | 0 | |
| ~XX204 0 | 7E 30 30 32 30 30 21 30 0D | 7.5 |
| ~XX60 1 | 7E 30 30 36 30 20 31 0D Format | 4:3 | ||
| ~XX60 2 | 7E 30 30 36 30 20 32 0D | 16:9 | ||
| ~XX60 3 | 7E 30 30 36 30 20 33 0D | 16:10(WUXGA Model) | ||
| ~XX60 5 | 7E 30 30 36 30 20 35 0D | LBX | ||
| ~XX60 6 | 7E 30 30 36 30 20 36 0D | Native | ||
| ~XX60 7 | 7E 30 30 36 30 20 37 0D | Auto | ||
| -XX62 n | 7E 30 30 36 32 20 a 0D | Digital Zoom | Zoom | n = -5 (a=2D 35) - 25 (a=32 35) |
| ~XX504 n | 7E 58 58 35 30 34 20 a 0D | H Zoom n = 0 (a=30) ~ 100 (a=31 30 30) | ||
| -XX505 n | 7E 58 58 35 30 35 20 a 0D | V Zoom n = 0 (a=30) - 100 (a=31 30 30) |
| -XX61 n | 7E 30 30 36 31 20 a 0D | Edge mask | n = 0 (a=30) - 10 (a=31 30) | |
| ~XX63 n | 7E 30 30 36 33 20 a 0D | H Image Shift | n = -100 (a=2D 31 30 30) ~ 100 (a=31 30 30) | |
| -XX64 n | 7E 30 30 36 34 20 a 0D | V Image Shift | n = -100 (a=2D 31 30 30) - 100 (a=31 30 30) | |
| -XX66 n | 7E 30 30 36 36 20 a 0D V Keystone | n = -40 (a=2D 34 30) - 40 (a=34 30) | ||
| -XX230 1 | 7E 30 30 32 33 30 20 31 0D | 3D Mode | DLP-Link | |
| -XX230 3 | 7E 30 30 32 33 30 20 33 0D | IR | ||
| -XX400 0 | 7E 30 30 34 30 30 20 30 0D | 3D→2D | 3D | |
| -XX400 1 | 7E 30 30 34 30 30 20 31 0D | L | ||
| -XX400 2 | 7E 30 30 34 30 30 20 32 0D | R | ||
| -XX405 0 | 7E 30 30 34 30 35 20 30 0D | 3D Format | Auto | |
| -XX405 1 | 7E 30 30 34 30 35 20 31 0D | SBS | ||
| -XX405 2 | 7E 30 30 34 30 35 20 32 0D | Top and Bottom | ||
| -XX405 3 | 7E 30 30 34 30 35 20 33 0D | Frame sequential | ||
| -XX231 0 | 7E 30 30 32 33 31 20 30 0D | 3D Sync Invert | On | |
| -XX231 1 | 7E 30 30 32 33 31 20 31 0D | Off | ||
| -XX70 1 | 7E 30 30 37 30 20 31 0D | Language | English |
| -XX70 2 | 7E 30 30 37 30 20 32 0D | German | |
| -XX70 3 | 7E 30 30 37 30 | 20 33 0D French | |
| -XX70 4 | 7E 30 30 37 30 20 34 0D | Italian | |
| -XX70 5 | 7E 30 30 37 30 20 35 0D | Spanish | |
| -XX70 6 | 7E 30 30 37 30 20 36 0D | Portuguese | |
| -XX70 7 | 7E 30 30 37 30 20 37 0D | Polish | |
| -XX70 8 | 7E 30 30 37 30 20 38 0D | Dutch | |
| -XX70 9 | 7E 30 30 37 30 20 39 0D | Swedish | |
| -XX70 10 | 7E 30 30 37 30 20 31 30 0D | Norwegian/Danish | |
| -XX70 11 | 7E 30 30 37 30 20 31 31 0D | Finnish | |
| -XX70 12 | 7E 30 30 37 30 20 31 32 0D | Greek | |
| -XX70 13 | 7E 30 30 37 30 20 31 33 0D | Traditional Chinese | |
| -XX70 14 | 7E 30 30 37 30 20 31 34 0D | Simplified Chinese | |
| -XX70 15 | 7E 30 30 37 30 20 31 35 0D | Japanese | |
| -XX70 16 | 7E 30 30 37 30 20 31 36 0D | Korean | |
| -XX70 17 | 7E 30 30 37 30 20 31 37 0D | Russian | |
| -XX70 18 | 7E 30 30 37 30 20 31 38 0D | Hungarian | |
| -XX70 19 | 7E 30 30 37 30 20 31 39 0D | Czechoslovak | |
| -XX70 20 | 7E 30 30 37 30 20 32 30 0D | Arabic | |
| -XX70 21 | 7E 30 30 37 30 20 32 31 0D | Thai | |
| -XX70 22 | 7E 30 30 37 30 20 32 32 0D | Turkish | |
| -XX70 23 | 7E 30 30 37 30 20 32 33 0D | Farsi | |
| -XX70 25 | 7E 30 30 37 30 20 32 35 0D | Vietnamese | |
| -XX70 26 | 7E 30 30 37 30 20 32 36 0D | Indonesian | |
| -XX70 27 | 7E 30 30 37 30 20 32 37 0D | Romanian |
| ~XX71 1 | 7E 30 30 37 31 20 31 0D | Projection | Front-Desktop |
| ~XX71 2 | 7E 30 30 37 31 20 32 0D | Rear-Desktop | |
| ~XX71 3 | 7E 30 30 37 31 20 33 0D | Front-Ceiling | |
| ~XX71 4 | 7E 30 30 37 31 20 34 0D | Rear-Ceiling |
| ~XX72 1 | 7E 30 30 37 32 20 31 0D | Menu Location | Top Left |
| ~XX72 2 | 7E 30 30 37 32 20 32 0D | Top Right | |
| ~XX72 3 | 7E 30 30 37 32 20 33 0D | Centre | |
| ~XX72 4 | 7E 30 | 30 37 32 20 34 0D | Bottom Left |
| ~XX72 5 | 7E 30 30 37 32 20 35 0D | Bottom Right |
(WUXGAModel)
| ~XX90 1 | 7E 30 30 39 31 20 31 0D | Screen Type | 16:10 | |
| ~XX90 0 | 7E 30 30 39 31 20 30 0D | 16:9 | ||
| ~XX77 n | 7E 30 30 37 37 20 aabbcc 0D | Security | Security Timer | Month/Day/Hour n = mm/dd/hh |
| mm= 00 (aa=30 30) ~ 12 (aa=31 32)dd = 00 (bb=30 30) ~ 30 (bb=33 30)hh= 00 (cc=30 30) ~ 24 (cc=32 34) | ||||
| ~XX78 1 | 7E 30 30 37 38 20 31 0D | Security Settings | On | |
| ~XX78 0 | ~nnnn | 7E 30 30 37 38 20 32 20 a 0D | Off(0/2 for backward compatible) | |
| ~nnnn = ~0000 (a=7E 30 30 30 30) | ||||
| ~9999 (a=7E 39 39 39 39) | ||||
| ~XX79 n | 7E 30 30 37 39 20 a 0D | Projector ID | n = 00 (a=30 30) ~ 99 (a=39 39) | |
| ~XX80 1 | 7E 30 30 38 30 20 31 0D | Mute | On | |
| ~XX80 0 | 7E 30 30 38 30 20 30 0D | Off (0/2 for backward compatible) | ||
| ~XX81 n | 7E 30 30 38 31 20 a 0D | Volume(Audio) | n = 0 (a=30) ~ 10 (a=31 30) | |
| ~XX89 0 | 7E 30 30 38 39 20 30 0D | Audio Input | Default | |
| ~XX89 1 | 7E 30 30 38 39 20 31 0D | Audio1 | ||
| ~XX89 3 | 7E 30 30 38 39 20 33 0D | Audio2 | ||
| ~XX89 4 | 7E 30 30 38 39 20 34 0D | Audio3 | ||
| ~XX89 5 | 7E 30 30 38 39 20 35 0D | Audio4 | ||
| ~XX82 1 | 7E 30 30 38 32 20 31 0D | Logo | Optoma | |
| ~XX82 2 | 7E 30 30 38 32 20 32 0D | User | ||
| ~XX82 3 | 7E 30 30 38 32 20 33 0D | Neutral | ||
| ~XX83 1 | 7E 30 30 38 33 20 31 0D | Logo Capture | ||
| ~XX88 0 | 7E 30 30 38 38 20 30 0D | Closed Captioning | Off | |
| ~XX88 1 | 7E 30 30 38 38 20 31 0D | cc1 | ||
| ~XX88 2 | 7E 30 30 38 38 20 32 0D | cc2 | ||
| ~XX87 1 | 7E 30 30 38 37 20 31 0D | Network Status(Read only Return :Oka, a=0/1 Disconnected/ Connected. | ||
| ~XX87 3 | 7E 30 30 38 37 20 33 0D | IP Address(Read only) Return: "Okaaa_bbb_ccc_ddd" | ||
| ~XX454 0/2 | 7E 30 30 34 35 34 20 30(32) 0D Crestron | Off | ||
| ~XX454 1 | 7E 30 30 34 35 34 20 31 0D | On | ||
| ~XX455 0/2 | 7E 30 30 34 35 35 20 30(32) 0D Extron | Off | ||
| ~XX455 1 | 7E 30 30 34 35 35 20 31 0D | On | ||
| ~XX456 0/2 | 7E 30 30 34 35 36 20 30(32) 0D PJLink | Off | ||
| ~XX456 1 | 7E 30 30 34 35 36 20 31 0D | On | ||
| ~XX457 0/2 | 7E 30 30 34 35 37 20 30(32) 0D AMX Device Discovery | Off | ||
| ~XX457 1 | 7E 30 30 34 35 37 20 31 0D | On | ||
| ~XX458 0/2 | 7E 30 30 34 35 38 20 30(32) 0D Telnet | Off | ||
| ~XX458 1 | 7E 30 30 34 35 38 20 31 0D | On | ||
| ~XX459 0/2 | 7E 30 30 34 35 38 20 30(32) 0D HTTP | Off | ||
| ~XX459 1 | 7E 30 30 34 35 38 20 31 0D | On | ||
| ~XX39 1 | 7E 30 30 33 39 20 31 0D | Input Source | HDMI | |
| ~XX39 2 | 7E 30 30 33 39 20 32 0D | DVI-D | ||
| ~XX39 3 | 7E 30 30 33 39 20 34 0D | BNC | ||
| ~XX39 5 | 7E 30 30 33 39 20 35 0D | VGA1 | ||
| ~XX39 6 | 7E 30 30 33 39 20 36 0D | VGA2 | ||
| ~XX39 8 | 7E 30 30 33 39 20 38 0D | Component | ||
| ~XX39 9 | 7E 30 30 33 39 20 39 0D | S-video | ||
| ~XX39 10 | 7E 30 30 33 39 20 31 30 0D | Video | ||
| ~XX39 15 | 7E 30 30 33 39 20 31 35 0D | DisplayPort | ||
| ~XX100 1 | 7E 30 30 31 30 30 20 31 0D | Source Lock | On | |
| ~XX100 0 | 7E 30 30 31 30 30 20 30 0D | Off (0/2 for backward compatible) | ||
| ~XX101 1 | 7E 30 30 31 30 31 20 31 0D | High Altitude | On | |
| ~XX101 0 | 7E 30 30 31 30 31 20 30 0D | Off (0/2 for backward compatible) | ||
| ~XX102 1 | 7E 30 30 31 30 32 20 31 0D | Information Hide | On | |
| ~XX102 0 | 7E 30 30 31 30 32 20 30 0D | Off (0/2 for backward compatible) | ||
| ~XX103 1 | 7E 30 30 31 30 33 20 31 0D | Keypad Lock | On | |
| ~XX103 0 | 7E 30 30 31 30 33 20 30 0D | Off (0/2 for backward compatible) | ||
| ~XX348 0 | 7E 30 30 33 34 38 20 30 0D | Display Mode Lock | Off (0/2 for backward compatible) | |
| ~XX348 1 | 7E 30 30 33 34 38 20 31 0D | On | ||
| ~XX195 0 | 7E 30 30 31 39 35 20 30 0D | Test Pattern | None | |
| ~XX195 1 | 7E 30 30 31 39 35 20 31 0D | Grid(White) | ||
| ~XX195 3 | 7E 30 30 31 39 35 20 33 0D | Grid(Green) | ||
| ~XX195 4 | 7E 30 30 31 39 35 20 34 0D | Grid(Magenta) | ||
| ~XX195 2 | 7E 30 30 31 39 35 20 32 0D | White | ||
| ~XX192 0 | 7E 30 30 31 39 32 20 30 0D | 12V Trigger | Off | |
| ~XX192 1 | 7E 30 30 31 39 32 20 31 0D | On | ||
| ~XX192 3 | 7E 30 30 31 39 32 20 33 0D | Auto 3D | ||
| ~XX11 0 | 7E 30 30 31 31 20 30 0D | IR Function | Off | |
| ~XX11 1 | 7E 30 30 31 31 20 31 0D | On | ||
| ~XX104 1 | 7E 30 30 31 30 34 20 31 0D Background Color | Blue | ||
| ~XX104 2 | 7E 30 30 31 30 34 20 32 0D | Black | ||
| ~XX104 3 | 7E 30 30 31 30 34 20 33 0D | Red | ||
| ~XX104 4 | 7E 30 30 31 30 34 20 34 0D | Green | ||
| ~XX104 5 | 7E 30 30 31 30 34 20 35 0D | White | ||
| ~XX105 1 | 7E 30 30 31 30 35 20 31 0D Advanced Direct Power On On | |||
| ~XX105 0 | 7E 30 30 31 30 35 20 30 | Off (0/2 for backward compatible) | ||
| ~XX113 0 | 7E 30 30 31 31 33 20 30 0D Signal Power On Off | |||
| ~XX113 1 | 7E 30 30 31 31 33 20 31 0D | On | ||
| ~XX106 n | 7E 30 30 31 30 36 20 a 0D Auto Power Off (min) n = 0 (a=30) ~ 180 (a=31 38 30) | |||
(5 minutes for each step).
| ~XX107 n | 7E 30 30 31 30 37 20 a 0D | Sleep Timer (min) | n = 0 (a=30) ~ 995 (a=39 39 35) | |
| (30 minutes for each step). | ||||
| ~XX114 1 | 7E 30 30 31 31 34 20 31 0D | Power Mode(Standby) Active (<=0.5W) | ||
| ~XX114 0 | 7E 30 30 31 31 34 20 30 0D | Eco. (0/2 for back) | elbltapmoc draw | |
| ~XX109 1 | 7E 30 30 31 30 39 20 31 0D | Lamp Reminder | On | |
| ~XX109 0 | 7E 30 30 31 30 39 20 30 0D | Off (0/2 for backward compatible) | ||
| ~XX110 1 | 7E 30 30 31 31 30 20 31 0D | Brightness Mode | Bright | |
| ~XX110 2 | 7E 30 30 31 31 30 20 32 0D | Eco | ||
| XX0 5 | 7E 30 30 31 31 30 20 35 0D | Power | ||
| ~XX326 n | 7E 30 30 33 32 36 20 a 0D | Power | 350W/340W/330W/320W/310W/300W/290W/280W(n=0/n=1/n=2/n=3/n=4/n=5/n=6/n=7/n=8) | |
| ~XX111 1 | 7E 30 30 31 31 31 20 31 0D | Lamp Reset | Yes | |
| ~XX111 0 | 7E 30 30 31 31 31 20 30 0D | No (0/2 for backward compatible) | ||
| ~XX112 1 | 7E 30 30 31 31 32 20 31 0D | Reset | Yes | |
| ~XX99 1 | 7E 30 30 39 39 20 31 0D | RS232 Alert Reset | System Alert | |
| ~XX210 n | 7E 30 30 32 30 30 20 n 0D | Display message on the OSD | n: 1-30 charact ers | |
| SEND to emulate Remote | ||||
| ~XX140 10 | 7E 30 30 31 34 30 20 31 30 0D | Up | ||
| ~XX140 11 | 7E 30 30 31 34 30 20 31 31 0D | Left | ||
| ~XX140 12 | 7E 30 30 31 34 30 20 31 32 0D | Enter (for projection MENU) | ||
| ~XX140 13 | 7E 30 30 31 34 30 20 31 33 0D | Right | ||
| ~XX140 14 | 7E 30 30 31 34 30 20 31 34 0D | Down | ||
| ~XX140 15 | 7E 30 30 31 34 30 20 31 35 0D | Keystone + | ||
| ~XX140 16 | 7E 30 30 31 34 30 20 31 36 0D | Keystone - | ||
| ~XX140 17 | 7E 30 30 31 34 30 20 31 37 0D | Volume - | ||
| ~XX140 18 | 7E 30 30 31 34 30 20 31 38 0D | Volume + | ||
| ~XX140 19 | 7E 30 30 31 34 30 20 31 39 0D | ssengthB | ||
| ~XX140 20 | 7E 30 30 31 34 30 20 32 30 0D | Menu | ||
| ~XX140 21 | 7E 30 30 31 34 30 20 32 31 0D | Zoom | ||
| ~XX140 28 | 7E 30 30 31 34 30 20 32 38 0D | Contrast | ||
| ~XX140 47 | 7E 30 30 31 34 30 20 34 37 0D | Source | ||
SEND from projector automatically
| 232 ASCII Code | HEX Code | Function | Projector Return | Description |
| when Standby/Warming/Cooling/Out of Range/Lamp fail/Fan Lock/Over Temperature/Lamp Hours Running Out/Cover Open | ||||
| INFOn | n : 0/1/2/3/4/6/7/8' = Standby/Warming/Cooling/Out of Range/Lamp fail/Fan Lock/Over Temperature/Lamp Hours Running Out/Cover Open | |||
READ from projector
| 232 ASCII Code | HEX Code | Function | Projector Return | Description |
| ~XX121 1 | 7E 30 30 31 32 31 20 31 0D | Input Source Commands | OKn | n: 0/1/2/3/4/5/7/10/15 = None/DVI/VGA1/VGA2/S-Video/Video/BNC/HDMI/Component/DisplayPort |
| ~XX122 1 | 7E 30 30 31 32 32 20 31 0D | Software Version | OKddd | dddd; FW version |
| ~XX123 1 | 7E 30 30 31 32 33 20 31 0D | Display Mode | OKn | n : 0/1/2/3/4/7/9/12 |
| None/Presentation/Bright/Movie/sRGB/Blackboard/DICOM SIM./3D | ||||
| ~XX124 1 | 7E 30 30 31 32 34 20 31 0D | Power State | OKn | n : 0/1 = Off/On |
| ~XX125 1 | 7E 30 30 31 32 35 20 31 0D | Brightness | OKn | |
| ~XX126 1 | 7E 30 30 31 32 36 20 31 0D | Contrast | OKn | |
| ~XX127 1 | 7E 30 30 31 32 37 20 310D | Format | OKn | n: 1/2/3/5/6/7 =4:3/16:9/16:10/LBX/Native/Auto |
| *16:9 or 16:10 depend on Screen Type setting | ||||
| ~XX128 1 | 7E 30 30 31 32 38 20 31 0D | Color Temperature | OKn | n : 3/0/1/2 = Warm/Standard/Cool/Cold |
| ~XX129 1 | 7E 30 30 31 32 39 20 31 0D | Projection Mode | OKn | n : 0/1/2/3 = Front-Desktop/ Rear-Desktop/ Front-Ceiling/ Rear-Ceiling |
| ~XX150 1 | 7E 30 30 31 35 30 20 31 0D | Information | OKabbbbccdddde | |
| a : 0/1 = Off/On | ||||
| bbbo: LampHour | ||||
| cc: source 00/01/02/03/04/05/07/10/15 = | ||||
| None/DVI/VGA1/VGA2/S-Video/Video/BNC/HDMI/Component/DisplayPort | ||||
Telnet Commands
▶ Port: support 3 ports of 23/1023/2023
Multi-connections: Projector could receive commands from different ports at the same time
Command Format: Follow RS232 command format (support both of ASCII and HEX)
Command Response: Follow RS232 return message.
| Lead Code | Projector ID | Command ID Space Variable | Carriage Return | |||||
| ~ X X X X | X n CR | |||||||
| Fix code One Digit~ | 00 | Defined by Optoma 2 or 3 Digit. See the Follow content | One Digit | Per item Definition | Fix code One Digit | |||

For wide screen resolution (WXGA), the compatibility support is dependent on Notebook/PC models.
AMX Device Discovery commands
DP:239.255.250.250
Port No.: 9131
▶ Each UDP broadcast information as below are updated around 40 seconds
| Command Description Remark (Parameter) | ||
| Device-UUID MAC address (Hex value without'':' separator) | 12 digits | |
| Device-SKDClass The Duet DeviceSdk class name VideoProjector | ||
| Device-Make Maker name MakerPXLW | ||
| Device-Model Model name Projector | ||
| Config-URL Device's IP addressLAN IP address is shown up if LAN IP address is valid.Wireless LAN IP address is shown up if Wireless LAN IP address is valid. | http://xxx.xxx.xxx.xxx/index.html | |
| Revision The revision must follow a major.minor.micro scheme. The revision is only increased if the command protocol is modified. | 1.0.0 | |

For wide screen resolution (WXGA), the compatibility support is dependent on Notebook/PC models.
This AMX function is only to support AMX Device Discovery.
The broadcast information only send out through valid interface.
Both LAN and Wireless LAN interfaces could be supported at the same time.
If “Beacon Validator” was used. Please take care below information.
PJLink ^TM supported commands
The table below shows commands to control the projector using the PJLink ^TM protocol.
Command Description Remark (Parameter)
| Command Description Remark (Parameter) | ||
| POWR Power control | 0 = Standby | |
| 1 = Power on | ||
| POWR? Inquiry about the power state | 0 = Standby | |
| 1 = Power on | ||
| 2 = Cooling down | ||
| 3 = Warming up | ||
| INPT INPT Input switching | 11 = VGA1 | |

This projector is fully compliant to the specifications of JBMIA PJLink™ Class 1. It supports all the commands defined by PJLink™ Class 1, and the compliance has been verified with the PJLink™ standard specifications Version 1.0.
| Command Description Remark (Parameter) | ||
| INPT? Inquiry | about input switching | 12 = VGA2 |
| 13 = Component | ||
| 14 = BNC | ||
| 21 = VIDEO | ||
| 22 = S-VIDEO | ||
| 31 = HDMI 1 | ||
| 32 = HDMI 2 | ||
| AVMT Mute control 30 = Video and audio mute disable | ||
| AVMT? Inquiry | about the mute state | 31 = Video and audio mute enable |
| ERST? Inquiry | about the error state | 1st byte: Fan error, 0 or 2 |
| 2nd byte: Lamp error, 0 to 2 | ||
| 3rd byte: Temperature error, 0 or 2 | ||
| 4th byte: Cover open error, 0 or 2 | ||
| 5th byte: Filter error, 0 or 2 | ||
| 6th byte: Other error, 0 or 2 | ||
| 0 to 2 mean as follows:0 = No error detected, 1 = Warning, 2 = Error | ||
| LAMP? Inquiry | about the lamp state | 1st value (1 to 5 digits):Cumulative LAMP operating time (This item shows a lamp operating time (hour) calculated based on that LAMP MODE is LOW.) |
| 2nd value: 0 = Lamp off, 1 = Lamp on | ||
| INST? Inquiry | about the available inputs | The following value is returned.“11 12 21 22 31 32” |
| NAME? Inquiry | about the projector name | The projector name set on the NETWORK menu or the ProjectorViewSetup window is returned |
| INF1? Inquiry | about the manufacturer name | “Optoma” is returned. |
| INF2? Inquiry | about the model name | “EH7700” is returned. |
| INF0? Inquiry | about other information | No other information is available. No parameter is returned. |
| CLSS? Inquiry | about the class information | “1” is returned. |
Trademarks
▶ DLP is trademarks of Texas Instruments.
IBM is a trademark or registered trademark of International Business Machines Corporation.
Macintosh, Mac OS X, iMac, and PowerBook are trademarks of Apple Inc., registered in the U.S. and other countries.
Microsoft, Windows, Windows Vista, Internet Explorer and PowerPoint are either a registered trademark or trademark of Microsoft Corporation in the United States and/or other countries.
HDMI, the HDMI Logo and High-Definition Multimedia Interface are trademarks or registered trademarks of HDMI Licensing LLC.
- AMX Device Discovery
The projector is monitored and controlled by the control system of AMX.
Crestron RoomView Connected™
The projector is monitored and controlled by the control system and software of Crestron Electronics, Inc.
PJLink™
PJLink trademark is a trademark applied for registration or is already registered in Japan, the United States of America and other countries and areas.
This projector supports standard protocol PJLink ^™ for projector control and you can control and monitor projector's operations using the same application among projectors of different models and different manufacturers.
Other product and company names mentioned in this user's manual may be the trademarks or registered trademarks of their respective holders.
About Crestron RoomView Connected™ Electronics, Inc. to facilitate configuration of the control system of Crestron and its target devices.
For details, see the website of Crestron Electronics, Inc. URL http://www.crestron.com URL http://www.crestron.com/getroomview/
Ceiling Installation

Damage to the projector as a result of incorrect installation voids the warranty.
To prevent damage to your projector please use the recommended mounting package for installation.
To ensure compliance, only use a UL Listed ceiling mount and screws that meet the following specifications:
Screw Type: M4
▶ Maximum screw length: 11 mm
▶ Minimum screw length: 9 mm
Refer to the following diagram to ceiling mount the projector.

- Ensure at least 10cm clearance between the ceiling and the underside of the projector.
Avoid locating the projector near heat sources such as air conditioning and heaters. Excess heat may cause the projector to power off.
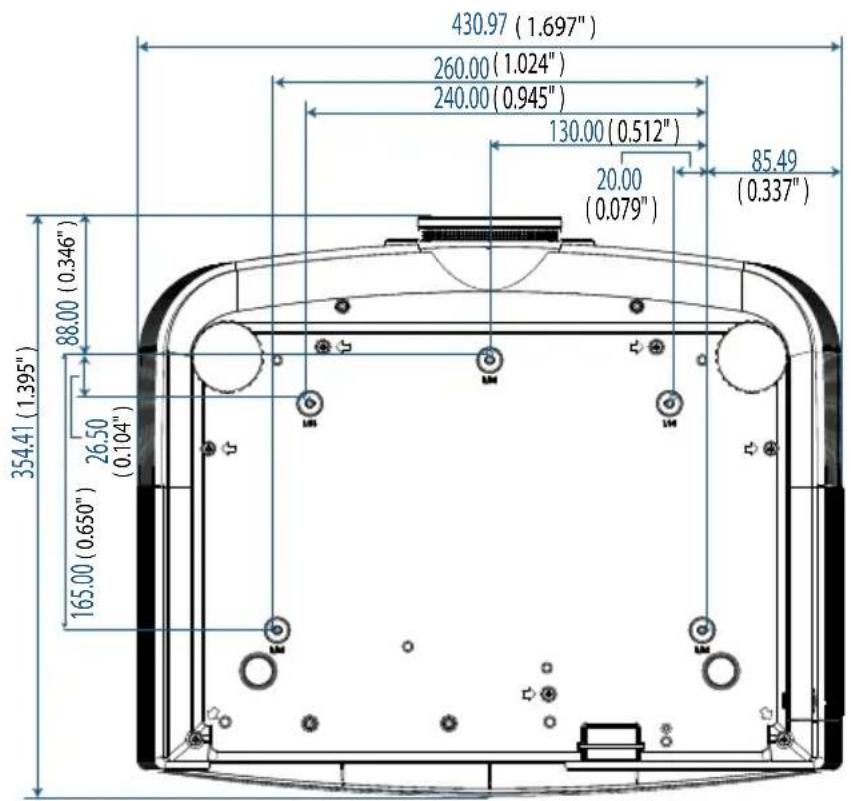
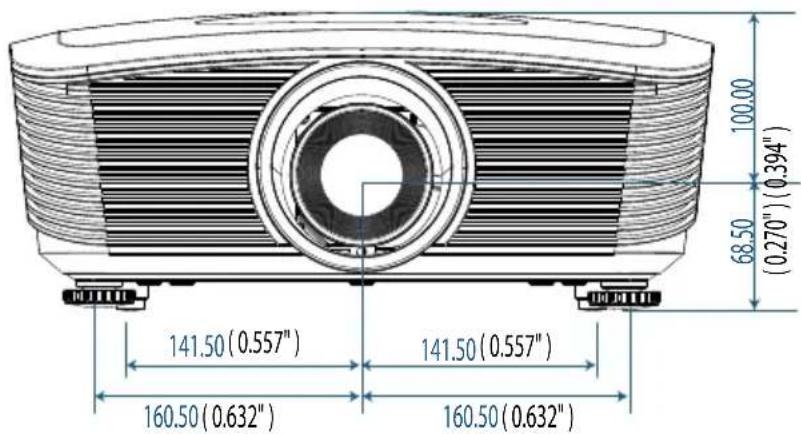
Optoma Global Offices
For service or support please contact your local office.
USA
3178 Laurelview Ct.
Fremont, CA 94538, USA
Tel:888-289-6786 Fax:510-897-8601
www.optomausa.com Service : services@optoma.com
Canada
2420 Meadowpine Blvd., Suite #105
Mississauga, ON, L5N 6S2, Canada
Tel:888-289-6786 Fax:510-897-8601
www.optoma.ca
Service : services
Europe
Unit 1, Network 41, Bourne End Mills,
Hemel Hempstead, Herts, HP1 2UJ, UK
Tel: +44 (0) 1923 691 800 Fax: +44 (0) 1923 691 888
www.optoma.eu
Service Tel : +44 (0)1923 691865 Service : service@tsc-europe.com
France
www.optomausa.com.br Service : www.optomausa.com.mx
Korea
WOOMI TECH.CO.,LTD
4F,Minu Bldg.3.tw3-14, Kangnam-Ku, seoul,135-815, KOREA
Tel: +82+2+34430004 Fax: +82+2+34430005
Japan
東京都足立区綾瀬3-25-18
株式会社オーエスエム
E-mail: info@osscreen.com www.os-worldwide.com
Taiwan
Unit A, 27/F Dragon Centre, 79 Wing Hong Street,
Cheung Sha Wan, Kowloon, Hong Kong
Tel: +852-2396-8968 Fax: +852-2370-1222
www.optoma.com.hk
China
5F, No. 1205, Kaixuan Rd., Changning District
Shanghai, 200052, China
Tel: +86-21-62947376 Fax: +86-21-62947375
www.optoma.com.cn
Regulation & Safety notices
This appendix lists the general notices of your projector.
FCC notice
This device has been tested and found to comply with the limits for a Class B digital device pursuant to Part 15 of the FCC rules. These limits are designed to provide reasonable protection against harmful interference in a residential installation. This device generates, uses, and can radiate radio frequency energy and, if not installed and used in accordance with the instructions, may cause harmful interference to radio communications.
However, there is no guarantee that interference will not occur in a particular installation. If this device does cause harmful interference to radio or television reception, which can be determined by turning the device off and on, the user is encouraged to try to correct the interference by one or more of the following measures:
▶ Reorient or relocate the receiving antenna.
▶ Increase the separation between the device and receiver.
Connect the device into an outlet on a circuit different from that to which the receiver is connected.
Consult the dealer or an experienced radio/television technician for help.
Notice: Shielded cables
All connections to other computing devices must be made using shielded cables to maintain compliance with FCC regulations.
Caution
Changes or modifications not expressly approved by the manufacturer could void the user's authority, which is granted by the Federal Communications Commission, to operate this projector.
Operation conditions
This device complies with Part 15 of the FCC Rules. Operation is subject to the following two conditions:
- This device may not cause harmful interference, and
- This device must accept any interference received, including interference that may cause undesired operation.
Notice: Canadian users
This Class B digital apparatus complies with Canadian ICES-003.
Declaration of Conformity for EU countries
EMC Directive 2004/108/EC (including amendments)
Low Voltage Directive 2006/95/EC
R & TTE Directive 1999/5/EC (if product has RF function)
Disposal instructions
Do not throw this electronic device into the trash when discarding. To minimize pollution and ensure utmost protection of the global environment, please recycle it.


- Introduction 8
- Installation....14
- User Controls 32
- Table of Contents
- Appendices 79
- Safety Information
- Class B emissions limits
- Important Safety Instruction
- Usage Notice
- Risk Group 2
- Precautions
- Do:
- Do not:
- Eye Safety Warnings
- Product Features
- Package Overview
- Product Overview Main Unit
- Control Panel
- Remote Control
- Connecting the Projector Connect to Computer / Notebook
- Connect to Video Sources
- Installing or Removing the Optional Lens
- Caution
- Removing the Existing Lens From the Projector
- Installing the New Lens
- Powering On/Off the Projector Powering On the Projector
- Powering Off the Projector
- Warning Indicator
- Adjusting the Projected Image Adjusting the Projector's Height
- Adjusting the vertical image position
- Adjusting the horizontal image position
- Lens Shift Range Diagram
- Adjusting the Zoom / Focus
- On-screen Display Menus
- How to operate
- Image
- Display Mode
- Brightness
- Contrast
- Sharpness
- Color
- Tint
- Advanced
- Image | Advanced
- Noise Reduction
- BrilliantColor™
- Gamma
- Color Temp
- Color Space
- RGB Gain/Bias
- Color Matching
- Image | Advanced | RGB Gain/Bias
- Gain
- Bias
- Image | Advanced | Color Matching
- Colors (Except White)
- White
- Reset
- Display
- Format
- Digital Zoom
- Edge Mask
- Image Shift
- V Keystone
- 3D
- Display | 3D
- 3D Mode
- 3D→2D
- 3D Format
- 3D Sync. Invert
- Setup
- Language
- Projection
- Screen Type (WUXGA only)
- Menu Location
- Security
- Signal (RGB)
- Signal(Video)
- Projector ID
- Audio Settings
- Network
- Setup | Language
- Setup | Security
- Security Setting
- Security Timer
- Change Password
- Setup | Signal (RGB)
- Automatic
- Frequency
- Phase
- Position
- Position
- Setup | Signal (Video)
- White Level
- Black Level
- IRE
- Setup | Audio Settings
- Mute
- Volume
- Audio Input
- Setup | Advanced
- Logo
- Logo Capture
- Closed Captioning
- Setup | Network
- LAN Settings
- Control Settings
- Setup | LAN Settings
- Setup | Control Settings
- Crestron
- Extron
- PJ Link
- AMX Device Discovery
- Telent
- Options
- Input Source
- Source Lock
- High Altitude
- Information Hide
- Keypad Lock
- Display Mode Lock
- Test Pattern
- Background Color
- Remote Settings
- 12V Trigger
- Lamp Setting
- Information
- Options | Input Source
- Options | Remote Settings
- Function 1
- Function 2
- IR Function
- Remote Code
- Options | Advanced
- Direct Power On
- Signal Power On
- Auto Power Off (min)
- Sleep Timer (min)
- Power Mode (Standby)
- Options | Lamp Setting
- Lamp Hour
- Lamp Reset
- Lamp Reminder
- Brightness Mode
- Power
- LAN\_RJ45
- Supported External Devices
- LAN RJ45
- User Controls
- Preparing Email Alerts
- RS232 by Telnet Function
- Quick Start-Guide for "RS232 by TELNET"
- How to have TELNET enabled in Windows VISTA / 7
- Specsheet for "RS232 by TELNET":
- Troubleshooting
- Image Problems
- No image appears on-screen
- Partial, scrolling or incorrectly displayed image
- The screen of the Notebook or PowerBook computer is not displaying your presentation
- Image is unstable or flickering
- Image has vertical flickering bar
- Image is out of focus
- The image is stretched when displaying 16:9 DVD title
- Image is too small or too large
- Image has slanted sides
- Image is reversed
- Intermission Problems
- The projector stops responding to all controls
- Lamp burns out or makes a popping sound
- HDMI Q & A
- What is the difference between a "Standard" HDMI cable and a "High-Speed" HDMI cable?
- How do I run HDMI cables longer than 10 meters?
- How can I tell if a cable is an HDMI certified cable?
- Message Reminders
- Remote Control Problems
- Audio Problems
- There is no sound
- The sound is distorted
- Replacing the Lamp
- Important:
- Warning:
- Appendices
- Cleaning the Projector
- Cleaning the Lens
- Caution:
- Cleaning the Case
- Compatibility Modes
- Computer Compatibility - VESA standards
- RS232 Commands
- RS232 Protocol Function List
- Telnet Commands
- AMX Device Discovery commands
- PJLink TM supported commands
- Trademarks
- Ceiling Installation
- Optoma Global Offices
- USA
- Canada
- Europe
- France
- Korea
- Japan
- Taiwan
- China
- Regulation & Safety notices
- FCC notice
- Notice: Shielded cables
- Operation conditions
- Notice: Canadian users
- Declaration of Conformity for EU countries
- Disposal instructions
Brand : OPTOMA
Model : EH503e
Category : Projector