
OZ4022 - Warming Drawer Concept - Free user manual and instructions
Find the device manual for free OZ4022 Concept in PDF.


| Product Type | Built-in Warming Drawer |
| Brand | Concept |
| Model | OZ4022 |
| Voltage | 230 V ~ 50Hz |
| Maximum Input Power | 1000 W |
| Heating Element Power | 1000 W |
| Adjustable Temperature Range | 40–80 °C |
| External Dimensions (W x D x H) | 595 x 561 x 141 mm |
| Internal Dimensions (W x D x H) | 548 x 420 x 97 mm |
| Internal Volume | 22 L |
| Net Weight | 18 kg |
| Maximum Load | 25 kg |
| Control Type | Electronic touch control with display |
| Functions | Preheating cups/glasses, preheating plates/dishware, keeping food warm, low-temperature cooking |
| Safety Features | Push-to-open mechanism, contact switch (operates only when closed), child safety (for ages 8+ under supervision), automatic timeout |
| Cleaning | Wipe with damp cloth and mild detergent; anti-slip mat hand wash only; no abrasive cleaners |
| Installation | Built-in; requires minimum cabinet dimensions (see manual) and ventilation gap |
| Included Accessories | Anti-slip mat |
| Reparability | Only qualified technicians; warranty covers defects, not improper installation |
Frequently Asked Questions - OZ4022 Concept
User questions about OZ4022 Concept
0 question about this device. Answer the ones you know or ask your own.
Ask a new question about this device
Download the instructions for your Warming Drawer in PDF format for free! Find your manual OZ4022 - Concept and take your electronic device back in hand. On this page are published all the documents necessary for the use of your device. OZ4022 by Concept.
USER MANUAL OZ4022 Concept
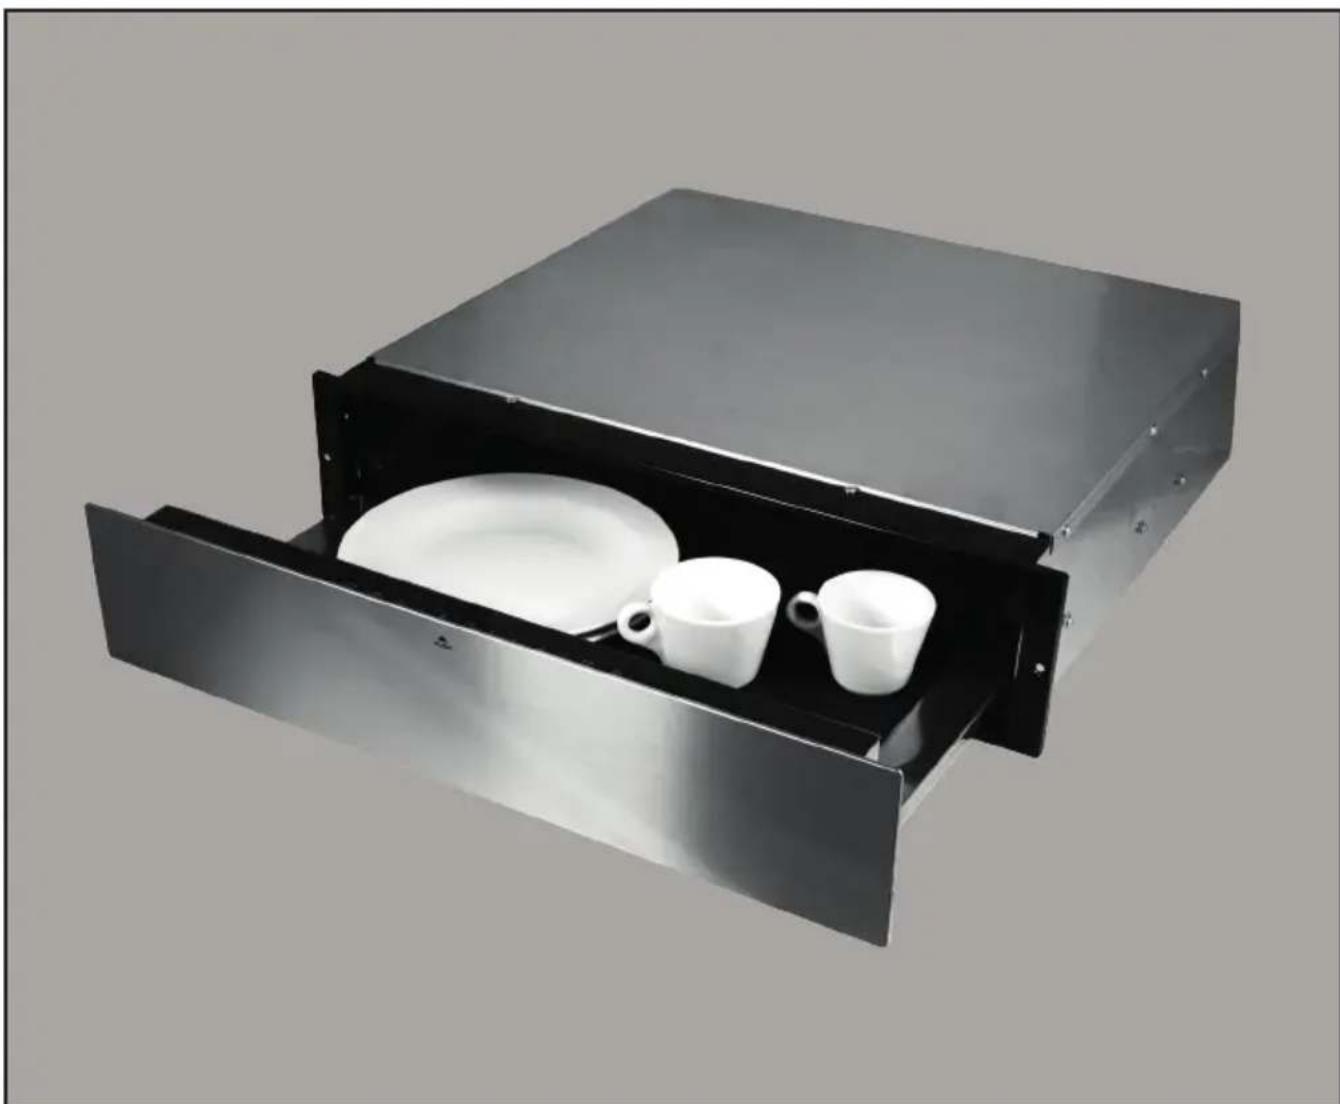
Built-in warming drawer
natural_image
Metallic kitchen drawer with open lid showing a plate and two white mugs (no text or symbols visible)OZ4022
PODĚKOVÁNÍ
NASTAVENÍ TEPLOTY OHŘEVU
Otváranie Push to open:
- Stlačte zásuvku v jej strede pre otvorenie alebo zatvorenie.
- Pri otvorení zásuvka vyjde von.
- Opatrne t'ahajte smerom k sebe, až bude zásuvka úplne vysunutá.
Ovládací panel

NASTAVENIE TEPLOTY OHREVU
UDRŽIAVANIE TEPLÉHO POKRMU
Thank you for purchasing this Concept Warming Drawer. We want you to be satisfied with everything we make every day you use it.
Please read the instructions carefully before initial use.
You should retain them for a future reference. Ensure that anyone using the warming drawer is familiarized with the instructions.
TABLE OF CONTENTS
Important safety information
Product description
Control panel description
User manual
Setting the functions
Keeping food warm
Low-temperature cooking
Important notice
Cleaning and maintenance
Installation
Trouble shooting
Environmental protection
| Technical specifications | |
| Voltage 230 V ~ 50Hz | |
| Max. input power 1000 W | |
| Heating element input power 1000 W | |
| Adjustable temperature range 40–80 °C | |
| External dimensions (W x D x H) 595 x 561 x 141 mm | |
| Internal dimensions (W x D x H) 548 x 420 x 97 mm | |
| Internal volume 22 l | |
| Weight 18 kg | |
The manufacturer reserves the right to make possible technical changes and to correct print errors and differences in the illustrations without previous notice.
IMPORTANT SAFETY INFORMATION
Upon delivery
- Immediately after delivery, check the package for any damage during shipping.
- Caution! Some edges of this appliance that are hidden after installation are sharp! Be careful not to get cut when handling an uninstalled unit.
- Do not install the appliance if it has been damaged. Contact the store where you purchased it immediately.
- Remove all the packaging and marketing materials before first use.
- Keep the packaging materials away from children or dispose of them properly.
During installation
- Do not use the appliance in any way other than as described in this manual.
• This appliance can be used in households and similar places like:
- Kitchen cabinets in shops, offices and other workplaces.
• Appliances used in agriculture.
- Appliances used by guests in hotels and other areas in a hotel environment.
• Appliances used in a Bed and Breakfast environment.
- Do not use the appliance if you are barefoot.
- Do not touch the appliance with wet hands.
- Do not put oversized food or metal objects inside of the appliance. They could cause a fire.
- Do not store anything inside of the appliance.
- Do not allow children or unauthorized people to handle the appliance, use it out of their reach.
• Children should not play with the appliance. - Pay extra attention if the appliance is used near children.
- Do not allow the appliance to be used as a toy.
- Do not let children play with the appliance and its controls.
- This appliance can be used by children aged 8 years and over. Persons with reduced physical, sensory or mental capabilities, or lack of experience and knowledge, should be supervised or familiarized with the instructions for use of the appliance in a safe way and have been made aware of the risks involved.
-
Do not touch hot surfaces during use or shortly after use.
• After long periods of use this warming drawer remains very hot after it is switched off for a protracted period of time. Keep children a safe distance away from the appliance until it cools down. There is risk of serious burns! -
If a malfunction occurs, turn off the appliance and unplug it from the wall outlet.
- When disconnecting the unit from the wall outlet, never pull the power cord, grasp the plug and disconnect it by pulling.
- Do not immerse the power cord or the plug in water or any other liquid.
- Check the appliance and the power cord for damage regularly.
- Do not switch on the appliance if it has been damaged.
- Do not use any accessories other than those recommended by the manufacturer.
- Do not use accessories with damaged surface treatment or if it has been worn out or has other defects.
- Children should not clean and maintain the appliance unless they are at least 8 years old and under supervision.
Correct use
• The appliance is designed for heating the dishware and keeping food warm.
• Always place food (meat) in cookware made of heat-resistant material.
- Never put food (meat) directly on the anti-slip mat, it may damage the anti-slip mat and ignite food (meat). It is a serious fire hazard.
- Use caution and avoid burns from the hot drawer or the dishware. Always use gloves.
- Do not touch the hot dishware if you have wet or damp hands, it causes scalding or burns!
- Do not store any plastic containers or flammable items in the warming drawer.
- The appliance may melt or ignite the objects when it is in use. This is a fire hazard.
- Due to the high temperatures that occur around the appliance when it is in use, do not place any place plastic containers or flammable objects anywhere near the appliance. The objects may catch fire.
- Do not use the appliance to heat the room.
- Never replace the anti-slip mat located inside the appliance with a paper towel or similar substitute.
- Do not stand or sit on the open drawer of the appliance.
• Maximum load for the drawer: 25kg
- Do not overload the telescopic runners that allow the drawer to move.
- If you have installed the appliance into the kitchen cabinet, close the appliance when it is switched off avoiding possible injury.
- Do not warm up unopened tins or jars of food. The pressure created by warming may cause an explosion, which can lead to an injury or scalding.
- The bottom side of the appliance is very hot, when in use. Never touch the bottom side.
- Open drawer may cause burns.
- Do not use plastic or aluminium containers. These objects can ignite and cause a fire when the appliance is in use.
- Use only heat-resistant glassware, Chinaware, etc.
- Be careful when opening and closing the drawer when there are fluids inside (e.g. soup, sauces, etc.), which can be spilt through the openings in the bottom of the drawer due
• to violent handling and thus may cause short circuit.
Possible defects
- Only qualified service technicians should repair or perform maintenance to this appliance.
- During the repairs the appliance must be disconnected from the power. Switch off the circuit breaker or remove the plug from the wall outlet.
- When disconnecting the unit from the wall outlet, never pull the power cord, grasp the plug end and disconnect it by removing it from the receptacle.
If you fail to follow these instructions, the possible repair cannot be recognized as a warranty repair.
PRODUCT DESCRIPTION
-
Control panel
-
Anti-slip mat
Using Push to open mechanism:
- Press the center of the drawer to open or close.
• The drawer opens only partially.
• Gently pull the drawer out until it is fully extended.
Control panel

Control panel description
1 Preheating cups and glasses
2 Preheating plates and dishware
3 Keeping food warm
4 Setting the temperature
5 Setting the duration
6 Setting the temperature and time
7 Stop button
8 Start button
The appliance can be used to keep food warm, as well as heating plates, cups, glasses or bowls.
It may take a longer time to heat the plates and bowls, but they can become very hot during the process. Keep that in mind, there is a risk of burns.
USER'S MANUAL
Before first use
After connecting the appliance to the mains or after a power failure, there is a display test, which lasts for 10 seconds. At the same time the cooling fan gets activated. It is not possible to use the appliance during this time.
First cleaning and heating
- Remove all the packaging and marketing materials before first use.
- Peel the anti-slip mat off from the bottom of the drawer.
- Remove the drawer, if it is possible.
- Wipe the visible part (internal and external) with a damp cloth and then dry it with a soft cloth.
- Stick the anti-slip mat back on the bottom of the drawer.
Before first use, power up the empty drawer for no less than two (2) hours.
Note:
- The appliance is equipped with a „Push to open“ closing mechanism.
- The appliance is equipped with a contact switch ensuring the appliance only turns on after the warming drawer is closed.
- During the initial operation the appliance may emit a slight odour. This is because some of the metal components inside the appliance are equipped with a protective coating. The odour will disappear after a short time.
- Make sure that during this process the room is well ventilated.
Specifications
- After connecting the appliance to the mains you will hear an audible signal. Open the drawer and the display shows „0“.
- When setting the time, this operation can "time out" if there is no activity within 3 minutes, the appliance will return to standby mode.
- After pressing any button, you will hear an audible signal.
- After the drawer has warmed up you will hear an audible signal three times.
Setting the functions
- Press a button (1), (2) or (3) while the appliance is in an idle mode (standby mode) to select a desired function.
- The display shows the preset temperature of the selected function (40°C or 60°C).
- Press the button „+“ or „-“ to set the desired temperature.
- Hold the button (5) and press the „+“ or „-“ to set the desired time.
- Press the button (8) to confirm the settings.
- Close the drawer. The appliance will operate according to the settings.
Note:
- When setting the parameters, you can change the function by pressing the desired button (1), (2) or (3).
- You can press the button (7) to cancel any selected setting before closing the drawer. The appliance will return to standby mode.
- During the heating process you can change the parameter settings for the actual heating. Open the drawer and select the parameter you want to change by pressing the button (4) or (5). Press the button „+“ or „-“ to adjust the selected temperature or the time. Press the button (8) to confirm the newly set parameters.
- Close the drawer to continue with the heating process.
- Press the button (7) to cancel the heating process with the newly set parameters.
- After pressing button (8) the function cannot be changed. You can only change the temperature and time.
- To change the function, you must first press button (7). Then press the button (1), (2) or (3) to select the desired function and the appropriate parameters for heating.
SETTING THE TEMPERATURE
You can customize the temperature range for any function. In table 1 you will find the pre-set temperature values. You can change the temperature by 5^ steps by pressing the button + + or - - . The last temperature set for the function is activated automatically when you turn on the appliance. The selected temperature will show on the display.
| Temperature °C* | ||
 |  |  |
| 40 60 60 | ||
| 45 65 65 | ||
| 50 70 70 | ||
| 55 75 75 | ||
| 60 80 80 | ||
Table 1 | * Approximate temperature values, as measured in the middle of the warming drawer when empty.
Setting the duration
The appliance is preset for continuous heating. You can control how long it is on by pressing the button „+“ or „-“.
The capacity of the appliance
The number of dishes that can be inserted into the drawer depends on the size and weight of the dishware. Do not overload the drawer! Maximum load for the drawer is 25 kg. The drawer should be partly closed if the weight of the dishware is just below the maximum load capacity of the drawer.
Here are only suggestions for preheating the dishware.
6 pieces of large plates ∅ 26 cm
6 pieces of soup plates ∅ 23 cm
6 pieces of small plates ∅ 19 cm
1 piece of oval plate ∅ 32 cm
1 piece of medium serving bowl ∅ 16 cm
1 piece of small serving bowl ø 13 cm
KEEPING FOOD WARM
| Type of food Cover the dish | Recommended temperature [°C] | |
| Steak (rare) YES 65 | ||
| Roasted meat | YES 80 | |
| Roast | YES 75 | |
| Stew | YES 80 | |
| Type of food Cover the dish | dish | Recommended temperature [°C] |
| Fish fingers NO 80 | ||
| Meat in sauce YES 80 | ||
| Vegetable in sauce YES 80 | ||
| Goulash YES 80 | ||
| Mashed potatoes YES 75 | ||
| Baked/new potatoes YES 75 | ||
| Fried cutlet NO 80 | ||
| Crepes / potato pancakes NO 80 | ||
| Pizza NO 80 | ||
| Boiled potatoes YES 80 | ||
| Sauce YES 80 | ||
| Apple strudel NO 80 | ||
| Bakery products | NO | 60 |
- Maintaining the food temperature depends on the amount of food and the type of a container.
• The cover must be made of the heat resistant material.
This is a gradual warming process, which maintains the set temperature inside the food. Using the conventional heating method the temperature is always higher than the temperature of food, which is intended for immediate consumption. In the case of the low temperature cooking of meat, the meat is heated for a long time at low temperature. Thanks to this method meat loses less fluid, maintains the organoleptic characteristics of freshness (vitamins, proteins, etc.) and intact juiciness and flavour.
Note:
-
This method is suitable for large cuts of meat.
-
For accurate measurement of the temperature inside meat we recommend using a temperature probe.
Temperature inside of food
Food can be cooked in the warming drawer up to a core temperature of 70^ . Meat which needs to be cooked to a core temperature higher than 70^ cannot be cooked in the warming drawer. The core temperature indicates the degree of doneness in the middle of a piece of meat. The lower the core temperature, the less well-done the meat is in the middle:
| 45–50 °C | Rare |
| 55–60 °C | Medium |
| 65 °C | Well done |
How to use
- Preheat the drawer at 70 °C for 15 minutes.
-
Put the meat in the drawer and cover it with a cover made of heat-resistant material.
-
The cooking time depends on the size of individual pieces of meat. See the cooking times for different sized pieces of meat in the tables in the Low-temperature paragraph.
Note:
- Salt the meat during the process of low temperature cooking or after it is done.
- Dry the meat with a kitchen paper towel before finishing on the pan.
- Preheat the pan with a reasonable quantity of oil or butter and place the meat in the pan.
- Serve on pre-heated plates. This prevents the meat from cooling too rapidly.
| Beef and veal | ||||
| Food preparation in the warming drawer Finishing (pan) | ||||
| Part of food Thickness | Cooking temperature | Cooking time Finishing time and temperature | ||
| The whole piece of meat | 50 mm | Rare 1 h 35 min | 90 seconds on the outside at maximum temperature | |
| Medium 2 h 35 min | ||||
| Well done 3 h 30 min | 3 minutes on the outside at medium temperature | |||
| 60 mm | Rare 1 h 45 min | 90 seconds on the outside at maximum temperature | ||
| Medium 2 h 50 min | ||||
| Well done 4 h | 3 seconds on the outside at medium temperature | |||
| 70 mm | Rare 2 h | 90 seconds on the outside at maximum temperature | ||
| Medium 3 h | ||||
| Well done 4 h 40 min | 3 minutes on the outside at medium temperature | |||
| MédaillonsRib eyeT-boneRump Steak | 20 mm | Rare 1 h 35 min | 90 seconds on one side at maximum temperature | |
| Medium 2 h 35 min | ||||
| Well done 3 h 30 min | 3 minutes on one side at medium temperature | |||
| 30 mm | Rare 1 h 45 min | 90 seconds on one side at maximum temperature | ||
| Medium 2 h 50 min | ||||
| Well done 4 h | 3 minutes on one side at medium temperature | |||
| MédaillonsRib eyeT-boneRump Steak | 40 mm | Rare 2 h | 2 minutes on one side at maximum temperature | |
| Medium 3 h | ||||
| Well done 4 h 40 min | 4 minutes on one side at medium temperature | |||
| SirloinRoast Beef | 60 mm | Rare 1 h 45 min | 4 minutes on the outside at medium temperature | |
| Medium 2 h 50 min | ||||
| Well done 4 h | 6 minutes on one side at medium temperature | |||
| 70 mm | Rare 2 h | 4 minutes on the outside at medium temperature | ||
| Medium 3 h | ||||
| Well done 4 h 40 min | 6 minutes on one side at medium temperature | |||
| 80 mm | Rare 2 h 20 min | 4 minutes on the outside at medium temperature | ||
| Medium 3 h 30 min | ||||
| Well done 5 h 40 min | 6 minutes on one side at medium temperature | |||
| Poultry | ||||
| Food preparation in the warming drawer Finishing (pan) | ||||
| Part of food | Thickness | Cooking temperature | Cooking time | Finishing time and temperature |
| Chicken breasts | 25 mm | Medium 1 h 30 min | 60 seconds on one side at maximum temperature | |
| Well done 2 h 90 seconds on one side at maximum temperature | ||||
| 35 mm | Medium 1 h 45 min | 60 seconds on one side at maximum temperature | ||
| Well done | 2 h 20 min | 90 seconds on one side at maximum temperature | ||
| Duck breasts | 35 mm | Rare 1 h | 4 minutes with the skin facing down at medium temperature | |
| Medium 1 h 30 min | 4 minutes with the skin facing down at medium temperature | |||
| Well done 2 h | 4 minutes with the skin facing down at medium temperature | |||
| 40 mm | Rare 1 h 45 min | 4 minutes with the skin facing down at maximum temperature | ||
| Medium 2 h 20 min | 4 minutes with the skin facing down at medium temperature | |||
| Well done 3 h | 4 minutes with the skin facing down at medium temperature | |||
| Turkish bread | 40 mm | Medium 3 h 90 seconds on one side at maximum temperature | ||
| Well done 4 h 3 minutes on one side at maximum temperature | ||||
| 50 mm | Medium 3 h 50 min | 90 seconds on one side at maximum temperature | ||
| Well done 5 h 3 minutes on one side at maximum temperature | ||||
| Goose or duck médaillons | 10 mm | Medium | 30 min | 60 seconds on one side at maximum temperature |
| 20 mm | Medium | 40 min | 60 seconds on one side at maximum temperature | |
| 30 mm | Medium | 50 min | 60 seconds on one side at maximum temperature | |
| Goose or duck pâté | 35 mm Medium 48 min | 90 seconds on the outside at maximum temperature | ||
| 45 mm Medium 1 h | 90 seconds on the outside at maximum temperature | |||
| 55 mm Medium 1 h 15 min | 90 seconds on the outside at maximum temperature | |||
| Lamb | ||||
| Food preparation in the warming drawer Finishing (pan) | ||||
| Part of food | Thickness | Cooking temperature | Cooking time | Finishing time and temperature |
| Lamb | 40 mm | Rare 1 h 20 min | 90 seconds on the outside at maximum temperature | |
| Medium 2 h 10 min | ||||
| Well done 3 h | 3 minutes on the outside at medium temperature | |||
| 50 mm | Rare 1 h 35 min | 90 seconds on the outside at maximum temperature | ||
| Medium 2 h 35 min | ||||
| Well done 3 h 30 min | 3 minutes on the outside at medium temperature | |||
| 60 mm | Rare 1 h 45 min | 90 seconds on the outside at maximum temperature | ||
| Medium 2 h 50 min | ||||
| Well done 4 h | 3 minutes on the outside at medium temperature | |||
| Baron of lamb | 60 mm | Rare 1 h 45 min | 3 minutes on the outside at maximum temperature | |
| Medium 2 h 50 min | 4 minutes on the outside at medium temperature | |||
| Well done 4 h | ||||
| 70 mm | Rare 2 h | 3 minutes on the outside at maximum temperature | ||
| Medium 3 h | 4 minutes on the outside at medium temperature | |||
| Well done 4 h 40 min | ||||
| 80 mm | Rare 2 h 20 min | 3 minutes on the outside at maximum temperature | ||
| Medium 3 h 30 min | 4 minutes on the outside at medium temperature | |||
| Well done 5 h 40 min | ||||
| Boneless lamb leg | 60 mm | Rare 1 h 45 min | 2 minutes on the outside at maximum temperature | |
| Medium 2 h 50 min | 3 minutes on the outside at medium temperature | |||
| Well done 4 h | ||||
| Boneless lamb leg | 70 mm | Rare 2 h | 2 minutes on the outside at maximum temperature | |
| Medium 3 h | 3 minutes on the outside at medium temperature | |||
| Well done 4 h 40 min | ||||
| 80 mm | Rare 2 h 20 min | 2 minutes on the outside at maximum temperature | ||
| Medium 3 h 30 min | 3 minutes on the outside at medium temperature | |||
| Well done 5 h 40 min | ||||
| Lamb chops | 10 mm | Rare 35 min | 60 seconds on one side at maximum temperature | |
| Medium 1 h 10 min | ||||
| Well done 2 h | 90 seconds on one side at maximum temperature | |||
| 20 mm | Rare 50 min | 60 seconds on one side at maximum temperature | ||
| Medium 1 h 30 min | ||||
| Well done 2 h 30 min | 90 seconds on one side at maximum temperature | |||
| Eggs | |||
| Size Weight Time Note | |||
| Extra large (XL) 73 g and more | 2 h 20 min | Hard-boiledIdeal on toast (sunny-side up). Rapid heating process in boiling water. | |
| 2 h 30 min | |||
| 3 h 10 min | |||
| Large (L) 63 g < 73 g | 2 h 11 min | Medium-boiledVery creamy yolk. Sturdier egg white. | |
| 2 h 31 min | |||
| 3 h 1 min | |||
| Medium (M) 53 g < 63 g | 2 h 5 min | Soft-boiledThe most popular preparation. Solid egg white, malleable yolk. | |
| 2 h 25 min | |||
| 2 h 55 min | |||
| Small (S) 53 g and less | 2 h | ||
| 2 h 20 min | |||
| 2 h 50 min | |||
Another use of low-temperature warming
| Type of food Suitable cookware | Cover cookware | Recommended temperature | Time | |
| Thawing frozenberries | Plate | NO | 65 °C | 1 hour |
| Thawing frozen vegetables Plate NO 65 °C 1 hour | ||||
| Dow Bowl YES 45 °C 1/2 hour | ||||
| Making yoghurt | Yoghurt cup with a lid | YES | 45 °C | 6 hours |
| Melting chocolate Bowl NO 50 °C 1 hour | ||||
| Oil | Bowl covered with a cling film | YES | 75 °C | 4 hours |
| Water | Bowl covered with a cling film | YES | 65 °C | 4 hours |
| Drying tomatoes | Plate with baking paper | NO | 60 °C | 20 hours |
| Drying vegetables | Plate | NO | 60 °C | 12 hours |
| Drying slices of fruit | Plate | NO | 60 °C | 12 hours |
| Drying herbs | Plate | NO | 70 °C | 4 hours |
| Drying the bread for breadcrumbs | Plate NO 80 °C 4 hours | |||
| Fish confit in oil | Cookware designed for use in a microwave oven | With its own cover opened | 50 °C | Depended on the size (1–2 hrs.) |
| White toast | Plate NO 80 °C 2 hours | |||
| Goulash | Glass container | YES | 80 °C | Between 1–12 hours |
IMPORTANT NOTICE
Caution! Risk of serious burns!
If you open the warming drawer after or during the heating process, do not touch the anti-slip mat or the bottom of the warming drawer! During the heating process these parts often get extremely hot hence the risk of burns.
CLEANING AND MAINTENANCE
- For the sake of good appearance and reliability, keep the appliance clean.
- The modern design of the unit facilitates the maintenance to the minimum.
- The parts of the appliance that come into contact with food have to be cleaned regularly.
- Do not use high-pressure cleaners or steam jets. The steam could reach the electrical parts inside the machine and cause a short circuit.
- Inappropriate cleaning agents can damage the surface of the appliance. Use only the cleaning agents designed for cleaning the dishware.
- Keep the appliance clean and dry after each use. Let the appliance cool down to a safe temperature before cleaning.
To prevent damage to the surface of the appliance do not use:
• cleaning agents, which include sodium, ammonia, acid or chlorides,
• detergents for descaling,
• abrasive cleaners e.g. powder and cream cleaners,
• solvent-based cleaners,
- cleaners designed for stainless steel,
• cleaning products specifically designed for dishwashers,
• sprays designed for cleaning ovens,
• detergents for cleaning glass,
- hard, abrasive sponges and brushes, eg. scourers,
- sharp metal scrapers.
Front side and interior
Remove any spilled food or other impurities as quickly as possible. Failure to remove any impurities may cause permanent staining altering the colour of the appliance.
Clean all surfaces with a clean sponge, warm water and only dish detergent. Dry it with a soft cloth. You may also use a clean, damp microfibre cloth without using detergent.
All surfaces are susceptible to scratching. Scratches on surface can cause damage to the appliance. If unsuitable cleaning agents come in contact with the surface of the appliance, it can cause damage or change the colour of the surface of the appliance.
Anti-slip mat
Take off the ant-slip mat from the drawer before cleaning.
Clean the anti-slip mat just with your hands using hot water and dish detergent. Subsequently, dry it with a soft cloth.
Do not put the anti-slip mat back into the drawer until it is completely dry.
Do not wash the anti-slip mat in a dishwasher or a washing machine.
Never put the anti-slip mat in the oven to dry.
INSTALLATION OF THE APPLIANCE
- Defects caused by improper installation are not covered by the warranty.
• Installation is the responsibility of the customer not the manufacturer.
• The manufacturer bears no responsibility for damage caused to people, animals or property due to incorrect installation. - Placing the appliance into suitable furniture ensures its proper functionality.
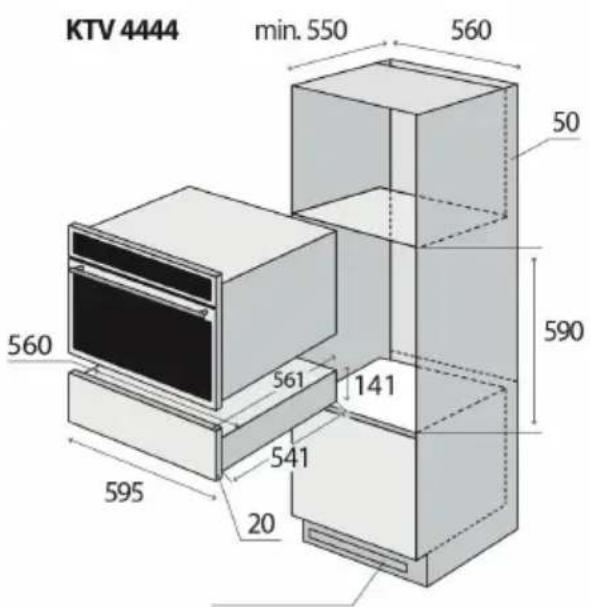
- The appliance is installed in standardized kitchen furniture designed for built-in appliances or in properly adapted furniture of dimensions according to Pic. 1.
-
The appliance can be placed only in an upright cabinet together with appliances that are defined by the manufacturer. (Pic. 1).
-
The manufacturer cannot guarantee trouble-free operation in case that the warming drawer is used in combination with other appliances other than those given by the manufacturer.
- If a suitable appliance is situated directly on the top of the warming drawer, it is not necessary to place a shelf between the appliances.
- Ensure any cabinet used is constructed to support the weight of both appliances.
- The kitchen furniture must be made of materials resistant to temperatures of at least 120 °C. Any materials and adhesives used must be resistant to heating in compliance with ČSN EN 60335-2-6. Materials and adhesives that are not in compliance with this standard may deform or loosen.
- All guards must be placed firmly in their appropriate place in a way they cannot be removed without using special tools.
- The rear board of the kitchen unit has to be removed in order to ensure appropriate air circulation around the appliance.
- The appliance must be installed so it is possible to see the entire content of the warming drawer when opened. This is important to avoid any spilling or scalding by hot food when removing from the drawer. You must be able to pull out the drawer to its maximum to have enough space to remove plates and bowls.
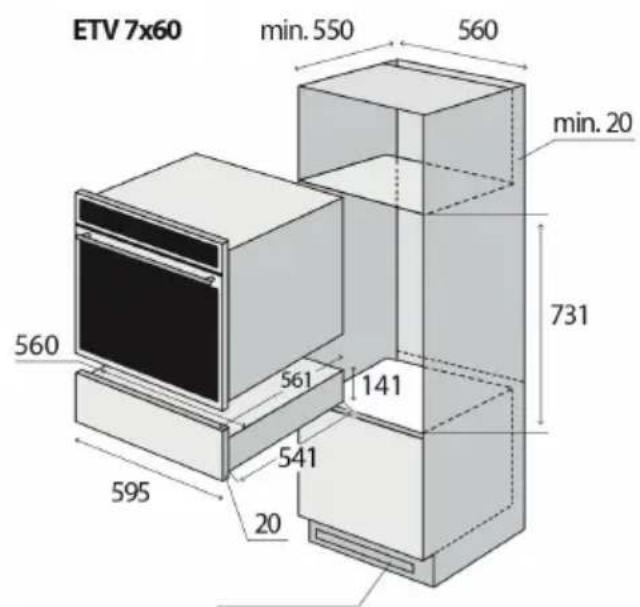
Pic. 1
min. 250 cm²
min. 250 cm²
Connection to the mains
- Only use grounded sockets.
- Do not use multiple sockets, plugs and extension cords. There is a risk of overheating.
- The plug of the power cord on the appliance must be freely accessible even after the installation.
• Changes in a connection may only be performed by a qualified professional. - Electrical safety of the appliance can be guaranteed only if the protective terminal of the appliance is connected to the protective conductor of the mains.
- The manufacturer bears no responsibility for damage to persons or property as a result of missing or bad protective connection.
- The power cord must be positioned in a way it does not come into contact with hot parts of the appliance and it is not being deformed or excessively bent.
When installing the appliance, follow these steps:
- Remove all the packaging and marketing materials before first use.
- The required dimensions of the cabinet for the installation are shown in Pic. 1. Due to effective air circulation the appliance must be located according to the dimensions shown in pictures and the cabinet must be designed that the air can circulate freely into the bottom part of the appliance. There must be a gap behind the rear wall of the appliance at least 50 mm (in case it is in combination with KTV) or 20 mm (in case it is in combination with ETV).
- Insert the machine on the edge of the cabinet and pass the power cord through the rear wall of the cabinet so its plug will be freely accessible after the installation.
- Carefully insert the whole appliance into the cabinet at the chosen location. Be careful to avoid pinching the power cord.
- Fasten the appliance to the cabinet by screwing two screws into the holes in the front wall of the frame of the appliance. Holes are visible after opening the drawer.
- Plug the power cord into the wall outlet.
Disassembling
If you disassemble the appliance, it is important to follow the steps in the correct order:
- First, unplug the power cord from the mains (pull the plug or switch off the circuit breaker).
- Loosen the fastening screws.
- Slide out the appliance while carefully pull the power cord.
TROUBLE SHOOTING
Malfunctions often have simple explanations. Please read the following notes before calling the after-sales service. Some of the malfunctions may be caused by improper use of the appliance.
The Installation and repair of an electrical appliance may only be performed by a qualified professional. Repairs and manipulation with the appliance by an unauthorized person could be dangerous.
| Defect description Possible cause Solution | ||
| The appliance does not heat | The appliance is not properly plugged into an electric outlet | Check the connection of the cord. |
| Circuit breaker has tripped | Turn off and on again the circuit breaker. After the circuit breaker has been switched on turn on the appliance. If the appliance does not heat contact a qualified expert or a service. | |
| Food is not warm enough | A function for maintaining the temperature is not selected. | Select the correct function. |
| The set temperature is too low Set a higher temperature. | ||
| Ventholes are blocked. | Make sure that air can circulate freely. | |
| Food is too hot | A function for maintaining the temperature is not selected. | Select the correct function. |
| The set temperature is too high Set a lower temperature. | ||
| Dishware is not warm enough | The function for heating plates, bowls, cups and glasses is not selected | Select the correct function. |
| The set temperature is too low Set a higher temperature. | ||
| Ventholes are blocked | Make sure that air can circulate freely. | |
| Dishware was not been heated long enough | There are different types of dishes, which have different heating time (see Pre-heating the dishware). | |
| Dishware is too hot | The function for heating plates, bowls, cups and glasses is not selected | Select the correct function. |
| The set temperature is too high Set a lower temperature. | ||
| There is a noise while using the warming drawer | The noise comes from the fan which distributes the warm air evenly inside the drawer. The fan operates at intervals when the function for keeping food warm at a low temperature is selected | This is not a malfunction. |
ENVIROMENTAL PROTECTION
- Prefer recycling of packaging materials and old appliances.
- Package materials may be disposed of as sorted waste.
- Dispose the plastic bags made of polyethylene (PE) of as sorted waste.
Recycling of the appliance at the end of its lifespan:
This appliance is labelled in accordance with European Directive 2012/19/EU concerning used electrical and electronic appliances (waste electrical and electronic equipment - WEEE). The symbol on the product or its packaging indicates that this product may not be treated as household waste. It is necessary to take it to a container park for the recycling of electrical and electronic equipment. By ensuring the correct disposal of this appliance you will help prevent potential negative consequences for the environment and human health, which could otherwise result from inappropriate disposal of this product. Disposal must be performed in accordance to the regulations for waste disposal. For more detailed information about recycling of this appliance see the authorized local office or service for household waste disposal or the shop, where you purchased the appliance.
CONCEPT POLSKA sp. z o.o.

- PODĚKOVÁNÍ
- NASTAVENÍ TEPLOTY OHŘEVU
- Otváranie Push to open:
- Ovládací panel
- NASTAVENIE TEPLOTY OHREVU
- UDRŽIAVANIE TEPLÉHO POKRMU
- TABLE OF CONTENTS
- IMPORTANT SAFETY INFORMATION
- Upon delivery
- During installation
- Correct use
- Possible defects
- PRODUCT DESCRIPTION
- Using Push to open mechanism:
- Control panel
- Control panel description
- USER'S MANUAL
- Before first use
- First cleaning and heating
- Note:
- Specifications
- Setting the functions
- SETTING THE TEMPERATURE
- Setting the duration
- The capacity of the appliance
- Temperature inside of food
- How to use
- IMPORTANT NOTICE
- Caution! Risk of serious burns!
- CLEANING AND MAINTENANCE
- To prevent damage to the surface of the appliance do not use:
- Front side and interior
- Anti-slip mat
- INSTALLATION OF THE APPLIANCE
- Connection to the mains
- When installing the appliance, follow these steps:
- Disassembling
- TROUBLE SHOOTING
- ENVIROMENTAL PROTECTION
- Recycling of the appliance at the end of its lifespan:
- CONCEPT POLSKA sp. z o.o.
Brand : Concept
Model : OZ4022
Category : Warming Drawer