
786590000 - Vacuum Cleaner Eta - Free user manual and instructions
Find the device manual for free 786590000 Eta in PDF.


| Product Type | Canister Vacuum Cleaner |
| Model | 786590000 |
| Brand | Eta |
| Dimensions (L x W x H) | 400 x 250 x 280 mm |
| Weight | 4.5 kg |
| Power Supply | 230 V, 50 Hz |
| Power Consumption | 700 W |
| Dust Container Capacity | 1.5 L |
| Filtration System | HEPA 13 filter |
| Noise Level | 75 dB |
| Cord Length | 5 m |
| Suction Power Control | Mechanical slider |
| Attachments Included | Crevice nozzle, upholstery brush, turbo brush |
| Operating Radius | 8 m |
| Maintenance | Clean dust container and filters regularly |
| Filter Cleaning | Washable HEPA filter (rinse with water, dry 24h) |
| Safety Features | Thermal overload protection, automatic shut-off |
| Spare Parts | Filters, brush rollers, dust bag (if applicable) |
| Repairability | Modular design; motor and electronics replaceable by qualified person |
| General Information | Made for dry vacuuming; light weight for easy portability |
Frequently Asked Questions - 786590000 Eta
User questions about 786590000 Eta
0 question about this device. Answer the ones you know or ask your own.
Ask a new question about this device
Download the instructions for your Vacuum Cleaner in PDF format for free! Find your manual 786590000 - Eta and take your electronic device back in hand. On this page are published all the documents necessary for the use of your device. 786590000 by Eta.
USER MANUAL 786590000 Eta
Multi-purpose Vacuum Cleaners OPERATING INSTRUCTIONS GB 32-43
natural_image
Exterior view of a Mariner air purifier with control panel and branding (no readable text beyond branding)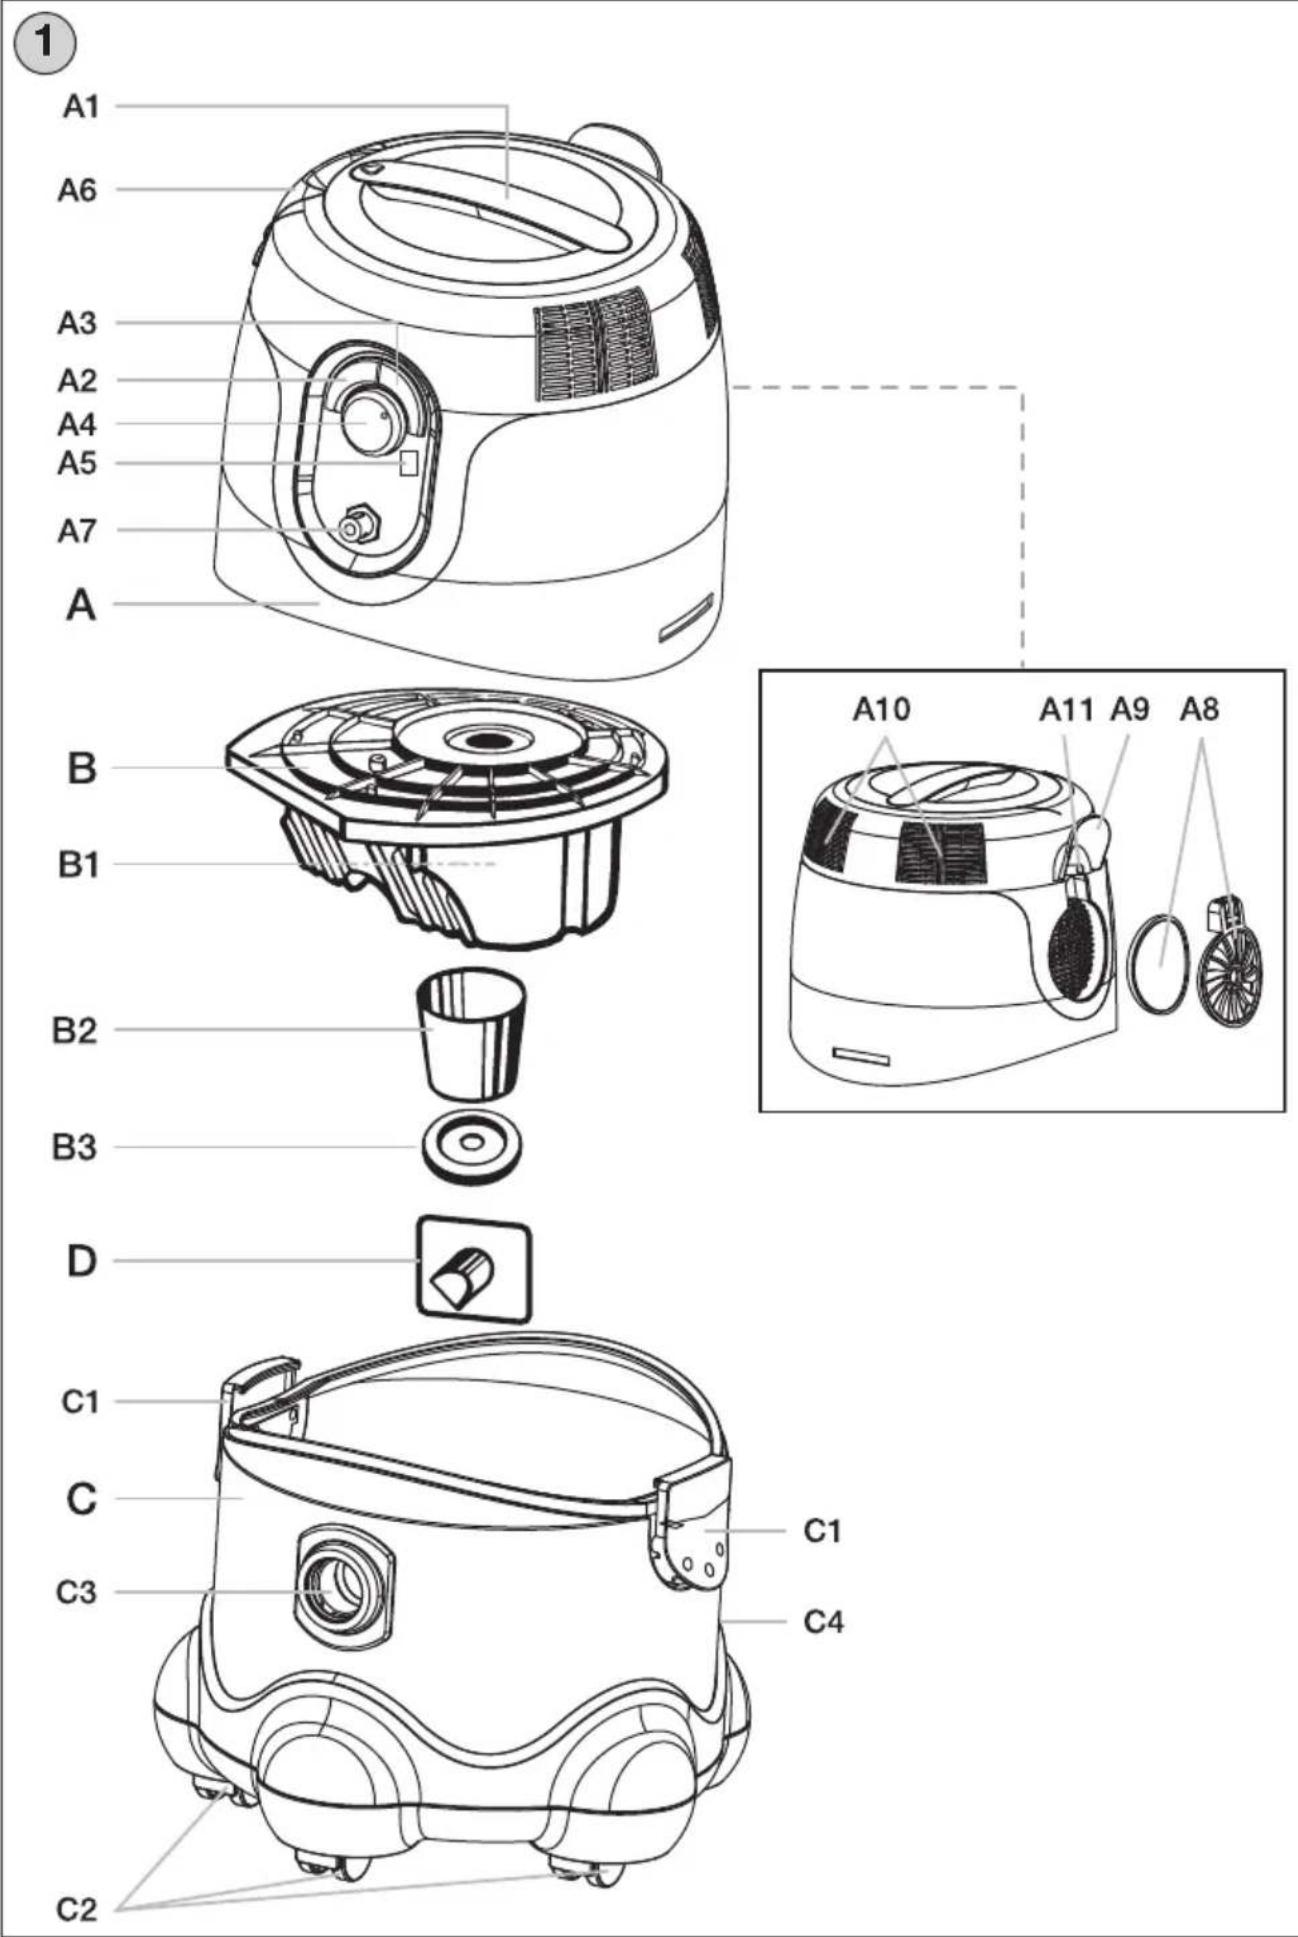
natural_image
Illustration of a hand holding a tool with directional arrows indicating motion or movement (no text or symbols)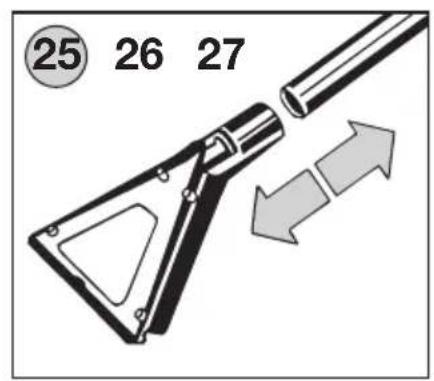
natural_image
Diagram of a firearm being adjusted for a gun, showing mechanical parts and directional arrows (no text or symbols)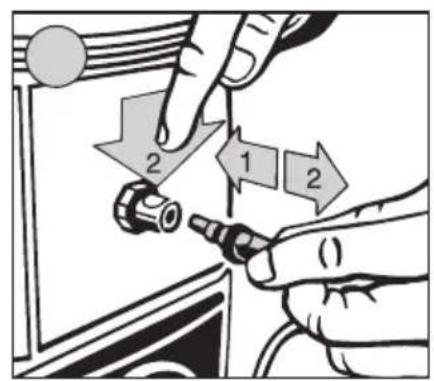
natural_image
Illustration of a hand holding a handheld device with wires and a circular background (no text or symbols)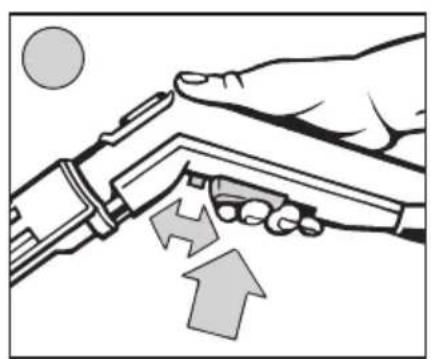
natural_image
Illustration of a robotic arm with directional arrows indicating movement or force (no text or symbols)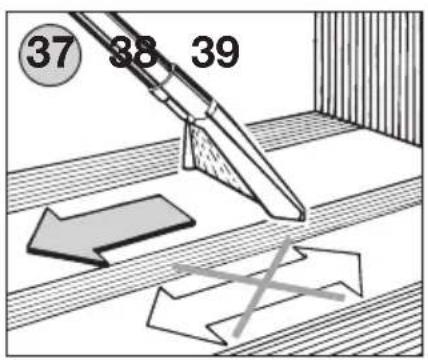
natural_image
Illustration of hands using a compass to draw a circle, with arrows indicating direction (no text or symbols)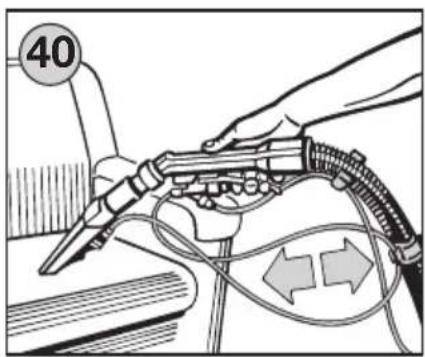
natural_image
Illustration of a hand using a handheld tool to connect a car, with no visible text or symbols.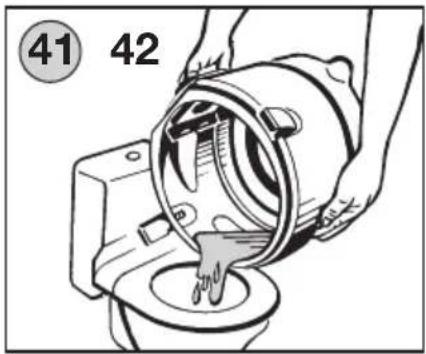
natural_image
Illustration of hands connecting hoses to a pipeline with directional arrows indicating flow or movement (no text or symbols)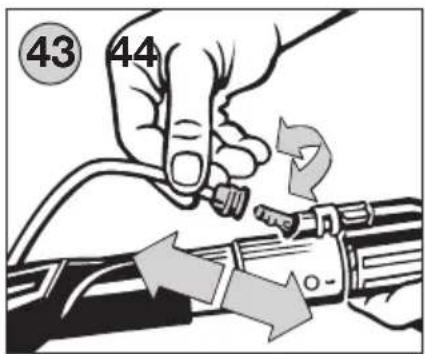
natural_image
Illustration of a woman cleaning a window with a vacuum cleaner nearby (no text or symbols)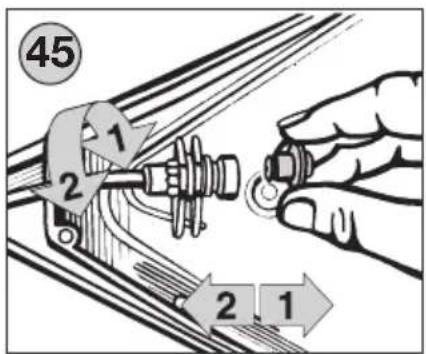
natural_image
Illustration of hands washing a car with a faucet and water droplets (no text or symbols)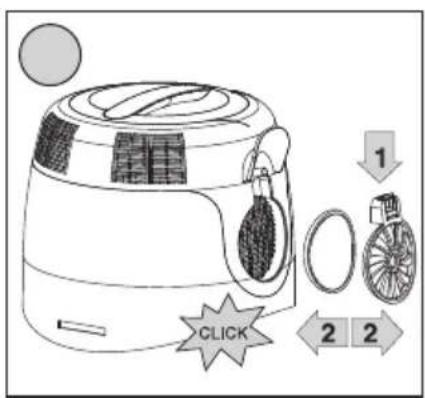
natural_image
Line drawing of a vacuum cleaner with coiled hose and fan (no text or symbols)NÁVOD K OBSLUZE
ETA x865-line vacuum cleaners are designed to be used for cleaning not only dry surfaces but also materials containing water or water itself as well as for 'wet' cleaning of carpeting, upholstery, windows, floors, car interiors etc.
I. SAFETY PRECAUTIONS
- Before putting the appliance into operation for the first time, read carefully the User's Manual, study the diagrams shown in it and keep the Manual for future reference.
- Check that the voltage specifications shown in the appliance nameplate conform to the voltage in your mains.
- The appliance is not intended to be used by people (including children) whose physical, sensual or mental inability or lack of experience and knowledge prevent them from safe use of the appliance unless they are supervised or unless they have been instructed in the terms of the use of the appliance by a person responsible for their safety. Children should be supervised so that playing with the appliance is prevented.
- The special detergent designed to be used with the appliance must be kept on reach of children. In contact with the skin, the detergent has a major drying of Therefore, protect your hands with gloves and treat them with a suitable lotion necessary.
- Never put any tool or the tube end to your eyes or ears and do not place of the body opening.
- Do not put your fingers or any other items into the input and output openings of the appliance. If the openings/parts for air passage are blocked (such as the tube), turn off the appliance and remove the cause of blocking.
- The appliance is not suitable for hovering substances that can be harmful to health.
- Using the appliance to clean very fine dust particles (such as fine sand, cement, or crushed plaster) can cause the dust bag pores and micro-filters to clog. By that, the air throughput through the cleaner and hence the suction power are compromised. In that case both the dust bag and the micro-filters must be exchanged, or the dust bag emptied + micro-filters changed, even if the dust bag is only partially filled.
- Paper filters are disposable, i.e. they cannot be cleaned and used again! Any mechanical cleaning of the paper filter causes damage to the internal filtration layer which leads to the loss of the filtration and mechanical properties of the filter.
- Never use the cleaner to remove sharp objects (such as broken glass), hot, volatile or explosive agents (such as ash, glowing cigarette butts, white spirit, solvents) or lubricants (such as grease or oil) and corrosive agents (such as acids, solvents) and substances with high foaminess. Hovering these substances may cause damage to the dust bag or the cleaner.
- Never direct the flow of the cleaning detergent to people, animals, plants or appliances containing electric parts (such as oven interiors, dryer interiors etc.).
- Never direct the flow of the cleaning detergent to the appliance itself.
- Never use the appliance with wet hands or legs!
- Never leave the appliance higher on the staircase than where you are standing
- Never leave the appliance running unattended!
- Never submerge the cleaner motor unit (not even partially) in water!

- Before you start using the appliance check that all arresting mechanisms are in proper positions.
- The working position of the cleaner is vertical (i.e. upright) and it is not allowed to put the cleaner up, tilt it or turn it over during wet cleaning as water may be the tank!
- When manipulating the appliance, do not pull the tube sharply and refrain from rough manipulation!
- Make sure that the jetting flow of the detergent is never directed towards ele sockets or electric appliances and their cord.
- When using the cleaner to clean smooth flooring take special care when walking in order to avoid injury by slipping.
- When using the cleaner for wet cleaning, the float may block the suction opening when the cleaner runs over an obstacle (such as the threshold). If so, turn the cleaner off and on again or empty the waste water tank.
- Before filling the detergent tank with the detergent fluid, emptying the waste tank, exchanging the dust bag, cleaning/exchanging the micro-filters or cleaning the cleaner or the cleaner accessories, always switch OFF and unplug the cleaner from the mains.
- Use only the non-foaming detergent brand supplied with the cleaner accessories! Additional bottles of the cleaner are available either in the elektro shops chain or from other retailers.
- Do not mix the used detergent with other detergents.
- Never add incrustation removal, aromatic substances or alcohol-containing substances to the tank for Detergent B as they could damage the pump or decrease the safety of the cleaner
- Before using the cleaner to clean dry surfaces with the use of the cloth dust, leave the cleaner body, the suction hose, the tubes and the inlet micro-filter to fully, in order to avoid damaging the cloth dust bag. The accessories need to dry at least 10 minutes by an air flow before switching from dry to wet cleaning and after the suction area has been cleaned and dried, it is possible to place the lid with the paper filter.
- Do not leave the cleaner exposed to weather conditions (rain, frost, direct sunlight etc.)
- The cleaner must be stored at temperature above 0 °C or left to reach the room temperature before use.
- Do not run the cleaner over the cord when using it and never unplug the plug from the socket by pulling the cable.
- Never pull the cord or the cleaner when unplugging the plug from the socket.
- When using the extension lead, make sure it is not damaged and conforms to the valid regulations.
- To avoid any risk in case the power cord of the appliance has been damaged, the cord must be replaced by a new one by the manufacturer, its service engineer or other similarly qualified person.
- To ensure safety and proper function of the appliance, use only original spare parts and accessories approved by the manufacturer.
- The manufacturer shall not be held liable for any damage caused by incorrect use of the detergent, the appliance and its accessories and the manufacturer is not liable from warranty for the appliance should the safety precautions given above not be adhered to. Failure to replace or maintain all filters regularly according to the instructions in Chapter XI. MAINTENANCE and also using non-original filters, the properties of which resulted in failure or damage of the vacuum cleaner is also understood to be improper use of the appliance.

Always use tested dust filters and micro-filters recommended by the manufacturer for trouble-free operation of the cleaner.
II. CLEANER FEATURES CHART
CLEANER FEATURE/CLEANER MODEL ETA 2865 ETA 3865 ETA 7865
electric pump + + + electric power control - + +
- Special accessories available for the cleaner include the ETA 0962.1 window cleaning set (for Models 2865 and 3865), ETA 0962.2 (for Model 7865) and the ETA 404 cloth bag
III. PRODUCT DESCRIPTION (Fig. 1, 2)
A - MOTOR PART
A1 - handle
A2 - MOTOR ON/OFF switch
A3 - PUMPA ON/OFF switch
A4 - motor REGULATION min./max.
A5 - pump pilot light
A6 - cover of the filling detergent tank opening
A7 - detergent delivery valve
A8 - micro-filter cartridge
A9 - cord reel holder
A10 - motor ventilation openings
A11 - power cord
B - DETERGENT TANK (capacity 4 l)
B1 - flow-arrest safety float
B3 - protective micro-filter
B4 - cap
C - WASTE WATER COLLECTOR TANK (capacity 8 l)
C1 - stoppers
C2 - travelling wheels
C3 - suction opening
C4 - cord reel holder
D - DIRT FLAP
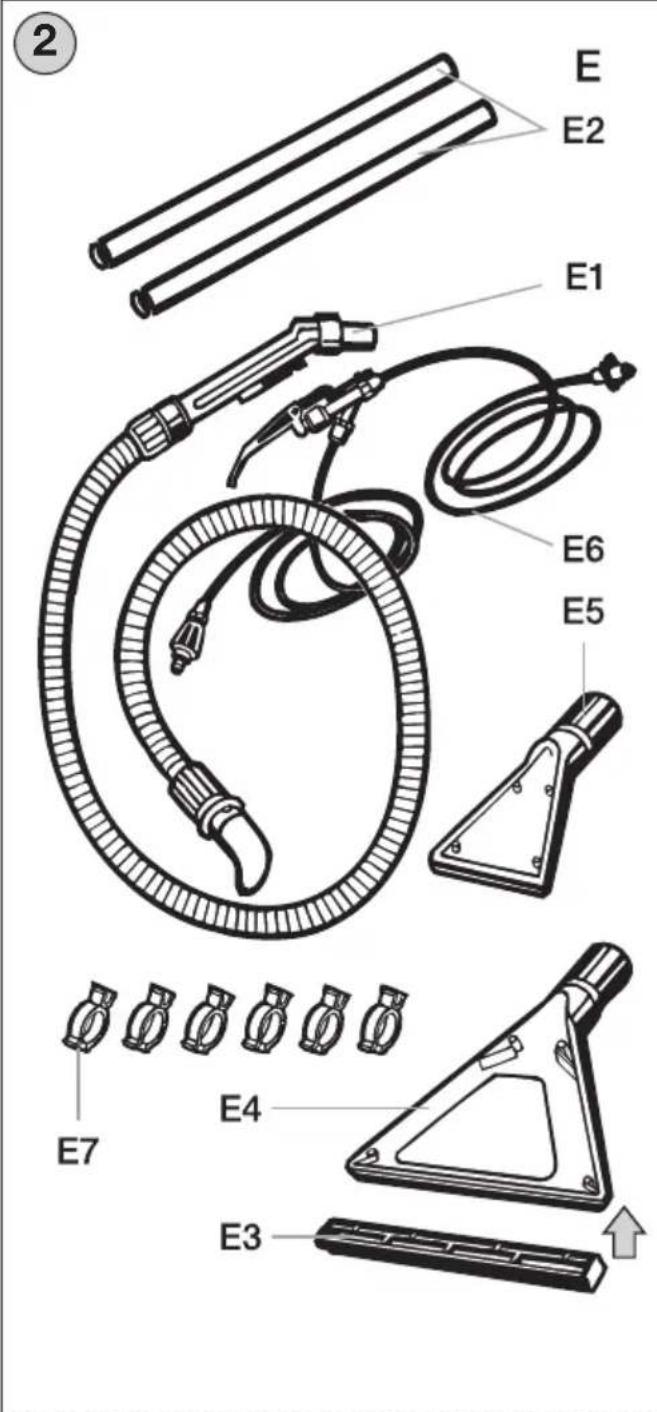
E - ACCESSORIES TO MODELS ETA 2865, ETA 3865
E1 - intake hose with end-piece and handle
E2 - 2 intake tubes
E3 - wiper (specific types only)
E4 - large tool (specific types only)
E5 - small tool (specific types only)
E6 - cleaning set (specific types only)
E7 - clamp rings (specific types only)
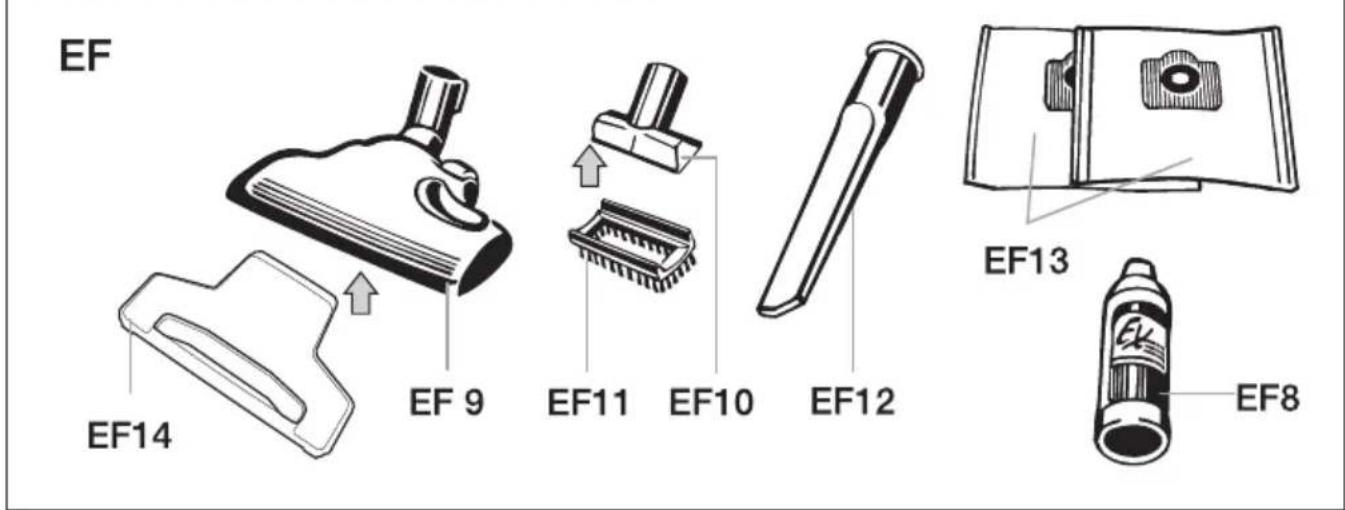
EF8 - detergent (specific types only)
EF9 - floor tool (specific types only)
EF10 - upholstery tool (specific types only)
EF11 - brush (specific types only)
EF12 - crevice tool (specific types only)
EF13 - dust bags (specific types only)
EF14 - adapter for hard floors (specific types only)
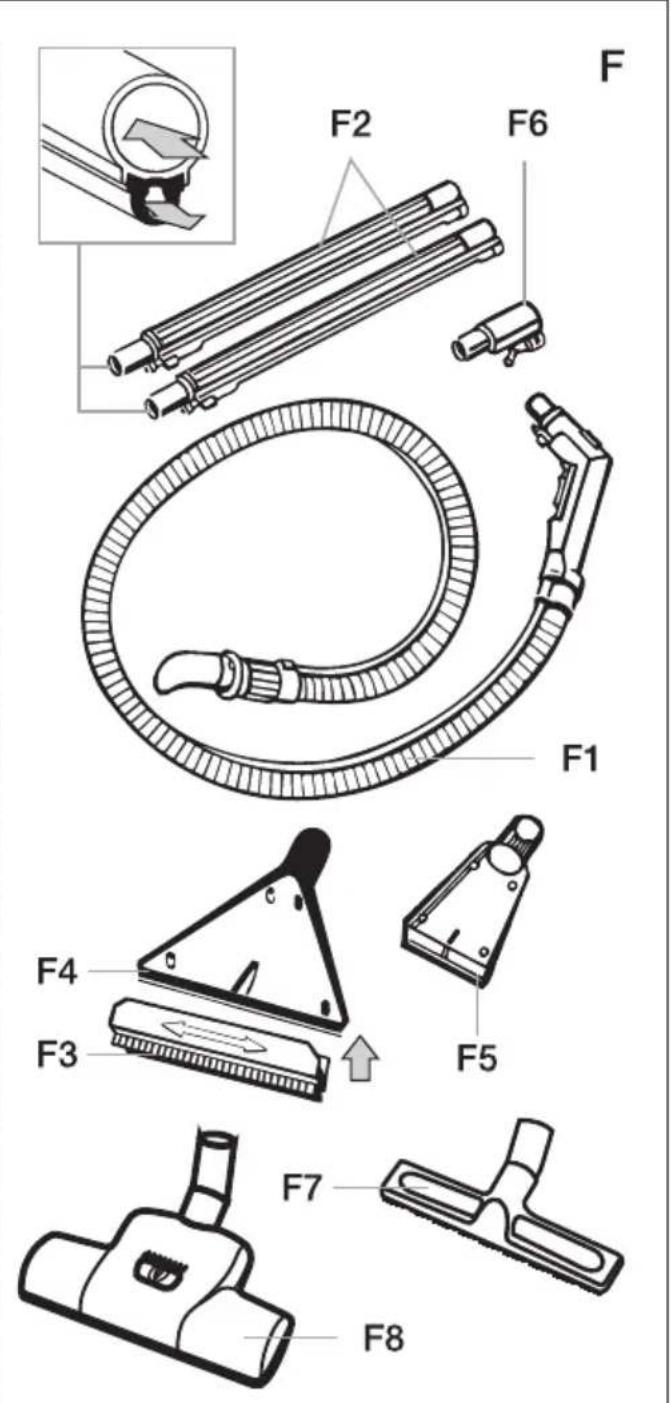
F - ACCESSORIES TO MODEL ETA 7865
F1 - intake hose with end-piece, handle and integrated detergent feed line
F2 - 2 intake tubes with integrated detergent feed line
F3 - wiper (specific types only)
F4 - large tool (specific types only)
F5 - small tool (specific types only)
F6 - reduction piece (specific types only)
F7 - narrow floor nozzle (specific types only)
F8 - TURBO tool (specific types only)
EF8 - detergent (specific types only)
EF9 - floor tool (specific types only)
EF10 - upholstery tool (specific types only)
EF11 - brush (specific types only)
EF12 - crevice tool (specific types only)
EF13 - dust bags (specific types only)
EF14 - adapter for hard floors (specific types only)
IV. PREPARING THE CLEANER FOR USE
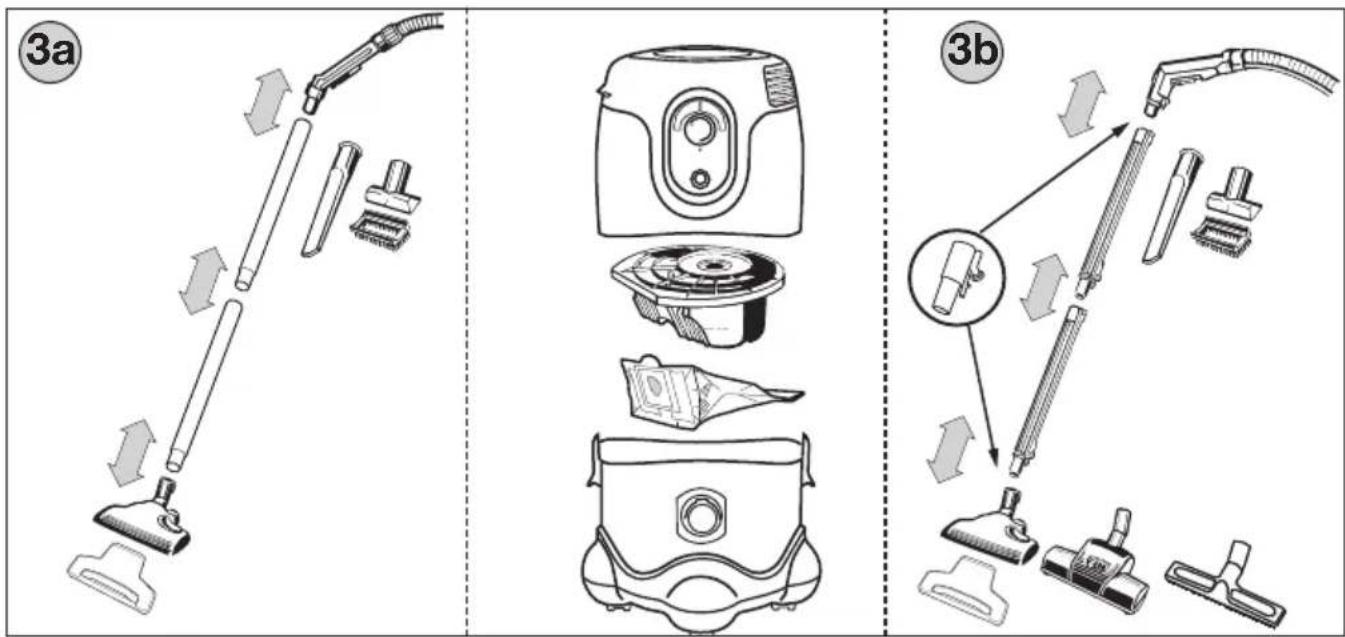
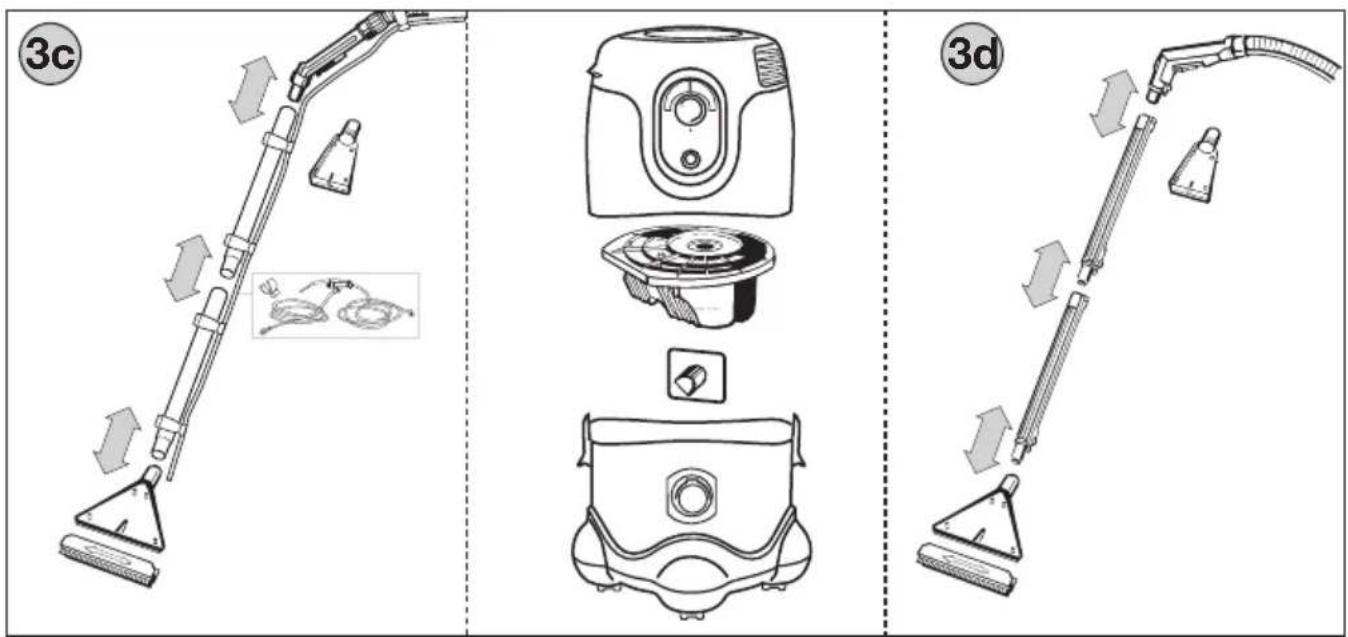
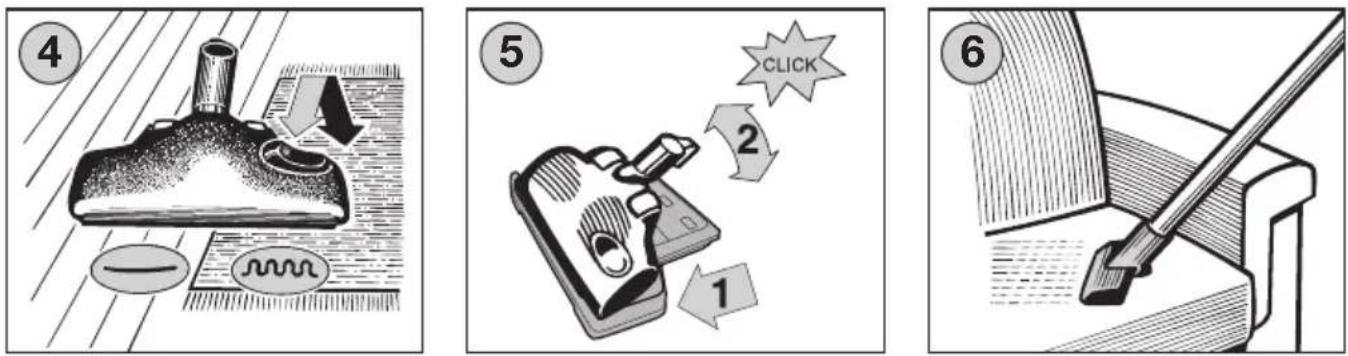
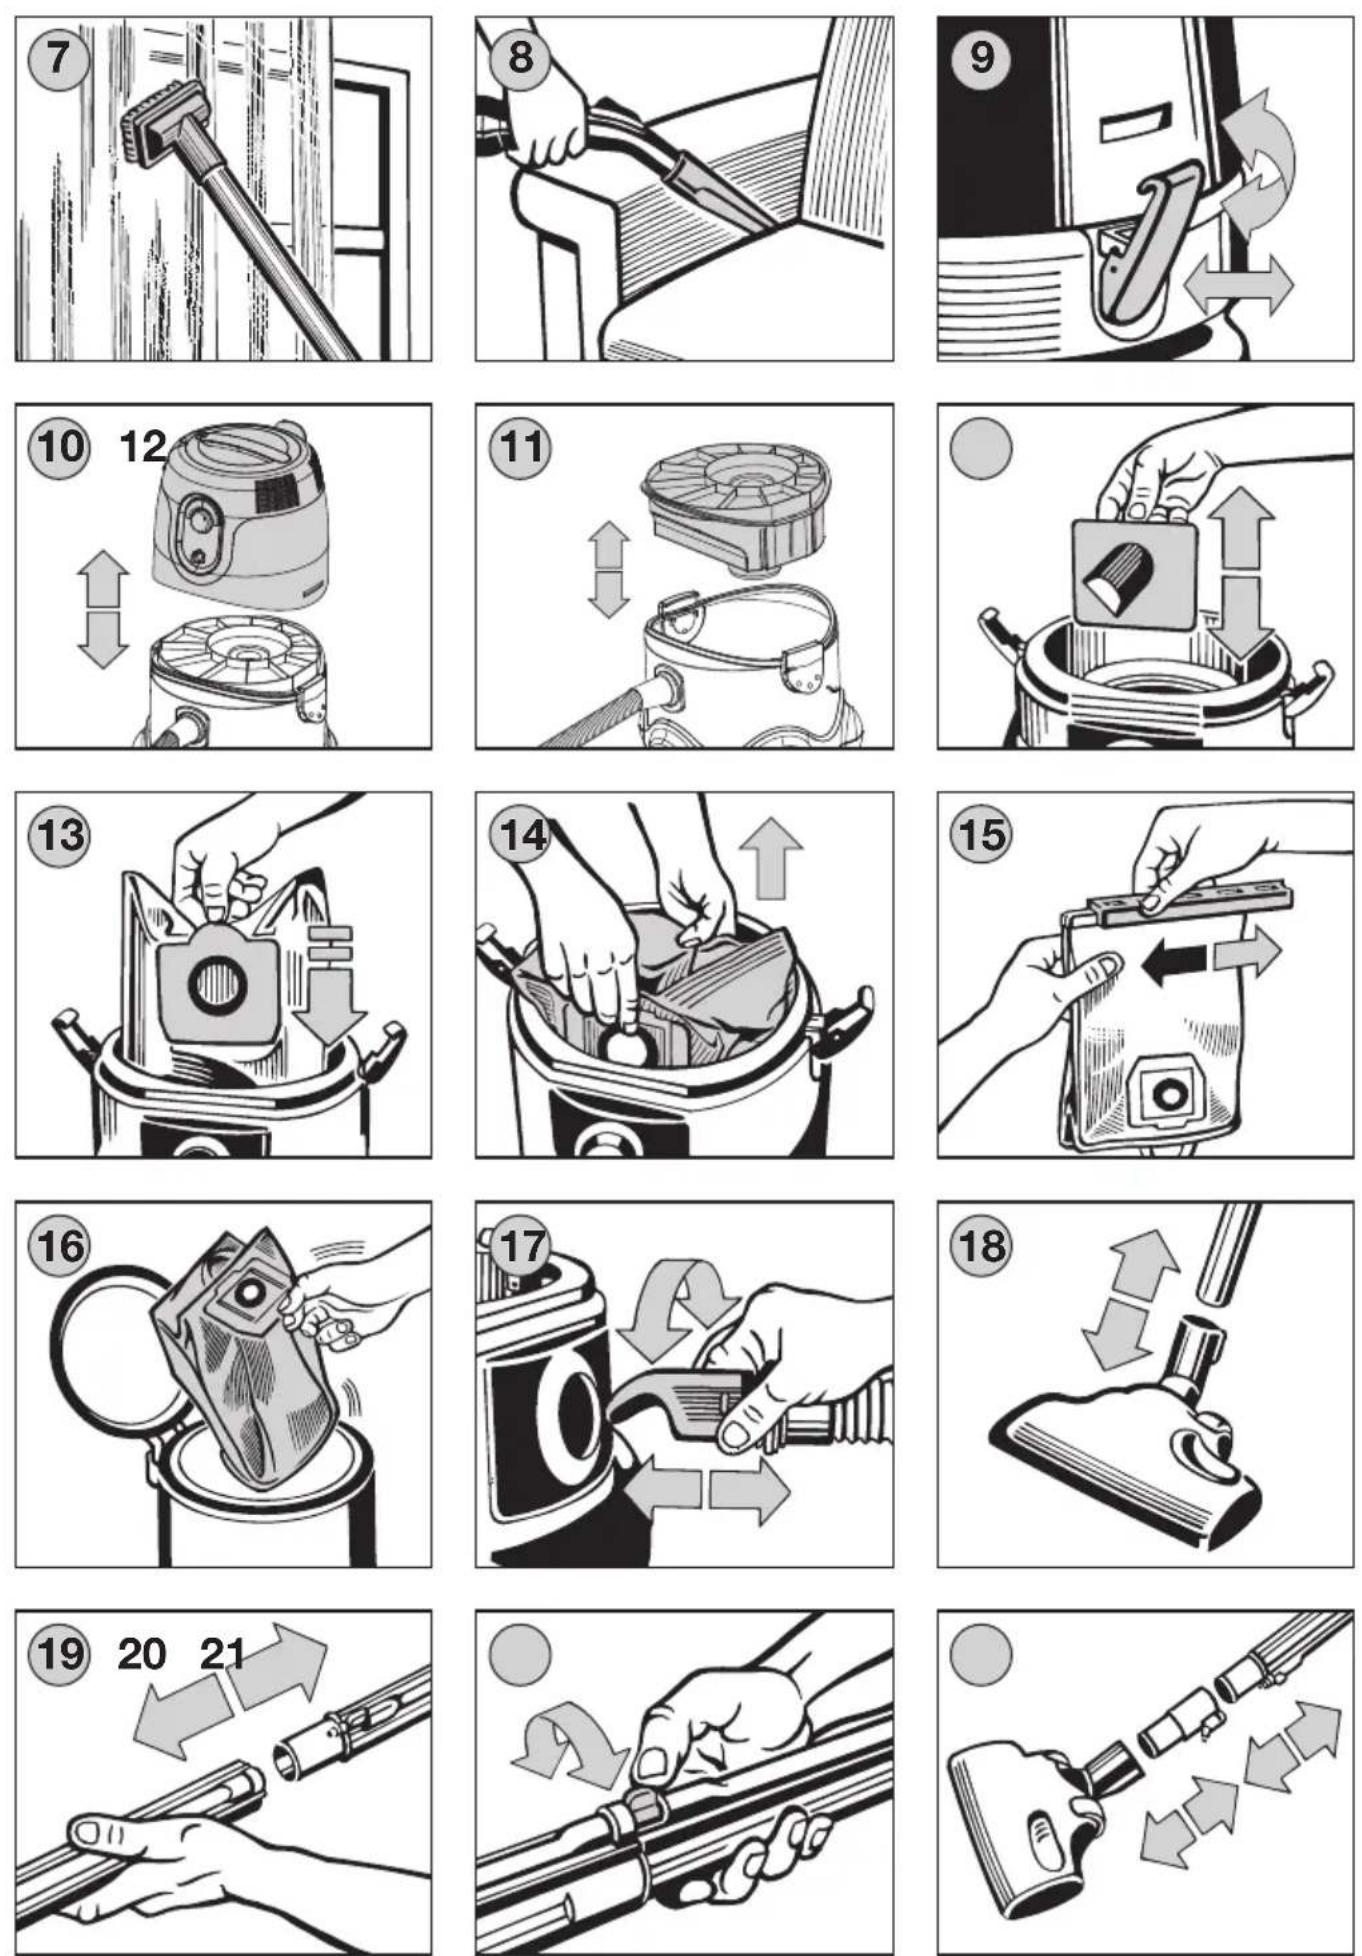
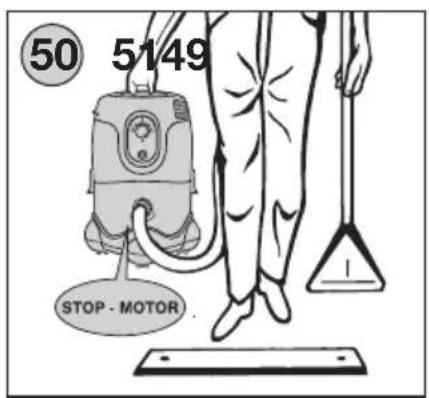
Remove all packing items and unpack all accessories. Assemble the cleaner and relevant accessories (Figure 3a, 3b, 3c, 3d) according to the intended activity (dry or wet) hovering/cleaning. Unlock the cleaner clamp locks (Figure 9), remove the motor part (Figure 10) and take off the detergent tank (Figure 11). Pull out the dirt flap (Figure 12) from the cleaner body. Insert the dust bag (Figure 13) in the holder in the cleaner body and check, whether the dust bag is held fast. Install the hose end-piece in the cleaner intake hole and rotate the hose end-piece clock-wise until the stop (Figure 17). By following the above procedure in the reverse order, reassemble the cleaner and shut fast the cleaner clamp locks. The floor tool is intended to be used to clean different surface types (Figure 4). The accessories can be used as follows: upholstery tool (Figure 6), cleaner brush (Figure 7), crevice tool (Figure 8). The cleaner can be carried over obstacles (such as thresholds or stairs) by using the handle (Figure 50).
- Accessories used: floor tool (EF9), upholstery tool (EF10), crevice tool (EF12), dust bag (EF13), cleaner brush (EF11), adapter for hard floors (EF14), reduction piece (F6), narrow floor nozzle (F7), TURBO tool (F8).
Models ETA 2865, ETA 3865
Assemble the cleaner by following the above procedure. Plug the assembled suction tubes into the hose handle and install the floor tool (Figure 18) using moderate force. The tool can be installed on either one or two tubes or on the suction hose handle directly (Figure 3a).
Model ETA 7865
Assemble the cleaner by following the above procedure. When assembling the suction tubes, first put the locking piece in the OPEN position, plug the tubes one into another (Figure 19), and click the locking piece into the CLOSED position (Figure 20). Install the reduction piece and the hose handle on the intake and outlet ends of the tube and lock them in position by setting the locking piece. Install the floor tool (Figure 21). Using moderate force, plug the detergent line strainer in the valve in the front of the motor unit (Figure 27) so that it does not obstruct the free movement of the cleaner during cleaning. The tool can be installed on one or both suction tubes and the hose handle directly, provided the reduction piece is used (Figure 3b).
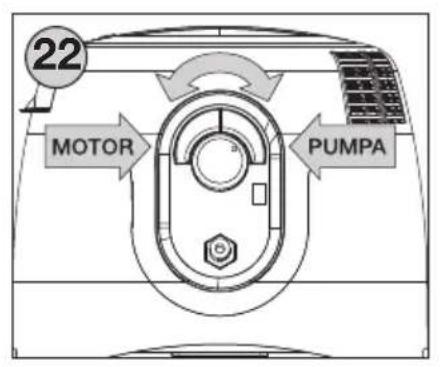
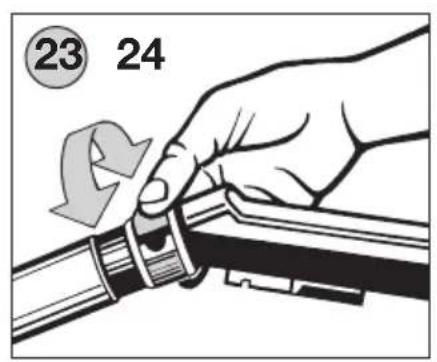
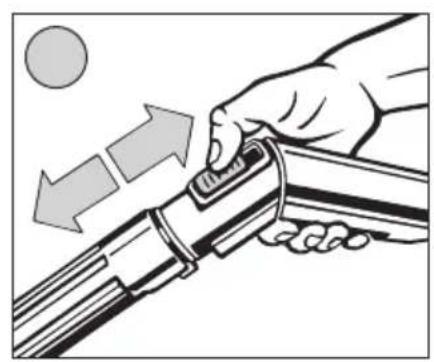
Unwind the desired length of the cord and plug the cord in the socket. The cleaner can be switched ON/OFF by depressing the MOTOR push-button (Figure 22). The suction power of the cleaner can be adjusted by rotating the power control ring on the hose handle on ETA 2865 (Figure 23) and by setting the REGULATION control knob to the desired position as well as adjusting the control ring on the hose handle on models ETA 3865 and ETA 7865 (Figures 23, 24). We recommend the minimal suction output for soft fabric (such as curtains). Use the maximal suction output for flooring (such as load carpets).
CAUTION
- Never use the cleaner to collect dust without the dust filter installed and never put the dust filter in the waste tank when it is still damp or wet!
- Before you vacuum dry impurities, clean the container, the suction hose and the appliance properly. Thus you will protect the dust filter from destruction.
Adapter for Cleaning Hard Floors (EF14)
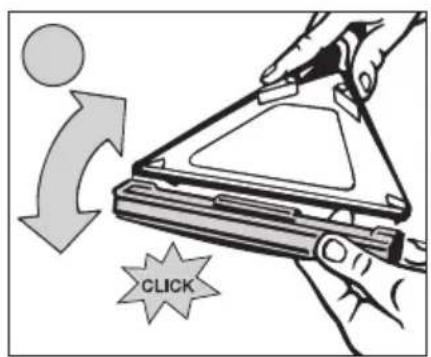
Put the front part of the floor nozzle EF9 under two notches and then tilt the adapter to the nozzle and fix (Fig. 5). You will hear a click sound. Disconnect the adapter from the floor nozzle in reverse order.
5a) Exchanging the Dust Filter
Be careful to check and exchange the dust filter regularly. Whenever the cleaner seems to start losing power check whether or not the dust bag has filled up and exchange it for a new one if necessary. Dismantle the cleaner by following the procedure described
above. Remove the suction hose end-piece off the cleaner housing (Figure 17), slide the dust filter lips off the dust filter holder. Taking proper care, take hold of the dust bag with both your hands (Figure 14), remove it from the cleaner housing and dispose of it with regular domestic waste.
5b) Emptying the Cloth Filter
The cloth filter may be used with all models of the cleaner. However, it is not supplied with the cleaner, it may be purchased separately (as a spare part). The cloth filter functions as a synthetic dust filter and fully replaces it. The procedure for installing and taking the filter out is identical to the procedure for the replacement of the synthetic dust filter. The cloth filter is intended for repeated use.
Dismantle the cleaner by following the procedure described above. Remove the suction hose off the cleaner housing (Figure 17). Slide the dust bag lips off the filter holder, take the filter by the handle and remove the filter off the cleaner housing (Figure 14). Remove the clamp bar by pulling it to the side (Figure 15) to open the filter, you can shake out the dust and shake it clean (Figure 16). After emptying the dust bag, install the clamp bar by following the above procedure in the reverse order and reinstall the cloth filter in the cleaner.
CAUTION
- We recommend emptying the filter outside the living area for hygienic reasons.
- Never wash or dip the cloth dust filter in water, never use a damaged cloth dust filter!
- Do not put textile dust filter into a damp or wet waste container!
VI. CLEANING WET SURFACES OR COLLECTING WATER
- Accessories used: large tool (E4, F4), small tool (E5, F5), crevice tool (EF12), wiper (E3, F3), dirt flap (D).
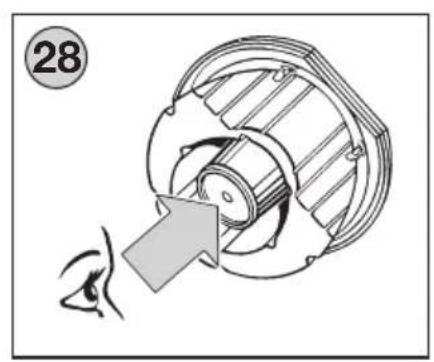
Dismantle the cleaner by following the procedure described above. Remove the suction hose (Figure 17) and the dust filter (Figure 14) off the cleaner housing. Install the dirt flap in the dirt flap holder inside the cleaner housing (Figure 12). The opening in the flap must be directed towards the bottom of the housing! Plug the suction hose b in the cleaner housing (Figure 17). Before installing the detergent tank check that the intake micro-filter (Figure 28) has been correctly installed and secured with the cap. Take hold of the detergent tank and by shaking it up and down check the float for free movement. Reassemble the cleaner by following the above procedure in the reverse order and close the locks.
Model ETA 2865, ETA 3865
Using moderate force, push the large tool on the suction hose (Figure 25).
Models ETA 7865
Pull the floor tool and the reduction piece off the suction tubes. Install the large water-collecting tool on the suction tubes and flip the tube lock shut (Figure 26). Using moderate force, push the detergent line connector piece in the valve in the front of the motor unit (Figure 27) so that the free movement of the cleaner is not obstructed.

Start the cleaner by switching ON the MOTOR switch (Figure 22).
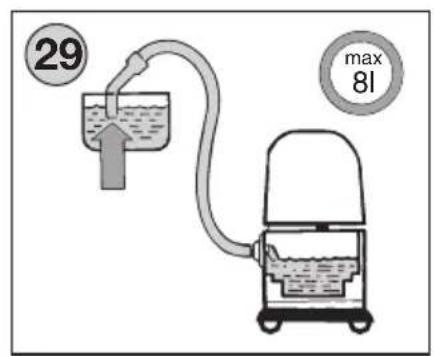
To collect water from a pool with the surface higher and content larger than the waste tank can take (8 l) without using a tool, the air intake on the hose handle must stay open (Figures 23, 24) for proper shut-off float operation. Take care to stop collecting the water and empty the waste water tank in due time (Figure 29). Once the waste water tank is filled, the float will shut off the cleaner intake. Once this happens, the cleaner becomes noisier and no more liquid is collected. Should that happen, switch the cleaner OFF and empty the water remaining in the hose into the waste water tank by lifting the hose over the cleaner level. After you have finished 'wet' cleaning, it is necessary to leave the cleaner running for about another 30 seconds to remove all water residues from the hose and tubes.
CAUTION
Never vacuum wet impurities or water with the dust filter on.
VII. CLEANING CARPETING, HARD AND SMOOTH FLOORING AND UPHOLSTERY
- Accessories used: cleaning set (E6), clamp rings (E7), large tool (E4, F4), small tool (E5, F5), wiper (E3, F3), detergent fluid (EF8).
Before starting to wet clean your carpet (carpet flooring), it should be vacuum cleaned dry first in order to remove solid dirt and dust and to straighten its fibres. Moreover, before starting to wet clean carpets, it is advisable to test the effect of the detergent on a discreet place on the carpet. Remove any small pieces of furniture off the carpet. The legs of other furniture should be wrapped with a suitable membrane to prevent them from coming into contact with the detergent and avoid any risk of staining. Start to clean the carpet on one end and proceed towards the door, in order to avoid stepping on and dirtying the already cleaned carpet surface. Use the detergent moderately and remember that the carpet should never get wet through. After cleaning, do not walk on the carpet until it has dried completely.
The cleaner preparation procedure is the same as that described in chapter
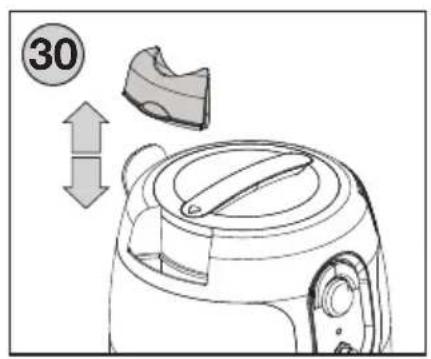
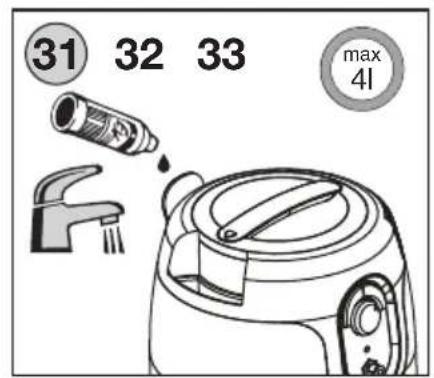
VI. CLEANING WET SURFACES OR WATER. Remove the cover in the motor part (Figure 30). Fill the detergent tank via its filler with the supplied and recommended non-foaming detergent in the amount of 10 - 15 ml of detergent per 1 litre of water. Fill up the tank with tepid water (no more than 40 °C and 4 l), (Figure 31). Following the above procedure in the reverse order, fasten the filter cap back.
Models ETA 2865, ETA 3865
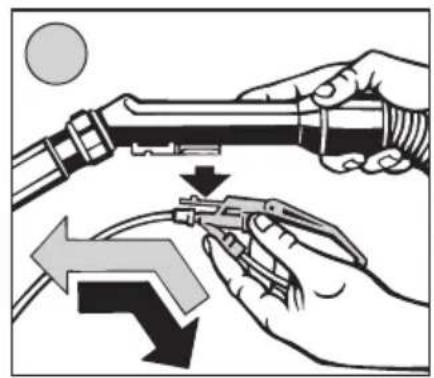
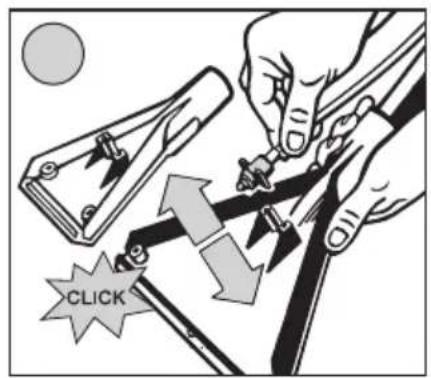
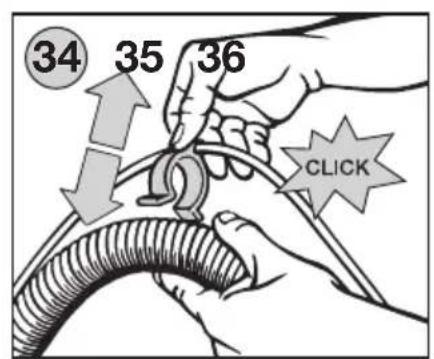
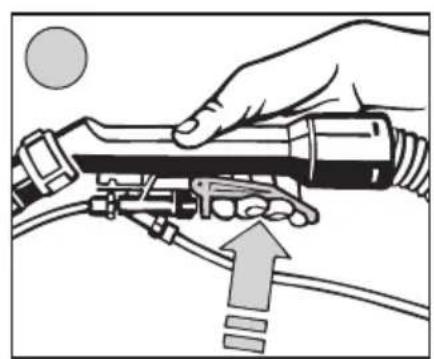
Using moderate force, push the feed line connector into the valve situated in the front of the motor unit (Figure 27). Plug the control valve in its bar on the hose handle (Figure 32) and attach the cleaner set line to the straight hose and tubes using the clamp rings (Figure 34). Click the nozzle in the nozzle holder guide on the large tool (Figure 33). The detergent is fed by depressing the control valve lever on the hose handle (Figure 35).
Model ETA 7865
The detergent is fed by depressing the control valve lever on the hose handle. In case a larger surface is to be cleaned, the detergent feed lever can be held in the locked position by operating the lever lock (Figure 36).
Mode 1 - Moderately Dirty Carpets

Depress the MOTOR and PUMPA push-buttons (Figure 22), the pump pilot light A5 will turn on. Place the large tool in one corner of the room on the carpet (carpet flooring) and start feeding the detergent. Move the tool slowly along the cleaned surface in the direction indicated by the arrow (Figure 37). The fluid injected in the carpet is immediately collected together with any dirt. The flooring stays only damp. At the end of the cleaning sweep, release the control valve lever/button, lift the tool and start a new sweep closely overlapping the last one.
Mode 2 - Very Dirty Carpets
Switch the motor OFF while leaving the pump running. Depress the control valve lever/button, move the tool slowly along the cleaned surface and cover the surface of about 1 by 1 meter of the carpet with the detergent. Let the detergent take effect for a few minutes. The pump can be switched OFF after you have applied the detergent. After that collect all the detergent mix as completely as you can so that the carpet is completely dried. In doing so, move backwards. Repeat the above procedure until you have treated the whole surface.
Cleaning Smooth Flooring
Before starting to wet clean the flooring, the floor should be vacuum cleaned dry first.
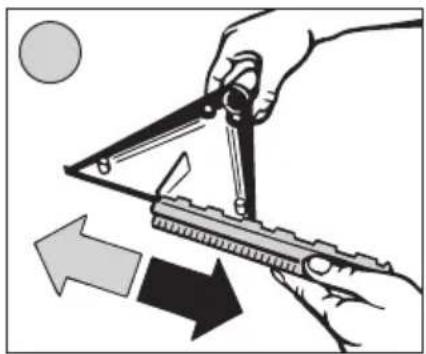
The cleaning procedure is the same as that described in chapter (VII. Moderately dirty carpets). With models ETA 2865 and ETA 3865, click the wiper blade onto the large tool (Figure 38). With model ETA 7865, slide the wiper blade onto the large tool (Figure 39).
Start the cleaning on one end of the surface and proceed towards the door so that to avoid stepping on the already cleaned surface. Do not walk on the cleaned surface until it has dried up completely.
Cleaning Upholstery
Before starting to wet clean upholstery, it should be vacuum cleaned dry first.
The cleaning procedure is the same as that described in chapter (VII. Moderately dirty carpets).
Models ETA 2865, ETA 3865
Using moderate force, push the small tool (Figure 40) onto one or two suction tubes or those handle directly. The nozzle is installed in the same way as on the large tool (Figure 33).
Model ETA 7865
Using moderate force, push the small tool onto one or two suction tubes or the hose handle directly and flip shut the locking piece (Figure 26).
VIII. FINISHING WORK
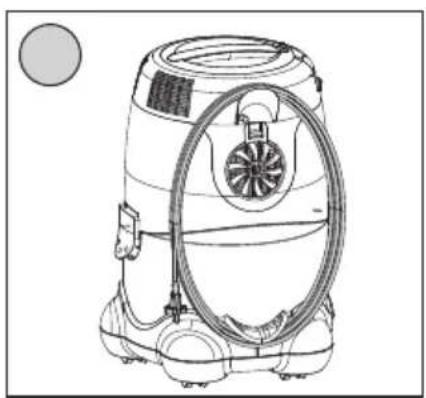
After you have finished cleaning with the cleaner, switch the cleaner OFF with the MOTOR and PUMPA switches. Unplug the cord from the mains and wind it in the holder of the cleaner (Figure 51). Dismantle the cleaner by removing: the motor unit (Figures 9, 10), the detergent tank (Figure 11), the suction hose connector (Figure 17) and the detergent feed line from the valve (Figure 27). Take hold of the tank with both hands and empty the tank over the thin edge (Figure 41). If you are going to do some more work with the cleaner,

reassemble the cleaner by following the above procedure in the reverse order. If not, clean the cleaner (see chapter XI. MAINTENANCE), let the cleaner dry and then reassemble it. You can facilitate drying by assembling the cleaner and letting it suck clean air for a few minutes. This will dry not only the waste water tank, but also the hose and tubes.
IX. CLEANING THE WINDOWS
- Accessories used: window cleaning set, reduction piece (F6)
The procedure to prepare the cleaner and accessories is the same as that outlined in Chapter (VII. Cleaning upholstery). Fill the detergent tank with the detergent recommended and supplied with the cleaner accessories, using double the concentration recommended for cleaning carpets and alike.
Models ETA 2865, ETA 3865
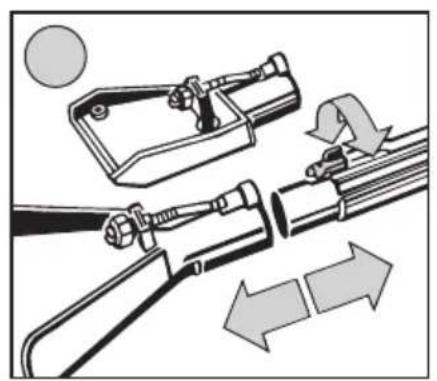
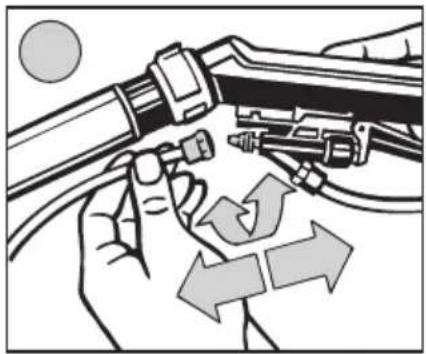
Remove the control valve from the hose handle (Figure 32). Remove the nut on the control valve which holds down the line leading to the nozzle on the large tool and pull the line of the control valve barb. Install the line leading from the window cleaning tool on the control valve barb and hold down the line with the ring nut (Figure 42). Remount the control valve (Figure 32) and install the window cleaning tool on the suction tubes. Fix the detergent feed line on the suction tubes using the clamp rings (Figure 34).
Model ETA 7865
Install the reduction piece in the suction tubes and flip shut the locking ring (Figure 20). Install the window-washing tool on the reduction piece. Plug the detergent feed line connector in the reduction valve and lock it in place by rotating it anticlockwise (Figure 43).
Window Washing Procedure
- Depending on how far you have to reach to wash the window to be cleaned, install the tool either on the hose handle directly or at the end of one or both the suction tubes.
- Spray the detergent/water mix all over the window in such a quantity that it stays on the surface.
- Using the sponge (installed on the other side of the tool), spread the detergent solution all over the surface to be washed in order to dissolve the dirt. Any solid dirt such as bit of dried mortar should be removed with the scraper located on the tool face.
- After carefully spreading the wet dirt over the surface, spray the detergent/water mix all over the window. After this spraying, the detergent with the dissolved dirt can be collected from the window surface.
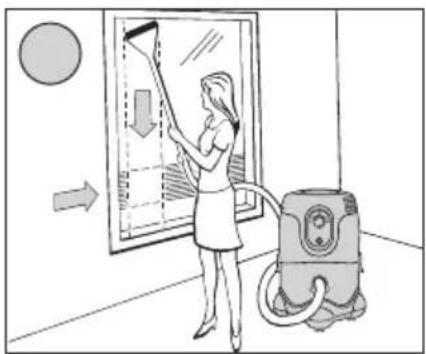
- When collecting the dirt with the vacuum cleaner, it is recommended to start along the top edge of the window and to proceed with even sweeps all across the window (Figure 44). To wipe the window surface clean and collect the dissolved dirt, keep pressing the tool against the window. The vacuum cleaned surface must be dry, in order to avoid any “smearing” on the cleaned surface.
- When washing windows, set the cleaner power to the minimum (Figures 22, 23, 24).
X. USEFUL TIPS

-
As long as no detergent is sprayed during the wet cleaning, keep the pump GB switched OFF. The pump is fitted with a self-resetting thermal cut-out. Once tripped, it switches the pump OFF (the pilot light is still on). Once the cut-out has cooled down sufficiently, the pump is restarted. Increased noise of the pump operation indicates insufficient volume of water in the detergent tank.
-
If the carpet has been shampooed with other detergents shortly before being wet vacuum cleaned, foam may develop in the cleaner waste water tank which can escape through the outlet micro-filter. In that case, unplug the cleaner off the mains and empty the waste water tank. Undesirable foam development can be prevented if you pour a coffee cup of vinegar in the waste water tank.
-
negotiate obstacles (such as thresholds or stairs), turn the cleaner OFF and lift the cleaner and carry it by the handle to avoid any risk of the cleaner tipping over or damaging the travelling wheels. We recommend switching the motor OFF when carrying the cleaner.
-
Should the cleaner tip over during cleaning, lift it up while leaving the motor running an switch the motor OFF afterwards. After a short while, the motor can be switched ON again.
XI. MAINTENANCE
Always store the cleaner in a dry place and in a sufficient distance from any sources of heat (such as the fireplace, stove, oven, heating radiator) and protect it from the atmospheric effects (such as rain, sunshine). Clean the cleaner surface with a wet soft cloth, never use abrasive or corrosive detergents! To ensure trouble-free operation of the cleaner, we recommend a professional repair check of the unit condition and the overall state of the cleaner in a professional service after 300 service hours, however, no longer than every three years. Store the cleaner properly cleaned in a dry, dust-free place, out of reach of children and minors.
Cleaners
After finishing every “wet” cleaning to keep the appliance to high hygiene standard, wash (shower) the waste water tank and the tank cover under running water and leave to dry. Treat the appliance surface with soft damp rag, do not use aggressive and coarse detergents!
Cleaner Sets
In order to ensure proper operation of the pump and accessories, it is recommended to flush the set with 1 - 2 L of clean water after you finished the cleaning. After all water been emptied, leave the pump running for another 20 seconds in order to remove all residues of water out of the system.
Wet Cleaning Nozzles (Large and Small)
After every “wet” cleaning, check visually whether there is no debris stuck underneath the nozzle transparent cover. Should that be the case, unscrew the 4 pieces of Philips screws remove the transparent cover, remove any dirt or debris and reassemble the tool in the reverse order.

Floor Tools / TURBO Tool
GB After every vacuum cleaning check visually for any debris stuck on the collectors/brushes. Should that be the case, remove the dirt or debris.
Window Washing Tools
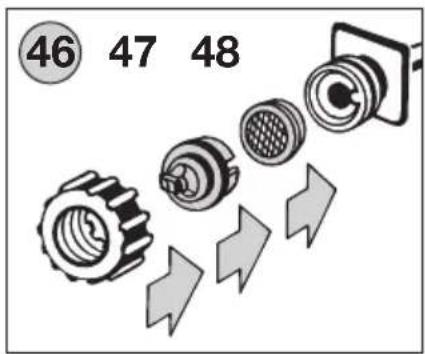
Check regularly the nozzle and mesh strainer for cleanliness. In case of uneven or faulty spraying action, unscrew the ring nut, remove the nozzle and the strainer and clean these parts (Figure 45, 46). When reassembling the unit, be careful to position the nozzle correctly (the correct position being defined by the locking lugs).
Intake and Outlet Micro-filters
After about 10 cleaning actions, check both micro-filters and replace them if necessary. You can purchase spare filters and micro-filters in the elektro store chain. After finishing every “wet” cleaning, clean the intake micro-filter:
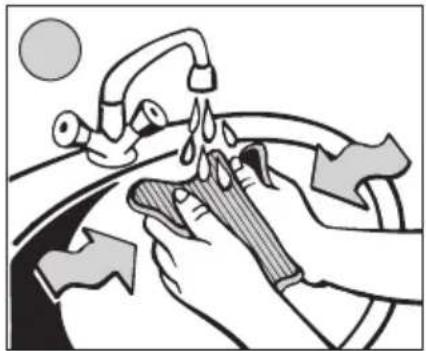
Intake Micro-filter: Remove the cap by pulling (Figure 47), then remove the micro-filter and wash it in tepid running water (Figure 48). Leave the micro-filter dry and reassemble the unit in the reverse order.
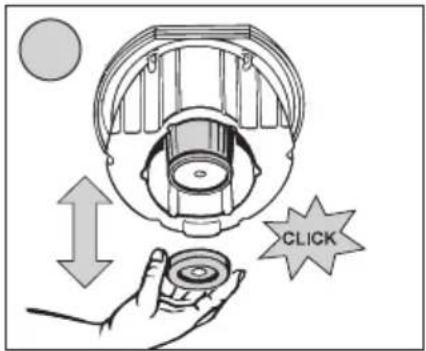
Outlet Micro-filter: Remove the mesh by depressing the cap in its upper part and tilting (Figure 49) and remove the micro-filter. Position the new micro-filter in the mesh. Place the projections of the mesh into the two openings in the casing of the cleaner and close it by tilting. You will hear a “click”.
CAUTION
- Never use any aggressive detergents or hot water to clean micro-filters.
- Cleaning the filter does not restore its original colour but its filtration properties.
- Please pay attention the contact surfaces and seals are functioning.
- Neglecting the replacement of micro-filters may lead to the failure of the cleaner! Observe the direction of positioning the micro-filter in the cleaner.
XII. ECOLOGY

If the size of the appliance allows, all the parts contain marking of the materials used for production packaging, components and accessories as well as for recycling. The symbols on the product or in the accompanying documentation mean that the electrical or electronic product used must not be liquidated together with communal waste. To ensure the appropriate liquidation take the used appliance to a collection point where it will be accepted free of charge. Correct liquidation of the product helps to protect valuable natural resources and helps to prevent a potential negative impact on the environment and human health which can be the outcome of inappropriate liquidation of waste. More details can be obtained from your local authorities or the closest collection point. Inappropriate manipulation of such waste can result in a fine according to the national legislation.
Maintenance of a serious nature or maintenance which requires interference with the internal parts of the appliance must be carried out by a professional service centre! By failing to follow the instructions issued by the manufacturer, the right to the warranty service will be invalidated!
VIII. SPECIFICATIONS
Voltage (V) as per the product nameplate
Input power (W) as per the product nameplate
MAX input power (W) as per the product nameplate
Insulation Class II
Weight (kg) approx. 10.5
The product has received ES declaration of conformity according to Act as amended.
The product matches the requirements of the below statutory order as amended.
- Committee Regulation No. 2006/95/ES as amended, setting the technical requirements of the electrical appliance as low.
- Committee Regulation No. 2004/108/ES as amended, setting the technical requirements of products in terms of their electromagnetic compatibility
The manufacturer reserves the right for any insignificant deviations from the standard finished product which do not have any effect on the functioning of the product.
TO AVOID DANGER OF SUFFOCATION, KEEP THIS PLASTIC BAG AWAY FROM BABIES AND CHILDREN DO NOT USE THIS BAG IN CRIBS, BEDS, CARRIAGES OR PLAYPENS. THIS BAG IS NOT A TOY.
Danger of suffocation. Keep the PE bag out of reach of children. The bag is not a toy.
ETA a.s., Poličská 444, 539 01 Hlinsko, Czech Republic.
Dear customer, your type of the Mariner vacuum cleaner may differ from the type displayed and mentioned at the respective type of the vacuum cleaner in the instructions for use by using other types of the suction hose (with/without a brush, with/without casters), suction tubes (plastic/metal) dust filters (synthetic / paper / textile) and appliances (cushion / slot nozzles, brushes, narrow nozzles, turbo nozzles and adapters for hard floors).
The specific (correct) equipment for the respective type of the vacuum cleaner is provided in the enclosed flyer.
HASZNÁLATI UTASÍTÁS
IX. AZ ABLAKOK MOSÁSA
el. siurblys + + +
el. galios reguliatorius - + +
Guarantee certificate is valid only for Czech Republic and Slovak Republic.
- NÁVOD K OBSLUZE
- SAFETY PRECAUTIONS
- CLEANER FEATURES CHART
- PRODUCT DESCRIPTION (Fig. 1, 2)
- A - MOTOR PART
- B - DETERGENT TANK (capacity 4 l)
- C - WASTE WATER COLLECTOR TANK (capacity 8 l)
- D - DIRT FLAP
- E - ACCESSORIES TO MODELS ETA 2865, ETA 3865
- F - ACCESSORIES TO MODEL ETA 7865
- PREPARING THE CLEANER FOR USE
- Models ETA 2865, ETA 3865
- Model ETA 7865
- CAUTION
- Adapter for Cleaning Hard Floors (EF14)
- 5a) Exchanging the Dust Filter
- 5b) Emptying the Cloth Filter
- CLEANING WET SURFACES OR COLLECTING WATER
- CLEANING CARPETING, HARD AND SMOOTH FLOORING AND UPHOLSTERY
- Mode 1 - Moderately Dirty Carpets
- Mode 2 - Very Dirty Carpets
- Cleaning Smooth Flooring
- Cleaning Upholstery
- FINISHING WORK
- CLEANING THE WINDOWS
- Window Washing Procedure
- USEFUL TIPS
- MAINTENANCE
- Cleaners
- Cleaner Sets
- Wet Cleaning Nozzles (Large and Small)
- Floor Tools / TURBO Tool
- Window Washing Tools
- Intake and Outlet Micro-filters
- ECOLOGY
- SPECIFICATIONS
- HASZNÁLATI UTASÍTÁS
- AZ ABLAKOK MOSÁSA
Brand : Eta
Model : 786590000
Category : Vacuum Cleaner