DN-16069 - Security Camera Digitus - Free user manual and instructions
Find the device manual for free DN-16069 Digitus in PDF.


User questions about DN-16069 Digitus
0 question about this device. Answer the ones you know or ask your own.
Ask a new question about this device
Download the instructions for your Security Camera in PDF format for free! Find your manual DN-16069 - Digitus and take your electronic device back in hand. On this page are published all the documents necessary for the use of your device. DN-16069 by Digitus.
USER MANUAL DN-16069 Digitus
All lead-free products offered by the company comply with the requirements of the European law on the Restriction of Hazardous Substances (RoHS) directive, which means our manufacture processes and products are strictly “lead-free” and without the hazardous substances cited in the directive.

The crossed-out wheeled bin mark symbolizes that within the European Union the product must be collected separately at the product end-of-life. This applies to your product and any peripherals marked with this symbol. Do not dispose of these products as unsorted municipal waste. Contact your local dealer for procedures for recycling this equipment.

This is a class A product. In a domestic environment this product may cause radio interference in which case the user may be required to take adequate measures.
Federal Communications Commission Interference Statement
This equipment has been tested and found to comply with the limits for a Class A digital device, pursuant to Part 15 of the FCC Rules. These limits are designed to provide reasonable protection against harmful interference when the equipment is operated in a commercial environment. This equipment generates, uses, and can radiate radio frequency energy and, if not installed and used in accordance with the instruction manual, may cause harmful interference to radio communications. Operation of this equipment in a residential area is likely to cause harmful interference in which case the user will be required to correct the interference at his own expense.
This device complies with Part 15 of the FCC Rules. Operation is subject to the following two conditions:
(1) This device mat not cause harmful interference, and
(2) This device must accept any interference received, including interference that may cause undesired operation.
Trademark Acknowledgements
iPad ^® & iPhone ^® are the registered trademarks of Apple Inc.
Android ^™ is a trademark of Google Inc. Use of this trademark is subject to Google Permissions.
Microsoft ^® , Windows ^® & Internet Explorer ^® are registered trademarks of Microsoft Corporation in the United States and/or other countries.
Disclaimer
We reserve the right to revise or remove any content in this manual at any time. We do not warrant or assume any legal liability or responsibility for the accuracy, completeness, or usefulness of this manual. The content of this manual is subject to change without notice.
This product doesn't have a standby / shutdown mode.
MPEG4 Licensing
THIS PRODUCT IS LICENSED UNDER THE MPEG4 VISUAL PATENT PORTFOLIO LICENSE FOR THE PERSONAL AND NON-COMMERCIAL USE OF A CONSUMER FOR (i) ENCODING VIDEO IN COMPLIANCE WITH THE MPEG4 VISUAL STANDARD ("MPEG-4 VIDEO") AND/OR (ii) DECODING MPEG4 VIDEO THAT WAS ENCODED BY A CONSUMER ENGAGED IN A PERSONAL AND NON-COMMERCIAL ACTIVITY AND/OR WAS OBTAINED FROM A VIDEO PROVIDER LICENSED BY MPEG LA TO PROVIDE MPEG4 VIDEO. NO LICENSE IS GRANTED OR SHALL BE IMPLIED FOR ANY OTHER USE. ADDITIONAL INFORMATION INCLUDING THAT RELATING TO PROMOTIONAL INTERNAL AND COMMERCIAL USES AND LICENSING MAY BE OBTAINED FROM MPEG LA, LLC. SEE HTTP://WWW.MPEGLA.COM.
GPL Licensing

This product contains codes which are developed by Third-Party-Companies and which are subject to the GNU General Public License (“GPL”) or the GNU Lesser Public License (“LGPL”).
The GPL Code used in this product is released without warranty and is subject to the copyright of the corresponding author.
Further source codes which are subject to the GPL-licenses are available upon request.
We are pleased to provide our modifications to the Linux Kernel, as well as a few new commands, and some tools to get you into the code. The codes are provided on the FTP site, and please download them from the following site or you can refer to your distributor:
TABLE OF CONTENTS
1. CAMERA NETWORK CONFIGURATIONS .... 1
1.1 Camera Overview .... 1
1.2 Assemble & Install Camera....1
1.3 Understand How Your Laptop / Computer Connect to Internet 2
1.4 Wireless Router + Modem....2
1.4.1 Configure on Laptop / PC....2
1.4.2 Configure on iPhone / iPad 4
1.5 Router + Modem 6
1.6 Modem / Hub + Modem....9
1.7 Change Default Account 12
1.7.1 From Web Browser 12
1.7.2 From iPhone / iPad 12
2. BEFORE YOU START TO USE 13
APPENDIX 1 CHANGE IP ADDRESS OF YOUR LAPTOP / PC 14
APPENDIX 2 MOBILE SURVEILLANCE VIA EAGLEEYES 17
A2.1 Prerequisites....17
A2.2 Where to download....17
APPENDIX 3 POE CONNECTION 18
APPENDIX 4 CONFIGURE PORT FORWARDING....19
APPENDIX 5 Q&A 20
1. CAMERA NETWORK CONFIGURATIONS
Please follow the instructions below to finish camera installation and network configurations.
You may configure the network connection of this network camera with your laptop / computer, or with your iPhone ^® or iPad ^® based on your network environment.
1.1 Camera Overview
Camera Overview
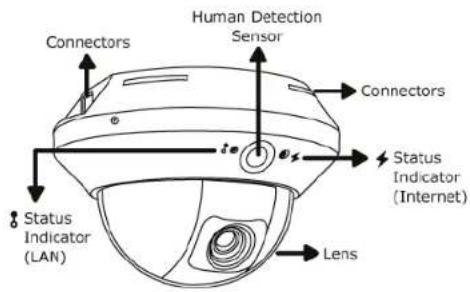
text_image
Connectors Human Detection Sensor Connectors Status Indicator (Internet) Status Indicator (LAN) LensConnectors
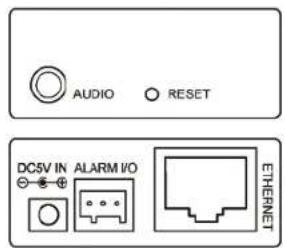
text_image
AUDIO RESET DCSV IN ALARM I/O ETHERNET1.2 Assemble & Install Camera
Step1: Loosen the three screws on the camera to remove the dome cover.
Step2: Make sure the screw holes on the plate are aligned with the holes on the camera base.
Note: If not, slightly loosen the two screws on the plate and rotate it.
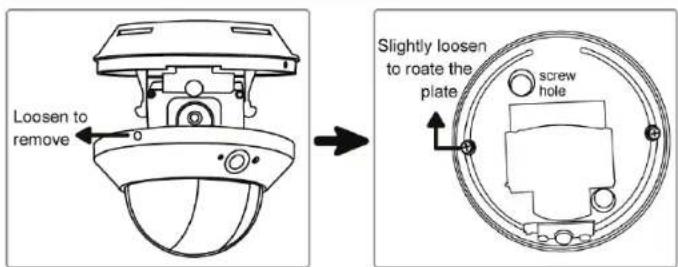
text_image
Loosen to remove Slightly loosen to roate the plate screw holeStep3: Mark the locations of the two screw holes on the ceiling, and drill a hole for each on the ceiling.
Note: The distance between your camera and the location you want to monitor should be 3 \~ 4 meters.
Step4: Fix the camera to the ceiling with the supplied screws.
Step5: Adjust the position and viewing angle of the camera, and fasten the two screws on the plate to fix.
Note: Do not tilt the camera lens too up or down. Part of the IR LEDs might be covered or the dome cover might not be able to be replaced back.
Step6: Replace the dome cover back to the camera.
Note: Before replacing the cover, make sure the cover is clean and so the camera view is clear.
Step7: Connect your camera to power.
Note: This camera also supports POE connection. For connection details, please refer to "APPENDIX 3 POE CONNECTION" at page 18.
1.3 Understand How Your Laptop / Computer Connect to Internet
- Wireless router + Modem
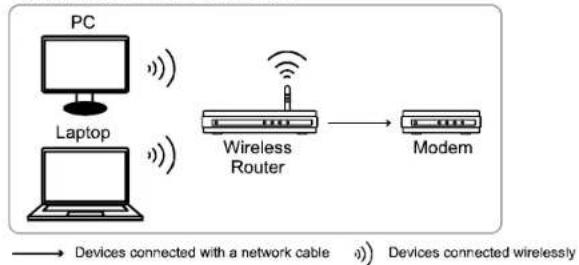
flowchart
graph LR
    PC["PC"] -->|Wireless Cable| Laptop["Laptop"]
    Laptop -->|Wireless Cable| Router["Wireless Router"]
    Router --> Modem["Modem"]
    Modem -->|Device Connected with Network Cable| PC
    Modem -->|Device Connected with Wireless Cable| Laptop
- Router + Modem
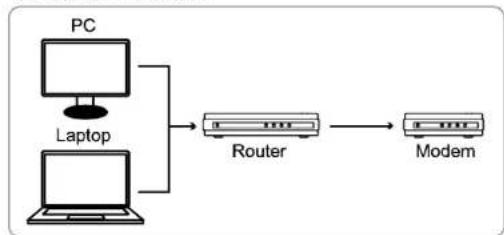
flowchart
graph LR
    PC["PC"] --> Router["Router"]
    Laptop["Laptop"] --> Router
    Router --> Modem["Modem"]
- Modem or Modem + Hub
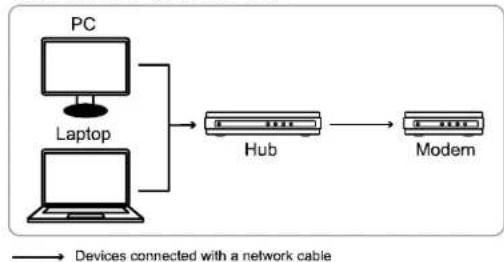
flowchart
graph LR
    PC["PC"] --> Hub["Hub"]
    Laptop["Laptop"] --> Hub
    Hub --> Modem["Modem"]
    Modem --> Device1["Devices connected with a network cable"]
Then, connect your network camera directly to your wireless router / router / hub / modem with a network cable, and power it on.
Note: Check ⚙ (LAN) status indicator is always on, not blinking. If it's blinking, check your RJ45 network cable and ensure it's not disconnected or defect.
If you're using:
■ Wireless router + modem, please refer to "1.4 Wireless Router + Modem".
- Router + modem, please refer to "1.5 Router + Modem".
■ Modem or modem + hub, please refer to "1.6 Modem / Hub + Modem".
For your account safety, it's recommended to change the default account setting. For details, please refer to "1.7 Change Default Account" at page 12.
1.4 Wireless Router + Modem
You may use your laptop / PC, or your iPhone / iPad to complete the network configuration of the camera.
1.4.1 Configure on Laptop / PC
Before configuring this camera on your laptop / PC, make sure:
Your Windows operating system is Windows 7, Vista or XP.
➢ (Recommended) Your wireless router supports UPnP, and this function is enabled.
Note: If your wireless router doesn't support UPnP, you need to additionally access your router for port forwarding. For details, please refer to "APPENDIX 4 CONFIGURE PORT FORWARDING" at page 19.
➢ You have noted down the IP address of your router, and the assigned IP address(es) and port(s) of other devices connected to the same router.
Note: For details, please refer to the user manual of your wireless router, or check with your installer.
You have downloaded "IPScan.exe" in your laptop / PC.
Note: Please download "IPScan.exe" from www.surveillance-download.com/user/m328a.swf.
Step1: Connect your laptop / PC to the wireless network with the camera connected.
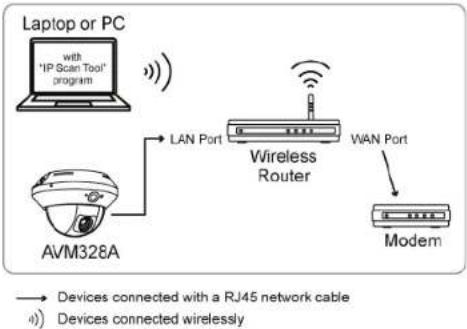
flowchart
graph TD
    A["Laptop or PC"] -->|with 'IP Scan Tool' program| B["AVM328A"]
    B -->|LAN Port| C["Wireless Router"]
    C -->|WAN Port| D["Modem"]
    D -->|Devices connected with a RJ45 network cable| E["Device"]
    style A fill:#f9f,stroke:#333
    style B fill:#ccf,stroke:#333
    style C fill:#cfc,stroke:#333
    style D fill:#fcc,stroke:#333
    style E fill:#ffc,stroke:#333
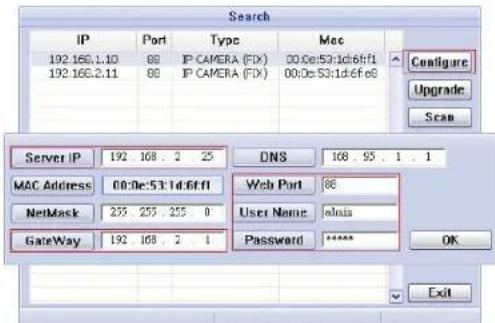
Step2: Open "IPScan.exe" (☐) to search your camera. The default IP address of the camera is 192.168.1.10. If you connect two or more cameras to the wireless router, "IPScan" will list many cameras with different IP addresses after searching. To know which camera you're configuring, you may identify each with its unique MAC address.
Note: The MAC address can be found on the sticker at the bottom side of the camera.
text_image
Search IP Port Type Mec 192.166.1.10 88 IP CAMERA (FIX) 00:0e:53:1d:6f:f1 192.166.2.11 88 IP CAMERA (FIX) 00:0e:53:1d:6f:e8 Configure Upgrade Scan Server IP 192.168.2.25 DNS 168.95.1.1 MAC Address 00:0e:53:1d:6f:f1 Web Port 88 NetMask 235.255.255 0 User Name admina GateWay 192.168.2.1 Password **** OK ExitStep3: Select the IP address you want to configure, and click "Configure" to show the IP setting page, and change the IP address, gateway and port number.
For example, the IP address of your router is 192.168.2.1. Then in this step, you need to change the IP address to 192.168.2.xx ("xx" means any value from 2 \~ 50), and change the gateway to "192.168.2.1 (the same as the IP address of your router). Then, change the port number to any value other than 88 if needed.
Note: Make sure the IP address you change is not used by other devices connected to the same router.
Step4: Enter the user name and password of this camera to confirm the change, and exit "IPScan". The default user name and password are both "admin".
Step5: Open the web browser, such as Internet Explorer, on your laptop / PC, and enter the IP address you just set on the URL column to access this camera. The format is "http://ipaddress:portnum".
In the login page, enter the user name, password, and security code to access.
Note: Please skip the wizard.
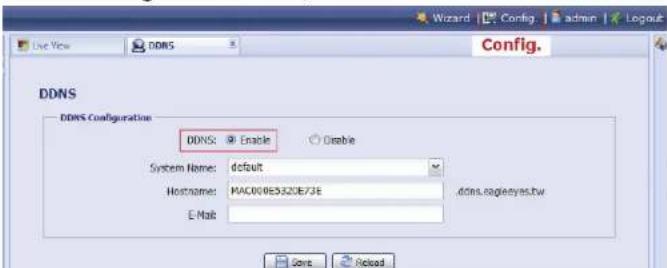
Step6: Go to "Config." → "DDNS", and enable the DDNS service.
text_image
DDNS DDNS Configuration DDNS: Enable System Name: default Hostname: MAC008E332E73E E-Mail DDNS... Enabled ddns.eagleeyes.tw 确定 Picked■ If your router supports UPnP, please proceed Step7.
If your router doesn't support UPnP, note down the host name, such as MAC000E5320E73E.ddns.eagleeyes.tw, and click "Save". Then, access your wireless router for port forwarding as instructed in "APPENDIX 4 CONFIGURE PORT FORWARDING" at page 19.
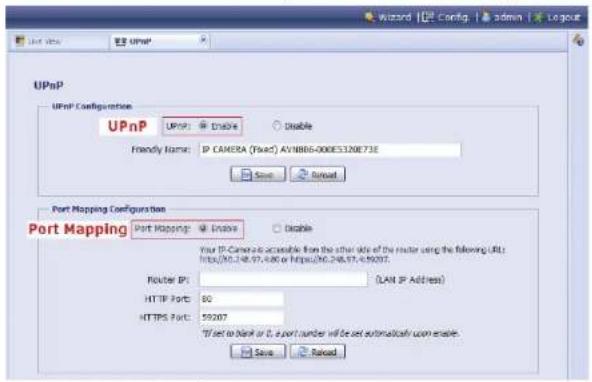
Step7: Go to "UPnP", and enable the UPnP service.
Then, enable "Port Mapping", and click "Save" to start port mapping automatically.
When the configurations are saved successfully, you'll see a message indicating the IP address and port number assigned to your camera.
Note down the IP address and port number, and log out the camera.
text_image
UPnP UPnP Configuration UPnP: Enable Freely Name: IP CAMERA (Pwac) AV1886-000E5320E73E Save Spread Port Mapping Configuration Port Mapping: Enable Your IP Camera is accessible from the other site of the router using the following URL: http://96.248.57.4.08 or https://96.248.57.4.09207. Router IP: LAN IP Address HTTP Port: 80 HTTPS Port: 59207 If set to Bank or O, a port number will be set automatically on enable. Save SpreadCheck your connection
Step1: Connect your laptop / PC to Internet with the wireless network other than the one camera is connected.
Step2: Enter the IP address or host name you just noted down and the port number in the URL address box of the web browser, and see if you can enter the login page of the camera successfully.
The format is "http://ipaddress:portnum" or "http://hostname:portnum".
1.4.2 Configure on iPhone / iPad
Before configuring this camera on iPhone / iPad, make sure:
You have installed our mobile program, EagleEyes-Lite or EagleEyes-Plus, on your iPhone or iPad. For details, please refer to "APPENDIX 2 MOBILE SURVEILLANCE VIA EAGLEEYES" at page 17.
Note: EagleEyes HD for iPad doesn't support network configuration. Please install EagleEyes-Lite or EagleEyes-Plus on your iPad instead.
➢ (Recommended) Your wireless router supports UPnP, and this function is enabled.
Note: If your wireless router doesn't support UPnP, you need to additionally access your router for port forwarding. For details, please refer to "APPENDIX 4 CONFIGURE PORT FORWARDING" at page 19.
Your camera is connected to your wireless router with a RJ45 network cable, and it's powered on.
Note: Check ⚙ (LAN) status indicator is always on, not blinking. If it's blinking, check your RJ45 network cable and ensure it's not disconnected or defect.
You have checked the IP address used by your wireless router with the camera connected as instructed below, and written it down. You'll need it later.
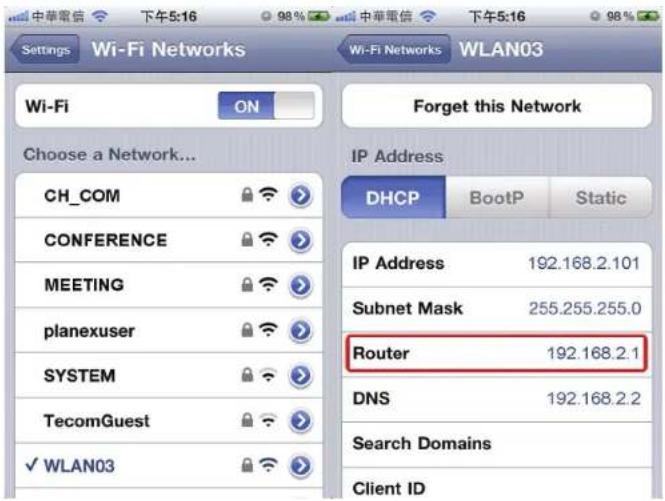
Connect your iPhone / iPad to the wireless router with cameras connected, and go to "Settings" → "Wi-Fi". Select ">” near the selected wireless network to enter the details.
The IP address shown in "Router" is the IP address used by your wireless router. In the following example, the IP address of your router is 192.168.2.1.
text_image
中華電信 下午5:16 98% 中華電信 下午5:16 98% Settings Wi-Fi Networks Wi-Fi Networks WLAN03 Wi-Fi ON Forget this Network Choose a Network... CH_COM CONference MEETING planexuser SYSTEM TecomGuest ✓ WLAN03 IP Address DHCP BootP Static IP Address 192.168.2.101 Subnet Mask 255.255.255.0 Router 192.168.2.1 DNS 192.168.2.2 Search Domains Client IDNote: This address will be needed when you want to access your router for port forwarding later.
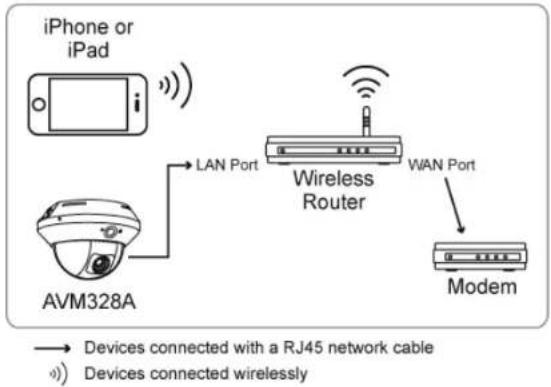
Step1: Connect your iPhone to the wireless router which has the camera connected.
flowchart
graph TD
    A["iPhone or iPad"] -->|LAN Port| B["AVM328A"]
    B --> C["Wireless Router"]
    C --> D["Modem"]
    D -->|WAN Port| C
    style A fill:#f9f,stroke:#333
    style B fill:#ccf,stroke:#333
    style C fill:#cfc,stroke:#333
    style D fill:#fcc,stroke:#333
Step2: Open "EagleEyes" on your iPhone or iPad.
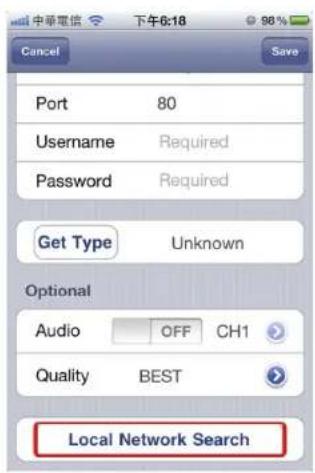
In the address book, click "+" to add new device. Then, select "Local Network Search" to search your network camera. You'll see an IP address assigned by your router.
Note: If you can't find the camera, make sure your LAN status indicator (💡) is always on, and search again after 3 minutes.
If you connect two or more cameras to the wireless router, you'll see many cameras with different IP addresses after searching. To know which camera you're configuring, you may identify each with its unique MAC address.
Note: The MAC address can be found on the sticker at the bottom side of the camera.
text_image
中華電信 下午6:18 96% Cancel Save Port 80 Username Required Password Required Get Type Unknown Optional Audio OFF CH1 Quality BEST Local Network Search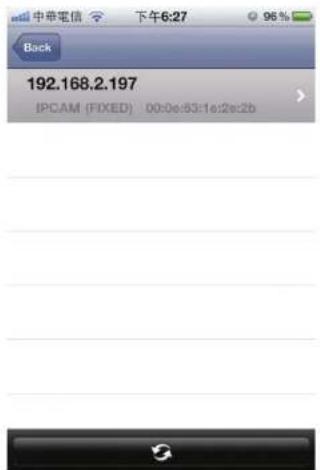
text_image
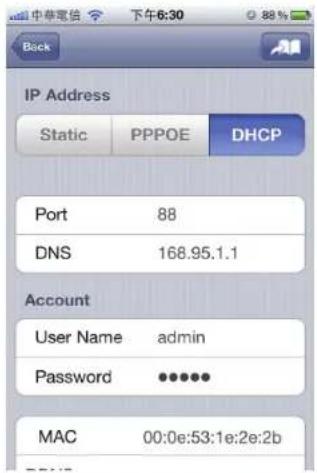
Back 192.168.2.197 IPCAM (FIXED) 00:0e:53:1e:2e:2bStep3: Select the IP address you want to configure to show the IP address setting page. The default port number is 88. You may change it to any value (such as 8080) if the port number of 88 is blocked.
text_image
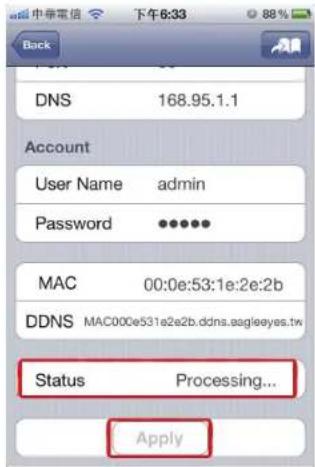
IP Address Static PPPOE DHCP Port 88 DNS 168.95.1.1 Account User Name admin Password •••••• MAC 00:0e:53:1e:2e:2bStep4: Select "Apply" to confirm all your changes. Then, wait till you see "Done" or "Fail" in "Status".
Regardless which message you see, proceed as instructed below:
■ For Done, you'll return to the new device page.
For Fail, select "AN" on the top right side. You'll later be prompted to select "DDNS" or "Local IP". Select "DDNS" and return to the new device page.
text_image
Back DNS 168.95.1.1 Account User Name admin Password •••••• MAC 00:0e:53:1e:2e:2b DDNS MAC000e531e2e2b.ddns.aagleeyes.tw Status Processing... ApplyStatus Change When Selecting "Apply":
Processing...
“Done” or “Fail”
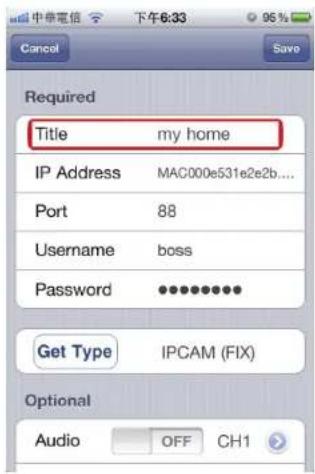
Step5: In the new device page, give a meaningful name for this connection in "Title", and click "Save".
Please continue with configuring port forwarding as instructed in "APPENDIX 4 CONFIGURE PORT FORWARDING" at page 19.
text_image
Required Title my home IP Address MAC000e531e2e2b... Port 88 Username boss Password •••••••••• Get Type IPCAM (FIX) Optional Audio OFF CH1Check your connection
Step1: Switch the network mode to 3G mode on iPhone or iPad.
Step2: Start EagleEyes, and select the connection you just added to see if you can access the camera successfully.
■ If yes, your network setup is successfully.
■ If no, go to Step3.
Step3: Switch your network mode to wireless mode on iPhone or iPad.
Step4: Start EagleEyes, and add a new connection with the IP address (e.g. 192.168.2.25) and the port number (e.g. 88). Then, try this connection and see if you can access the camera successfully.
■ If yes, go for port forwarding setting as instructed in "APPENDIX 4 CONFIGURE PORT FORWARDING" at page 19.
If no, return to Step1 in "1.2.2 Configuring on iPhone / iPad" and re-configure the network again.
1.5 Router + Modem
You may use your laptop / PC to complete the network configuration of the camera.
Before configuring this camera on your laptop / PC, make sure:
Your Windows operating system is Windows 7, Vista or XP.
➢ (Recommended) Your router supports UPnP, and this function is enabled.
Note: If your wireless router doesn't support UPnP, you need to additionally access your router for port forwarding. For details, please refer to "APPENDIX 4 CONFIGURE PORT FORWARDING" at page 19.
➢ You have noted down the IP address of your router.
Note: For details, please refer to the user manual of your router, or check with your installer.
You have downloaded "IPScan.exe" in your laptop / PC.
Note: Please download "IPScan.exe" from www.surveillance-download.com/user/m328a.swf.
Step1: Connect your laptop / PC to the router.
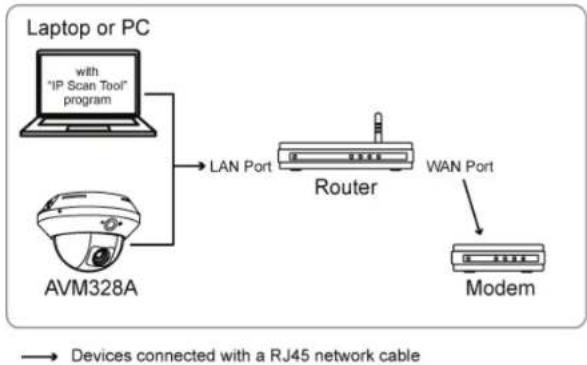
flowchart
graph TD
    A["Laptop or PC"] -->|with "IP Scan Tool" program| B["AVM328A"]
    B --> C["LAN Port"]
    C --> D["Router"]
    D --> E["WAN Port"]
    E --> F["Modem"]
    style A fill:#f9f,stroke:#333
    style B fill:#ccf,stroke:#333
    style C fill:#cfc,stroke:#333
    style D fill:#fcc,stroke:#333
    style E fill:#cff,stroke:#333
    style F fill:#ffc,stroke:#333
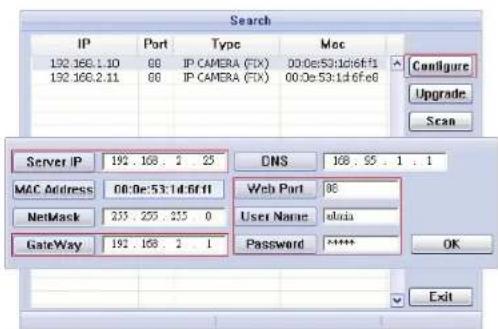
Step2: Open "IPScan.exe" (Q) to search your camera. The default IP address of the camera is 192.168.1.10. If you connect two or more cameras to the same router, "IPScan" will list many cameras with different IP addresses after searching. To know which camera you're configuring, you may identify each with its unique MAC address.
Note: The MAC address can be found on the sticker at the bottom side of the camera.
text_image
Search IP Port Type Moc 192.168.1.10 88 IP CAMERA (FIX) 00:0e53:1d16f11 192.168.2.11 88 IP CAMERA (FIX) 00:0e53:1d16fe8 Configure Upgrade Scan Server IP 192.168.2.25 DNS 168.55.1.1 MAC Address 08:0e53:1d16f11 Web Port 88 NetMask 255.255.255 0 User Name:*main GateWay 192.168.2.1 Password***** OK ExitStep3: Select the IP address you want to configure, and click "Configure" to show the IP setting page, and change the IP address, gateway and port number.
For example, the IP address of your router is 192.168.2.1. Then in this step, you need to change the IP address to 192.168.2.xx ("xx" means any value from 2 \~ 50), and change the gateway to "192.168.2.1 (the same as the IP address of your router). Then, change the port number to any value other than 88 if needed.
Note: Make sure the IP address you change is not used by other devices connected to the same router.
Step4: Enter the user name and password of this camera to confirm the change, and exit "IPScan". The default user name and password are both "admin".
Step5: Open the web browser, such as Internet Explorer, on your laptop / PC, and enter the IP address you just set on the URL column to access this camera. In the login page, enter the user name, password, and security code to access.
Note: Please skip the wizard.
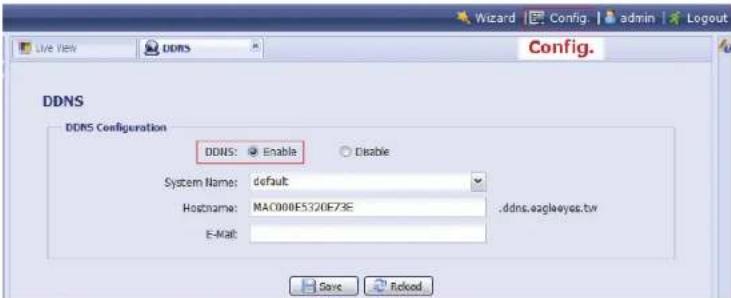
Step6: Go to "Config." → "DDNS", and enable the DDNS service.
text_image
DDNS DDNS Configuration DDNS: Enable Disable System Name: default Hostname: MAC000E5320F73E E-Mail: . ddns.aaglayes.tw Save Reload■ If your router supports UPnP, please proceed Step7.
If your router doesn't support UPnP, click "Save", and access your router for port forwarding as instructed in "APPENDIX 4 CONFIGURE PORT FORWARDING" at page 19.
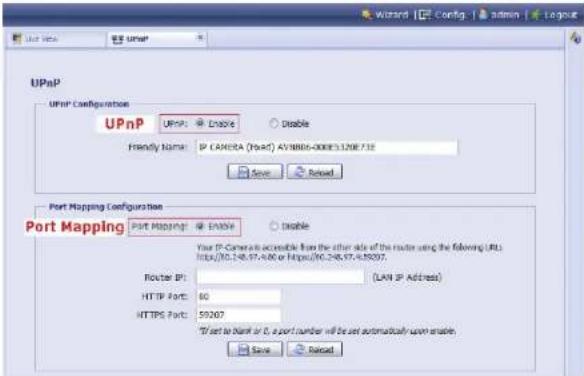
Step7: Go to "UPnP", and enable the UPnP service.
Then, enable "Port Mapping", and click "Save" to start port mapping.
When the configurations are saved successfully, you'll see a message indicating the IP address and port number assigned to your device.
Note down the IP address and port number, and log out the camera.
text_image
UPnP UPnP Configuration UPnP: Enable Disable Friendly Name: IP CANERA (ServAt) 431880-000E3.120E718 Save Reset Port Mapping Configuration Port Mapping: Enable Disable Your IP-Camera accessible from the other site of the router using the following URL: https://6.245.97-5.90 or https://6.245.97-4.9007. Router IP: LAW IP Address HTTP Port: 80 HTTPS Port: 59207 "Test to Bank or O, a port number will be set automatically upon enable Save ResetCheck your connection
Step1: Open your web browser, e.g. Internet Explorer.
Step2: Enter the IP address or host name you just noted down and the port number in the URL address box of the web browser, and see if you can access the login page of the camera successfully.
The format is "http://ipaddress:portnum" or "http://hostname:portnum".
1.6 Modem / Hub + Modem
You may use your laptop / PC to complete the network configuration of the camera.
Before configuring this camera on your laptop / PC, make sure:
Your Windows operating system is Windows 7, Vista or XP.
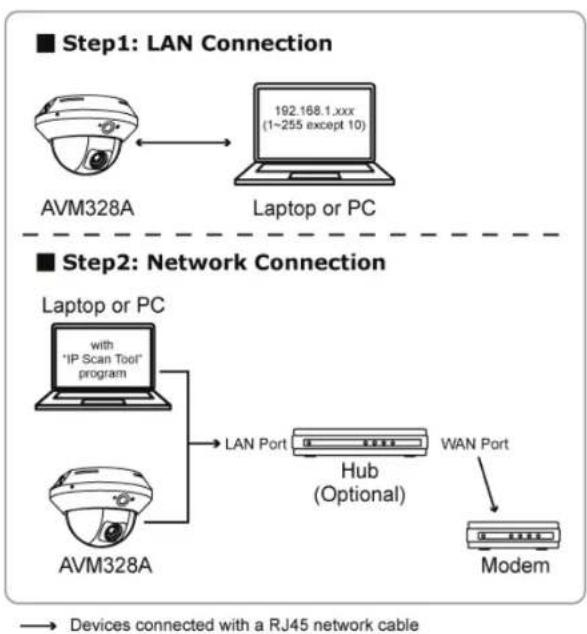
You have changed the IP address of your laptop / PC to "192.168.1.xxx", where xxx could be 0\~255 except 10.
Note: To know how to change the IP address of your laptop / PC, please refer to "APPENDIX 1 CHANGE IP ADDRESS OF YOUR LAPTOP / PC" at page 14.
flowchart
graph TD
    A["Step1: LAN Connection"] --> B["Laptop or PC"]
    B --> C["192.168.1.xxx (1~255 except 10)"]
    D["Step2: Network Connection"] --> E["Laptop or PC"]
    E --> F["LAN Port"]
    F --> G["Hub (Optional)"]
    G --> H["WAN Port"]
    H --> I["Modem"]
    J["AVM328A"] --> K["with "IP Scan Tool" program"]
    L["AVM328A"] --> M["Device connected with a RJ45 network cable"]
Step1: Disconnect your laptop / PC from the hub or modem, and connect it to this camera with a network cable.
Note: Make sure the IP address of your laptop / PC is changed to "192.168.1.xxx" (1\~255 except 10). To know how to change, please refer to "APPENDIX 1 CHANGE IP ADDRESS OF YOUR LAPTOP / PC" at page 14.
Step2: Open the web browser, such as Internet Explorer, on your laptop / PC, and enter "http://192.168.1.10:88" on the URL column to access this camera. In the login page, enter the user name, password, and security code to access.
Note: The default user name and password for remote access are both "admin".
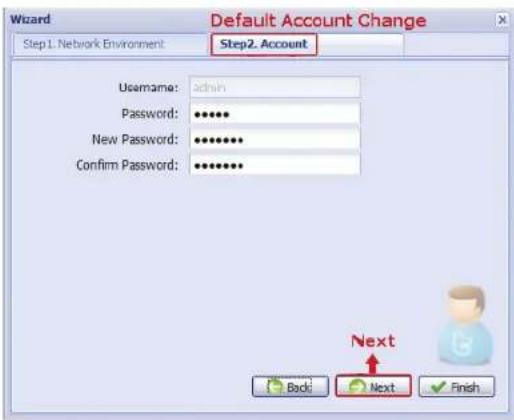
Step3: The wizard starts to analyze your network environment. When it's completed, select "Next" to go to the following pages to change the default password for access safety, check the current date and time, and complete network configurations.

flowchart
graph TD
    A["IP Camera"] --> B["Switch/Hub/Router"]
    C["Cable/DSL Modem"] --> B
    D["Computer"] --> B
    E["Computer"] --> B
    B --> F["Internet"]
    style B fill:#f9f,stroke:#333
    style F fill:#ccf,stroke:#333
text_image
Default Account Change Step1. Network Environment Step2. Account Username: admin Password: •••••• New Password: •••••••• Confirm Password: •••••••• Next Back Next Finish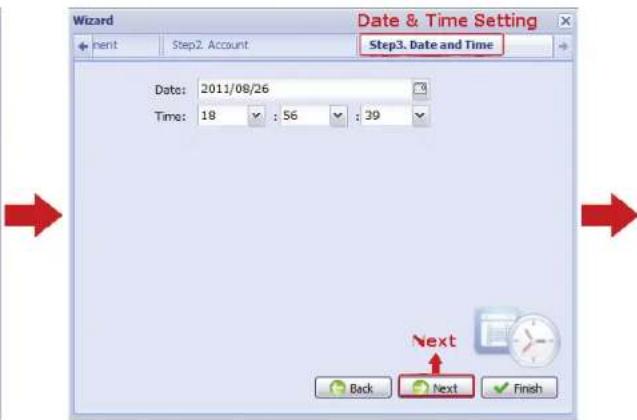
text_image
Wizard Date & Time Setting Next Step2. Account Step3. Date and Time Date: 2011/08/26 Time: 18 : 56 : 39 Next Back Next Finish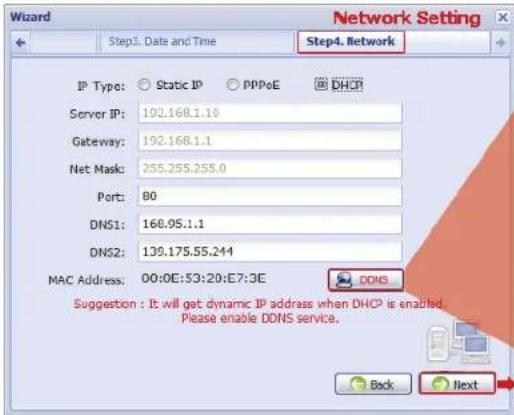
text_image
Wizard Step1. Date and Time Step4. Network IP Type: Static IP PPPoE DHCP Server IP: 192.168.1.10 Gateway: 192.168.1.1 Net Mask: 255.255.255.0 Port: 80 DNS1: 168.95.1.1 DNS2: 139.175.55.244 MAC Address: 00:0E:53:20:E7:3E DDNS Suggestion : It will get dynamic IP address when DHCP is enabled. Please enable DDNS service. Back Next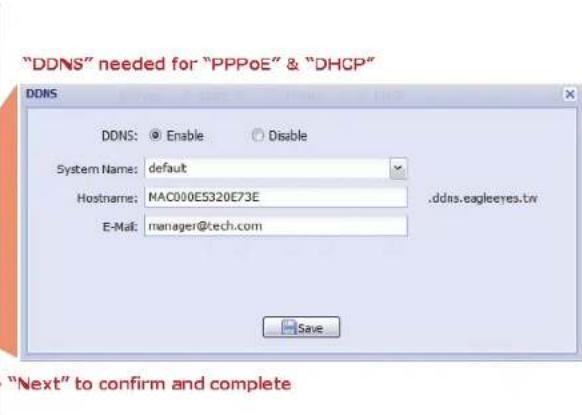
text_image
"DDNS" needed for "PPPoE" & "DHCP" DDNS DDNS: ○ Enable ○ Disable System Name: default Hostname: MAC000E5320E73E .ddns.eagleeres.tw E-Mail: manager@tech.com Save "Next" to confirm and complete| Item | Description |
| Account Change your default account password if needed.This change can also be made in “Config.” → “General” → “Account”. | |
| Date and Time Check and select the current date and time. | |
| Network Configure your network setting based on the network type you’re using.For details, please refer to Step4 & Step5. | |
Step4: In "Network", configure the network setting of your camera based on the network type you're using. There're three types: Static IP, PPPOE and DHCP.
For Static IP:
a) Enter the information of "Server IP", "Gateway" and "Net Mask" obtained from your ISP (Internet Service Provider).
b) Enter the port number. The valid number ranges from 1 to 9999. The default value is 88.
c) Click "Save" to save your network configurations, and log out.
d) Disconnect your camera and your PC, and connect them to Internet separately. Then, enter the IP address you just note down in the URL address box of the web browser, and see if you can access the camera successfully.
For PPPOE:
a) Enter the user name and password obtained from your ISP, and click "Save".
b) Continue the DDNS setting as instructed in Step5.
For DHCP:
a) Before selecting this option, you need to finish the DHCP router settings first.
b) Get a router and connect it to the Internet via your PC (with Static IP or PPPoE setting). There are different setting methods for different routers. Please refer to their respective user manuals.
c) Continue the DDNS setting as instructed in Step5.
Step5: (Optional) Click "DDNS" (A) to continue setting for PPPOE and DHCP.

text_image
DDNS DDNS: Enable Disable System Name: default Hostname: MAC000e531d6ff1 .ddns.eagleeyes.tw E-Mail: manager@tech.com.tw Savea) Enable DDNS.
b) Select "default" in "System Name".
c) In "Hostname", keep the default value, i.e. the MAC address of this camera. Then, note down the whole address of the camera, for example, MAC000e531d6ff1.ddns.eagleeyes.tw.
d) (Optional) Enter your email address to receive messages from the DDNS server.
Note: Please at least use the default address to access your network camera remotely once. This is to ensure our DDNS server has your camera registered. Then, you may change the host name to a more meaningful name to memorize later here.
e) Click "Save" to return to the network setting page. Then, click "Next".
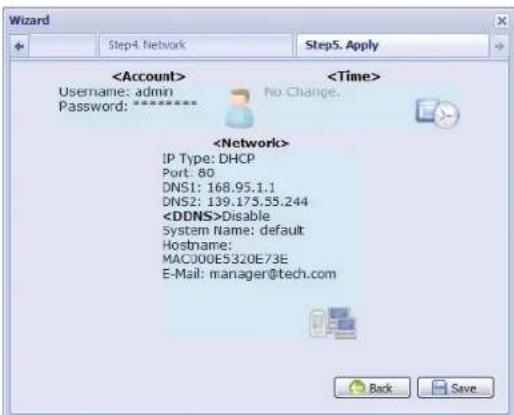
Step6: Check if the changes you've made are correct, and click "Save" to complete.
text_image
Check your connection
Step1: Disconnect your camera and your laptop / PC, and connect them to Internet separately.
Note: If you changed the IP address of your laptop / PC for LAN connection, remember to restore it back for Internet access to work properly.
Step2: Enter the host name you just noted down and the port number in the URL address box of the web browser, and see if you can access the login page of the camera successfully. The format is "http://hostname:portnum".
1.7 Change Default Account
To ensure your account safety, please access the camera after network configuration to change the default user name and password with new one you prefer.
1.7.1 From Web Browser
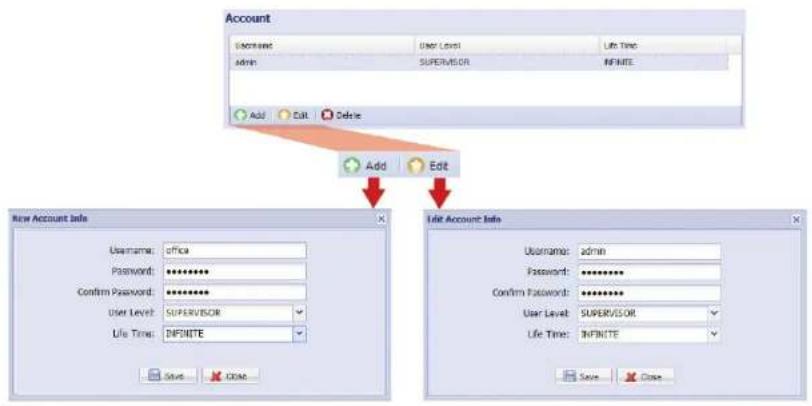
Log into the camera, and select "Config." → "General" → "Account". You may:
■ Select the default account "admin", and click "Edit" to change the default password, or
■ Directly click "Add" to create a new account and remove the default account.
text_image
Account User Name: User Level: Life Time: Admin: SUPERVISOR INFINITE Add Edit Delete Add Edit New Account Info Username: office Password: ********** Confirm Password: ********** User Level: SUPERVISOR Life Time: INFINITE Save Close Edit Account Info Username: admin Password: ********** Confirm Password: ********** User Level: SUPERVISOR Life Time: INFINITE Save Close1.7.2 From iPhone / iPad
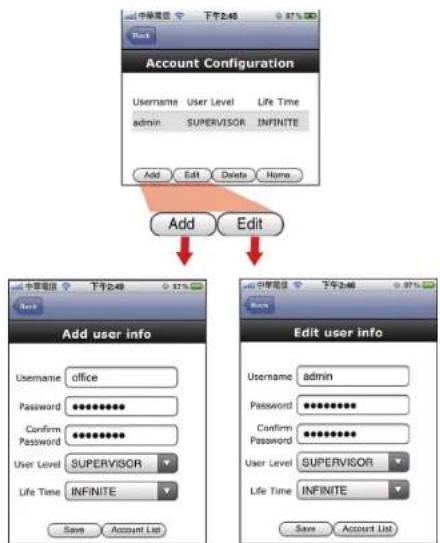
Log into the camera, and click “💡” on the top right corner to enter the system configuration page. Then, select “Advance Setup” → “Account”.
You may:
■ Select the default account "admin", and click "Edit" to modify the default password, or
■ Directly click "Add" to create a new account and remove the default account.
text_image
Account Configuration Username User Level Life Time admin SUPERVISOR INFINITE Add Edit Delete Home Add Edit Add user info Username office Password ********** Confirm ********** User Level SUPERVISOR Life Time INFINITE Save Account List Edit user info Username admin Password ********** Confirm ********** User Level SUPERVISOR Life Time INFINITE Save Account List2. BEFORE YOU START TO USE
After you finish network configurations, it's recommended to adjust the video images if needed.
Below assumes you're using Internet Explorer to access the camera.
Note: For iPhone users, please access the camera, and select 🔒 on the top right corner of the live view to enter the configuration page.
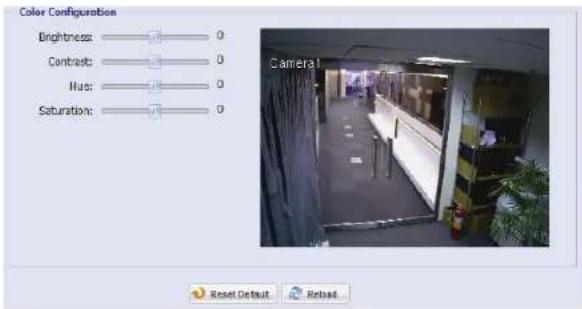
To slightly adjust the color of the video, in the live page of your web browser, click "Config" on the top right side of the browser to open the configuration page.
Then, click "Camera" → "Color" to adjust the brightness / contrast / hue / saturation of the video images, as shown below.
text_image
Color Configuration Brightness: 0 Contrast: 0 Hue: 0 Saturation: 0 Camera1 Reset Default ReloadAPPENDIX 1 CHANGE IP ADDRESS OF YOUR LAPTOP / PC
For LAN connection with this network camera, you need to change the IP address of your laptop / PC to 192.168.1.xxx (1\~255, except 10) first.
Note: Before changing the IP address, make sure you note down the original IP address setting of your laptop / PC. You need to restore the IP address setting when you complete the network configuration of this camera.
For Windows XP users:
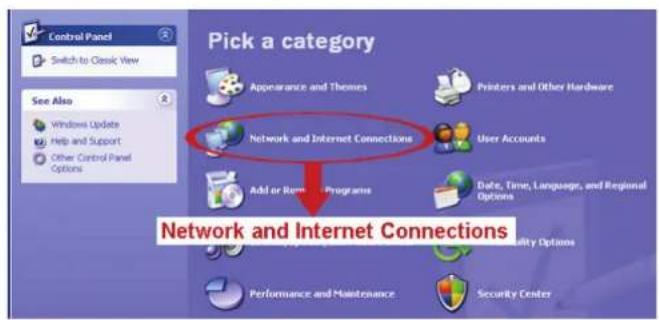
a) Select "start" → "Control Panel" → "Network and Internet Connections" → "Network Connections" (If you're in "Category View").
text_image
Control Panel Switch to Classic View See Also Windows Update Help and Support Other Control Panel Options Pick a category Appearance and Themes Printers and Other Hardware Network and Internet Connections User Accounts Add or Remove Programs Date, Time, Language, and Regional Options Security Options Performance and Maintenance Security Center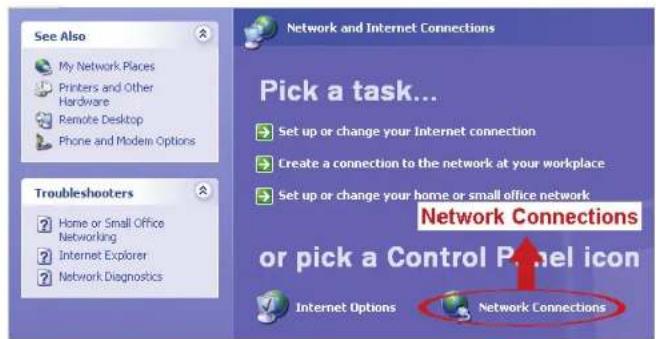
text_image
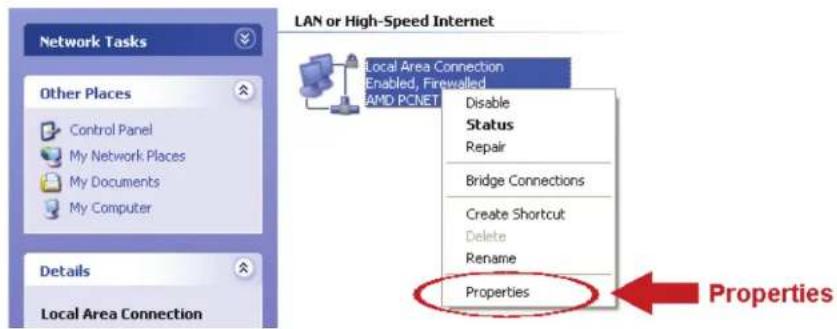
See Also My Network Places Printers and Other Hardware Remote Desktop Phone and Modem Options Troubleshooters Home or Small Office Networking Internet Explorer Network Diagnostics Network and Internet Connections Pick a task... Set up or change your Internet connection Create a connection to the network at your workplace Set up or change your home or small office network Network Connections or pick a Control Panel icon Internet Options Network Connectionsb) In "LAN or High-Speed Internet", right-click on "Local Area Connection", and select "Properties".
text_image
LAN or High-Speed Internet Local Area Connection Enabled, Firewalled AMD PCNET Disable Status Repair Bridge Connections Create Shortcut Delete Rename PropertiesNote: If your local area connection is not enabled, please also enable it.
c) In the "General" tab, select "Internet Protocol (TCP/IP)", and select "Properties".
d) In the "General" tab, select "Use the following IP address", and set the IP address to "192.168.1.XXX" (XXX can be any value from 1\~255 except 10).
Note: It's recommended to note down the current settings first and then change as instructed. It's helpful when you need to restore the PC network settings for connecting to Internet later.
e) Click "OK" to close the "Internet Protocol (TCP/IP) Properties" dialog box. Then, click "Close" to close the "Local Area Connection Properties" dialog box.
For Windows Vista users:
a) Select "Control Panel" (start) → "Control Panel" → "Network and Internet" to enter the "Network and Sharing Center". Then, click "Manage network connections" (If you're in "Category View").
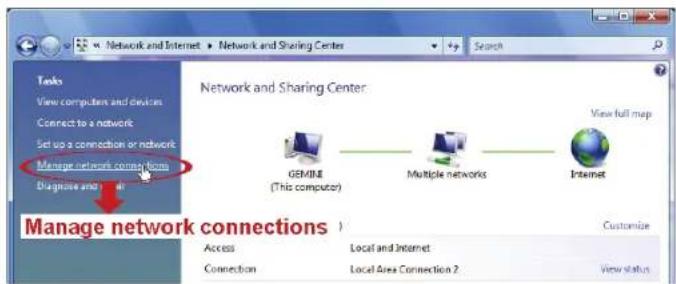
text_image
Network and Internet ▶ Network and Sharing Center Search Tasks View computer and devices Connect to a network Set up a connection or network Manage network connections Diagnise and Network and Sharing Center GEMINE (This computer) Multiple networks Internet View full map Customize Manage network connections > Access Local and Internet Connection Local Area Connection 2 View statusb) Right-click on "Local Area Connection", and select "Properties".
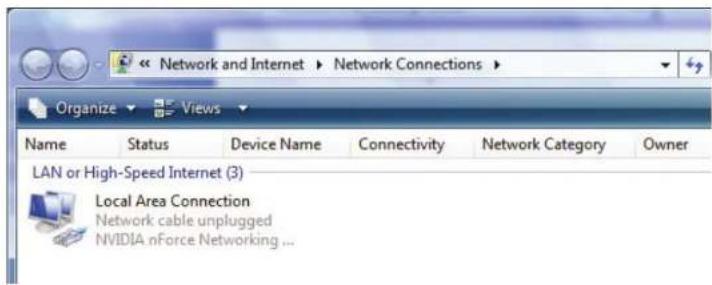
text_image
Network and Internet ▶ Network Connections ▶ Organize ▼ Views ▼ Name Status Device Name Connectivity Network Category Owner LAN or High-Speed Internet (3) Local Area Connection Network cable unplugged NVIDIA nForce Networking ...Note: If your local area connection is not enabled, please also enable it.
c) In the "Networking" tab, select "Internet Protocol Version 4 (TCP/IPv4)", and select "Properties".
d) In the "General" tab, select "Use the following IP address", and set the IP address as described below.
Note: It's recommended to note down the current settings first and then change as instructed. It's helpful when you need to restore the PC network settings for connecting to Internet later.
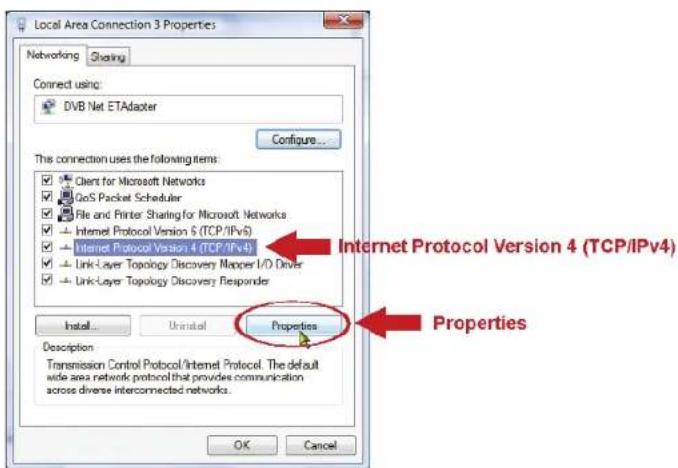
text_image
Local Area Connection 3 Properties Networking Sharing Connect using: DVB Net ETAdapter Configure... This connection uses the following items: Client for Microsoft Networks GoS Packet Scheduler File and Printer Sharing for Microsoft Networks Internet Protocol Version 6 (TCP/IPVs) Internet Protocol Version 4 (TCP/IPVs4) Link-Layer Topology Discovery Mapper I/O Driver Link-Layer Topology Discovery Responder Properties Install... Unavailable Description Transmission Control Protocol/Internet Protocol. The default wide area network protocol that provides communication across diverse interconnected networks. OK Cancel Internet Protocol Version 4 (TCP/IPv4) Properties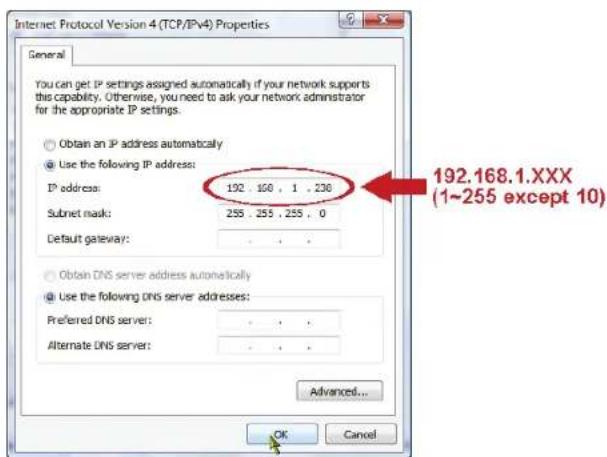
text_image
Internet Protocol Version 4 (TCP/IPv4) Properties General You can get IP settings assigned automatically if your network supports this capability. Otherwise, you need to ask your network administrator for the appropriate IP settings. Obtain an IP address automatically Use the following IP address: IP address: 192, 160, 1, 230 Subnet mask: 255, 255, 255, 0 Default gateway: Obtain DNS server address automatically Use the following DNS server addresses: Preferred DNS server: Alternate DNS server: Advanced... OK Cancel 192.168.1.XXX (1~255 except 10)e) Click "OK" to close the "Internet Protocol Version 4 (TCP/IPv4) Properties" dialog box. Then, click "Close" to close the "Local Area Connection Properties" dialog box.
For Windows 7 users:
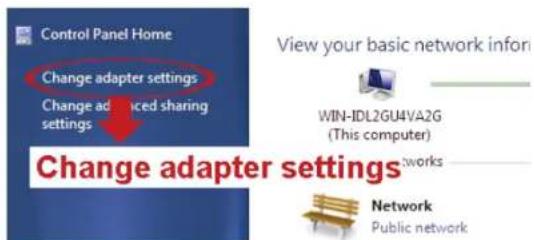
a) Select “☑” (start) → “Control Panel” → “Network and Internet” to enter the “Network and Sharing Center”. Then, click “Change adapter settings”.
text_image
Control Panel Home Change adapter settings Change advanced sharing settings View your basic network info WIN-IDL2GU4VA2G (This computer) Network Public network Change adapter settingsb) Right-click on "Local Area Connection", and select "Properties".
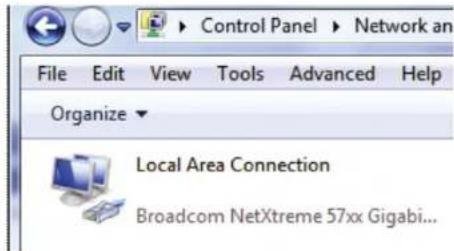
text_image
Control Panel > Network an File Edit View Tools Advanced Help Organize Local Area Connection Broadcom NetXtreme 57xx Gigabi...Note: If your local area connection is not enabled, please also enable it.
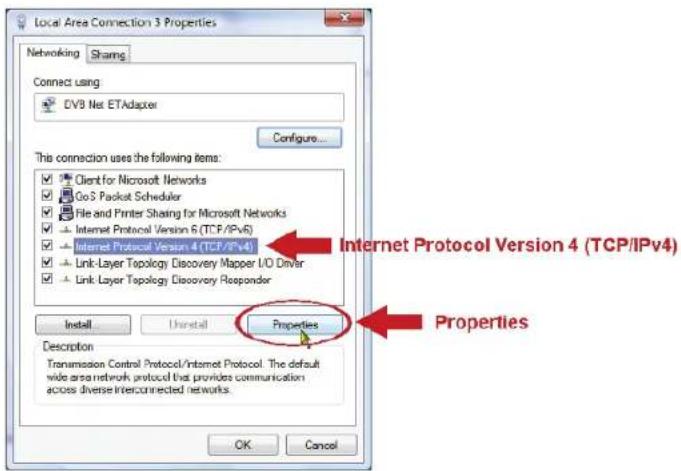
c) In the "Networking" tab, select "Internet Protocol Version 4 (TCP/IPv4)", and select "Properties".
d) In the "General" tab, select "Use the following IP address", and set the IP address as described below.
Note: It's recommended to note down the current settings first and then change as instructed. It's helpful when you need to restore the PC network settings for connecting to Internet later.
text_image
Local Area Connection 3 Properties Networking Sharing Connect using DV9 Net ETAdapter Configure... This connection uses the following items: Client for Microsoft Networks Go S Packet Scheduler File and Printer Sharing for Microsoft Networks Internet Protocol Version 6 (TCP/IPv6) Internet Protocol Version 4 (TCP/IPv4) Link-Layer Topology Discovery Mapper I/O Driver Link-Layer Topology Discovery Responder Properties Install Install Description Transmission Control Protocol/Internet Protocol. The default wide area network protocol that provides communication across diverse interconnected networks. OK Cancel Internet Protocol Version 4 (TCP/IPv4) Properties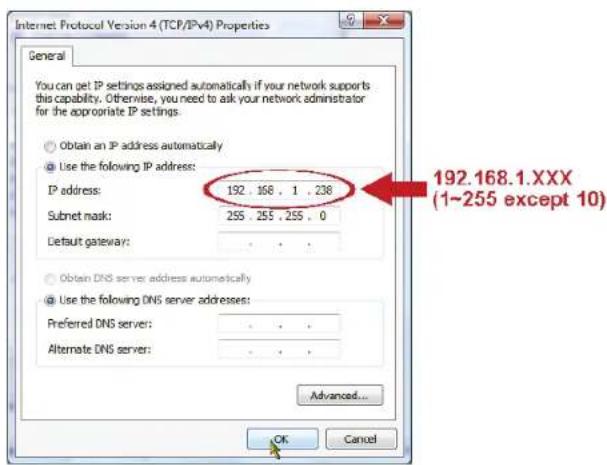
text_image
Internet Protocol Version 4 (TCP/IPV4) Properties General You can get IP settings assigned automatically if your network supports this capability. Otherwise, you need to ask your network administrator for the appropriate IP settings. Obtain an IP address automatically Use the following IP address: IP address: 192 . 168 . 1 . 238 Subset mask: 255 . 255 . 255 . 0 Default gateway: Obtain DNS server address automatically Use the following DNS server addresses: Preferred DNS server: Alternate DNS server: Advanced... OK Cancel 192.168.1.XXX (1~255 except 10)e) Click "OK" to close the "Internet Protocol Version 4 (TCP/IPv4) Properties" dialog box. Then, click "Close" to close the "Local Area Connection Properties" dialog box.
APPENDIX 2 MOBILE SURVEILLANCE VIA EAGLEEYES
EagleEyes is a mobile phone program used with our surveillance system for remote surveillance. It has several advantages:
■ It's free (Except EagleEyes Plus for iPhone).
It's compatible with several popular mobile platforms, such as iPhone, iPad and Android.
It's easy to download, install and configure. For more details about configuring and operating this program, please visit our official website www.eagleeyescctv.com.
A2.1 Prerequisites
Before installing EagleEyes to your mobile phone for remote surveillance, make sure you have checked the following:
√ Your mobile platform is iPhone, iPad & Android.
√ Mobile Internet services are subscribed and available to use for your mobile phone.
Note: You might be charged for Internet access via wireless or 3G networks. For the Internet access rate details, please check with your local network operator or service provider.
√ You have noted down the IP address, port number, user name and password used to access your network camera from Internet.
A2.2 Where to download
Connect to www.eagleeyescctv.com from your mobile phone, and sign in.
Note: Please DO NOT try to download EagleEyes from your computer.
Then, select "Software" and the mobile platform of your phone to download EagleEyes to your phone.
■ For Android & iPad, select the download link from the website to start downloading.
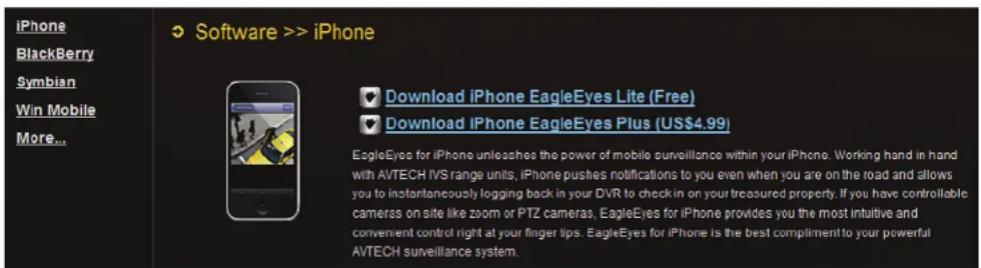
■ For iPhone, two versions of EagleEyes are available:
-- EagleEyes Plus (US\$4.99), and
-- EagleEyes Lite (Free).
Select the version you want, and you'll be directed to "App Store" to download the application.
Note: You can also find EagleEyes on "App Store" from your iPhone. Go to "App Store", and select "Search". Enter the keyword "eagleeyes" to find and download the version you want.
text_image
iPhone BlackBerry Symbian Win Mobile More... Software >> iPhone Download iPhone EagleEyes Lite (Free) Download iPhone EagleEyes Plus (US$4.99) EagleEyes for iPhone unleashes the power of mobile surveillance within your iPhone. Working hand in hand with AVTECH IVS range units, iPhone pushes notifications to you even when you are on the road and allows you to instantaneously logging back in your DVR to check in on your treasured property. If you have controllable cameras on site like zoom or PTZ cameras, EagleEyes for iPhone provides you the most intuitive and convenient control right at your finger tips. EagleEyes for iPhone Is the best compliment to your powerful AVTECH surveillance system.When the download is completed, EagleEyes will be installed automatically to the location where all applications are saved in your phone by default, or where you specify.
Note: For more details about configuring and operating this program, please visit our official website www.eagleeyescctv.com.
APPENDIX 3 POE CONNECTION
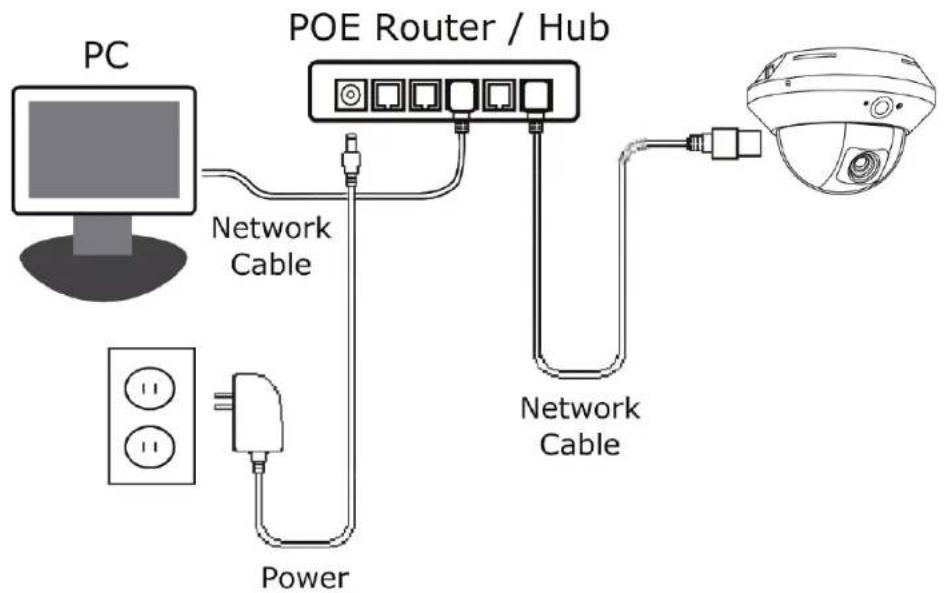
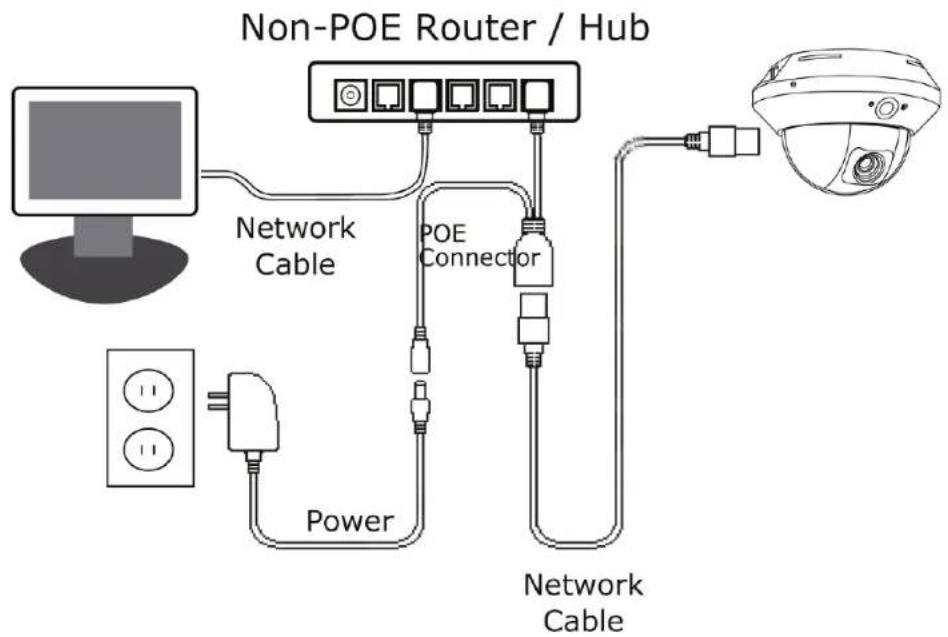
This device supports PoE (Power-over-Ethernet), developed by the IEEE802.3af task force, and power can be supplied over the same network (Ethernet) cable as the one used to connect to Internet. No power cable is needed. Below shows two examples of POE application for reference.
■ When your router / hub supports POE connection
text_image
PC POE Router / Hub Network Cable Network Cable Power- When your router / hub doesn't support POE connection (An optional POE connected required)
text_image
Non-POE Router / Hub Network Cable POE Connector Power Network CableAPPENDIX 4 CONFIGURE PORT FORWARDING
You need to additionally access your router for port forwarding when your router doesn't support UPnP. Each router has different setting page.
Step1: Access your router for port forwarding.
If you're configuring the camera with laptop / PC or iPhone / iPad over wireless network, open your web browser, e.g. Internet Explorer or Safari, and enter the IP address of your router.
If you're configuring camera with laptop / PC over LAN, disconnect the camera and connect to your router. Then, open your browser, e.g. Internet Explorer, and enter the IP address of your router.
Step2: In the router setting interface, go to the port forwarding (or virtual server) rule configuration page.
Note: The naming of port forwarding or virtual server may vary based on different router brands. To know where it is, please refer to the user manual of your router.
APPENDIX 5 Q&A
For more details about EagleEyes Q&A, please visit our official website: www.eagleeyescctv.com/supp_QnA.aspx.
| Question Answer | |
| I can connect to this camera in my house or office where it's installed with wireless network.But when I leave my house or office, I can't connect to it from my mobile phone (with 3G network), or other PC (connected to Internet). Why? | You didn't configure this camera to Internet, but only in LAN.Please follow the steps in the advanced network setup guide to complete network configurations, or it's recommended for you to check with your local installer or reseller for this service because it's usually hard for a person who doesn't have network knowledge to set network configurations. |
| My live images are not fluent. Why? | Image fluency could be affected by the local network upload bandwidth, router efficiency, client network download bandwidth, complexity of live view, and more.(Recommended) To have the best image fluency, select QVGA; to have the best image quality, select “SXVGA”; to have normal image fluency and quality, select “VGA”. |
| My image is vague. Why? | The camera might lose its focus. Please rotate the lens to adjust. |
| The live video keeps flickering. Why? | Please try adjusting the power line frequency to “60 Hz” or “50 Hz” for the camera.For iPhone users, access the camera, and select “” on the top right corner to enter IPCAM Configuration page. Then, go to “Advance Setup” → “Camera” to change setting.For access from Internet Explorer, log into the camera, and select “Config.” → “Camera” → “Video”. |