
MCA-180 - Hi-Fi System DENVER - Free user manual and instructions
Find the device manual for free MCA-180 DENVER in PDF.


| Product Type | CD Micro System with FM Radio and Alarm Clock |
| Brand | DENVER |
| Model | MCA-180 |
| Power Supply | AC 230V ~ 50Hz |
| Clock Backup Battery | 2 x AA (1.5V) batteries |
| Remote Control Battery | 2 x AAA (1.5V) batteries |
| Disc Compatibility | Audio CD |
| Radio Bands | FM |
| Audio Input | AUX (3.5mm stereo jack) |
| Headphone Output | 3.5mm stereo jack (speakers auto-disconnect) |
| Speakers | Built-in stereo speakers (left and right outputs) |
| Controls | Standby/On, Function (Radio/FM, AUX, CD), Volume, Tuning, Play/Pause, Skip/Search, Stop, Program, Repeat, Alarm On/Off, Alarm Set, Time Set, Hour/Minute |
| Display | LED display (frequency, track number, time, etc.) |
| FM Antenna | Wire antenna (adjustable for better reception) |
| Remote Control | Included (with Play/Pause, Skip/Search, Repeat, Stop) |
| Alarm Functions | Alarm by radio or CD; alarm time setting with HOUR/MIN buttons; alarm on/off |
| CD Programmable Playback | Up to 20 tracks in desired sequence |
| Repeat Modes | Repeat single track (REP) or all tracks (ALL REP) |
| Indicators | Power, FM Stereo, AUX |
| Safety | Do not expose to rain or moisture; use only specified voltage |
Frequently Asked Questions - MCA-180 DENVER
User questions about MCA-180 DENVER
0 question about this device. Answer the ones you know or ask your own.
Ask a new question about this device
Download the instructions for your Hi-Fi System in PDF format for free! Find your manual MCA-180 - DENVER and take your electronic device back in hand. On this page are published all the documents necessary for the use of your device. MCA-180 by DENVER.
USER MANUAL MCA-180 DENVER
CD Micro System with FM Radio and alarm clock
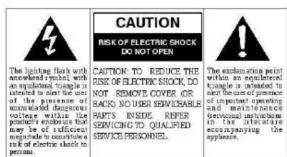
The lighting flush with anewhead symbol, with an equalized scale is intended to enter the use of the presence of uncontrolled dangerous voltage within the procedure's enclosure that may be of sufficient magnitude to constitute a risk of electric shock to persons. CAUTION: TO REDUCE THE RISK OF ELECTRIC SHOCK, DO NOT REMOVE COVER OR BACK. NO USER SERVICABLE PARTS INSIDE REFER SERVICING TO QUALIFIED SERVICE PERSONNEL.
The examination point within an equilateral triangle is intended to alert the uses of presence of important operating and maintenance (servicing) instructions in the literature accompanying the appliance.
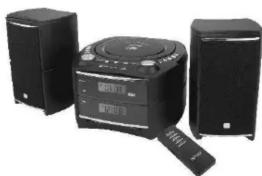
natural_image
Three black electronic devices with speakers and a portable radio on top (no visible text or labels)WARNING: TO REDUCE THE RISK OF FIRE OR ELECTRIC SHOCK, DO NOT EXPOSE THE APPLIANCE TO RAIN OR MOISTURE.
INSTRUCTION MANUAL Operating Instructions
LOCATION OF CONTROLS
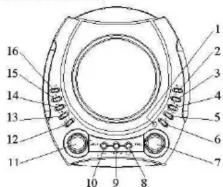
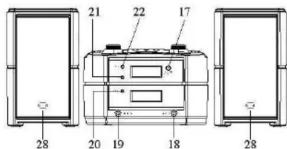
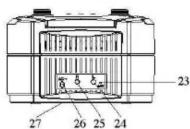
- Open Button for CD Door
- Fast Forward Button "SKIP +" 3. Required Button "SKIP."
- Rewind Button "SK
- CD Program Button
- CD Repeat Button
- CD Stop Button
- Tuning knob
- CD Play/ Pause Button
- Function Button (Radio FM, AUX, CD)
- Stanchby/ Power on Button
- Volume control Button
- Alarm on/off B
- Alarm setting Button
- Time set Button
- Minute Button (Clock min. setting)
- Hour Button (Clock hour setting)
- Remote sensor
- Remote sensor
- AUX Line-in i
- Phone jack
- FM stereo indicator
- AUX indicator
- Power indicator
- FM Antenna
- Lo0 Snacker
- Left Speaker output Jack
- Right Speaker output Jack
- AC output socket
- Battery compartment
- Speakers
REMOTE CONTROL
- Play/pause button
- Skip/search forward
- Skip/search backward button
- Repeat 1/All button
- Stop button
- Battery compartment
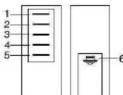
Insert two(2) "AAA"/1.5V batteries following the polarity as indicated in the compartment to the right. Alkaline batteries are recommended for long using time.
Note: when planning not to use the remote control for a long time. Remove the batteries in order to avoid the electrolyte leakage.
Unit power supply(mains 230V\~50Hz)
Connect the power cable plug to the (230V) wall outlet.
Warning:
Before using the unit. Check that the local mains supply is
compatible with the HI-FI System (230V\~50Hz)
Do not plug or unplug the power cable when your hands wet.
When planning not to use this unit for long period of time (i.e. Vietnam, etc.) discompt the plan from the wall outlet
(i.e., vacation etc.) disconnect the plug from the wall outlet. When disconnecting the power cord from the wall outlet, grasp the plug; do not pull the cord in order to avoid shock risks caused by the damaged cable.
Battery installation (for the clock)
-
Open the Battery cover on the underside of the unit 2. Insert two (2) "AA" / 1.6V batteries following the rail
-
Insert two(2) "AA"/1.5 V batteries following the polarity as indicated in the compartment to the right. Alkaline batteries
indicated in the compartment to the rig are recommended for long using time.
- Press the battery cover back to close until it is tight.
Note: After cutting off the AC Power supply, the Time
information will be lost when the battery is moved.
HEADPHONE JACK
This unit will accept stereo headphones with a 0.35mm plug.
Before connecting the headphones set the volume to minimum
level as not to damage your ears or the headphones. Conn
headphones to the headphones jack. The speakers will be automatically disconnected.
automatically disconnected. Warnings, prolonged expes
Warning: Prolonged exposure to high sound levels may permanently damage your hearing. You may not hear some
permanently damage your hearing. You may not warning sound while wearing these headphones.
VOLUME
Adjust the VOLUME control to the desired level.
-
Press STANDBY/ ON button to turn on the unit.
-
Press FUNCTION button switch to RADIO.
-
Turn TUNING Knob to tune in desired Radio station.
-
The STEREO indicator will light when the radio was
-
The STEREO indicator will light when the radio reached FM stereo frequency.
-
To turn off Radio, simply press STANDBY/ON button on the
-
Note: While in the Radio Mode, the display will indicate as Frequency. It cannot be set the time or alarm while the radio was in using. To set time or alarm, turn off the unit first.. Your time setting will be invalid if frequency appears.
MCA-180 (English) (A4)
12 Nov 2007 /L
ANTENNA
For better reception, FM wire antenna shall be fully untied and adjusted well
CLOCK SETTING
Press and hold "TIME" button to set the clock, press HOUR button or MIN button respectively to adjust the display time.
ALARM TIME SETTING
-
Press and hold "AL. SET" button to set the Alarm time, press HOUR button or MIN button respectively to adjust the alarm time.
-
Turn on the alarm function by pressing AL.ON/OFF button till the alarm icon appears
Note. The unit alarm by radio or alarm by CD is depends on what user is using before turn off the unit.
For example, if the user was listen to the radio before, the unit will be alarm by radio.
To turn off the alarm, simply press "STANDBY/ON" button once.
-
Press OPEN button to open the CD door.
-
Insert a CD with the label facing up
-
Close the CD Door.
-
Press FUNCTION button select to CD
-
After select to CD, the display will turn on and the first track
of the CD will play automatically.
-
Press once more PLAY/PAUSE button to momentarily pause, the word of "PLAY" showing on the display will flashing. To resume, press PLAY/PAUSE again.
-
To stop the playback, Press STOP button.
SKIPPING TRACKS
Press during play.
Backward----(SKIP-) button
Fast Forward----(SKIP+) button
SEARCHING TRACKS
Press and hold during play
Backward----(SKIP-) button
Fast Forward----(SKIP+) button
PROGRAMMED PLAYBACK
Up to 20 tracks can be programmed to play in any desired
sequence.
- When the unit is in stop mode, press PROG button, you will
see "PROG. 00" is flashing in display.
- Press (SKIP+) button or (SKIP-) button to select a desired
track to be memorized.
-
Press PROG button to save the programmed tracks.
-
Repeat steps 2 and 3 to program tracks.
-
Press PLAY/PAUSE button to start playing.
-
To cancel program play, Press STOP button
REPEAT PLAY
To Repeat Single Track
Press REPEAT button while the track you want to repeat is
playing. The "REP" will appear in display.
Tongesthatetuk: Pass (SKIP)
----To repeat another track, Press (SKIP+) or (SKIP-) button
----To cancel repeat play, Press REPEAT button two times.
To Repeat all the tracks
Press REPEAT button twice during play. The "ALL REP" will
appear in display.
----All tracks will be played through in sequence and then the
sequence will be repeated continuously.
To cancel repeat play press REPEAT button one time.
To select, repeat play, press test and control one value.
HEADPHONE JACK
This unit will accept stereo headphones with a 0.35mm plug.
Before connecting the headphones set the volume to minimum
level as not to damage your cars or the headphones. Connect the
headphones to the headphones jack. The speakers will be
automatically disconnected
Warning: Prolonged exposure to high sound levels may
permanently damage your hearing. You may not hear some
warning sound while wearing these headphones.
AUX INPUT JACK
-
Adjust the POWER OFF/AUX/RADIO/CD selector to AUX.
-
Connect the AUX connect wire from the out jack of your
Personal Player such as portable MP3 players to the AUX input
person jack
- Play Start from your Personal Player.
TROUBLESHOOTING GUIDE
You experience a problem with this unit check the chart below before
calling of service.
| SYMPTOM | CAUSE | SOLUTION |
| CD Player will Not turn on. | • AC Cord not connected properly. | Connect the AC cord properly. |
| Disc will not Play | • Disc inserted incorrectly.• Defective compact disc.• CD compartment not closed.• Moisture condensation on disc. | • Reinsert disc with label side facing up.• Try another compact disc.• Close CD compartment.• Wipe disc with soft cloth. |
| Erratic CD playback | • Dirty or defective disc. | • Clean or replace disc. |
| No sound | • Headphone + Speaker plug are not inserted properly.• Volume control set to minimum.• Defective compact disc.• FUNCTION is not set to the desired position. | • Reinsert headphone or Speaker Plug into headphone or speaker jack.• Increase the volume.• Try another compact disc.• Press FUNCTION SELECTOR switch to the desired function. |
| Noise or Sound distorted on radio | • Unit is not positioned correctly. | • Rotate unit until best reception is obtained. |
COPYRIGHT DENVER ELECTRONICS A/S
DENVER
www.denver-electronics.com

Instructions on environment protection
Do not dispose of this product in the usual household garbage at the
X end of its lifecycle; hand it over at a collection point for the recycling
of electrical and electronic appliances. The symbol on the product,
the instructions for use or the packing will inform about the methods
for disposal.
The materials are recyclable as mentioned in this marking. By recycling,
material recycling or other forms of re-utilization of old appliances.
you are making an important contribution to protect our environment.
Please inquire at the community administration for the authorized
disposal location.


- CD Micro System with FM Radio and alarm clock
- REMOTE CONTROL
- Unit power supply(mains 230V\~50Hz)
- Warning:
- Battery installation (for the clock)
- HEADPHONE JACK
- VOLUME
- MCA-180 (English) (A4)
- Nov 2007 /L
- ANTENNA
- CLOCK SETTING
- ALARM TIME SETTING
- SKIPPING TRACKS
- Press during play.
- SEARCHING TRACKS
- PROGRAMMED PLAYBACK
- REPEAT PLAY
- To Repeat all the tracks
- AUX INPUT JACK
- TROUBLESHOOTING GUIDE
- COPYRIGHT DENVER ELECTRONICS A/S
- DENVER
- www.denver-electronics.com
Brand : DENVER
Model : MCA-180
Category : Hi-Fi System