
Dual Comfort HWC775W - Humidifier HONEYWELL - Free user manual and instructions
Find the device manual for free Dual Comfort HWC775W HONEYWELL in PDF.

| Product Type | Cool and Warm Mist Humidifier |
| Brand | Honeywell |
| Model | Dual Comfort HWC775W |
| Power Supply | 120 V, 60 Hz, 180 W |
| Tank Capacity | 5.6 L (1.5 gallons) |
| Mist Output | Low, Medium, High (3 levels) |
| Mist Temperature | Cool or Warm (non-scalding warm mist) |
| Built-in Humidistat | Yes, adjustable from 30% to 69% RH |
| Auto Shut-off | Yes, when tank is empty or desired humidity is reached |
| Reset Indicator Light | Orange (empty tank) and flashing red (mineral deposits) |
| Adjustable Nozzle | Two-way mist nozzle (powerful flow or wide diffusion) |
| Essential Oil Tray | Yes, heated for passive evaporation |
| Nebulizer Type | Ultrasonic for cool mist |
| Heating Element | For warm mist mode (boiling chamber) |
| Material | Plastic, water-resistant base |
| Dimensions (approx.) | Approximately 30 cm wide, 40 cm high, 25 cm deep |
| Weight (dry) | Approximately 2.5 kg |
| Recommended Cleaning | Weekly: descaling with vinegar, disinfecting with bleach |
| Child Safety | Keep out of reach; hot mist in warm mode |
| Replacement Parts | Tank, cap, chimney, oil tray, cleaning brush |
| Warranty | 2-year limited (material and workmanship defects) |
| Customer Service | 1-800-477-0457 (U.S.); ConsumerRelations@HelenofTroy.com |
| Website | www.HoneywellPluggedIn.com |
| Manufacturer | Kaz USA, Inc., a Helen of Troy company |
| Origin | Made in China |
Frequently Asked Questions - Dual Comfort HWC775W HONEYWELL
User questions about Dual Comfort HWC775W HONEYWELL
0 question about this device. Answer the ones you know or ask your own.
Ask a new question about this device
Download the instructions for your Humidifier in PDF format for free! Find your manual Dual Comfort HWC775W - HONEYWELL and take your electronic device back in hand. On this page are published all the documents necessary for the use of your device. Dual Comfort HWC775W by HONEYWELL.
USER MANUAL Dual Comfort HWC775W HONEYWELL
natural_image
Two HWC778 series water purifiers, one white and one black, displayed side by side (no visible text or symbols on the devices themselves)HWC775 Series
HWC775 SERIES
HWC778 SERIES
IMPORTANT SAFETY INSTRUCTIONS
READ AND SAVE THESE SAFETY INSTRUCTIONS BEFORE USING THIS HUMIDIFIER
When using electrical appliances, basic precautions should always be followed to reduce the risk of fire, electric shock, and injury to persons, including the following:
- The humidifier should ALWAYS be placed on a firm, flat, waterproof surface at least four feet (1.2m) away from bedside, 12 inches (30cm) from the wall. KEEP OUT OF REACH OF CHILDREN AND PETS. This product produces hot steam and should be placed in an area not accessible to children or pets, with the power cord out of reach.
- Be sure the humidifier is in a stable position and the power cord is away from heated surfaces and out of the way to prevent the humidifier from being overturned.
- DO NOT leave the humidifier unattended in a closed room, doing so may cause serious injury or property damage. If room becomes saturated, open the door and turn the humidifier off or down.
- Before using the humidifier, extend the cord and inspect for any signs of damage. DO NOT use the unit if the cord has been damaged. DO NOT operate with power cord coiled or with twist tie in place.
- The humidifier has a polarized plug (one blade is wider than the other) as a safety feature. This plug will fit into a polarized outlet only one way. If the plug does not fit fully into the outlet, reverse the plug. If it still does not fit, contact a qualified electrician. DO NOT attempt to defeat this safety feature.
- ⚠️ CAUTION: To avoid fire or electric shock hazard, plug the humidifier directly into a 120V AC electrical outlet. To avoid risk of fire, electric shock, or personal injury, NEVER use an extension cord or power strip.
-
The humidifier should ALWAYS be unplugged and emptied when not in operation or while being cleaned. Turn off and unplug humidifier before moving. DO NOT move or tilt humidifier while it is in operation. Plug and unplug unit with dry hands. NEVER pull by cord.
-
DO NOT operate the humidifier without water. Turn off and unplug unit when tank is empty and the reset light is on.
- Humidifier requires regular cleaning. Refer to and follow cleaning instructions.
- DO NOT operate outdoors; this humidifier is intended for indoor residential use only.
- DO NOT place in direct sunlight, high temperature areas or near computers or sensitive electronic equipment.
- DO NOT cover or insert objects into any openings on the unit. DO NOT block intake or output vents.
- DO NOT touch the Nebulizer or Heating Element while the unit is plugged in, as burns could result.
- DO NOT attempt to repair or adjust any electrical or mechanical functions on this humidifier. Doing so will void your warranty.
- DO NOT add any essential oils or medications (e.g. Vicks VapoSteam®) into the Water Reservoir or Water Tank. Doing so could damage the humidifier and void the warranty.
- DO NOT touch the steam vapor. Steam can cause burns.
- DO NOT operate without the Mist Chimney and Mist Chimney Cover in place.
- For Residential Use Only.
- SAVE THESE INSTRUCTIONS.
GETTING TO KNOW YOUR COOL + WARM MIST HUMIDIFIER
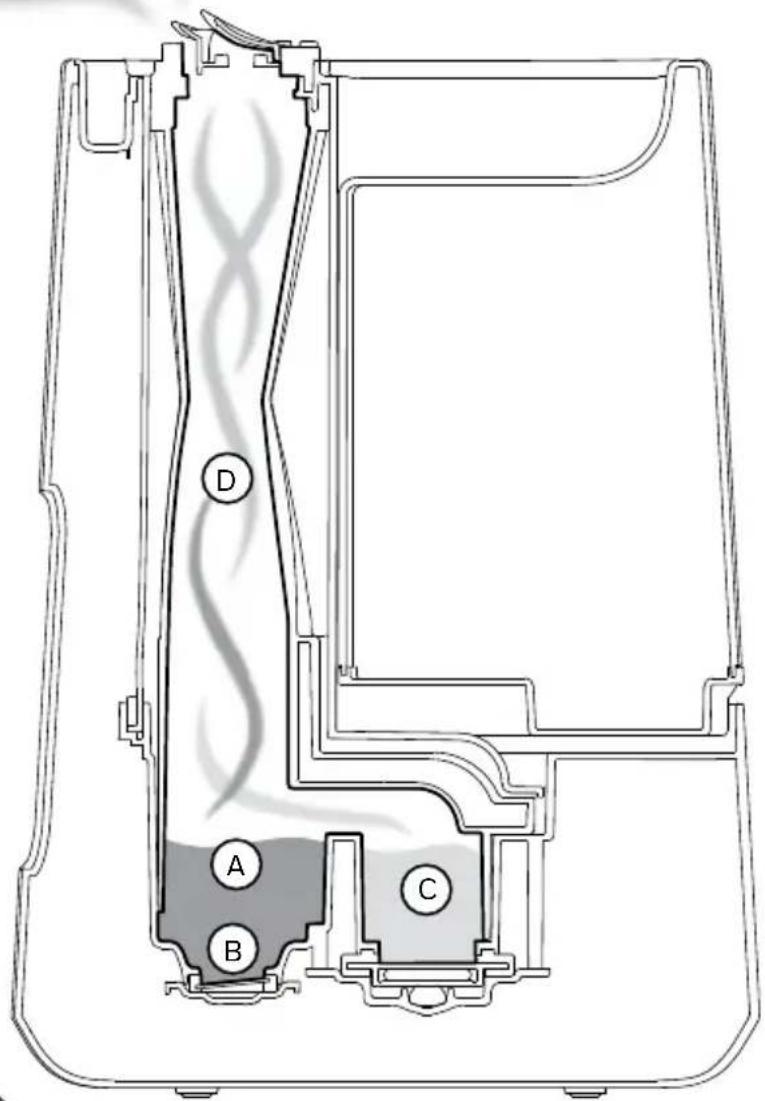
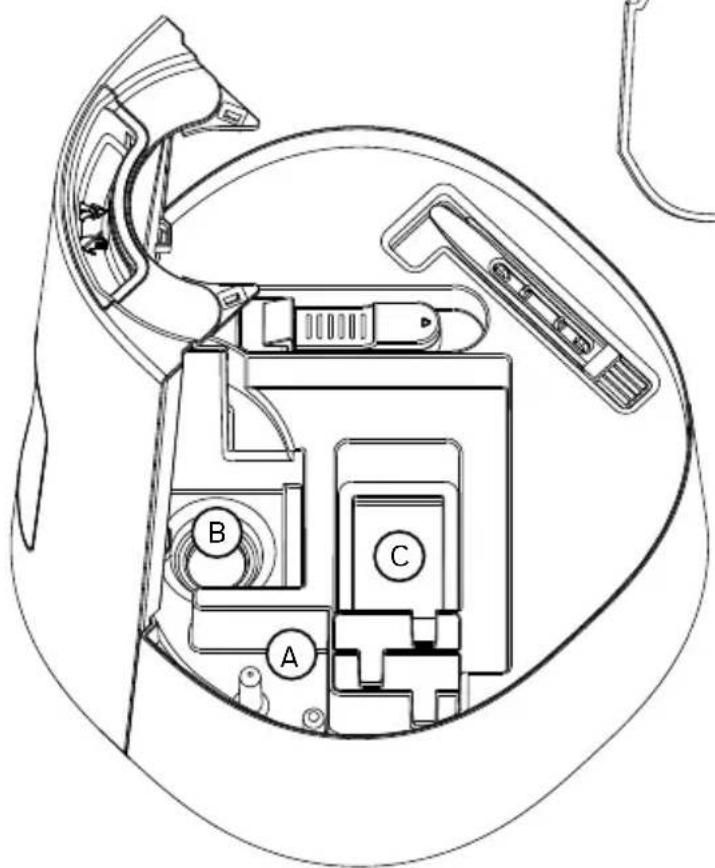
How it Works
A. Water drains into the Reservoir.
B. On cool mist setting, a Nebulizer vibrates at an ultrasonic frequency and produces cool, ultrafine mist that travels up the Mist Chimney where it enters the room.
C. On warm mist setting, water in the Boiling Chamber is boiled to create a steam vapor.
D. On warm mist setting, the steam vapor mixes with a small amount of cool mist to produce soothing, warm (not hot) comforting mist.

GETTING TO KNOW YOUR COOL + WARM MIST HUMIDIFIER (continued)
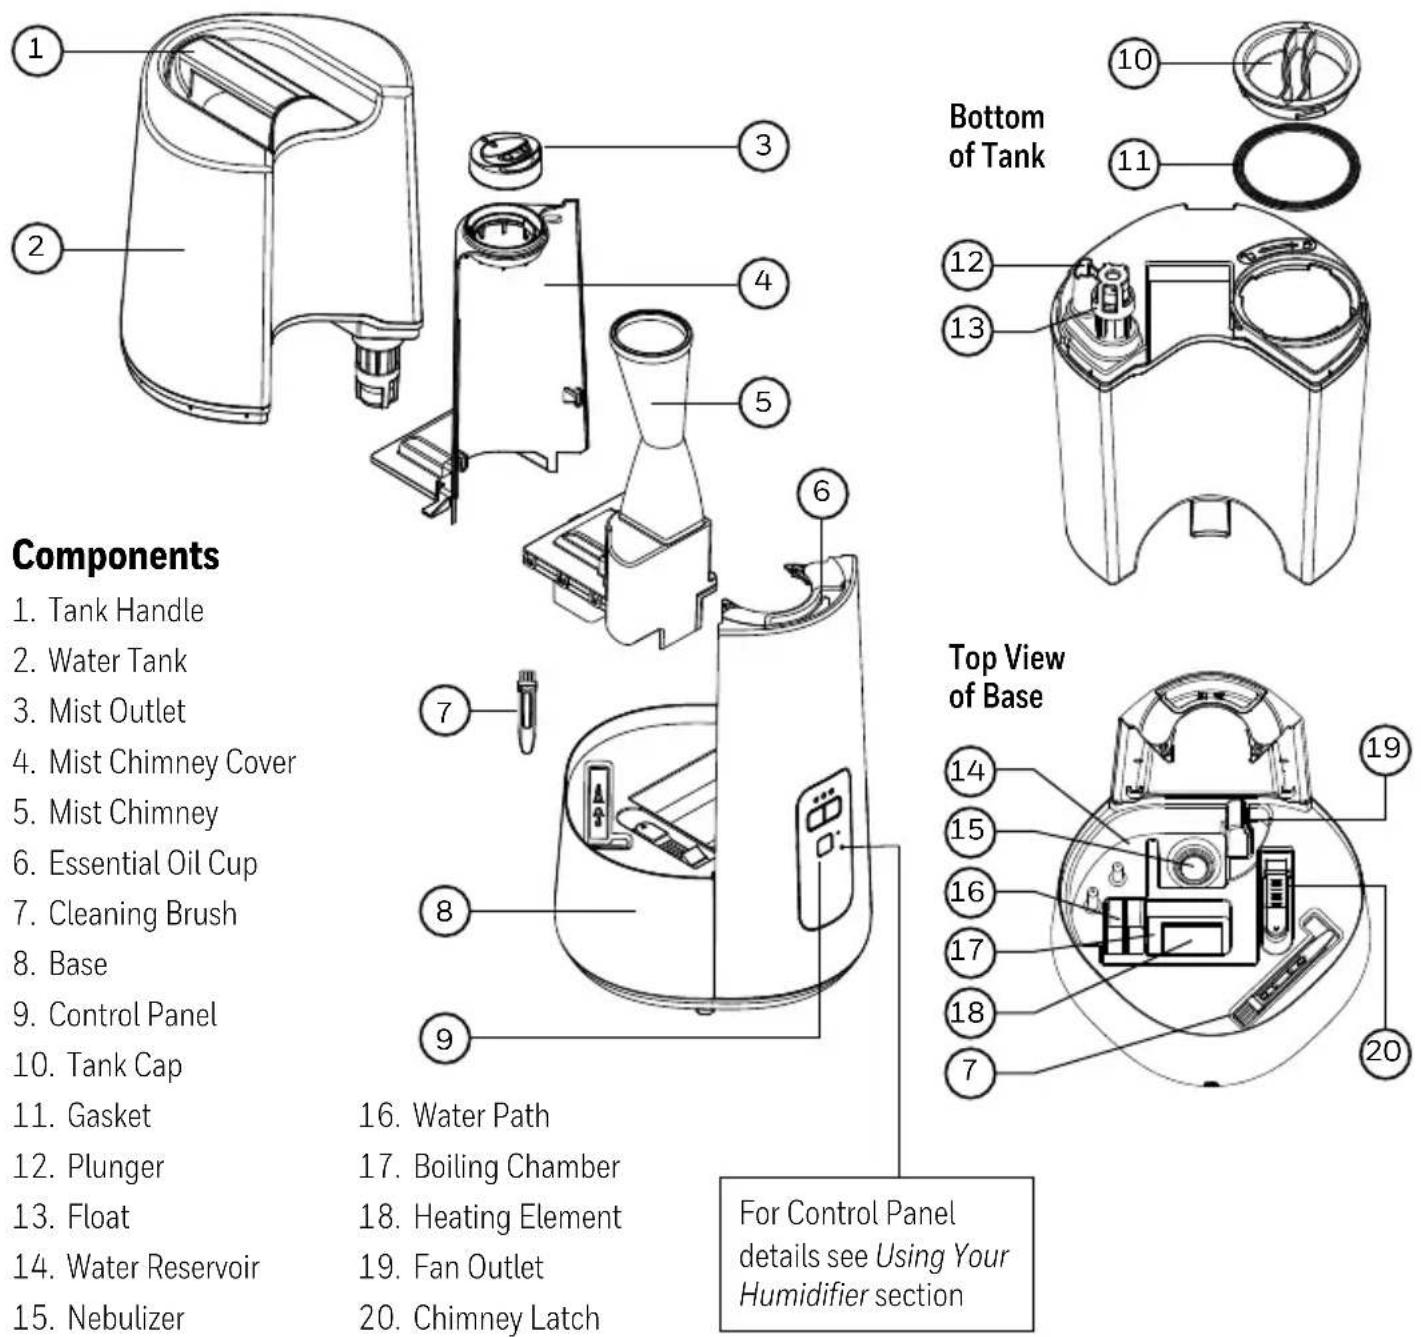
- Water Path
- Boiling Chamber
- Heating Element
- Fan Outlet
- Chimney Latch
For Control Panel details see Using Your Humidifier section
SETTING UP YOUR HUMIDIFIER
Unpack the Humidifier
Keep this Owner's Manual for reference.
Remove packaging materials. Remove twist tie from power cord and extend power cord to full length.
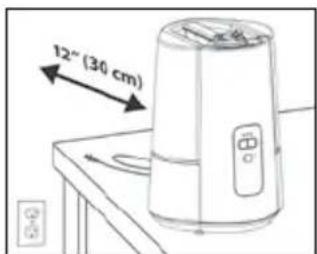
Place on a firm, level, water resistant surface a minimum of 12" (30cm) from any walls. Mist should be directed away from any walls, bedding and furniture.
WARNING: KEEP OUT OF REACH OF CHILDREN. THIS PRODUCT PRODUCES HOT STEAM AND SHOULD BE PLACED IN AN AREA NOT ACCESSIBLE TO CHILDREN OR PETS, WITH THE POWER CORD OUT OF REACH.
FILLING / REFILLING
NOTE: Tank should be carried using two hands; one hand on the Tank Handle and the other supporting the bottom of the tank.
Kaz USA, Inc. will not accept responsibility for property damage caused by water spillage.
This humidifier holds 1.5 gallons (5.6L) of water (Tank and Reservoir combined).
Filling
natural_image
Cross-sectional diagram of a mechanical device with internal components and a tool inserted (no text or labels)
natural_image
Diagram of a device with a curved handle and circular button, showing mechanical components (no text or symbols)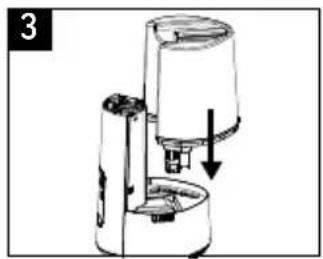
natural_image
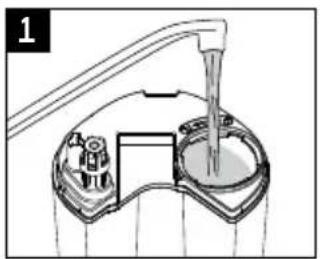
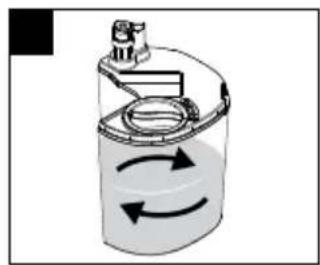
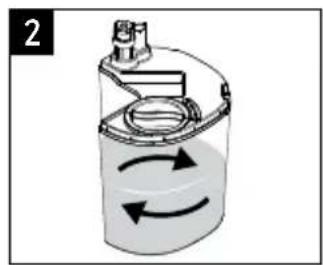
Diagram of a coffee maker with a downward arrow indicating compression or lifting (no text or symbols present)- Remove Water Tank and turn upside down. Remove Tank Cap by turning counter clockwise (left). Fill Tank with cool water. DO NOT fill with warm or hot water.
- Replace Tank Cap by turning clockwise (right), aligning arrow to lock symbol. Be sure Gasket is in place.
- Place Tank on Base. Water will drain from the Tank into the Reservoir when the Plunger is engaged.
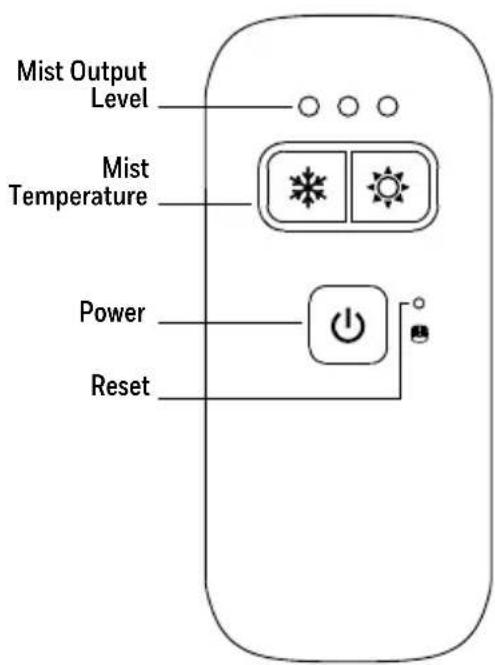
HWC775 Manual Control
- Power: Press Power Button to turn on.
Unit defaults to cool mist, high output setting.
Press Power Button ⏻ again to turn off.
If humidifier was programmed before turning off, previous settings will be remembered. Unplugging the humidifier resets to default settings.
- Mist Temperature: Press Cool ✦ or Warm 🔍 buttons to toggle between cool and warm mist output settings.
The Mist Output LEDs and light around the Mist Temperature buttons will be blue when unit is in cool mist mode and orange when in warm mist mode.
NOTE: Cool mist is immediate but please allow 5 minutes or more for water to boil to produce warm mist. It is normal to hear the sound of the water boiling occasionally as more water drains into the Boiling Chamber.
- Mist Output Level: Press the desired Mist Temperature button to toggle through low, medium and high (1, 2 or 3 LEDs) mist output settings.
The higher the output setting, the more moisture enters the air.
The lower the output setting, the longer the run time before needing to be refilled.
- Reset: The Reset Light has several functions. See next section for details.
HWC775 Manual Control
USING YOUR HUMIDIFIER (continued)
HWC778 Humidistat Control
- Power: Press Power Button to turn on.
The unit will default to cool mist, high output, and will display the current room humidity level. Press Power Button ⏻ again to turn off.
If humidifier was programmed before turning off, previous settings will be remembered. Unplugging the humidifier resets to default settings.
- Mist Temperature: Press Cool ✦ or Warm ⚡ selectors to toggle between cool and warm mist output settings.
The Mist Output LEDs and light around the Mist Temperature buttons will be blue when unit is in cool mist mode and orange when in warm mist mode.
NOTE: Cool mist is immediate but please allow 5 minutes for water to boil to produce warm mist. It is normal to hear the sound of the water boiling occasionally as more water drains into the Boiling Chamber.
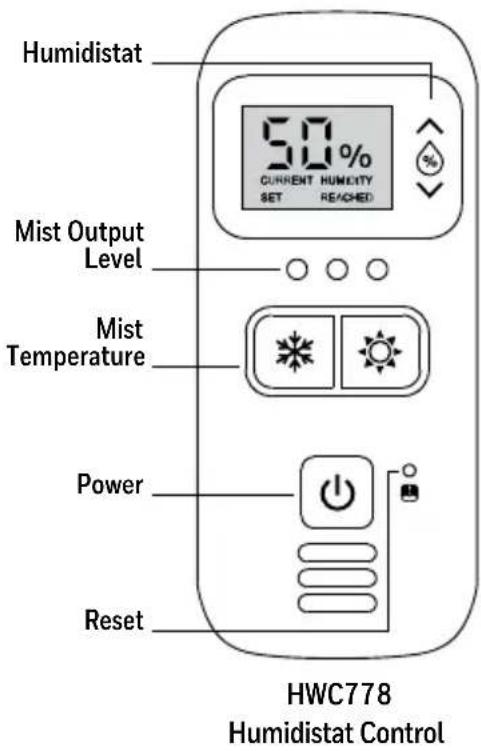
- Mist Output Level: Press the desired Mist Temperature icon to toggle through low, medium and high (1, 2 or 3 LEDs) mist output settings.
The higher the output setting, the more moisture enters the air.
The lower the output setting, the longer the run time before needing to be refilled.
- Humidistat: Press the Humidity Control icons ⚙ to adjust the humidistat.
To scroll through the numbers faster, press and hold the icon as long as needed until the desired level is shown. The display will blink three times showing the SET humidity level, then the display will return to show the current room humidity level. CURRENT will illuminate on the display to indicate the current room humidity level.
The humidistat can be set between 30%-69%. Below 30%, LO will illuminate on the display to indicate the minimum humidity level. Above 69%, the display will show HI to indicate the maximum humidity level has been set.
NOTE: The % number displayed on the control panel represents the relative humidity (RH) as measured at the Humidistat sensor. The relative humidity in your room may vary from the number displayed on the humidifier. A comfortable humidity level is 40-60%.
Humidity Reached (US models only)
When the set humidity level is reached, HUMIDITY REACHED will appear on the display and the humidifier will turn off. As long as HUMIDITY REACHED is illuminated, the humidifier will not run.
Once the humidity level drops below the set level, HUMIDITY REACHED will disappear and the humidifier will start running again.
To increase the set humidity level, press the Humidity Control icons
- Reset: The Reset Light has several functions. See next section for details.
RESETTING YOUR HUMIDIFIER
| Situation Reset Light How to Reset |
| Water Tank Removed Illuminates Orange Replace Tank on Base (must contain water) |
| Tank Empty Illuminates Orange Fill Tank and Replace on Base |
| Mineral Buildup on Heating Element Blinks Red See Cleaning Instructions |
2-WAY MIST OUTLET
This humidifier features a 2-Way Mist Outlet that allows you to direct mist in in two directions. Positioning both openings in the same direction results in a strong mist plume into the room. Separating the mist outlets allows for pointing the mist in two directions for wider distribution.

natural_image
Simple line drawing of a nozzle or spray bottle dispensing liquid into a container (no text or symbols)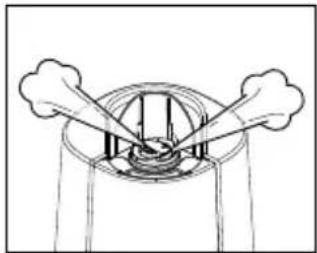
natural_image
Simple line drawing of a circular structure with two protruding arms and internal components, no text or symbols present.USING THE ESSENTIAL OIL CUP
This humidifier features an Essential Oil Cup that can be used with your favorite essential oil or liquid inhalant (like Vicks VapoSteam®) for added enjoyment. The cup is heated to help evaporate the oil. This is not a diffuser – the oil does not come in contact with the water but is passively evaporated into the air. Essential oil and inhalant are not included.
natural_image
Line drawing of a hand pouring liquid into a mechanical component (no text or symbols)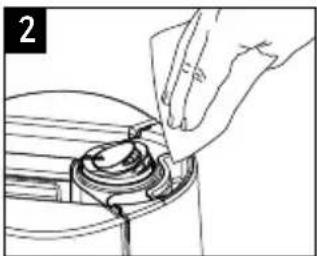
natural_image
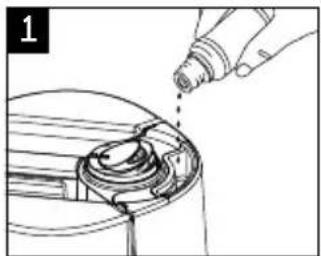
Line drawing of a hand inserting a component into a circular device (no text or symbols)- Add a few drops of essential oil or liquid inhalant in the Essential Oil Cup.
WARNING: DO NOT ADD ESSENTIAL OILS, LIQUID INHALANTS OR ANY ADDITIVES TO THE WATER. DOING SO CAN DAMAGE THE HUMIDIFIER AND VOID THE WARRANTY.
- To clean the Essential Oil Cup, wait 5 minutes for it to cool. Then gently wipe residue from the cup with a soft cloth.
HARD WATER AND YOUR HUMIDIFIER
High mineral content in your water, also known as hard water, may cause a white mineral residue to accumulate on surfaces in the room near the humidifier. This mineral residue is commonly referred to as white dust. The higher the mineral content (hardness) of your water, the greater the potential that an ultrasonic humidifier may produce white dust.
With warm mist humidifiers the minerals can cling to the heating element which can prevent it from running efficiently. It is important to clean the Heating Element and Nebulizer regularly.
White dust is not a result of a defect or flaw in the humidifier. It is a result of the amount of minerals suspended in the water you are using. Tap water can be diluted with distilled water to reduce white dust.
CLEANING YOUR HUMIDIFIER
To keep your humidifier running efficiently, clean it regularly. Weekly cleaning is recommended. All maintenance should be done in the kitchen or bathroom on a water resistant surface near a faucet.
To properly clean your humidifier, we recommend the separate processes of Scale Removal and Disinfecting.
These two processes must be performed separately.
Before Cleaning
If the humidifier has recently been in use on the warm setting, wait at least 20 minutes for unit to cool before beginning the cleaning process.
natural_image
Hand inserting a plug into an electrical outlet (no text or symbols visible)
natural_image
Technical line drawing of a handheld device with no visible text or symbols
natural_image
Technical line drawing of a mechanical component with no visible text or symbols-
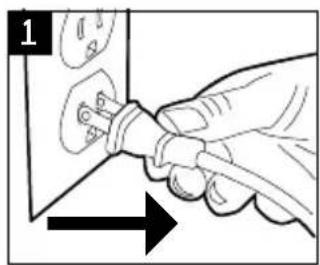
Turn off and unplug humidifier. Never clean the humidifier when it is running.
-
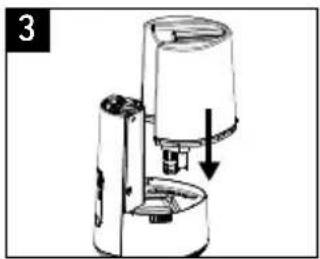
Remove Water Tank and empty completely. Remove any accessories from the water tank.
-
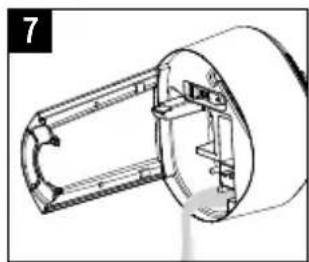
Ensure Chimney is removed (See Disassembly below), then pour water from the Base into the sink. Be sure to pour out of the side of the Base, as indicated by an arrow, to avoid leaking into the Control Panel.
Replace Chimney and Chimney Cover before beginning the cleaning process.
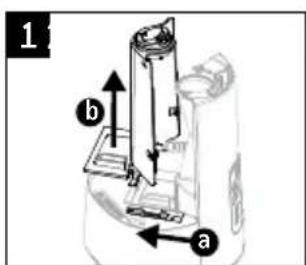
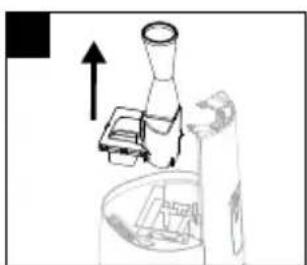
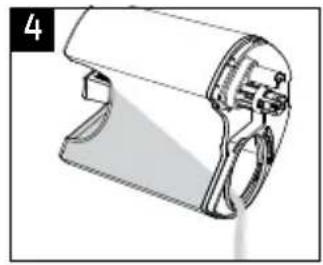
Disassembly
-
Mist Chimney Cover - a) slide red latch and b) remove.
-
Mist Chimney – grasp Chimney and pull straight up.
-
Mist Outlet – pull out of Mist Chimney Cover (optional).
natural_image
Simple line drawing of a mechanical device with an upward arrow, no text or symbols present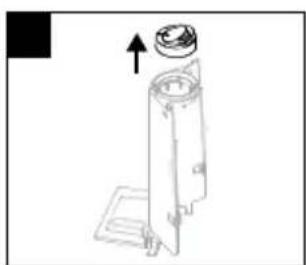
natural_image
Technical line drawing of a mechanical device with an upward arrow indicating motion (no text or symbols)Reassembly
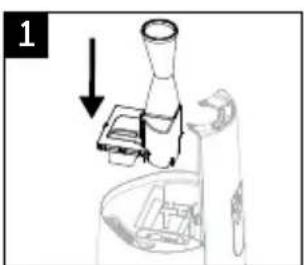
-
Replace Mist Chimney.
-
If removed, replace Mist Outlet on top of Mist Chimney Cover.
-
Slide the red latch a) and place the Mist Chimney Cover in place b); secure the latch.
natural_image
Diagram of a mechanical device with an arrow indicating direction, no visible text or symbols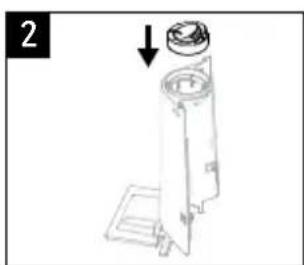
natural_image
Technical line drawing of a mechanical device with a cylindrical component and an arrow indicating assembly (no text or symbols)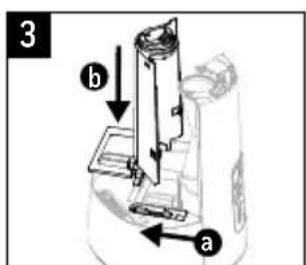
CLEANING YOUR HUMIDIFIER (continued)
Scale Removal (Mineral Buildup)
Follow steps 1-3 in Before Cleaning section, then follow the additional steps below.
natural_image
Diagram of a cylindrical device with internal components and directional arrows indicating circulation or flow (no text or symbols)

natural_image
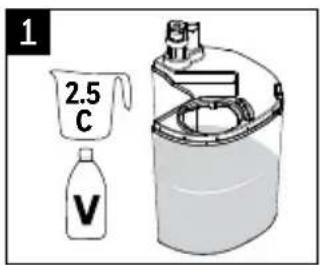
Technical line drawing of a handheld device with handle and clasp (no text or symbols)- Pour 2.5 cups (.6 liters) of undiluted distilled white vinegar into the Water Tank.
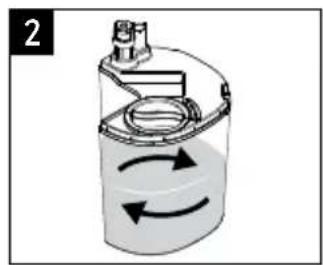
- Replace Tank Cap and swish vinegar in Tank to coat the inside of the Water Tank.
- Place Tank on Base, allowing vinegar to drain into the Water Reservoir. The vinegar will loosen mineral buildup on the Nebulizer, Heating Element, Float, Chimney bottom, and in the bottom of the Tank. Soak for 20 minutes.
- Remove Water Tank and empty vinegar into sink.
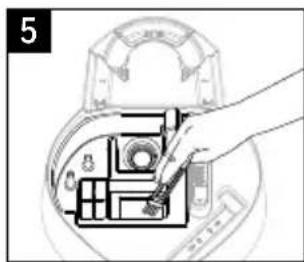
- Remove Mist Chimney Cover, Mist Chimney and Mist Outlet to access Reservoir area (see Disassembly instructions). Use Cleaning Brush to loosen
natural_image
Hand inserting a component into a device inside a device casing (no text or symbols visible)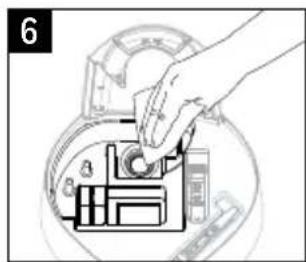
natural_image
Technical line drawing of a mechanical component with no visible text or symbolsmineral buildup in corners of Reservoir, Water Path and Boiling Chamber.
- Gently wipe Nebulizer, Heating Element and Reservoir area with a soft cloth or paper towel to remove loosened minerals.
NOTE: Nebulizer is fragile. DO NOT apply extreme pressure.
- Pour vinegar from the Base into the sink. Be sure to pour from the side as indicated by an arrow to avoid leaking into the Control Panel. Rinse the Tank and Reservoir with clean water until the smell of vinegar is gone.
⚠️ CAUTION: DO NOT SUBMERGE BASE IN WATER. DOING SO WILL DAMAGE THE HUMIDIFIER AND VOID THE WARRANTY.
Reassemble Mist Chimney, Mist Chimney Cover, and Mist Outlet (see Reassembly instructions)
CLEANING YOUR HUMIDIFIER (continued)
Disinfecting
Before starting the disinfecting process, follow Steps 1-3 in the Before Cleaning section.
NOTE: Bleach may stain clothes. It is recommended to wear rubber gloves during this process to protect your hands.
natural_image
Diagram of a cylindrical device with internal components and directional arrows indicating rotation (no text or symbols)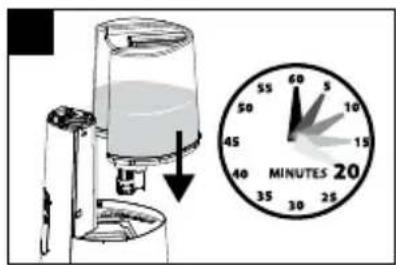
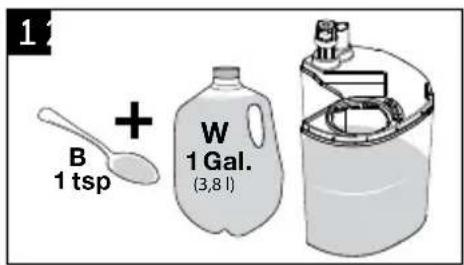
- Add 1 teaspoon of bleach to 1 gallon (3.8L) of water and add to Water Tank.
- Replace Tank Cap and swish bleach solution in Tank to coat the inside of the Water Tank.
-
Place Tank on Base, allowing solution to drain into the Water Reservoir. Soak for 20 minutes.
-
Remove Water Tank and empty solution into sink.
-
Ensure Chimney is removed, then pour solution from the Base into the sink. Be sure to pour out of the side of the Base, as indicated by an arrow, to avoid leaking into the Control Panel.
-
Rinse Tank and Reservoir area with clean water until the smell of bleach is gone.

natural_image
Technical line drawing of a handheld device with handle and clasp (no text or symbols)
natural_image
Technical line drawing of a mechanical component with no visible text or symbolsCAUTION: DO NOT SUBMERGE BASE IN WATER. DOING SO WILL DAMAGE THE HUMIDIFIER AND VOID THE WARRANTY.
Reassemble Mist Chimney, Mist Chimney Cover, and Mist Outlet (see Reassembly instructions).
END OF SEASON CARE AND STORAGE
Follow the cleaning instructions when the humidifier will not be used for at least one week, or at the end of the season. At the end of the season, remove any accessories from the humidifier.
Dry the humidifier completely before storing. DO NOT store with water inside the Water Tank or Reservoir. Pack unit in original carton and store in a cool, dry location.
TROUBLESHOOTING
| PROBLEM POSSIBLE CAUSE SOLUTION | ||
| Power is on but no mist appears | Humidity level has been reached (HWC778 humidistat version only)Water Tank is emptyAuto shut off has been engaged inadvertently | Increase Humidity setting. See Using your Humidifier sectionFill Tank with waterRemove the Tank and adjust the Float |
| Reset Light Illuminated (orange) | Water Tank is emptyWater Tank is not secured on Base | Fill Tank with WaterSecure Tank on Base |
| Reset Light Blinking (red) | Mineral Deposits on Heating Element | See Cleaning Instructions |
| Unit is leaking • Cap is not on tightCracked tank | Ensure cap is secured in the lock positionInspect for cracks; contact Consumer Relations for replacement | |
| Sounds different on warm mist setting than cool mist setting | The sound may increase on warm mist setting as the heating element warms up to boil water | Wait up to 5 minutes for water to boil then sound should decrease; sound will be slightly higher on warm mist setting |
| Condensation forms around humidifier or on windows | Mist Intensity is set too high for room size or pre-existing humidity level | Decrease mist output to low setting or open door to the room |
| White dust settling on surfaces in room | Mineral content in hard water | Dilute tap water with distilled water to minimize white dust |
NOTE: Failure to keep this unit clean from mineral deposits normally contained in any water supply will affect the efficiency of operation of this unit. Customer failure to follow these instructions may void the warranty.
CONSUMER RELATIONS
We are here to help. Call us toll-free at: 1-800-477-0457
E-mail: ConsumerRelations@HelenofTroy.com
Or visit our website at: www.HoneywellPluggedIn.com
Please be sure to specify Model number HWC775 or HWC778.
NOTE: IF YOU EXPERIENCE A PROBLEM, PLEASE CONTACT CONSUMER RELATIONS FIRST OR SEE YOUR WARRANTY. DO NOT RETURN TO THE ORIGINAL PLACE OF PURCHASE. DO NOT ATTEMPT TO OPEN THE ELECTRICAL HOUSING YOURSELF, DOING SO MAY VOID YOUR WARRANTY AND CAUSE DAMAGE TO THE HUMIDIFIER OR PERSONAL INJURY.
SPECIFICATIONS
Electrical rating: 120V, 60Hz., 180W
Capacity: 1.5 gallons (5.6 L)
2 YEAR LIMITED WARRANTY
You should first read all instructions before attempting to use this product.
A. This 2 year limited warranty applies to repair or replacement of product found to be defective in material or workmanship. This warranty does not apply to damage resulting from commercial, abusive, unreasonable use or supplemental damage. Defects that are the result of normal wear and tear will not be considered manufacturing defects under this warranty. KAZ IS NOT LIABLE FOR INCIDENTAL OR CONSEQUENTIAL DAMAGES OF ANY NATURE, ANY IMPLIED WARRANTY OF MERCHANTABILITY OR FITNESS FOR A PARTICULAR PURPOSE ON THIS PRODUCT IS LIMITED IN DURATION TO THE DURATION OF THIS WARRANTY. Some jurisdictions do not allow the exclusion or limitation of incidental or consequential
damages or limitations on how long an implied warranty lasts, so the above limitations or exclusions may not apply to you. This warranty gives you specific legal rights, and you also may have other rights which vary from jurisdiction to jurisdiction. This warranty applies only to the original purchaser of this product from the original date of purchase.
B. At its option, Kaz will repair or replace this product if it is found to be defective in material or workmanship.
C. This warranty does not cover damage resulting from any unauthorized attempts to repair or from any use not in accordance with the instruction manual.
DOUBLE CONFORT
natural_image
Two Honeywell water purifiers, one white and one black, displayed side by side with control buttons and a digital display (no text or symbols on the devices themselves)Série HWC775
SÉRIE HWC775
SÉRIE HWC778

SE FAMILIARISER AVEC L'HUMIDIFICATEUR À VAPEUR FROIDE ET TIÈDE (suite)

natural_image
Cross-sectional diagram of a mechanical device with internal components and a tool inserted (no text or symbols)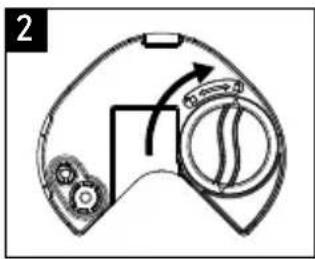
natural_image
Diagram of a laboratory instrument with a downward arrow indicating a process (no text or symbols present)Commandes manuelles - HWC775
Commandes manuelles – HWC775
UTILISATION (suite)
Commandes de l'humidistat - HWC778
natural_image
Simple line drawing of a mechanical component with a spray nozzle (no text or symbols)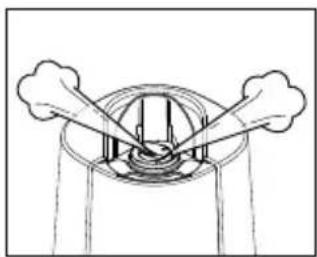
natural_image
Simple line drawing of a mechanical or electrical component with two arms and a central circular structure (no text or symbols)natural_image
Line drawing of a hand pouring liquid into a mechanical component (no text or symbols)
natural_image
Hand inserting a component into a circular device (no text or symbols visible)natural_image
Hand inserting a plug into an electrical outlet (no text or symbols visible)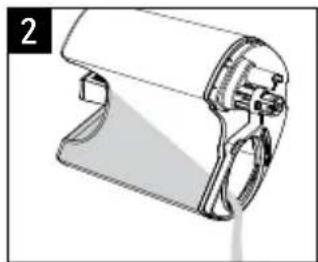
natural_image
Technical line drawing of a handheld device with handle and base (no text or symbols)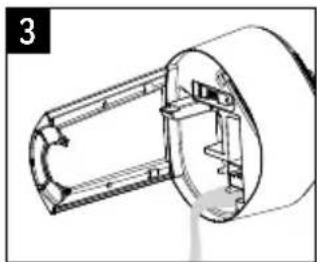
natural_image
Technical line drawing of a mechanical component with no visible text or symbolsnatural_image
Simple line drawing of a kitchen appliance with a chimney and side table (no text or symbols)
natural_image
Technical line drawing of a mechanical device with an upward arrow indicating motion (no text or symbols)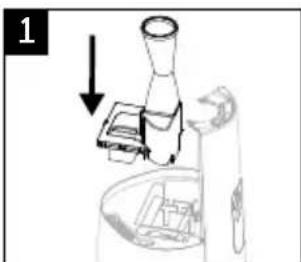
natural_image
Diagram of a mechanical device with a lever and base, showing a downward arrow (no text or symbols present)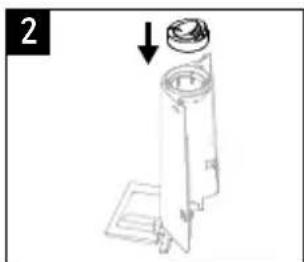
natural_image
Technical line drawing of a mechanical device with a cylindrical component and an arrow indicating assembly (no text or symbols)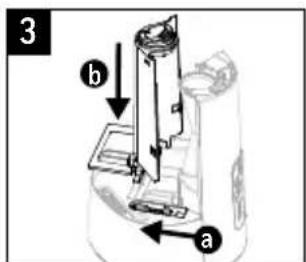
NETTOYAGE (suite)
natural_image
Diagram of a cylindrical device with internal components and directional arrows indicating rotation (no text or symbols)
natural_image
Technical line drawing of a handheld device with handle and control panel (no text or symbols)natural_image
Diagram of a cylindrical device with internal components and circular arrows indicating rotation (no text or symbols)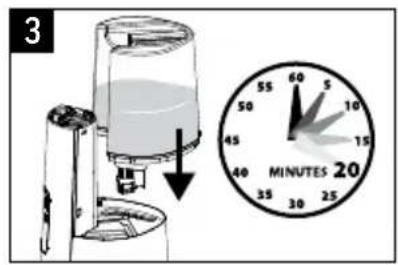
natural_image
Technical line drawing of a handheld device with handle and lever mechanism (no text or symbols)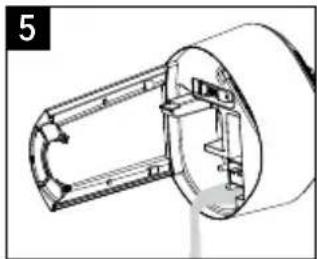
natural_image
Technical line drawing of a mechanical component with no visible text or symbolsnatural_image
Two Honeywell water purifiers, one white and one black, displayed side by side with control buttons and a digital display (no visible text or symbols on the devices themselves)Series HWC775
SERIES HWC775
SERIES HWC778
natural_image
Cross-sectional diagram of a mechanical device with internal components and a tool inserted (no text or labels)
natural_image
Diagram of a game controller with directional arrows indicating motion (no text or symbols)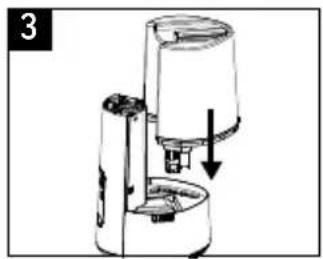
natural_image
Diagram of a coffee maker with a downward arrow indicating compression or lifting (no text or symbols present)natural_image
Simple line drawing of a spray nozzle emitting vapor, no text or symbols present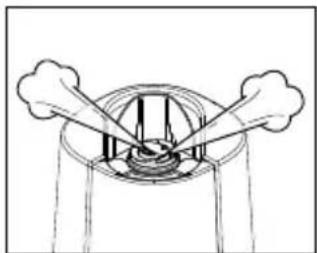
natural_image
Simple line drawing of a circular structure with two protruding arms and internal vertical lines, no text or symbols present.USO DEL DOSIFICADOR DE ACEITE ESENCIAL
natural_image
Line drawing of a hand pouring liquid into a mechanical component (no text or symbols)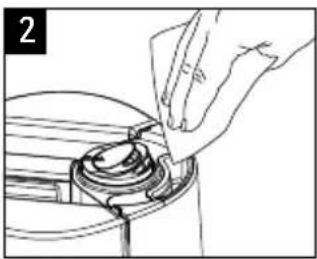
natural_image
Hand placing a component into a circular mechanical part (no text or symbols visible)natural_image
Technical line drawing of a mechanical device with no visible text or symbols
natural_image
Technical line drawing of a mechanical component with no visible text or symbolsnatural_image
Simple line drawing of a mechanical device with an upward arrow, no text or symbols present
natural_image
Technical line drawing of a mechanical device with an upward arrow indicating motion (no text or symbols)
natural_image
Diagram of a microscope setup with an arrow indicating direction (no text or symbols present)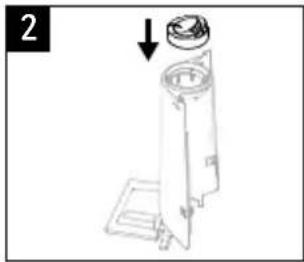
natural_image
Technical line drawing of a mechanical device with a cylindrical component and an arrow indicating assembly (no text or symbols)
natural_image
Diagram of a cylindrical device with internal components and circular flow arrows indicating rotation (no text or symbols)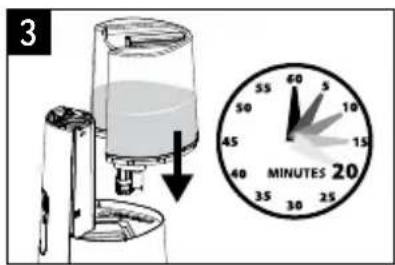

natural_image
Technical line drawing of a handheld device with handle and lever mechanism (no text or symbols)natural_image
Hand placing a component into a circular device with internal components (no text or symbols visible)
natural_image
Technical line drawing of a mechanical component with no visible text or symbolsnatural_image
Diagram of a cylindrical device with internal components and directional arrows indicating rotation (no text or symbols)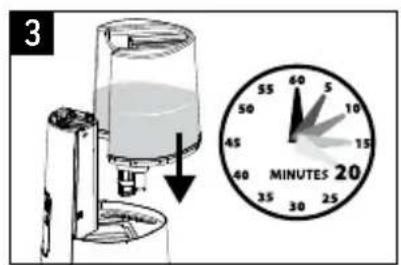
natural_image
Technical line drawing of a mechanical component with no visible text or symbols
natural_image
Technical line drawing of a mechanical component with no visible text or symbols© 2021 All rights reserved.
Manufactured by Kaz USA, Inc., a Helen of Troy Company
400 Donald Lynch Blvd., Suite 300, Marlborough, MA 01752
Imported by Kaz Canada, Inc., a Helen of Troy Company
6700 Century Avenue, Suite 210, Mississauga, Ontario L5N 6A4
Contact us at 1-800-477-0457 or www.HoneywellPluggedIn.com
In Canada: www.HoneywellPluggedIn.ca
Honeywell is a trademark of Honeywell International Inc., used under license by Helen of Troy Limited.
Honeywell International Inc. makes no representation or warranties with respect to this product.
Made in China
For Responsible recycling, please visit:
RECYCLE NATION
www.RecycleNation.com
www.RecycleNation.com
Helen
of Troy
Creative Department Artwork Specifications
Brand: Honeywell
Category: Humidifier
Model:
HWC775 Series 8 Series
Artwork Part #: A005027R1
Die Line Part #: N/A
Subject: Owner's Manual
Region: US, CANADA
Flat Size: MM: W279.4 x H215.9
IN: W11 x H8.5
Folded Size: MM: W139.7 x H215.9
IN: W5.5 x H8.5
Scale: 1/1
Material: 50# gloss or matte text (inside
pages) Minimum 80# gloss or matte
text (cover)
Page Count: 40
Revision: 9
Date: 01APR21
Release Date: 05APR21
Re-release Date:
Colors:
Dielines (Do not print) Spot Colors
Cyan 0% Magenta 0% Yellow 0% Black 100%

Special Instructions:
Quality Requirement of Artwork and Quality Clarification Process of Artwork Printing: Meet Eng-QS-06&02
Helen of Troy
Creative Services
Marlborough, MA 01752, USA
+15084907000
- IMPORTANT SAFETY INSTRUCTIONS
- READ AND SAVE THESE SAFETY INSTRUCTIONS BEFORE USING THIS HUMIDIFIER
- GETTING TO KNOW YOUR COOL + WARM MIST HUMIDIFIER
- How it Works
- GETTING TO KNOW YOUR COOL + WARM MIST HUMIDIFIER (continued)
- SETTING UP YOUR HUMIDIFIER
- Unpack the Humidifier
- FILLING / REFILLING
- Filling
- HWC775 Manual Control
- USING YOUR HUMIDIFIER (continued)
- HWC778 Humidistat Control
- RESETTING YOUR HUMIDIFIER
- 2-WAY MIST OUTLET
- USING THE ESSENTIAL OIL CUP
- WARNING: DO NOT ADD ESSENTIAL OILS, LIQUID INHALANTS OR ANY ADDITIVES TO THE WATER. DOING SO CAN DAMAGE THE HUMIDIFIER AND VOID THE WARRANTY.
- HARD WATER AND YOUR HUMIDIFIER
- CLEANING YOUR HUMIDIFIER
- Before Cleaning
- Disassembly
- Reassembly
- CLEANING YOUR HUMIDIFIER (continued)
- Scale Removal (Mineral Buildup)
- ⚠️ CAUTION: DO NOT SUBMERGE BASE IN WATER. DOING SO WILL DAMAGE THE HUMIDIFIER AND VOID THE WARRANTY.
- Disinfecting
- CAUTION: DO NOT SUBMERGE BASE IN WATER. DOING SO WILL DAMAGE THE HUMIDIFIER AND VOID THE WARRANTY.
- END OF SEASON CARE AND STORAGE
- TROUBLESHOOTING
- CONSUMER RELATIONS
- SPECIFICATIONS
- YEAR LIMITED WARRANTY
- DOUBLE CONFORT
- SE FAMILIARISER AVEC L'HUMIDIFICATEUR À VAPEUR FROIDE ET TIÈDE (suite)
- Commandes manuelles - HWC775
- UTILISATION (suite)
- Commandes de l'humidistat - HWC778
- NETTOYAGE (suite)
- USO DEL DOSIFICADOR DE ACEITE ESENCIAL
- Helen
- of Troy
- Model:
- HWC775 Series 8 Series
- Colors:
- Special Instructions:
- Quality Requirement of Artwork and Quality Clarification Process of Artwork Printing: Meet Eng-QS-06&02
Brand : HONEYWELL
Model : Dual Comfort HWC775W
Category : Humidifier