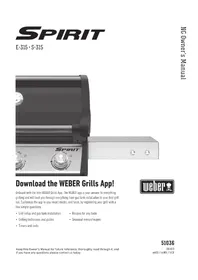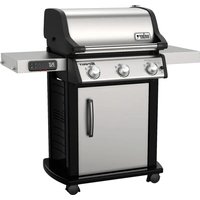
Spirit SX-315 - Grill plate WEBER - Free user manual and instructions
Find the device manual for free Spirit SX-315 WEBER in PDF.


User questions about Spirit SX-315 WEBER
0 question about this device. Answer the ones you know or ask your own.
Ask a new question about this device
Download the instructions for your Grill plate in PDF format for free! Find your manual Spirit SX-315 - WEBER and take your electronic device back in hand. On this page are published all the documents necessary for the use of your device. Spirit SX-315 by WEBER.
USER MANUAL Spirit SX-315 WEBER
natural_image
Exterior view of a modern燃气 stove (SPIRIT) with control knobs and a digital display unit (no visible text or symbols)ASSEMBLY GUIDE
GUÍA DE MONTAJE | ENSEMBLE GUIDE
text_image
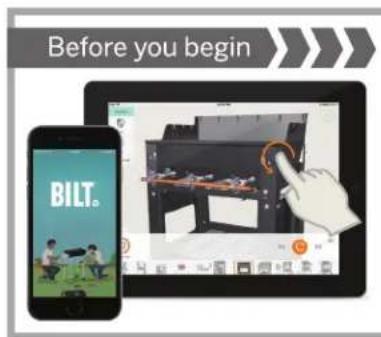
Before you begin BILT.Enhance your assembly experience.
Download the free BILT™ app for 3D step-by-step instructions.



53015
111820 enUS / esMX / frCA
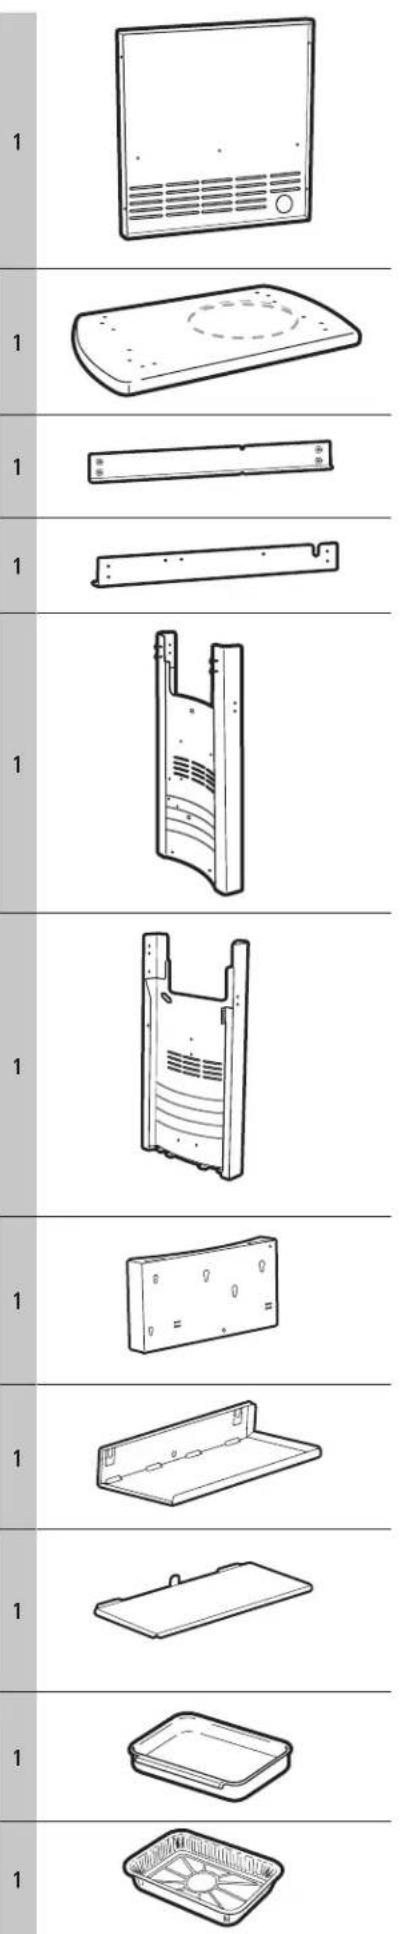
natural_image
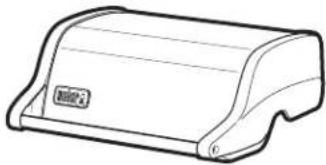
Line drawing of a mechanical housing or enclosure with no visible text or symbols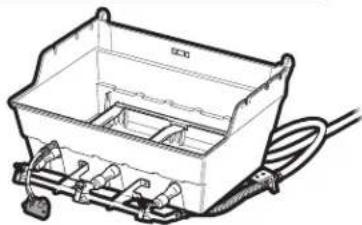
natural_image
Technical line drawing of a rectangular electronic device with internal components and wiring (no text or symbols)
natural_image
Simple 3D rectangular block diagram with no text or symbols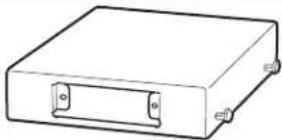
natural_image
Simple line drawing of a rectangular electronic device with a handle and mounting holes (no text or symbols)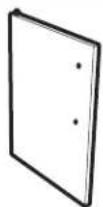
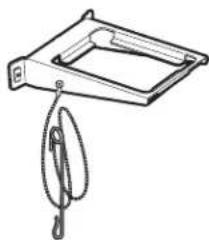
natural_image
Simple line drawing of a mechanical device with a pulley and handle (no text or symbols)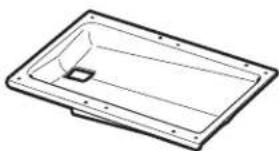
natural_image
Simple line drawing of a rectangular tray or enclosure with a small square cutout on the side (no text or symbols)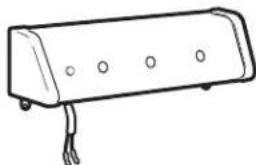
natural_image
Simple line drawing of a rectangular electronic device with three circular ports and wires attached (no text or symbols)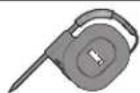
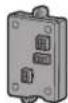
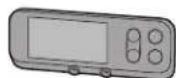
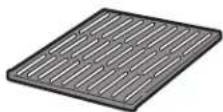
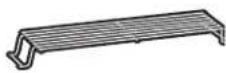




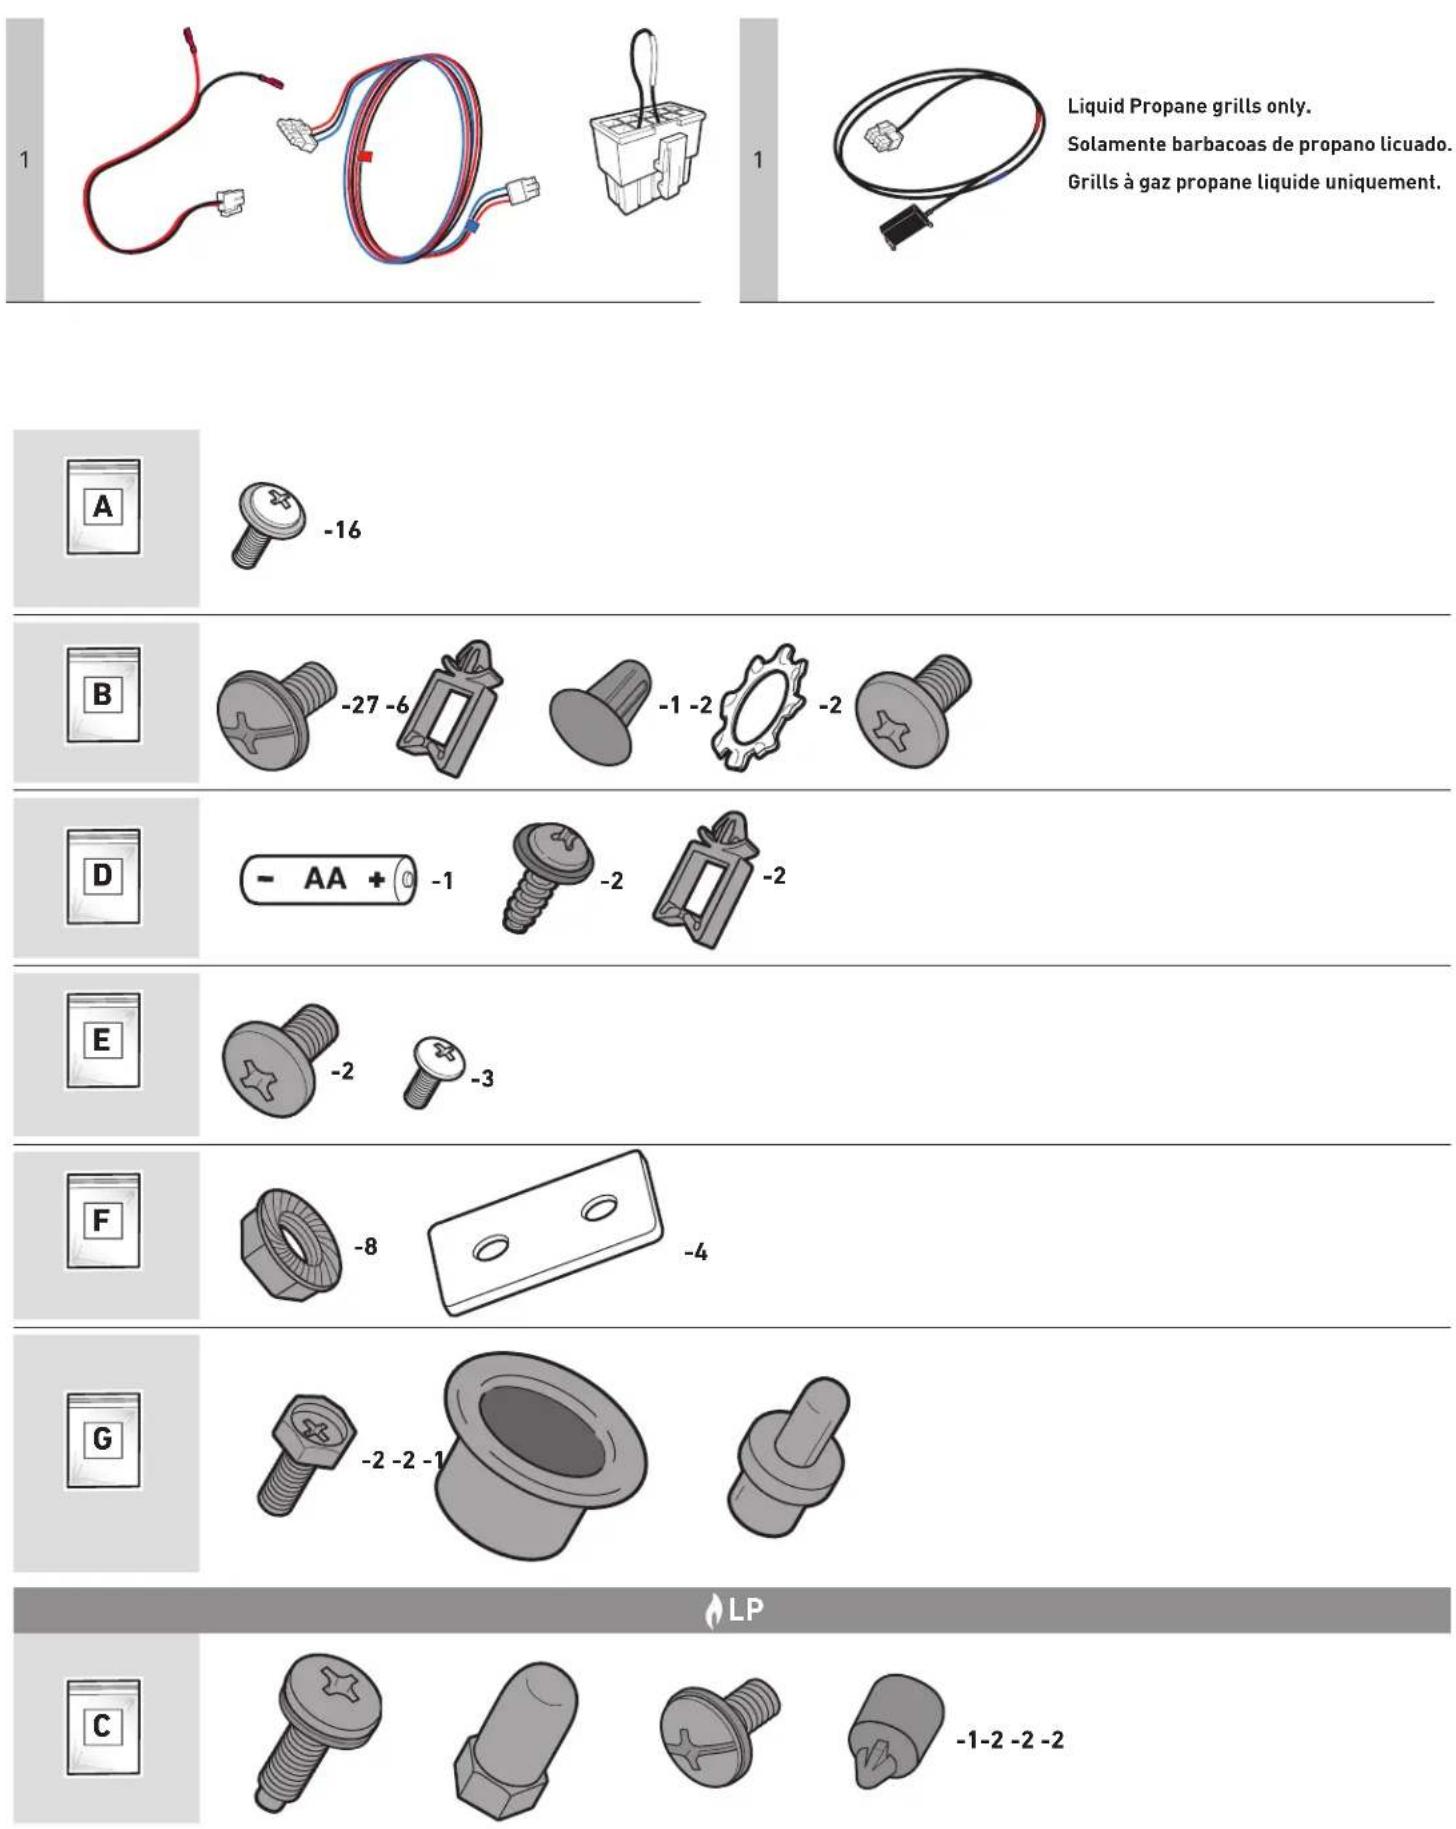
Liquid Propane grills only.
Solamente barbacoas de propano licuado.
Grills à gaz propane liquide uniquement.
TOOLS REQUIRED:
natural_image
Illustration of two people assembling a box with a device, no text or symbols present1

BILT。
text_image
Diagram illustrating the installation of a remote control panel with lock and warning symbols, showing internal components and mounting points.3

-6

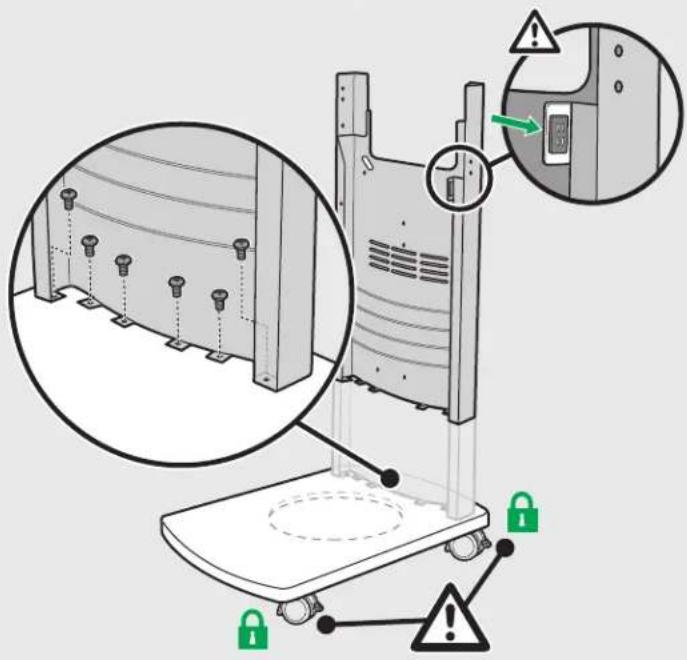
text_image
Diagram illustrating a device lock mechanism with warning labels and safety icons4

-1

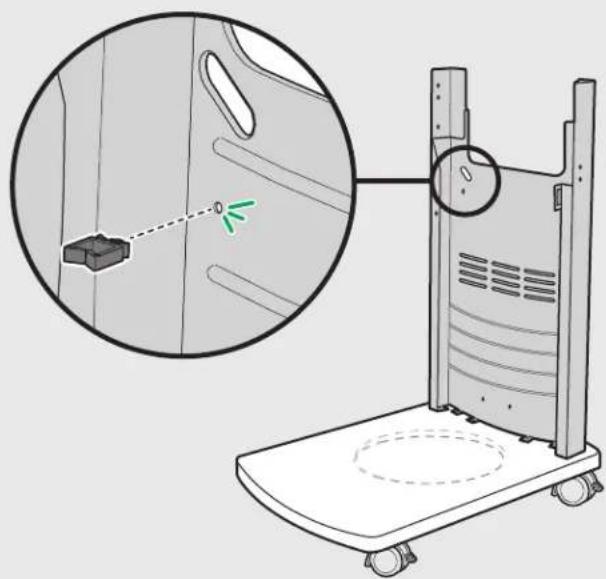
natural_image
Diagram of a car interior with a handbag and a cart base, showing a close-up view of the door panel (no text or symbols present)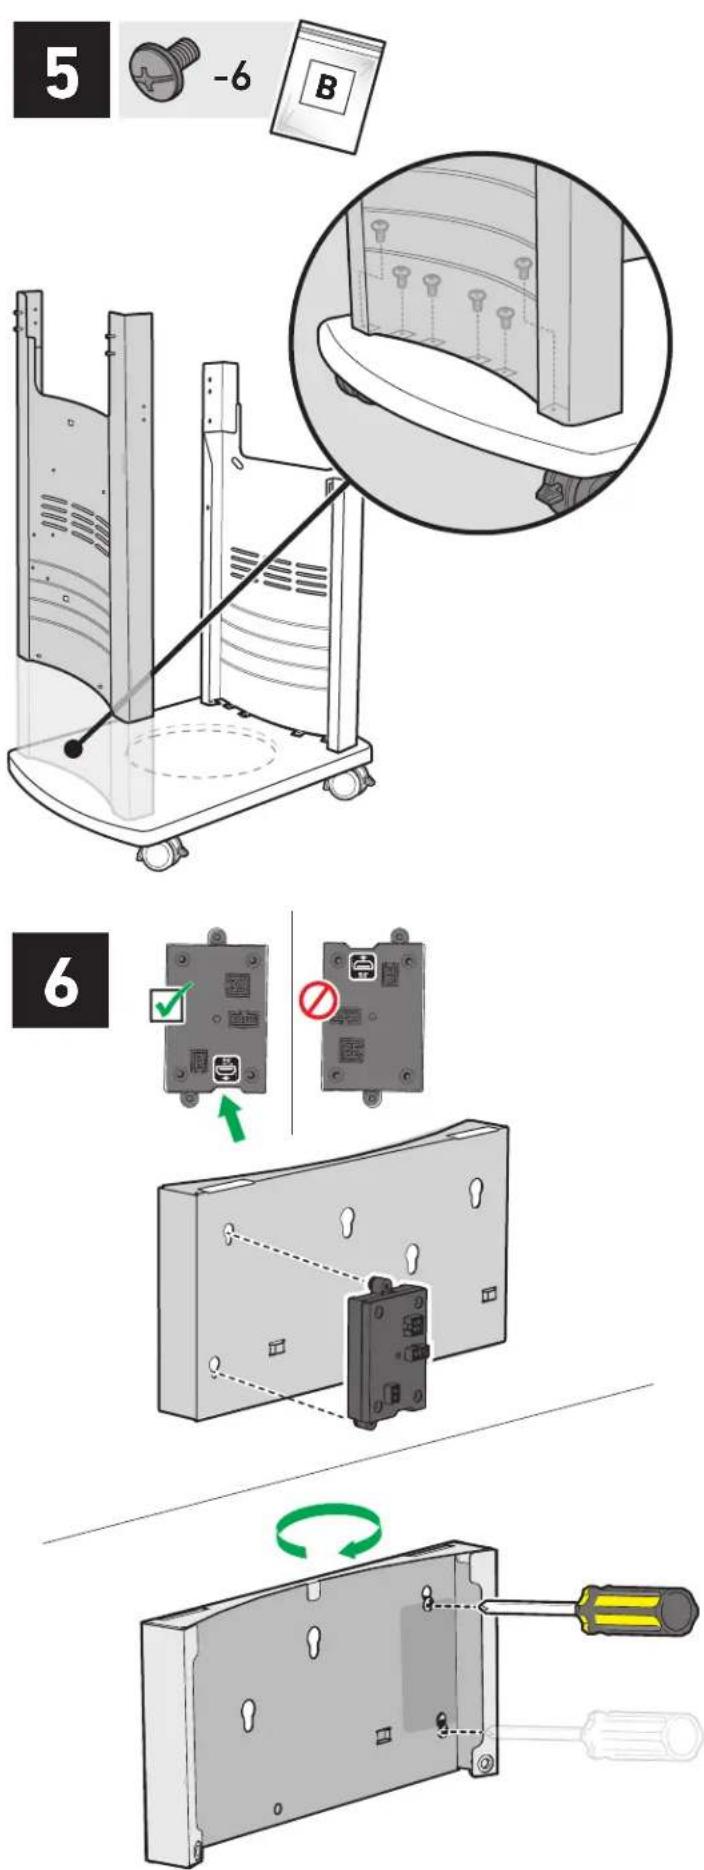
text_image
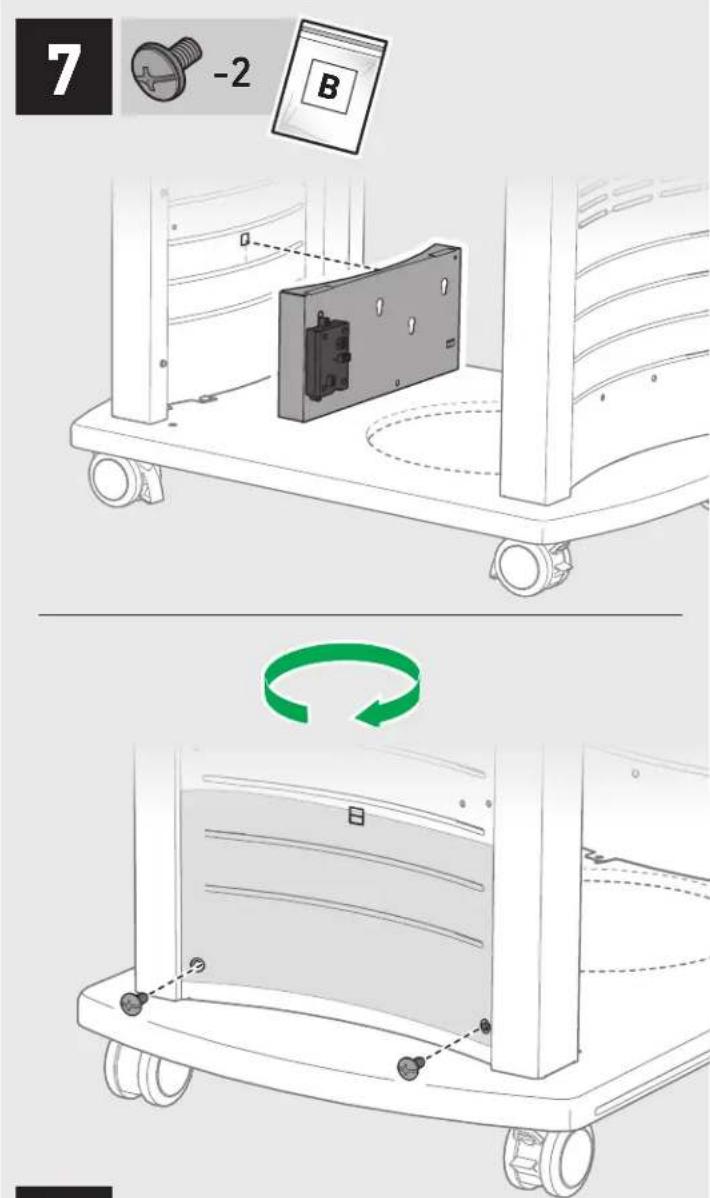
7 -2 B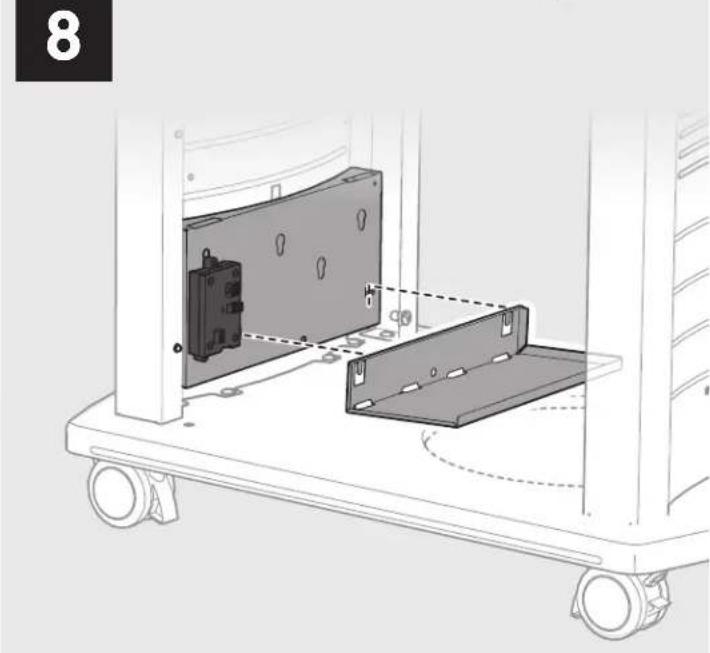
natural_image
Mechanical assembly diagram showing two components mounted on a wheeled cart, with no visible text or symbols.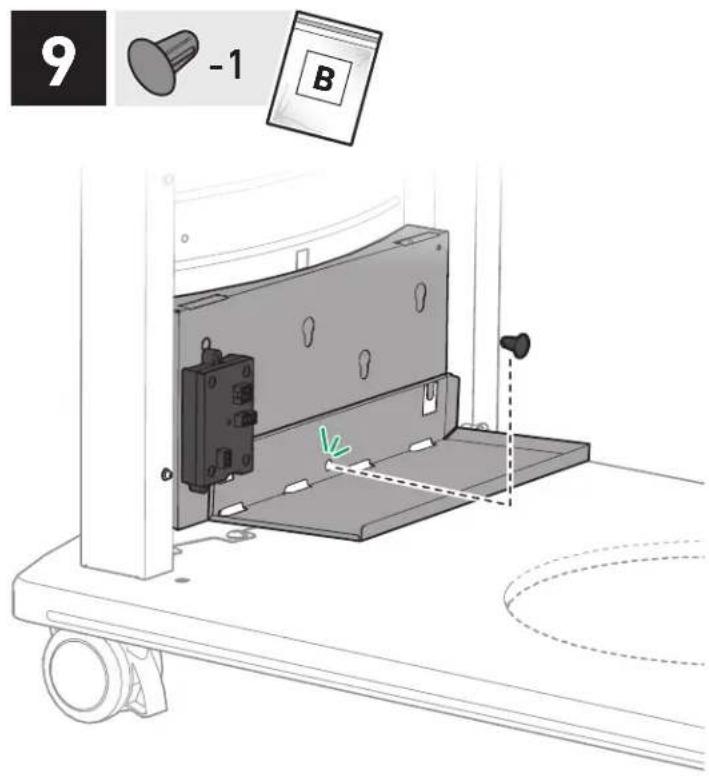
text_image
9 -1 B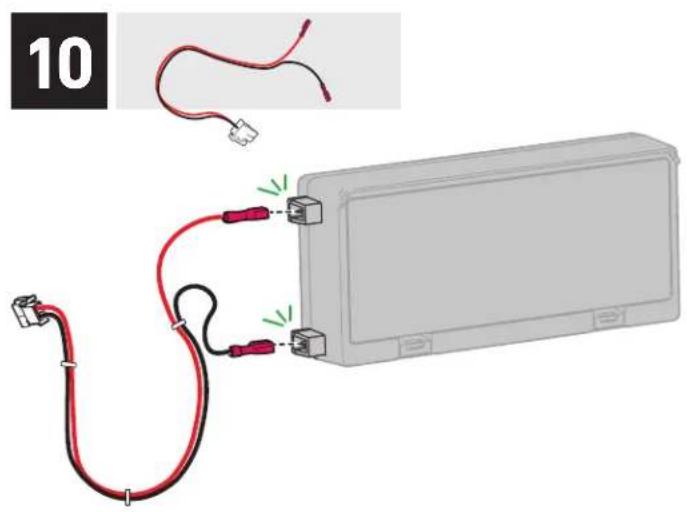
natural_image
Illustration of a battery pack connected to a terminal block with red and black wires, showing wiring details (no text or symbols)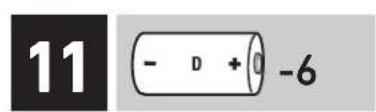
text_image
11 - D + 0 -6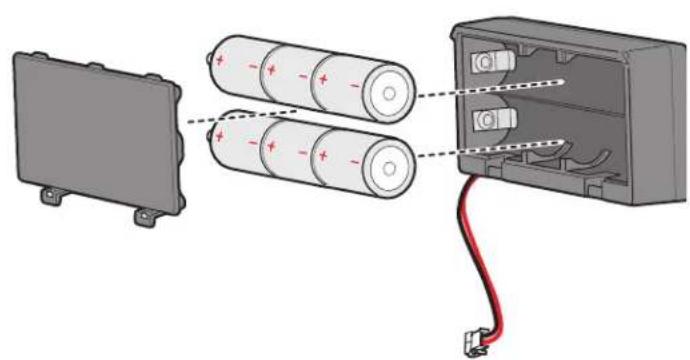
natural_image
Diagram showing battery charging process with two batteries and a terminal block connected by a red wire (no text or symbols)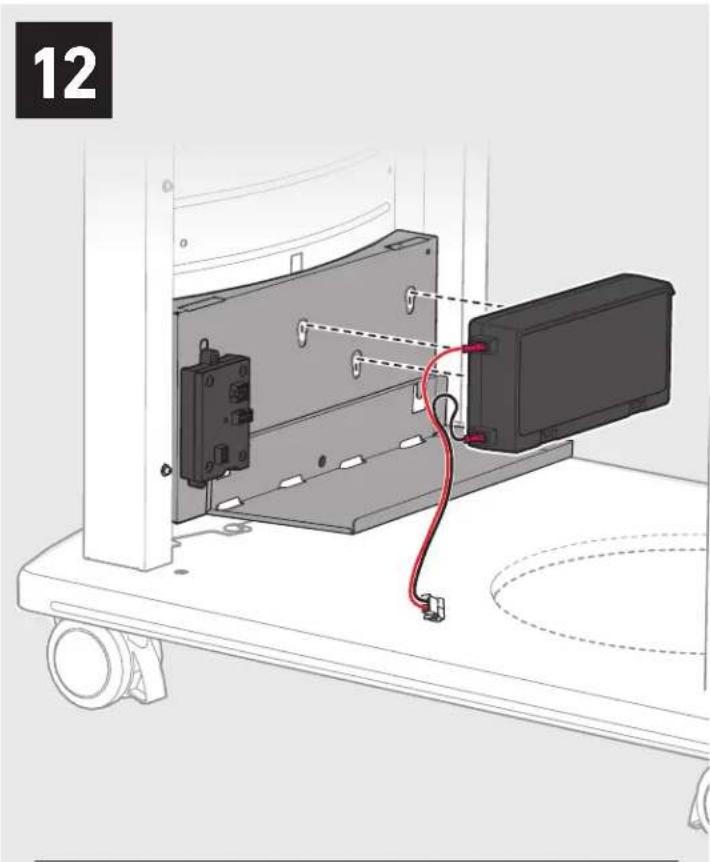
natural_image
Technical diagram of a device assembly with a red cable and component, no visible text or symbols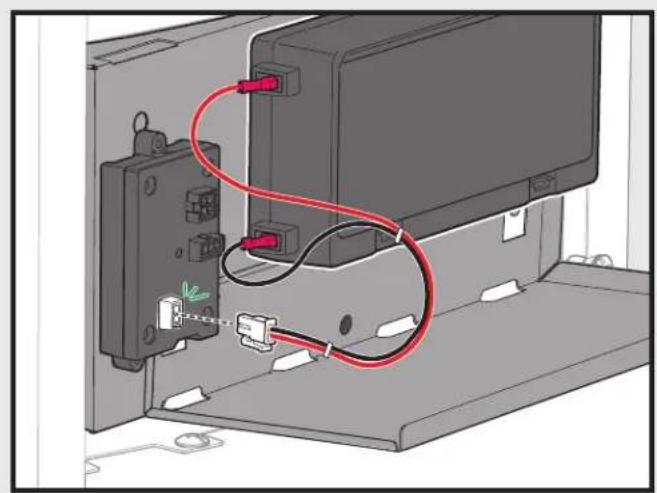
natural_image
Diagram of a device showing connections between a black box and a red cable, with no visible text or symbols.
text_image
13 -3 B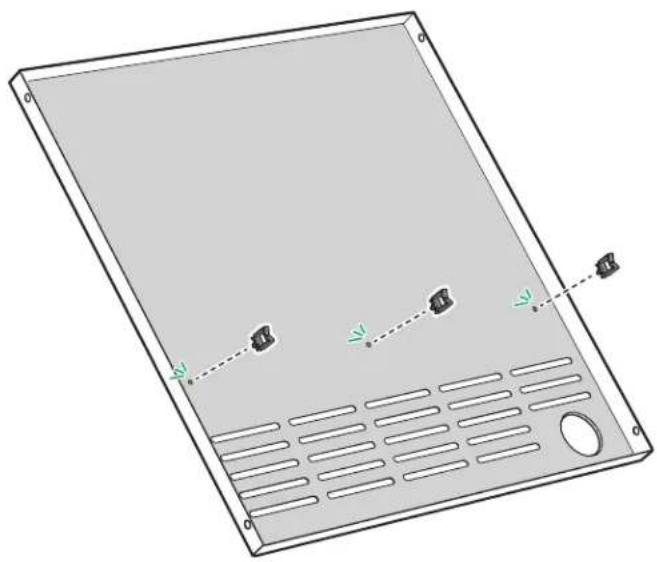
natural_image
3D diagram of a rectangular electronic device with three labeled components and dashed lines indicating connection points (no text or symbols present)
text_image
14 -4 B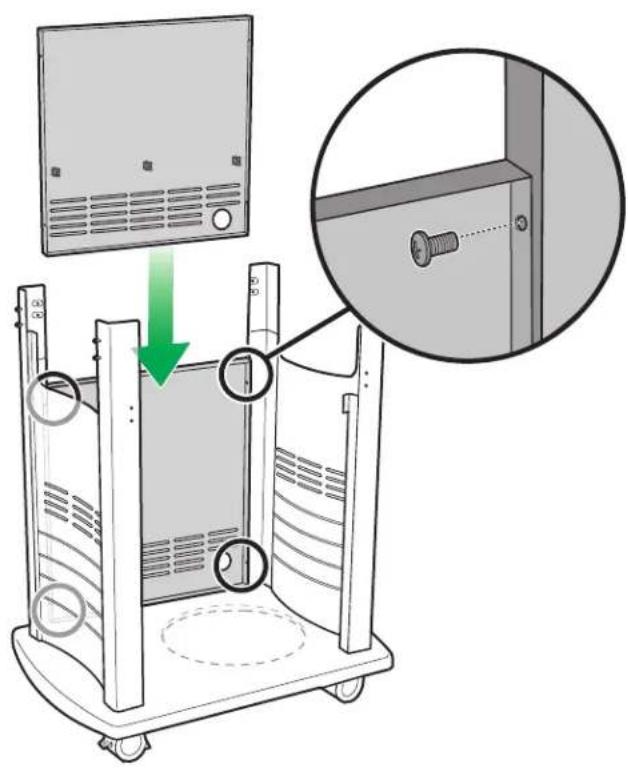
text_image
Diagram showing a device with a mounted control panel and a magnified inset highlighting a screw assembly.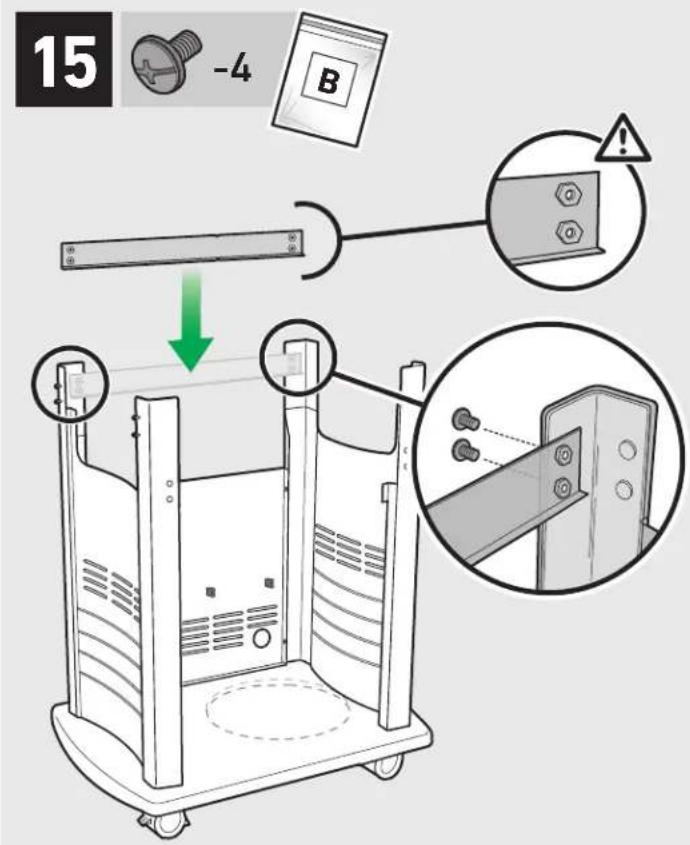
text_image
15 -4 B
text_image
16 -2 B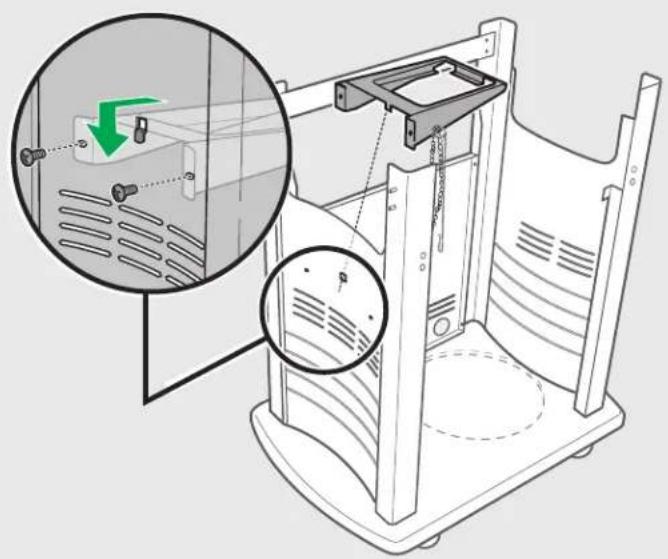
natural_image
Technical line drawing of a mechanical device with a magnified inset showing internal components (no text or symbols)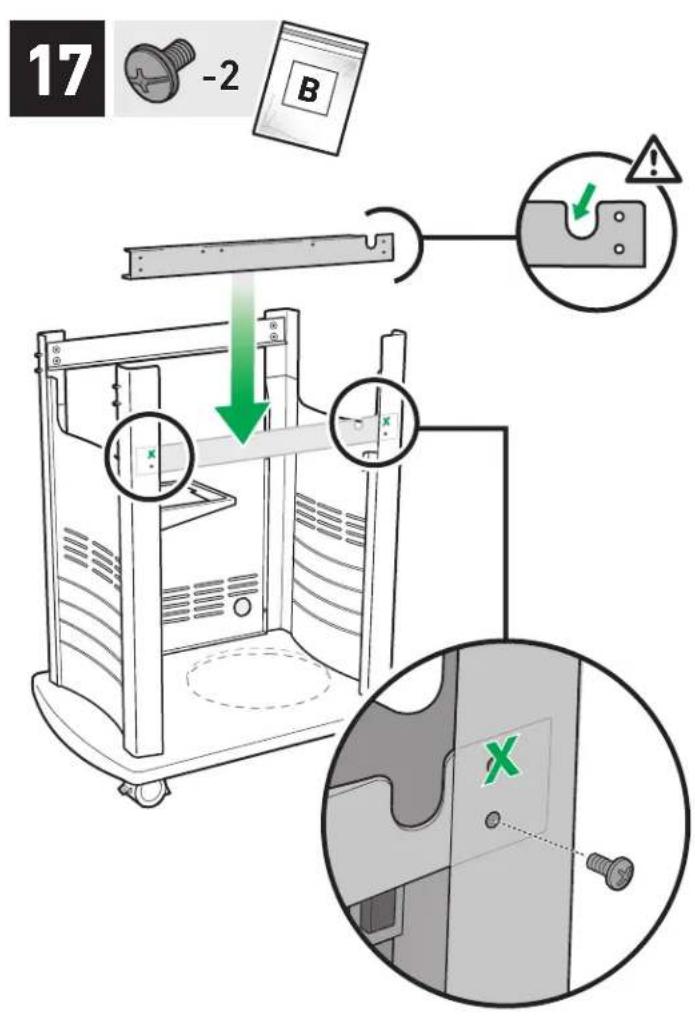
text_image
17 -2 B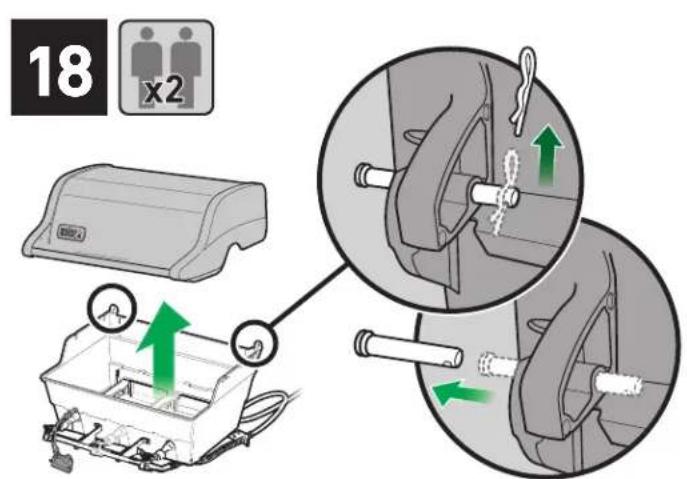
text_image
18 x2
⚠️ Save hardware.
⚠ Conserve las partes.
⚠ Sauvegarder le matériel.
text_image
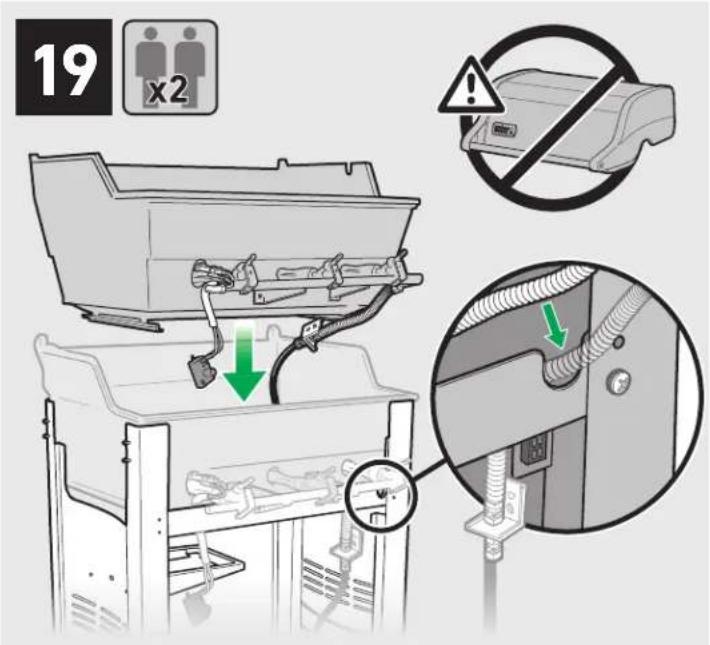
19 x2 ↓ ↓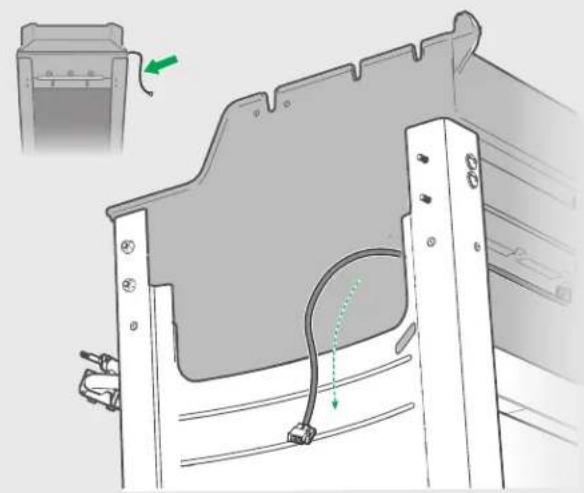
natural_image
Diagram of a car interior with a hand holding a tool, showing wiring and a green arrow indicating direction (no text or symbols)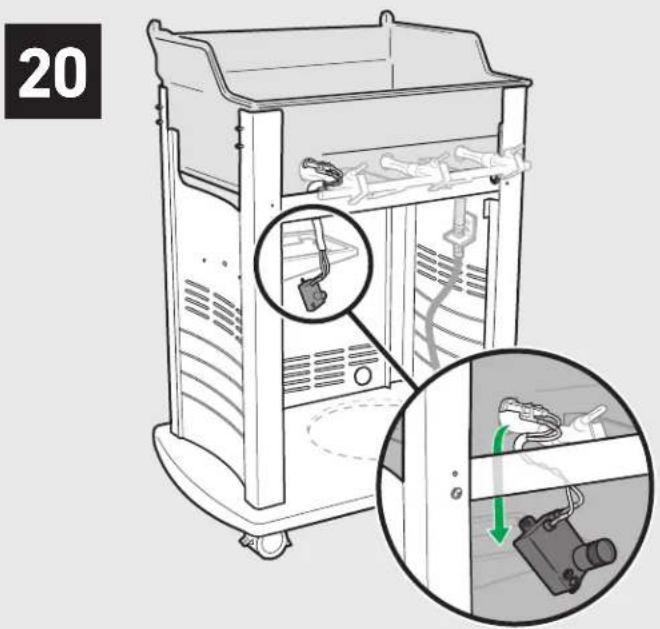
text_image
20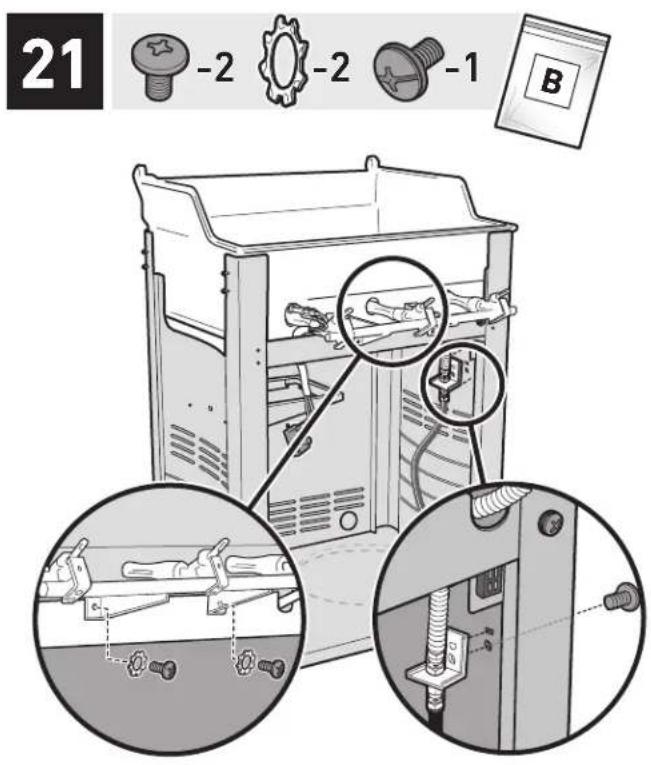
text_image
21 -2 -2 -1 B
text_image
22 LP -1 C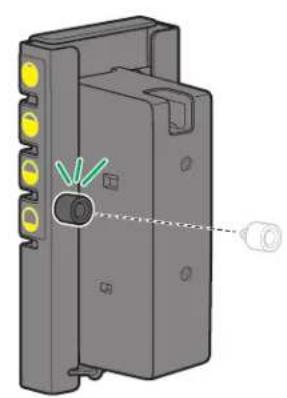
natural_image
3D mechanical component diagram showing a vertical assembly with yellow ports and a central connector (no text or symbols)Liquid Propane grills only.
Solamente barbacoas de propano licuado.
Grills à gaz propane liquide uniquement.
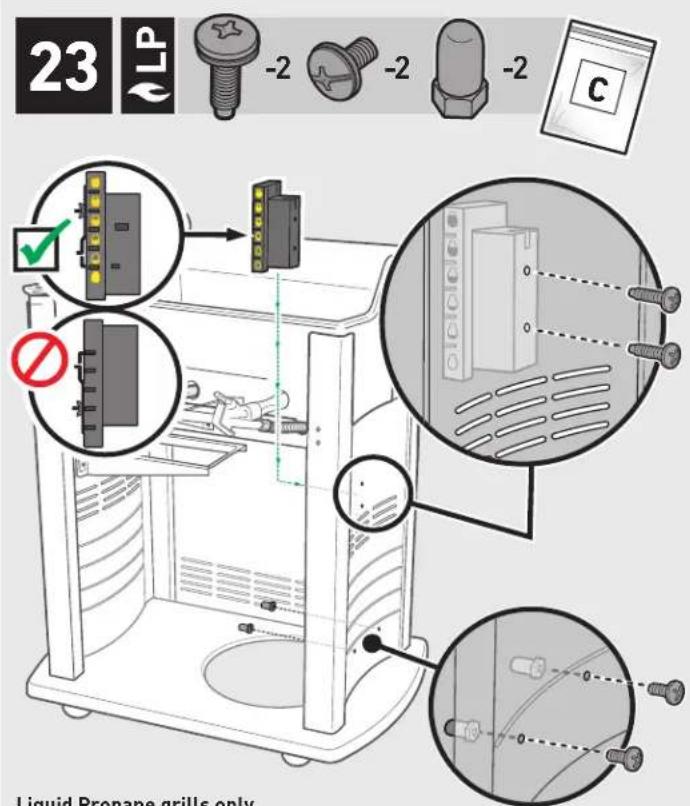
text_image
23 LP -2 -2 -2 Liquid Propane grills onlytext_image
24 Natural Gas grills only. See Owner's Guide for complete gas instructions.text_image
28 + AA - 1 D - AA + - AA +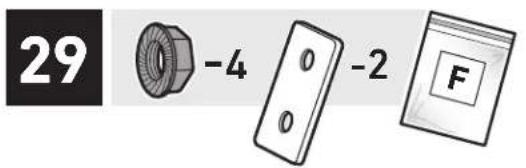
text_image
29 -4 -2 F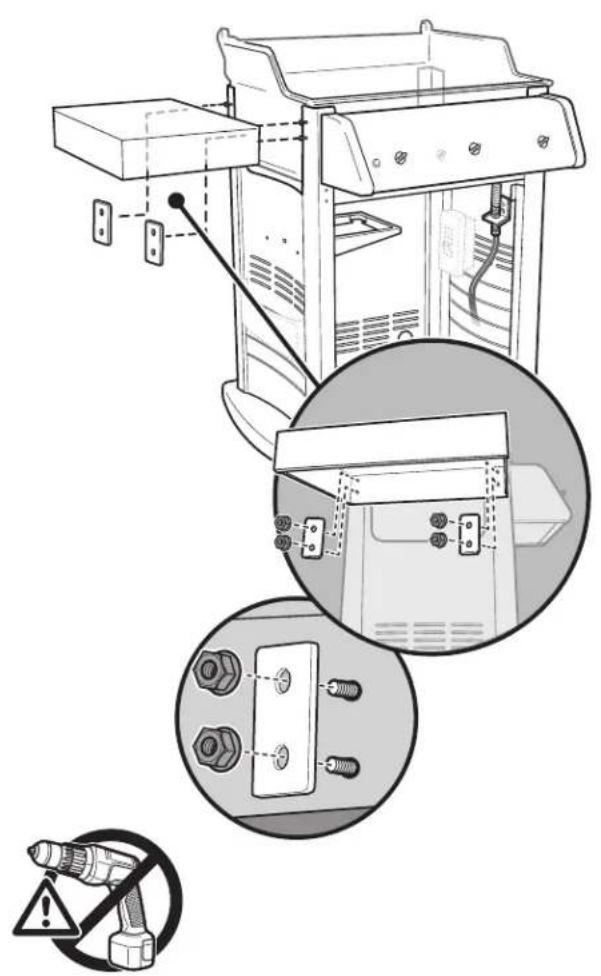
natural_image
Technical line drawing of a device with exploded view and close-up insets showing internal components (no text or symbols)text_image
30 -2 B 31 -4 -2 F Tighten the nuts until snug. Turn only a quarter turn further. DO NOT OVER TIGHTENnatural_image
Diagram showing a cable with red and blue wires connected to a device, labeled '33' in the top-left corner (no text or symbols on the diagram itself)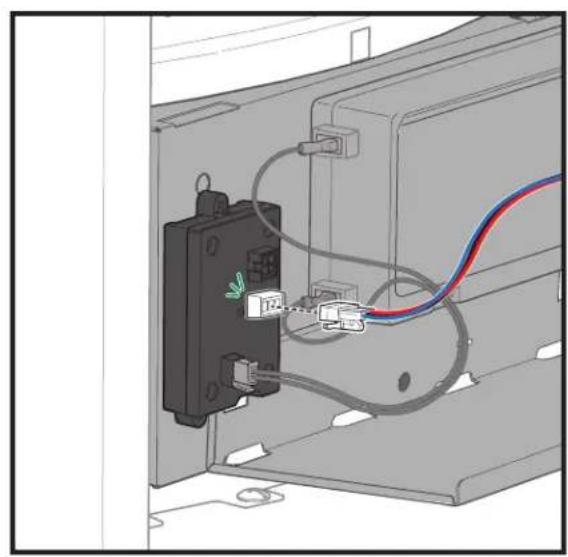
natural_image
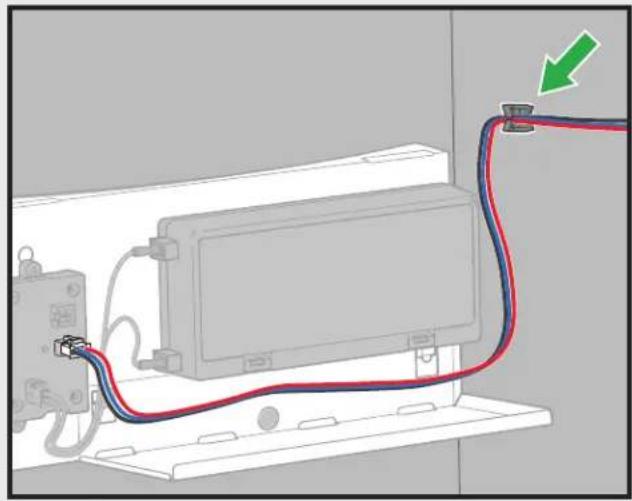
Interior view of an electrical enclosure showing wiring connections and a black component with a green label (no text or symbols present)34
natural_image
Diagram of a cable connection between an oscilloscope and a monitor, with a green arrow indicating direction (no text or symbols present)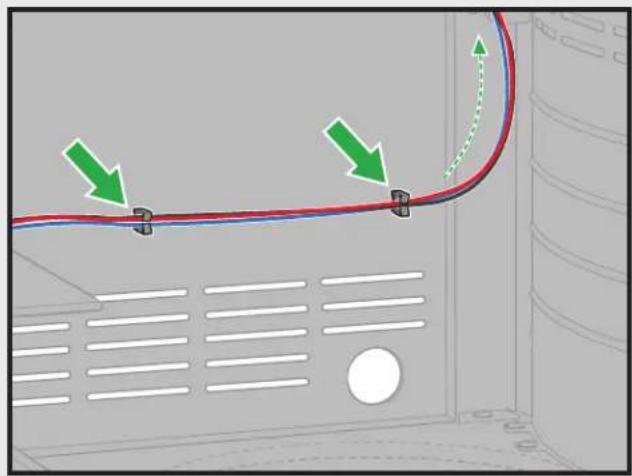
natural_image
Diagram showing a curved red line with green arrows indicating direction, no text or symbols present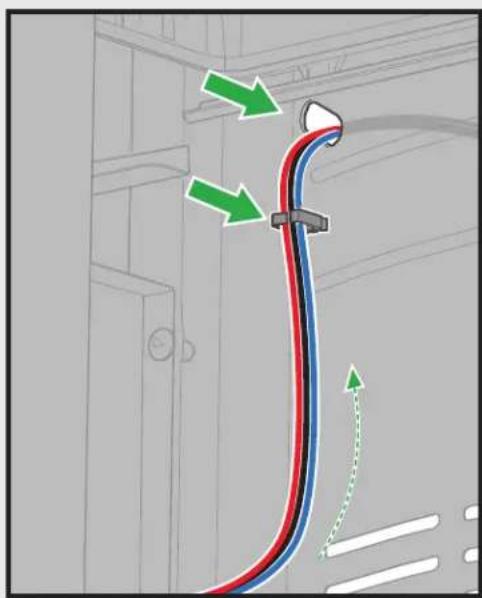
natural_image
Diagram of a cable or hose with red, blue, and black bands, showing directional arrows indicating movement (no text or symbols present)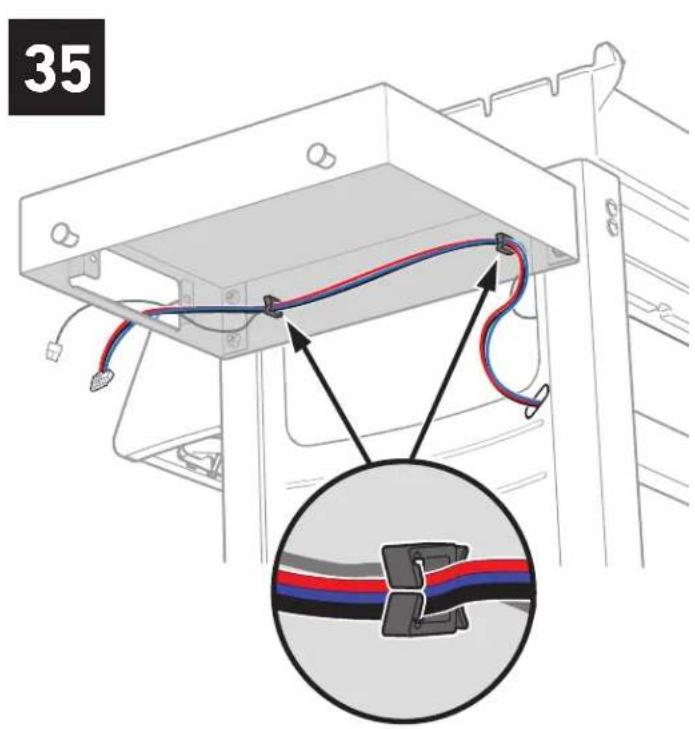
text_image
35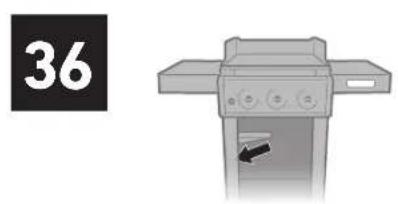
natural_image
Illustration of a printer with a paper airplane inside, next to a black square containing the number 36 (no text or symbols on the diagram itself)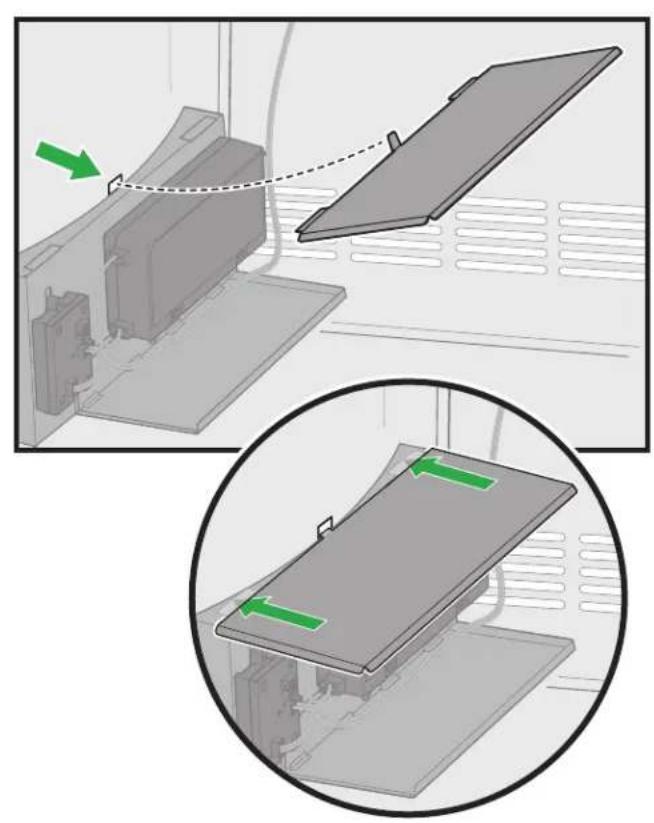
natural_image
Diagram showing a device with a green arrow indicating motion, and an inset close-up of the component (no text or symbols present)
text_image
37 LPLiquid Propane grills only.
Solamente barbacoas de propano licuado.
Grills à gaz propane liquide uniquement.
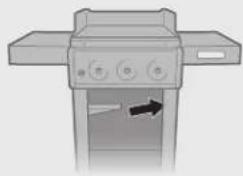
natural_image
Diagram of a mechanical device with control buttons and an arrow indicating direction (no text or symbols)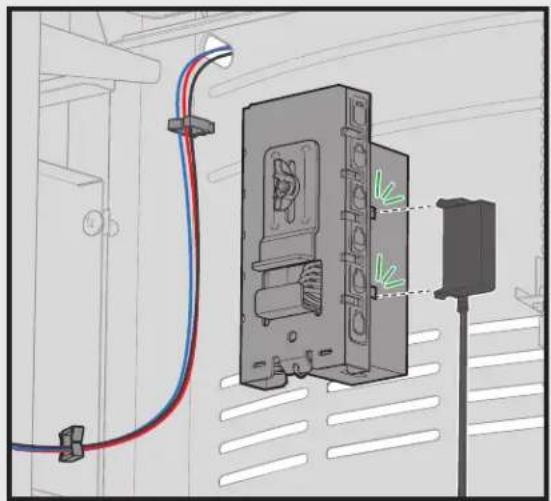
natural_image
Technical diagram of an electrical enclosure with wiring and a mounted device (no text or symbols visible)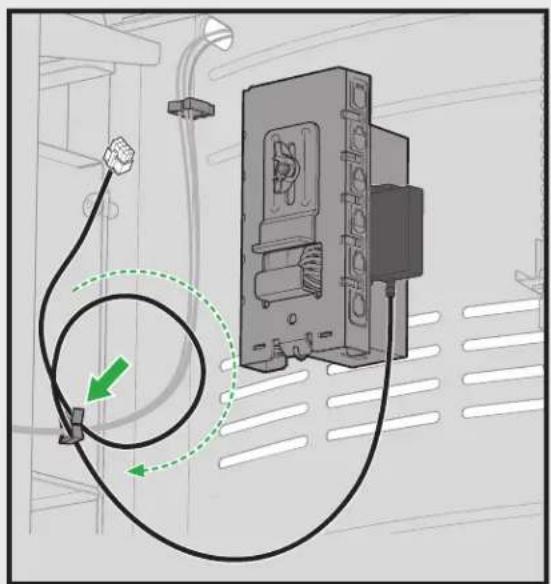
natural_image
Diagram of an electrical outlet connected to a cable with a green arrow indicating direction (no text or symbols present)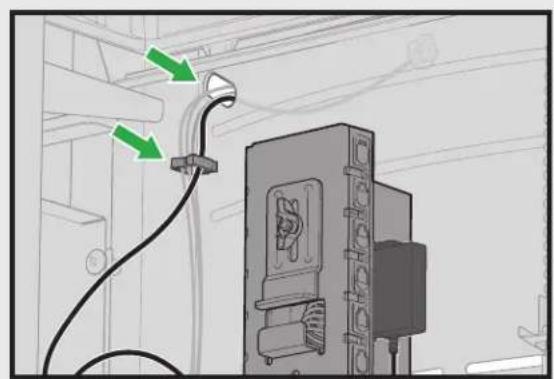
natural_image
Diagram of a cable installation with green arrows indicating connection points (no text or symbols present)38
LP
Liquid Propane grills only.
Solamente barbacoas de propano licuado.
natural_image
Diagram of a mechanical assembly with cable and housing connections, showing internal components and a magnified inset (no text or symbols)39
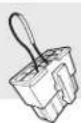
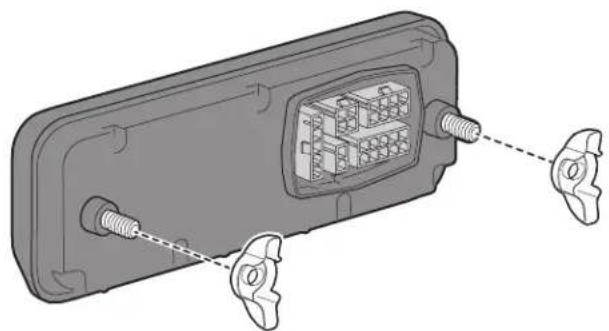
natural_image
3D diagram of a device rear panel with connector pins and internal components (no text or symbols)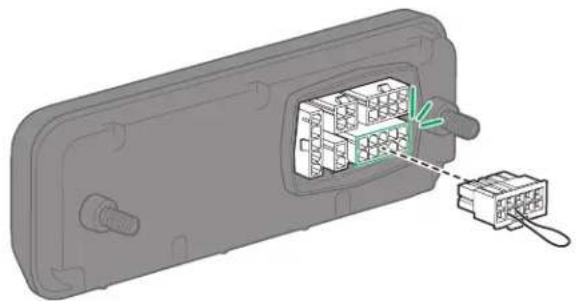
natural_image
3D diagram of a device panel with internal components and a connected connector (no text or symbols)40
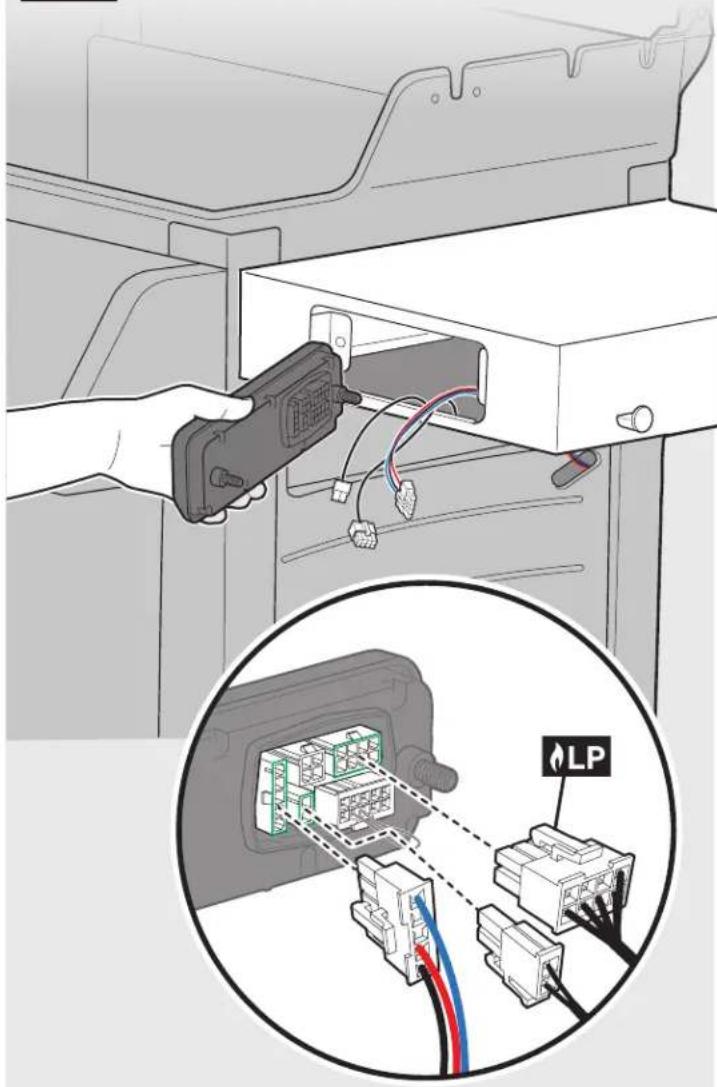
text_image
Diagram showing a hand using a device to connect to an attached electrical connector, with an inset highlighting the connection via a LP symbol.natural_image
Line drawing of a portable electric stove with a magnified inset showing internal components (no text or symbols)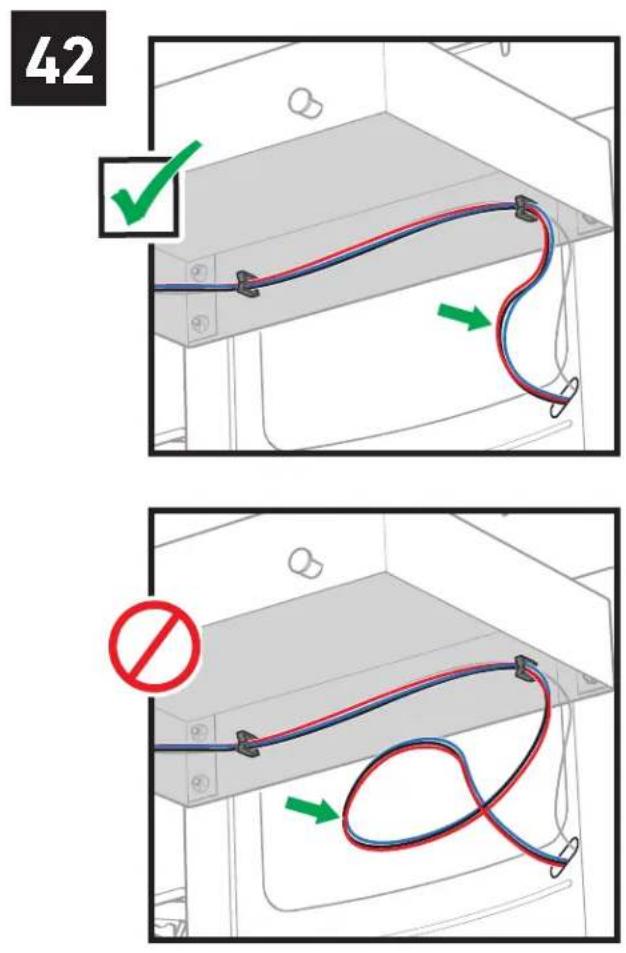
text_image
42 ✓ No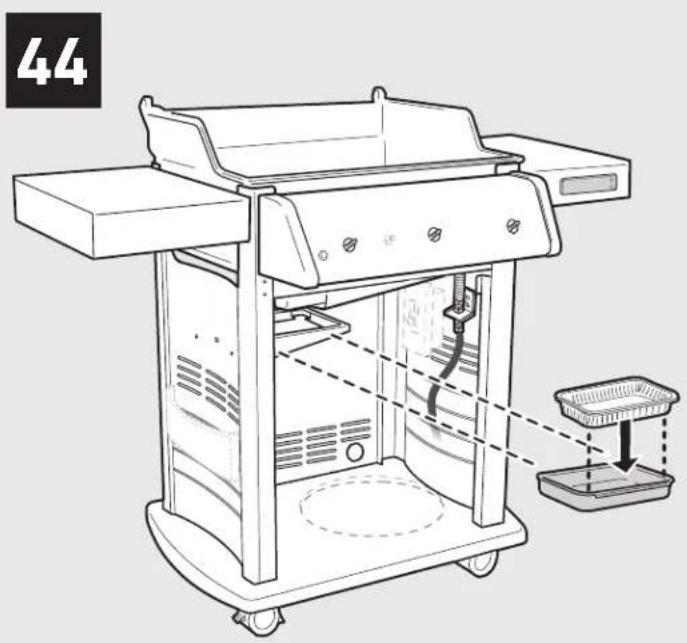
natural_image
Line drawing of a portable electric grill with a tray and control panel, no text or symbols present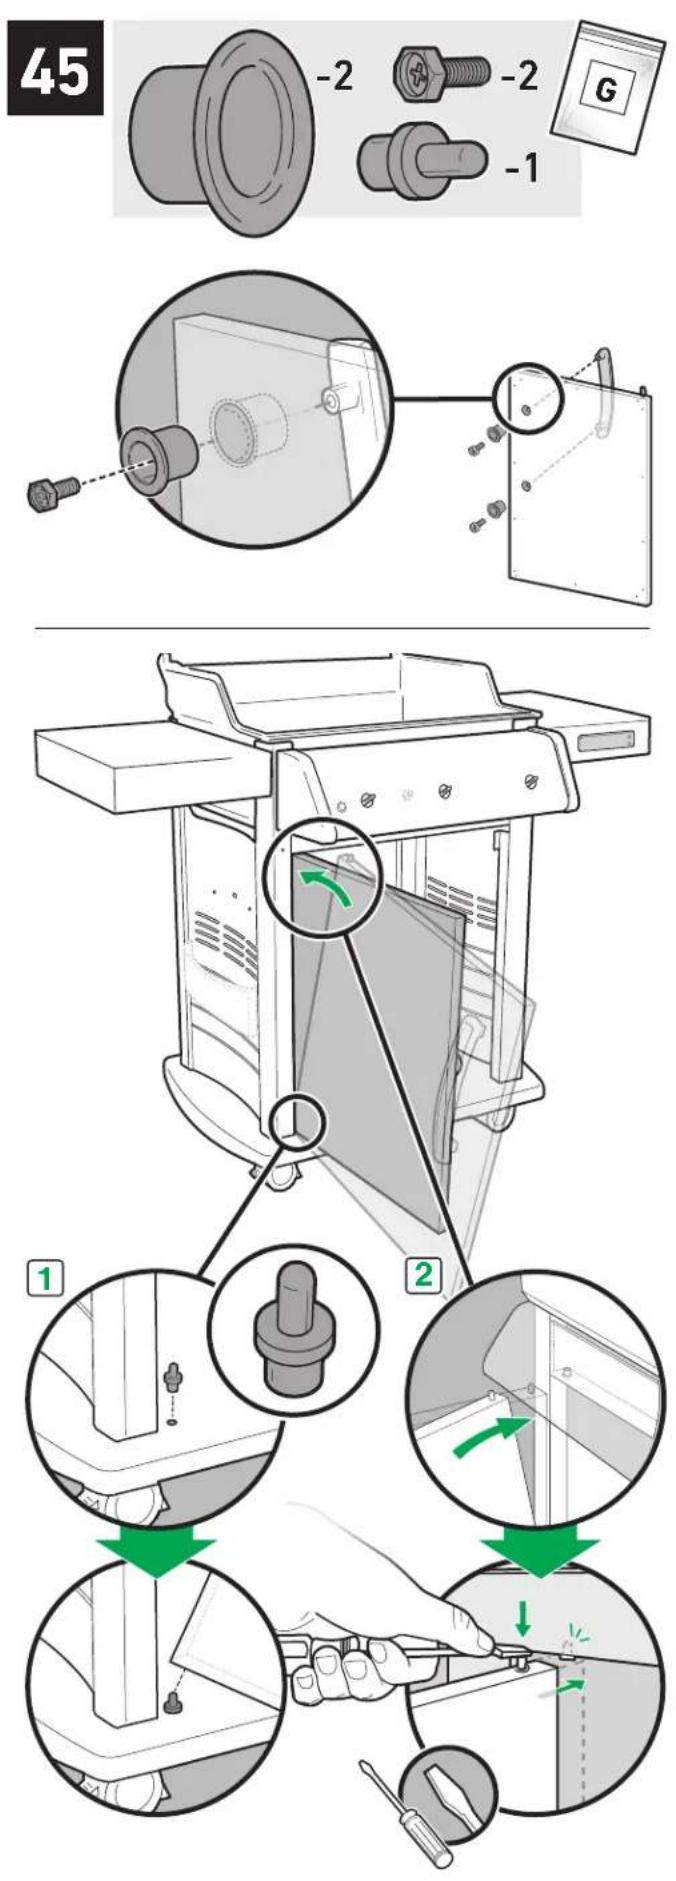
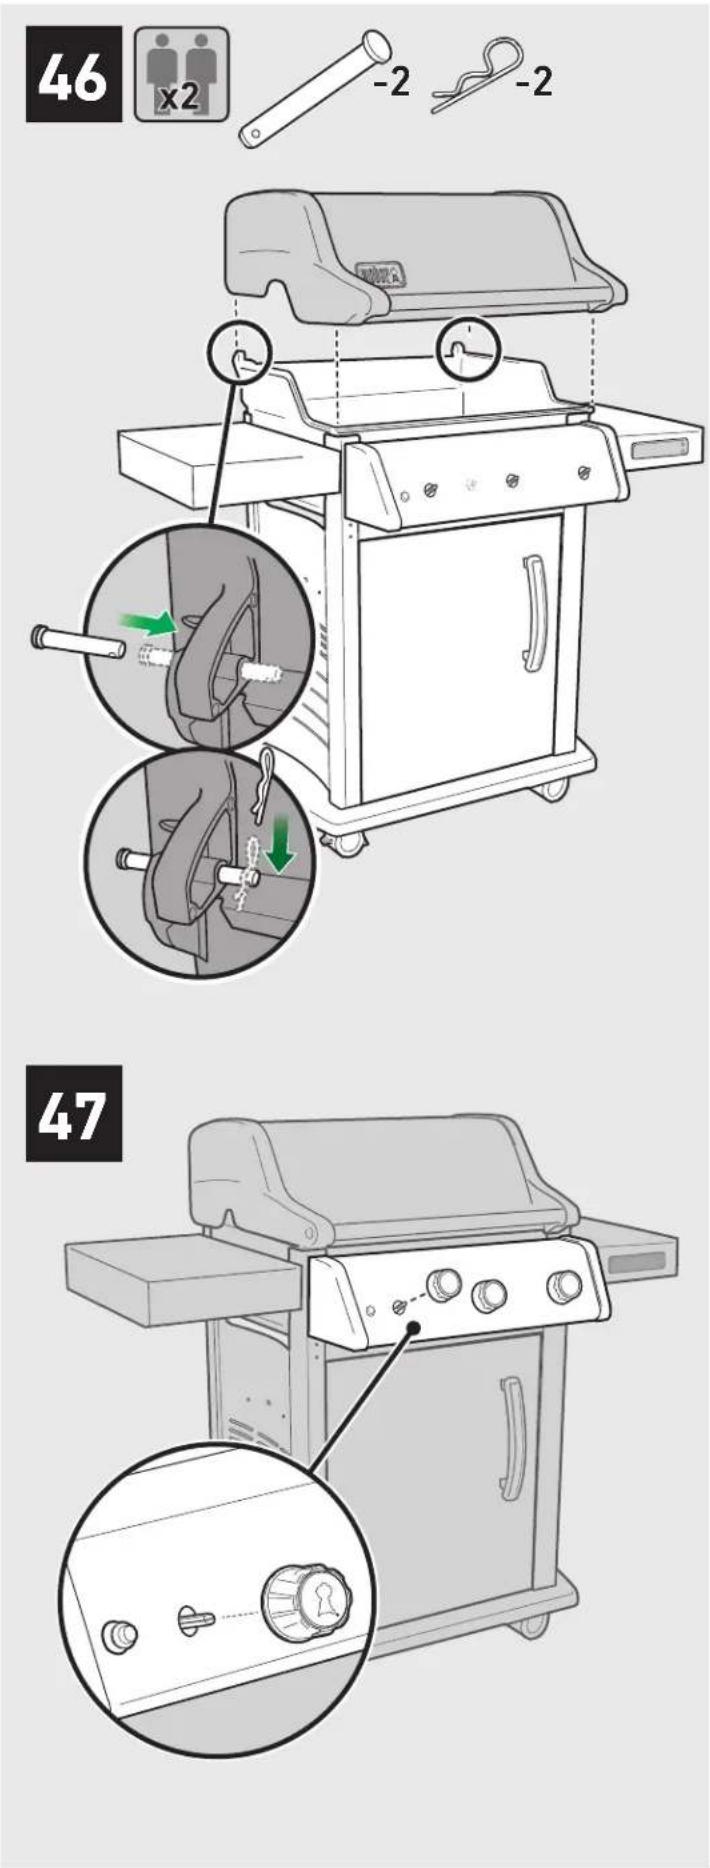
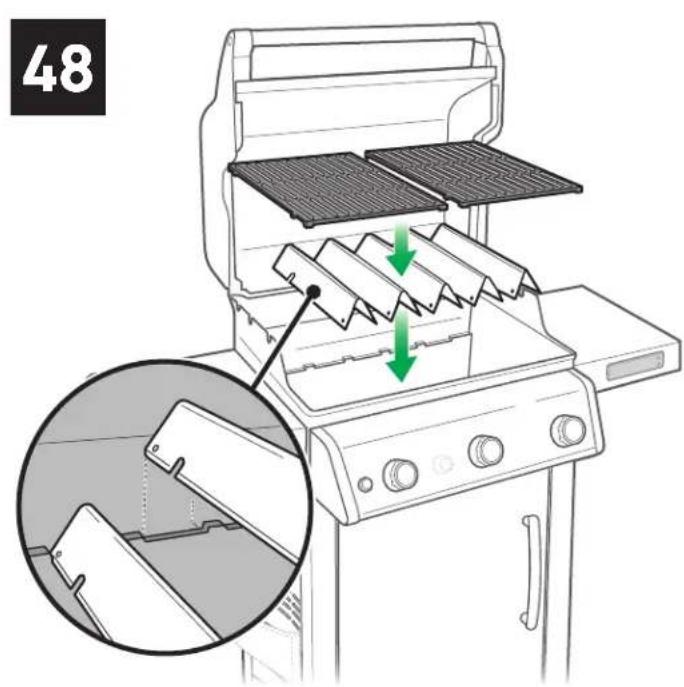
text_image
48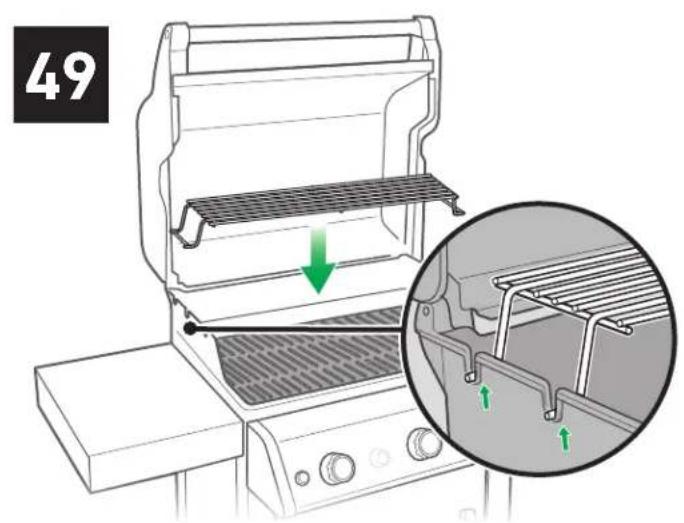
text_image
49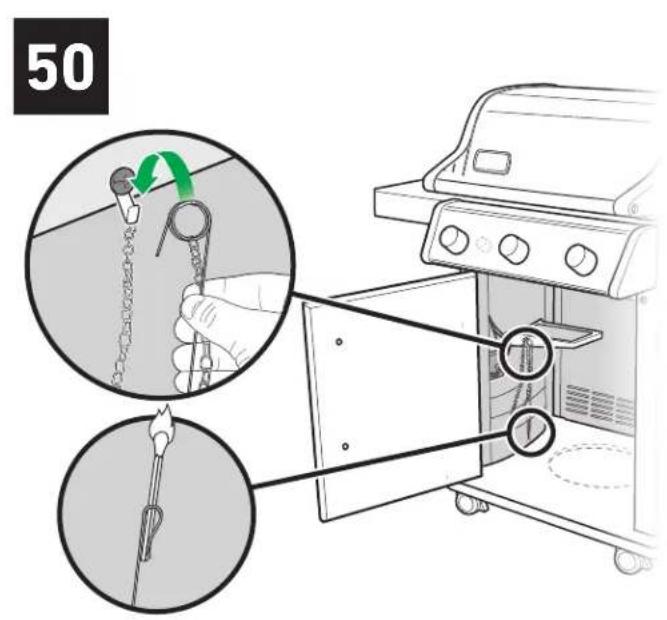
text_image
50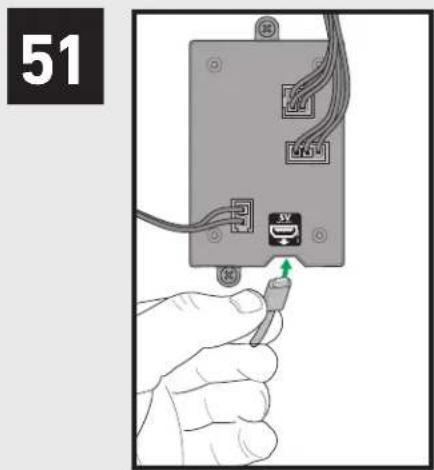
text_image
51 SVRegister your grill to receive exclusive WEBER content that is sure to make you the ultimate backyard hero.
REGÍSTRATE HOY.
Apple and the Apple logo are trademarks of Apple Inc., registered in the U.S. and other countries. App Store is a service mark of Apple Inc. Android and Google Play are trademarks of Google Inc.
natural_image
Close-up of a Spirit brand electronic device with control knob and display screen (no visible text or symbols)REGISTER TODAY.
We are so glad that you have joined us on the journey to grilling greatness. Register your grill and gain access to fun and engaging WEBER information, including tips, tricks and how to get the most out of your grilling experience.

PHONE APP EMAIL weber.com


Keep this Owner's Manual for future reference, thoroughly read through it, and if you have any questions please contact us today.

53016
111820
enUS
Important Safety Information
DANGER, WARNING, and CAUTION statements are used throughout this Owner's Manual to emphasize critical and important information. Read and follow these statements to help ensure safety and prevent property damage. The statements are defined below.
△DANGER: Indicates a hazardous situation which, if not avoided, will result in death or serious injury.
⚠ WARNING: Indicates a hazardous situation which, if not avoided, could result in death or serious injury.
△CAUTION: Indicates a hazardous situation which, if not avoided, could result in minor or moderate injury.
⚠️ DANGER
If you smell gas:
- Shut off gas to the appliance (grill).
- Extinguish any open flame.
- Open lid.
- If odor continues, keep away from the appliance (grill) and immediately call your gas supplier or your fire department.
⚠ WARNING
- Do not store or use gasoline or other flammable liquids or vapors in the vicinity of this (grill) or any other appliance.
- An LP cylinder (tank) not connected for use shall not be stored in the vicinity of this (grill) or any other appliance.
USE OUTDOORS ONLY.
READ THE INSTRUCTIONS BEFORE USING THE APPLIANCE (GRILL).
NOTICE TO INSTALLER: These instructions must be left with the consumer.
NOTICE TO CONSUMER: Retain these instructions for future reference.
Installation and Assembly
⚠️ DANGER: This grill is not intended to be installed in or on recreational vehicles or boats.
⚠ WARNING: Do not use this grill unless all parts are in place and the grill was properly assembled according to the assembly instructions.
⚠ WARNING: Do not build this model of grill in any built-in or slide-in construction.
⚠ WARNING: Do not modify the appliance (grill). Liquid propane gas is not natural gas. The conversion or attempted use of natural gas in a liquid propane gas unit or liquid propane gas in a natural gas unit is unsafe and will void your warranty.
- In the United States, installation must conform with local codes or, in the absence of local codes, with either the National Fuel Gas Code, ANSI Z223.1/NFPA 54, Natural Gas and Propane Installation Code, CSA B149.1; or Propane Storage and Handling Code, B149.2; or the Standard for Recreational Vehicles, ANSI A119.2/NFPA 1192, and CSA Z240 RV Series, Recreational Vehicle Code, as applicable.
- In Canada, the installation of this grill must comply with local codes and/or the latest edition of Standard CAN/CSA-B149.2 (Propane Storage and Handling Code). These instructions, while generally acceptable, do not necessarily comply with the Canadian installation codes, particularly with piping above and below ground.
• In Mexico, if there are local codes that apply to portable gas appliances, you must comply with the latest edition of Official Mexican Standard (NOM). - If an external electrical source is utilized (such as a rotisserie) it must be electrically grounded in accordance with local codes or, in the absence of local codes, with the National Electrical Code, ANSI/NFPA 70, or the Canadian Electrical Code, Part 1. CSA C22.1.
Operation
△ DANGER: Only use the grill outdoors in a well-ventilated area. Do not use in a garage, building, breezeway, tent, any other enclosed area, or beneath overhead combustible construction.
△ DANGER: Do not use the grill in any vehicle or in any storage or cargo area of any vehicle. This includes, but is not limited to, cars, trucks, station wagons, mini-vans, sport utility vehicles, recreational vehicles, and boats.
△ DANGER: Do not use the grill within 24 inches (61 cm) of combustible materials. This includes the top, bottom, back and sides of the grill.
⚠️ DANGER: Keep the cooking area clear of flammable vapors and liquids such as gasoline, alcohol, etc., and combustible materials.
⚠️ DANGER: This appliance (grill) must be kept away from flammable materials during use.
⚠ DANGER: Do not put a grill cover or anything flammable on, or in the storage area under the grill while it is in operation or is hot.
⚠ DANGER: Should a grease fire occur, turn off all burners and leave lid closed until fire is out.
⚠ WARNING: Accessible parts may be very hot. Keep young children away.
⚠ WARNING: The use of alcohol, prescription drugs, non-prescription drugs, or illegal drugs may impair the consumer's ability to properly and safely assemble, move, store, or operate the grill.
⚠ WARNING: Never leave the grill unattended during pre-heating or use. Exercise caution when using this grill. The entire cookbox gets hot when in use.
⚠ WARNING: Do not move the appliance (grill) during use.
⚠ WARNING: Keep any electrical supply cord and the fuel supply hose away from any heated surfaces.
⚠️ CAUTION: This product has been safety-tested and is only certified for use in a specific country. Refer to country designation located on outside of box.
- Do not use charcoal or lava rock in the grill.
Storage and/or Nonuse
⚠ WARNING: Turn off the gas supply at the gas cylinder (tank) after use.
⚠ WARNING: LP tanks must be stored outdoors out of the reach of children and must not be stored in a building, garage, or any other enclosed space.
⚠ WARNING: After a period of storage and/or nonuse, the grill should be checked for gas leaks and burner obstructions before use.
⚠ Storage of the grill indoors is permissible only if the LP tank is disconnected and removed from the grill.
California Proposition 65
⚠ WARNING: Combustion byproducts produced when using this product contain chemicals known to the state of California to cause cancer, birth defects, or other reproductive harm.
△ PROPOSITION 65 WARNING: Handling the brass material on this product exposes you to lead, a chemical known to the state of California to cause cancer, birth defects, or other reproductive harm. Wash hands after handling this product.
[Non-Text]
[Non-Text]
[Non-Text]
[Non-Text]
[Non-Text]
[Non-Text]
[Non-Text]
[Non-Text]
[Non-Text]
[Non-Text]
[Non-Text]
[Non-Text]
[Non-Text]
[Non-Text]
[Non-Text]
[Non-Text]
[Non-Text]
[Non-Text]
[Non-Text]
[Non-Text]
[Non-Text]
[Non-Text]
[Non-Text]
[Non-Text]
[Non-Text]
HELLO!
We are so glad that you have joined us on the journey to grilling happiness.
Please take some time to read through this Owner's Manual to ensure that you are up and grilling quickly and easily. We want to be with you for the life of your grill, so please take just a couple of minutes to register your grill. When you sign up for a WEBER-ID as part of your registration, we will deliver special grill-related content just for you to enjoy.
So, come along and join us online, on your smart device or however else you'd like to stay in touch.
Thank you for choosing WEBER.
We are happy you are here.
weber connect

DOWNLOAD THE FREE APP

Even your grill can update its status

CONNECT AND MONITOR

INSERT PROBE

PERFECT RESULTS
FEATURE BENEFIT
| REMOTE GRILL MONITOR | WI-FI AND BLUETOOTH® GRILL MONITORINGRemote grilling access gives you the freedom to walk away and monitor the heat from your smart device. |
| STEP-BY-STEP GRILLING | PERFECTLY GRILLED FOODKnow when it's time to flip, rest, and serve directly from your smart device.Receive notifications on everything from when it's time to flip food, to a countdown that displays when it's ready. |
| APP ENABLED FOOD THERMOMETERS | INSTANT FOOD STATUS READOUTView food temperature & doneness without lifting the lid. The food probes monitor doneness from beginning to end and will notify you via the app when it's time to flip, rest, and serve. |
| RECIPES & INSTRUCTION | WEBER RECIPES AND COOK PROGRAMSWeber recipes and cook programs that provide real time, step-by-step grilling instructions specific to your cook preference and cut of meat. |
| LED DISPLAY DASHBOARDThe LED display dashboard on your module is where you can visually check temperatures, receive notifications, view connectivity status, and check the status of your cook. | |

Download on the
App Store

GET IT ON
Google Play
TABLE OF CONTENTS
2 Welcome to WEBER
Important Safety Information
4 The WEBER Promise Warranty
5 Product Features
SPIRIT Features
6 Getting Started
Important Information about
LP Gas & Gas Connections
LP Tank Installation & Leak Checking
Refilling or Replacing an LP Tank
10 Operation
The Very First Time You Grill
Every Time You Grill
Igniting the Grill
Integrated WEBER CONNECT
Technology
Using the WEBER CONNECT Module
Food Temperature Probe Care
14 Tips and Hints
The Flame - Direct or Indirect
Grilling Do's and Don'ts
16 Product Care
Cleaning and Maintenance
18 Troubleshooting
22 Grilling Guide
23 Replacement Parts
Warranty
Thank you for purchasing a WEBER product. Weber-Stephen Products LLC, 1415 S. Roselle Road, Palatine, Illinois 60067 ("WEBER") prides itself on delivering a safe, durable, and reliable product.
This is WEBER's Voluntary Warranty provided to you at no extra charge. It contains the information you will need to have your WEBER product repaired in the unlikely event of a failure or defect.
Pursuant to applicable laws, the customer has several rights in case the product is defective. Those rights include supplementary performance or replacement, abatement of the purchasing price, and compensation. In the European Union, for example, this would be a two-year statutory warranty starting on the date of the handover of the product. These and other statutory rights remain unaffected by this warranty provision. In fact, this warranty grants additional rights to the Owner that are independent from statutory warranty provisions.
WEBER'S VOLUNTARY WARRANTY
WEBER warrants, to the purchaser of the WEBER product for in the case of a gift or promotional situation, the person for whom it was purchased as a gift or promotional item), that the WEBER product is free from defects in material and workmanship for the period(s) of time specified below when assembled and operated in accordance with the accompanying Owner's Manual. (Note: If you lose or misplace your WEBER Owner's Manual, a replacement is available online at www.weber.com, or such country-specific website to which Owner may be redirected.) Under normal, private single family home or apartment use and maintenance, WEBER agrees within the framework of this warranty to repair or replace defective parts within the applicable time periods, limitations, and exclusions listed below. TO THE EXTENT ALLOWABLE BY APPLICABLE LAW, THIS WARRANTY IS EXTENDED ONLY TO THE ORIGINAL PURCHASER AND IS NOT TRANSFERABLE TO SUBSEQUENT OWNERS, EXCEPT IN THE CASE OF GIFTS AND PROMOTIONAL ITEMS AS NOTED ABOVE.
OWNER'S RESPONSIBILITIES UNDER THIS WARRANTY
To ensure trouble-free warranty coverage, it is important (but it is not required) that you register your WEBER product online at www.weber.com, or such country-specific website to which Owner may be redirected. Please also retain your original sales receipt and/or invoice. Registering your WEBER product confirms your warranty coverage and provides a direct link between you and WEBER in case we need to contact you.
The above warranty only applies if the Owner takes reasonable care of the WEBER product by following all assembly instructions, usage instructions, and preventative maintenance as outlined in the accompanying Owner's Manual, unless the Owner can prove that the defect or failure is independent of non-compliance with the above mentioned obligations. If you live in a coastal area, or have your product located near a pool, maintenance includes regular washing and rinsing of the exterior surfaces as outlined in the accompanying Owner's Manual.
WARRANTY HANDLING / EXCLUSION OF WARRANTY
If you believe that you have a part which is covered by this Warranty, please contact WEBER Customer Service using the contact information on our website (www.weber.com, or such country-specific website to which Owner may be redirected). WEBER will, upon investigation, repair or replace (at its option) a defective part that is covered by this Warranty. In the event that repair or replacement are not possible, WEBER may choose (at its option) to replace the grill in question with a new grill of equal or greater value. WEBER may ask you to return parts for inspection, shipping charges to be pre-paid.
This WARRANTY lapses if there are damages, deteriorations, discolorations, and/or rust for which WEBER is not responsible caused by:
- Abuse, misuse, alteration, modification, misapplication, vandalism, neglect, improper assembly or installation, and failure to properly perform normal and routine maintenance;
- Insects (such as spiders) and rodents (such as squirrels), including but not limited to damage to burner tubes and/or gas hoses;
- Exposure to salt air and/or chlorine sources such as swimming pools and hot tubs/spas;
- Severe weather conditions such as hail, hurricanes, earthquakes, tsunamis or surges, tornadoes or severe storms.
The use and/or installation of parts on your WEBER product that are not genuine WEBER parts will void this Warranty, and any damages that result hereby are not covered by this Warranty. Any conversion of a gas grill not authorized by WEBER and performed by a WEBER authorized service technician will void this Warranty.
PRODUCT WARRANTY PERIODS
Cookbox:
10 years, no rust through/burn through (2 years paint excluding fading or discoloration)
Lid assembly:
10 years, no rust through/burn through (2 years paint excluding fading or discoloration)
Stainless steel burner tubes:
10 years, no rust through/burn through
Stainless steel cooking grates:
5 years, no rust through/burn through
Stainless steel FLAVORIZER BARS:
5 years, no rust through/burn through
Porcelain-enameled cast iron cooking grates: 5 years, no rust through/burn through
WEBER CONNECT Components:
3 years
All remaining parts:
2 years
DISCLAIMERS
APART FROM THE WARRANTY AND DISCLAIMERS AS DESCRIBED IN THIS WARRANTY STATEMENT, THERE ARE EXPLICITLY NO FURTHER WARRANTY OR VOLUNTARY DECLARATIONS OF LIABILITY GIVEN HERE WHICH GO BEYOND THE STATUTORY LIABILITY APPLYING TO WEBER. THE PRESENT WARRANTY STATEMENT ALSO DOES NOT LIMIT OR EXCLUDE SITUATIONS OR CLAIMS WHERE WEBER HAS MANDATORY LIABILITY AS PRESCRIBED BY STATUTE.
NO WARRANTIES SHALL APPLY AFTER THE APPLICABLE PERIODS OF THIS WARRANTY. NO OTHER WARRANTIES GIVEN BY ANY PERSON, INCLUDING A DEALER OR RETAILER, WITH RESPECT TO ANY PRODUCT (SUCH AS ANY "EXTENDED WARRANTIES"), SHALL BIND WEBER. THE EXCLUSIVE REMEDY OF THIS WARRANTY IS REPAIR OR REPLACEMENT OF THE PART OR PRODUCT.
IN NO EVENT UNDER THIS VOLUNTARY WARRANTY SHALL RECOVERY OF ANY KIND BE GREATER THAN THE AMOUNT OF THE PURCHASE PRICE OF THE WEBER PRODUCT SOLD.
YOU ASSUME THE RISK AND LIABILITY FOR LOSS, DAMAGE, OR INJURY TO YOU AND YOUR PROPERTY AND/OR TO OTHERS AND THEIR PROPERTY ARISING OUT OF THE MISUSE OR ABUSE OF THE PRODUCT OR FAILURE TO FOLLOW INSTRUCTIONS PROVIDED BY WEBER IN THE ACCOMPANYING OWNER'S MANUAL.
PARTS AND ACCESSORIES REPLACED UNDER THIS WARRANTY ARE WARRANTED ONLY FOR THE BALANCE OF THE ABOVE MENTIONED ORIGINAL WARRANTY PERIOD(S).
THIS WARRANTY APPLIES TO PRIVATE SINGLE FAMILY HOME OR APARTMENT USE ONLY AND DOES NOT APPLY TO WEBER GRILLS USED IN COMMERCIAL, COMMUNAL OR MULTI-UNIT SETTINGS SUCH AS RESTAURANTS, HOTELS, RESORTS, OR RENTAL PROPERTIES.
WEBER MAY FROM TIME TO TIME CHANGE THE DESIGN OF ITS PRODUCTS. NOTHING CONTAINED IN THIS WARRANTY SHALL BE CONSTRUED AS OBLIGATING WEBER TO INCORPORATE SUCH DESIGN CHANGES INTO PREVIOUSLY MANUFACTURED PRODUCTS, NOR SHALL SUCH CHANGES BE CONSTRUED AS AN ADMISSION THAT PREVIOUS DESIGNS WERE DEFECTIVE.
Weber-Stephen Products LLC Customer Service Center
1415 S. Roselle Road
Palatine, IL 60067
U.S.A.
For replacement parts, call:
1-800-446-1071

PROTECT YOUR
INVESTMENT
Shield your grill from the elements with a heavy-duty premium grill cover.
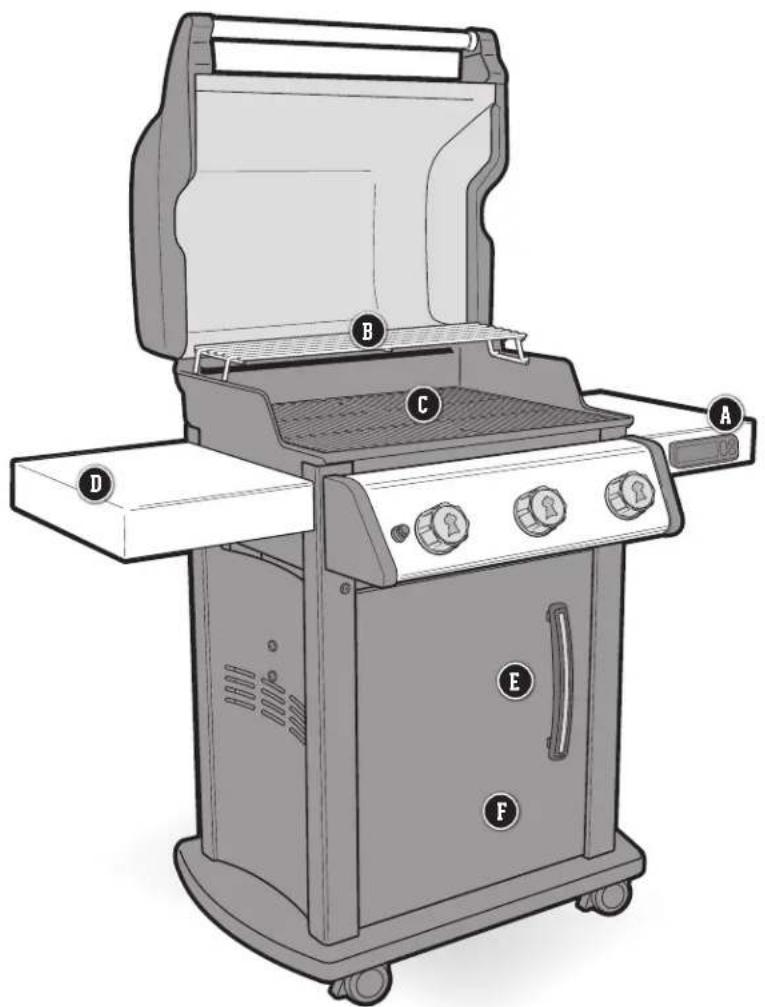
SPIRIT FEATURES
text_image
Diagram of a gas stove with labeled components A through F, showing open chamber and internal grating structure.A WEBER CONNECT
Confidently tend to the grill and your guests while using the integrated WEBER CONNECT technology. This device monitors internal grill temperature and uses food temperature probes allowing you to monitor the temperature of your food. You can also monitor your grill from your smart device with the WEBER CONNECT app via Bluetooth® or Wi-Fi connection.
One food temperture probe is included. Additional food probes are sold separately.
B Warming Rack
The warming rack keeps food warm or toasts burger buns, as the main meal grills below.
C Porcelain-Enameled, Cast Iron Cooking Grates
The reversible cooking grates empower you to be even more creative with your dish. The thin side of the cooking grate is ideal for delicate food such as fish and shrimp, while the wider side creates a thick sear mark enhancing the flavor of your food.
D Side Tables
Use the side tables to keep platters, seasonings, and tools within arm's reach.
E Fuel Gauge
The easy-to-read fuel gauge located next to the gas tank lets you see how much fuel is left in your tank at all times. The WEBER CONNECT module also displays a fuel status indicator, as well as indicating fuel status on your smart device with the WEBER CONNECT app.
F Grill Cabinet
The grill cabinet adds enclosed storage space for the LP tank and the electronic components.
Important Information about LP Gas & Gas Connections
What Is LP Gas?
Liquefied petroleum gas, also called LP, LP gas, liquid propane, or simply propane or butane, is the flammable, petroleum-based product used to fuel your grill. It is a gas at moderate temperatures and pressure when it is not contained. But at moderate pressure inside a container, such as a tank, LP is a liquid. As pressure is released from the tank, the liquid readily vaporizes and becomes gas.
Safe Handling Tips For LP Tanks
- A dented or rusty liquid propane tank may be hazardous and should be checked by your liquid propane supplier. Do not use a liquid propane tank with a damaged valve.
- Although your liquid propane tank may appear to be empty, gas may still be present, and the tank should be transported and stored accordingly.
- The LP tank must be installed, transported, and stored in an upright, secure position. LP tanks should not be dropped or handled roughly.
- Never store or transport the LP tank where temperatures can reach 125^ (51.7°C) (the tank will become too hot to hold by hand).
- Place dust cap on cylinder valve outlet whenever the cylinder is not in use. Only install the type of dust cap on the cylinder valve outlet that is provided with the cylinder valve. Other types of caps or plugs may result in leakage of propane.
LP Tank Requirements
- The tank must be approximately 18 ^1/4 inches (46.35 cm) high and 12 ^1/4 inches (31.1 cm) in diameter with a marked 20 pound (9.07 kg) LPG capacity or 47.6 pound (21.6 kg) water capacity as stated by the manufacturer. Other tanks may be acceptable provided they are compatible with the grill retention means (tank scale).
• The tank used must be constructed and marked in accordance with the Specifications for LP gas Cylinders of the U.S. Department of Transportation (D.O.T.): or the Canadian Standard for Cylinders, Spheres and Tubes for Transportation of Dangerous Goods and Commission, CAN/CSA-B339, as applicable. - Tanks must be provided with a listed OPD (Overfilling Prevention Device) and a Type 1 (CGA 791) tank connection. The tank connection must be compatible with the grill connection.
- The tank must include a collar to protect the tank valve.
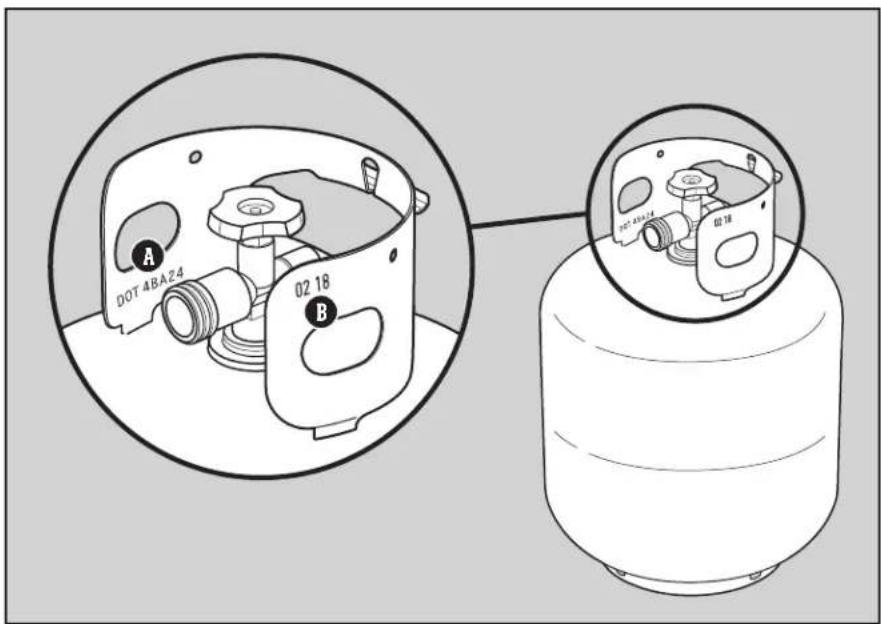
- Tanks must have a D.O.T. certification (A), and a testing date (B) that is within five years of current use.
What is a Regulator?
Your gas grill is equipped with a pressure regulator, which is a device to control and maintain uniform gas pressure as gas is released from the LP tank.
Regulator Requirements
- The regulator and hose assembly supplied with this grill must be used. This regulator has a flow limiting device built into the unit that will restrict the flow of gas in the event that a leak is detected.
- Replacement regulator and hose assemblies must be as specified by Weber-Stephen Products LLC (UL-listed Type 1 (CGA 791) tank connection device as described in the latest edition of ANSI Z21.81).
text_image
A DOT 4BA24 02 18 B DOT 4BA24 02 18LP Tank Installation & Leak Checking
Installation Location
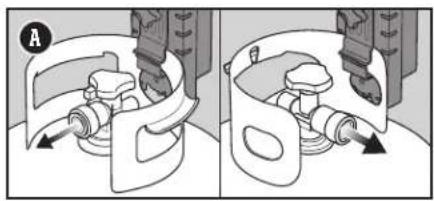
The LP tank is installed inside the base cabinet, on the tank scale (right side). The shape of the collar assembly (the metal protective ring around the tank valve) determines one of two directions in which the tank will correctly hang on the tank scale (A).
Inspect the Tank
1) Confirm that the tank valve is fully closed. Close by turning valve clockwise.
2) Confirm that the tank valve is the proper mating type for the regulator (B).
3) Inspect the tank valve, including the internal rubber seal for damage or debris (C). If damaged, return tank to local retailer.
Install The Tank
1) Check that all burner control knobs are in the off position. Check by pushing in and turning knobs clockwise.
2) Open base cabinet door.
3) Loosen hand nut and rotate tank lock up (D).
4) Lift tank into position on the tank scale (E).
5) Rotate the tank lock down. Tighten the hand nut.
6) Screw the regulator coupling onto the tank valve, turning clockwise (F). Hand-tighten only. Using a wrench could damage the regulator coupling and could cause a leak. Proceed to "CHECKING FOR GAS LEAKS."
natural_image
Mechanical assembly diagram showing two stages of a device with arrows indicating motion (no text or symbols)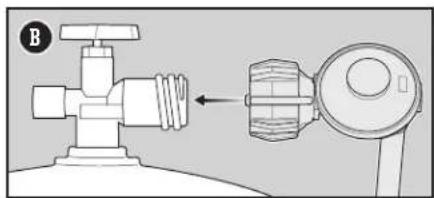
natural_image
Diagram of a mechanical valve assembly with a directional arrow indicating movement (no text or symbols present)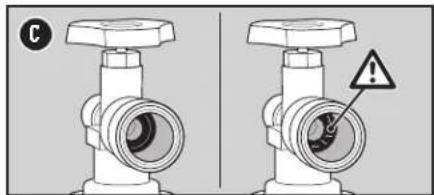
text_image
C !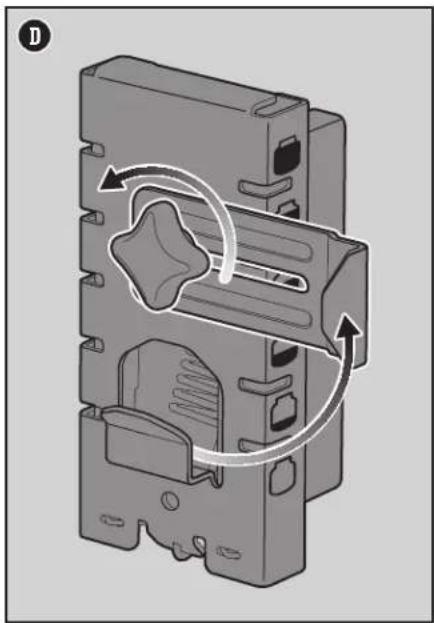
natural_image
Mechanical diagram showing a piston-cranked device with rotational flow arrows indicating motion (no text or symbols)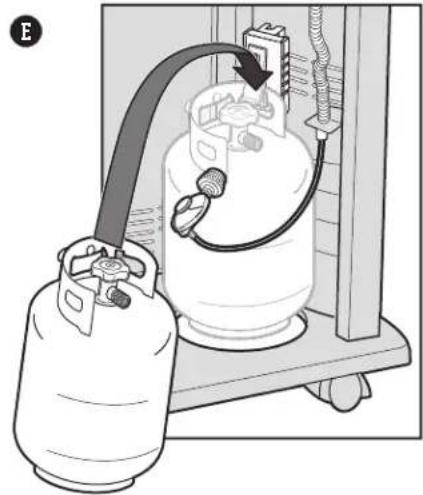
natural_image
Diagram of a gas cylinder setup with attached tubing and a gas cylinder, no text or symbols present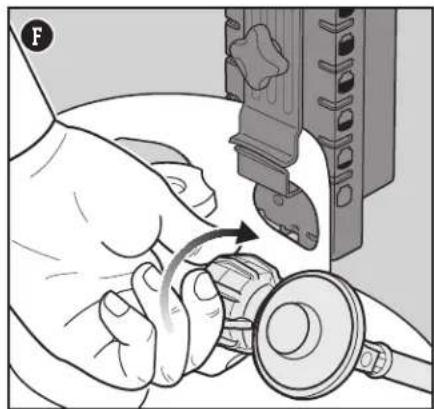
natural_image
Close-up of hands using a tool to adjust or install a mechanical component, no visible text or symbolsWhat is a Leak Check?
Once the LP tank is properly installed, it is necessary to perform a leak check. A leak check is a reliable way to verify that gas is not escaping after you connect the tank. The fuel system in your grill features factory-made connections that have been thoroughly checked for gas leaks and the burners have been flame-tested. WEBER recommends performing a thorough leak check after assembly, as well as annually. The following fittings should be tested:
• Where the regulator connects to the tank.
- Where the gas hose connects to the bulkhead.
- Where the bulkhead connects to the corrugated gas line.
Checking for Gas Leaks
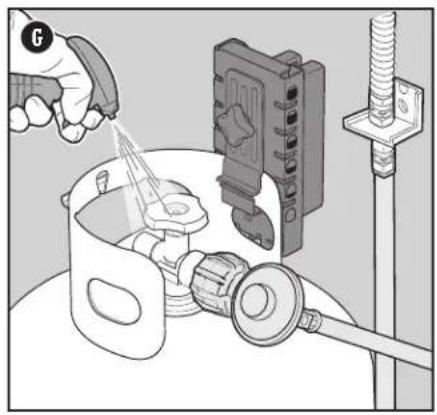
1) Wet fittings (G) with a soap and water solution, using a spray bottle, brush, or rag. You can make your own soap and water solution by mixing 20% liquid soap with 80% water; or, you can purchase leak check solution in the plumbing section of any hardware store.
2) Slowly open gas supply by turning tank valve counterclockwise while checking for bubbles.
3) If bubbles appear there is a leak:
a) If the leak is at the cylinder (H), turn off the gas. DO NOT OPERATE THE GRILL. Disconnect the tank and return the tank to your local retailer.
b) If the leak is at the regulator (I), turn off the gas. NEVER ATTEMPT TO TIGHTEN THE REGULATOR WITH TANK VALVE OPEN. DO NOT OPERATE THE GRILL. Contact the Customer Service Representative in your area using the contact information on our website.
c) If the leak is at any fittings indicated in illustration (J), re-tighten fitting with a wrench and recheck for leaks with soap and water solution. If leak persists, turn off the gas. DO NOT OPERATE THE GRILL.
d) If the leak is at any fittings indicated in illustration (K), turn off the gas. DO NOT OPERATE THE GRILL.
If a leak is present, contact the Customer Service Representative in your area using the contact information on our website.
4) If bubbles do not appear, leak checking is complete:
a) Turn gas supply off at the tank and rinse connections with water.
NOTE: Since some leak test solutions, including soap and water, may be slightly corrosive, all connections should be rinsed with water after checking for leaks.
natural_image
Illustration of a hand pouring liquid into a container with a spring scale and connecting rod (no text or symbols)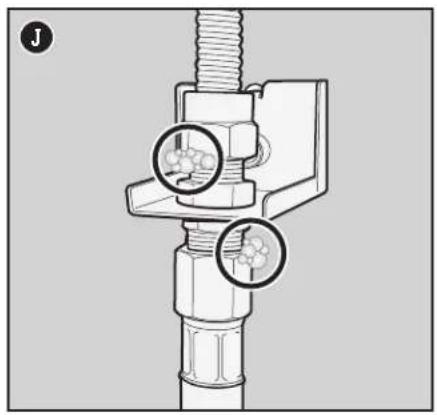
natural_image
Mechanical assembly diagram showing a bolt and nut with two circular insets highlighting internal components (no text or symbols)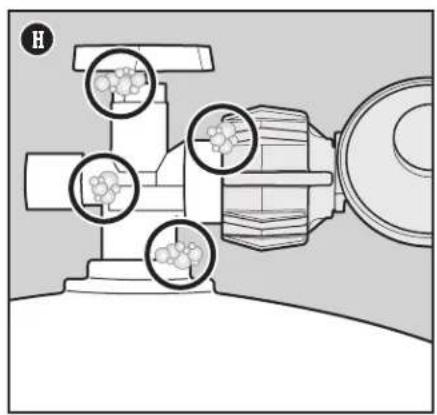
natural_image
Technical diagram of a mechanical device with circular insets showing internal components (no text or labels)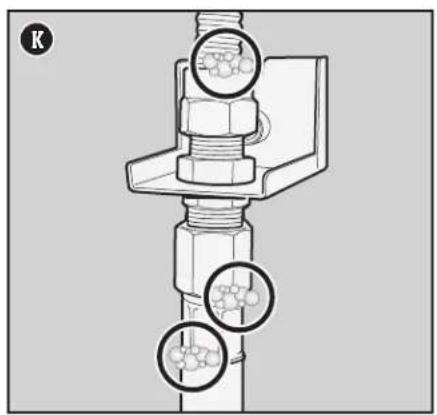
natural_image
Mechanical assembly diagram showing bolted joint with two circular insets highlighting internal components (no text or labels)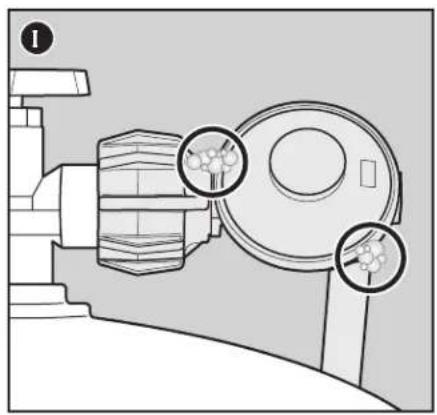
natural_image
Technical line drawing of a mechanical assembly with two circular insets showing internal components (no text or symbols)⚠️ DANGER: Do not use a flame to check for gas leaks. Be sure there are no sparks or open flames in the area while you check for leaks.
⚠️ DANGER: Leaking gas may cause a fire or explosion.
⚠️ DANGER: Do not operate the grill if there is a gas leak present.
⚠️ DANGER: If you see, smell, or hear the hiss of gas escaping from the liquid propane tank:
1) Move away from liquid propane tank.
2) Do not attempt to correct the problem yourself.
3) Call your fire department.
△ DANGER: Always close the tank valve before disconnecting the regulator. Do not attempt to disconnect the gas regulator and hose assembly or any gas fitting while this grill is in operation.
△ DANGER: Do not store a spare LP tank under or near this grill. Never fill the tank beyond 80% full. Failure to follow these statements exactly may result in a fire causing death or serious injury.
Refilling or Replacing an LP Tank
How Much Fuel is in the Tank?
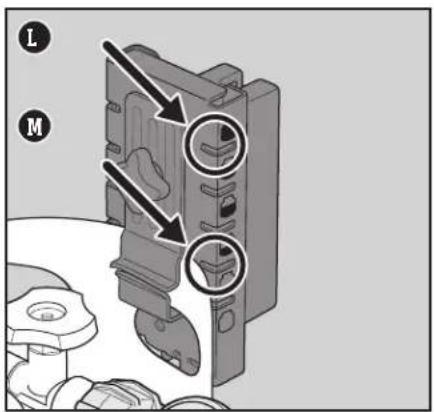
The tank scale indicates the amount of fuel in a standard 20 pound (9.07 kg) tank once the tank is hung from the scale. The fuel level is checked by viewing the red level indicator line, located on scale. When the indicator line is at the top, the tank is full (L). When it is at the bottom, the tank is empty (M) and needs to be removed to replace or refill.
Removal of the LP Tank
1) Confirm that the tank valve is fully closed. Close by turning valve clockwise (N).
2) Unscrew regulator coupling by turning counterclockwise by hand (0).
3) Loosen tank hand nut and turn tank lock up out of the way.
4) Lift tank off tank scale.
Additional Leak Check Precautions
The following fittings should be tested for gas leaks each time a tank is refilled and reinstalled:
- Where the regulator connects to the tank (H) and at the regulator (I).
Follow the instructions for "Checking for Gas Leaks".
Notification on the WEBER CONNECT Module

The WEBER CONNECT module will display a fuel level notification when an LP tank is installed to your fuel scale. Refer to "Using the WEBER CONNECT Module" section in this manual.
text_image
Technical diagram of a mechanical device with labeled parts and directional arrows indicating assembly or movement.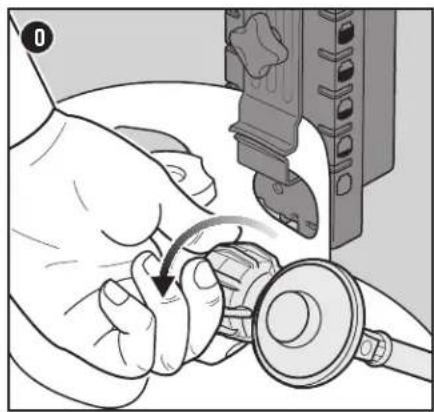
natural_image
Illustration of a hand using a tool to adjust or install a mechanical component, with no visible text or symbols.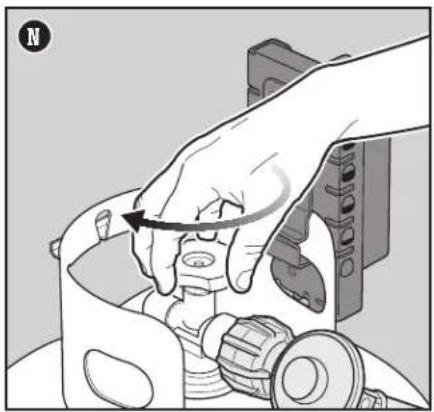
natural_image
Illustration of a hand adjusting a mechanical component with a circular arrow indicating rotation (no text or symbols present)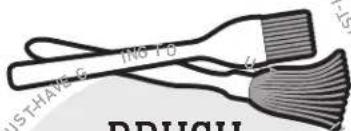
text_image
USTHANG ING 16 DRUGU
TONGS
Consider these to be an extension of your hand. The best tongs should have an effortless tension mechanism, comfortable hand grips, and a lock to keep them compact.
BRUSH AND MOP
Look for a basting brush with heat-resistant silicone bristles and a long handle, and a mop with long, cotton threads that sop up the thinner, vinegar-based sauces.
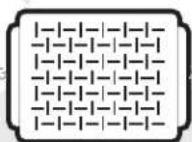
GRILLING PAN
Designed for food that is either too small or too delicate for the cooking grates, a perforated grilling pan keeps food right where it ought to be—on the grill, not in it.
The Very First Time You Grill
Perform an Initial Burn-Off
Heat the grill on the highest setting, with the lid closed, for at least 20 minutes prior to grilling for the first time.
Every Time You Grill
Meal-to-Meal Maintenance
The Meal-To-Meal Maintenance plan includes the following simple, yet important, steps that should always be performed prior to grilling.
Check for Grease
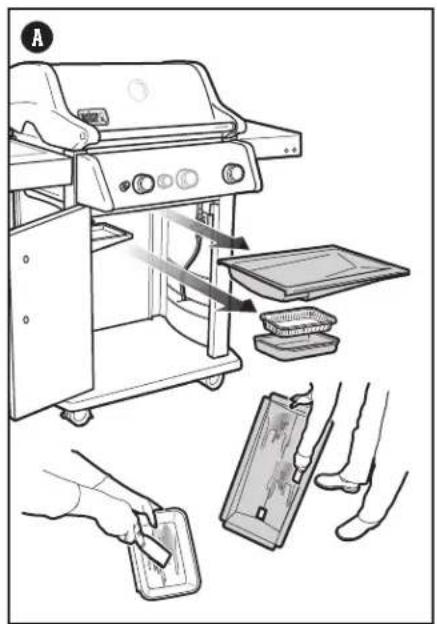
Your grill was built with a grease management system that funnels grease away from food and into a disposable container. As you cook, grease is channeled down the slide-out grease tray and into a disposable drip tray that lines the catch pan. This system should be cleaned each and every time you grill to prevent fires.
1) Confirm that the grill is off and cool.
2) Remove the slide-out grease tray by pulling the tray out of the cabinet (A). Remove excess grease with a plastic scraper.
3) Remove the catch pan. Check for excessive amounts of grease in the disposable drip pan that lines the catch pan. Discard disposable drip pan when necessary and replace with a new one.
4) Reinstall all components.
Inspect the Hose
Routine inspection of the hose is necessary.
1) Confirm that the grill is off and cool.
2) Check hose for any signs of cracking, abrasions, or cuts (B). If the hose is found to be damaged in any way, do not use the grill.
Preheat the Grill
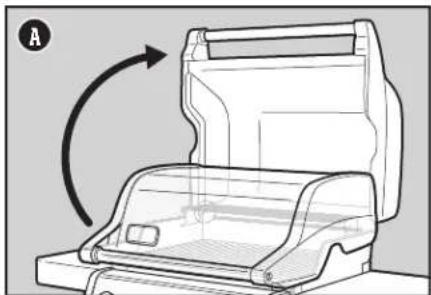
Preheating the grill is critical to successful grilling. Preheating helps to prevent food from sticking to the grate and gets the grate hot enough to sear properly. It also burns off residue of a previously cooked meal. 1) Open the grill lid.
2) Ignite your grill according to the ignition instructions in this Owner's Manual.
3) Close lid.
4) Preheat the grill with all burners on the start/high ① position for 15 minutes (C).
Clean the Cooking Grate
After preheating, any bits of food or debris left over from previous use will be easier to remove. Cleaned grates will also prevent your next meal from sticking.
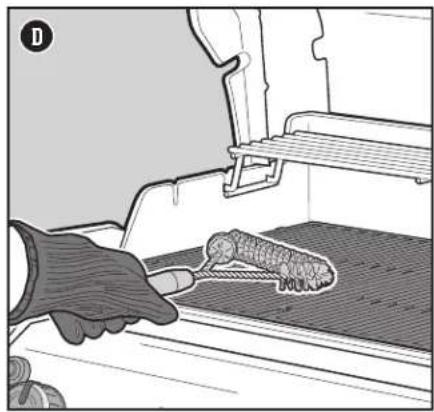
1) Brush the grates with a stainless steel bristle grill brush immediately after preheating (D).
text_image
Diagram illustrating a hair dryer setup with labeled components and actions for cleaning or packaging.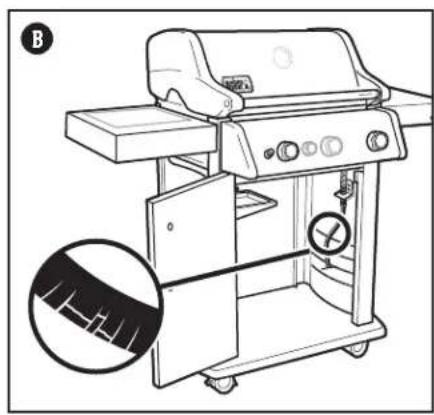
text_image
Technical diagram of a portable gas stove with labeled components and an inset showing a close-up of the interior panel.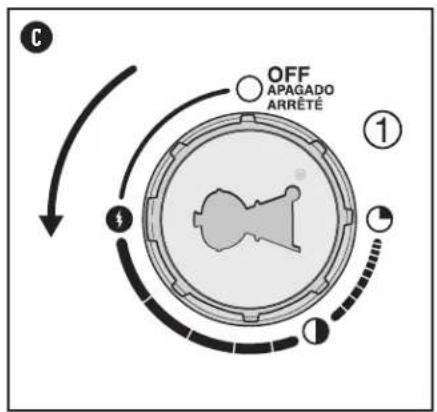
flowchart
graph TD
    A["OFF APAGADO ARRÊTÉ"] --> B((Circular dial))
    B --> C["Directional arrows: ①, ②"]
    C --> D["Directional arrows: ③"]
    D --> E["Directional arrows: ④"]
natural_image
Illustration of a hand using a tool to remove a textured object from a mechanical component (no text or symbols visible)△ DANGER: Do not line the slide-out grease tray or cookbox with aluminum foil.
△ DANGER: Check the slide-out grease tray and catch pan for grease build-up before each use. Remove excess grease to avoid a grease fire.
⚠ WARNING: Use caution when removing catch pan and disposing of hot grease.
⚠ WARNING: Use heat-resistant barbecue mitts or gloves when operating grill.
△ WARNING: Grill brushes should be checked for loose bristles and excessive wear on a regular basis. Replace brush if any loose bristles are found on cooking grates or brush. WEBER recommends purchasing a new stainless steel bristle grill brush at the beginning of every spring.
⚠ WARNING: If the hose is found to be damaged in any way, do not use the grill. Replace using only WEBER authorized replacement hose.
⚠ WARNING: Keep ventilation openings around tank clear and free of debris.
Igniting the Grill
Using the Crossover Ignition System to Ignite the Grill
The crossover ignition system ignites burner 1 furthest to the left with a spark from the igniter electrode. You generate the energy for the spark by pushing the igniter button. You will hear the igniter ticking. Burner(s) 2 (and 3) can be lit after burner 1 is lit. All burners should be lit for preheating, however, all burners do not have to be lit while grilling.
1) Open the grill lid (A).
2) Check that all burner control knobs are in the off O position. Check by pushing in and turning knobs clockwise (B).
Note: It is important that all burner control knobs are in the off O position before turning on the LP tank. If they are not, the flow limiting device built into the regulator will activate, limiting the flow of gas from the LP tank.
3) Turn the LP tank on by slowly turning the tank valve counterclockwise; wait 60 seconds (C).
Note: It is important that the LP tank is turned on slowly. If it is opened too quickly, the flow limiting device built into the regulator will activate, limiting the flow of gas from the LP tank.
4) Begin with burner 1 furthest to the left. Push the burner control knob in and turn it counterclockwise to the start/high ① position (D).
IMPORTANT: Always ignite burner 1 first.
The other burner(s) ignite from burner 1.
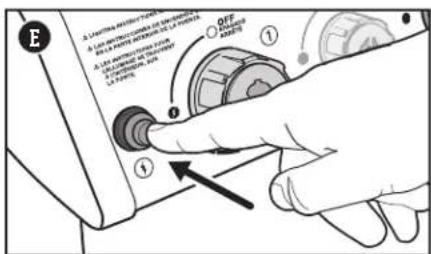
5) Push and hold the electronic ignition button (E). You will hear it ticking.
6) Check that burner 1 is lit by looking through the cooking grates and through the cutout in the FLAVORIZER BARS.
7) If the burner does not ignite, turn burner control knob to the off O position and wait five minutes to allow the gas to clear before attempting to light the burner again.
8) When burner 1 ignites, you can turn on burner 2 (and burner 3).
Should the burners fail to ignite using the electronic ignition, refer to the TROUBLESHOOTING section. There you will find instructions on igniting the grill with a match to help determine the exact problem.
To Extinguish Burners
1) Push each burner control knob in and then turn clockwise all the way to the off Position.
2) Turn gas supply off at the LP tank.
natural_image
Diagram of a mechanical device with a rotating arrow indicating rotation (no text or symbols present)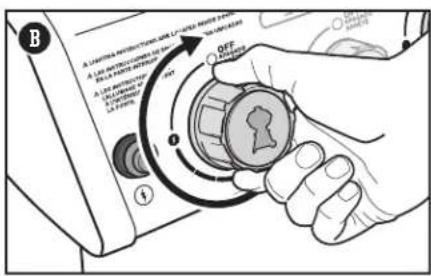
text_image
A SISTEMA PRODUCTION AND LIQUIDING SWITCH A 100% OFF OFF OFF OFF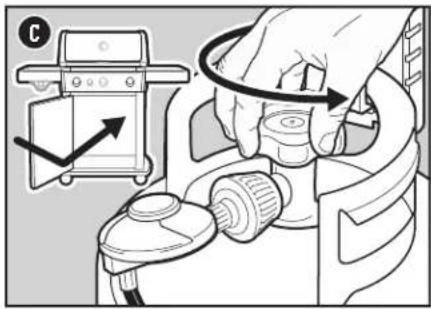
text_image
Diagram illustrating hand operating a device with directional arrows and a labeled control panel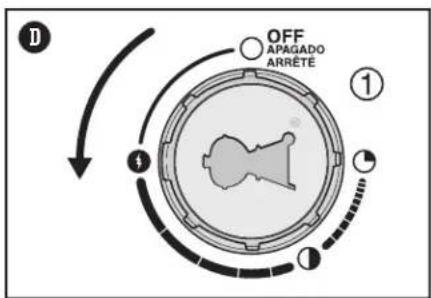
flowchart
graph TD
    A["OFF APAGADO ARRÊTE"] --> B["Process Step 1"]
    B --> C["Directional Arrow to Center"]
    C --> D["End"]
text_image
E A. LUTTER SWITCH ON CHAPES A. 100% OFF OFF OFF OFF ① ② ③ ④ ⑤ ⑥ ⑦ ⑧ ⑨ ⑩ ⑪ ⑫ ⑬ ⑭ ⑮ ⑯ ⑰ ⑱ ⑲ ⑳ ⑴ ⑵ ⑶ ⑷ ⑧ ⑨ ⑩ ⑪ ⑫ ⑬ ⑭ ⑮ ⑯ ⑰ ⑱ ⑲ ⑳ ⑪ ⑫ ⑬ ⑭ ⑮ ⑯ ⑰ ⑱ ⑲ ⑳ ⑪ ⑫ ⑬ ⑭ ⑮ ⑯ ⑰ ⑱ ⑲ ⑳ ⑪ ⑫ ⑬ ⑭ ⑮ ⑯⚠ WARNING: Open lid during ignition.
⚠ WARNING: Do not lean over open grill while igniting or cooking.
△ WARNING: If ignition does not occur within four seconds of attempting to light the first burner, turn the burner control knob to the off position. Wait five minutes to allow accumulated gas to dissipate, and then repeat the lighting procedure.
Integrated WEBER CONNECT Technology

WEBER CONNECT App
First things first.
Download the WEBER CONNECT app.
Open the app to receive:
- Flip and Serve Notifications
• Food Readiness Countdowns - Custom Food Doneness Alerts
• Step-by-step Grilling Assistance
• Propane Alert Notifications (US & Canada only)
Connecting Your Grill To Bluetooth® or Wi-Fi Network
To connect your WEBER grill via Bluetooth® or your local Wi-Fi network, follow these steps:
NOTE: WEBER recommends that your smart device be running the latest version of its operating system before attempting to connect your grill to Bluetooth® or your Wi-Fi network.
1) Push any button located on the temperature controller to turn ON the WEBER CONNECT module.
2) Verify that your smart device is connected to Bluetooth ^® or your local Wi-Fi network.
3) From your smart device, download the new WEBER CONNECT app from the App Store on Apple devices, or the Play Store on Android devices.
4) Open the WEBER CONNECT app and follow the in-app instructions for connecting to your WEBER grill.
NOTE: In order to successfully connect your smart device to your grill via a local Wi-Fi network, first make sure your grill is paired via Bluetooth® and that your grill is within range of your Wi-Fi router. If your attempts to connect have been unsuccessful, try moving the grill within range of the Wi-Fi router or adding a signal extender for a stronger signal.
Using the WEBER CONNECT Module
text_image
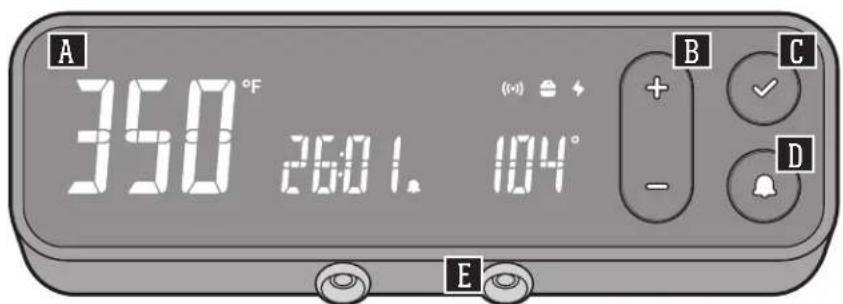
A 350 °F 2601. 104° B C + ✓ - D EModel: WC2 CONTROLLER
A Dashboard
The LED display dashboard on your module is where you can visually check temperatures, receive notifications, view connectivity status, and check the status of your cook.
B


Push the ⚠️ buttons to increase or decrease time or target temperatures. Push the button to confirm your selection.
C

Confirm Selection
After selecting a target time or temperature, push the 📊 button confirm the selection.
D

Timer
Push the ⏻ button to start a new timer or navigate between grill temperature and food temperature probes. Push the ╒ or ⏱ buttons to increase or decrease the desired time or target temperature. Push the ⏽ button to confirm a selection.
E Food Temperature Probes
Your new WEBER CONNECT module can handle up to two separate food temperature probes (one probe included) to gain superior control of your grill for perfect results every time.
NOTE: Download the WEBER CONNECT app to get the latest grill software and features.
| Notifications | |
| The WEBER CONNECT module display will show your fuel level when properly connected to your fuel scale. A full fuel level will display in green. A mid fuel level will display in yellow. A low fuel level will display in red. | |
| ((·)) | A green wireless symbol is shown on the WEBER CONNECT module display when connected to the WEBER CONNECT app via your local Wi-fi network.A blue wireless symbol is shown on the WEBER CONNECT module display when connected to the WEBER CONNECT app via Bluetooth ^9 . |
| A power indicator will display the battery power level of the batteries for the WEBER CONNECT module. Full battery level will appear in green. Low battery level will appear in red. | |
| To silence an audio notification, push the BELL button. |
Setting a Grill Temperature Notification
Please follow these steps for setting a notification to alert you when your grill has reached a target internal temperature:
1) Push any button located on the temperature controller to turn ON the WEBER CONNECT module.
2) Push the BELL button to activate grill temperature notification.
3) While the display is blinking, push the + or - buttons to set the target grill temperature. Push the CHECKMARK button to confirm your selection.
4) Reapcat steps 2 and 3 to update or set a new target temperature.
5) Once the grill reaches the target temperature, the BELL button will blink, the controller will ding, and if using the WEBER CONNECT app, you will receive a push notification on your smart device.
6) All of these WEBER CONNECT module functions can also be set wirelessly via Wi-fi or Bluetooth ^® from the WEBER CONNECT app on your smart device.
Grilling with Food Temperature Probes
Use the included food temperature probe to monitor your WEBER grill for the perfect food, every time.
Please follow these steps for using food temperature probes:
1) Once the grill has been preheated, open the grill lid and clean the cooking grates using a grill brush or scraper, then set the control knobs to the desired grill temperature.
2) Place your food on the grates.
3) Plug the food temperature probe(s) into the ports of the WEBER CONNECT module (F) and, using heat resistant grill mitts or gloves, route food temperature probe cables through the side channel on the grill (G).
4) Insert food probe(s) into the center of the thickest part of your food.
5) Close the grill lid.
6) Push any button located on the temperature controller to turn ON the WEBER CONNECT module.
7) Push the BELL button to navigate between grill temperature and food temperature probes 1 and 2.
8) Once you select which probe you are using, push the + or - buttons to set the target food temperature. Push the CHECKMARK button to confirm your selection.
9) Repeat steps 7 and 8 to update or set a new target temperature.
10) Once the probe reaches the target temperature, the BELL button will blink, the controller will ding, and if using the WEBER CONNECT app, you will receive a push notification on your smart device.
11) All of these WEBER CONNECT module functions can also be set wirelessly via Wi-fi or Bluetooth® from the WEBER CONNECT app on your smart device.
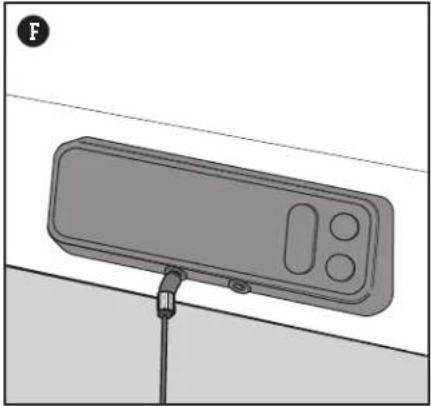
natural_image
Diagram of a device with four buttons and a vertical connector, mounted on a stand (no text or symbols)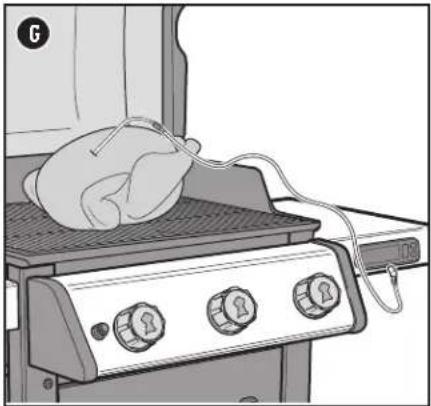
natural_image
Illustration of a grating machine with a bag placed on top, connected to wires and buttons (no text or symbols)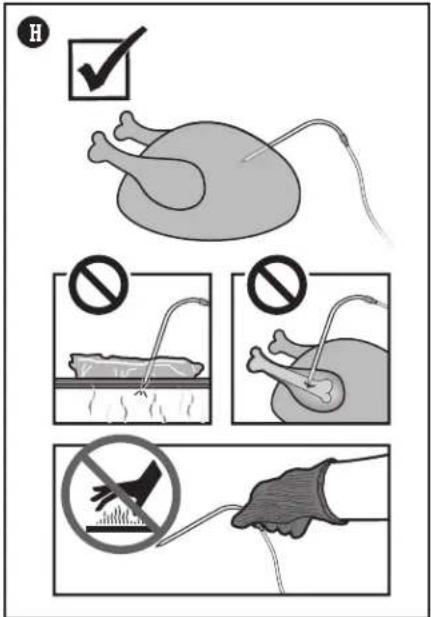
text_image
Medical illustration showing surgical procedure steps with checkmark and prohibition signs for catheter placementFood Temperature Probe Care
Cleaning the Food Temperature Probe
Clean probe before first use. The probe should be cleaned by wiping with water and a damp cloth.
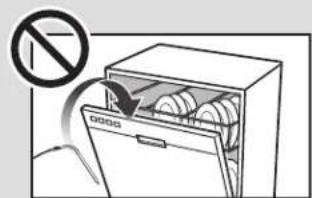
The food temperature probes are not dishwasher safe or waterproof and damage may result from excessive water exposure. Never submerge the probes directly in water or other liquids.
Storing Food Temperature Probe
Once cleaned, neatly wrap the probe when not in use and store indoors.
text_image
Diagram showing a washing machine with a 'No' symbol indicating no waste or discharge, and a label '0000' on the door.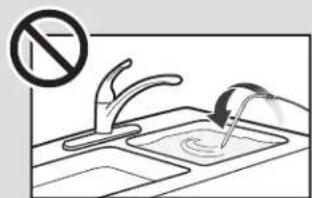
text_image
Safety warning illustration showing a hand washing a sink with a 'no' symbol above the faucet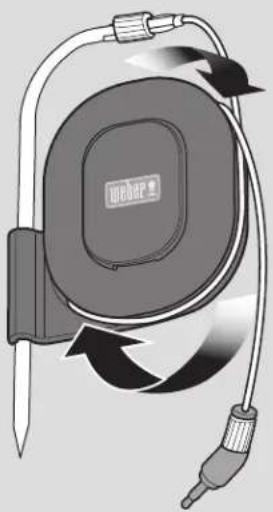
natural_image
Illustration of a medical or laboratory device with curved tubing and a central circular component labeled 'WebMap' (no text beyond label)WARNING
△ Risk of injury! The food temperature probes are very sharp. Please be careful when handling probes.
Risk of burns! Handling the food temperature probes without hand protection will result in severe burns. The colored probe indicators are not intended to be touched with bare hands while using the grill as they are not heat-insulated. Please wear heat-resistant gloves at all times while using this product in order to avoid being burned.
The Flame - Direct or Indirect
flowchart
graph TD
    A["High"] --> B["BURNER 1"]
    B --> C["Low State"]
    D["BURNER 2"] --> E["BURNER 1"]
    E --> F["Low State"]
    G["BURNER 3"] --> H["BURNER 2"]
    H --> I["Low State"]
    J["Low State"] --> K["BURNER 1"]
    K --> L["Low State"]
    M["BURNER 2"] --> N["BURNER 1"]
    N --> O["Low State"]
DIRECT HEAT SETUP
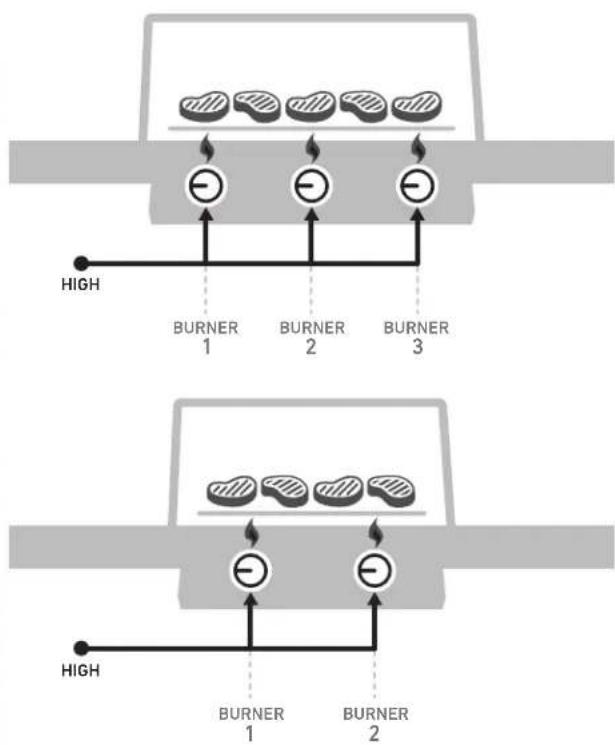
Use the direct method for small, tender pieces of food that take less than 20 minutes to cook, such as: hamburgers, steaks, chops, kabobs, boneless chicken pieces, fish fillets, shellfish, and sliced vegetables.
With direct heat, the fire is right below the food. It sears the surfaces of the food, developing flavors, texture, and delicious caramelization while cooking the food all the way to the center.
flowchart
graph TD
    A["OFF"] --> B["ON/OFF"]
    C["MEDIUM"] --> D["ON/OFF"]
    E["BURNER 1"] --> F["ON/OFF"]
    G["BURNER 2"] --> H["ON/OFF"]
    I["BURNER 3"] --> J["ON/OFF"]
    K["OFF"] --> L["ON/OFF"]
    M["MEDIUM"] --> N["ON/OFF"]
    O["BURNER 1"] --> P["ON/OFF"]
    Q["BURNER 2"] --> R["ON/OFF"]
INDIRECT HEAT SETUP
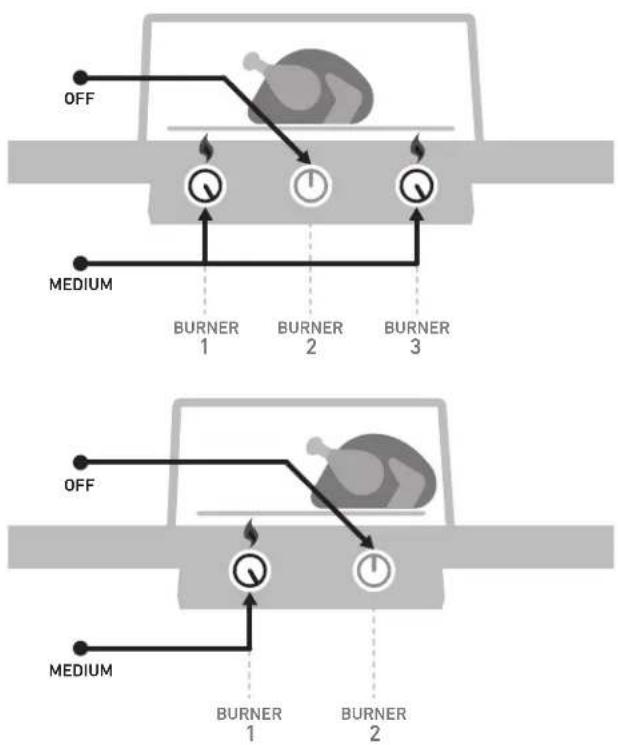
Use the indirect method for larger cuts of meat that require 20 minutes or more of grilling time, or for foods so delicate that direct exposure to the heat would dry them out or scorch them, such as: roasts, bone-in poultry pieces, whole fish, delicate fish fillets, whole chickens, turkeys, and ribs. Indirect heat can also be used for finishing thicker foods or bone-in cuts that have been soared or browned first over direct heat.
With indirect heat, the heat is on both sides of the grill, or off to one side of the grill. The food sits over the unit part on the cooking grate.
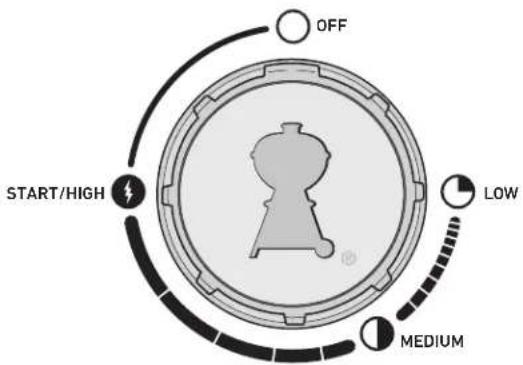
text_image
OFF START/HIGH LOW MEDIUMGrilling Do's and Don'ts
Preheat each and every time.
If the cooking grates aren't hot enough, food will stick, and you will likely never have a chance of searing properly or developing those handsome grill marks. Even if a recipe calls for medium or low heat, always preheat the grill on the highest setting first. Open the lid, turn up the heat, close the lid, and then let the cooking grate heat up for 15 minutes on high.
Don't grill on dirty grates.
Tossing food onto the cooking grates before they have been cleaned is never a good idea. Leftover "stuff" on the grates acts like glue, binding it to the grates and your new food. To avoid tasting last night's dinner on today's lunch, make sure you are grilling on a clean cooking grate. Once the grates are preheated, use a stainless steel bristle grill brush to make a clean, smooth surface.
Be present in the process.
Before firing up your grill, make sure that everything you need is within arm's reach. Don't forget your essential grilling tools, already oiled and seasoned food, glazes or sauces, and clean cooking platters for cooked food. Having to run back to your kitchen not only means missing out on the fun, but could also result in burning your food. French chefs call this "mise en place" (meaning, "put in place"). We call it "being present".
Create a little elbow room.
Packing too much food onto the cooking grates restricts your flexibility. Leave at least one-quarter of the cooking grates clear, with plenty of space between each food item, in order to get your tongs in there and easily move the food around. Sometimes grilling involves split-second decisions and the ability to jockey food from one area to another. So give yourself enough room to operate.
Try not to peek.
The lid on your grill is for more than just keeping the rain out. Most importantly, it's for preventing too much air from getting in, and too much heat and smoke from getting out. When the lid is closed, the cooking grates are hotter, the grilling times are faster, the smoky tastes are stronger, and the flare-ups are fewer. So put a lid on it!
Only flip once.
What's better than a juicy steak with a deep sear and plenty of beautifully caramelized bits? The key to accomplishing these results is to keep your food in place. Sometimes we have the tendency to flip our food before it reaches the desirable level of color and flavor. In nearly all cases, you should turn food just once. If fiddling with it more than that, you are probably also opening the lid too much, which causes its own set of problems. So step back and trust the grill.
Know when to tame the flame.
When grilling, sometimes the most important thing to know is when to stop. The most reliable way to test doneness of your food is to invest in an instant-read thermometer. This slim little gem will help you pinpoint that critical moment when your food is at its best.
Don't be afraid to experiment.
Back in the 1950s, grilling meant one thing: meat (and only meat) charred over open flames. The modern day backyard chef doesn't need a kitchen in order to prepare a full course meal. Use your grill to make char-grilled appetizers, sides, and even desserts. Register your grill to receive special content that will inspire you along the way. We'd love to join you on your grilling adventures.
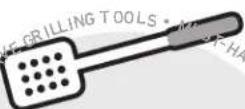
SPATULA
Look for a long-handled spatula designed with a bent (offset) neck so that the blade is set lower than the handle. This makes it easier to lift food off the cooking grates.
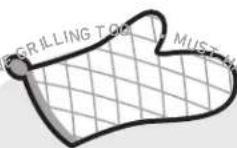
BARBECUE MITTS
When in doubt, wear them. The good ones are insulated and protect both hand and forearm.

TIMER
Avoid the disappointment of torching your dinner by simply setting a timer. Nothing fancy needed—just one that is reliable and easy to use.
Cleaning and Maintenance
Cleaning the Inside of the Grill
Over time, the performance of your grill can diminish if it has not been maintained properly. Low temperatures, uneven heat, and food sticking to cooking grates are all signs that cleaning and maintenance are overdue. When your grill is off and cool, start by cleaning the inside, from the top down. A thorough cleaning is recommended at least twice a year. Consistent use may require quarterly cleanings.
Cleaning the Lid
From time to time you may notice "paint-like" flakes on the inside of the lid. During use, grease and smoke vapors slowly change into carbon and deposit on the inside of your lid. These deposits will eventually peel, and looks very similar to paint. These deposits are non-toxic, but the flakes could fall onto your food if you do not clean the lid regularly.
1) Brush the carbonized grease from the inside of the lid with a stainless steel bristle grill brush (A). To minimize further build-up, the inside of the lid can be wiped with a paper towel after grilling while the grill is still warm (not hot).
Cleaning the Cooking Grates
If you have been cleaning your cooking grates as recommended, the debris on your grates should be minimal.
1) With grates installed, brush the debris off your cooking grate with a stainless steel bristle grill brush (B).
2) Take the grates out and set aside.
Cleaning the FLAVORIZER BARS
FLAVORIZER BARS catch drippings that smoke and sizzle, adding flavor to your food. Any drippings that are not vaporized by the FLAVORIZER BARS are funneled away from the burners. This helps prevent flare-ups inside of your grill, and protects the burners from getting clogged.
1) Scrape the FLAVORIZER BARS with a plastic scraper (C).
2) If necessary, brush the FLAVORIZER BARS with a stainless steel bristle grill brush.
3) Remove FLAVORIZER BARS and set aside.
Cleaning the Burners
Two areas on the burners that are key to optimum performance are the ports (small openings running along the length of the burners) and the spider/insect screens on the ends of the burner. Keeping these areas clean is essential for safe operation.
Cleaning the Burner Ports
1) Use a clean stainless steel bristle grill brush to clean the outside of the burners by brushing across the top of the burner ports (D). Do not brush lengthwise along the tube, as this will only brush debris from one port to another.
2) When cleaning burner 1, avoid damaging the ignition electrode by carefully brushing around it (E).
Cleaning the Spider Screens
1) Locate the ends of the burners on the underside of the control panel where they meet the valves.
2) Clean the spider/insect screens on each of the burners using a soft bristle brush (F).
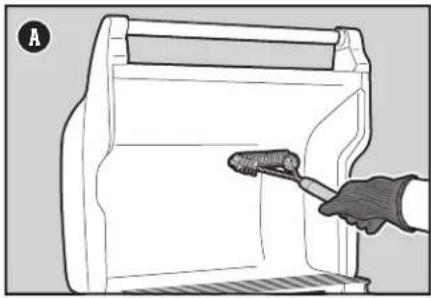
natural_image
Illustration of a hand using a tool to clean or inspect the interior of a plastic container (no text or symbols visible)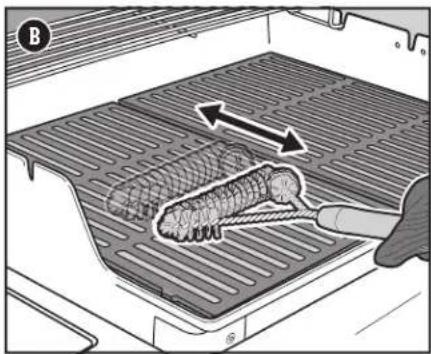
natural_image
Illustration of a hand using a tool to remove meat from a griddle inside a storage tray (no text or symbols)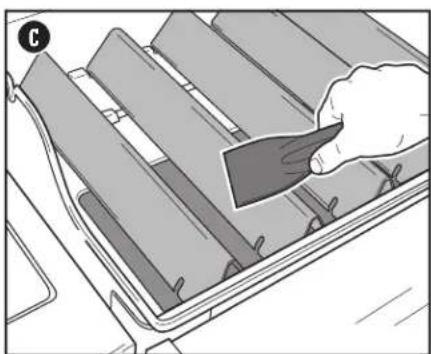
natural_image
Illustration of a hand using a tool to remove or remove a tray of rectangular objects (no text or symbols visible)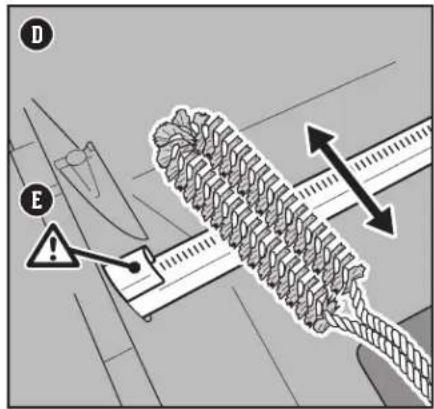
text_image
D E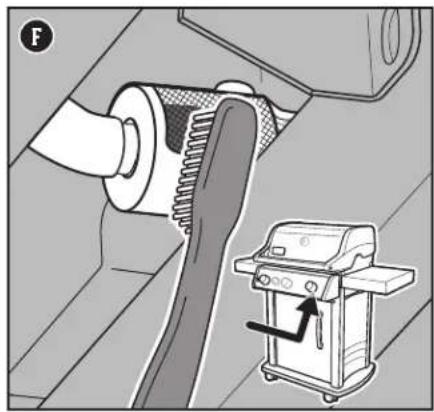
natural_image
Mechanical assembly diagram showing a gear meshing and a motor cart with an arrow indicating motion (no text or symbols)⚠ WARNING: Turn your grill off and wait for it to cool before thoroughly cleaning.
⚠ WARNING: Over time, the development of rough surfaces can form on the FLAVORIZER BARS. Wearing gloves is recommended when handling. Do not clean FLAVORIZER BARS or cooking grates in a sink, dishwasher, or self-cleaning oven.
⚠ WARNING: When cleaning the burners, never use a brush that has already been used to clean the cooking grates. Never put sharp objects into the burner port holes.
CAUTION: Do not place any grill components onto the side tables as they may scratch the paint or stainless steel surfaces.
△ CAUTION: Do not use any of the following to clean your grill: abrasive stainless steel polishes or paints, cleaners that contain acid, mineral spirits or xylene, oven cleaner, abrasive cleansers (kitchen cleansers), or abrasive cleaning pads.
Cleaning the Cookbox
Look inside the cookbox for any grease accumulation or leftover food particles. Excessive accumulation can cause a fire.
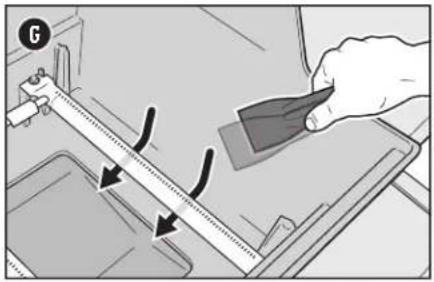
1) Use a plastic scraper to scrape debris off the sides and bottom of the grill into the opening in bottom of the cookbox (G). This opening leads debris into the slide-out catch pan.
Cleaning the Grease Management System
The grease management system consists of an angled slide-out grease tray and a catch pan (H). These components were designed to be easily removed, cleaned, and replaced; an essential step every time you prepare to grill. Instructions on inspecting the grease management system can be found in MEAL-TO-MEAL MAINTENANCE.
Cleaning the Outside of the Grill
The outside of your grill may include stainless steel, porcelain-enameled, and plastic surfaces. WEBER recommends the following methods based on the surface type.
Cleaning Stainless Steel Surfaces
Clean stainless steel using a non-toxic, non-abrasive stainless steel cleaner or polish designed for use on outdoor products and grills. Use a microfiber cloth to clean in the direction of the grain of the stainless steel. Do not use paper towels.
Note: Do not risk scratching your stainless steel with abrasive pastes. Pastes do not clean or polish. They will change the color of the metal by removing the top chromium oxide film coating.
Cleaning Painted, Porcelain-Enameled Surfaces and Plastic Components
Clean painted, porcelain-enameled and plastic components with warm soapy water, and paper towels or cloth. After wiping down the surfaces, rinse and dry thoroughly.
Cleaning the Outside of Grills that are in Unique Environments
If your grill is subject to a particularly harsh environment, you will want to clean the outside more often. Acid rain, pool chemicals, and salt water can cause surface rusting to appear. Wipe down the outside of your grill with warm soapy water. Follow up with a rinse and thorough drying. Additionally, you may want to apply a stainless steel cleaner weekly to prevent surface rust.
Cleaning the Inside of the Cabinet
Use a soft, damp cloth to wipe the interior of the cabinet. Be careful not to pull any of the wire connections when cleaning around the electronic components
CAUTION: NEVER SPRAY THE GRILL WITH A STEADY WATER STREAM SUCH AS FROM A GARDEN HOSE OR POWER WASHER. ELECTRONIC COMPONENTS COULD BECOME DAMAGED.
natural_image
Illustration of a hand using a tool to adjust or install a mechanical component, with arrows indicating motion direction (no text or symbols present)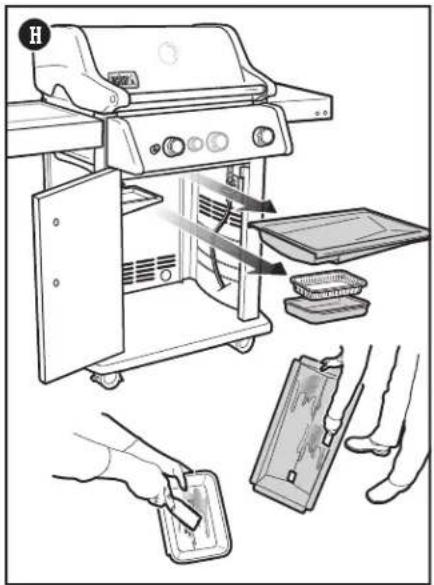
text_image
Diagram illustrating a kitchen appliance inspection process with labeled components and hand-drawn instructions for cleaning or repair.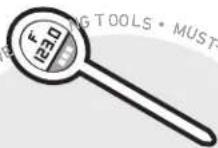
THERMOMETER
Small and relatively inexpensive, this gadget is essential for quickly gauging the internal temperature of the meat when grilling.
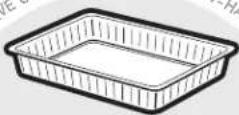
FOIL PANS
Perfect for lining the catch pan to make cleanup convenient and easy.
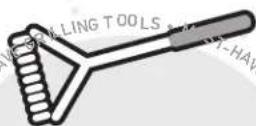
GRILL BRUSH
A must-use before you even dream of grilling. A quick once-over on hot grates prevents the charred remains of meals past from sticking to your meals present.
GRILL WILL NOT IGNITE
SYMPTOM
- Burner does not ignite when following the electronic ignition instructions in the "Operation" section of this Owner's Manual.
CAUSE SOLUTION
| There is a problem with gas flow. | If the grill will not ignite, the first step is to determine if there is gas flowing to the burners. To check this, follow the instructions below for "Using a Match to Determine if there is Gas Flow to the Burners."If match lighting IS NOT successful, follow the gas flow troubleshooting suggestions on the next page. |
| There is a problem with the electronic ignition system. | If the grill will not ignite, the first step is to determine if there is gas flowing to the burners. To check this, follow the instructions below for "Using a Match to Determine if there is Gas Flow to the Burners."If match lighting IS successful, follow the instructions below for "Checking the Components of the Electronic Ignition System." |
Using a Match to Determine if there is Gas Flow to the Burners
1) Open the grill lid.
2) Check that all burner control knobs are in the off O position. Check by pushing in and turning knobs clockwise.
Note: It is important that all burner control knobs be in the off O position before you turn on the LP tank. If they are not, the flow limiting device built into the regulator will activate, limiting the flow of gas from the LP tank.
3) Turn the LP tank on by slowly turning the tank valve counterclockwise: wait 60 seconds.
Note: it is important that the LP tank is turned on slowly. If it is opened too quickly, the flow limiting device built into the regulator will activate, limiting the flow of gas from the LP tank.
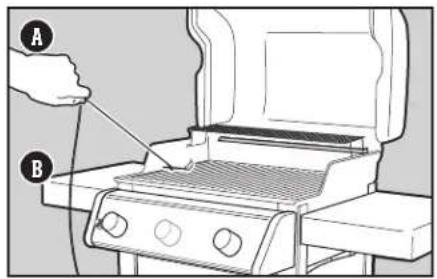
4) Begin with burner 1, furthest to the left. Put match in the matchstick holder and strike match. Insert lit match down through the cooking grates, past the FLAVORIZER BARS and next to the burner (A).
5) Push the burner control knob in and turn it counterclockwise to the start/high ① position.
6) Check that the burner is lit by looking through the cooking grates and through the cutout in the FLAVORIZER BARS (B).
7) If the burner does not ignite within 4 seconds, turn burner control knob to the off ○ position and wait five minutes to allow the gas to clear before attempting to light the burner again. If repeated attempts fail, follow the gas flow troubleshooting instructions on the next page.
8) If the burner ignites, the problem lies in the ignition system. Follow the instructions for "Checking the Components of the Electronic Ignition System."
9) After burner 1 ignites, you can turn on burner 2 (and burner 3).
Checking the Components of the Electronic Ignition System
When pressing the ignition button you should hear a ticking sound. If you cannot hear the ticking sound, check the battery, then check the wires.
Checking the Battery
There are three potential issues with the battery that supplies the power to your ignition module that need to be checked:
1) Some batteries have a plastic protective wrap around them. (Do not confuse this plastic with the battery label.) Check that this plastic wrap is removed.
2) Confirm that the battery is installed correctly (C).
3) If the battery is old, replace it with a new battery.
Checking the Wires
There are two potential trouble spots that need to be checked:
1) Check that the ignition wires are connected securely to the terminals on the ignition button under the control panel.
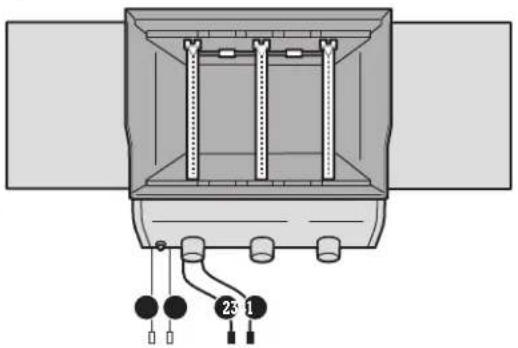
2) Make sure the ignition wires are properly attached to the ignition module. The wire terminals are color coded to correspond with the terminals on the ignition module. The number of wires will vary per model.
text_image
A B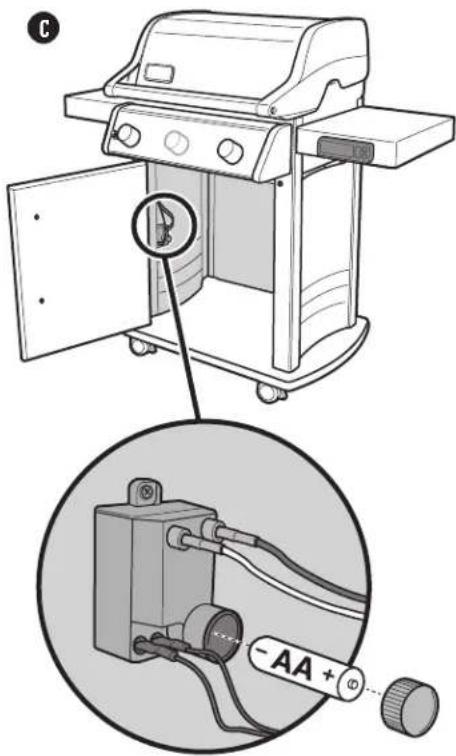
text_image
Technical diagram showing a gas stove with labeled components and a close-up of its internal wiring, including a battery labeled 'AA'.
REPLACEMENT PARTS
To obtain replacement parts, contact the local retailer in your area or log onto weber.com.
Igniter Module Wire Chart
text_image
Technical diagram of a mechanical or electrical component with labeled parts and connection points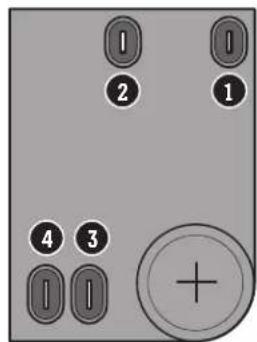
text_image
1 2 1 4 3 +GAS FLOW
SYMPTOM
- Grill does not reach desired temperature or heats unevenly.
• One or more of the burners fail to ignite. - Flame is low when burner is on high position.
• Flames do not run the whole length of the burner. - Burner flame pattern is erratic.
CAUSE SOLUTION
The "flow limiting device" has been activated. This safety feature built into the regulator restricts the gas flow in the event of a gas leak. You can inadvertently activate this safety feature without having a gas leak. This typically occurs when you turn on the gas at the LP tank and one or more of the control knobs are not in the off position. It may also occur if you turn on the LP tank too quickly.
Reset the "flow limiting device" by closing the LP tank valve and turning all the burner control knobs to the off Position. Wait five minutes to allow accumulated gas to dissipate, then ignite the grill again following the instructions in the "Operation" section.
The LP tank is low or empty. Refill LP tank.
Fuel hose is bent or kinked. Straighten fuel hose.
Burner ports are dirty. Clean burner ports. Refer to "Cleaning the
Burner Ports."
SYMPTOM
- Gas is smelled in conjunction with burner flames that appear yellow and lazy.
CAUSE SOLUTION
Spider screens on the burners are obstructed. Clean spider screens. Refer to "Cleaning the Spider Screens" in the Product Care section. Also refer to the illustrations and information in this section about proper flame pattern and spider screens.
SYMPTOM
• The smell of gas and/or a light hissing sound.
CAUSE SOLUTION
The internal rubber seal in the LP tank valve could be damaged. Extinguish any open flame. Shut off gas to the appliance (grill). Inspect the rubber seal for damage. If damaged, return tank to place of purchase.
Connection between regulator and LP tank could be incomplete. Extinguish any open flame. Shut off gas to the appliance (grill). Refer to LP TANK INSTALLATION & LEAK CHECKING section of your owner's manual.
GREASY GRILL (Peeling Paint & Flare-Ups)
SYMPTOM
• Inside of lid appears to have the appearance of peeling paint.
CAUSE SOLUTION
The flakes you see are accumulated cooking vapors that have turned into carbon. This happens over time after repeated use of your grill. This is not a defect. Clean the lid. Refer to the "Product Care" section.
SYMPTOM
- Experiencing flare-ups when grilling or preheating.
CAUSE SOLUTION
There is leftover food from the previous meal. Always preheat the grill on the highest setting for 15 minutes.
The inside of the grill needs to be cleaned thoroughly. Follow the steps in the "Cleaning and Maintenance" section to clean the grill inside from the top down.
⚠ WARNING: Do not attempt to make any repair to gas carrying, gas burning, ignition components or structural components without contacting Weber-Stephen Products LLC, Customer Service Department.
⚠ WARNING: Failure to use genuine Weber-Stephen parts for any repair or replacement will void all warranty protection.
△ CAUTION: The burner tube openings must be positioned properly over the valve orifices.
Proper Burner Flame Pattern
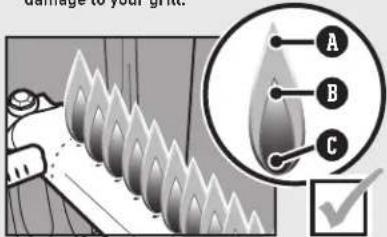
The burners in your grill were factory set for the correct air and gas mixture. When the burners are performing correctly, you will see a specific flame pattern. The tips may occasionally flicker yellow (A), with a descending light blue (B) to dark blue flame (C).
△ WARNING: Blocked and dirty ports can restrict full gas flow, resulting in a fire (D) in and around the gas valves, causing serious damage to your grill.
text_image
damage to your grill A B C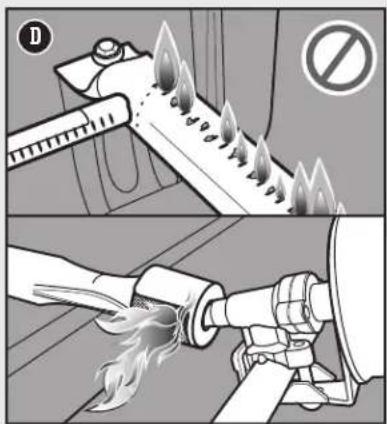
text_image
Diagram illustrating fire damage and explosion hazard in a vehicle, showing tool, no sign, and flame impactSpider Screens
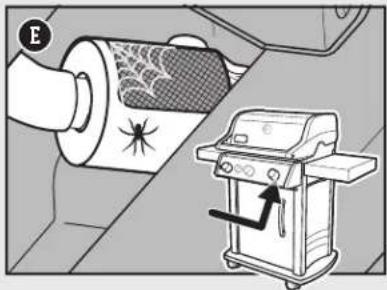
The combustion air openings of the burners (E) are fitted with stainless steel screens to prevent spiders and other insects from spinning webs and building nests inside the burners. Additionally, dust and debris can accumulate on the outside of the spider/insect screen and obstruct the oxygen flow to the burners.
text_image
Diagram illustrating a process with a pipe emitting a spider defect and a gas stove with an upward arrow indicating airflow or heat.CALL CUSTOMER SERVICE
If you are still experiencing any problems, contact the Customer Service Representative in your area using the contact information on weber.com.
natural_image
Diagram of a mechanical device with cylindrical components and a rectangular unit, no visible text or symbolsB
LOSS OF POWER
SYMPTOM
- WEBER CONNECT module does not turn on.
CAUSE SOLUTION
Wires are disconnected. Check that all of the wires are connected securely
to the terminals on the back of the WEBER CONNECT module and to the control board inside the cabinet. Refer to the "WEBER CONNECT Wire Chart".
Batteries are old. Install new batteries. Refer to "Replacing Batteries
for the WEBER CONNECT Module ^® on this page.
Alternative external power bank may be depleted.
If you are using an optional external power bank, sold separately, disconnect it from the control board and check the manufacturer's operating guide for information on recharging. Refer to "Connecting an External Power Bank".
Replacing Batteries for the WEBER CONNECT Module
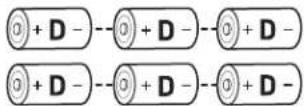
Use alkaline batteries only. Do not mix old and new batteries or different types of batteries (standard, alkaline, or rechargeable). If you do not plan to use the grill for a month or more, remove the batteries.
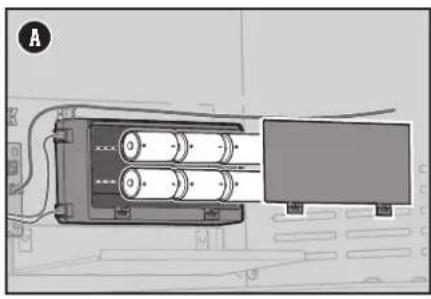
1) Locate the battery housing on the inside of the cabinet on the bottom left side.
2) Press the tabs on the battery door to open (A).
3) Replace six D batteries (B).
WEBER CONNECT IS EXPERIENCING CONNECTIVITY ISSUES
SYMPTOM
- Bluetooth® is having trouble maintaining connectivity or pairing with a smart device.
CAUSE SOLUTION
Bluetooth® is a short range signal only. When the WEBER CONNECT module is on, it is ready
to pair. Make sure that Bluetooth® on the smart device is turned on and that the device is near the grill.
Bluetooth ^® has already paired to another smart device.
If the Bluetooth ^® indicator light is on but is not flashing, it means that it is already paired to a smart device. Turn off Bluetooth ^® on any smart device that you do not wish to have paired to the grill.
SYMPTOM
- Wi-Fi is having trouble maintaining connectivity with a Wi-Fi network.
CAUSE SOLUTION
Grill is out of range of the Wi-Fi network signal. In order to
successfully connect your smart device
to your local Wi-Fi network, your grill must be within range of your Wi-Fi router. If your attempts to connect have been unsuccessful, try moving the grill within range of the Wi-Fi router or adding a signal extender for a stronger signal.
ERROR CODE APPEARS ON DISPLAY
SYMPTOM
- During start-up or barbecuing, an error code appears on the digital display.
CAUSE SOLUTION
The WEBER CONNECT module is a device that is sensitive to certain external factors. Variations in power supply or radio frequency may affect operation.
Contact the Customer Service Representative in your area using the contact information on weber.com.
Auxiliary Power Input
Connecting an External Power Bank
As an alternative to using six D alkaline batteries to power the WEBER CONNECT Module during your cook, you can instead connect an external rechargeable power bank, sold sperately.
The power bank should have a minimum capacity of 10,000 mA hours with a 5 volt micro USB connector. The shelf inside the grill cabinet can accept a power bank with a maximum dimension of 4" wide x 7" deep x 1.25" high.
To use an external power bank, it is not necessary to remove the alkaline batteries from the battery pack. Instead, after simply connecting the power bank to the control board with the micro USB connector, the WEBER CONNECT module will draw power directly from the power bank.
1) Open the grill cabinet.
2) Place the power bank on the small shelf at the bottom of the side panel, adjacent to the battery pack (A).
3) Connect the micro USB cable to the bottom of the control board (B).
4) Turn the power bank on. Refer to the manufacturer's operating guide for instructions on fully charging the power bank. Additional information regarding the use of a power bank:
- Do not plug the power bank into an exterior outlet while it is connected to the grill.
- Disconnect the power bank from the grill and bring it indoors after use.
- The power bank will not supply power to the burner igniters. Refer to "Checking the Components of the Electronic Ignition System".
- The micro USB connector on the control board is not for data transmission.
- Do not store the power bank outside.
• Fully recharge the power bank before every use.
- Use only if outdoor temperature is between 10^ (-12^) to 100^ (38^) unless the power bank is rated for higher and/or lower temperature conditions. Follow the manufacturer's operating guidelines..
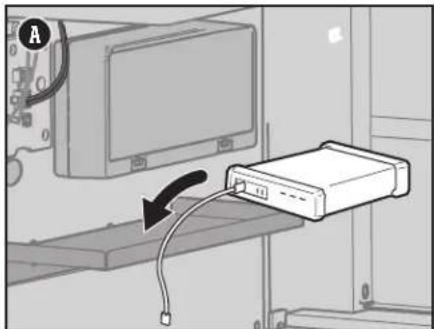
natural_image
Diagram showing a device being connected via cable to a monitor, with no visible text or symbols.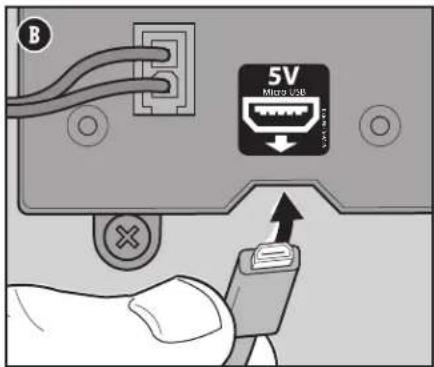
text_image
B 5V Micro USB USBWEBER CONNECT Wire Chart
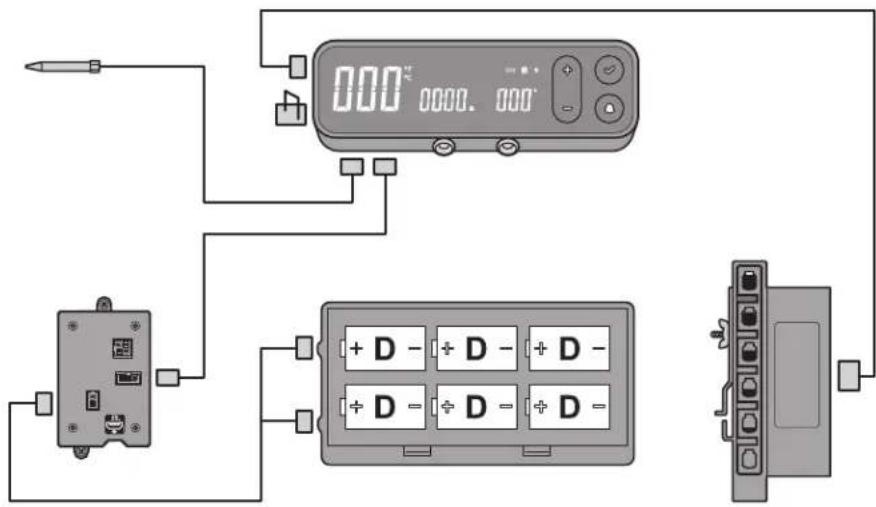
text_image
000° 0000. 000° + D - + D - + D - + D - + D - + D -Grilling Guide
Type Thickness/Weight Approximate Total Grill Time
| RED MEAT | ||
| Steak: New York strip, porterhouse, rib-eye, T-bone, and fillet mignon (tenderloin) | 3⁄4 inch (19 mm) thick 4 to 6 minutes direct high heat | |
| 1 inch (25 mm) thick 6 to 8 minutes direct high heat | ||
| 2 inches (5 cm) thick | 14 to 18 minutes sear 6 to 8 minutes direct high heat, then 8 to 10 minutes indirect high heat | |
| Flank Steak | 11⁄2 to 2 pounds (0.68 - 0.91 kg), 3⁄4 inch (19 mm) thick | 8 to 10 minutes direct medium heat |
| Ground Beef Patty | 3⁄4 inch (19 mm) thick | 8 to 10 minutes direct medium heat |
| Tenderloin 3 to 4 pounds (1,36 -1,81 kg) | 45 to 60 minutes 15 minutes direct medium heat, then 30 to 45 minutes indirect medium heat | |
| PORK | ||
| Bratwurst: fresh 3 ounce (85 g) link 20 to 25 minutes direct low heat | ||
| Chop: boneless or bone in | 3⁄4 inch (19 mm) thick 6 to 8 minutes direct high heat | |
| 11⁄4 to 11⁄2 inches (3.18 - 3.81 cm) thick | 10 to 12 minutes sear 6 minutes direct high heat, then 4 to 6 minutes indirect high heat | |
| Ribs: baby back, spareribs | 3 to 4 pounds (1.36 -1.81 kg) | 11⁄2 to 2 hours indirect medium heat |
| Ribs: country-style, bone in | 3 to 4 pounds (1.36 -1.81 kg) | 11⁄2 to 2 hours indirect medium heat |
| Tenderloin 1 pound (0.45 kg) | 30 minutes sear 5 minutes direct high heat, then 25 minutes indirect medium heat | |
| POULTRY | ||
| Chicken Breast: boneless, skinless | 6 to 8 ounces (170-226 g) | 8 to 12 minutes direct medium heat |
| Chicken Thigh: boneless, skinless | 4 ounces (113g) | 8 to 10 minutes direct medium heat |
| Chicken Pieces: bone in, assorted | 3 to 6 ounces (85-170 g) | 36 to 40 minutes 6 to 10 minutes direct low heat, then 30 minutes indirect medium heat |
| Chicken: whole | 4 to 5 pounds (1.81-2.27 kg) | 1 to 11⁄4 hours indirect medium heat |
| Cornish Game Hen | 11⁄2 to 2 pounds (0.68-0.91 kg) | 60 to 70 minutes indirect medium heat |
| Turkey: whole, unstuffed | 10 to 12 pounds (4.54-5.44 kg) | 2 to 21⁄2 hours indirect medium heat |
| SEAFOOD | ||
| Fish, Fillet, or Steak: halibut, red snapper, salmon, sea bass, swordfish, and tuna | 3⁄4 to 1⁄2 inch (6.35-12.7 mm) thick | 3 to 5 minutes direct medium heat |
| 1 to 11⁄2 inches (25-31 mm) thick | 10 to 12 minutes direct medium heat | |
| Fish: whole | 1 pound (0.45 kg) | 15 to 20 minutes indirect medium heat |
| 3 pounds (1.36 kg) 30 to 45 minutes indirect medium heat | ||
| Shrimp | 11⁄2 ounces (42.5 g) | 2 to 4 minutes direct high heat |
| VEGETABLES | ||
| Asparagus | 1⁄2 inch (12.7 mm) diameter | 6 to 8 minutes direct medium heat |
| Corn | in husk | 25 to 30 minutes direct medium heat |
| husked | 10 to 15 minutes direct medium heat | |
| Mushroom | shiitake or button | 8 to 10 minutes direct medium heat |
| portobello | 10 to 15 minutes direct medium heat | |
| Onion | halved | 35 to 40 minutes indirect medium heat |
| 1⁄2 inch (12.7 mm) slices | 8 to 12 minutes direct medium heat | |
| Potato | whole | 45 to 60 minutes indirect medium heat |
| 1⁄2 inch (12.7 mm) slices | 9 to 11 minutes parboil 3 minutes, then 6 to 8 minutes direct medium heat | |
The cuts, thicknesses, weights, and grilling times above are meant to be guidelines. Factors such as altitude, wind, and outside temperature can affect cooking times. Two rules of thumb: Grill steaks, fish fillets, boneless chicken pieces, and vegetables using the direct method for the time given on the chart (or to the desired doneness), turning food once halfway through grilling time. Grill roasts, whole poultry, bone-in poultry pieces, whole fish, and thicker cuts using the indirect method for the time given on the chart (or until an instant-read thermometer registers the desired internal temperature). Cooking times for beef and lamb use the USDA's definition of medium doneness unless otherwise noted. Before carving, let roasts, larger cuts of meat, and thick chops and steaks rest for 5 to 10 minutes after cooking. The internal temperature of the meat will rise by 5 to 10 degrees during this time.
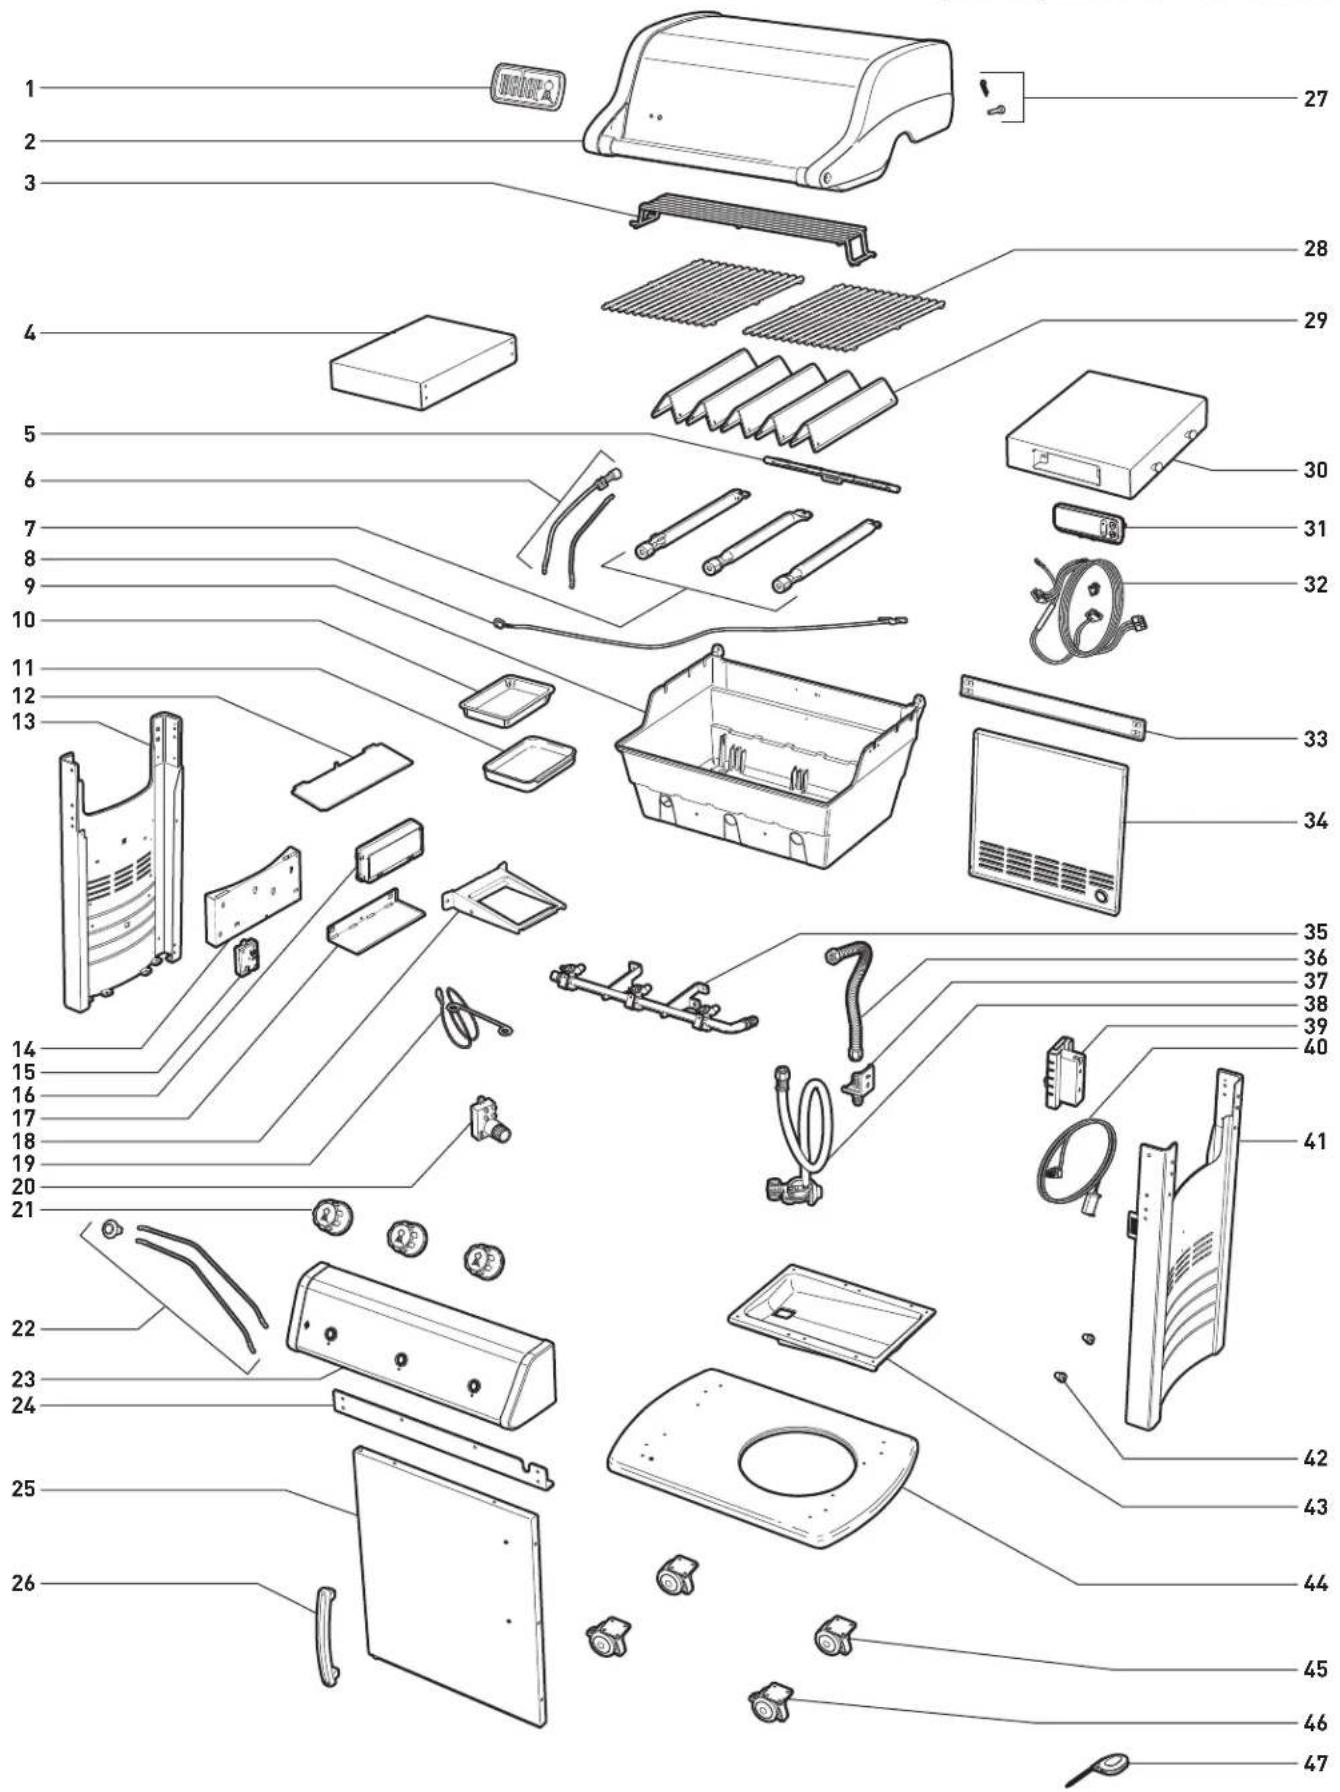
text_image
Exploded view diagram of a refrigerator assembly with numbered parts for identification



weber.com
U.S.:
1-800-446-1071
Canada:
1-800-446-1071
Compliance Statements for WC2 CONTROLLER
FCC Compliance: This equipment has been tested and found to comply with the limits for a Class B digital device, pursuant to part 15 of the FCC rules. These limits are designed to provide reasonable protection against harmful interference in a residential installation. This equipment generates, uses and can radiate radio frequency energy and, if not installed and used in accordance with the instructions, may cause harmful interference to radio communications. However, there is no guarantee that interference will not occur in a particular installation. If this equipment does cause harmful interference to radio or television reception, which can be determined by turning the equipment off and on, the user is encouraged to try to correct the interference by one or more of the following measures: (1) Reorient or relocate the receiving antenna. (2) Increase the separation between the equipment and receiver. (3) Connect the equipment into an outlet on a circuit different from that to which the receiver is connected. (4) Consult the manufacturer, dealer or an experienced radio/TV technician for help. Changes or modifications not expressly approved by Weber could void the user's authority to operate this device.
FCC Radio Frequency (RF) Exposure: This equipment complies with FCC and ISED Canada radiation exposure limits set forth for an uncontrolled environment. The user should avoid prolonged exposure within 20cm of the antenna, which may exceed the FCC or RSS-102 radio frequency exposure limits.
IC Compliance: This device contains license-exempt transmitter(s)/receiver(s) that comply with Innovation, Science and Economic Development Canada's license-exempt RSS(s). Operation is subject to the following two conditions: (1) This device may not cause interference; and (2) This device must accept any interference, including interference that may cause undesired operation of the device.
IFETEL Compliance: Operation of this unit is subject to the following two conditions: (1) this unit or device may not cause harmful interference, and (2) this unit or device must accept any interference, including interference that may cause undesired operation.
CAN ICES-3B/NMB-3B
FCC: 2AHSR-NBE2N001
IC: 21267-NBE2N001
HVIN: WC2 Controller / PMN WC2 Controller


Bluetooth®
SMART

Apple and the Apple logo are trademarks of Apple Inc., registered in the U.S. and other countries. App Store is a service mark of Apple Inc. Android is a trademark of Google LLC. Google Play and the Google Play logo are trademarks of Google LLC.
The Bluetooth ^® word mark and logos are registered trademarks owned by Bluetooth SIG, Inc. and any use of such marks by Weber-Stephen Products LLC is under license. Other trademarks and trade names are those of their respective owners.
SPIRIT
EX-315·SX-315
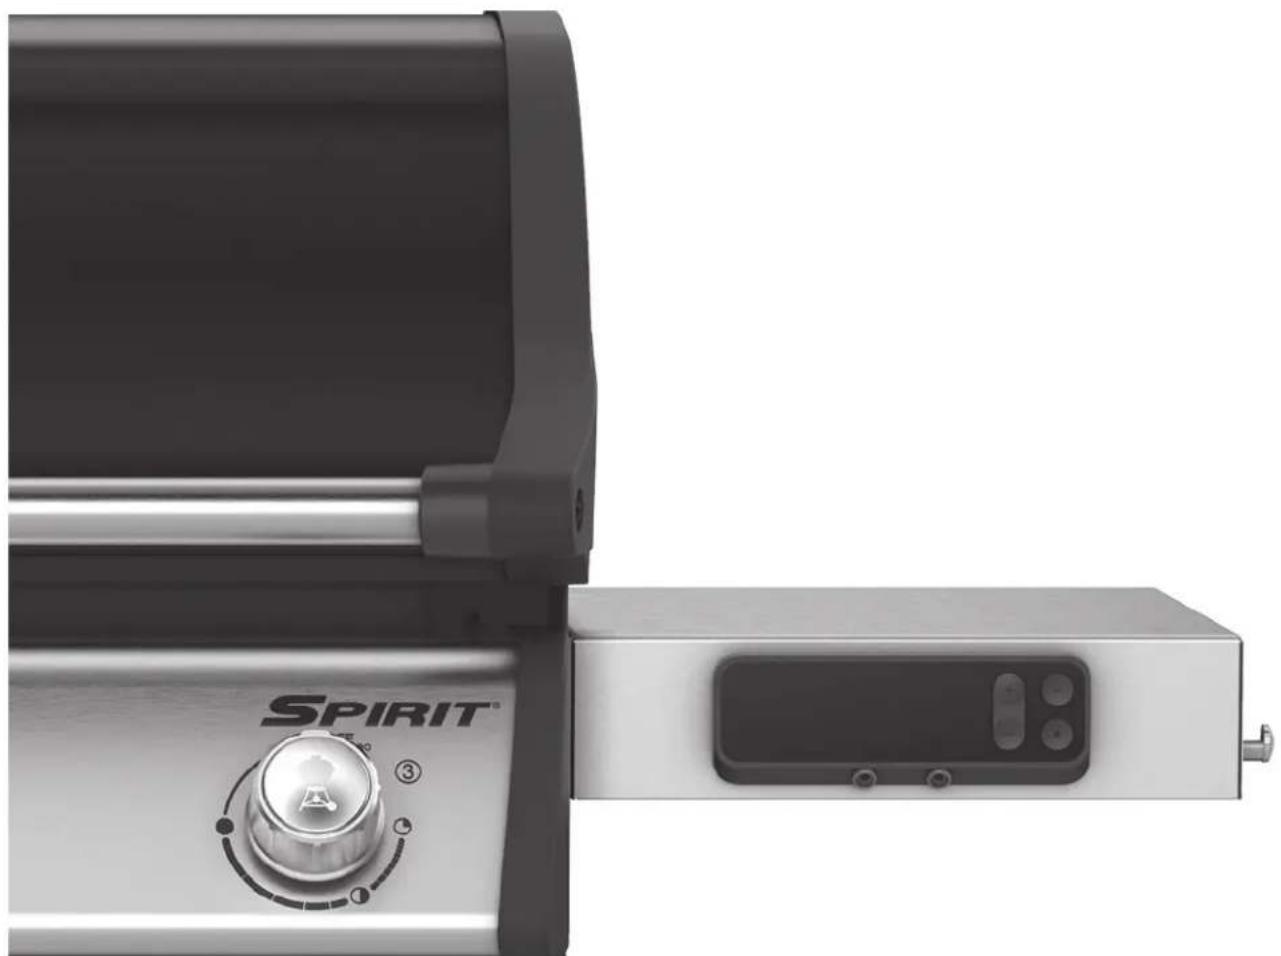
natural_image
Close-up of a Spirit brand electronic device showing a rotary knob and control panel (no text or symbols visible)REGÍSTRESE HOY MISMO
Weber-Stephen Products LLC
text_image
Diagram of a gas stove with labeled components A through F, showing open chamber and internal grating structure.A WEBER CONNECT
natural_image
Mechanical assembly diagram showing two stages of a device with arrows indicating motion (no text or symbols)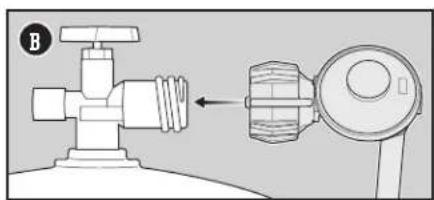
natural_image
Diagram of a valve and pump assembly with directional arrow (no text or labels)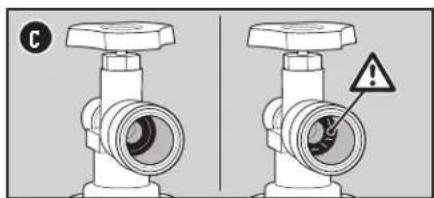
text_image
Diagram showing two identical valve configurations with a warning symbol indicating a defect or hazard.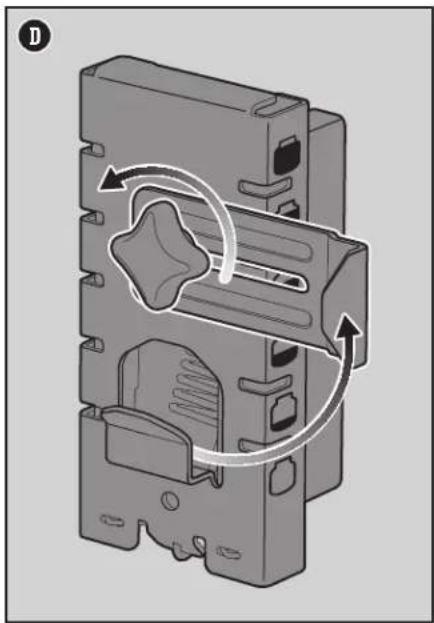
natural_image
Mechanical diagram showing a piston-cranked device with rotational flow arrows indicating motion (no text or symbols)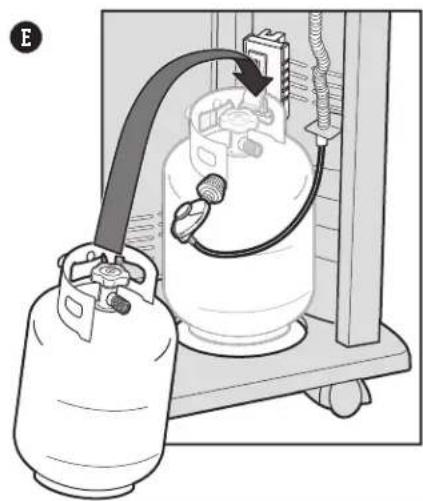
natural_image
Diagram of a gas cylinder setup with tubing and a valve, no text or symbols present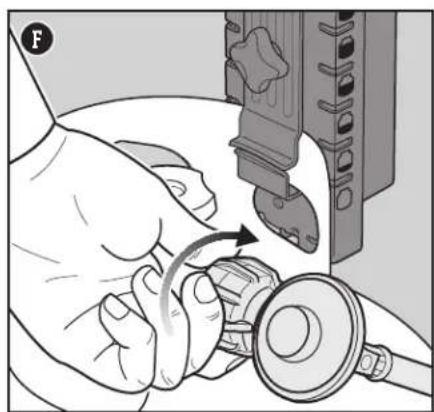
natural_image
Close-up of hands performing a mechanical repair operation with a tool (no visible text or symbols)natural_image
Illustration of a hand pouring liquid into a container with a mechanical clamp and tubing (no text or symbols)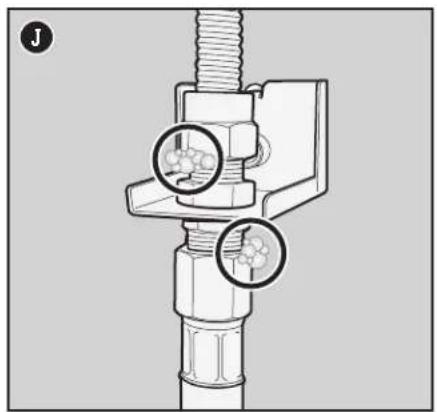
natural_image
Mechanical assembly diagram showing a bolt and threaded component with two circular insets highlighting internal features (no text or symbols)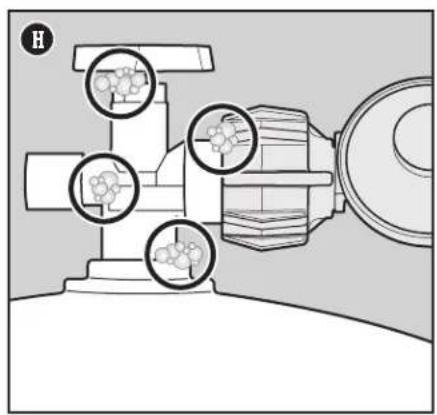
natural_image
Technical diagram of a mechanical device with circular insets showing internal components (no text or labels)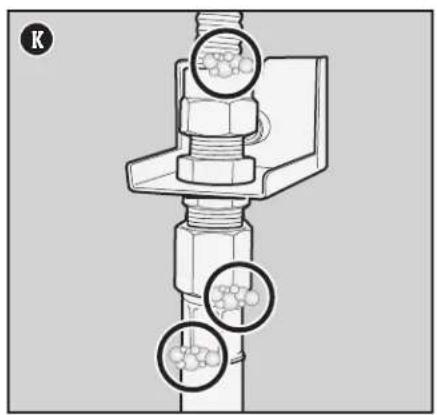
natural_image
Mechanical assembly diagram showing bolted joint with two circular insets highlighting internal components (no text or labels)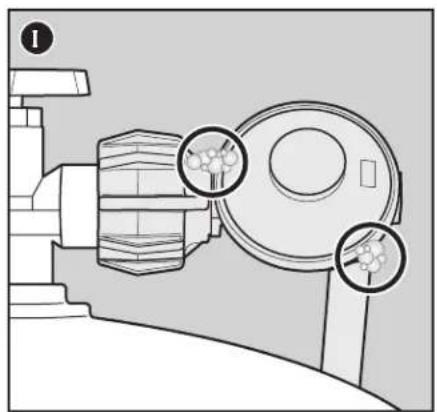
natural_image
Technical line drawing of a mechanical device with two circular insets showing internal components (no text or symbols)text_image
Technical diagram of a mechanical device with labeled parts and directional arrows indicating assembly or movement.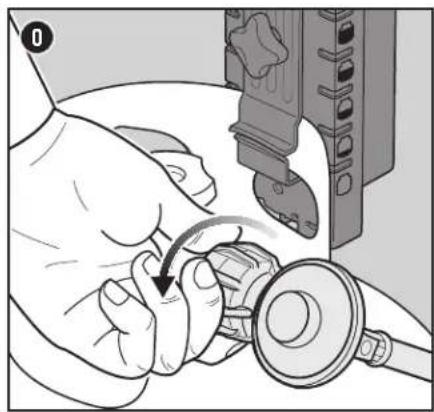
natural_image
Illustration of a hand using a tool to adjust or install a mechanical component, with no visible text or symbols.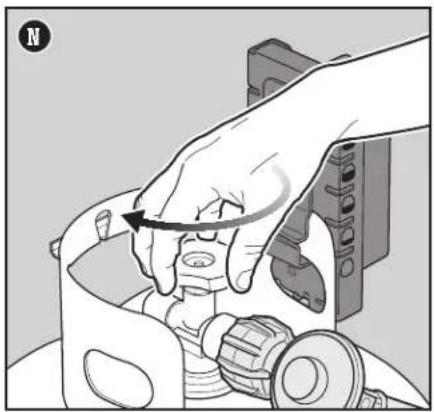
natural_image
Illustration of a hand operating a mechanical device with a rotating arrow indicating rotation (no text or symbols present)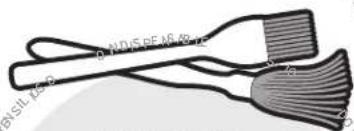
text_image
BNSIL 15.0 DARUS PE 46.87.2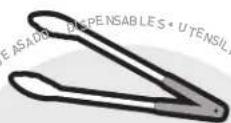
PINZAS
text_image
Diagram illustrating a hair dryer setup with labeled components and actions for cleaning or cleaning the interior.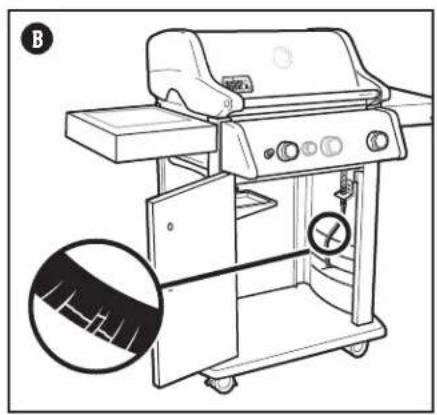
text_image
Technical diagram of a portable gas stove with labeled components and a magnified inset showing fabric texture details.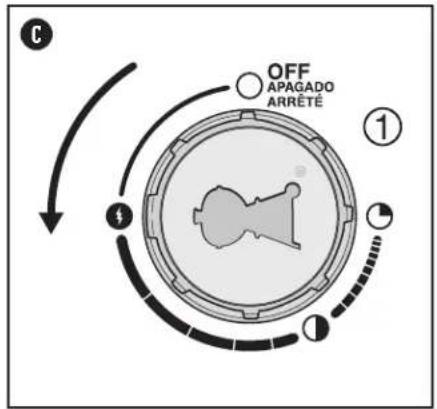
text_image
C OFF APAGADO ARRÊTE ① ② ③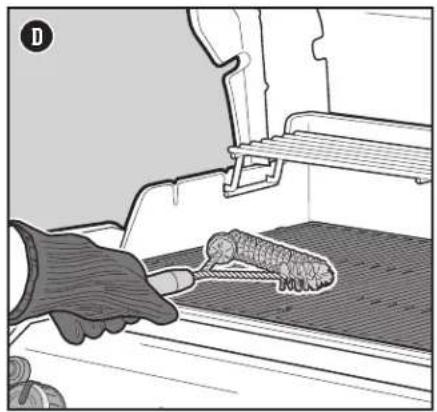
natural_image
Illustration of a hand using a tool to trim a small object inside a container (no text or symbols visible)natural_image
Diagram of a mechanical device with a rotating arrow indicating rotation (no text or symbols present)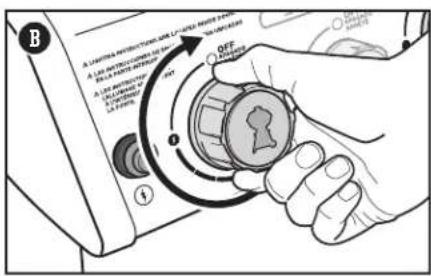
text_image
A SISTEMA PRODUCTION AND LIQUIDING SWITCH A 100% OFF OFF OFF OFF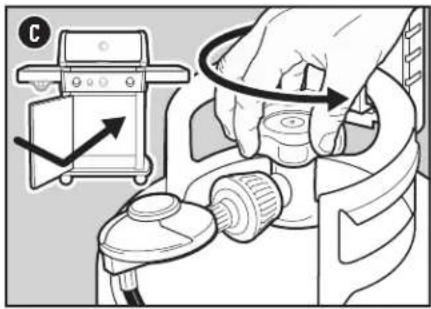
text_image
Diagram showing a hand using a device to switch a valve, with a magnified view of the device's internal structure.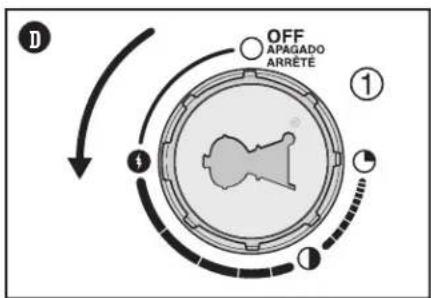
flowchart
graph TD
    A["OFF APAGADO ARRETE"] --> B["①"]
    B --> C["②"]
    C --> D["③"]
    D --> E["④"]
    style A fill:#f9f,stroke:#333
    style B fill:#ccf,stroke:#333
    style C fill:#cfc,stroke:#333
    style D fill:#fcc,stroke:#333
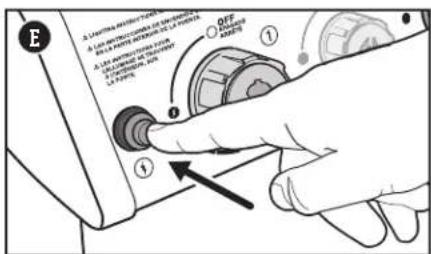
text_image
E A. LUTTER SWITCH ON CHAPES A. 100% OFF OFF OFF OFF ① ② ③ ④natural_image
Diagram of a mounted electronic device with four buttons and a cable (no text or symbols)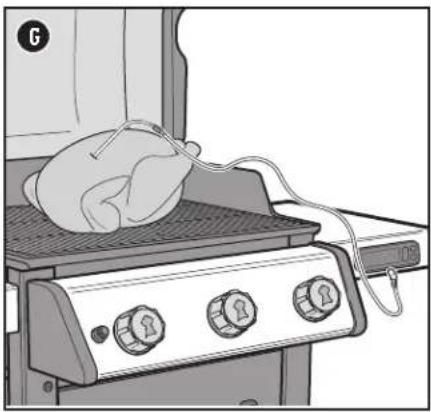
natural_image
Illustration of a gas stove burner with a hand placed on top, connected to a rack-mounted device (no text or symbols visible)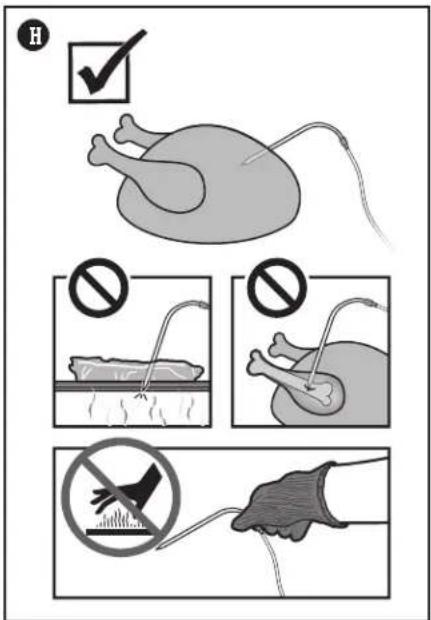
text_image
Medical illustration showing surgical procedure steps with checkmark and no-drawn diagrams for catheter placementtext_image
Illustration showing two methods of removing a 9000 kitchen sink into a sink, with no text or symbols present.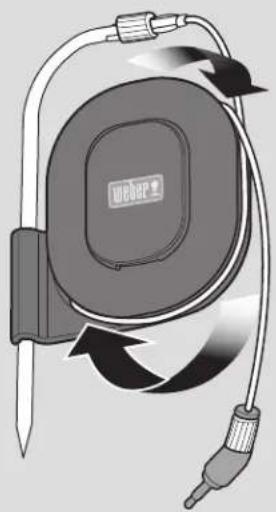
natural_image
Illustration of a medical device with curved tubing and a central circular component labeled 'WebMap' (no text or symbols on the device itself)ADVERTENCIA
natural_image
Illustration of a hand using a tool to apply paint to a plastic container (no text or symbols visible)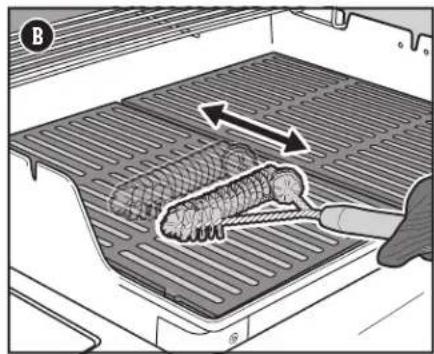
natural_image
Diagram of a kitchen appliance with a grater inside a grater, showing a hand holding a tool (no text or symbols present)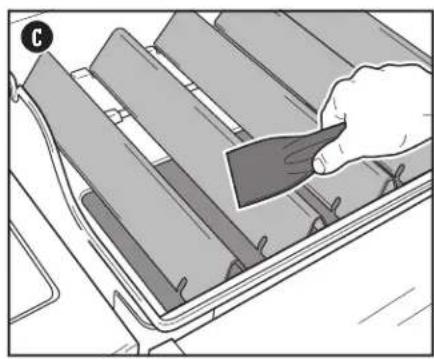
natural_image
Illustration of a hand holding a tool over a tray with multiple compartments (no text or symbols visible)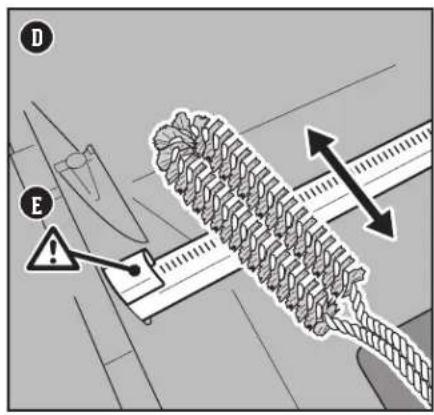
text_image
D E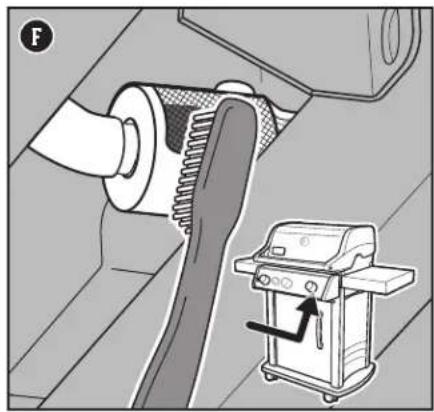
natural_image
Mechanical assembly diagram showing a gear meshing and a motor cart with an arrow indicating motion (no text or symbols)natural_image
Illustration of a hand using a tool to adjust or install a mechanical component, with arrows indicating motion direction (no text or symbols present)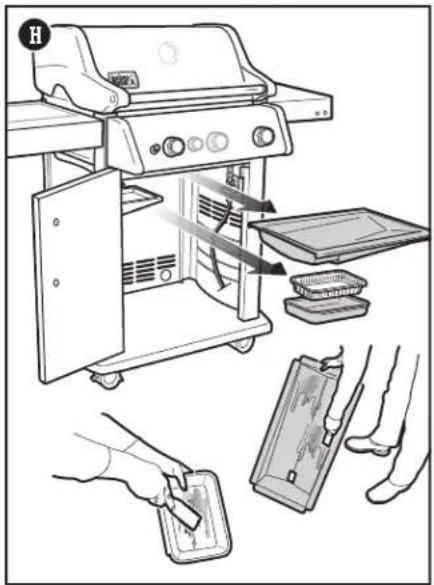
text_image
Diagram illustrating a hair dryer setup with labeled components and hands operating the machine.
TERMÓMETRO
text_image
Technical diagram showing a gas stove with labeled components and a close-up of its internal wiring, including a battery labeled 'AA'.text_image
Technical diagram of a mechanical assembly with labeled parts and connection points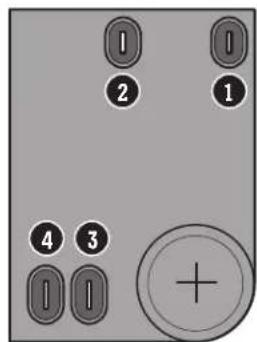
text_image
1 2 1 4 3 +FLUJO DE GAS
SÍNTOMA
text_image
Diagram showing a hand holding a fan blade with three labeled points (A, B, C) and a checkmark indicating approval.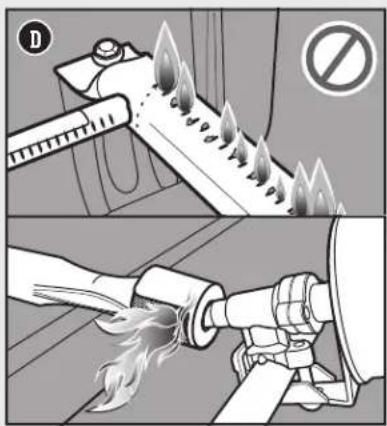
text_image
Diagram illustrating fire resistance testing with labeled components and no sign indicating no fire resistance.Filtros de arañas
text_image
Diagram illustrating a spider impact experiment with a spider on a pipe and a gas stove, labeled with component E.natural_image
Diagram of a mechanical device with cylindrical components and wiring, no visible text or symbolsB
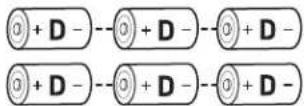
natural_image
Diagram showing a device being connected to a monitor, with an arrow indicating the cable or connection (no text or symbols present)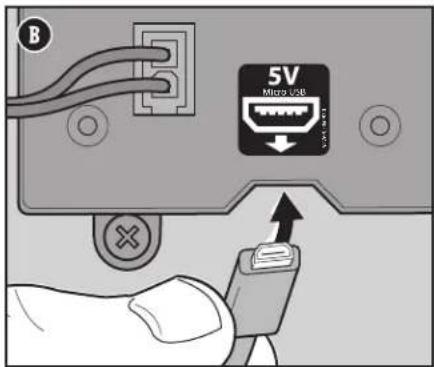
text_image
B 5V Micro USB USBtext_image
Exploded view diagram of a refrigerator with numbered parts for identification



weber.com
natural_image
Close-up of a Spirit brand electronic device with control knob and display screen (no visible text or symbols)ENREGISTREZ-LE AUJOURD'HUI.
text_image
weber connect
TÉLÉCHARGEZ L'APPLICATION GRATUITE

Weber-Stephen PRODUCTS LLC
text_image
Diagram of a gas stove with labeled components A through F, showing open chamber and internal grating structure.A WEBER CONNECT
natural_image
Mechanical assembly diagram showing two stages of a device with arrows indicating motion (no text or symbols)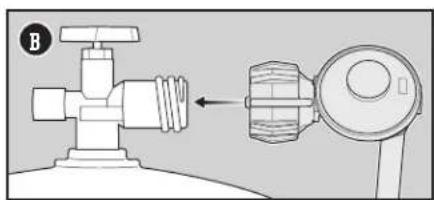
natural_image
Diagram of a valve and pump assembly with directional arrow (no text or labels)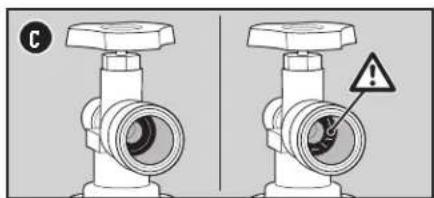
text_image
Diagram showing two identical valve configurations with a warning symbol indicating a defect or hazard.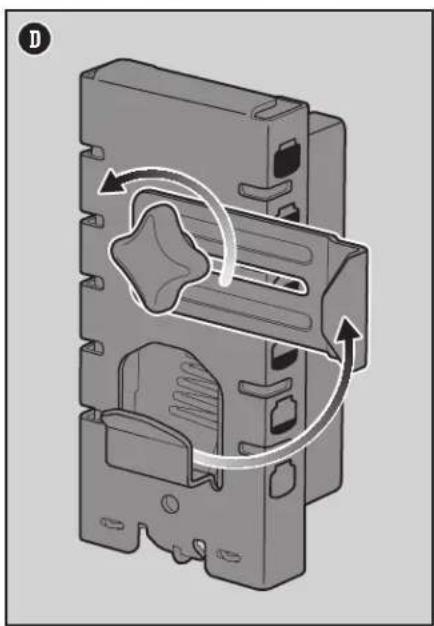
natural_image
Mechanical diagram showing a piston-cranked device with internal components and directional arrows indicating motion (no text or symbols)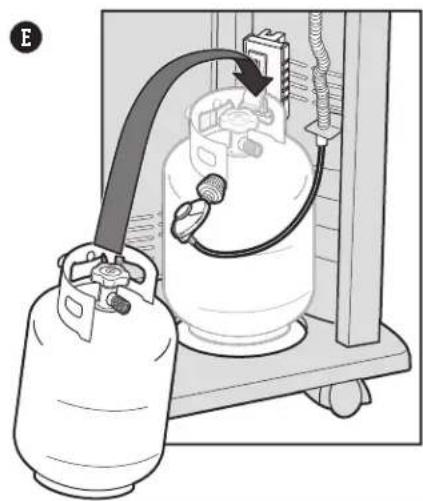
natural_image
Diagram of a gas cylinder setup with tubing and a valve, no text or symbols present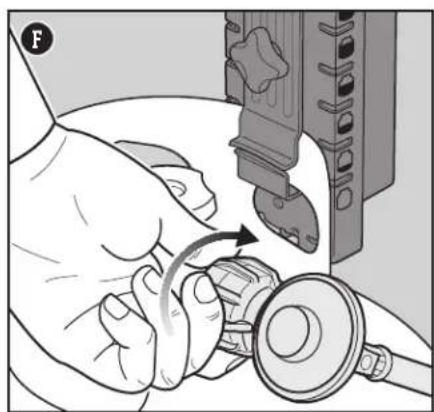
natural_image
Close-up of hands performing a mechanical repair operation with a tool (no visible text or symbols)natural_image
Illustration of a hand pouring liquid into a container with a mechanical clamp and rod inserted (no text or symbols)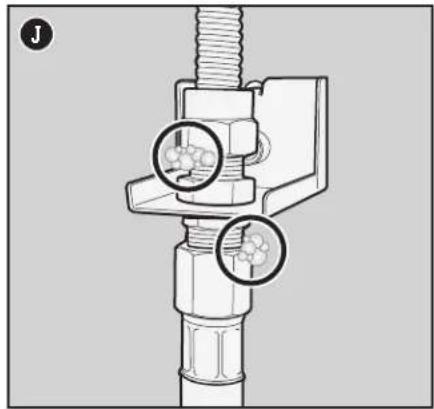
natural_image
Mechanical assembly diagram showing a bolt and threaded component with two circular insets highlighting internal features (no text or symbols)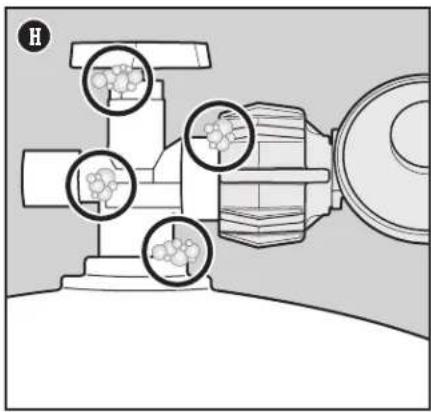
natural_image
Technical diagram of a mechanical pump or valve with three circular insets showing internal components (no text or labels)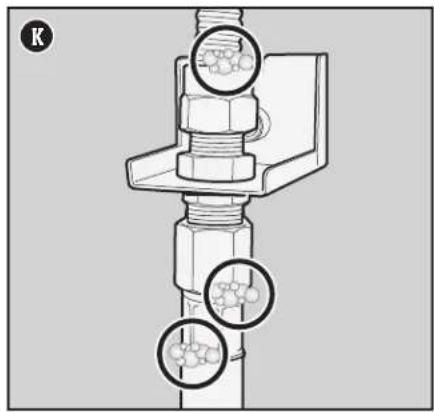
natural_image
Mechanical assembly diagram showing bolted joint with two circular insets highlighting internal components (no text or labels)
natural_image
Technical line drawing of a mechanical device with circular components and two circular insets showing internal components (no text or symbols)text_image
Technical diagram showing mechanical assembly with labeled parts and directional arrows indicating movement or force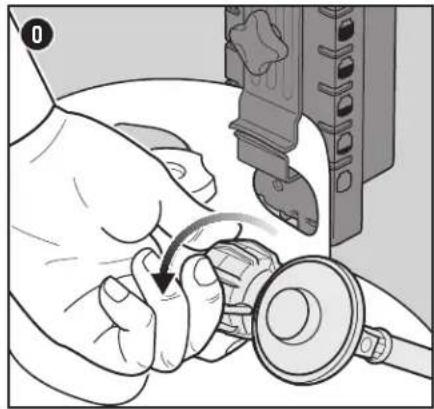
natural_image
Illustration of a hand using a tool to adjust or install a mechanical component, with no visible text or symbols.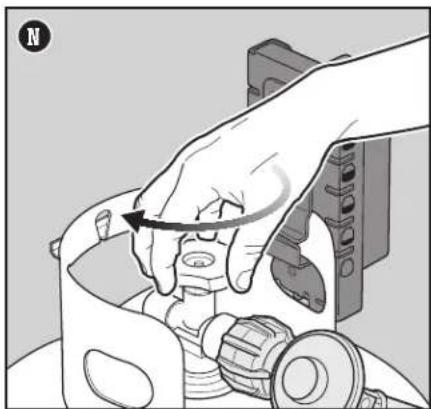
natural_image
Illustration of a hand operating a mechanical device with a rotating arrow (no text or symbols)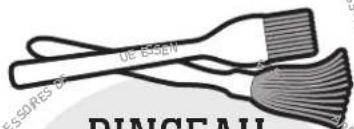
text_image
DE BISCH DINGEAU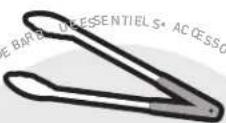
PINCE
text_image
Diagram illustrating a hair dryer setup with labeled components and actions for cleaning or repair.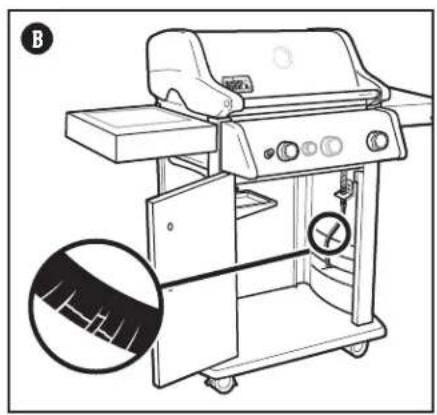
text_image
Technical diagram of a portable gas stove with labeled components and a magnified inset showing fabric texture details.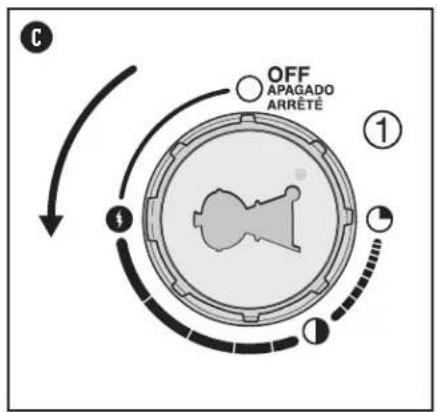
flowchart
graph TD
    A["OFF APAGADO ARRÊTÉ"] --> B["Step 1"]
    B --> C["Step 2"]
    C --> D["Step 3"]
    D --> E["Step 4"]
    E --> F["Step 5"]
    F --> G["Step 6"]
    G --> H["Step 7"]
    H --> I["Step 8"]
    I --> J["Step 9"]
    J --> K["Step 10"]
    K --> L["Step 11"]
    L --> M["Step 12"]
    M --> N["Step 13"]
    N --> O["Step 14"]
    O --> P["Step 15"]
    P --> Q["Step 16"]
    Q --> R["Step 17"]
    R --> S["Step 18"]
    S --> T["Step 19"]
    T --> U["Step 20"]
    U --> V["Step 21"]
    V --> W["Step 22"]
    W --> X["Step 23"]
    X --> Y["Step 24"]
    Y --> Z["Step 25"]
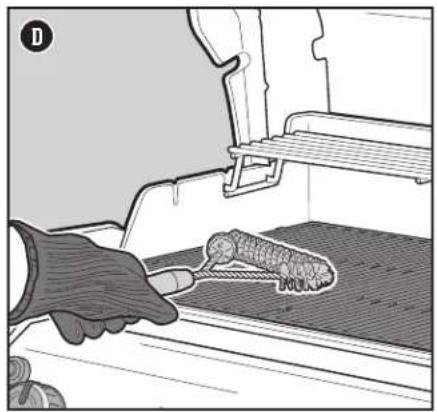
natural_image
Illustration of a hand using a tool to trim a small object inside a container (no text or symbols visible)natural_image
Diagram of a mechanical device with an arrow indicating rotational motion (no text or symbols present)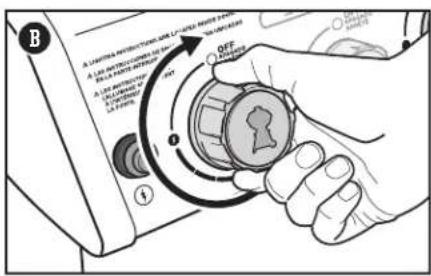
text_image
A SISTEMA PRODUCTION AND LIQUIDING ROLLAR SWITCH A 100% OFF OFF OFF OFF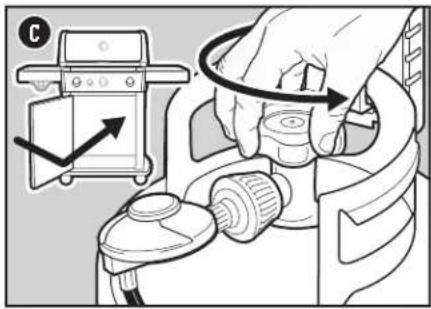
text_image
Diagram showing hand operating a device with directional arrows and a labeled control panel, likely illustrating a mechanical or electrical operation.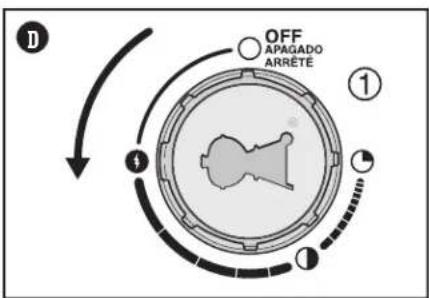
flowchart
graph TD
    A["OFF APAGADO ARRÊTE"] --> B["Circular Process"]
    B --> C["Directional Path ①"]
    B --> D["Directional Path ②"]
    B --> E["Directional Path ③"]
    B --> F["Directional Path ④"]
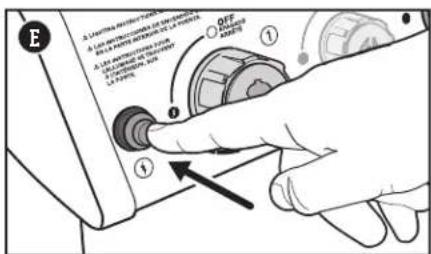
text_image
E A. LUTTER REFLECTOR ON CHAPES A. 100% OFF OFF OFF OFF ① ② ③ ④natural_image
Illustration of a mounted electronic device with four buttons and a cable (no text or symbols)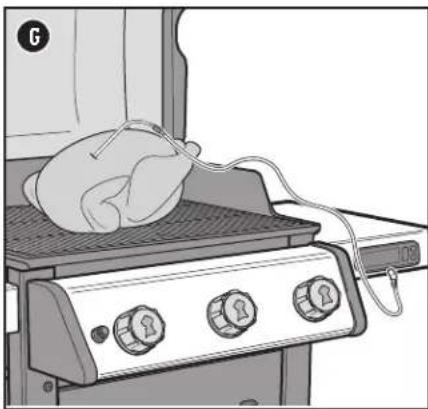
natural_image
Illustration of a gas stove burner with a hand placed on top, connected to a rack-mounted device (no text or symbols visible)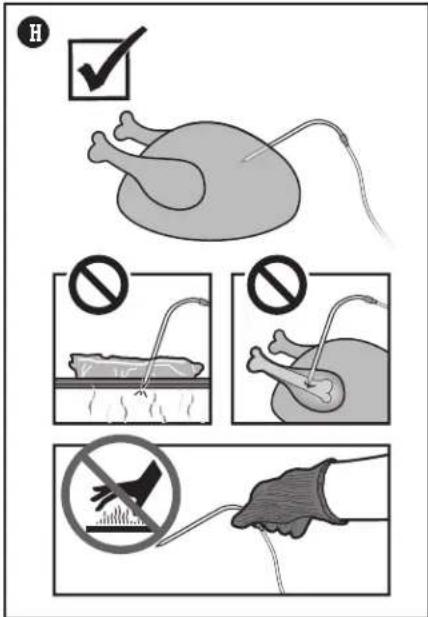
text_image
Medical illustration showing surgical procedure steps with checkmark and prohibition signs for catheter insertiontext_image
Safety warning symbol showing no prohibition on a faucet and sink with water drop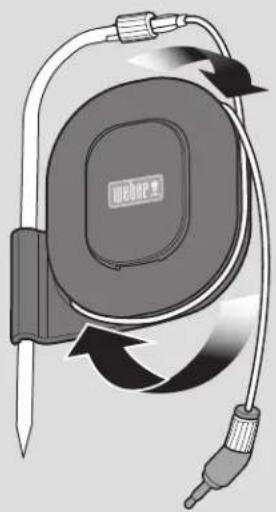
natural_image
Illustration of a medical or laboratory device with curved tubing and a central display (no text or symbols visible)natural_image
Illustration of a hand holding a tool near a plastic container (no text or symbols visible)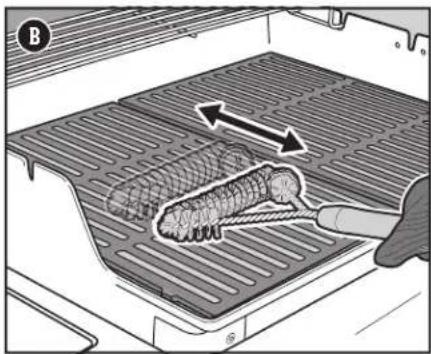
natural_image
Illustration of a hand using a tool to remove meat from a griddle inside a storage tray (no text or symbols)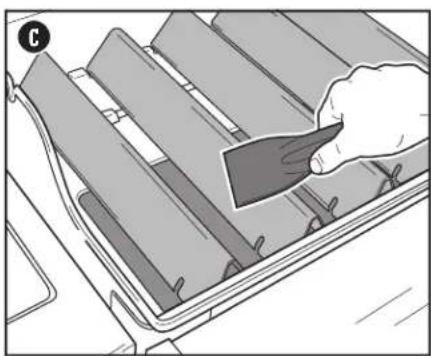
natural_image
Illustration of a hand holding a tool over a tray with multiple compartments (no text or symbols visible)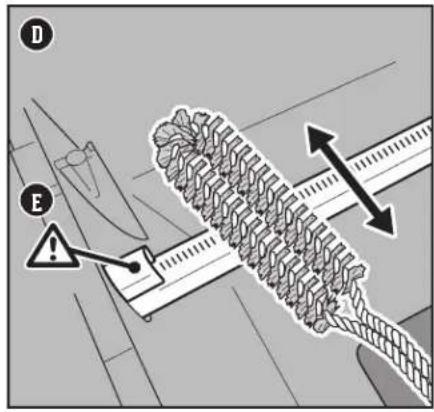
text_image
D E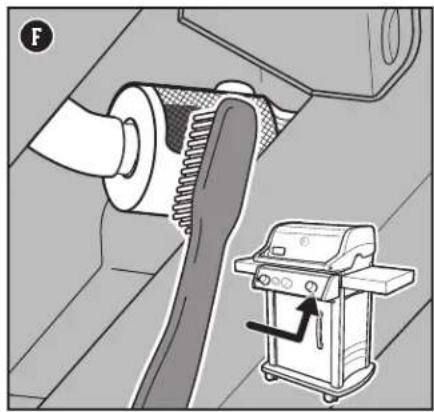
natural_image
Mechanical assembly diagram showing a gear meshing and a motor cart with an arrow indicating motion (no text or symbols)natural_image
Illustration of a hand using a tool to measure a mechanical part with arrows indicating motion (no text or symbols present)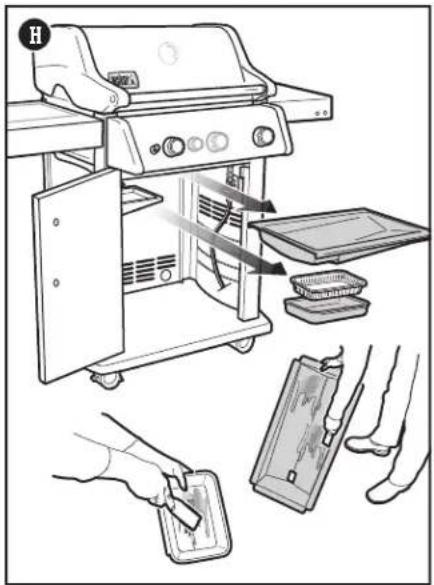
text_image
Diagram illustrating a hair dryer setup with labeled components and hands operating the machine.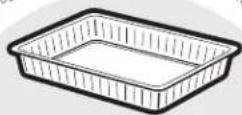
PLATS EN ALUMINIUM
text_image
Technical diagram showing a gas stove with labeled components and a close-up of its internal wiring, including a battery labeled '-AA +'.PIÈCES DE REEMPLACEMENT
natural_image
Technical diagram of a mechanical assembly with labeled components (no text or symbols present)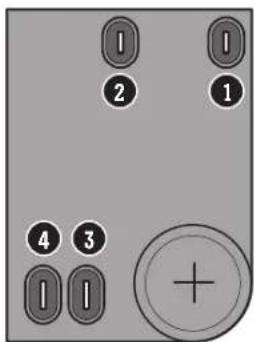
text_image
1 2 1 4 3 +DÉBIT DE GAZ
SYMPTÔME
text_image
Diagram illustrating fire extinguishing process with labeled components and no prohibition symboltext_image
Diagram illustrating a battery discharge process with labeled components and a gas stove, showing electrical hazard and airflow direction.APPELEZ LE SERVICE À LA CLIENTÈLE
natural_image
Diagram of a mechanical device with cylindrical components and wiring, no visible text or symbolsB
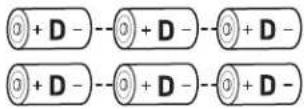
PERTE DE PUISSANCE
SYMPTÔME
text_image
Diagram showing a device being connected via cable to a monitor, with label 'A' pointing to the monitor.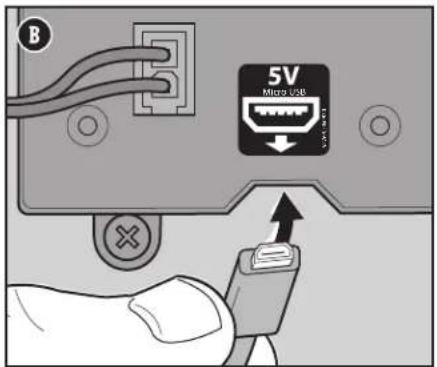
text_image
B 5V MERO USB TWO USBtext_image
Exploded view diagram of a refrigerator with numbered parts for identificationPièces de rechange




weber.com