
Vinovilla Victoria - Wine cellar Klarstein - Free user manual and instructions
Find the device manual for free Vinovilla Victoria Klarstein in PDF.

| Product type | Wine cellar |
| Brand | Klarstein |
| Model | Vinovilla Victoria |
| Article number | 10041821, 10046195 |
| Power supply | 220-240 V ~ 50 Hz |
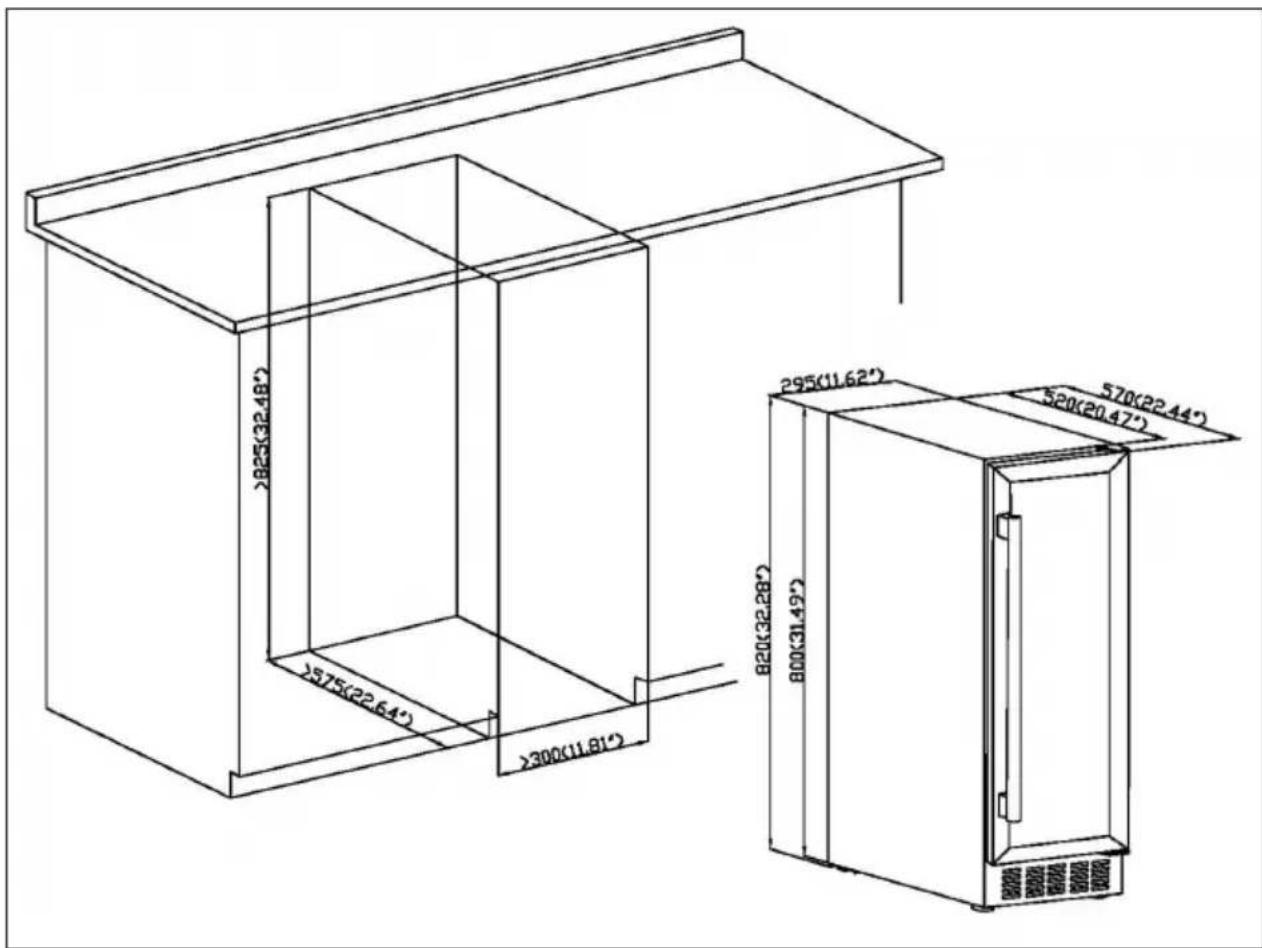
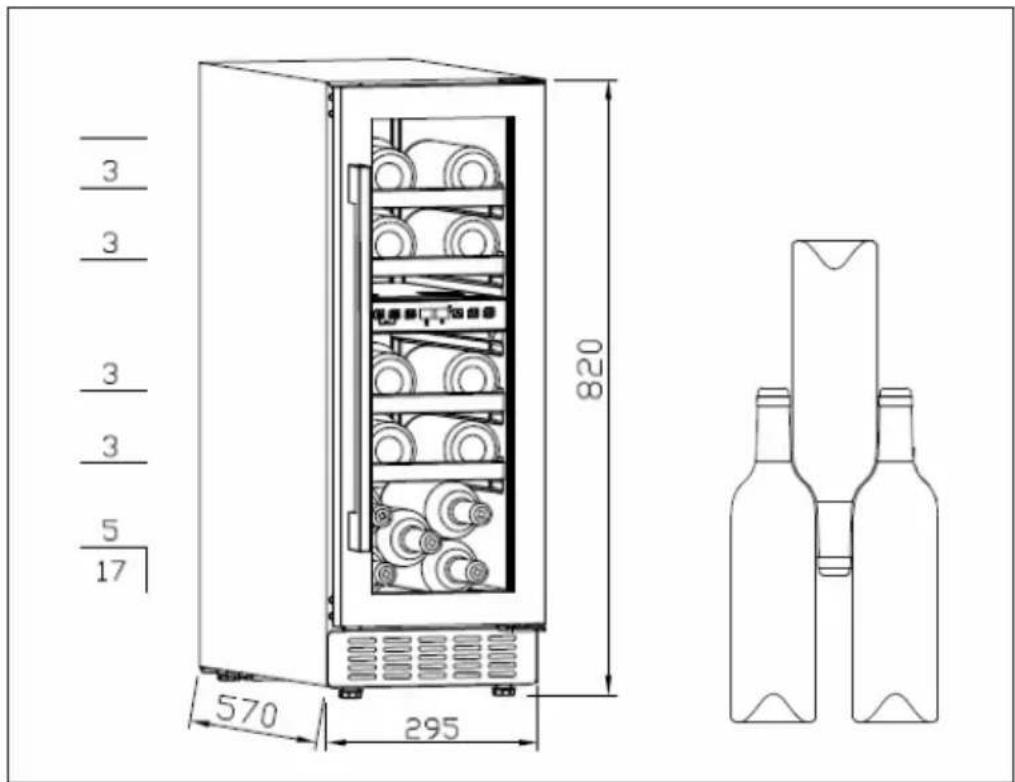
| Dimensions (H x W x D) | 820 x 295 x 570 mm |
| Capacity | 52 L (17 bottles of 750 ml) |
| Temperature range | 5 to 22 °C (dual zone) |
| Climate class | SN, N, ST (10-38 °C) |
| Annual consumption | 98 kWh/year |
| Energy class | F |
| Noise level | 41 dB(A) |
| Defrost type | Automatic |
| Refrigerant | R600a (isobutane) |
| Interior lighting | LED (panel switch) |
| Touch display | Yes |
| Child lock | Yes (key combination) |
| Adjustable feet | Yes |
| Handle | To be attached (included) |
| Warranty | 24 months |
Frequently Asked Questions - Vinovilla Victoria Klarstein
User questions about Vinovilla Victoria Klarstein
0 question about this device. Answer the ones you know or ask your own.
Ask a new question about this device
Download the instructions for your Wine cellar in PDF format for free! Find your manual Vinovilla Victoria - Klarstein and take your electronic device back in hand. On this page are published all the documents necessary for the use of your device. Vinovilla Victoria by Klarstein.
USER MANUAL Vinovilla Victoria Klarstein
VINOVILLA 17 DUO VICTORIA
Weinkühlschrank
Wine Cooler
Vinoteca
Cave à vin
KLARSTEIN
www.klarstein.com

area
| Category | Value | | -------- | ----- | | 1 | 100 | | 2 | 100 | | 3 | 100 | | 4 | 100 | | 5 | 100 | | 6 | 100 | | 7 | 100 | | 8 | 100 | | 9 | 100 | | 10 | 100 | | 11 | 100 | | 12 | 100 | | 13 | 100 | | 14 | 100 | | 15 | 100 | | 16 | 100 | | 17 | 100 | | 18 | 100 | | 19 | 100 | | 20 | 100 | | 21 | 100 | | 22 | 100 | | 23 | 100 | | 24 | 100 | | 25 | 100 | | 26 | 100 | | 27 | 100 | | 28 | 100 | | 29 | 100 | | 30 | 100 | | 31 | 100 | | 32 | 100 | | 33 | 100 | | 34 | 100 | | 35 | 100 | | 36 | 100 | | 37 | 100 | | 38 | 100 | | 39 | 100 | | 40 | 100 | | 41 | 100 | | 42 | 100 | | 43 | 100 | | 44 | 100 | | 45 | 100 | | 46 | 100 | | 47 | 100 | | 48 | 100 | | 49 | 100 | | 50 | 100 | | 51 | 100 | | 52 | 100 | | 53 | 100 | | 54 | 100 | | 55 | 100 | | 56 | 100 | | 57 | 100 | | 58 | 100 | | 59 | 100 | | 60 | 100 | | 61 | 100 | | 62 | 100 | | 63 | 100 | | 64 | 100 | | 65 | 100 | | 66 | 100 | | 67 | 100 | | 68 | 100 | | 69 | 100 | | 70 | 100 | | 71 | 100 | | 72 | 100 | | 73 | 100 | | 74 | 100 | | 75 | 100 | | 76 | 100 | | 77 | 100 | | 78 | 100 | | 79 | 100 | | 80 | 100 | | Note: The actual values are not provided in the code. The code generates random data for the first three categories (categories) and is not included in the output. |INHALTSVERZEICHNIS
BEDIENUNG


natural_image
Symbol of a trash bin crossed with a diagonal line, no text or numbers presentBerlin Brands Group UK Limited
PO Box 42
272 Kensington High Street
London, W8 6ND
United Kingdom
Dear customer,
Congratulations on the purchase of your device. Please read the following instructions carefully and follow them to prevent potential damage. We accept no liability for damage caused by disregarding the instructions or improper use. Please scan the QR code to access the latest operating instructions and for further information about the product.

CONTENTS
Safety Instructions 22
Installation 25
Device Overview 27
Door handle attachment 28
Operation 29
Wine storage 31
Cleaning and care 32
Troubleshooting 33
Product data sheet 34
Disposal Considerations 36
Manufacturer & Importer (UK) 36
TECHNICAL DATA
| Product code 10041821, 10046195 | |
| Power supply 220-240 V ~ 50 Hz |
SAFETY INSTRUCTIONS
- This appliance is not intended to be used by persons (including children) with reduced physical, sensory or mental capabilities, or lack of experience and knowledge, unless they have been given supervision or instruction concerning use of the appliance by a person responsible for their safety.
- Supervise children to ensure that they do not play with the device.
- Children over 8 years as well as mentally, sensory and physically impaired persons may only use the device if they have been informed in detail about the functions and safety precautions by a supervisor responsible for them beforehand and understand the associated risks. Children must not play with the device. Cleaning and maintenance work must not be carried out by children without supervision.
- If the power cord is damaged, it must be replaced by the manufacturer, customer service or a similarly qualified person in order to avoid a hazard.
- To avoid a hazard due to instability of the unit, it must be fixed according to the instructions.
- When setting up the device, make sure that the power cord is not pinched or damaged.
- Make sure that there are no multiple sockets or power supply units on the back of the device.
- Make sure that the ventilation openings in the housing of the unit or in the built-in cabinet are not blocked.
- Do not use mechanical devices or other means to speed up the defrosting process unless they are expressly recommended by the manufacturer.
- The refrigerant circuit must not be damaged.
- Do not use electrical appliances in the beverage cooling compartments of the appliance unless they are specifically recommended by the manufacturer.
- Do not store explosive substances in the unit, such as spray cans with flammable propellant.
-
This appliance is intended for use in households and similar environments. These include:
-
Staff kitchens in shops, offices and other work environments
- Farms, hotels, motels and other residential establishments
- Pensions that offer breakfast (Bed & Breakfasts)
- Catering and similar non-retail applications
• Children aged 3 to 8 may fill refrigerators with food and remove food.
To avoid contamination of beverages, please follow the instructions below:
- Opening the door for too long can cause a significant temperature rise in the compartments of the appliance.
- Regularly clean surfaces that may come into contact with drinks. Clean the water drain regularly.
- Clean the water tanks (if present) if they have not been used for 48 hours. Flush the water system connected to a water supply (if any) if no water has been drawn for 5 days.
- If you are not using the refrigerator for a longer period of time, switch it off, let it defrost, clean it and dry it. Leave the door open to prevent mould from forming in the appliance.
Note: This unit contains the refrigerant Isobutane (R600a), a natural gas that has high environmental compatibility, but is flammable. Although it is flammable, it does not damage the ozone layer or increase the greenhouse effect. The use of this refrigerant results in a slightly higher noise level of the unit. In addition to the compressor noise, you can hear the flow of refrigerant. This is unavoidable and has no negative effect on the performance of the device. Be careful during transport to avoid damage to the refrigerant circuit. Refrigerant leaks can irritate the eyes.
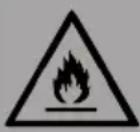
WARNING
When using, during maintenance and when disposing of the appliance, pay attention to the left symbol located on the back or on the compressor of the appliance. This symbol warns you of possible fires. There are flammable substances in the refrigerant lines and in the compressor. Keep the appliance away from sources of fire during use, maintenance and disposal.
Special notes on correct use
- This device is intended exclusively for the storage of wine.
- This appliance is not intended for use as a built-in appliance unless explicitly stated in the instructions.
• This appliance is not suitable for freezing food. - The racks were pre-set to allow the most efficient use of energy.
Note: It is recommended to set the temperature to 12 °C . If the temperature is set too high, the wine may spoil. If the temperature is set too low, the power consumption could increase.
Special notes on the shelves
- The shelves have been pre-set to allow the most efficient use of energy.
- Only use the shelves provided by the manufacturer.
- Never block the holes in the shelves or use any other types of shelves that have not been approved by the manufacturer, which may cause poor cooling or increase energy consumption.
- We recommend that you use the shelves as shown so that the energy is used as efficiently as possible.
Notes on ambient temperature
Install this unit in a location where the ambient temperature corresponds to the climate class indicated on the unit's rating plate.
| SN Low | This cooling unit is intended for use at ambient temperatures of 10-32 °C. | |
| N Moderate | This cooling unit is intended for use at ambient temperatures of 16-32 °C. | |
| ST Subtropical | This cooling unit is intended for use at ambient temperatures of 16-38 °C. | |
| T Tropical | This cooling unit is intended for use at ambient temperatures of 16-43 °C. | |
The ambient temperature influences the internal temperature of the wine refrigerator. For optimal operation of the wine refrigerator, we recommend an ambient temperature of 23^ C to 25^ C.
INSTALLATION
Before first use
Let the unit stand for 24 hours before first use to allow the coolant to disperse. Leave the door open during this time to allow production-related odours to dissipate.
Note: All models without front ventilation or ventilation slots on the front are not built-in appliances and must be free-standing.
Location
The place where you place the unit should:
- be resilient and well ventilated.
- be away from direct sunlight and heat sources.
- not be too damp, such as bathrooms or washrooms.
• have a level floor.
• have a standardised electrical connection.
• have a socket outlet with overvoltage protection. - be far away from microwaves, as their interference could have a negative effect on the unit.
Furthermore, the ambient temperature in the room should be neither very cold nor very warm. Cold and heat can possibly have a negative effect on the function, so that the desired interior temperature is not reached.
Setting up
- Remove all packaging material from and around the refrigerator.
- Position the refrigerator so that the plug is accessible at all times. Disconnect the mains cable and place the unit in its final location. Place it so that the compressor is free and not in contact with other objects or walls.
- Level out any small unevenness in the floor before filling the unit. Use the adjustable feet for this purpose. To do this, turn the back feet completely in and compensate for the slant with the front two feet.
Note on built-in appliances
- All appliances with ventilation slots on the front are suitable for installation, but must not be installed in completely closed enclosures.
• Built-in appliances draw air in on the right side of the ventilation frame (some models also on the back) and let it out again via the ventilation frame at the front. - Like many electrical appliances, the wine refrigerator has many sensitive parts that can be damaged by a power failure or lightning strike. Your connections should therefore be equipped with surge protection.
- If you install the appliance in a frame with a door, there must be a ventilation opening at the bottom of the door. In hot climates, slots with a minimum dimension of 40 ~mm × 200 ~mm must also be provided at the top of the rear or at the top of both sides of the enclosure to allow cool air to enter. A minimum of 30 ~mm space must be left to the rear wall of the frame. The ventilation slot should not be placed on a side where another appliance, such as an oven, is already located.
Installation dimensions
DEVICE OVERVIEW
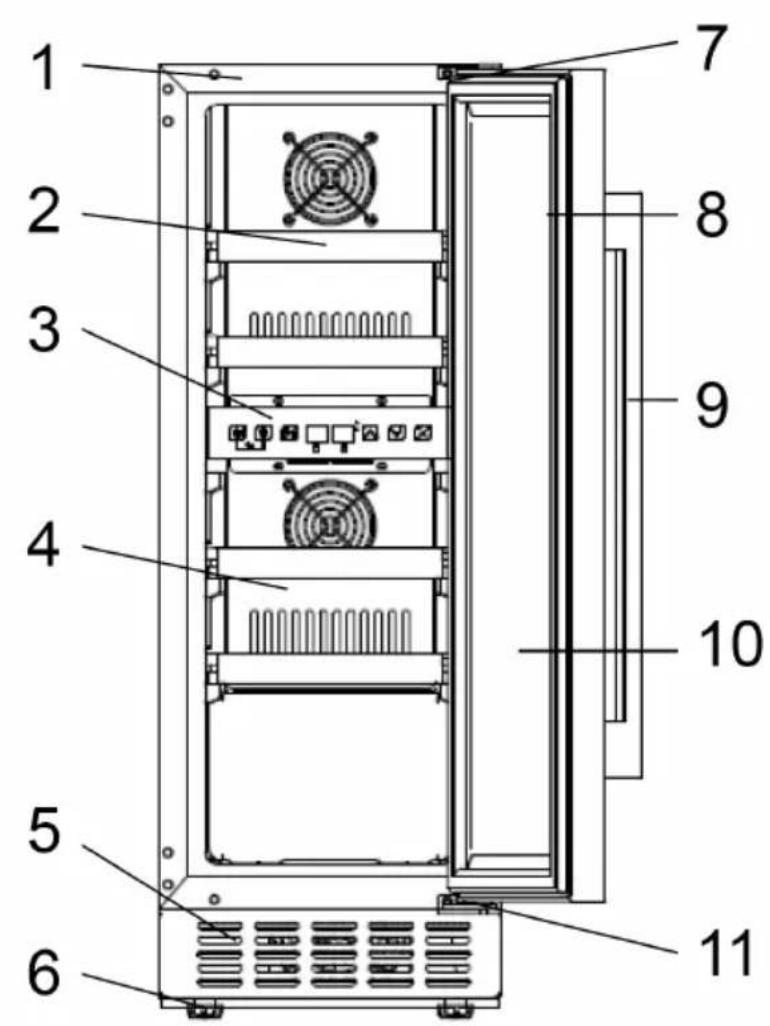
| 1 Housing 7 Lower hinge | ||
| 2 Shelf 8 Door | ||
| 3 Control panel 9 Handle | ||
| 4 Cover 10 Door seal | ||
| 5 Ventilation slots 11 Upper hinge | ||
| 6 Adjustable feet |
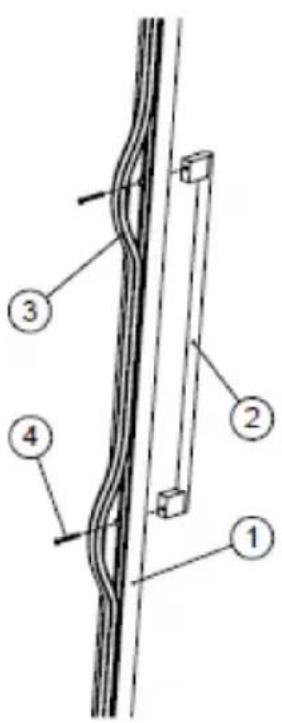
DOOR HANDLE ATTACHMENT
The handle is delivered in separate packaging with screws together in the box.
1 Expose the two small holes on the inside of the door frame by pulling out the door seal a little.
2 Align the handle with the holes and insert the screws from the inside.
3 Tighten the screws with a screwdriver.
4 Replace the door seal to cover the screws.
OPERATION


On / Off
Press and hold the button for 3 seconds to switch off the unit and go into stand-by mode. Press and hold the button again for 3 seconds to return to normal operation.
Light
Press the button to switch the LED lights inside on or off. In stand-by mode, the button has no function.
Zone switch
Press the button to switch between the upper and lower zones and select the desired zone for the temperature setting. Press the button once, the LED display of the selected zone flashes regularly. Press the UP and DOWN buttons to set the temperature. Press the button again to change the zone and set the temperature.
Up key
Press the button once. The LED display flashes regularly and shows the currently set target temperature. Continue pressing the button to set the desired temperature. Each time the button is pressed, the temperature increases by 1 °C. If no button is pressed, the display stops flashing after 5 seconds and the newly set temperature is saved. The LED display then shows the current temperature inside again.
Down button
Press the button once. The LED display flashes regularly and shows the currently set target temperature. Continue pressing the button to set the desired temperature. Each time the button is pressed, the temperature decreases by 1 °C. If no button is pressed, the display stops flashing after 5 seconds and the newly set temperature is saved. The LED display then shows the current temperature inside again.
Changing the Fahrenheit/Celsius display
To switch between Fahrenheit and Celsius, press and hold the button for 3 seconds.
Button combinations
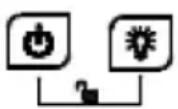
Child safety combination
To lock the control panel, press and hold both buttons simultaneously for 3 seconds. To unlock the control panel, press and hold both buttons simultaneously for 3 seconds.
Notes on operation
- The preset temperature is 12^ and must be set according to the wine after commissioning.
- The cooling temperature can be set from 5-22°C for both the upper and lower zones. And the temperature of the lower zone can only be set equal to or higher than the temperature of the upper zone.
Alarm tones
When the system malfunction occurs and an alarm tone sounds, press any button on the control panel to stop the alarm tone.
Error codes
If the temperature sensor of the upper zone fails, an error code is displayed
E1 for an open circuit.
E2 for a short circuit.
If the temperature sensor of the lower zone fails, an error code is displayed:
E5 for an open circuit.
E6 for a short circuit.
If the defrost sensor fails, an error code is displayed:
E3 for an open circuit.
E4 for a short circuit.
WINE STORAGE
- The unit is equipped with several shelves on which you can store your wine.
- The four wooden shelves have a loading capacity of 17 wine bottles (standard Bordeaux bottle of 750 ml).
- The loading capacity varies depending on the type of bottle arrangement or on the bottle size.
• Each shelf is designed to store 1 or 2 layers of wine bottles on it. Do not load the shelves with more than 2 layers.
• Each shelf can be partially pulled out to make it easier to store the wine bottles. - Open the door wide enough before pulling out the shelves.
- If you do not use the wine refrigerator for a long time, switch it off, clean it and leave the door open.
Storage recommendations
| Wine type Temperature Celsius Temperature Fahrenheit | ||
| Red wine 15 - 18 °C 58 - 65 °F | ||
| White wine 9 - 14 °C 48 - 57 °F | ||
| Sparkling wine/champagne | 4 - 8 °C 39 - 47 °F | |
CLEANING AND CARE
Cleaning the appliance
- Switch off the appliance first and disconnect the power cord from the mains socket.
- Remove all the contents.
- Wipe the inside with a damp cloth dipped in lukewarm water with a little washing-up liquid.
- Make sure the rubber seal on the door is clean so that the appliance remains efficient.
- The exterior of the wine refrigerator should be cleaned with a mild detergent.
- Dry the inside and outside with a soft cloth.
- Dust and anything else that clogs the exhaust vents will reduce the cooling capacity of the appliance. If necessary, vacuum the exhaust air opening.
Decommissioning in the event of absence
- First switch off the appliance. Then disconnect the power cord from the power outlet.
- Remove all the contents.
- Clean the appliance.
- Leave the lid on slightly to prevent condensation, mould or odours from forming.
Installation at another location
- First switch off the appliance. Unplug the power cord.
- Remove all the contents.
- Secure all loose items with tape.
- Tape up the doors.
Energy saving recommendations
The wine refrigerator should be placed in the coolest place in the room, away from appliances that generate heat, heating pipes and direct sunlight. Make sure that the door is properly closed when the wine refrigerator is switched on.
TROUBLESHOOTING
| Problem Possible cause and solution | |
| The appliance is not working. | It is not plugged in. |
| It is switched off. | |
| The fuse is out or blown. | |
| The appliance is not cold enough. | Check the temperature settings. |
| The environment requires a lower setting. | |
| The door was opened too often. | |
| The door is not closed properly. | |
| The door seal does not seal properly. | |
| The light doesn't work. | The appliance is not plugged in. |
| The fuse is out or blown. | |
| The light bulb is broken. | |
| The light switch is set to "off". | |
| The appliance goes on and off frequently. | The room temperature is higher than usual. |
| There are many bottles in the appliance. | |
| The door was opened too often. | |
| The door is not closed properly. | |
| The temperature is not set correctly. | |
| The door seal does not seal properly. | |
| Vibrations Check if the appliance is level. | |
| The appliance is very loud. | The coolant is circulating. Noises that occur as a direct result of this are not a defect, but normal. |
| After each cooling cycle, you hear a gurgling sound because there is still coolant in circulation. | |
| The contraction and expansion of the inner walls can cause cracking. | |
| The appliance is not level. | |
| The door does not close properly. | The appliance is not level. |
| The door was turned upside down and not fitted properly. | |
| The seal or the magnet are damaged. | |
| The shelves stick out too far. | |
PRODUCT DATA SHEET
Information according to Regulation (EU) No 2019/2016
| Manufacturer's name or trade mark: Klarstein | ||||
| Manufacturer's address: Wallstraße 16, 10179 Berlin, Germany. | ||||
| Product code: 10041821, 10046195 | ||||
| Type of cooling device: | ||||
| Low-noise device: no Construction type: Free-standing | ||||
| Wine storage cabinet: yes Other cooling device: no | ||||
| General product parameters: | ||||
| Parameter Value Parameter Value | ||||
| Dimensions (mm) | Height | 820 | Total volume (in dm3 or L) | 52Width |
| 295 | ||||
| Depth | 570 | |||
| EEI | 122 | Energy efficiency class F | ||
| Airborne sound emissions (in dB(A) re 1 pW) | 41 | Airborne sound emission class | C | |
| Annual energy consumption (in kWh/a) | 98 | Climate class: | Extended temperate, temperate, subtropical | |
| Minimum ambient temperature (in °C) for which the cooling device is suitable | 10 | Maximum ambient temperature (in °C) for which the cooling device is suitable | 38 | |
| Winter circuit | no | |||
| Subject parameters: | |||||
| Subject type | Subject parameters and values | ||||
| Volume of the compartment (in dm3 or l) | Recommended temperature setting for optimised food storage (in °C) These settings shall not conflict with the storage conditions set out in Table 3 of Annex IV | Freezing capacity (in kg/24h) | Defrost type (automatic defrost = A, manual defrost = M) | ||
| Pantry compartment no - - - | |||||
| Wine storage compartment | yes | 52,0 12 - A | |||
| Cellar compartment no - - - | |||||
| Fresh food compartment no | - - - | ||||
| Cold storage compartment | no | - - - | |||
| Zero stars or ice maker compartment | no | - - - | |||
| One-star compartment no | - - - | ||||
| Two-star subject no - - - | |||||
| Three-star subject no - - - | |||||
| Four-star compartment no | - - - | ||||
| Two-stars compartment no | - - - | ||||
| Variable temperature compartment | - - - | ||||
| For wine storage cabinets | |||||
| Number of standard wine bottles | 17 | ||||
| Light source parameters: | |||||
| Light source type - | |||||
| Energy efficiency class - | |||||
| Minimum term of the warranty offered by the manufacturer: 24 months | |||||
| Further information: | |||||
| Web link to the website of the manufacturer where the information specified in point 4(a) of the Annex to Commission Regulation (EU) 2019/2019 can be found: www.klarstein.de | |||||
DISPOSAL CONSIDERATIONS

natural_image
Symbol of a trash bin crossed out by a diagonal line, with no text or labels present.If there is a legal regulation in your country regarding the disposal of electrical and electronic equipment, this symbol on the product or on the packaging indicates that this product must not be disposed of with household waste. Instead, it must be taken to a collection point for the recycling of electrical and electronic equipment. By disposing of this product in accordance with the regulations, you protect the environment and the health of those around you from negative consequences. For information on recycling and disposal of this product, contact your local government or household waste disposal service.
MANUFACTURER & IMPORTER (UK)
Manufacturer:
Chal-Tec GmbH, Wallstraße 16, 10179 Berlin, Germany.
Importer for Great Britain:
Berlin Brands Group UK Limited
PO Box 42
272 Kensington High Street
London, W8 6ND
United Kingdom
Cher client, chère cliente,
SOMMAIRE
UTILISATION


Marche/arrêt
FICHE DE DONNÉES PRODUIT
natural_image
Symbol of a trash bin crossed with a diagonal line, no text or labels presentBerlin Brands Group UK Limited
PO Box 42
272 Kensington High Street
London, W8 6ND
United Kingdom
Estimado cliente:
ÍNDICE
natural_image
Symbol of a trash bin crossed with a diagonal line, no text or numbers presentBerlin Brands Group UK Limited
PO Box 42
272 Kensington High Street
London, W8 6ND
United Kingdom
Gentile cliente,
INDICE
UTILIZZO


On/Off
natural_image
Symbol of a trash bin crossed out by a diagonal line, with no text or labels present.PRODUTTORE E IMPORTATORE (UK)
Produttore:
Chal-Tec GmbH, Wallstraße 16, 10179 Berlino, Germania.
Berlin Brands Group UK Limited
PO Box 42
272 Kensington High Street
London, W8 6ND
United Kingdom

area
| Category | Value | | -------- | ----- | | A | 100 | | B | 100 | | C | 100 | | D | 100 |
KLARSTEIN

- VINOVILLA 17 DUO VICTORIA
- INHALTSVERZEICHNIS
- BEDIENUNG
- Dear customer,
- CONTENTS
- TECHNICAL DATA
- SAFETY INSTRUCTIONS
- WARNING
- Special notes on correct use
- Special notes on the shelves
- Notes on ambient temperature
- INSTALLATION
- Before first use
- Location
- Setting up
- Note on built-in appliances
- Installation dimensions
- DEVICE OVERVIEW
- DOOR HANDLE ATTACHMENT
- OPERATION
- On / Off
- Light
- Zone switch
- Up key
- Down button
- Changing the Fahrenheit/Celsius display
- Button combinations
- Child safety combination
- Notes on operation
- Alarm tones
- Error codes
- WINE STORAGE
- CLEANING AND CARE
- Cleaning the appliance
- Decommissioning in the event of absence
- Installation at another location
- Energy saving recommendations
- TROUBLESHOOTING
- PRODUCT DATA SHEET
- DISPOSAL CONSIDERATIONS
- MANUFACTURER & IMPORTER (UK)
- Manufacturer:
- Importer for Great Britain:
- Cher client, chère cliente,
- SOMMAIRE
- UTILISATION
- Marche/arrêt
- FICHE DE DONNÉES PRODUIT
- Estimado cliente:
- ÍNDICE
- Gentile cliente,
- INDICE
- UTILIZZO
- On/Off
- PRODUTTORE E IMPORTATORE (UK)
- Produttore:
- KLARSTEIN
Brand : Klarstein
Model : Vinovilla Victoria
Category : Wine cellar