
3in1 Blower Vac - Blower JCB - Free user manual and instructions
Find the device manual for free 3in1 Blower Vac JCB in PDF.


User questions about 3in1 Blower Vac JCB
0 question about this device. Answer the ones you know or ask your own.
Ask a new question about this device
Download the instructions for your Blower in PDF format for free! Find your manual 3in1 Blower Vac - JCB and take your electronic device back in hand. On this page are published all the documents necessary for the use of your device. 3in1 Blower Vac by JCB.
USER MANUAL 3in1 Blower Vac JCB
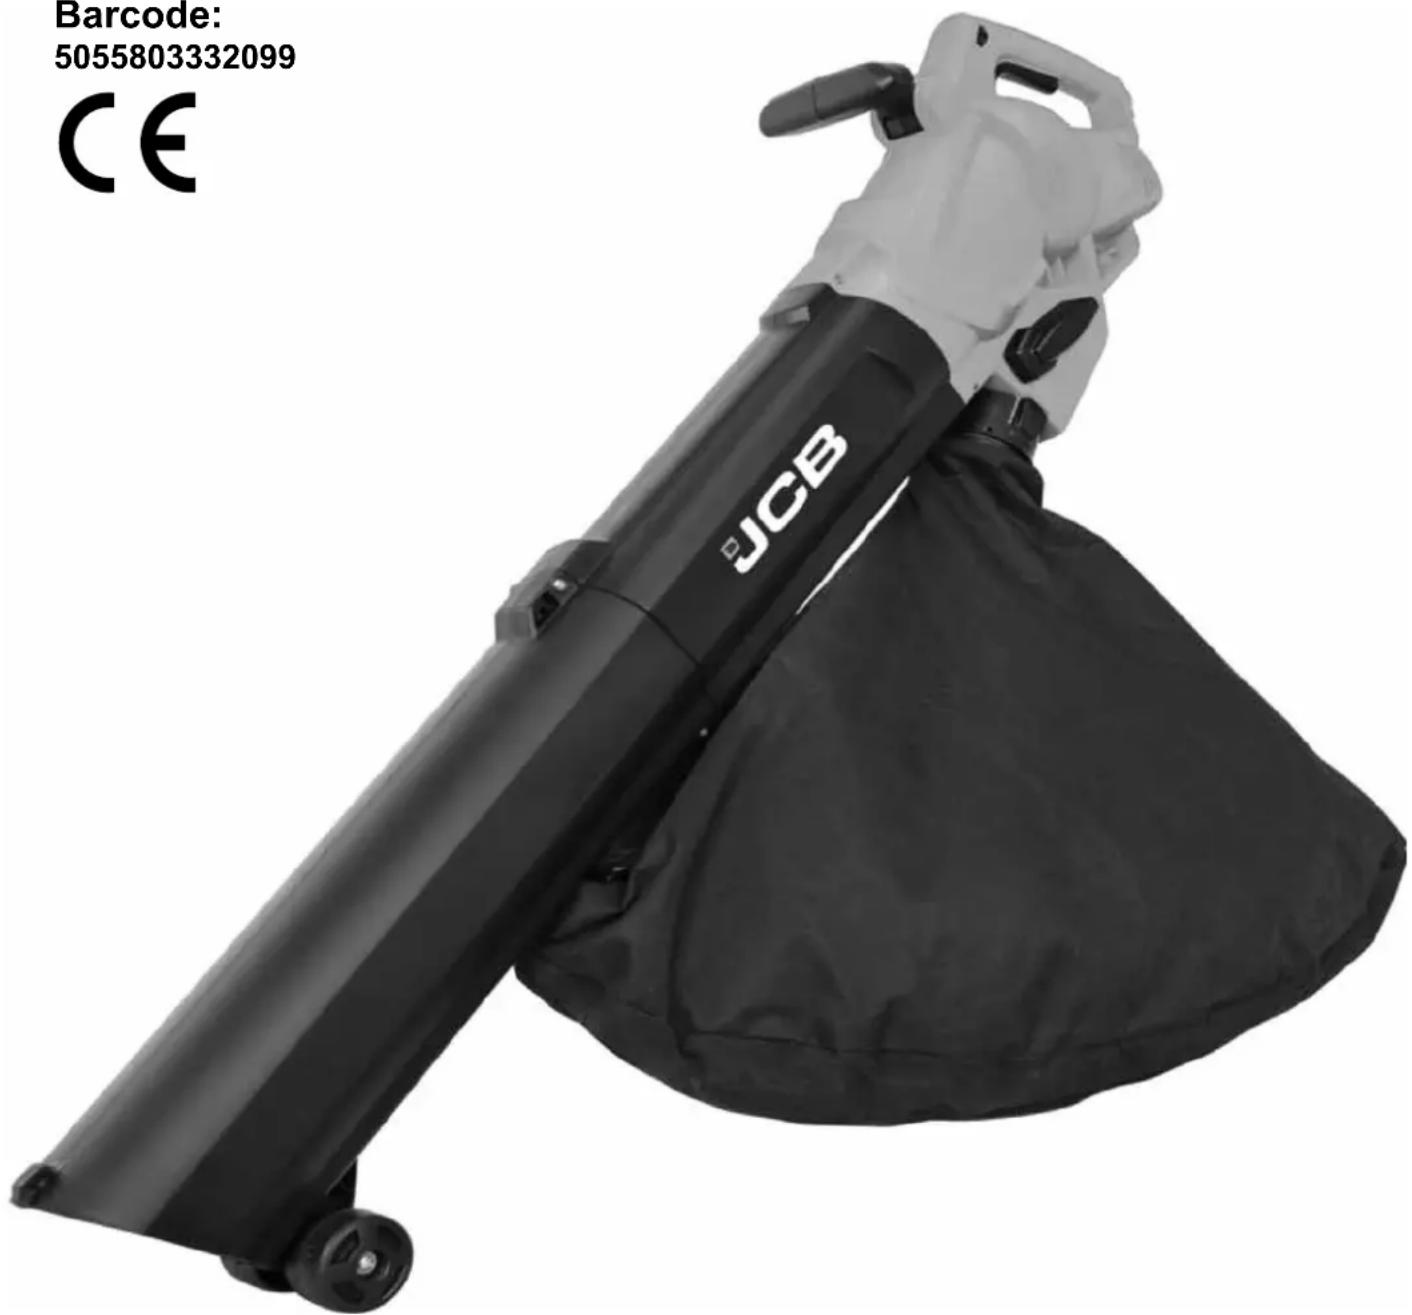
Barcode: 5055803332099
CE
text_image
Barcode: 5055803332099 CE JCBnatural_image
A plain gray horizontal line with no text, symbols, or markings.
natural_image
Completely black image with no visible content or text.1
text_image
Labeled diagram of a hairdryer with numbered parts for identification2
text_image
1 2 3 4 5 6 7 8 9 10 11 12 a b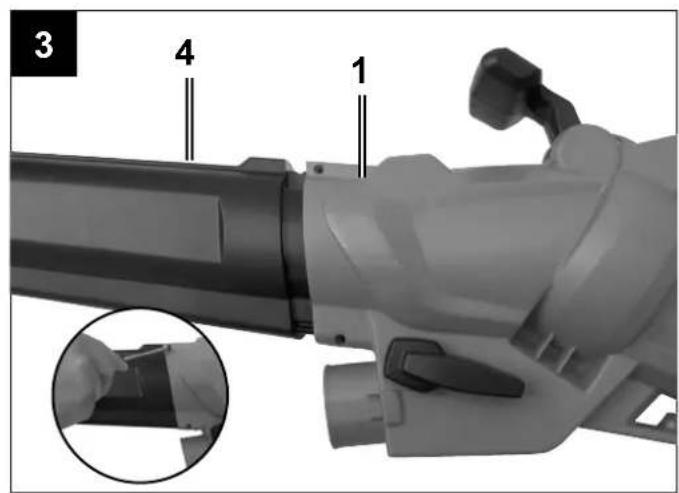
text_image
3 4 1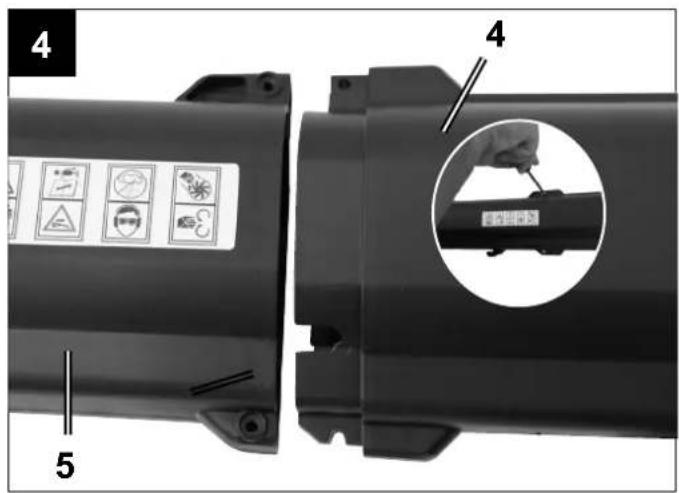
text_image
4 5 4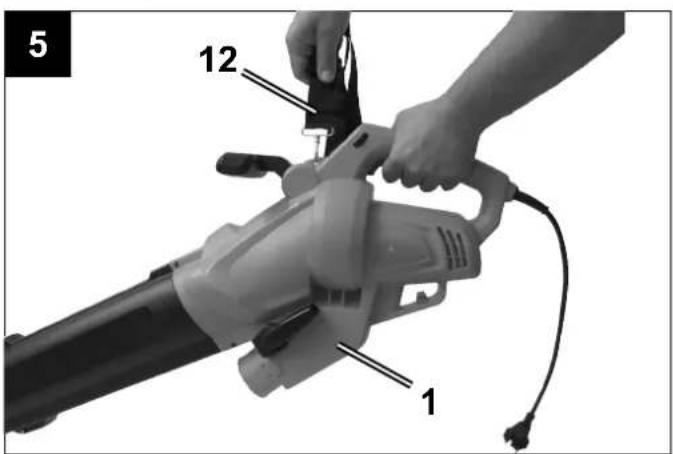
text_image
5 12 1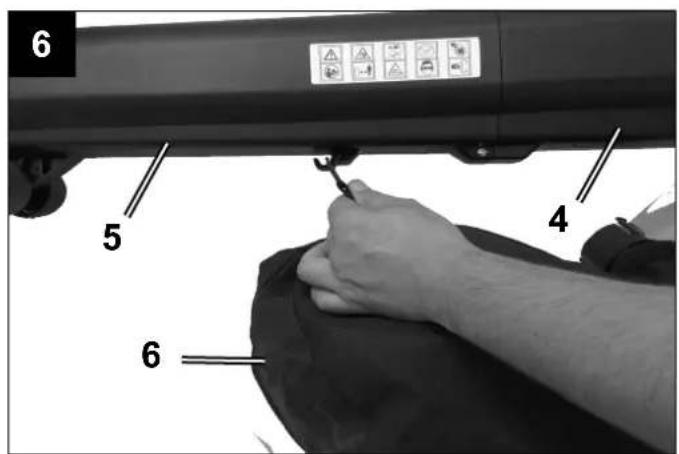
text_image
6 5 4 6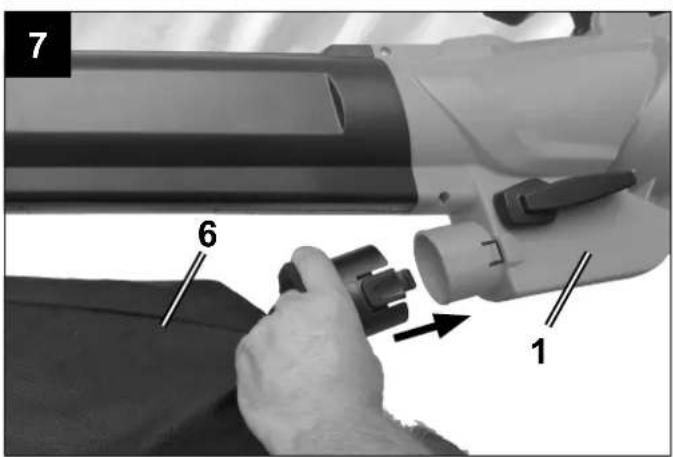
text_image
7 6 1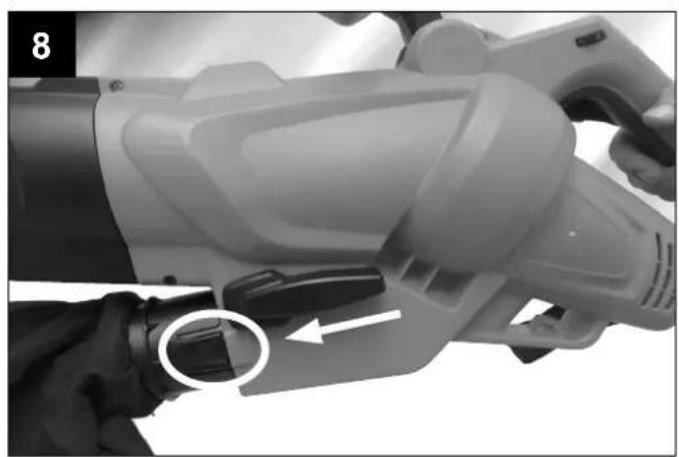
natural_image
Close-up of a hand holding a white electric shaver with a black adjustment knob, no visible text or symbols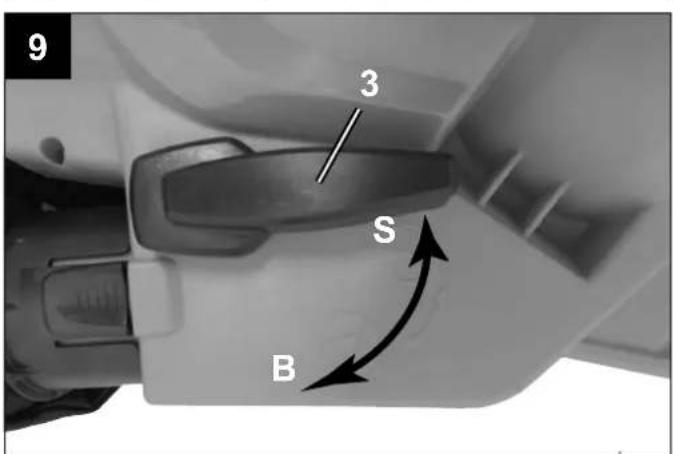
text_image
9 3 S B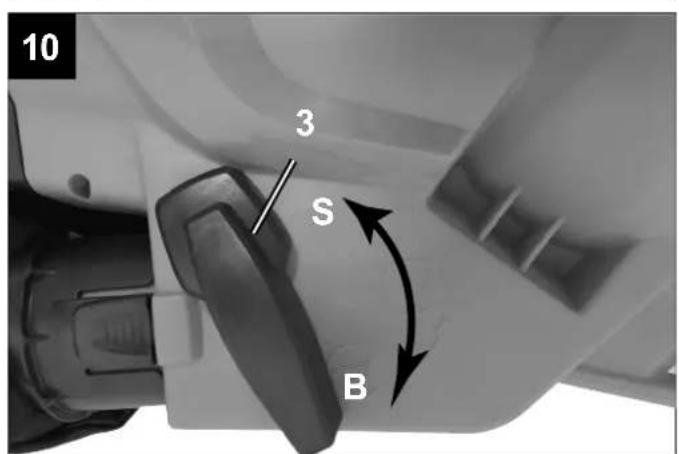
text_image
10 3 S B11
text_image
8 4 5 +Explanation of the symbols on the equipment

Caution - Read the operating instructions to reduce the risk of inquiry

Wear safety goggles!

Wear ear-muffs!

protective gloves!

ust protection mask!

bbust, non-slip footwear.
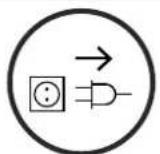
Remove plug from the mains immediately if the cable is damaged or cut.
text_image
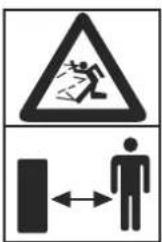
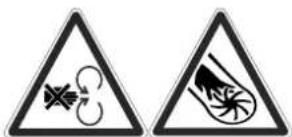
Warning sign showing a person slipping on a falling object above a vehicle, with bidirectional arrow indicating collision or displacement.Warning! Beware of thrown objects hit by cutting attachments. Never use without properly mounted blade guard. Keep bystanders away.

Warning! Long hair can be pulled in.
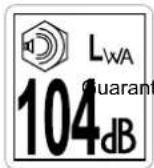
guaranteed sound power level L
WA 104dB
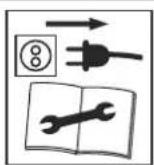
Switch off and unplug the device before cleaning or performing maintenance on it.

⚠ WARNING!
Don't use your device in moisty weather.
text_image
Two triangular warning signs with pictograms of a car and a turbine, indicating hazard or accident.⚠ WARNING!
Rotating fan blades can cause serious injury or cut. Keep hands clear. Switch off and unplug the device before servicing.

Protection class II
Table of contents:
Page:
- Introduction 8
- Device description 8
- Scope of delivery 8
- Intended use 8
- Safety information 9
- Technical data 10
- Before starting the equipment 10
- Assembly 11
- Operation 11
- Electrical connection 11
- Maintenance 12
- Storage 12
- Disposal and recycling 12
14 Spare-part ordering 12 - Troubleshooting 13
- Declaration of conformity 24
1. Introduction
MANUFACTURER:
GreatStar Europe Ltd., SO51 0HR
DEAR CUSTOMER,
we hope your new tool brings you much enjoyment and success.
NOTE:
According to the applicable product liability laws, the manufacturer of the device does not assume liability for damages to the product or damages caused by the product that occurs due to:
- Improper handling,
• Non-compliance of the operating instructions,
• Repairs by third parties, not by authorized service technicians,
• Installation and replacement of non-original spare parts,
• Application other than specified, - A breakdown of the electrical system that occurs due to the non-compliance of the electric regulations and VDE regulations 0100, DIN 57113 / VDE0113.
WE RECOMMEND:
Read through the complete text in the operating instructions before installing and commissioning the device. The operating instructions are intended to help the user to become familiar with the machine and take advantage of its application possibilities in accordance with the recommendations. The operating instructions contain important information on how to operate the machine safely, professionally and economically, how to avoid danger, costly repairs, reduce downtimes and how to increase reliability and service life of the machine.
In addition to the safety regulations in the operating instructions, you have to meet the applicable regulations that apply for the operation of the machine in your country. Keep the operating instructions package with the machine at all times and store it in a plastic cover to protect it from dirt and moisture. Read the instruction manual each time before operating the machine and carefully follow its information. The machine can only be operated by persons who were instructed concerning the operation of the machine and who are informed about the associated dangers. The minimum age requirement must be complied with.
In addition to the safety notices contained in this operating manual and the particular instructions for your country, the generally recognised technical regulations for the operation of identical devices must be complied with.
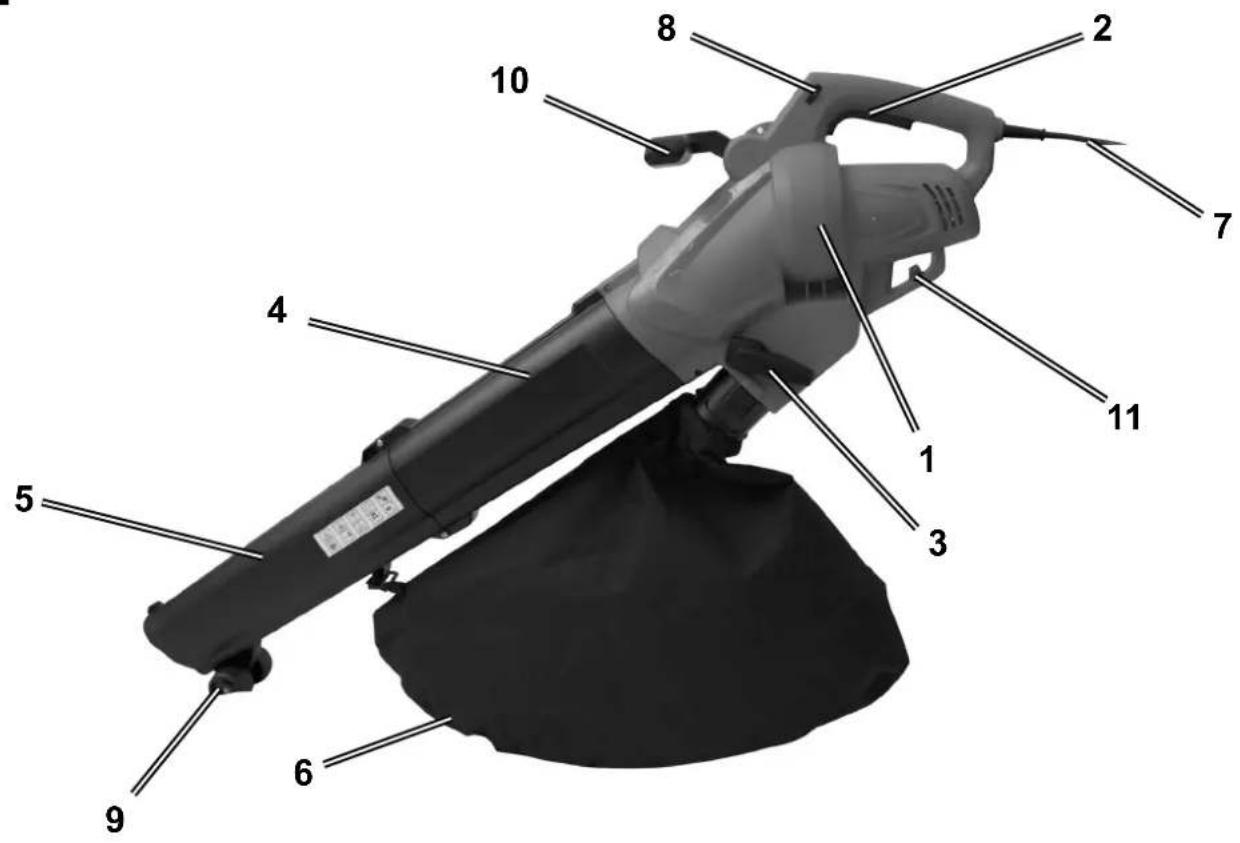
Layout (Fig 1-2)
- Motor housing
- On/Off switch
- Selection handle
- Upper intaketube
- Lower intaketube
- Collection bag
- Power cable
- Speed controller
- Wheels
- Front handle
- Cable strain relief
- Shoulder strap
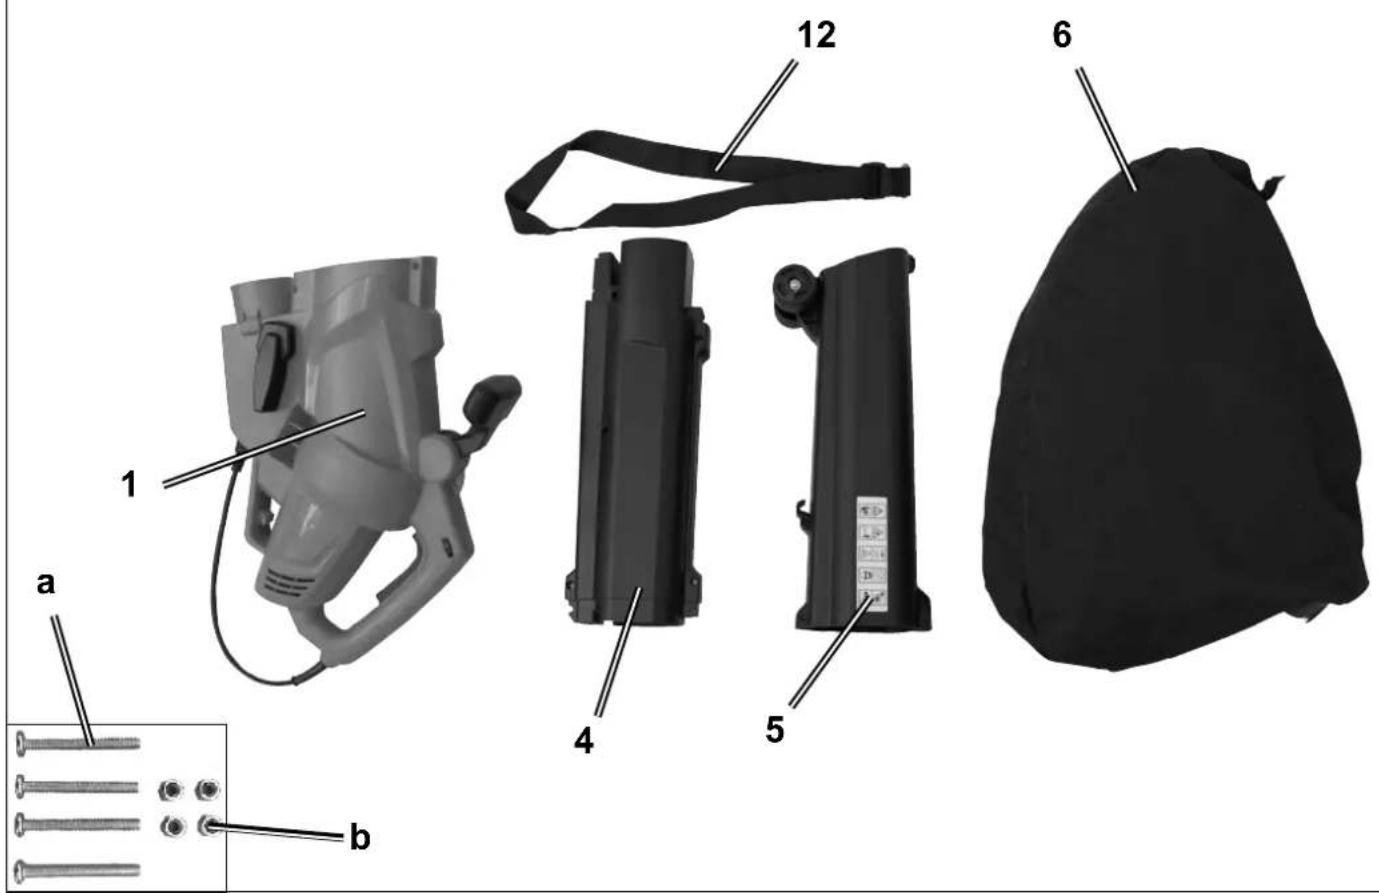
a. 4x Screw M4x35
b. 4x Nut M4
3. Scope of delivery
- Open the packaging and remove the device carefully.
- Remove the packaging material as well as the packaging and transport bracing (if available).
- Check that the delivery is complete.
- Check the device and accessory parts for transport damage.
-
If possible, store the packaging until the warranty period has expired.
-
Leaf Blower
- Shoulder strap
- Collection bag
- Manual
ATTENTION!
The device and packaging materials are not toys! Children must not be allowed to play with plastic bags, film and small parts! There is a risk of swallowing and suffocation!
4. Intended use
The garden blower vac is designed to handle only foliage and garden refuse such as grass and small branches. Any other use is prohibited.
The equipment is to be used only for its prescribed purpose. Any other use is deemed to be a case of misuse. The user / operator and not the manufacturer will be liable for any damage or injuries of any kind caused as a result of this.
Please note that our equipment has not been designed for use in commercial, trade or industrial applications. Our warranty will be voided if the machine is used in commercial, trade or industrial businesses or for equivalent purposes.
5. Safety information
General notes on safety
- The machine has been designed to be operated by one person.
- The device must not be used by people (including children) with limited physical, sensory or mental faculties or who lack the necessary experience and/or knowledge - other than they are supervised by a person responsible for safety or are being instructed to operate the trimmer by such a person.
- Children should be supervised to ensure that they do not play with the device.
- The device must not be operated by children. Laws and local regulations can determine a minimum age for use. Likewise, working with the device should never be allowed for persons who are not completely familiar with the operating instructions.
- The user is responsible for accidents and risks to other people and their property.
Caution! When using power tools, observe the following basic safety measures for the prevention of electric shocks and the risk of injury and fire:
Working with the device:
Familiarise yourself with all the unit's parts and correct operation of the unit before you start working with it. Make sure that you can immediately switch off the unit in an emergency. Improper use of the unit may lead to serious injury.
CAUTION: How to avoid accidents and injuries:
The personal protective equipment protects your own health and the health of others and ensures trouble-free operation of the device.
- Wear suitable working clothes such as robust footwear with anti-slip soles, rugged, long trousers, gloves, protective goggles and hearing protection. Do not use the device if you are barefoot or are wearing open sandals. Wear respiratory protection if you are working in a dusty environment. Wear a dust mask.
- Alway do a visual inspection before start working if the shredder mechanism, screws and other fasteners are secured. Also check the housing and all protective guards. Always replace worn or damaged parts in pairs to beware the balance. Replace damaged or unreadable labels.
- In very dry conditions, dampen the surface slightly in order to reduce the strain from dust.
- Refrain from wearing loose clothing or jewellery that could be drawn into the air intake nozzle. If you have long hair, use protective head covering.
- Check the operational serviceability and integrity of the device regularly in order to avoid danger to the operator.
- Do not allow other persons to touch the device or the extension cord. Keep the device away from persons, particularly children and domestic animals.
- Pay attention to open windows, children, pets, etc.
Stop working if children and pets are nearby. The blown material may fly in their direction. Maintain a safety distance around you of 5 m.
- Do not turn on the device if it is upside down or is not in working position.
- Do not point the device when it is working at persons, in particular, do not point the airstream at eyes and ears.
- Make yourself familiar with your surroundings and pay attention to possible dangers which, under certain circumstances, can be missed while working.
- While working, make sure that you are standing in a firm position – especially when you are on a slope. Always hold the device with both hands and work only with correctly adjusted shoulder carrying strap.
- Carefully inspect the surface to be cleaned and remove all wires, stones, cans and other foreign bodies.
- Keep fingers and feet away from the suction tube opening and impeller wheel. There is a danger of injury.
- Do not work with the device if you are tired or lack concentration or after the consumption of alcohol or tablets. Always take time out for a break. Work at a reasonable pace. Move slowly; do not run.
- Do not use the device in the rain, in bad weather or in a moist environment. Work in daylight or under good artificial lighting.
- Do not work with a device which is damaged, incomplete or altered without the approval of the manufacturer. Check the safety status of the device before use, in particular the power cable and the switch.
- Employ the device in a completely assembled condition only.
- Employ the device suction operating mode only when the collection bag is attached.
- Do not intake any burning, smouldering or smoking materials (e.g. cigarettes, embers etc.), fumes or easily inflammable, poisonous or explosive materials.
- Do not intake any moist or wet material or any liquids.
- Only use the replacement parts that are supplied and recommended by our Service Centre.
- Remove the plug from the plug socket
- when you are not using the device,
- transporting it or leaving it unattended;
- when you are checking the device, cleaning it or removing blockages;
- when you are carrying out cleaning or maintenance work or replacing accessories;
- when the power or extension cable is damaged; after contact with foreign bodies or in case of abnormal vibration;
- Do not use the device in closed or badly ventilated rooms. Do not use the device near inflammable liquids or gases. In case of non-observance of these directions, danger of fire or explosion exists.
- Keep the device in a dry location and out of reach of children.
- Keep all cooling air inlets clear of dirt.
CAUTION! The following states how damage to the trimmer and possible injury to people can be avoided:
- Handle the unit with care. Clean the ventilation slits regularly; keep to the maintenance instructions.
- Do not overload your device. Work only within the indicated range of performance. Do not employ any low power machines for heavy work. Do not use your device for purposes for which it has not been designed.
- Do not attempt to repair the appliance yourself unless you have specific training to do so. Leave any work not listed in this manual to our Service Centre.
- Check the grass bag regularly for wear or damage.
Electrical safety:
CAUTION! The following states how to avoid accidents and injuries due to electric shock:
- Make sure that the mains voltage is compatible with the information of the label.
- Connect the device, as far as possible, only to a plug socket with a groundfault circuit interrupter (g.f.c.i switch), with a rated residual current at not more than 30 mA.
- Check the device and the power cable with plug for damage before every use. Avoid bodily contact with grounded parts (e.g. metal fences, metal post).
- The coupling of the extension cord must be protected against splashed water, it must consist of rubber or be surrounded by rubber. Employ only extension cords which are stipulated for use in the open air and are marked accordingly. The flexible lead crosssection of the extension cord must at least 1.5 mm ^2 . Always roll out the cable drum completely before use. Check the cable for damage.
- Keep the cable away from the field of action and basically play it out behind the operator.
- Use the tension relief provided for the fixing of the extension cord.
- Do not carry the device by the cable. Do not use the cable to pull out the plug from the plug socket. Protect the cable against heat, oil and sharp edges.
- Damaged cables, coupling and plugs or connecting leads not corresponding to specifications, must not be employed. Remove the plug immediately from the plug socket in case of damage to the mains cable. Do not touch the mains power supply cable under any circumstances until you have pulled the plug out of the mains socket.
- If the power cable for this equipment is damaged, it must be replaced by the manufacturer, a customer service agent of the same or a similarly qualified person in order to prevent hazards.
- Do not use the appliance if the on/off switch does not work properly. Always have a damaged switch repaired by our Service Centre.
- Before each use, check the power supply lead and the extension cable for damage and ageing. Do not use the equipment if the cable is damaged or worn.
Residual risks
Even if you use this electric power tool in accordance with instructions, certain residual risks cannot be rules out. The following hazards may arise in connection with the equipment's construction and layout:
- Damage to hearing if no suitable ear protection is used.
- Health damage caused by hand-arm vibrations if the equipment is used over a prolonged period or is not properly guided and maintained.
- Remaining hazards can be minimized by following the instructions in Safety Precautions, Proper Use and in the entire operating manual.
Warning! This electric tool generates an electromagnetic field during operation. This field can impair active or passive medical implants under certain conditions. In order to prevent the risk of serious or deadly injuries, we recommend that persons with medical implants consult with their physician and the manufacturer of the medical implant prior to operating the electric tool.
6. Technical data
| Rated input voltage 230-240 V ~ 50 Hz | |
| Input power 3000 W | |
| Protection class II | |
| Safety class IPX20 | |
| Air capacity 11-13.5 m | ^3 /min |
| Air speed 275 km/h | |
| Shredding rate 10:1 | |
| Content of the collection bag | 45l |
| Sound pressure level ( L_pA ) 86,3 dB(A) | |
| Uncertainty K_pA | 3 dB(A) |
| Sound power level measured ( L_wA ) | 104 dB(A) |
| Sound power level guaranteed ( L_wA ) | 100,3 dB(A) |
| Uncertainty K_wA | 3,57 dB(A) |
| Vibration at the handle ( a_h ) 2,765 m/s | ^2 |
| Vibration additional grip ( a_h ) 2.765 m/s | ^2 |
| Uncertainty K 1.5 m/s | ^2 |
Noise and vibration
Total vibration values determined in accordance with EN 61029.
Wear hearing protection! The effects of noise can cause a loss of hearing. Total vibration values (vector sum - three directions) determined in accordance with EN 61029.
7. Before starting the equipment
Before you connect the equipment to the mains supply make sure that the data on the rating plate are identical to the mains data.
Warning!
Always pull the power plug before making adjustments to the equipment.
Start up the equipment only when fully assembled. Always inspect the power cable for damage before starting up. The equipment may be used only if the cable is in flawless condition.
8. Montage
⚠ Important!
You must fully assemble the appliance before using it for the first time!
Mounting the suction tube (Fig. 3-4)
- Plug the upper intaketube (4) into the motor housing (1). Lay in the first nut (b) into the hexagonal on the right side (in work direction). Now screw in the first screw (a) from the left. Same procedure for the second screw.
- Now stuck the lower intake tube (5) and upper intake tube (4) together. Fix them same procedure like the point above.
Note: Please note that the two vacuum tubes must always be joined together before they are mounted on the motor housing, and that they must never be taken apart when mounted!
Mount carrying strap (Fig. 5)
Hook the shoulder strap (12) into the attachment bar of the motor housing (1)
Mounting the collection bag (Fig. 6-8)
Hook in the collection bag (6) on the underside of the lower intaketube (5). Now stuck the collection bag (6) on the connection support of the motor housing (1). The collection bag (6) is only properly connected when the hooks snap in.
9. Operation
Sizing the strap
Size the length of the carrying strap so that the vacuum tube just clears the ground. The guide rollers (9) at the bottom end of the suction tube will help you to maneuver the suction tube on the ground.
Connecting the tool to the power supply and switching on (Fig. 1)
The tool can be plugged into any socket-outlet (with 230 V AC) that is equipped with a 10A fuse or higher. The socket-outlet has to be safeguarded by an earthleakage circuit breaker (e.l.c.b.). The operating current must not exceed 30 mA.
- To switch on, press and hold the ON/OFF switch (2).
- To switch off, let go of the ON/OFF switch (2).
Selecting the mode of operation
Suctioning (Fig. 9):
- Turn the selection handle (3) to position S. You can do this both when the device is at a standstill and while it is running.
- When suctioning, the device also works as a shredder what reduce the volume in ratio of 10:1. So there is more space for shredded material and it will be prepared for composting.
Blowing (Fig. 10):
- Turn the selection handle (3) to position B. You can do this both when the device is at a standstill and while it is running.
- Channel the air stream forward and walk slowly to blow foliage or garden refuse into a pile or to clear out hard-to-reach places.
Important! Empty the debris bag before blowing. Otherwise, the material that has been vacuumed up could drop out.
Emptying the collection bag
Empty the collection bag (6) in good time. When the bag is heavily loaded with material, vacuum power is considerably reduced. Deposit organic refuse at a compost site.
- Switch off the tool and pull out the plug.
- Open the zipper on the collection bag (6) and shake out the material.
- Close the zip on the collection bag (6) again.
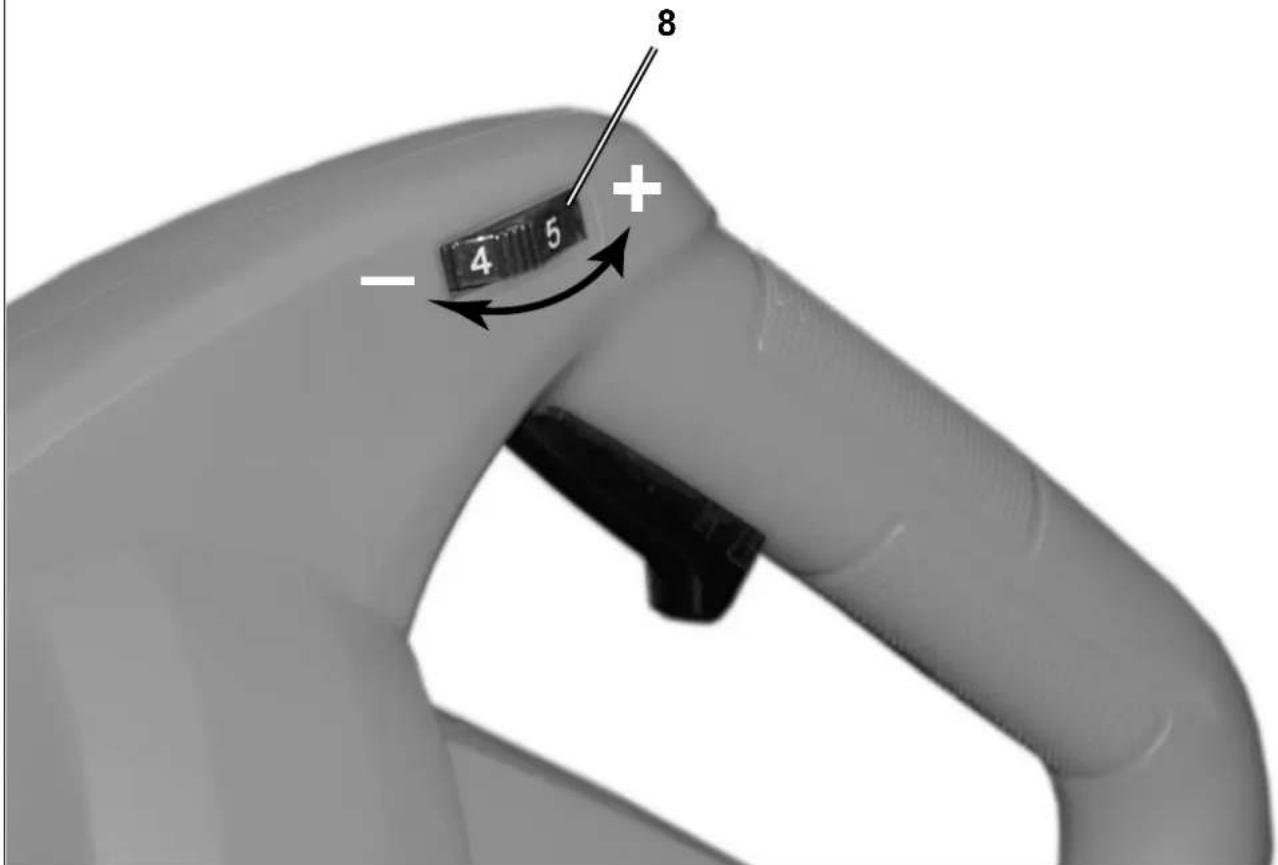
Speed control (Fig. 11)
The device is fitted with an electronic speed controller. To use it, turn the speed controller (8) to the desired position. Use the device only with the speed which is actually required and do not let it run at a speed which is faster than necessary.
10. Electrical connection
The electrical motor installed is connected and ready for operation. The connection complies with the applicable VDE and DIN provisions. The customer's mains connection as well as the extension cable used must also comply with these regulations.
Damaged electrical connection cable
The insulation on electrical connection cables is often damaged.
This may have the following causes:
- Passage points, where connection cables are passed through windows or doors.
- Kinks where the connection cable has been improperly fastened or routed.
- Places where the connection cables have been cut due to being driven over.
- Insulation damage due to being ripped out of the wall outlet.
- Cracks due to the insulation ageing.
Such damaged electrical connection cables must not be used and are life-threatening due to the insulation damage. Check the electrical connection cables for damage regularly. Make sure that the connection cable does not hang on the power network during the inspection.
Electrical connection cables must comply with the applicable VDE and DIN provisions. Only use connection cables with the marking „H05VV-F“.
The printing of the type designation on the connection cable is mandatory.
AC motor
- The mains voltage must be 230 V\~
- Extension cables up to 25 m long must have a cross-section of 1.5 mm^2 .
Connections and repairs of electrical equipment may only be carried out by an electrician.
Please provide the following information in the event of any enquiries:
• Type of current for the motor
• Machine data - type plate
• Machine data - type plate
11. Cleaning and maintenance
Danger!
Always pull out the mains power plug before starting any cleaning work.
Cleaning
- Keep all safety devices, air vents and the motor housing free of dirt and dust as far as possible. Wipe the equipment with a clean cloth or blow it with compressed air at low pressure.
• We recommend that you clean the device immediately each time you have finished using it. - Clean the equipment regularly with a moist cloth and some soft soap. Do not use cleaning agents or solvents; these could attack the plastic parts of the equipment. Ensure that no water can seep into the device.
• After shaking out the debris bag, turn it inside out and thoroughly clean it in order to prevent mould and unpleasant odors from forming. - You can use soap and water to clean out a heavily soiled debris bag.
- Rub a bar of dry soap across the zipper teeth if the zipper becomes difficult to pull.
- Clean the vacuum/blower tube with a brush upon evidence of dirt and grime.
- Dirt and grime can make the switch (blower/vacuum) more difficult to operate as a result of the material that swirls up off the ground. When this occurs, simply flip the switch back and forth a few times, which should bring it back to the normal feel.
Maintenance
- Should the tool experience problems beyond those mentioned above, let only an authorized professional or a customer service shop perform an inspection.
- There are no parts inside the equipment which require additional maintenance.
12. Storage
Store the equipment and accessories out of children's reach in a dark and dry place at above freezing temperature. The ideal storage temperature is between 5 and 30 °C. Store the electric tool in its original packaging.
13. Disposal and recycling
The equipment is supplied in packaging to prevent it from being damaged in transit. The raw materials in this packaging can be reused or recycled. The equipment and its accessories are made of various types of material, such as metal and plastic. Defective components must be disposed of as special waste. Ask your dealer or your local council.
Old devices must not be disposed of with household waste!

This symbol indicates that this product must not be disposed of together with domestic waste in compliance with the Directive (2012/19/EU) pertaining to waste electrical and electronic equipment (WEEE). This product must be disposed of at a designated collection point. This can occur, for example, by handing it in at an authorised collecting point for the recycling of waste electrical and electronic equipment. Improper handling of waste equipment may have negative consequences for the environment and human health due to potentially hazardous substances that are often contained in electrical and electronic equipment. By properly disposing of this product, you are also contributing to the effective use of natural resources. You can obtain information on collection points for waste equipment from your municipal administration, public waste disposal authority, an authorised body for the disposal of waste electrical and electronic equipment or your waste disposal company.
14. Spare-part ordering
Please quote the following in your order for spare parts:
- Type of device
• Article No. of deviceident. No. of device - Spare Part No. of the required spare part
Service information
Please note that the following parts of this product are subject to normal or natural wear and that the following parts are therefore also required for use as consumables.
Wear parts*: Collection bag.
* Not necessarily included in the scope of delivery!
- Troubleshooting guide
| Problem Possible cause Fault correction | ||
| Device does not start | Mains voltage is not present | Check plug socket, cable, line, plug and fuse, where appropriate, repair through electrical specialist |
| Defective on/off switch | Repair through customer service | |
| Worn carbon brushes | ||
| Defective motor | ||
| Blowing/suction pipe is not completely fitted | Install a two-part blowing/suction pipe | |
| Device works with interruptions | Damaged power cable Check cable; where appropriate, replace | |
| Internal loose connection | Repair through customer service | |
| Defective on/off switch | ||
| Low suction capacity or suction not present | Collection bag is full Empty collection bag | |
| Collection bag is dirty Clean collection bag | ||
| Selector switch in incorrect position | Set selector switch to the suction symbol | |
| Device clogged up or blocked by foreign bodies | Remove plug or blockages (see chapter Cleaning and Maintenance) | |
| Small or missing blowing power | Selector switch in incorrect position | Set selector switch to the blowing symbol |
| Airstream regulator in incorrect position | Rotate airstream regulator to high position | |
| Device works with interruptions | Foreign body blocks impeller wheel | Remove blockage |
text_image
Warning sign with pictogram of falling object and human figure, indicating hazard or accidenttext_image
Two triangular warning signs with symbols: a cross symbol and a wind turbine, indicating hazard or accident.ATTENTION!
text_image
Exploded view diagram of a handheld device with numbered parts for identification
natural_image
A plain gray horizontal line with no text, symbols, or markings.
natural_image
Completely black image with no visible content or text.EC Declaration of Conformity
We,
GreatStar Europe LTD., SO51 0H R
Declare that the product
Description
3-in-1 Blower Vac
Complies with the following
Directives,
2014/35/EU
2014/30/EU
2006/42/EC
2000/14/EC 2005/88EC
RoHS Directive
2011/65/EU
Standards conform to:
EN60335-1
EN55014-1
EN55014-2
EN61000-3-2
EN61000-3-3
EN62233
The person authorised to complies the technical file,
Names: James Bingham
Adress: GreatStar Europe Ltd., SO510H R
text_image
JBOe
text_image
C€17/08/2017
James Bingham
Operations Director