CB6081 Largo Type 6502 Serie 1 - Barbecue TEFAL - Free user manual and instructions
Find the device manual for free CB6081 Largo Type 6502 Serie 1 TEFAL in PDF.

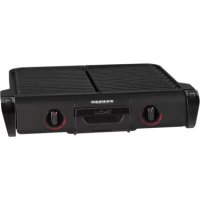
| Product type | Electric barbecue |
| Brand | Tefal |
| Model | CB6081 Largo Type 6502 Serie 1 |
| Power supply | 220-240 V with earth connection |
| Electrical protection | Residual current device 30 mA |
| Control type | Removable control unit with adjustable thermostat |
| Thermostat | Adjustable from min to max |
| Preheating time | Approximately 10 minutes |
| Cooking capacity | Meats, fish, skewers, vegetables |
| Coating | Non-stick on grill plate and lid |
| Included accessories | Support feet, storage rack, drip tray, control unit |
| Care and cleaning | Clean with sponge, hot water and dish soap. Do not use metal sponge. Do not immerse control unit. |
| Safety | Do not use empty, do not close lid with control unit inserted, do not use unattended, replace damaged cable by a professional. |
| Use | Household only, protected from weather and humidity |
| Storage | Dry place, away from sun and frost |
Frequently Asked Questions - CB6081 Largo Type 6502 Serie 1 TEFAL
User questions about CB6081 Largo Type 6502 Serie 1 TEFAL
0 question about this device. Answer the ones you know or ask your own.
Ask a new question about this device
Download the instructions for your Barbecue in PDF format for free! Find your manual CB6081 Largo Type 6502 Serie 1 - TEFAL and take your electronic device back in hand. On this page are published all the documents necessary for the use of your device. CB6081 Largo Type 6502 Serie 1 by TEFAL.
USER MANUAL CB6081 Largo Type 6502 Serie 1 TEFAL
natural_image
Outdoor setup featuring a portable grill with cutlery and various food items, placed on gravel (no visible text or symbols)natural_image
3D mechanical component diagram showing a rectangular frame with a coiled spring and mounting holes (no text or symbols)natural_image
3D mechanical assembly diagram showing a bracket with labeled parts (no text or symbols present)natural_image
Technical diagram of a two-tiered mechanical structure with labeled parts (8 and 6), no readable text or symbols beyond labelsnatural_image
Illustration of a simple outdoor table with a rectangular top and four legs, featuring a rack and a handle (no text or symbols)natural_image
Line drawing of a simple four-legged stool with a lid and side railing (no text or symbols)
natural_image
Diagram of a device with an open lid and internal components, showing a blue arrow pointing to a component (no text or symbols present)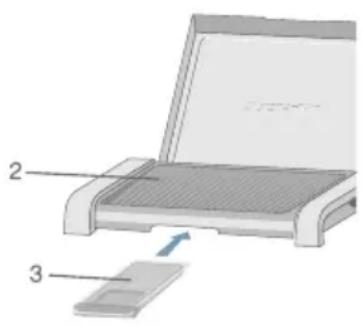
natural_image
Diagram of a device with an open lid and a base component, showing no text or symbols.natural_image
Line drawing of a four-legged table with a flat top and a small object on the lower side (no text or symbols)Côtelette .....10 minutes ....150 g
Thon (tranche) .....8 minutes ....200 g
Sole (filet) 5 minutes . . .200 g
Saumon . . . . . . . . . . . . . . . . . . . . . . . . . . . . . . . . . . . . . . . . . . . . . . . . . . 6 minutes ....200 g
Thank you for buying this TEFAL appliance, which is intended for domestic use only. Read the instructions in this leaflet carefully and keep them safe.
To use your electric barbecue safely, always use and store it sheltered from bad weather and humidity.
TEFAL has an ongoing policy of research and development and may modify these products without prior notice.
Before first use
Remove all packaging, stickers or miscellaneous accessories inside and outside the appliance. Clean the protective cover (1), the grill plate (2) and the juice collection tray (3): follow the instructions provided in the "After use" paragraph.
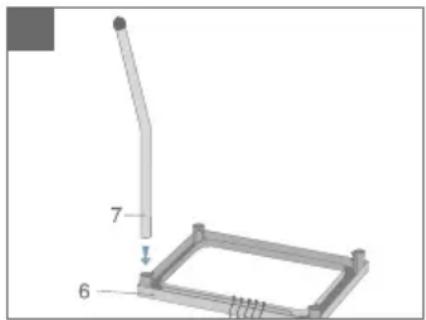
Assemble the support legs:
natural_image
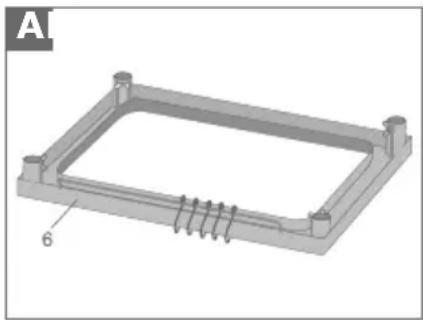
3D mechanical component diagram showing a rectangular frame with a coiled spring and mounting holes (no text or symbols)Place the support frame (6) upside down on a flat, stable surface.
natural_image
Mechanical assembly diagram showing a lever and base plate with labeled parts (no text or symbols present)Insert a straight tube (7) into each corner of the support frame (6); then tighten the butterfly nut.
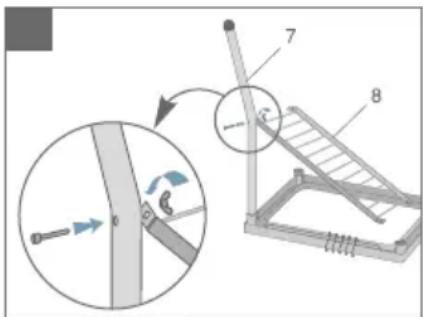
Insert a bolt into the leg (7), from the outside, and then tighten using a butterfly nut, inserting a corner of the storage rack (8).
natural_image
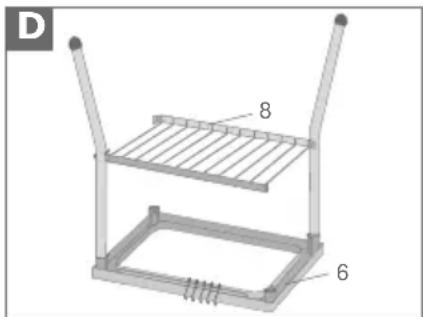
Technical diagram of a metal rack structure with labeled components (8 and 6), no readable text or symbols beyond labelsRepeat steps C and D with the opposite side of the support frame (6), in order to stabilise the storage rack (8) horizontally.
natural_image
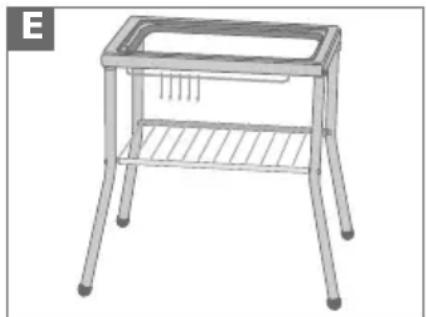
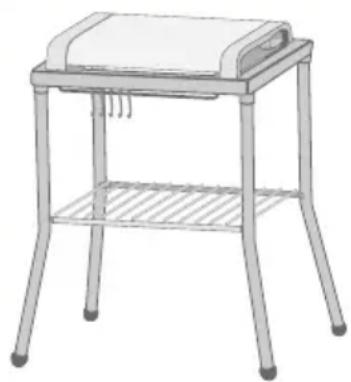
Illustration of a simple kitchen sink with a tray and side legs (no text or symbols)Finish the other two legs before turning the support legs up the right way.
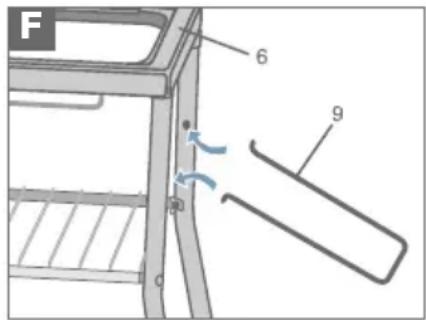
Insert the support wires (9) into the legs, on either side of the support frame (6).
natural_image
Line drawing of a simple four-legged stool with a lid and side railing (no text or symbols)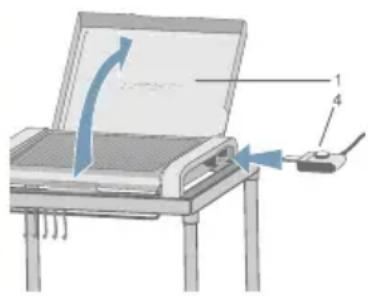
Plugging in and preheating
Place the appliance on its support legs or on a stable surface.
Avoid using "Bulgomme" tablecloth type plaint supports.
Never place the appliance directly on a fragile support (glass table, tablecloth, varnished furniture, etc.).
To avoid overheating of the appliance, never place it in a corner or against a wall.
Unroll the cord completely.
Check that the electrical installation is compatible with the power and voltage indicated on the bottom of the appliance.
Only plug the appliance into earthed sockets.
Supply the appliance through a residual current device (RCD) having a tripping current not exceeding 30 mA.
If an extension cord is used:
- this must be earthed and rated accordingly;
- take all precautions necessary to ensure that no one will get tangled in it.
The supply cord should be regularly examined for signs of damage and the appliance is not to be used if the cord is damaged.
If the power supply cord is damaged, it must be replaced by the manufacturer or its service agent or a similarly qualified person in order to avoid a hazard.
Open the protective cover (1).
Insert the control unit (4) fully into the appliance and then plug into the mains: the pilot lamp lights up.
The control unit (4) cannot be inserted when the cover is closed.
Do not use any other control unit (4) other than the one supplied with your appliance.
Never plug in the appliance while the protective cover (1) is closed.
Never leave the appliance plugged in while it is not in use.
Never use the appliance when empty.
Do not use charcoal or any other combustible material in the appliance.
Set the thermostat to the Max position.
Allow the appliance to preheat for approximately 10 minutes.
Upon first use, a slight odour or small amount of smoke may be released during the first few minutes - this is normal.
Never leave the appliance unattended.
Cooking
After preheating, the appliance is ready to be used.
Set the thermostat to the desired position.
Set the thermostat by adjusting the position of the thermostat to the temperature that you desire so that it faces the pilot light.
Allow it to cook as much as required.
Do not cook food in tinfoil.
Never place tinfoil or any other object between the grill plate (2) and foods to be cooked.
Never heat a cooking utensil on the appliance.
Never touch the metallic parts of the appliance while it is heating or in operation because these are very hot.
Do not close the protective cover (1) when the control unit (4) is inserted in the appliance.
Cooking juices drip into the juice collection tray (3).
Never withdraw the juice collection tray (3) during cooking.
If cooking a large quantity of meat, empty the juice collection tray (3) after cooking a batch of meat and before starting a new batch of meat to be cooked.
After use
Set the thermostat to the Min. position.
Unplug the lead from the mains: the pilot lamp goes out.
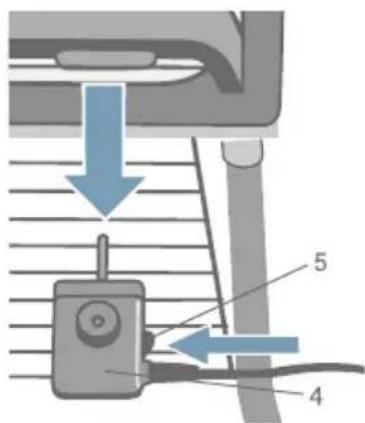
Next, remove the control unit (4) from the appliance by pressing on the latch (5) to unlock it.
Allow the appliance to cool.
Remove the support legs.
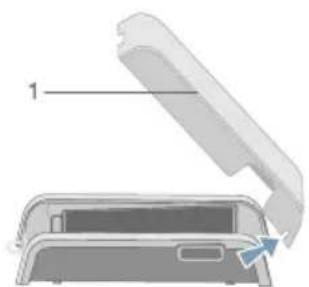
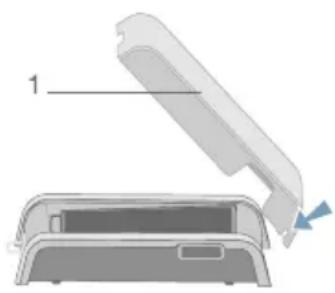
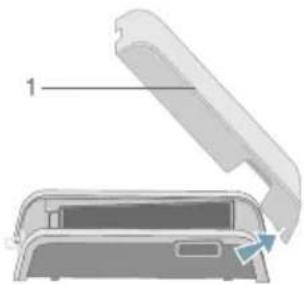
Remove the protective cover (1) from the appliance by opening it to mid-height and then lifting it from the back of the appliance.


natural_image
Diagram of a device with an open lid and internal casing, showing a blue arrow indicating direction (no text or symbols present)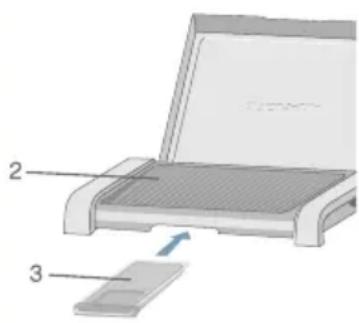
The protective cover (1), the grill plate (2) and the juice collection tray (3) may be cleaned with the sponge, hot water and washing up liquid.
Never use a metallic sponge or scouring powder as this could damage the non-stick coating inside the protective cover (1) and on the grill plate (2).
The grill plate (2) may be easily cleaned without any risk when the control unit (4) is removed from the appliance.
While cleaning the appliance, make sure you do not twist the pins of the heating element.
Never submerge the appliance in water with the control unit (4) and the cord.
Storage
Insert the juice collection tray (3) in the front of the appliance, under the grill plate (2).
natural_image
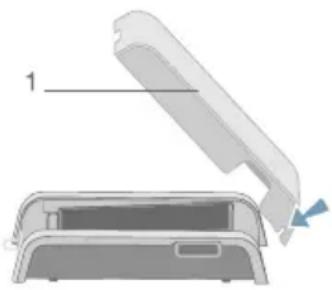
Diagram of a device with an open lid and a base, showing a blue arrow indicating direction (no text or symbols present)Insert the protective cover (1) at the back of the appliance, as shown in the drawing opposite.
natural_image
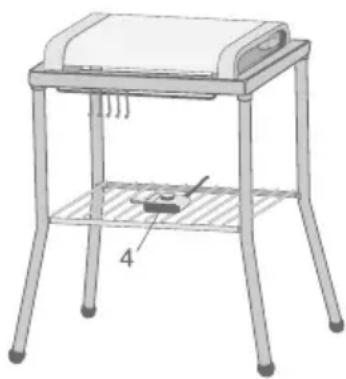
Line drawing of a four-legged table with a flat top and a small electronic device on the lower side (no text or symbols)Close the protective cover (1) to protect the grill plate (2).
The protective cover (1) will not close correctly while the control unit (4) is inserted in the appliance.
Do not insert the control unit (4) in the appliance.
Place the appliance on its support legs.
Store the appliance and control unit (4) in a dry place. Never store the appliance in direct sunlight or leave it outside during winter.
For U.K. users only:
ADDITIONAL INFORMATION AND INSTRUCTIONS WIRING INSTRUCTIONS
WARNING : ALL APPLIANCES MUST BE EARTHED.
IMPORTANT : the wires in this lead are coloured in accordance with the following codes.
Green and Yellow : Earth
Blue : Neutral
Brown : Live
Connect the Green/Yellow wire to the terminal in the plug marked "E" (or by the earth symbol) or coloured Green and Yellow.
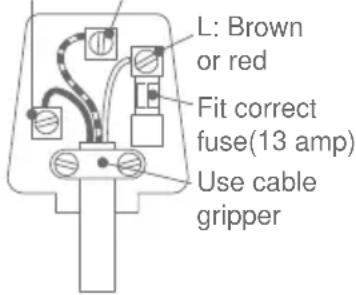
Connect the Brown wire to the terminal in the plug marked "L" or coloured Red.
N: Blue E: Green and or black yellow or green
Connect the Blue wire to the terminal in the plug marked "N" or coloured Black.
Seek professional advice if you are unsure of the correct procedure for the above.
ABOUT YOUR FACTORY FITTED PLUG
The cord is already fitted with a plug incorporating an appropriate fuse. If the plug does not fit your socket outlet, see paragraph below. Should you need to replace the fuse in the plug supplied, an appropriately rated approved BS 1362 fuse must be used (refer to electrical specification for fuse rating).
If the plug supplied does not fit your socket outlet, it should be removed from the mains lead and disposed of safely. The flexible cord insulation should be stripped back as appropriate and a suitable alternative plug fitted. The replacement plug must be equipped with an appropriate fuse. If the plug has external access to the fuse (non-rewirable type plug) please note that the fuse cover is an important part of the plug. Please ensure that it is always refitted correctly. If you lose this cover, please do not use the plug. You may contact Tefal U.K. Limited for a replacement.
Recipes
Cooking charts
Cooking times are provided for reference purposes only, and can vary depending on individual taste.
Cooking time Quantity per surface
BEEF
Steak . . . . . . . . . . . . . . . . . . . . . . . . . . . . . . . . . . . . . . . . . . . . . . 3 minutes . . . . . . 150 g
Boneless rib steak . . . . . . . . . . . . . . . . . . . . . . . . . . . 3 minutes . . . . . . 150 g
Hamburger . . . . . . . . . . . . . . . . . . . . . . . . . . . . . . 4 minutes . . . . . . 100 g
T-Bone steak . . . . . . . . . . . . . . . . . . . . . . . . . . . . . . . . . . . . . . . . . . . . . 6 minutes . . . . . . 200 g
Satay (skewers of beef marinated in a soya based sauce) .....5 minutes .....piece
CHICKEN
Thigh (with spices, marinated) .....10 minutes .....piece
Wing (with spices, marinated) .....6 minutes .....piece
Breast . . . . . . . . . . . . . . . . . . . . . . . . . . . . . . . . . . . . . . . . . . . . . . . 9 minutes . . . . . . 150 g
Satay 7 minutes . . . . .piece
PORK
Chop 10 minutes 150 g
Sausage 8 minutes . . . .piece
Satay 7 minutes . . . .piece
MISCELLANEOUS
Lamp chop . . . . . . . . . . . . . . . . . . . . . . . . . . . . . . . . . . . . . . . . . . . . . . . 7 minutes . . . . . . 150 g
Merguez (spicy sausage) .....5 minutes .....piece
Meat skewers .....10 minutes .....piece
FISH
Trout 5 minutes . . . . .piece
Mackerel 4 minutes . . . . .piece
Red mullet (fillet) .....5 minutes .....piece
Sardine . . . . . . . . . . . . . . . . . . . . . . . . . . . . . . . . . . . 3 minutes . . . . . .piece
Plaice 4 minutes . . . .piece
Tuna (slice) 8 minutes .200 g
Sole (fillet) 5 minutes .200 g
Salmon . . . . . . . . . . . . . . . . . . . . . . . . . . . . . . . . . . . . . . . . . . . . . . . 6 minutes . . . . . . 200 g
Skewer . . . . . . . . . . . . . . . . . . . . . . . . . . . . . . . . . . . . . . . . 5 minutes . . . . . .piece
Some cooking tips
To cook a small quantity of mixed grill, we recommend that you use the part of the cooking plate located around the control unit (4).
When cooking food that releases a lot of juice (e.g.: sausages), remember to empty the juice collection tray (3) regularly in order to avoid any overflow (remember: empty the juice collection tray (3) after cooking a batch of meat and before starting a new batch of meat to be cooked).
If you prefer a more spicy kebab or mixed grill, marinate your meat.
Marinade
For 300 ml of classic marinade
Preparation: 5 minutes
- 150 ml dry white wine vinegar • 150 ml dry white wine • 1 large onion • 6 cloves - 2 bay leaves • 6 black pepper corns • salt
Peel the onion and cut it into strips. Grind the pepper and break the bay leaves into small pieces. Mix all the ingredients in a bowl. Put the meat at the bottom of a hollow plate and pour the marinade over. Leave in the fridge for 5 hours for kebabs, steaks, veal chops. Turn the meat from time to time using a wooden spoon.
Mixed grills
Beef fillet with garlic and parsley
Per portion: • 1 slice of fillet, 150 g • chopped garlic and parsley • salt • pepper Grill the fillets for approximately 3 minutes per side. Sprinkle with the garlic-parsley mixture when halfway through cooking.
"Mustard" boneless rib steak
Per portion: • 200 g rib steak • 1 tsp of mustard • salt • pepper
Spread the mustard on the meat, season and grill approximately 4 minutes per side.
Beef rib roast
Pour 4 people: • 1 kg rib roast • Herbes de Provence (a blend of thyme, rosemary, basil, savory and marjoram) • salt • pepper
Season the meat with salt, pepper and Herbes de Provence. Cook for approximately 8 minutes, turning while cooking.
Mixed grills
Lamp chops with basil
Per portion: • one 150 g lamp chop • 1 clove of garlic • oil • fresh chopped basil • salt • pepper
Crush the garlic with the salt, pepper and oil. Add the basil, smear this mixture onto the chops and cook for approximately 7 minutes per side.
Chicken fillet in "diable" sauce
Per portion: • one 150 g chicken filet • 1/2 concentrated meat stock cube • 2 glasses of dry white wine • 2 shallots • 1 tsp of mustard • salt • Cayenne pepper
For the "diable" sauce: bring the white wine to the boil with the chopped shallots and reduce by half. Mix in the half-cube and Cayenne pepper, remove from heat and add mustard. Cook the meat approximately 6 minutes per side. Pour the sauce over the meat.
Salmon with "mint" sauce
Per portion: • one 200 g salmon filet • mint sauce for 4 people: 1 egg yolk, 1 small pot of crème fraîche, 1 small handful of fresh chopped mint, 1 glass of court-bouillon (stock for cooking fish and shell fish), salt and pepper
Cook the filets for approximately 6 minutes per side, turning carefully with a spatula. Prepare the sauce by mixing the egg yolk, crème fraîche, chopped mint, court-bouillon. Season and then heat slowly whisking gently until it boils.
Red mullet, sardines, tuna fillets, "sea-side" style
Per portion: • 3 red mullet or 4 sardines or one 200 g tuna fillet • oil • 1/2 lemon • 1 knob of butter • salt • pepper
Smear the fish with oil, season. Cook for approximately 5 minutes per side for goatfish, 3 minutes per side for sardines, and approximately 8 minutes per side for tuna filet. Serve with melted butter and lemon quarters.
Kebabs
Beef and tomato kebabs
For 6 people: • 900 g of sirloin steak • 24 button mushrooms • 24 small white onions • 3 tomatoes • seasoning: 2 tbsp of oil, salt and pepper
Cut the beef into 3 cm cubes. Cut the tomatoes into quarters.
Skewer, alternating between beef, vegetables and mushrooms.
Brush each kebab with the seasoning.
Cooking time: 10 minutes.
Pork and pineapple kebabs
For 6 people: • 1 kg loin of pork • 1 tin of pineapple chunks • seasoning: 2 tbsp of oil, salt, pepper and Tabasco (a few drops)
Cut the meat into 3 cm cubes.
Skewer, alternating between pork and pineapple.
Brush each kebab with seasoning.
Cooking time: approximately 25 minutes.
Veal kebabs
For 6 people: • 1 kg chump of veal • 1 aubergine • 24 small white onions • seasoning: 2 tbsp of oil, salt and pepper
Cut the meat into 3 cm cubes.
Skewer, alternating between veal and vegetables.
Brush each kebab with seasoning.
Cooking time: approximately 20 minutes.
Kebabs
Curried salmon kebab
For 6 people: • 800 g fresh salmon filet • 20 pink shrimp (peeled) • 2 limes
- 1 tsp of curry • 1 tbsp of melted butter • salt • pepper
Cut the fresh salmon into 3 cm cubes, cut the lemons into slices and then into two.
Skewer, alternating between pieces of salmon, shrimp and lemon.
Brush each kebab with melted butter, season and sprinkle with curry.
Cooking time: approximately 15 minutes.
Rack of lamb kebabs Provencal style
For 6 people: • 900 g of rack of lamb • 6 cherry tomatoes • 24 small button mushrooms • 12 small white onions • seasoning: 2 tbsp of oil, salt, pepper and herbes de Provence
Cut the meat into 3 cm cubes, brush each kebab with seasoning.
Cooking time: approximately 20 minutes.
natural_image
3D mechanical component diagram showing a rectangular frame with a coiled spring and mounting holes (no text or symbols)natural_image
Mechanical assembly diagram showing a bracket with labeled parts (no text or symbols present)natural_image
3D diagram of a two-tiered storage or rack system with labeled components (no text or symbols beyond labels)natural_image
Illustration of a simple metal table with a rectangular top and four legs, no text or symbols present.natural_image
Line drawing of a four-legged stool with a flat top and side railing (no text or symbols)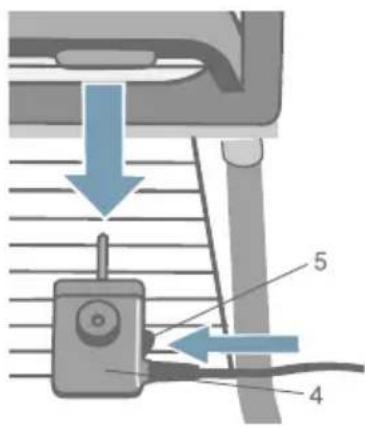
natural_image
Diagram of a device with an open lid and a base panel, showing no text or symbols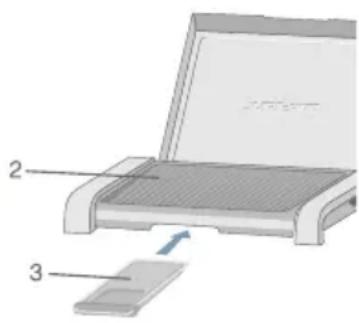
natural_image
Diagram of a device with an open lid and a base, showing a blue arrow indicating rotation (no text or symbols present)