FRAE1626AW - Fridge FRIGIDAIRE - Free user manual and instructions
Find the device manual for free FRAE1626AW FRIGIDAIRE in PDF.


User questions about FRAE1626AW FRIGIDAIRE
0 question about this device. Answer the ones you know or ask your own.
Ask a new question about this device
Download the instructions for your Fridge in PDF format for free! Find your manual FRAE1626AW - FRIGIDAIRE and take your electronic device back in hand. On this page are published all the documents necessary for the use of your device. FRAE1626AW by FRIGIDAIRE.
USER MANUAL FRAE1626AW FRIGIDAIRE
Door Removal/Reversal....9
Controls and Settings....13
Storage Features....16
Saving Energy 17
Care and Cleaning ....18
Troubleshooting 19
Limited Warranty 22
A31502101 (September 2025)
Welcome to our family
Thank you for bringing Frigidaire into your home! We see your purchase as the beginning of a long relationship together.
This manual is your resource for the use and care of your product. Please read it before using your appliance. Keep it handy for quick reference. If something doesn't seem right, the troubleshooting section will help you with common issues.
FAQs, helpful tips and videos, cleaning products, and kitchen and home accessories are available at Frigidaire.com.
We are here for you! Visit our website, chat with an agent, or call us if you need help. We may be able to help you avoid a service visit. If you do need service, we can get that started for you.
Let's make it official! Be sure to register your product.
Keep your product info here so it's easy to find.
Model Number ____
Serial Number ____
Purchase Date ____

WARNING
Please read all instructions before using this appliance.
Safety Definitions
This is the safety alert symbol. It is used to alert of potential personal injury hazards. Obey all safety messages that follow this symbol to avoid possible injury or death.

DANGER
DANGER indicates an imminently hazardous situation which, if not avoided, will result in death or serious injury.

WARNING
WARNING indicates a potentially hazardous situation which, if not avoided, could result in death or serious injury.

CAUTION
CAUTION indicates a potentially hazardous situation which, if not avoided, may result in minor or moderate injury.

IMPORTANT
IMPORTANT indicates installation, operation or maintenance information which is important but not hazard-related.

DANGER

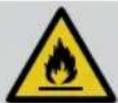
DANGER Risk of fire or explosion. Flammable refrigerant used. Do not use mechanical devices to defrost refrigerator. Do not puncture refrigerant tubing.
DANGER Risk of fire or explosion. Flammable refrigerant used. To be repaired only by trained service personnel. Use only manufacturer-authorized service parts. Any repair equipment used must be designed for flammable refrigerants. Follow all manufacturer repair instructions. Do not puncture refrigerant tubing.

WARNING
CALIFORNIA RESIDENTS ONLY Cancer and Reproductive Harm www.P65Warnings.ca.gov

CAUTION

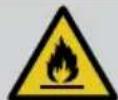
CAUTION Risk of fire or explosion. Dispose of refrigerator properly in accordance with the applicable federal or local regulations. Flammable refrigerant used.
CAUTION Risk of fire or explosion due to puncture of refrigerant tubing. Follow handling instructions carefully. Flammable refrigerant used.
Safety Instructions
- DO NOT store or use gasoline, or other flammable liquids, or aerosols within or in the vicinity of this or any other appliance. Read product labels for warnings regarding flammability and other hazards.
- DO NOT store explosive substances such as aerosol cans with a flammable propellant in this appliance.
- DO NOT operate the refrigerator in the presence of explosive fumes.
- Avoid contact with any moving parts of automatic ice maker.
- Remove all staples from the carton. Staples can cause severe cuts, and also destroy finishes if they come in contact with other appliances or furniture.

WARNING
Do not use electrical appliances inside the food storage compartments of the appliance unless they are of the type recommended by the manufacturer.
Child Safety
This appliance is not intended for use by persons (including children) with reduced physical, sensory or mental capabilities, or lack of experience and knowledge, unless they have been given supervision or instruction concerning use of the appliance by a person responsible for their safety.
Destroy or recycle the carton, plastic bags, and any exterior wrapping material immediately after the refrigerator is unpacked. Children should NEVER use these items to play. Cartons covered with rugs, bedspreads, plastic sheets or stretch wrap may become airtight chambers, and can quickly cause suffocation.
Proper Disposal of your Appliance
Risk of child entrapment
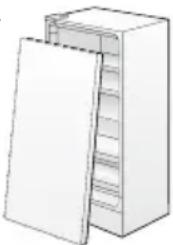
Child entrapment and suffocation are not problems of the past. Junked or abandoned appliances are still dangerous – even if they will sit for “just a few days”. If you are getting rid of your old appliance, please follow the instructions below to help prevent accidents.
We strongly encourage responsible appliance recycling/disposal methods. Check with your utility company or visit energystar.gov/products/recycle for more information on recycling your old appliance.
natural_image
Illustration of a closed storage cabinet with one lid open, showing internal shelves (no text or symbols)Before you throw away your old appliance:
- Remove door.
- Leave shelves in place so children may not easily climb inside.
- Have refrigerant removed by a qualified service technician.

WARNING
Do not locate multiple portable socket-outlets or portable power supplies at the rear of the appliance

WARNING
When positioning the appliance, ensure the supply cord is not trapped or damaged.

WARNING
These guidelines must be followed to ensure that safety mechanisms in this appliance will operate properly.
Electrical information
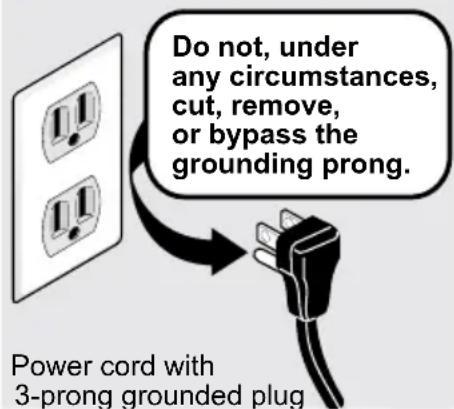
- Refer to the serial plate for correct electrical rating. The power cord of the appliance is equipped with a three-prong grounding plug for your protection against electrical shock hazards. It must be plugged directly into a properly grounded three-prong receptacle, protected with a 15-amp time delay fuse or circuit breaker. The
receptacle must be installed in accordance with the local codes and ordinances. Consult a qualified electrician. Do NOT use an extension cord or adapter plug.
- If the power cord is damaged, it should be replaced by an authorized service technician to prevent any risk.
- Never unplug the appliance by pulling on the power cord. Always grip the plug firmly, and pull straight out from the receptacle to prevent damaging the power cord.
- Unplug the appliance before cleaning and before replacing a light bulb to avoid electrical shock.
- If voltage varies by 10% or more, appliance performance may be affected. Operating the unit with insufficient power can damage the motor. Such damage is not covered under the warranty. If you suspect your household voltage is high or low, consult your power company for testing.
- To prevent the appliance from being turned off accidentally, do not plug unit into an outlet controlled by a wall switch or pull cord.
- Do not pinch, knot, or bend power cord in any manner.

IMPORTANT
To turn off power to your appliance you must unplug the power cord from the electrical outlet.
Grounding type wall receptacle
text_image
Do not, under any circumstances, cut, remove, or bypass the grounding prong. Power cord with 3-prong grounded plug
WARNING
Turning the control to OFF turns off the compressor, but does not disconnect power to other electrical components.
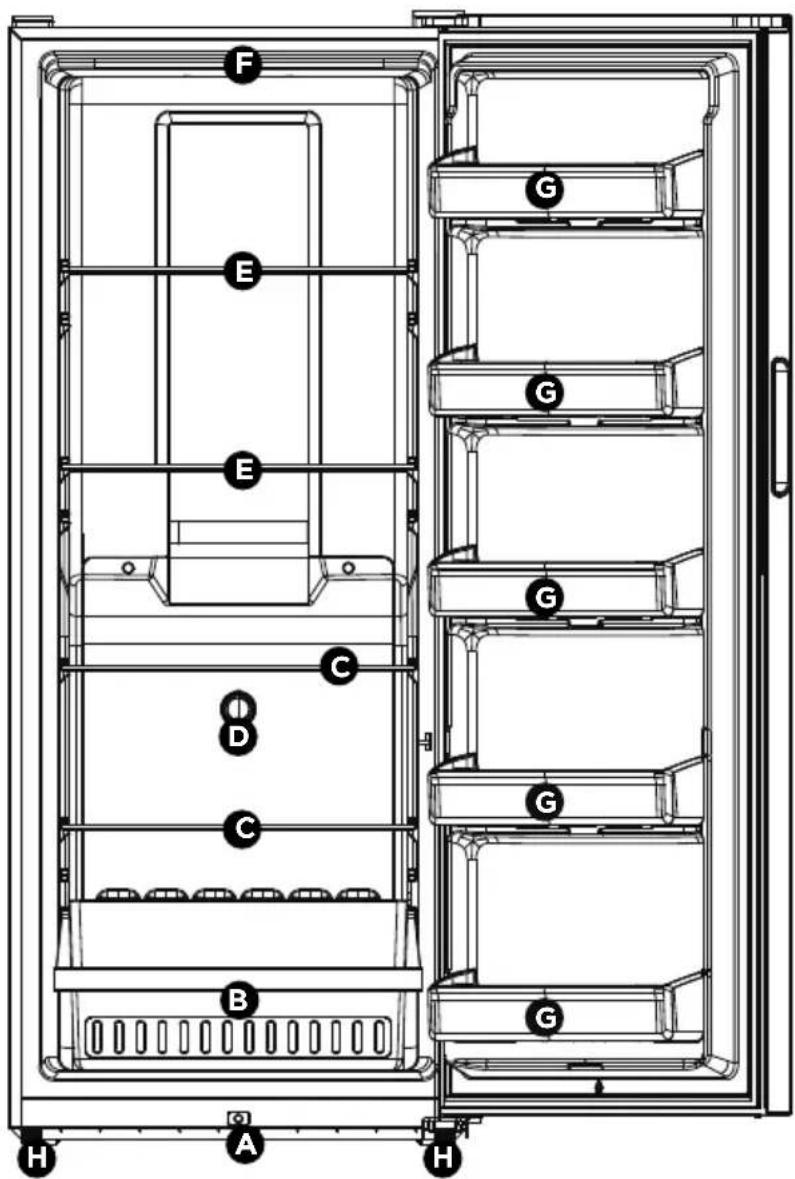
Features may vary according to model
text_image
F E E C D C B H A H G G G G| A | Power On LED |
| B | Plastic Drawer |
| C | Short-Depth Shelves |
| D | Temperature Control Knob |
| E | Full-Depth Shelves |
| F | Interior LED |
| G | Fixed Door Bins |
| H | Front Leveling Feet |

IMPORTANT
Cleaning your Appliance
Remove tape and glue residue from surfaces before turning on the appliance. Rub a small amount of liquid dish soap over the adhesive with your fingers. Rinse with warm water and dry with a soft cloth.
Do not use sharp instruments, rubbing alcohol, flammable fluids, or abrasive cleaners to remove tape or glue. These products can damage the surface of your appliance.
After you remove all of the package materials, clean the inside of your appliance before using it. See the CARE & CLEANING section in this manual.
See important information about cleaning glass shelves and covers in the STORAGE FEATURES section of this manual.

IMPORTANT
Moving your Appliance
Your appliance is heavy. When moving the appliance for cleaning or service, be sure to cover the floor with cardboard or hardboard to avoid floor damage. Always pull the appliance straight out when moving it. Do not wiggle or “walk” the appliance when trying to move it as floor damage could occur.
This Use & Care Manual provides general operating instructions for your model. Use the appliance only as instructed in this Use & Care Manual. Before starting the appliance, follow these important first steps.
Location
- Choose a place that is near a grounded electrical outlet. Do Not use an extension cord or an adapter plug.
- If possible, place the appliance out of direct sunlight and away from the range, dishwasher or other heat sources.
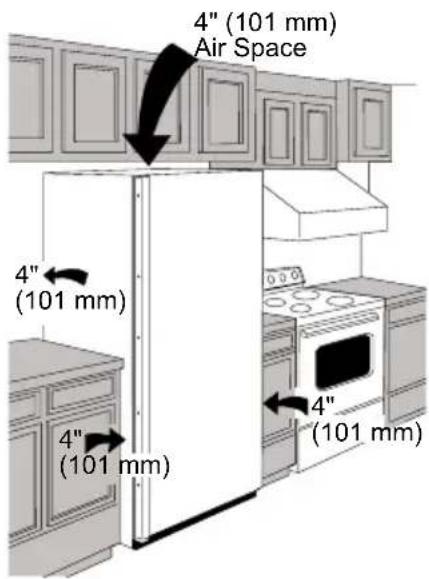
- Allow space around the unit for good air circulation. Leave a 4 inch (101 mm) space on all sides of the unit for adequate circulation.

WARNING
This appliance is intended for use in residential household and similar interior applications such as:
- a kitchen/kitchenette
- a pantry room
- a basement
- an enclosed garage
• other interior residential-type environments

CAUTION
For the most efficient operation, the appliance should be located where surrounding temperatures will not exceed 110^ F ( 43^ C). Temperatures of 45^ F ( 7^ C) and below will affect operation. Additional compressor heaters are not recommended.

WARNING
Installation clearances
Allow the following clearances for ease of installation, proper air circulations, and plumbing and electrical connections:
Sides, Top & Back 4" (101 mm)
text_image
4" (101 mm) Air Space 4" (101 mm) 4" (101 mm) 4" (101 mm)
NOTE
The exterior walls of the unit may become quite warm as the compressor works to transfer heat from the inside. Temperatures as much as 30^ F / 17^ C warmer than room temperature can be expected. For this reason it is particularly important in hotter climates to allow enough space for air circulation around your appliance.
Leveling
Rest all bottom corners firmly on a solid floor. The floor must be strong enough to support a fully loaded appliance.

NOTE
It is VERY IMPORTANT for you to level your unit for it to function properly. If the appliance is not leveled during installation, the door may be misaligned and not close or seal properly, causing cooling, frost or moisture problems.
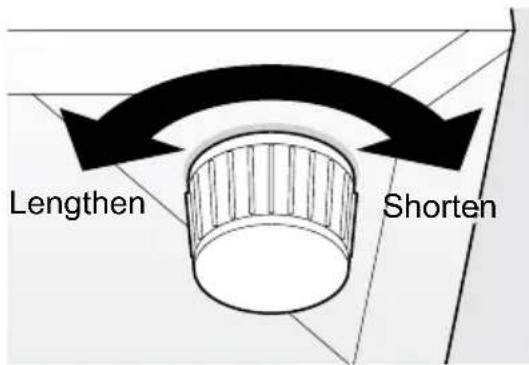
To Level the Appliance: Adjust the bottom feet by turning counterclockwise to lengthen and clockwise to shorten. Use a carpenter's level to level the appliance from front to back. Adjust the leveling feet in front 12 bubble higher, so the door closes easily.
text_image
Lengthen Shorten
CAUTION
To allow the door to close and seal properly, DO NOT let food packages extend past the front of shelves.
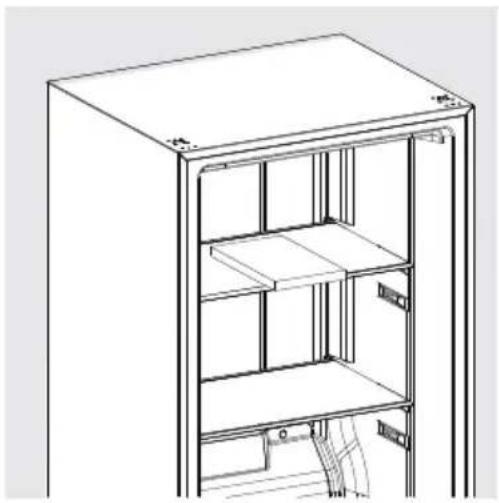
natural_image
Line drawing of a cabinet interior showing front and rear shelves (no text or symbols)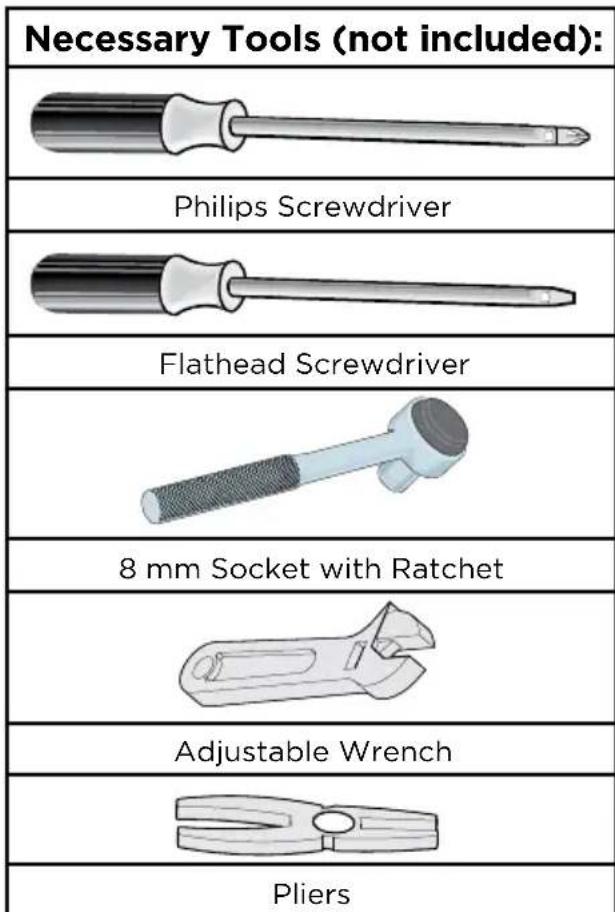
text_image
Necessary Tools (not included): Philips Screwdriver Flathead Screwdriver 8 mm Socket with Ratchet Adjustable Wrench Pliers
IMPORTANT
Before you begin, turn the appliance temperature control to OFF and remove the electrical power cord from the wall outlet. Remove any food from the door shelves.
- Keep the 2 plastic door spacers between the door and the cabinet as shown below. The spacers are used to make sure the distance between the door and cabinet is 12 inch.
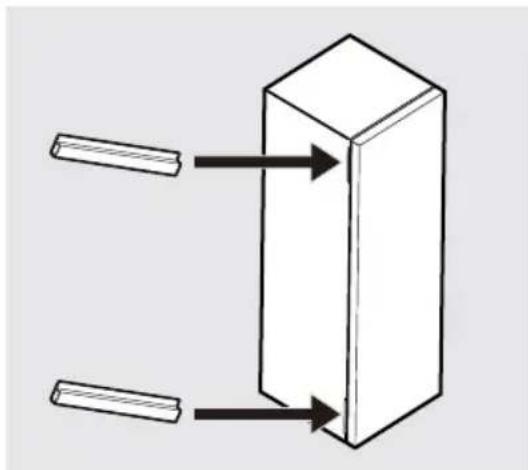
natural_image
Simple line drawing of a rectangular block with two protruding bars, no text or symbols present
CAUTION
This procedure will require 2 people to safely perform.
- Lay the freezer on its back on a padded surface.
- Unscrew the right adjustable leveling foot (A). Remove the 4 screws (B) holding the bottom hinge (C) to the cabinet with an 8 mm socket with ratchet. Screw the adjustable leveling foot back into the cabinet hole (D).
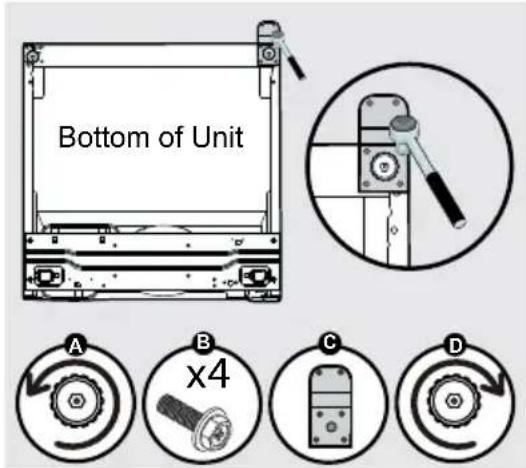
text_image
Bottom of Unit A B x4 C D- Unscrew the door stopper on the right side with a Phillips screwdriver and pry off the stopper with a flat-head screwdriver. Then screw it on the left side.
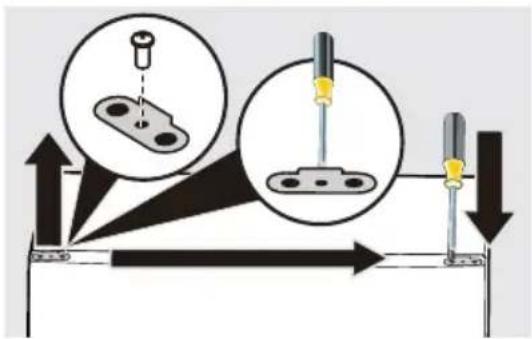
text_image
Diagram illustrating a mechanical or electrical setup with labeled components and directional arrows indicating movement or process.- Unscrew and insert the hinge pin on the opposite side of the bottom hinge using an adjustable wrench and pliers.
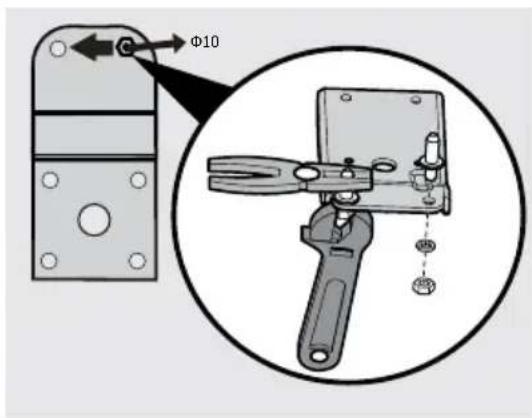
text_image
Φ10- Unscrew the left adjustable leveling foot and loosen the screw.
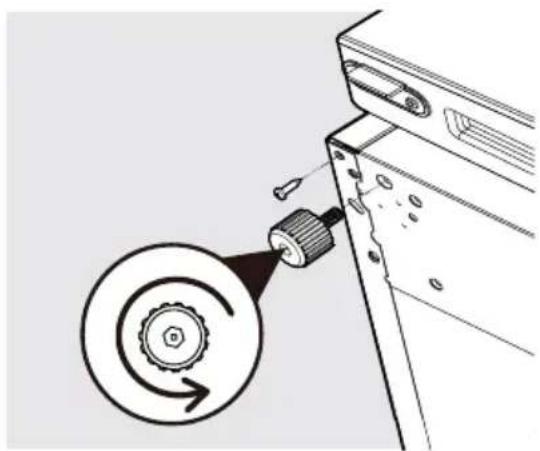
natural_image
Diagram showing a device with a magnifying glass and a circular button labeled 'Screw' (no text or symbols present)- Attach the bottom hinge (A) with 4 screws (B) and the adjustable leveling foot (C) on the left side of the cabinet.
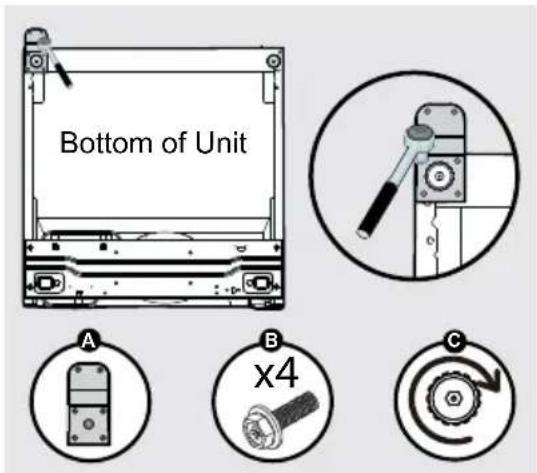
text_image
Bottom of Unit A B x4 C
IMPORTANT
When you screw on the bottom hinge:
- Move the door slightly to the left or right to make sure the hinge hole is aligned with the cabinet hole.
-
Insert the 4 screws by half depth, and then align the hinge and fully tighten.
-
Using an 8 mm socket with a ratchet: a. Remove the right top hinge cover and unsnap the PCB; leave the PCB and wiring attached to the unit.
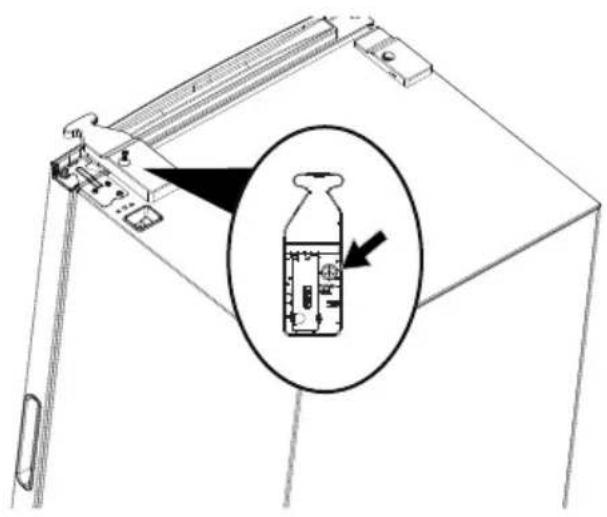
text_image
Technical diagram showing a device with labeled components and an inset image of a bottle with internal structure.b. Remove the top hinge from the right side.
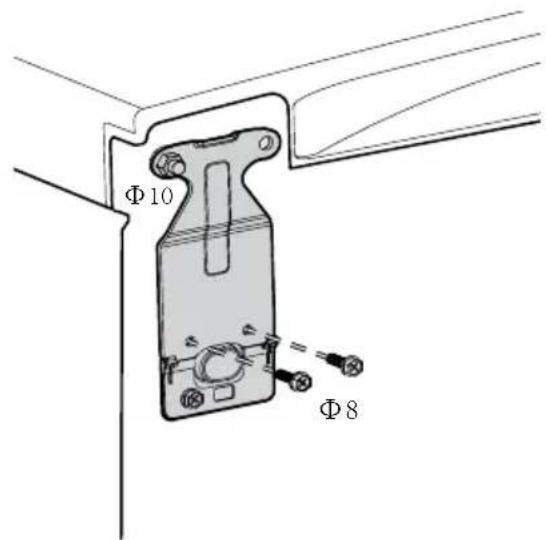
text_image
Φ10 Φ8c. Remove left top decorative cover.
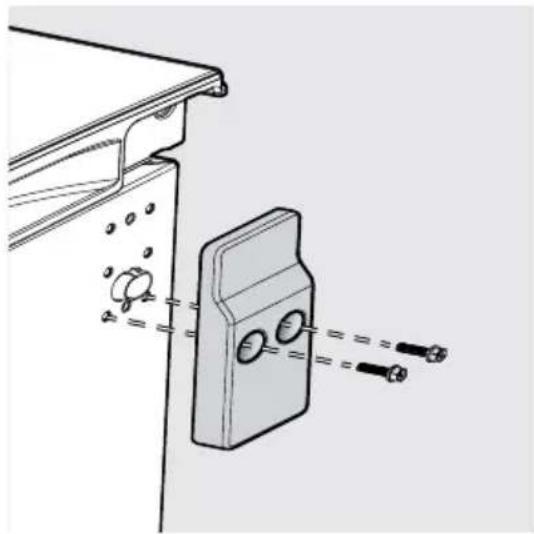
natural_image
Technical line drawing of a mechanical bracket assembly with mounting holes and fasteners (no text or symbols)- Using an adjustable wrench and pliers, move the hinge pin from the right side to the left side.
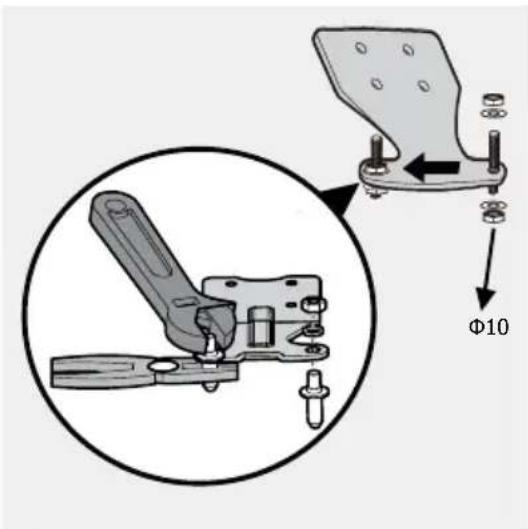
text_image
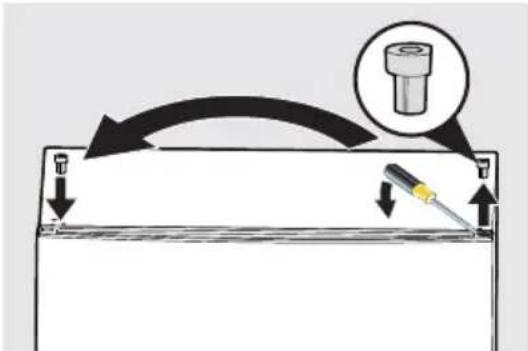
Φ10- With a flat head screwdriver, gently pry upward on hinge pin bearing to remove from door. Reinstall on the opposite side of the door.
text_image
Diagram illustrating a mechanical or electrical setup with labeled components and directional arrows indicating motion or movement.- Attach the hinge and covers.
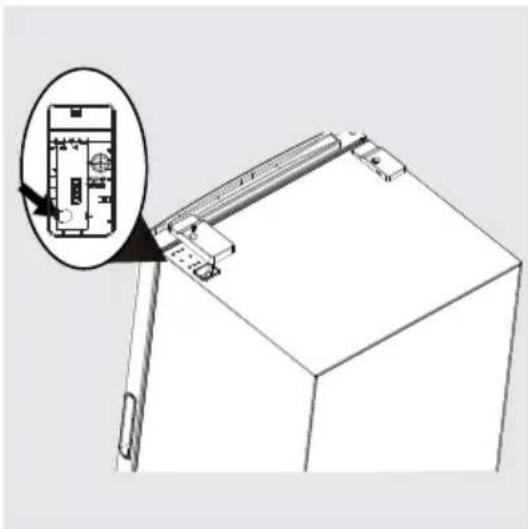
a. Take out the decorative cover in the accessory bag and insert the PCB into it, then attach the cover to the cabinet.
natural_image
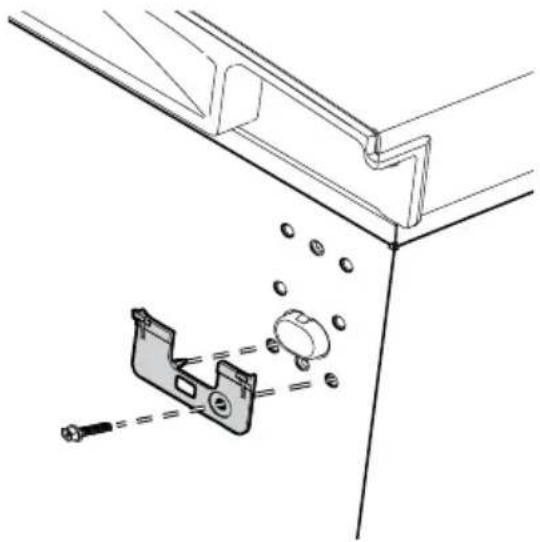
Technical line drawing of a mechanical assembly with an inset showing a component detail (no text or symbols)b. Remove the positioning guide from the accessory bag and attach it to the top left of cabinet.
natural_image
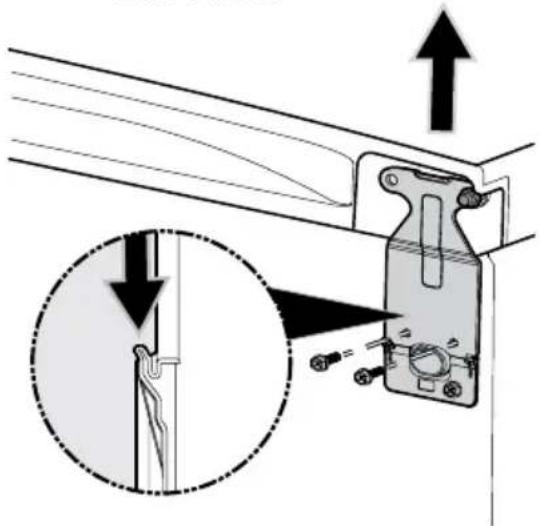
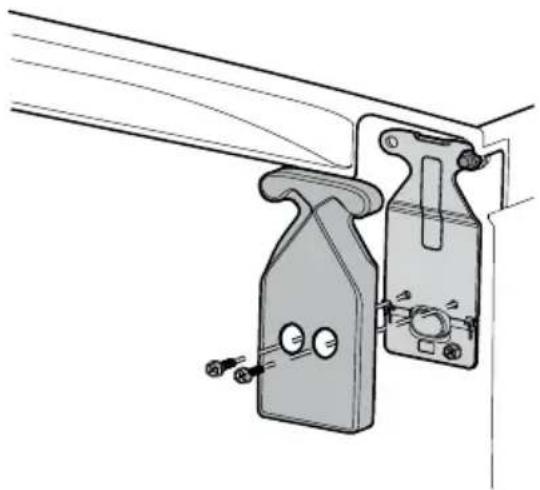
Technical line drawing of a mechanical bracket assembly with a close-up of a component and bolts (no text or symbols)c. Insert the hinge into the positioning guide. Move the door up and insert the hinge pin. Attach the hinge onto the cabinet with screws
natural_image
Technical diagram showing a mechanical assembly with an inset close-up of a vertical rod inserted into a bracket (no text or symbols present)d. Attach the hinge cover.
natural_image
Technical line drawing of a mechanical clamp or bracket assembly (no text or symbols)
CAUTION
This procedure will require 2 people to safely perform.
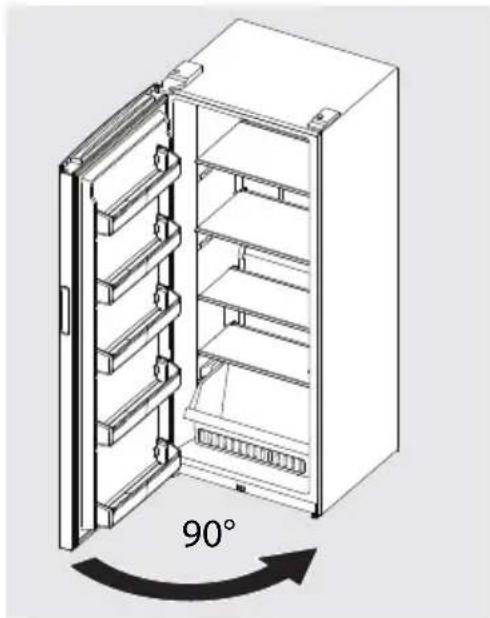
- Raise the appliance to the upright position. Open and close the door to check if door moves smoothly.
natural_image
Isometric line drawing of a refrigerator with 90-degree angle标注 (no text or symbols on the diagram itself)- Allow 1 hour before plugging the unit back into electrical outlet.
Cool Down Period
- For safe food storage, allow 4 hours for the appliance to cool down completely. The unit will run continuously for the first several hours. You may place already frozen food in the unit after the first few hours of operation. Do NOT load unfrozen food into the freezer until freezer has operated for 4 hours.
- When loading the freezer, freeze only 3 lbs of fresh food per cubic foot of freezer space at one time. Distribute packages to be frozen evenly throughout the freezer. It is not necessary to turn control knob to a colder setting while freezing food.
Temperature Control
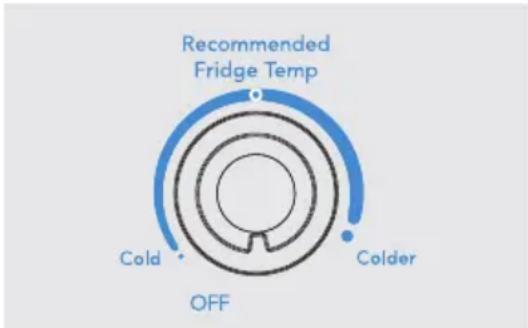
The temperature control is located inside the freezer on the back wall. The temperature is factory preset to Recommended Fridge Temp to provide satisfactory food storage temperatures. However, the temperature control is adjustable to provide a range of temperatures for your personal satisfaction. If a colder temperature is desired, turn the temperature control knob toward Colder and allow several hours for temperatures to stabilize between adjustments. Approximate temperature ranges are listed below.
| Mode | Cold | Recommended | Colder |
| Fridge | 7°C 46°F | 5°C 40°F | 3°C 36°F |
text_image
Recommended Fridge Temp Cold Colder OFFTemperature Control
Door Ajar Alert
If your door has been left open for 5 minutes or more the audible alert will sound and the light will flash until the door is closed.
Power On Light
The Power On Light indicates the appliance is properly connected to electrical power. The light turns off when the temperature control is turned to OFF. If the light goes out, refer to Appliance does not run in the TROUBLESHOOTING section. A flashing light with an audible alert indicates a high temp condition (see Temperature Too warm in the TROUBLESHOOTING section.
High Temp Alert
If the temperature inside the cabinet exceeds 53.6^ F ( 12^ C), the LED light at the bottom of the cabinet will flash and the alarm will sound. The alarm can be reset by opening and then closing the door. The LED will continue to flash until the cabinet temperature is below 50^ F ( 10^ C).
Sabbath Mode
The Sabbath Mode is a feature that disables portions of the appliance and its controls in accordance with observance of the weekly Sabbath and religious holidays within the Orthodox Jewish community.
The Sabbath Mode disables the temperature control knob and mutes all sounds (except the High Temp alert and to exit Sabbath Mode). The LED light at the botton of the cabinet will flash and the High Temp alert will sound until you deactivate the Sabbath Mode. Sabbath mode will exit automatically after 80 to 84 hours from the time the unit entered Sabbath Mode, or you can manually exit Sabbath Mode.

NOTE
The temperature setting is not affected by the Sabbath Mode. For food safety, the High Temp alert will sound for 10 minutes if the internal temperature increases.
After 10 minutes, the alarm will stop, but the LED light at the bottom of the cabinet will continue to flash until you deactivate the Sabbath Mode.
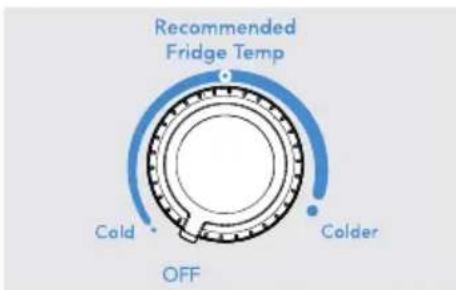
To enter Sabbath Mode:
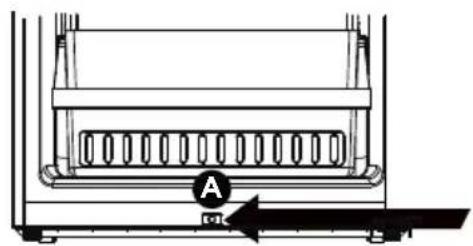
- Turn the temperature control to OFF.
text_image
Recommended Fridge Temp Cold Colder OFFOFF
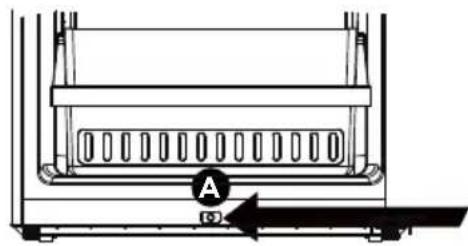
- Wait for the green LED (A) to turn off.
text_image
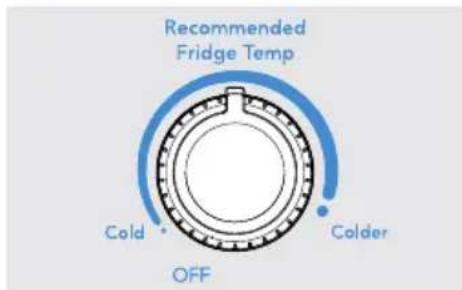
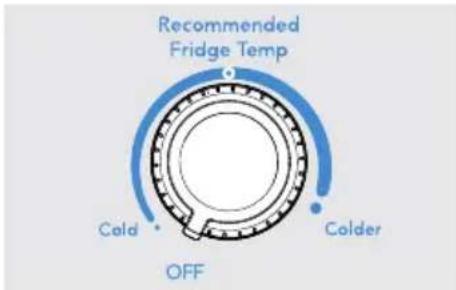
A E=21- Turn the temperature control slowly to Recommended Fridge Temp and then back to OFF.
text_image
Recommended Fridge Temp Cold OFF ColderRecommended Fridge Temp
text_image
Recommended Fridge Temp Cold Colder OFFOFF
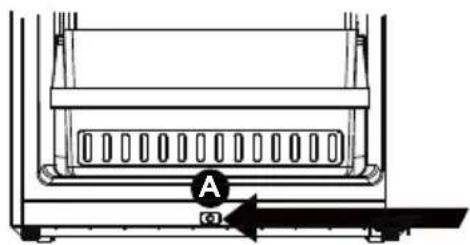
- Wait for the green LED (A) to turn off.
natural_image
Technical line drawing of a mechanical component with labeled section A and directional arrow (no text or symbols beyond labels)- Repeat previous steps 3 times within 20 seconds until you hear a beep after the green LED turns off, which indicates the unit is in Sabbath Mode.

NOTE
While in the Sabbath Mode, the lights will not work until you deactivate Sabbath.
The appliance stays in Sabbath Mode after power failure recovery. You must deactivate it with the temperature control knob.
To manually exit Sabbath Mode:
- Turn the temperature control to OFF.
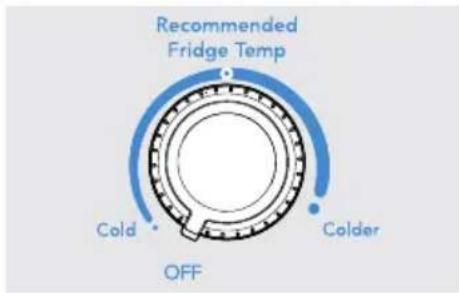
text_image
Recommended Fridge Temp Cold Colder OFFOFF
- Wait for the green LED (A) to turn off.
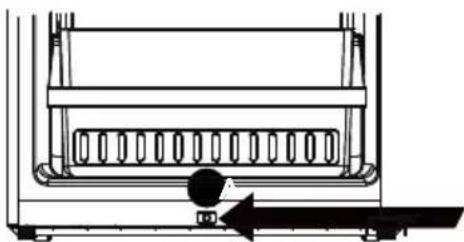
natural_image
Technical line drawing of a mechanical component with a knob and arrow indicator (no text or symbols)- Turn the temperature control slowly to Recommended Fridge Temp and then back to OFF.
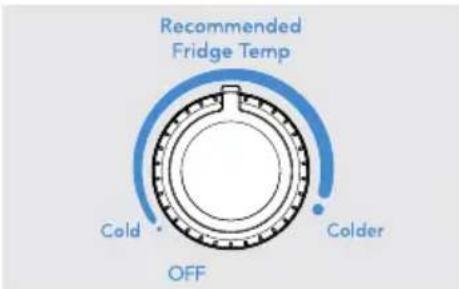
text_image
Recommended Fridge Temp Cold Colder OFFRecommended Fridge Temp
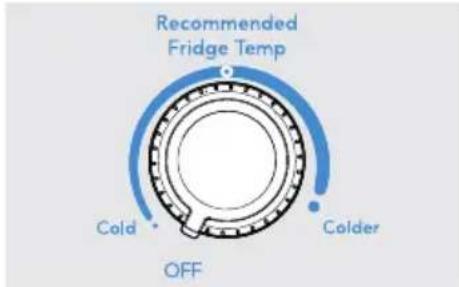
text_image
Recommended Fridge Temp Cold Colder OFFOFF
- Wait for the green LED (A) to turn off.
natural_image
Technical line drawing of a mechanical component with labeled section A and directional arrow (no text or symbols beyond label)- Repeat previous steps 3 times within 20 seconds until you hear a beep after the green LED turns off, which indicates the unit is no longer in Sabbath Mode.

For further assistance, guidelines for proper use and complete list of models with the Sabbath feature, please visit star-k.org.
Shelf Adjustment
You can easily adjust the appliance shelves to suit individual needs. Before adjusting the shelves, remove all food.
To adjust the sliding shelves, remove the shelves by pulling them forward.
To replace a shelf, rest the side edges on any pair of shelf rails and carefully push the shelf back into position. Make sure the back trim of the shelf securely fit into the notches at rear of the liner.
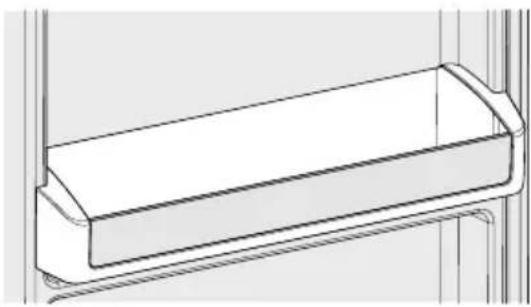
Fixed Door Bin
The fixed door bin is especially designed to hold large containers or freezer bags.
natural_image
Technical line drawing of a rectangular mechanical component or housing (no text or symbols)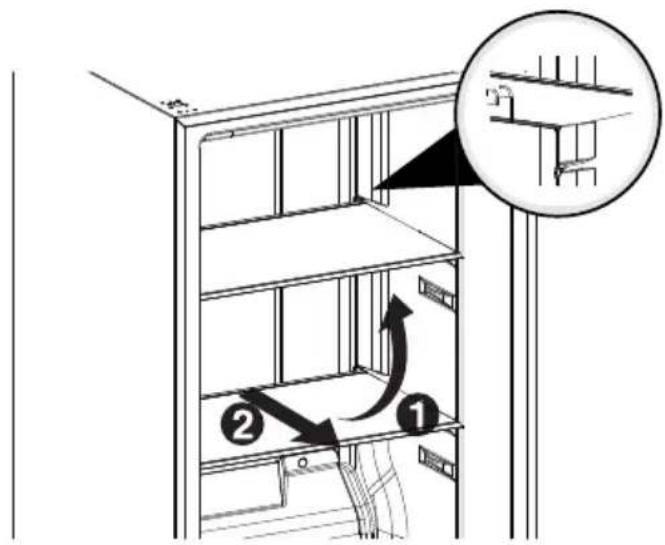
text_image
Technical diagram showing a shelving unit with labeled components and directional arrows indicating assembly or movement.
text_image
SAVE MONEY SAVE ENERGY- Locate the appliance in the coolest area of the room, away from heat-producing appliances or heating ducts, and out of direct sunlight.
- Let hot foods cool to room temperature before placing them in the unit. Overloading the appliance forces the compressor to run longer. Foods that freeze too slowly may lose quality or spoil.
- Be sure to wrap foods properly and wipe containers dry before placing them in the unit. This cuts down on frost build-up inside the unit.
- Do not line shelves and baskets with aluminum foil, wax paper, or paper toweling. Liners interfere with cold air circulation, making the freezer less efficient.
- Organize and label food to reduce door openings and extended searches. Remove as many items as needed at one time, and close door as soon as possible.

CAUTION
Damp objects stick to cold metal surfaces. Do not touch interior metal surfaces with wet or damp hands.
Some upright freezers are frost-free and defrost automatically but should be cleaned occasionally.
Cleaning the Inside
Wash inside surfaces of the unit with a solution of 2 tbsp. (25 g) of baking soda in 1 qt. (1 l) warm water. Rinse and dry. Wring excess water out of the sponge or cloth when cleaning in the area of the controls, or any electrical parts.
Wash the removable parts with the baking soda solution mentioned above, or mild detergent and warm water. Rinse and dry. Never use metallic scouring pads, brushes, abrasive cleaners, or alkaline solutions on any surface. Do not wash removable parts in a dishwasher.
Cleaning the Outside
Wash the cabinet with warm water and mild liquid detergent. Rinse well and wipe dry with a clean soft cloth. Replace parts and food.
Do not use razor blades or other sharp instruments, which can scratch the appliance surface when removing adhesive labels. You can remove any glue left from the tape with a mixture of warm water and mild detergent, or touch the residue with the sticky side of the tape already removed. DO NOT REMOVE THE SERIAL PLATE.

WARNING
If you leave the door open while on vacation, make certain children cannot get into the appliance and become entrapped.

WARNING
Do not open the door unnecessarily if the unit is off for several hours.
Vacation and Moving Tips
Short Vacations: Leave the unit operating during vacations of less than 3 weeks.
Long Vacations: If the appliance will not be used for several months, remove all food and unplug the power cord. Clean and dry the interior thoroughly. Leave the door open slightly, blocking it open if necessary, to prevent odor and mold growth.
Moving: Disconnect the power cord plug from the wall outlet. Remove foods, defrost, and clean the appliance. Secure all loose items such as the base panel, baskets, and shelves by taping them securely in place to prevent damage. In the moving vehicle, secure the unit in an upright position to prevent movement. Also protect the outside of the appliance with a blanket, or a similar item.
Let us help you troubleshoot your concern! This section will help you with common issues. If you need us, visit our website, chat with an agent, or call us. We may be able to help you avoid a service visit. If you do need service, we can get that started for you!
1-800-374-4432 (United States)
Frigidaire.com
1-800-265-8352 (Canada)
Frigidaire.ca
| CONCERN CAUSE SOLUTION | ||
| APPLIANCE OPERATION | ||
| Appliance does not run. | Temperature Control is in the OFF position or POWER OFF position.Appliance may not be plugged in or plug is loose.Hose fuse blown or tripped circuit breaker.Power outage | See the CONTROLS AND SETTINGS section.Ensure plug is tightly pushed into outlet.Check/replace fuse with a 15-amp timedelay fuse. Reset circuit breaker.Check house lights. Call local electric company. |
| Appliance runs too much or too long. | Room or outside weather is hot.Appliance has recently been disconnected for a period of time.Large amounts of warm or hot food have been stored recently.Door is opened too frequently or too long.Door may be slightly open.Temperature control is set too low.Gaskets are dirty, worn, cracked, or poorly fitted. | It's normal for the appliance to work longer under these conditions.It may take 4 hours for the appliance to cool down completely.Warm food will cause appliance to run more until the desired temperature is reached.Warm air entering the appliance causes it to run more. Open door less often.Ensure door is tightly closed.Turn control knob to a warmer setting. Allow several hours for the temperature to stabilize.Clean or change gasket. Leaks in door seal will cause appliance to run longer in order to maintain desired temperatures. |
| APPLIANCE TEMPERATURES | ||
| Interior appli-ance tempera-ture is too cold. | Control is set too low. | Set control to a warmer setting.Allow several hours for temperature to stabilize. |
| Temperature in-side appliance is too warm. | Control is set too warm.Door is opened too frequently or too long.Door may not be seating properly.Large amounts of warm or hot food has been stored recently.Unit has recently been disconnected for a period of time. | Turn control to a colder setting.Allow several hours for temperature to stabilize.Warm air enters the appliance every time the door is opened. Open door less often.See DOOR PROBLEMS in the TROUBLESHOOTING section.Warm food will cause appliance to run more until the desired temperature is reached.Appliance may take up to 4 hours to cool down completely. |
| External temperature is too warm. | The external walls can be as much as 30°F warmer than room temperature. | This is normal while the compressor works to transfer heat from inside the cabinet. |
| SOUND AND NOISE | ||
| Louder sound levels whenever appliance is on. | Modern appliances have increased storage capacity and more stable temperatures. They require heavy-duty compressors. | This is normal. When the surrounding noise level is low, you might hear the compressor running while it cools the interior. |
| Longer sound levels when compressor comes on. | Appliance operates at higher pressures during the start of the ON cycle. | This is normal. Sound will level off or disappear as appliance continues to run. |
| Popping or cracking sound when compressor comes on. Bubbling or gurgling sound. | Metal parts undergo expansion and contraction, as in hot water pipes.Refrigerant (used to cool the appliance) is circulating throughout the system. | This is normal. Sound will level off or disappear as appliance continues to run.This is normal. |
| Vibrating or rattling noise. | Appliance is not level. It rocks on the floor when it is moved slightly.Floor is uneven or weak.Appliance is touching the wall. | Level the appliance. Refer to Leveling in the INSTALLATION section.Ensure floor can adequately support the appliance. Level the appliance by putting wood or metal shims under part of the appliance.Re-level appliance or move appliance slightly. Refer to Leveling in the INSTALLATION section. |
| WATER / MOISTURE / FROST INSIDE APPLIANCE | ||
| Moisture forms on inside walls. | Weather is hot and humid.Door may not be seating properly.Door is opened too often or too long. | The rate of frost buildup and internal sweating increases. This is normal.See DOOR PROBLEMS in the TROUBLESHOOTING section.Open door less often. |
| WATER / MOISTURE / FROST OUTSIDE APPLIANCE | ||
| Moisture forms on outside. | Door may not be seating properly, causing cold air from inside to meet warm air from outside. | See DOOR PROBLEMS in the TROUBLESHOOTING section. |
| ODOR IN APPLIANCE | ||
| Odors in appliance. | Interior needs to be cleaned.Foods with strong odors are in the appliance. | Clean interior with sponge, warm water, and baking soda.Cover the food tightly. |
| DOOR PROBLEMS | ||
| Door will not close. | Appliance is not level. It rocks on the floor when it is moved slightly.Floor is uneven or weak. | This condition can force the cabinet out of square and misalign the door.Refer toLevelingin the INSTALLATIONsection.Level the floor by using wood or metal shims under the appliance or brace floor supporting the appliance. |
| LIGHTING PROBLEMS | ||
| Power Available Light is not on | LED may be burned out.No electric current is reaching the appliance.The door has been left open for more than 5 minutes. | Contact a qualified service dealer.SeeAppliance does not runin the TROUBLESHOOTINGsection.Close the door. |
Your appliance is covered by a one year limited warranty. For one year from your original date of delivery, Electrolux will pay all costs for repairing or replacing any parts of this appliance that prove to be defective in materials or workmanship when such appliance is installed, used and maintained in accordance with the provided instructions.
Exclusions
This warranty does not cover the following:
- Products with original serial numbers that have been removed, altered or cannot be readily determined.
- Product that has been transferred from its original owner to another party or removed outside the USA or Canada.
- Rust on the interior or exterior of the unit.
- Products purchased "as-is" are not covered by this warranty.
- Food loss due to any Appliance or freezer failures.
- Products used in a commercial setting.
- Service calls which do not involve malfunction or defects in materials or workmanship, or for appliances not in ordinary household use or used other than in accordance with the provided instructions.
- Service calls to correct the installation of your appliance or to instruct you how to use your appliance.
- Expenses for making the appliance accessible for servicing, such as removal of trim, cupboards, shelves, etc., which are not a part of the appliance when it is shipped from the factory.
- Service calls to repair or replace appliance light bulbs, air filters, water filters, other consumables, or knobs, handles, or other cosmetic parts.
- Surcharges including, but not limited to, any after hour, weekend, or holiday service calls, tolls, ferry trip charges, or mileage expense for service calls to remote areas, including the state of Alaska.
- Damages to the finish of appliance or home incurred during installation, including but not limited to floors, cabinets, walls, etc.
- Damages caused by: services performed by unauthorized service companies; use of parts other than genuine Electrolux parts or parts obtained from persons other than authorized service companies; or external causes such as abuse, misuse, inadequate power supply, accidents, fires, or acts of God.
DISCLAIMER OF IMPLIED WARRANTIES; LIMITATION OF REMEDIES
CUSTOMER'S SOLE AND EXCLUSIVE REMEDY UNDER THIS LIMITED WARRANTY SHALL BE PRODUCT REPAIR OR REPLACEMENT AS PROVIDED HEREIN. CLAIMS BASED ON IMPLIED WARRANTIES, INCLUDING WARRANTIES OF MERCHANTABILITY OR FITNESS FOR A PARTICULAR PURPOSE, ARE LIMITED TO ONE YEAR OR THE SHORTEST PERIOD ALLOWED BY LAW, BUT NOT LESS THAN ONE YEAR. ELECTROLUX SHALL NOT BE LIABLE FOR CONSEQUENTIAL OR INCIDENTAL DAMAGES SUCH AS PROPERTY DAMAGE AND INCIDENTAL EXPENSES RESULTING FROM ANY BREACH OF THIS WRITTEN LIMITED WARRANTY OR ANY IMPLIED WARRANTY. SOME STATES AND PROVINCES DO NOT ALLOW THE EXCLUSION OR LIMITATION OF INCIDENTAL OR CONSEQUENTIAL DAMAGES, OR LIMITATIONS ON THE DURATION OF IMPLIED WARRANTIES, SO THESE LIMITATIONS OR EXCLUSIONS MAY NOT APPLY TO YOU. THIS WRITTEN WARRANTY GIVES YOU SPECIFIC LEGAL RIGHTS. YOU MAY ALSO HAVE OTHER RIGHTS THAT VARY FROM STATE TO STATE.
If You Need Service
Keep your receipt, delivery slip, or some other appropriate payment record to establish the warranty period should service be required. If service is performed, it is in your best interest to obtain and keep all receipts. Service under this warranty must be obtained by contacting Electrolux at the addresses or phone numbers below.
This warranty only applies in the USA and Canada. In the USA, your appliance is warranted by Electrolux Major Appliances North America, a division of Electrolux Home Products, Inc. In Canada, your appliance is warranted by Electrolux Canada Corp. Electrolux authorizes no person to change or add to any obligations under this warranty. Obligations for service and parts under this warranty must be performed by Electrolux or an authorized service company. Product features or specifications as described or illustrated are subject to change without notice.
FRIGIDAIRE
welcome home
Our home is your home. Visit us if you need help with any of these things:
owner support

accessories
service
registration
(See your registration card for more information.)
Frigidaire.com
1-800-374-4432
Frigidaire.ca
1-800-265-8352
Congélateur
natural_image
Line drawing of a closed refrigerator with open door (no text or symbols)text_image
F E E C D C B H A H G G G Gnatural_image
Line drawing of a cabinet interior showing front and back views (no text or symbols)natural_image
Illustration of a screwdriver with a metallic head and threaded shaft (no text or symbols)Tournevis Philips

natural_image
Illustration of a screwdriver with a pointed tip and threaded shaft (no text or symbols)natural_image
3D rendered image of a mechanical tool with a textured handle and cylindrical body (no text or symbols)natural_image
Simple line drawing of a rectangular block with two side bars and arrows indicating direction (no text or symbols)
PRUDENCE
text_image
Diagram illustrating a mechanical or electrical setup with labeled components and directional arrows indicating movement or process.natural_image
Diagram showing a mechanical device with a gear shift and circular motion indicator (no text or symbols)text_image
Technical diagram showing a device with an inset image of a bottle labeled '40-12' and a magnified view of its internal structure.natural_image
Technical line drawing of a mechanical bracket assembly with mounting holes and fasteners (no text or symbols)text_image
Diagram illustrating a mechanical or electrical setup with labeled components and directional arrows, including a magnified inset showing a bolt.natural_image
Technical line drawing of a refrigerator with an inset showing internal components (no text or symbols)natural_image
Technical line drawing of a mechanical assembly with a component and mounting holes (no text or symbols)natural_image
Technical diagram showing a mechanical assembly with an inset close-up of a detail (no text or symbols present)natural_image
Technical line drawing of a mechanical clamp or bracket assembly (no text or symbols)
PRUDENCE
natural_image
Isometric line drawing of a refrigerator with 90-degree angle标注 (no text or symbols on the diagram itself)text_image
Recommended Fridge Temp Cold + OFF Coldertext_image
Recommended Fridge Temp Cold Colder OFFDÉSACTIVÉ
natural_image
Technical line drawing of a mechanical component with a labeled section A (no text or symbols beyond label)text_image
Recommended Fridge Temp Cold Colder OFFtext_image
Recommended Fridge Temp Cold + OFF ColderDÉSACTIVÉ
natural_image
Technical line drawing of a mechanical component with a labeled arrow pointing to a feature (no text or symbols present)text_image
Recommended Fridge Temp Cold Colder OFFDÉSACTIVÉ
natural_image
Technical line drawing of a mechanical component with a labeled section A (no text or symbols beyond label)text_image
Recommended Fridge Temp Cold Colder OFFtext_image
Recommended Fridge Temp Cold Colder OFFDÉSACTIVÉ
natural_image
Technical line drawing of a mechanical component with a labeled section A (no text or symbols beyond label)natural_image
Technical line drawing of a rectangular mechanical component or housing (no text or symbols)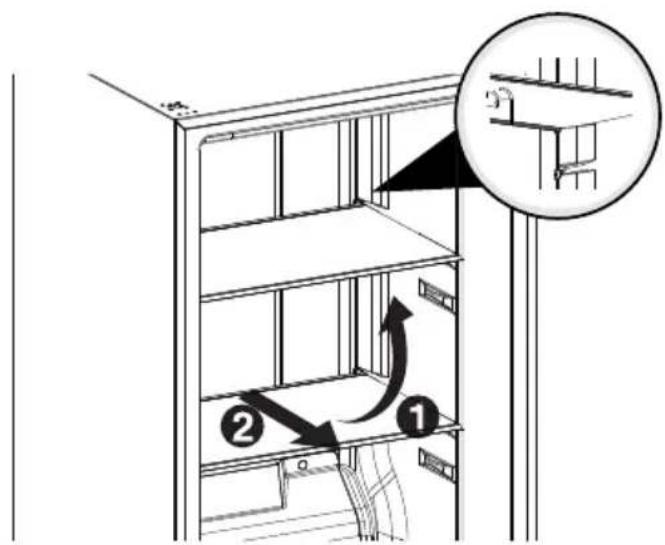
text_image
Technical diagram showing a shelving unit with labeled components and directional arrows indicating assembly or movement.