
EA1700H - Drill Herkules - Free user manual and instructions
Find the device manual for free EA1700H Herkules in PDF.

| Product type | Motorized earth auger (soil drill) |
| Brand | Herkules |
| Model | EA1700H |
| Dimensions (L × W × H) | 540 × 310 × 370 mm |
| Weight | 9.5 kg |
| Engine | Single-cylinder 2-stroke, 51.7 cc |
| Engine power | 1.3 kW |
| Idle speed | 3000 rpm |
| Maximum engine speed | 9600 rpm |
| Rated drill speed | 0-310 rpm |
| Fuel tank capacity | 1 liter |
| Fuel | 90 octane petrol, mixture 1:40 (2-stroke oil) |
| Included drills | ∅ 100 mm, 150 mm, 200 mm |
| Vibration level (handle) | 15.62 m/s² |
| Power supply | Petrol (internal combustion engine) |
| Intended use | Digging holes for planting, fences, pergolas in light soils |
| Safety equipment | Stop switch, spark plug cover, thermal protection |
| Routine maintenance | Air filter cleaning, spark plug check, fuel drain |
| Wear parts | Spark plug, air filter, drill bit |
| Repair | Entrust to a professional, use original Scheppach parts |
| Warranty | Legal, defective parts exchanged free of charge |
Frequently Asked Questions - EA1700H Herkules
User questions about EA1700H Herkules
0 question about this device. Answer the ones you know or ask your own.
Ask a new question about this device
Download the instructions for your Drill in PDF format for free! Find your manual EA1700H - Herkules and take your electronic device back in hand. On this page are published all the documents necessary for the use of your device. EA1700H by Herkules.
USER MANUAL EA1700H Herkules
natural_image
Exterior view of a Bussel 5.176E electric drill bit with spiral drill (no text or symbols visible)EA1700H
| DE | ErdbohrerOriginalbetriebsanleitung | 6 |
| GB | Earth augerTranslation from the original instruction manual | 15 |
| FR | MototarièreTraduction des instructions d'origine | 24 |
| IT | TrivellaTraduzioni del manuale d'uso originale | 34 |
| ES | MotoahoyadoraTraducción de las instrucciones originales de funcionamiento | 44 |
| EE | PinnasepuuriTölge Originaalkasutusjuhend | 54 |
| FI | MaaporaaKäännös alkuperäisestä käyttöohjeesta | 63 |

Inhaltsverzeichnis
- Introduction...... 17
- Device description (Fig. 1-3)....17
- Scope of delivery 17
- Intended use.... 17
- Safety information 18
- Technical data 20
- Before operation....20
- Operation....20
- Cleaning and maintenance 21
- Storage/Transport....22
- Service information 22
- Disposal and recycling....22
- Troubleshooting....23
Explanation of the symbols on the equipment
 | Read the complete user guide before using the appliance |
 | Read, understand and follow all warnings. |
 | Always wear safety glasses, hearing protection and a safety helmet. |
 | Wear security and anti-vibration gloves when you use the device. |
 | Always wear non-skid safety shoes with cut protection when using this product. |
 | Important. Exhaust gas is poisonous, do not operate in an unventilated area. |
 | Open flames at your workplace are prohibited! |
 | Keep bystanders away! |
 | There is a risk of debris being ejected when the engine is running. Make sure you keep a safe distance. Caution thrown objects when operating. |
 | Danger - Hot surface! Achtung heiße Oberfläche - Verbrennungsgefahr |
 | Guaranteed sound power level of the device. |
 | Fuel filler cap. |
 | Choke |
1. Introduction
Manufacturer:
scheppach
We hope you have a lot of fun and success using your new machine.
Note:
According to the applicable product liability laws, the manufacturer of the device does not assume liability for damages to the product or damages caused by the product that occurs due to:
- improper handling,
• noncompliance of the operating instructions,
• repairs by third parties, not by authorized service technicians, - installation and replacement of non-original spare parts,
- non-intended use.
We recommend:
that you read through the entire operating instructions before putting the machine into operation.
These operating instructions are to assist you in getting to know your machine and utilize its proper applications. The operating instructions contain important notes on how you work with the machine safely, expertly, and economically, and how you can avoid hazards, save repair costs, reduce downtime and increase the reliability and service life of the machine. In addition to the safety requirements contained in these operating instructions, you must be careful to observe your country's applicable regulations.
The operating instructions must always be near the machine. Put them in a plastic folder to protect them from dirt and humidity. They must be read by every operator before beginning work and observed conscientiously. Only persons who have been trained in the use of the machine and have been informed of the various dangers may work with the machine. The required minimum age must be observed. In addition to the safety requirements in these operating instructions and your country's applicable regulations, you should observe the generally recognized technical rules concerning the operation of identically constructed devices.
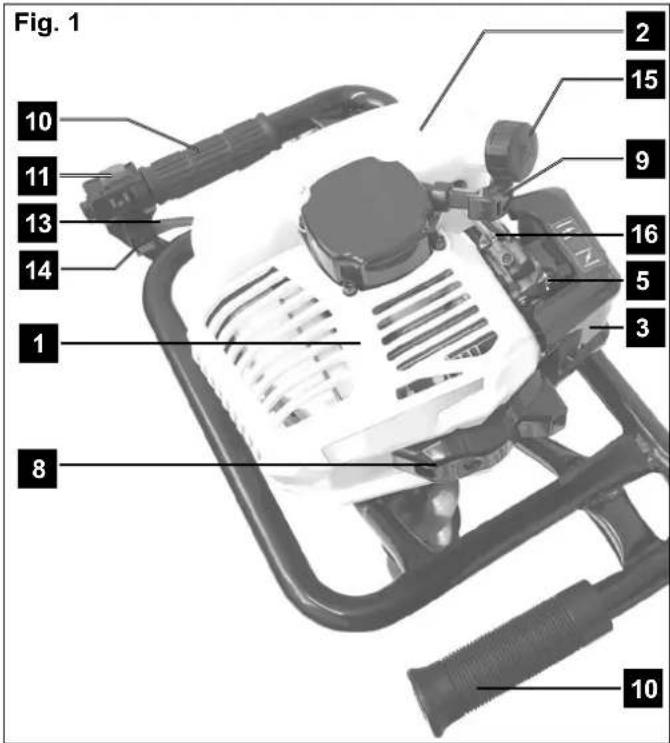
2. Device description (Fig. 1-3)
- Engine
- Fuel tank
- Air filter / carburettor cover
- Transmission
- Idle setting
- Drive shaft
- Drill
- Spark plug cover
- Choke
- Handle
- Stop switch
- Transmission lubricating nipple
- Gas regulating lever
- Locking lever
- Tank cover
- Fuel pump
3. Scope of delivery
Motor casing with handle
Auger ∅ 100, 150, 200 mm
Petrol mixing container
Accessories kitl
Spark plug spanner
Spanner 8/10 mm
Hexagonal spanner 4/5 mm
Operating instructions
- Open the packaging and remove the device carefully.
- Remove the packaging material as well as the packaging and transport bracing (if available).
- Check that the delivery is complete.
- Check the device and accessory parts for transport damage.
- If possible, store the packaging until the warranty period has expired.
Attention!
The device and packaging materials are not toys! Children must not be allowed to play with plastic bags, film and small parts! There is a risk of swallowing and suffocation!
4. Intended use
The machine complies with the relevant EC Machine Guideline.
- Before starting any work, all protective and safety devices must be in place on the earth auger.
- The earth auger has been designed to be operated by one person.
- The earth auger has been designed for excavating planting holes, for pergolas and fences in light soil. It has only limited use on ground that is hard and stony and has many roots.
- The operator is responsible for third parties in the area of operations.
- All safety and hazard notices on the machine must be observed.
- All safety and hazard notices on the machine must be kept in a completely legible condition.
-
Use the machine in a technically flawless condition only, as well as for its intended purpose, in a safe manner and being aware of dangers, in compliance with the operating instructions!
-
Disruptions which can affect safety in particular must be eliminated straight away!
- The manufacturer's stipulations concerning safety, work and maintenance as well as the measurements specified in Technical Data, must be complied with.
- The relevant accident prevention stipulations and other widely recognised safety rules must be observed.
- The machine may only be used, maintained or repaired by people who are familiar with it and its dangers. Unauthorised changes to the machine negate the manufacturer's liability for damages resulting from this.
- The machine may only be used for work for which it has been built and which is described in the operating manual.
- The machine may only be used with the manufacturer's original accessories and original tools.
The equipment is allowed to be used only for its prescribed purpose. Any other use is deemed to be a case of misuse. The user/operator and not the manufacturer will be liable for any damage or injuries of any kind resulting from such misuse.
Please note that our equipment has not been designed for use in commercial, trade or industrial applications. Our warranty will be voided if the equipment is used in commercial, trade or industrial businesses or for equivalent purposes.
Remaining risks:
The machine has been built according to the latest technology and recognised safety rules. However, there is still a chance of residual risks whilst working. Furthermore, despite all measures taken, remaining risks can occur that are not obvious.
Remaining risks can be minimised by complying with the „Safety notices“ and the „Intended use“ as well as the operating instructions overall.
5. Safety information
Caution!
Read all safety regulations and instructions. Any errors made in following the safety regulations and instructions may result in an electric shock, fire and/or serious injury. Keep all safety regulations and instructions in a safe place for future use.
Please note
- Read the manual before commissioning
- Use hearing protection, safety goggles and a hard hat
- Use safety gloves
- Wear safety boots
- Removing or changing protective devices and guards is prohibited
• Smoking is prohibited in the working environment - Do not touch rotating parts
- Do not touch hot parts
- Keep third parties away from the working environment
- Do not use the machine in a wet environment
-
Risk from ejected objects
• Warning: electric current -
Caution: do not run the machine in a closed area; fumes will accumulate
• Petrol is flammable and explosive - Keep motor away from heat and sparks
Hazards and safety measures
- Human behaviour, misbehaviour. Always concentrate fully when working.
- Wrapping around and entangling of work clothes.
- The auger drill can catch clothes, string or wire and draw them in.
- Wear tight-fitting clothing and safety boots with a non-slip sole and steel toe caps.
- Wear long hair in a hair net.
- Warning! In the event of unseen foreign objects.
- Recoil by the auger drill
- If the ground is stony, hard or has many roots, strong recoil may occur at the handles.
- Avoid working with this machine on ground that is stony, hard or has many roots.
- Warning! Hold on to handles tightly, wear protective clothing.
- Burns
- Touching the exhaust/casing can lead to burns.
- Warning! Leave the power tool to cool down. Wear work gloves.
- Contact, inhalation
• The fumes from the machine can damage your health. Only ever use the machine outside
- Warning! Take a break
• Electrical contact
- Touching the spark plug cap can lead to an electric shock when the motor is running.
- Warning! Never touch the spark plug connector or the spark plug when the motor is running.
- Hearing damage
- Long-term unprotected work with the earth auger can cause hearing damage.
- Warning! Always use hearing protection.
- Fire, explosion
• The machine's fuel mix is flammable.
- Warning! Smoking and open fires are prohibited during work and refuelling.
• People slipping, tripping or falling
- On unstable ground, you can be injured if you trip.
- Warning!
Be aware of obstacles in the working environment. Always ensure a safe standing position and wear non-slip shoes.
- Ejected roots, rocks or other foreign objects
- During drilling, ejected rocks or pieces of wood can injure people and animals.
- Warning!
Ensure that neither people nor animals are present in the hazardous area and that you wear appropriate safety clothing as well as eye and hearing protection.
- Pass on the safety notices to everyone working with the machine. Staff commissioned to work with the machine must read the operating manual before starting work and, in particular, the chapter „Safety notices“. It is too late during work. This particularly applies to staff only occasionally working with the machine, such as during set-up or maintenance. All safety and hazard notices on the machine must be observed.
©
Mineral oil products degrease your skin. If your skin comes in contact with these substances repeatedly and for an extended period of time, it will desiccate. Various skin deseases may result. In addition, allergic reactions are known to occur.
Eyes can be irritated by contact with oil. If oil comes into your eyes, immediately wash them with clear water. If your eyes are still irritated, see a doctor immediately!
Check fuel lines, fuel tank cap and fuel tank for leakages or tears.
Do not start the machine with such damage.
Do not refuel the machine when the motor is still hot or running.
Never refuel the machine close to an open flame.
Period of use:
Using the earth auger can lead to poor circulation in the fingers, hands or wrists. Symptoms such as pins and needles, pain, stinging and changes in the skin can occur.
If these symptoms occur, seek medical help.
Use appropriate gloves and take regular breaks.
Keep this safety information in a safe place.
6. Technical data
| Dimensions without drillw x d x h mm | 540 x 310 x 370 |
| Motor design 1 cylinder/2-stroke | |
| Max. motor performance kW | 1,3 |
| Displacement ccm 51,7 | |
| Idle speed r.p.m. 3000 | |
| max. speed r.p.m. | 9600 |
| Nominal speed auger r.p.m. 0-310 | |
| Vibration level at handle m/s ^2 | 15,62 |
| Fuel Petrol 90 octane | |
| Tank capacity l 1 | |
| Mixing ratio of 2-stroke motoroil/fuel | 1:40 |
| Weight kg 9,5 |
Subject to technical changes!
Limit the noise and vibration to a minimum!
- Only use appliances which are in perfect working order.
• Service and clean the appliance regularly. - Adapt your working style to suit the appliance.
- Do not overload the appliance.
- Have the appliance serviced whenever necessary.
- Switch the appliance off when it is not in use.
- Wear protective gloves.
7. Before operation
Assembly
For packaging reasons, your machine has not been assembled completely.
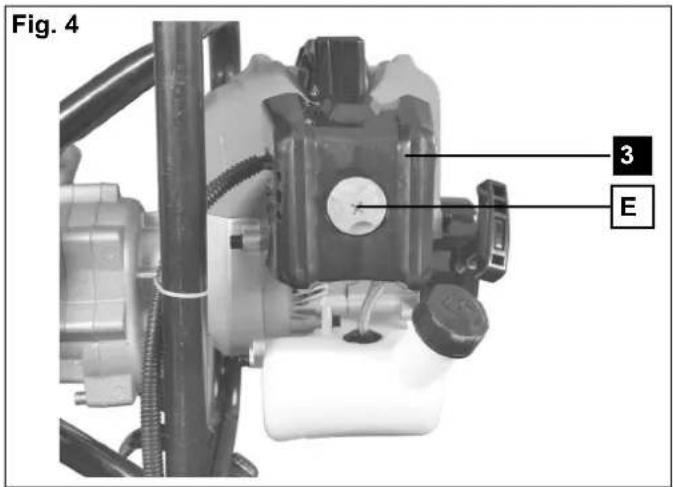
Inserting the earth auger, Fig. 2
- Place the motor casing on a work bench. Place the earth auger (7) on the drive shaft (6), ensuring that both holes are aligned.
- Insert the driving pin (A).
- Secure with split pin (B) and slightly bend it.
Fuelling Fig. 1
- Open the fuel tank cap (15).
- Pour in the fuel mixture using a funnel.
- Do not fill the tank completely as fuel expands.
- Close the fuel tank cap (15) tightly and clean the area from possibly spilled fuel mixture.
Fuel mixture
The auger's motor is a two-stroke motor. It is driven by a 1:40 fuel mixture made up of two-stroke oil and fuel. The fuel requires unleaded ordinary petrol with a research octane count of at least 91. Lubrication of the motor takes place by adding premium two-stroke oil.
Do not mix the fuel mixture in the fuel tank. Use the mixing container supplied or another appropriate container. Only pour the fuel mixture into the fuel tank after previously mixing and stirring it well.
- Use fresh, clean fuel. Water and contaminants in the petrol damage the fuel system.
- Refuel in a well-ventilated area with the motor not running. If the motor was in use directly prior to refuelling, leave it to cool down first. Never refuel the machine in a building where the petrol fumes can reach flames or sparks.
- Petrol is highly flammable and explosive. When handling fuel, you may suffer burns or other severe injuries.
- Turn off the motor and keep away from heat, sparks and flames.
- Only ever refuel outside.
- Wipe up spilled petrol straight away.
Starter cord (Fig. 1)
Pulling the cord (9) starts the motor.
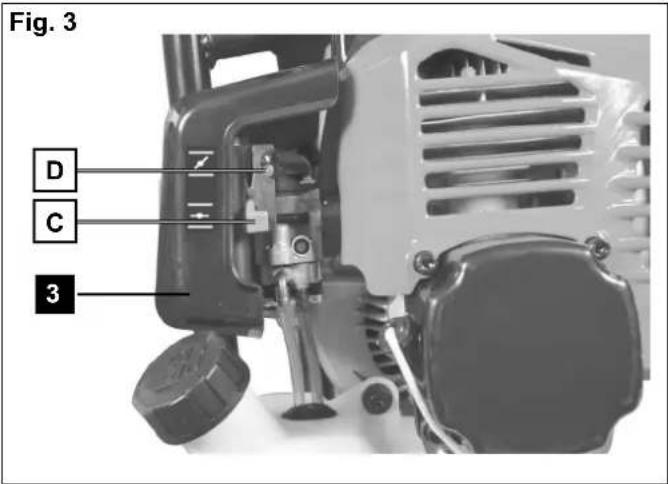
Choke lever (Fig. 3)
The choke lever (C) closes and opens the choke in the carburettor. In the position, the air-petrol-mixture is enriched for the motor's cold start. The position is used for the operation of the motor and for a warm start.
Idle setting screw (Fig. 3)
Using screw (D), the auger's idling mixture can be adjusted. If the idling mixture is a little too high (the boring head turn by itself in idle mode), the idling mixture can be reduced by slowly turning the screw anticlockwise.
Warning! Other work on the carburettor must be carried out by a specialist.
8. Operation
Before commissioning, it is important that you know and follow the safety notices.
For all work on the earth auger, you must turn off the motor, disconnect the spark plug connector and wear safety gloves. Start the auger only after complete assembly and checking it.
WARNING! Carefully read the safety notices (see "Safety notices" and additional notices for petrol-powered machines).
Warning! Wear safety boots and tight-fitting clothes in order to prevent injuries.
Before commissioning, it is important that you know and follow the safety notices
- Observe national stipulations during work when using the auger on public property or paths.
- Keep adults, children and animals away from the hazardous area.
- Check the working environment for foreign bodies and remove them.
- When leaving the machine, the motor must always be turned off.
- Check the earth auger for correct functioning and its safe operating condition.
- Do not work by yourself, someone has to be close in case of emergencies.
- Hold on to the earth auger with both hands when working.
- Ensure you have a safe position, during the drilling process as well.
- Do not lean too far forwards when working.
- Check for a flawless idling mode. The auger must not rotate in idling mode when the motor is warm.
- Immediately turn off the motor when you can feel changes to the machine's behaviour.
- Do not place the hot auger in dry grass or on flammable objects (fire risk!).
- Drill the hole in the ground in several sections so you can remove the soil in between.
- Keep the auger vertical, do not twist it!
- Always secure bore holes, otherwise there is a risk of injury!
- Exclusively drill holes in soil with the earth auger.
- Other applications are not permitted.
Starting the motor: (Fig. 3)
- If the motor is cold, turn the choke lever (C) to the S position.
- If the motor is warm, turn the choke lever (C) to the position.
- Prime the fuel pump (16) by pressing it several times until you can see fuel in the pump.
- Put the stop switch (11) in the „start“ position.
- Lightly pull on the starter cord (9) until you can feel resistance, then pull on the cord strongly 2-3 times until the motor fires briefly.
CAUTION!: Do not pull out the starter cable more than approx. 50 cm, and lead it back by hand. For efficient starting, it is important to pull the starter cable quickly and powerfully.
- Turn the choke lever (C) to position.
- Pull the starter cord 2-3 times again until the motor fires and runs in idle mode.
- Warning! The earth auger only begins to rotate when the throttle lever is used.
Stop the engine
Press the stop switch (11) in the 'Stop' position.
When restarting, first press the stop switch (11) back to the 'Start' position.
Before starting the motor, check the following:
- Fuel level - the fuel tank should be at least half full
• Condition of the fuel lines
• Outer screw couplings for tight fit
• The earth auger has to be able to run freely
Operating
- Set the auger down and actuate the throttle control lever (13).
- Adjust the power according to the ground conditions in order to be able to proceed ideally.
- If the ground condition is ideal, permitting a steady work speed, using the adjusting screw, you can lock the throttle control lever (13) (in the centre position) in order to make your work easier.
When leaving the auger, the motor must always be turned off.
9. Cleaning and maintenance
Cleaning
• We recommend that you clean the device immediately each time you have finished using it.
- Clean the equipment regularly with a moist cloth and some soft soap. Do not use cleaning agents or solvents; these could attack the plastic parts of the equipment. Ensure that no water can seep into the device.
Maintenance
For all work on the machine, the spark plug cap and the spark plug have to be removed (high voltage).
Please adhere to the maintenance schedule.
Daily before beginning work
Check fuel tank and fuel lines for tightness.
Check mounting parts, exhaust cover, air filter cover, oil, position of the auger and functioning of the operating elements.
After 20 operating hours
Clean air filter and check spark plug
After 100 operating hours
Clean fuel tank and replace spark plug
After 300 operating hours
Replace air filter
Important notice in the event of repairs:
When sending earth augers to be repaired, please note that, for safety reasons, they must be delivered to the service station free from oil and petrol.
Warning! No smoking and no open fire.
Risk of explosion.
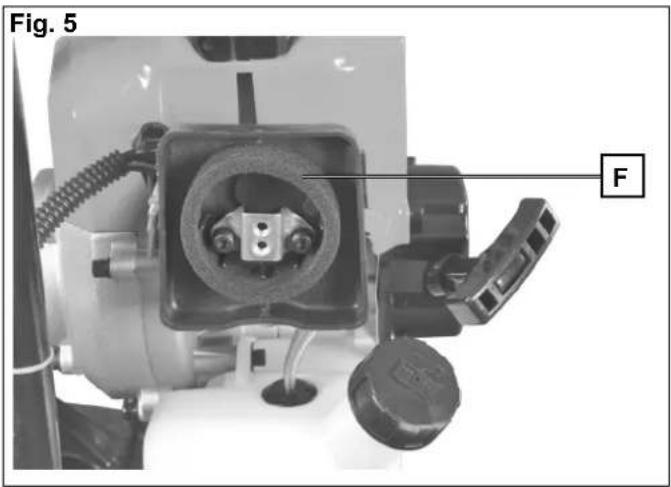
Air filter, Fig. 4-5
Regular cleaning of the air filter prevents carburettor malfunctions.
Cleaning the air filter and replacing the air filter insert:
- Loosen the screw (E) on the air filter casing (3), remove the air filter cover and check it.
- Replace the damaged element.
- Clean dirt from the inside of the filter casing with a clean, damp cloth.
- Carefully remove the foam filter insert (F) and check it for damage, replace if required.
- Clean the foam filter insert (F) in warm water and with a mild soap solution. Thoroughly rinse it with clear water and leave it to dry.
Warning!
Do not use petrol or cleanser.
Risk of explosion.
- Return the foam filter insert (F) and reposition the air filter casing.
Do not run the motor without an air filter insert or when it is damaged. This can cause motor damage. In this case: The manufacturer is not liable for damage resulting from this; the risk lies exclusively with the user.
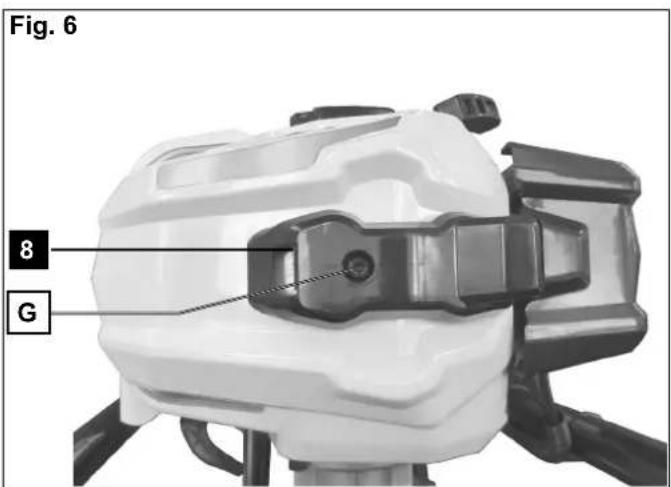
Spark plug Fig. 6-7
The exhaust/casing becomes very hot during operation. Wait for the motor to cool down.
NEVER touch the hot motor.
- Remove the spark plug cover (8) by removing the screw (G) with the provided key.
- Remove the spark plug cap (H).
- Remove the spark plug (l) and check it.
- Check the insulator. In case of damage such as cracks or chips: Replace the spark plug (I).
- Clean the spark plug electrodes with a wire brush.
- Check the electrodes' gap and adjust it. Gap 0.75 mm.
- Return the spark plug (I) and tighten it with the spark plug spanner.
- Replace the spark plug cap (H) on the spark plug (I).
- Re-install the spark plug cover (8)
Ensure that no dirt gets into the cylinder head during replacement.
Check the position of the spark plug (1).
- A loose spark plug (I) can damage the motor by overheating.
- Tightening it too much can damage the thread in the cylinder head.
The manufacturer is not liable for damage resulting from this, the risk lies exclusively with the user.
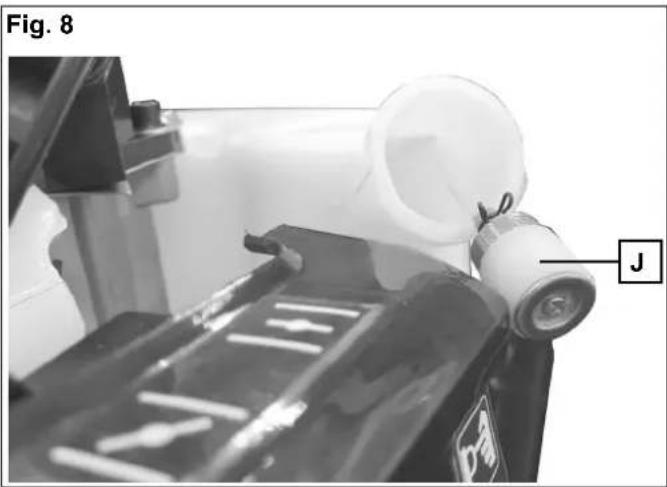
Replacing the fuel filter Fig. 8
The felt filter (J) of the fuel filter can become clogged. It is recommended to replace the fuel filter once every three months in order to ensure unimpeded fuel flow to the carburetor.
To remove the fuel filter for replacement, pull it out through the tank filler neck using a piece of wire bent at one end to form a hook.
10. Storage/Transport
Transport
Leave the motor to cool down before transporting the machine or storing it indoors in order to prevent burning and fire hazards.
Turn off the motor even for short distances when changing locations during work.
Carry the auger exclusively by the handle. Do not touch the casing (risk of burning).
When transporting the auger in a vehicle, it must be stored safely.
The fuel tank (2) must be emptied completely before transport.
Storage
Never store an auger for longer than 30 days without carrying out the following steps.
Follow the cleaning instructions and maintenance instructions before storing the device!
Storing the auger
If you store an auger for longer than 30 days, it must be prepared ahead of time. Unless the storage instructions are followed, fuel remaining in the carburetor will evaporate, leaving gum-like deposits. This could lead to difficult starting and result in costly repairs.
- Remove the fuel tank cap slowly to release any pressure in tank. Carefully drain the fuel tank.
- Start the engine and let it run until the engine stops in order to remove the fuel from the carburettor.
- Allow the engine to cool (approx. 5 minutes).
- Remove the spark plug.
- Pour 1 teaspoon of clean 2-cycle oil into the combustion chamber. Pull starter rope slowly several times to coat internal components. Replace spark plug.
- Store the auger in a dry location, far away from potential sources of ignition, such as furnaces, hot water boilers with gas, gas dryers, etc.
Recommissioning the auger
- Remove spark plug.
- Pull starter rope briskly to clear excess oil from combustion chamber.
- Clean the spark plug and check that the electrode gap is correct.
• Prepare unit for operation. - Fill fuel tank with proper fuel / oil mixture.
11. Service information
Service information
Please note that the following parts of this product are subject to normal or natural wear and that the following parts are therefore also required for use as consumables..
Wear parts*: spark plug, drill
* Not necessarily included in the scope of delivery!
12. Disposal and recycling
The equipment is supplied in packaging to prevent it from being damaged in transit. The raw materials in this packaging can be reused or recycled. The equipment and its accessories are made of various types of material, such as metal and plastic. Never place defective equipment in your household refuse. The equipment should be taken to a suitable collection center for proper disposal. If you do not know the whereabouts of such a collection point, you should ask in your local council offices.
13. Troubleshooting
| Problem Possible Cause Action | ||
| Motor does not start 1. Spark plug cable is loose2. No fuel or old fuel3. Throttle lever not in the correct position4. Choke not in „ON“ position5. Blocked fuel line6. Dirty spark plug7. Motor is wet | 1. Fix the spark plug cable securely on the spark plug2. Refuel with clean, fresh fuel3. Push the throttle lever into the starting position4. During a cold start, the throttle has to rest against the choke5. Clean the fuel line6. Clean it, adjust gap or replace spark plug7. Wait a few minutes before starting it again | |
| Motor does not run smoothly | 1. Spark plug cable is loose2. The machine is running on the CHOKE3. Blocked fuel line or stale fuel4. Ventilation is blocked5. Water or dirt in the fuel system6. Dirty air filter | 1. Connect the spark plug cable tightly2. Push the choke lever to „OFF“3. Clean the fuel line Fill the tank with fresh, clean fuel4. Clean the ventilation5. Empty the fuel tank Refuel with fresh fuel6. Clean the air filter or replace it |
| Motor has overheated 1. Too little oil in the motor2. Dirty air filter3. Air flow restricted | 1. Fill the fuel tank with the correct fuel mixtur2. Clean the air filter or replace it3. Remove the ventilation casing and clean it | |
| Motor does not stop when the throttle is on STOP, or the speed does not increase when the throttle is adjusted | Dirt on the throttle Remove the dirt | |
If these actions do not remove the fault, or faults occur that are not mentioned here, have your machine checked by an expert.
Table des matières
- Contact, inhalation
CE - Declaration of Conformity
Standard references:
EN 12100:2010; EN 14982:2009
This declaration of conformity is issued under the sole responsibility of the manufacturer.
The object of the declaration described above fulfils the regulations of the directive 2011/65/EU of the European Parliament and Council from 8th June 2011, on the restriction of the use of certain hazardous substances in electrical and electronic equipment.
Subject to change without notice
Documents registar: Stefan Hartinger
Günzburger Str. 69, D-89335 Ichenhausen
Garantie DE
Apparent defects must be notified within 8 days from the receipt of the goods. Otherwise, the buyer's rights of claim due to such defects are invalidated. We guarantee for our machines in case of proper treatment for the time of the statutory warranty period from delivery in such a way that we replace any machine part free of charge which provably becomes unusable due to faulty material or defects of fabrication within such period of time. With respect to parts not
manufactured by us we only warrant insofar as we are entitled to warranty claims against the upstream suppliers. The costs for the installation of the new parts shall be borne by the buyer. The cancellation of sale or the reduction of purchase price as well as any other claims for damages shall be excluded.
Garantie FR


- EA1700H
- Inhaltsverzeichnis
- Explanation of the symbols on the equipment
- Introduction
- Manufacturer:
- scheppach
- Note:
- We recommend:
- Device description (Fig. 1-3)
- Scope of delivery
- Attention!
- Intended use
- Remaining risks:
- Safety information
- Caution!
- Please note
- Hazards and safety measures
- Period of use:
- Keep this safety information in a safe place.
- Technical data
- Limit the noise and vibration to a minimum!
- Before operation
- Assembly
- Fuelling Fig. 1
- Fuel mixture
- Starter cord (Fig. 1)
- Choke lever (Fig. 3)
- Idle setting screw (Fig. 3)
- Operation
- Starting the motor: (Fig. 3)
- Stop the engine
- Operating
- Cleaning and maintenance
- Cleaning
- Maintenance
- Daily before beginning work
- After 20 operating hours
- After 100 operating hours
- After 300 operating hours
- Important notice in the event of repairs:
- Warning! No smoking and no open fire.
- Risk of explosion.
- Air filter, Fig. 4-5
- Warning!
- Spark plug Fig. 6-7
- Replacing the fuel filter Fig. 8
- Storage/Transport
- Transport
- Storage
- Storing the auger
- Recommissioning the auger
- Service information
- Service information
- Disposal and recycling
- Troubleshooting
- Table des matières
- CE - Declaration of Conformity
- Standard references:
- EN 12100:2010; EN 14982:2009
- Garantie DE
- Garantie FR
Brand : Herkules
Model : EA1700H
Category : Drill