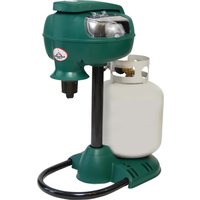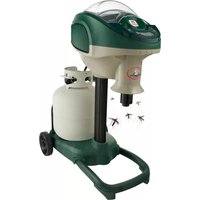
Executive - Insect repellent Mosquito Magnet - Free user manual and instructions
Find the device manual for free Executive Mosquito Magnet in PDF.


User questions about Executive Mosquito Magnet
0 question about this device. Answer the ones you know or ask your own.
Ask a new question about this device
Download the instructions for your Insect repellent in PDF format for free! Find your manual Executive - Mosquito Magnet and take your electronic device back in hand. On this page are published all the documents necessary for the use of your device. Executive by Mosquito Magnet.
USER MANUAL Executive Mosquito Magnet
Attracts and Kills Mosquitoes
flowchart
graph LR
    A["Week 1: Noticeable Results in 7-10 days"] --> B["Week 2"]
    B --> C["Week 3"]
    C --> D["Week 4: declines in 4 weeks"]
    style A fill:#f9f,stroke:#333
    style B fill:#f9f,stroke:#333
    style C fill:#f9f,stroke:#333
    style D fill:#f9f,stroke:#333
Smart Technology
Cordless
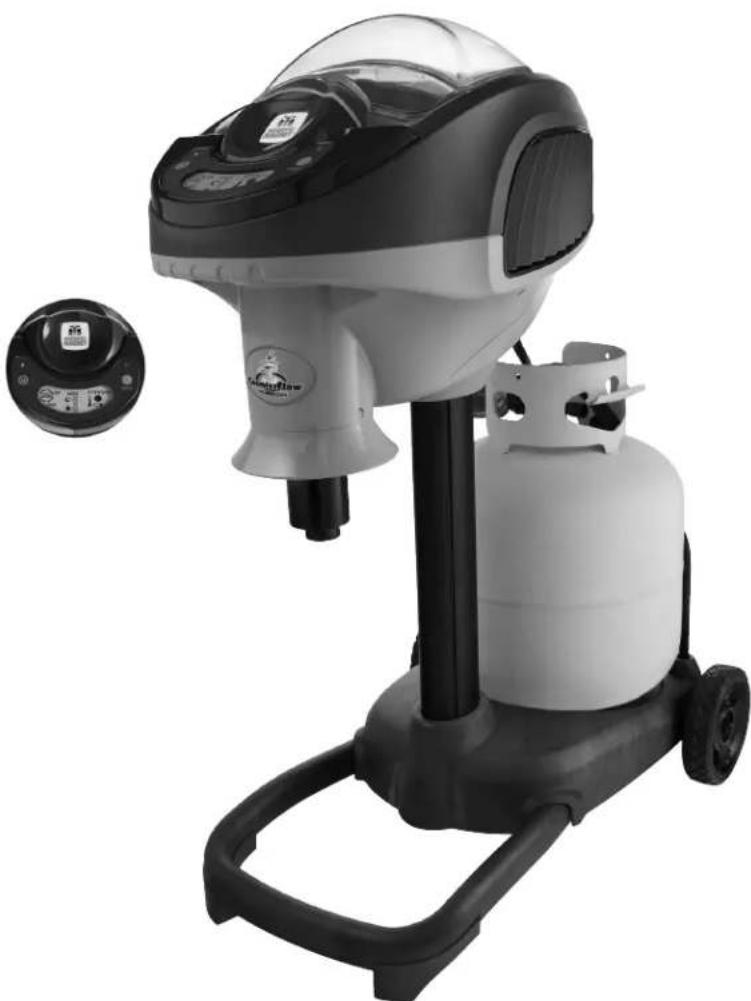
natural_image
Exterior view of a modern office building (no signage)EXECUTIVE
For Outdoor Use Only 1440-653 Rev 09/21
Operation Manual
CE
CAUTION / WARNUNG / MERK / HUOMIO / VAR FÖRSIKTIG! / ATTENZIONE
CAUTION - The appliance is not to be used by persons (including children) with reduced physical, sensory or mental capabilities, or lack of experience and knowledge, unless they have been given supervision or instruction - children being supervised not to play with the appliance.
This symbol on the product or its packaging indicates that this product must not be disposed of with your other household waste. Instead, it is your responsibility to dispose of your waste equipment by handing it over to a designated collection point for the recycling of waste electrical and electronic equipment. The separate collection and recycling of your waste equipment at the time of disposal will help conserve natural resources and ensure that it is recycled in a manner that protects human health and the environment. For more information about where you can drop off your waste for recycling, please contact your local authority, or where you purchased your product.
Congratulations on your purchase of Mosquito Magnet®. Now you can begin to enjoy your outdoor living space again.
Mosquito Magnet ^® is the #1 mosquito trap in North America. Backed by 18 years of research and independent testing, Mosquito Magnet ^® is scientifically proven to effectively reduce mosquitoes & other biting insects from your yard.
Mosquito Magnet® is easy to use. In this manual, you’ll learn everything you need to know about how it works, optimal trap placement, maintenance, storage and warranty information. The keys to success are trap placement, utilization of the correct co-formulant for your area and routine maintenance. For optimal catch rate, you’ll need to change the propane tank and co-formulant every 21 days.
Visit us online at www.mosquitomagnet.com for additional information regarding Mosquito Magnet® tips, testimonials, and additional product offerings.
Woodstream™ Corporation
69 North Locust Street
Lititz, PA 17543
1-800-953-5737
www.mosquitomagnet.com
The Mosquito Magnet ^® traps are covered by one or
more of the following patents:
US & Canada
US Patents: Nos. 5,813,166; 6,655,080; 6,662,489; 6,817,140; 6,840,005;
6,848,466; 6,892,492; 7,074,830; 7,181,885; 7,281,351; 7,293,387;
7,536,824; 7,614,180; 7,910,091; 7,987,631; 8,006,432; 8,067,469;
8,141,291; 8,347,549; 8,470,881; 8,753,110; 8,973,299; 9,949,471
Canada Patents: Nos. 2322038; 2460876; 2558775; 2569737; 266346
All Other Countries
Australia: 735984; 2002356537; 2005226680; 2005251813; 2007258277;
2008246208; 2012202864 Brazil: 9908104-0; PI0213059-9; PI0508967-0
China: ZL0281957.X; ZL20058000881.0; ZL200580025316.5;
ZL200580046646.2; ZL200780029874.8; ZL200910254151.9
Denmark: 1432304
Europe: 1049373; 1432304; 1537780; 1827093; EP1725094B; EP1765068B
Finland: 1432304; 1827093; EP1725094B
France: 1049373; 1432304; 1537780; 1765068; 1827093; EP1725094B
Germany: 1049373; 1725094; 60211538.8
Hong Kong: HK1107743; HK1112810; HK1148207 Italy: 1049373; 1432304;
1537780; 1725094; 1765068; 1827093
Japan: 4317748; 4741578; 5444525
Mexico: 314022
New Zealand: 506403; 542745
Portugal: 1765068
Sweden: 1432304; 1537780; 1765068; 1827093; EP1725094B
United Kingdom: 1049373; 1432304; 1537780; 1725094; 1765068; 1827093
FOR YOUR SAFETY
If you smell gas:
- Shut off the gas to the appliance.
- Extinguish any open flame.
- Open lid.
- If odor continues, immediately call your gas supplier or your fire department.
FOR YOUR SAFETY
- Do not store or use gasoline or other flammable vapors and liquids in the vicinity of this or any other appliance.
- An LP cylinder not connected for use shall not be stored in the vicinity of this or any other appliance.
Made in China
MOSQUITO MAGNET®
Contents
Safety Instructions E6-7
Principal Parts E8
Assembly Instructions E9
Set-Up
Charging Instructions
Trap Placement
Propane Tank Installation
Instructions
Starting Instructions
Shut Down Instructions
When Not In Use
End of Season Storage
For Best Results
Smart Technology E13
Maintenance
Maintenance
Propane Tank Changing Tips
Maintenance Schedule
Troubleshooting
E10-11
E12
E14
E15
Woodstream™ Corporation
69 North Locust Street
Lititz, PA 17543
www.mosquitomagnet.com
Model No.:
Serial No.:
Type of Gas:
Manifold Pressure:
Minimum Gas
Supply Pressure:
Input Rating:
Minimum Clearances:
Executive
Propane
100 - 110 psi
11.0 in. WC
759 Btu/Hr.
50-60cm
text_image
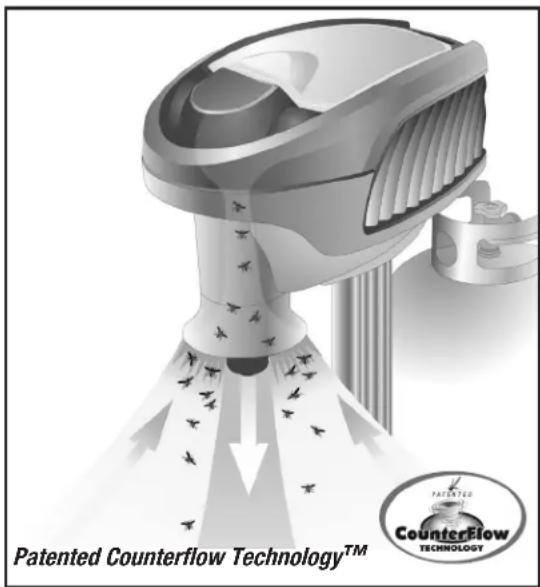
Patented Counterflow Technology™ PANTED CounterFlow TECHNOLOGYHow the Mosquito Magnet® Works
Mosquitoes and other biting insects use the attractant carbon dioxide (CO 2 ) to locate people. The Mosquito Magnet ^ mimics a human by converting propane to CO 2 , with its patented catalytic conversion technology.
Attracted by the CO _2 mosquitoes and other biting insects are drawn to the Mosquito Magnet®. When they reach the trap, the insects are vacuumed into a bug bag by our patented Counterflow Technology™, where they dehydrate and die within 24 hours.
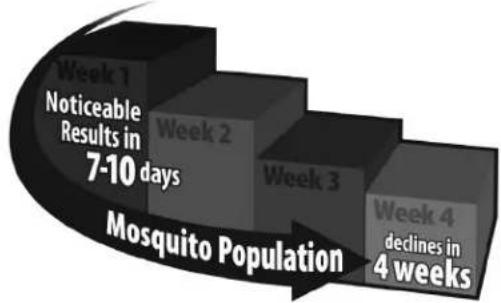
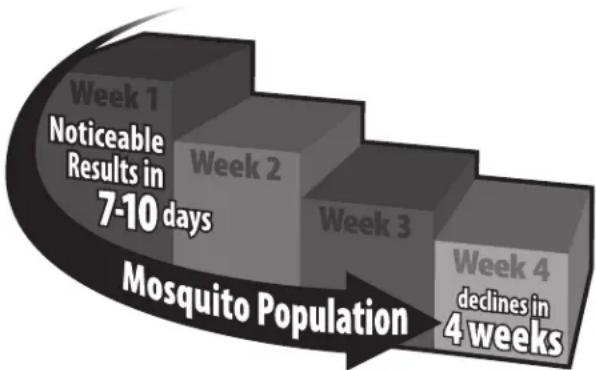
The Mosquito Magnet ^® is silent, odorless and runs 24/7. When properly placed in your yard, the trap begins working immediately. Noticeable results can be achieved in 7 to 10 days, to greatly reduce your biting insect population, allow 4 weeks. To increase the effectiveness of CO_2 a co-formulant can be added such as R-Octenol or Mosquito Magnet ^® Pod. Leave the Mosquito Magnet ^® out all summer long, to control the mosquito population in your yard.
Only biting insects are targeted including mosquitoes, no-see-ums, black flies and midges. Beneficial insects such as butterflies, bees or moths are not targeted.

MOSQUITO MAGNET®
Safety Instructions
Please read and follow all safety instructions and warnings.
Children and adults should be alerted to the hazards of high surface temperatures and should stay away to avoid burns or clothing ignition.
Young children should be carefully supervised when they are in the area of the heater. Keep out of reach of children.
Clothing or other flammable materials should not be hung from the heater, or placed on or near the heater.
Note: Some or all of the following required safety instructions for propane powered devices may apply to your trap. Allow trap to cool for 5 minutes before re-starting.
Warning: Improper installation, adjustment, alteration, service or maintenance can cause injury or property damage. Read the installation, operating and maintenance instructions thoroughly before installing or servicing the trap.
Caution: The gas pressure regulator provided with this appliance must be used. This regulator is set for an outlet pressure of 11.0 in. Water Column. The minimum inlet gas supply pressure is 11.0 in. Water Column from regulator.
- This unit is not intended to be installed in or on recreational vehicles and/or boats.
- The gas supply must be turned off at the LP-Gas supply cylinder when this appliance is not in use.
- The installation must conform with local codes.
- To test for a gas leak, place soapy water around the connector, regulator, and gas hose assembly. If bubbles appear, there is a gas leak.
- Inspect the hose before each use of the unit. If it is evident there is excessive abrasion or wear, or the hose is cut, it must be replaced prior to the unit being put into operation. The replacement hose shall be that specified by the manufacturer.
- The trap is equipped with an internal spark ignition device. Failure to follow starting procedure will result in the trap not starting.
- Installation and repair should be done by a qualified service person (find service centers on www.mosquitomagnet.com). The heater should be inspected before use and at least annually by a qualified service person. More frequent cleaning may be required as necessary. It is imperative that the control compartment, burners, and circulating air passageways of the heater be kept clean.
Safety Instructions
- Maintain adequate clearances of 50-60cm around air openings into the combustion chamber, clearances from combustible material, provisions for accessibility and for combustion and ventilating air supply. Keep the trap area clear and free from combustible materials, gasoline, and other flammable vapors and liquids. The appliance is not to be used in locations where flammable vapor or explosive dust is likely to exist.
- Do not obstruct the flow of combustion and ventilation air.
- Keep the ventilating openings of the cylinder enclosure free and clear from debris.
- Clean the trap with a water damp cloth, if necessary.
- A maximum of a 20 lb. LP-Gas cylinder shall be used.
- The LP-Gas cylinder supply system must be arranged for vapor withdrawal and the cylinder must include a collar to protect the cylinder valve.
- The trap shall be used outdoors only in a well ventilated space and shall not be used in a building, garage, or any other enclosed area.
- The LP-Gas cylinder must be disconnected and removed from the appliance, if the appliance is stored indoors.
- LP-Gas cylinders must be stored outdoors in a well-ventilated area out of reach of children.
-
Disconnected cylinders must have threaded valve plugs tightly installed and must not be stored in a building, garage, or any other enclosed area.
-
The pressure regulator and hose assembly supplied with this appliance must be used for connection to the LP-Gas cylinder. Replacement pressure regulators and hose assemblies must be specified by the manufacturer.
- Avoid improper use of extension cords. Keep connections away from moisture and avoid damage to the cord.
- If the supply cord is damaged, it must be replaced by the manufacturer or its service agent or a similarly qualified person in order to avoid hazard.
- Do not store near heat or fire or where temperature may exceed 60°C.
- PPG Regulator and Hose Assembly Class A
- Rated Working Pressure: 2.74 kPa Outlet Pressures: 2.50 kPa to 3.5 kPa Velocity: 165 ft/min to 275 ft/min
Visit www.mosquitomagnet.com
Principle Parts
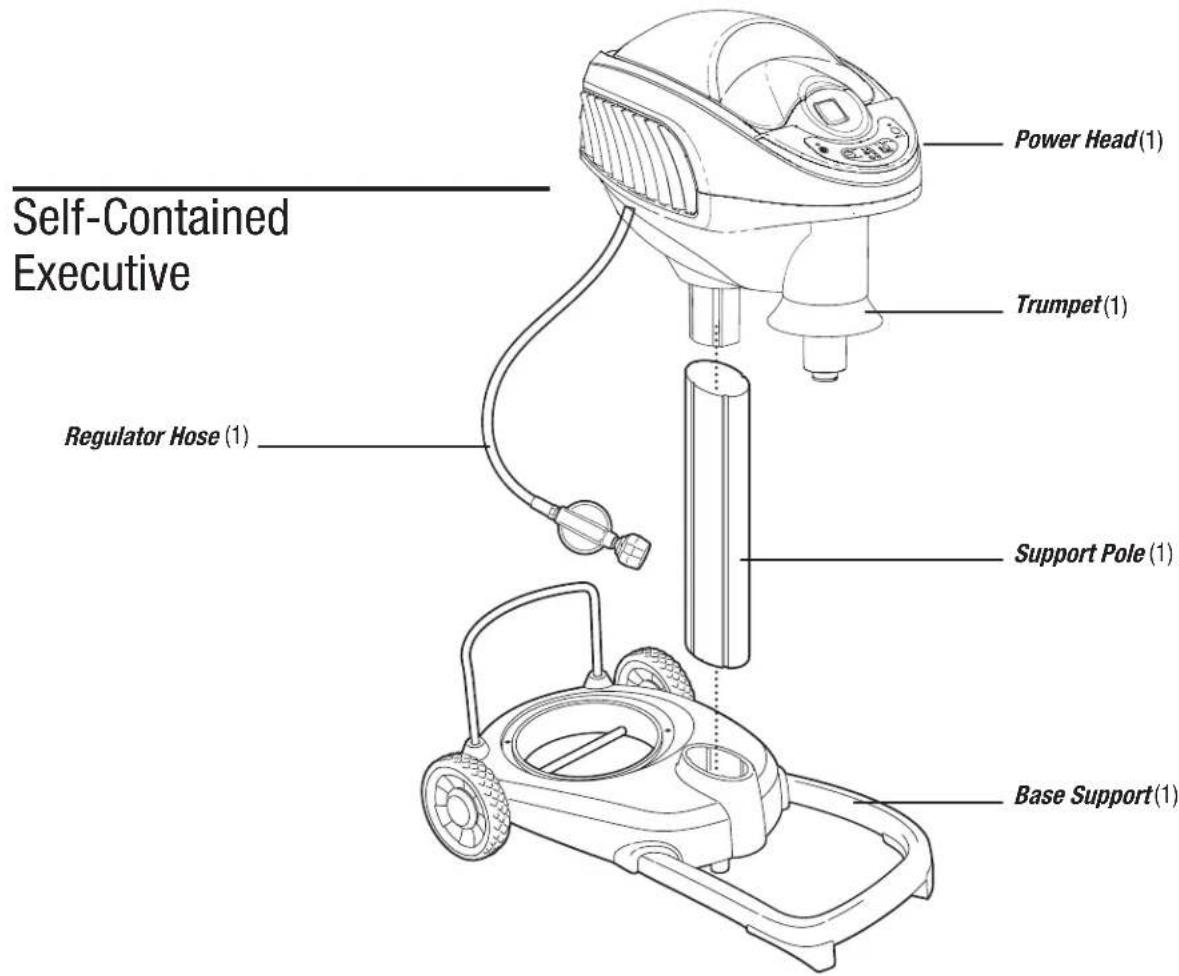
text_image
Self-Contained Executive Regulator Hose (1) Power Head(1) Trumpet(1) Support Pole (1) Base Support(1)Parts Included
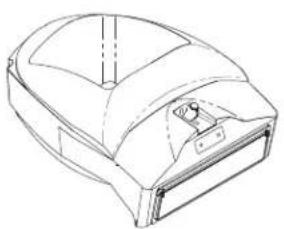
Bug Bag
natural_image
Line drawing of a mechanical housing or enclosure with no visible text or symbols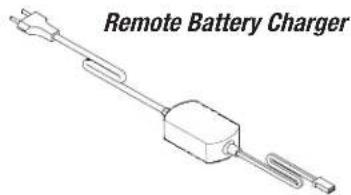
text_image
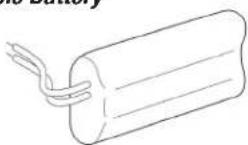
Remote Battery ChargerRechargeable Battery
Assembly Instructions
Trap Assembly:
Step 1
natural_image
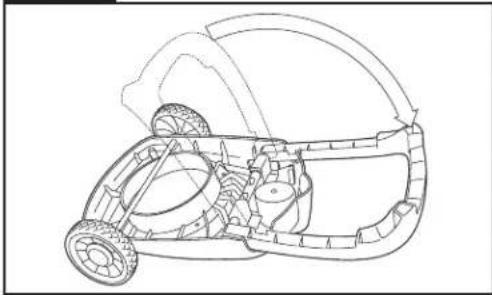
Technical line drawing of a mechanical device with wheels and internal components (no text or symbols)Place base upside down on a flat surface, unfold U-shaped support leg until it locks in place.
Step 2
natural_image
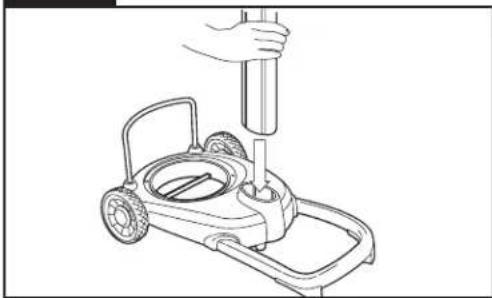
Line drawing of a hand using a tool to lift a lawn mower (no text or symbols)Turn base and leg assembly right-side-up and place support pole into cavity on base.
Bug Bag Installation:
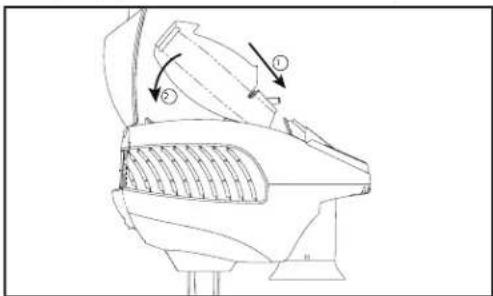
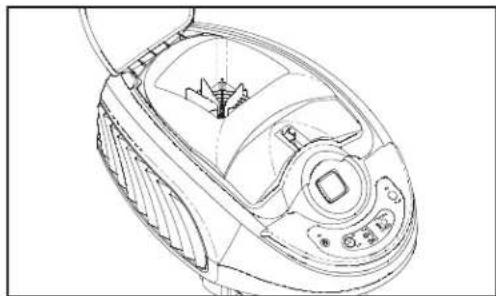
To insert Bug Bag, first engage front/open section then gently push the back end down into place.
natural_image
Technical line drawing of a mechanical device with labeled components (① and ②), no readable text or symbols present.Step 3
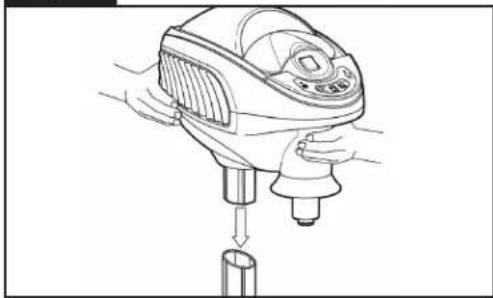
natural_image
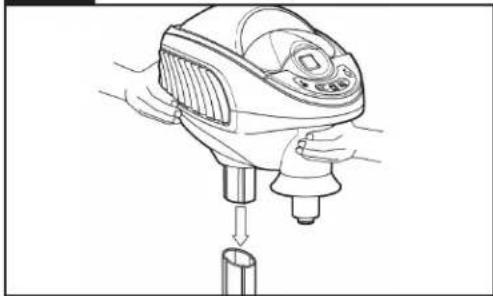
Line drawing of a handheld device with a cylindrical base and two inserted pins (no text or symbols)Place trap power head onto pole. Press down firmly with two hands to secure.
Assembled trap should have the front of power head/trumpet placed farthest from the wheels in the same direction as base U-shaped legs.
Step 4
The battery is not fully charged at the factory; charge the battery before the first use. Under proper usage, one charge lasts all season. See page 10 for further details.
CAUTION
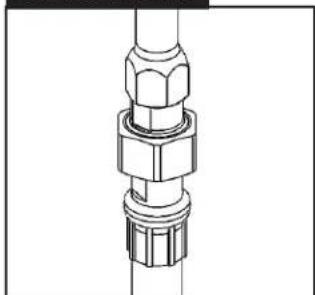
natural_image
Technical line drawing of a mechanical connector assembly (no text or symbols)DO NOT BUMP HOSE ATTACHMENT WITH PROPANE TANK. DO NOT TAMPER WITH HOSE ATTACHMENT CONNECTED TO TRAP.
natural_image
Line drawing of a vacuum cleaner device with control panel and fan (no text or symbols)Set-Up
Charging Instructions
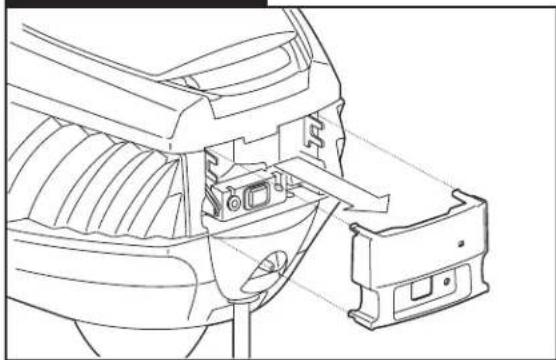
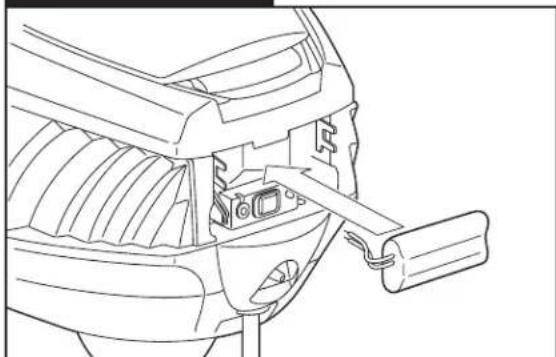
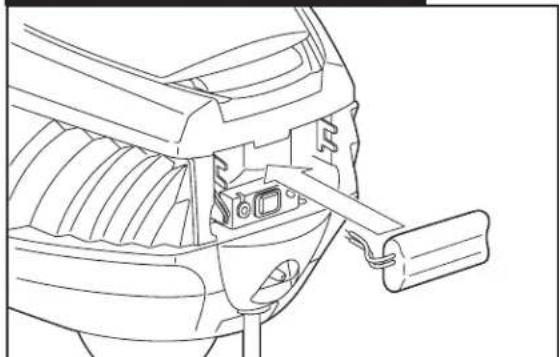
- Remove cover panel from rear of Power Head Unit (panel snaps off). Press the battery latch & pull out of the trap to disconnect. Remove the battery by pulling up on the bottom and rotating the battery out of position.
- The Battery Charger is not rated for Outdoor use. The battery must be charged indoors.
- Plug the Battery Charger into a suitable indoor outlet.
- Connect the re-chargeable battery to the battery charger.
- The LED on the Battery Charger will indicate Red when the battery is charging, when the battery is fully charged the LED will indicate Green. The typical charge time is less than two hours.
- The battery charger is automatic, it will shut down to a safe maintenance charge current when the battery is fully charged. It will not over charge the battery. For maximum life, do not leave the battery on the charger for extended periods.
- When the battery is fully charged, disconnect the battery from the battery charger and return it in the Mosquito Magnet Executive.
- Insert and connect the re-chargeable battery.
- Replace the cover panel on the rear of Power Head Unit.
Trap Placement
- Determine the direction of the prevailing wind. Check local weather patterns if you are unsure.
- Stand in the center of the area you are trying to protect and look toward the prevailing wind.
- Proper placement of the trap will be approximately 10m in front of you, within 1.5-2m of ground cover (i.e. bushes, flowerbeds, tree line, marshbed). Ensure that trap is not directly against any blockades such as buildings, fences, etc.
- It is recommended that the trap be placed in the shade.
- Do not place trap directly above a water source (sprinklers, hose, etc.).
- Trap must be placed on level ground to avoid tipping or uneven propane distribution.
- For optimal trap placement in your yard, refer to the instructional video at www.mosquitomagnet.com/videos to build your own yard diagram for correct trap placement.
Remove Back Panel
natural_image
Technical line drawing of a mechanical assembly with no visible text or symbolsInsert & Connect Battery
natural_image
Line drawing of a car interior showing dashboard, seatbelt, and camera mechanism (no text or symbols)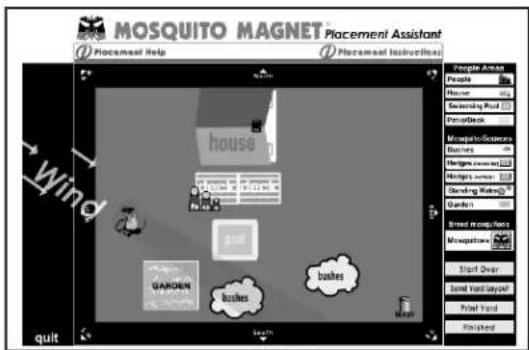
text_image
MOSQUITO MAGNET Placement Assistant Placement Help Placement Instructions People Area People House Switching Pool Placeback Miscellaneous Business Margins software Mobile server Sending Manager Garden Breed remote/less Mosquitoans Direct Over Send Yard layout Print Yard Finished house garden bushes bushes quitSet-Up
Propane Tank Installation
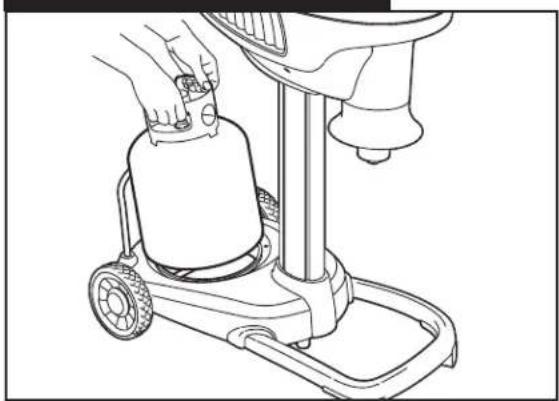
- After trap is placed in its ideal location, place propane tank onto the molded cradle.
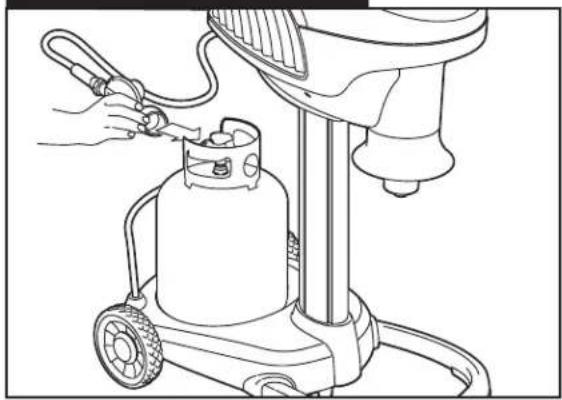
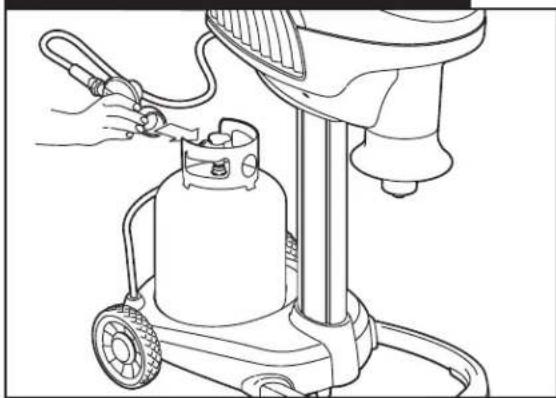
- Make sure propane tank is fully closed. Attach propane regulator hose to propane tank. Secure tightly by hand. Do not use tools.
- Turn propane on by slowly turning valve counter-clockwise. Take care not to turn too quickly to avoid engagement of safety valve.

DO NOT MOVE TRAP WITH TANK ATTACHED!
TANK MUST BE DISCONNECTED FROM REGULATOR BEFORE TRAP IS RELOCATED TO AVOID DAMAGE TO REGULATOR AND/OR TRAP. BE ADVISED, DAMAGE CAUSED FROM FAILURE TO COMPLY WITH THIS INSTRUCTION IS NOT COVERED UNDER WARRANTY.
Step 1 - Propane Tank Placement
natural_image
Line drawing of a hand operating a small cylindrical tool with wheels, next to a mechanical press or drill (no text or symbols)Step 2 - Attach Regulator
natural_image
Line drawing of a hand operating a cleaning or dust purifier machine with a cylindrical tank (no text or symbols)CAUTION
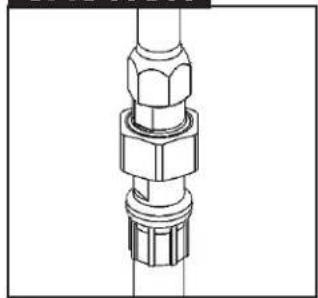
natural_image
Technical line drawing of a mechanical connector assembly (no text or symbols)DO NOT BUMP HOSE ATTACHMENT WITH PROPANE TANK. DO NOT TAMPER WITH HOSE ATTACHMENT CONNECTED TO TRAP.
Step 3 - Slowly Open Valve

natural_image
Line drawing of a hand operating a cylindrical tool on a wheeled cart (no text or symbols)Instructions
**READ MANUAL BEFORE STARTING**
Charge your battery per instructions. Under proper usage, battery will last all season.
Starting Instructions
It is recommended that you read the entire manual before starting the Mosquito Magnet® trap.
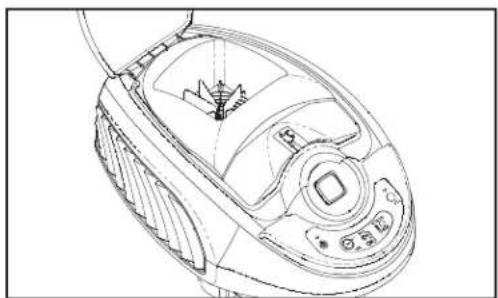
- To start the trap, press and hold the ON/OFF button for three seconds until the orange LED illuminates.
- RUN will show on the display. WARM and the indicator arrows will also flash on the display. The LED (indicator above ON/OFF button) will be orange.
- The fan will ramp from low speed to high speed after approximately 3 minutes.
- The display will flash WARM and the LED will be orange for approximately 15-25 minutes while the trap is warming up.
- After the trap reaches operating temperature, the LED will be green and WARM will disappear from the display.
Shut Down Instructions
To turn off the trap, press the ON/OFF button. RUN will show on the display. COOL and the indicator arrows will flash on the display. The LED will be green. After a two minute cool down, the fan will stop, the LED will turn off and OFF will show on the display.
When Not In Use
If the unit is not in use, the gas must be turned off at the supply cylinder. Storage of this unit indoors is permissible only if the cylinder is disconnected and removed. Cylinders must be stored outdoors, out of reach of children and must not be stored in a building, garage or any other enclosed area.
End of Season Storage
Push ON/OFF switch to OFF position to shut down the trap. The LED light will go out and the fan will continue running until trap is cool. Close the propane tank valve and disconnect regulator.
Any open Mosquito Magnet ^® cartridge should be removed and discarded. See co-formulant label for disposal instructions. The bug bag should also be discarded prior to storing the trap.
STORAGE: The trap should be stored indoors in a garage or shed in the off-season. Cover trumpet to prohibit insects from nesting. Cover unit with a tarp and secure tightly at the bottom to keep out dust, spider webs and other debris.
For Best Results (unit must run for 24 hours/day)
- Your trap will begin capturing immediately with significant reduction in the mosquito population in 7-10 days. Allow 4 weeks to significantly reduce the mosquito population in your yard.
flowchart
graph LR
    A["Week 1: Noticeable Results in 7-10 days"] --> B["Week 2"]
    B --> C["Week 3"]
    C --> D["Week 4: Declines in 4 weeks"]
- Allow trap to cool for 5 minutes before re-start.
- Never spray insecticide in or around trap.
- Trap can be left running in the rain.
- If using lime or fertilizer compounds, be sure to shut down the trap first to prevent dust or fine mist from being drawn into trap and clogging bug bag.
Warning: Improper installation, adjustment, alteration, service or maintenance can cause injury or property damage. Read the installation, operating and maintenance instructions thoroughly before installing or servicing this equipment.
Caution: The gas pressure regulator provided with this appliance must be used. This regulator is set for an outlet pressure 11.0 in. water column.
The gas supply must be turned off at the LP-Gas supply cylinder when this appliance is not in use.
Smart Technology
Setting Fuel-Saving Modes
The trap has the option to run 24/7 or in one of 4 Fuel-saving Modes which can extend the life of your propane tank. The propane tank will last 21 days by operating your trap 24/7, which is recommended for the corresponding propane usage expended based on the mode of operation.
| Operation Fuel-Saving | Tank Life* | Shut Down Day Time | Shut Down Night Time |
| Mode 1 | 22 days | 1 Hr | 1 Hr |
| Mode 2 | 24 days | 2 Hr | 2 Hr |
| Mode 3 | 27 days | 3 Hr | 3 Hr |
| Mode 4 | 30 days | 4 Hr | 4 Hr |
*Based on a 20lb. (9.07kg.) propane tank
The Fuel-Saving Mode of operation will stop the propane use in the middle of the day & during the middle of the night. Research has shown mosquito activity is typically lowest during these time frames.
NOTE: The "Smart Technology" system automatically learns the cycles of day and night within a 24 hour period while in the Fuel-Saving Mode. This system uses a photo sensor to allow the trap to learn and adjust shut downs based on the shift in sunrise and sunset as seasons change.
Fuel-Saving Modes
- Press the MODE button to select the Gas Saver Mode Setting.
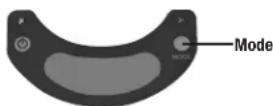
- Every time the MODE button is pressed the Mode will cycle through 1, 2, 3, 4, Off, 1, etc.
- Mode 1 will shut down the trap 1 hour during the middle of the day and 1 hour during the middle of the night Modes 2, 3, and 4 correspond to 2, 3, and 4 hours of shut down time respectively.
- To indicate the trap is in Fuel-Saver Mode, the arrows will flash and the green LED light will be off. Additionally, the Sun element will
flash during the day and the Moon element will flash during the night when the trap is in Fuel-Saving Mode. The fan will continue to operate in the trap, at a reduced speed, to prevent any escape of mosquitoes but will not capture any additional mosquitoes during this time frame.
- If the trap is set in the fuel-saving mode, the battery must be disconnected and then reconnected every time the propane tank is refilled. The battery disconnect is required to reset the Fuel Saving timer.

Cold Temperature Shutdown
The trap has a temperature sensor that can be used to automatically put the trap in a standby mode when the outdoor air temperature and the trap temperature are both below a user selectable set point. Research has shown that there is very little mosquito activity when the air temperature drops below 50°F (10°C). However, in some locations and with some mosquito species, activity can continue at temperature shutdown point starting at 50°F (10°C). The trap has a user selectable cold temperature shutdown point starting at 50°F (10°C) and incrementing down in increments of 5°F (2.8°C) to a minimum temperature of 30°F (-1°C). The default setting on the trap is no cold temperature shutdown.
To access the Cold Temperature Shutdown parameters, press and hold the Mode button for at least 3 seconds until the Cold Temperature Shutdown menu appears. Toggle through the temperature choices by pressing the Mode button, beginning with Off (blank) and then to 30, 35, 40, 45, and 50 (°F). Continue to toggle the Mode button after 50 will return to Off (blank) and then repeat the cycle. Once a temperature choice has been made, stop pressing the Mode button; wait approximately 3 seconds; and your temperature choice will be automatically saved.
If the trap is running (the word RUN is visible and the green LED light is on), and a cold temperature shutdown value has been selected, the trap will shut down when the air temperature and the trap temperature has dropped below that set point. When the trap is in the Cold Temperature Shutdown Mode the word COOL and the Thermometer icon will flash. The trap will restart when the temperature sensor indicates that the air temperature and the trap temperature are approximately 5^ F ( 2.8^ C) above the selected cold temperature shutdown value.
If the trap is in warm up mode when the temperature drops below the selected set point, it will shut down, but it will not restart automatically.

Low Battery Warning
The battery icon and attention will flash if the battery to be recharged.
Child Safety Lock
The ON/OFF button needs to be held for 3 full seconds to turn-on the trap.

MOSQUITO MAGNET®
Maintenance
Maintenance
If using one of our Fuel-Saving Modes, be sure to adjust the dates accordingly.
• 21 Day Maintenance Cycle
- Refill propane. (Propane lasts approximately 21 days with 24-hour/7-days operation.)
- Replace co-formulant cartridge.
See Mosquito Magnet ^® co-formulant label for instructions.
- Empty or replace bug bag.
- Periodically wipe down the outside of the trap with a clean, water damp cloth.
- Charge your battery for 24 hours at the beginning of the season.
Propane Tank Changing Time
When attaching the regulator knob to a tank after a tank change, be sure to fully tighten the regulator knob onto the tank. No need to use tools, but do turn the knob as far as possible by hand. When this is done, loosen the knob 1/4 turn, then re-tighten to maximize seal.
The purpose for this is to fully engage the regulator onto the tank. If the regulator is not fully engaged, the flow of gas may be restricted to the point where the trap will show a gas empty code. If this occurs, press the off button, close the tank valve, and remove the regulator from the tank. Re-attach the regulator and try again.
Troubleshooting
| Problem | Possible Cause Solutions | |
Unit won't startUnit won't stay runningLCD  LED - Red LED Flashing at 7 second intervals LED - Red LED Flashing at 7 second intervals | 1. Propane tank may be empty.2. If propane tank is new and has been newly filled it must be purged.3. There could be a loose connection.4. Fuel line may be blocked by propane contaminants.5. Regulator is not fully engaged.6. Bug bag may be full or clogged. | 1. Weigh tank and check against “empty” weight.2. Bring tank to filling location. Air may be in fuel line. Ask for tank to be purged.Hint: If you have another propane powered device operating on a standard, 20 lb propane tank, try hooking that tank up to the trap to verify that the issue is with your tank.3. Verify all connections. Make sure propane tank valve is fully open.4. Replace the bug bag. |
Unit won't stay RunningLCD  LED - Flashing Red/Orange at 7 second intervals LED - Flashing Red/Orange at 7 second intervals | 1. Low Battery Voltage. | 1. Charge the battery before the first use and at the beginning of each season. The Charger LED will be Green when the battery is fully charged.2. Check battery connection, making sure it is fully inserted and locked.3. If a fully charge battery indicates Low Battery Voltage during the cycle, recharge or replace the battery. |
Unit shut downLCD 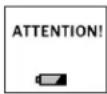 LED - Flashing Red/Green at 7 second intervals LED - Flashing Red/Green at 7 second intervals | 1. High Temperature. | 1. Turn off trap and allow to cool for one hour, then restart. If the code continues contact your Local Service Provider or call Customer Care on:-+001-800-953-5737 (USA) or +44 (0) 1572 722558 (UK). |
Unit shut downLCD  LED - Double Flashing Red LED at 7 second intervals LED - Double Flashing Red LED at 7 second intervals | 1. Thermistor Fault. | 1. Contact your Local Service Provider or call Customer Care on:-+001-800-953-5737 (USA) or +44 (0) 1572 722558 (UK). |
| Unit shut downLED - Solid Red | 1. Electrical Fault. | 1. Contact your Local Service Provider or call Customer Care on:- +001-800-953-5737 (USA) or +44 (0) 1572 722558 (UK). |
| Low or no catch | 1. Insects may not be out yet.2. Trap placement issue.3. Biting insect reproductive cycles have not yet been broken.4. Counterflow may be disrupted. | 1. Verify temperature is consistently over 50° F (10°C).2. Follow steps in the “Trap Placement” section of your owner’s manual.3. Keep trap in constant operation 24 hours/day, 7 days per week for at least 4 weeks to reduce the mosquito population.4. Air flow may be restricted. Contact your Local Service Provider. |
69 North Locust Street
Lititz, PA 17543
www.mosquitomagnet.com
69 North Locust Street
Lititz, PA 17543
United States
www.mosqitomagnet.com

MOSQUITO MAGNET®
Bienvenido
69 North Locust Street
Lititz, PA 17543
1-800-953-5737
www.mosquitomagnet.com
US Patents: Nos. 5,813,166; 6,655,080; 6,662,489; 6,817,140; 6,840,005;
6,848,466; 6,892,492; 7,074,830; 7,181,885; 7,281,351; 7,293,387;
7,536,824; 7,614,180; 7,910,091; 7,987,631; 8,006,432; 8,067,469;
8,141,291; 8,347,549; 8,470,881; 8,753,110; 8,973,299; 9,949,471
Canada Patents: Nos. 2322038; 2460876; 2558775; 2569737; 266346
All Other Countries
Australia: 735984; 2002356537; 2005226680; 2005251813; 2007258277;
2008246208; 2012202864 Brazil: 9908104-0; PI0213059-9; PI0508967-0
China: ZL0281957.X; ZL20058000881.0; ZL200580025316.5;
ZL200580046646.2; ZL200780029874.8; ZL200910254151.9
Denmark: 1432304
Europe: 1049373; 1432304; 1537780; 1827093; EP1725094B; EP1765068B
Finland: 1432304; 1827093; EP1725094B
France: 1049373; 1432304; 1537780; 1765068; 1827093; EP1725094B
Germany: 1049373; 1725094; 60211538.8
Hong Kong: HK1107743; HK1112810; HK1148207 Italy: 1049373;
1432304; 1537780; 1725094; 1765068; 1827093
Japan: 4317748; 4741578; 5444525
Mexico: 314022
New Zealand: 506403; 542745
Portugal: 1765068
Sweden: 1432304; 1537780; 1765068; 1827093; EP1725094B
United Kingdom: 1049373; 1432304; 1537780; 1725094; 1765068; 1827093
Hecho en China
PARA SU SEGURIDAD
o visite www.mosquitomagnet.com
Partes principales

natural_image
Line drawing of a mechanical component or housing with no visible text or symbols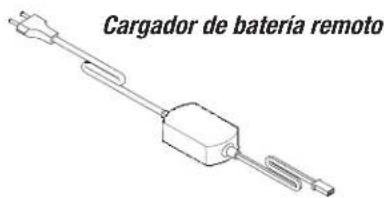
natural_image
Technical line drawing of a mechanical assembly with gears and housing (no text or symbols)natural_image
Line drawing of a hand using a tool to lift a lawn mower (no text or symbols)natural_image
Technical line drawing of a mechanical device with labeled components (no text or symbols)Paso 3
natural_image
Line drawing of a handheld device with a downward arrow indicating a process (no text or symbols present)natural_image
Line drawing of a vacuum cleaner device with control panel and fan (no text or symbols)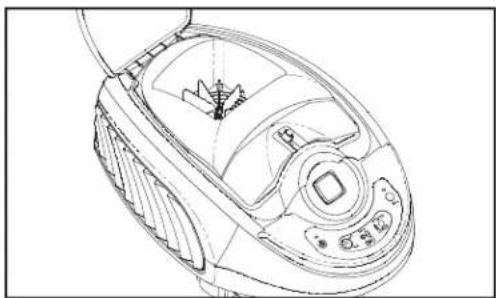
natural_image
Line drawing of a vacuum cleaner device with control panel and fan (no text or symbols)Instalación
natural_image
Technical line drawing of a mechanical assembly with no visible text or symbolsnatural_image
Line drawing of a car interior showing seatbelt, dashboard, and steering wheel (no text or symbols)text_image
MOSQUITO MAGNET Placement Assistant Placement Help Placement Instructional People Area People House Switching Road PlateDeck Monopole Systems Business Hedges connected Hedge network Standing Lighting Garden Street lighting Monopatterns Start Over Send Yard layout! Print Yard Finished house garden bushes winds quitInstalación
natural_image
Line drawing of a hand operating a small cylindrical device with wheels, next to a mechanical press or drill (no text or symbols)natural_image
Line drawing of a hand operating a cleaning or dust purifier machine with a cylindrical tank (no text or symbols)natural_image
Line drawing of a hand operating a portable gas cylinder on a wheeled cart (no text or symbols)Instrucciones
**LEA EL MANUAL ANTES DE EMPEZAR**
69 North Locust Street
Lititz, PA 17543
E.U.A.
69 North Locust Street
Lititz, PA 17543
E.U.A.
www.mosquitomagnet.com
MOSQUITO MAGNET®
Bem-vindo(a)
69 North Locust Street
Lititz, PA 17543
E.U.A.
www.mosquitomagnet.com
Patentes:
US & Canada
US Patents: Nos. 5,813,166; 6,655,080; 6,662,489; 6,817,140; 6,840,005;
6,848,466; 6,892,492; 7,074,830; 7,181,885; 7,281,351; 7,293,387;
7,536,824; 7,614,180; 7,910,091; 7,987,631; 8,006,432; 8,067,469;
8,141,291; 8,347,549; 8,470,881; 8,753,110; 8,973,299; 9,949,471
Canada Patents: Nos. 2322038; 2460876; 2558775; 2569737; 266346
All Other Countries
Australia: 735984; 2002356537; 2005226680; 2005251813; 2007258277;
2008246208; 2012202864 Brazil: 9908104-0; PI0213059-9; PI0508967-0
China: ZL0281957.X; ZL20058000881.0; ZL200580025316.5;
ZL200580046646.2; ZL200780029874.8; ZL200910254151.9
Denmark: 1432304
Europe: 1049373; 1432304; 1537780; 1827093; EP1725094B; EP1765068B
Finland: 1432304; 1827093; EP1725094B
France: 1049373; 1432304; 1537780; 1765068; 1827093; EP1725094B
Germany: 1049373; 1725094; 60211538.8
Hong Kong: HK1107743; HK1112810; HK1148207 Italy: 1049373;
1432304; 1537780; 1725094; 1765068; 1827093
Japan: 4317748; 4741578; 5444525
Mexico: 314022
New Zealand: 506403; 542745
Portugal: 1765068
Sweden: 1432304; 1537780; 1765068; 1827093; EP1725094B
United Kingdom: 1049373; 1432304; 1537780; 1725094; 1765068; 1827093
PARA A SUA SEGURANÇA
Visite o site www.mosquitomagnet.com
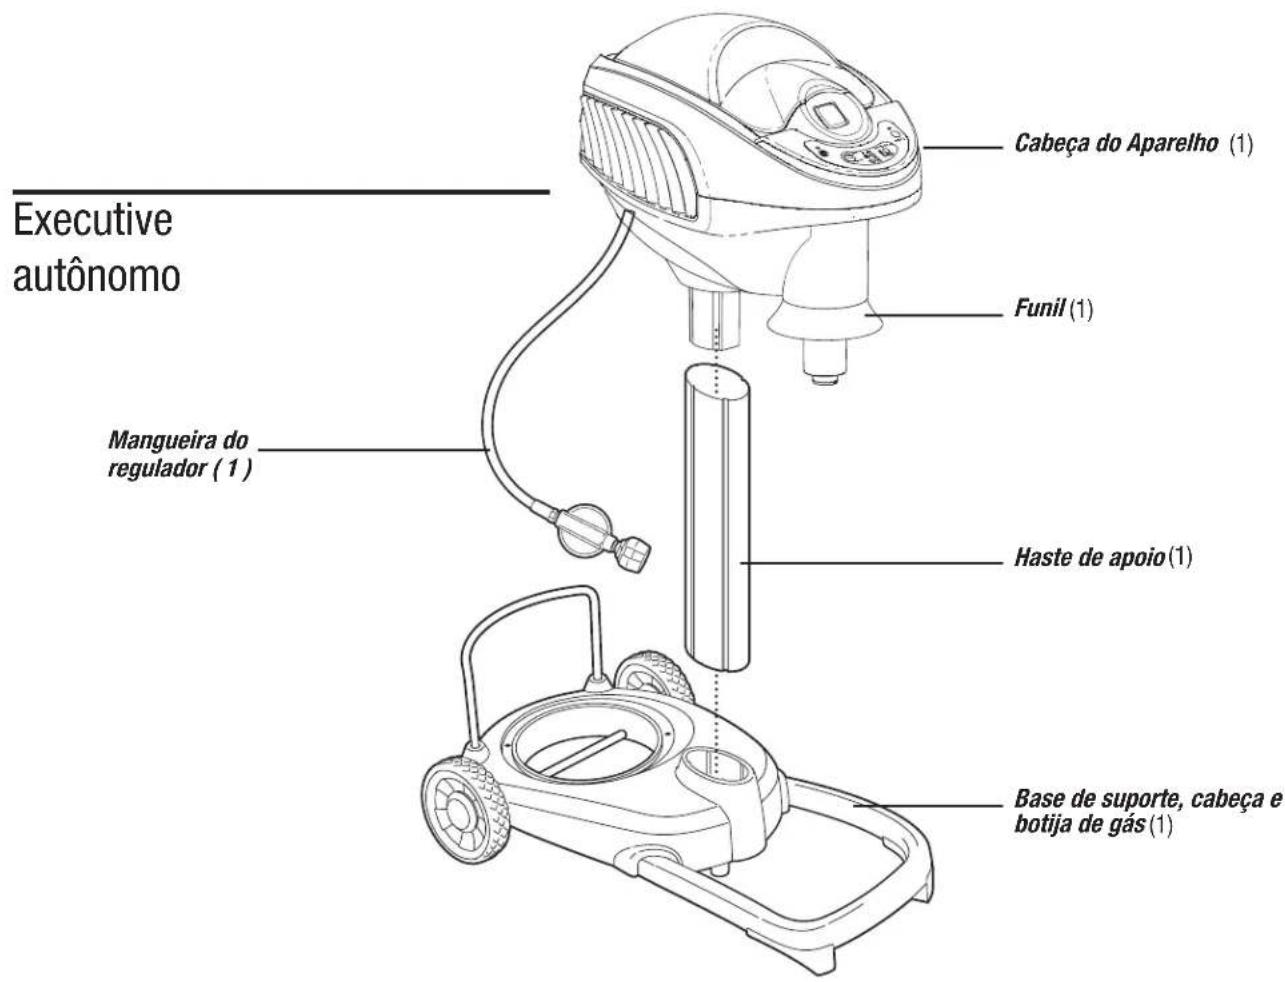
Peças principais
natural_image
Line drawing of a mechanical component or housing with no visible text or symbols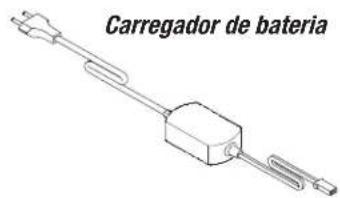
text_image
Carregador de baterianatural_image
Technical line drawing of a mechanical assembly with gears and wheels (no text or symbols)natural_image
Line drawing of a hand using a tool to lift a lawn mower (no text or symbols)natural_image
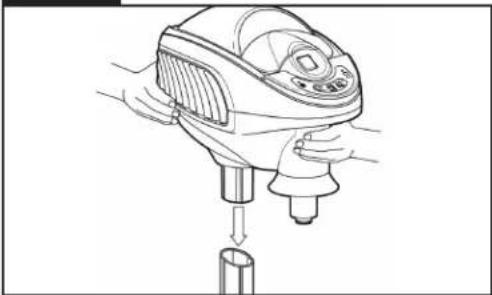
Technical line drawing of a mechanical device with no visible text or symbolsPasso 3
natural_image
Line drawing of a handheld device with two pins and a cylindrical base, no text or symbols presentnatural_image
Line drawing of a vacuum cleaner device with control panel and buttons (no text or symbols)Instalação
Como Carregar e Instalar a Bateria
natural_image
Technical line drawing of a car interior showing structural components and a door panel (no text or symbols)Insira e conecte a bateria
natural_image
Line drawing of a car interior showing seatbelt, dashboard, and steering wheel (no text or symbols)text_image
MOSQUITO MAGNET Placement Assistant Placement Help Placement Instruction People Areas People Mission Screening Pool Placeback Mosquito Scanning Balance Hedge Window Weighted Window Standing Rowing Garden Stream Through Door Mosquito Start Over Send Yard Layout Finish Yard Finished house House Bushes GARDEN Bushes quitInstalação
natural_image
Line drawing of a hand operating a cleaning or cleaning tool on a wheeled cart (no text or symbols)Passo 2 - Conecte o Regulador do Gás
natural_image
Line drawing of a hand operating a cleaning or dust removal device with a gas cylinder (no text or symbols)natural_image
Line drawing of a gas cylinder on a cart with a handle, no text or symbols presentInstalação
natural_image
Diagram of a blender with a rotating button and directional arrow (no text or symbols)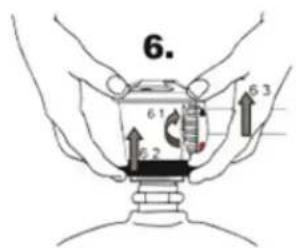
text_image
6.
www.mosquitomagnet.com
www.mosqitomagnet.com

MOSQUITO MAGNET®
Bienvenue
69 North Locust Street
Lititz, PA 17543
USA
www.mosquitomagnet.com
Brevets:
US & Canada
US Patents: Nos. 5,813,166; 6,655,080; 6,662,489; 6,817,140; 6,840,005;
6,848,466; 6,892,492; 7,074,830; 7,181,885; 7,281,351; 7,293,387;
7,536,824; 7,614,180; 7,910,091; 7,987,631; 8,006,432; 8,067,469;
8,141,291; 8,347,549; 8,470,881; 8,753,110; 8,973,299; 9,949,471
Canada Patents: Nos. 2322038; 2460876; 2558775; 2569737; 266346
All Other Countries
Australia: 735984; 2002356537; 2005226680; 2005251813; 2007258277;
2008246208; 2012202864 Brazil: 9908104-0; PI0213059-9; PI0508967-0
China: ZL0281957.X; ZL20058000881.0; ZL200580025316.5;
ZL200580046646.2; ZL200780029874.8; ZL200910254151.9
Denmark: 1432304
Europe: 1049373; 1432304; 1537780; 1827093; EP1725094B; EP1765068B
Finland: 1432304; 1827093; EP1725094B
France: 1049373; 1432304; 1537780; 1765068; 1827093; EP1725094B
Germany: 1049373; 1725094; 60211538.8
Hong Kong: HK1107743; HK1112810; HK1148207 Italy: 1049373;
1432304; 1537780; 1725094; 1765068; 1827093
Japan: 4317748; 4741578; 5444525
Mexico: 314022
New Zealand: 506403; 542745
Portugal: 1765068
Sweden: 1432304; 1537780; 1765068; 1827093; EP1725094B
United Kingdom: 1049373; 1432304; 1537780; 1725094; 1765068; 1827093
Fabrique aux China
POUR VOTRE SÉCURITÉ
natural_image
Line drawing of a mechanical component or housing with no visible text or symbols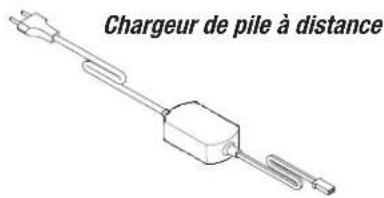
natural_image
Technical line drawing of a lawn mower mechanism showing wheel, blade, and gear assembly (no text or labels)natural_image
Line drawing of a hand using a tool to lift a lawn mower (no text or symbols)natural_image
Technical line drawing of a mechanical device with no visible text or symbolsÉtape 3

natural_image
Line drawing of a handheld device with a cylindrical base, no text or symbols presentnatural_image
Technical line drawing of a mechanical connector assembly (no text or symbols)NE PAS CHOQUER LA FIXATION DU TUYAU AVEC LE RÉSERVOIR DE PROPANE. NE PAS TRAVAILLER AVEC L'ACCESSOIRE DE TUYAU CONNECTÉ AU SIPHON.
natural_image
Line drawing of a vacuum cleaner device with control panel and buttons (no text or symbols)Installation
Consignes de chargement
natural_image
Technical line drawing of a car interior showing structural components and a door panel (no text or symbols)natural_image
Line drawing of a car interior showing seatbelt, dashboard, and steering wheel (no text or symbols)text_image
MOSQUITO MAGNET Placement Assistant Placement Help Placement Instructional People Area People Mission Screening Pool Placeback Mosquito Scenicos Babies Multiple times per day Weighted in bed Standing Rowing Garden Stream Through Room Mosquito Short Over Send Your Layout! Print Fixed Finished house house truck pass warden bushes bushes quitInstallation
natural_image
Technical line drawing of a mechanical connector assembly (no text or symbols)natural_image
Technical line drawing of two mechanical components with wheels and a central component, no text or symbols presentnatural_image
Line drawing of a hand operating a cleaning or dust purifier machine with a gas cylinder (no text or symbols)natural_image
Line drawing of a portable electric tool with a cylindrical container and wheels (no text or symbols)Instructions
* LIRE LE MANUEL AVANT DE COMMENCER**