
Retro EK6642 - Deep fryer SALTER - Free user manual and instructions
Find the device manual for free Retro EK6642 SALTER in PDF.

| Product type | Air fryer |
| Brand | Salter |
| Model | Retro EK6642 |
| Power supply | 220–240 V ~ 50–60 Hz |
| Power | 2400 W |
| Number of compartments | 2 |
| Temperature range | 60 °C to 220 °C (VertiCook Ultra up to 230 °C) |
| Maximum timer | 2 hours (120 minutes) |
| Preset functions | Fries, chicken, steak, fish, pizza, bake, defrost, reheat, dehydrate |
| Special functions | Sync cooking, match cooking, VertiCook Ultra, turn reminder |
| Control panel | Digital with LED display |
| Tray material | Non-stick coating |
| Maintenance and cleaning | Clean after each use: wipe the main unit with a damp cloth, wash trays and grills with soapy water |
| Safety | Automatic shut-off, hot surface, overheat protection, compartment locking |
| Spare parts and repairability | No user-serviceable parts; repair by a qualified electrician only |
| Weight (estimated) | Approximately 8 kg |
| Dimensions (estimated) | Approximately 40 x 35 x 30 cm |
Frequently Asked Questions - Retro EK6642 SALTER
User questions about Retro EK6642 SALTER
0 question about this device. Answer the ones you know or ask your own.
Ask a new question about this device
Download the instructions for your Deep fryer in PDF format for free! Find your manual Retro EK6642 - SALTER and take your electronic device back in hand. On this page are published all the documents necessary for the use of your device. Retro EK6642 by SALTER.
USER MANUAL Retro EK6642 SALTER
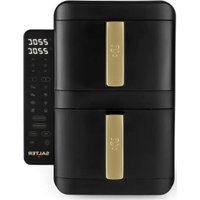
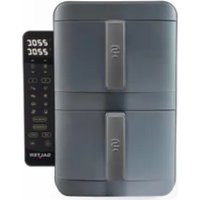
EN | Description of parts
-
Air fryer main unit
-
Cooking compartments
-
Non-stick coated cooking trays
-
Cooking racks
-
Cooking compartment handles
-
Digital control panel
a. Cooking presets
b. Compartment 1 display
c. Compartment 2 display
d. Temperature adjustment buttons
e. Time adjustment buttons
f. Compartment 1 button
g. Compartment 2 button
h. Sync cook button
i. Match cook button
j. Power button
k. Start/Pause button
I. VertiCook Ultra button
m. Turn reminder button
g. Knop compartment 2
h. Sync cook-knop
i. Match cook-knop
j. Aan-uitknop
k. Start-/pauzeknop
I. VertiCook Ultra-knop
- When using electrical appliances, basic safety precautions should always be followed.
- Check that the voltage indicated on the rating plate corresponds with that of the local network before connecting the appliance to the mains power supply.
- This appliance can be used by children aged from 8 years and above and persons with reduced physical, sensory or mental capabilities and knowledge, if they have been supervised/instructed and understand the hazards involved.
■ Children shall not play with the appliance.
■ Children should not perform cleaning or user maintenance, unless they are older than 8 and supervised.
■ This appliance is not a toy. - If the power supply cord, plug or any part of the appliance is malfunctioning or if it has been dropped or damaged, cease using the product immediately to avoid potential injury.
- This appliance contains no user serviceable parts, only a qualified electrician should carry out repairs. Improper repairs may place the user at risk of harm.
- Keep the appliance and its power supply cord out of the reach of children.
- Keep the appliance out of the reach of children when it is switched on or cooling down.
- Keep the appliance and its power supply cord away from heat or sharp edges that could cause damage.
- Keep the power supply cord away from any parts of the appliance that may become hot during use.
- Keep the appliance away from other heat emitting appliances.
- Do not allow the power supply cord to hang over worktops, touch hot surfaces or become twisted.
- Do not immerse the electrical components of the appliance in water or any other liquid.
- Do not operate the appliance with wet hands or if any connections are wet.
- If this appliance falls or accidentally becomes immersed in water, unplug it from the wall outlet immediately. Do not reach into the water.
- Do not leave the appliance unattended whilst connected to the mains power supply.
- Do not remove the appliance from the mains power supply by pulling the cord; switch it off and remove the plug by hand.
- Do not pull or carry the appliance by its power supply cord.
- Do not use the appliance for anything other than its intended use.
- Do not use any accessories other than those supplied.
■ Do not use this appliance outdoors. - Do not store the appliance in direct sunlight or in high humidity conditions.
■ Do not move the appliance whilst it is in use. - Always unplug the appliance after use and allow it to cool fully before any cleaning, user maintenance or storing away.
■ Always use the appliance on a stable, heat-resistant surface, at a height that is comfortable for the user. - This appliance should not be operated by means of an external timer or separate remote control system.
■ Use of an extension cord with the appliance is not recommended. - This appliance is intended for domestic use only. It should not be used for commercial purposes.
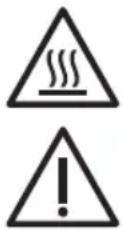
CAUTION: Hot surface – do not touch hot sections or heating components of the appliance.
WARNING: Keep the appliance away from flammable materials.
Dos and don'ts
DO:
Check that the cooking compartments are securely fitted before use. Not doing so will prevent the air fryer from operating.
Only hold the cooking compartments by the cooking compartment handle.
Take care when removing the cooking compartments, as steam may be emitted.
Ensure there is a sufficient gap between the unit and any obstructions.
DON'T:
Invert the cooking compartments, as hot oil or fat may pour out of the air vents at the rear of the cooking compartment. Always keep the cooking compartments upright to avoid injury.
Cover the air fryer or block its air inlets, as this will disrupt the airflow and may cause overheating or inconsistent cooking results.
Fill the cooking compartments with oil or any other liquid.
Touch the cooking compartments during or straight after use, as they will be hot; only hold each cooking compartment by the cooking compartment handle.

natural_image
Technical line drawing of a mechanical device with a 20cm dimension label (no text or symbols on the device itself)
WARNING: ENSURE THAT THE AIR FRYER OVEN HAS AT LEAST 20 CM OF FREE SPACE IN ALL DIRECTIONS BEFORE USE.
Automatic switch-off
The air fryer is fitted with an automatic switch-off. This will activate when the set cooking time has elapsed, causing the timer to sound and the air fryer to turn off.

NOTE: If the air fryer needs to be turned off before the set cooking time has elapsed, switch off and unplug it from the mains power supply.
Care and maintenance
Before attempting any cleaning or maintenance, switch off and unplug the air fryer from the mains power supply and allow it to fully cool.
STEP 1: Wipe the air fryer main unit with a soft, damp cloth and dry thoroughly.
STEP 2: Clean the non-stick coated cooking trays and cooking racks in warm, soapy water, then rinse and dry thoroughly. Clean the cooking compartment with a soft, damp cloth and dry thoroughly.
Never use harsh or abrasive cleaning detergents or scourers to clean the air fryer or its accessories, as this could cause damage.

NOTE: The air fryer should be cleaned after each use.
Instructions for use
Before first use
Clean the air fryer following the instructions outlined in the section entitled 'Care and maintenance'.

NOTE: When using the air fryer for the first time, a slight smoke or odour may be emitted. This is normal and will soon subside. Allow for sufficient ventilation around the air fryer during use. It is advised to run the air fryer without food for approx. 10 minutes before first use; this will prevent the initial smoke or odour from affecting the taste of the food.
Assembling the air fryer
STEP 1: Line up the cooking compartment handles with the slots in the cooking compartments and push down until they click into place. The handles are not designed to be removed once attached to the cooking basket.
STEP 2: Fit the non-stick coated cooking trays into the cooking compartments, checking that they are seated securely.
STEP 3: For cooking on four levels, place the cooking racks on top of the cooking trays, ensuring that the handles are on the left and right sides of the cooking compartment.
STEP 4: Slide the cooking compartments into the air fryer main unit.
Using the control panel
When the air fryer is plugged in and switched on at the mains power supply, the air fryer main unit will beep and the power button will illuminate to indicate that it is powered.
Press the power button to switch on the air fryer.
Manual function
The time and temperature can be set manually; time and temperature values are dependent on the food being cooked.
STEP 1: Plug in and switch on the air fryer at the mains power supply.
STEP 2: Select the relevant compartment by tapping '1' or '2'. The compartment number will flash to indicate the selection.
STEP 3: Press '###' to select the manual function.
STEP 4: Use the temperature adjustment buttons to select the desired temperature. Temperature can be set from 60 to 220^ .
STEP 5: Use the time adjustment buttons to select the desired time, up to a max. of 2 hours.
STEP 6: Press the start/pause button to begin cooking.

NOTE: Refer to the recipe booklet for additional information and cooking guidelines.
Preset functions
STEP 1: Plug in and switch on the air fryer at the mains power supply.
STEP 2: Select the relevant compartment by tapping '1' or '2'. The compartment number will flash to indicate the selection.
STEP 3: Press the desired preset function. The preset function can be adjusted manually using the time and temperature adjustment buttons if required.
STEP 4: Press the start/pause button to begin cooking.

NOTE: To pause cooking, press the start/pause button. To resume cooking, press the start/pause button again. Once the preset time has elapsed, the timer will sound and the air fryBer will switch off. During cooking, the time and temperature can be adjusted at any time by pressing the time and temperature adjustment buttons. If both cooking compartments are in use, press '1' or '2' before changing the time and temperature of the individual basket. If the cooking compartment is removed during cooking, cooking will be paused for the preset function on this compartment only; reinsert the cooking compartment to resume the cooking process. To switch off the air fryer, press and hold the power button.
| Function Preset temperature (°C) Preset time | ||
| Manual 🎨 | 200 15 mins | |
| Chicken 🎨 | 200 20 mins | |
| Chips 🎨 | 200 22 mins | |
| Steak 🎨 | 200 10 mins | |
| Vegetable 🎨 | 160 15 mins | |
| Fish 🎨 | 180 10 mins | |
| Bake 🎨 | 160 25 mins | |
| Keep Warm 🎨 | 50 30 mins | |
| VertiCook Ultra 230 20 mins |
Using the sync cook setting
When cooking different foods in each compartment with different times and temperatures, use the sync cook setting so that both compartments finish cooking at the same time.
STEP 1: Press compartment button 1 and set the required settings following the instructions in the section entitled 'Using the control panel'.
STEP 2: Repeat for the second cooking compartment by pressing compartment button 2.
STEP 3: Press the sync cook button; the button will flash to signal that the setting has been selected.
STEP 4: Press the start/pause button to begin cooking.
Using the match cook setting
Use the match cook setting when using both cooking compartments to cook the same foods; cooking will finish at the same time for both compartments.
STEP 1: Press compartment button 1 or 2 and set the required settings following the instructions in the section entitled 'Using the control panel'.
STEP 2: Press the match cook button; the button will flash to signal that the setting has been selected.
STEP 3: Press the start/pause button to begin cooking.
Using the VertiCook Ultra setting
Use the VertiCook Ultra setting to quickly select a high temperature setting.
STEP 1: Press compartment button 1 or 2 and press the VertiCook Ultra button; the button will flash to signal that the setting has been selected and the display will show 230^ .
STEP 2: Use the time adjustment buttons to select the desired time, up to a max. of 30 minutes.
STEP 3: Press the start/pause button to begin cooking.

NOTE: The power button will remain illuminated whilst the air fryer is plugged in.
Using the air fryer
STEP 1: Plug in and switch on the air fryer at the mains power supply; the air fryer will beep and the power button will illuminate to indicate that the air fryer is plugged in.
STEP 2: Press the power button to switch on the air fryer; the LED display and control panel will illuminate, indicating the air fryer is ready to be programmed.
STEP 3: Remove the cooking compartments by pulling them out of the air fryer using the handles. Position the cooking compartments onto a flat, stable, heat-resistant surface.
STEP 4: Place the ingredients onto the non-stick coated cooking tray. For cooking on four levels, place the cooking racks on top of the cooking trays, ensuring that the handles are on the left and right sides of the cooking compartment.
STEP 5: Slide the cooking compartments back into the air fryer main unit to close it.
STEP 6: Following the instructions in the section entitled 'Using the control panel', use the digital control panel to set the cooking time and temperature as required for the ingredients. Time and temperature settings can also be set using the preset functions, which automatically cycle between time and temperature presets for cooking various foods when pressed. These presets can then be adjusted using the time and temperature adjustment buttons as required.
STEP 7: Some ingredients may require shaking halfway through the cooking time. If required, press the turn reminder button before cooking. Halfway through the cooking time, the air fryer will beep several times as a reminder to turn/shake the ingredients. Remove the cooking compartments from the air fryer main unit using the cooking compartment handle. Shake the cooking compartments gently and then slide back into the air fryer main unit to continue cooking. Do not invert or tilt the cooking compartment, as hot oil or fat may pour out of the rear air vents.
STEP 8: Once cooking is complete and the preset time has elapsed, the air fryer will beep several times and switch off. Check whether the ingredients are ready; if the ingredients are not cooked, close the cooking compartments and replace back into the air fryer main unit. If the food is cooked, transfer the contents into a bowl or onto a plate using a heat-resistant utensil.

NOTE: If the cooking time or temperature setting needs to be changed during use, use the time and temperature adjustment buttons as required.

CAUTION: Do not tip the food directly into a bowl or onto a plate, as excess oil or fat may collect at the bottom of the cooking compartments and leak onto the ingredients or serving bowl. Exercise caution when opening and closing the cooking compartments during use, as they will become very hot.

WARNING: Nominal voltage is still present even when the air fryer is switched off. To permanently switch off the air fryer, switch off and unplug from the mains power supply.
Storage
Check that the air fryer is cool, clean and dry before storing in a cool, dry place.
Never wrap the cord tightly around the air fryer; wrap it loosely to avoid causing damage.
Specifications
Product code: EK6642
Input: 220–240 V \~ 50–60 Hz
Output: 2400 W
natural_image
Technical line drawing of a mechanical device with a 20cm dimension label (no text or symbols on the device itself)
AVERTISSEMENT : AVANT UTILISATION, ASSUREZ-VOUS QU'IL Y A AU MOINS 20 CM D'ESPACE LIBRE AUTOUR DE CHAQUE CÔTÉ DE LA FRITEUSE À AIR CHAUD.
Arrêt automatique
natural_image
Technical line drawing of a mechanical device with a 20cm dimension label (no text or symbols on the device itself)
WAARSCHUWING: ZORG ERVOOR DAT DE HETELUCHTFRITEUSE IN ALLE RICHTINGEN TEN MINSTE 20 CENTIMETER VRIJE RUIMTE HEEFT VOORDAT U HET APPARAAT GEBRUIKT.
natural_image
Technical line drawing of a mechanical device with a 20cm dimension label (no text or symbols on the device itself)
natural_image
Technical line drawing of a mechanical device with a 20cm dimension label (no text or symbols on the device itself)
natural_image
Technical line drawing of a mechanical device with a 20cm dimension label (no text or symbols on the device itself)
AVISO: CERTIFIQUE-SE DE QUE O FORNO FRITADEIRA DE AR TEM PELO MENOS 20 CM DE ESPAÇO LIVRE EM TODAS AS DIREÇÕES ANTES DE O UTILIZAR.
natural_image
Technical line drawing of a mechanical device with a 20cm dimension label (no text or symbols on the device itself)
AVVERTENZA: PRIMA DELL'USO, VERIFICARE CHE IL PRODOTTO DISPONGA DI ALMENO 20 CM DI SPAZIO LIBERO IN TUTTE LE DIREZIONI.
natural_image
Technical line drawing of a mechanical device with a 20cm dimension label (no text or symbols on the device itself)
EN | Disposal of Waste Batteries and Electrical and Electronic Equipment
This product is labelled with this crossed out wheel bin symbol in accordance with European Directive 2012/19/EC to indicate that it must not be disposed of with your other household waste. Due to the presence of hazardous substances, mixtures or components, electrical and electronic devices that are not subject to selective sorting are potentially dangerous to the environment and human health. Please check your local city office or waste disposal service for the return and recycling of this product.
Ultimate Products UK Ltd.,
Victoria Street, Manchester OL9 0DD. UK.
Ultimate Products Europe Ltd.,
19 Baggot Street Lower, Dublin D02 X658. ROI.
MADE IN CHINA.

- EN | Description of parts
- Dos and don'ts
- DO:
- DON'T:
- WARNING: ENSURE THAT THE AIR FRYER OVEN HAS AT LEAST 20 CM OF FREE SPACE IN ALL DIRECTIONS BEFORE USE.
- Automatic switch-off
- Care and maintenance
- Instructions for use
- Before first use
- Assembling the air fryer
- Using the control panel
- Manual function
- Preset functions
- Using the sync cook setting
- Using the match cook setting
- Using the VertiCook Ultra setting
- Using the air fryer
- Storage
- Specifications
- AVERTISSEMENT : AVANT UTILISATION, ASSUREZ-VOUS QU'IL Y A AU MOINS 20 CM D'ESPACE LIBRE AUTOUR DE CHAQUE CÔTÉ DE LA FRITEUSE À AIR CHAUD.
- Arrêt automatique
- AVISO: CERTIFIQUE-SE DE QUE O FORNO FRITADEIRA DE AR TEM PELO MENOS 20 CM DE ESPAÇO LIVRE EM TODAS AS DIREÇÕES ANTES DE O UTILIZAR.
- AVVERTENZA: PRIMA DELL'USO, VERIFICARE CHE IL PRODOTTO DISPONGA DI ALMENO 20 CM DI SPAZIO LIBERO IN TUTTE LE DIREZIONI.
- EN | Disposal of Waste Batteries and Electrical and Electronic Equipment
Brand : SALTER
Model : Retro EK6642
Category : Deep fryer