
Classic Stereo Mini - Hi-fi system PURE - Free user manual and instructions
Find the device manual for free Classic Stereo Mini PURE in PDF.

| Brand | Pure |
| Model | Classic Stereo Mini |
| Category | Hi-fi system |
| Product type | Compact hi-fi system with radio and Bluetooth |
| Power supply | 100-240 V AC, 50/60 Hz (power adapter included) |
| Power adapter | Model GQ48-200-300-AX |
| Wireless connectivity | Bluetooth |
| Radio | DAB+/FM |
| Use | Indoor only |
| Warranty | 2 years |
| Maintenance and cleaning | Unplug before cleaning; use a soft, dry cloth; avoid abrasives |
| Safety | Do not open the case; do not expose to water; respect DC connector polarity |
| Spare parts and repairability | No user-serviceable parts; contact authorized service |
| Certifications | CE |
| Operating temperature | Moderate climate (avoid extremes) |
| Recycling | Complies with local regulations |
Frequently Asked Questions - Classic Stereo Mini PURE
User questions about Classic Stereo Mini PURE
0 question about this device. Answer the ones you know or ask your own.
Ask a new question about this device
Download the instructions for your Hi-fi system in PDF format for free! Find your manual Classic Stereo Mini - PURE and take your electronic device back in hand. On this page are published all the documents necessary for the use of your device. Classic Stereo Mini by PURE.
USER MANUAL Classic Stereo Mini PURE
Safety and information guide
support.pure-audio.com


Index 1 | In the box
1 - In the box ....3
2 - Get to know your Classic Stereo Mini......4
3 - Plugging in your Classic Stereo Mini......6
4 - DAB+ radio....7
5 - FM radio ....8
6 - CD player....8
7 - Bluetooth....9
8 - USB 9
9 - Auxiliary input....10
10 - Audio equaliser ....10
11 - Radio favourites....10-11
12 - Display brightness .....11
13 - Alarms ....12
14 - Sleep Timer ....12
13 - System settings....13
14 - Tips & Troubleshooting....13
15 - PSTI Declaration ....14
16 -Safety information....15

EN
Inside the box, you'll find the Classic Stereo Mini receiver and two matchings speakers in the colour you selected.
You'll also receive a 20V power adapter, regional adapter pins, two sets of speaker cables, remote control, 2x AAA battery cells for the remote control and this helpful guide to get you started.
We suggest taking a moment to read through the guide before you begin setting up your device. This way, you can become familiar with its features and be ready for a smooth experience right from the start.
2 | Get to know your Classic Stereo Mini
The Classic Stereo Mini is a compact stereo system equipped with CD player, DAB+, FM, Bluetooth, USB and an auxiliary input for your preferred devices.
Designed and tuned in the UK, it's crafted to deliver consistently enjoyable listening experiences.
Before you begin, take a moment to explore its features so you can get the most out of your first listening session.
Trouble Shooting:
For more help please visit our FAQ section at:
support.pure-audio.com


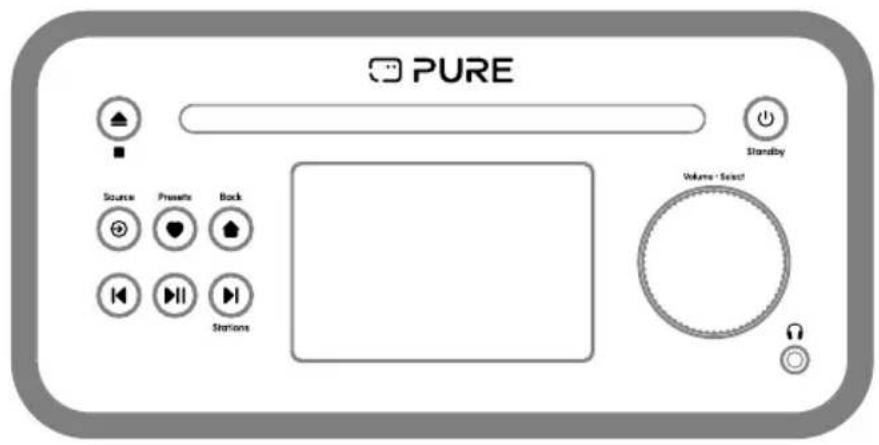
Select
Select / Volume Dial
Now playing view: Turn: Adjust volume up or down Press: Mute
Menus & lists views: Turn: Scroll through entries Press: Select

Back
Home (Back)
Now playing view: Press: Configuration menu
Inside menu or list: Press: Back a level


Source
Press: Change source

Playback
Pause/Play
Press: Skip Forward/Back Hold: Fast Forward/Rewind

Standby
Standby
Standby: Press: Turn on Radio on: Press: Turn off

Presets
DAB or FM Radio: Hold: Save a station to favourites Press: Open the favourites list

Stop (Eject)
Press: Stop CD / Eject CD
EN

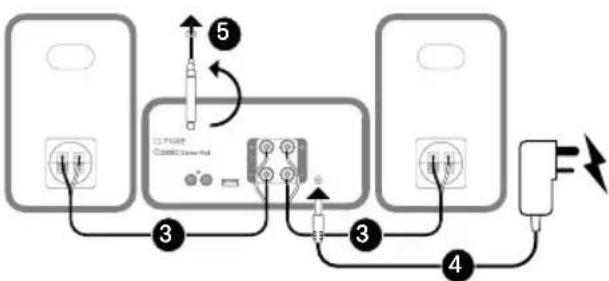
3 | Plugging in your Classic Stereo Mini
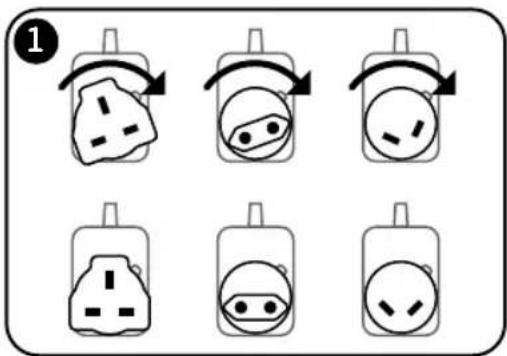
1. Attach the power adaptor pins
Identify the power adaptor pins that match your region and securely attach them to the DC power adaptor. Align the pins and turn to lock in place.
2. Position the system
Place your Classic Stereo Mini and speakers in the location where you plan to use it.
3. Connect the speakers to Receiver
Using the supplied speakers cables, connect the left and right speakers to the receiver. Unscrew the posts on the receiver and feed the cable into the holes. Screw the posts up again to secure the wires.
On the speakers, push back the sprung clips and push in the ends of the cables. Be sure to wire the same colours between receiver and speaker to ensure the correct phase.
4. Connect the power adaptor to the mains
Plug the DC power adaptor into a mains socket. If your socket has a switch, ensure it is turned on.
5. Extend and adjust the antenna (for DAB+/FM)
If you plan to listen to DAB+ or FM radio stations, fully extend the antenna. Adjust its length and angle as needed to improve reception quality, especially in areas with weak signal strength.

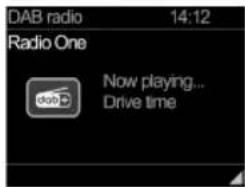
4 | DAB+ radio

EN
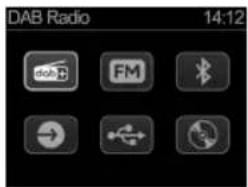
1. Switch to DAB+ radio mode
- Press the Source button repeatedly until "DAB radio" is highlighted on the display or press the DAB+ button on the remote.

- Press Select to confirm.

2. Scanning for DAB radio stations
- On first time use of DAB radio mode the product will scan for radio stations automatically.
Notes:
• Scanning will delete your existing DAB radio favourites.
- Ensure the antenna is fully extended and positioned correctly for the best reception.
• If you cannot receive a station you should receive, adjust the antenna for better reception.

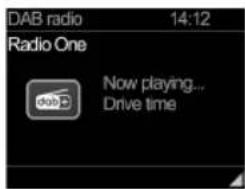
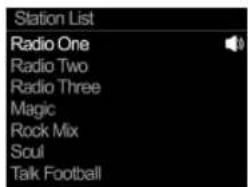
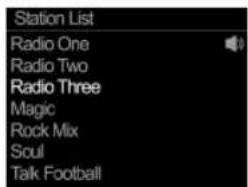
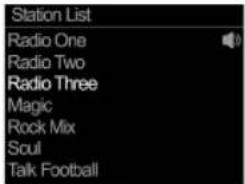
Selecting a station
- Open the Station list by pressing the Forward or Backward button or up or down on the remote.

- Scroll through the station list using the Select Dial or remote.

• Highlight the station you want and press Select to tune in.

- To return to the Station list, press the Forward or Backward button or up or down on the remote.

5 | FM radio
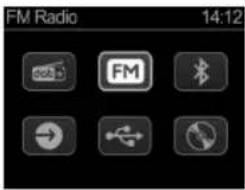
1. Switch to FM radio mode
- Press the Source button repeatedly until "FM radio" is highlighted on the display or press the FM button on the remote.

- Press the Select to confirm.

2. Scanning for FM radio stations
- On entering FM mode for the first time the system will seek for the first available FM station.
- You can manually adjust the frequency by tapping the up or down arrows on the remote or the skip forward and back buttons or press for a few seconds to seek.

Note:
- Ensure the antenna is fully extended and positioned correctly for the best reception. Selecting a station

6 | CD Player
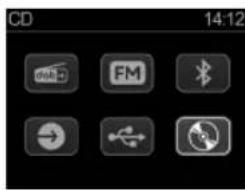
1. Switch to CD player mode
- Press the Source button repeatedly until "CD player" is highlighted on the display or press the CD button on the remote.

- Press Select to confirm.

2. Loading or removing CD's
- Press the eject button to open the CD tray.
- Insert or remove the CD with the cover art or label side facing up.

3. Playback controls
- Use the playback controls on the front of the radio or remote to play/pause, forward and back to skip tracks and long press to fast forward or rewind.

8

7 | Bluetooth
1. Switch to Bluetooth mode
- Press the Source button repeatedly until "Bluetooth" is highlighted on the display or press the Bluetooth button on the remote.


2. Pair your Bluetooth device
- Open your phone, tablet or other devices Bluetooth settings.
- Select Classic Stereo Mini to pair with the system.
• Once connected your device name will appear on screen.
3. Disconnect or pair a new Bluetooth device
- Whilst your device is connected, hold the Bluetooth button on the remote control for a few seconds.

- Your device will disconnect. You can now pair another device to the system.

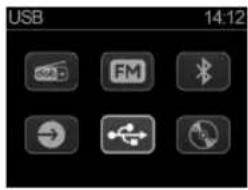
8 | USB
1. Switch to USB mode
- Connect a USB stick to the USB port and press the Source button repeatedly until "USB" is highlighted on the display or press the USB button on the remote.


- Press Select to confirm.


2. Navigating tracks\*
• To skip tracks forward or back press the skip track buttons on the system or on the Remote control.

3. Playback control
- To fast forward or rewind the audio file, hold the skip track buttons on the system or on the Remote control.

![USB 14:12 F01 T001 01:35 [No Name]](/content/2026/05/755261/images/43e152e6ea9d1fdc2d1a9aece753f786469d470732b4086d5ebf0794bbbc655c.jpg)
* See specifications on the back page of this guide for supported file systems and audio formats.
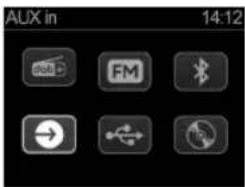
9 | Aux in
1. Switch to Aux in mode
- Press the Source button repeatedly until "Aux in" is highlighted on the display and press select to open or press the Aux button on the remove.


10 | Audio EQ's
1. Open the Configuration menu
You can quickly change between 5 audio EQ profiles using the remote control.
- Press the EQ button on the remote to switch between profiles.

- Dynamic
Delivers a lively, energetic sound profile that highlights even the most subtle details, making your listening experience feel vivid and engaging.
- Comfort
Offers a soothing, mellow tone designed for relaxed, longer listening sessions, so you can enjoy your favourite tracks without fatigue.
- Neutral
Maintains a balanced, authentic sound signature that stays true to the original recording, providing a faithful and honest audio experience.
• Night
Reduces the dynamic range of the sound so listening at night is comfortable in the late hours without disturbing family or neighbours.
- Custom
Adjust the bass and treble levels manually.
10

11 | Radio Presets
Using Presets on your Classic Stereo Mini
Your Classic Stereo Mini allows you to store DAB+, and FM radio stations.
- You can save up to 40 stations each for DAB+ and FM.
- You can save stations using the Preset buttons on the remote or the Preset list button on the remote or on the front of the system.
1. Saving Presets
Using Remote Preset Buttons:
- Hold one of the Preset buttons on the remote for a few seconds.

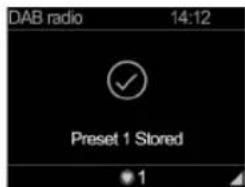
Using the Preset List:
- Holdthe Preset button on the front of the system, or the Preset button on the remote for a few seconds to save the current station to the Preset list.


2. Recalling Presets
Access your saved stations using the Preset buttons or the Preset list:
Using Preset buttons:
- Press one of the Preset buttons to quickly tune into the saved station.
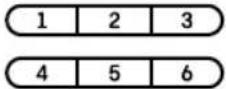
Using the Preset list:
- Press the Preset button or Preset button on the remote to open the list.

- Use the Select Dial or remote to scroll through your Presets and press Select to tune in.

![Recall from Preset 1. Radio One 2. Radio Two 3. Radio Three 4. [Empty] 5. [Empty] 6. [Empty] 7. [Empty]](/content/2026/05/755261/images/7ee82cace43e2267cc830e1791e1ed4f7096d825aff503c567f9df379a24fd28.jpg)
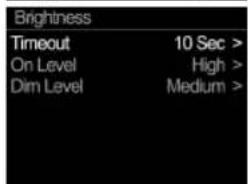
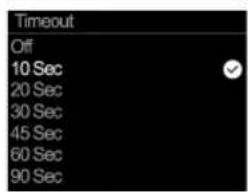
12 | Display brightness
Adjust display brightness


- Press the Home (Back) button from any Now playing view.
- Turn the Select Dial to highlight Brightness and press to open.
- You can adjust the following options:
- Timeout:
- Off / 10 - 180 Seconds
- On Level - brightness value:
- High / Medium / Low.
- Off Level – brightness value:
- High / Medium / Low
- Use the Select Dial or remote to adjust these settings.
| System Settings | |
| DAB Scan | > |
| Equaliser | > |
| Sleep | > |
| Alarm | > |
| Time/Date | > |
| Brightness | > |
| Language | English > |


13 | Alarms
Set Alarms.
- Press the Home button on the system or the remote control.

- Highlight Alarms by turning the Select Dial or use the remote.

- Press Select to open.

- Select Alarm 1 or 2 by turning the Select Dial or use the remote then pressing Select to open.

- You can enable or disable the alarm settings from inside this menu along with the following options:
| System Settings | |
| DAB Scan | > |
| Equaliser | > |
| Sleep | > |
| Alarm | > |
| Time/Date | > |
| Brightness | > |
| Language | English > |
| Alarm | |
| Alarm 1 | Off 06:00 > |
| Alarm 2 | Off 06:00 > |
| Alarm 1 info. | |
| Alarm | Off |
| Frequency | Daily > |
| Wake Up time | 06:00 > |
| Source | Digital R > |
| Preset | Last List > |
| Duration | 45 > |
| Volume | 12 > |
- Alarm: Off / On
• Frequency: Once / Weekdays Weekends / Daily - Wake Up time: Set Alarm Time
• Source: Buzzer / Digital Radio / FM - Preset: (DAB+ & FM only) Last Listen / Saved Presets
• Duration: 15 / 30 / 45 / 60 / 90 / 120
• Volume: 4 - 32
14 | Sleep Timer
Set Sleep Timer


- Press the Home button on the system or the remote control.
- Highlight Sleep by turning the Select Dial or use the remote.
- Press Select to open.
- Turn the Select Dial or press Up or Down on the remote control to change the sleep timer duration.
- Press Select to confirm.
- To cancel a sleep timer repeat the steps above and change the sleep duration to "Sleep Timer Off".
| System Settings | |
| DAB Scan | > |
| Equaliser | > |
| Sleep | > |
| Alarm | > |
| Time/Date | > |
| Brightness | > |
| Language | English > |

15 | System settings
- Press the Home (Back) button from any Now playing view.

From the system settings you can adjust or select a number of options including:
• DAB Scan
• Equaliser
- Sleep Timer
- Alarms
• Time & Date
- Display Brightness
- Language
- Factory Reset
- Software Version
| System Settings | |
| DAB Scan | > |
| Equaliser | > |
| Sleep | > |
| Alarm | > |
| Time/Date | > |
| Brightness | > |
| Language | English > |
| System Settings | |
| Sleep | > |
| Alarm | > |
| Time/Date | > |
| Brightness | > |
| Language | English > |
| Factory Reset | > |
| Software Version | > |
15 | Tips & troubleshooting
EN
Tips on using you Classic Stereo Mini
- Scan for DAB stations.
Stay up-to-date! Open the System Settings from the Home button and select DAB Scan.
- Enhance your listening experience.
Get the perfect sound by choosing one of the 4 Equaliser profiles, designed for vibrant dynamics, soothing comfort, precise music reproduction or night time listening.
Troubleshooting
-
No sound is coming from the speakers.
-
Ensure the volume is turned up to an audible level.
- Check the speaker wires are firmly secured at the speaker side and binding posts tightened on the amplifier end and ensuring only the metal wires are inside the terminals.
- For DAB and FM radio stations, check the signal strength indicator—poor signal can result in no sound.
-
Switch to another station or source (e.g., Bluetooth or Auxiliary input) to determine if the issue is with the current station.
-
Bluetooth won't connect or keeps disconnecting.
-
Ensure Bluetooth is enabled on your device and the radio is in pairing mode.
- Remove previously paired devices from the radio or your device's Bluetooth settings and reconnect.
- Restart both the radio and your device before reattempting connection.
16 | PSTI Declaration
Product Security Statement Of Compliance (Version 1) 24/02/2025
The statement of compliance
(a) Products / Batch:
- Pure Classic Stereo Mini in Black / Coffee Black Walnut / Cotton White Oak / Batch-All
(b) Company Information
1) PURE INTERNATIONAL LIMITED,
Concept House,
Home Park Road,
Kings Langley, Herts, WD4 8UD
2) Aqipa GmbH
Möslbichl 78
A-6250 Kundl
Austria
(c) Statement of compliance is prepared by:
Pure International Ltd ("manufacturer") of the product;
(d) "manufacturer" declare that they have complied with: Requirements in Schedule 2
Passwords
- There are no default passwords used within the product
Vulnerability Policy
-See https://www.pure-audio.com/en-GB/vulnerabilityStatement
Security Update Period
-1st January. 2030
Updates at https://www.pure-audio.com/en-GB/SecurityupdatesStatement.
(f) signature, name and function of the signatory; and
Name: Christian Trap
Function: CEO
Signature:

(g) the place and date of issue of the statement of compliance.
Place: Kings Langley, United Kingdom
Date: 24/02/2025
Signature:

Source: Reference: https://www.legislation.gov.uk/uksi/2023/1007/contents/made
14


Symbols used on this product
| Description | |
| Potentially serious risk to your personal safety. To avoid possible injury or death, obey all safety notices with this symbol. | |
| Caution. Read the user manual before use. | |
| DC voltage | |
| DC connector polarity, the centre of the connector terminal is positive. | |
| Where to switch on or off the product, or put it in standby. |
- Read all the safety information and instructions before using the product. When passing this product to someone, include all documents.
- If you do not follow the operating instructions provided, it may compromise the safety of your product and this may invalidate the warranty.
- Only use attachments / accessories specified by Pure for use with this product.
- This product is intended for indoor use only. When in use ensure adequate ventilation and airflow around the product.
- Do not expose the product to dripping or splashing. Do not place objects filled with liquids, such as vases, on the product. If liquid spills on to the product, switch it off at the mains immediately, disconnect the mains plug and contact your dealer. Never touch the plug or the product with wet hands.
- Using the product in rooms or climates with high humidity and temperatures may cause condensation to form inside the product, which can damage the product. Use the product in moderate climates only.
- Do not use your product in extremely hot or cold temperatures. Keep the product away from heat sources, such as radiators or gas/electric fires. Do not expose your product to naked flames, such as lighted candles.
- Verify Line Voltage Before Use: Classic Stereo Mini has been designed for use with 100-230 Vrms, 50/60 Hz AC current. Connection to a supply voltage other than that for which your product is intended can create a safety and fire hazard and may damage the unit. If you have any questions about the voltage requirements for your specific model or about the supply voltage in your area, contact your selling dealer before plugging the unit into a wall outlet.
- Handle the Power Adapter with Care: When disconnecting the power adapter from an AC outlet, always pull the plug; never pull the cord. Install the product in a location where the power cable will not be trampled or pinched.
- If you do not intend to use your speaker for any considerable length of time, disconnect the plug from the AC outlet. The products primary disconnect device is the mains plug and should be readily accessible.
- Do Not Use Extension Cords: To avoid safety hazards, use only the power cord supplied with your unit. We do not recommend that extension cords be used with this product. As with all electrical devices, do not run power cords under rugs or carpets, or place heavy objects on them. Damaged power cords should be replaced immediately by an authorized service centre with a cord that meets factory specifications.
- Do Not Open the Cabinet: There are no user-serviceable components inside this product. Opening the cabinet may present a shock hazard, and any modification to the product will void your warranty. If water accidentally falls inside the unit, disconnect it from the AC power source immediately
- Dispose of the product in accordance with local environmental rules.
EN | Information and safety guide
- Disconnect your product from the power supply during lightning storms or if you will not use your product for a long period of time (for example, if you are going on holiday).
- Always unplug your product from the AC power supply before cleaning. When cleaning the product, do not use any type of abrasive pad or abrasive cleaning solutions as these may damage the product's surface.
- When exposed to electrostatic discharge, the device may malfunction. Reset the device to enable full recovery. If interference occurs, reorient or relocate the product. Increase the separation between devices causing and receiving interference.
- Cease to use the product if there are any abnormalities during operation, such as high temperature, discolouration, bulging, leakage, and so on.
- Medical device interference: The product contains a radio and other components that emit electromagnetic fields and magnets. These electromagnetic fields and magnets may interfere with pacemakers, defibrillators or other medical devices. Maintain a safe distance of separation between the medical device and the product. Consult your doctor and medical device manufacturer for information specific to your medical device. Stop using the product if you suspect it is interfering with your pacemaker, defibrillator or any other medical device.
- Use only power adapter listed in these user manual/user instructions (supplied by Pure with model number: (GQ48-200-300-AX) to power the equipment and do not use the power supply for any other purpose.
- The direct plug-in adapter is used as a disconnect device, the disconnect device shall remain readily operable and accessible.
Approvals

CE marked. Hereby, Pure International Limited declares that this radio model Classic Stereo Mini is in compliance with the essential requirements of RED 2014/53/EU. The full text of the EU Declaration of Conformity is available at the following internet address: https://www.pure-audio.com/policies/declaration-of-conformity
Pure International Limited declares that this radio model Classic Stereo Mini is in compliance with EN18031-1:2024 (No personal data used)
Bluetooth
The Bluetooth ^® word mark and logos are registered trademarks owned by Bluetooth SIG, Inc. and any use of such marks by Pure is under license. Other trademarks and trade names are those of their respective owners.
Warranty
Pure International Limited warrants to the end user that this product will be free from defects in materials and workmanship in the course of normal use for a period of two years from the date of purchase. This guarantee covers breakdowns due to manufacturing or design faults; it does not apply in cases such as accidental damage, however caused, wear and tear, negligence, adjustment, modification or repair not authorised by us. Please visit www.pure-audio.com/register to register your product with us. Should you have a problem with your unit please contact your supplier or contact Pure Support at the address shown on the rear of this manual.


4 | DAB+-Radio

DE
5 | FM-Radio
![FM radio 14:12 87.50 MHz [Kein Radiotext]](/content/2026/05/755261/images/708f04681032e605a27acf9f015e6890755d3c8e0533f637773bb011a8260235.jpg)

6 | CD-Spieler
* See Specifications on the back page of this guide for supported file systems and audio formats.
9 | Aux in
10 | Audio-Equalizer
https://www.pure-audio.com/policies/declaration-of-conformity
https://www.pure-audio.com/policies/declaration-of-conformity
EN For additional language user guides and FAQ's visit:
Product Specifications
Radio Digital (DAB/DAB+): Frequencies Digital Band III 174–240 MHz
FM radio: Frequencies FM 87.5-108 MHz (with RDS)
Bluetooth: BT Classic - 5.3
Frequency range: 2402 - 2480 MHz
Maximum power: <2.5 dBm (e.i.r.p), A2DP support
CD player: CD-A, CD-R, CD-RW
USB Drive: File systems supported: FAT32 and exFAT.
CD/USB Audio formats: MP3, WAV (PCM)
Display: 2.4" Colour TFT

Cyber core software version: V1.0
Software version: V1.0
Speaker: 2 x 3" Full Range Woofers
2×1" Tweeters
Input connectors: USB-A RCA Phono Auxiliary - line level
Power supply requirements: 20V 3A
Power supply output: 20V 3A - 60W
Dimensions - Receiver: W: 210mm, H: 107mm, D: 238mm
Dimensions - Speaker (Each): W: 150mm, H: 222mm, D: 216mm
Weight - Receiver: 2.1 kg
Weight - Speaker (Each) 2.4 kg
This guide was accurate at the time of printing.
Please see support.pure-audio.com to see if a newer version is available.
support.pure-audio.com

Pure
Concept House
Home Park Road
Kings Langley
Hertfordshire,
WD4 8UD
United Kingdom
Pure
Möslbichl 78
6250 Kundl
Austria
pure-audio.com
Joyful listening.


- Index 1 | In the box
- EN
- | Get to know your Classic Stereo Mini
- | Plugging in your Classic Stereo Mini
- Attach the power adaptor pins
- Position the system
- Connect the speakers to Receiver
- Connect the power adaptor to the mains
- Extend and adjust the antenna (for DAB+/FM)
- | DAB+ radio
- Switch to DAB+ radio mode
- Scanning for DAB radio stations
- Notes:
- Selecting a station
- | FM radio
- Switch to FM radio mode
- Scanning for FM radio stations
- Note:
- | CD Player
- Switch to CD player mode
- Loading or removing CD's
- Playback controls
- | Bluetooth
- Switch to Bluetooth mode
- Pair your Bluetooth device
- Disconnect or pair a new Bluetooth device
- | USB
- Switch to USB mode
- Navigating tracks\*
- Playback control
- | Aux in
- Switch to Aux in mode
- | Audio EQ's
- Open the Configuration menu
- | Radio Presets
- Using Presets on your Classic Stereo Mini
- Saving Presets
- Recalling Presets
- | Display brightness
- Adjust display brightness
- | Alarms
- Set Alarms.
- | Sleep Timer
- Set Sleep Timer
- | System settings
- | Tips & troubleshooting
- Tips on using you Classic Stereo Mini
- Troubleshooting
- | PSTI Declaration
- EN | Information and safety guide
- | DAB+-Radio
- DE
- | FM-Radio
- | CD-Spieler
- | Audio-Equalizer
Brand : PURE
Model : Classic Stereo Mini
Category : Hi-fi system