MGWH150IXPN - Boiler MIDEA - Free user manual and instructions
Find the device manual for free MGWH150IXPN MIDEA in PDF.

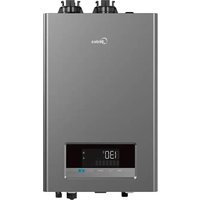
| Product Type | Tankless gas water heater |
| Brand | Midea |
| Model | MGWH150IXPN |
| Heating Capacity (Input) | 20,000 - 150,000 BTU/h (natural gas/propane) |
| Uniform Energy Factor (UEF) | 0.95 |
| Dimensions (L x H x D) | 680 x 440 x 270 mm (26.8 x 17.3 x 10.6 in) |
| Weight | 35 kg (77.2 lb) |
| Power Supply | 120 V, 60 Hz, 150 W (max 294 W with anti-freeze and pump) |
| Water Connections | Cold water inlet: 3/4 NPT, Hot water outlet: 3/4 NPT |
| Gas Connection | 3/4 NPT |
| Water Pressure | 15 - 150 PSI |
| Natural Gas Supply Pressure | 3.5 - 10.5 in WC (870 - 2610 Pa) |
| Propane Gas Supply Pressure | 8 - 13 in WC (1990 - 3230 Pa) |
| Minimum Flow Rate | 0.5 GPM (1.9 L/min) |
| Vent Type | Direct vent forced draft (2 or 3 in PVC/CPVC/polypropylene) |
| Ignition | Electric |
| Temperature Range | 95 °F - 140 °F (35 °C - 60 °C) |
| Safety Devices | High flue gas limit switch (70 °C), high water limit (85 °C), anti-freeze protection |
| Materials | SPCC casing, 300 series stainless steel heat exchanger |
| Connectivity | Built-in WiFi, MSmartHome app |
| Maintenance | Periodic heat exchanger flush, water inlet filter cleaning, exterior cleaning |
| Warranty | Refer to the provided warranty card |
Frequently Asked Questions - MGWH150IXPN MIDEA
User questions about MGWH150IXPN MIDEA
0 question about this device. Answer the ones you know or ask your own.
Ask a new question about this device
Download the instructions for your Boiler in PDF format for free! Find your manual MGWH150IXPN - MIDEA and take your electronic device back in hand. On this page are published all the documents necessary for the use of your device. MGWH150IXPN by MIDEA.
USER MANUAL MGWH150IXPN MIDEA
Instantaneous Gas Water Heater
Premixed Series

SmartHome

Download the app
& activate product
USER MANUAL
MGWH199IXNP/MGWH199IXPP
MGWH180IXNP/MGWH180IXPP
MGWH150IXNP/MGWH150IXPP
WARNING: If the information in these instructions is not followed exactly a fire or explosion may result causing property damage, personal injury, or death.
- Do not store or use gasoline or other flammable vapors and liquids in the vicinity of this or any other appliance.
WHAT TO DO IF YOU SMELL GAS: - Do not try to light any appliance.
- Do not touch any electrical switch; do not use any phone in your building.
- Immediately call your gas supplier from a neighbor's phone.
- Follow the gas supplier's instructions.
-
If you cannot reach your gas supplier, call the fire department.
-
Installation and service must be performed by a qualified installer, service agency, or the gas supplier.
THANK YOU LETTER
Thank you for choosing Midea! Before using your new Midea product, please read this manual thoroughly to ensure that you know how to operate the features and functions that your new appliance offers in a safe way.
CONTENTS
THANK YOU LETTER 01
SAFETYINSTRUCTIONS 02
SPECIFICATIONS 06
PRODUCT OVERVIEW 08
QUICK START GUIDE 10
OPERATION INSTRUCTIONS 11
CLEANING AND MAINTENANCE 15
APPSETUPANDOPERATION 16
TROUBLESHOOTING 21
CERTIFICATIONS AND SAFETY APPROVALS 26
TRADEMARKS, COPYRIGHTS AND LEGAL STATEMENT 27
DISPOSAL AND RECYCLING 27
DATA PROTECTION NOTICE 28


SAFETY INSTRUCTIONS
Read Before Installation!
Incorrect installation may cause serious damage or injury!
The seriousness of potential damage or injuries is classified as either a WARNING! Or CAUTION!
Explanation of Symbols

Warning
This symbol indicates ignoring instructions may cause death or serious injury.

Caution
This symbol indicates that ignoring instructions may cause moderate personal injury, damage to the unit, or other property.

DO NOT
This symbol indicates that you should NEVER perform the indicated action.

Warning
Please read the manual in its entirety before operating or repairing.
NOTE: The installation must conform to local codes or, in the absence of local codes, the National Fuel Gas Code, ANSIZ223.1/NFPA 54.

California Proposition 65 Warning:
The product referred to in this manual contains chemicals which are known to the State of California to cause cancer, birth defects, or other reproductive harm.

WARNING:
Cancer and Reproductive Harm- www.P65Warnings.ca.gov
This appliance has been designed for home use only, and may cause danger if used in special occasions.
BEFORE OPERATING, smell all around the area near the appliance for the scent of gas. Be sure to smell next to the floor as some gas is heavier than air and will settle there.
DO NOT try to light the burner by hand. This appliance does NOT have a pilot light. It is equipped with an ignition device which automatically lights the burner.
DO NOT store or use gasoline or other flammable substances (vapors or liquids) in the vicinity of this water heater or any other appliance. This could create a hazard that may result in personal injury, fire, and/or an explosion.
DO NOT place newspapers or laundry near the water heater or venting system (including the vent termination outlet), as these could create a fire hazard, which could result in personal injury and property damage.
DO NOT use or store aerosol products (such as hair sprays, spray paints etc.) or any other compressed gases near the water heater or venting system (including the vent termination outlet), as this could result in personal injury, fire, and/or an explosion.
DO NOT use this appliance if any part has been submerged in water. Immediately call a qualified service technician to inspect the appliance and to replace any parts which have been under water.
DO NOT use tools to push in or turn the manual gas appliance shut-off valve. Use only your hand to perform this action. In the event the valve will not turn, DO NOT attempt to repair it. Using too much force or attempting to repair the manual gas shut-off valve could result in personal injury, fire, and/or an explosion. Call a qualified service technician to perform any repairs.
- Have your installer or plumber show the location of the manual gas shut-off valve and demonstrate how to properly use it.
OPERATIONAL WARNINGS:
DO NOT operate the water heater with the front cover open, Doing so could cause a fire or carbon monoxide (CO) poisoning, which could result in property damage, personal injury, death, and/or an explosion.
DO NOT onerate the water heater without a proper venting system, Operating the unit without a vent could cause fire and/or carbon monoxide poisoning, which could result in property damage, personal injury, or death. Inspect the vent termination and air intake supply annually to ensure proper operation of the water heater, If any of the vent pipes, vent elbows, or intake pipes are damaged in any way (separated at a joint or show signs corrosion, rusting, or melting), turn OFF the water heater and discontinue use until piping is repaired.
DO NOT touch the power cord or internal components of the water heater with wet hands. Doing so could result in electric shock and personal injury. Always disconnect the power supply before servicing.
- If the water heater is damaged for any reason, immediately shut off the gas supply to the appliance.
- If the water heater is damaged as a result of overheating, fire, flood, or any other reason, close the manual shut-off valve and DO NOT operate the unit again until it has been repaired and inspected by a qualified technician.
WHAT TO DO IF YOU SMELL GAS:
DO NOT try to start, ignite/light, or operate any nearby appliance.
DO NOT touch any electrical switch.
NOT use any phone within the building where you smell gas.
- EXIT the building IMMEDIATELY and CALL your GAS SUPPLIER. Follow the gas supplier's instructions. If you CANNOT reach the gas supplier, CALL the FIRE DEPARTMENT.
TO PREVENT BURNS:
DO NOT
DO NOT change or adjust the temperature setting of the water heater before reading all of the instructions in this manual carefully.
ALTITUDE ADJUSTMENT:
The parameter setting of the water heater may need to be adjusted depending on the altitude of the location it is being installed. Being from the West ourselves, we already adjusted the initial altitude setting to operate between 2,000 - 6,500 feet above sea level, since being out West is best. Please refer to the table below for the proper setting based on your altitude. This adjustment can be made through the water heater control panel.
For Canada: For operation at elevation at 2000-4500ft, input rating should be reduced at the rate of 90% with normal manifold pressure. For operation at elevation at 4500-9800ft, input rating shall be reduced at the rate of 4% for each 1000ft above sea level accordance with local codes or, in the absence of local codes, CSA B149.1.
For US: For operation at elevations above 2000ft, input rating should be reduced at the rate of 4% for each 1000ft above sea level accordance with local codes or, in the absence of local codes, NFPA54/ANSI Z223.1.
Instructions on how to perform this adjustment can be found in the Appliance Servicing section of installation manual. However, this adjustment should only be performed by a qualified technician at the time of installation. If this adjustment is not made, or performed incorrectly, it could cause improper operation of the unit. Improper operation could cause gas leakage, fire, and/or an explosion that can put you at risk of personal injury or death.
| Program data Altitude setting | ||
| Altitude above Sea Level | 2,000 - 6,500 feet | 6,500 - 9,800 feet |
| L2 05 (Factory Default Setting) | 06 | |
Vapors from flammable liquids will explode and catch fire, causing death or severe burns.
DO NOT use or store flammable products such as gasoline, solvents, or adhesives in the same room or any area near the water heater.
The water heater has a main burner.
Keep flammable products:
- Far away from the unit.
- In approved containers.
- Tightly closed.
- Away from children
The main burner flame can:
- Come on at any time.
- Will ignite flammable vapors.
Vapors:
- Cannot be seen.
- Are heavier than air.
- Can travel a long distance.
NOT install the water heater where flammable products will be stored or used unless the main burner is at least 18 inches above the floor. This will reduce, but not eliminate, the risk of vapors being ignited by the main burner.
Read and follow all water heater warnings and instructions. If the owner's manual is missing, contact the retailer or manufacturer.
IMPORTANT: This water heater has been approved for use in the USA. Installing and operating this water heater in any other country will void the product's warranty.
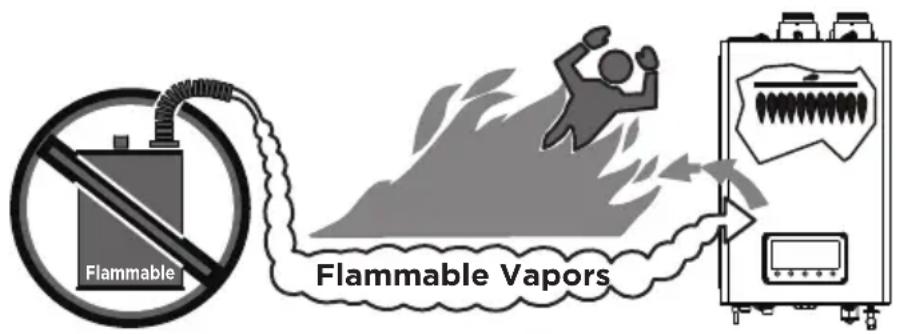
Figure 1

Caution
For service or repair, contact an authorized Midea technician or licensed professional. Improper installation, adjustment, alteration, service, or maintenance can cause unit failure or damage, property damage, personal injury, or death, and will void the product's warranty. If you need assistance or further information, please consult the manufacturer or a qualified professional.
DO NOT attempt to repair or replace any part of the water heater unless it is specifically recommended in this manual.
DO NOT operate the water heater if it shows any signs of damage or any part of it has been submerged in water. Doing so could result in personal injury, product failure, and/or property damage. If any part of the unit has been damaged or has been submerged in water, immediately contact a qualified service technician to inspect the unit and replace any parts that are damaged or have been under water.
DO NOT allow children to operate or access the water heater. Doing so could result in personal injury, product failure, and/or property damage.
DO NOT attempt to adjust or change the temperature setting while the water heater is in use, as this could result in personal injury.
DO NOT turn on the water heater unless the water and gas supplies are properly connected and fully opened. Operating the unit without the water and gas connected and flowing could cause damage to the water heater.
DO NOT turn on the water heater if the cold watersupply shut-off valve is closed, as this could caused damage to the unit.
DO NOT use this water heater for anything other than its intended purpose, as described within this manual.
DO NOT remove the front cover unless the power to the water heater is turned off and the appliance is disconnected from the outlet. Failure to follow this warning could result in electric shock.
DO NOT use unapproved replacement parts or accessories, as this could cause the unit to operate improperly or fail and void the product's warranty.
DO NOT place anything in or around the vent terminals that could obstruct airflow in or out of the water heater (e.g. clothesline).
Should overheating occur, or the gas supply fails to shut off, turn off the manual gas valve to the appliance.
SPECIFICATIONS
Note: PIs check the model on the brand, the explanation of the model have been list below.
| MGWH IX199 | N | P | ||
| Related power | N: Natural Gas P: Propane | P: Pump N: NO Pump | ||
| Natural Gas Model Name | MG-WH150IXNP | MG-WH180IXNP | MG-WH199IXNP | |
| Propane Model Name | MG-WH180IXPP | MG-WH199IXPPM | ||
| Heat Capacity (Input) | Natural Gas, Propane Gas | 20000-150000 BTU/H | 20000-180000 BTU/H | 20000-199000 BTU/H |
| Uniform Energy Factor | UEF (for NG & LP) | 0.95 | 0.95 | 0.95 |
| Flow Rate (DHW) | 37°F (20 °C) Temp Rise | 8.1 | 9.7 | 10.7 |
| 47°F (26 °C) Temp Rise | 6.4 | 7.6 | 8.4 | |
| 67°F (37 °C) Temp Rise | 4.5 | 5.4 | 5.9 | |
| Dimensions | 26.8X17.3X10.6in (680*440*270mm) | |||
| Weight | 77.2lbs (35kg) | |||
| Installation Type | Indoor | |||
| Venting Type | Forced draft direct-vent | |||
| Ignition | Electronic Ignition | |||
| Water Pressure | 15-150 PSI | |||
| Natural Gas Supply Pressure (from source) | 3.5in.WC-10.5in WC (870Pa~2610Pa) | |||
| Propane Gas Supply Pressure (from source) | 8in.WC-13in WC (1990Pa-3230Pa) | |||
| Minimum Flow Rate | 0.5GPM (1.9L/MIN) | 0.5GPM (1.9L/MIN) | 0.5GPM (1.9L/MIN) | |
| Con- nection Sizes | Cold Water Inlet | 3/4NPT | ||
| Hot Water Outlet | 3/4NPT | |||
| Gas Inlet | 3/4NPT | |||
| Power Supply | Main Supply | 120V, 60Hz | ||
| Maximum Power Consumption | 150 W (+114 W when anti-freeze module is on, +180W when pump is on) | |||
| Materi- als | Casing | SPCC | ||
| Heat Exchangers | 300 series stainless steel | |||
| Venting | Exhaust | 2 in. or 3 in. PVC, CPVC, approved Polypropylene | ||
| Intake | ||||
| Safety Devices | Flue High Limit Switch (158°F / 70°C) • Water Temperature High Limit Switch (185°F / 85°C) • Freeze Protection Ceramic Heater (Turns on at 41°F / 5°C & Turns off at 59°F / 15°C) | |||
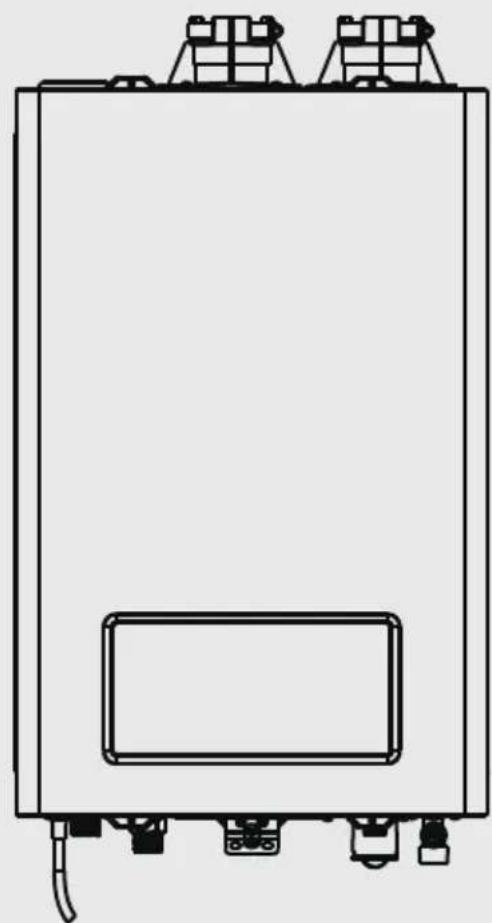
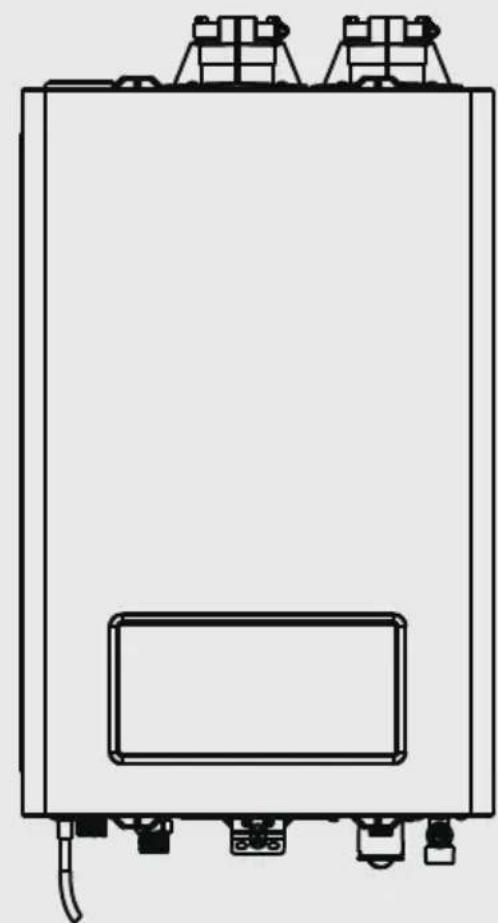
PRODUCT OVERVIEW
Product

Figure 2
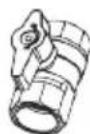
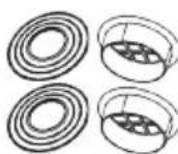
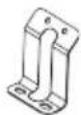
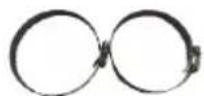
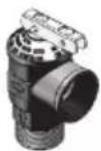
Included Items
Tankless Gas Water Heater x 1

Three (3") in. Exhaust Pipe Flow Restrictor x 1 (3" inch pipe only)

Styrofoam Packing Materials × 2
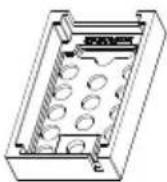
Wall-Mounting Bracket (upper) x 1

Toggle Bolts x 4

Manual Gas Shut-Off Valve × 1 (Optional)
Bird Screens 2 x 2 pieces each
Fastener Packet x1
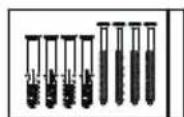
Wall-Mounting Bracket power/bottom) x 1
Hose/Pipe Clamps x 2
Pressure relieve valve (Optional)
e User manual x1 Installation manual X1 1:1 Installation Drawing x 1 Warranty card x1
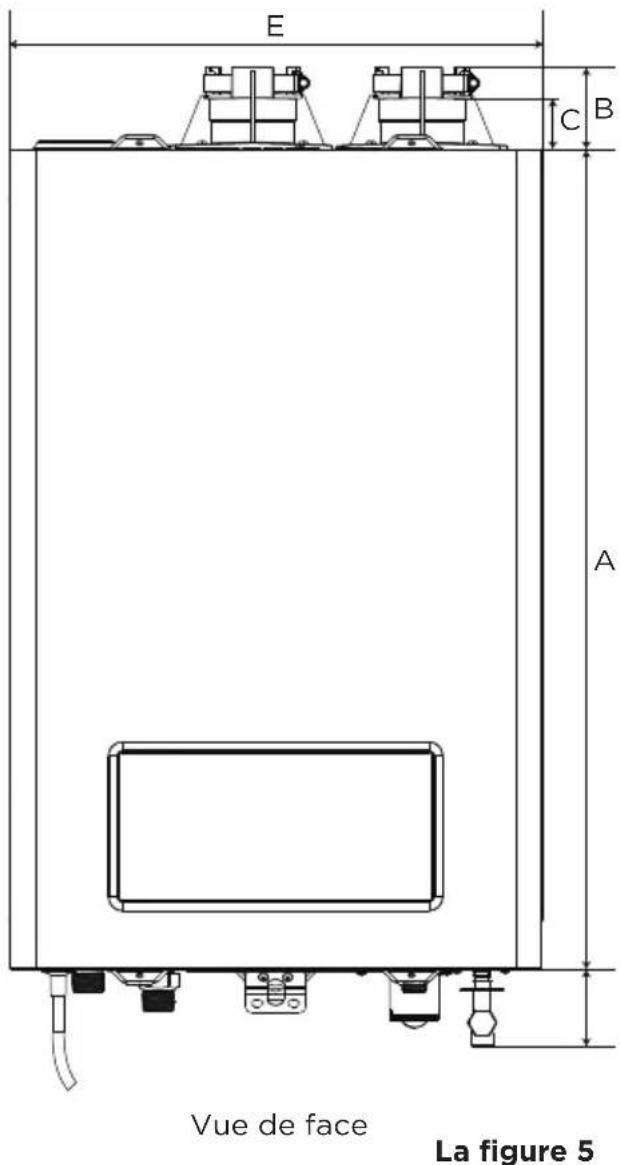
Dimension
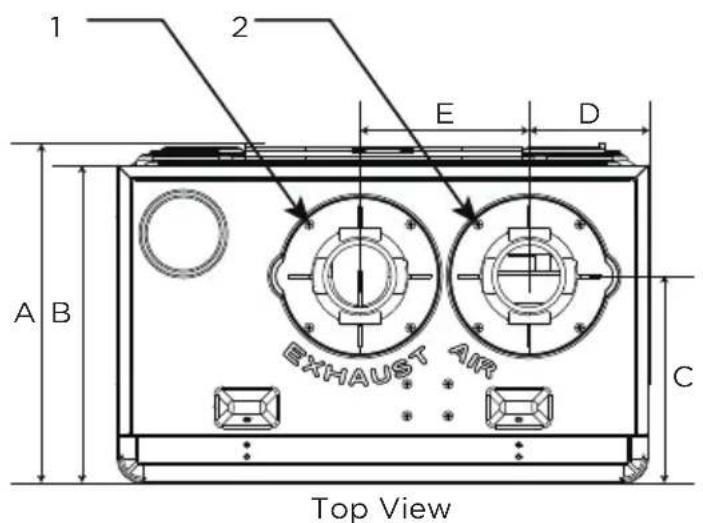
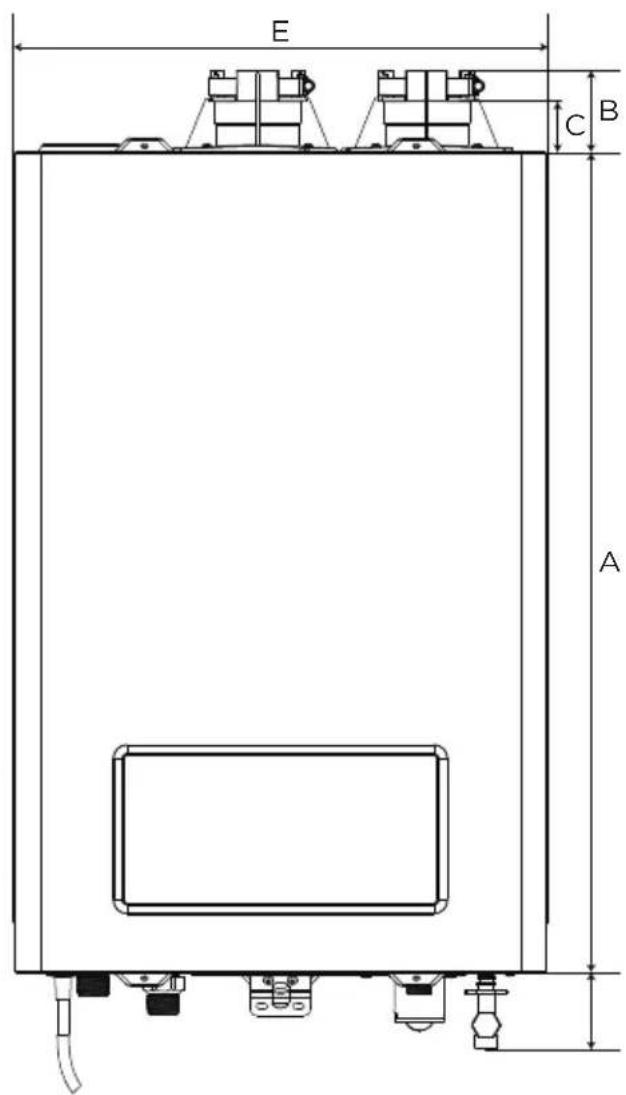
Front View
Figure 5
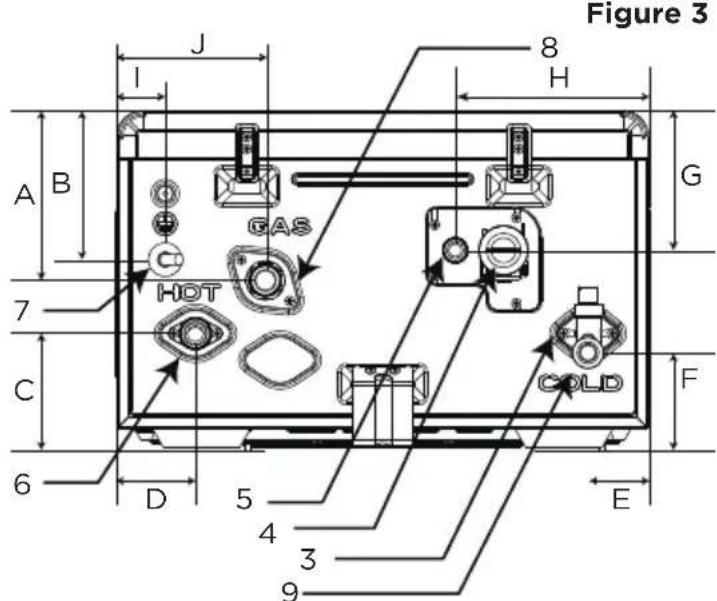
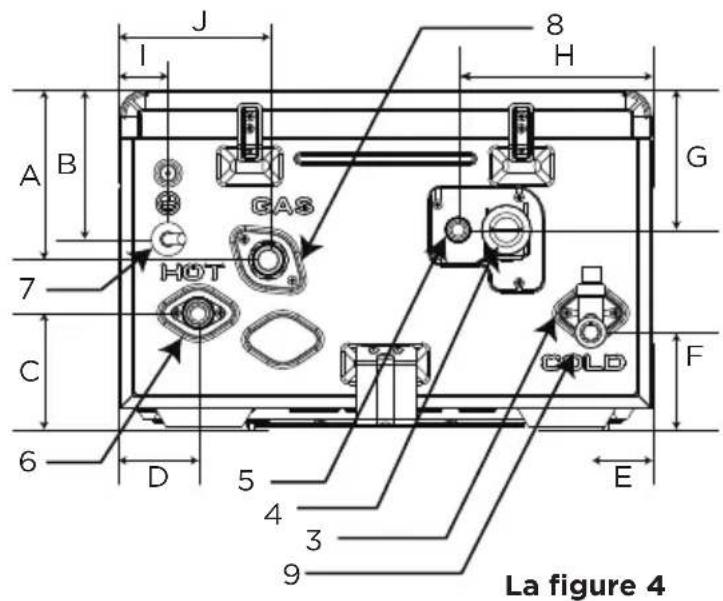
Figure 4
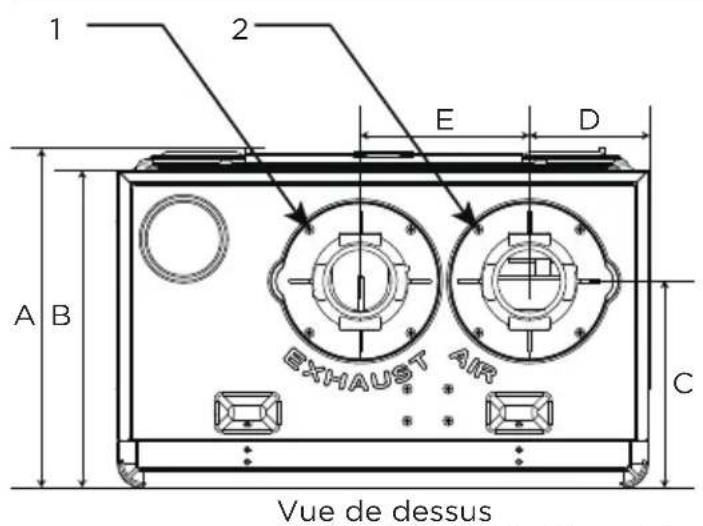
Bottom View
Appliance Components
| Description SizeNo. | ||
| 1 | Exhaust Vent 2" inches(in.) | |
| 2 | Air Intake | 2" in. |
| 3 | Cold Water Inlet | 3/4" in. |
| 4 | Condensate Clean | N/A |
| 5 | Condensate Drain | 3/4" in. |
| 6 | Hot Water Outlet | 3/4" in. |
| 7 | Power Cable | 120V/60Hz |
| 8 | Gas Inlet | 3/4" in. |
| 9 | Water inlet | 3/4" in. |
Appliance Dimensions
| Item | Top View | Front View | Bottom View |
| A | 10 7/8 in. | 26 3/4 in. | 5 5/8 in. |
| B | 10 3/8 in. | 2 3/4 in. | 4 7/8 in. |
| C | 6 3/4 in. | 1 3/4 in. | 3 1/8 in. |
| D.1 | 3 7/8 in. | 1 3/4 in. | 2 1/2in |
| D.2 | 3 7/8 in. 1 | 3/4 in. 2 5/8 | in. |
| E | 5 1/2 in. | 17 1/4 in. | 2 in. |
| F | 2 1/2 in. | ||
| G | 4 3/8 in. | ||
| H | 4 1/8 in. | ||
| I | 4 7/8in. | ||
| J | 1 5/8 in. |
Before first use
CAUTION
Before first using, a trial running should be carried out by authorized professionals. Before using, please make sure the gas water heater is installed properly.
Trial running and quick start
- Insert the power supply plug and switch on the power.
- Turn on the gas switch.
- Open the water inlet valve before ignition
- Turn on the hot water faucet. Observe the flame from the screen.
- Turn off the hot water faucet
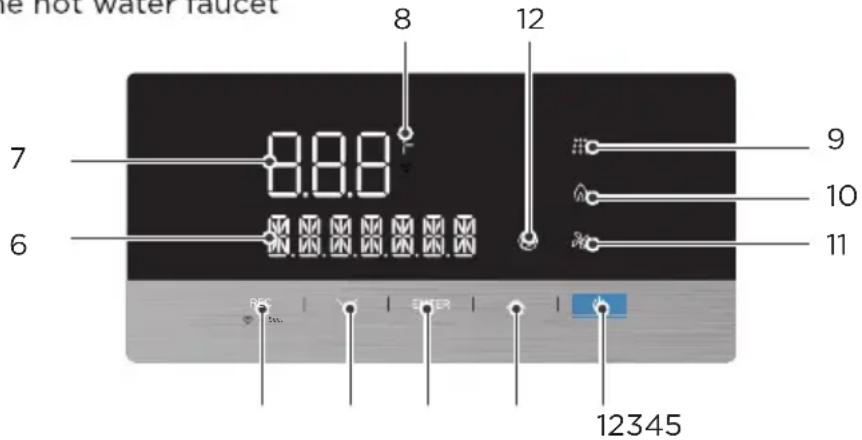
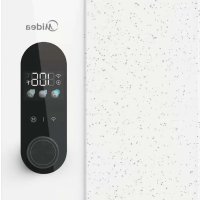
| No. Symbol Description Function | |||
| 1 | Power | Power ON/OFF | |
| 2 | Up | • Increase temperature setting. • Switch the information displayed when Info button is pressed. | |
| 3 | ENTER | Enter | • Set the default temperature • Restore to the default temperature |
| 4 Down | • Decrease temperature setting. • Switch the information displayed when Info button is pressed. | ||
| 5 | REC | Recirculation setting | Enter the recirculation parameter settings. |
| -3 Sec. | Wifi Function | Press 3 seconds to connect Wifi. | |
| 6 | Information Display | Display detailed information for each status. | |
| 7 | 888 | Temperature Displays temperature of the water. | |
| 8 | F | Temperature | Displays the temperature in Fahrenheit. |
| 9 | Water Flow Indicates water flow signal is detected. | ||
| 10 | Flame | Indicates flame signal is detected. | |
| 11 | Blower | Indicates blower is operating. | |
| 12 | Pump Indicates pump is operating. | ||
OPERATION INSTRUCTIONS

Warning
Follow the instructions below to avoid unsafe operating conditions that could cause property damage, severe personal injury, or even death.
- Ensure the water heater is filled with water before using the water heater. If the water heater's internal gas valve cannot shut off the gas supply, use the manual gas shut-off valve and call a qualified technician.
- If any part of the water heater has been submerged in water, do not use this appliance, immediately cut off the power supply, and call a qualified technician.
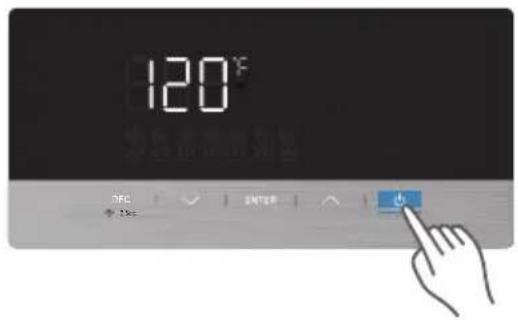
Turning the Water Heater On or Off
Power On/off
Press the POWER button to turn on/off. when the unit is turned"ON",the temperature setting will show on the display and the buzzer will sound once.
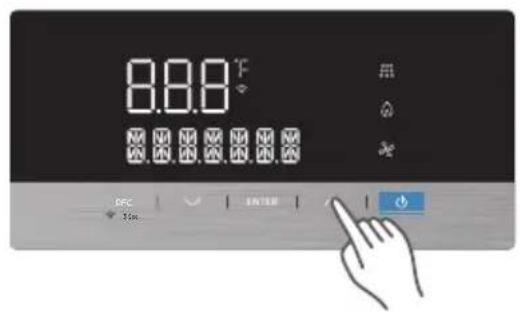
Adjusting the Water Temperature
The default temperature setting is 120^ (48.9^) . To adjust the temperature while the power is on, press the or buttons. Pressing the button will change the temperature by 1 degree and the buzzer will sound with each press. Holding the button will down will rapidly adjust the temperature setting.
Decrease Temperature Setting
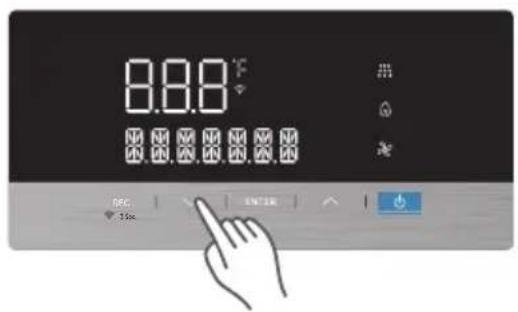
Increase Temperature Setting
Range of temperature setting
95^ 140^
Accuracy
1°F
NOTE
- The set temperature may be changed from 95 to 140^ while the burner is off but the appliance is "ON", If the current set temperature is below 120^ and the burner is on, then the temperature setting is locked from 95 to 120^ to help prevent scalding from temperature adjustment.
- If the set temperature is above 120^ F ,the set temperature can be changed from 95 to 140^ F .
- Before using the recirculation mode, the local time should be set; otherwise, the function will not be able to start.Details shall refer to the installing manual.
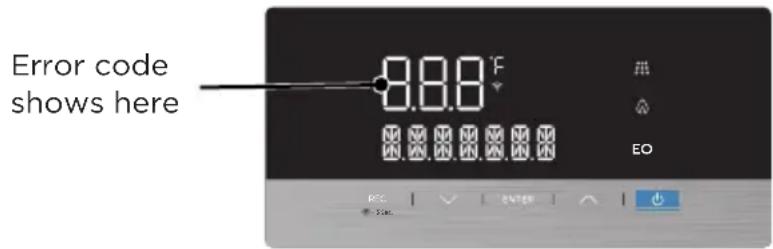
Error code
If an error message appears, you can try resetting the water heater to resolve the problem. To reset the water heater, press the power button.
If resetting the water heater does not solve the problem, refer to "5. Troubleshooting" on page trouble shooting or contact technical support on the warranty card.
| ERROR CODE DISPLAY | DISPLAY CONTENT | |||
| 1 | Hot water outlet Temperature Sensor Failure | E0 | E0 Flash | OT SENSOR ERROR |
| 2 | Accidental Flame Lost | E1 | E1 Flash | FLAME LOST ERROR |
| 3 | Fake Flame | E2 | E2 Flash | FAKE FLAME ERROR |
| 4 | Thermistor Failure | E3 | E3 Flash | THERMOSTAT ERROR |
| 5 | Outlet Temperature Too High | E4 | E4 Flash | OT OVERHEAT ERROR |
| 6 | Fan Failure | E5 | E5 Flash | FAN ERROR |
| 7 | Gas Valve Failure | E6 | E6 Flash | GAS VALVE ERROR |
| 8 | Pump Failure | E8 E8 Flash PUMP | ERROR | |
| 9 | Main Water Valve Failure* | E9 | N/A | MAIN WATER VALVE ERROR |
| 10 | Overtime Failure | EE | EE Flash | HEATING OVERTIME ERROR |
| 11 | Inlet Temperature Failure | F2 | F2 Flash | IT SENSOR ERROR |
| 12 | Ignition Fail | C0 | C0 Flash | IGNITION FAILURE ERROR |
| 13 | Residual Flame | C1 | C1 Flash | FLAME LEFT ERROR |
| 14 | Vent Blockage | C4 | C4 Flash | VENT BLOCK ERROR |
| 17 | Waterway Blockage Failure | C5 C5 Flash | WATER CIRCUIT BLOCK ERROR | |
| 16 | Exhaust gas Temperature | C9 | C9 Flash | EGT SENSOR ERROR |
| 17 | Exhaust Gas Temperature Too High | CA | CA Flash | EXHAUST GAS OVER-HEAT ERROR |
| 18 | Bypass Water Valve Failure* | CB | N/A | BYPASS WATER VALVE ERROR |
| 19 | Heat Exchanger Outlet Temperature Sensor Failure | CF | CF Flash | HET SENSOR ERROR |
| 20 | Watch Dog Circuit Failure | AO | AO Flash | WATCH DOG ERROR |
| 21 | MCU PC Command | A1 | A1 Flash | MCU CMD ERROR |
| 22 | FailureInstruction Compilation & Execution Failure | A2 | A2 Flash | CMD RUN ERROR |
| 23 | MCU RAM DC Failure | A3 | A3 Flash | MCU RAM DC ERROR |
| 24 | MCU ROM Failure | A4 | A4 Flash | MCU ROM ERROR |
| 25 | MCU Register Dc | A5 | A5 Flash | MCU REGISTER ERROR |
- These error codes will not display on the screen, however, they can be accessed in the after-sales mode. Please refer to the previous page for more information.
Appliance Servicing*

CAUTION
*This operation MUST ONLY be performed by licensed professionals or with the specific guidance of an authorized Midea representative.
Diagnostics and Suggested Corrective Actions
The water heater control panel is able to record information about the water heater's operating condition at the time of the ten most recent faults or errors. This information is available to view in the error code history when accessed in the Appliance Servicing Mode. The following screens will be displayed when reviewing the water heater history. The table below also includes diagnostic information and possible corrective actions.
| Display Condition Diagnostic | Possible Corrective Actions | ||
| Nothing appears on the display panel but the unit beeps. | Main control board is not receiving commands. | Check the wiring to ensure it is correct and there are no short-circuits. | Correct wiring per wiring diagram, including the connection of the transformer to the control. |
| Nothing appears on the display panel and no other components are operating. | No 120V power supply is being received. | Ensure the power button on the display panel is turned ON. | Turn on the power button on the display panel. |
| Is there 120V at the distribution box? | Troubleshoot and correct the power supply to the distribution box. | ||
| Is the power connector on the MAIN CONTROL BOARD disconnected? | Properly connect the power cable to the MAIN CONTROL BOARD. | ||
| Inspect the fuse. | Replace the MAIN CONTROL BOARD. | ||
| Display repeatedly goes through initialization sequence. | Occurs when power supply is abnormal. | Power supply voltage too low. | Turn on the power button on the display panel. |
| Switching power is malfunctioning. | Replace the MAIN CONTROL BOARD. | ||
| Nothing appears on the display control panel, but the water heater is operating. | This occurs when communications are lost from the control to the display. | Check for loose connections and proper pin alignment / engagement on the control's connector. | Correct wiring per wiring diagram, including the connection of the transformer to the control. |
| Power the water heater off and on using the power button on the display board and check for operation. | Replace the display module. | ||
This operation MUST be performed by licensed professionals or with the guidance of an authorized Midea representative.
Press and hold the ENTER and INFO buttons together for 3 seconds to enter the servicing information interface (OT shows as default). Press then or to scroll through the information fields listed below. Once the desired field is selected, press ENTER to show more details.

*HE: The most recent 10 error codes can be selected from the list.
**TUW: Total water consumption, displayed in Gallons (e.g. 0 HG means less than 100 L/G, 1 HG means 100G-200G).
***IS: Number of times of Ignition success (e.g., OH means less than 100 times, 1H means 100-200 times).
| Contents | Description | Units |
| OT Outlet Temperature °F | ||
| IT Inlet temperature °F | ||
| EGT Exhaust Gas Temperature °F | ||
| HET Heat Exchanger Temperature °F | ||
| FS Fan Speed RPM | ||
| AP Air Pressure PA | ||
| HE* | Historical Error | N/A |
| WF | Water flow rate | GPM |
| TUW** | Total Water Consumption | HG |
| IS*** | Ignition Success Times | H |
| UA | Version Number of Main Board | N/A |
| UB Version Number of Display Board | N/A | |
CLEANING AND MAINTENANCE
Cleaning
- Check frequently to see if the gas supply pipelines are in good condition without cracks.
- Pay attention to any rubber hoses or gaskets. In order to prevent gas leakage, check the joints of pipelines frequently by using suds to see if there are bubbles that form. If bubbles form, there is a leak.
- A water heater must be examined and cleaned after it has been used for a period of time (generally about six months to a year) to guarantee normal operation of the heater.
- Clean the external casing of the unit with water and light soap. Use of harsh chemical cleaners or volatile solvents will cause the paint to fade or lose its luster.
- Clean the inlet water filter regularly.
Burner
- Remove the screw of the front cover, and check burner flame for proper color from the flame observe window. Once ignited, the flame must cover the surface of the burner. The flame must burn with a clear, blue or orange stable flame. If the flame does not have this appearance, call the licensed professionals or authorized Midea representative for help.
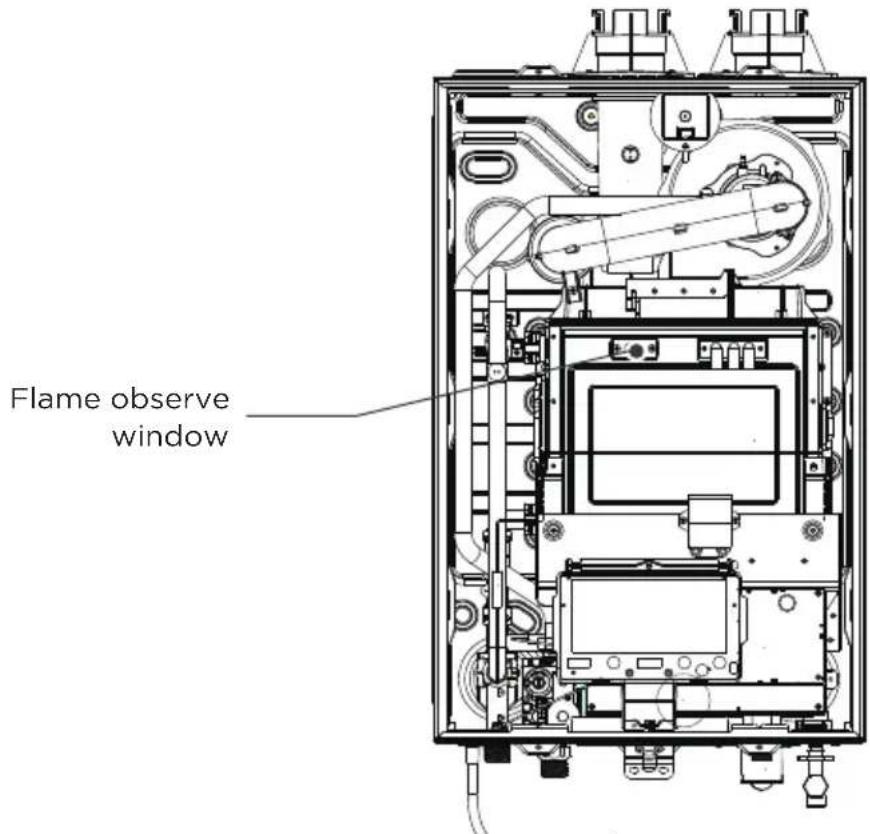
Figure 6
APP SETUP AND OPERATION
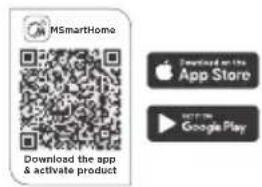
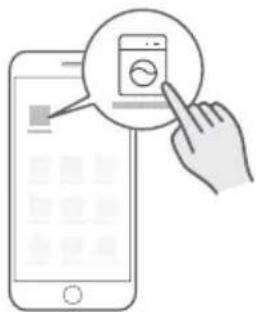
Install Application
- Ensure the mobile phone is connected to your home network.
- Scan the QR code or search for the MSmartHome application from the Google Play Store or Apple App Store on a smart device.
Register and log in
Open the MSmartHome app, and create a new account to start (you can also register through a third-party account). If you already had an existing account, use the account to log in.
Connect your devices to MSmartHome
- Ensure the mobile phone is Connect your device to wireless network.
- Please power on your devices.
- Open MSmartHome app on your phone.
- If a message of "smart appliances discovered nearby" appears, click to add.
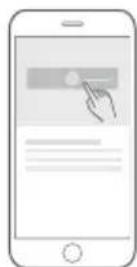
- If no message appears, select "+" on the page and select your device in the list of nearby devices available. If your device is not listed, please add your device manually by the device category and device model.
-6. Connect your device to wireless network according to the instructions on app, if the connection fails, please follow the instructions provided by the app to continue with the operation.

Wireless Network Signal Light
| Slowly flashing | • Waiting for connectiona |
| Quickly flashing | • Connecting |
| Keep on | • Connected to your wireless router |
NOTE
- Make sure your devices are powered on.
- Keep your mobile phone close enough to your device when you are connecting network to your device.
- Connect your mobile phone to the wireless network at home, and make sure you know the password of the homewireless network.
- Check if your router supports WLAN 2.4Ghz band and turn it on. If you are not sure whether the router supports WLAN 2.4Ghz band, please contact the router manufacturer.
- The device cannot connect to the wireless network that requires authentication, and it usually appears in public area such as hotels, restaurants, etc. Please connect to a wireless network that does not require authentication.
- It is recommended to use a wireless network name that only contains letters and numbers. If your wireless network name contains special characters, please modify it in the router.
- Turn off the WLAN function of your mobile phone when connecting network to your devices.
- In the case that your device connected to WLAN before but it needs to reconnect, please click "+" on app Home page, and add your device again by the device category and model according to the instructions on app.
Reset the WLAN configuration
- Press REC and Power button 3 se cond to turn on the WLAN function and re-enter the cnetwork configuration process.
- The wireless network signal will slowly flashing.
- Reconnect to the network based on the content of previous page.
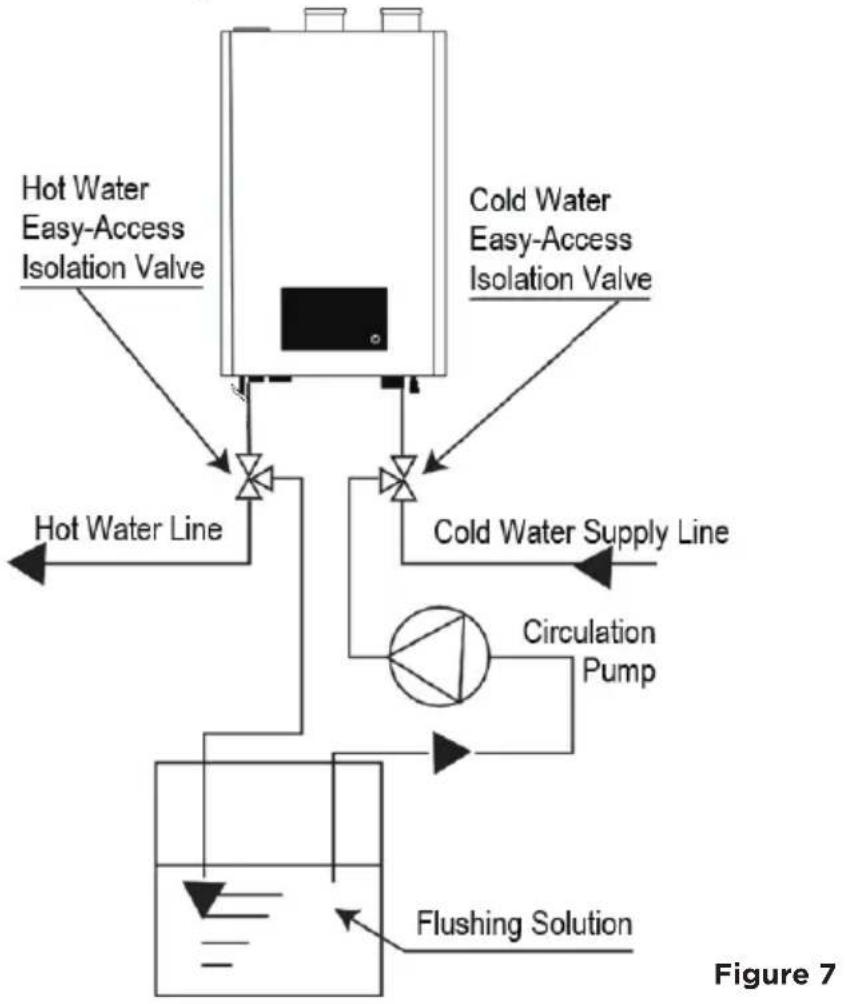
Flush the Heat Exchanger
Due to the hardness of the water in your area, scale may build up inside the heat exchanger and block efficient water flow. Periodic flushing is mandatory in order to ensure smooth water flow. It is recommended the heat exchanger be flushed on the schedule on the bottom of Page 11 based on your water hardness. Damage to the water heater which results from water scale deposit WILL NOT be covered under the product warranty.
Please follow these steps when the appliance is flushed to descale the heat exchanger. It is recommended that you contact a licensed professional to carry out this procedure.
- Ensure the isolation valves are fully closed before beginning this procedure.
- Connect the empty connection of the isolation valve on the cold water side to the outlet of the circulation pump.
- Connect the empty connection of the isolation valve on the hot water valve to a tube leading to the solution tank.
- Connect the inlet of the circulation pump to a tube that leads to the solution tank.
- Make sure there is no leakage in any of the connectors.
- Fill the solution tank with descending solution above the tube connected to the circulation pump. If using commercial descending kit, please properly follow the instructions of the descending kit.
- Run the circulation pump until solution begins exiting the tubing connected to the hot water isolation valve. Ensure this tubing returns fluid to the flushing solution container
-
Continue running the circulation pump until the solution that comes out from the hot water side is clean.
-
Fully drain solution from unit. Disconnect all tubes for flushing and fully close the empty connectors of the isolation valves.
- Open the isolation valves to switch back to normal water flow.
- Restore the power supply, gas supply, and water supply.
- Run the water heater for at least five (5) minutes to make sure there is no solution remaining in the unit.
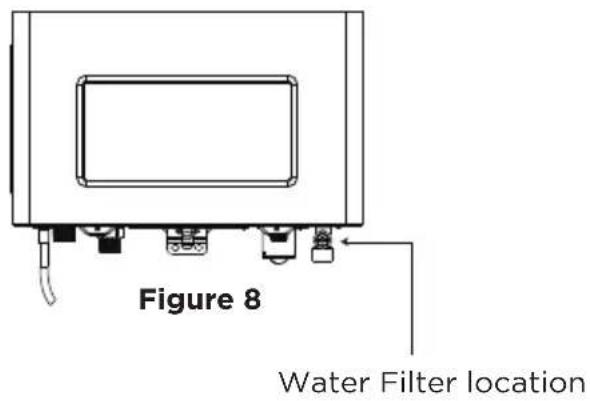
Clean the Inlet Water Filter

CAUTION
Before performing any maintenance, please follow these steps:
- Disconnect the power supply, disconnect power to the outlet that services this unit, and close the manual gas shut-off valve.
-
After the power is turned OFF, drain the hot water from a nearby faucet until it runs cold. Then close the water supply isolation valves (cold and hot) of the water heater.
-
Drain the water heater.
- Locate the cold water inlet to the water heater.
- Unscrew the brass end facing towards you on the cold water inlet assembly by turning it counterclockwise until it becomes loose. Remove the brass end and filter from the water inlet assembly.
- Rinse the filter screen with clean water, brush with an unused toothbrush, or wipe it when necessary. Do not tap the screen on a hard surface or with your hand. Tapping the screen might deform the filter, affecting filtering ability.
- Insert the cleaned filter and tighten it by turning clockwise until it is securely back in the cold water inlet assembly.
Front View Bottom View

Picture of brass end and clean water filter removed from water heater (Enlarged).
Water Filter Screen

Figure 10
Time calibration
- Power on the water heater
- Enter the STETIME in servicing information interface
- Calibrate the current time
4.Exit

CAUTION
The current time shall be set every half year
- If the device is powered off for more than two months, the time should be reset.
After the change of seasons, the time should be reset.
TROUBLESHOOTING
Error Codes and Solutions
Should you experience a problem with the water heater, please refer to the following chart for possible remedies. Error codes that appear on the front panel display are explained in the below section. For minor problems or issues, resetting the water heater may resolve the issue. To reset the water heater, press the POWER button on the front panel, or turn off the faucet and then back on.
| Error codes | Description | Possible SolutionCause | |
| E0 E0 | Displayed | Outlet water temperature sensor open or has short-circuited. | Ensure temperature sensor is properly connected. If connection is good, change the sensor. |
| If error still occurs change the MAIN CONTROL BOARD. | |||
| E1 | Accidental Flame Lost | Gas has run out during combustion or no pressure in the pipeline. Gas valve operation is unstable. | Increase the gas supply pressure to the required value. Replace the gas valve. |
| E2 | Flame Signal Detected Before Ignition | Open circuit formed between flame sensor and the burner or the heat exchanger before ignition. | Unplug the flame sensor from the MAIN CONTROL BOARD, with the power on, but burner off. • If E2 persists, change the MAIN CONTROL-BOARD. • If E2 does not persist, change the flame sensor. |
| E3 | Thermistor Open Circuit* | Heat exchanger outlet water overheated. | 1. Check if there's debris or dirt on the filter of the water inlet. If so, clean the filter (refer to the Clean the Inlet WaterFilter section on Page 41). 2. Check the BWF value (refer to theAppliance Servicing section), if it exceeds 0.4 GPM, check the HE, if the CBerror can be searched from HE, changethe bypass water valve. |
| Thermistor failure. | Turn off the unit, use a multi-meter to check if the thermistor is conducting. If E3 exists while the thermistor is conducting, change the MAIN CONTROL BOARD. | ||
| E4 | Outlet Water Temperature Exceeds 185°F (85°C) For Over 3 Seconds | Outlet hot water overheated. | 1. Check if there's debris or dirt on the filter of the water inlet. If so, clean the filter (refer to the Clean the Inlet WaterFilter section). 2. Check the BWF value (refer to the Appliance Servicing section), if it exceeds 0.4 GPM, check the HE, if the CB error can be searched from HE, change thebypass water valve. |
| Temperature sensor failure. | Replace the sensor. |
- The unit will not automatically restore while this error code is displayed. Press power off and then on to manually restore the unit.
| Error codes | Description | Possible SolutionCause | |
| E5 | Fan Failure | Cables not connected. | • Connect the cables. |
| Fan controller failure. | • If E5 persists, replace the fan. | ||
| E6 | Gas Valve Failure | Cables not connected. | • Connect the cables. |
| Solenoid Failure. | • If E6 persists, replace the gas valve. | ||
| E8 | Low water flow | The water flow low,and pump fail detected | • Cut off the power,and start again • Close all faucet and open again • The appliance will start again to recover the pump • Try several times ,if the recovery failed,re-place the pump |
| EE Overtime | Burner time exceeds 40 minutes of continuous operation. | Close & open the faucet to restart combustion operation. | |
| F2 | Inlet Water Temperature Sensor Failure | Inlet water temperature sensor open or has short-circuited. | • Ensure the sensor is connected. • If the sensor is connected & F2 persists, change the sensor. • If F2 persists with a new sensor, change the MAIN CONTROL BOARD. |
| C0 | Ignition Failure | Gas valve not open. | Replace the gas valve. |
| Air in the gas supply line. | Attempt to ignite several times to discharge the air. | ||
| Gas supply pressure too low. | Ensure gas supply pressure is within range. | ||
| Nozzle blockage. Clean the nozzle. | |||
| No signal from flame sensor. | Change the flame sensor, if C0 persists, change the MAIN CONTROL BOARD. | ||
| C1 | Residual Flame | Gas valve leakage. | Replace the gas valve. |
| C3 | Air pressure sensor error | Wrong air pressure detected | Reset the plug |
| C4 | Vent Blockage | Vent pipe blockage. | Clean & remove debris from the vent pipe. |
| Ambient wind pressure too high. | Change the terminal to resist higher wind pressure. | ||
| Air pressure sensor failure. | Replace air pressure sensor module. | ||
| Fan failure. | Replace the fan. | ||
| C5 | Low water flow | The water pipe blocked and the pump fail to start | • Disassemble and check the water circulation system, clean the inlet and the pipe if any blockage found. • Connect all the pipe and set the circulation mode (HQ=03) • Wait the system recover |
| C9 | Exhaust Gas Temperature Sensor Failure | Exhaust gas temperature sensor is open or has short-circuited. | ·Ensure the sensor is connected. ·If the sensor is connected & C9 persists, change the sensor. ·If C9 persists with a new sensor, change the MAIN CONTROL BOARD. |
| CA | Exhaust Gas Temperature Too High | Heat exchanger failure. | Change the heat exchanger. |
| Exhaust gas temperature failure. | Refer to C9 above. | ||
| CB | Bypass Water Valve Failure | Bypass water valve jam. | Clean the bypass water valve. |
| Bypass water valve failure. | Replace the bypass water valve. | ||
| CF | Heat Exchanger Outlet Temperature Sensor Failure | Heat exchanger outlet temperature sensor is open or has short-circuited. | ·Ensure the sensor is connected. ·If the sensor is connected & CF persists, change the sensor. ·If CF persists with a new sensor, change theMAIN CONTROL BOARD. |
| A0 | Watch Dog Circuit Failure | MCU internal failure. | Change the controller. |
| A1 | MCU PC Command Failure | MCU internal failure. | Change the controller. |
| A2 | Instruction Compilation & Execution Failure | MCU internal failure. | Change the controller. |
| A3 | MCU RAM Failure | MCU internal failure. | Change the controller. |
| A4 | MCU internal failure. | Change the controller. | |
| A5 | MCU Register DC | MCU internal failure. | Change the controller. |
| Issue Possible Causes Possible Remedies | ||
| No electrical power to the water heater. | Is the plug on the power supply cord unplugged from the electrical outlet? | Reset the plug. |
| Has the electrical panel's 10 Amp circuit breaker been tripped? | Reset the circuit breaker. | |
| Is the fuse on the circuit board good? | If the display panel is blank, unplug the unit & contact a qualified installer or service technician. | |
| Is there a power outage? | Contact the power company. | |
| No water is available when the faucet is turned on or opened. | Is the water supply valve shut off at the meter (are the cold water faucets still working)? | Open the closed supply valve. |
| Is the water supply valve near the unit opened? | Open the water valve. | |
| Is the water pipe frozen? | Turn OFF the unit, close all water valves and the gas valve. Then, contact a qualified installer or service technician. | |
| Is the main water valve jammed? | Check to see if an E9 code has been triggered in the error code history of the Appliance Servicing mode. If the water supply is OK, and there is no water flow at the hot water outlet, change the main water valve. | |
| Hot water is not available when the faucet is turned on or opened. | Does the water heater have power (is it plugged in)? | Restore electrical power to the unit. |
| Is the water heater turned on? | Press & hold the power button to turn the unit on. | |
| Is an error code flashing on the display panel? | Refer to the error codes & solutions section on the previous pages. | |
| Is the gas supply valve shut off at the meter (are other gas devices operating)? | Open the gas supply valve. | |
| The water temperature is not hot enough or turns cold during operation. | Is the faucet open enough to draw at least a 1/2 gallon per minute through the water heater? | Open the faucet to allow more water flow. |
| Is an error code flashing on the display panel? | Refer to the error codes & solutions section on the previous pages. | |
| Is the outlet water temperature set too low? | Adjust the outlet water temperature. | |
| The water is not hot enough. | Is the water temperature set too low? | Adjust the temperature setting. |
| The water at the faucet is too hot. | Is the water temperature set too high? | Adjust the temperature setting. |
| A fan can be heard even when the unit is not operating. | The fan continues to operate after the burner shuts off to clear the exhaust vent of combustion gases. | This is a normal pre-purge or post- purge operation; no action is required. |
| White smoke can be seen coming out of the exterior exhaust gas vent. | Depending on the outside temperature, water vapor can be produced as the exhaust is vented. | This is a normal operation; no action is required. |
| The recirculation doesn't work or work in wrong time,but no error codes display | The time is not correctly configured Calibrate time | |
CERTIFICATIONS AND SAFETY APPROVALS
Declaration of conformity
Certifications and Safety Approvals
Declaration of Conformity We hereby confirm that the following customer model names and Midea model names match each other respectively
| Brand Midea | model Marketing Model | |
| Midea | JSG52-32PCHS-NG | MGWH199IXNN |
| JSG52-32PCHS-LP | MGWH199IXPN | |
| JSG52-32PCHPS-NG | MGWH199IXNP | |
| JSG52-32PCHPS-LP | MGWH199IXPP | |
| JSG48-29PCHS-NG | MGWH180IXNN | |
| JSG48-29PCHS-LP | MGWH180IXPN | |
| JSG48-29PCHPS-NG | MGWH180IXNP | |
| JSG48-29PCHPS-LP | MGWH180IXPP | |
| JSG40-24PCHS-NG | MGWH150IXNN | |
| JSG40-24PCHS-LP | MGWH150IXPN | |
| JSG40-24PCHPS-NG | MGWH150IXNP | |
| JSG40-24PCHPS-LP | MGWH150IXPP |
Application of Council Directives Standards, to which Conformity Is Declared:
South Coast Air Quality Management District Rule 1146.2 Tested to South Coast Air
Quality Management District Protocol: Nitrogen Oxides Emissions Compliance Testing for Natural Gas-Fired Water Heaters and Small Boilers
CSA/ANSI Z21.10.3:19/CSA 4.3:19
NSF Compliance: Fabricate and label equipment components that will be in contact with potable water to comply with NSF 61 and NSF 372
Energy Star Compliance: Fabricate and label equipment in compliance with Energy Star requirements.Special Requirements: NSF/ANSI/CAN 372 -2022- Drinking Water System Components - Lead Content .
TRADEMARKS, COPYRIGHTS AND LEGAL STATEMENT
Midea logo, word marks, trade name, trade dress and all versions thereof are valuable assets of Midea Group and/or its affiliates ("Midea"), to which Midea owns trademarks, copyrights and other intellectual property rights, and all goodwill derived from using any part of an Midea trademark. Use of Midea trademark for commercial purposes without the prior written consent of Midea may constitute trademark infringement or unfair competition in violation of relevant laws.
This manual is created by Midea and Midea reserves all copyrights thereof. No entity or individual may use, duplicate, modify, distribute in whole or in part this manual, or bundle or sell with other products without the prior written consent of Midea.
All the described functions and instructions were up to date at the time of printing this manual. However, the actual product may vary due to improved functions and designs.
DISPOSAL AND RECYCLING
Important instructions for environment
Compliance with the WEEE Directive and Disposing of the Waster Product: This product complies with EU WEEE Directive (2012/19/EU). This product bears a classification symbol for waster electrical and electronic equipment (WEEE).
This symbol indicates that this product shall not be disposed with other household wastes at the end of its service life. Used device must be returned to official collection point for recycling of electrical electronic devices. To find these collection systems please contact to your local authorities or retailer where the product was purchased. Each household performs important role in recovering and recycling of old appliance. Appropriate disposal of used appliance helps prevent potential negative consequences for the environment and human health.

Compliance with RoHS Directive
The product you have purchased complies with EU RoHS Directive (2011/65/EU). It does not contain harmful and prohibited materials specified in the Directive.
Package information
Packaging materials of the product are manufactured from recyclable materials in accordance with our National Environment Regulations. Do not dispose of the packaging materials together with the domestic or other wastes. Take them to the packaging material collection points designated by the local authorities.

DATA PROTECTION NOTICE
For the provision of the services agreed with the customer,
we agree to comply without restriction with all stipulations of applicable data protection law, in line with agreed countries within which services to the customer will be delivered, as well as, where applicable, the EU General Data Protection Regulation (GDPR).
Generally, our data processing is to fulfil our obligation under contract with you and for product safety reasons, to safeguard your rights in connection with warranty and product registration questions. In some cases, but only if appropriate data protection is ensured, personal data might be transferred to recipients located outside of the European Economic Area.
Further information are provided on request. You can contact our Data Protection Officer via MideaDPO@midea.com. To exercise your rights such as right to object your personal data being processed for direct marketing purposes, please contact us via MideaDPO@midea.com. To find further information, please follow the QR Code.

make yourself at home

www.midea.com
XXXXXXXXXXXXXXXXXX
V1.0
Download the app
& activate product
MGWH199IXNP/MGWH199IXPP
MGWH180IXNP/MGWH180IXPP
MGWH150IXNP/MGWH150IXPP
APERCU DU PRODUIT 08
GUIDE DE DEMARRAGE RAPIDE 10
INSTRUCTIONS DE FONCTIONNEMENT 11
CONFIGURATION ETFONCTIONNEMENT DE L'APPLICATION----17
NETTOYAGE ET ENTRETIEN 19
DÉPANNAGE 22
CERTIFICATIONS ET APPROBABATIONS DE SECURITE 28
MARQUES, DROITS D'AUTEUR ET DÉCLARATION
LEGALE 29
ÉLIMINATION ET RECYCLAGE 29
AVIS SUR LA PROTECTION DES DONNÉES 30


CONSIGNES DE SECURITÉ
Dimension
La figure 3
Vuede dessous
INSTRUCTIONS DEFONCTIONNEMENT
Avertissement
make yourself at home

www.midea.com
XXXXXXXXXXXXXXXXX
V1.0