
MWH180ECNCR - Boiler MIDEA - Free user manual and instructions
Find the device manual for free MWH180ECNCR MIDEA in PDF.

| Product type | Electric instantaneous water heater |
| Brand | Midea |
| Model | MWH180ECNCR |
| Power supply | 240 V AC, 60 Hz, single-phase |
| Rated power | 18 kW (18 kW model) |
| Dimensions (L x D x H) | 289 mm x 118 mm x 400 mm |
| Water connection | NPT 3/4 in (inlet and outlet) |
| Min./max. water pressure | 30 psi (2.07 bar) / 150 psi (10.34 bar) |
| Minimum activation flow rate | 0.5 gal/min (1.9 L/min) |
| Temperature adjustment range | 30 °C to 60 °C (manual mode up to 60 °C) |
| Operating modes | Manual, Kitchen, Shower, Infant (limited to 40 °C) |
| Special functions | Settings memory, dry-heat protection, overheat protection, anti-freeze, self-diagnosis |
| Connectivity | Wi-Fi 2.4/5 GHz, MSmartHome app, compatible with Alexa and Google Assistant |
| Display | Digital screen with rotary knob adjustment |
| Maintenance | Periodic cleaning of the strainer and seals |
| Safety | Mandatory residual current circuit breaker, grounding, thermal protection at 95 °C |
| Installation | By a qualified professional, comply with local codes |
| Warranty | 1 year limited (parts and labor) |
| Package contents | Water heater, sealing ring, screw set |
Frequently Asked Questions - MWH180ECNCR MIDEA
User questions about MWH180ECNCR MIDEA
0 question about this device. Answer the ones you know or ask your own.
Ask a new question about this device
Download the instructions for your Boiler in PDF format for free! Find your manual MWH180ECNCR - MIDEA and take your electronic device back in hand. On this page are published all the documents necessary for the use of your device. MWH180ECNCR by MIDEA.
USER MANUAL MWH180ECNCR MIDEA
Electric Tankless Water Heaters

MSmartHome

MSmartHome
Download the app & activate product
USER MANUAL
MWH-130ECNCR(B)
MWH-180ECNCR(B)
EN English
FR French
ES Spanish
LANGUAGES
THANK YOU LETTER
Thank you for choosing Midea! Before using your new Midea product, please read this manual thoroughly to ensure that you know how to operate the features and functions that your new appliance offers in a safe way.
CONTENTS
THANK YOU LETTER 01
SAFETYINSTRUCTIONS 02
SPECIFICATIONS 05
PRODUCT OVERVIEW 06
QUICK START GUIDE 08
PRODUCT INSTALLATION 09
OPERATION INSTRUCTIONS 13
APP SETUP AND OPERATION 14
CLEANING AND MAINTENANCE 18
TROUBLESHOOTING 19
TRADEMARKS, COPYRIGHTS AND LEGAL STATEMENT 20
DISPOSAL AND RECYCLING 20
DATA PROTECTION NOTICE 21
WARRANTY 22
SAFETY INSTRUCTIONS
Intended Use
The following safety guidelines are intended to prevent unforeseen risks or damage from unsafe or incorrect operation of the appliance. Please check the packaging and appliance on arrival to make sure everything is intact to ensure safe operation. If you find any damage, please contact the retailer or dealer. Please note modifications or alterations to the appliance are not allowed for your safety concern. Unintended use may cause hazards and loss of warranty claims.
EN
Explanation of Symbols

Warning
The signal word indicates a hazard with a medium level of risk which, if not avoided, may result in death or serious injury.

Attention
The signal word indicates important information (e.g. damage to property), but not danger.

Caution
The signal word indicates a hazard with a low degree of risk which, if not avoided, may result in minor or moderate injury.
Read these operating instructions carefully and attentively before using/commissioning the unit and keep them in the immediate vicinity of the installation site or unit for later use!

Warning
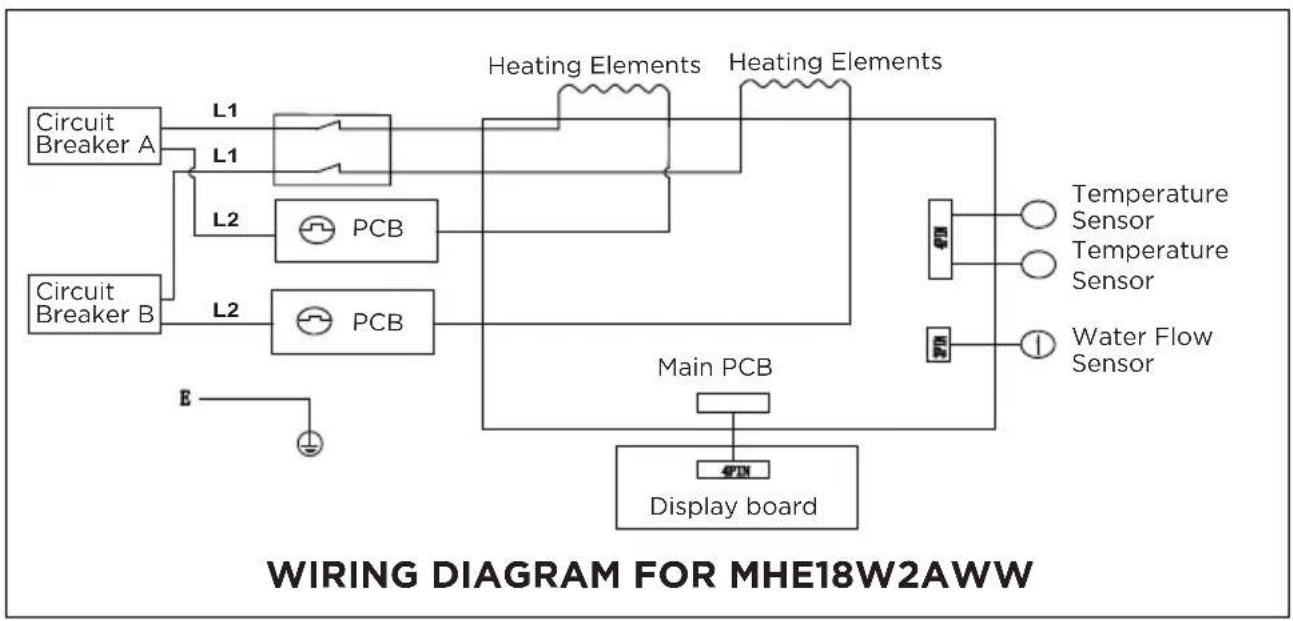
MHE18W2AWW:A 240 V, 60 Hz, AC only, required rating of circuit breaker : 2x40A.
For supply connection use 8 AWG or larger wires suitable for 85^(194^)
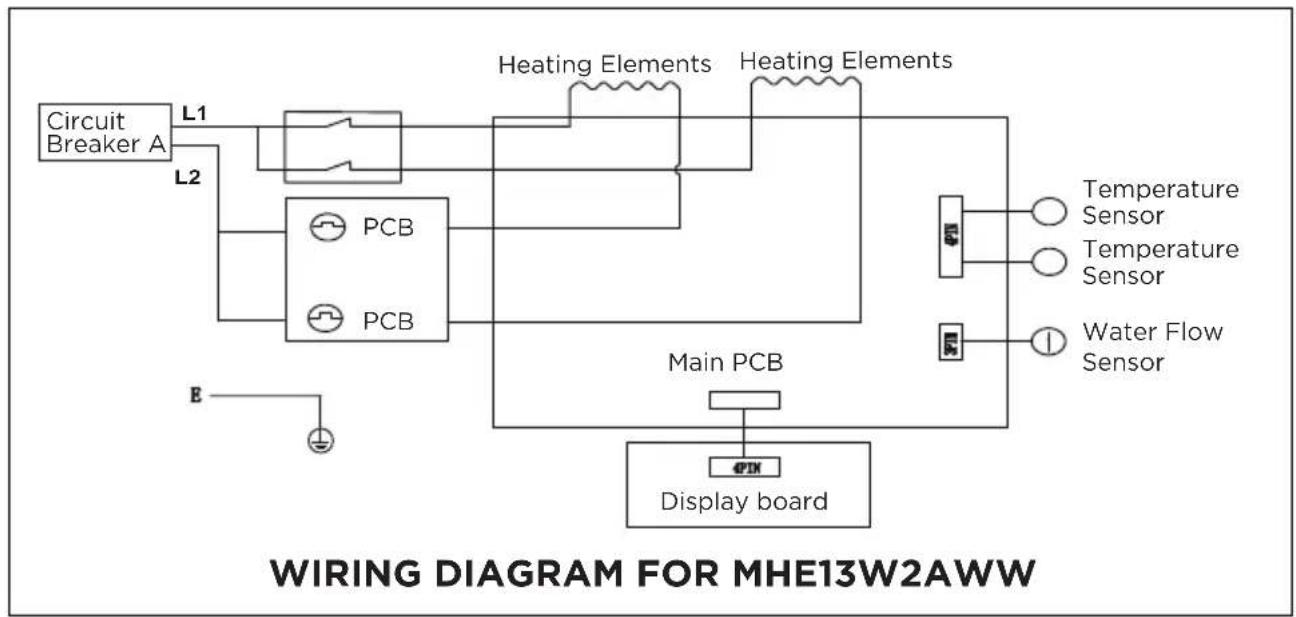
MHE13W2AWW:A 240 V, 60 Hz, AC only, required rating of circuit breaker : 60A.
For supply connection use 6 AWG or larger wires suitable for 85^(194^)
These appliances must be grounded.
To provide continued protection against risk of electrical shock, connect to a properly grounded circuit that is protected by a recognized CLASS A GROUND-FAULTCIRCUIT INTERRUPTER(GFCI).
To prevent personal injury, injury to others and property damage, the instructions below must be followed. Incorrect operation due to failure to follow instructions will cause harm or damage.
Installation must be carried out by a qualified personnel and in compliance to the local authority regulations.
For any improper installation and incorrect operation of this product, our company will not be liable for any responsibility.

These instructions are precautions to prevent the risks of serious injury or death of the user, and any damages to property.
Special Cautions
- This water heater is for household use, apartment use, or certain commercial applications. It can provide hot water for baths, washing hands, kitchen and so on.
- A plug is not used for this water heater. Each set of wires must be connected to its own individual double pole breaker. Please distinguish live line 1, live line 2 and earth ground line during installation.
- Check whether the amperes of the household wiring is enough before installation, and if a dedicated circuit must be used for the installation. Please consult an electrician on all electrical aspects.
- Before installing this water heater, check and confirm the earth electrode is reliably earthed, without electricity.
- This appliance is intended for indoor use only, where the indoor temperature is above 36^(2^) .
- Hot water from appliance may cause scalding, please test the temperature of the hot water beforeuse.
- To minimize heat loss, the distance between the point of use of hot water and the water heat should be kept to a minimum.
- The electric water heater may be damaged if the water hardness is too high, water hardness should be less than 450mg / L (CaCO3). Damage to the unit caused by scale or a high mineral count is not covered under the warranty.
- In time of lightning, switch off the individual double pole breaker in advance to protect the waterheater against possible damage.
- Manufacturer recommends that this product be installed by a licensed and qualified electrician in accordance with all applicable national, state, provincial, and local electrical codes. As with all electrical appliances, under no circumstances should you attempt to install, repair or disassemble this water heater without first shutting off all power to the unit directly at the fuse or breaker box. Make sure to shut off all breakers. SERIOUS BODILY INJURY OR DEATH COULD OCCUR IF YOU IgNORE THIS WARMING.
- In order to avoid a hazard due to inadvertent resetting of the individual double circuit breaker, this appliance must not be supplied through an external switching device, such as timer or connected to a circuit that is regularly switched "On" and "Off" by the utility.
- The water heater is not intended for use by persons (including children) with reduced physical, sensory or mental capabilities, or lack of experience and knowledge, unless they have been given supervision or instructions concerning use of the appliance by a person responsible for their safety.
Children should be supervised to ensure that they do not play with the heater. - Do not open front cover. This may cause electric shock.
- To ensure safety, it is necessary to install PPR water pipes with a length of more than 79^ (2m) the water inlet and outlet.
- In order to prevent damage caused by frostbite, this product will be heated when the ambient temperature is lower than 41^ F(5^ C) .

Warning
The water heater should be earthed before use. Please ensure that the resistance of household earth wire is < 4 Using water heater without earthed is highly prohibited.
Hotter water increases the potential for Hot Water SCALDS.
Hot Water Time/Temperature Chart for Scalding
| Temperature °F(℃) | Exposure time |
| 120°F(49℃) | 9 minutes |
| 124°F(51℃) | 2-6 minutes |
| 125°F(52℃) | 2 minutes |
| 131°F(55℃) | 20-30 seconds |
| 140°F(60℃) | 5-6 seconds |
| 151°F(66℃) | 2 seconds |
| 158°F(70℃) | 1 second |
| 160°F(71℃) Instantaneously | |
The electric water heater can be set to: OFF, 86 - 140^ (30 - 60^) (The actual outlet water temperature depends on the inlet water temperature and flow).
Households with small children, disabled, or elderly persons, may require that the a thermostat be set at 113^ (45^) or lower to prevent possible injury from hot water.
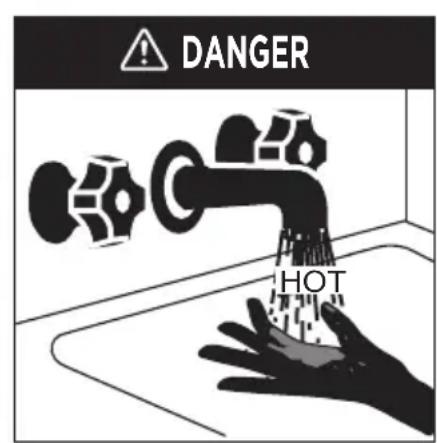
Water temperature over 125^(52^) can cause severe burns or death. Children, disabled individuals, and elderly are at highest risk of being scalded. See instruction manual before setting water heater temperature. Feel temperature of water prior to bathing or showering. See manual for available temperature limiting valves

WARNING
SAFETY PRECAUTIONS BEFORE USING WATER HEATER

Note
Notice: Mixing valves are recommended for reducing point of use water temperature by mixhot and cold water in branch water lines. It recommended that a mixing valve complying with the Standard for Temperature Actuated Mixing Valves for Hot Water Distribution Systems, ASSE 1017 be installed. This automatic tankless water heater is equipped with both computer-controlled and electro-mechanical auto resetting thermostat switches for high-limited temperature protection. Since this product does not use a storage tank, the use of a temperature pressure relief valve (T&P) is not required for most installations. UL Standard 499 does NOT require that a pressure relief valve be used. However, a T&P valve may be required to meet installation codes in your area when the water pressure over 150 psi. If one is required, install the pressure relief valve in accordance with local codes and ensure that it operates correctly and that air is purged from the valve prior to installing the water heater. When connecting to Flex or High Temperature CPVC pipe, we recommend that a T&P valve be used for added safety. Please note: Installations in the Commonwealth of Massachusetts and State of Kentucky require a pressure relief valve. Please check your local installation codes for any special requirements.
EN
SPECIFICATIONS
Technical Performance Parameters
EN
| MHE18W2AWWWProduct MOTE3W2AWW | ||
| Electrical Supply | 240 VAC / 60 Hz /Single Phase | |
| Rated power input | 18 kW | 13 kW |
| Max. amp. load | 2 × 37.5 A | 1 × 54.1 A |
| Recommended minimal wire size | 2 × 8 AWG | 1 × 6 AWG |
| Recommended circuit breaker | 2 × 40 A | 1 × 60 A |
| Water connection | 3/4" NPT | 1/2" NPT |
| Min. permissible pressure | 30 psi / 2.07 bar / 0.207 MPa | |
| Max. permissible pressure | 150 psi / 10.34 bar / 1.034 MPa | |
| Min. water flow to activate unit | 0.5 gpm (1.9 L/min) | |
| Width | 113/4"(289mm) | 113/4"(289mm) |
| Depth | 45/8"(118mm) | 4"(102mm) |
| Height | 153/4"(400mm) | 153/4"(400mm) |
Maximum temperature rise for a given flow rate
| TEMP. GPM RISE °F(°C) (LPM) Model | 1(3.8) | 1.5(5.7) | 2(7.6) | 3(11.3) | 4(15.1) | 5(18) | 9(6(22) | 7(26) | 5(8(30) | 2 |
| MHE13W2AWW | 88(49) | 59(33) | 44(24) | 29(16) | 2(12) | 18(10) | 15(8) | 13(7) | 1(6) | |
| MHE18W2AWW | limited | 82(45) | 61(34) | 41(23) | 31(17) | 24(14) | 20(11) | 17(10) | 15(8) |
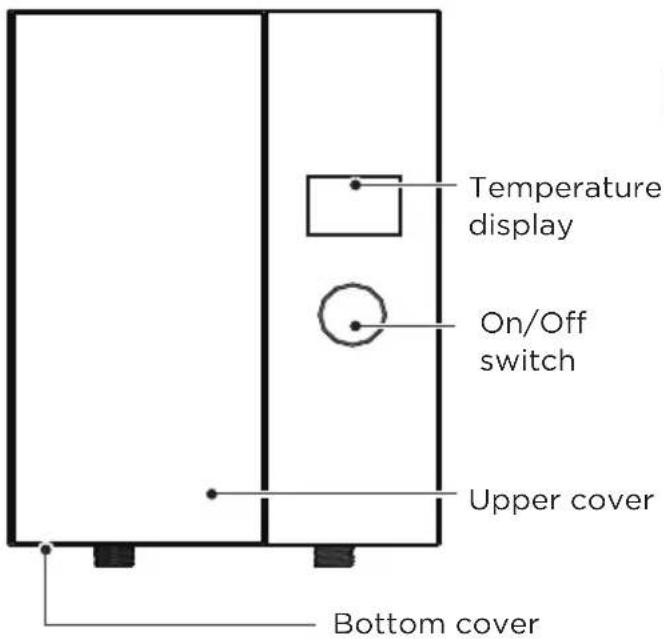
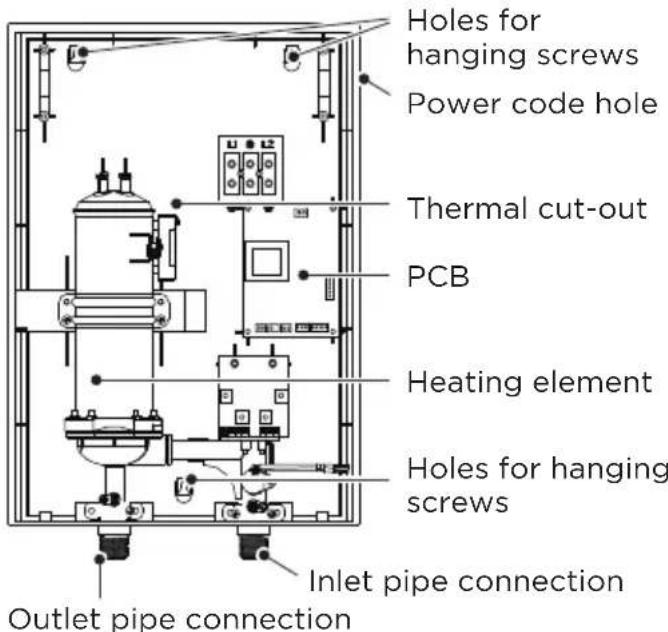
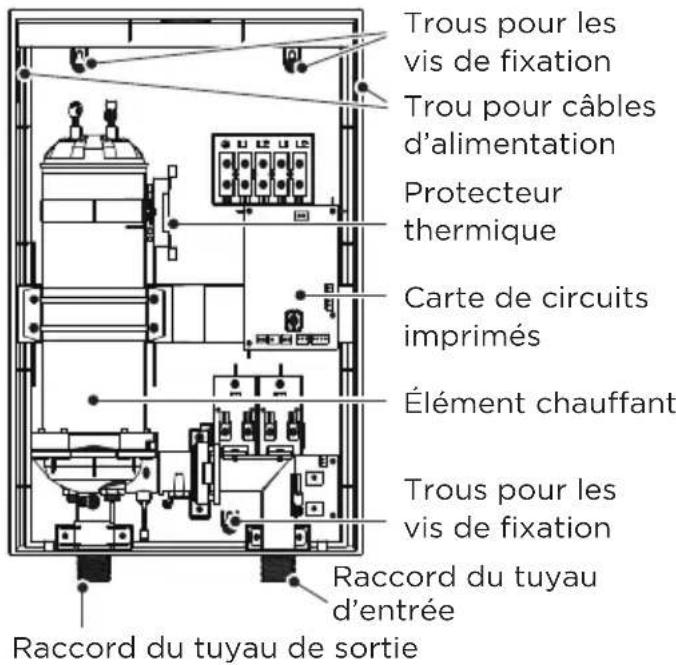
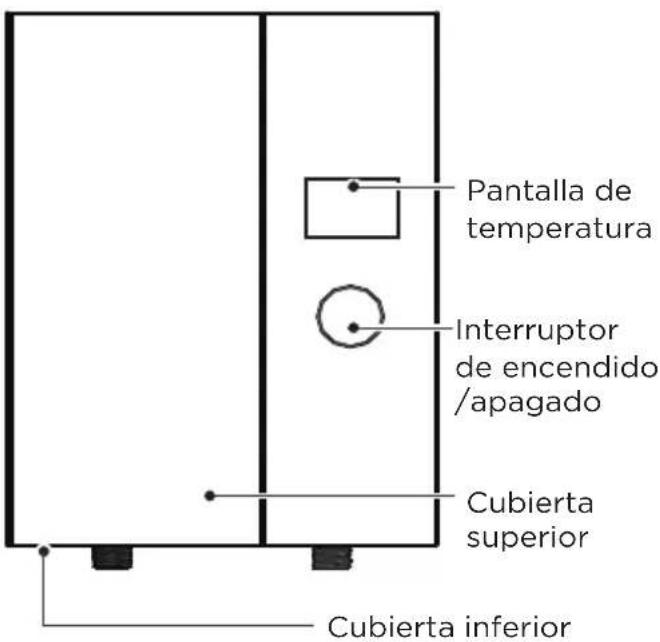
PRODUCT OVERVIEW
Parts Identification
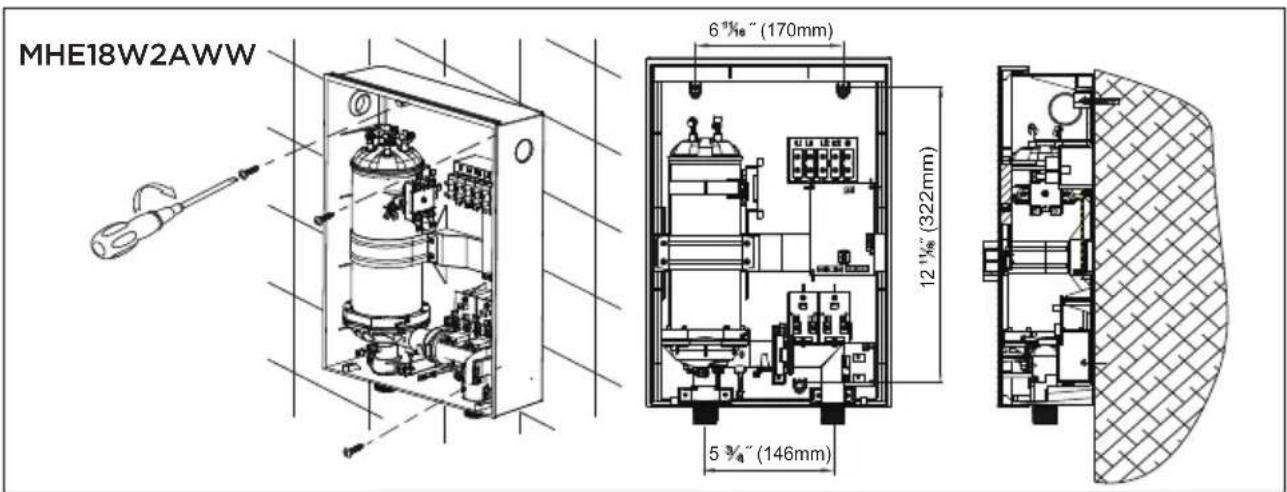
Product Structure (For MHE18W2AWW)
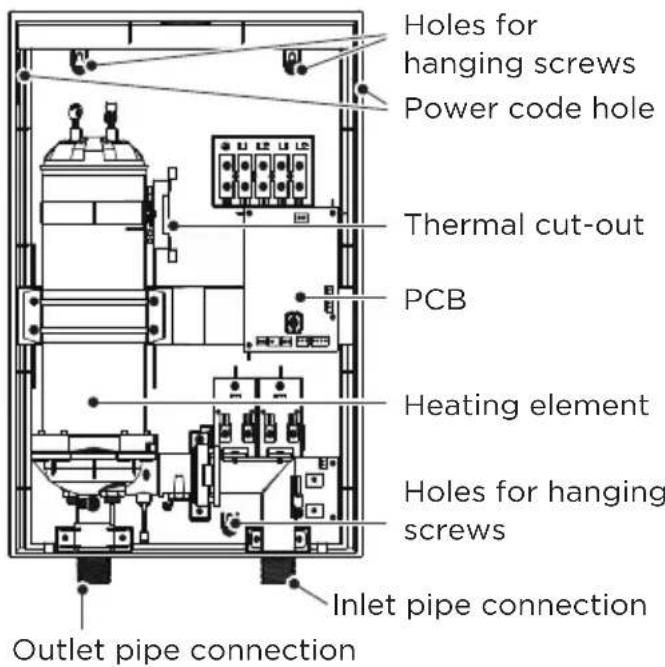
Parts Identification
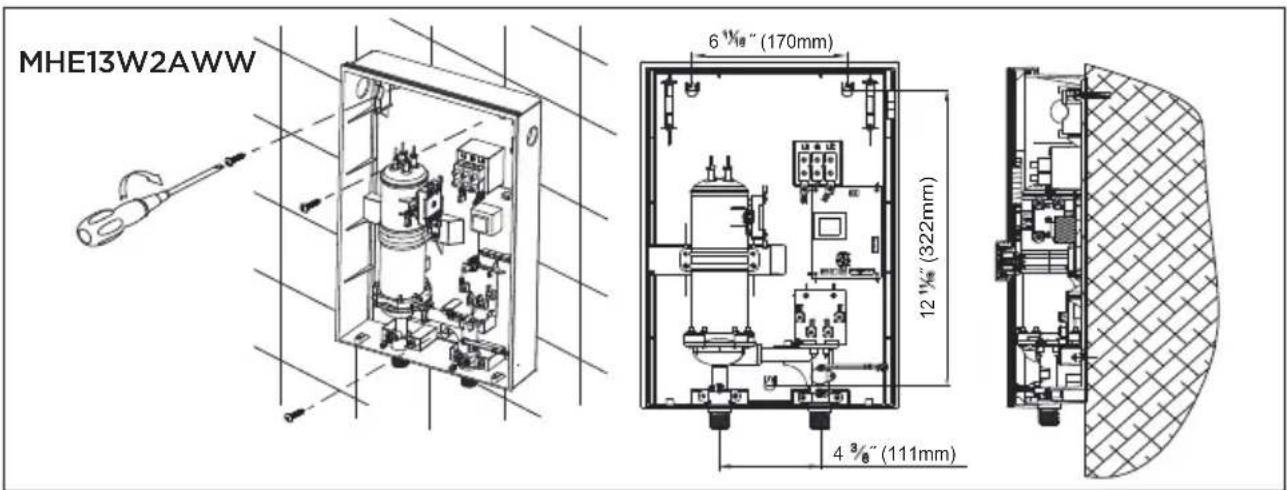
Product Structure (For MHE13W2AWW)

Internal Wire Diagram
Package Contents
① Water Heater;
② Seal Ring;
(3) Screw Pack;
Before First Use
1. User Guidance
- Before powering unit on, run the water at faucet until the water flow is stable.
- In case of high-water pressure from water supply, do not fully open supply valve. Check flow at faucet and adjust inlet valve as necessary to increase or reduce flow rate.
- Press the knob and the display will light up.
- Adjust the knob to increase the water temperature and decrease the water temperature. turn the button clockwise to increase water temperature and contra rotate to lower water temperature.
- The water heater detects water flow/pressure and will stop working if water valve is turned off.
- The water heater has a memory function. In case of power loss, last setting will be shown after power restored.
- When hot water is not needed, press the knob. The display will turn off, and water heater will stop heating water flowing through it.
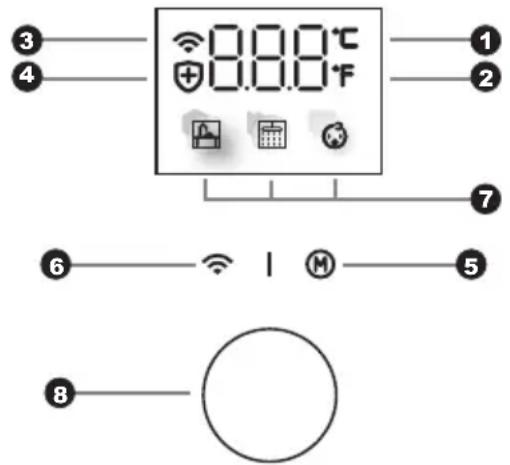
2. Operating Of The Unit
- Short press the center of knob(8) to power on, the display will light up. short press again to power off;
- Short press the mode key(5) to select different modes. The mode light(7) is kitchen mode/shower mode/children mode from left to right. When the mode lights are not on, it is the manual mode. The factory temperature of all modes is set to 107^ or lower;
- When the children mode is selected, press and hold the mode button until the children mode light flashes, the required water temperature can be set by turning knob(8). At this time, the maximum setting temperature is limited to 104^(40^) , then press the mode key(5) again to save the set temperature. After setting, the adjustment time will be saved in subsequent use.
- The kitchen mode or shower mode is similar to children mode, but the maximum setting temperature is limited to 140^(60^) ;
- When the manual mode is selected, the required water temperature can be set directly by turning knob(8), the maximum setting temperature is limited to 140^(60^) ;
- Press and hold the WiFi distribution button(6) for 3 seconds to enter the distribution mode, the WiFi light(3) will flash, after the network distribution is successful, the WiFi light will be on, and the machine can be remotely operated at this time. Please refer to the operating instruction for details;
- Press and hold the center of the knob for 3 seconds to switch the temperature unit ^ F and ^ C ;
PRODUCT INSTALLATION
1. Before Installation
Flammable materials should be kept at least 24^ (610mm) away from your water heater and the hot water outlet pipe.
Check for leaks before proceeding to electrical installation.
DO NOT install this product in a location where it may be subjected to freezing temperatures. If the water inside your tankless water heater freezes, it can cause severe and permanent damage that is not covered under your warranty.
DO NOT locate the water heater in a location that is difficult to access. Make sure that the water heater and hot water outlet pipe are out of reach of children so they can not tamper with the tempera-ture controls or injure themselves by touching the hot water outlet pipe.
This product does NOT require venting. Avoid installing your tankless water heater in a Avoid installing your tankless water heater in a location prone to excessive humidity, moisture, or dust, or in an area where it may be splashed with water or other liquids.
DO NOT install under water pipes or air conditioning lines that might leak or condense moisture that could then drip onto the heater.
DO NOT install above electrical boxes or junction boxes.

CAUTION
The water heater should not be located in an area where leakage will result in damage to the area adjacent to it or to lower floors of the structure. Where such areas cannot be avoided, it is recommended that a suitable catch pan, adequately drained, be installed under the water heater. Make sure requirements for such installations as required for your area. We recommend that you install a drip pan (connected to a safe drain) below the water heater to avoid property damage in the unlikely event of a leak. Alternatively, you can install an active water leak detector and shutoff valve designed to turn off your water supply in the event that a leak is ever detected.

Warning
Manufacturer recommends that this product be installed by a licensed and qualified electrician in accordance with all applicable national, state, provincial, and local electrical codes. As with all electrical appliances, under no circumstances should you attempt to install, repair or disassemble this water heater without first shutting off all power to the unit directly at the fuse or breaker box. Make sure to shut off all breakers. SERIOUS BODILY INJURY OR DEATH COULD OCCUR IF YOU IgNORE THIS WARNING.
All wiring (wire gauge) and circuit protection (breakers) must comply with the U.S. National Electrical Code (NEC) in the USA, or the Canadian Electrical Code (CEC) in Canada. Failure to do so could result in property damage and/or personal injury, and void your warranty. Note: The Canadian Electrical Code generally requires that all supply wires and corresponding circuit protection used for domestic hot water heating and hydronic heating applications be sized to a minimum of 125% of the maximum current rating of the heater.
Ensure that you have made the correct connections. You must follow the wire connection as shown to ensure proper operation of the unit. If you mix up one set of wires with another, the unit will not operate correctly even though it turns on and otherwise appears to function properly.
2. Installation Instruction
- Check the capacity of power circuit;
- Power cord installation;
- Water heater installation;
- Plumbing connection;
- Power supply connection;
- Water Supply.
3. Power Cord Installation
Step 1 Repave the screws at the bottom of the unit Remove the front plate gently.
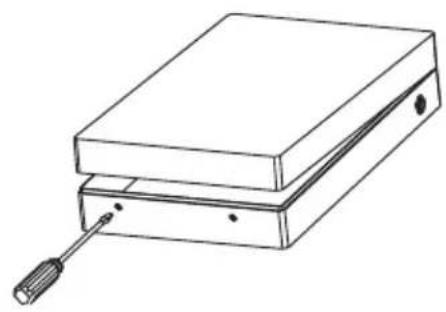
Strip section of power cord conduit entering the water heater.
Step 3 Connect the power cord to wiring terminals; themethod is as shown in picture.
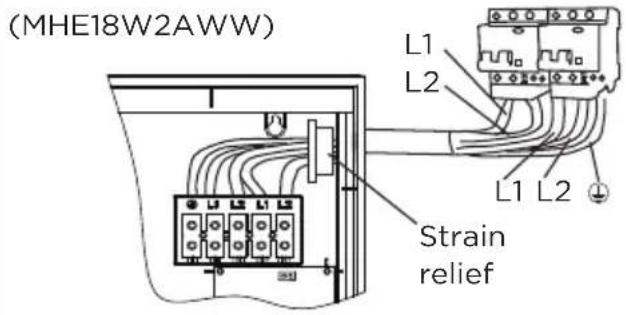
Connect the power cord to wiring terminals; themethod is as shown in picture.

(Fig.1)
EN
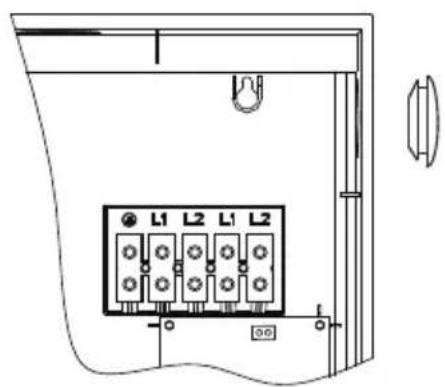
The installation position of live line 1, live line 2 and earth line. should be corresponding to the other end on wiring terminals.
4. Water Heater Installation
- Determine installation position of the unit according to length of power cord / position of individual double pole breaker Distance between bottom of water heater and floor should be greater than or equal to 63^ (1.6m)
- Make sure the distance between the unit and surrounding wall is not less than 12^ (300mm), so that you have enough space for maintenance.
- Mark the positions of the mounting screws (2 for MHE180, and 3 for MHE130. Screws and wall anchors are included) Drill a 7/32 hole and drive a wall anchor for each mounting screw. For solid wood wall or studs, wall anchors are not needed.
- Drive the screws 3/4 of the way into wall. See Fig 2
- Hang the unit onto the wall and tighten screws.
- This device cannot be installed in a horizontal, inverted, or inclined orientation.
(Fig.2)
5. Plumbing Connection
- MHE18W2AWW:The specification of machine pipe fittings is 3 / 4'' NPT.
MHE13W2AWW:The specification of machine pipe fittings is 1 / 2^ NPT.
Rubber seal gaskets must be added to the threaded end surface of inlet and outlet in order to avoid water leakage. Rubber seal gasket with filter screen must be added to the cold water inlet side.
Prefilter is recommended.It is also recommended to set up the pressure relief valve to the inlet of the main body.
Install 79"(2m) PPR water pipe for the plant at least .
- Typical residential installation (Fig.3). Typical commercial installation(Fig.4).
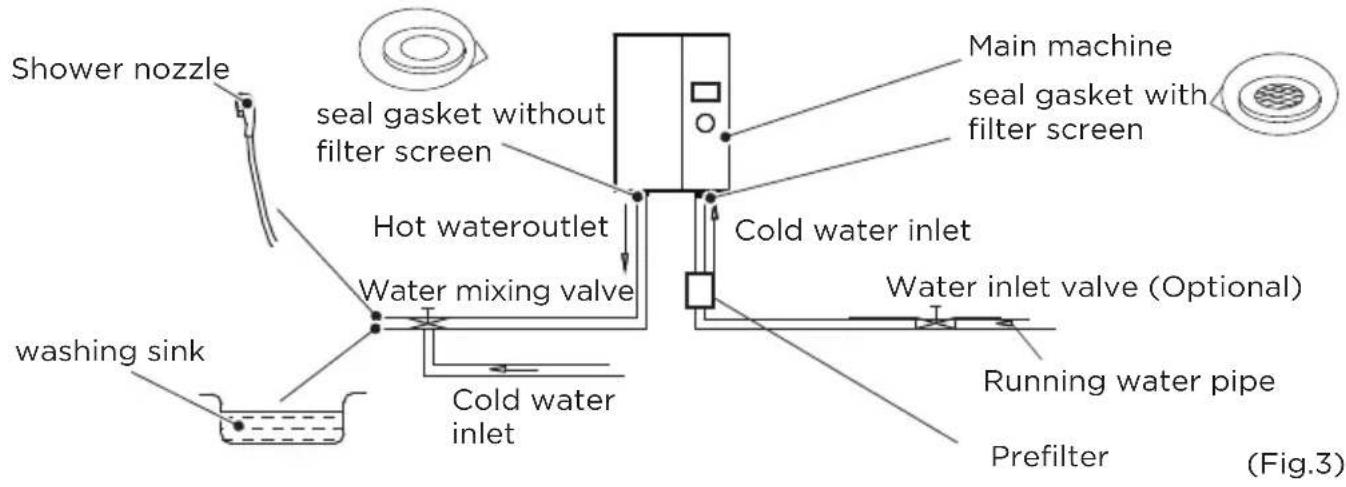
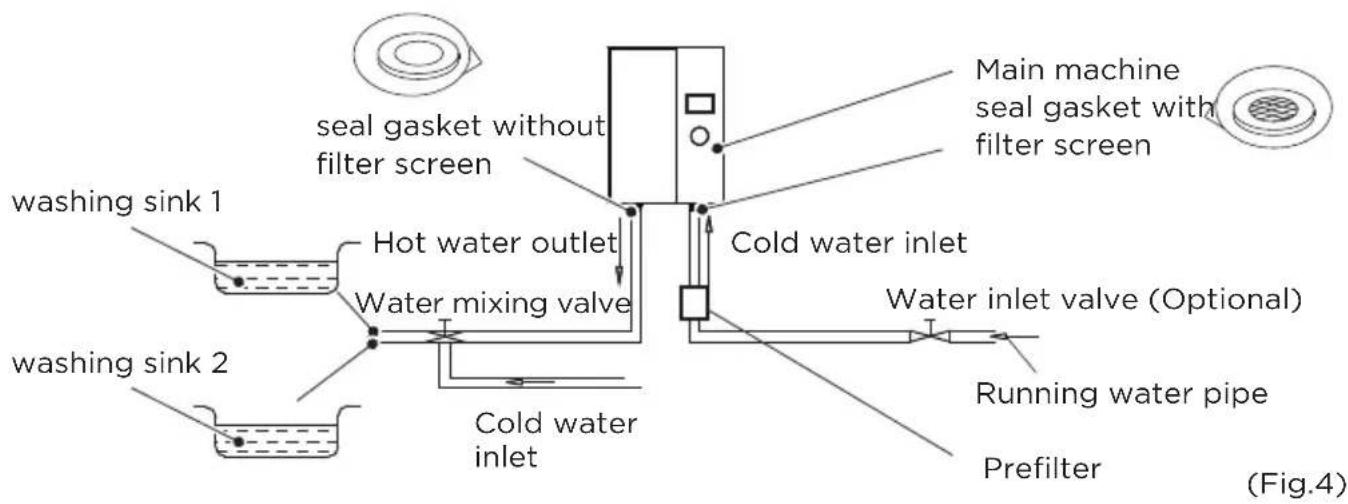

Warning
Metallic / chromed hose and conductive control valve shall not be used.
6. Power Supply Connection
- Choose individual double pole breaker according to power of water heater. The individual double pole breaker must be readily accessible and clearly identifiable and out of reach of person using a fixed bath or shower. The wiring must be connected to the individual double pole breaker without the use of a plug or socket outlet.
- When connecting the water heater to electric network, please pay attention to connect live line, and earth line with corresponding line in electric network.
EN
7. Water Supply
After plumbing is finished, open water supply to the unit to get the air out of the line and until water flows smoothly from faucet. Check for leaks.

Note
The water heater may become damaged if the water supply hardness is too high. To ensure a normal service life, install a water softener to water supply to reduce hardness to less than 450mg / L (CaCO3).
OPERATION INSTRUCTIONS
Function introduction
- This closed-style heater can maintain pressure, which can provide the water to several places. Once the water tap is open, hot water will come out immediately with no capacity limitation.
- The electronic control system has memory function in case of power loss for more reliable and convenient use.
- If the unit malfunctions, and the water temperature reaches 203^(95^) , the thermal cut-out will disconnect the power supply and stop heating automatically.
- Using advanced water flow controlling technology and sensing technology to effectively protect the heater from dry heating.
- Various functions like microcomputer safety self-inspection, dry heating protection, over water pressure protection, etc.
- Water and electricity linkage, water supply starts, the electricity will be on; water supply stops, the power will be off.
1. Over-temperature protection
To prevent possible injury from hot water, the maximum setting temperature is limited to 122^(50^) when the machine is heating. At the same time, if the set temperature of other modes exceeds 122^(50^) , the mode cannot be switched.
2. Fault codes and descriptions
- When the water inlet sensor or the water outlet sensor fails, the machine will display E1 code; When the machine is overheated, the machine will display E2; When the machine appears dry heating, the machine will display E3;
DECLARATION: this water heater can only be maintained by authorized service personnel, incorrect installation and using method may cause serious injury or loss of property.

Warning
Do cut off power supply before maintenance, to avoid danger like electric shock.
APP SETUP AND OPERATION
EN
Use Your Appliance with the MSmartHome App
Before you start, make sure that:
Your smartphone is connected to home wifi network, and you know the network password.
Make sure you are next to home appliances.
The 2.4GHz (preferable) or 5GHz band wireless signal is enabled on your wireless router.

Download MSmartHome App
Scan the QR code below, or search for "MSmartHome" in Google play (Android devices) or App Store (ios devices) to download the app.


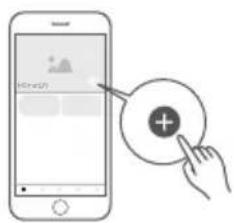
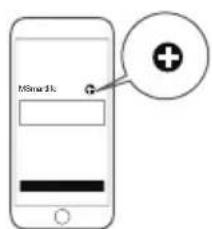
Add your appliance
Tap the "+"icon to add home appliance to your MsmartLife account.

Register or Login account
Open the App and create a user account, if you already have one, just log in.


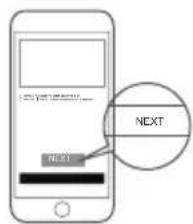
Connected to the network
Follow the instructions in the app to set up the WiFi connection. If the network connection fails, please refer to the App tips for operation.
Notes on networking
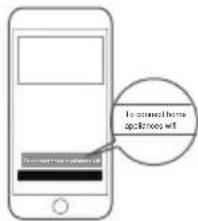
- When networking the product, please make sure that the mobile phone is as close as possible to the product.
- According to the App tips, if the product only supports 2.4GHz wifi communication, please note that the 2.4GHz network is selected for connection.
Midea recommends WiFi router SSID names contain only alphanumeric values. If special characters, punctuation marks, or spaces are used, it might prevent the WiFi SSID name from showing up in the available networks to join in the App. If the App is unable to display the WiFi SSID name, log into the router and change the WiFi SSID name.
- A large number of devices on the WiFi router can affect network stability, there is no way that Midea can advise a specific number limitation as this depends on router quality and many other factors.
- If the router or WiFi name and WiFi password change, please repeat the above process to reconnect to the network.
- As the product technology is updated, the content of MSMARTLife may change, and the actual display in MSMARTLifeApp shall prevail.
Guidelines for Electric Water Heater Distribution Network
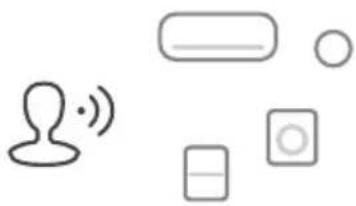
- When the water heater is powered on, the wifi signal will automatically activate and flash (“①”). If there is no network operation for 10 minutes, the wifi icon will automatically go out; After extinguishing, you can press this button for 3s to activate again;
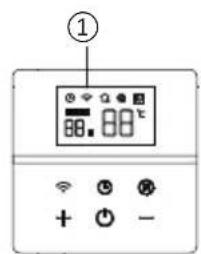
When the water heater is powered on, the wifi signal will automatically activate and flash
2 If there is no network operation for 10 minutes, the wifi icon will automatically go out; After extinguishing, you can press this button for 3s to activate again.
- Click "O" on the APP display interface to select "electric water heater" and select the corresponding product model, such as D30-20ED6, if the product model is D30-20ED6, then select D30-20ED6
Select product category
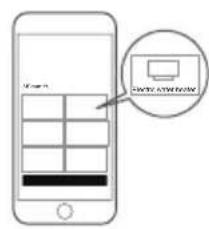
Choose electric water heater
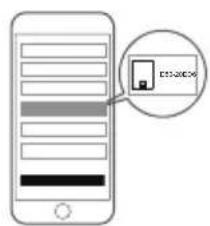
Choose the same model as the product
- Enter the home wifi account and password, Go to the next step, The system prompts "MSmartife" to join the wireless LAN "Midea_XXXX", choose join.
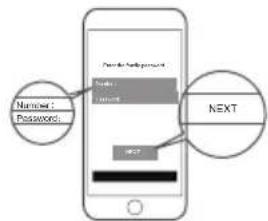
1 Enter home wifi number and password
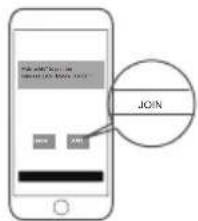
Choose "JOIN"

Choose "perfection"
EN
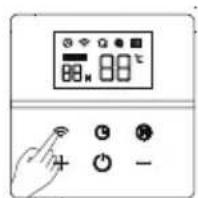
3.1 If you enter the wifi password and proceed to the next step, no network signal is received: MSmartife to join the wireless LAN "Midea_XXXX", you need to press and hold the network key again for 3 seconds to light up the icon
1 ① Start up the machine after powering it on.
② Hold the【WIFI】 button for more than 3 seconds.
The electric water heater has sent a wifi signal, please connect this mobile phone to this wifi: Wifi: MideaXXXXwifi password:XXXXX
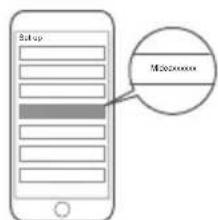
1 Find the wifi signal with ""MideaXXX"" and connect
2 Go back to the APP interface and complete the network connection
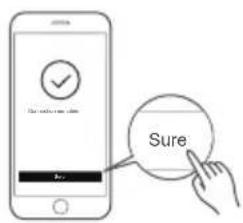
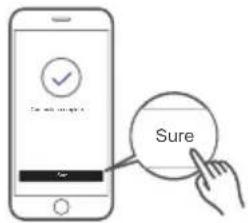
4.For the first use, you need to complete the settings according to the instructions to confirm the product;please operate according to the prompts
The product WiFi is in conformity with IEEE 802.11a, 802.11b / g / n standard
Connecting Your Device to Amazon Alexa and/or Google Assistant
Your Midea device works with Alexa and/or Google Assistant.
Before you can use the voice control features with Midea appliance, please follow the steps below:
Make sure device connected with MSmartHome App
Use the "MSmartHome" app to setup the device for app control, you can follow the user guides of "Use Your Appliance with the MSmartHome App" in product manual book.
Search for "MSmartHome"Alexaskill/Google action
In the Amazon Alexa App Browse SKILL to search for "MSmartHome"skill.In the Google Home App, click ^ + ^ to set up device(Works with Google), and then search for "MSmartLife" action.

Enable "MSmartHome"
Enable "MSmartHome" Alexa skill/Google action, and then login your MSmartHome App account in the H5 and agree the linking.

Try voice control with your devices
After setup is complete, try asking Alexa/Hey Google to control your Midea home appliance.
Things to Try
Available voice commands of your Midea device
Alexa
- Turn on/off the water heater/(Device name)
2.Set the water heater/(Device name) to xxx degrees (temperature range xx-xx)
Google Assistant
- Turn on/off the water heater/(Device name)
2.Set the water heater/(Device name) to xxx degrees (temperature range xx-xx)
··
CLEANING AND MAINTENANCE
Maintenance
- Excessive heat loss at the point of use might occur if water heater is installed too far away.
- If it is needed to supply water for multiple points of use, a water valve should be installed at the outlet. When not in use for a long time, please shut off water inlet to avoid the water heater's water line to become under pressure for long period, reducing the lifespan of the water heater.
- If the unit is not in use for a long time, check the water heater first before use. Electrify after the water flows out steady.
- Do not spray water to electrical or heater body directly.
- Please shutoff the power during thunder and rainstorms to avoid damaging the water heater.
- If the heater is not used for a long time and there is a potential for freezing to occur (temperature lower than 32^ / 0^ ), in order to prevent the heater from being damaged due to freezing, the water inside the heater should be drained out.
- Regularly check the power cord connecting to the terminals to make sure that they are undamaged and properly connected, not overheating, and properly grounded.
- Check sealing ring with filter to clean periodically.
- If any parts and components of this electric water heater are damaged, please contact customer service.
- Removing the cover to change the temperature set point exposes electrical shock and burn hazards, which can cause INJURY or DEATH. Adjustment should only be done by a licensed plumber or electrician.
TROUBLESHOOTING
EN
| SYMPTOMS | REASONS SUGGESTIONSSYMPTOMS | TOMS |
| Switch on the power supply, The screen displays nothing. | 1. Power supply error;2. PCB error;3. Electricity leaks. | 1. Check whether power is cut;2. Contact customer support. |
| The display is off and the outlet water is cold. | 1. PCB error;2. The water flow insufficient 0.5 gpm (1.9L/min);3. Impurities clogging the flow sensor of the rotor. | 1. Call customer support;2. Adjustable water flow;3. Call customer support. |
| The display is on and the outlet water is cold. | 1. The silicon control is broken;2. Heating elements is broken. | Call customer service. |
| No water flows out fromthe shower head. | 1. The running water supply is cut off;2. The valve of running water is not open. | 1. Wait for restoration of running water supply;2. Open the valve of running water |
| Outlet water temperature sometimes is hot, sometimes is cold. | 1. Water pressure is not stable;2. Outlet water temperature is too high, overheating protection again and again. | Adjust heating power by lowering or increasing water flow. |
| The display "E1" or "E3" flashes. | 1. The screen flashing "E1" indicates the temperature sensor failure.2. The screen flashing "E3" indicates heating element dry burning and Triac abnormal. | Contact customer service. |
| The " ⊙ " on the screen is flashing and heater doesn't work | to the ground wire. | Contact customer service. The heater is not c |
TRADEMARKS, COPYRIGHTS AND LEGAL STATEMENT
Midea logo, word marks, trade name, trade dress and all versions thereof are valuable assets of Midea Group and/or its affiliates ("Midea"), to which Midea owns trademarks, copyrights and other intellectual property rights, and all goodwill derived from using any part of an Midea trademark. Use of Midea trademark for commercial purposes without the prior written consent of Midea may constitute trademark infringement or unfair competition in violation of relevant laws.
This manual is created by Midea and Midea reserves all copyrights thereof. No entity or individual may use, duplicate, modify, distribute in whole or in part this manual, or bundle or sell with other products without the prior written consent of Midea.
All the described functions and instructions were up to date at the time of printing this manual. However, the actual product may vary due to improved functions and designs.
DISPOSAL AND RECYCLING
Important instructions for environment
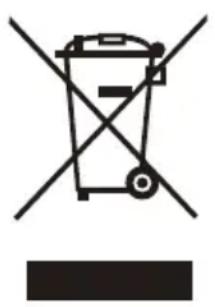
Compliance with the WEEE Directive and Disposing of the Waster Product: This product complies with EU WEEE Directive (2012/19/EU). This product bears a classification symbol for waster electrical and electronic equipment (WEEE).
This symbol indicates that this product shall not be disposed with other household wastes at the end of its service life. Used device must be returned to official collection point for recycling of electrical electronic devices. To find these collection systems please contact to your local authorities or retailer where the product was purchased. Each household performs important role in recovering and recycling of old appliance. Appropriate disposal of used appliance helps prevent potential negative consequences for the environment and human health.
Compliance with RoHS Directive
The product you have purchased complies with EU RoHS Directive (2011/65/EU). It does not contain harmful and prohibited materials specified in the Directive.
Package information
EN
Packaging materials of the product are manufactured from recyclable materials in accordance with our National Environment Regulations. Do not dispose of the packaging materials together with the domestic or other wastes. Take them to the packaging material collection points designated by the local authorities.

DATA PROTECTION NOTICE
For the provision of the services agreed with the customer, we agree to comply without restriction with all stipulations of applicable data protection law, in line with agreed countries within which services to the customer will be delivered, as well as, where applicable, the EU General Data Protection Regulation (GDPR).
Generally, our data processing is to fulfil our obligation under contract with you and for product safety reasons, to safeguard your rights in connection with warranty and product registration questions. In some cases, but only if appropriate data protection is ensured, personal data might be transferred to recipients located outside of the European Economic Area.
Further information are provided on request. You can contact our Data Protection Officer via MideaDPO@midea.com. To exercise your rights such as right to object your personal data being processed for direct marketing purposes, please contact us via MideaDPO@midea.com. To find further information, please follow the QR Code.
Water Heater Limited Warranty
Your product is protected by this Limited Warranty:
Warranty service must be obtained from Midea Consumer Services or an authorized Midea service servicer.
Warranty
One Year Limited Warranty from original purchase date.
EN
Midea, through its authorized servicers will:
- Pay all costs for repairing or replacing parts of this appliance which prove to be defective in materials or workmanship.
Consumer will be responsible for:
- Diagnostics, removal, transportation and reinstallation cost required because of service.
- Costs of service calls that are a result of items listed under NORMAL RESPONSABILITIES OF THE CONSUMER**
Midea replacement parts shall be used and will be warranted only for the original warranty.
NORMAL RESPONSABILITIES OF THE CONSUMER**
This warranty applies only to products in ordinary household use, and the consumer is responsible for the items listed below:
- Proper use of the appliance in acordance with instructions provided with the product.
- Routine maintenance and cleaning necessary to keep the good working condition.
- Proper installation by an authorized service professional in accordance with instructions provided with the appliance and in accordance with all local plumbing, electrical and/or gas codes.
- Proper connection to a grounded power supply of sufficient voltage, replacement of blown fuses, repair of loosen connections or defects in house wiring.
- Expenses for making the appliance accessible for servicing.6. Damages to finish after installation.
EXCLUSIONSThis warranty does not cover the following:
- Failure caused by damage to the unit while in your possession (other than damage caused by defect or malfunction), by its improper installation, or by unreasonable use of the unit, including without limitation, failure to provide reasonable and necessary maintenance or to follow the written installation and Operating Instructions.
- Damages caused by serviced performed by persons other than those authorized by Midea customer service; or external causes such as abuse, misuse, inadequate power supply or acts of God.
- If the unit is put to commercial, business, rental, or other use or application other than for consumer use, we make no warranties, express or implied, including but not limited to, any implied warranty of merchantability or fitness for use or purpose.
- Products without original serial numbers or products that have serial numbers which have been altered or cannot be readily determined.
NOTICE: Some states do not allow the exclusions or limitation of incidental or consequential damages. So this limitation or exclusion may not apply to you.

make yourself at home

Download the app & activate product
MANUEL
D'UTILISATION
MHE18W2AWW
MHE13W2AWW
LETTRE DE REMERCIEMENT
APERCU DU PRODUIT 06
GUIDE DE DEMARRAGE RAPIDE 08
INSTALLATION DU PRODUIT 09
INSTRUCTIONS D'UTILISATION 13
CONFIGURATION ET FONCTIONNEMENT DE
L'APPLICATION 14
NETTOYAGE ET ENTRETIEN 18
DÉPANNAGE 19
MARQUES DE COMMERCE, DROITS D'AUTEUR ET
DECLARATION JURIDIQUE 20
ÉLIMINATION ET RECYCLAGE 20
AVIS DE PROTECTION DES DONNÉES 21
GARANTIE 22
INSTRUCTIONS DE SECURITÉ
Utilisation prévue
NOMENCLATURE POUR MHE18W2AWW
Identification des pieces
NOMENCLATURE POUR MHE13W2AWW

PRODUCT INSTALLATION
FR
CLEANING AND MAINTENANCE
ENTRETIEN
make yourself at home

MHE18W2AWW MHE13W2AWW
ESTSTRUCTURA DEL PRODUCTO
PARAMHE18W2AWW
ESTRUCTURA DEL PRODUCTO
PARAMHE13W2AWW

PRODUCT INSTALLATION
CLEANING AND MAINTENANCE
MANTENIMIENTO
Midea replacement parts shall be used and will be warranted only for the original warranty.
make yourself at home

- Electric Tankless Water Heaters
- USER MANUAL
- LANGUAGES
- THANK YOU LETTER
- CONTENTS
- SAFETY INSTRUCTIONS
- Intended Use
- Explanation of Symbols
- Warning
- Attention
- Caution
- Special Cautions
- Hotter water increases the potential for Hot Water SCALDS.
- Hot Water Time/Temperature Chart for Scalding
- SAFETY PRECAUTIONS BEFORE USING WATER HEATER
- Note
- SPECIFICATIONS
- Technical Performance Parameters
- Maximum temperature rise for a given flow rate
- PRODUCT OVERVIEW
- Parts Identification
- Internal Wire Diagram
- Package Contents
- Before First Use
- User Guidance
- Operating Of The Unit
- PRODUCT INSTALLATION
- Before Installation
- Installation Instruction
- Power Cord Installation
- Water Heater Installation
- Plumbing Connection
- Power Supply Connection
- Water Supply
- OPERATION INSTRUCTIONS
- Function introduction
- Over-temperature protection
- Fault codes and descriptions
- APP SETUP AND OPERATION
- Use Your Appliance with the MSmartHome App
- Before you start, make sure that:
- Download MSmartHome App
- Add your appliance
- Register or Login account
- Connected to the network
- Notes on networking
- Guidelines for Electric Water Heater Distribution Network
- Connecting Your Device to Amazon Alexa and/or Google Assistant
- Make sure device connected with MSmartHome App
- Search for "MSmartHome"Alexaskill/Google action
- Enable "MSmartHome"
- Try voice control with your devices
- Things to Try
- Alexa
- Google Assistant
- CLEANING AND MAINTENANCE
- Maintenance
- TROUBLESHOOTING
- EN
- TRADEMARKS, COPYRIGHTS AND LEGAL STATEMENT
- DISPOSAL AND RECYCLING
- Important instructions for environment
- Compliance with RoHS Directive
- Package information
- DATA PROTECTION NOTICE
- Water Heater Limited Warranty
- Warranty
- Midea, through its authorized servicers will:
- Consumer will be responsible for:
- NORMAL RESPONSABILITIES OF THE CONSUMER**
- EXCLUSIONSThis warranty does not cover the following:
- LETTRE DE REMERCIEMENT
- INSTRUCTIONS DE SECURITÉ
- Utilisation prévue
- NOMENCLATURE POUR MHE18W2AWW
- Identification des pieces
- NOMENCLATURE POUR MHE13W2AWW
- FR
- ENTRETIEN
- ESTSTRUCTURA DEL PRODUCTO
- PARAMHE18W2AWW
- ESTRUCTURA DEL PRODUCTO
- PARAMHE13W2AWW
- MANTENIMIENTO
Brand : MIDEA
Model : MWH180ECNCR
Category : Boiler