PPBKS 56 C3 - Chain saw PARKSIDE - Free user manual and instructions
Find the device manual for free PPBKS 56 C3 PARKSIDE in PDF.

| Product type | Petrol chainsaw with electric start |
| Brand | Parkside |
| Model | PPBKS 56 C3 |
| Displacement | 56.5 cm³ |
| Max engine power | 2.2 kW (3.0 HP) |
| Engine idle speed | 3000 ± 300 rpm |
| Max engine speed | 11500 rpm |
| Fuel tank capacity | 550 cm³ (0.55 L) |
| Chain oil tank capacity | 260 cm³ (0.26 L) |
| Permitted fuel | ROZ 95 (E10), mixture 40:1 with 2-stroke oil |
| Guide bar (length / pitch) | 52 cm (18") / 0.325" |
| Chain (pitch / number of drive links) | 0.325" / 72 drive links |
| Max chain speed | 22.15 m/s |
| Weight (with bar and chain) | 7.75 kg |
| Sound pressure level | 93.9 dB(A) |
| Guaranteed sound power level | 116 dB(A) |
| Vibration (front / rear handle) | 8.945 / 9.460 m/s² |
| Power supply | Petrol engine + 20V Li-Ion battery for electric starter |
| Safety devices | Chain brake, hand guard, throttle trigger lock, stop switch |
| Supplied items | Chainsaw, guide bar, chain, cutting wedge, chain guard, oil bottle, mixing bottle, combination tool, carry bag, battery, charger |
| Intended use | Outdoor wood cutting, private use |
| Warranty | 5 years |
Frequently Asked Questions - PPBKS 56 C3 PARKSIDE
User questions about PPBKS 56 C3 PARKSIDE
0 question about this device. Answer the ones you know or ask your own.
Ask a new question about this device
Download the instructions for your Chain saw in PDF format for free! Find your manual PPBKS 56 C3 - PARKSIDE and take your electronic device back in hand. On this page are published all the documents necessary for the use of your device. PPBKS 56 C3 by PARKSIDE.
USER MANUAL PPBKS 56 C3 PARKSIDE
natural_image
Black-and-white photo of a Parkside chain saw (no visible text or symbols on the device body)Petrol Chainsaw With Electric Start
Translation of the original instructions
NL BE
Before reading, unfold the page containing the illustrations and familiarise yourself with all functions of the device.
FR BE
natural_image
Close-up of a mechanical component with no visible text or symbolsC

②

④

natural_image
Mechanical component diagram with labeled part '38' (no readable text or symbols beyond label)Inhaltsverzeichnis
Einleitung.... 5
Service-Center....30
Importeur.... 30
- Handelsname: MEILIN
- Firmenname: Yongkang Meilin Machinery Co., Ltd.
- Kontaktanschrift in der Union: 3rd floor, Building 2, No. 220 Shangpu Road, Dongcheng Street, Yongkang City, Jinhua City, Zhejiang Province, China
natural_image
Two diagrams showing a mechanical device (a) and a robotic arm (b), both with directional arrows indicating motion or force, no text or symbols present.Scope of delivery/accessories....33
Overview.... 33
Description of functions....33
Technical data....34
Safety information....35
Meaning of the safety information...... 35
Pictograms and symbols.... 35
Safety instructions for petrol chainsaws.... 36
Causes and Operator Prevention of Kickback.... 38
Residual risks....38
Preparation....38
Safety devices....39
Checking the battery charge level..... 39
Charging the battery.... 39
Operation.... 39
Before operation.... 39
Switching on and off....41
Sawing techniques....43
Cleaning, maintenance and storage..... 46
Cleaning....46
Maintenance.... 46
Storage.... 51
Transport....51
Disposal/environmental protection......52
Dispose of batteries in an environmentally friendly manner....52
Troubleshooting.... 53
Service.... 53
Guarantee.... 53
Repair service.... 54
Service Centre.... 54
Importer....55
Spare parts and accessories.... 55
Translation of the original EU declaration of conformity.... 56
Exploded view.... 300
Introduction
Congratulations on purchasing your new petrol chainsaw (hereinafter referred to as product or device).
You have chosen a high-quality device. This device was quality-tested and subjected to a
final inspection during production, therefore ensuring proper functioning of your device. In some cases, residual amounts of lubricants may be present on or in the device. This is not a flaw or a defect and is no cause for concern.


The instruction manual forms part of this device. It contains important information on safety, use and disposal. Read the instruction manual carefully. Familiarise yourself with the controls and how to use the device correctly. Use the device only as described and for the stated fields of application. Store the instruction manual carefully and ensure that all documents are handed over in the event that the device is passed on to another user.
Proper use
This device is only intended for the following use:
- Sawing wood outdoors
The device is not intended for any other types of application. This typically includes cutting masonry, plastic, stone, metal, food or wood containing foreign objects (e.g. nails or screws).
The device is intended for use by adults.
Children under the age of 16 may not use the device, except under supervision.
The chainsaw may only be used by one person. The user must wear appropriate personal protective equipment (PPE). The chainsaw must be held with the right hand on the rear handgrip and the left hand on the front handgrip.
Before using the device, the user must read and understand all information and instructions in the instruction manual.
Any other use that is not expressly permitted in this instruction manual may pose a serious hazard to the user and result in damage to the device. The operator or user of the machine is responsible for any accidents or personal injury and/or material damage to third parties or their property. The machine is intended to be used by do-it-yourselfers. It was not designed for heavy commercial use.
The warranty is void in the case of commercial use. The manufacturer is not liable for damage caused by improper use or incorrect operation.
The device is part of the X 20 V TEAM series and can be operated with batteries of the X 20 V TEAM series. Batteries of the X 20 V TEAM series may only be charged using chargers of the X 20 V TEAM series.
Scope of delivery/accessories
Unpack the device and check that everything is present.
Dispose of the packaging material properly.
- Petrol Chainsaw
- Blade bar (pre-assembled)
- Saw chain (pre-assembled)
- Cutting aid
- Chain guard
• Oil bottle (500 ml, Organic saw chain oil) - Fuel mixing bottle
- Combination tool
- Carrier bag
• Original instructions - Rechargeable battery and charger with instruction manual
Overview

The illustrations for the device can be found on the front and back fold-out page.
Fig. A
1 Front handle
2 Starter handle
3 Electric starter
4 Throttle lock
5 Rear handle
6 Hand protection
7 Throttle lever
8 Tank cover (Fuel)
9 Tank cover (Chain oil)
10 Saw chain
11 Blade bar
12 Chain catch
13 Chain brake lever/Front hand protection
14 Battery holder
15 Sprocket cover
16 Chain tensioner screw
17 Nut
18 Cold start lever (choke)
19 Fuel pump
20 Off button
21 Fuel mixing bottle
22 Oil bottle
23 Cutting aid
24 Chain guard
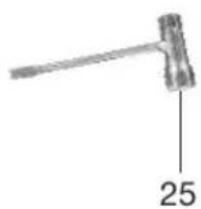
25 Combination tool
26 Carrier bag
27 Battery
28 Button (Charge level indicator)
29 Charge level indicator
30 Battery release
31 Charger
Fig. B
32 Oil regulating screw
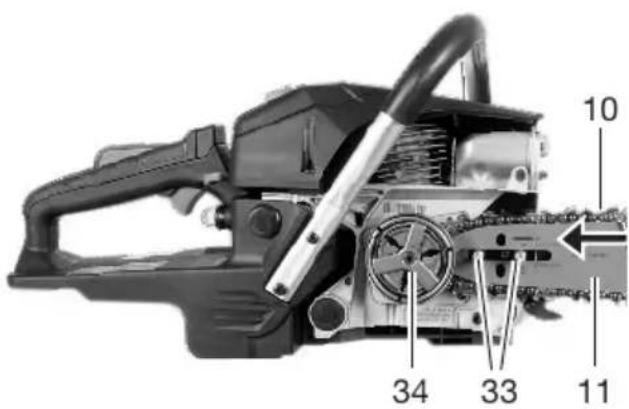
Fig. C
33 Blade bar bolt
34 Sprocket
35 Receptacle (Chain tensioner pin)
36 Oil passage
37 Chain catching bolt
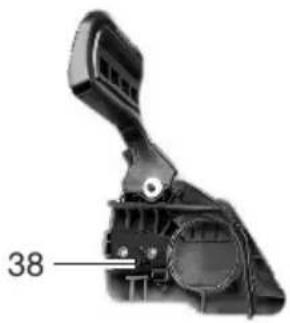
38 Chain tensioner pin
Fig. D
39 Cutting rod
40 End plate
41 Quick connector
42 Adapter nut
Fig. N
43 Wing nut
44 Air filter cover
45 Air filter
Fig. O
46 Spark plug connector
47 Spark plug
Fig. Q
48 Sight line/Felling direction indicator
Description of functions
The circulating saw chain is guided over a blade bar (guide rail). The chainsaw is equipped with a quick-stop chain brake. An automatic oil system ensures continuous chain lubrication. The device is provided
with various protective devices to protect the user.
Please refer to the descriptions below for information on how the operating elements work.
Technical data
Petrol Chainsaw ...... PPBKS 56 C3
Displacement 56.5 cm ^3
Max. engine power .....2.2 kW (3.0 PS)
Engine speed ....
- Idling n_0 3000±300 min ^-1
- with blade bar and saw chain n_max 11500 min ^-1
Tank volume ....
- Chain oil ....260 cm ^3 (0.26 l)
- Fuel ....550 cm ^3 (0.55 l)
Approved fuel ...... ROZ 95 (E10)
Fuel mixing ratio 40:1
Approved two-stroke engine oil ISO-L-EGD, JASO FD
Emission level ......V
Carbon dioxide emission value ( CO_2 ) determined by an EU type approval procedure: 1183.52 g/kWh
Engine manufacturer
• Trade name: MEILIN
- Company name: Yongkang Meilin Machinery Co., Ltd.
- Contact address in the Union: 3rd floor, Building 2, No. 220 Shangpu Road, Dongcheng Street, Yongkang City, Jinhua City, Zhejiang Province, China
Chain speed v_max .....22.15 m/s
Protection type ......IPX0
Weight, empty tank/with battery ....
- without blade bar and saw chain .... 6.67 kg
– with blade bar and saw chain ..... 7.75 kg
Saw chain .... Kangxin .325.058x72DL
- Chain speed v_0 22.15 m/s
- Chain pitch 8,25 mm (0,325")
- Number of driving elements ....72
- Drive link thickness ....1.5 mm
Blade bar ....Kangxin BE18-72-5810P
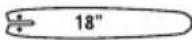
- Blade bar type ....18"
- Blade bar length ....52 cm (520 mm)
- Cutting length ....45 cm (450 mm)
Chain sprocket pitch ..... 8.25 mm (0,325")
- Number of teeth (chain sprocket) .... 7
Sound pressure level ( L_pA ) 93.9 dB; K_pA=3 dB
Sound power level ( L_WA )
- Guaranteed ....116 dB
- Measured ....113.9 dB; K_WA=2.43 dB
⚠️ CAUTION! Hearing damage! Wear ear protection.
Vibration ( a_h )
- Front handle ....8.945 m/s ^2 ; K=1.5 m/s ^2
- Rear handle ....9.460 m/s ^2 ; K=1.5 m/s ^2
Battery Li-Ion
Temperature ....≤50 °C
- Charging ....4 - 40 °C
- Operation 4 - 50 °C
- Storage ....15 - 25 °C
PARKSIDE Performance Smart battery Smart PAPS 204 A1/Smart PAPS 208 A1
- Operating frequency/Frequency band 2400-2483,5 MHz
- transmitted power .... ≤20 dBm
Levels of noise and vibration were determined according to the standards and regulations in the declaration of conformity.
The specified total vibration value and the stated noise emission value have been measured according to a standardised test method and can be used to compare one device with another. The specified total vibration value and the stated specified noise emission value can also be used for a provisional assessment of the load.
WARNING! The vibration and noise emissions may deviate from the specified values during actual use of the device, depending on how the device is being used. Safety measures for the protection of the operator are to be determined that are based on an estimate of the actual vibration load under the real operating conditions (for this, all parts of the operating cycle are to be taken into account, for example, times in which the device is turned off, and those during which it is turned on but running without a load).
X 20 V TEAM
The device is part of the X 20 V TEAM series and can be operated with batteries of the X 20 V TEAM series. Batteries of the X 20 V TEAM series may only be charged using chargers of the X 20 V TEAM series.
We recommend that you operate this appliance with the following batteries only:
PAP 20 B1, PAP 20 B3, Smart PAPS 204 A1, Smart PAPS 208 A1, Smart PAPS 2012 A1 We recommend charging these batteries with the following chargers: PLG 20 A3, PLG 20 A4, PLG 20 C1, PLG 20 C2, PLG 20 C3, PLG 201 A1, PDSLG 20 A1, PDSLG 20 B1, PDSLG 20 B2, Smart PLGS 2012 A1 Rechargeable battery and charger technical data: See separate manual.
Safety information
This section deals with the basic safety instructions for using the device.
⚠ WARNING! Injury and property damage due to improper handling of battery. Observe the safety information and notes on charging and proper use as shown in the instruction manual for your battery and charger from the series X 20 V TEAM. A detailed description of the charging process and further information can be found in these separate operating instructions.
⚠ WARNING! A chainsaw is a dangerous piece of equipment that can cause serious or even fatal injuries if used incorrectly or carelessly. Therefore, for your safety and the safety of others, always observe the following safety instructions and ask an expert for advice if you are unsure.
Meaning of the safety information
⚠️ DANGER! If you do not observe this safety instruction, an accident will occur. The result of which is severe bodily injury or death.
⚠ WARNING! If you do not observe this safety instruction, an accident may occur. The result of which is likely severe bodily injury or death.
⚠️ CAUTION! If you do not observe this safety instruction, an accident will occur. The result of which is likely minor or moderate bodily injury.
NOTICE! If you do not observe this safety instruction, an accident will occur. The result of which is possible damage to property.
Pictograms and symbols
Symbols on the device
NOTICE! Familiarise yourself with all operating elements before starting work. Practise using the chainsaw and have an expert explain the function, mode of operation and sawing techniques to you.
NOTICE! The saw chain does not rotate when the chain brake is locked into place. Release the chain brake by pulling the chain brake lever towards the front handle.

Attention!

Read the instruction manual


Use eye protection and hearing protection Use head protection

Use protective gloves

Wear safety shoes with firm soles!

Wear clothing with cut resistant inserts!

Always work with both hands!

Open flames, fire, open ignition sources and smoking are prohibited.

Use of the device in the rain or a damp environment is prohibited.

Attention! Kickback - be aware that you may experience kickback while working with the machine.

Caution! Hot surfaces, burn risk!

Guaranteed sound power level L_WA in dB.


Volume of chain oil tank

Saw chain oiling

Stopping the device

Choke closed
Choke open
Blade bar type

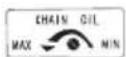
Adjusting the chain lubrication

40:1
Mixing ratio fuel to 2-stroke oil: 40:1, ONLY use fuel mixture

Press the petrol pump six times

ROZ 95
Fuel to be used

ISO-L-EGD
JASO FD
2-stroke oil to be used
Graphical symbol on chain brake lever


Chain brake (activated/deactivated)
Graphical symbol on sprocket cover

Direction of travel of saw chain

Chain brake (open/closed)
Adjusting the chain tension
Graphical symbol on blade bar

Blade bar type

Groove width

Chain pitch

Number of driving elements
Symbol on the hangtag

Activate the chain brake

Press the fuel pump

Pull the cold start lever (choke)

Pull the starter cord or actuate the electric starter

Operate the throttle lock and throttle lever

Deactivate the chain brake
Safety instructions for petrol chainsaws
Attention! Read the following safety information to prevent personal injury and damage to property.
General Information
- This appliance must not be used by persons (including children) with reduced physical, sensory or mental capabilities, or lack of experience and knowledge. Children must be supervised to ensure that they do not play with the appliance.
- Pay attention to noise protection and local regulations when working in the forest with chainsaws. Local regulations may require a suitability test. Check with the forestry administration.
- Do not use the chainsaw when you are tired or ill or after taking alcohol, tablets or drugs. Always have a break on time.
- Cut wood only. Do not use chain saw for purposes not intended. For example: do not use chain saw for cutting metal, plastic, masonry or non-wood building materials. Use of the chain saw for operations different than intended could result in a hazardous situation.
Preparation
- When working, always wear suitable work clothes that allow freedom of movement. This includes a hard hat, hearing protection, safety goggles or face protection, hand protection and cut pro-
tection: Leg protection and non-slip foot protection.
- Dust may be generated when sawing dry wood. Wear a suitable dust mask.
- Ensure that the handles are dry and clean when working.
- Do not work with a damaged or incomplete chainsaw or one which has been converted without the permission of the manufacturer. Never use the chainsaw with defective protective equipment. Before use, check the safety status of the chainsaw, in particular the blade bar and the chain.
- Do not start the chainsaw in a closed or poorly ventilated area as there is a risk of inhaling engine exhaust fumes.
- Never start the chainsaw before the blade bar, saw chain and sprocket cover are fitted correctly.
Operation
- Please make sure that no other persons or animals are present in your work area.
- Only start when the working area is free of obstacles and you have planned a retreat path from the falling tree.
- Always hold the chain saw with your right hand on the rear handle and your left hand on the front handle. Holding the chain saw with a reversed hand configuration increases the risk of personal injury and should never be done.
- Hold the chain saw by insulated gripping surfaces only, because the saw chain may contact hidden wiring. Saw chains contacting a "live" wire may make exposed metal parts of the chain saw "live" and could give the operator an electric shock.
- Always keep proper footing and operate the chain saw only when standing on fixed, secure and level surface. Slippery or unstable surfaces may cause a loss of balance or control of the chain saw.
- When lubricating the chain, a light trace of oil forms due to the escaping oil. Pay attention to the wind direction and do not expose yourself unnecessarily to such lubricating oil mist.
- Keep all parts of the body away from the saw chain when the chain saw is operating. Before you start the chain
saw, make sure the saw chain is not contacting anything. A moment of inattention while operating chain saws may cause entanglement of your clothing or body with the saw chain.
- Never work one-handed or above shoulder height.
- Prolonged use of the device can lead to blood circulation disorders in the hands caused by vibration (Raynaud's syndrome). Change your working position regularly. However, you can extend the duration of use by wearing suitable gloves or taking regular breaks. Please ensure that if you are susceptible to poor circulation, low outside temperatures or strong gripping forces while working, this may reduce the length of time for which you are able to work.
- When cutting a limb that is under tension be alert for spring back. When the tension in the wood fibres is released the spring loaded limb may strike the operator and/or throw the chain saw out of control.
- Use extreme caution when cutting brush and saplings. The slender material may catch the saw chain and be whipped toward you or pull you off balance.
- Switch off the engine and wait until the saw chain has come to a standstill before setting the chainsaw down.
Cleaning, maintenance and storage
- Follow the maintenance, control and service instructions in these operating instructions carefully.
- All maintenance work not mentioned in these instructions may only be performed by our service centre for chainsaws.
- Follow all instructions when clearing the chainsaw of accumulated material, storing or performing maintenance. Make sure that the engine is switched off and secured against accidental switching on. Unexpected operation of the chainsaw when removing accumulated material or during maintenance can result in serious injury.
- Only use accessory parts which are recommended in this manual.
- Carry the chain saw by the front handle with the chain saw switched off and away from your body. When transport-
ing or storing the chain saw, always fit the guide bar cover. Proper handling of the chain saw will reduce the likelihood of accidental contact with the moving saw chain.
- Store the chainsaw and fuel safely and out of reach of children. Ensure there is no risk of any leaking fuel or vapours coming into contact with sparks or open flames. Electrical appliances, for example, can be a source of sparks.
- Use suitable, permissible containers for storing the fuel. Empty the fuel and chain oil tanks when storing or transporting the chainsaw for long periods. Have old operating materials disposed of properly.
Causes and Operator Prevention of Kickback
natural_image
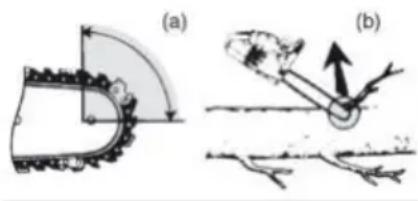
Two diagrams showing a mechanical component (a) and a lever mechanism (b), both without any text or symbols.- Kickback may occur when the nose or tip of the guide bar touches an object, or when the wood closes in and pinches the saw chain in the cut (Fig. b).
- Tip contact in some cases may cause a sudden reverse reaction, kicking the guide bar up and back towards the operator (Fig. a).
- Pinching the saw chain along the top of the guide bar may push the guide bar rapidly back towards the operator.
- Either of these reactions may cause you to lose control of the saw which could result in serious personal injury. Do not rely exclusively upon the safety devices built into your saw. As a chain saw user, you should take several steps to keep your cutting jobs free from accident or injury.
Kickback is the result of chain saw misuse and/or incorrect operating procedures or conditions and can be avoided by taking proper precautions as given below:
- Maintain a firm grip, with thumbs and fingers encircling the chain saw handles, with both hands on the saw and position your body and arm to allow you to resist kickback forces. Kick-
back forces can be controlled by the operator, if proper precautions are taken. Do not let go of the chain saw.
- Do not overreach and do not cut above shoulder height. This helps prevent unintended tip contact and enables better control of the chain saw in unexpected situations.
- Only use replacement guide bars and saw chains specified by the manufacturer. Incorrect replacement guide bars and saw chains may cause chain breakage and/or kickback.
- Follow the manufacturer's sharpening and maintenance instructions for the saw chain. Decreasing the depth gauge height can lead to increased kickback.
Residual risks
There will always be residual risks even if you operate this device according to the instructions. The following hazards may occur in connection with the type and design of this device:
- Hearing damage if suitable ear protection is not worn.
- Health injuries resulting from the effect of hand/arm vibration in the event that the tool is used over a longer period of time or is not used and maintained properly.
- Cutting injuries
WARNING! Danger due to electromagnetic field generated while the tool is in operation. Under certain circumstances, this field may negatively affect active or passive medical implants. In order to reduce the danger of serious or fatal injuries, we recommend that individuals who wear medical implants should consult their doctor and the manufacturer of the implant before operating the tool.
Preparation
⚠ WARNING! Risk of injury due to unintentional start-up. Only insert the battery into the device once the device is fully prepared for use. Do not start the motor until the device is fully prepared for use.
Safety devices
The following safety devices are provided to protect the user and the device:
Throttle lock (4)
- Prevents the saw chain from starting accidentally.
Rear handle (5) with rear hand guard (6)
- Protects the hand from branches, twigs and if the saw chain jumps off.
Saw chain (10) with low kickback
• Helps to absorb kickbacks thanks to specially developed safety devices.
Chain catch (12)
- Increases stability when making vertical cuts.
- Makes sawing easier.
Chain brake lever/front hand protection (13)
- The saw chain does not run when the chain brake is locked into place.
- Stops the saw chain immediately in the event of a kickback.
- Lever can also be operated manually.
- Protects the operator's left hand if it slips off the front handle.
Off button (20)
- The device switches off immediately when the off button is pressed.
Chain catching bolt (37)
- Reduces the risk of injury if the saw chain jumps off or breaks.
Checking the battery charge level
LEDs Meaning
red, orange, green Battery charged
red, orange Battery partially charged
red Battery needs to be charged
- Press the button (28) next to the charge level indicator button (29) on the battery (27).
The LEDs of the charge level indicator show how much charge remains in the battery. - Charge the battery (27) when only the red LED on the charge level indicator (29) is illuminated.
Charging the battery
See also the charger instruction manual.
Notes
- If warm, allow the battery to cool before charging.
- Do not expose the battery to direct sunlight or temperatures ≤50 °C for long periods of time. In particular, avoid placing the product on radiators or storing it in vehicles parked in the sun.
Procedure
- If necessary, remove the battery (27) from the cordless tool.
- Slide the battery into the charging slot of the charger (31).
- Plug the charger into an outlet.
- Once charging is complete, disconnect the charger from the mains supply.
- Pull the battery charging slot out.
Operation
Before operation
⚠ WARNING! Risk of injury! Always wear protective gloves, protective goggles, hearing protection, a safety helmet, safety gloves and cut-resistant work clothes when working with the saw chain. Before carrying out any work on the device, disconnect the spark plug connector (46) and activate the chain brake.
⚠️ CAUTION! Dust may be generated when sawing dry wood. Wear a suitable dust mask.
Carry out the following steps before operating the chainsaw:
- If necessary Installing the saw chain and blade bar, p. 48
• Tensioning the saw chain, p. 49 - Pouring in chain oil, p. 40
- Checking the chain brake, p. 41
- Checking the oil automation
- check that the protective devices are in perfect condition and complete and that all screw connections are tight,
- check the tightness of the fuel system,
• make sure that the chainsaw is not touching anything.
NOTICE! The chainsaw can be re-oiled, see Cleaning, maintenance and storage, p. 46.
Mixing and filling fuel
Notes
- DANGER! Risk of fire or explosion! Always ensure good ventilation when handling fuel. Do not smoke while refuelling and keep any heat sources at a distance. Never refuel while the engine is running. Carefully open the fuel filler cap so that any overpressure can slowly dissipate. Start the device at a distance of at least 3 m from the fuelling point.
- CAUTION! Use only the fuel mixture recommended in the instructions. The fuel mixture ages. Therefore, do not use fuel mixtures that are older than 3 months (E10: 30 days). If this not done, the engine may become damaged and your warranty will become null and void.
- WARNING! Danger to health! Avoid direct skin contact with petrol and inhalation of petrol fumes.
- NOTICE! Unsuitable fuel can damage the two-stroke engine. Only operate the tool with a mixture of petrol and two-stroke engine oil (Ratio: 40:1).
- Tank volume (Fuel): 550~cm^3 (0.55 l)
- For optimal performance, use oil for air-cooled two-stroke engines.
Tools and aids required
- Fuel mixing bottle (21)
| Petrol 2-stroke oil | |
| 40:1 | |
| 1 | 25 ml | |
| 3 | 75 ml | |
| 5 | 125 ml | |
Mixing fuel (Fig. A)
The fuel mixing bottle (21) features a scale that indicates the mixing ratio for one tank filling.
- First fill petrol into the fuel mixing bottle (21) up to the mark (PETROL).
- Then fill with two-stroke engine oil up to the second mark (OIL).
- Close and shake the fuel mixing bottle (21).
Filling with fuel (Fig. A)
- Place the tool on its side with the fuel cap (8) facing upwards.
- Unscrew the fuel cap (8).
-
Pour the fuel mixture into the fuel tank.
-
Wipe off any fuel residue around the fuel cap.
- Close the fuel cap (8).
Maintain the chain lubrication
Checking chain lubrication
NOTICE! If the chainsaw is used with too little oil, the cutting performance and lifespan of the saw chain will decrease as the saw chain will become blunt more quickly. You can recognise insufficient oil by the smoke development or discolouration of the blade bar. Make sure that there is always oil flowing onto the chain.
Notes
- Before starting work, check the oil level.
- Check the chain lubrication function each time you switch the device on.
- You can check the chain lubrication at any time during operation.
Procedure
-
While the saw chain is running: Hold the chainsaw above clear ground. Observe the trace of oil. The chainsaw must not touch the ground!
-
Significant trace of oil: The chainsaw is working properly.
- Slight trace of oil: Adjusting the oil flow (Fig. B), p. 47
- No trace of oil: Pouring in chain oil, p. 40; Cleaning the oil passage (Fig. C), p. 47.
Pouring in chain oil
⚠ WARNING! Risk of fire! Always turn off the device and let the engine cool down before filling with chain oil.
NOTICE! If the chainsaw is used with too little oil, the cutting performance and lifespan of the saw chain will decrease as the saw chain will become blunt more quickly. You can recognise insufficient oil by the smoke development or discolouration of the blade bar. Make sure that there is always oil flowing onto the chain.
The oil flows to the blade bar (11) as soon as the chain starts running.
- Check the oil level regularly and top up with oil if the level is low. Tank capacity: 260 cm^3 (0.26 l)
- Use bio chain oil containing additives to reduce friction and wear. Alternatively, use chain lubricating oil with a low proportion of adhesion additives.
- Empty the oil tank if it will not be used for a prolonged period of time (6–8 weeks).
Procedure (Fig. A)
- Place the device on its side with the tank cover (9) facing upwards.
- Unscrew the tank cover (9).
- Pour the bio chain oil into the tank.
- Wipe away any spilt oil.
- Screw on the tank cover (9).
Inserting and removing the battery
⚠ WARNING! Risk of injury due to unintentional start-up. Only insert the battery into the device once the device is fully prepared for use.
NOTICE! Risk of damage! An incorrect battery can damage the device and battery.
Inserting the battery
- Push the battery (27) along the guide into the battery holder (14). You will hear the battery click into place.
Removing the battery
- Press and hold the battery release (30) on the battery (27).
- Pull the battery out of the battery holder (14).
Checking the chain brake
Notes
- The saw chain will not run when the chain brake is locked into place.
- RANGER! Risk of injury from the trailing saw chain. Do not use the chainsaw if the chain brake does not work properly. Contact the service centre.
Procedure (Fig. B)
- Place the tool on a level surface.
- Release the chain brake by pulling the chain brake lever (13) against the front grip (1).
- Hold the tool firmly with both hands, with your right hand on the rear grip (5) and your left hand on the front grip (1). Your thumb and fingers must tightly clasp the grips.
- Switch on the tool.
-
With the engine running, operate the chain brake lever (13) with your left hand. To do so, push the chain brake lever (13) away from the front grip (1). The saw chain should stop abruptly.
-
If the chain brake is working properly, release the throttle lever (7) and release the chain brake.
Switching on and off
The device can also be operated without a battery if you start the device with the starter cord.
⚠️ DANGER! Do not use the chainsaw near flammable liquids or gases.
⚠️ CAUTION! The saw chain must not move when idle. If the saw chain moves when the engine is idle, there is a problem with the clutch or no-load rotation speed. Please contact the service centre.
Cold start
Starting with the starter rope (Fig. A)
⚠ WARNING! Risk of injury due to the saw chain starting up. Make sure that the chain brake is activated. The tool has a throttle lock, which is activated when the cold start lever (18) is pressed in again manually. If the tool is now started and the chain brake is not activated, the saw chain will start to run.
Notes
- Check whether there is enough chain oil in the tank and top up with chain oil if necessary (Pouring in chain oil, p. 40).
- Place the tool on a firm, stable base and remove the chain guard (24). The saw chain (10) must not touch the ground or objects.
- Operate the chain brake by pushing the chain brake lever (13) away from the front handle (1) until the chain brake engages.
- Press the petrol pump (19) six times.
- Pull the cold start lever (18) (choke) to position N.
- Hold the tool firmly, with one hand on the front handle (1) and your foot in the rear grip (5).
- Grip the starter handle (2) on the starter rope with your other hand. Pull it quickly several times until the engine starts.
-
Briefly operate the throttle lock (4) and the throttle lever (7) so that the cold start lever (18) moves to position . The tool now begins to idle.
Allow the tool to warm up at idle for between 45 seconds and 1:30 minutes. -
Release the chain brake by pulling the chain brake lever (13) towards the front handle (1) until the chain brake releases.
⚠️ CAUTION! If the saw chain moves when the engine is idle, there is a problem with the clutch or no-load rotation speed. Take the device out of operation and contact the Service Centre.
- If you now operate the throttle lock (4) and the throttle lever (7), the saw chain (10) starts to run.
Starting with the electric start (Fig. A)
-
Place the tool on a firm, stable base and remove the chain guard (24). The saw chain (10) must not touch the ground or objects.
-
Insert the battery (27).
-
Operate the chain brake by pushing the chain brake lever (13) away from the front handle (1) until the chain brake is engaged.
-
Press the petrol pump (19) six times.
-
Pull the cold start lever (18) (choke) to position N.
-
Fold the cover upwards and press the electric starter (3) until the engine starts.
-
Briefly operate the throttle lock (4) and the throttle lever (7) so that the cold start lever (18) moves to position |+. The tool begins to idle.
Allow the tool to warm up at idle for between 45 seconds and 1:30 minutes.
-
Release the chain brake by pulling the chain brake lever (13) towards the front handle (1) until the chain brake releases.
-
If you now operate the throttle lock (4) and the throttle lever (7), the saw chain (10) starts to run.
If the engine has started and stopped briefly
Starting with the starter rope (Fig. A)
-
Operate the throttle lock (4) and briefly the throttle lever (7). The cold start lever (choke) (18) moves back to the warm start position.
-
Pull the starter rope on the starter handle (2) again quickly several times in succession until the engine starts. If this is not successful, follow the instructions in section Troubleshooting, p. 53.
If the outside temperature is very high, the engine may have to be started without pulling the cold start lever (choke) (18) even in cold start.
- Release the chain brake by pulling the chain brake lever (13) towards the front handle (1) until the chain brake releases.
⚠️ CAUTION! If the saw chain moves when the engine is idle, there is a problem with the clutch or no-load rotation speed. Take the device out of operation and contact the Service Centre.
- If you now operate the throttle lock (4) and the throttle lever (7), the saw chain (10) starts to run.
Starting with the electric start (Fig. A)
-
Operate the throttle lock (4) and briefly the throttle lever (7). The cold start lever (choke) (18) moves back to the warm start position.
-
Fold the cover upwards and press the electric starter (3) again.
-
Release the chain brake by pulling the chain brake lever (13) towards the front handle (1) until the chain brake releases.
⚠️ CAUTION! If the saw chain moves when the engine is idle, there is a problem with the clutch or no-load rotation speed. Take the device out of operation and contact the Service Centre.
- If you now operate the throttle lock (4) and the throttle lever (7), the saw chain (10) starts to run.
Warm start
Notes
- A warm start can be carried out max. 15 - 20 min. after the last use.
- Check whether there is enough chain oil in the tank and top up with chain oil if necessary (Pouring in chain oil, p. 40).
Starting with the starter rope (Fig. A)
-
Place the tool on an even, stable base and remove the chain guard (24). The saw chain (10) must not touch the ground or objects.
-
Leave the cold start lever (choke) (18) in position ||.
-
Operate the chain brake by pushing the chain brake lever (13) away from the front handle (1) until the chain brake is engaged.
-
Press the petrol pump (19) six times.
-
Hold the tool firmly, with one hand on the front handle (1) and your foot in the rear grip (5).
-
Grip the starter handle (2) on the starter rope with your other hand. Slowly pull the starter rope out until the initial resistance is felt.
-
Now pull the starter rope quickly several times. The engine should start after a few pulls.
If the engine does not start after several attempts, try the procedure: Cold start.
- Release the chain brake by pulling the chain brake lever (13) towards the front handle (1) until the chain brake releases.
⚠️ CAUTION! If the saw chain moves when the engine is idle, there is a problem with the clutch or no-load rotation speed. Take the device out of operation and contact the Service Centre.
- If you now operate the throttle lock (4) and the throttle lever (7), the saw chain (10) starts to run.
Starting with the electric start (Fig. A)
-
Place the tool on an even, stable base and remove the chain guard (24). The saw chain (10) must not touch the ground or objects.
-
Insert the battery (27).
-
Leave the cold start lever (choke) (18) in position |+.
-
Operate the chain brake by pushing the chain brake lever (13) away from the front handle (1) until the chain brake is engaged.
-
Press the petrol pump (19) six times.
-
Fold the cover upwards and press the electric starter (3) until the engine starts. The tool begins to idle.
-
Release the chain brake by pulling the chain brake lever (13) towards the front handle (1) until the chain brake releases.
⚠️ CAUTION! If the saw chain moves when the engine is idle, there is a problem with the clutch or no-load rotation speed. Take the device out of operation and contact the Service Centre.
- If you now operate the throttle lock (4) and the throttle lever (7), the saw chain (10) starts to run.
Switching off the engine in an emergency (Fig. A)
- Press the off button (20) "O".
Switching off the engine (Fig. A)
-
Release the throttle lever (7) if necessary.
-
Press the off button (20) "O".
Sawing techniques
⚠ WARNING! Risk of injury! If the saw chain is jammed, do not try to pull the chainsaw out by force. Switch off the motor and use a lever arm or wedge to release the chainsaw.
- Always stand above the tree trunk when sawing on slopes.
- Remove dirt, stones, loose bark, nails, clips and wires from the tree.
- The saw chain must not touch the ground or any object while sawing through the material or thereafter.
- You will have better control over the device if you saw using the lower edge of the blade bar (saw chain in pulling direction) and not using the upper edge of the blade bar (saw chain in pushing direction).
- Ensure that the saw chain does not get stuck while sawing. The log must not break or splinter.
- Please observe the precautionary measures to protect against kickback (Causes and Operator Prevention of Kickback, p. 38)
- Reduce the contact pressure towards the end of the cut without loosening the firm grip on the chainsaw handles in order to maintain full control at the moment of ‘sawing through’.
- The chainsaw may slip unexpectedly while cutting. This happens in particular when the guide bar cannot find a firm grip on round, smooth, or hard surfaces, or when sawing with the tip of the guide bar.? Always hold the saw firmly with both hands, stand securely, and avoid using only the tip of the guide bar.
- After completing the cut, wait until the chainsaw has come to a standstill before removing it.
- Always switch off the chainsaw motor before moving from tree to tree.
Felling trees
NOTICE! There is a sight line/felling direction indicator (48) on the device. Position the chainsaw on the tree (Fig. Q). The sight line/felling direction indicator (48) shows the felling direction. Set the felling notch and felling cut as described below.
WARNING! A lot of experience is needed to fell trees. Only fell trees if you know how to use the chainsaw safely. Never use the chainsaw if you feel unsafe.
CAUTION! Do not cut down a tree if there is a strong or changing wind, if there is a risk of damage to property or if the tree could hit power lines. When felling trees, ensure that no other persons are subject to hazards and that no material damage is caused. If a tree should come into contact with a power line, the supply company must be informed immediately.
⚠️ CAUTION! For safety reasons, we advise inexperienced users against felling a tree trunk with a blade bar length that is smaller than the trunk diameter.
- Please make sure that no other persons or animals are present in your work area. The safety distance between the tree to be felled and the nearest workplace must be 2 ½ tree lengths.
- Pay attention to the felling direction. The user must be able to move around safely near the felled tree so that he can cut the tree to size and cut off all branches easily. The falling tree must be prevented from becoming entangled in another tree.
- Please note that the natural falling direction depends on the pitch and crookedness of the tree trunk, the wind direction, position of larger branches and the number of branches.
- Stay above the tree to be felled when sawing on a slope. The tree will probably roll or slide downhill after felling.
- Small trees with a diameter of 15-18 cm can usually be sawn off with one cut.
- For trees with a larger diameter, notch cuts and a felling cut must be applied (Fig. K).
- If cutting and felling is being carried out by two or more persons simultaneously, the distance between the felling and cutting persons must be at least twice the height of the tree to be felled.
Fold up the hearing protection immediately after finishing the sawing process so that you can hear sounds and warning signals.
Procedure
1. Limbing (Fig. I)
Remove branches hanging downwards by sawing from the top of the branch. Never saw off branches higher than shoulder height.
2. Escape area (Fig. J)
Remove the undergrowth around the tree to ensure an easy retreat. The escape area (1) should be offset by about 45^ behind the planned felling direction (2).
3. Cut drop notch (A) (Fig. K)
Place a drop notch in the direction in which you want the tree to fall. Start with the lower, horizontal cut. The cutting depth should be about 1/3 of the trunk diameter. Now make an oblique saw cut with a cutting angle of approximately 45^ from above, which meets the lower saw cut exactly. This prevents the saw chain or guide rail from jamming when the second notch cut is made.
⚠ WARNING! Never step in front of a tree that is notched.
4. Felling cut (B) (Fig. K)
Make the felling cut from the other side of the trunk. Stand to the left of the tree trunk and saw with the saw chain pulling (with the underside of the blade bar). The felling cut must be at least 5 cm above the horizontal notch section. It should be deep enough so that the distance to the notch cutting line is at least 1/10 of the trunk diameter. The part of the log that has not been sawn through is called the hinge (felling bar). The hinge prevents the tree from turning and falling in the wrong direction. Do not cut through this hinge. When the felling cut nears the hinge, the tree should begin to fall. If it becomes apparent that the tree will not fall in the desired direction or if it bends back, and if the saw chain is stuck, discontinue the felling cut. Use wooden, plastic or aluminium wedges to open the cut and fell the tree to fall into the desired fall line.
-
Slide a cutting wedge into the felling cut as soon as the cutting depth so permits, in order to prevent the blade bar from getting jammed (Fig. L).
-
If the trunk diameter is greater than the length of the blade bar, make two cuts (Fig. M).
- Once the felling cut has been made, the tree falls by itself or with the help of the felling wedge.
⚠ WARNING! As soon as the tree starts to fall, pull the chainsaw out of the cut, stop the engine, put the chainsaw down and leave the workplace via the retreat path. Pay attention to falling branches and do not stumble.
Limbing
Limbing is the term for removing branches and twigs from a felled tree.
⚠️ CAUTION! Risk of injury! Never saw off branches when you are standing on the tree trunk. Keep an eye on the kickback area when branches are under tension.
(Fig. I)
- Only remove support branches after cutting to length.
- Saw branches under tension from the bottom upwards to prevent the tool from jamming.
- Use the same technique as for Cutting to length, p. 45 when sawing off thicker branches.
- Work to the left of the trunk and as close as possible to the tool. If possible, the weight of the tool should rest on the trunk.
- Change location to saw off branches beyond the trunk.
- Cut branched branches to length individually. Leave larger branches pointing downwards and supporting the tree for the time being.
- Separate smaller branches with one cut.
Cutting to length
Cutting to length means sawing felled tree trunks into small sections.
- Ensure that you have a secure footing and balance your body weight evenly on both feet.
- Support the trunk if possible. The trunk should be underpinned and supported by branches, beams or wedges.
• Make sure that the saw chain does not touch the ground when sawing. - Stand above the trunk on sloping terrain.
Fitting the cutting aid
(Fig. D)
- Unscrew the front nut (17) of the sprocket cover using the combination tool (25) ⬆.
- Attach the adapter nut (42) of the cutting aid to the blade bar bolt (33).
- Tighten the adapter nut (42) with the combination tool (25) ⬇.
- Pull the quick connector (41) backwards and push the cutting rod (39) onto the adapter nut (42).
- Release the quick connector (41).
- Check that the quick connector (41) is firmly seated with the adapter nut (42).
Sawing with the cutting aid
- Only use on delimbed logs lying horizontally on the ground.
- Pay attention to the length of the log and to forces that could close the previous cutting gap and pinch the end plate (40). If the end plate (40) becomes jammed, stop the chainsaw immediately, uncouple the cutting rod (39) and release the clamp.
- The cutting aid may only be attached to the chainsaw during the cutting process. The cutting aid must be removed for delimbing and refuelling the chainsaw (Removing the cutting aid, p. 45).
- After about 100 cutting operations, check that the cutting aid is firmly seated and retighten if necessary.
- Ensure that the adapter nut (42) and the quick connector (41) are extremely clean. If the coupling system becomes stiff, please lubricate it.
- Avoid bending, knocks, crushing, chafing etc. on the cutting rod. The cutting rod must be checked regularly for damage.
Removing the cutting aid (Fig. D)
- Pull the quick connector (41) backwards and remove the cutting rod (39) from the adapter nut (42). The adapter nut can remain on the blade bar bolt (33).
Techniques for cutting to length
Trunk lying on the ground (Fig. E)
Saw all the way through the trunk from above, taking care not to touch the ground at the end of the cut. If it is possible to turn the trunk, saw through 2/3 of it. Then turn the
trunk over and saw through the rest of the trunk from above.
Trunk is supported at one end (Fig. F)
First saw through 1/3 of the trunk diameter from bottom to top (with the top of the blade bar) to avoid splintering. Then saw from top to bottom (with the underside of the blade bar) towards the first cut to avoid jamming.
Trunk is supported at both ends (Fig. G)
First saw through 1/3 of the trunk diameter from top to bottom (with the underside of the blade bar). Then saw from bottom to top (with the top of the blade bar) until the cuts meet.
Sawing on a sawhorse (Fig. H)
Hold the chainsaw firmly with both hands and guide the machine in front of your body while sawing. When the log is cut, guide the machine past the body on the right (1). Keep your left arm as straight as possible (2). Watch out for the falling trunk. Position yourself so that the severed trunk does not pose a hazard. Pay attention to your feet. The severed trunk could cause injuries if it falls. Keep your balance (3).
Cleaning, maintenance and storage
⚠ WARNING! Electric shock! Risk of injury due to unintentional start-up. Maintenance and cleaning work must always be carried out with the engine switched off and the spark plug connector (46) removed. You should have any repair and maintenance work that is not described in these instructions carried out by our Service Centre. Only use original replacement parts.
CAUTION! Please be aware that the chainsaw may leak oil after use if it is stored on its side or head. This is a normal occurrence and is caused by the ventilation opening on the top edge of the tank which is a necessary component; this is not grounds for complaint. Since every chainsaw is inspected and tested using oil during manufacture, a small amount of oil may remain in the tank after emptying, which may slightly dirty the housing during transport. Please clean the housing with a cloth.
Cleaning
⚠ WARNING! Electric shock! Never spray down the device with water.
⚠ WARNING! Always carry out cleaning work with: engine switched off, engine cooled down, spark plug connector disconnected and chain brake active.
⚠️ CAUTION! Cutting injuries! Wear cut-resistant gloves when working with the saw chain or with the blade bar.
NOTICE! Risk of damage. Chemical substances may attack the plastic parts of the machine. Do not use any cleaning agents or solvents.
Clean the machine thoroughly. This will extend the life of the machine and prevent accidents.
Cleaning after every use
- Keep the handles free of petrol, oil or grease. If necessary, clean the handles with a damp cloth washed in soapy water.
- Clean the saw chain. Do not use any liquids to clean the saw chain. Lightly oil the saw chain with chain oil after cleaning.
- For cleaning, also remove the sprocket cover (15) so that this area can also be cleaned.
- Clean the blade bar (11)
- Clean the ventilation slits and the surface of the machine with a paintbrush or dry cloth.
- Clean the oil passage (36) to ensure fault-free, automatic oiling of the saw chain during operation. Use a brush or a cloth to help remove residues from the oil passage.
Maintenance
Service intervals
Carefully perform the maintenance tasks listed in the following table on a regular basis. Regular servicing of your device will extend its life. Additionally, you will achieve optimum cutting performance and prevent accidents.
| Machine part Action Before | each use | After 10 hours of use | After each use | |
| Chain brake components | Visual inspection, replace as needed | √ | ||
| Sprocket (34) Visual inspection, replace as needed | √ | |||
| Saw chain (10) Check saw chain, oil, reg-rind or replace if necessary | √ | |||
| Saw chain (10) Clean and oil the saw chain √ | ||||
| Blade bar (11) Servicing the blade bar, p. 50 √ √ | ||||
| Blade bar (11) Turning the blade bar, p. 51 √ | ||||
| Automatic oil system | Check, clean oil pas-sage if necessary | √ | ||
| Coupling Check that the device is stationary while idle | √ | |||
| Screws, nuts, bolts | Check and tighten √ | |||
| Air filter (45) | Cleaning the air filter, p. 47 | √ | ||
| Spark plug (47) | Checking/adjusting/replacing spark plug, p. 47 | √ | ||
Maintain the chain lubrication
Before starting work, check the oil level and the function of the chain lubrication.
NOTICE! If the chainsaw is used with too little oil, the cutting performance and lifespan of the saw chain will decrease as the saw chain will become blunt more quickly. You can recognise insufficient oil by the smoke development or discolouration of the blade bar. Make sure that there is always oil flowing onto the chain.
Adjusting the oil flow (Fig. B)
Turn the oil regulating screw (32) on the underside using a slotted screwdriver.
- Increase oil flow
- ○: Decrease oil flow
Cleaning the oil passage (Fig. C)
Clean the oil passage regularly to ensure fault-free, automatic oiling of the saw chain during operation.
- Mounting the saw chain and blade bar, p. 48
- Remove any residues and dirt in the oil passage (36) using a brush or cloth.
- If cleaning the oil passage is unsuccessful, have the chainsaw repaired by our Customer Service. contact the service centre.
Cleaning the air filter
CAUTION! Never run the device without an air filter. Dust and dirt may otherwise enter the engine and cause damage to the tool. Keep the air filter clean.
Procedure (Fig. N)
- Switch off the engine and let the device cool down.
- Loosen the wing nut (43).
- Take off the air filter cover (44).
- Remove the air filter (45).
- Clean the air filter (45) with water and allow it to air dry. Never use petrol for cleaning!
NOTICE! Replace the air filter (45) if it is worn, damaged or dirty (Spare parts and accessories, p. 55).
- Put the air filter (45) back in.
- Put the air filter cover (44) back on.
- Fix the air filter cover again with the wing nut (43).
Checking/adjusting/replacing spark plug
CAUTION! Worn spark plugs, or a spark plug gap that is too large, will lead to a reduction in engine power.
Procedure (Fig. O)
-
Switch off the engine and let the device cool down.
-
Undo the wing nut (43).
- Take off the air filter cover (44).
- Remove the air filter (45).
- Pull the spark plug connector (46) from the spark plug (47).
- Unscrew the spark plug (47) ∪ with the combination tool (25).
- Check the spark plug gap with the help of a feeler gauge (available from specialised dealers).
- Reset the gap if necessary, by carefully bending the ground/side electrode of the spark plug (47).
- Clean the spark plug (47) with a wire brush.
- Reinsert the cleaned and reset spark plug (47) or replace any damaged spark plugs with a new one (Spare parts and accessories, p. 55).
- Reattach the spark plug connector (46).
- Mount the air filter (45) and air filter cover (44) again.
The electrode air gap must be 0,6-0,7 mm.
Adjusting the carburettor
The carburettor has been preconfigured for ideal performance at the factory. If any re-adjustments are necessary, have the adjustments made by a specialist workshop.
Mounting the saw chain and blade bar
⚠️ CAUTION! Cutting injuries! Wear cut-resistant gloves when working with the saw chain or with the blade bar.
Tools and aids required
- Combination tool
Procedure
- Switch off the device, disconnect the spark plug connector (46) (Fig. O) and allow the device to cool down.
- Place the device on a level surface.
- Pull the chain brake lever (13) to the front handle (1).
- Turn the chain tensioner screw (16) with the combination tool (25) ∪ in order to release tension from the saw chain (10).
- Unscrew the two nuts (17) on the sprocket cover (15) using the combination tool (25).
-
Remove the sprocket cover (15).
-
Push the blade bar (11) towards the chain sprocket (34) and remove the saw chain (10) and then the blade bar (11).
Changing the saw chain and blade bar
Prior to changing the saw chain, the groove of the guide rail must be cleaned of dirt because dirt deposits available can cause the saw chain to break out of the rail. The deposits can also absorb the chain oil. So the consequence would be that the chain oil would not or only a small part of it would reach the underside of the rail and the lubrication would be reduced.
Requirements
- Mounting the saw chain and blade bar, p. 48
Procedure
- Replace the blade bar (11) and the saw chain (10).
- Fit the blade bar (11) and saw chain (10) as described under Installing the saw chain and blade bar, p. 48.
Installing the saw chain and blade bar
CAUTION! Always carry out maintenance and adjustment work with the engine switched off and the spark plug connector (46) disconnected.
CAUTION! Cutting injuries! Wear cut-resistant gloves when working with the saw chain or with the blade bar.
Notes
- Before fitting a new saw chain: Check the blade bar and chain sprocket for damage.
Tools and aids required
- Combination tool
Procedure (Fig. C)
- Place the device on a level surface.
- Deactivate the chain brake: Pull the chain brake lever (13) back towards the front handle (1).
You can only refit the sprocket cover (15) when the chain brake band has been released. - Place the blade bar (11) on the blade bar bolts (33) and slide it onto the chain sprocket (34).
- Thread the saw chain (10) over the chain sprocket (34).
- Place the saw chain (10) on the top of the blade bar (11) in the blade bar groove.
Start at the chain sprocket (34). It is normal for the saw chain (10) to sag.
- Pull the blade bar (11) forwards to tension the saw chain (10).
- Put the sprocket cover (15) back in position. Ensure that the chain tensioner pin (38) engages in the receptacle (35).
- Tighten the two nuts (17) on the sprocket cover (15) hand-tight. The blade bar should still be able to move.
- Tension the saw chain: Turn the chain tensioner screw (16) with the combination tool (25) ⬇.
- Tighten the nuts (17) of the sprocket cover (15) using the combination tool (25).
Tensioning the saw chain
NOTICE! Do not re-tension or change the saw chain when it is hot because it shrinks slightly once it has cooled down. If this is not observed it can lead to damage on the guide rail or the engine because the saw chain is now too taut on the blade bar.
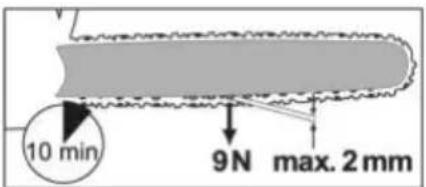
Regularly tightening the saw chain provides safety for the user and reduces and/or prevents wear and chain damage. We recommend that the user check the chain tension before starting work and at intervals of approx. 10 minutes and correct it if necessary. The saw chain warms up when working with the saw and thus expands slightly. These “expansions” can be expected especially from newer saw chains.
Chain tension and chain lubrication have a significant impact on the service life of the saw chain. The chain tension of a new saw chain must be readjusted after a maximum of 5 cuts.
The saw chain is properly tensioned when it does not hang from the underside of the blade bar and cannot be moved around by a gloved hand. When pulling on the saw chain with 9 N (approx. 1 kg) of force, the saw chain and blade bar should not be separated by a distance of more than 2 mm.
CAUTION! Always carry out maintenance and adjustment work with the engine switched off and the spark plug connector (46) disconnected.
Tools and aids required
- Combination tool
Checking the chain tension
Pull the saw chain (10) upwards at the top of the blade bar (11).
- Saw chain can hardly be pulled upwards: The chain tension is too high. Relax the saw chain.
- The saw chain can be pulled up so far that the driving elements are not fully visible: The chain tension is correct.
- The saw chain can be pulled up so far that the driving elements are fully visible: The chain tension is too low. Tension the saw chain.
Procedure (Fig. A)
- Deactivate the chain brake: Pull the chain brake lever (13) back towards the front handle (1).
You can only refit the sprocket cover (15) when the chain brake band has been released.
- Loosen the nuts (17) on the sprocket cover (15) using the combination tool (25).
- Tension the saw chain: Turn the chain tensioner screw (16) with the combination tool (25) ⬇.
Relax the saw chain: Turn the chain tensioner screw (16) with the combination tool (25) ⑤.
- Tighten the nuts (17) of the sprocket cover (15) using the combination tool (25).
The chain tension of a new saw chain must be readjusted after a maximum of 5 cuts.
Sharpening the cutting teeth
CAUTION! Risk of injury! An incorrectly sharpened saw chain increases the danger of kickback! Use cut-resistant gloves when working with the saw chain or with the blade bar.
A sharp saw chain ensures optimum cutting performance. It effortlessly eats through the wood and leaves behind large, long wood chips. A saw chain is dull when you have to push the cutting equipment through the wood and the wood chips are very small.
With a very blunt saw chain, no chips are produced, only wood dust.
Special tools are required for sharpening the saw chain to ensure that the chain is sharpened at the correct angle and to the correct depth. For inexperienced chain-saw users, we recommend having the saw chain sharpened by an expert or a specialist workshop. If you are confident that you can sharpen the chain, proceed according to the instructions for your saw chain sharpener (e.g. Parkside PSG 85 B2).
- The sawing parts of the saw chain are the cutting links, which consist of a cutting tooth and a depth gauge lug. The height distance between these two determines the sharpening depth.
- The saw chain is worn and must be replaced with a new saw chain when only approx. 4 mm of the cutting tooth is left.
- The following values must be taken into account when sharpening the cutting teeth (Fig. P):
- Sharpening angle (30°)
- Front angle (60°)
• Sharpening depth (0.65 mm)
• Round file diameter (4.0 mm)
⚠ WARNING! Risk of accident! Deviations from the dimensions of the cutting edge geometry can lead to an increased tendency of kickback by the machine.
Tools and aids required
- Round file
- Flat file
Procedure (Fig. P)
- Switch off the engine and let the device cool down.
- Switch off the device and remove the battery.
- Ensure that the saw chain is tightly tensioned to enable correct sharpening.
- Only sharpen from the inside out. Guide the round file from the inside of the cutting tooth to the outside. Lift off the file when you pull it back.
- Sharpen the teeth on one side first. Then turn the saw chain over and sharpen the teeth on the other side.
- Check the length of the cutting links. After sharpening, all the cutting links must have the same length and width.
- After every third sharpening, check the sharpening depth (depth gauge) and re-
file the height using a flat file. The depth gauge should be set back by approx. 0.65 mm from the cutting tooth.
- After resetting, round off the depth gauge slightly towards the front.
Running in a new saw chain
The tensioning force of a new saw chain decreases after some time. You must therefore retighten the saw chain after the first 5 cuts or after 10 minutes of sawing at the latest (Tensioning the saw chain, p. 49).
WARNING! Risk of injury! Never attach a new saw chain to a worn chain sprocket or to a damaged or worn blade bar. The saw chain could jump off or break.
Servicing the blade bar
⚠ WARNING! Cutting injuries! Wear cut-resistant gloves when working with the saw chain or with the blade bar.
Tools and aids required
- Combination tool
- Flat file
Procedure (Fig. C)
- Switch off the engine and let the tool cool down.
- Deactivate the chain brake: Pull the chain brake lever (13) back towards the front handle (1).
You can only refit the sprocket cover (15) when the chain brake band has been released.
- Unscrew the two nuts (17) on the sprocket cover (15) using the combination tool (25).
- Turn the chain tensioner screw (16) with the combination tool (25) ∪ in order to release tension from the saw chain (10).
- Remove the sprocket cover (15), the blade bar (11) and the saw chain (10).
- Check the blade bar (11) for wear. Remove burrs and straighten the guide surfaces with a flat file.
- Clean the oil passage (36) to ensure fault-free, automatic oiling of the saw chain during operation.
- Mount the blade bar (11), saw chain (10) and sprocket cover (15) and tighten the saw chain (10).
NOTICE! When in an optimal condition, the oil passages will automatically spray the saw chain with a little oil a few seconds after starting the chainsaw.
Changing the chain catch
- Mounting the saw chain and blade bar, p. 48
- Loosen and remove the screws on the chain catch (12).
- Replace the chain catch (12).
- Tighten the screws on the chain catch (12).
- Installing the saw chain and blade bar, p. 48
Turning the blade bar
CAUTION! Cutting injuries! Wear cut-resistant gloves when working with the saw chain or with the blade bar.
Notes
- The blade bar (11) needs to be reversed regularly after a working time of about 10 hours in order to ensure even wear.
Procedure (Fig. C)
- Mounting the saw chain and blade bar, p. 48
- Turn the blade bar along its horizontal axis.
When doing so, pay attention to the correct rotation direction of the saw chain - Installing the saw chain and blade bar, p. 48
Storage
- Remove the battery.
- Clean and maintain the tool prior to storage.
- Attach the chain guard (24).
- The combination tool (25) can be stowed in the chain guard (24) for storage (Fig. A).
- Empty the oil tank prior to longer periods of non-use. Dispose of waste oil environmentally correctly (Disposal/environmental protection, p. 52).
There may still be oil residues within hoses and in the tool that could leak out during storage. Place the tool on a suitable base/oil pan for storage. - Store the tool in a dry and dustproof location and out of reach of children.
Devices with battery:
- The storage temperature for the battery and device is between 15 °C and 25 °C. Avoid extreme cold or heat during storage to ensure the battery output is not adversely affected.
- Remove the battery from the device before storage over a longer period (see separate operating instructions for battery and charger).
Storage when not in operation
⚠️ CAUTION! Fuel residues in the carburet-tor can cause starting problems or permanent damage to the device.
For operational breaks of up to 3 months
- Drain the fuel tank in a well-ventilated place.
- Start the engine, allowing it to idle until the engine stops and the carburettor is free of fuel.
- Let the engine cool off (about 5 minutes).
Further actions for operational breaks of more than 3 months
- Remove the spark plug (47) with the combination tool (25) (Checking/adjusting/replacing spark plug, p. 47).
- Fill a teaspoon with pure two-stroke oil into the combustion chamber.
- Pull the starter cable slowly several times to distribute the oil inside the engine.
- Put the spark plug (47) back in.
Transport
- Cover the blade bar and saw chain with the chain guard (24) when you transport the tool.
- Short distances at the place of work: Carry the tool by the front handle (1) with the blade bar pointing backwards.
- Switch off the tool each time before transport. Secure the tool against tipping over during transport (including in vehicles) to prevent injury, damage or loss of fuel.
- Switch off the tool each time before transport and remove the battery. Secure the tool against tipping over during transport (including in vehicles) to prevent injury, damage or loss of oil.
- Longer distances or in vehicles: Transport the tool in the provided carrier bag (26).
Disposal/environmental protection
Dispose of the tool in accordance with the local regulations. For further information, please contact your local administration.
- Do not dispose of waste oil and petrol residues in the sewage system or down the drain. Dispose of waste oil and petrol remnants in an environmentally friendly way – take them to your local recycling centre.
- The tool, accessories and packaging should be properly recycled.
• Machines must not be disposed of with domestic waste. - Empty the oil and fuel tanks carefully and return your tool to a recycling centre.
- Dispose of empty oil and fuel containers in an environmentally friendly manner.
- The plastic and metal parts used on your tool can be properly sorted according to materials and grades and efficiently recycled.
- If you have any other questions, contact the service centre.
Remove the battery from the device and recycle the device, battery, accessories and packaging in an environmentally-friendly manner.

Waste electrical and electronic equipment (WEEE) must not be disposed of with domestic waste.
The symbol of the crossed-out wheeled bin means that this product must not be disposed of as unsorted municipal waste at the end of its useful life.
Directive 2012/19/EU on waste electrical and electronic equipment:
Consumers are legally obliged to recycle electrical and electronic equipment in an environmentally sound manner at the end of its life. In this way, environmentally friendly and resource-saving recycling is ensured. Depending on the implementation in national law, you may have the following options:
- Return to a shop,
- Hand over to an official collection point,
- Return to the manufacturer/distributor.
This does not affect accessories enclosed with the old devices or tools without any electrical components.
Dispose of batteries in an environmentally friendly manner

Do not throw batteries into domestic waste, fire (risk of explosion) or water. Damaged batteries can harm the environment and your health if poisonous fumes or liquids escape.
You are obliged to dispose of defective or used batteries in an environmentally friendly manner. (Regulation (EU) 2023/1542 concerning batteries and waste batteries; UK: The Waste Batteries and Accumulators Regulations 2009)
- Do not open the batteries and avoid mechanical damage. There is a risk of a short circuit and vapours may leak out, causing irritation to the respiratory tract.
- For safety reasons, batteries should be discharged before disposal.
- Tape the poles to prevent short circuits.
- Dispose of rechargeable batteries via a retailer or collection point.
• Damaged batteries
Handle externally damaged batteries with particular care!
- Do not touch damaged batteries with your bare hands.
- If you cannot tape the poles, place the batteries individually in a plastic bag.
- Place damaged batteries individually in a non-flammable, sealable container that can still be filled with sand.
• Take damaged batteries to a collection point with specialised personnel.
Troubleshooting
The following table will assist you in fixing faults:
| Problem Possible cause Error | correction | |
| Device does not start | No fuel in the tank Fill up with fuel | |
| Incorrect starting sequence Switching on and off, p. 41 | ||
| Electric starter (3) defective contact the service centre. | ||
| Defective motor contact the service centre. | ||
| Spark plug (47) worn out Checking/adjusting/replacing spark plug, p. 47 | ||
| Saw chain not running Chain brake blocks saw chain (10) | Checking the chain brake, p. 41 | |
| Poor cutting performance | Saw chain (10) incorrectly fitted | Installing the saw chain and blade bar, p. 48 |
| Saw chain (10) blunt • Sharpening the cutting teeth, p. 49• Changing the saw chain and blade bar, p. 48 | ||
| Insufficient chain tension Tensioning the saw chain, p. 49 | ||
| Device has difficulties running, saw chain jumps off | Insufficient chain tension Tensioning the saw chain, p. 49 | |
| Saw chain gets hot, smoke development when sawing, discolouration of the rail | Not enough chain oil • Checking the oil level and oil automation• Pouring in chain oil, p. 40• Maintain the chain lubrication, p. 40• contact the service centre. | |
Service
Guarantee
Dear Customer,
This product is provided with a 5 year guarantee from the date of purchase. In case of defects, you have statutory rights against the seller of the product. These statutory rights are not restricted by our guarantee presented below.
Terms of Guarantee
The guarantee period begins on the date of purchase. Please retain the original receipt. This document is required as proof of purchase. If a material or manufacturing defect occurs within five years of the date of purchase of this product, we will repair or replace – at our choice – the product for you free of charge. This guarantee requires the defective product and proof of purchase to
be presented within the five-year period with a brief written description of what constitutes the defect and when it occurred.
If the defect is covered by our guarantee, you will receive either the repaired product or a new product. No new guarantee period begins on repair or replacement of the product.
Guarantee Period and Statutory Claims for Defects
The guarantee period is not extended by the guarantee service. This also applies for replaced or repaired parts. Any damages and defects already present at the time of purchase must be reported immediately after unpacking. Repairs arising after expiry of the guarantee period are chargeable.
Guarantee Cover
The product has been carefully produced in accordance with strict quality guidelines and conscientiously checked prior to delivery.
The guarantee applies for all material and manufacturing defects. This guarantee does not extend to cover product parts that are subject to normal wear and may therefore be considered as wearing parts (e.g. Saw chain) or to cover damage to breakable parts.
This guarantee shall be invalid if the product has been damaged, used incorrectly or not maintained. Precise adherence to all of the instructions specified in the operating manual is required for proper use of the product. Intended uses and actions against which the operating manual advises or warns must be categorically avoided.
The product is designed only for private and not commercial use. The guarantee will be invalidated in case of misuse or improper handling, use of force, or interventions not undertaken by our authorised service branch.
Processing in Case of Guarantee
To ensure efficient handling of your query, please follow the directions below:
- Please have the receipt and product number (IAN 495712_2504) ready as proof of purchase for all enquiries.
- Please refer for the product number to the type plate on the product, an engraving on the product, the title page of the operating instructions (bottom left) or the sticker on the back or underside of the product.
- Should functional errors or other defects occur, please initially contact the service centre specified below by telephone or use the contact form available on parkside-diy.com in the category Service.
- After consultation with our customer service, a product recorded as defective can be sent postage paid to the service address communicated to you, with the proof of purchase (receipt) and specification of what constitutes the defect and when it occurred. In order to avoid acceptance problems and additional costs, please be sure to use only the address communicated to you. Ensure that the consignment is not sent carriage forward or by bulky goods, express or other special freight. Please send the appliance inc. all accessories supplied at the time of purchase and ensure adequate, safe transport packaging.

You can view and download these and many other manuals on parkside-diy.com. This QR code will take you directly to parkside-diy.com. Select your country and search for the operating instructions via the search mask. You can open your operating instructions by entering the article number (IAN) 495712_2504.
Repair service
For repairs that are not covered by warranty, contact the service centre. They will gladly create a cost estimate for you.
• We can only work on devices which are sent in properly packed and with postage paid.
Note: Please send your device cleaned and with an indication of the defect to the address named for the service centre.
- The following are not accepted: devices sent in without prepaid postage, sent as bulky goods, sent as an Express shipment, or devices sent as any other form of special freight.
• We will dispose of defective devices you ship to us free of charge.
Service Centre
Service Great Britain Tel.: 0800 051 8970 Contact form on parkside-diy.com IAN 495712_2504
MT Service Malta Tel.: 800 65168 Contact form on parkside-diy.com IAN 495712_2504
Importer
Please note that the address below is not a service address. Contact the service centre named above first.
Spare parts and accessories
You can get spare parts and accessories from www.grizzlytools.shop. If you have any problems with your order, contact us via our online shop. If you have any other questions, contact: Service Centre, p. 54
| Pos. nr. Name Order No. | |
| 9 Tank cover (Chain oil) 91115902 | |
| 47 Spark plug 91115903 | |
| 15 Sprocket cover 91115914 | |
| 45 Air filter 91115910 | |
| 37 Chain catching bolt 91115907 |
⚠ WARNING! Safe use of the chainsaw is only possible with approved saw chains and guide rails. The use of unapproved combinations can cause serious or even fatal injuries.
- Saw chain:
• .325.058x72DL (Kangxin)
• 21BPX072X (Oregon)
- Blade bar:
• BE18-72-5810P (Kangxin)
• 188PXBK095 (Oregon)
Translation of the original EU declaration of conformity
Product: Petrol Chainsaw With Electric Start
Model: PPBKS 56 C3
Serial number: 000001-029000
The object of the declaration described above is in conformity with the relevant Union harmonisation legislation:
2006/42/EC • 2014/30/EU • 2000/14/EC & 2005/88/EC
• (EU) 2016/1628 & (EU) 2018/989 • 2011/65/EU & (EU) 2015/863
The object of the declaration described above is in conformity with Directive 2011/65/EU of the European Parliament and of the Council of 8 June 2011 on the restriction of the use of certain hazardous substances in electrical and electronic equipment.
To ensure conformity, the following harmonised standards and national standards and regulations have been applied:
EN ISO 11681-1:2022 • EN ISO 14982:2009 • EN IEC 63000:2018
In accordance with the Directive 2000/14/EC relating to noise emission, the following is confirmed: Sound power level (L WA)
- Measured: 113.9 dB;
-Guaranteed:116dB
Followed conformity assessment procedure according to 2000/14/EC, Annex VI.
EC type-examination certificate
• Number: M6A 036607 2364 Rev. 00
- Notified body: TÜV SÜD Product Service GmbH • NB: 0123
This declaration of conformity is issued under the sole responsibility of the manufacturer:


Authorised representative of documentation
Sommaire
Introduction.... 57
Service-Center....84
Importateur.... 85
natural_image
Two diagrams showing a mechanical component (a) and a tool interacting with a surface (b), both without any text or symbols.Service-Center....111
Importeur.... 111
natural_image
Two technical diagrams showing mechanical components and a tool interacting with a surface (no text or symbols present)Service-Center....139
Importador.... 139
natural_image
Two technical diagrams showing mechanical components and a tool interacting with a surface (no text or symbols present)Service-Center....166
Importatore.... 166
Ricambi e accessori.... 166
natural_image
Two diagrams showing mechanical components: (a) a gear-like structure with motion arrows, and (b) a tool interacting with a surface (no text or symbols)PDF ONLINE
parkside-diy.com
Service-Center....190
Dovozce....190
natural_image
Two diagrams showing mechanical components: (a) a gear-like structure with motion arrows, and (b) a tool interacting with a surface (no text or symbols)Service-Center....215
Importér.... 216
natural_image
Two diagrams showing a mechanical component and a tool interacting with a surface, labeled (a) and (b), with no visible text or symbols.PDF ONLINE parkside-diy.com
natural_image
Two diagrams showing mechanical components: (a) a gear-like structure with angular motion, and (b) a tool interacting with a tree branch (no text or symbols)- Adres kontaktowy na terenie Unii: 3rd floor, Building 2, No. 220 Shangpu Road, Dongcheng Street, Yongkang City, Jinhua City, Zhejiang Province, China
natural_image
Two diagrams showing mechanical components: (a) a gear-like structure with motion arrows, and (b) a tool interacting with a surface (no text or symbols)PDF ONLINE
parkside-diy.com
• Numer: M6A 036607 2364 Rev. 00
- Jednostka notyfikowana: TÜV SÜD Product Service GmbH • NB: 0123 - Ridlerstraße 65 • 80339 München • Deutschland
Service-Center....294
Importør...... 294
• Handelsnavn: MEILIN
- Firmanavn: Yongkang Meilin Machinery Co., Ltd.
- Adresse i EU: 3rd floor, Building 2, No. 220 Shangpu Road, Dongcheng Street, Yongkang City, Jinhua City, Zhejiang Province, China
natural_image
Two diagrams showing a mechanical component (a) and a tool interacting with a surface (b), both without any text or symbols.Opbevaring under driftspauser
natural_image
Close-up of a mechanical device with labeled components, no readable text or symbols beyond branding and number 33 (no readable text or symbols)E
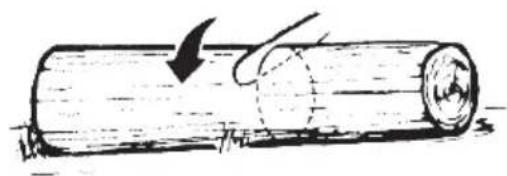
natural_image
Simple line drawing of a wooden log being cut with a curved arrow indicating the direction (no text or symbols)F
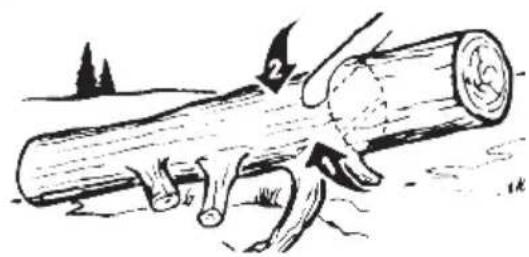
natural_image
Illustration of a wooden log being struck by a hand, showing a rope and a labeled arrow (no text or symbols present)G
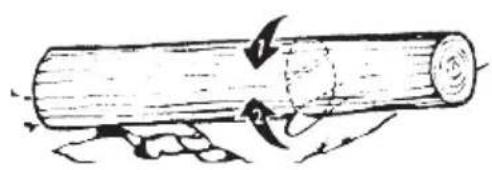
natural_image
Diagram of a wooden log being pulled with arrows indicating motion (no text or symbols)H
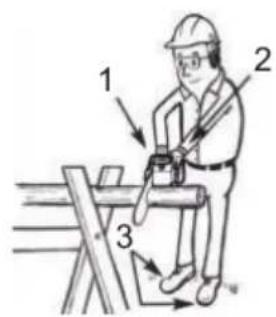
|
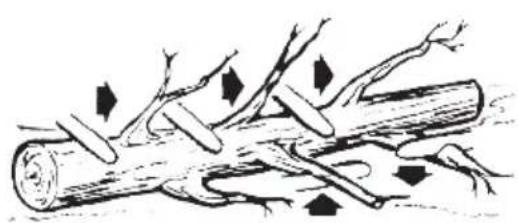
natural_image
Illustration of a hand holding a wooden log with arrows indicating force or movement (no text or symbols)J
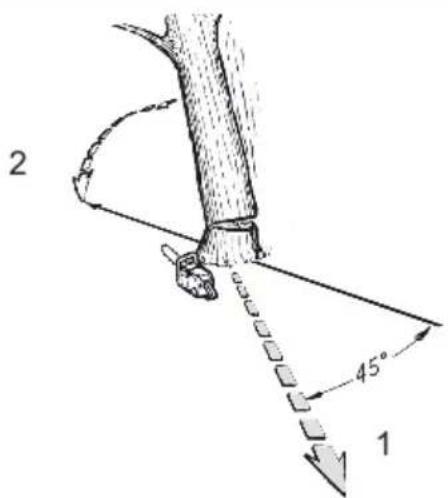
K
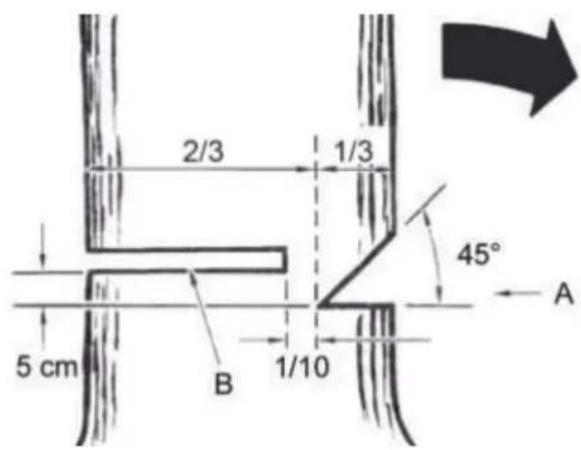
L

natural_image
Simple line drawing of a tree trunk with a rope tied at the base, showing a downward arrow indicating compression or damage (no text or symbols)M
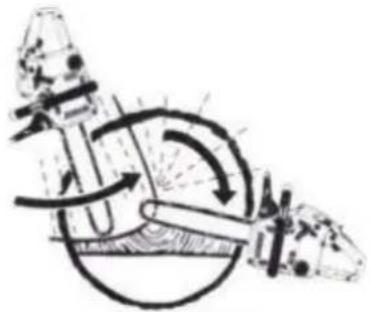
natural_image
Diagram of aircraft aerodynamics showing airflow and cutting paths (no text or labels)N
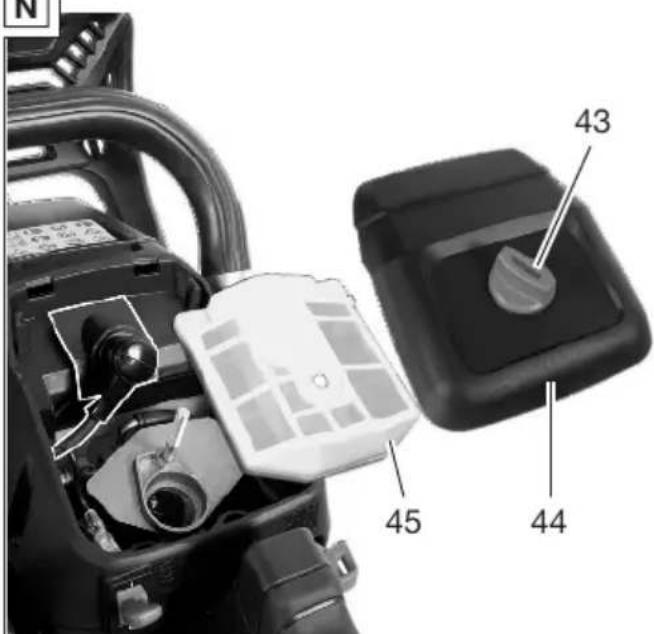
0

P
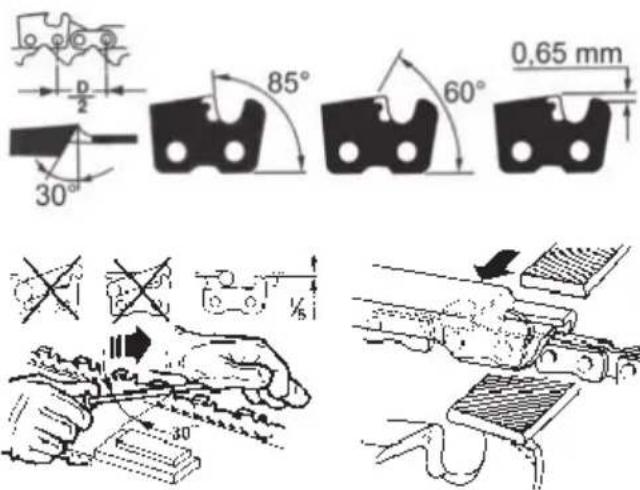
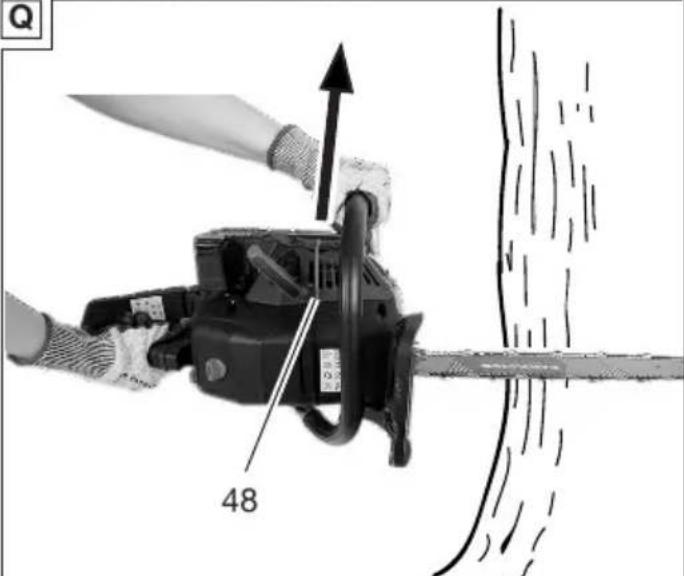
responsible forestry
FSC® C189562