
Realishot C110 - Camera AGFAPHOTO - Free user manual and instructions
Find the device manual for free Realishot C110 AGFAPHOTO in PDF.

| Product type | Compact digital camera |
| Brand | AgfaPhoto |
| Model | Realishot C110 |
| Sensor | Sony CMOS 13.0 MP |
| Lens | Aperture f/1.96 ~ 3.64, focal length 2.38 mm ~ 7.14 mm (24 mm equivalent wide-angle) |
| Zoom | Optical zoom 3X, digital zoom 4X |
| Screen | 2.8-inch high-definition IPS screen |
| Photo resolution | Up to 24 MP (24M/20M/13M/10M/8M/5M/3M/2M) |
| Video resolution | 4K30, 2.7K60, 1080P120, 720P120 and other formats |
| Focus | AF, MF, AF+MF, face detection |
| Shooting modes | Auto, program, shutter priority, scene, macro, burst, self-timer, interval |
| Image stabilization | Built-in (enable/disable) |
| Flash | External flash (hot shoe) with modes off, auto, forced |
| Storage | SD/SDHC/SDXC UHS-III card up to 512 GB |
| Connectivity | Wi-Fi 2.4 GHz, USB Type-C (USB 2.0), HDMI, external mic |
| Power | Rechargeable battery, charging via USB Type-C (5 V / 2 A) |
| Dimensions (L × W × H) | 117 × 160 × 66 mm |
| Weight | 285 ± 10 g (without battery) |
| Operating temperature | 0 °C to 40 °C |
| Maintenance | Clean with a dry soft cloth, avoid chemicals and solvents |
| Included accessories | Battery, USB cable, wrist strap, external flash (depending on version) |
Frequently Asked Questions - Realishot C110 AGFAPHOTO
User questions about Realishot C110 AGFAPHOTO
0 question about this device. Answer the ones you know or ask your own.
Ask a new question about this device
Download the instructions for your Camera in PDF format for free! Find your manual Realishot C110 - AGFAPHOTO and take your electronic device back in hand. On this page are published all the documents necessary for the use of your device. Realishot C110 by AGFAPHOTO.
USER MANUAL Realishot C110 AGFAPHOTO
natural_image
Black AGFAPHOTO C110 digital camera with lens and aperture (no visible text or symbols beyond branding)Realishot C110
User manual
Please carefully read the instruction manual before using this product. It contains important information, so keep it safe for future reference.
- Do not use the product in case it has any damage, or unusual conditions like smoke, abnormal sound, peculiar smell.
- To prevent shock, do not open the casing. There are no user serviceable parts inside. Servicing must be performed by a qualified technician.
- Avoid exposing the product to extreme temperatures, humidity, or strong vibrations. This can cause sensor damage, as well as malfunctioning of internal circuitry.
- Do not use any corrosive chemicals or solvent to clean the product.
- Do not disassemble, repair, or transform the product without authorization.
- Do not operate it for a long time while it's being charged.
- Do not let magnetic objects such as magnets approach the product to avoid faults and data loss.
- Prevent dust or dirt from entering the slot and USB port. Promptly wipe off or remove them in case of such condition to avoid conditions like poor contact.
- Keep the product, accessories, and packing materials out of the reach of children to avoid possible suffocations.
- Charge within the temperature range of 10°C to 35°C; otherwise longer charging times or charging malfunction can occur.
- Do not damage the USB cable.
- Do not heat, pull, or bend the USB cable to avoid possible fire or electric shock.
It is recommended to copy your important recorded data to other memory cards or a PC frequently.
Be sure to follow the guidelines below to prevent corruption or damage to your recorded data.
- Do not use, replace, or store the card in locations that are exposed to, strong magnetic field, static electricity or electrical noise.
EN
- Do not turn off the camera power during shooting, playback, or when otherwise accessing the micro-SD card.
- Do not store the card in locations with high temperatures or high humidity.
INTRODUCTION
EN
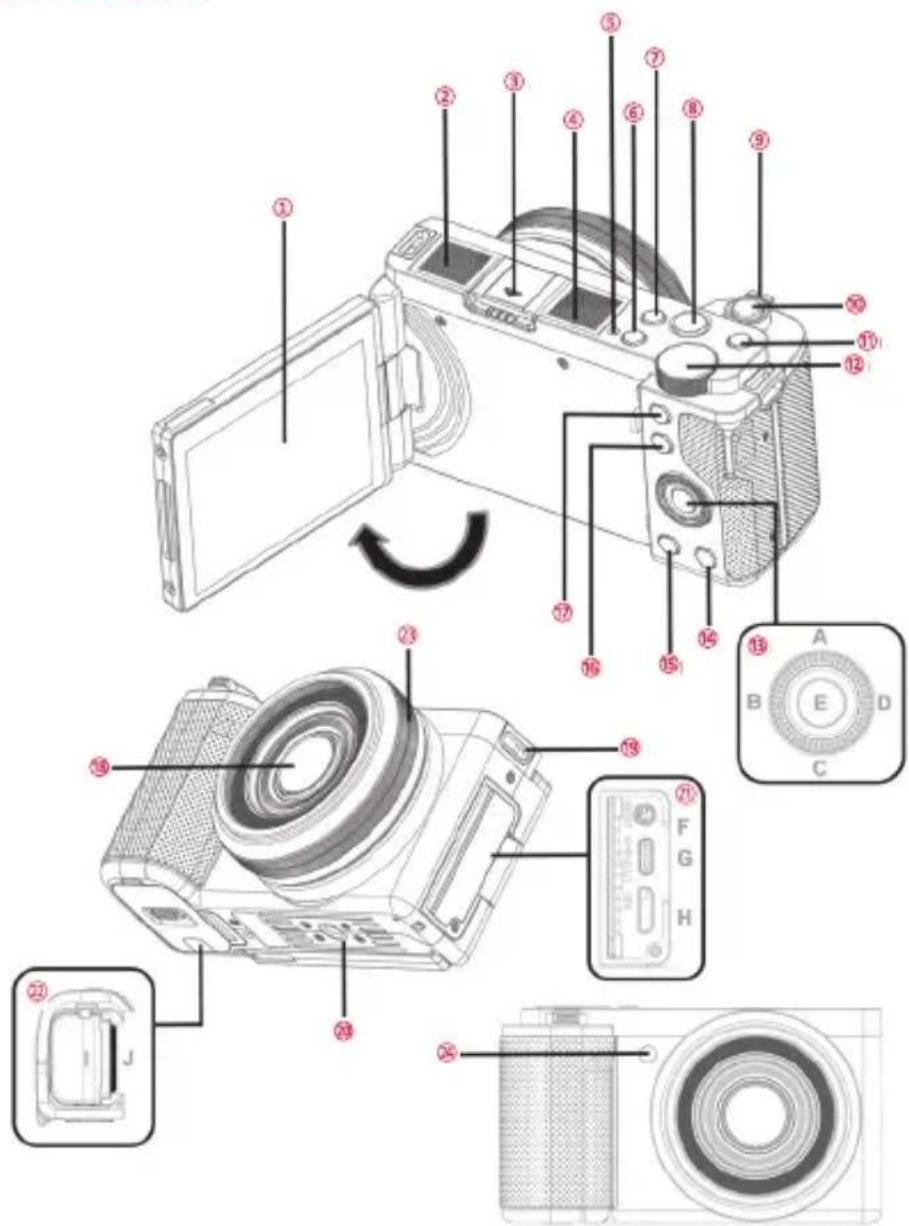
| 1 | IPS Panel Screen preview and video/photo playback | |
| 2 | Microphone Recording sound | |
| 3 | Hot Shoe Interface Mount hot shoe products | |
| 4 | Speaker Play sound | |
| 5 | State Light Green light always on: Standby;Green light continuously flashing: In the recording;Green light flashes once: take a photo;Red light always on: During charging, it turns off when fully charged | |
| 6 | POWER Button Power On/Off | |
| 7 | DISP Button Press to switch screen display mode | |
| 8 | VIDEO Button START/STOP recording | |
| 9 | T/W Zoom Button In video/Photo Mode, pull left/right to zoom in/out;In playback, pull left to switch to grid preview | |
| 10 | Shutter Button Two-stage button, tap to focus and press to take a photo in photo mode | |
| 11 | MODE Button Call up Shooting Modes list | |
| 12 | Adjusting knob In P (Program Auto) mode: Adjust exposure;In S (Shutter Priority) mode: adjust the shutter speed;In Video mode: adjust exposure;In SCN (Scene Selection) mode: select the scene;In Macro mode: Adjust exposureIn A (Automatic) Mode : sets all settings to Automatic | |
| 13 | A Drive Mode Button | In standby: enter the burst/self-timer option;In the function menu: Select the function upwards |
| B AE-L Button | In standby: Lock the current exposure value;In the function menu: Select function to the left | |
| C Exposure Button | In standby: enter the exposure value option;In the function menu: Select the function downwards | |
| D AFL Button | In standby: lock the current focus;In the function menu: select the function to the right | |
| E Ok button | In standby: enter the effects, contrast, Image tone, saturation, Hue and sharpness options;In the function menu: Confirm the selection of functions; In playback mode: start/pause playback | |
| 14 | Delete Button Delete recent files. | |
EN
| 15 | PLAYBACK Button Enter the playback mode | |
| 16 | Fn shortcut function Button Enter the shortcut function menu | |
| 17 | MENU Button In standby: enter the function menu; playing a video: stop playing | |
| 18 | Lens Framing | |
| 19 | Strap Mounting Hole Install adjustable strap | |
| 20 | 1/4 Tripod Socket Tripod installation | |
| 21 | F MIC Interface Access to external microphones | |
| G TYPE-C USB Interface External USB cable | ||
| H HD interface External HDMI cable | ||
| 22 | I Battery Compartment For the Battery | |
| J SD slot For SD Card | ||
| 23 | Manual focusing wheel Manually focus in MF mode | |
| 24 | AF auxiliary light Auxiliary focusing | |
INSTALLING THE BATTERY & CHARGING
• Installing the battery

natural_image
Technical line drawing of a camera module with a mechanical component and directional arrow (no text or symbols)Install the battery into the camera in the direction shown in the diagram
EN
- Battery charging
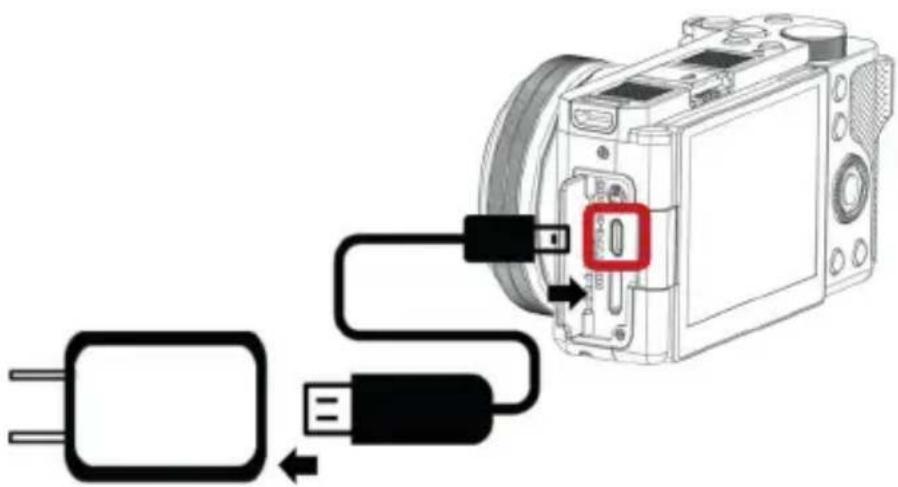
natural_image
Diagram showing cable connection to a camera module with a red square highlighting the connector (no text or symbols present)USING A MEMORY CARD
- Inserting a memory card
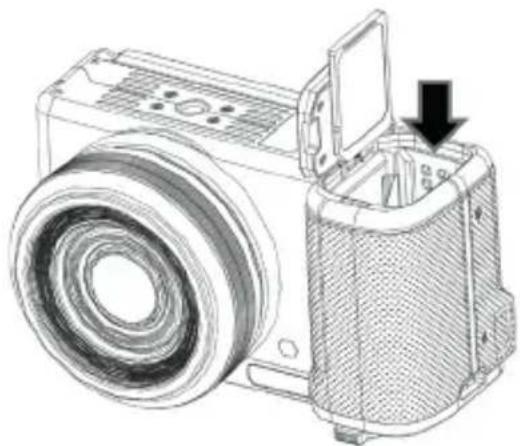
natural_image
Technical line drawing of a camera module with a highlighted internal component (no text or symbols)Insert the memory card straight in the direction shown in the diagram
When using the memory card for the first time, please format it on the camera.
A U3 memory card is recommended, and any memory card below U3 may not function properly.
PHOTO
Press the MODE Button to select the Shooting Modes
Half press the shutter button to focus, then fully press the Shutter button again to take a photo
- Photo function menu
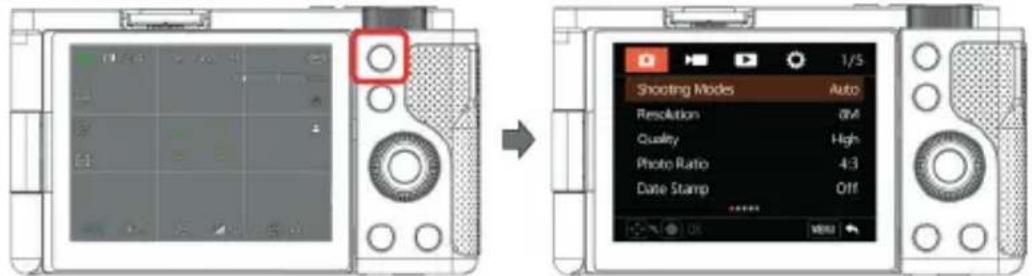
Press the MENU Button to enter the function menu
| Shooting Modes | Automatic mode / Program mode /Shutter Priority/Video/Scene Selection/Macro |
| Resolution | 24M/20M/13M/10M/8M/5M/3M/2M |
| Photo Ratio | 4:3/16:9 |
| Time Stamp | Off/Date/Date & Time |
| Focus Modes | AF/MF/AF+MF/AF+MF2 |
| Real time focusing | Off/On |
| Face tracking | Off/On |
| AF Assist Lamp | Off/Auto |
| White Balance | Auto/Daylight/Cloudy/Tungsten Light/Fluorescent(H)/Fluorescent(L)/ Color Temperature 3000~9000K |
| Filter Style | Standard/Natural/Vivid/Monotone/High Contrast B&W/Negative/High Contrast/Retro/CCD/Warm Colors/Cold Colors/Red Tone/Green Tone/Blue Tone/Yellow Tone |
EN
| Soft Skin Effect | Off/Low/High |
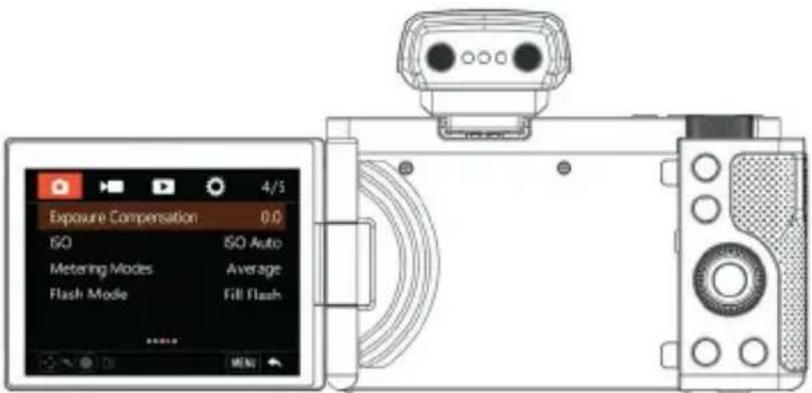
| Exposure Compensation | -3.0~+3.0 |
| ISO | Auto/100/200/400/800/1600/3200 |
| Metering Modes | Average/Center/Spot |
| Flash Mode | Off/Auto Flash/Forced Flash (External flash is required before use) |
| Drive Modes | Single Shootings/ Continuous shootings:3/ Continuous shootings:5/ Continuous shootings:7/Self-timer:2 sec/Self-timer:5 sec/Self-timer:10 sec |
| Interval Timer Shooting | Off/3 Sec/5 Sec/10 Sec/30 Sec/1Min |
| Interval Mode Duration | Unlimited/5 Min/10 Min/15 Min/20 Min/30 Min/60 Min |
| Image Stabilization | Off/On |
VIDEO
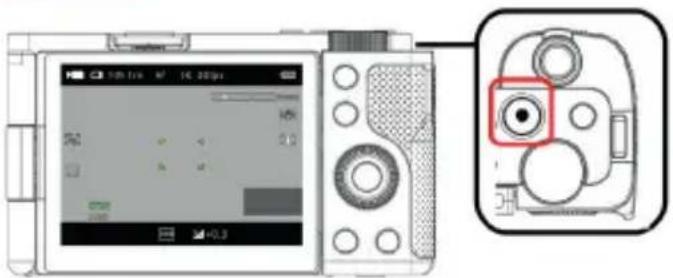
Press the VIDEO Button to start/stop recording
• Video function menu
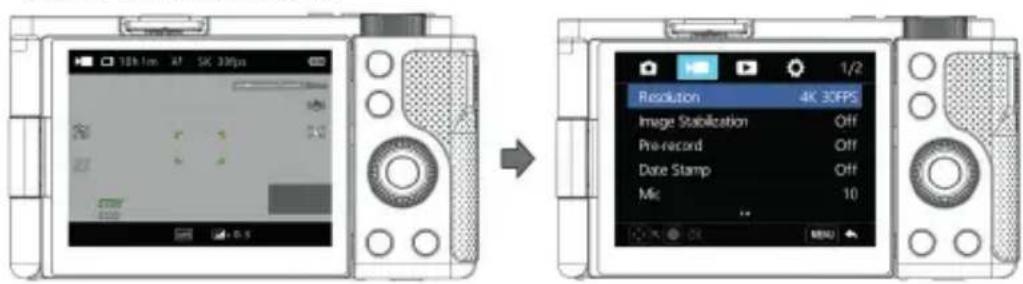
Press the MENU Button to enter the function menu in Video mode
| Resolution 4K30/2.7K60/2.7K30/1080P120/1080P60/1080P30/720P120/720P60/720P30 |
| Image Stabilization Off/On |
| Pre-recording Off/On |
| Time Stamp Off/Date/Date&Time |
| Mic 0~20 |
| Slow Motion Off/1080P 4X/ 1080P 2X/ 720P 4X/ 720P 2X |
| Loop Record Off/1 Min/3 Min/5 Min |
| Time-Lapse Video Off/1 Sec/3 Sec/5 Sec/10 Sec/30 Sec/1 Min |
| Duration Unlimited/5 Min/10 Min/15 Min/20 Min/30 Min/60 Min |
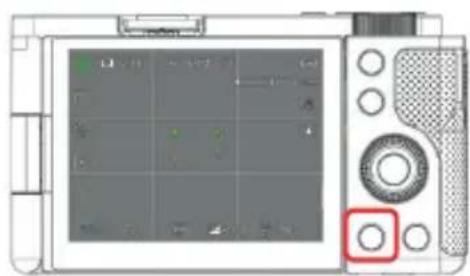
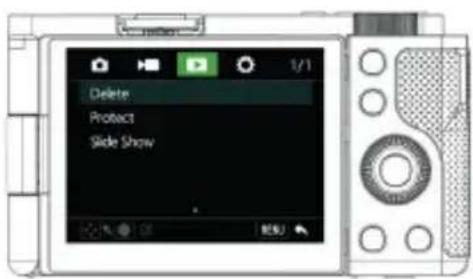
PLAYBACK
natural_image
Front view of a digital camera module with control panel and adjustment knobs (no visible text or symbols)
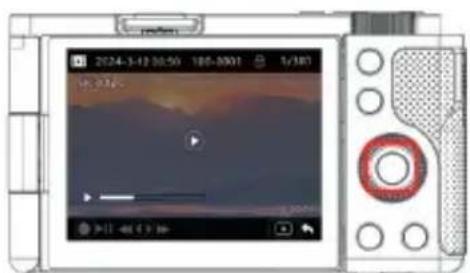
Press CONFIRM Button to play the video
Press the PLAYBACK Button while in standby

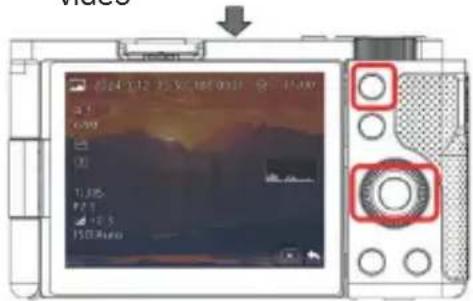
Press the AEL and AFL Buttons to switch file browsing;
Delete Single/All
Protect Protect this file/Unprotect this file/Protect all/Unprotect all
Slide Show 2 Sec/5 Sec
EN
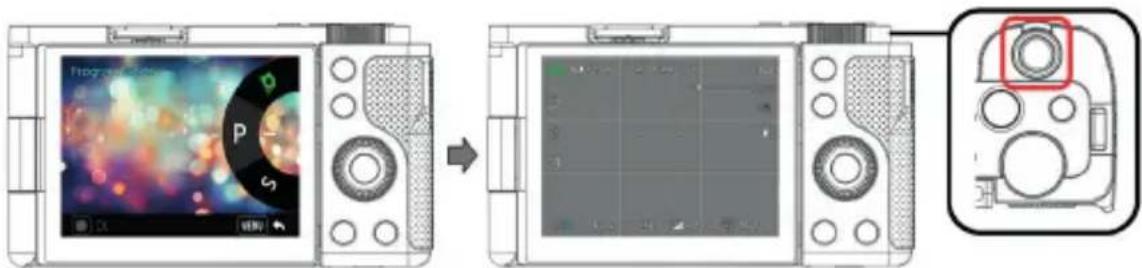
SYSTEM SETTINGS

natural_image
Front view of a digital camera with control panel and display screen (no visible text or symbols)Press the MENU Button to enter the function menu

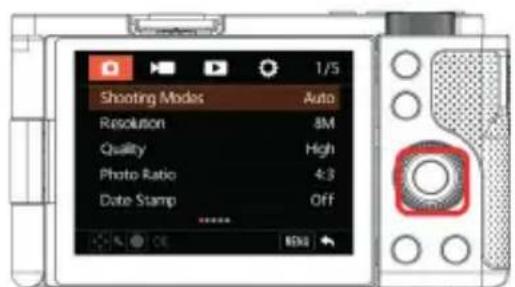
Press the EXPOSURE Button+AFL Button to adjust and enter the system settings menu
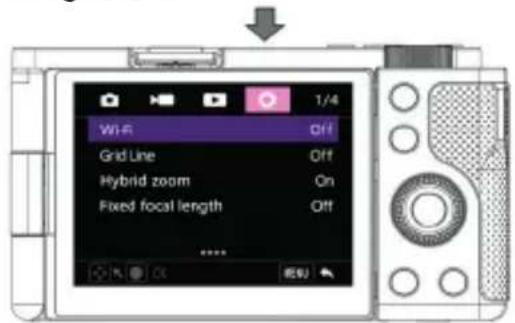
Wi-Fi Off/On
Grid Line Off/White Line/Yellow Line/Red Line
Hybrid zoom Off/On
Fixed focal length Off/17mm Focal length/24mm Focal length/35mm Focal length/ 50mm Focal length
Sounds Shutter/Boot-up/Beep/Volume
Date&Time Setup Date&Time Settings
Time Style YYMMDD/MMDDYY/DDMMYY
Screen Brightness Low/Middle/High
Screen Saver Off/1 Min/2 Min/3 Min
Auto Power Off Off/5 Min/10 Min
Light Frequency 50HZ/60HZ
Format Card Yes/No
Factory Reset Yes/No
FLASH
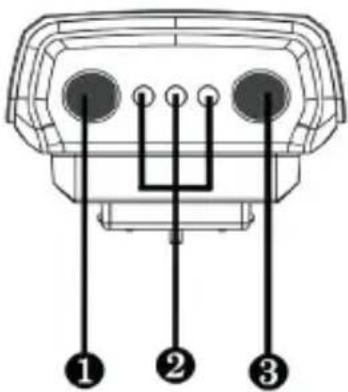
① Power button: Press and hold for 3 seconds to turn on/off, short press to switch flash modes.
② Flash mode indicator light (1st mode: Low / 2nd mode: Medium / 3rd mode: High).
③ Flash test button.

natural_image
Diagram of a digital camera with an arrow pointing to the lens (no text or symbols present)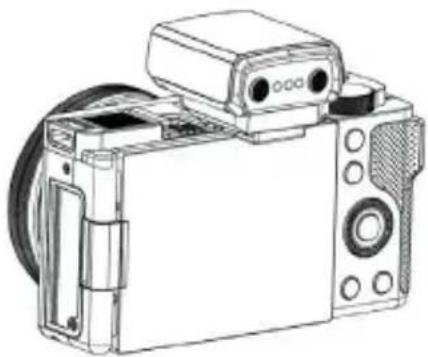
natural_image
Line drawing of a digital camera with lens and control panel (no text or symbols)Remove the hot shoe cover from the camera and mount the flash onto the camera.
Long press the power button to turn on the flash, and then turn on the flash mode in the camera's photo settings to use it.
EN
MOBILE APPLICATION
The mobile application allows remote control via Wi-Fi. Use it to preview shots in real time, start/stop recording, adjust settings, and transfer media to your smartphone.

- Download And Install the App:
Scan the QR code below to download and install directly Or
Search and install «OD CAM» directly through the App Store or Google Play Store.
- Wi-Fi connection

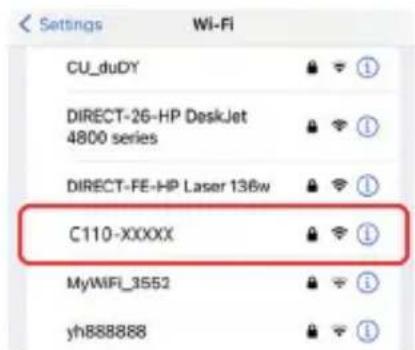
1 To connect to Wi-Fi, go to settings and select Wi-Fi.
2 Go into your smartphone settings and enable Wi-Fi.
3 Find the Wi-Fi name for the camera [Default name: C110-xxxxx].
4 Enter the Wi-Fi password (Default password: 12345678) for a successful connection.
5 Open the OD Cam App and click the [Connecting device] to enter the main interface of the APP.
After connecting the device for the first time, please change the default Wi-Fi password on the camera to ensure the security of your device.
For Android users, please select (Yes) for all possible questions like Allow the App to obtain the permission?)
The Wi-Fi function is point-to-point wireless connection within effective distance. The maximum distance is about 6m. Please use the function within the effective distance.
Because of various phone brands or configurations, the process to enter the main interface may be slow or the connection may fail. Please try the connection process again.
Q&A
Q1: A video may be automatically divided into several files. How can I combine them into one?
A1: You can combine them by using a video combiner in your computer.
Q2: Which operating systems or mobile phones is the App compatible with?
A2: The App is compatible with the following operating systems: Android: Android 5.0, Android 6.0, Android 7.0, Android 8.0, Android 9.0, Android 10.0, and Android 11.0; iOS: iOS 9, iOS 10, iOS 11, iOS 12, iOS 13, iOS 14; iOS 15; iOS 16 iOS 17 and iOS 18; Regardless of the systems it is compatible with, the stability of the App depends on the configurations of the phone as well as network conditions. The App is not Applicable to computers.
Q3: Why does my Android phone always fail in connecting to the App?
A3: After successfully connecting your phone to the Wi-Fi, please select (Yes) in case it prompts (Wi-Fi is not connected to the Internet. Will you continue using it?)
FAULTS AND SOLUTION
Fault Possible Cause and Solution
| Failure to switch on | ·The Camera has low battery. Please recharge it immediately.·Check whether the operating environment temperature is within 0~40°C. |
| Failure to switch off | ·If the ambient temperature is high or the Camera is used for an extended period, it may have excessively high temperature. Please wait a moment. |
| Automatic shutdown | ·It's normal that the Camera automatically shuts down after standing by for three minutes.·Check whether the operating environment temperature is within 0~40°C.·If the Camera is used for an extended period, it may have excessively high temperature. Please wait a moment and switch it on after it cools down. |
| Rapid battery drain | ·Battery performance degrades in low temperature. Please use it after it is preheated.·The battery is not fully charged. Please recharge it.·The battery is reaching the end of its usable life,please buy a new battery. |
| Wi-Fi signals are unstable | ·The distance is too long. Please use it within 6m (effective distance).·The Camera has low battery. Please recharge it immediately.·The wireless signals are interfered because the Camera is placed on a metal table or stand.Keep it away from metal.·The Wi-Fi signals of the phone are weak. Please use another phone. |
| Video voice is too low | ·The sound equipment is poor or the volume is not properly adjusted. Please use other equipment or adjust the volume.·The distance to the sound source is too long. Please record your videos within 5m (effective distance). |
TECHNICAL SPECIFICATIONS
| Sensor Sony 13.0MP CMOS sensor | |
| Aperture and focal length F.no 1.96 ~ 3.64 f: 2.38mm~7.14mm | |
| Lens thread diameter 49mm | |
| Screen 2.8"IPS High -Definition screen | |
| Zoom 3X Optical zoom - 4X Digital zoom | |
| Photographing distance Wide: 0.3m~INF - Tele: 0.5m~INF | |
| File format Video: MP4 - Photo: JPEG | |
| Video Resolution 4K30/2.7K60/2.7K30/1080P120/1080P60/1080P30/720P120/720P60/720P30 | |
| Photo Pixel 24M/20M/13M/10M/8M/5M/3M/2M | |
| Memory medium SDHC memory card/SDXC memory card UHS-III,512GB (maximum) | |
| Microphone Built-in | |
| Speaker Built-in | |
| Wi-Fi Built-in | |
| USB Type-C USB 2.0 | |
| HDMI Built-in | |
| Hot Shoe Built-in | |
| Computer OS Windows 7/8/10/11 Mac OSX10.5 and above | |
| Mobile OS | Android 5.0 and above; iOS 9.0 and above |
| Power input DC5V/2A -Type-C USB | |
| Dimensions L 117mm W 60mm H 66mm | |
| Weight | 285±10g(Excluding battery) |
| Working temperature 0~40°C | |
| Frequencies used | WiFi – 2,4 GHz IEEE 802.11b/g/n |
| Maximum power used | WiFi (2.4G): 16dBM |
MESURES DE PRÉCAUTION
natural_image
Technical line drawing of a camera with a mechanical component and a downward arrow indicating motion (no text or symbols)natural_image
Diagram of a DSLR camera connected to a plug, showing cable routing and a close-up of the cable (no text or symbols present)UTILISATION D'UNE CARTE MÉMOIRE
natural_image
Technical line drawing of a camera module with a highlighted internal component (no text or symbols)natural_image
Diagram of a digital camera module showing front and side views with no visible text or symbolsnatural_image
Front view of a digital camera with control panel and display screen (no visible text or symbols)

natural_image
Front view of a digital camera interface with control panel and display screen (no readable text or symbols)natural_image
Diagram of a digital camera with an arrow pointing to the front panel (no text or symbols present)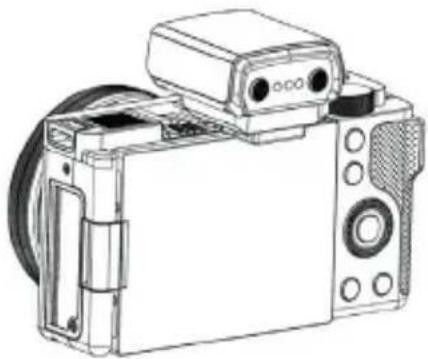
natural_image
Line drawing of a digital camera with lens and control panel (no text or symbols)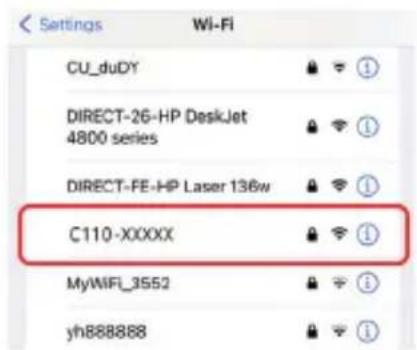
DE
natural_image
Technical line drawing of a camera module with a downward arrow indicating motion (no text or symbols present)natural_image
Diagram of a DSLR camera with cable and connector, showing internal components (no text or symbols)natural_image
Technical line drawing of a camera module with a highlighted internal component (no text or symbols)natural_image
Diagram showing a camera module with an inset close-up of its internal components (no text or symbols visible)natural_image
Front view of a digital camera module with control panel and display screen (no visible text or symbols)natural_image
Diagram of a digital camera with an arrow pointing to a component, no text or symbols present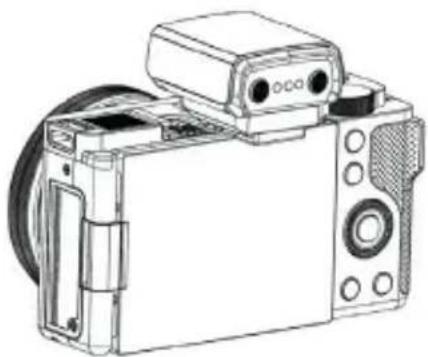
natural_image
Line drawing of a digital camera with lens and control panel (no text or symbols)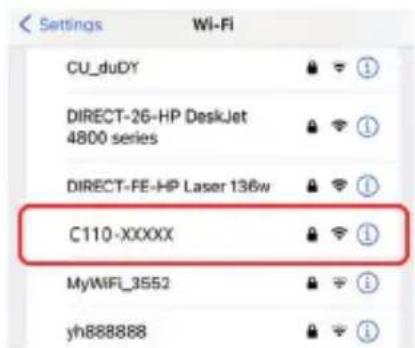
natural_image
Technical line drawing of a mechanical device with a cylindrical component and a rectangular housing, showing no text or symbols.natural_image
Diagram showing cable connection to a camera module with a red square highlighting the connector (no text or symbols present)UTILIZZO DI UNA SCHEDA DI MEMORIA
natural_image
Technical line drawing of a mechanical device with a highlighted component and arrow indicating direction (no text or symbols)natural_image
Diagram of a digital camera module with an inset close-up showing the lens and screen (no text or symbols present)natural_image
Diagram of a digital camera with control panel and display screen, showing no readable text or symbolsnatural_image
Front view of a digital camera interface showing playback, exposure, and control panel (no readable text or symbols)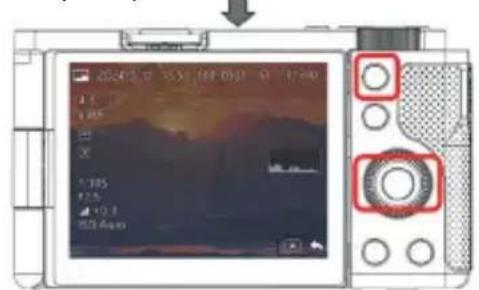
natural_image
Front view of a digital camera with control panel and display screen (no visible text or symbols)natural_image
Diagram of a digital camera with an arrow pointing to the lens (no text or symbols present)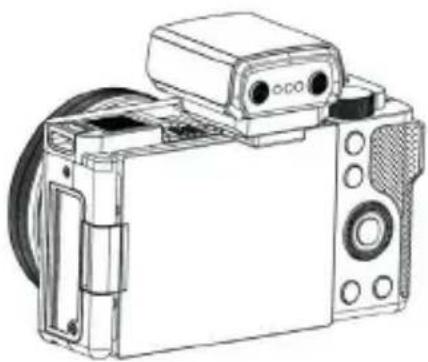
natural_image
Line drawing of a digital camera with lens and control panel (no text or symbols)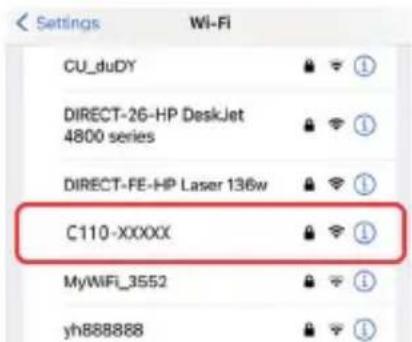
Notice of compliance for the European Union
Products bearing the CE mark comply with the applicable European directives and associated harmonised European standards.
Disposal of waste equipment by users in the European Union
This symbol means that according to local laws and regulations it is prohibited to dispose of this product with household waste Instead it is your responsibility to protect the environment and human health by handing over your used device to a designated collection point for the recycling of waste electrical and electronic equipment. For more information about where you can drop off your waste equipment for recycling please contact your local city office, your household waste disposal service or the shop where you purchased the product.
GT Company declares that the electric radio equipment of the type Digital camera/video camera complies with directive 2014/53/EU. The full text of the EU declaration of conformity is available at the following web address: www.agfaphoto-gtc.com
This device complies with part 15 of the FCC Rules. Operation is subject to the following two conditions:
- This device may not cause harmful interference, and
- This device must accept any interference received, including interference that may cause undesired operation.
Warranty : 2-year limited warranty / garantie limitée de deux ans / 2 Jahre eingeschränkte Garantie / Garantía limitada de 2 años / Garanzia limitata di 2 anni / Garantia limitada de 2 anos / 2-letnia ograniczona gwarancja / 2 év korlátozott garancia / 2letá omezená záruka / 2 jaar beperkte garantie / 2-летняя ограниченная гарантия / 2 års begrænset garanti / 2 vuoden rajoitettu takuu / 2 vuoden rajoitettu takuu / アフターサービス.
After sales service / Service après vente / Kundendienst / Servicio postventa / Assistenza post vendita / Értékesítés utáni szolgáltatás / Service na verkoop / Serviço pós venda / Serwis pogwarancyjny / Poprodejní servis / Послепродажное обслуживание / 2年保証:
aftersales@agfaphoto-gtc.com / +33 (0) 1 85 49 10 26
Made in China
Product manufactured for and distributed by GT Company:
FR Office : 5 Rue de la Galmy, 77700 Chessy UK Office : 1st floor gallery court 28 arcadia avenue London - United Kingdom - N3 2FG USA Office : 1251 Avenue of the Americas, fl.3, 10020 New York www.gtcompany.fr - info@gtcompany.fr
AgfaPhoto is used under license of Agfa-Gevaert NV. For this product a sub-license has been granted by AgfaPhoto Holding GmbH (www.agfaphoto.com). Neither Agfa-Gevaert NV nor AgfaPhoto Holding GmbH manufacture this product or provide any product warranty or support. For service, support and warranty information, contact the distributor or manufacturer.