
POWAIR0011 - Pneumatic rotary tool PowerPlus - Free user manual and instructions
Find the device manual for free POWAIR0011 PowerPlus in PDF.

| Product type | Pneumatic straight grinder (rotary tool) |
| Brand | PowerPlus |
| Model | POWAIR0011 |
| No-load speed | 22,000 rpm |
| Operating pressure | 6.3 bar / 91 psi |
| Average air consumption | 566 l/min |
| Air inlet size | 1/4" PT |
| Grinding wheel shank diameter | 1/4" (standard) / 1/8" (with included collet) |
| Included accessories | 2 collets (1/8"), 5 grinding wheels 1/4", 5 grinding wheels 1/8", 2 wrenches, 1 connector, 1 carrying case |
| Sound pressure level LpA | 84 dB(A) |
| Sound power level LwA | 95 dB(A) |
| Vibration (aw) | 1.4 m/s² |
| Estimated weight | 0.85 kg |
| Lubrication | Pneumatic tool oil via inline lubricator or manually |
| Maintenance | Lubricate before each use; drain compressor tank |
| Safety | Wear goggles and hearing protection; do not exceed 6.3 bar; disconnect before maintenance |
| Standards | EN ISO 11148-9:2011; CE (2006/42/EC) |
Frequently Asked Questions - POWAIR0011 PowerPlus
User questions about POWAIR0011 PowerPlus
0 question about this device. Answer the ones you know or ask your own.
Ask a new question about this device
Download the instructions for your Pneumatic rotary tool in PDF format for free! Find your manual POWAIR0011 - PowerPlus and take your electronic device back in hand. On this page are published all the documents necessary for the use of your device. POWAIR0011 by PowerPlus.
USER MANUAL POWAIR0011 PowerPlus
natural_image
PowerPlus electric tool with black tip and metallic body, accompanied by multiple small metal tools and pink/grey components (no text or symbols visible)
NL NEDERLANDS VERTAALDE VERSIE VAN DE ORIGINELE HANDLEIDING
FR FRANÇAIS TRADUCTION DU MODE D'EMPLOI D'ORIGINE
EN ENGLISH ORIGINAL INSTRUCTION MANUAL
natural_image
Close-up of a metallic mechanical tool with metal blades and a pointed tip (no visible text or symbols)Fig. 2
natural_image
Close-up of a mechanical tool with multiple small components and a cylindrical body (no visible text or symbols)Fig. 3
1 TOEPASSING....2
2 BESCHRIJVING (FIG. A) 2
3 INHOUD VAN DE VERPAKKING....2
4 VEILIGHEIDSREGELS....2
5 LUCHTTOEVOER ....3
6 SMERING ....3
7 BELANGRIJK!!! 4
8 AANSLUITING EN GEBRUIK (FIG. 2 & FIG. 3) ....4
9 ONDERHOUD....4
10 OPBERGEN....4
11 TECHNISCHE GEGEVENS....4
12 GELUID....5
13 PROBLEEMOPLOSSING....5
14 MILIEU....7
15 CONFORMITEITSVERKLARING....7
PNEUMATISCHE STIFTSLIJPER
POWAIR0011
1 TOEPASSING
2 BESCHRIJVING (FIG. A)
-
Trekker
-
As
-
Trekkerontgrendeling
-
Slijpsteen
-
Koppeling
3 INHOUD VAN DE VERPAKKING
13 PROBLEEMOPLOSSING
19/05/2020, Lier - Belgium
1 UTILISATION....2
2 DESCRIPTION (FIG. A)....2
3 LISTE DES PIECES CONTENUES DANS L'EMBALLAGE ....2
4 RÈGLES DE SÉCURITÉ ......2
5 ALIMENTATION EN AIR....3
6 GRAISSAGE....3
7 IMPORTANT!!! 4
8 CHARGEMENT ET FONCTIONNEMENT (FIG. 2 & FIG. 3) ....4
9 ENTRETIEN....4
10 ENTREPOSAGE....4
11 DONNEES TECHNIQUES....5
12 BRUIT 5
13 DÉPANNAGE....5
14 ENVIRONNEMENT....7
15 DÉCLARATION DE CONFORMITÉ....8
MEULEUSE DROITE PNEUMATIQUE
POWAIR0011
1 UTILISATION
19/05/2020, Lier - Belgium
1 APPLIANCE 2
2 DESCRIPTION (FIG. A)....2
3 PACKAGE CONTENT LIST 2
4 SAFETY RULES....2
5 AIR SUPPLY....3
6 LUBRICATION ....3
7 IMPORTANT!!! 3
8 LOADING AND OPERATION (FIG. 2 & FIG. 3)....4
9 MAINTENANCE....4
10 STORAGE 4
11 TECHNICAL DATA 4
12 NOISE....4
13 TROUBLE SHOOTING....5
14 ENVIRONMENT......6
15 DECLARATION OF CONFORMITY 7
PNEUMATIC DIE GRINDER
POWAIR0011
1 APPLIANCE
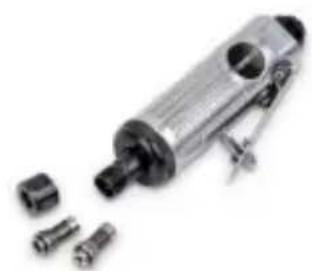
This air die grinder kit is designed for grinding, polishing, deburring and smoothing sharp edges. The die grinder uses standard 1/4" shank grinding stone. An 1/8" collet and 10 useful grinding stones are included in this kit.

Warning Read this manual and general safety instructions carefully before using the appliance, for your own safety.
2 DESCRIPTION (FIG. A)
-
Trigger
-
Spindle
-
Trigger lock
-
Grinding stone
-
Coupler
3 PACKAGE CONTENT LIST
- Remove all packaging materials.
- Remove remaining packaging and packing inserts (if included).
- Check that the package contents are complete.
- Check the appliance, the power cord, the power plug and all accessories for transportation damage.
- Keep the packaging materials as far as possible until the end of the warranty period. Then take it to your local waste disposal system.

WARNING Packaging materials are not toys! Children must not play with plastic bags! There is a danger of suffocation!
1 x Pneumatic die grinder
1 x Collet 18
5 x grinding stones 14 "
1 x Nipple
5 x grinding stones 1/8"
1 x BMC
2 x Spanners
1 x Manual

If any parts are missing or damaged, please contact your dealer.
4 SAFETY RULES
- This die grinder kit is a part of a high pressure system. Do not exceed maximum operating pressure of the air tool (90PSI). The die grinder could explore and result in death or serious injury.
- Disconnect the die grinder from air compressor before changing tools or accessories, servicing and during non-operation.
- Always wear safety glasses and using hearing protection during operation.
- Do not wear loose fitting clothing and jewelry which may become caught in moving parts and result in serious injury.
POWAIR0011 EN
- Do not depress trigger when connecting the air hose.
- Never trigger the tool when not applied to a work object. Accessories must be securely attached.
- Make sure all connections are secure and check air hoses for weak or worn condition before each use.
- WARNING! Disconnect air supply before installing or any maintenance.
5 AIR SUPPLY
- The air supply MUST be greater than air requirement of the tool. Recommended air compressor is 3/4HP.
- Air Hose: Using 3M or 7.5M long with 5mm I.D. and 1/4"PT threads is recommended. However, hoses longer than 7.5M should use 10mm even 12 mm I.D. For proper performance and more convenience. Using fittings or air hoses which are too small can create a pressure drop and reduce the power of the die grinder.

WARNING! Keep hoses away from heat, oil and sharp edges. Replace any hose that is damaged, weak or worn. The use of air filters and air line lubricators is recommended.
6 LUBRICATION
An automatic in-line filter-regulator-lubricator is recommended (Fig 1) as it increases tool life and keeps the tool in sustained operation. The in-line lubricator should be regularly checked and filled with air tool oil.
Proper adjustment of the in-line lubricator is performed by placing a sheet of paper next to the exhaust ports and holding the throttle open approximately 30 seconds. The lubricator is properly set when a light stain of oil collects on the paper. Excessive amounts of oil should be avoided.
In the event that it becomes necessary to store the tool for an extended period of time (overnight, weekend, etc.), it should receive a generous amount of lubrication at that time. The tool should be run for approximately 30 seconds to ensure oil has been evenly distributed throughout the tool. The tool should be stored in a clean and dry environment.
- It is most important that the tool be properly lubricated by keeping the air line lubricator filled and correctly adjusted. Without proper lubrication the tool will not work properly and parts will wear prematurely.
- Use the proper lubricant in the air line lubricator. The lubricator should be of low air flow or changing air flow type, and should be kept filled to the correct level. Use only recommended lubricants, specially made for pneumatic applications. Substitutes may harm the rubber compounds in the tools, O-rings and other rubber parts.
7 IMPORTANT!!!
If no filter/ pressure regulator/ lubricator is installed in the compressed air system, then pneumatic tools must be lubricated with 2 to 6 drops of oil at least once a day or after every two hours of use. This must be done directly along the male coupler or the screw (OIL) provided for the purpose on the side of the tool's housing.
Automatic lubrication is also possible using the supplied mini oiler that you have to install between the threaded connector of the tool and the male coupler. Make sure that the oiler is always filled with suitable oil.
Fig. 1
- Tool
- Quick connector
- Quick coupler
- Air hose
- Quick connector
-
Quick coupler
-
Lubricator
- Regulator (0-8.5 bar)
- Filter
- Cut-off valve
- Air compressor
8 LOADING AND OPERATION (FIG. 2 & FIG. 3)
■ Before each use, drain water out of air compressor tank and condensation from air lines. After clearing air compressor moisture and lubricating the die grinder, connect it to an air hose of a recommended compressor.
- Use the hand wrenches equipped to remove the cap for replacing the collet and to install grinding stones.
■ Since the speed of this die grinder is 22,000rpm, they can quickly remove a lot of material - sometimes more than you want. Therefore, it is important to use a gentle touch for many jobs. Stop often and blow away debris to check progress.
9 MAINTENANCE
This die grinder requires lubrication BEFORE initial use and BEFORE and AFTER each additional use throughout its life.
- WARNING!! Disconnect the die grinder from the air supply and hold the tool upside down.
- Pull the trigger, put a half teaspoon of air tool oil into the muffle cover.
■ Reconnect the die grinder to the air supply and cover the exhaust port with a towel and run for 20 seconds. Oil will discharge from the rear exhaust port when air pressure is applied. Any excess oil in the motor is immediately expelled from the exhaust port. WARNING! Always direct exhaust port away from people or objects.
10 STORAGE
The die grinder must be lubricated before storing. Only run for 3 seconds instead of 20 seconds because more oil needs to remain in the tool when storing.
11 TECHNICAL DATA
| Model | POWAIR0011 |
| No load speed | 22000min-1 |
| Max. air pressure | 6.3bar / 91psi |
| Air inlet size | 14" |
| Avg. air consumption | 566l/min |
12 NOISE
Noise emission values measured according to relevant standard. (K=3)
| Acoustic pressure level LpA | 84 dB(A) |
| Acoustic power level LwA | 95 dB(A) |

aw (Vibration)
1.4 m/s²
K = 1.5 ~m / s^2
13 TROUBLE SHOOTING
The following form lists the common operating system with problem and solutions. Please read the form carefully and follow it.

WARNING: If any of the following symptoms appears during your operating, stop using the tool immediately, or serious personal injury could result. Only a qualified persons or an authorized service center can perform repairs or replacement of tool.

Disconnect tool from air supply before attempting repair or adjustment. When replacing O-rings or Cylinder, lubricate with air tool oil before assembly.
| PROBLEMS | POSSIBLE CAUSES | REMEDIES |
| Tool runs at normal speed but loses under load | Motor parts worn. | Lubricating clutch housing.Check for excess clutch oil. Clutch cases need only be half full. Overfilling can cause drag on high speed clutch parts, i.e. a typical oiled/lubricated wrench requires 1/2 ounce of oil. GREASE LUBRICATED:NOTE: Heat usually indicates insufficient grease in chamber. Severe operating conditions may require more frequent lubrication. GREASE LUBRICATED:NOTE: Heat usually indicates insufficient grease in chamber. Severe operating conditions may require more frequent lubrication. |
| Cam clutch worn or sticking due to lack of lubricant. | ||
| Tool runs slowly. Air flows slightly from exhaust | Motor parts jammed with dirt particles | Check air inlet filter for blockage.Pour air tool lubricating oil into air inlet as per instructions.Operate tool in short bursts quickly reversing rotation back and forth where applicable.Repeat above as needed. |
| Power regulator in closed position | ||
| Air flow blocked by dirt. | ||
| Tools will not run. Air flows freely from exhaust | One or more motor vanes stuck due to material build up. | Pour air tool lubricating tool into air inlet.Operate tool in short bursts of forward and/or reverse rotation where applicable.Tap motor housing gently with plastic mallet.Disconnect supply. Free motor by rotating drive shank manually where applicable |
| Tool will not shut off | ‘O’ rings throttle valve dislodged from seat inlet valve. | Replace ‘O’ ring. |

Note: Repairs should be carried out by a qualified person.
14 ENVIRONMENT
Should your appliance need replacement after extended use, do not discard it with the household rubbish but dispose of it in an environmentally safe way.
15 DECLARATION OF CONFORMITY


VARO – Vic. Van Rompuy N.V. - Joseph Van Instraat 9 - BE2500 Lier - BELGIUM, declares that.
product: Pneumatic die grinder
trade mark: PowerPlus
model: POWAIR0011
is in conformity with the essential requirements and other relevant provisions of the applicable European Directives, based on the application of European harmonized standards. Any unauthorized modification of the apparatus voids this declaration.
European Directives (including, if applicable, their amendments up to the date of signature); 2006/42/EC
European harmonized standards (including, if applicable, their amendments up to the date of signature);
EN ISO 11148-9:2011
Keeper of the Technical Documentation : Philippe Vankerkhove, VARO – Vic. Van Rompuy N.V.
The undersigned acts on behalf of the company CEO,
Mertens Lido
Ludo Mertens
Certification Manager
19/05/2020, Lier - Belgium
DRUCKLUFT-SCHLEIFER POWAIR0011
1. EINSATZBEREICH
Modell-No: POWAIR0011
19/05/2020, Lier - Belgium
19/05/2020, Lier - Belgium
19/05/2020, Lier - Belgium
19/05/2020, Lier - Belgium
1 BRUKSOMRÅDE....2
2 BESKRIVELSE (FIG. A)....2
3 PAKKENS INNHOLD....2
4 SIKKERHETSREGLER....2
5 LUFTFORSYNING....3
6 SM∅RING....3
7 VIKTIG!!! 3
8 LADNING OG BRUK (FIG. 2 & FIG. 3)......4
9 VEDLIKEHOLD....4
10 OPPBEVARING 4
11 TEKNISKE DATA....4
12 ST∅Y....4
13 FEILS∅KING....5
14 MILJ∅....6
15 SAMSVARSERKLÆRING....7
TURBINSLIPER POWAIR0011
1 BRUKSOMRÅDE
19/05/2020, Lier - Belgium
1 ANVENDELSE....2
2 BESKRIVELSE (FIG. A)....2
3 MEDF∅LGENDE INDHOLD....2
4 SIKKERHEDSFORSKRIFTER 2
5 LUFTTILF∅RSEL....3
6 SM∅RING....3
7 VIGTIGT!!! 3
8 BELASTNING OG BETJENING (FIG. 2 & FIG. 3)......4
9 VEDLIGEHOLDELSE....4
10 OPBEVARING....4
11 TEKNISKE DATA....4
12 ST∅J....4
13 FEJLFINDING....5
14 MILJ∅ 6
15 KONFORMITETSERKLÆRING 7
1 ANVENDELSE
19/05/2020, Lier - Belgium
1 ANVÄNDNINGSOMRÅDE....2
2 BESKRIVNING (FIG. A) 2
3 FÖRPACKNINGSINNEHÅLL 2
4 SÄKERHETSFÖRESKRIFTER 2
5 LUFTTILLFÖRSEL....3
6 SMÖRJNING 3
7 VIKTIGT!!! 3
8 FÖRBEREDELSE OCH ANVÄNDNING (FIG. 2 & FIG. 3)....4
9 UNDERHÅLL....4
10 FÖRVARING....4
11 TEKNISKA DATA....4
12 BULLER....4
13 FELSÖKNING....5
14 MILJÖHÄNSYN 6
15 KONFORMITETSDEKLARATION 7
PNEUMATISK TURBINSLIPMASKIN POWAIR0011
1 ANVÄNDNINGSOMRÅDE
3 FÖRPACKNINGSINNEHÅLL
19/05/2020, Lier - Belgium
1 KÄYTTÖ 2
2 LAITTEEN OSAT (KUVA A)....2
3 PAKKAUKSEN SISÄLTÖ 2
4 TURVAOHJEET 2
5 ILMANTULO 3
6 VOITELU....3
7 TÄRKEÄÄ!!! 4
8 KUORMITUS JA KÄYTTÖ (KUVA 2 & KUVA 3)....4
9 KUNNOSSAPITO 4
10 SÄILYTYS....4
11 TEKNISET TIEDOT ....4
12 MELU 4
13 VIANETSINTÄ 5
14 LAITTEEN KÄYTÖSTÄ POISTAMINEN....6
15 YHDENMUKAISUUSILMOITUS....7
PNEUMAATTINEN HIOMAKONE
POWAIR0011
1 KÄYTTÖ
19/05/2020, Lier - Belgium
19/05/2020, Lier - Belgium
1 UREĐAJ 2
2 OPIS (SL. A)....2
3 POPIS SADRŽAJA PAKIRANJA....2
4 SIGURNOSNA PRAVILA 3
5 DOVOD ZRAKA 3
6 PODMAZIVANJE....3
7 VAŽNO!!! 4
8 OPTEREĆENJE I RAD (SL. 2 & SL. 3)....4
9 ODRŽAVANJE 4
10 SKLADIŠTENJE 4
11 TEHNIČKI PODACI 4
12 BUKA....5
13 RJEŠAVANJE PROBLEMA....5
14 OKOLIŠ 6
15 IZJAVA O SUKLADNOSTI....7
PNEUMATSKA BRUSILICA POWAIR0011
1 UREĐAJ
Ova brusilica namijenjena brušenju, poliranju, ravnanju i završnom (finom) brušenju oštrih rubova. Brusilica koristi standardni brusnu ploču promjera 1/4". Komplet uključuje ogrlicu od 1/8" i 10 praktičnih brusnih ploča.

4 SIGURNOSNA PRAVILA
19/05/2020, Lier - Belgium
1 PRIMENA....2
2 OPIS (SL. A)....2
3 LISTA SADRŽAJA PAKETA....2
4 BEZBEDNOSNA PRAVILA....2
5 DOVOD VAZDUHA 3
6 PODMAZIVANJE....3
7 VAŽNO!!! 4
8 OPTEREĆENJE I RAD (SL. 2 & SL.3)....4
9 ODRŽAVANJE 4
10 ODLAGANJE....4
11 TEHNIČKI PODACI 4
12 BUKA....5
13 DIJAGNOZA I OTKLANJANJE KVARA....5
14 ŽIVOTNA SREDINA 6
15 IZJAVA O USKLAĐENOSTI 7
PNEUMATSKA BRUSILICA
POWAIR0011
1 PRIMENA
Ova pneumatska brusilica u kompletu je dizajnirana za brušenje, poliranje, skidanje opiljaka i glačanje oštrih ivica. Ova brusilica koristi standardni brusni disk za osovinu od 1/4 inča. U ovom kompletu se nalaze i jedna stezna čaura od 1/8 inča i 10 korisnih brusnih diskova.

19/05/2020, Lier - Belgium
1 OBLAST POUŽITÍ 2
2 POPIS (OBR. A) 2
3 SEZNAM OBSAHU BALENÍ 2
4 BEZPEČNOSTNÍ PRAVIDLA....2
5 PŘÍVOD VZDUCHU....3
6 MAZÁNÍ 3
7 DÜLEŽITÉ!!! 4
8 VOLBA PŘÍSLUŠENSTVÍ A PROVOZ (OBR. 2 & OBR. 3)......4
9 ÚDRŽBA....4
10 SKLADOVÁNÍ 4
11 TECHNICKÉ ÚDAJE......4
12 HLUČNOST 5
13 ŘEŠENÍ PROBLÉMŮ ....5
14 ŽIVOTNÍ PROSTŘEDÍ 7
15 PROHLÁŠENÍ O SHODĚ 7
PNEUMATICKÁ KLEŠTINOVÁ BRUSKA POWAIR0011
1 OBLAST POUŽITÍ
19/05/2020, Lier - Belgium
1 POUŽÍVANIE 2
2 POPIS (OBR. A)....2
3 OBSAH BALENIA 2
4 BEZPEČNOSTNÉ PRAVIDLÁ 2
5 VZDUCHOVÉ NAPÁJANIE....3
6 MAZANIE....3
7 DÔLEŽITÉ!!! 3
8 VLOŽENIE OBJÍMKY A PREVÁDZKA (OBR. 2 & OBR. 3) ....4
9 ÚDRŽBA....4
10 SKLADOVANIE....4
11 TECHNICKÉ ÚDAJE......4
12 HLUK....4
13 RIEŠENIE PROBLÉMOV 5
14 ŽIVOTNÉ PROSTREDIE 6
15 VYHLÁSENIE O ZHODE....7
PNEUMATICKÁ PRIAMA BRÚSKA
POWAIR0011
1 POUŽÍVANIE
19/05/2020, Lier - Belgium
1 DOMENII DE UTILIZARE 2
2 DESCRIERE (FIG. A) 2
3 CONTINUTUL PACHETULUI....2
4 AVERTISMENTE GENERALE DE SIGURANTĂ....2
5 ALIMENTAREA CU AER 3
6 LUBRIFIEREA....3
7 IMPORTANT!......4
8 ÎNCĂRCAREA ȘI EXPLOATAREA (FIG. 2 & FIG. 3)....4
9 ÎNTRETINERE ....4
10 DEPOZITAREA 4
11 DATE TEHNICE....4
12 ZGOMOT 5
13 DEPANARE....5
14 MEDIU....6
15 DECLARATIA DE CONFORMITATE....7
1 DOMENII DE UTILIZARE
19/05/2020, Lier - Belgium
1 ALKALMAZÁS 2
2 LEÍRÁS (A. ÁBRA)....2
3 CSOMAGOLÁS TARTALMA 2
4 BIZTONSÁGI SZABÁLYOK....2
5 LEVEGŐELLÁTÁS......3
6 OLAJOZÁS....3
7 FONTOS!!!4
8 TÖLTÉS ÉS MÜKÖDTETÉS (2. ÁBRA & 3. ÁBRA)....4
9 KARBANTARTÁS......4
10 TÁROLÁS....4
11 MÜSZAKI ADATOK 4
12 ZAJ 5
13 HIBAELHÁRÍTÁS....5
14 KÖRNYEZETVÉDELEM....6
15 MEGFELELŐSÉGI NYILATKOZAT 7
PNEUMATIKUS LYUKCSISZOLÓ GÉP
POWAIR0011
1 ALKALMAZÁS
19/05/2020, Lier - Belgium
19/05/2020, Lier - Belgium
1 ПРЕДНАЗНАЧЕНИЕ НА ЕЛЕКТРИЧЕСКИЯ УРЕД....2
2 ОПИСАНИЕ (ФИГ. А)....2
3 СПИСЪК НА СЪДЪРЖАНИЕТО НА ПАКЕТА....2
4 ПРАВИЛА ЗА БЕЗОПАСНОСТ....2
5 ПОДАВАНЕ НА ВЪЗДУХ....3
6 CMA3BAHE....3
7 ВАЖНО!!! 4
8 ЗАРЕЖДАНЕ И ЕКСПЛОАТАЦИЯ (ФИГ. 2 & ФИГ. 3) ....4
9 ПОДДРЪЖКА....4
10 СЪХРАНЕНИЕ....5
11 TECHNICAL DATA ....5
12 ШУМ 5
13 ОТСТРАНЯВАНЕ НА НЕИЗПРАВНОСТИ ....5
14 ОКОЛНАТА СРЕДА ....7
15 ДЕКЛАРАЦИЯ ЗА СЪОТВЕТСТВИЕ....8
ПНЕВМАТИЧЕН ШЛАЙФ POWAIR0011
1 ПРЕДНАЗНАЧЕНИЕ НА ЕЛЕКТРИЧЕСКИЯ УРЕД
19/05/2020, Lier - Belgium

natural_image
Open black plastic tool kit with various dials and tools (no visible text or labels)varo
WWW.VARO.COM
DESIGNED AND MARKETED BY VARO
©copyright by varo
VARO - VIC. VAN ROMPUY nv
JOSEPH VAN INSTRAAT 9 - 2500 LIER - BELGIUM
OFFICES: