
EPP 4 - Manicure and pedicure set Essentiel B - Free user manual and instructions
Find the device manual for free EPP 4 Essentiel B in PDF.

User questions about EPP 4 Essentiel B
0 question about this device. Answer the ones you know or ask your own.
Ask a new question about this device
Download the instructions for your Manicure and pedicure set in PDF format for free! Find your manual EPP 4 - Essentiel B and take your electronic device back in hand. On this page are published all the documents necessary for the use of your device. EPP 4 by Essentiel B.
USER MANUAL EPP 4 Essentiel B
Electric foot file /
natural_image
White handheld hairdryer with a circular head and black textured body, no visible text or symbols.Notice d'utilisation / User guide / Bedienungsanleitung / Gebruiksaanwijzing
| FRENDENL | ||||
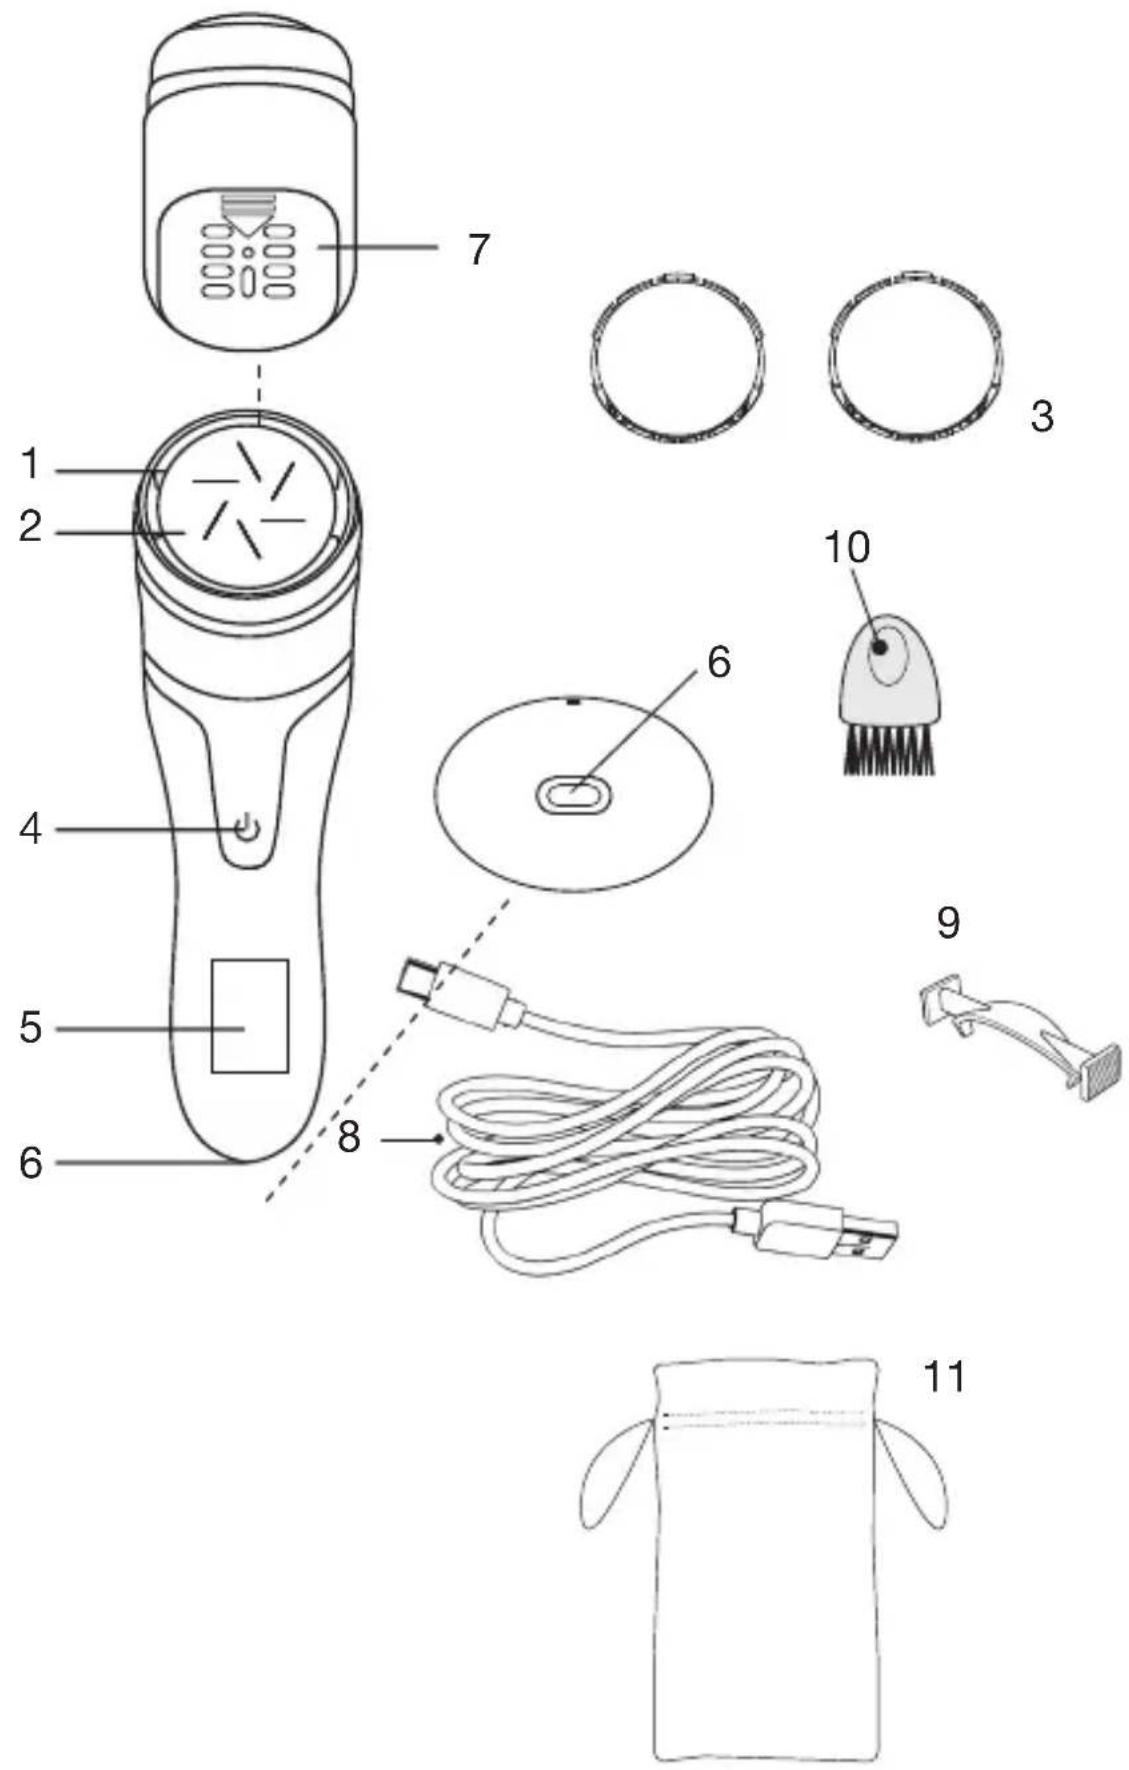
| 1 | Capuchon de protection | Protective cover Schutzkappe Beschermdop | ||
| 2 | Disque gros grain (x 1) | Large-grit disc (x 1) | Schleifscheibe mit grober Körnung (x 1) | Schijf met grove korrel (x 1) |
| 3 | Disque grain moyen (x 2) | Medium-grit disc (x 2) | Schleifscheibe mit mittlerer Körnung (x 2) | Schijf met gemiddelde korrel (x 2) |
| 4 | Bouton marche/arrêt et sélection de la vitesse | On/off button and speed selection | Ein/Aus-Taste und Geschwindigkeits-regler | Aan/Uit-knop en snel-heidskeuzeknop |
| 5 | Ecran d'affichage Display screen Anzeiged display Weergavescherm | |||
| 6 | Port de charge Charge connector Ladebuchse Oplaadpoort | |||
| 7 | Compartiment de récupération des peaux mortes | Dead skins collecting compartment | Auffangbehälter für abgestorbene Hautschüppchen | Bak om dode huid op te vangen |
| 8 | Câble de charge USB-C | USB-C charging cable | USB-C-Ladekabel USB-C oplaadkabel | |
| 9 | Pince pour retirer le disque | Pliers to remove disc | Zange zum Herausnehmen der Schleifscheibe | Tangetje om de schijf te verwijderen |
| 10 | Brossette de nettoyage | Cleaning brush Reinigungsbürste Reinigingsborstel | ||
| 11 | Pochette de rangement | Storage pouch | Aufbewahrungstasche Opberghoes | |
votre produit
Usage prévu
natural_image
Close-up of a white electronic device with a black connector and cable (no visible text or symbols)Figure 1
utilisation

natural_image
Illustration of hands holding a petri dish with an upward arrow indicating growth (no text or symbols)Figure 4
natural_image
Diagram of a hairdryer with an arrow pointing to the inner ear area (no text or symbols present)Figure 5
This foot file is designed to smooth dry, rough and callused skin on the feet. Please do not use it on other parts of your body.
It should only be used by the same person for hygiene reasons. Polishing discs should not be shared.
Contents of the box
- 1 foot file
• 1 USB-C charging cable
• 3 discs : 2 medium-grit & 1 large-grit disc
• 1 disc protective cap
• 1 pliers to remove discs
• 1 cleaning brush - 1 storage pouch
• 1 instruction manual
Technical features
- Foot file : Input: 5.0 V 1.0 A (non-replaceable) Battery: 3.7V, 1500mAh Lithium-ion
- Power: 6 W
- 2 speeds
• Speed and battery level displayed
• Hygienic vacuum collects dead skin - Charge time: 2h50
• Autonomy: 80 minutes
• Lithium-ion battery
charging the device
Before first use or if the device has not been used for a long period of time, the battery must be recharged.
- Only charge the device when it is completely dry.
- Only charge the device with the supplied specific USB charging cord.
- The device should be charged, used and stored at a temperature between 5°C and 35°C.
- Do not charge the device more than necessary (and never for more than 12 hours).
-
The device should not be used while charging.
-
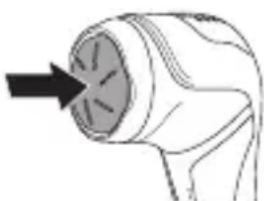
The device must be turned off. (Press the ⏻ on/off button for 3 seconds to stop the device from working).
- Hold the device with one hand and insert the end of the charging cable into the device's charging port (Figure 1) with the other hand. Follow the correct insertion direction.
- When charging, the screen will flash. It will display "100%" when the device is fully charged.
- When charging is complete, unplug the power adapter from the power outlet.
A full charge lasts approximately 2 hours and 50 minutes and gives you a run time of around 80 minutes.
natural_image
Close-up of a white handheld device with a black screen and cable (no visible text or symbols)Figure 1
use
Caution: Do not use the device on irritated skin.
- After washing your feet, dry them with a clean towel.
- Install a polishing disc:
- either a medium-grain disc (3) to take care of your feet or
- or a coarse-grain disc (2) to remove thick calluses.
Make sure to install the disc correctly (refer to the paragraph on replacing a disc).
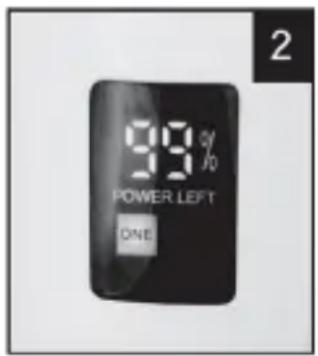
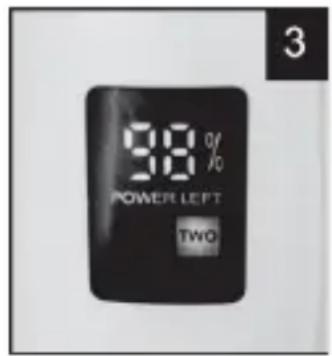
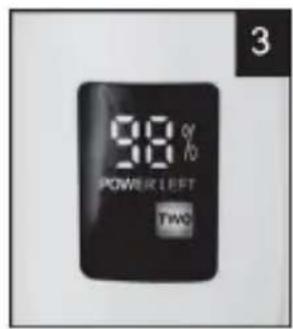
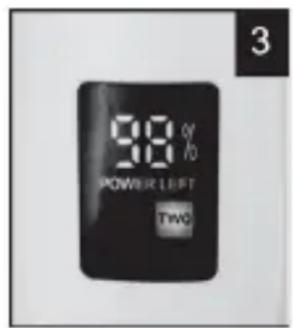
- Press the ⏻ on/off button for 3 seconds to turn on the appliance. It turns on by default at speed 1: "ONE" is displayed on the screen (fig 2).
- Press the button again briefly to switch to speed 2: "TWO" is displayed on the screen (fig 3).
- Hold the body of the device and apply the polishing disc to calluses, corns and rough skin for 2-3 seconds. Do not use excessive force and slowly brush the skin surface you want to polish. If you use too much force, the device will stop working.
We recommend that you test your skin tolerance on an area first. Start by using the least exfoliating disc until you are sure that you can tolerate the treatment well.
- Please stop polishing after a while and check if the desired effect has been achieved. If not, repeat polishing on this area for 2-3 seconds until you achieve the desired effect.
Caution: If you feel pain or discomfort on the skin, please stop using it.
Caution: Do not polish the same area for more than 2-3 seconds.
- Press the ⏻ on/off button for 3 seconds to turn off the device.
- Rinse or wipe off any dandruff on the skin with a damp towel.
- Clean the polishing disc. To do this, please refer to the cleaning instructions.
- At the end of use, install the transparent protective cover to protect the polishing disc.
- To install the transparent cover:
Align the "▲" symbol on the rasp with the "I" symbol on the transparent cover and press. You should hear a locking "click". Make sure the cover is in place.
replacing a polishing disc
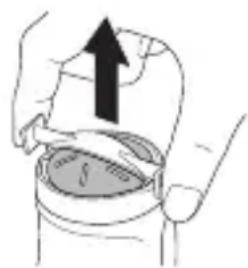
- To remove a disc:
Place both ends of the supplied clamp around the disc. Pinch and lift the disc to remove it (fig. 4).
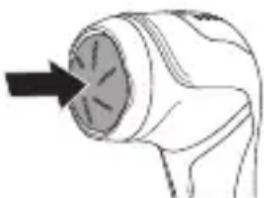
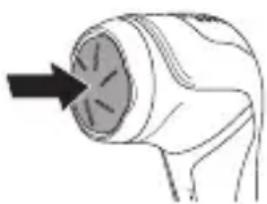
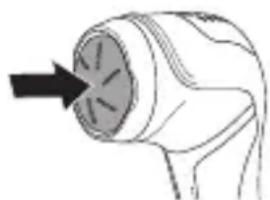
- To install a disc:
Insert the disc onto the motor shaft (fig. 5). You should hear a "click" when it engages.
natural_image
Illustration of hands holding a container with an upward arrow indicating motion (no text or symbols)Figure 4
natural_image
Simple line drawing of a handheld device with a black arrow pointing to the inner aperture (no text or symbols)Figure 5
cleaning and maintenance
- Unplug the power cord from the power outlet before cleaning or maintaining the appliance.
-
Never immerse the appliance body or power cord in water or any other liquid.
-
Clean the appliance after each use to ensure best performance.
- Turn off the appliance.
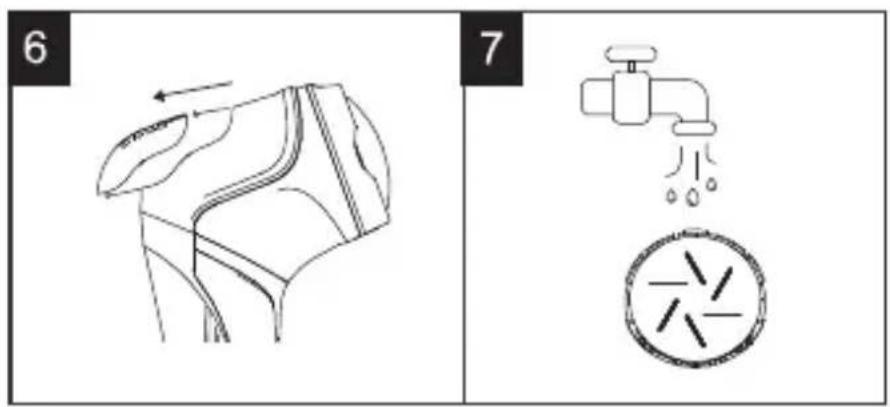
- Remove the cover of the dead skin collection compartment (fig. 6). Empty it and clean it with the cleaning brush provided.
- Remove the transparent cover and the polishing disc. You can rinse the disc under the tap (fig. 7). Be careful when handling the discs, they can be sharp.
-
You can wipe the appliance with a slightly damp towel. Never run it under the tap.
-
Please do not start the appliance while cleaning.
- After cleaning, dry all parts. And, replace the cover on the dead skin collection compartment before using the appliance again.
- You can obtain replacement polishing discs as well as the appropriate tweezers for removing the discs from your dealer (product code: 8011436).
storage
- Store the appliance in a cool, dry place, out of the reach of children.
- Do not expose it to heat or humidity.
- Do not wrap the power cord around the appliance.
Ihr Produkt
Verwendungszweck
natural_image
Close-up of a white medical or laboratory device with a black rectangular component and a white cable (no visible text or symbols)Abbildung 1
Verwendung
natural_image
Illustration of hands holding a small object with an upward arrow, no text or symbols presentAbbildung 4
natural_image
Simple line drawing of a handheld device with an arrow pointing to the internal structure (no text or symbols)Abbildung 5
natural_image
Close-up of a white medical or dental device with a black central component and a white cable (no visible text or symbols)Figuur 1
gebruik
natural_image
Illustration of hands holding a container with an upward arrow, no text or symbols presentFiguur 4
natural_image
Line drawing of a hairdryer with an arrow pointing to the tip (no text or symbols)Figuur 5
All information, designs, drawings and pictures in this document are the property of SOURCING & CREATION. SOURCING & CREATION reserves all rights to its brands, designs and information. Any copy and reproduction through any means shall be deemed and considered as counterfeiting.
Protection of the environment
This symbol attached to the product means that it is an appliance whose disposal is subject to the directive on waste from electrical and electronic equipment (WEEE). This appliance may not in any way be treated as household waste and must be subject to a specific type of removal for this type of waste. Recycling and recovery systems are available in your area (waste removal) and by distributors. By taking your appliance at its end of life to a recycling facility, you will contribute to environmental conservation and prevent any harm to your health.

Umweltschutz
\* Tested in our laboratories
Warranty valid from the date of purchase (receipt as proof of purchase). This warranty does not cover defects or damage caused by improper set up, incorrect use, or normal wear and tear of this product.
\* In unseren Labors getestet
SERVICE RELATION CLIENTS / Customer Relations Department / Kundenservice / Klantenafdeling
Avenue de la Motte CS 80137 59811 Lesquin cede
FABRIQUÉ EN R.P.C. / Made in China /