DO1188S - Slicer DOMO - Free user manual and instructions
Find the device manual for free DO1188S DOMO in PDF.

| Product type | Electric slicer |
| Brand | DOMO |
| Model | DO1188S |
| Power supply | 220-240 V ~ 50-60 Hz |
| Power | 120 W |
| Adjustable cutting thickness | 1 to 15 mm |
| Maximum cutting capacity (food) | Up to 15 cm x 15 cm with pusher; larger pieces without pusher (caution) |
| Blade type | Sharpened stainless steel circular blade |
| Maximum continuous use time | 5 minutes |
| Safety features | Safety switch, finger guard pusher, hand guard |
| Housing material | Plastic and metal |
| Non-slip feet | Yes (folding tray) |
| Cleaning | Blade, sliding platform and pusher washable with soapy water; housing with damp cloth; do not immerse |
| Foods not recommended | Frozen foods, bones, nuts, packaging |
| Warranty | 2 years |
| Included accessories | Pusher, hand guard, sliding tray, blade |
Frequently Asked Questions - DO1188S DOMO
User questions about DO1188S DOMO
0 question about this device. Answer the ones you know or ask your own.
Ask a new question about this device
Download the instructions for your Slicer in PDF format for free! Find your manual DO1188S - DOMO and take your electronic device back in hand. On this page are published all the documents necessary for the use of your device. DO1188S by DOMO.
USER MANUAL DO1188S DOMO
natural_image
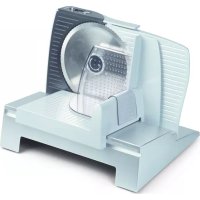
White semi-DAVID phone with a circular lens and 'DOMO' branding, shown in studio setting (no additional text or symbols visible)EN Instruction booklet Food Slicer
Read all instructions carefully.
Save this instruction manual for future reference.
⚠PRODUCTSPECIFIEKE WAARSCHUWINGEN
MONTAGE HANDBESCHERMING
natural_image
Isometric line drawing of a mechanical component with a downward arrow indicating force or movement (no text or symbols)MONTAGE SCHUIFPLATFORM
natural_image
Line drawing of a folded chair or bench with a curved seat and foldable top (no text or symbols)MONTAGE VOEDSELDUWER
natural_image
Diagram of a mechanical device with a downward arrow indicating motion or force (no text or symbols present)SNIJDIKTE AANPASSEN
natural_image
Technical diagram of a circular mechanical component with two labeled parts (1 and 2), showing internal structure without any text or symbols.GEBRUIK
natural_image
Technical line drawing of a mechanical device with internal components and directional arrows indicating movement (no text or symbols)OPGELET
natural_image
Symbol of a trash bin with crossed lines indicating no waste or discharge, and a solid black rectangle below (no text or labels)⚠ AVERTISSEMENTS SPÉCIFIQUES AU PRODUIT
natural_image
Isometric line drawing of a mechanical device with a downward arrow indicating force or movement (no text or symbols)MONTAGE PLATEFORME COULISSANTE
natural_image
Line drawing of a mechanical component with a curved handle and striped base, showing a downward arrow (no text or symbols)MONTAGE POUSSOIR
natural_image
Diagram of a mechanical device with a downward arrow indicating motion or force, no text or symbols presentnatural_image
Technical diagram of a mechanical component with two labeled parts (1 and 2), showing rotational arrows and hatching patterns (no text or symbols beyond labels)UTILISATION
natural_image
Technical line drawing of a mechanical device with internal components and directional arrows (no text or symbols)ATTENTION
natural_image
Symbol of a trash bin crossed with a diagonal line, no text or numbers presentnatural_image
Technical line drawing of a mechanical device with a downward arrow indicating a component (no text or symbols present)MONTAGE SCHIEBEPLATTE
natural_image
Line drawing of a mechanical component with a curved handle and a downward arrow indicating rotation (no text or symbols)MONTAGE SCHIEBER
natural_image
Diagram of a mechanical device with an open lid and a downward arrow indicating motion (no text or symbols)natural_image
Technical diagram of a circular mechanical component with two labeled parts (1 and 2), showing internal structure without any text or symbols.GEBRAUCH
natural_image
Technical line drawing of a mechanical device with internal components and directional arrows indicating motion (no text or symbols)ACHTUNG
natural_image
Symbol of a trash bin with crossed lines indicating no waste or discharge (no text or labels)Thank you for your confidence in DOMO. We do hope you enjoy your new purchase. Before reaching you, all our products undergo a strict quality inspection. Should you still encounter problems with your appliance, then we are truly sorry and will do everything possible to resolve the situation quickly. Do not hesitate to contact our customer service. Our staff will do all they can to help you!
+32 14 21 71 91 info@linea2000.be

Monday - Thursday: 8.30 - 12.00 and 13.00 - 17.00
Friday: 8.30 - 12.00 and 13.00 - 16.30
This device has a warranty period of 2 years from the date of purchase. During this warranty period, the distributor will assume responsibility for any defects that can be shown to be the result of material, construction or manufacturing errors. Such defects will be remedied by repair or replacement of the device. The 2-year warranty period will be suspended during the repair period and will continue after the repair has taken place for the remaining duration of the warranty period. The warranty will be honoured if proof of purchase clearly showing the date of purchase is provided. If your device becomes defective within the 2-year warranty period, please return it with your proof of purchase to the store you purchased it from or follow the procedure of the relevant webshop if you bought it online.
The warranty does not cover damage to the device, accessories or parts caused by:
• normal wear and tear from use;
• non-compliance with the instructions for use, maintenance and cleaning in the manual;
- incorrect connection, e.g. electrical voltage too high;
- incorrect, heavy-handed or abnormal use;
• repairs or alterations carried out by the consumer or unauthorised third parties;
- use of parts or accessories not recommended nor supplied by the distributor.
SAFETY INSTRUCTIONS
When using electrical appliances, basic safety precautions should always be taken, including the following. Any injury or damage caused by failure to comply with these rules are at your own risk. Neither the manufacturer, importer, or the supplier may be held liable.
- Read all instructions carefully.
• Make sure all packaging materials and promotional stickers have been removed before using the appliance for the first time. Make sure children cannot play with the packaging materials. -
This appliance is only suitable for use in domestic and similar environments, such as:
-
staff kitchen areas in shops, offices and other working environments;
- farm houses;
- by clients in hotels, motels and other residential type environments;
• bed and breakfast type environments.
• Children should be supervised to ensure that they do not play with the appliance.
- This appliance can be used by children aged from 16 years and above and persons with reduced physical, sensory or mental capabilities or lack of experience and knowledge if they have been given supervision or instruction concerning use of the appliance in a safe way and understand the hazards involved.
• Children shall not play with the appliance.
- Cleaning and user maintenance shall not be made by children unless they are older than 16 or supervised.
- Keep the appliance and its cord out of reach of children younger than 16 years.
- All repairs should be carried out by the manufacturer or its aftersales service.
⚠️ELECTRICAL WARNINGS
- In order to avoid a hazard this appliance must not be supplied through an external switching device, such as a timer or a
separate remote control, or connected to a circuit that is regularly switched on and off by the utility.
- The appliance must be disconnected from its power source when not in use, during service and when replacing parts. If present, first turn all the buttons to the 'off' position, then pull the plug out of the socket by grasping the plug itself. Never pull the cord or appliance to remove the plug from the socket.
- Before use, check carefully that the electric tension and frequency of the power net at your home match the indications on the rating label of the appliance.
- The appliance must be plugged into an appropriate outlet that is installed in accordance with local installation regulations.
- Do not let the power supply cord hang over the edge of a counter, or touch hot surfaces.
- Keep the power cord away from hot parts and don't cover the appliance.
- Unwrap the cord completely to prevent overheating of the cord. Do not allow the power cord supply to run underneath or around the unit.
- For safety reasons, never use the appliance if the cord, plug, or appliance itself is damaged, or after a malfunction of the appliance. Return the appliance to the DOMO Service Department or its service agent for examination, repair, or electrical or mechanical adjustment. Do not try to repair the appliance yourself.
⚠️INSTALLATION
- Do not place near flammable materials, gases or explosives.
- Do not use or store this appliance outdoors.
• Always use the appliance on a steady, dry and level surface.
- Never place this appliance near a gas stove or electrical stove or in a place where it may come into contact with a warm appliance.
⚠ USE
- Do not use this appliance for other than intended use.
- Never leave the appliance unattended while it is functioning.
- Do not operate the appliance with wet hands.
- The use of accessories that are not recommended or sold by the manufacturer can cause fire, electrical shock or injuries. Only use the utensils delivered with the appliance.
⚠ CLEANING AND MAINTENANCE
- To protect against electrical shock or burns, do not immerse unit, cord, or plug in water or other liquid.
- Failure to maintain this appliance in a clean condition could adversely affect the life of the appliance and possibly result in a hazardous situation.
⚠PRODUCTSPECIFIC WARNINGS
- Never place the slicer near any source of heat.
- The slicer can be used to slice meat, bread, vegetables or cheese. Do not slice frozen food or meat with bones, food with a thick skin (e.g. coconuts) or large seeds, rolled roast without removing the string, wrappers (i.e. aluminium foil) or any hard, inedible food parts.
- Do not use the appliance, unless the blade is well in place.
- Handle the blade with the greatest possible care when you are removing it, cleaning it, or replacing it in the machine. Do not touch the cutting edge of the blade.
- The blade is extremely sharp. Be very careful. Make sure that your hand does not get close to the cutting surface.
- This appliance must be used with the sliding feed table and the piece holder in position unless this is not possible due to the size or shape of the food.
- Keep your fingers well away from the sharp blade when the slicer is being used.
- This kind of appliance cannot function continuously; it is not a professional type of appliance. It is necessary to make temporary stops. The maximum continuous usage time is 5 min.
- Never touch the blade when the appliance is in use.
Furthermore, never try to stop the movement of the blade in any way whatsoever.
- The blade comes into contact with food. We advise you to clean the machine each time you use it. Make sure that you always
remove the plug from the mains socket before starting to clean the machine.
- Never immerse the machine in water or any other liquid. Never place the machine in a dishwasher.
SAVE THESE INSTRUCTIONS FOR FUTURE REFERENCE
All images and descriptions in this manual are purely indicative and may differ slightly from the actual device.
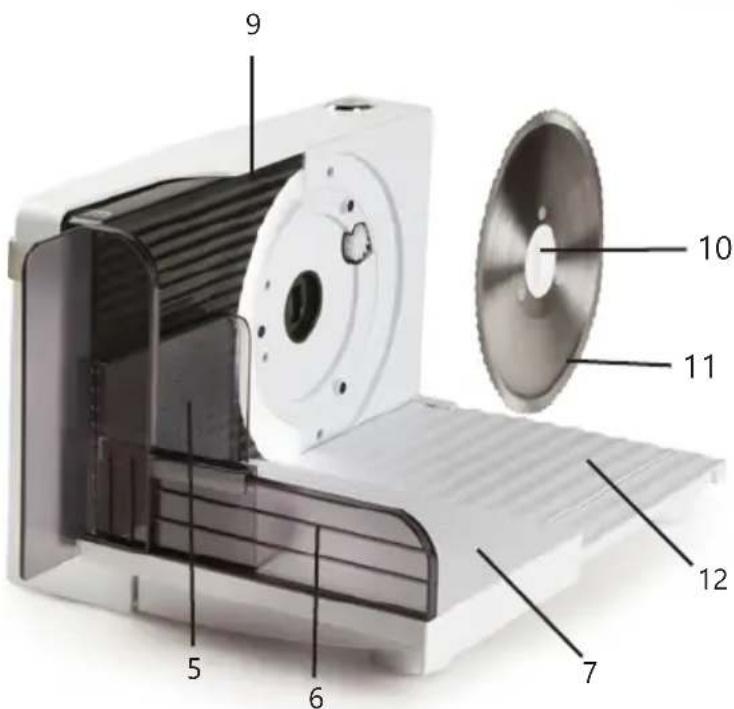
PARTS
- On/off switch
- Housing
- Thickness indicator
- Knob (dial) for adjusting thickness
- Food pusher with finger protection
- Hand protection
- Food carriage
- Safety switch
- Support platform
- Screw for fastening the blade
- Blade
- Foldable tray

BEFORE THE FIRST USE
- Before use, remove all packaging materials and any promotional stickers.
- Check that all accessories for the device are present and that the unit is not damaged.
-
Clean all parts with a moist cloth.
-
Put the appliance on a level, stable surface and unfold the foldable tray completely so that the four little feet rest on the surface.
- Place a tray or plate at the side of the appliance to catch the slices.
- To prevent food from sticking to the appliance, you can moisten the blade with a wet towel beforehand (see chapter "Dismantling blade"). This also allows you to slice more easily.
△ Always remove the plug from the mains socket before adding or removing parts or cleaning.
ASSEMBLY HAND PROTECTION
Place the hand protection (6) straight into the openings in the sliding carriage (7) and press firmly.
natural_image
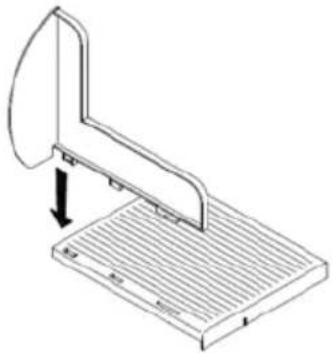
Technical line drawing of a mechanical component with a downward arrow indicating assembly or force (no text or symbols)ASSEMBLY FOOD CARRIAGE
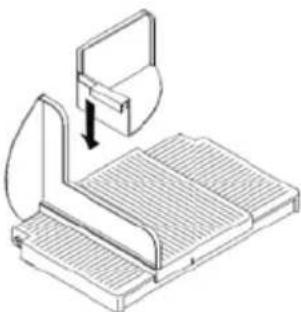
Place the hooks at the bottom of the food carriage (7) on the edge in the foldable carriage (12) and press down the food carriage. Carefully check the food carriage to make sure it is secured properly.
natural_image
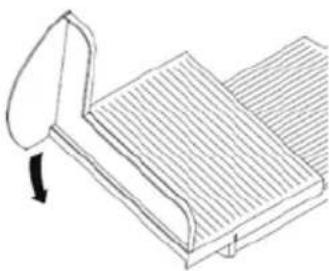
Line drawing of a folded or folded object with a curved handle and arrow indicating rotation (no text or symbols)ASSEMBLY FOOD PUSHER
Place the food pusher (5) on top of the hand protection (6). CAUTION: it is only safe to remove the food pusher if the food that you wish to slice is longer than 15 cm. If using the appliance without the food pusher, then extra care must be taken. Always keep your fingers/thumb well away from the rotating blade.
natural_image
Diagram of a mechanical device with a downward arrow indicating motion or force (no text or symbols present)ADJUST SLICING THICKNESS
The slicing thickness can be adjusted from 1 to 15 mm. Turn the dial (knob) for adjusting thickness (4), to the desired gauge. The thickness indicator at the top of the slicer shows the selected thickness.
DISMANTLING BLADE
Turn the screw for fastening the blade (10) clockwise. Adjust the support platform to the thickest setting so that it is easier to remove the blade. The blade and the machine casing can be cleaned with a disposable damp cloth.
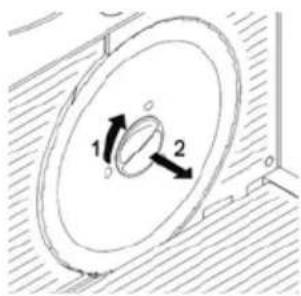
Take great care: The blade is razor-sharp! Always hold onto it by the screw used for fastening it.
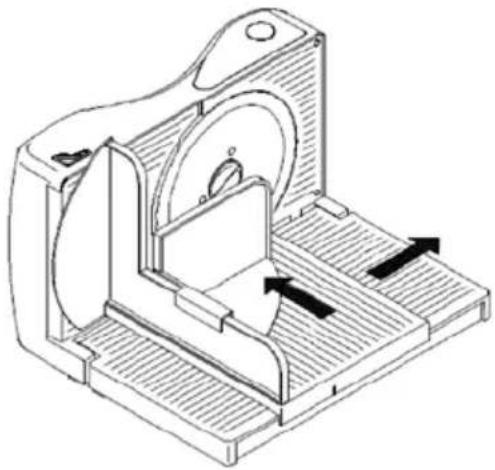
USE
-
Pull the food carriage (7) that is attached to the foldable tray (12) away from the cutting edge of the blade.
-
Place the food on the food carriage (7) and push it against the support platform (9) with the food pusher (5).
-
Press the safety button (8) and hold it in.
-
Press the on/off switch (1) to start the machine so that the blade starts rotating.
-
Keep the on/off switch (1) pressed in for as long as you wish to continue slicing. You can release the safety button (8) when you press in the on/off switch (1).
-
Slide the food carriage (7) backwards and forwards along the rotating blade (11) on the foldable tray (12).
-
Release the on/off switch (1) when you are finished.
natural_image
Technical line drawing of a mechanical device with internal components and directional arrows indicating motion (no text or symbols)CAUTION
- You must always use the food pusher when slicing food that is smaller than 15 cm x 15 cm. For larger pieces you can remove the food pusher. If you remove the protection, take extra care!
- Hold your fingers well away from the rotating blade.
- Never use the machine for longer than 5 minutes in any one session.
- First allow the machine to cool down before you use it again.
- The blade is not suitable for cutting frozen products or meat with bones.
PREVENT OVERLOADING
The appliance will vibrate slightly if it is overloaded. The blade will rotate very slowly or it will stop rotating altogether. In that case, the best thing to do is switch off the machine for 15 minutes to allow it to cool down before using it again.
CLEANING AND MAINTENANCE
- Remove the plug from the power outlet.
- Never immerse the machine in water.
- Before cleaning the appliance, set the slice thickness to the minimum.
- Remove the blade from the slicer by turning the screw in the middle of the blade clockwise and pulling the blade out. Be careful when removing the blade.
• Always clean the slicer immediately after use in order to prevent drying of food remains.
- In order to remove food residues rich in oil it may be necessary to use a detergent and water to clean the machine.
- Never use a pointed or sharp instrument to remove the remains of food from in between the blade and machine.
• The housing can be cleansed with a damp cloth.
- The blade, the food carriage and the food pusher must be cleaned in water with non-abrasive detergent/soap. Clean then rinse and dry the parts thoroughly before reassembly.
- Never use aggressive, abrasive cleansing products or scouring pads to clean the electrical slicer.
- Do not put the parts in a dishwasher.
- The appliance must be completely clean, dry and cooled off before storing it.
SPECIFICATIONS
| Model DO1188S | |
| Voltage 220-240V~ 50-60Hz | |
| Power 120W | |
| Energy consumption in off-mode after 0 minutes 0W |
GUIDELINES
natural_image
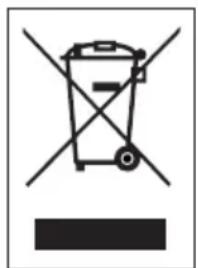
Symbol of a trash bin crossed with two crossed lines, no text or numbers presentThis symbol on the product or on its packaging indicates that this product may not be treated as household waste. Instead it must be brought to the applicable collection point for recycling of electrical and electronic equipment. By ensuring this product is disposed of correctly, you will help prevent potential negative consequences for the environment and human health, which could otherwise be caused by inappropriate waste handling of this product. For more detailed information about recycling of this product, please contact your local city office, your household waste disposal service or the shop where you purchased the product.

The packaging is recyclable. Please treat the packaging ecologically.

This appliance conforms to all European requirements in the areas of safety, health, and environmental protection.
The EU declaration concerning this appliance can be requested at any time from info@linea2000.be
GARANTIA
Estimado cliente,
natural_image
Line drawing of a mechanical device with a curved bracket and a base plate (no text or symbols)MONTAJE DE LA PLATAFORMA DESLIZANTE
natural_image
Line drawing of a mechanical component with a curved handle and a rectangular base (no text or symbols)MONTAJE DEL EMPUJADOR DE ALIMENTOS
natural_image
Isometric line drawing of a mechanical device with a downward arrow indicating motion (no text or symbols)AJUSTE DEL GROSOR DE LOS ALIMENTOS
natural_image
Diagram of a circular mechanical component with two labeled parts (1 and 2), showing rotational motion without any text or symbols.USO
natural_image
Technical line drawing of a mechanical device with internal components and directional arrows indicating motion (no text or symbols)natural_image
Symbol of a trash bin with crossed lines indicating no waste or discharge, and a solid black rectangle below (no text or labels)natural_image
Isometric line drawing of a mechanical component with a downward arrow indicating force or movement (no text or symbols)MONTAGGIO DEL PIANO SCORREVOLE
natural_image
Line drawing of a folded chair or table with a curved seat and a side arm, no text or symbols present.MONTAGGIO DEL PRESSAMERCE
natural_image
Isometric line drawing of a mechanical device with a downward arrow indicating motion (no text or symbols)natural_image
Technical diagram of a circular mechanical component with two directional arrows indicating rotation (no text or symbols)UTILIZZO
natural_image
Technical line drawing of a mechanical device with internal components and directional arrows indicating motion (no text or symbols)ATTENZIONE
natural_image
Symbol of a trash bin with crossed lines indicating no waste or discharge, and a solid black rectangle below (no text or labels)natural_image
Technical line drawing of a mechanical component with a downward arrow indicating a cut or assembly (no text or symbols present)INSTALACE KRÁJECÍ LYŽINY
natural_image
Line drawing of a folded chair or bench with a curved seat and an arrow indicating left side (no text or symbols)INSTALACE PŘÍTLAČNÁ ČÁST
natural_image
Diagram of a mechanical device with a downward arrow indicating motion or force (no text or symbols present)NASTAVENÍ SÍLY ŘEZU
natural_image
Technical line drawing of a mechanical device with internal components and directional arrows (no text or symbols)POZOR!
natural_image
Symbol of a trash bin crossed with two crossed lines, no text or numbers presentnatural_image
Isometric line drawing of a mechanical component with a downward arrow indicating force or movement (no text or symbols)INSTALACE KRÁJECÍ LYŽINY
Lyžinu (7) nasadte na skladací dosku (12) tak, a potom lyžinu stlačte smerom nadol. Starostlivo skontroluje lyžinu, aby ste sa uistili, že je naozaj pevne inštalovaná.

natural_image
Line drawing of a mechanical component with a curved handle and internal grooves, showing no text or symbols.INŠTALÁCIA PRÍTLAČNÁ ČASŤ
natural_image
Diagram of a mechanical device with a downward arrow indicating motion or force (no text or symbols present)NASTAVENIE SILY REZU
Silu rezu je možné nastavit' asi do 15 mm.Otočte regulátorom nastavenie sily rezu (4) do zvolenej sily rezu. Požadovanú silu rezu udáva údaj o sile na hornej strane spotrebiča.
DEMONTÁŽ NOŽA
natural_image
Technical diagram of a mechanical component with two labeled parts (1 and 2), showing rotational arrows indicating motion or force direction (no text or symbols beyond labels)POUŽITIE
natural_image
Technical line drawing of a mechanical device with internal components and directional arrows indicating motion (no text or symbols)POZOR!
Looking for extra accessories or you have a broken piece?
ORDER the original DOMO accessories and parts on our webshop.

Webshop


natural_image
Stack of sheets of paper with a circular inset showing a small object, no visible text or symbols
natural_image
Two white plastic electrical connectors with mounting holes (no text or symbols visible)
natural_image
White rectangular container with black interior, no visible text or symbols