KD61102B - Fridge Atag - Free user manual and instructions
Find the device manual for free KD61102B Atag in PDF.

User questions about KD61102B Atag
0 question about this device. Answer the ones you know or ask your own.
Ask a new question about this device
Download the instructions for your Fridge in PDF format for free! Find your manual KD61102B - Atag and take your electronic device back in hand. On this page are published all the documents necessary for the use of your device. KD61102B by Atag.
USER MANUAL KD61102B Atag
Instructions for use
Fridge
88-102-122478cm
GEBRUIK VAN HET KOELVAK
natural_image
Hand placing a door latch into a filing cabinet (no text or symbols visible)Temperatuurinstelling
natural_image
Technical line drawing of a mechanical device with arrows indicating motion or force directions (no text or symbols)Afb. 1
natural_image
Diagram of a mechanical device with two circular insets showing internal force directions (no text or symbols)Afb. 2
natural_image
Line drawing of a hand pressing down on a cabinet handle with a downward arrow (no text or symbols)natural_image
Pure electrical circuit lines without any symbolsnatural_image
Diagram showing a refrigerator with an open door and a close-up inset of the front panel (no text or symbols visible)Fig. 1

natural_image
Illustration of a refrigerator with open doors and a hand inserting food into the refrigerator (no text or symbols)Fig. 2
| 1-3 |  |  |  |
| 4-7 |  |  |  |
| 8-12 |  |  |  |
ONTDOOIEN VAN HET APPARAAT
natural_image
Illustration of a hand opening the refrigerator with a piping bag inserted, showing liquid level (no text or symbols)Fig. 1
REINIGING EN ONDERHOUD
natural_image
Illustration of a hand inserting a plug into a rack-mounted device (no text or symbols visible)KLANTENSERVICE
ENGLISH Instructions for use Page 12
natural_image
Hand placing a small object into a cabinet drawer with an arrow indicating the direction (no text or symbols present)Temperatureinstellung
natural_image
Technical line drawing of a mechanical assembly with arrows indicating rotational and linear motion (no text or symbols)Abb. 1
natural_image
Diagram of a mechanical device with two circular insets showing internal forces or movements (no text or symbols)Abb. 2
natural_image
Line drawing of a hand pressing down on a cabinet with a black arrow indicating the press direction (no text or symbols present)text_image
Control panel interface with current and voltage indicators and a timer symbolnatural_image
Diagram showing a refrigerator with an open door and a close-up inset of the front panel (no text or symbols visible)Abb. 1
natural_image
Illustration of a refrigerator with open doors and a hand inserting food into the refrigerator (no text or symbols)Abb. 2
| 1-3 | |||
| 4-7 | |||
| 8-12 |
ABTAUEN DES GERÄTS
natural_image
Illustration of a hand opening the refrigerator with a piping bag and outlet pipe (no text or symbols)Abb. 1
natural_image
Illustration of a hand inserting a plug into a rack-mounted device (no text or symbols visible)Switching on the appliance
- Plug in the appliance
- When the appliance is plugged in, it is normally factory set to a temperature of 5^ C.
Adjusting the temperature
For temperature adjustment, see the enclosed product sheet.
Note:
Ambient air temperature, the frequency of door opening, the introduction of hot food and unsuitable appliance positioning can all affect the internal temperature of the refrigerator, which may differ from that shown on the display.
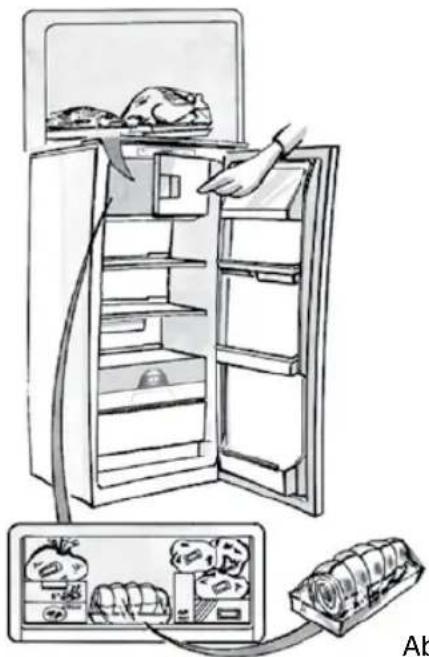
Storing food the refrigerator compartment:
• Cover food to prevent it drying out
- The distance between the shelves and the rear wall inside the refrigerator ensures the free circulation of air
- Do not place food in direct contact with the rear wall of the refrigerator compartment
• Do not place hot food in the refrigerator
• Store liquids in closed containers
Important:
Storing vegetables with a high water content can cause condensation to form on the glass shelves; this will not affect the correct operation of the appliance.
MEAT & FISH BOX (depending on model)
The Meat & Fish box was designed specially to keep foods fresher for longer, without altering nutritional values or original freshness. Do not store fruit or vegetables in this box, as the temperature may drop below 0°C, causing water contained in the food to freeze.
natural_image
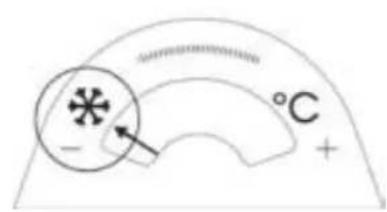
Line drawing of a hand placing a door handle into a filing cabinet (no text or symbols)Temperature Adjustment
The temperature inside the Meat & Fish box is indicated by the position of the arm on the door of the box, and depends on the general temperature of the refrigerator compartment.
We recommend setting the temperature of the refrigerator compartment between +2^ and +6^ . To work out if the temperature inside the Meat & Fish box is correct, refer to the pictures below:
text_image
°C -When the arm points to the left, you need to raise the temperature in the refrigerator compartment.
text_image
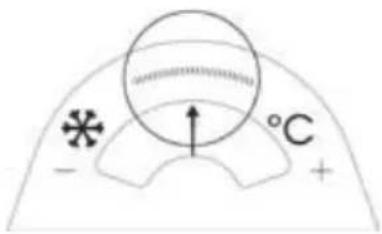
- * °C +When the arm is in the middle, the temperature is ok.
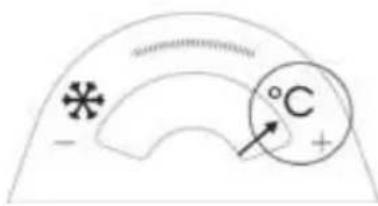
text_image
°C +When the arm points to the right, you need to lower the temperature in the refrigerator compartment.
Important: when the function is activated and foods with a high water content are present, condensation may form on the shelves. In this case, disable the function temporarily.
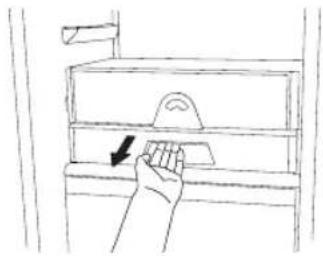
Removing the Meat & Fish compartment:
To ensure correct operation of the product, adequate preservation of food and to optimise energy consumption, it is advisable not to remove the Meat & Fish compartment if the symbol (see Quick Guide) is not present on the control panel. In all other cases, the Meat & Fish compartment can be removed to obtain more space inside the refrigerator.
Proceed as follows:
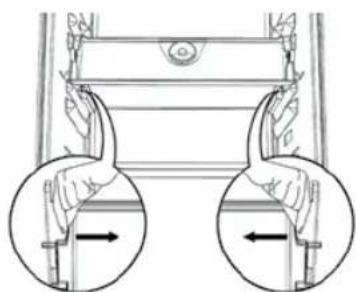
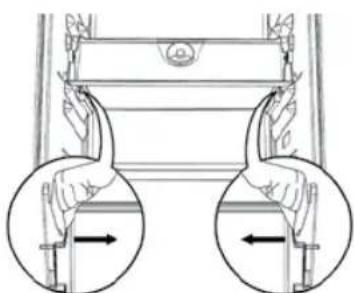
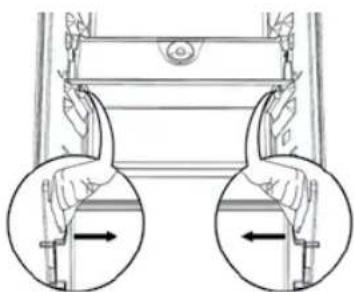
- Remove the compartment drawer (Figure 1).
- Remove the drawer cover by releasing the bottom side clips (Figure 2).
To reinstate the Meat & Fish compartment, make sure to refit the drawer cover before inserting the drawer and reactivating operation.
- Press the "Meat & Fish compartment function" button on the control panel for 3 seconds, until the yellow indicator goes off.
To optimise energy consumption, it is advisable to deactivate the Meat & Fish compartment and remove its components (except the shelf above the crisper drawers).

natural_image
Diagram of a mechanical device with internal components and directional arrows (no text or symbols)Fig. 1
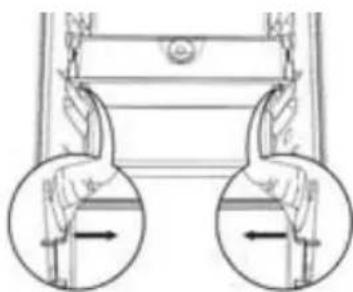
natural_image
Diagram of a mechanical device with two hands holding weights, showing motion directions (no text or symbols)Fig. 2
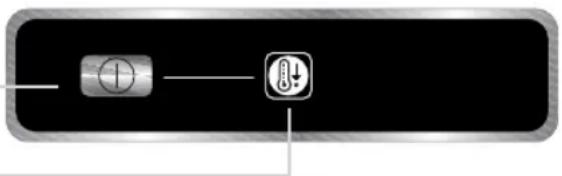
"ZERO DEGREES" BOX (depending on the model)
The “Zero Degrees” box is specifically designed to maintain a low temperature and a suitable humidity level, in order to keep foods fresher for longer (e.g. meat, fish, fruit and winter vegetables).

text_image
Diagram showing a hand pressing down on a cabinet with a directional arrow indicating force or movement.Activating and deactivating the box
The temperature inside the box, when active, is approximately 0^ .
To activate the compartment, press the button shown in the figure for more than 1 second, until the symbol lights up
The symbol lit indicates that the compartment is functioning. Press the button again for more than 1 second to deactivate the compartment
natural_image
Pure electrical circuit lines without any symbolsThe following factors are vital for the "Zero Degrees" box to work properly:
- the refrigerator compartment must be switched on
- the temperature of the refrigerator compartment must be between +2°C and +6°C
- the box must be inserted to enable activation
- no special functions must have been selected (Standby, Cooling-Off, Vacation – where applicable).
If one of these special functions has been selected, the “Zero Degrees” box must be deactivated manually, and any fresh food inside it removed. If manual deactivation does not take place, the box will be deactivated automatically after 8 hours.
Note:
- if the symbol does not light up when the box is activated, check that the box is properly inserted; if the problem persists, contact your nearest authorized After-sales Service
- if the box is active and the drawer open, the symbol on the control panel may be deactivated automatically. If the drawer is inserted, the symbol will become active again
- irrespective of the state of the box, a slight noise may be heard: this is normal and is not a cause for concern.
- when the box is not active, the temperature inside it depends on the general temperature inside the refrigerator compartment. In this case, we recommend it is used to store fruit and vegetables which are not sensitive to cold temperatures (fruits of the forest, apples, apricots, carrots, spinach, lettuce, etc.).
Important: If the function is activated and food with high water content is present, condensate may form on the shelves. In this case, temporarily deactivate the function.
When placing small containers and food products on the top shelf of the “zero degrees” compartment, make sure they do not accidentally fall between the drawer and the back of the refrigerator compartment.
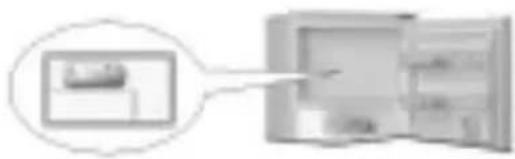
Removing the "Zero Degrees" box:
The “Zero Degrees” box can be removed to create more space inside the refrigerator. In this case proceed as follows:
- to facilitate removal, we recommend emptying (and if necessary, removing) the two lower door trays
- switch off the box
- pull out the drawer and the white plastic shelf underneath the box.
Note: the upper shelf and the side supports cannot be removed.
To restore “Zero Degrees” box operation, make sure you replace the white plastic shelf underneath the box before inserting the drawer and reactivating the function. To optimise energy consumption, we recommend you deactivate the “Zero Degrees” box and remove it.
Clean the box and all its parts regularly, using a cloth and a solution of warm water and neutral detergent specifically formulated for refrigerator interiors (take care not to immerse the white plastic shelf underneath the box in water).
Before cleaning the box (including the outside), remove the drawer so as to disconnect the box from the electricity supply.
Never use abrasive detergents.
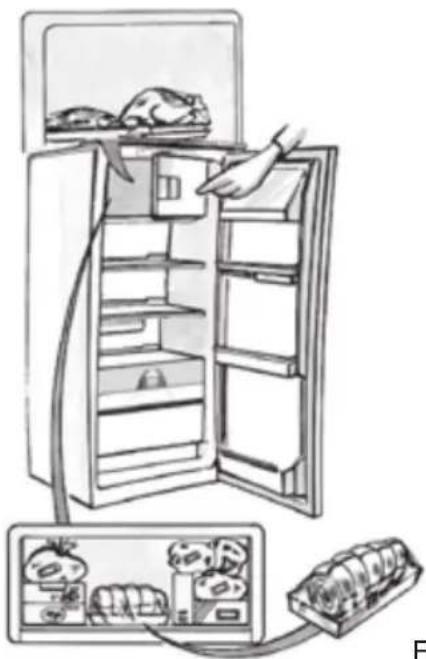
HOW TO USE THE FREEZER COMPARTMENT (if present)
The freezer compartment also be used for freezing fresh food. The quantity of fresh food that can be frozen in 24 hours is shown on the rating plate.
Freezing fresh food
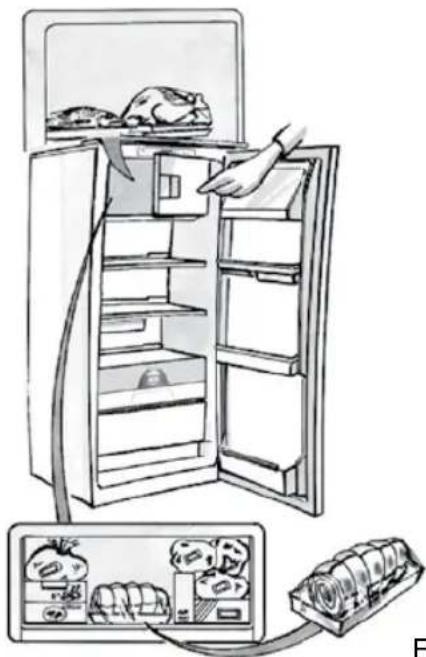
- The recommended position for fresh food is that indicated in Fig. 1, if a wire shelf is present, or that in Fig. 2 for models with no wire shelf.
- Place food in the middle of the compartment, ✦ making sure it does not touch already frozen food, but is placed at a distance of approx. 20 mm (fig. 1 and 2).
The table alongside shows the recommended maximum storage time for frozen fresh foods.
When purchasing frozen food products:
- Make sure the packaging is not damaged, since the product quality may have deteriorated. If the package is swollen or has damp patches, it may not have been stored under optimal conditions and defrosting may have already begun.
- When shopping, leave frozen food purchases until last and transport the products in a thermally insulated cool bag.
- Place the items in the compartment as soon as you get home.
- If food has defrosted even partially, do not re-freeze it. Consume within 24 hours.
- Avoid, or reduce temperature variations to the minimum. Respect the best-before date on the package.
• Always follow the storage instructions on the frozen food packages.
Making ice cubes
- Fill the ice cube tray 2/3 full and place it in the compartment ✦ ✦.
- Do not use sharp or pointed instruments to detach the tray if it is stuck to the bottom of the * *** compartment.
- Bend the ice tray slightly to remove the cubes.
natural_image
Diagram showing a refrigerator with an open door and a close-up inset of the front panel (no text or symbols)Fig. 1
natural_image
Illustration of a refrigerator with open doors and a hand inserting food into the refrigerator (no text or symbols)Fig. 2
| 1-3 | |||
| 4-7 | |||
| 8-12 |
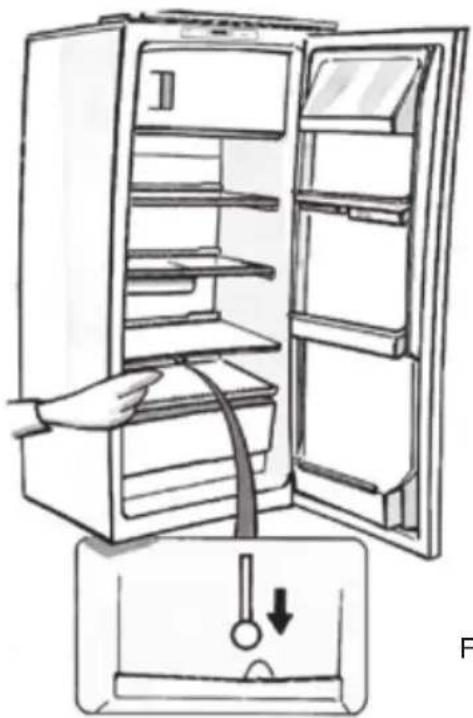
HOW TO DEFROST THE APPLIANCE
Before defrosting the appliance, unplug it or switch off the power at the mains. Defrosting of the refrigerator compartment is completely automatic. Droplets of water on the rear wall of the refrigerator compartment indicate that the periodic automatic defrost cycle is in progress. The defrost water is automatically routed to a drain outlet and into a container from which it evaporates.
Clean the defrost water drain outlet regularly using the tool supplied with the appliance in order to ensure defrost water is removed correctly. (Fig. 1)
Defrosting the compartment \* \* \* \* (if present)
Defrost the ✕GH compartment once or twice a year or when ice formation is excessive. It is perfectly normal for ice to form. The amount of ice which forms and the rate at which it accumulates will vary depending on ambient conditions and the frequency with which the freezer door is opened. Ice formation is concentrated at the top of the compartment and does not affect the efficiency of the appliance.
If possible, defrost the freezer when it is nearly empty.
- Remove the food from the freezer compartment and group together in a cool place or in a cool bag.
- Leave the door open to allow the frost to melt.
- Clean the interior of the freezer with a sponge and warm water and/or neutral detergent. Do not use abrasive substances.
- Rinse the interior and dry thoroughly.
- Put the food back into the freezer.
- Close the door.
Plug the appliance back in and switch on, following the instructions in chapter "How to operate the refrigerator compartment". The settings and selections made prior to switching off will be restored.
natural_image
Line drawing of a refrigerator with an open door and a hand inserting a piping bag into the drawer (no text or symbols)Fig. 1
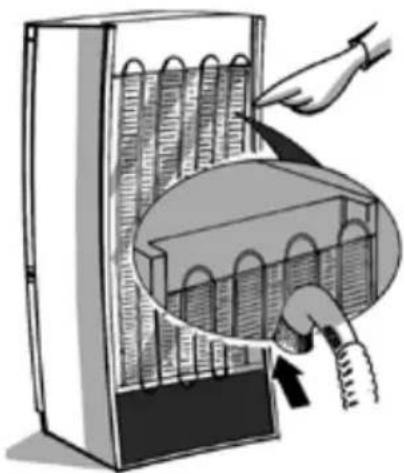
CLEANING AND MAINTENANCE
Before any cleaning or maintenance operation, unplug the appliance from the mains or disconnect the electrical power supply.
- Clean the inside of the refrigerator compartment periodically with a sponge dampened in warm water and/or neutral detergent. Rinse and dry with a soft cloth. Do not use abrasive products.
- The separators must not be washed in water but simply cleaned with a damp sponge.
- Clean the inside of the freezer compartment when defrosting.
- Clean the air vents and condenser at the rear of the appliance regularly with a vacuum cleaner or brush.
- Clean the outside with a damp cloth. Do not use abrasive products, scourers, stainremovers (e.g. thrichlorethylene acetone) or vinegar.
natural_image
Illustration of a hand inserting a plug into a rack with a magnified inset showing internal components (no text or symbols)Prolonged disuse
- Empty the refrigerator.
- Disconnect the appliance from the mains power supply.
- Defrost and clean the interior.
-
In the event of prolonged disuse, leave the appliance door open to prevent mould, odours and oxidation from forming.
-
Clean the appliance.
-
Clean the inside of the low temperature compartment (where present) when defrosting.
- Clean the inside of the refrigerator compartment periodically with a sponge dampened in warm water and/or neutral detergent. Rinse and dry with a soft cloth. Do not use abrasive products.
AFTER-SALES SERVICE
Before contacting the After-Sales Service:
- See if you can solve the problem yourself with the help of the Trouble-shooting guide.
- Switch the appliance off and then on again to check if the problem has been eliminated. If it has not, switch off the appliance again and repeat the operation after one hour.
- If the problem persists after this course of action, contact After-sales Service.
Specify:
• the type of fault
- the appliance model
- The Service number (the number after the word SERVICE on the rating plate inside the appliance)
- Your full address
- Your telephone number and area code
SERVICE
0000 000 00000
Note:
The direction of door opening can be changed. If this operation is performed by After-sales Service it is not covered by the warranty.
INSTALLATION
• Install the appliance away from heat sources. Installation in a hot environment, direct exposure to the sun or installation near heat sources (heaters, radiators, cookers) will increase power consumption and should therefore be avoided.
- If this is not possible, the following minimum distances must be respected:
- 30 cm from coal or paraffin stoves;
- 3 cm from electric and/or gas stoves.
- Fit the spacers (if supplied) on the rear of the condenser positioned at the back of the appliance.
• Install the appliance in a dry, well-ventilated place, and ensure it is level, using the front adjustment feet if necessary.
- Clean the interior.
- Fit the accessories.
Electrical connection
- Electrical connections must be made in accordance with local regulations.
-
Voltage and power consumption are indicated on the rating plate inside the appliance.
-
Regulations require that the appliance be earthed. The manufacturer declines all liability for injury to persons or animals and for damage to property resulting from failure to observe the above procedures and reminders.
- If the plug and socket are not of the same type, have the socket replaced by a qualified electrician.
- Do not use extension leads or adapters.
Disconnecting the appliance
It must be possible to disconnect the appliance by unplugging it or by means of a two-pole switch fitted upline of the socket.
ELECTRICAL CONNECTION FOR GREAT BRITAIN AND IRELAND ONLY
Warning - this appliance must be earthed
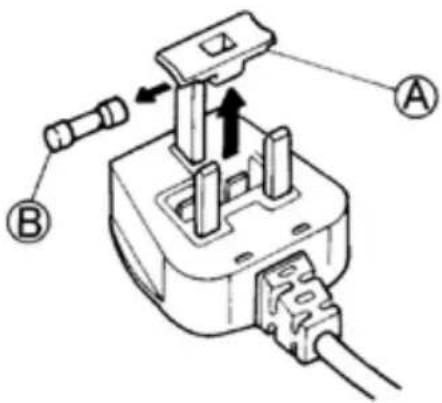
Fuse replacement
If the mains lead of this appliance is fitted with a BS 1363A 13amp fused plug, to change a fuse in this type of plug use an A.S.T.A. approved fuse to BS 1362 type and proceed as follows:
- Remove the fuse cover (A) and fuse (B).
- Fit replacement 13A fuse into fuse cover.
- Refit both into plug.
Important:
The fuse cover must be refitted when changing a fuse and if the fuse cover is lost the plug must not be used until a correct replacement is fitted.
Correct replacement are identified by the colour insert or the colour embossed in words on the base of the plug. Replacement fuse covers are available from your local electrical store.
For the Republic of Ireland only
The information given in respect of Great Britain will frequently apply, but a third type of plug and socket is also used, the 2-pin, side earth type.
Socket outlet / plug (valid for both countries)
If the fitted plug is not suitable for your socket outlet, please contact After-sales Service for further instruction. Please do not attempt to change plug yourself. This procedure needs to be carried out by a qualified technician in compliance with the manufactures instructions and current standard safety regulations.
text_image
Technical diagram of a plug-in socket with labeled components A and B, showing internal wiring and valve mechanism.COMMENT FAIRE FONCTIONNER LE COMPARTIMENT RÉFRIGÉRATEUR
natural_image
Line drawing of a hand placing a door handle into a filing cabinet (no text or symbols)natural_image
Diagram of a mechanical device with arrows indicating rotational or directional movement (no text or symbols)Fig. 1
natural_image
Diagram of a mechanical device with two circular insets showing internal force directions (no text or symbols)Fig. 2
COMPARTIMENT "ZÉRO DEGRÉ"
(selon le modèle)
natural_image
Line drawing of a hand pressing down on a cabinet with a red label (no text or symbols)natural_image
Pure electrical control buttons without any text or symbolsnatural_image
Diagram showing a refrigerator with an open door and a close-up inset of the front panel (no text or symbols visible)Fig. 1
natural_image
Illustration of a refrigerator with open doors and a hand inserting food into the refrigerator (no text or symbols)Fig. 2
| 1-3 | |||
| 4-7 | |||
| 8-12 |
COMMENT DÉGIVRER L'APPAREIL
natural_image
Illustration of a hand opening the refrigerator with a piping bag inserted, showing liquid level (no text or symbols)Fig. 1