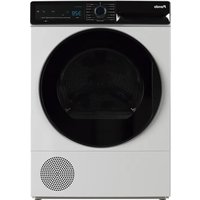
PWS-8161 - Washing machine Pando - Free user manual and instructions
Find the device manual for free PWS-8161 Pando in PDF.


| Product type | Condenser dryer |
| Brand | Pando |
| Model | PWS-8161 |
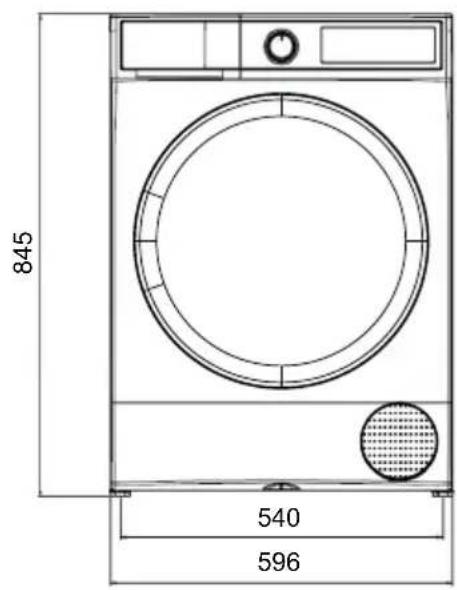
| Height (mm) | 845 |
| Width (mm) | 596 |
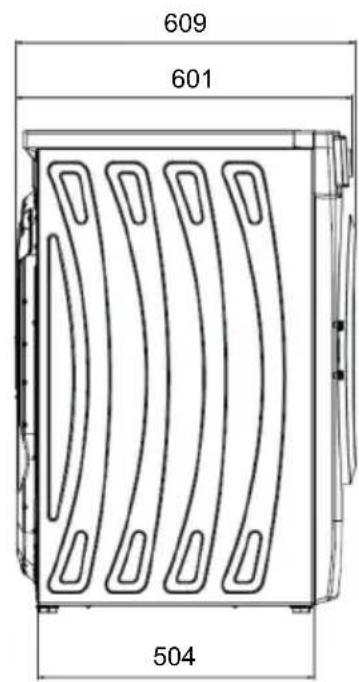
| Depth (mm) | 601 |
| Weight (kg) | 44.1 |
| Maximum capacity (kg) | 8 |
| Voltage (V/Hz) | 220-240 / 50 |
| Rated power (W) | 1000 |
| Noise level (dB(A)) | 64 |
| Number of programs | 15 |
| Drying type | Condensation with water tank or direct drain |
| Main features | Delayed start, adjustable drying level, anti-crease, child lock, silent function |
| Maintenance | Clean the lint filter after each cycle; regularly clean the heat exchanger and humidity sensor |
| Safety | Child lock, overheat protection, empty drum detection, door lock |
| Refrigerant | R290 (flammable, environmentally friendly) |
| Spare parts | Lint filter, drain hose, water tank, adjustable feet |
| Warranty | 3 years (parts and labor) |
Frequently Asked Questions - PWS-8161 Pando
User questions about PWS-8161 Pando
0 question about this device. Answer the ones you know or ask your own.
Ask a new question about this device
Download the instructions for your Washing machine in PDF format for free! Find your manual PWS-8161 - Pando and take your electronic device back in hand. On this page are published all the documents necessary for the use of your device. PWS-8161 by Pando.
USER MANUAL PWS-8161 Pando
natural_image
Modern kitchen appliance setup with a large washing machine and stacked towels, surrounded by shelves of clothes and decorative items (no visible text or symbols)Pando
integralcooking
PWS-8161
Manual de uso - ES
Manual do uso - PT
Quality Management System Certification

ISO 14001:2015 - ES20/208675
Environmental Management System Certification


Certificate of registration of carbon footprint.
offsetting and CO2 absorption projects of the
Ministry for Ecological Transition and
Demographic Challenge (MITERD).
The Global Kitchen Partner
Images and content in this handbook is of exclusive property of Pando - INOXPAN S.L, for which it is completely forbidden the use of images as well as total or partial reproduction without previous authorisation in written.
LAS IMÁGENES MOSTRADAS EN ESTE MANUAL NO SON CONTRACTUALES.
THE IMAGES SHOWN IN THIS HANDBOOK ARE NOT CONTRACTUAL
Pando Technical Management reserves the right to modify, alter or improve any technical drawings exposed in this handbook without previous warning.
natural_image
Symbol of a trash bin crossed out by two crossed lines, with a blank rectangular base below (no text or symbols)
TRATAMIENTO DEL RESIDUO
MEDIDAS DEL PRODUCTO ....17
INSTALACIÓN ....18
natural_image
Line drawing of a front-loading washing machine with circular vent and side panel (no text or symbols)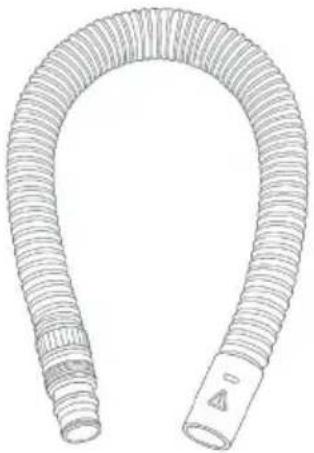
natural_image
Line drawing of a coiled tube with a flanged end and a warning symbol (no text or labels)
natural_image
Icon of an open book with a lowercase 'i' and horizontal lines, representing information (no text or symbols present)natural_image
Three icons showing washing machines with crossed-out black X marks, no text or symbols present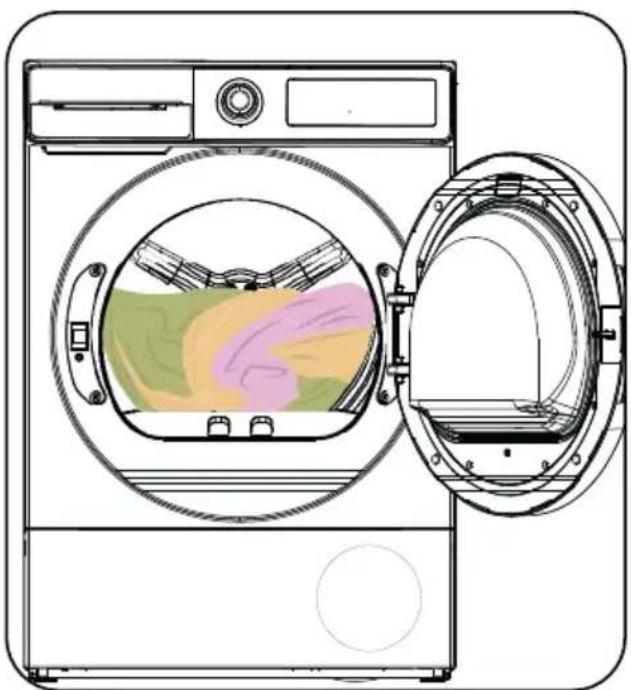
natural_image
Line drawing of a washing machine with internal components and an open door (no text or symbols)natural_image
Illustration of hands installing or adjusting a device into a rack (no text or symbols visible)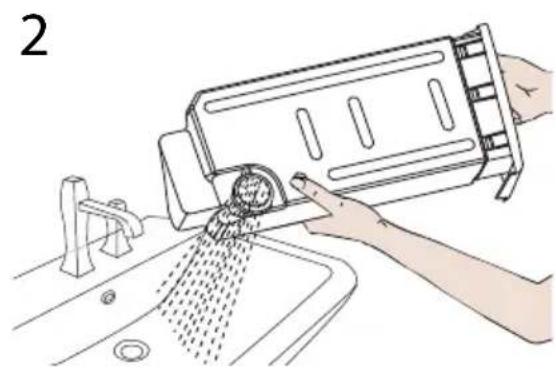
natural_image
Illustration of a hand washing a kitchen sink with a water dispenser (no text or symbols)natural_image
Illustration of a hand cleaning a car interior with a yellow substance inside (no text or symbols)natural_image
Line drawing of a front-loading washing machine with speaker and fan components (no text or symbols)https://www.pando.es/en/after-sales-services/
FR
natural_image
Symbol of a trash bin crossed out by two crossed lines, with no text or labels present.
MEDIDAS DO PRODUTO....52
INSTALAÇÃO ....53
natural_image
Line drawing of a front-loading washing machine with circular vent and side panel (no text or symbols)
natural_image
Line drawing of a coiled tube with a flanged end and a warning symbol (no text or labels)
natural_image
Icon of an open book with a lowercase 'i' and horizontal lines, representing information (no text or symbols present)natural_image
Technical line drawing of a monitor mounted on a stand, with dimension label 1042 (no text or symbols on the device itself)INSTALAÇÃO
natural_image
Three icons showing washing machines with crossed X marks, no text or symbols presentnatural_image
Line drawing of a washing machine with an open door showing internal components (no text or symbols)natural_image
Illustration of hands installing or adjusting a mechanical component with a bracket (no text or symbols visible)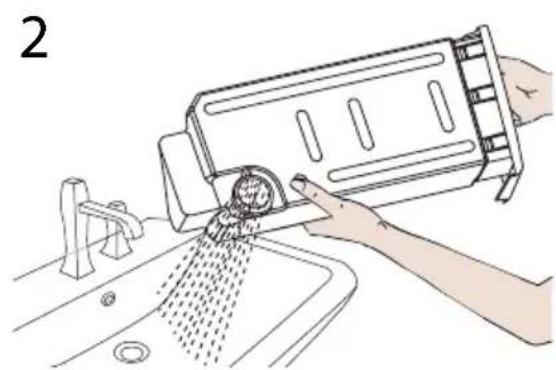
natural_image
Illustration of a hand washing a kitchen sink with a water dispenser (no text or symbols)natural_image
Illustration of a hand placing a yellow substance into a car intake tray (no text or symbols)Som do compressor
natural_image
Line drawing of a front-loading washing machine with speaker and fan components (no text or symbols)natural_image
Symbol of a trash bin crossed with no text or numbers, representing environmental restriction (no text present)
TRAITEMENT DES DÉCHETS
MESURES DU PRODUIT 89
INSTALLATION....90
natural_image
Line drawing of a front-loading washing machine with circular vent and side panel (no text or symbols)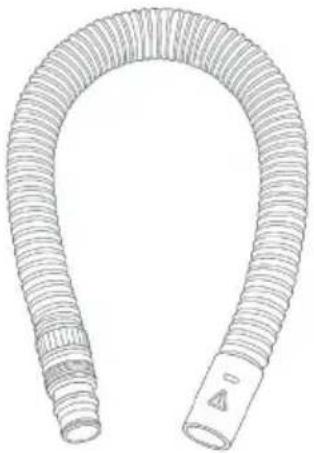
natural_image
Line drawing of a coiled tube with a flanged end and a warning symbol (no text or labels)
natural_image
Icon of an open book with a lowercase 'i' and horizontal lines, representing information (no text or symbols present)natural_image
Three icons showing a washing machine with crossed-out lines, no text or symbols presentnatural_image
Line drawing of a washing machine with an open door opening, showing internal components (no text or symbols)natural_image
Illustration of hands installing or adjusting a device into a rack (no text or symbols visible)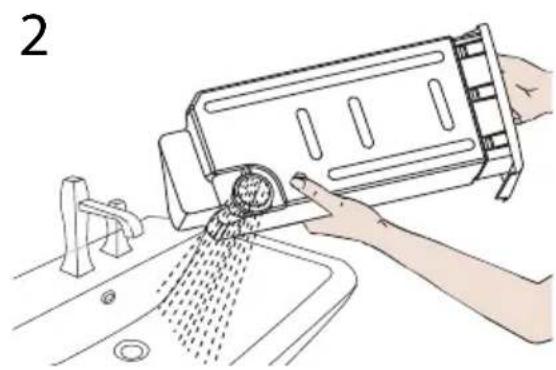
natural_image
Illustration of a hand washing a kitchen sink with a water dispenser (no text or symbols)flowchart
graph TD
    A["Step 1: Hand placement"] --> B["Step 2: Assembly with fan and blade"]
    B --> C["Step 3: Assembly with fan and blade"]
    C --> D["Step 4: Assembly with fan and blade"]
    D --> E["Step 5: Assembly with fan and blade"]
    E --> F["Step 6: Assembly with fan and blade"]
    F --> G["Step 7: Assembly with blade"]
natural_image
Illustration of a hand placing a yellow substance into a car intake tray (no text or symbols)natural_image
Technical line drawing of a server rack with speaker icon and sound waves (no text or symbols)natural_image
Line drawing of a front-loading washing machine with speaker and fan components (no text or symbols)DÉPANNAGE
https://www.pando.es/en/after-sales-services/
FR
Pando reserves the right to change or cancel any measures of the articles in the manual without prior notice, without affecting the essential characteristics of functionality and safety, and is not responsible for any errors or omissions that may occur in the manual.
Technical specifications valid except for typographical errors, omission, or printing. The images and content of this manual are the exclusive property of Pando - INOXPAN S.L., and any appropriation of images and total or partial reproduction without prior written authorization is strictly prohibited.
THE IMAGES SHOWN IN THIS MANUAL ARE NOT CONTRACTUAL.
Pando's Technical Management reserves the right to modify, alter, or improve the technical drawings displayed in this manual without prior notice.
The paper version of this manual cannot be updated in real-time, to ensure the latest version of your product's instructions, we recommend consulting the digital version at www.pando.es
First of all, we would like to thank you for the trust you have placed in our company by purchasing one of our products.
For purchasing one of our products. We are sure that you have made the right decision.
At Pando, not only do we offer top quality products, but we also have a large team of professionals who will help you and advise you on any queries you may have during installation or operation.
To get to know us better, we invite you to visit our website (www.pando.es) where you can see our full range of products with the most up to date commercial and technical information.
Here you will find a wide selection of Decorative Hoods; wall-mounted, ceiling-mounted, island, integrated into furniture and integrated into the hob.
This variety allows us to adapt to any style of kitchen.
We also show you our collection of essential appliances in any home.
Appliances such as our collection of high-performance Ovens and Microwaves with high performance, Induction and Gas Hobs that will help you to make the best recipes, Wine Cellars and Ageing Cellars to maintain and preserve your wines in the best conditions, Dishwashers with the most modern technology and our with the most up-to-date technology and our range of Refrigerators and Freezers with Freezers and Refrigerators for panel integration together with those for free installation.
All this under a brand with a very long trajectory of more than 40 years in the sector, which manufactures its products as a sector, which manufactures its products like a true craftsman. Bringing the best of our experience to everything we do.
We sincerely hope you have fun, experience and enjoy the comfort and capabilities of what is already your new capabilities of what is already your new kitchen ally.
Thank you Pando team
ENVIRONMENTAL PROTECTION
The symbol on the product or its packaging indicates that this product cannot be disposed of like normal domestic waste. The product must be handed over at a collection point for recycling electrical and electronic equipment. If you ensure that this product is correctly disposed of, you will help to avoid the possible negative environmental and public health effects that could arise from incorrect disposal. For more detailed information about recycling this product, please contact your city authorities, the domestic waste service or the establishment where you purchased it. This electrical appliance is marked in compliance with European Directive 2012/19/EU on electrical and electronic appliance waste (WEEE).
COLLECTION OF HOUSEHOLD APPLIANCES
natural_image
Symbol of a trash bin crossed out by two crossed lines, with a solid black rectangle below (no text or labels)
WASTE TREATMENT
DISPOSAL OF THE PACKAGING. The packaging is marked with in Green Dot.
In its commitment to the protection of the environment and in compliance with the provisions of the European Directive 94/62 / EC on packaging and packaging waste and the derived Law 22/2011 on Waste and Contaminated Soil, Pando entrusts entities of social economy an Integrated Management System, responsible for the periodic collection at the consumer's home or in its vicinity of used packaging and packaging waste for subsequent treatment.
To remove all packaging materials such as cardboard, expanded polyurethane, and film, use the appropriate containers.
This ensures the correct treatment and reuse of packaging materials.
INDEX
SAFETY WARNINGS....118
• Electrical Safety....120
- Child safety....120
• Product Safety 121
- Correct use of the appliance.... 122
INSTALLATION....124
- Connection to the water outlet (with optional drain hose)...... 124
• Water drain hose connection.... 124 - Adjusting the feet.... 124
- Electrical connection.... 124
- Adjusting the adjustable feet 124
BOX CONTENTS 125
PRODUCT MEASUREMENTS 126
- Placing the machine on the floor 127
OVERVIEW 127
PREPARING GARMENTS....127
- Sorting laundry for drying 127
PREPARING CLOTHES FOR DRYING....128
- Capacity of load 128
USING THE DRYER 129
• Control panel 129
- Programme selection button.... 129
PROGRAMME SELECTION AND CONSUMPTION TABLE ....129
PROGRAMMES....131
AUXILIARY FUNCTIONS ...... 134
- During the programme.... 136
• End of programme....136
• Information about the drum light.... 136
• Electronic indicator and display 137
PROGRAM COMPATIBILITY TABLE....138
CLEANING AND CARE....139
- Cleaning the lint filter 139
- Cleaning the heat exchanger.... 140
- Cleaning the moisture sensor.... 140
- Cleaning the inside surface of the loading door 141
HABITUAL OPERATING NOISES ....141
TROUBLESHOOTING....142
ERROR CODES....145
TECHNICAL DATA SHEET 146
WARRANTY....147
CHANGE OF DOOR OPENING....148
SAFETY WARNINGS
This appliance may be used by adults who know how to use it safely and are aware of the risks involved.
Children must not play with the appliance. Cleaning and maintenance should only be carried out by adults.
- Keep the appliance out of the reach of pets.
- Do not leave children unattended near the appliance.
- Keep the packaging material out of the reach of children.
- Do not allow children to sit on, climb or enter the appliance.
- This dryer is designed for domestic and indoor use only. The warranty will be void in case of commercial use.
- Use this product only for laundry with a label indicating that it is suitable for drying.
- The manufacturer is not responsible for damage resulting from improper use or transport.
- The lifetime of your tumble dryer is 10 years. This is the period during which the spare parts necessary for the proper functioning of the dryer will be available on the market.
- Do not allow floor coverings
to obstruct the ventilation openings.
• Installation and repair of the machine must only be carried out by an authorised repair agent. The manufacturer is not liable for damage resulting from self-repair or any kind of unauthorised non-professional repair.
WARNING: Never spray or pour water on the dryer to wash it! There is a risk of electric shock!
Leave at least 3 cm space between the side and rear walls of the product and above if you plan to place your appliance under a countertop.
Assembly/disassembly for under-countertop installation, if necessary, must be carried out by an authorised service agent.
- Before installation, check the product for visible damage. Never install or use a damaged product.
- Keep pets away from the dryer.
- Fabric softeners or similar products must be used according to the manufacturer's instructions.
- Remove all foreign objects from pockets, such as lighters and matches.
- The appliance must not be installed behind a lockable door,
sliding door or hinged door on the opposite side of the dryer from the dryer if this prevents the door from opening fully.
WARNING: On the appliance housing or built-in structure, keep ventilation openings clear of obstructions.
- Before contacting your local authorized service provider for installation of the tumble dryer, check the information in the owner's manual to ensure that the electrical installation and water outlet are adequate. If they are not, call a qualified electrician and plumber to make the necessary adjustments.
- It is the customer's responsibility to prepare the installation site of the tumble dryer as well as the electrical and waste water installation. Before installation, check that the tumble dryer is not damaged. If it is damaged, do not install it. Damaged products may endanger your health.
• Install the dryer on a stable and flat surface. -
Operate the dryer in a dust-free environment where the air ventilation is good.
-
The clearance between the dryer and the floor must not be reduced by objects such as carpets, wood or adhesive tape.
- Do not block the air vents located on the base of the dryer.
- The appliance must not be installed behind a lockable door, sliding door or hinged door on the opposite side to the tumble dryer in such a way that it prevents the door from opening fully.
- Once the tumble dryer has been installed, the connections must remain stable. When installing the tumble dryer, make sure that the rear surface is not resting on anything (e.g. a tap or a plug).
- The operating temperature of the tumble dryer is +5°C to +35°C. If used outside this temperature range, the performance of the dryer will be adversely affected and the product will be damaged.
- Be careful when transporting the product as it is heavy. Always wear safety gloves.
• Always install the product against a wall. - The surface of the product should be placed against the
wall.
- When the product is placed on a stable surface, use a spirit level to check if it is completely stable. If not, adjust the legs until it is stable. Repeat this process each time you relocate the product.
- Do not place the dryer on the power cord.
This section contains safety instructions to help protect you from the risk of personal injury or property damage. Failure to follow these instructions will void any warranty.
Electrical Safety
- The appliance must not be powered through an external switching device, such as a timer, or connected to a circuit that is regularly switched on and off by a utility company.
- Do not touch the power plug with wet hands. Always pull the plug to unplug the product, otherwise there is a risk of electric shock.
- Connect the dryer to a grounded, fuse-protected outlet. The grounding must be done by a qualified electrician. Our company is not responsible for any damage or loss resulting from
the use of the tumble dryer without grounding as required by local regulations.
- The voltage and permissible fuse protection are indicated on the model plate (for the model plate, refer to the general description).
- The voltage and frequency values indicated on the model plate must be equal to the voltage and frequency values of the mains supply in your home.
- Unplug the dryer when it is not in use for a long period of time, and before installation, maintenance, cleaning and repair, otherwise the dryer may be damaged.
- The plug must be accessible at all times after installation.
WARNING: To avoid the risk of fire or electric shock, do not use extension cords, multiple sockets or adaptors to connect the dryer to the mains.
Child safety
- This appliance can be used by adults who know how to use it safely and are aware of the risks.
• Children must not play with the
appliance. Cleaning and maintenance should only be carried out by adults.
- Keep the appliance out of the reach of pets.
- Do not leave children unattended near the appliance.
- Keep packaging material out of the reach of children.
- Do not allow children to sit on, climb or enter the appliance.
- Do not leave children unattended near the machine.
• Children can become trapped in the machine with risk of death. - Do not allow children to touch the glass door during operation. The surface becomes extremely hot and may cause skin damage.
- Keep packaging material out of the reach of children.
- Poisoning and irritation may occur if detergents and cleaning materials are consumed or come into contact with the skin and eyes.
- Keep cleaning materials out of the reach of children. Electrical products are dangerous for children.
- Keep children away from the product while it is running.
• To prevent children from
interrupting the tumble dryer cycle, you can use the child lock to prevent any changes to the running programme.
- Do not allow children to sit or climb on or into the product.
• Children under 3 years of age should be kept away unless under supervision.
Product Safety
WARNING: Due to the risk of fire, the following laundry items and products should NEVER be dried in the tumble dryer:
- Do not dry unwashed items in the tumble dryer.
- Clothes that have been soiled with substances such as coo-king oil, acetone, alcohol, petrol, paraffin, paraffin, spot removers, turpentine, waxes and wax removers should be washed in hot water with an additional amount of detergent before tumble drying.
- Cloths and cleaning mats that have residues of flammable cleaning products or acetone, petrol, petroleum, spot removers, turpentine, candle, wax, wax, wax remover or chemicals.
• Clothing that has residues of hairspray, nail polish remover
and similar substances.
- Clothing on which industrial chemicals have been used for cleaning (such as chemical cleaning).
- Clothing that has any type of foam, sponge, rubber or rubber-like parts or accessories. This includes latex foam sponge, shower caps, waterproof fabrics, tight-fitting clothing and foam pillows.
- Stuffed items and damaged items (parts or jackets). Foam protruding from these items may catch fire during the drying process.
- Using the dryer in environments containing coal or flour dust may cause an explosion.
WARNING: Underwear containing metal reinforcements must not be placed in the dryer. The dryer may be damaged if the metal reinforcements come loose and break during drying.
If possible, leave the door open between cycles.
WARNING: This dryer contains R290 refrigerant gas.
Risk of fire and damage!
This
product
contains
environmentally safe but flammable R290 gas. Keep open flames and sources of fire away from the product.
Correct use of the appliance
CAUTION: Avoid stopping a tumble dryer before the drying cycle has finished unless all items are removed quickly and spread out to dissipate heat.
CAUTION: Make sure that pets do not enter the tumble dryer. Check the inside of the dryer before use.
ATTENTION: It may happen that the laundry overheats inside the dryer if you cancel the programme or in case of a power failure while the dryer is running. This concentration of heat may cause self-combustion, therefore, always activate the "Cool down" programme to cool down or quickly remove all laundry from the dryer to hang it up and dissipate the heat.
- Use the dryer only for domestic drying and for drying fabrics with a label indicating that they are suitable for drying. All other uses are beyond the scope of the intended use and are prohibited.
-
Warranty will be void in case of commercial use.
-
This appliance is designed for use inside domestic residences only and must be placed on a straight and stable surface.
- Do not lean or sit on the door of the tumble dryer. The dryer may tip over.
- To maintain a temperature that does not damage the laundry (e.g. to prevent the laundry from catching fire), a cooling process is started after the heating process. After this, the programme ends. At the end of the programme, always remove the laundry quickly.
ATTENTION: Never use the dryer without a lint filter or with a damaged lint filter.
- The lint filters must be cleaned after each use as described in Cleaning the lint filter.
- Wet filters can cause malfunctions during the drying process. Do not insert a wet lint filter into the dryer.
- Lint must not be allowed to accumulate around the dryer (does not apply to appliances intended to be vented to the outside of the building)
IMPORTANT: The clearance between the dryer and the floor must not be reduced by objects such as carpets, wood or panelling, otherwise sufficient air intake for the machine cannot be guaranteed.
- Do not install the dryer in rooms where there is a risk of freezing. Freezing temperatures adversely affect the performance of the dryer. Condensed water freezing in the pump and hose can cause damage.
INSTALLATION
Connection to the water outlet (with optional drain hose)
In appliances with a condensing unit, water accumulates in the water tank during the drying process. Instead of emptying the water tank after each drying cycle, you can discharge the water directly with the water drain hose connection supplied with the dryer.
Water drain hose connection
Pull and pull out the end of the hose at the back of the tumble dryer. Do not use any tools to remove the hose.
Place one end of the water drain hose, which is supplied with the product, into the slot from which the hose was pulled out.
Attach the other end of the drain hose directly to the water outlet or sink.
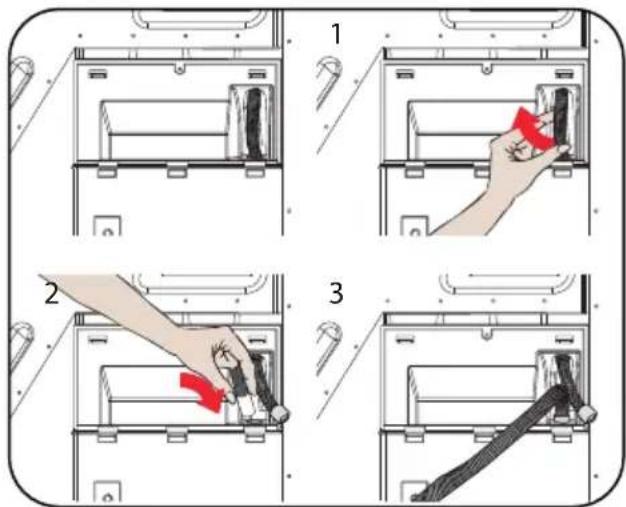
CAUTION: The hose must be connected in such a way that it cannot be displaced. If the hose comes out during water discharge, it is possible that your house may be flooded.
IMPORTANT: The drain hose must be installed at a maximum height of 80 cm.
IMPORTANT: The water drain hose must not be kinked between the outlet and the product, folded or stepped on.
Adjusting the feet
For the dryer to operate with less noise and vibrations, it must be stable and balanced on its feet. Adjust the power supply to ensure the balance of the product.
Turn the feet to the right and to the left until the dryer is level and stable.
IMPORTANT: Never remove the adjustable feet.
Electrical connection
WARNING: There is a risk of fire and electric shock.
- Your dryer is set to 220-240 V and 50 Hz.
- The mains cord of the dryer is equipped with a special plug. This plug must be connected to an earthed socket protected by a 16 amp fuse as indicated on the model plate. The current rating of the power line fuse where the outlet is connected must also be 16 amps. Consult a qualified electrician if you do not have such a plug or fuse.
- Our company is not responsible for damage resulting from unauthorized repairs.
IMPORTANT: Using your machine with low voltage ratings will shorten the life and decrease the performance of your machine.
Adjusting the adjustable feet
- Allow at least 3 cm of space between the side and rear walls of the product and the underside of the countertop when installing your product under a countertop.
- Mounting / dismounting under the countertop, if necessary, must be done by an authorized service technician.
- For the tumble dryer to operate more quietly and vibration-free, it must stand on its feet correctly and in balance. Adjust the feet to obtain this balance.
BOX CONTENTS
natural_image
Line drawing of a front-loading washing machine with circular vent and side panel (no text or symbols)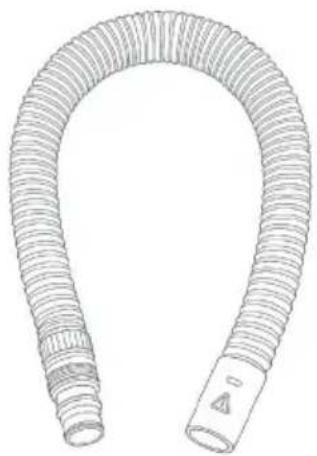
natural_image
Line drawing of a flexible hose with a flanged end and a small rectangular opening (no text or symbols)
natural_image
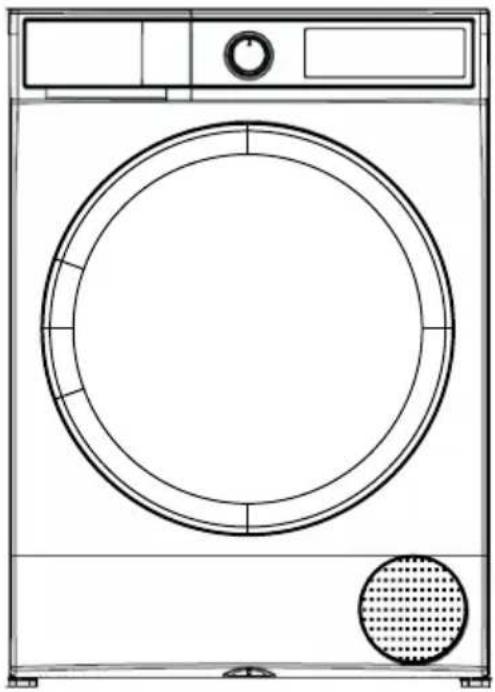
Icon of an open book with a lowercase 'i' and horizontal lines, representing information (no text or symbols beyond the icon)- Pando tumble dryer
- Drainage pipe
- User's manual
PRODUCT MEASUREMENTS
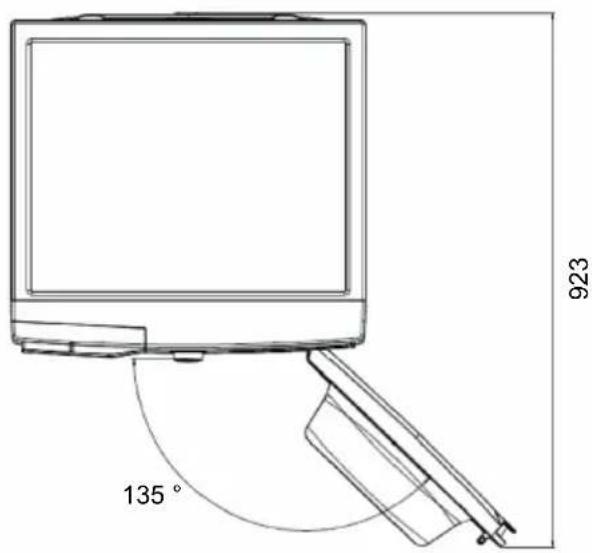
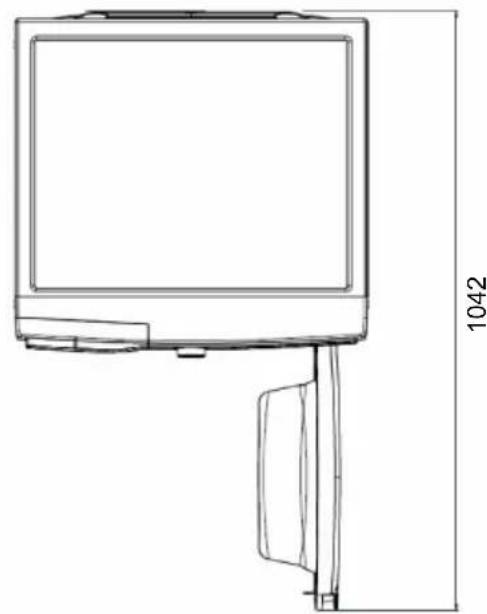
The manufacture and design of our components and products may vary slightly within established tolerances. These variations may affect aspects such as tone, contours, proportions or final dimensions. These differences are inherent to the production process and the characteristics of the materials used, and are therefore not considered defects. The maximum tolerance allowed is ±5mm .
natural_image
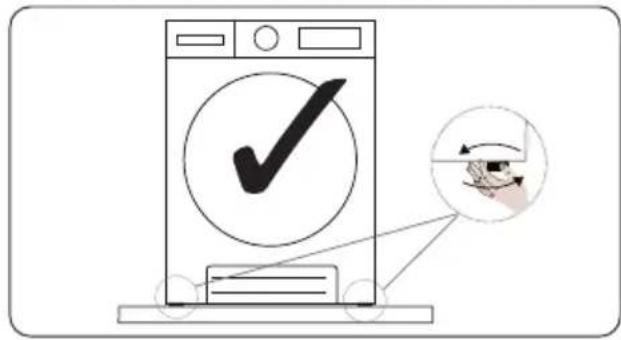
Line drawing of a monitor mounted on a stand with a vertical dimension label (1042) for scale, no text or symbols present.- Adjust by turning the feet clockwise and counterclockwise until the tumble dryer is level and balanced.
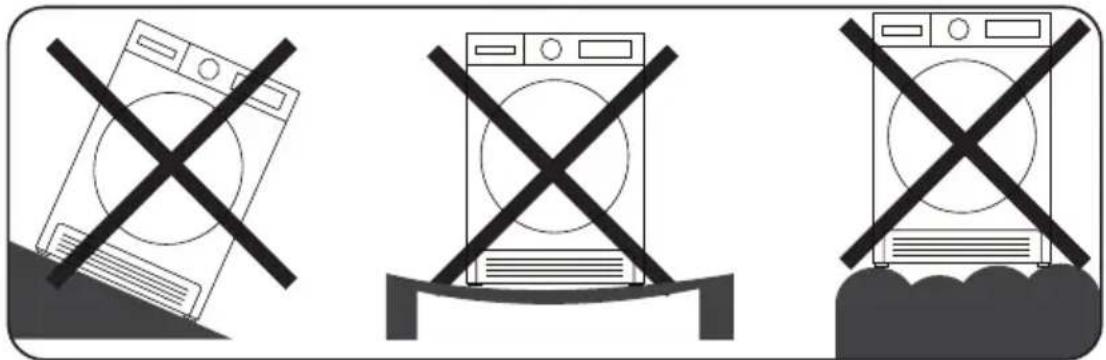
- The product must not be placed on sloping, uneven or crooked floors.
Placing the machine on the floor
The tumble dryer must be placed on a fl at surface. It must not be placed on sloping or angled floors.
OVERVIEW
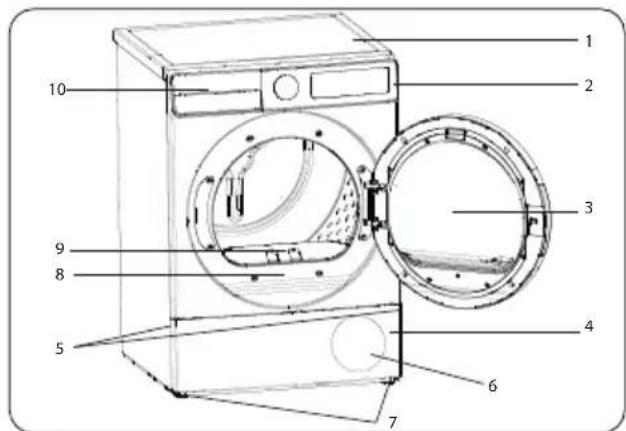
- Top tray
- Control panel
- Loading door
- Plinth
- Plinth opening slot
- Air vents
- Adjustable feet
- Rating plate
- Lint fi Iter
- Drawer cover
PREPARING GARMENTS
Sorting laundry for drying
Follow the instructions on the labels of the laundry to be dried. Only dry laundry that has a statement/symbol indicating "can be tumble dried".
- Do not use the product with load quantities and types of laundry other than those indicated in 4.3. Load capacity.
- Do not dry thin, multi-layered or thickly layered laundry together as they dry at different levels. For this reason, dry items with the same structure and type of fabric together. In this way, you can obtain an even drying result. If you think the laundry is still damp, you can select a time programme for additional drying.
- Dry your large laundry (such as du-vets) and small laundry separately to nor have damp laundry.
IMPORTANT: Delicate fabrics, fabrics with embroidery, woollen clothes*, silk fabrics, expensive delicate fabrics, recycled fabrics, airtight garments, tulle curtains, rubber or plastic items, fibreglass items, garments with metallic embroidery, leather fabrics are not suitable for drying in the tumble dryer.
*Dry woollen laundry in the Wool programme if available depending on the model of the tumble dryer. Be sure to follow the instructions of the Wool programme.
PREPARING CLOTHES FOR DRYING
Danger of explosion or fi re! Remove all foreign objects such as lighters and matches from the pockets.
WARNING: The tumble dryer drum and fabrics may get damaged.
- The laundry may get tangled during the washing process. Separate clothes from each other before placing them in the dryer.
- Remove all items from the laundry pockets and apply the following:
- Tie fabric belts, apron strings, etc. together or use a laundry bag.
- Close zips, buckles and fasteners, fasten buttons on covers.
- For best drying results, sort laundry according to fabric type and drying programme.
- Remove hooks and similar metal parts from laundry.
- Woven items, such as T-shirts and knitted garments, usually shrink on the first drying. Use a protective programme.
- Do not over dry synthetic garments. This will cause wrinkling.
- When washing the laundry for drying, adjust the amount of softener according to the washing machine manufacturer's data.
Capacity of load
Follow the instructions in "Programme selection and consumption table".
. (See Programme selection and consumption table). Do not load the product with more laundry than the capacity values specified in the table.
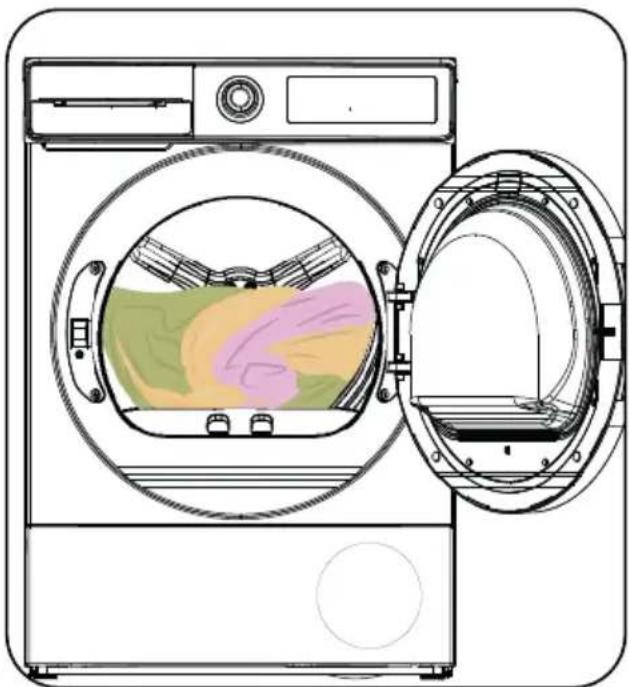
natural_image
Line drawing of a washing machine with internal components and an open door (no text or symbols)IMPORTANT: It is not recommended to load the dryer with more laundry than shown in the figure. When overloaded, the drying performance of the dryer decreases and the dryer and laundry may be damaged.
| Clothes (per piece) | Dry load weight (g) |
| Sheets (double) 725 | |
| Pillowcase 240 | |
| Bath towel 700 | |
| Hand towel 225 | |
| Shirt 190 | |
| Cotton shirt 200 | |
| Jeans | 650 |
| Knitted - Trench trousers | 400 |
| T-shirt | 120 |
USING THE DRYER
Control panel
The user interface and icons may change depending on the product. Select the one that best suits your product.
Programme selection button
Programme selection button selects the desired drying programme.
PROGRAMME SELECTION AND CONSUMPTION TABLE
Press the Start/Pause button to start the programme. The Start/Pause LED indicates that the programme has started and the rest of the programme is shown on the display.
| Programme Load (kg) | Spin speed of the washing machine | Initial moisture content | Duration (hour:minutes) | Energy consumption per drying cycle (kWh/cycle) |
| Extra dry cotton | 8 1000 60% 3:32 1,72 | |||
| Extra dry cotton | 4 1000 60% 2:35 1,20 | |||
| Organic cotton* | 8 1000 60% 3:19 1,54 | |||
| Organic cotton* | 4 1000 60% 2:00 0,86 | |||
| Dry cotton iron-on | 8 1000 60% 2:27 1,20 |
natural_image
Three icons showing washing machines with crossed X marks, no text or symbols present| Dry cotton iron-on | 4 1000 | 60% 1:45 0,78 | |||
| Dry wardrobe for synthetics | 4 800 | 40% 1:19 0,59 | |||
| Dry iron for synthetics | 4 800 | 40% 0:58 0,41 | |||
| Delicate 2 6 | 00 50% | 1:03 0,43 | |||
| Wool 1,5 | 600 | 50% 2:40 1,30 |
*Energy labelling standard programme "Commission Regulation (EU) No. 2023/2533".
All values in the table have been determined in accordance with EN 61121:2013/A12:2025. The consumption values may vary from the values in the table depending on the type of fabric, spin speed, ambient conditions and tension values.
The programme "Organic Cotton" is the "standard cotton programme" according to Commission Regulation (EU) No. 932/2012.
The programme Organic Cotton is suitable for drying wet cotton laundry and this programme is used to assess compliance with EU ecodesign legislation. The Eco Cotton programme is the most energy efficient programme for drying wet cotton clothes. Loading the domestic tumble dryer up to the maximum capacity indicated in the user manual for the respective programmes will contribute to energy saving.
For standard tests, the water drain hose must be connected to the water drain according to the relevant installation instructions.
PROGRAMMES
The Start/Pause LED will flash during programme selection. Press the Start/Pause button to start the programme. The Start/Pause LED indicates that the programme has started and the Drying LED lights up.
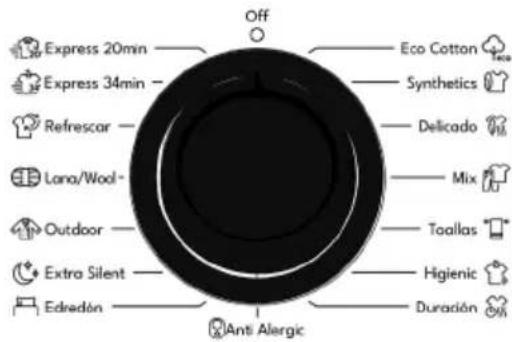
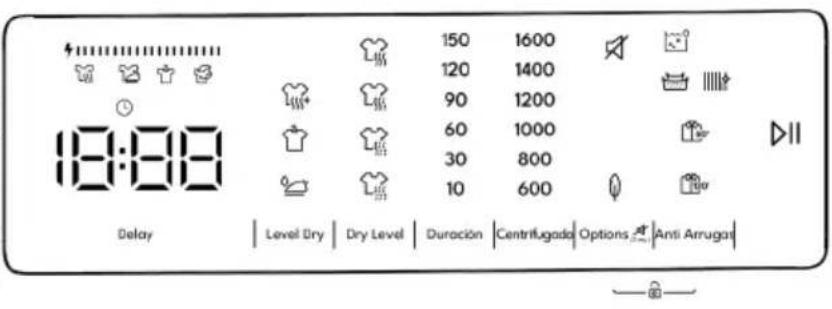
| Programa Description | Load (kg) | Initial moisture content (%) | |
| Eco Cotton - extra seco | This programme dries thick and multilayer fabrics, such as cotton towels, sheets, pillow-cases, bathrobes, at high temperature so that they can be placed in the wardrobe. | 8 60% | |
| Eco Cotton - seco armario | This programme dries cotton pyjamas, underwear, tablecloths, etc. so that you can store them in the wardrobe. | 8 60% | |
| Eco Cotton - seco plancha | This programme dries cotton laundry in preparation for ironing. The laundry removed from the dryer will be damp. | 8 60% | |
| Synthetics - seco armario | This programme dries synthetics, such as shirts, T-shirts, blouses, at a lower temperature compared to the cotton programme to allow you to put them in the wardrobe. | 4 | 40% Synthetics - dry wardrobe This programme dries synthetics, such as shirts, T-shirts, blouses, at a lower temperature compared to the cotton programme to allow you to put them in the wardrobe. 4 40% |
| Synthetics - seco plancha | This programme dries synthetics such as shirts, T-shirts, blouses at a lower temperature compared to the cotton programme to prepare them for ironing. The laundry removed from the dryer will be damp. | 4 40% | |
| Delicado | This programme dries fine garments such as shirts, blouses and silk garments at low temperature so that they are ready to wear. | 2 50% | |
| Programa Description | Load (kg) | Initial moisture content (%) |
| Mix | This programme dries cotton-synthetic blended garments that do not discolour so that they are ready to wear. | 4 60% Towels This programme dries fine garments such as shirts, blouses and silk garments at low temperature so that they are ready to wear. 2 50% 4 60% |
| Toallas | This programme dries thick cotton laundry such as towels, bathrobes, etc. | 3 60% |
| Higienic | This programme is suitable for textiles that need hygienic requirements. | 3 60% |
| Duración (20-40-60min) | To reach the desired drying level at low temperature, you can use the auxiliary function "duration". Regardless of the drying level, the programme stops at the desired time. | - |
| Anti Alergic | The programme is used for drying cotton laundry that requires higher hygiene, such as baby clothes, at high temperatures. | 3 60% |
| Edredón This programme is used for drying duvets. 2,5 60% | ||
| Extra Silent | The Silent programme operates the dryer by decreasing the ambient noise. The noise sensation decreases by almost 50% compared to the programme Organic Cotton. | 8 60% |
| Outdoor | This programme is suitable for warm clothes, waterproof jackets, jackets with inner insulation, etc. | 2 40% |
| Lana/Wool | Use this programme to gently dry woollen clothes, washed as indicated in the washing instructions. Take out the laundry at the end of the drying cycle. | 1,5 50% |
| Programa Description | Load (kg) | Initial moisture content (%) | |
| Refrescar | Without providing warm air, refreshing is done by selecting the Drying Time option and bad odours can be removed. | - | - |
| Express 34min | 1 kg of cotton shirts spun at high speed in the washing machine dry in 34/45 minutes. | 1 50% | |
| Express 20min | 2 to 3 shirts are ready to be ironed in 20/30 minutes. | 0,5 50% |
IMPORTANT: Do not open the loading door while the programme is running. If you have to open the door, do not keep it open for a long time.
AUXILIARY FUNCTIONS
Below is the table summarizing the options that can be selected in the programmes.
| Option Description | |
| Delay (delayed start) | You can delay the programme start time by selecting the option from 1 hour to 23 hours. You can activate the desired delay time by pressing the Start/Pause button. After the time has elapsed, the selected programme will start automatically. During the delay time, programme compatible options can be activated/deactivated. A long press of the Delay Start button changes the delay time continuously. |
| Drying Target (iron, cabinet, extra dryer) | The humidity level obtained after drying can be increased in 3 levels. In this way, the required drying level can be selected. The levels that can be selected apart from the standard setting: 1, 2, 3. After selection, the corresponding LED of the drying level lights up. |
| Dry level (1, 2, 3, 4) | This function will dry the laundry based on the selected humidity level, with the lower symbol being the wettest and the upper symbol the driest. |
| Duration | When the control is positioned in the "Duration" programme or in the "Refresh" programme, the option can be selected by pressing the "Duration" button and the programme is started by pressing the start/pause button. |
| Spin (600-1600) | To improve the drying efficiency, the revolutions per minute that can be set (600-800-1000-1200-1400-1600) should match the speed at which the laundry has been spun in the wash. In no case will the tumble dryer spin at the speed set in that function column. |
| Options (delicate) | Delicate fabrics will be dried longer at low temperature. |
| Anti-wrinkle (60'/120') | If you select the anti-wrinkle option and do not open the tumble dryer door at the end of the programme, the 1 hour anti-wrinkle phase will be extended to 2 hours. After selecting the option, you will hear an audible warning. You can press the same button again to cancel the option. If you open the door or press the Start/Pause button while the anti-wrinkle process is running, then the anti-wrinkle process will be cancelled. |
| Muting the control panel (Options 3s) | The dryer gives an audible warning when you turn the programme selector knob, when you press the buttons and at the end of the programme. To mute the beeps, press and hold the Options button for 3 seconds. When you press the button, you will hear an acoustic warning showing that the option has been cancelled. |
| Child Lock (Options + Anti Wrinkle 3s) | There is a child lock option to prevent changes in the programme flow when the buttons are pressed during the programme. To activate the child lock, the user must press the Options and Anti Wrinkle buttons simultaneously for 3 seconds. When activating/deactivating the child lock, the display will show "CL" for 2 seconds and then turn off; and an audible warning will be heard. The child lock is not automatically deactivated at the end of the programme. To deactivate the child lock at the end of the programme, turn the programme selection knob to the off position. Then turn the knob to any programme position and press the Options and Anti Wrinkle buttons simultaneously for 3 seconds. |
During the programme
If you open the door while the programme is running, the product will switch to pause mode. Once the door is closed, press the Start/Pause button to resume the programme. Do not open the loading door when the programme is running. If you have to open the door, do not keep it open for a long time.
End of programme
Once the programme is finished, the warning LEDs for Start/Pause, water tank level, filter cleaning and heat exchanger cleaning will light up. In addition, an acoustic warning will sound at the end of the programme. You can remove the soiled laundry so that the dryer is ready for a new load.
IMPORTANT: Clean the lint filter after each programme. Empty the water tank after each programme.
IMPORTANT: If you do not remove the laundry after the programme has finished, the 1-hour anti-crease phase will be activated automatically. This programme rotates the drum at regular intervals to prevent creasing.
Information about the drum light
- The light operates automatically when the door is opened and switches off automatically after a while, whether the door is closed or kept open.
- It is not an adjustable option.
- Please do not attempt to replace or modify the LED light.
Electronic indicator and display
| AUXILIARY FUNCTION ICONO | ||
| Delayed start timer |  | |
| Drying target | Extras dry |  |
| Wardrobe dry |  | |
| Iron dry |  | |
| Dry level | Drying level 1 |  |
| Drying level 2 |  | |
| Drying level 3 Drying level 2 Drying level 3 Drying level 3 Drying level 3 Drying level 3 Drying level 3 Drying level 3 Drying level 3 |  | |
| Drying level 4 |  | |
| Options | Delicate | [CD60] |
| Anti crease | Anti crease 60' |  |
| Anti crease 120' |  | |
| Mute panel |  | |
| Start and pause STEPS and pause |  | |
| DRYING STEPS | |
| Drying |  |
| Iron dry |  |
| Wardrobe dry |  |
| End |  |
| Water tank warning indicator |  |
| Lint filter cleaning warning indicator | [6XK] |
| Heat exchanger cleaning warning indicator |  |
| The electronic display shows the drying steps throughout the programme. Each time a programme step is started, the light of the corresponding drying step lights up. When the drying step is completed, the light of the corresponding drying step goes off. | |
| Energy consumption display | |
| The energy consumption display shows the energy consumption of the selected programme. The larger the value shown on the display, the higher the energy consumption. The energy consumption level increases or decreases depending on the type of fabric, the duration of the selected programme, the drying level and the spin speed that has been applied in the wash. | |
PROGRAM COMPATIBILITY TABLE
| Delay | Optetivo de secedo - plancha | Optetivo de secedo - armerio | Optetivo de secedo - extra | Optetivo de secedo - extra | ||||||
| Optetivo de secedo - plancha | Optetivo de secedo - armerio | Optetivo de secedo - extra | Optetivo de secedo - extra | Optetivo de secedo - extra | ||||||
| Express 20 min | Express 34 min | Refrescar | Lana/Wool | Outdoor | Extra silent | Edredón | Cuidado del Bebé | Duración | Higienic | |
| - | - | - | - | - | ||||||
CLEANING AND CARE
IMPORTANT: Do not use industrial chemicals to clean the dryer. Do not use a dryer that has been cleaned with industrial chemicals.
Cleaning the lint filter
IMPORTANT: Do not forget to clean the lint filters after each use.
To clean the lint filters:
- Open the loading door.
- Pull up the lint filters to remove them.
- Separate the inner filter from the outer filter.
- Open the inner filter.
- Clean the inner filter with your hands or with a soft cloth.
- Close the filters and attach the hooks.
- Place the inner filter inside the outer filter.
- Replace the lint filters.
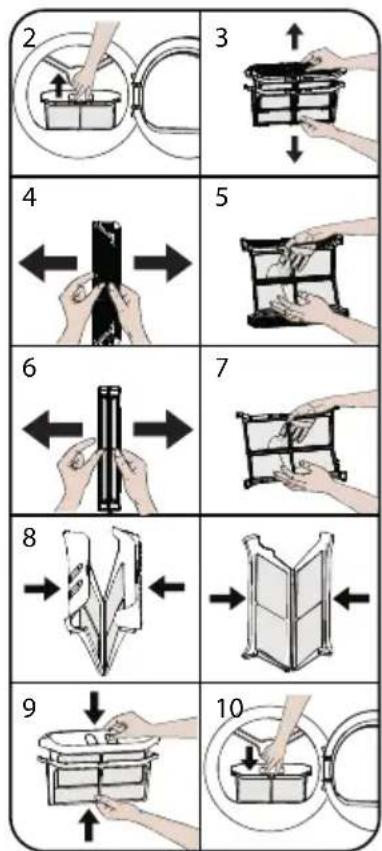
After using the dryer for some time, if you find a layer causing a clogging on the filter surface, clean it. Lint should be thrown away in the dustbin. To prevent the spread of microplastics, they should not be disposed down the drain.
To empty the water tank:
- Pull the drawer cover and carefully remove the tank.
- Drain the water from the tank.
- Replace the tank.
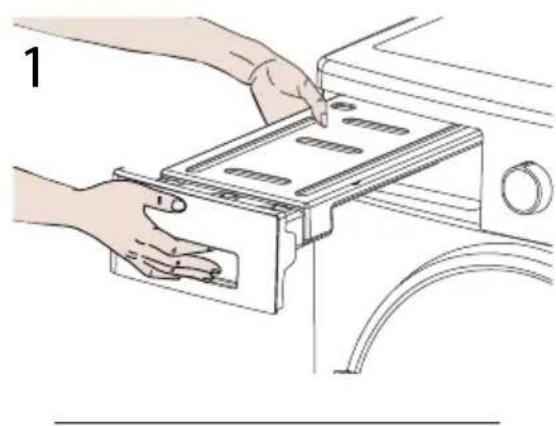
natural_image
Illustration of hands installing or adjusting a device into a rack (no text or symbols visible)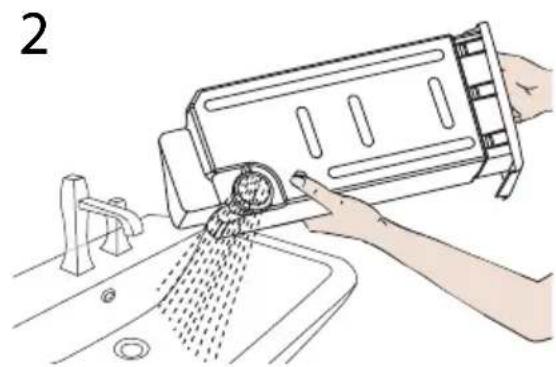
natural_image
Illustration of a hand washing a kitchen sink with a water dispenser (no text or symbols)IMPORTANT: Never remove the water tank when the programme is running. Condensed water in the water tank is not fit for human consumption.
Do not forget to empty the tank after each use. If the water tank becomes full during programme operation, the warning button will light up and the machine will switch to standby mode. In this case, you should
empty the water tank and press the 'Start/Pause' button to resume the programme. When the water tank is emptied, the warning indicator will go off and the programme will resume. During the cycle, it is recommended to use a direct drain hose to avoid this warning.
Cleaning the heat exchanger
IMPORTANT: Clean the heat exchanger when you see the warning "Heat exchanger cleaning".
IMPORTANT: Even if the heat exchanger cleaning warning led is not on, the heat exchanger may be cleaned more frequently depending on the usage behaviour.
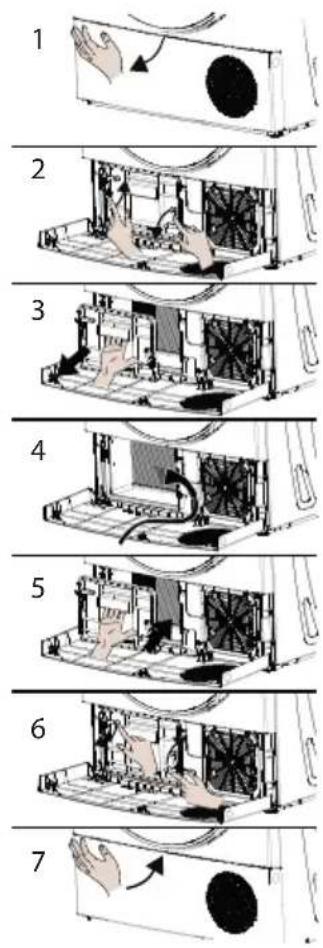
If the drying process is completed, open the loading door and wait for it to cool down.
- Open the cover plate cover.
- Unlock the heat exchanger cover by
turning in the indicated direction.
- Remove the heat exchanger cover.
- Clean the front surface of the heat exchanger when it is dry using a hoover.
- Mount the heat exchanger cover.
- Lock the heat exchanger cover by turning it in the direction indicated by arrows.
- Close the cover of the cover plate.
WARNING: Do not clean with bare hands. The fins of the heat exchanger are sharp and could be cut.
Cleaning the moisture sensor
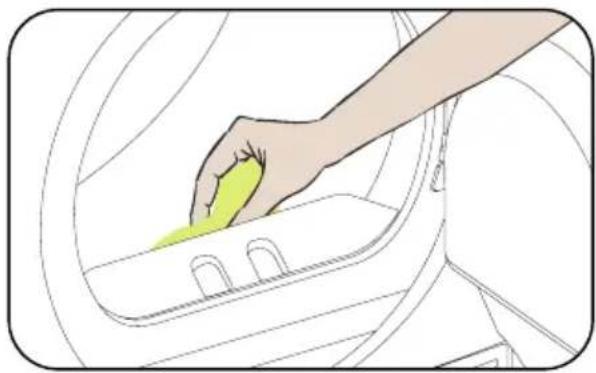
There are moisture sensors inside the machine that detect whether the laundry is dry or not. They are located in the drum, at the bottom of the door behind the filters. They are distinguished by two metal plates.
To clean the sensors:
- Open the loading door of the machine.
- If the machine is still hot, wait for it to cool down.
- Using a soft cloth soaked in vinegar, wipe the metal surfaces of the sensor and dry them.
natural_image
Illustration of a hand placing a yellow substance into a car interior (no text or symbols)IMPORTANT: Clean the metal surfaces of the sensor 4 times a year.
IMPORTANT: Do not use metal tools to clean the metal surfaces of the sensor.
WARNING: Due to the risk of fire or explosion, do not use cleaning solutions, cleaning agents or similar products to clean the sensors.
Cleaning the inside surface of the loading door
IMPORTANT: Do not forget to clean the inside surface of the loading door after each drying process.
Open the loading door of the tumble dryer and wipe all the inside surfaces and the gasket with a soft, damp cloth.
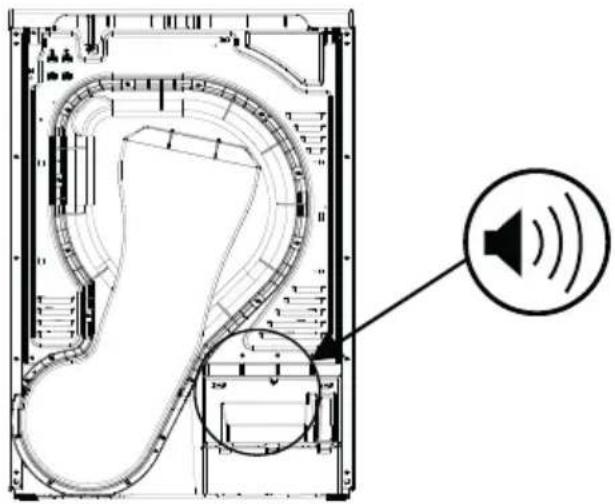
The pump is activated when the machine starts running and during operation at certain intervals. It is normal to hear the sound of the pump and water during this process.
natural_image
Technical diagram of a device interior with speaker icon and circular annotation (no text or symbols)Compressor sound
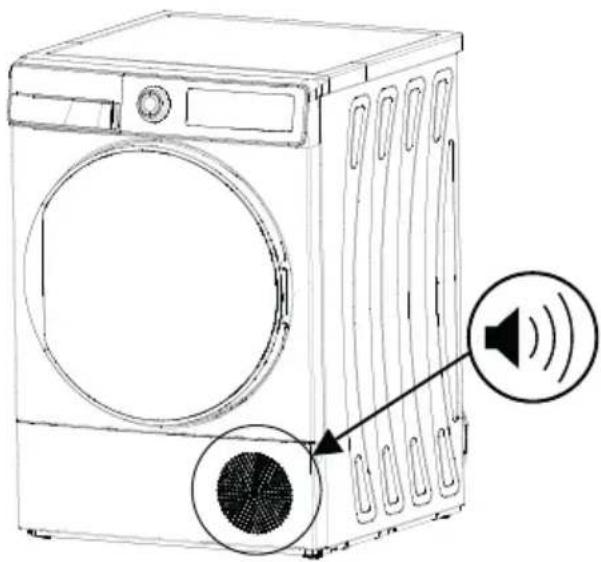
It is normal to hear a metallic sound from the compressor from time to time while the machine is running.
natural_image
Line drawing of a front-loading washing machine with speaker and fan components (no text or symbols)TROUBLESHOOTING
Your dryer is equipped with systems that continuously checks during the drying process to take necessary measures and warn you in case of any malfunction.
WARNING: If the problem persists even if you have followed the steps in this section, contact your dealer or an authorized service provider. Never attempt to repair a product that does not work.
| PROBLEM REASON SOLUTION | ||
| The drying process takes too long. | The surface of the lint filter may be clogged. | Wash the filter with warm water. |
| The heat exchanger may be clogged. | Clean the heat exchanger. | |
| The vents at the front of the machine may be closed. The vents on the front of the machine may be closed. | Open the doors/windows to prevent the room temperature from rising too high. | |
| There might be a scale layer on the moisture sensor. | Clean the moisture sensor. | |
| There might be too many laundry inside the dryer. | Do not overload the dryer. | |
| The selected spin speed might not be sufficient. | Select a higher spin speed on your washing machine. | |
| The laundry comes out wet after the drying process. | Laundry that comes out hot after drying process is usually wetter. | |
| The selected programme may not be suitable for the type of laundry. | Refer to the care labels of the laundry, select a programme suitable for the type of laundry and also use the time programmes. | |
| The surface of the lint filter may be clogged. | Wash the filter with lukewarm water. | |
| The heat exchanger might be clogged. | Clean the heat exchanger. | |
| There might be too many laundry inside the dryer. | Do not overload the dryer. | |
| The selected spin speed might not be sufficient. | Select a higher spin speed on your washing machine. | |
| PROBLEM REASON | SOLUTION | |
| The dryer cannot be opened or the programme cannot be started. The dryer does not start when it is set. | The dryer may not be plugged in. | Make sure that the plug is inserted into the socket. |
| The loading door might be open. | Make sure that the loading door is closed properly. | |
| You might have not set a programme or you have not pressed the Start/Pause button. | Make sure that the programme has been set and the dryer is not in standby (pause) mode. | |
| The child lock might be activated. | Deactivate the child lock. | |
| The programme has been interrupted for no reason. | The loading door might not be closed properly. | Make sure that the loading door is closed properly. |
| There might have been a power failure. | Press the Start/Pause button to start the programme. | |
| The water tank might be full. | Empty the water tank. | |
| The laundry has shrunk, caked or deteriorated. | The programme used might not be suitable for the type of laundry. | Refer to the care labels of the laundry, select a programme suitable for the type of laundry. |
| There is a water leakage in the loading door. | There might be lint accumulated on the inner surfaces of the loading door and on the gasket surfaces of the loading door. | Clean the inner surfaces of the loading door and the loading door seal surfaces. |
| Loading door opens by itself. | The loading door may not be closed properly. | Push the loading door until you hear the closing sound. |
| Water tank warning symbol is on/flashing. | The water tank may be full. | Empty the water tank. |
| The water discharge hose may be kinked. | If the product is connected directly to the water outlet, check the water discharge hose. | |
| The heat exchanger cleaning warning symbol is on. | The heat exchanger may be dirty. | Clean the heat exchanger. |
| The filter cleaning warning symbol is lit. | The lint filter may be dirty. | Clean the filter. |
| The filter base may be clogged with lint. | Clean the filter base. | |
| There may be a layer causing a clog on the surface of the lint filter. | Wash the filter with lukewarm water. | |
| PROBLEM REASON SOLUTION | ||
| The filter and heat exchanger cleaning warning symbol is flashing. | The filter base might be clogged with lint. | Clean the filter base. |
| There might be a layer causing a clogging on the surface of the lint filter. | Wash the filter with lukewarm water. | |
| The heat exchanger might be clogged. | Clean the heat exchanger. | |
| The programme cannot be started and the filter warning LED is flashing. | The filter cannot be inserted. R | Replace the filter. |
| The filter warning LED is flashing even though the filter is inserted. | Call for service. | |
| The drying process ends in 20 minutes. | If there are no laundry in the drum or the laundry is dry, the "empty drum detection" function is activated. Drying programme ends in 20 minutes and switches to normal "End" mode. | Check the drum and the laundry moisture. |
| If the laundry is still wet, there may be a fault in the moisture sensor. | Call for service. | |
ERROR CODES
Your tumble dryer is equipped with a built-in fault detection system, indicated by a combination of flashing operating lights. The most common error codes are shown below.
| ERROR CODE ERROR SOLUTION | ||
| E00 User interface error | Contact the nearest authorised service centre. | |
| E03 Pump error | Empty the water tank. If the problem is not solved, contact the nearest authorised service centre. | |
| E4 Compressor failure | Contact the nearest authorised service centre. | |
| E05 | Compressor temperature sensor error | Contact the nearest authorised service centre. |
| E06 | Door temperature sensor error | Contact the nearest authorised service centre. |
| E07 Motor error | Contact the nearest authorised service centre. | |
| E08 Voltage fluctuation error | There may be voltage fluctuations in the mains. Contact the nearest authorised service centre. | |
TECHNICAL DATA SHEET
| Pando | PWS-8161 | |
| Height mm 845 | ||
| Width mm 596 | ||
| Depth mm 601 | ||
| Depth with door closed mm 609 | ||
| Depth with door open mm 1042 | ||
| Weight kg 44,1 | ||
| Maximum permissible load kg 8 | ||
| Mains voltage V/Hz 220-240V / 50Hz | ||
| Minimum installation protection A 10 | ||
| Nominal power | W | 1000 |
| Power consumption | W | 0,5-1 |
| Maximum noise level dB(A) | 64 | |
| Operating ambient temperature | °C | 5-35°C |
| Programmes | 15 | |
| Drain hose length | cm 160 | |
| Mains cable length | cm 150 | |
For more technical information about the PWS-8160, please visit https://eprel.ec.europa.eu/screen/product/washingmachines2019/2290254. This link leads to the EPREL platform, the official EU product database.
PANDO WARRANTY CERTIFICATE:
INOXPAN S.L., thanks you for choosing and placing your trust in a product of our brand Pando, which is distinguished by its Quality, Design and Innovation, being faithful to its origins and commitments.
PANDO WARRANTY CONDITIONS:
This product is guaranteed for 3 years from the date of purchase, the company undertakes to replace or repair free of charge any defective part of origin due to defect or manufacturing defect of the product, as well as the necessary labour and expenses incurred as a result of such repair or replacement. (The consumer may choose between repair or replacement, unless the remedy chosen proves impossible or, in comparison with the other remedy, would entail disproportionate costs for the seller. The consumer does not have the right to terminate the contract where the lack of conformity is minor. The burden of proof that the lack of conformity is minor shall be borne by the company).
For the warranty to be valid, it is essential to comply with the following requirements:
- Attach a photograph of the purchase invoice and the product label when requesting technical assistance, using the form available at: https://pando.es/servicio-tecnico-pando/garantia-pando/.
- Present the invoice or original purchase receipt to the Pando Authorised Service technician at the time of the visit.
EXCLUSIONS FROM THE PANDO WARRANTY:
- The following cases will not be covered by the warranty or could be cause for cancellation of the same, and the consumer will be responsible for the cost of materials, labour and travel expenses of the technical service:
• Installation or operation checks, cleaning or maintenance of the product, start-up and explanation of use. - Non-compliance, faults or damage caused by not following the standards, recommendations, safety instructions, instructions for use, installation and maintenance contained in the product manuals.
- Non-compliance, faults or damage caused by transport, transfers or removals and handling of the appliance by unauthorised personnel not belonging to this company or to the Pando brand.
- When the appliance is intended for commercial, professional or similar use and not for domestic use, or when it is used with other products of a professional or similar nature (the product is designed and manufactured for domestic use only).
- Blows, dents, scratches or scratches, broken glass, and damage due to the presence or signs of foreign bodies inside or outside the product, such as insects, rodents, sand, liquids, metallic objects...
- Damage of an aesthetic nature, such as corrosion, rust, stains or alterations in the colour or tone of the product. These may be caused by external factors such as: Prolonged or unprotected exposure to intense sources of light, heat or solar radiation; location of the product outdoors or in uncontrolled environments, exposed to dust, rain, humidity or sea breeze (saltpetre), which is highly corrosive; use of unsuitable cleaning products or those not recommended by the manufacturer, including contact, direct or in a gaseous state, with corrosive agents. Accumulation of dirt, limescale residues from water or other deposits which have not been removed by regular and proper maintenance.
• Non-conformity, breakdowns or damage caused by anomalies in the electrical supply or installation, limescale deposits in the water, fortuitous natural causes of atmospheric or geological origin such as storms, lightning, earthquakes, floods, vandalism, etc. - Not having easy and safe access to uninstall or manipulate the product from the furniture or place of installation, as well as access to the power connections, water inlet and drainage of the same, or that the elements of the furniture prevent the technician from its easy and safe extraction, in these cases the consumer will be fully responsible for arranging and facilitating that the appliance is safe and easily accessible, assuming the costs of labour and displacement derived from the Pando Authorised Technical Service or installer if this has to proceed.
- Work to dismantle, remove or change the product requires manipulation or dismantling of furniture such as: removing doors, windows, drawers, skirting boards, shelves, cornices... Easy and safe access must be provided for the technician for the entry and exit of the product to the home and the place of location, otherwise it is the responsibility of the consumer to bear the costs of access.
- Damage to furniture or external elements of the product that are not suitable or resistant to the characteristics of use of the product.
• Appliances from resales, second hand, change of the original owner of the appliance or from exhibitions that are more than three years old from their date of manufacture. - Non-conformities resulting from improper installation of the washer or dryer, such as lack of earthing, cutting and splicing the plug of the power supply cable or the use of non-original Pando components or accessories.
• Elements and accessories subject to natural wear and tear, such as filters, hoses and gaskets. - Damage to the product or external elements caused by chemical or electrochemical effects of water or due to extreme environmental conditions.
- Damage caused to external elements of the product due to improper use or maintenance, in breach of the instructions specified in the product user's Handbook.
INOXPAN, S.L., is expressly excluded from any liability for any direct or indirect damage to persons or things caused by a product improperly installed, handled, used and/or maintained.
Contact details Offi cial Pando Authorised Technical Service:
SPAIN, PORTUGAL AND ANDORRA OTHER COUNTRIES
ES
https://www.pando.es/en/after-sales-services/
FR
C/ Can Carmany, 1 Pol. Ind. Nord, 08310 ARGENTONA (Barcelona - Spain)
Tel. +34 93 757 94 11 Fax +34 93 757 96 53 www.pando.es com.pando@pando.es Export: export@pando.es Tel. 93 741 55 11

Pando
www.pando.es

SERVICIO POSVENTA
Environmental Management System Certification
UNE-EN ISO 14001:2015
ES20/208675



- Pando
- integralcooking
- PWS-8161
- The Global Kitchen Partner
- TRATAMIENTO DEL RESIDUO
- MEDIDAS DEL PRODUCTO ....17
- INSTALACIÓN ....18
- MEDIDAS DO PRODUTO....52
- INSTALAÇÃO ....53
- INSTALAÇÃO
- Som do compressor
- TRAITEMENT DES DÉCHETS
- MESURES DU PRODUIT 89
- INSTALLATION....90
- DÉPANNAGE
- ENVIRONMENTAL PROTECTION
- WASTE TREATMENT
- INDEX
- SAFETY WARNINGS....118
- INSTALLATION....124
- BOX CONTENTS 125
- PRODUCT MEASUREMENTS 126
- OVERVIEW 127
- PREPARING GARMENTS....127
- PREPARING CLOTHES FOR DRYING....128
- USING THE DRYER 129
- PROGRAMME SELECTION AND CONSUMPTION TABLE ....129
- PROGRAMMES....131
- AUXILIARY FUNCTIONS ...... 134
- PROGRAM COMPATIBILITY TABLE....138
- CLEANING AND CARE....139
- HABITUAL OPERATING NOISES ....141
- TROUBLESHOOTING....142
- ERROR CODES....145
- TECHNICAL DATA SHEET 146
- WARRANTY....147
- CHANGE OF DOOR OPENING....148
- SAFETY WARNINGS
- Electrical Safety
- Child safety
- Product Safety
- Risk of fire and damage!
- Correct use of the appliance
- INSTALLATION
- Connection to the water outlet (with optional drain hose)
- Water drain hose connection
- Adjusting the feet
- Electrical connection
- Adjusting the adjustable feet
- BOX CONTENTS
- PRODUCT MEASUREMENTS
- Placing the machine on the floor
- OVERVIEW
- PREPARING GARMENTS
- Sorting laundry for drying
- PREPARING CLOTHES FOR DRYING
- WARNING: The tumble dryer drum and fabrics may get damaged.
- Capacity of load
- USING THE DRYER
- Control panel
- Programme selection button
- PROGRAMME SELECTION AND CONSUMPTION TABLE
- PROGRAMMES
- AUXILIARY FUNCTIONS
- During the programme
- End of programme
- Information about the drum light
- CLEANING AND CARE
- Cleaning the lint filter
- Cleaning the heat exchanger
- Cleaning the moisture sensor
- Cleaning the inside surface of the loading door
- Compressor sound
- TROUBLESHOOTING
- ERROR CODES
- TECHNICAL DATA SHEET
- PANDO WARRANTY CERTIFICATE:
- PANDO WARRANTY CONDITIONS:
- EXCLUSIONS FROM THE PANDO WARRANTY:
Brand : Pando
Model : PWS-8161
Category : Washing machine